Nikon TE2000 fluorescence microscope - uib.no · arein «manual» mode onthe stage controlbox ......
33
Nikon TE2000 fluorescence microscope - User manual -
Transcript of Nikon TE2000 fluorescence microscope - uib.no · arein «manual» mode onthe stage controlbox ......
Nikon TE2000 fluorescence microscope
- User manual -
Hege 86698 • Endy 86007
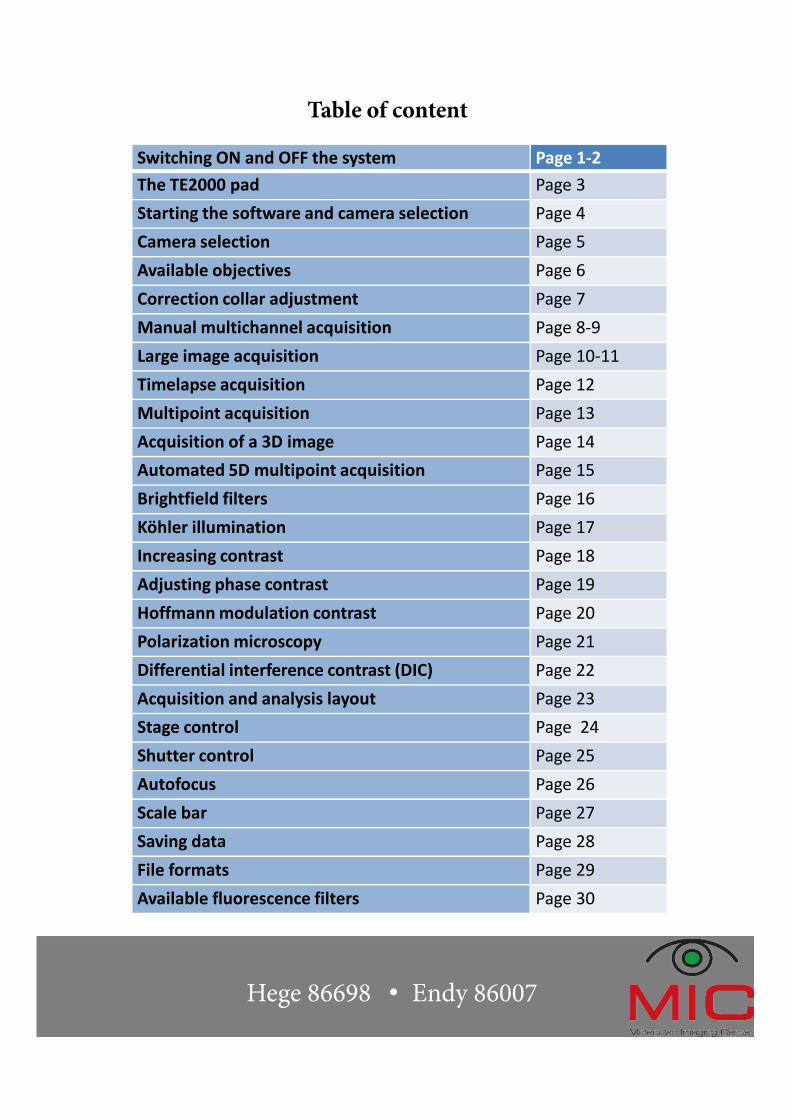
Switching ON and OFF the system Page 1-2
The TE2000 pad Page 3
Starting the software and camera selection Page 4
Camera selection Page 5
Available objectives Page 6
Correction collar adjustment Page 7
Manual multichannel acquisition Page 8-9
Large image acquisition Page 10-11
Timelapse acquisition Page 12
Multipoint acquisition Page 13
Acquisition of a 3D image Page 14
Automated 5D multipoint acquisition Page 15
Brightfield filters Page 16
Köhler illumination Page 17
Increasing contrast Page 18
Adjusting phase contrast Page 19
Hoffmann modulation contrast Page 20
Polarization microscopy Page 21
Differential interference contrast (DIC) Page 22
Acquisition and analysis layout Page 23
Stage control Page 24
Shutter control Page 25
Autofocus Page 26
Scale bar Page 27
Saving data Page 28
File formats Page 29
Available fluorescence filters Page 30
Table of content
Hege 86698 • Endy 86007
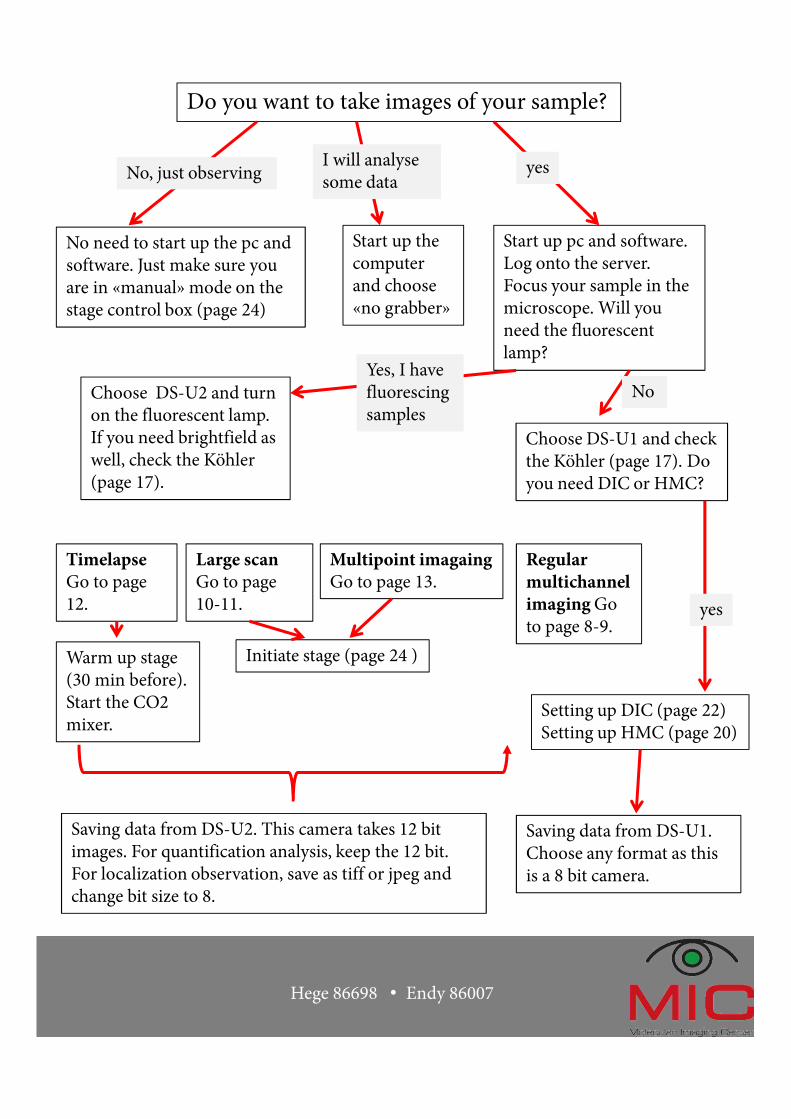
Do you want to take images of your sample?
No need to start up the pc and software. Just make sure youare in «manual» mode on thestage control box (page 24)
Start up thecomputer and choose«no grabber»
Start up pc and software. Log onto the server. Focus your sample in themicroscope. Will youneed the fluorescentlamp?
Choose DS-U2 and turn on the fluorescent lamp. If you need brightfield as well, check the Köhler(page 17).
yesI will analyse some data
NoYes, I have fluorescingsamples
No, just observing
Choose DS-U1 and checkthe Köhler (page 17). Do you need DIC or HMC?
TimelapseGo to page12.
Large scanGo to page10-11.
RegularmultichannelimagingGoto page 8-9.
Multipoint imagaingGo to page 13.
Initiate stage (page 24 )Warm up stage (30 min before). Start the CO2 mixer.
yes
Setting up DIC (page 22)Setting up HMC (page 20)
Saving data from DS-U1.Choose any format as thisis a 8 bit camera.
Saving data from DS-U2. This camera takes 12 bit images. For quantification analysis, keep the 12 bit. For localization observation, save as tiff or jpeg and change bit size to 8.

Switch on the system
1. Turn on the main switch (A).
2. Start up the computer (B).
3. Log in with your user account at the PC.
– If you do not have a user account yet, ask MIC personnel to get one.
4. If you need the mercury lamp,
– check online in the booking system (F) and in the logbook (G) whether it has been used in the last 30 min (is it warm?).
– turn on the power switch (C) and press ignition (D).
– note the run time (E) in the logbook (G).
5. Start “NIS-AR” (H), the NIS-Elements software.
A
B
C
D
E
H
G
F
Hege 86698 • Endy 86007
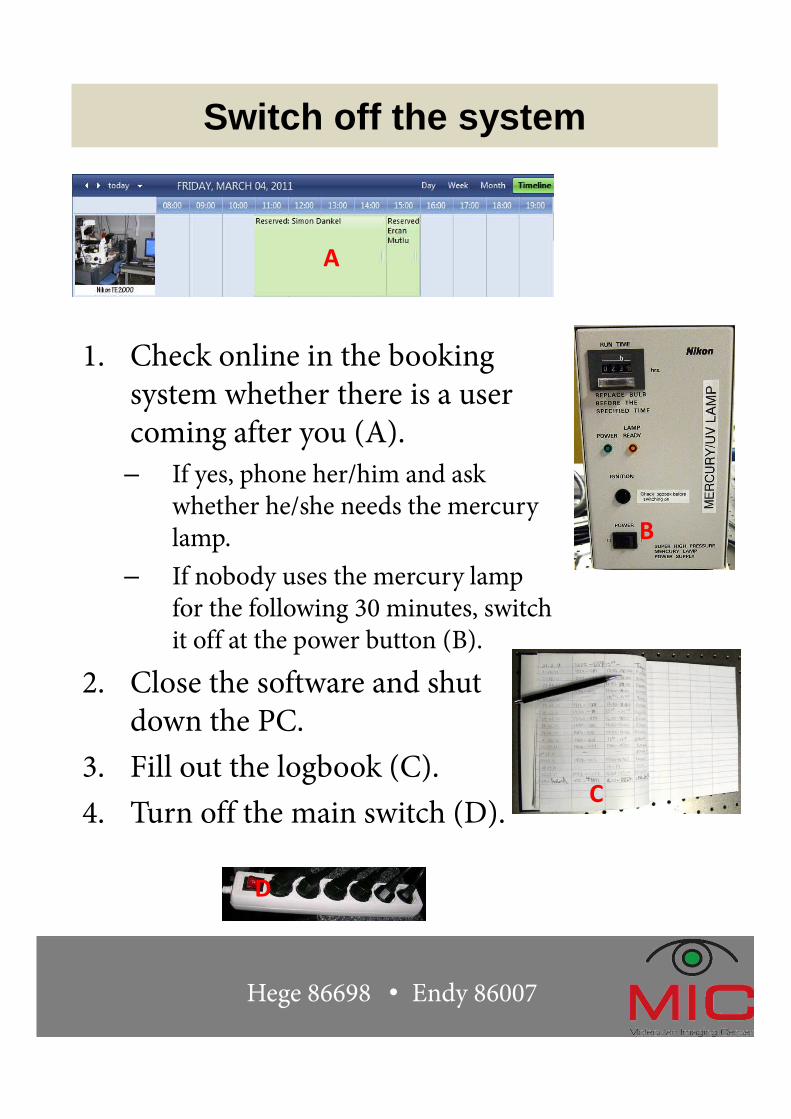
Switch off the system
1. Check online in the booking system whether there is a user coming after you (A).
– If yes, phone her/him and ask whether he/she needs the mercury lamp.
– If nobody uses the mercury lamp for the following 30 minutes, switch it off at the power button (B).
2. Close the software and shut down the PC.
3. Fill out the logbook (C).
4. Turn off the main switch (D).
D
A
B
C
Hege 86698 • Endy 86007

The TE2000 pad
Fluorescence filter positions. No. 6 is empty and used for imagingBF, Ph, Pol, HMC, and DIC.
Shutter for the UV light. The power supply needs to be on (D) and lamp ignited (E).
Light path control. Eyepiece (E), B/W-camera for fluorescence and DIC (F), and colour camera (G).
E
F G
Halogen light control. The main switch on the power supply needs to be on (A). Regulate the intensity here (B). Halogen shutter (C).
Objective switch
A
BC
D
E
Hege 86698 • Endy 86007
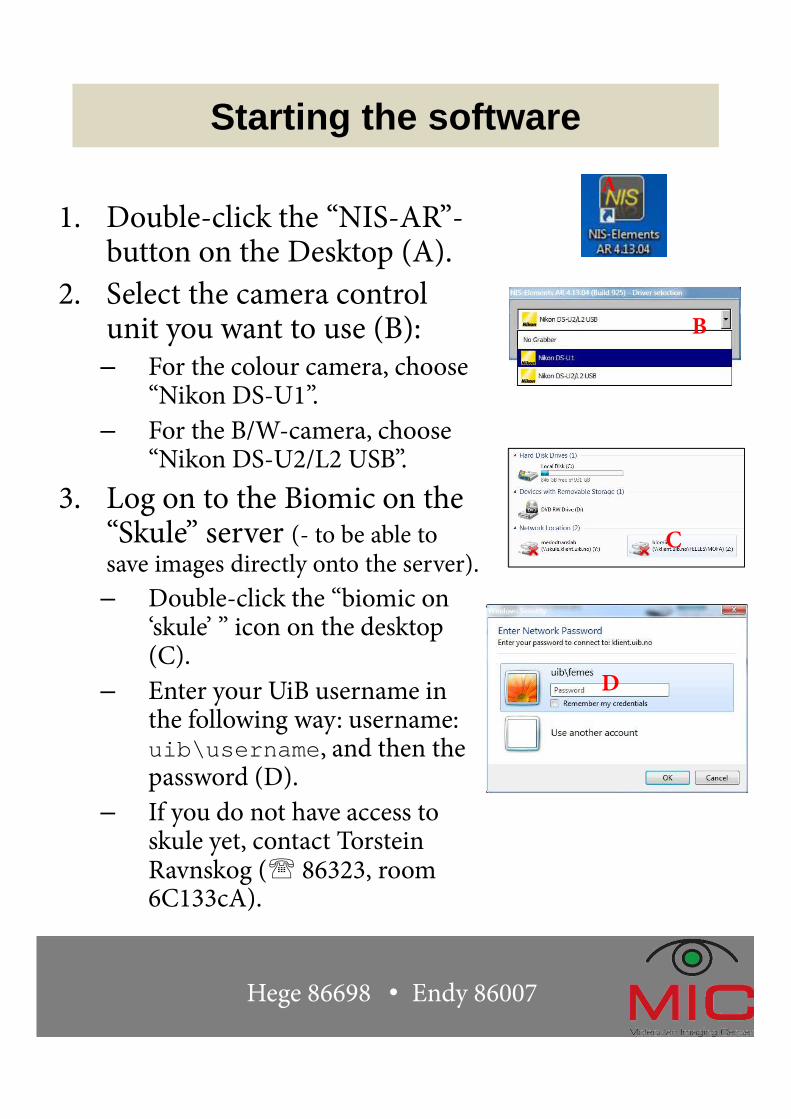
Starting the software
1. Double-click the “NIS-AR”-button on the Desktop (A).
2. Select the camera control unit you want to use (B):– For the colour camera, choose
“Nikon DS-U1”.
– For the B/W-camera, choose “Nikon DS-U2/L2 USB”.
3. Log on to the Biomic on the “Skule” server (- to be able to save images directly onto the server).
– Double-click the “biomic on ‘skule’ ” icon on the desktop (C).
– Enter your UiB username in the following way: username: uib\username, and then the password (D).
– If you do not have access toskule yet, contact TorsteinRavnskog (℡ 86323, room6C133cA).
A
B
C
D
Hege 86698 • Endy 86007
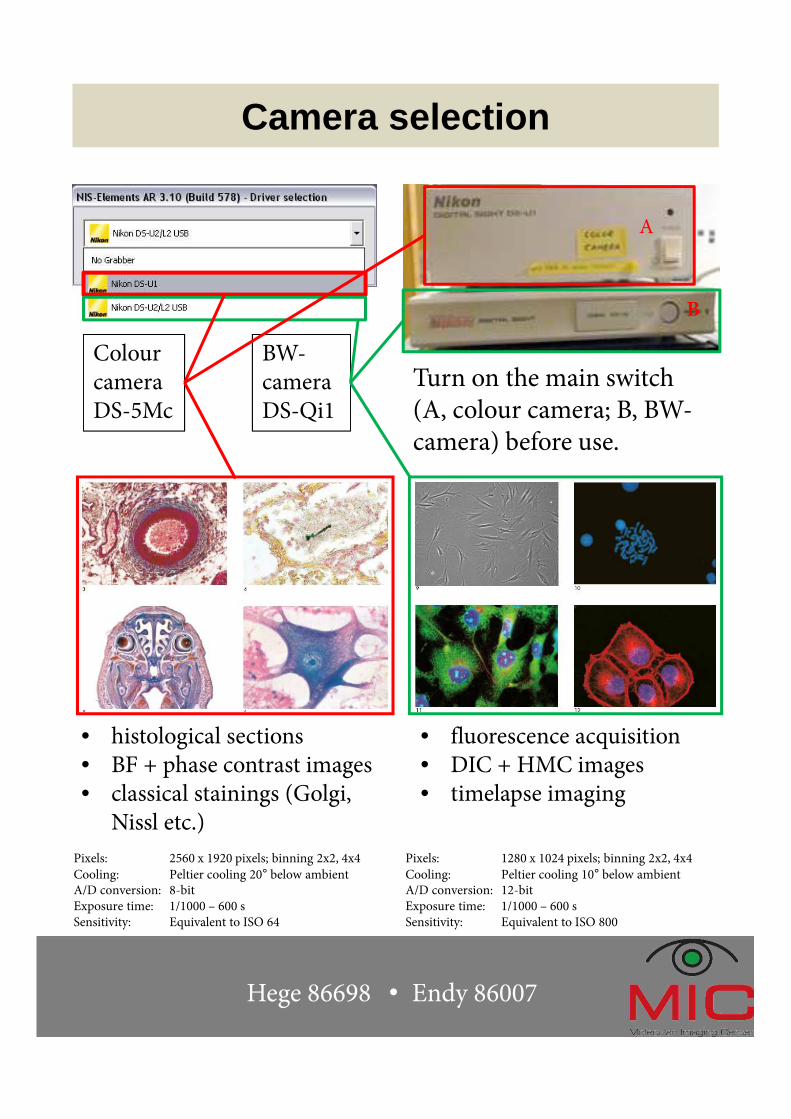
Camera selection
Colour cameraDS-5Mc
BW-camera DS-Qi1
Turn on the main switch (A, colour camera; B, BW-camera) before use.
A
B
• histological sections• BF + phase contrast images• classical stainings (Golgi,
Nissl etc.)
• fluorescence acquisition• DIC + HMC images• timelapse imaging
Pixels: 2560 x 1920 pixels; binning 2x2, 4x4
Cooling: Peltier cooling 20° below ambientA/D conversion: 8-bitExposure time: 1/1000 – 600 sSensitivity: Equivalent to ISO 64
Pixels: 1280 x 1024 pixels; binning 2x2, 4x4
Cooling: Peltier cooling 10° below ambientA/D conversion: 12-bit Exposure time: 1/1000 – 600 sSensitivity: Equivalent to ISO 800
Hege 86698 • Endy 86007

Correction collar adjustment
Correction collar not adjusted Correction collar adjusted
Some objectives have a correction collar (A) to adjust for a cover slip thickness between 0 and 2 mm (B).
In order to adjust: • look through the eyepiece at all times.• turn the correction collar slightly
(might be somewhat stuck at the beginning).
• refocus (C).• turn the correction collar again slightly.• refocus again.• repeat until you get a sharp, crisp image
(D).
A
B
D
C
Hege 86698 • Endy 86007
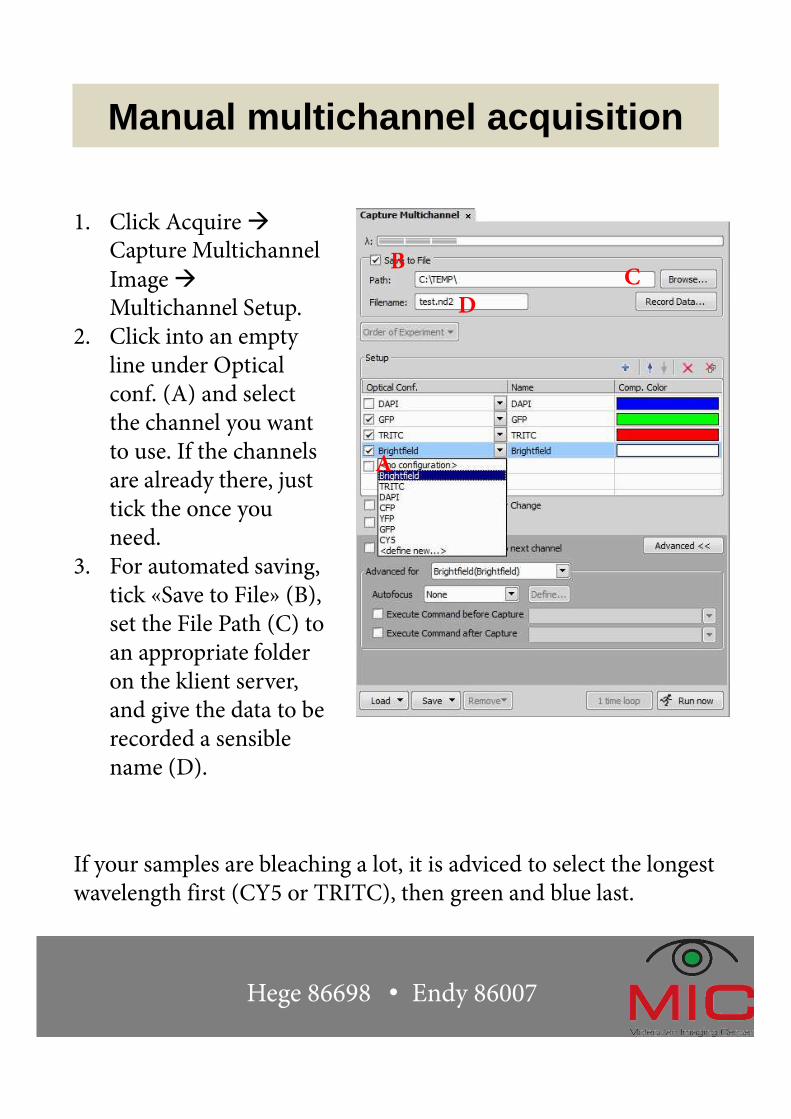
Manual multichannel acquisition
1. Click Acquire �Capture Multichannel
Image �Multichannel Setup.
2. Click into an empty line under Optical conf. (A) and select the channel you want to use. If the channels are already there, just tick the once you need.
3. For automated saving, tick «Save to File» (B), set the File Path (C) to an appropriate folder on the klient server, and give the data to be recorded a sensible name (D).
A
BC
D
If your samples are bleaching a lot, it is adviced to select the longest wavelength first (CY5 or TRITC), then green and blue last.
Hege 86698 • Endy 86007
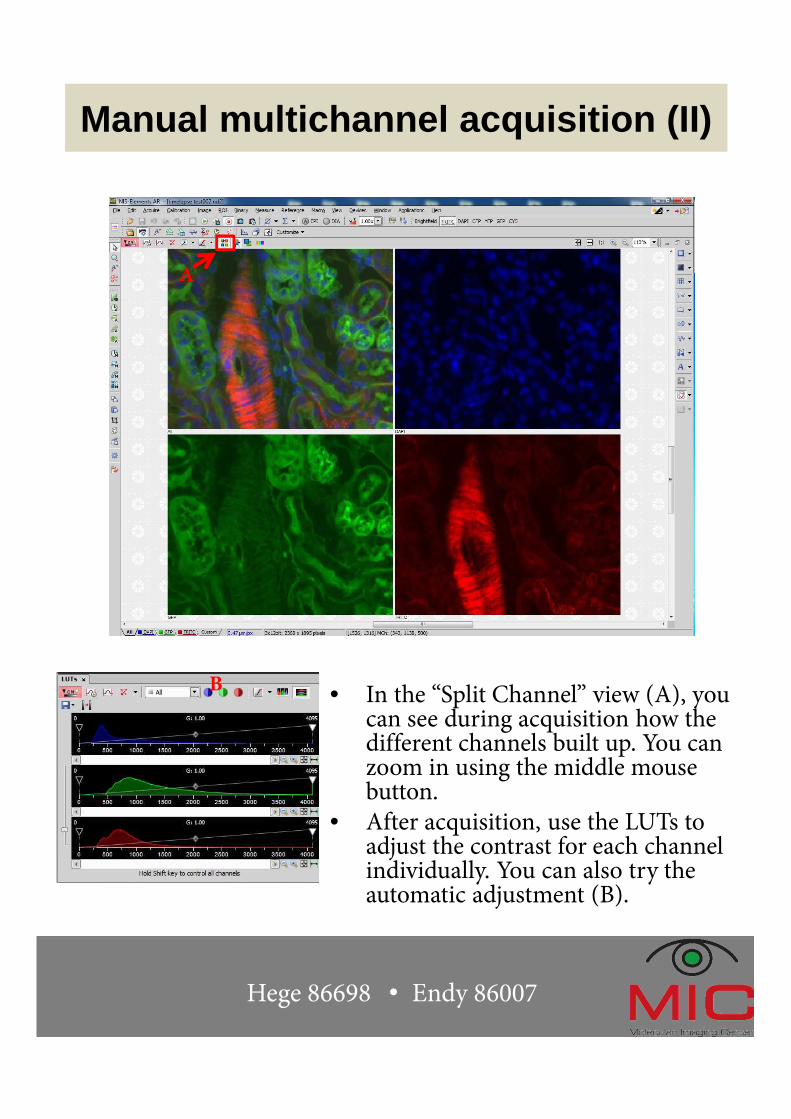
Manual multichannel acquisition (II)
• In the “Split Channel” view (A), you can see during acquisition how the different channels built up. You can zoom in using the middle mouse button.
• After acquisition, use the LUTs to adjust the contrast for each channel individually. You can also try the automatic adjustment (B).
A
B
Hege 86698 • Endy 86007

Large image acquisition (I)
1. Initiate stage (Devices �Initiate stage).
2. Open the ND acquisition window (A)
(Applications �Define/Run ND Application).
3. Define the channels you want to image (B).
4. The image will be saved automatically. Be sure to define where the image should be saved and give it a filename (C).
5. You need to define an editional command (open the UV shutter) before the first channel (D) or else your first image will be dark. Find the command (E): Stg_OpenFirstShutter
A
B
C
D
E
Hege 86698 • Endy 86007
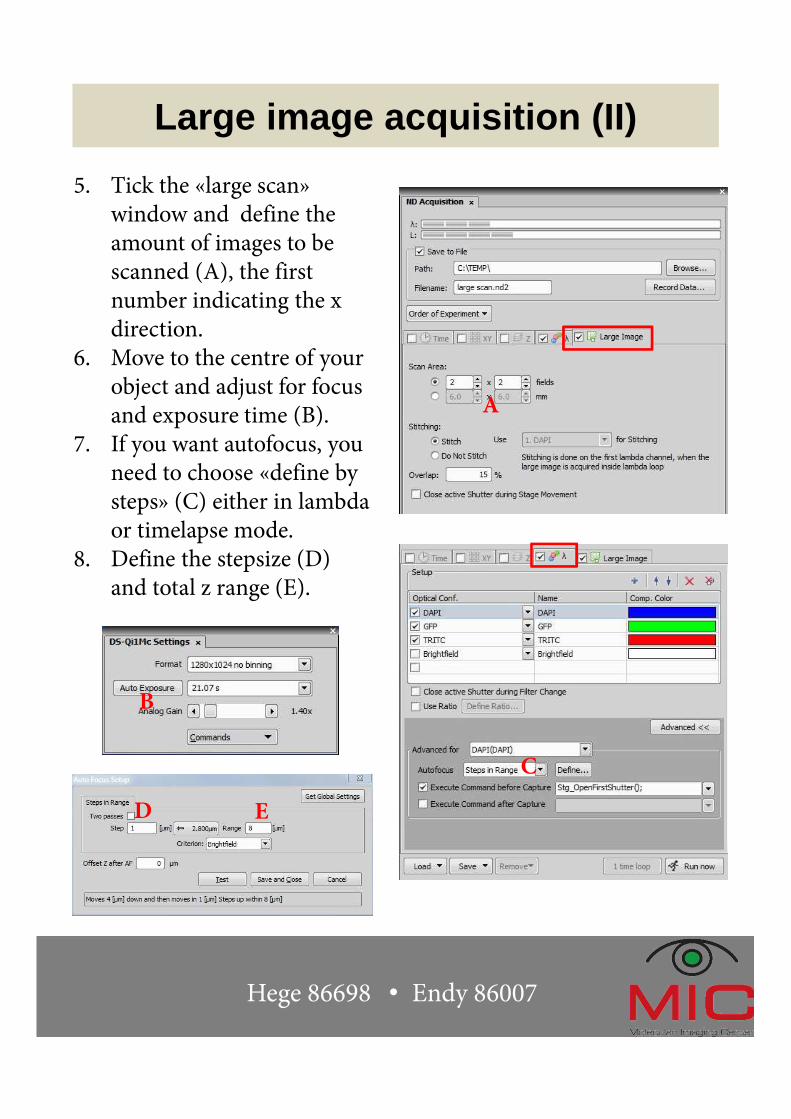
Large image acquisition (II)
5. Tick the «large scan» window and define theamount of images to be scanned (A), the first number indicating the x direction.
6. Move to the centre of yourobject and adjust for focusand exposure time (B).
7. If you want autofocus, youneed to choose «define by steps» (C) either in lambda or timelapse mode.
8. Define the stepsize (D) and total z range (E).
A
B
D E
Hege 86698 • Endy 86007
C

Timelapse acquisition
1. Open the ND acquisition
window (Applications �Define/Run ND Application).
2. Define which channels you want to image under “lambda” flag (A).
3. Check the “time” flag. Define the interval (B) at which the images should be taken. Define the “duration” of the experiment (C).
4. You can define different loops of timelapse experiments. If you want to acquire faster imaging for an hour before doing a slower imaging, then define a second “phase” (D).
5. For long term experiments, use autofocus under “advanced” (E).
Hege 86698 • Endy 86007
A
B C
D
E
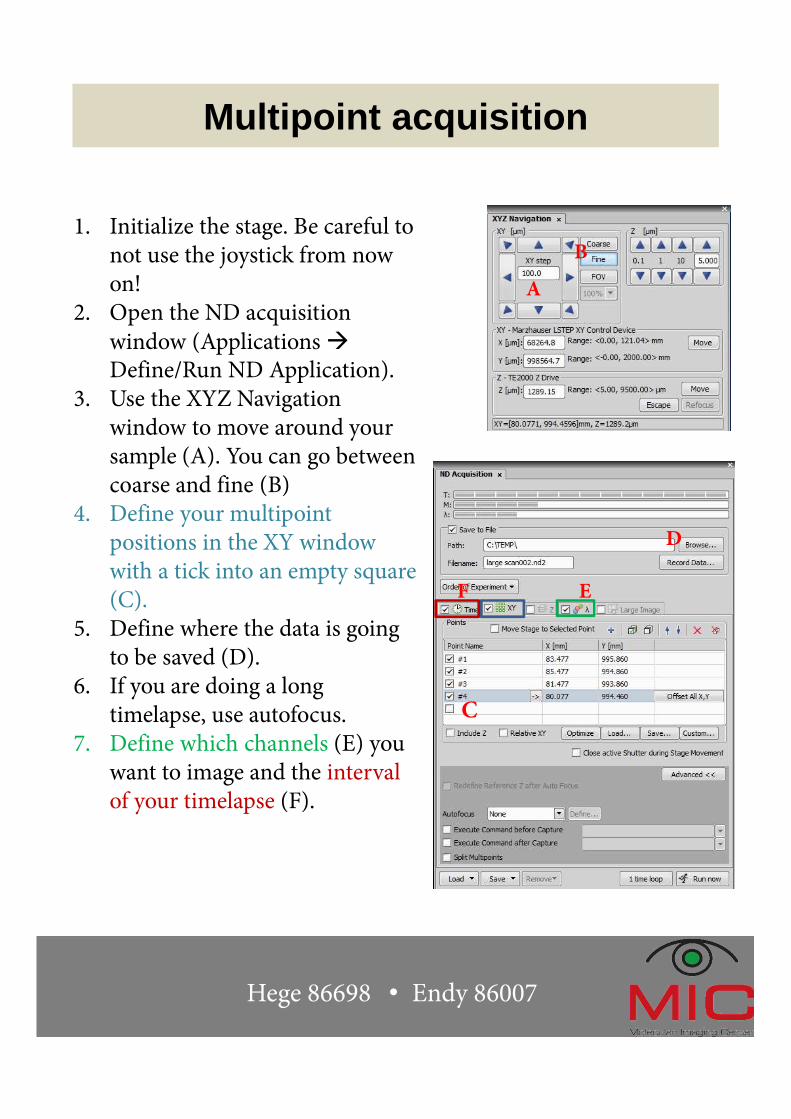
Multipoint acquisition
1. Initialize the stage. Be careful to not use the joystick from nowon!
2. Open the ND acquisition
window (Applications �Define/Run ND Application).
3. Use the XYZ Navigation window to move around your sample (A). You can go between coarse and fine (B)
4. Define your multipoint positions in the XY window with a tick into an empty square (C).
5. Define where the data is going to be saved (D).
6. If you are doing a long timelapse, use autofocus.
7. Define which channels (E) you want to image and the interval of your timelapse (F).
Hege 86698 • Endy 86007
A
B
D
C
EF
Brightfield filters
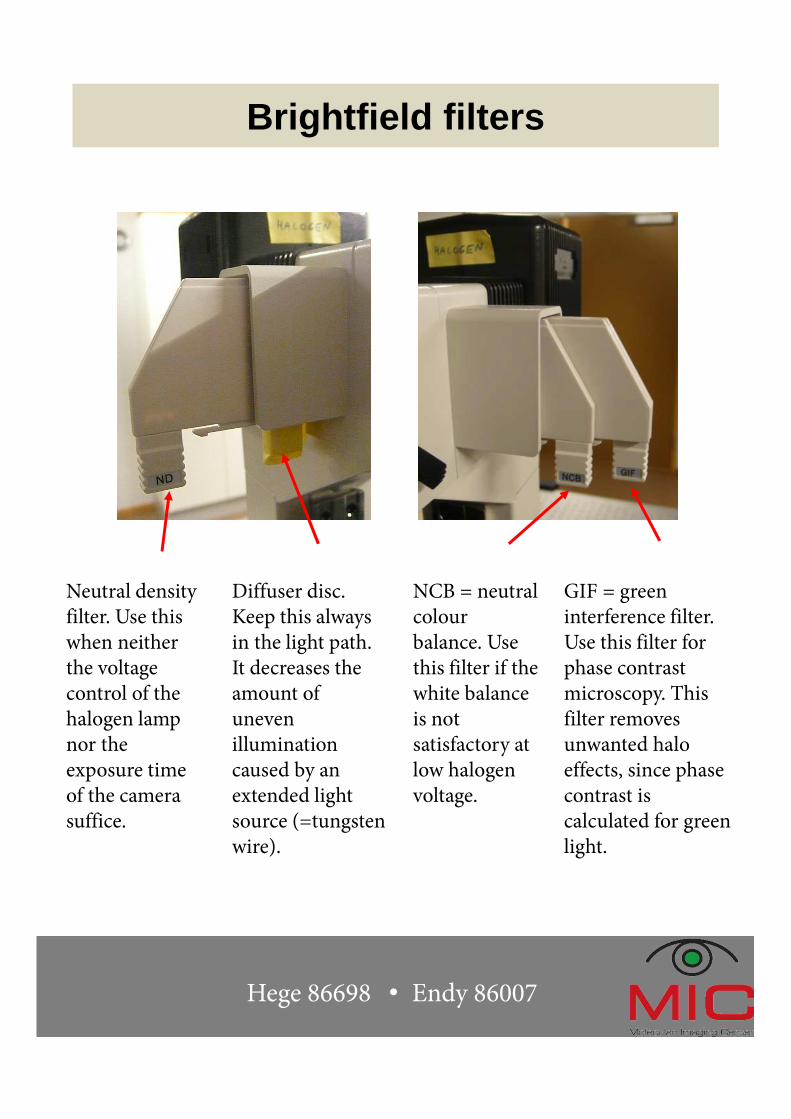
Diffuser disc. Keep this always in the light path. It decreases the amount of uneven illumination caused by an extended light source (=tungsten wire).
Neutral density filter. Use this when neither the voltage control of the halogen lamp nor the exposure time of the camera suffice.
NCB = neutral colour balance. Use this filter if the white balance is not satisfactory at low halogen voltage.
GIF = green interference filter. Use this filter for phase contrast microscopy. This filter removes unwanted halo effects, since phase contrast is calculated for green light.
Hege 86698 • Endy 86007
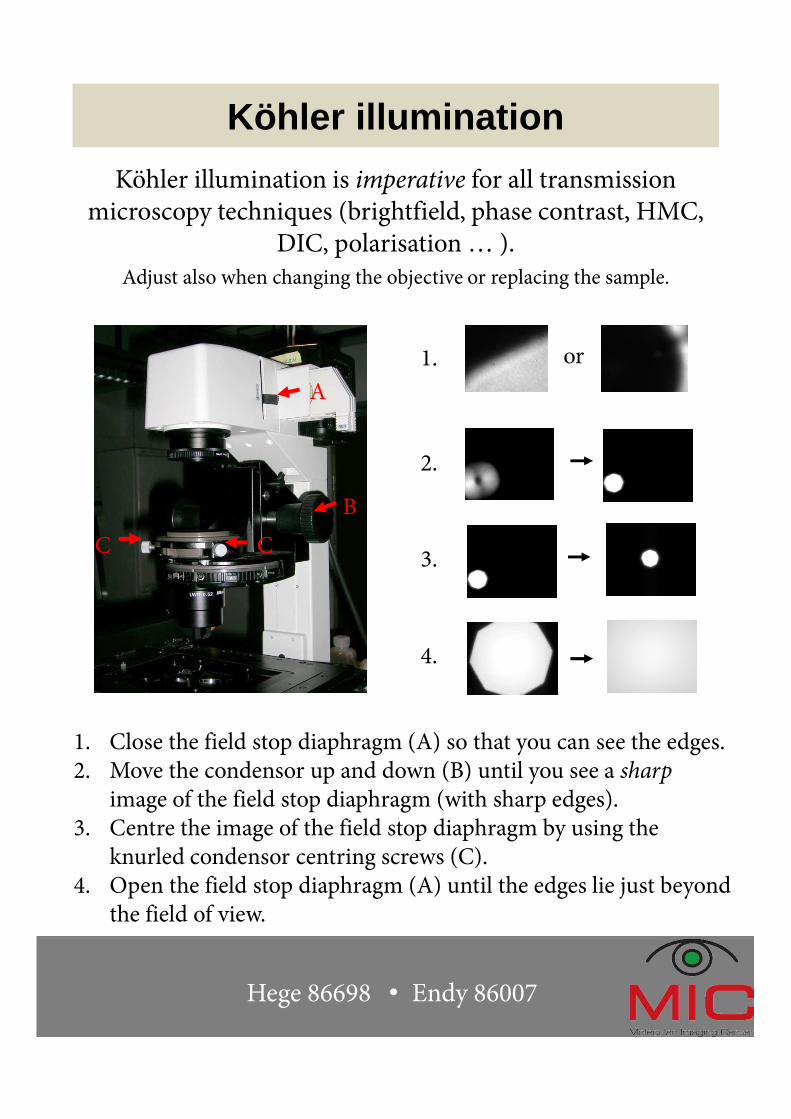
Köhler illumination
Köhler illumination is imperative for all transmission microscopy techniques (brightfield, phase contrast, HMC,
DIC, polarisation … ). Adjust also when changing the objective or replacing the sample.
A
B
CC
or1.
2.
3.
4.
1. Close the field stop diaphragm (A) so that you can see the edges.2. Move the condensor up and down (B) until you see a sharp
image of the field stop diaphragm (with sharp edges).3. Centre the image of the field stop diaphragm by using the
knurled condensor centring screws (C).4. Open the field stop diaphragm (A) until the edges lie just beyond
the field of view.
Hege 86698 • Endy 86007

Increasing contrast
• After setting up the Köhler illumination, close the aperture stop (arrow).
• The contrast/depth of field will greatly increase.
• As you close the aperture stop, the resolution will decrease!
Diatomee in brightfield with different contrast settings: A, aperture open; B, aperture halfway closed; C, aperture fully closed. Note that in A, only a small part of the Diatomee is in focus, whereas in C, you see all in focus, but also dirt in the image pathway.
A B C
Hege 86698 • Endy 86007
Adjusting phase contrast
A1A2
C1
C2
B
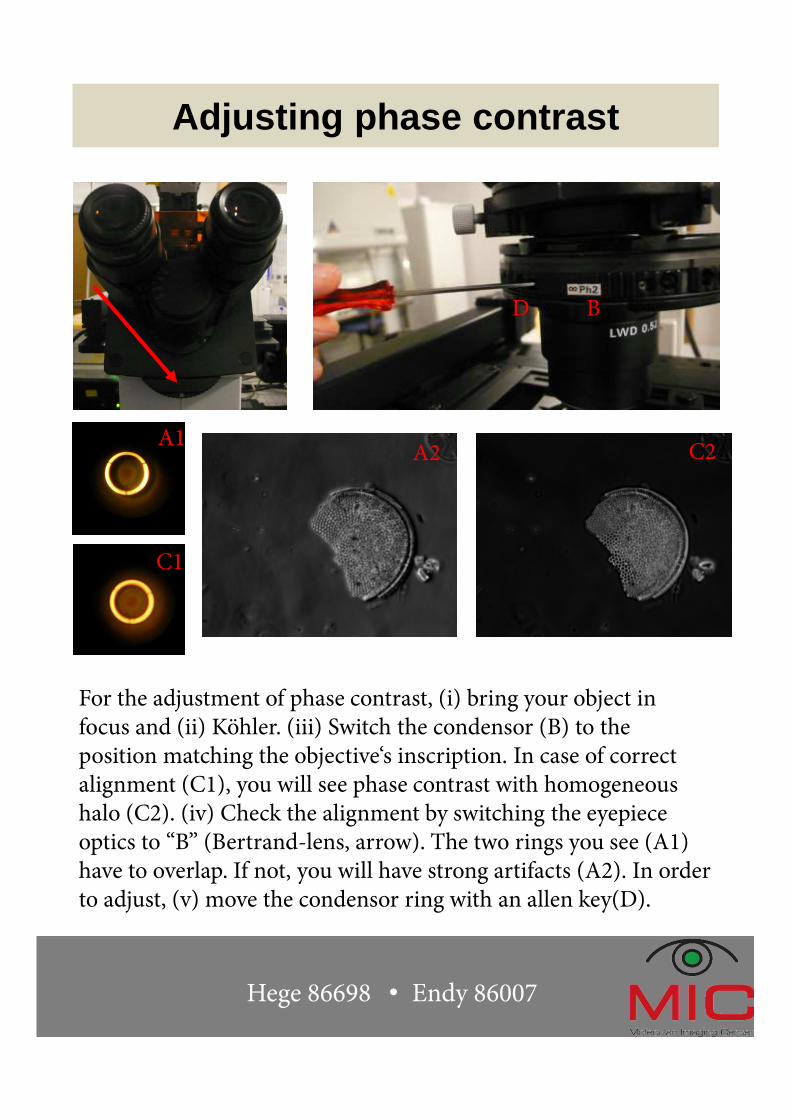
For the adjustment of phase contrast, (i) bring your object in focus and (ii) Köhler. (iii) Switch the condensor (B) to the position matching the objective‘s inscription. In case of correct alignment (C1), you will see phase contrast with homogeneous halo (C2). (iv) Check the alignment by switching the eyepiece optics to “B” (Bertrand-lens, arrow). The two rings you see (A1) have to overlap. If not, you will have strong artifacts (A2). In order to adjust, (v) move the condensor ring with an allen key(D).
D
Hege 86698 • Endy 86007
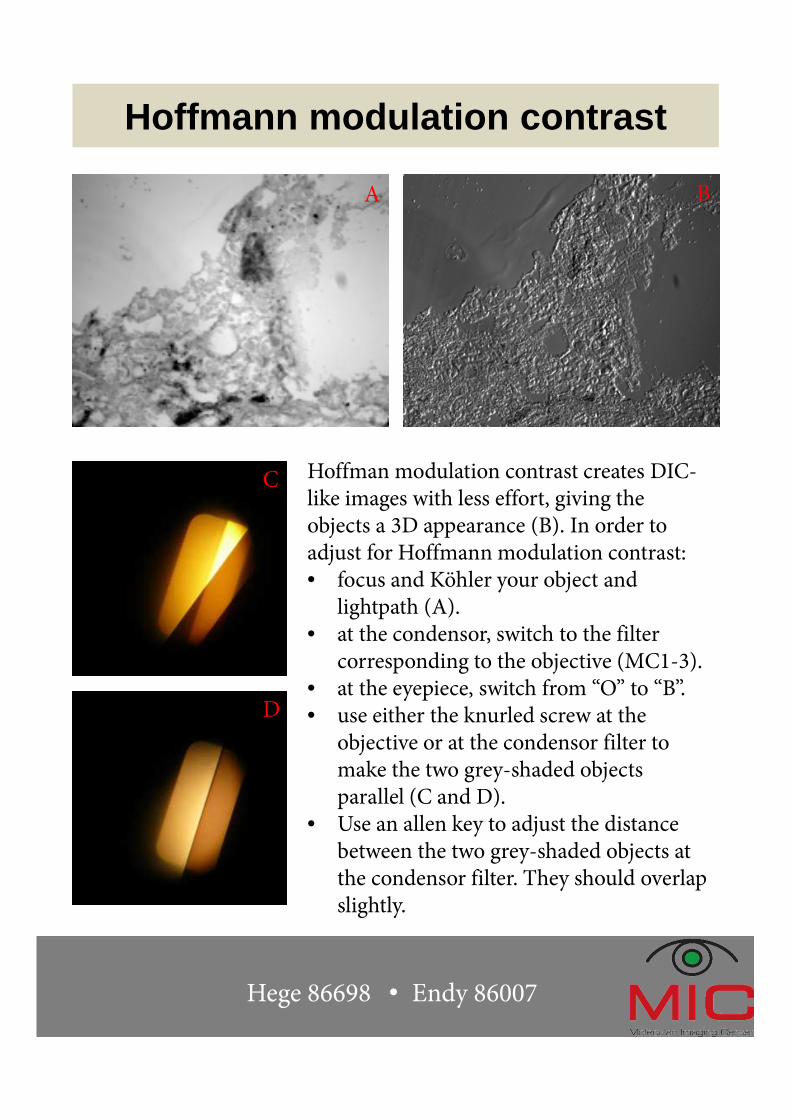
Hoffmann modulation contrast
Hoffman modulation contrast creates DIC-like images with less effort, giving the objects a 3D appearance (B). In order to adjust for Hoffmann modulation contrast:• focus and Köhler your object and
lightpath (A).• at the condensor, switch to the filter
corresponding to the objective (MC1-3). • at the eyepiece, switch from “O” to “B”.• use either the knurled screw at the
objective or at the condensor filter to make the two grey-shaded objects parallel (C and D).
• Use an allen key to adjust the distance between the two grey-shaded objects at the condensor filter. They should overlap slightly.
A
C
D
B
Hege 86698 • Endy 86007

Polarisation microscopy
AB
C
D
Polarisation microscopy is particularly useful for imaging linear structures like crystals, and can also resemble dark field microscopy. To adjust, • focus and Köhler your object
and lightpath (C).• set in the polariser (A), which
is situated above the consensor. • set in the analyser (B), which is
situated below the filter revolver on the right hand side. Make sure the filters are crossed (background is black).
• image your sample (D). move both filters out again after imaging, since each will take 50 % of the light!
Hege 86698 • Endy 86007

Differential interference contrast
In order to adjust for DIC,• focus and Köhler your object
and lightpath to get a nice brightfield image (A).
• insert the polariser above the condensor and the analyser below the filter revolver.
• insert the DIC prisms matching the objective‘s inscription in the condensor revolver and below the objective (B) to get the typical DIC-image (C). Control the “shadow” by turning the polariser.
• For colour-DIC (D), insert the
λ-plate below the polariser (E).
A
B
C
D
E
Hege 86698 • Endy 86007
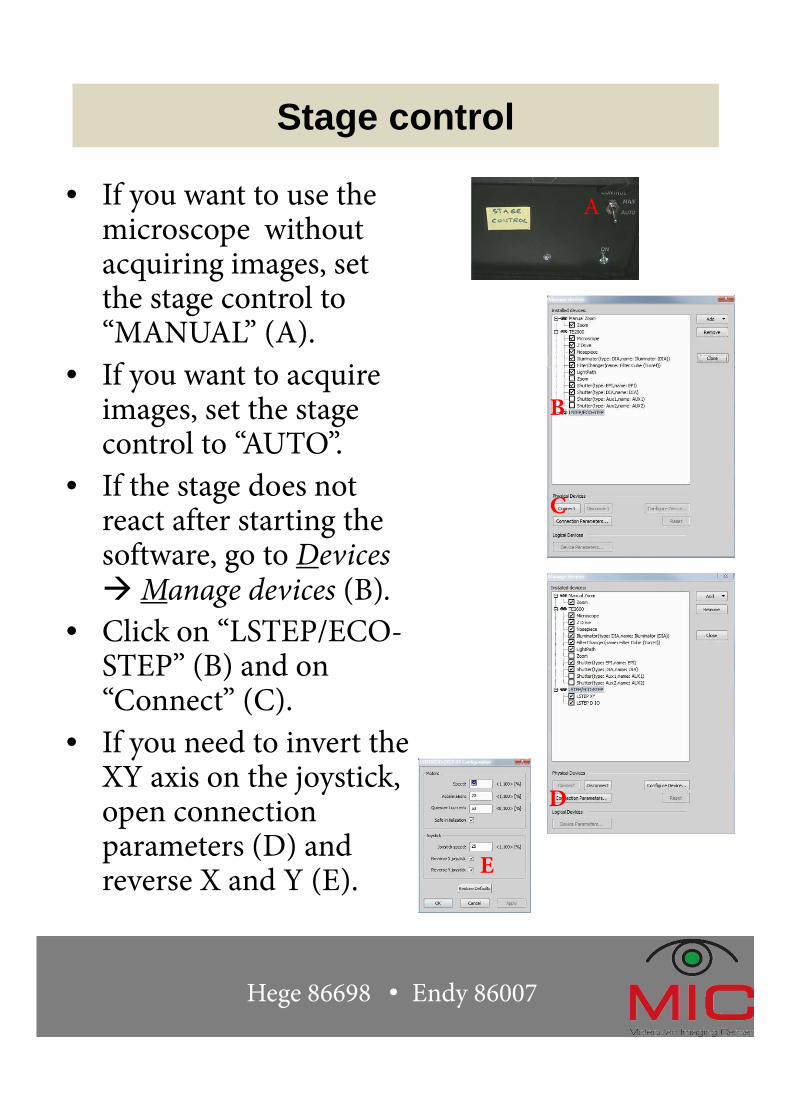
Stage control
• If you want to use the microscope without acquiring images, set the stage control to “MANUAL” (A).
• If you want to acquire images, set the stage control to “AUTO”.
• If the stage does not react after starting the software, go to Devices �Manage devices (B).
• Click on “LSTEP/ECO-STEP” (B) and on “Connect” (C).
• If you need to invert the XY axis on the joystick, open connection parameters (D) and reverse X and Y (E).
A
C
B
D
E
Hege 86698 • Endy 86007

Acquisition and analysis layout
Make your own favourite layout of the right PC screen.
Open useful windows in view � acquisition controls and analysis controls. Save your layout in View � Layout �Save current layout.If some of your windows are gone next time, retrieve by
going to View � Layout � Reload current layout.
Useful floating windows:• Camera acquisition control• ND acquisition• TE2000 Pad• LUTs• XYZ navigation
Hege 86698 • Endy 86007
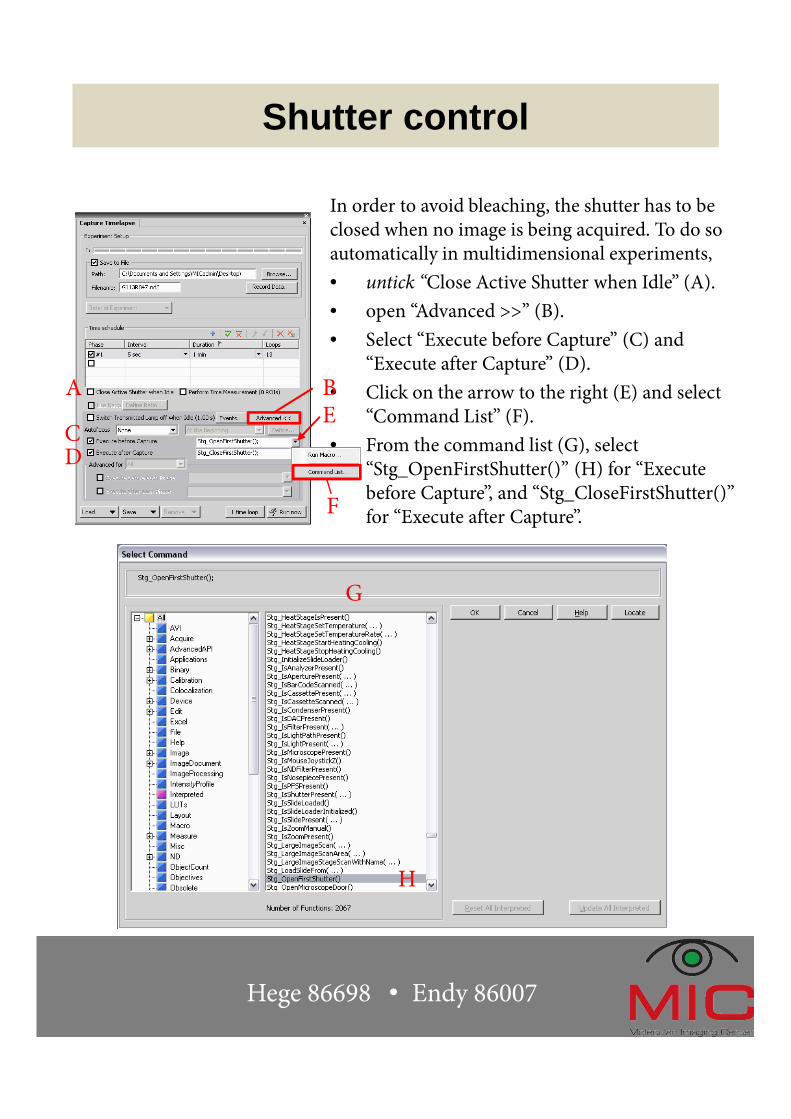
Shutter control
In order to avoid bleaching, the shutter has to be closed when no image is being acquired. To do so automatically in multidimensional experiments,
• untick “Close Active Shutter when Idle” (A).
• open “Advanced >>” (B).
• Select “Execute before Capture” (C) and “Execute after Capture” (D).
• Click on the arrow to the right (E) and select “Command List” (F).
• From the command list (G), select “Stg_OpenFirstShutter()” (H) for “Execute before Capture”, and “Stg_CloseFirstShutter()” for “Execute after Capture”.
A B
CD
E
F
G
H
Hege 86698 • Endy 86007
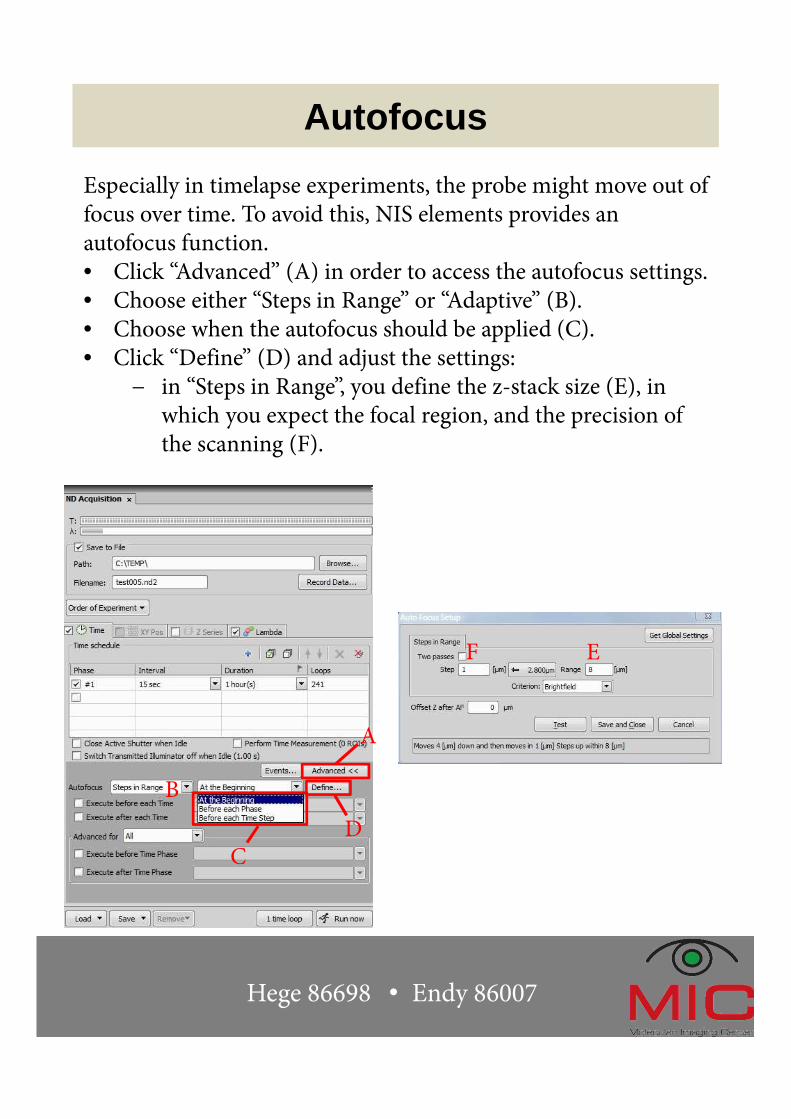
Autofocus
Especially in timelapse experiments, the probe might move out of focus over time. To avoid this, NIS elements provides an autofocus function.• Click “Advanced” (A) in order to access the autofocus settings.• Choose either “Steps in Range” or “Adaptive” (B).• Choose when the autofocus should be applied (C).• Click “Define” (D) and adjust the settings:
− in “Steps in Range”, you define the z-stack size (E), in which you expect the focal region, and the precision of the scanning (F).
A
CD
B
EF
Hege 86698 • Endy 86007
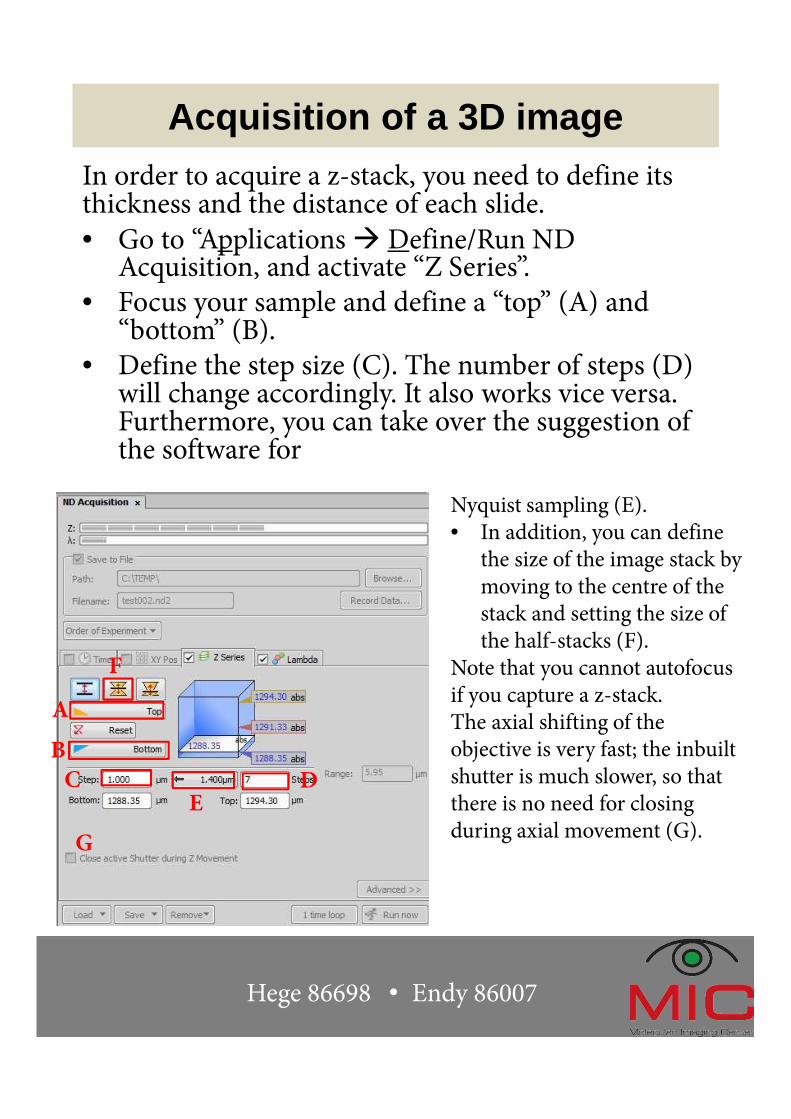
Acquisition of a 3D imageIn order to acquire a z-stack, you need to define its thickness and the distance of each slide.
• Go to “Applications � Define/Run ND Acquisition, and activate “Z Series”.
• Focus your sample and define a “top” (A) and “bottom” (B).
• Define the step size (C). The number of steps (D) will change accordingly. It also works vice versa. Furthermore, you can take over the suggestion of the software for
Nyquist sampling (E).• In addition, you can define
the size of the image stack by moving to the centre of the stack and setting the size of the half-stacks (F).
Note that you cannot autofocus if you capture a z-stack.The axial shifting of the objective is very fast; the inbuilt shutter is much slower, so that there is no need for closing during axial movement (G).
A
B
C DE
F
G
Hege 86698 • Endy 86007
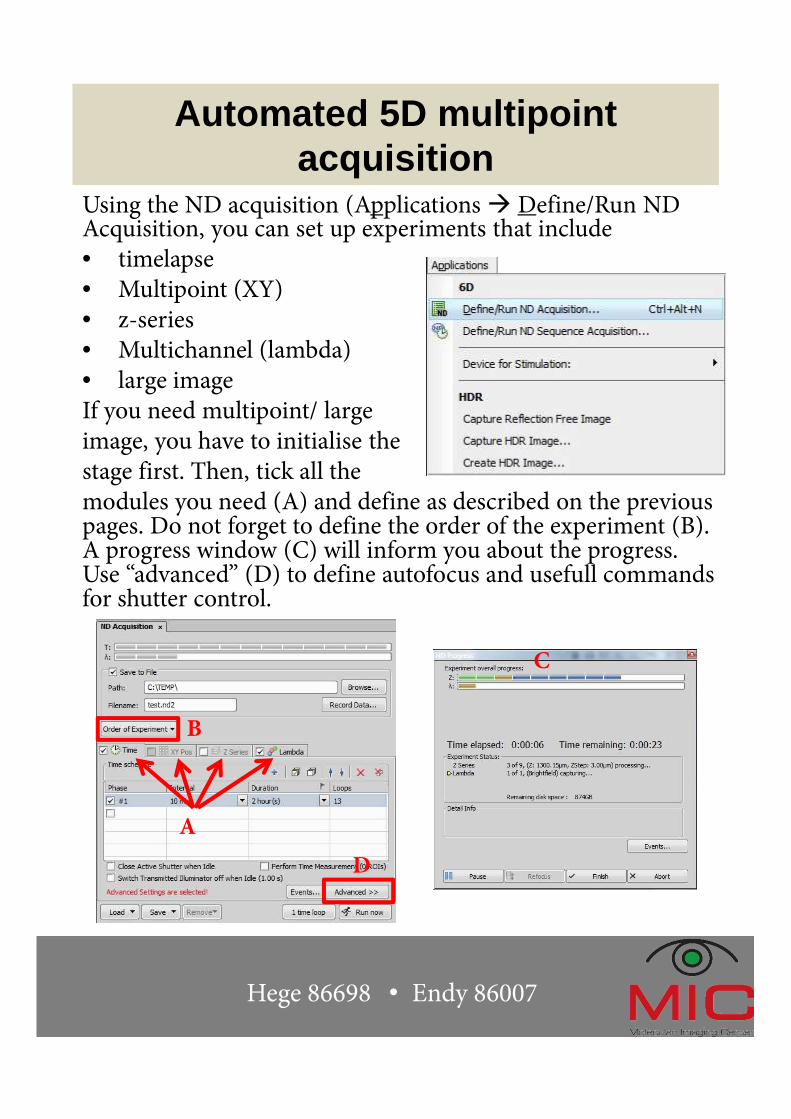
Automated 5D multipoint acquisition
Using the ND acquisition (Applications � Define/Run ND Acquisition, you can set up experiments that include • timelapse• Multipoint (XY)• z-series• Multichannel (lambda)• large imageIf you need multipoint/ largeimage, you have to initialise thestage first. Then, tick all the modules you need (A) and define as described on the previous pages. Do not forget to define the order of the experiment (B). A progress window (C) will inform you about the progress. Use “advanced” (D) to define autofocus and usefull commands for shutter control.
A
B
Hege 86698 • Endy 86007
C
D
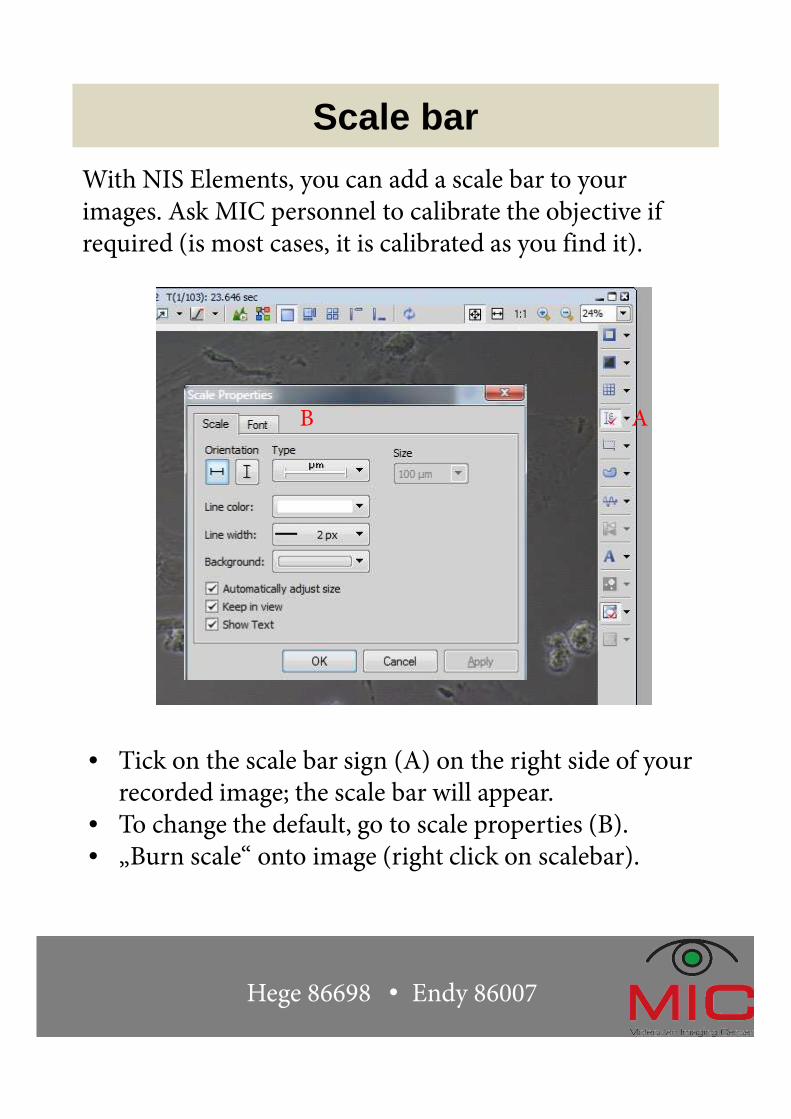
Scale bar
With NIS Elements, you can add a scale bar to your images. Ask MIC personnel to calibrate the objective if required (is most cases, it is calibrated as you find it).
• Tick on the scale bar sign (A) on the right side of yourrecorded image; the scale bar will appear.
• To change the default, go to scale properties (B).• „Burn scale“ onto image (right click on scalebar).
Hege 86698 • Endy 86007
AB

Saving data
All data should be saved on “biomic”, and in the following two formats:
• “*.nd2” is the manufacturer’s format that contains all the META-data. This is your raw data that you have to keep to be able to show what you have done.
• “TIFF” is the scientific format which can be used by almost all software, but is does not contain the full META-data.
You can adjust parts of the META-data in the “Image Fields” dialogue.
The hugely popular “JPEG/JPG” is lossy, produces artefacts, and is not recommended in science. Use it only for simple presentation purposes.
Hege 86698 • Endy 86007

File formats
Data generated on this microscope is 12 bit, which is more than the Windows Photo Viewercan handle properly! Apart from NIS elements, use the following programmes for image visualisation, and processing:
• FIJI/ImageJ
• MATLAB
• Imaris
• ImagePro
• …
In Photoshop, you will have to adjust brightness/contrast, and it cannot handle two channel TIFF without problems.
Hege 86698 • Endy 86007
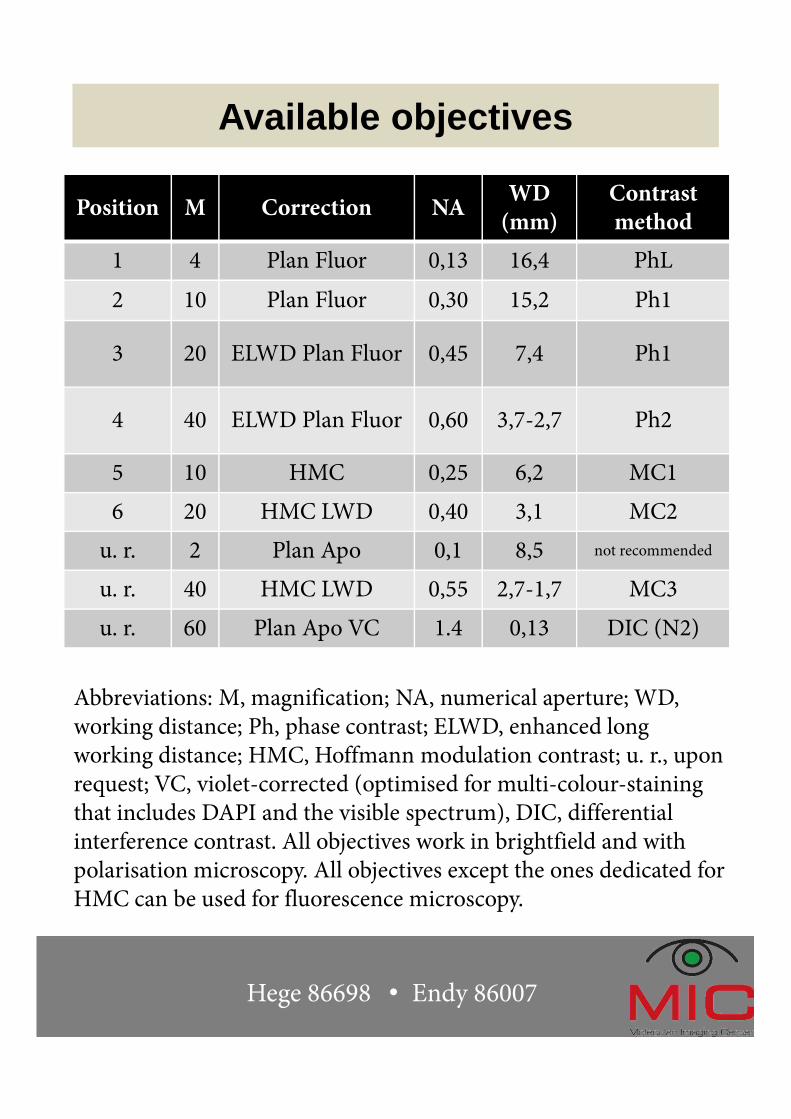
Available objectives
Position M Correction NAWD
(mm)
Contrast
method
1 4 Plan Fluor 0,13 16,4 PhL
2 10 Plan Fluor 0,30 15,2 Ph1
3 20 ELWD Plan Fluor 0,45 7,4 Ph1
4 40 ELWD Plan Fluor 0,60 3,7-2,7 Ph2
5 10 HMC 0,25 6,2 MC1
6 20 HMC LWD 0,40 3,1 MC2
u. r. 2 Plan Apo 0,1 8,5 not recommended
u. r. 40 HMC LWD 0,55 2,7-1,7 MC3
u. r. 60 Plan Apo VC 1.4 0,13 DIC (N2)
Abbreviations: M, magnification; NA, numerical aperture; WD, working distance; Ph, phase contrast; ELWD, enhanced long working distance; HMC, Hoffmann modulation contrast; u. r., upon request; VC, violet-corrected (optimised for multi-colour-staining that includes DAPI and the visible spectrum), DIC, differential interference contrast. All objectives work in brightfield and with polarisation microscopy. All objectives except the ones dedicated for HMC can be used for fluorescence microscopy.
Hege 86698 • Endy 86007
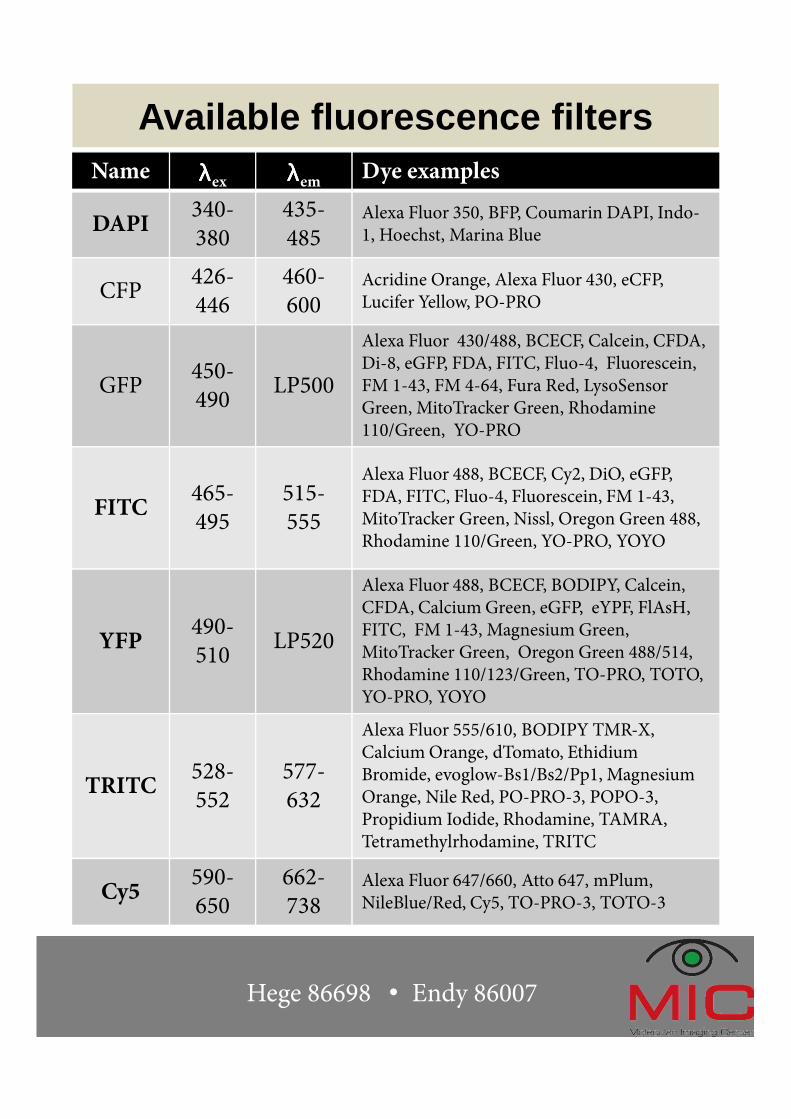
Available fluorescence filtersName λλλλex λλλλem
Dye examples
DAPI340-380
435-485
Alexa Fluor 350, BFP, Coumarin DAPI, Indo-1, Hoechst, Marina Blue
CFP426-446
460-600
Acridine Orange, Alexa Fluor 430, eCFP, Lucifer Yellow, PO-PRO
GFP450-490
LP500
Alexa Fluor 430/488, BCECF, Calcein, CFDA, Di-8, eGFP, FDA, FITC, Fluo-4, Fluorescein, FM 1-43, FM 4-64, Fura Red, LysoSensor Green, MitoTracker Green, Rhodamine 110/Green, YO-PRO
FITC465-495
515-555
Alexa Fluor 488, BCECF, Cy2, DiO, eGFP, FDA, FITC, Fluo-4, Fluorescein, FM 1-43, MitoTracker Green, Nissl, Oregon Green 488, Rhodamine 110/Green, YO-PRO, YOYO
YFP490-510
LP520
Alexa Fluor 488, BCECF, BODIPY, Calcein, CFDA, Calcium Green, eGFP, eYPF, FlAsH, FITC, FM 1-43, Magnesium Green, MitoTracker Green, Oregon Green 488/514, Rhodamine 110/123/Green, TO-PRO, TOTO, YO-PRO, YOYO
TRITC528-552
577-632
Alexa Fluor 555/610, BODIPY TMR-X, Calcium Orange, dTomato, EthidiumBromide, evoglow-Bs1/Bs2/Pp1, Magnesium Orange, Nile Red, PO-PRO-3, POPO-3, Propidium Iodide, Rhodamine, TAMRA, Tetramethylrhodamine, TRITC
Cy5590-650
662-738
Alexa Fluor 647/660, Atto 647, mPlum, NileBlue/Red, Cy5, TO-PRO-3, TOTO-3
Hege 86698 • Endy 86007