Nida Pro Users Guide
326
Nida Pro User’s Guide
Transcript of Nida Pro Users Guide

Nida Pro
User's Guide

Printed: April 2002 COPYRIGHT © 2002 by Nida Corporation. Printed in U.S.A. All rights reserved. No part of this publication may be reproduced, stored in a retrieval system, or transmitted, in any form or by any means, electronic, mechanical, pho- tocopying, recording, or otherwise, without prior written permission from Nida Corporation. 041-202NP
For your future convenience, take a moment now to fill out the System Worksheet on page 1-9. This information is vital if you need to contact Nida for technical support.
i
Nida Pro User's Guide
Table of Contents
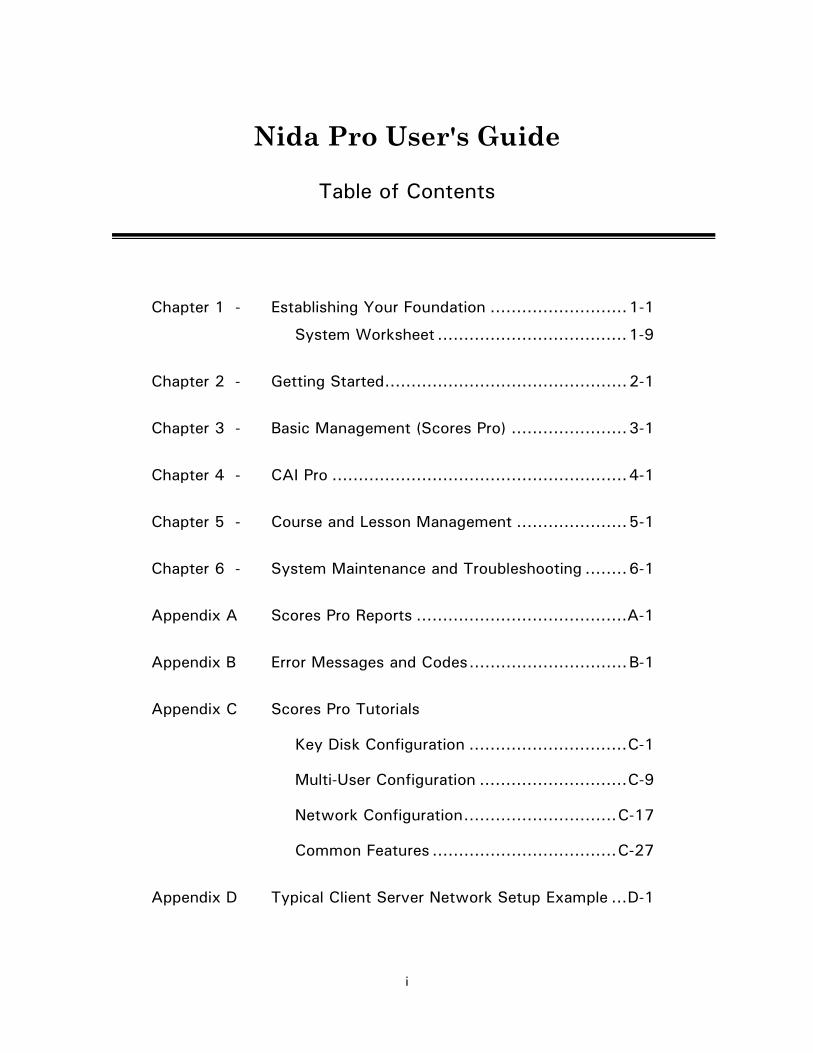
Chapter 1 - Establishing Your Foundation ..........................1-1 System Worksheet ....................................1-9 Chapter 2 - Getting Started..............................................2-1 Chapter 3 - Basic Management (Scores Pro) ......................3-1 Chapter 4 - CAI Pro ........................................................4-1 Chapter 5 - Course and Lesson Management .....................5-1 Chapter 6 - System Maintenance and Troubleshooting ........6-1 Appendix A Scores Pro Reports ........................................A-1 Appendix B Error Messages and Codes..............................B-1 Appendix C Scores Pro Tutorials
Key Disk Configuration ..............................C-1
Multi-User Configuration ............................C-9
Network Configuration.............................C-17
Common Features ...................................C-27 Appendix D Typical Client Server Network Setup Example ...D-1

ii

1-1
CHAPTER 1CHAPTER 1CHAPTER 1CHAPTER 1 –––– ESTABLISHING YOUR ESTABLISHING YOUR ESTABLISHING YOUR ESTABLISHING YOUR FOUNDATIONFOUNDATIONFOUNDATIONFOUNDATION
At Nida, we understand LEARNING
Our courseware includes: CAI (Computer Aided Instruction) - self-paced study that leads
students through the theory involved in the technology of our world today, and then offers hands-on practice for application of that theory to cement the concepts in their mind.
Test Consoles - training equipment that provides simulated
electronic circuits to supply real-world experience in the safety of the academic environment.
Lab Text Manuals - hard copy materials to present the lesson
material in a traditional format, reinforcing the concepts.
We understand INSTRUCTORS
They need to spend their time on teaching, not administration. Scores Pro provides the management tools to enable complete and accurate record keeping, with details that are instantly available for reference and analysis.
We understand CUSTOMER SERVICE
Users cannot derive the benefits of any system if they can't get it to work. At Nida, our technical support door is always open: 1-800-327-NIDA or [email protected]. The System Worksheet on page 1-9 will provide us with the details we need to serve you best. To forestall your need for tech support, we offer this Guide to address most of the operational issues you might encounter. You will find in-depth discussions for full understanding or Step-Action Tables for immediate "How Do I Do This?" situations. Don't get us wrong - we WANT to hear from our customers. But we'd like most to hear what we're doing right for you.
ENJOY YOUR NIDA COURSEWARE

Establishing Your Foundation
1-2
Hardware and Software Requirements
The Nida Scores Pro, CAI Pro, Monitor Pro, and Quester software all have the following minimum system requirements:
• Pentium II Processor or higher
• Windows 98, NT, 2000, XP
• SVGA
• 12MB RAM
• Serial Port
• 500 MB Free Hard Drive Space
• CD-ROM Drive

Overview of System Types
1-3
Before you install
Before you install your Nida Classroom Management software, you must first determine which type of system configuration best meets your needs. The software supports the following configurations:
• stand-alone
• multi-user, and
• several variations of network systems for classroom environments.
The Nida Classroom Management software can also be configured for a combination of systems, such as a classroom network that supports remote use.
Configuration Selection
To assist you in determining which configuration is best for your program, we have provided:
• a summary of each configuration, and
• the Planning Matrix: an easy-to-follow
flow chart that steps you through a series of questions about your system.
Installation Guide
Once you have determined which system configuration you want to use, you can find the installation guide for your particular configuration in Chapter 2, Getting Started.

Establishing Your Foundation
1-4
Summary of System Configurations Key Disk Configuration
The Key Disk configuration is the simplest and most versatile of the four Scores Pro configuration options and is used in stand-alone computer environments. Each student must have a key disk (a 3.5” floppy or zip disk created by the instructor) to access the CAI software. The disk contains the student’s course outline and stores the results of each lesson the student attempts. The instructor periodically merges data from each student’s key disk into the Scores Pro database at the instructor’s workstation.
Recommended Use:
This option is recommended for installations where no local area network has been installed or where the instructor chooses not to make use of an existing network.
Multi-User Configuration
The Multi-User Configuration allows the student's ID information, course outline, and records to be retained on the local hard drives of the student stand-alone workstations. Student access is controlled through a student selection process within the Nida menu application using passwords assigned by the instructor. The instructor retrieves data from the workstations with a Transfer Disk and merges the data from that disk into the database on the Instructor workstation. While this configuration eliminates the need for individual Key Disks, individual prerequisite checking and student records security is not available.
Recommended Use:
This configuration is only used when a system is not connected to a network and students do not hold responsibility for their own floppy disk.

System Configurations
1-5
Summary of System Configurations, continued Peer-to-Peer Network (Workgroup) Configuration
The Peer-to-Peer Network (Workgroup) configuration can be used with the Nida software when your system is part of a local area network. Each student is assigned a “home” directory under a common root on a computer workstation designated as a “server”. All the Nida software is located on the server, which is accessed by the student workstation through a local peer-to-peer network. This configuration eliminates the need for individual student key disks or instructor transfer disks.
Recommended Use:
If your students logon to your network under a common name or you are not using a formal network software package, this configuration will best support your system.
Client/Server Configuration
The Client/Server Network configuration provides the most security, greatest ease of use, and all the other advantages of a network configuration. The Client/Server Configuration offers two options:
1. The Direct Map option utilizes a drive letter mapped to individual student directories.
2. The Logon Configuration allows students to access their
directories using their login name.
Recommended Use:
This configuration is the option for you only if experienced network administrators or qualified network engineers are available to properly prepare your network for the Nida software installation. The Nida software is compatible with Novell, Windows NT and most other server operating systems. Network Note: Due to the variety of network architecture, the Nida installation instructions cannot offer assistance in setting up your system network. We have, however, provided an example of a typical client server setup in Appendix D.

Establishing Your Foundation
1-6

System Configurations
1-7
Planning Matrix Use this matrix to determine which configuration of Scores Pro best supports your system requirements.
Are you using anetwork?
Are youoperatingon a
Win95, Win98,or NTWorkstation?
Type of Software
UpgradeOperating System
or consider textbased format
Contact Nida
Is your networkNT or Novell Client/
Server?
Do yourstudents have
individualaccounts?
Is a driveletter mapped to the
student homedirectory
Install as Client/Server
Direct Map
Install as Client/Server
Network Logon
Install asPeer-to-Peer
Install asKey Disk
Are you networkedas a Peer-to-Peer
Will studentsuse individual floppy
disks?
Do you needPrerequisiteChecking?
Do you needrecord security?
Must useindividual student
floppy disks
Install asMulti-User
Start
Apple w/ emulator
Windows 3.1
Other
Y
N
Y
N
Y
N
Y
N
Call NidaYou may have toinstall as a Key
Disk System
Y
N
Y
NY
N
Y
N
Y
N

Establishing Your Foundation
1-8
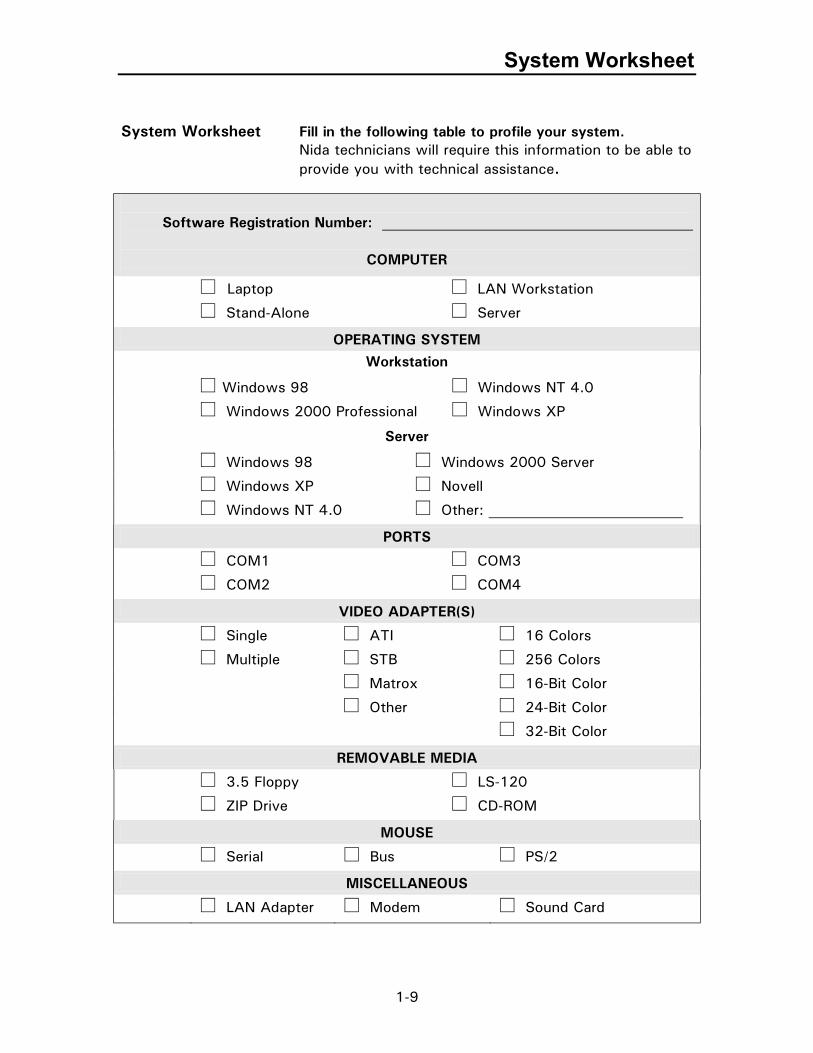
System Worksheet
1-9
System Worksheet Fill in the following table to profile your system. Nida technicians will require this information to be able to
provide you with technical assistance.
Software Registration Number:
COMPUTER
Laptop LAN Workstation
Stand-Alone Server
OPERATING SYSTEM Workstation
Windows 98 Windows NT 4.0 Windows 2000 Professional Windows XP
Server Windows 98 Windows 2000 Server
Windows XP Novell
Windows NT 4.0 Other:
PORTS
COM1 COM3
COM2 COM4
VIDEO ADAPTER(S)
Single ATI 16 Colors
Multiple STB 256 Colors
Matrox 16-Bit Color
Other 24-Bit Color
32-Bit Color
REMOVABLE MEDIA
3.5 Floppy LS-120
ZIP Drive CD-ROM
MOUSE
Serial Bus PS/2
MISCELLANEOUS
LAN Adapter Modem Sound Card

Establishing Your Foundation
1-10

2-1
CHAPTER 2CHAPTER 2CHAPTER 2CHAPTER 2 ---- GETTING STARTED GETTING STARTED GETTING STARTED GETTING STARTED
Introduction
In the previous chapter, you determined which Scores Pro configuration best suits your particular classroom setup. In this chapter, we will step you through the software installation and then assist you in setting up your Scores Pro Management System and hardware. The chapter is divided into three sections:
Section One – Installation
Section Two – Scores Pro Setup
Section Three - Hardware Connection
Pre-Installation Check
Open your Scores Pro/CAI Pro package. You should have the following items at hand during the installation procedure:
• CD ROM labeled Nida Software
• Validation Disk (3.5 inch floppy disk)
• Registration Sheet with your Scores Pro registration number
Installation Steps
Begin in Section One to install your chosen system configuration:
Stand-Alone Key Disk Configuration................... Page 2-2
Multi-User Configuration .................................. Page 2-9
Peer-to-Peer Network (Workgroup) Configuration . Page 2-17
Client/Server Network Configuration .................. Page 2-29
Continue as directed through the window explanations.
Run the IDAPI executable ..................................... Page 2-42
Set up Scores Pro in Section Two .......................... Page 2-43
Make your hardware connections
in Section Three ................................................. Page 2-53

Getting Started
2-2
Section One - Installation Stand Alone-Key Disk Configuration
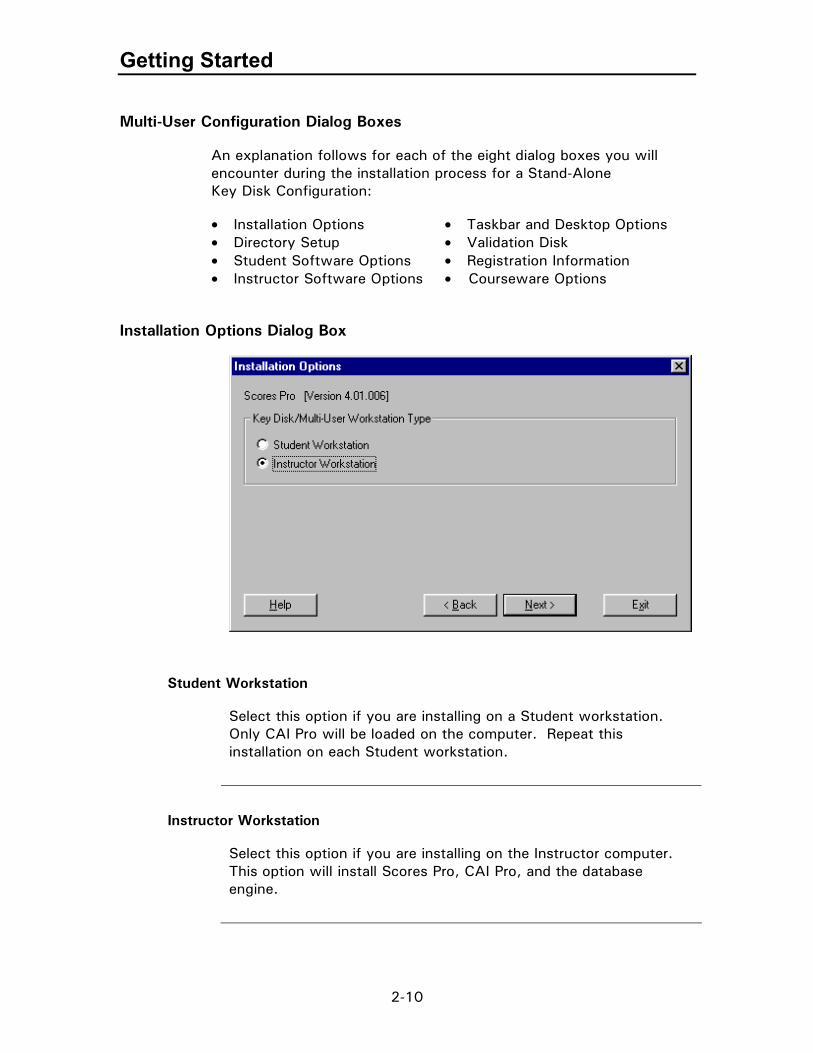
Insert the Scores Pro CD ROM into your drive. If the Nida Installation Wizard window does not appear, select Start|Run|X:\Install (X = the drive letter of your CD ROM drive). Select the Scores Pro Installation icon. After carefully reading the license agreement, click Accept. The following Installation Options dialog box should be displayed.
Select the Key Disk option (as shown above) and click Next>. Follow the instructions as they appear on the screen. The dialog boxes and options you will encounter during the installation procedure are described on the next pages.

Installation – Key Disk
2-3
Stand-Alone Key Disk Configuration Dialog Boxes
An explanation follows for each of the eight dialog boxes you will encounter during the installation process for a Stand-Alone Key Disk Configuration:
• Installation Options
• Directory Setup
• Student Software Options
• Instructor Software Options
• Taskbar and Desktop Options
• Validation Disk
• Registration Information
• Courseware Options
Installation Options Dialog Box
Student Workstation
Select this option if you are installing on a Student workstation. Only CAI Pro will be loaded on the computer. Repeat this installation on each Student workstation.
Instructor Workstation
Select this option if you are installing on the Instructor computer. This option will install Scores Pro, CAI Pro, and the database engine.

Getting Started
2-4
Stand-Alone Key Disk Configuration Dialog Boxes, continued Directory Setup Dialog Box
Nida Software
The default path installs the Nida software to the computer's C:\ drive. If you wish to install it to a different drive, enter the path here.
Student Software Options Dialog Box
Continued on next page

Installation – Key Disk
2-5
Student Software Options Dialog Box, continued Load CAI runtime files and Menu software
Runtime files and Menu software are required to run CAI Pro. This option should always be checked for initial installations.
Load CAI lessons
This option installs purchased CAI lessons. It should always be checked for initial installations.
Load Question and Objective help files
Check this option if you wish to install the test question answers and help files.
Instructor Software Options Dialog Box
Load Scores Pro Help Files (HTML)
This option is only available if you are installing Scores Pro on an Instructor station. It allows for instant help when you are working in the Scores Pro Management System.

Getting Started
2-6
Stand-Alone Key Disk Configuration Dialog Boxes, continued Taskbar and Desktop Options
Add applications to Programs folder
This option is defaulted to put Nida Software on the Program Menu automatically.
Add applications to Desktop
This option is defaulted to put the Scores Pro or CAI Pro icon on the desktop automatically.
Add applications to the main Start Menu
Check this box for Scores Pro/CAI Pro to appear on the Start Menu.
Add menu program to Startup folder
Check this box if you want the computer to automatically start CAI Pro after Windows is loaded.

Installation – Key Disk
2-7
Stand-Alone Key Disk Configuration Dialog Boxes, continued Validation Disk Dialog Box
The default for this part of the installation is Drive A. If your 3.5” floppy drive is named with a different letter, enter that letter.
Registration Information Dialog Box
These fields must be filled in to continue with the install. Your Registration Number can be found on the hard-copy Registration Sheet. Enter this number exactly as written.
It’s a good idea to copy the registration number to the Validation Disk label for future installs.

Getting Started
2-8
Stand-Alone Key Disk Configuration Dialog Boxes, continued Courseware Options Dialog Box
Available Lesson Groups
Checking a lesson group will install the Nida lessons associated with that group. Tag All will check each lesson group. Clear will deselect all lesson groups. For custom installations, check the lesson groups as required.
Next Installation Step
When the Scores Pro installation is complete, turn to Page 2-42 and follow the procedure to run the IDAPI executable on the Instructor computer.

Installation – Multi-User
2-9
Section One - Installation Multi-User Configuration
Insert the Scores Pro CD ROM into your drive. If the Nida Installation Wizard window does not appear, select Start|Run|X:\Install (X = the drive letter of your CD ROM drive). Select the Scores Pro Installation icon. After carefully reading the license agreement, click Accept. The following Installation Options dialog box should be displayed.
Select the Multi-User Workstations option (as shown above) and click Next>. Follow the instructions as they appear on the screen. The dialog boxes and options you will encounter during the installation procedure are described on the next pages.
Getting Started
2-10
Multi-User Configuration Dialog Boxes
An explanation follows for each of the eight dialog boxes you will encounter during the installation process for a Stand-Alone Key Disk Configuration:
• Installation Options • Directory Setup • Student Software Options • Instructor Software Options
• Taskbar and Desktop Options • Validation Disk • Registration Information • Courseware Options
Installation Options Dialog Box
Student Workstation
Select this option if you are installing on a Student workstation. Only CAI Pro will be loaded on the computer. Repeat this installation on each Student workstation.
Instructor Workstation
Select this option if you are installing on the Instructor computer. This option will install Scores Pro, CAI Pro, and the database engine.

Installation – Multi-User
2-11
Multi-User Configuration Dialog Boxes, continued Directory Setup Dialog Box
Nida Software
The default path installs the Nida software to the computer's C:\ drive. If you wish to install it to a different drive, enter the path here.

Getting Started
2-12
Multi-User Configuration Dialog Boxes, continued Student Software Options Dialog Box
Load CAI runtime files and Menu Software
Runtime files and Menu software are required to run CAI Pro. This option should always be checked for initial installations.
Load CAI Lessons
This option installs purchased CAI lessons. It should always be checked for initial installations.
Load Question and Objective help files
Check this option if you wish to install the test question answers and help files.

Installation – Multi-User
2-13
Multi-User Configuration Dialog Boxes, continued Instructor Software Options Dialog Box
Load Scores Pro Help Files (HTML)
This option is only available if you are installing Scores Pro on an Instructor station. It allows for instant help when you are working in the Scores Pro Management System.

Getting Started
2-14
Multi-User Configuration Dialog Boxes, continued Taskbar and Desktop Options
Add applications to Programs folder
This option is defaulted to put Nida Software on the Program Menu automatically.
Add applications to Desktop
This option is defaulted to put the Scores Pro or CAI Pro icon on the desktop automatically.
Add applications to the main Start Menu
Check this box for Scores Pro/CAI Pro to appear on the Start Menu.
Add menu program to Startup folder
Check this box if you want the computer to automatically start CAI Pro after Windows is loaded.

Installation – Multi-User
2-15
Multi-User Disk Configuration Dialog Boxes, continued Validation Disk Dialog Box
The default for this part of the installation is Drive A. If your 3.5” floppy drive is named with a different letter, enter that letter.
Registration Information Dialog Box
These fields must be filled in to continue with the install. Your Registration Number can be found on the hard-copy Registration Sheet. Enter this number exactly as written.
It’s a good idea to copy the registration number to the Validation Disk label for future installs.

Getting Started
2-16
Multi-User Disk Configuration Dialog Boxes, continued Courseware Options Dialog Box
Available Lesson Groups
Checking a lesson group will install the Nida lessons associated with that group. Tag All will check each lesson group. Clear will deselect all lesson groups. For custom installations, check the lesson groups as required.
Next Installation Step
When the Scores Pro installation is complete, turn to Page 2-42 and follow the procedure to run the IDAPI executable on the Instructor computer.

Installation – Peer-to-Peer Network
2-17
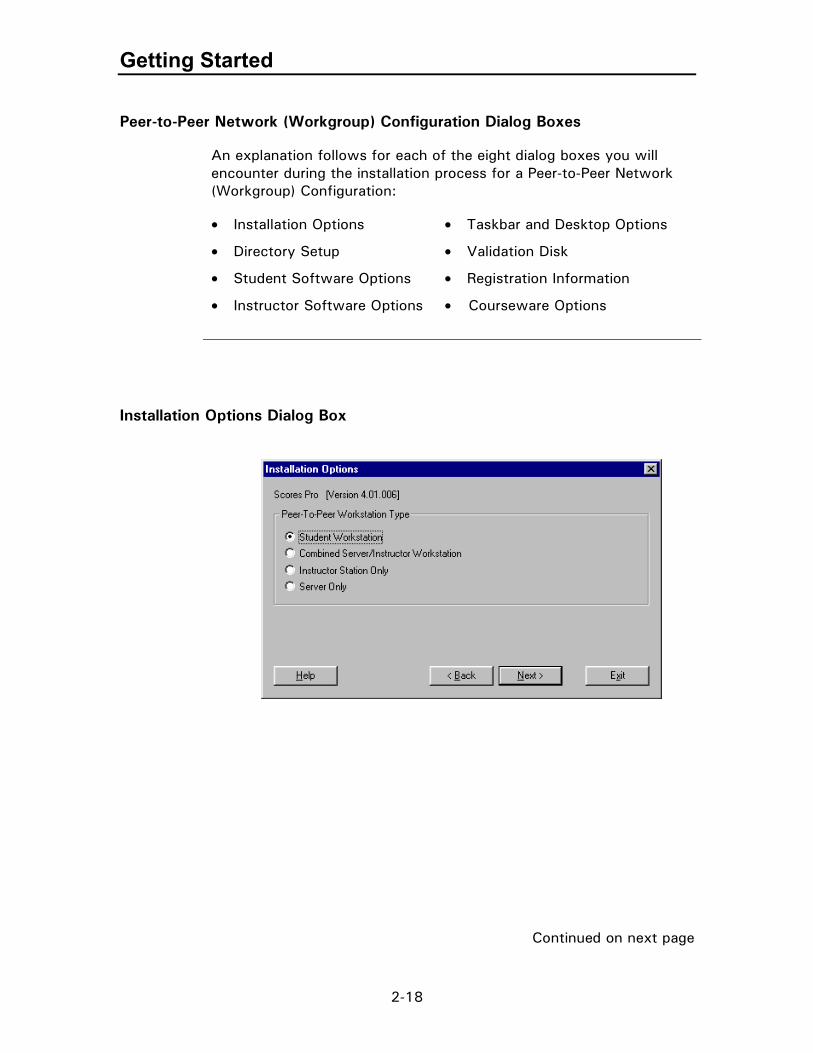
Section One – Installation Peer-to-Peer Network (Workgroup) Configuration
Insert the Scores Pro CD ROM into your drive. If the Nida Installation Wizard window does not appear, select Start|Run|X:\Install (X = the drive letter of your CD ROM drive). Select the Scores Pro Installation icon. After carefully reading the license agreement, click Accept. The following Installation Options dialog box should be displayed.
Select the Peer-to-Peer Network (Workgroup) option (as shown above) and click Next>. Follow the instructions as they appear on the screen. The dialog boxes and options you will encounter during the installation procedure are described on the next pages.
Getting Started
2-18
Peer-to-Peer Network (Workgroup) Configuration Dialog Boxes
An explanation follows for each of the eight dialog boxes you will encounter during the installation process for a Peer-to-Peer Network (Workgroup) Configuration:
• Installation Options
• Directory Setup
• Student Software Options
• Instructor Software Options
• Taskbar and Desktop Options
• Validation Disk
• Registration Information
• Courseware Options
Installation Options Dialog Box
Continued on next page
Installation – Peer-to-Peer Network
2-19
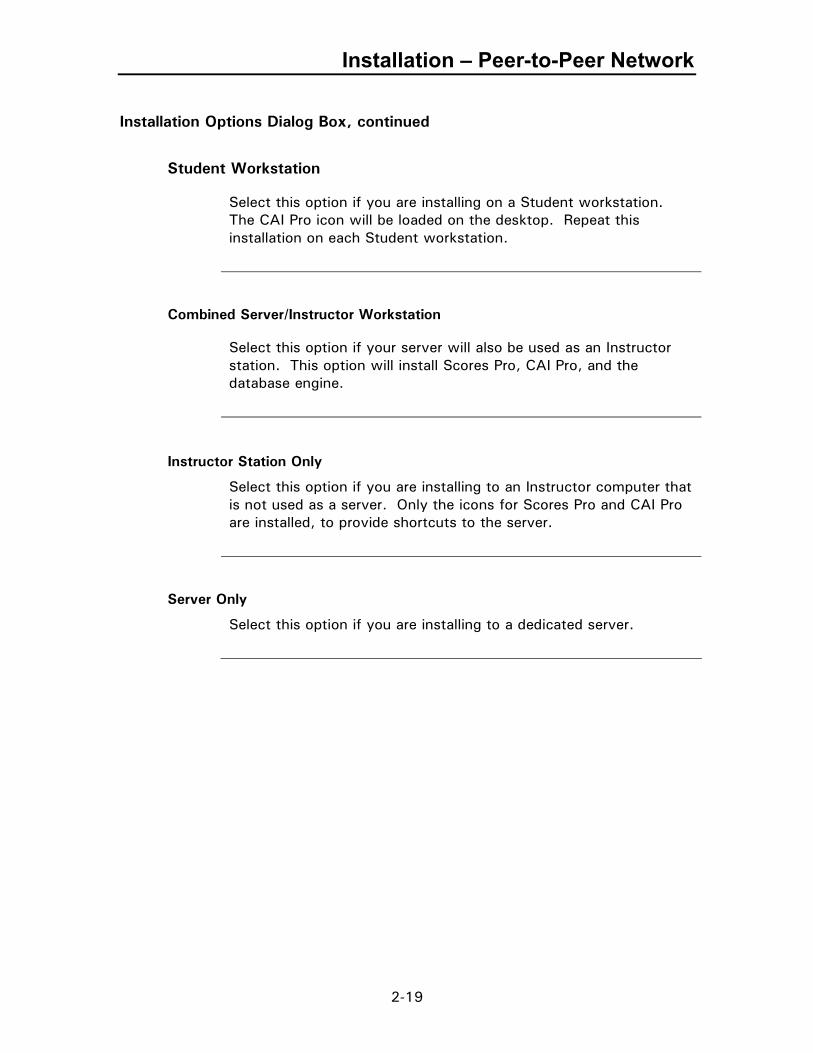
Installation Options Dialog Box, continued Student Workstation
Select this option if you are installing on a Student workstation. The CAI Pro icon will be loaded on the desktop. Repeat this installation on each Student workstation.
Combined Server/Instructor Workstation
Select this option if your server will also be used as an Instructor station. This option will install Scores Pro, CAI Pro, and the database engine.
Instructor Station Only
Select this option if you are installing to an Instructor computer that is not used as a server. Only the icons for Scores Pro and CAI Pro are installed, to provide shortcuts to the server.
Server Only
Select this option if you are installing to a dedicated server.

Getting Started
2-20
Directory Setup Dialog Box Student Workstation
CAI Lessons
Map to the \Nida98\Lessons directory on the server. Students require Read-Only access to this directory.
Student Software
Map to the \Nida98\Student directory on the server. Students require Read-Only access to this directory.
User's Root
The User's Root directory field should reflect the drive letter to which the student’s home directory is mapped. The home directory is a subdirectory is created for each user under this directory to hold menu information and lesson results. Students need Read/Write access to their own home directory.

Installation – Peer-to-Peer Network
2-21
Directory Setup Dialog Box, continued Server & Instructor
Nida Software
The Nida CAI software will be installed in the \Lessons, \Student, and \Instruct directories under this directory. Share the \Lesson and \Student directories as Read-Only. If the Instructor software and data will be accessed from another workstation, the \Instruct directory must be shared as Full Control with a password.
User's Root
The User’s Root directory will contain a subdirectory for each user. The subdirectories will contain the student’s menu and lesson results and will be created by the Scores Pro software. Share this directory as Full Control.
Getting Started
2-22
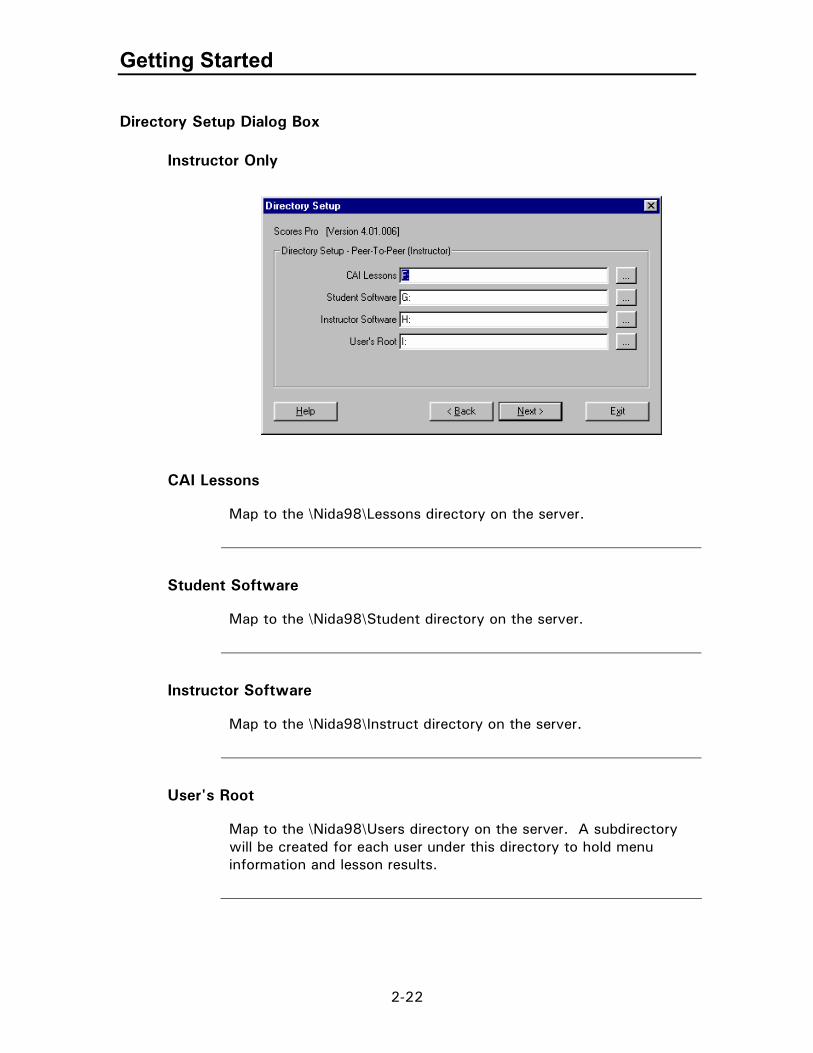
Directory Setup Dialog Box Instructor Only
CAI Lessons
Map to the \Nida98\Lessons directory on the server.
Student Software
Map to the \Nida98\Student directory on the server.
Instructor Software
Map to the \Nida98\Instruct directory on the server.
User's Root
Map to the \Nida98\Users directory on the server. A subdirectory will be created for each user under this directory to hold menu information and lesson results.

Installation – Peer-to-Peer Network
2-23
Peer-to-Peer Network (Workgroup) Configuration Dialog Boxes, continued Student Software Options
Load CAI runtime files and Menu software
Runtime files and Menu software are required to run CAI Pro. This option should always be checked for initial installations.
Load CAI lessons
This option installs purchased CAI lessons. It should always be checked for initial installations.
Load Question and Objective help files
Check this option if you wish to install the test question answers and help files.

Getting Started
2-24
Peer-to-Peer Network (Workgroup) Configuration Dialog Boxes, continued Instructor Software Options Dialog Box
Load Scores Pro Help Files (HTML)
This option is only available if you are installing Scores Pro on an Instructor station. It allows for instant help when you are working in the Scores Pro Management System.

Installation – Peer-to-Peer Network
2-25
Peer-to-Peer Network (Workgroup) Configuration Dialog Boxes, continued Taskbar and Desktop Options
Add applications to Programs folder
This option is defaulted to put Nida Software on the Program Menu automatically.
Add applications to Desktop
This option is defaulted to put the Scores Pro or CAI Pro icon on the desktop automatically.
Add applications to the main Start Menu
Check this box for Scores Pro/CAI Pro to appear on the Start Menu.
Add menu program to Startup folder
Check this box if you want the computer to boot up to CAI Pro.
Getting Started
2-26
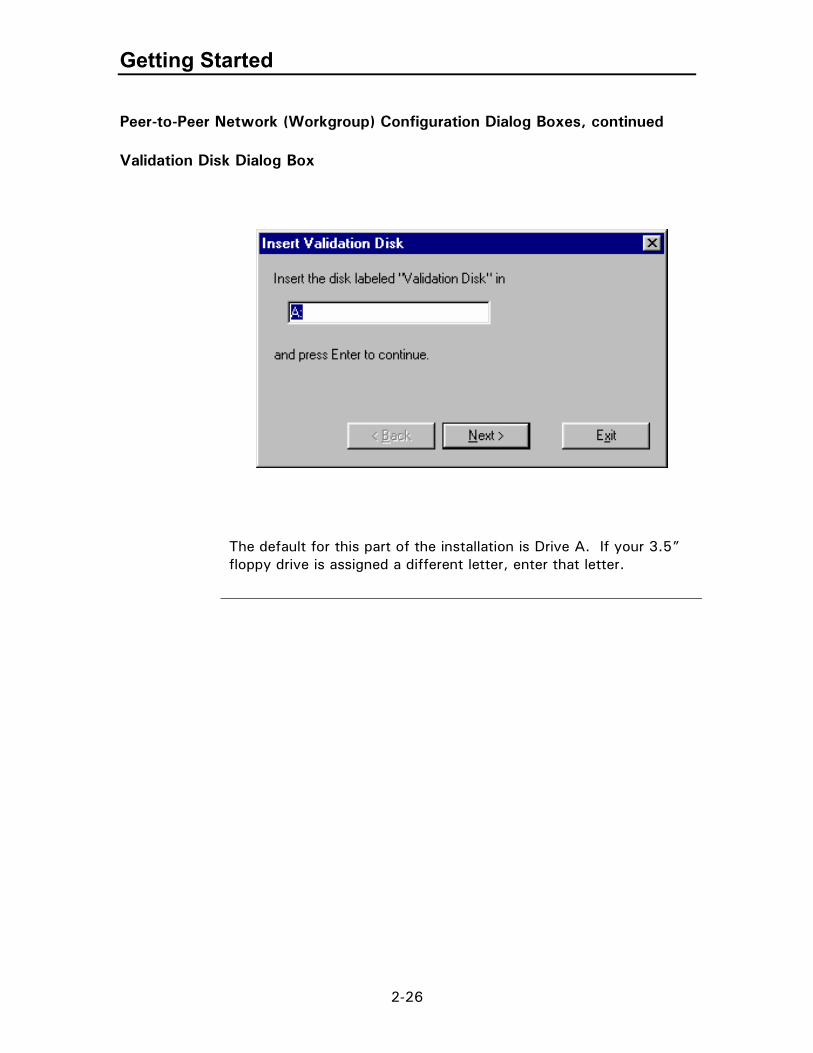
Peer-to-Peer Network (Workgroup) Configuration Dialog Boxes, continued Validation Disk Dialog Box
The default for this part of the installation is Drive A. If your 3.5” floppy drive is assigned a different letter, enter that letter.

Installation – Peer-to-Peer Network
2-27
Peer-to-Peer Network (Workgroup) Configuration Dialog Boxes, continued Registration Information Dialog Box
These fields must be filled in to continue with the install. Your Registration Number can be found on the hard-copy Registration Sheet. Enter this number exactly as written.
It’s a good idea to copy the registration number to the Validation Disk label for future installs.

Getting Started
2-28
Peer-to-Peer Network (Workgroup) Configuration Dialog Boxes, continued Courseware Options Dialog Box
Available Lesson Groups
Checking a lesson group will install the Nida lessons associated with that group. Tag All will check each lesson group. Clear will deselect all lesson groups. For custom installations, check the lesson groups as required.
Next Installation Step
When the Scores Pro installation is complete, turn to Page 2-42 and follow the procedure to run the IDAPI executable on the Instructor computer.

Installation – Client/Server Network
2-29
Section One – Installation Client/Server Network Configuration
The Nida Installation Wizard will guide you through the Client/Server Network configuration installation. Details of the installation are explained below. Let’s begin the installation. Insert the Scores Pro CD ROM into your drive. If the Nida Installation Wizard window does not appear, select Start|Run|X:\Install (X = the drive letter of your CD ROM drive). Select the Scores Pro Installation icon. After carefully reading the license agreement, click Accept. The following Installation Options dialog box should be displayed.
Select the Client/Server Network option (as shown above) and click Next>. Follow the instructions as they appear on the screen. The dialog boxes and options you will encounter during the installation procedure are described on the next pages.

Getting Started
2-30
Client/Server Network Configuration Dialog Boxes
An explanation follows for each of the nine dialog boxes you will encounter during the installation process for a Client/Server Network Configuration:
• Installation Options
• Student Identification
• Directory Setup
• Student Software Options
• Instructor Software Options
• Taskbar and Desktop Options
• Validation Disk
• Registration Information
• Courseware Options
Installation Options Dialog Box
Continued on next page

Installation – Client/Server Network
2-31
Student Workstation
Select this option if you are installing on a Student workstation. The CAI Pro icon will be installed on the desktop and a path to the server will be established. Repeat this installation on each Student workstation.
Instructor Workstation
Select this option if you are installing on the Instructor computer. This option will install the Scores Pro and CAI Pro icons on the desktop and establish a path to the server.
Software Installation (On Server)
This option will install all Scores Pro and CAI Pro files on the server, but will not create desktop icons.
Include Instructor Access
Check this box if this workstation will also be used as an Instructor workstation.
Getting Started
2-32
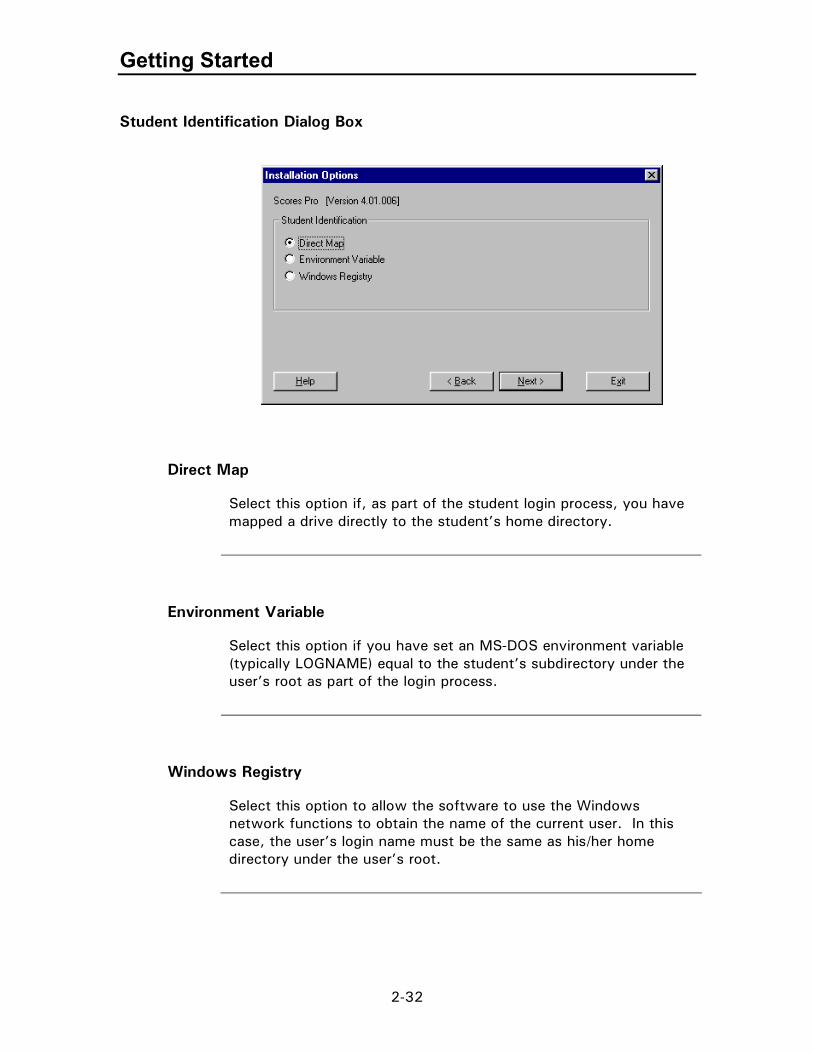
Student Identification Dialog Box
Direct Map
Select this option if, as part of the student login process, you have mapped a drive directly to the student’s home directory.
Environment Variable
Select this option if you have set an MS-DOS environment variable (typically LOGNAME) equal to the student’s subdirectory under the user’s root as part of the login process.
Windows Registry
Select this option to allow the software to use the Windows network functions to obtain the name of the current user. In this case, the user’s login name must be the same as his/her home directory under the user’s root.

Installation – Client/Server Network
2-33
Directory Setup Dialog Box Student (Direct Map Only)
CAI Lessons
Map to the \Nida98\Lessons directory on the server. Students require Read-Only access to this directory.
Student Software
Map to the \Nida98\Student directory on the server. Students require Read-Only access to this directory.
User Home Directory
The User Home directory should be the drive letter to which the student’s home directory will be mapped during the logon process. Students need Read/Write access to their own home directory.

Getting Started
2-34
Directory Setup Dialog Box, continued Student Access (Environment Variable or Windows Registry)
CAI Lessons
Map to the \Nida98\Lessons directory on the server. Students require Read-Only access to this directory.
Student Software
Map to the \Nida98\Student directory on the server. Students require Read-Only access to this directory.
User's Root
The User’s root directory must contain a subdirectory for each student that will hold the student’s information and lesson results. These subdirectories are created by the network administrator. Each student needs Read/Write/Create access to his/her own home directory.

Installation – Client/Server Network
2-35
Directory Setup Dialog Box, continued Instructor (Direct Map Only)
CAI Lessons
Map to the \Nida98\Lessons directory on the server. Instructors may require Full Access to this directory.
Student Software
Map to the \Nida98\Student directory on the server. Instructors may require Full Access to this directory.
Instructor Software
Map to the \Nida98\Instructor directory on the server. Instructors need Full Access to this directory.
User's Root
The User’s Root directory must contain a subdirectory for each student that will hold the student’s menu information and lesson results. Instructors must have Full Access to this directory.
User's Home Directory
The User’s Home directory should be mapped to the drive letter to which is accessed during the login process. Students need read/write access to their own home directories. This entry is required by the instructor to access the CAI software in Student mode.

Getting Started
2-36
Directory Setup Dialog Box Instructor (Environment Variable or Windows Registry)
CAI Lessons
Map to the \Nida98\Lessons directory on the server. Instructors may require Full Access to this directory.
Student Software
Map to the \Nida98\Student directory on the server. Instructors may require Full Access to this directory
Instructor Software
Map to the \Nida98\Instructor directory on the server. Instructors need Full Access to this directory
User's Root
The User’s Root directory must contain a subdirectory for each student that will hold the student’s menu information and lesson results. Instructors must have Full Access to these directories.

Installation – Client/Server Network
2-37
Client/Server Network Configuration Dialog Boxes, continued Student Software Options Dialog Box
Load CAI runtime files and Menu software
Runtime files and Menu software are required to run CAI Pro. This option should always be checked for initial installations.
Load CAI lessons
This option installs purchased CAI lessons. It should always be checked for initial installations.
Load Question and Objective help files
Check this option if you wish to install the test question answers and help files.

Getting Started
2-38
Client/Server Network Configuration Dialog Boxes, continued Instructor Software Options Dialog Box
Load Scores Pro Help Files (HTML)
This option is only available if you are installing Scores Pro on an Instructor station. It allows for instant help when you are working in the Scores Pro Management System.

Installation – Client/Server Network
2-39
Client/Server Network Configuration Dialog Boxes, continued Taskbar and Desktop Options
Add applications to Programs folder
This option is defaulted to put Nida Software on the Program Menu automatically.
Add applications to Desktop
This option is defaulted to put the Scores Pro or CAI Pro icon on the desktop automatically.
Add applications to the main Start Menu
Check this box for Scores Pro/CAI Pro to appear on the Start Menu.
Add menu program to Startup folder
Check this box if you want the computer to boot up to CAI Pro.

Getting Started
2-40
Client/Server Network Configuration Dialog Boxes, continued Validation Disk Dialog Box
The default for this part of the installation is Drive A. If your 3.5” floppy drive is named with a different letter, enter that letter.
Registration Information Dialog Box
These fields must be filled in to continue with the install. Your Registration Number can be found on the hard-copy Registration Sheet. Enter this number exactly as written.
It’s a good idea to copy the registration number to the Validation Disk label for future installs.

Installation – Client/Server Network
2-41
Client/Server Network Configuration Dialog Boxes, continued Courseware Options Dialog Box
Available Lesson Groups
Checking a lesson group will install the Nida lessons associated with that group. Tag All will check each lesson group. Clear will deselect all lesson groups. For custom installations, check the lesson groups as required.
Next Installation Step
When the Scores Pro installation is complete, turn to Page 2-42 and follow the procedure to run the IDAPI executable on the Instructor workstation.
Getting Started
2-42
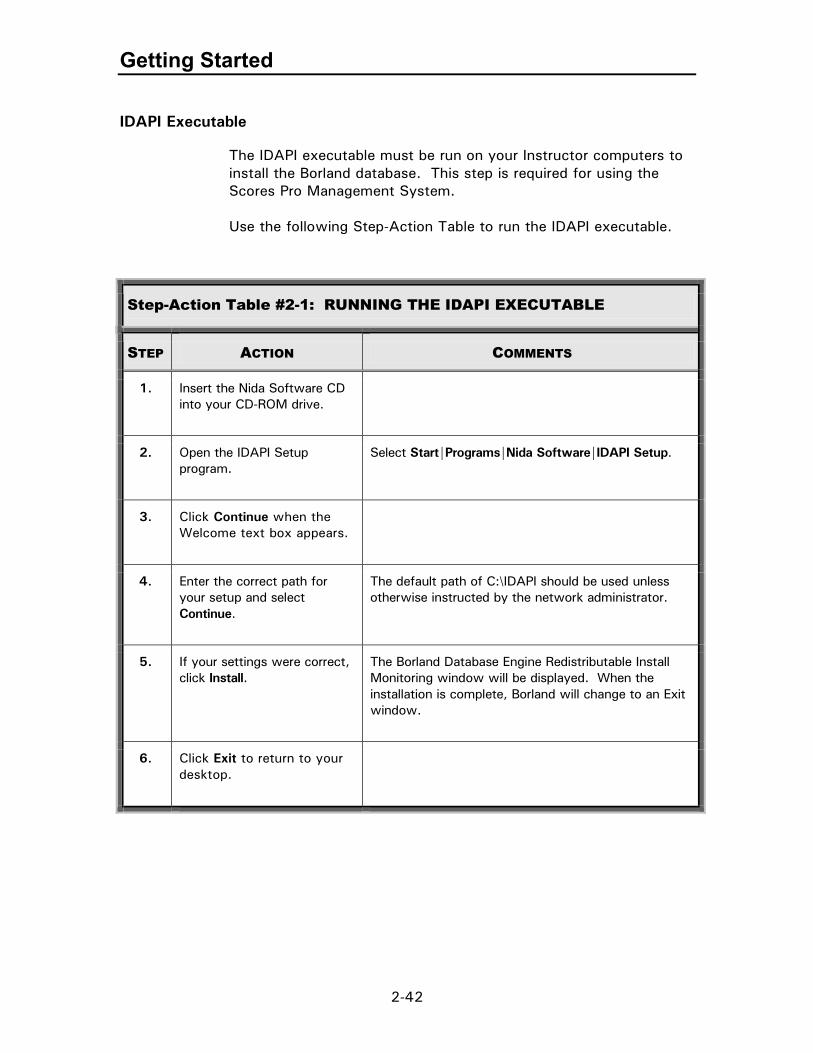
IDAPI Executable
The IDAPI executable must be run on your Instructor computers to install the Borland database. This step is required for using the Scores Pro Management System. Use the following Step-Action Table to run the IDAPI executable.
Step-Action Table #2-1: RUNNING THE IDAPI EXECUTABLE
STEP ACTION COMMENTS
1. Insert the Nida Software CD into your CD-ROM drive.
2. Open the IDAPI Setup program.
Select Start|Programs|Nida Software|IDAPI Setup.
3. Click Continue when the Welcome text box appears.
4. Enter the correct path for your setup and select Continue.
The default path of C:\IDAPI should be used unless otherwise instructed by the network administrator.
5. If your settings were correct, click Install.
The Borland Database Engine Redistributable Install Monitoring window will be displayed. When the installation is complete, Borland will change to an Exit window.
6. Click Exit to return to your desktop.

Scores Pro Setup
2-43
Section Two – Scores Pro Setup
Now that you have installed your Scores Pro Management System, there are a few details that must be completed.
First, at the Instructor station, make sure the IDAPI executable has been run to allow you to access and modify the database. Next, you need to set certain parameters in both Scores Pro and CAI Pro that will customize your system to your particular needs. These include:
• Checking your system configuration
• Changing the Scores Pro banner to match your facility, and
• Assigning passwords Let’s begin the Scores Pro setup procedures.

Getting Started
2-44
Checking Your System Configuration
Normally, the system options are set when you install Scores Pro and CAI Pro, but it is a good idea to check the configuration parameters prior to creating a database. Additionally, on occasion, you may need to change your system configuration as your requirements change or your capabilities expand. Open Scores Pro and enter the password "NIDA1" when prompted. Select System|Options from the menu bar to access the system options. To make changing the system options easier, you should be familiar with the System Options tab dialog boxes. They are:
Type
Configuration
Directories
Passwords
The windows, dialog boxes, and options you will encounter during the setup procedure are described on the following pages.

Scores Pro Setup
2-45
System Options Dialog Box - Type Tab
Type Tab
From the Type tab, you can enable and disable the Scores Pro system types.
Key Disk, Multi-User, and Network Options
Refer to the Overview of System Types section of Chapter 1 for details on each of these options.
Performance Testing and Maps Options
These are options for special programs. Refer to the user's manual of the specific programs for additional information. Note: If you are unfamiliar with these programs and would like to learn more about these options, contact your Nida representative for information and details.
Remote Use and Internet Options
These options are used to support distance education programs.
Getting Started
2-46
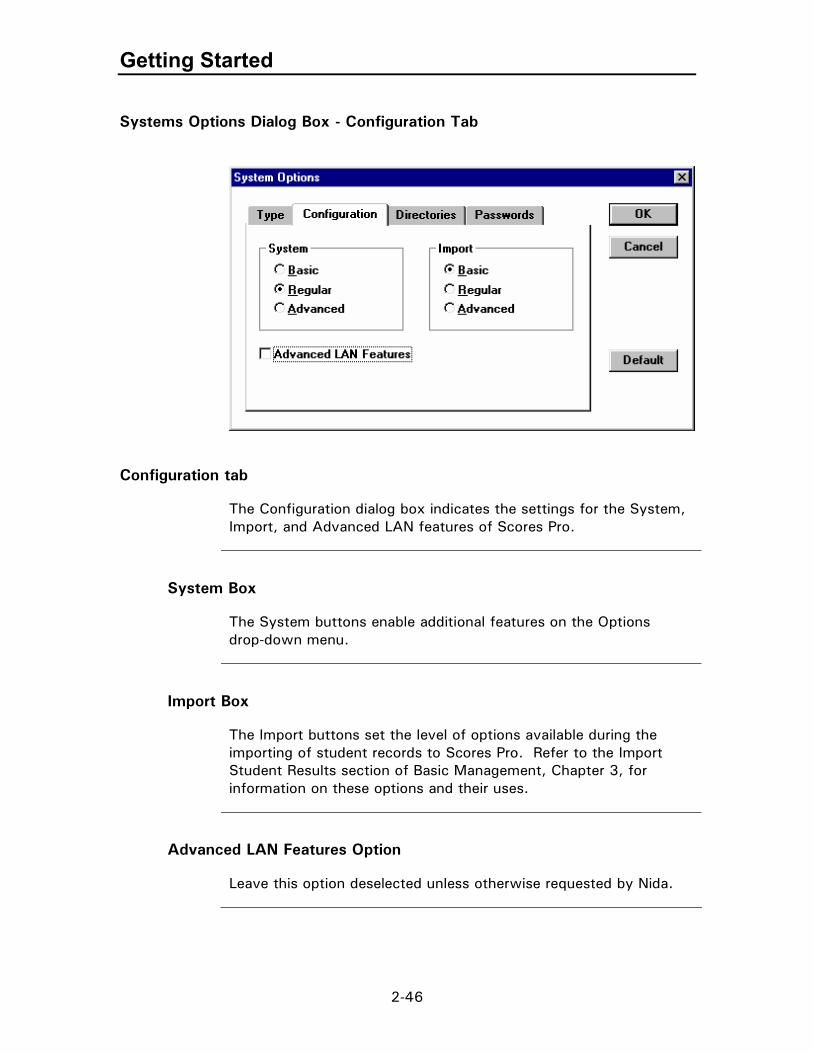
Systems Options Dialog Box - Configuration Tab
Configuration tab
The Configuration dialog box indicates the settings for the System, Import, and Advanced LAN features of Scores Pro.
System Box
The System buttons enable additional features on the Options drop-down menu.
Import Box
The Import buttons set the level of options available during the importing of student records to Scores Pro. Refer to the Import Student Results section of Basic Management, Chapter 3, for information on these options and their uses.
Advanced LAN Features Option
Leave this option deselected unless otherwise requested by Nida.

Scores Pro Setup
2-47
System Options Dialog Box – Directories Tab
Directories tab
The Directories dialog box provides the path to Nida programs, lessons, and help files. The actual paths will depend on the type of installation selected and the directory information entered during the Scores Pro installation process.
Banner
The Directories dialog box is also utilized to change the banner at the bottom of the Scores Pro opening window.

Getting Started
2-48
System Options Dialog Box – Passwords Tab
The Passwords tab allows the administrator to set various levels of access to the Scores Pro system. As shown below, there are four access levels available. The default password is NIDA1.
Password Access Levels
IF YOU CHANGE THE PASSWORD(S), WRITE THEM DOWN AND SAVE THEM IN AN AREA EXTERNAL TO SCORES PRO. LOSS OF THE PASSWORDS WILL PREVENT SYSTEM ACCESS AND CAUSE INTERRUPTION TO YOUR TRAINING PROGRAM.
Continued on next page

Scores Pro Setup
2-49
Passwords Tab, continued Advanced Button
The Advanced button accesses the Access Control dialog box. This box lists all of the functions available in Scores Pro and enables the administrator/instructor to set levels of security.
Expand the functions by clicking the + sign. Use check marks in the appropriate column to assign levels of security. For example, placing a check mark in the User column will allow all levels access to that function. A check mark under Administrator will restrict access to all but the Administrator and System.
Update Button
Periodically, there will be updates or revisions for your Nida software. The updated software will include a file containing any changes to the access control lists. Click the Update button to open the updated files and merge them with the master access control list. This function is only performed if the updated software installation instructions call for it.

Getting Started
2-50
Use the following Step-Action Tables to check your system options.
Step-Action Table #2-2: CHECKING SYSTEM OPTIONS
STEP ACTION COMMENTS
1. Open Scores Pro and select Options|System from the menu bar.
The default password is NIDA1.
2. Access the System Options dialog box.
3. Click the Type tab. Verify that the box identifying your system type is checked.
4. Click the Configuration tab. Check the option buttons for proper configuration.
The default configuration of Regular for System and Basic for Import functions will be displayed. For Advanced option buttons and their usage, refer to Chapter 3, Basic Management.
5. Click the Directories tab. Ensure that the Programs, Lessons, and Help paths match the configuration that you set during the installation.
If you are using a Key Disk, Multi-User, or Network configuration with the Instructor computer as the server, the directories are usually found in C:\.
6. Click OK to return to the main Scores Pro window.

Scores Pro Setup
2-51
Directories Tab – Banner Field
When you first open Scores Pro, you will see the Nida Scores Pro window. This window is defaulted with the “Nida Corporation” banner emblazoned across the bottom. You can change the banner to reflect your own facility’s name. Use the following Step-Action Table to change the Scores Pro window banner.
Step-Action Table #2-3: CHANGING THE SCORES PRO WINDOW BANNER
STEP ACTION COMMENTS
1. Open Scores Pro and select Options|System from the menu bar.
The default password is NIDA1.
2. Access the System Options dialog box.
3. Click the Directories tab.
4. Highlight the text in the banner field.
The current text will be deleted as soon as you type the first letter of the new name.
5. Type in the new banner name.
6. Click OK to return to the Scores Pro main window.
Your new name will be displayed in the banner on the window.

Getting Started
2-52
Use the following Step-Action Table to change your system passwords and set levels of access.
Step-Action Table #2-4: CHANGING YOUR SYSTEM PASSWORDS AND SETTING LEVELS OF ACCESS
STEP ACTION COMMENTS
1. Open Scores Pro and select Options|System menu bar.
The default password is NIDA1.
2. Access the System Options dialog box.
3. Click the Passwords tab.
4. Highlight the password in the appropriate field and type in the new password.
For establishing levels, each password must be different.
5. Click the Advanced button. The Access Control dialog box will appear.
6. Expand the functions by clicking the + box adjacent to each function.
7. For each function, place a check mark under the lowest level of authorized access.
8. Click OK to set the control levels.
You will return to the System Options dialog box.
9. Click OK to return to the Scores Pro main window.
NOTE: Write down and save the passwords in an area external to Scores Pro. Loss
of the passwords will prevent system access and cause interruption to your training program.

Hardware Connection
2-53
Section Three – Hardware Connection Introduction
When Scores Pro has been installed on your Instructor workstation and CAI Pro has been installed on all of your Student workstations, you will need to set up the Nida trainers and test the computer-to-trainer interface. Repeat this process at each student workstation to ensure your classroom/lab is operationally ready when your first students arrive for training.
Interfacing Hardware
Use the following Step-Action Table to assist you in interfacing the Nida Model 130 Series, TecDec, or PLC trainers to your computer.
Step-Action Table #2-5: CONNECTING THE TRAINER TO YOUR COMPUTER
STEP ACTION COMMENTS
1. Remove the trainer from the package and place it to the right of your computer.
Left-handers may want to place the trainer on the left side of the computer.
2. Attach the black power cable to the back of the trainer and plug it into a 120V standard outlet.
If your standard power is 220V-240V, refer to the "Power Source" instructions in the Troubleshooting section of this guide.
3. Attach the RJ11 connector of the interface cable to the “CAI” receptacle on the back of the trainer.
For PLC’s, attach the 9-pin connector to the PLC.
4. Attach the 9-pin connector of the interface cable to Com 1 of your computer.
If you are using Com 1 for a modem or mouse, attach the 9-pin connector to Com 2 and refer to the “Testing the Interface” instructions on the next page before running an experiment.
5. Turn the trainer ON by activating the rocker switch on the trainer.
The 130E trainer will run a self-test for several seconds. A beep will sound at the end, and the trainer should read “Manual Mode”. If not, turn the trainer OFF and then ON again while holding down the SHIFT key on the trainer.
Your trainer is ready to go!

Getting Started
2-54
Testing the Interface
For an experiment to run properly, good communications must be established between the trainer and your computer. Use the following Step-Action Table to assist you in testing your trainer interface connection.
Step-Action Table #2-6: TESTING THE INTERFACE
STEP ACTION COMMENTS
1. Open CAI Pro. Double-click the CAI Pro icon.
2. Select Options|Communications from the menu bar.
A password box will appear.
3. Enter the password and click OK.
4. Select the desired Com Port (1-4). Com Port 1 is the default port.
5. Select the appropriate trainer in the Model box.
Only one trainer can be selected at a time.
6. Click the Test button. Look for "Status: Communications OK". This indicates a good communications link. If you see "Status: No Communications", first ensure the trainer is ON and then refer to the troubleshooting section of this manual.
7. On the trainer, press or turn the DC Power switches for PC1, PC2, and PC3 to ON.
The corresponding boxes on the Test dialog box will be checked.
8. Click OK on the Test and Setup windows to return to the CAI Pro main window.
You are now ready to run a lesson, experiment, or test.
3-1
CHAPTER 3CHAPTER 3CHAPTER 3CHAPTER 3 –––– BASIC MANAGEMENT BASIC MANAGEMENT BASIC MANAGEMENT BASIC MANAGEMENT Overview
The foundation of the Nida Pro series of management tools begins with the Scores Pro Management System.
This system allows the instructor or administrator to add, modify, delete, and view information on lessons, courses, instructors, students, and classes. Scores Pro:
• assigns students to classes
• provides course outline customization
• merges and records student data produced in CAI Pro
• tracks student and class progress
• generates reports to support all data inquiry needs.

Basic Management
3-2
Scores Pro Title Window
When Scores Pro is opened, the Scores Pro title window is displayed. This window contains a menu bar, a toolbar, and a message bar that assist you in performing basic Scores Pro management functions.
Note: Prior to opening, Scores Pro will prompt you for a system password. The default password is NIDA1. Refer to Chapter 2, Getting Started, for details on changing the password.
Menu Bar
At the top of the Scores Pro title window, under the title bar, is the menu bar. This bar contains the options of File, Search, View, Query, Options, and Help. Each option opens a drop-down menu of its own.
Menu Bar Access
Only three menu bar options are active until a database is created or opened: File, Options, and Help. The menu bar remains in place when a database is open and various tabs are selected.

Menu Bar
3-3
Scores Pro Menu Bar Options File
The File drop-down menu accesses commands to create, open, and close a database; import results; set up and use the printer; transfer data; and exit Scores Pro. Only the Create/Open Database and Setup Printer commands are active until a database is open.
Search
The Search drop-down menu allows you to look for specific items in the database. See Page 3-71 for details on using the Search feature.
View
The View drop-down menu gives you an alternate way to move from listing window to listing window. When a database is open, tabs at the bottom of the screen mimic the view options. The Zoom option is used for previewing reports or setting up reports for printing.
Continued on next page

Basic Management
3-4
Menu Bar, continued Query
The Query menu allows a qualified information technologist to search the database using SQL commands. This feature is not required to access information in your Scores Pro database. We recommend you use the Scores Pro standard listings to retrieve and view data.
Options
The Options menu accesses the System, Grades, Variables, Update Lessons/Courses, and Remove Duplicate Data options. These options will be discussed in detail later in this section.
Help
The Help menu provides access to the Scores Pro help windows and registration information. Contents opens the Software Documentation window which
allows you to navigate through the online technical support. About opens the About Scores Pro box which displays the
version number, your registration number, and copyright information. This information may be requested by a Nida technician during a technical assistance call.

Toolbar
3-5
Scores Pro Toolbar
The toolbar is located under the menu bar on the Scores Pro title window and provides buttons for quick access to certain Scores Pro commands. They are, from left to right: Create Database, Open Database, Import Student Results, four Report Window navigation buttons, Print, Close, and Help. Like the menu bar, the toolbar remains in place when a database is open and various tabs are selected. Buttons will be discussed individually as they apply to the specific functions of Scores Pro.
Scores Pro Message Bar
Located at the bottom of the Scores Pro window, the message bar displays help and information about buttons or menu selections. When you pause your pointer over a menu item on the screen, a description will appear on the message bar to remind you of its function.
Basic Management
3-6
Scores Pro Database
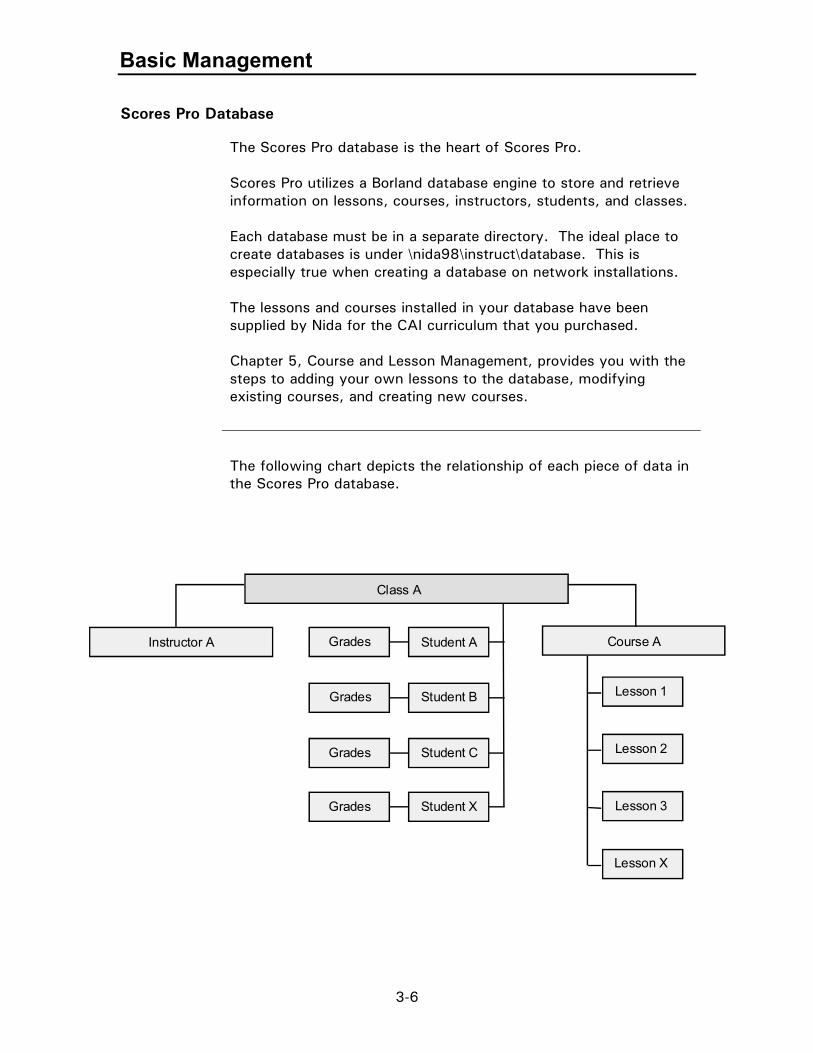
The Scores Pro database is the heart of Scores Pro. Scores Pro utilizes a Borland database engine to store and retrieve information on lessons, courses, instructors, students, and classes. Each database must be in a separate directory. The ideal place to create databases is under \nida98\instruct\database. This is especially true when creating a database on network installations. The lessons and courses installed in your database have been supplied by Nida for the CAI curriculum that you purchased. Chapter 5, Course and Lesson Management, provides you with the steps to adding your own lessons to the database, modifying existing courses, and creating new courses.
The following chart depicts the relationship of each piece of data in the Scores Pro database.
Class A
Course A
Lesson 2
Lesson 3
Lesson X
Lesson 1Student BGrades
Student CGrades
Student XGrades
GradesInstructor A Student A

Databases
3-7
Use the following step action table to create a new database.
Step-Action Table #3.1: CREATING A NEW DATABASE
STEP ACTION COMMENTS
1. Open Scores Pro. From your desktop, double-click the Scores Pro icon; or, select Start|Programs|Nida Software|Scores Pro. The default password is NIDA1.
2. Select File|New Database from the menu bar. or Click the Create Database button on the toolbar.
The Create New Database dialog box will be displayed:
3. Type the name of your new database in the Database Name field.
To make it easy to find your database in the future, double-click the Database folder in the Directories box. This will ensure your new database is created in the Database folder.
4. To answer the two questions that appear, click Yes if the path is correct: Do you wish to create the new database in a subdirectory of the currently selected path (path displayed)? and This will create a new database in <path>. Do you wish to continue?
A short delay will occur as the database is created. Your new database name will appear in the list under the Database Name field.
5. Click OK. The Create New Database dialog box will close, and a listing for the selected tab will be displayed.
Basic Management
3-8
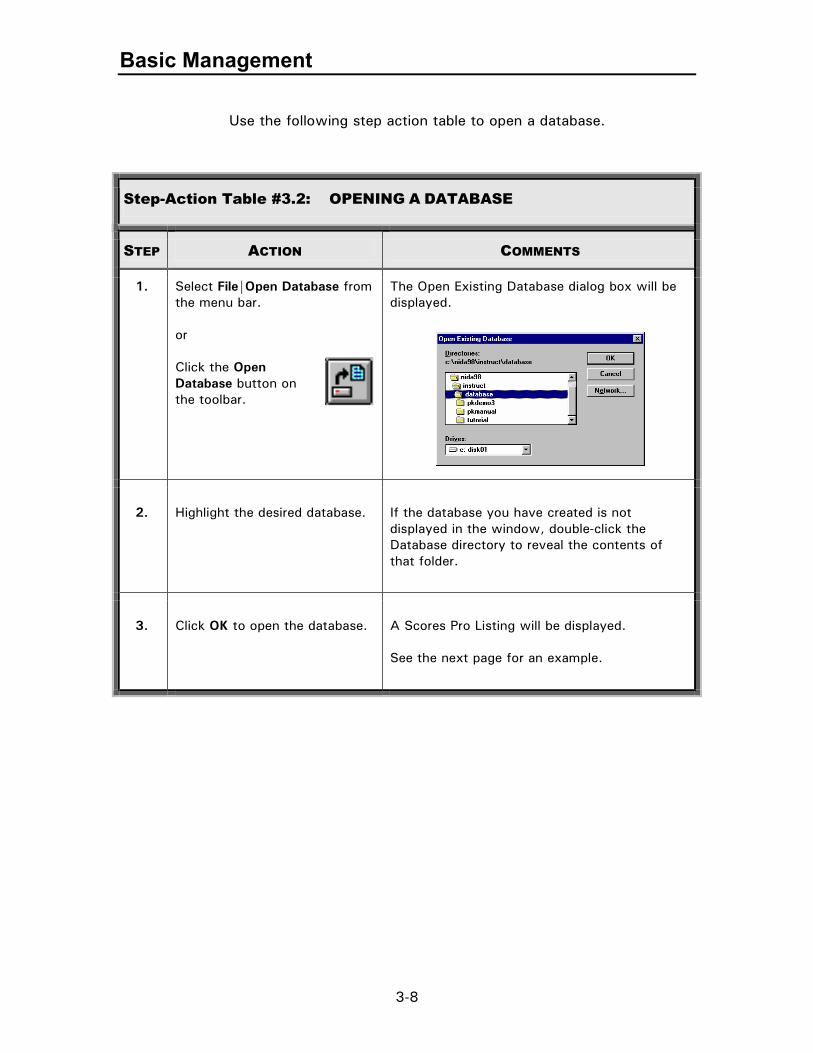
Use the following step action table to open a database.
Step-Action Table #3.2: OPENING A DATABASE
STEP ACTION COMMENTS
1. Select File|Open Database from the menu bar. or Click the Open Database button on the toolbar.
The Open Existing Database dialog box will be displayed.
2.
Highlight the desired database.
If the database you have created is not displayed in the window, double-click the Database directory to reveal the contents of that folder.
3.
Click OK to open the database.
A Scores Pro Listing will be displayed. See the next page for an example.

Scores Pro Listing
3-9
Scores Pro Listing
Below is an example of a Scores Pro Listing that will be displayed upon opening a database.

Basic Management
3-10
Once your database has been created in Scores Pro, information on instructors, students, and classes can be assigned.
Instructor Information
To access the Instructor Listing, select the Instructors tab at the bottom of the Listing that appears when you open a database. Right-click anywhere on the Instructors Listing to bring up a context menu. From the context menu, select Add Instructor to display the Instructor Information dialog box, with its four tabs: Basic, Photo, Internet, and User. Upon completing the information for each instructor, click Add. After you have added the last instructor, click Close to return to the Instructor listing. To change existing instructor information, highlight the instructor's name and select Edit Instructor Info from the context menu. The Instructor Information dialog box will be displayed. Modify the fields as required.
Instructor Information Basic Tab
The Basic tab is used to enter the instructor’s fundamental record information. Continued on next page

Instructors
3-11
Instructor Information Basic Tab, continued
Several of the instructor information fields must be filled in before a record can be established. These field names appear in blue text on your computer screen: the instructor's ID, first name, and last name. The field names that appear in black text on your computer screen are optional instructor information fields, but they are useful for filtering and reports: the instructor's middle name, title, and specialty.
Instructor Information Basic Tab ID Field
ID numbers are used to store and access instructor information in the database. If this is the first time you have entered an instructor, the ID field will be blank. Enter a number of your choice in the ID field and the appropriate required/optional information in the remaining fields. Each time an additional instructor is entered, the ID field will automatically increment one number. However, the information in this field can be changed as required, in case the new instructor is not to receive the next number in sequence for any reason.

Basic Management
3-12
Instructor Information Photo Tab
The Photo tab allows you to enter the file path for a photo to be displayed in the Instructor Photo box of the Instructor Information window. The photo file must be a .pcx or .bmp file sized to 235 x 275 pixels. Enter the path to the folder containing your staff pictures in the File field.

Instructors
3-13
Instructor Information Internet Tab
The Internet tab is used to enter the instructor’s e-mail information, for distance learning applications which require instructors to communicate with students via e-mail. The SMTP Server field is used to enter the simple mail protocol transport address of the server that will be used to route and manage the instructor's mail.

Basic Management
3-14
Instructor Information User Tab
The Optional Fields on this dialog box are used for filtering. Filtering is discussed at the end of this chapter. See Page 3-69. An example illustrating the use of this option: Your staff is divided into day and night groups. Entering the words "day" or "night" in Field 1 will allow you to filter on only the staff members working that particular shift. This is especially helpful when you are working with a large staff.

Instructors
3-15
Use the following table to modify instructor information in the database:
Step-Action Table #3.3: INSTRUCTOR INFORMATION
STEP ACTION COMMENTS
1. Open Scores Pro. From your desktop, double-click the Scores Pro icon; or, select Start|Programs|Nida Software|Scores Pro. The default password is NIDA1.
2. Open your database. See the Database section in this chapter for information on creating and opening a database.
3. Select the Instructor tab at the bottom of the window and right-click the Instructor Listing that appears.
A context menu will be displayed.
4a. To add a new instructor: Click Add Instructor on the context menu and fill in the information as required. When finished, click Add. Repeat for any additional instructors. Click Close to end.
The Instructor Information dialog box will be displayed, with the first available number in the ID field. The blue fields must be filled in. The black fields are optional. The Instructor Information dialog box will remain displayed. The ID field will increment by one, and all fields below it will be blank.
4b. To edit instructor information: Highlight the desired instructor, click Edit Instructor Info, and make the necessary changes. Click OK to end.
The Instructor Information dialog box will be displayed, with the current information in the fields.
4c. To delete an instructor: Click Delete Instructor. Click OK to end.
You will not be able to delete an instructor for an existing class without first assigning a different instructor to the class.
5. The Instructor Listing will be displayed when you click Close or OK. Verify that all changes appear correctly.

Basic Management
3-16
Student Information
To access the Student Listing, select the Students tab at the bottom of the Listing that appears when you open a database. Right-click anywhere on the Student Listing to bring up a context menu. From the context menu, select Add Student to display the Student Information dialog box, with its five tabs: Basic, Network, Photo, Internet, and User. (You may notice that the Student Information dialog box is nearly identical to the Instructor Information dialog box, with the exception of the additional Network tab.) Upon completing the information for each student, click Add. After you have added the last student, click Close to return to the Student listing. To change existing student information, highlight the student name and select Edit Student Info from the context menu. The Student Information dialog box will be displayed. Modify the fields as required.
Student Information Basic Tab
The Basic tab is used to enter the student’s fundamental record information. Continued on next page

Students
3-17
Student Information Basic Tab, continued
Several of the student information fields must be filled in before a record can be established. These field names appear in blue text on your computer screen: the student's ID, first name, and last name. The field names that appear in black text on your computer screen are optional student information fields, but they are useful for filtering and reports: the student's middle name, title, and specialty.
Student Information Basic Tab ID Field
ID numbers are used to store and access student information in the database. If this is the first time you have entered a student, the ID field will be blank. Enter a number of your choice in the ID field and the appropriate required/optional information in the remaining fields. Each time an additional student is entered, the ID field will automatically increment one number. However, the information in this field can be changed as required, in case the new student is not to receive the next number in sequence for any reason.
Student Information Basic Tab Default Course ID Field
This field is used to identify which report is displayed in the Student Listing when the student is enrolled in more than one course. It does not affect the student report when accessed through the Classes tab.

Basic Management
3-18
Student Information Network Tab
The Network tab is used to enter the student network information for systems using the Multi-User, Peer-to-Peer, or Client/Server configuration.
Network Tab Home Field
The Home field contains the student’s home directory name. This field will create a personal subdirectory for each student in the Users' directory.
Network Tab Password Field
The Password field is an optional fill-in field. For Multi-User and Peer-to-Peer systems, it is recommended that each student be assigned a password. For Client/Server systems, passwords are normally already assigned to students for logon to the network. In this case, it is not necessary to assign an additional password in Scores Pro.
Access Field
The Access field is used when Scores Pro is interfaced with the Nida MAPS program. Refer to the user's manual of the specific application for details on using this option. Leave the field blank for normal Scores Pro operations.

Students
3-19
Student Information Photo Tab
The Photo tab allows you to enter the file path for a photo to be displayed in the Student Photo box of the Student Information window. This feature is especially helpful when your students are part of a distance education program. Again, just like the Instructor photo, the Student photo must be in a .pcx or .bmp format, sized to 235 x 275 pixels. Enter the path to the folder containing your student pictures in the File field.

Basic Management
3-20
Student Information Internet Tab
The Internet tab is used to enter the student’s e-mail information, for distance-learning applications which require students to communicate with instructors via e-mail. The SMTP Server field is used to enter the simple mail protocol transport address of the server that will be used to route and manage the student's mail.

Students
3-21
Student Information User Tab
The Optional Fields on this dialog box are used for filtering. Filtering is discussed at the end of this chapter. See Page 3-69. An example illustrating the use of this option: The U.S. Navy Submarine Group has blue and gold teams. Only one team is in port at any one time, even though all students are included in one class. Entering the words "blue" or "gold" in Field 1 will allow the instructor to filter on only one particular group.

Basic Management
3-22
Use the following table to modify student information in the database:
Step-Action Table #3.4: STUDENT INFORMATION
STEP ACTION COMMENTS
1. Open Scores Pro. From your desktop, double-click the Scores Pro icon; or, select Start|Programs|Nida Software|Scores Pro. The default password is NIDA1.
2. Open your database. See the Database section in this chapter for information on creating and opening a database.
3. Select the Students tab at the bottom of the window and right-click the Students Listing that appears.
A context menu will be displayed.
4a. To add a new student: Click Add Student on the context menu and fill in the information as required. When finished, click Add. Repeat for any additional students. Click Close to end.
The Student Information dialog box will be displayed, with the first available number in the ID field. The blue fields are required. The black fields are optional. The Network information must be filled in for Multi-User or Network configurations. Password information is always optional. The Student Information dialog box will remain displayed. The ID field will increment by one, and all fields below it will be blank.
4b. To edit student information: Highlight the desired student name, click Edit Student Info, and make the necessary changes. Click OK to end.
The Student Information dialog box will be displayed, with the current information in the fields.
4c. To delete a student: Click Delete Student. Click OK to end.
Warning: When you delete a student, you remove all the student's data from the database. This process is irreversible.
5. The Student Listing will be displayed when you click Close or OK. Verify that all changes appear correctly.

Classes
3-23
Class Listing
The Class Listing is the center of your management system.
From this window, you can:
• add, delete, or modify classes
• assign courses to students
• generate reports
• make key disks
• set up home directories
• view student progress

Basic Management
3-24
Creating/Modifying Classes
As you saw in the database relationship chart on Page 3-6, a class is made up of an instructor, a number of students, and a course. Right-click anywhere on the Class Listing to access the context menu, and select Add Class. The Class Information dialog box will be displayed. To change existing class information, highlight a class and select Edit Class Information from the context menu. Modify the class information as required.
Class Information Dialog Box
The drop-down lists for the Course and Instructor fields make this dialog box very easy to use. The following information describes each field:
Class Information ID Field
The entry in this field is used to distinguish your class in the database, just as an ID number in your school catalog serves to reference a class. This field will increment one number each time you click the Add button. Continued on next page

Classes
3-25
Class Information Dialog Box, continued Class Information Course Field
The Course field is used to identify the course name and ID number. To place a course in this field, click the down arrow and highlight an existing course from the drop-down list. A course must first exist in the database to be displayed in this list. To enter a new course into the database, thus adding it to the drop-down list, refer to Chapter 5, Course and Lesson Management.
Class Information Instructor Field
To choose an instructor for your class, click the down arrow and select the name from the drop-down list. The Instructor field is similar to the Course field. An instructor must be established in the database to be displayed in the drop-down list.
Class Information Optional Fields
The Optional Fields box is used to enter field names for filtering. Up to three fields are available for filtering.

Basic Management
3-26
Adding Students to Your Class
After you have created a class, you will need to fill the class with students. Right-click the Class Listing and choose Select Students from the context menu.
Select Students Window
The Select Students window contains two boxes. Student names are displayed in ID number order in both boxes.
1. The (smaller) box on the left contains the students assigned to your class.
2. The (larger) box on the right contains all of the students in
your database.

Classes
3-27
Customizing Select Students Listings
Each of the two title bars in the Select Students window can be customized to display exactly the information you need to have available. Right click either title bar to display the Item Selection dialog box. The left box displays the column headings available. The right box displays the items that appear on the title bar. Use the Add and Remove arrow buttons to move items from one box to the other. See Page 3-64 for details on customizing title bars.
Adding Students to a Class
To move a student into a class: Highlight the desired name in the right-hand box and click the "add" double arrow button. When the name is shifted, the highlight bar will drop down to the next student.
Removing Students from a Class
To remove a student from a class: Highlight the desired name in the left-hand box and click the "remove" double arrow button. When the name is removed, the highlight bar will drop down to the next student. The student will only be removed from the class, not deleted from the database.

Basic Management
3-28
Use the following tables to assist you in adding classes.
Step-Action Table #3.5: ADDING A CLASS
STEP ACTION COMMENTS
1. Open Scores Pro. From your desktop, double-click the Scores Pro icon; or, select Start|Programs|Nida Software|Scores Pro. The default password is NIDA1.
2. Open your database. See the Database section in this chapter for information on creating and opening a database.
3. Select the Classes tab at the bottom of the window.
The Class Listing will be displayed.
4. Right-click the Class Listing. A context menu will appear.
5. Click Add Class. The Class Information dialog box will be displayed.
6. Fill in the ID field. Use alphanumeric ID entries that match your own course codes.
7. Select the course name and instructor.
Click each drop-down arrow and choose a name from the list. Only courses and instructors entered into your database will appear on the lists.
8. Click Add to create the class. The ID field will increment one number while the Course and Instructor fields remain unchanged.
9. Repeat Steps 5-8 for as many classes as you wish to add.
10. Click Close. The Class Listing will appear, displaying the name(s) of the class(es) you have created.
11. Assign students to the class(es) you have created.
See the next Step Action Table to create your class roster(s).

Classes
3-29
Use the following tables to assist you in assigning students to a class.
Step-Action Table #3.6: ASSIGNING STUDENTS TO A CLASS
STEP ACTION COMMENTS
1. If you are continuing from the previous Step Action Table, begin with Step 5.
2. Open Scores Pro. From your desktop, double-click the Scores Pro icon; or, select Start|Programs|Nida Software|Scores Pro. The default password is NIDA1.
3. Open your database. See the Database section in this chapter for information on creating and opening a database.
4. Select the Classes tab at the bottom of the window.
The Classes Listing will be displayed.
5. Highlight the desired class and right-click the Classes Listing.
A context menu will appear.
6. Highlight Select Students. The Select Students window will be displayed.
7. Enter students into your class: Highlight a name in the right hand (database) box and click the "add" double arrow button.
The highlight bar will move down one name in the right-hand (database) list for each click of the << button. The database name will appear in the left hand box, indicating that the student has been assigned to the class.
8. Remove students from your class if necessary: Highlight the desired name in the left hand (class) box and click the "remove" double arrow button.
The student will only be removed from the class, not deleted from the database.
9. When you have finalized your class roster, click OK.
Students are now assigned to the class you have created.

Basic Management
3-30
Assigning Curriculum
All of the basic management tasks we have reviewed thus far in Basic Management have been common to all setup configurations. However, one of the tasks that is different depending on how your system is configured is:
Assigning curriculum to students In Scores Pro, curriculum can be assigned with a key disk, multi-user transfer disk, or network. In distance education scenarios, curriculum assignment is accomplished with remote user disks, e-mail packets, or Internet connections. The method you use to send curriculum to a student is dependent on the way you configured your system in Chapters 1 and 2. Let’s take a look at the method of assigning curriculum to students for each resident configuration.
Assigning Curriculum in Key Disk Configuration
A Key Disk is used for two purposes:
• to assign student menus
• to collect data Once you have created a class and assigned students to it, your next step is to create a Key Disk. The Key Disk, a 3.5” floppy disk or zip disk, unlocks the student’s curriculum at the Student station and allows the student to work in assigned lessons. A Key Disk must be created for each individual student.
Continued on next page
Curriculum – Key Disk
3-31
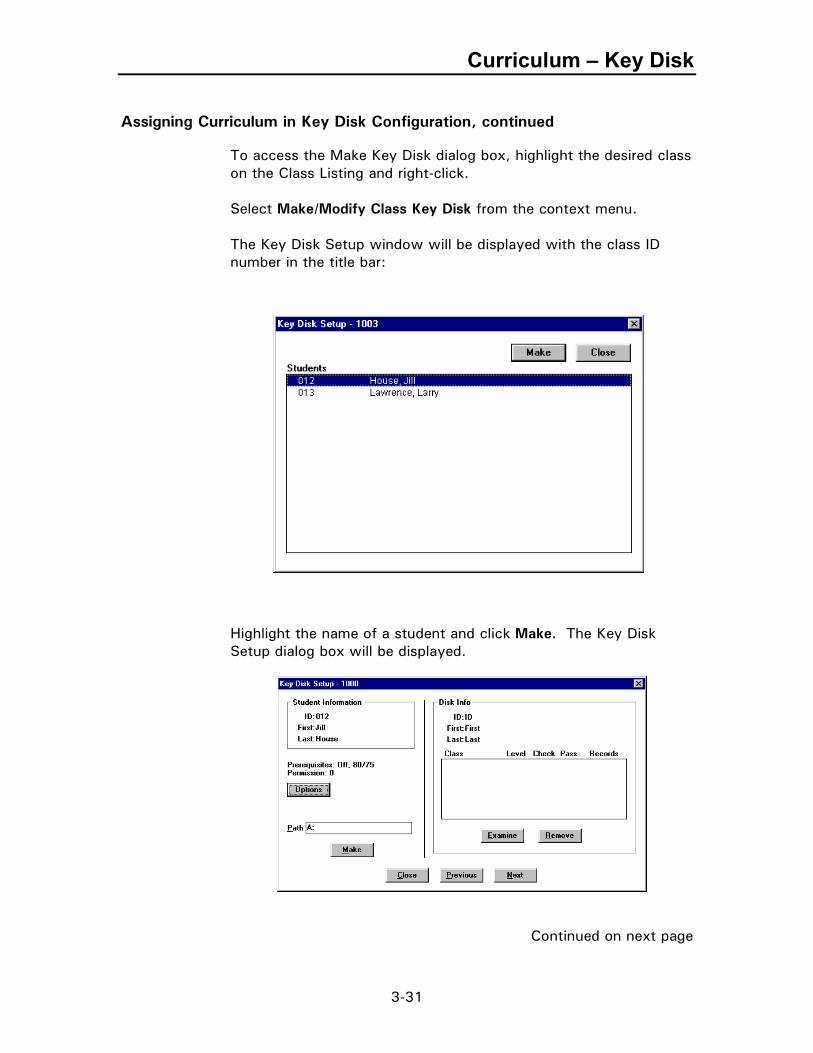
Assigning Curriculum in Key Disk Configuration, continued
To access the Make Key Disk dialog box, highlight the desired class on the Class Listing and right-click. Select Make/Modify Class Key Disk from the context menu. The Key Disk Setup window will be displayed with the class ID number in the title bar:
Highlight the name of a student and click Make. The Key Disk Setup dialog box will be displayed. Continued on next page

Basic Management
3-32
Key Disk Setup Dialog Box, continued Student Information Box
The student information box contains the pertinent information for the student selected. This is the information from the blue fields of the student's database record.
Disk Info Box
The Disk Info box reflects the information encoded on the Key Disk. For a new disk, this box will be blank. When a Key Disk has been created, this box will:
• repeat the student's pertinent information
• list each class in which the student is enrolled and entered on the Key Disk
To view the contents of a Key Disk, click the Examine button. The Disk Info box will be filled in and the classes assigned to the student will be displayed. To remove a class from a Key Disk, highlight the class in the Disk Info box and click Remove.
Options Button
The Options button accesses the Student Menu Options dialog box. This box allows customization of class accounts including setting prerequisite checking, passing grades, and permission levels.

Curriculum – Key Disk
3-33
Student Menu Options
Check the Active box to activate prerequisite checking on the Key Disk being created. The Passing Grade (Quiz) field sets the grade required to pass a lesson quiz, and the Passing Grade (Test) field sets the grade required to pass a block or unit test. The Permission Level field sets the level of access the student has to lessons that have been assigned a permission level number in Scores Pro, Course tab, Edit Course Info, Details. Refer to Chapter 5, Course and Lesson Management for more information on Permission Levels and their function.
Next & Previous Buttons
The Next and Previous buttons are used to create Key Disks for entire classes or blocks of students in a class. The Next button moves the highlight bar down one student, just as it does on the first Key Disk Setup window. The new student’s pertinent information will be displayed in the Student Information box. The Previous button moves the highlight bar up the student list. These buttons eliminate the need to move back and forth between Key Disk Setup windows in order to make multiple Key Disks for the same class.

Basic Management
3-34
Use the following tables to assist you in creating a Key Disk.
Step-Action Table #3.7: CREATING A KEY DISK
STEP ACTION COMMENTS
1. Open Scores Pro. From your desktop, double-click the Scores Pro icon; or, select Start|Programs|Nida Software|Scores Pro. The default password is NIDA1.
2. Open your database. See the Database section in this chapter for information on creating and opening a database.
3. Select the Classes tab at the bottom of the window and right-click the Classes Listing.
A context menu will be displayed.
4. Select Make/Modify Class Key Disk (Key Disk).
The Key Disk Setup dialog box with the class roster will be displayed.
5. Highlight the desired student name and click Make.
The second Key Disk Setup dialog box will be displayed. Note: The Make button is disabled until a
student name is highlighted.
6. Insert a Key Disk into the drive identified in the Path field.
The Path default is A:.
7. To modify prerequisite checking, grades, or permission levels, click the Options button.
Change the data in the Student Menu Options dialog box as desired and click OK.
8. Click Make. The Disk Info box will display the new Key Disk class information.
9. Use the Next and Previous buttons to move through your class list if you are making multiple Key Disks for the same class.
10. Click Close when finished creating Key Disks.
The first Key Disk Setup dialog box will be displayed.
11. Click Close to return to the Class Listing.

Curriculum – Multi-User
3-35
Assigning Curriculum in Multi-User Configuration
For transferring data in the Multi-User configuration, a single disk is used. It is called the Transfer Disk, and it contains the entire class roster. Each student in the class must be assigned a home directory in the Scores Pro database. (See Student Information window, Page 3-18, if necessary.) Class information is exported to a Transfer Disk for importation on each student workstation. Students must work at the same workstation during every session, but they do not have to keep or manage an individual disk, since their menu and records are retained on the workstation. Periodically, student records are exported from the Student workstation to the Instructor computer via the Transfer Disk.
To create a Transfer Disk, right-click the Class Listing and select Make Class Transfer Disk (Multi-User) from the context menu. The Make Transfer Disk dialog box will appear. (See next page.)
Continued on next page

Basic Management
3-36
Assigning Curriculum in Multi-User Configuration, continued Make Transfer Disk dialog box
The Make Transfer Disk dialog box displays:
• the path to the drive containing your Transfer Disk The field default is A:.
• the options currently set for prerequisite checking, passing
grades, and permission level
Options button
The Options button accesses the Student Menu Options dialog box. This box allows customization of class accounts including setting prerequisite checking, passing grades, and permission levels.

Curriculum – Multi-User
3-37
Assigning Curriculum in Multi-User Configuration, continued Student Menu Options dialog box
Check the Active box to activate prerequisite checking on the Transfer Disk being created. The Passing Grade (Quiz) field sets the grade required to pass a lesson quiz. The Passing Grade (Test) field sets the grade required to pass a block or unit test. The Permission Level field sets the level of access the student has to lessons that have been assigned a permission level number in Scores Pro, Course tab, Edit Course Info, Details. Refer to Chapter 5, Course and Lesson Management for more information on Permission Levels and their function.

Basic Management
3-38
Importing Class Data to a Student Workstation
Once you have created a Transfer Disk, your next step is to place the curriculum information on the Student computer. On the Student workstation, activate the Instructor Options. (Refer to Chapter 4, CAI Pro for details if necessary.) The CAI Pro menu bar will display options to:
• import menus
• export student data
• administer data Select Import Transfer Disk from the menu to display the Import Class dialog box:
This dialog box, defaulted to drive A, should reflect the drive that contains the Transfer Disk. Click OK to import the class roster into CAI Pro. The Student workstation will now be configured to allow student access to lesson menus.
Important Note: Be sure to DEACTIVATE the Instructor Options before you leave the Student workstation.

Curriculum – Multi-User
3-39
Use the following Step-Action Table to assist you in making a Transfer Disk.
Step-Action Table #3.8: MAKING A TRANSFER DISK
STEP ACTION COMMENTS
1. Open Scores Pro. From your desktop, double-click the Scores Pro icon; or, select Start|Programs|Nida Software|Scores Pro. The default password is NIDA1.
2. Open your database. See the Database section in this chapter for information on creating and opening a database.
3. Select the Classes tab at the bottom of the window and right-click the Classes Listing.
4. Select Make Class Transfer Disk (Multi-User).
The Make Transfer Disk dialog box will be displayed.
5. Insert a Transfer Disk into the drive identified in the Path field.
The Path default is drive A.
6. To modify prerequisite checking, grades, or permission levels, click the Options button.
Change the data in the Student Menu Options dialog box as desired and click OK. The Make Transfer Disk dialog box will be displayed.
7. Click OK to begin the Make Transfer Disk process.
A warning will be displayed to advise you that all files on the disk will be erased. Be sure to merge the contents of the disk into the database prior to overwriting the disk.
8. Click Yes. The Transfer Disk data will flash, indicating that the creation is in progress. At the conclusion, the Class Listing will be displayed.
9. Remove the Transfer Disk and take it to each Student workstation to import the data.
See the next Step-Action Table to import the data from the Transfer Disk to each Student workstation.

Basic Management
3-40
Use the following Step-Action Table to assist you in importing class data from a Transfer Disk to a Student workstation.
Step-Action Table #3.9: IMPORTING A TRANSFER DISK TO A STUDENT WORKSTATION
STEP ACTION COMMENTS
1. Open CAI Pro on the Student workstation and activate the Instructor Options.
Refer to Step-Action Table #4.6 on Page 4-18 for guidance on activating the Instructor Options.
2. Select Instructor|Import Transfer Disk from the menu bar.
The Import Data dialog box will be displayed.
3. Ensure the drive letter is correct for the location of the Transfer Disk. Click OK.
A processing advisory will be displayed while student records are transferring. When the transfer is complete, the main CAI Pro window will be displayed.
4. Remove the Transfer Disk from the student workstation.
5. Disable the Instructor Options on the student workstation.
6. Repeat this process for each student workstation.

Curriculum - Network
3-41
Networks
In a Network configuration, the Scores Pro database on the server or Instructor station retains all of the information that was entered for instructors, students, and classes. The class list and student menu data, however, must be made available to the student without compromising the integrity of the database. The Network's counterpart of the stand-alone system's Key Disk or the Multi-User's Transfer Disk is the Home Directory. This directory is accessible to students and contains the class list, student individual menus, and student records. In that it is entirely separate from the database, the Home Directory is equivalent to a Key Disk. The Class Listing context menu provides access to the two commands used in this configuration:
• Setup Home Directories (Network)
• Administer Home Directories (Network)
Setup Home Directories
The Setup Home Directories function must be run for the affected class whenever:
a class is created a student is added to a class a student is removed from a class the course is modified the instructor is changed the course for the class is changed individual student information is changed
Right-click the Class Listing and select Setup Home Directories (Network) to display the Setup LAN Home Directories dialog box.
Important Note: It is essential that an Import Student Results (Lightning Bolt button) operation is completed prior to selecting Setup Home Directories.

Basic Management
3-42
Setup LAN Home Directories Dialog Box
The Setup LAN Home Directories dialog box shows the:
• class ID number
• Users’ root (path to the Users' directory)
• options that are in effect for the class
Users' Root
The Users’ Root field points to the Users’ directory that contains the individual students' directories. Check the path in this field to ensure it matches the target drive and directory assigned during the setup of the network system.
Options Button
The Options button accesses the Student Menu Options dialog box. This box allows customization of class accounts including setting prerequisite checking, passing grades, and permission levels.

Curriculum - Network
3-43
Student Menu Options Dialog Box
Check the Active box to activate prerequisite checking on the student's menu. The Passing Grade (Quiz) field sets the grade required to pass a lesson quiz. The Passing Grade (Test) field sets the grade required to pass a block or unit test. The Permission Level field sets the level of access the student has to lessons that have been assigned a permission level number in Scores Pro, Course tab, Edit Course Info, Details. Refer to Chapter 5, Course and Lesson Management for more information on Permission Levels and their function.

Basic Management
3-44
Administer Home Directories
Administer Home Directories is one of the functions that is unique to the Network configuration of Scores Pro. It serves as a basic clean-up routine for the Users' directory:
• removes unregistered students from the master class indexes
• purges each individual student home directory of menus no
longer assigned
• adjusts the class list and adds any new members to the Users’ directory when a class is modified
The Administer Home Directories function cleans up only the Users’ directory; it does not remove records that have been previously imported into the Scores Pro database.
Important Note: It is essential that an Import Student Results (Lightning Bolt button) operation is completed prior to cleaning up the directories with the Administer Home Directories function.
To access the Administer Home Directories function, right-click the Class Listing to display the context menu and select Administer Home Directories. The Administer LAN Home Directories dialog box will be displayed. (See next page.)

Curriculum - Network
3-45
Administer LAN Home Directories Dialog Box
The Administer LAN Home Directories dialog box is used to remove classes from student home directories. It can also remove student data that is attached to students who are still listed in the Users' directory but who have been removed from a class. Again, this function does not affect student records that have been previously merged into the Scores Pro database.
Users' Root
The Users’ Root field displays the path to the students' home directories. Check that this field reflects the path identified during the setup of Scores Pro on the network.
Continued on next page

Basic Management
3-46
Administer LAN Home Directories dialog box, continued List Group Box
When the Current Classes option button is enabled in the List group box, the list underneath includes all of the classes that are currently active on your network, with the class names sequenced in ID number order. Alternatively, when the Unregistered Students option button is enabled, the List box displays only those students in the Users' directory who are not currently assigned to a class.
Continued on next page

Curriculum - Network
3-47
Administer LAN Home Directories dialog box, continued Delete Unregistered Students Check Box
When you delete a class in Scores Pro, a possible result is that your Users' directory will contain one or more student subdirectories that are empty. If a student is not/will not be enrolled in any classes, you may wish to purge that subdirectory to optimize your network. To remove these unregistered students along with the class you are deleting, enable the Delete Unregistered Students check box before you click Remove under the Current Classes option. If this check box is clear, the list of unregistered students will remain intact when the Remove function is performed. It is recommended that this box be left unchecked until an archive of the student records has been made through the Import Student Results function.
Remove Button
Click the Remove button to delete the highlighted class or unregistered student. Warning! This process is irreversible. A warning will be displayed giving you the option of continuing with the Remove process or canceling it.

Basic Management
3-48
The following Step-Action Table will assist you in setting up home directories.
Step-Action Table #3.10: SETTING UP HOME DIRECTORIES
STEP ACTION COMMENTS
1. Open Scores Pro. From your desktop, double-click the Scores Pro icon; or, select Start|Programs|Nida Software|Scores Pro. The default password is NIDA1.
2. Open your database. See the Database section in this chapter for information on creating and opening a database.
3. Select the Classes tab at the bottom of the window and right-click the Class Listing.
4. Highlight the desired class and select Setup Home Directories (Network).
The Setup LAN Home Directories dialog box will be displayed.
5. Check that the Users' Root path reflects the correct path to your Users' directory.
The path defaults to the one that was entered during the installation procedure.
6. To modify prerequisite checking, grades, or permission levels, click the Options button.
Change the data in the Student Menu Options dialog box as desired and click OK.
7. Click OK to begin the setup process.
The student roster will flash as each student’s name goes through the setup process. The Class Listing will be displayed. If a student in the highlighted class has not been assigned a home directory, a warning will remind you to use the Students tab to assign one.

Curriculum - Network
3-49
Use the following Step-Action Table to assist you in administering home directories.
Step-Action Table #3.11: ADMINISTERING HOME DIRECTORIES
STEP ACTION COMMENTS
WARNING! THIS PROCESS IS IRREVERSIBLE.
To prevent the loss of student records,
perform an IMPORT STUDENT RESULTS routine prior to following the steps in this process.
1. Right-click the Class Listing and select Administer Home Directories.
The Administer LAN Home Directories dialog box will be displayed.
2. To clean up the Class Listing: Click the Current Classes option button, if the function is not already enabled. Highlight the class to be removed.
A list of all the classes that are currently active on your network will be displayed, with class names sequenced in ID number order.
3. To remove all unregistered students along with the class, check the Delete Unregistered Students box.
If this option is left unchecked, unregistered students will be unaffected by the Remove function.
4. Click the Remove button. The class will be removed from each student subdirectory of the Users' directory.
5. To clean up the Student Listing: Click the Unregistered Students option button.
A list will be displayed showing all students who have a subdirectory assigned but who are not enrolled in any courses. A blank window simply means that there are no unregistered students listed in the Users' directory.
5. Highlight the student to be removed and click the Remove button.
6. When cleanup is complete, click Close.
The Class Listing will be displayed.

Basic Management
3-50
Importing Student Results
As a student takes and completes lessons, it is important for the instructor to retrieve the student’s data for review and feedback to the student. Each time a student completes a lesson, the results are recorded in a file located on an individual Key Disk or in a personal Home Directory.
• For Key Disk systems, records are immediately transferred to the student’s Key Disk upon lesson exit.
• For Multi-User or Network systems, records are temporarily
placed in a specific directory until they can be exported to a Transfer Disk or transferred via the network into the Scores Pro database.
Regardless of the system configuration, records are merged into the Scores Pro database by means of the Import Student Results function. The following sections will describe each configuration's method of importing data and procedure for importing student results into your Scores Pro database.
Import Configuration
There are three levels of options available to support the Import Student Results function:
Basic displays the minimum number of options on the Import Student Results dialog box.
Regular and Advanced add greater flexibility.
Recall that, during the setup of Scores Pro (Chapter 2), we reviewed the Configuration tab in the Options|System menu where the Import levels are set.
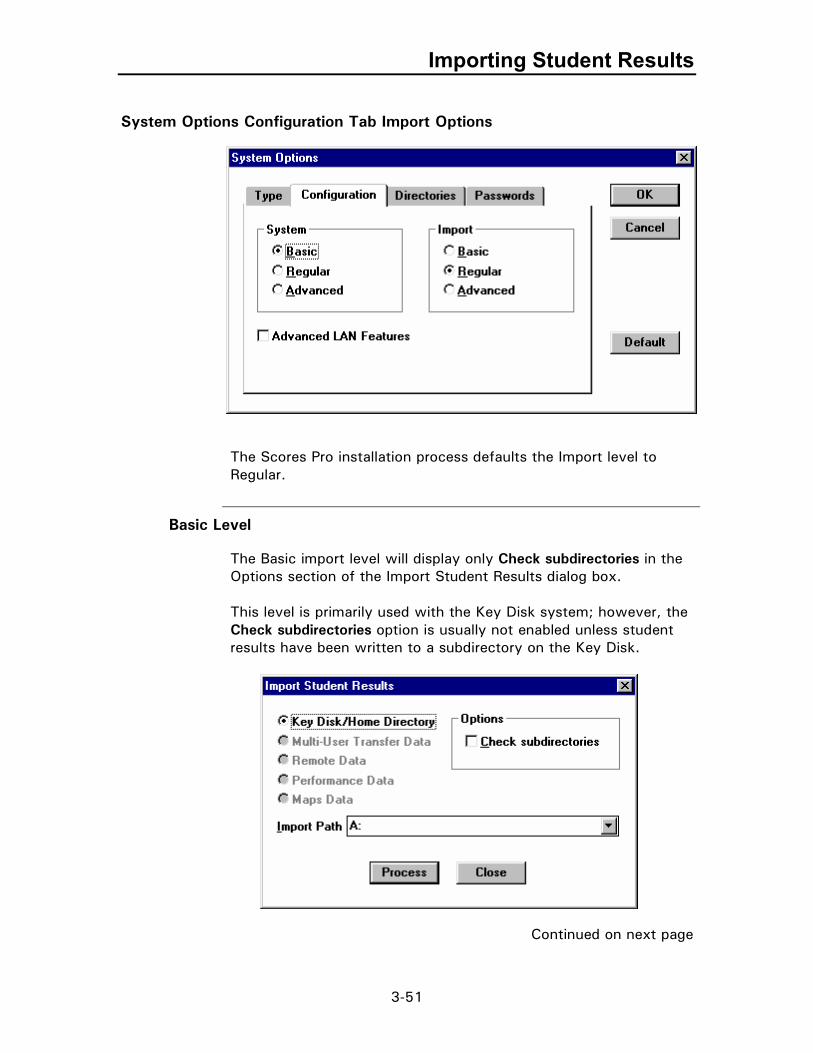
Importing Student Results
3-51
System Options Configuration Tab Import Options
The Scores Pro installation process defaults the Import level to Regular.
Basic Level
The Basic import level will display only Check subdirectories in the Options section of the Import Student Results dialog box. This level is primarily used with the Key Disk system; however, the Check subdirectories option is usually not enabled unless student results have been written to a subdirectory on the Key Disk.
Continued on next page

Basic Management
3-52
System Options Configuration Tab Import Options, continued Regular Level
The Regular import level (default level) displays additional options in the Import Student Results dialog box that allow the instructor increased flexibility of record collection.
Ignore Sessions Less Than …. Minutes Option
The Ignore sessions option will disregard records representing student session times of less than the period indicated in the time box. The time box is defaulted to 5 minutes, but it can be adjusted to whatever period the instructor feels is adequate for a student to properly complete a session.
Recorded Option
The Recorded option enables the instructor to specify the collection of records between specific dates or previous days. This option ignores records posted outside the set parameters.
Continued on next page

Importing Student Results
3-53
System Options Configuration Tab Import Options, continued Advanced Level
The Advanced level adds one additional option to the Import Student Results window of the Regular level.
Process Previously Merged Data Option
When Scores Pro merges data, it marks the records so they will not be duplicated or merged a second time. Enabling the Process option ignores these marks and processes all data available. This option is used for recovering lost or discarded data.
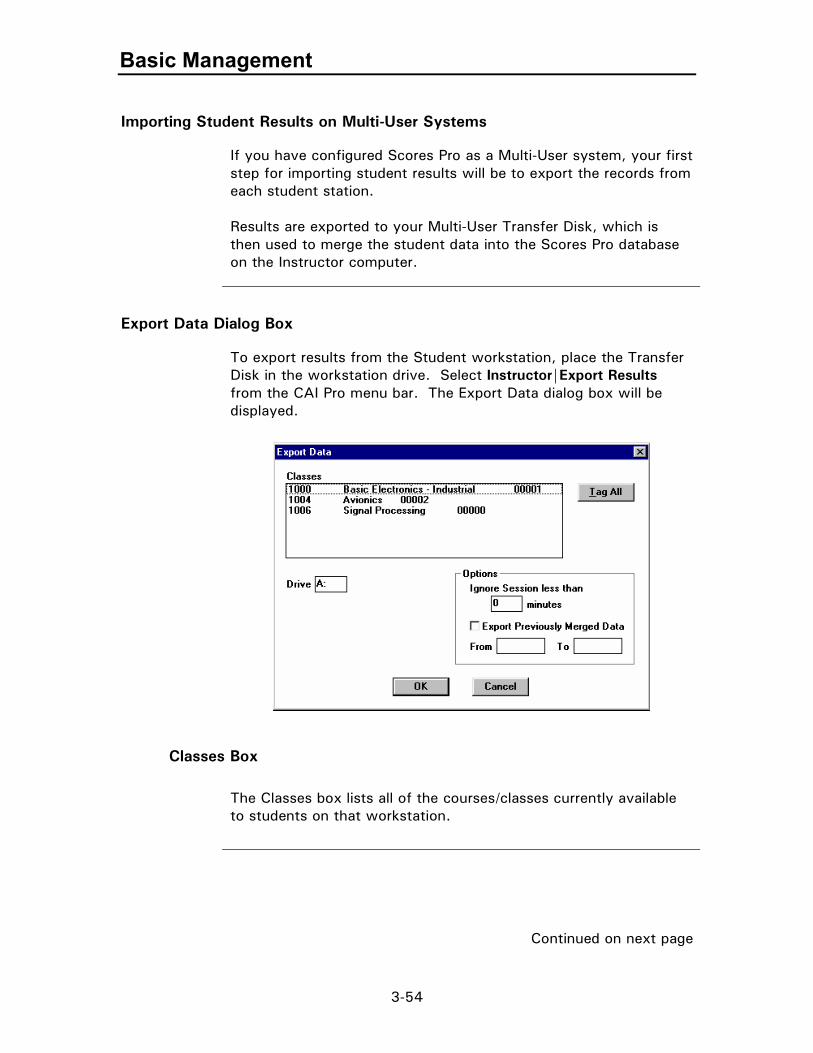
Basic Management
3-54
Importing Student Results on Multi-User Systems
If you have configured Scores Pro as a Multi-User system, your first step for importing student results will be to export the records from each student station. Results are exported to your Multi-User Transfer Disk, which is then used to merge the student data into the Scores Pro database on the Instructor computer.
Export Data Dialog Box
To export results from the Student workstation, place the Transfer Disk in the workstation drive. Select Instructor|Export Results from the CAI Pro menu bar. The Export Data dialog box will be displayed.
Classes Box
The Classes box lists all of the courses/classes currently available to students on that workstation.
Continued on next page

Importing Student Results
3-55
Export Data Dialog Box, continued Drive
The Drive field indicates the drive that holds the Transfer Disk. This field is defaulted to A:.
Options
The Options block allows some of the custom data retrieval options as described earlier in this section.
Process
The steps for exporting result to the Transfer Disk are found on the following page.

Basic Management
3-56
Use the following Step-Action Table to assist you in exporting student data from a Student workstation to a Transfer Disk.
Step-Action Table #3.12: EXPORTING STUDENT RECORDS TO A TRANSFER DISK
STEP ACTION COMMENTS
1. Open CAI Pro on the Student workstation and activate the Instructor Options.
Refer to Chapter 4, CAI Pro for guidance on activating the Instructor Options.
2. Select Instructor|Export Results from the menu bar.
The Export Data dialog box will be displayed.
3. Highlight the class(es) to be exported.
Click the Tag All button to select all classes listed.
4. Ensure the drive letter is correct for the location of the Transfer Disk. Click OK to begin the Export routine.
The Export routine will be executed, followed by a message indicating the number of sessions processed to the Transfer Disk.
5. Click OK on the message window.
The CAI Pro main window will be displayed.
6. Remove the Transfer Disk from the student workstation.
7. Disable the Instructor Options on the Student workstation.
8. Repeat this process for each Student workstation.

Importing Student Results
3-57
Importing Process
The import levels, discussed earlier, determine which options are available for importing data. Normally, the import level is set in accordance with the setup configuration of your system; however, each setup configuration uses the same procedure to import the student records into the Scores Pro database. There are two ways to begin the importing procedure:
• select File|Import Results from the menu bar or
• click the lightning bolt button on the toolbar Use either method to access the Import Student Results dialog box.
Import Student Results Dialog Box Features
The Import Student Results dialog box allows the instructor to:
• select the type of system
• choose from a list of importing parameters
• select an import path
• begin the process

Basic Management
3-58
Import Student Results Dialog Box
System Type Option Buttons
Scores Pro will default to the system configuration selected in the installation routine. If you are importing records from Nida programs that are set to parameters other than the defaults for your system, select the system type using the option buttons in the left portion of the dialog box. Refer to the user guide for the specific system type for more information on the various types listed.
Options Group
The choices displayed in this group depend on the level determined during the Scores Pro setup (Basic, Regular, or Advanced). The various options themselves are explained in the Import Levels section earlier in this chapter. (See Page 3-51.)
Continued on next page

Importing Student Results
3-59
Import Student Results Dialog Box, continued Import Path
The import path indicates the directory that temporarily holds the student information. On Key Disk and Multi-User systems, the path will be the letter designation of your disk drive. On Network systems, the path will specify the Users’ directory.
Process Button
The Process button starts the Import Student Results routine. When you click this button, the Processing Information box will be displayed momentarily, followed by a message indicating the number of records processed. On Network systems, the message will also indicate how many directories were found in use.
Important Note: Scores Pro will not import records from a directory that is currently being utilized by a student.

Basic Management
3-60
Use the following Step-Action Table to assist you in importing your student results into the Scores Pro database.
Step-Action Table #3.13: IMPORTING STUDENT RESULTS
STEP ACTION COMMENTS
1. Open Scores Pro. From your desktop, double-click the Scores Pro icon; or, select Start|Programs|Nida Software|Scores Pro. The default password is NIDA1.
2. Open your database. See the Database section in this chapter for information on creating and opening a database.
3. Select File|Import Results from the menu bar. or Click the Lightning Bolt button.
The Import Student Results dialog box will be displayed.
4. Select the desired system type using the option buttons in the Import Student Results dialog box.
Key Disk and Network systems default to the Key Disk/Home Directory button and enable All Data. Multi-User systems default to the Multi-User Transfer Data option.
5. Check that the Users' Root path reflects the path to your Key Disk/Transfer Disk drive or network Users’ directory.
The Users' Root path defaults to the path entered during the installation procedure.
6. Customize your import by enabling the desired options in the Options group.
Refer to the Import Levels section of this chapter (Page 3-51) for details of each option.
7. Click the Process button. The Processing Information box will be displayed momentarily, followed by a message indicating the number of records processed.
8. Click OK on the Message box and Close on the Import Student Results dialog box to return to the Scores Pro Listing.

Reports
3-61
Viewing Report Data
Scores Pro provides an extensive capacity for accessing the details of student progress and class participation. At the touch of a few buttons, you can see the exact information you require for purposes of feedback and analysis. From class reports to individual student session reports, you can view the data on your monitor screen or print it out on paper. To display a detailed report, highlight a class, student, lesson, or session in a Listing, right-click, and select Preview.
The following graphic represents the report of student Jill House in Class 1000, a basic electronics course, who has recently begun the program of instruction.
Continued on next page

Basic Management
3-62
Viewing Report Data, continued
The screen below provides an example of the Class Report that was accessed by highlighting Class 1000 on the Class Listing and selecting the Forward navigation button on the toolbar.
Moving Through the Data Windows
Student data can be viewed and printed from either the Student Listing or the Class Listing.
The Student Listing displays student data associated with the default course ID set in the Student Information dialog box. If a student is enrolled in more than one course, only the default course data will be displayed in the Listing. The Class Listing allows you to view class data, student data, and several levels of detailed student data.
Nida recommends that you use the Class Listing as your primary source of student data because of all the various functions that are performed from this Listing on a routine basis.
Reports
3-63
Accessing Reports
From either Listing, there are two methods of accessing reports:
1. Highlight a student or class and right-click to display the Reports context menu. Choose a report by clicking the desired menu item.
2. Highlight a student or class and click the Forward navigation
button on the toolbar. Continue highlighting items and clicking the Forward button to access the reports in greater detail.
Note: Menu items and navigation buttons will be disabled until a student, class, lesson, or topic is highlighted.
Failing Grade Alert
In Scores Pro displays, red numbers are used to report a failing effort in a lesson. A student’s grade results that are less than the passing grade set under Options|Grades will be shown in red. Passing grades are shown in black. To set the Passing Grade, select Options|Grades on the main menu bar. The Grade Display Options box appears.
The Letter Grades box allows you to set the minimum numerical grade to receive the corresponding letter grade. The Passing Grade field sets the report alert grade. All grades in the report that are lower than the Passing Grade will be shown in red.

Basic Management
3-64
Customizing Report Data
The data in the reports will be displayed in columns under title bar headings that are completely customizable. To customize the column headings, place the pointer anywhere on the title bar and right-click. The Item Selection dialog box will be displayed with two group boxes:
• the Items box on the left
• the Selected Items box on the right
The Items box reflects all of the column headings available. The Selected Items box shows the items currently on the title bar of the report. For a complete listing of title bar items and their description, refer to Student Report Fields in Appendix A, Scores Pro Reports.
Continued on next page

Reports
3-65
Customizing Report Data, continued
To add column headings, highlight the desired data field in the Items box. Click the "add" double arrow button to transfer the item to the Selected Items box. To remove column headings, highlight the data field in the Selected Items box. Click the "remove" double arrow button to move the item back to the Items box. Click OK to dismiss the Items Selection dialog box and display the report with the new heading bar.
Adjust Column Widths
Adjust the column widths of your report by placing the pointer over a column divider line and dragging the line to the new position. A crossed arrow symbol will replace the pointer when the line can be dragged.
Change Order
Items are displayed on the report from left to right in the same order as the Selected Items appear from top to bottom in the Selected Items box. To change the order of the Selected Items list, highlight the item and click the "up" or "down" Change Order arrow. The Selected Item will move to the next line in the chosen direction.
Change Field Names
To change the field names in the listing window, place the pointer over the name in the header and right-click while holding down the CTRL key.
Defaults
Nida has preloaded the Selected Items box with the most popular data headers. To return your modified Selected Items box list to the original Nida list, click the Defaults button.

Basic Management
3-66
Report Format
You can adjust the way the report fits on your monitor screen. Select View|Zoom from the menu bar and choose Fit Width, Fit Height, or Best Fit. To customize the report margins, grid, and/or fonts, right-click anywhere on the report body and select the desired customization item from the context menu.
Printing a Report
Once you have the report reflecting the information you need, you can print your report:
• Use the Printer button on the toolbar
or
• Right-click the report and select Print from the context menu.

Reports
3-67
Use the following Step-Action Table to assist you in setting up and printing a Scores Pro report.
Step-Action Table #3.14: SETTING UP AND PRINTING A REPORT
STEP ACTION COMMENTS
1. Open Scores Pro. From your desktop, double-click the Scores Pro icon; or, select Start|Programs|Nida Software|Scores Pro. The default password is NIDA1.
2. Open your database. See the Database section in this chapter for information on creating and opening a database.
3. Select the Classes tab at the bottom of the window.
4. Highlight the desired class, right-click, and select Preview|Listing.
The report will be displayed.
5. To adjust the report size on the monitor screen, select Zoom and choose a view mode.
6. To customize the column headings, place the pointer on the title bar and right-click.
The Item Selection dialog box will be displayed. Refer to Page 3-64 for details on using the Item Selection box.
7. To customize the report display parameters, right-click the report body and make a selection from the context menu.
Various elements of formatting may be adjusted, including margins, grid, and fonts.
8. To adjust the header column widths, place the pointer over a column divider and drag the line left or right.
A crossed arrow symbol will replace the pointer when the line can be dragged.
9. Select Close from the toolbar to return to the Class Listing.
To initiate printing from this window, click the Printer button on the toolbar.

Basic Management
3-68
Use the following Step-Action Tables to assist you in printing a Scores Pro report.
Step-Action Table #3.15: PRINTING A LISTING
STEP ACTION COMMENTS
1. Display the Listing of your choice on your monitor screen. Customize the column headings as required.
To customize the report, right-click the title bar to access the Item Selection dialog box. Refer to Page 3-64 for details.
2. Right-click the Listing and select Print from the context menu. or Click the Print button on the menu bar. When the printer setup is correct, click the OK button.
The Print dialog box will be displayed. Click the Setup button to access the Print Setup dialog box and adjust printer, orientation, and paper parameters.
Step-Action Table #3.16: PRINTING A STUDENT, LESSON, OR SESSION REPORT
STEP ACTION COMMENTS
1. Select the Classes tab.
2. Highlight the student’s class and click the right arrow key on the toolbar.
The Class Report will be displayed.
3. Highlight the student’s name and click the right arrow key on the toolbar.
The Student Report will be displayed.
4. Right-click anywhere on the Student Report, highlight Print, and select the desired level of report.
The Print dialog box will be displayed. Click the Setup button to access the Print Setup dialog box and adjust printer, orientation, and paper parameters.
5. Click OK to print your report.

Filtering
3-69
Filters
Filters enable the display of a defined group of records instead of complete lists from the database. Narrowing your reports down to the precise group(s) you want to examine provides you with a valuable tool for feedback and analysis instead of overwhelming you with extraneous data. Filtering is a feature that is available from every Listing window. To access the filtering feature, right-click any Listing and select Filters from the context menu. The Filter Setup dialog box will be displayed.
Filter Setup dialog box
Filtering uses two methods to select items from the database:
• regular expressions
• ranges
Continued on next page

Basic Management
3-70
Filter Setup dialog box, continued
A regular expression is a string of characters used to select only certain items from the database. For example, in the Specialty field, the expression “Electronics” could be used to search the database for all students with the word “Electronics” entered as their specialty. The Student Listing would then display only those students in the electronics specialty.
A range allows the display of records within a specific set of parameters. For example, entering the range of A-G in the Last Name field displays a Student Listing of only those students whose last names begin with the letters A through G.
To enable a filter, highlight the field you wish to use as a filter and click the check box. A check mark will appear in the box. To disable a filter, highlight the field and click the check box. The check mark will disappear.
IMPORTANT NOTE: If you open a Listing and all or part of the data is missing, CHECK FOR FILTERS!

Search
3-71
Search Function
Scores Pro includes a Search function for retrieving classes, students, instructors, or courses from the database. This function, which can be accessed from any tab except Lessons, makes it easy to locate a specific item on that tab's Listing. The option is especially useful when you are looking for a specific item in a large database.
Search Basis
The Search function will accept an ID number, first name, or last name from the Student Listing.
Continued on next page

Basic Management
3-72
Search Process
To initiate a search, select Search|Find from the menu bar. The Search for Text dialog box will be displayed.
Enter the name of the item to be located and click OK. The first occurrence of the search item will be highlighted on the Listing.
Find Next
The Find Next option will search the database for the next occurrence of the item shown in the Search for Text dialog box.

4-1
CHAPTER 4CHAPTER 4CHAPTER 4CHAPTER 4 ---- CAI PRO CAI PRO CAI PRO CAI PRO
Overview
CAI Pro is the student software portion of the Scores Pro Management System.
In contrast to Scores Pro, which is loaded and utilized at the instructor computer, the CAI Pro software is loaded on each student station in one of three ways:
• as an icon and shortcut to the CAI Pro on a network server
• as a complete software package for stand-alone student stations, or
• as a combination of a network workstation with locally
loaded curriculum. You have installed your system in accordance with your specific system requirements using the guide in Chapter 1.

CAI Pro
4-2
Chapter Purpose
This chapter of the Nida Pro User's Guide steps you through the options of CAI Pro that you can use to make the most of the learning opportunity available to you and your students. You will find information on:
Accessing Lessons
Student Options
Instructor Options
Accessing Lessons
The primary task of CAI Pro is to present curriculum to the students in a Computer Assisted Instruction (CAI) format. For students to receive the curriculum, they must first be able to access their individualized menu and CAI lessons.
Maximizing Your Training Time
Nida recommends that students complete the following lessons prior to beginning other CAI lessons or utilizing the Nida trainer:
� Introduction to CAI
� Equipment Familiarization These lessons will show students how to quickly navigate through any Nida lesson and make the most of their training time. Note: If students are beginning in the standard Nida DC course,
these lessons are already a part of their program.

Accessing Lessons
4-3
Use the following Step-Action Table to access a CAI Pro Lesson.
Step-Action Table #4-1: ACCESSING A LESSON
STEP ACTION COMMENTS
1. Access the desktop. Utilize the procedure for your specific computer system.
2. Open CAI Pro. Double-click the CAI Pro icon. If you are on a stand-alone system using a Key Disk, ensure that the Key Disk has been inserted into the floppy drive.
3. Click Lessons in the menu bar. For Multi-User and Client/Server configurations, a list of student names followed by a list of classes will be displayed. Choose the appropriate name and class.
4. Select the desired lesson by double-clicking the lesson name.
If an arrow appears to the right of the title, click the title for an additional menu.
5. Click the picture of the Nida landscape to start the lesson.
Use the arrow keys at the bottom of each window to navigate through the lesson.
6. Return to the Lesson Menu page at any time by pressing F4 and clicking Yes.
If you do not wish to complete an entire theory or experiment section, pressing F4 will allow you quick access to the lesson menu. You can jump to other areas of the lesson from there.
7. Exit the lesson by pressing F2 and clicking Yes.
You can exit from any point in the lesson. Note: If you are running a DOS lesson, press F1 to view a function key map of commands. These will be different from those in Windows-based CAI.
If you encounter an error message while attempting to access a lesson, refer to Chapter 6, System Maintenance and Troubleshooting.

CAI Pro
4-4
Student Options
CAI Pro offers students a full range of features to maximize their training experience.
Immediate Access to Lessons
For immediate access to lessons, students simply select Lessons from the menu bar.
Bookmarking Feature
Having entered a lesson, the student can place a bookmark in the lesson that allows instant return to the specific page for continuation of training during a subsequent session.
Student Drop-Down Menu
Options available from the Student drop-down menu are:
• View Records
• Search Lessons
• Applications
These options will be discussed in detail on the following pages.
Note: The instructor can disable any or all of the options located on the Student drop-down menu.

Student Options
4-5
Bookmarks
Students will not always be able to complete a lesson in the time allotted for their class period. In order to continue their next training session from exactly where they left off in their current lesson, they can use a bookmark. The Nida courseware allows students to mark their place in a lesson, exit CAI Pro, and resume at exactly the same window the next time they enter the lesson. This feature eliminates the need and time for students to search through a lesson looking for the page where they ended the session before. Use the following Step-Action Table to assist your students in bookmarking their lessons.
Step-Action Table #4-2: BOOKMARKING LESSONS
STEP ACTION COMMENTS
1. From any window within a lesson, press the F9 key.
CAI Pro will place a bookmark on the page which is open at the time F9 is pressed.
2. Answer Yes to exit the lesson.
3. To reenter the lesson, open CAI Pro and select the bookmarked lesson.
The bookmarked lesson will be in Bold lettering on the lesson menu.
4. Double-click the lesson to open it to the bookmarked page.

CAI Pro
4-6
View Records
The View Records option allows students to
• monitor their progress through the lesson menu
• review tests that they have previously taken. As the instructor, you can disable this feature by selecting Options|General from the menu bar. Refer to the Instructor Options on Page 4-22. Use the following Step-Action Table to assist your students in viewing their records.
Step-Action Table #4-3: VIEWING A STUDENT RECORD
STEP ACTION COMMENTS
1. Select Student|View Records from the menu bar.
The Student lesson menu will be displayed.
2. Highlight the desired lesson from the lesson menu.
3. Double-click the lesson title to access the Lesson Results window.
See the following pages for an explanation of the Lesson Results window.
Student Options
4-7
Lesson Results Window
The Lesson Results window is divided into two boxes:
1. the Sessions box
2. the Responses box The columns in these boxes will be discussed in detail on the following pages.

CAI Pro
4-8
Lesson Results Window: Sessions Box
The Sessions box lists all of the sessions the student has completed in the selected lesson. Bookmarked lessons will not appear. The Sessions box contains the following columns:
• Date
• Time
• Over. (Overall)
• Final
Date Column
This column reflects the calendar date that the session was opened and closed. Bookmarked lessons will reflect the date the session was opened.
Continued on next page

Student Options
4-9
Sessions Box, continued Time Column
This column indicates the time in minutes that the session was open. Bookmarked lessons will count only the time during active participation. Sessions begin when a lesson is selected and end when the student exits the lesson. Multiple passes through a quiz without exiting the lesson count as one session.
Over. (Overall) Column
The first Over. column indicates how many embedded questions were answered within the theory portion of the lesson. The second Over. column reflects the overall average of correct answers to those questions.
Final Column
The first Final column shows the number of questions answered during the session. This number will be in multiples of 10 for quiz attempts. For example, a 30 in this column would indicate that the student attempted the quiz 3 times during the session. The number will be in multiples of 25 for block or unit tests. The second Final column indicates the final score received on quizzes, block tests, or unit tests.

CAI Pro
4-10
Lesson Results Window: Responses Box
The Responses box lists all of the questions answered for the highlighted session. It contains the following columns:
• Obj. (Objective) • Quest. (Question) • Response • Score
Obj. (Objective) Column
This column indicates the objective number of this lesson to which the question applies.
Quest. (Question) Column
This column reflects the question number as assigned by the question bank for this lesson.
- A two-digit number indicates a question embedded within the lesson.
- A three-digit number indicates questions as follows:
o 100 - 199 = quiz or test question o 200 - 299 = exercise question
Continued on next page

Student Options
4-11
Responses Box, continued Response Column
This column displays the answer chosen by the student for the question. Area references show which area of the window was selected.
Score Column
This column reflects the selection of correct or incorrect answers: For a question embedded within a lesson (two-digit question number):
• 100 = correct
• 50 = one wrong answer was selected before the correct
answer was chosen
• 33 = two wrong answers were selected before the correct answer was chosen
For a quiz question (three-digit question number, 100-199):
• 100 = correct
• 0 = incorrect
View Question Text
To view the question text with the correct answer: double-click the question in the Responses box or highlight the question and click the button.
Exit Lesson Results Window
Click OK to return to the Lessons menu.
CAI Pro
4-12
Search Lessons
The Search Lessons option allows lessons to be viewed without activating the record keeping function. Lessons completed using this option will not affect the student’s scores or records. This student option can be disabled by the instructor to prevent students from viewing subjects unrelated to their course of study. Refer to the Instructor Options on Page 4-23 to disable this function.
Search for Lesson Window
There are two tabs displayed on the Search for Lesson window:
• Keywords
• Subjects
Continued on next page
Student Options
4-13
Search for Lesson Window: Keywords Tab
Click the Keywords tab to search the database for a lesson with a title that contains a particular keyword.
For example, highlight the word capacitor in the Keyword list and click the List button to display all lessons with the word capacitor in their title. Click the Run button to open the lesson for review. This search option is handy when you are looking for a subject area but do not know the specific lesson title.

CAI Pro
4-14
Search for Lesson Window: Subjects Tab
Click the Subjects tab to display all of the lessons in your database by category, subcategory, unit, and block.
Find the category you want and click the plus (+) box. Continue to click the plus boxes until you reach the unit or block you are seeking. Double-click the unit or block, or highlight the unit or block and click the List button, to reach the Lessons listing. For example, if you are looking for the Ohm’s Law and Power lesson, you simply select the category Basic Electronics, the unit DC Circuits, and the block Basic DC Circuits. Click List to display all of the lessons in the Basic DC Circuits block. Click Run to open the lesson for review. This search option offers an excellent method for finding a lesson when you know the lesson title or when you want to research the lesson contents of specific categories of instruction.

Student Options
4-15
Use the following Step-Action Table to access the Search Lessons option.
Step-Action Table #4-4: SEARCHING FOR LESSONS
BY KEYWORD
STEP ACTION COMMENTS
1. Select Student|Search Records from the menu bar.
The Search for Lesson window will be displayed.
2. Select the Keywords tab. The Keywords tab enables a lesson search using specific title words.
3. Highlight a keyword from the list that closely matches the subject area.
4. Click List. A list of all lessons with the keyword in the title will be displayed.
5. Click Run. The lesson will open for your review.
BY LESSON TITLE
STEP ACTION COMMENTS
1. Select Student|Search Records from the menu bar.
The Search for Lesson window will be displayed.
2. Select the Subjects tab. The Subjects tab enables a lesson search using the lesson title outline.
3. Find the lesson to be viewed. Select the general category, unit, block, and lesson title.
4. Highlight the lesson title in the Lessons box and click Run.
Double-clicking the lesson title in the Lessons box will also open the lesson.
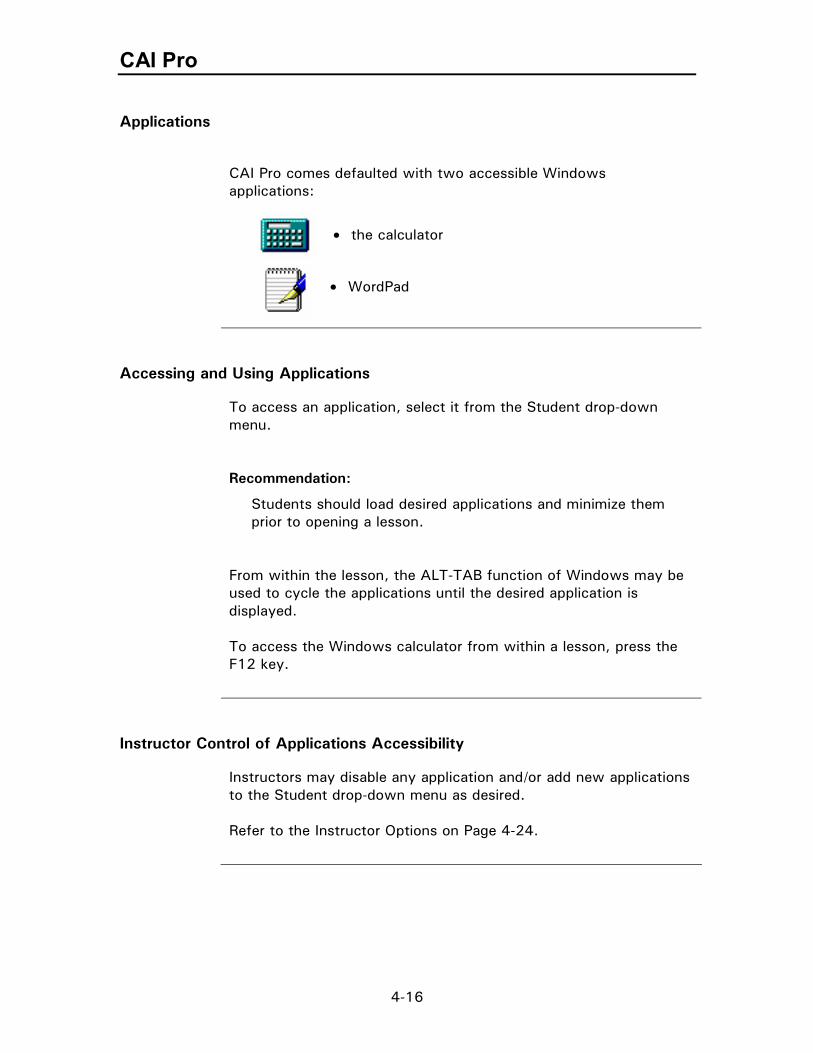
CAI Pro
4-16
Applications
CAI Pro comes defaulted with two accessible Windows applications:
• the calculator
• WordPad
Accessing and Using Applications
To access an application, select it from the Student drop-down menu. Recommendation:
Students should load desired applications and minimize them prior to opening a lesson.
From within the lesson, the ALT-TAB function of Windows may be used to cycle the applications until the desired application is displayed. To access the Windows calculator from within a lesson, press the F12 key.
Instructor Control of Applications Accessibility
Instructors may disable any application and/or add new applications to the Student drop-down menu as desired. Refer to the Instructor Options on Page 4-24.

Instructor Options
4-17
Instructor Options
As the classroom instructor, you are required to manage the various features of CAI Pro. You must know how to:
enable and disable student options
test communications between the computer and the trainer
set quiz and testing options
control the records link between the student computer and Scores Pro located on the instructor computer.
To empower you to complete all of these tasks, CAI Pro provides additional features on the Options menu for your use.
Accessing Instructor Options
When CAI Pro opens, it defaults to provide students with the options described in the Student Options section. The instructor needs access to additional options to properly manage the CAI Pro system. When the Instructor options are enabled, an Instructor menu is present on the menu bar and several additional options will be displayed on the Options drop-down menu. There are two ways to enable the Instructor options:
• during the CAI Pro loading process
• once CAI Pro is up and running
Instructor Drop-Down Menu
The Instructor drop-down menu on the menu bar is active only when your system is configured as a Multi-User system.

CAI Pro
4-18
Use either of the following Step-Action Tables to enable the CAI Pro Instructor Options.
Step-Action Table #4-5: ENABLING INSTRUCTOR OPTIONS DURING LOADING
STEP ACTION COMMENTS
1. Open CAI Pro by selecting Program|CAI Pro from the menu bar or double-clicking the CAI Pro icon.
The Registration window will be displayed.
2. Simultaneously press the CONTROL and SHIFT keys on your keyboard and then release.
Keys must be pressed simultaneously.
3. Observe that the Instructor option is displayed on the menu bar.
The Instructor menu options are protected with passwords.
Step-Action Table #4-6: ENABLING THE INSTRUCTOR OPTIONS FROM WITHIN CAI PRO
STEP ACTION COMMENTS
1. Select Help|About from the menu bar.
The About CAI Pro window will be displayed.
2. Simultaneously press the SHIFT and CONTROL keys on your keyboard and then release.
Keys must be pressed simultaneously.
3. Click OK.
4. Observe that the Instructor option is displayed on the menu bar.
The Instructor menu options are protected with passwords.

Instructor Options
4-19
Trainer Communications
Good communications between the computer and the Nida trainer are essential for performing experiments in the Nida lessons. The instructor can set up and test the communications link using the CAI Pro Communications option.
Communications Setup Window
The Communications Setup window allows the instructor to select a COM port and test the communications link between the computer and trainer. Note: The Advanced button is used to access the NIDAINFO
Codes. Do not change the NIDAINFO Codes unless asked to do so by an authorized Nida technician.
Click the Test button under the selected Comm Port on the Communications Setup window to display the Test dialog box for information on the communications link between the Student computer and the selected trainer.

CAI Pro
4-20
Verifying Operational Readiness of Communications Link
The Communications Setup window on the previous page shows the selection of Comm Port 1 for a Model 130E. When Test is clicked for that selection, the window below is displayed.
Test Window
If there is a good link between the computer and trainer:
• there will be a check in the Status box
• the correct power conditions will be indicated for the trainer and each PC position as you exercise the power switches

Instructor Options
4-21
Use the following Step-Action Table to access the CAI Pro Communications Options.
Step-Action Table #4-7: ACCESSING THE COMMUNICATION OPTIONS OF CAI PRO
STEP ACTION COMMENTS
1. Select Options|Communications from the menu bar.
2. Enter the password.
3. Select the Comm Port (1-4).
4. Select the model of your trainer from the Model list.
(Checking Theory will disable the Test function.)
5. Click the Test button. The Test window will be displayed.
6. Verify that there is a checkmark in the Status box.
A checkmark in the Status box indicates a good communications link.
7. If the Status box is blank, first ensure the trainer is ON; then check the comm port, cabling, and connectors.
If the checkmark still does not appear, refer to Chapter 6, System Maintenance and Troubleshooting.
8. On the trainer, press the switches for DC Power, PC1, PC2, and PC3.
The corresponding boxes on the Test window will display checks.
9. Click OK on the Test and Setup windows to return to the CAI Pro main window.
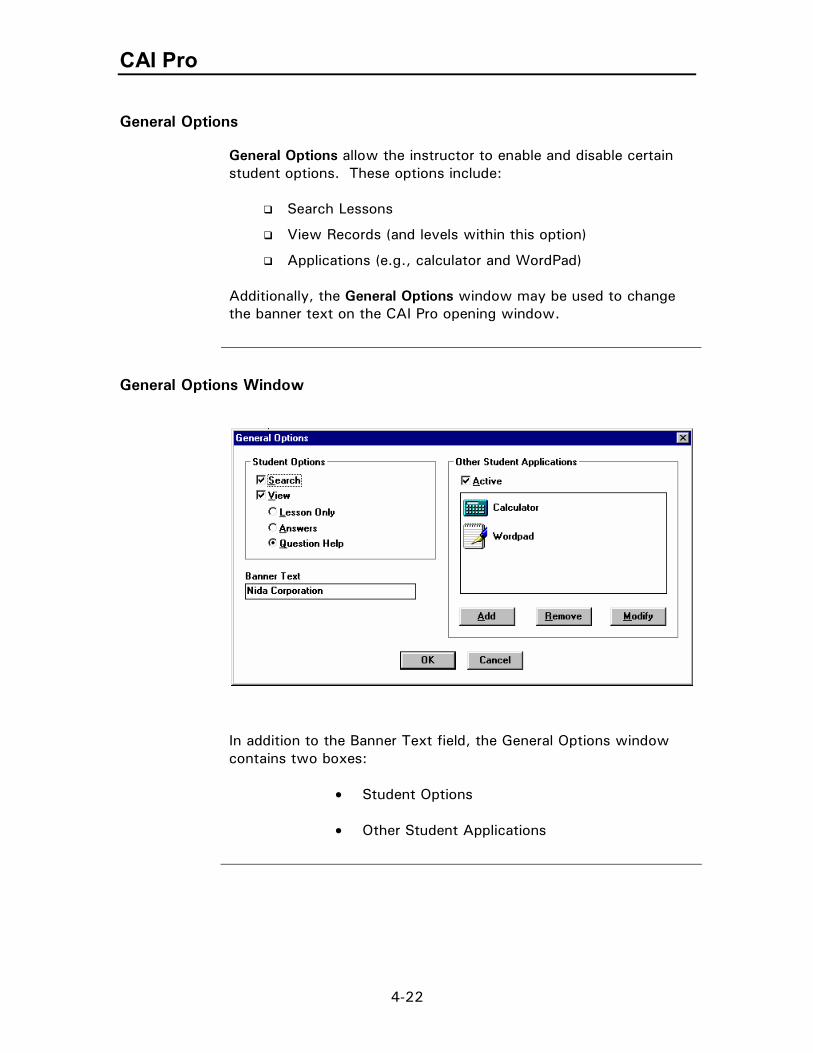
CAI Pro
4-22
General Options
General Options allow the instructor to enable and disable certain student options. These options include:
Search Lessons
View Records (and levels within this option)
Applications (e.g., calculator and WordPad) Additionally, the General Options window may be used to change the banner text on the CAI Pro opening window.
General Options Window
In addition to the Banner Text field, the General Options window contains two boxes:
• Student Options
• Other Student Applications

Instructor Options
4-23
General Options Window: Student Options Box
The Student Options box enables and disables two options:
1. Search
2. View
Search
A checkmark in the Search box enables the Search Lessons option on the Student drop-down menu.
View
A checkmark in the View box enables the View Records option on the Student drop-down menu. When the View option is selected (checked), three levels of lesson viewing are available:
• Lesson Only allows the student to view the Session data but no Response data. Question numbers with answers will not be displayed.
• Answers allows the student to view the Session data and the
Response data. Students will be able to see the question numbers, the answers they selected, and whether they answered each answer correctly.
• Question Help will allow students full access to questions, responses, correct answers, and individual questions.

CAI Pro
4-24
General Options Screen: Other Student Applications Box
The Other Student Applications box allows the instructor to enable or disable non-Nida applications for student use during lessons. A checkmark in the Active box allows student access to all of the applications pictured below it. (The window above shows the two CAI Pro default applications: the Calculator and WordPad.) To provide student access to other applications, click the Add button and fill out the Application Properties dialog box, as shown on the following page.

Instructor Options
4-25
Application Properties Dialog Box
Title Field
The title you enter in this field will appear on the Student drop-down menu.
Command Line Field
Use the Browse button to enter the new application’s Command Line. (Normally, this is an .EXE file.)
Startup Directory Field
Use the Browse button to assist you in finding the application and entering the path for its Startup Directory.
Set Icon Button
The icon will be set automatically to the application's primary icon. If you wish to change the icon to an alternate one, click Set Icon and choose from the application's alternate icon set.

CAI Pro
4-26
Use the following Step-Action Table to access the CAI Pro General Options.
Step-Action Table #4-8: ACCESSING GENERAL OPTIONS
STEP ACTION COMMENTS
1. Access the CAI Pro Instructor options.
If the Instructor Options do not appear on the menu bar, refer to the steps on Page 4-18 to enable them.
2. Select Options|General from the menu bar.
3. Enter the password. The default Nida passwords must be in CAPS.
4. Select the desired student options.
Search enables the Search Lessons option from the Student menu. View enables the View Records option from the Student menu, with three sublevels available. See the descriptions on the previous pages to determine your preferences.
5. Activate or deactivate the Other Student Applications.
A checkmark in the Active box enables all applications that are displayed as icons in the box below it.
6. If the Banner Text box does not already show the correct text, enter the name of your training site.
Double-click or drag across the current entry to highlight it; it will be deleted when you type the first character of your site name.
7. Select OK when finished. You will return to the CAI Pro main window.
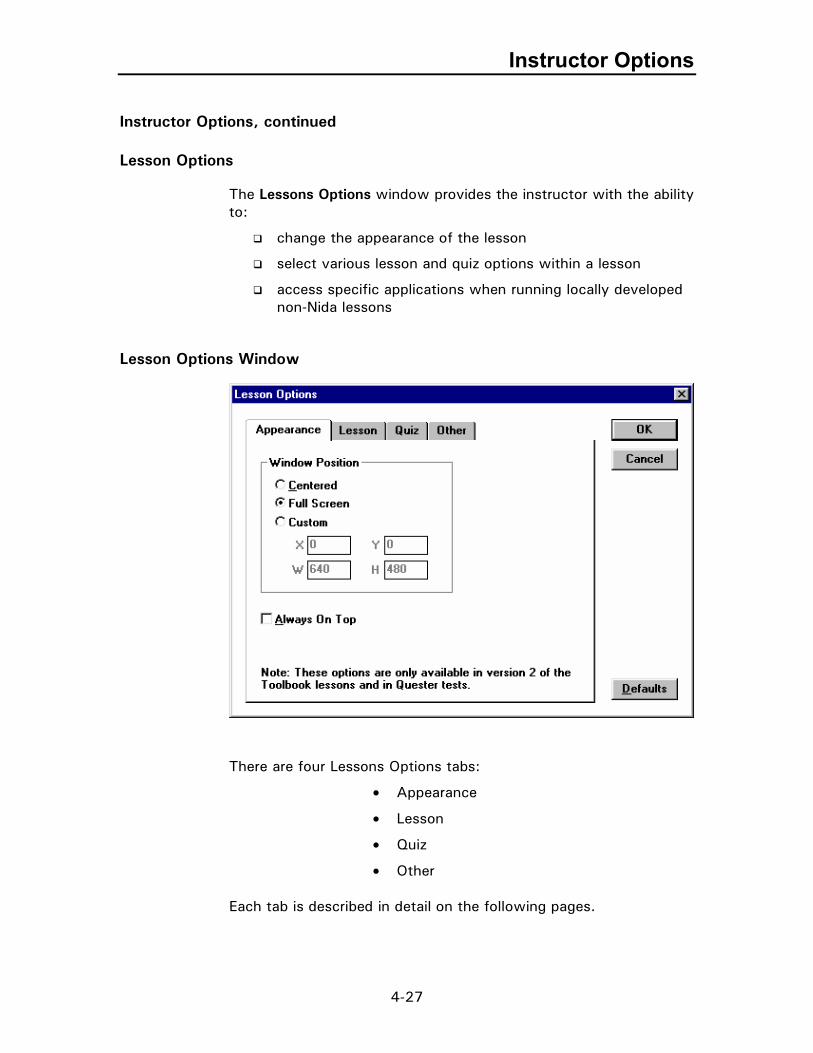
Instructor Options
4-27
Instructor Options, continued Lesson Options
The Lessons Options window provides the instructor with the ability to:
change the appearance of the lesson
select various lesson and quiz options within a lesson
access specific applications when running locally developed non-Nida lessons
Lesson Options Window
There are four Lessons Options tabs:
• Appearance
• Lesson
• Quiz
• Other Each tab is described in detail on the following pages.

CAI Pro
4-28
Lesson Options Window: Appearance Tab
Window Position Box
The Appearance tab displays the Window Position options. Select the option that best displays the lesson on the student computer.
• Centered will center the lesson display but may also reveal other applications on the desktop.
• Full Screen will mask any part of the display that is not part of
the Nida lesson.
• Custom allows you to enter the display parameters that best suit your system. (This is similar to Settings in your Windows Display options.)
Always On Top Box
A check mark in the Always On Top box will ensure that the Nida lesson is always in view on the desktop; however, the ability to access the calculator, WordPad, or other applications will be lost.

Instructor Options
4-29
Lesson Options Window: Lesson Tab
The Lesson Mode box offers five options:
• Assessment
• Pre-Test/Post-Test
• Open Learning
• Structured Learning
• No Quiz Each option is described in detail on the following pages.
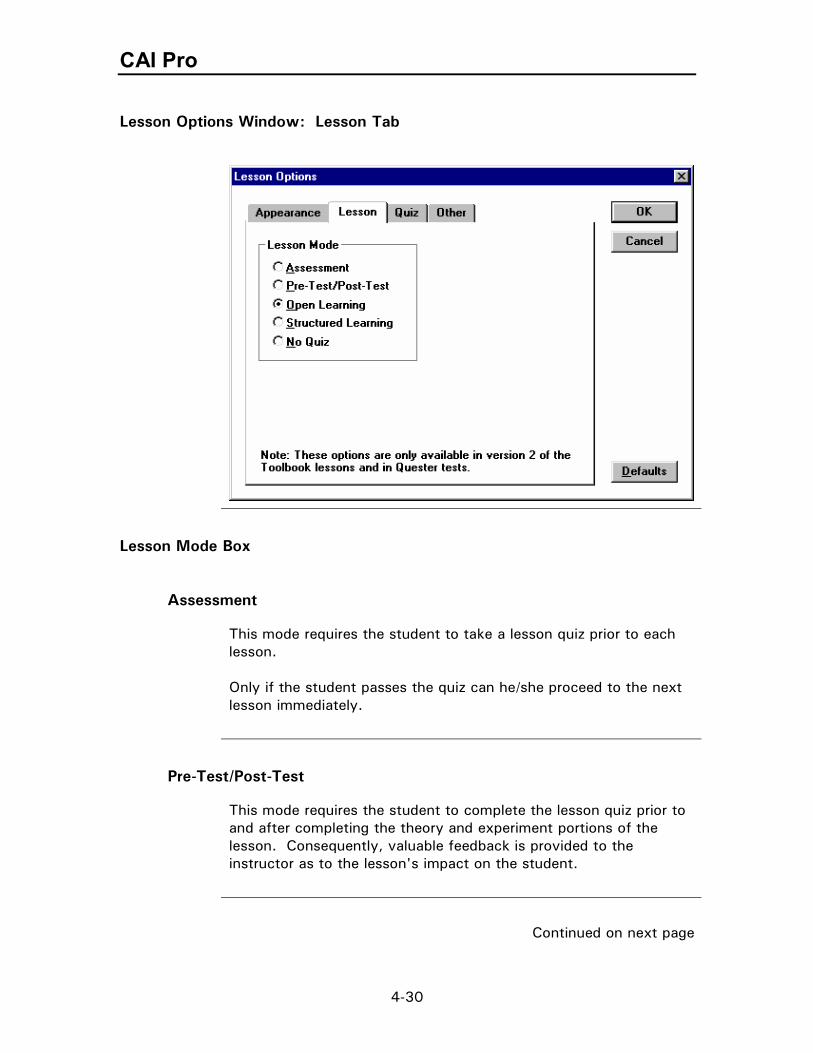
CAI Pro
4-30
Lesson Options Window: Lesson Tab
Lesson Mode Box
Assessment
This mode requires the student to take a lesson quiz prior to each lesson. Only if the student passes the quiz can he/she proceed to the next lesson immediately.
Pre-Test/Post-Test
This mode requires the student to complete the lesson quiz prior to and after completing the theory and experiment portions of the lesson. Consequently, valuable feedback is provided to the instructor as to the lesson's impact on the student.
Continued on next page

Instructor Options
4-31
Lesson Mode Box, continued Open Learning
This mode allows the student to complete the lesson theory, experiments, and quiz sections in any order.
Structured Learning
This mode requires the student to complete the lesson in the order it is presented: theory section(s), experiment, quiz.
No Quiz
This mode removes the quiz from the lesson.

CAI Pro
4-32
Lesson Options Window: Quiz Tab
The Quiz tab allows enormous flexibility in how you administer the lesson quizzes and how much feedback you permit your students to receive. This tab contains five option areas:
• Timed
• Restrict Quiz Attempts
• Passing Grade
• Quiz Mode
• Critique Mode
These options are discussed in detail on the following pages.

Instructor Options
4-33
Quiz Tab, continued Timed Option
This box allows you to limit the time a student can spend on each lesson quiz. To enable this feature, check the Timed box and enter the time limit in number of seconds allowed per question. Students will have 10 times the number of seconds in the Time Limit box to complete the quiz and 25 to 50 times the number of seconds to complete a block or unit test.
Restrict Quiz Attempts to One Session Option
This box sets a limit on the number of quiz attempts that a student can make within a session. Once the limit has been met, the student must receive permission, in the form of an instructor pass code, to take another quiz. A zero in the Attempts Per Session field will allow unlimited quiz attempts.
Passing Grade
This field sets the default score for a passing grade. If a student’s individual menu has been encoded with a different passing grade by Scores Pro, the Scores Pro grade will take precedence.
Continued on next page

CAI Pro
4-34
Quiz Tab, continued
Quiz Mode Box
This option sets the number of times a student may move through a quiz.
Single Pass
Single Pass restricts students to one pass through the test with no skipping or returning to a question once it has been answered.
Multi-Pass
Multi-Pass allows students to skip questions and return to them after they reach the final question. A skipped question will not change when a student returns to answer it, despite the random selection of quiz questions.
Continued on next page

Instructor Options
4-35
Quiz Mode Box, continued Full Pass
Full Pass allows the most flexibility in taking a lesson quiz. Students can skip questions, answer them after the last quiz question, and return to previously answered questions to change the answer. In Full Pass, students are free to change answers as long as they do not exit the test.
Critique Mode Box
This box sets the amount of feedback a student may receive after taking a lesson quiz.
No Review
No Review restricts students from reviewing the quiz they just completed.
Incorrect Only
Incorrect Only allows students to review the questions they answered incorrectly. It will display their answer (highlighted with a yellow bullet) and the correct answer (answer bullet in a green box).*
All Questions
All Questions lets students review the entire quiz. Again, indications are given as to whether questions were answered correctly or incorrectly.*
* Note: If given Incorrect Only or All Questions rights, the student
must review the quiz prior to exiting the quiz section of the lesson.

CAI Pro
4-36
Lesson Options Window: Other Tab
The Other tab displays a box that is used for entering Registry Overrides. Registry Overrides are used for starting applications used with non-Nida lessons. Refer to Chapter 5, Course and Lesson Management, for details on entering data into this window.

Instructor Options
4-37
Use the following Step-Action Table to access the CAI Pro Lesson Options.
Step-Action Table #4-9: ACCESSING LESSON OPTIONS
STEP ACTION COMMENTS
1. Access the CAI Pro Instructor options.
If the Instructor Options do not appear on the menu bar, refer to the steps on Page 4-18 to enable them.
2. Select Options|Lessons from the menu bar.
3. Enter the password.
4. Select the desired Lesson Options tab.
5. Activate or deactivate the lesson options as desired.
A checkmark in the option box or a bullet in the option circle will activate the option.
6. Select OK when finished. You will return to the CAI Pro main window.

CAI Pro
4-38
System Options Window
The CAI Pro System Options are usually set during the installation of your Nida Scores Pro/CAI Pro system. Under normal conditions, you should not need to access the System Options; however, there may be times when you or Nida Corporation may need you to make changes to the system parameters. Each System Options tab is described in detail on the following pages.
Quick Setup Box
Common to all tabs on the System Options window is the Quick Setup box located in the bottom right area of the window. (See the illustration on the next page.) Selection of a button will set the information in each tab to the Nida defaults for that configuration. Important Note: The Quick Setup buttons should only be used when you are using a Nida default configuration. Most networks will not be configured correctly with the defaults.

Instructor Options
4-39
System Options Window: Student Records Tab
The information in this window should match the information in your Scores Pro system configuration. For details on each of the configurations, see System Types in Chapter 1 of this Guide.

CAI Pro
4-40
System Options Window: Directories Tab
The Directories tab provides the software path to the Nida programs, lessons, and help files. Additionally, it offers “Run from” options for increased system versatility.
"Run from" Options
For the "Run from" option of Stand-Alone configurations, select Nida Program Directory, which is created during a Key Disk or Multi-User installation. The "Run from" option for Network systems should be set to Temporary Directory and Local Drive (c:\M3\Temp). Running from a local drive reduces the load on the server by unzipping lessons into the temporary directory for use during the student's session. When the student exits the lesson, the session data is sent back to the server and the contents of the temporary directory are deleted. The "Run from" option of Home Directory can also be used in Network configurations for special applications.

Instructor Options
4-41
System Options Window: Options Tab
The Options tab enables your system to perform certain commands when you open or work with a CAI lesson.
Unzip Lessons
This option allows zipped Nida lessons to be automatically unzipped when a lessons opens. Unless directed by Nida, this box should always be checked.
Load Commands
This option allows the addition of special commands for loading utilities or drivers for unique applications during a lesson.
Instructor Mode
A checkmark in the Instructor mode box will force CAI Pro to open with the Instructor options available. This feature eliminates the need to use the Control/Shift routine to access the Instructor options. Note: This mode should not be enabled on student computers.
Exact Permission Levels
This box is inactive on your system. It is used only for special military testing operations.

CAI Pro
4-42
System Options Window: Passwords Tab
NOTE: The system password is case sensitive.
The Passwords tab is used to change the passwords for gaining access to the System options (which is the section that contains this window), Instructor options, or Communications options. Your system is defaulted to the Nida passwords.

Instructor Options
4-43
System Options Window: Profiles Tab
Use and System Options
For Use, the default is Local Settings; and for System, it is Configuration 1. These profiles are set at Nida. Although it may appear that changes can be made on this window, the default settings will remain in place.
Export and Import Buttons
The Export button is used to capture your system settings on a floppy disk. The floppy disk can then be used with the Import button as a backup or to duplicate desired settings on all your computers without having to change each setting individually.

CAI Pro
4-44
Use the following Step-Action Table to access the CAI Pro System Options. Important Note: Before making any changes to these options,
contact your system manager.
Step-Action Table #4-10: ACCESSING SYSTEM OPTIONS
STEP ACTION COMMENTS
1. Access the CAI Pro Instructor options.
If the Instructor Options do not appear on the menu bar, refer to the steps on Page 4-18 to enable them.
2. Select Options|System from the menu bar.
3. Enter the password. The default Nida passwords must be in CAPS.
4. Select the appropriate tab to access the desired system option.
Use the tab descriptions on the previous pages to locate the option for selection.
5. Select OK when finished. You will return to the CAI Pro main window.

5-1
CHAPTER 5CHAPTER 5CHAPTER 5CHAPTER 5 –––– COURSE AND LESSON COURSE AND LESSON COURSE AND LESSON COURSE AND LESSON MANAGEMENTMANAGEMENTMANAGEMENTMANAGEMENT
Introduction
The Scores Pro Management System provides time-saving features that allow instructors to:
• add non-Nida lessons to their database
• build entirely new courses • customize existing courses to meet specific curriculum
requirements These features add flexibility in curriculum presentation and save time in curriculum design and development efforts.
Course and Lesson Management
5-2
Nida courseware consists of courses that are made up of lessons. In this chapter, we will discuss:
1. Course Management
2. Lesson Management Both of these features are accessible from the tabs at the bottom of the Scores Pro window after you open a database.
The Courses tab accesses the Course Listing, which displays all the courses available and any additional courses you've created or modified. The Lessons tab accesses the Lessons Listing, which displays all the Nida lessons that are available to your program and any lessons you have added. Right-click on either listing to access menus that allow you to add, delete, or edit lessons and courses.

Courses
5-3
Courses
Each class you created under the Classes tab is assigned an ID number, an Instructor, and a course. The course can be a default Nida course or a customized course you modified or created. If the Nida curriculum format and flow is compatible with your program, there is no need to modify the course outline. There are options, however, to add, modify, delete, or include non-Nida lessons in an existing course. This section of the guide will describe these options and step you through the process of managing your courses.
Course Listing
The Courses tab at the bottom of the Scores Pro window accesses the Course Listing, which displays all the courses that are currently available to your program. To add, delete, or edit courses on the Course Listing, highlight the desired lesson and right-click anywhere on the window. A context menu will be displayed.

Course and Lesson Management
5-4
Creating New Courses
Scores Pro allows the instructor to create a new course using lessons from the Lesson Listing. These lessons can be Nida lessons, locally developed lessons, or a combination of both.
Course Information
The first step in creating a lesson is to enter the identifying Course Information. To access the Course Information window, right-click the Course Listing and select Add Course from the context menu. The window below will be displayed:
ID Field
The ID field is used to list and rank your new course on the Course Listing. Scores Pro will use this number when the course is assigned to students.
Title Field
This field indicates the name of your course. The name entered in the Title field will appear in CAI Pro at the top of the window.
Continued on next page

Courses
5-5
Course Information, continued Level Field
The Level field is for report information only. The course level indicates the rank of this course in your program or curriculum. For example, a level one course could be a freshman course while a level 4 might indicate a senior level course.
Credits Field
The Credits field is for report information only. Enter the credits you have assigned to this course in this field.
Optional Fields Box
The Optional Fields box is used for entering strings or names for filtering. Refer to the Filtering section of Chapter 3, Basic Management for details on using the Optional Fields box.
Add the Course
When you have entered all of the course details, click the Add button on the Course Information window. The course will appear in the Course Listing.

Course and Lesson Management
5-6
Course Outline
Once the course information has been entered, the next step in creating a course is to build the course outline. The course outline allows you to organize your course into units and blocks that you are free to name according to your system format or personal preference. Blocks are subsequently filled with Lessons that are named by use of the custom lesson dialogs under the Lessons tab when they are designed. We will discuss lessons later in this chapter. The process from this point is exactly the same for creating a new course or for modifying an existing course. To access the Course Outline window, highlight your new or existing course, right-click, and select Edit Course Outline from the context menu.
Course Outline Window
The Course Outline window consists of two boxes, the Outline Box and the Details Box. The Outline box displays all of the lessons in your outline. A new course will display the word <empty> in the Outline box. The Details box displays all of the lessons that are in your database. You can right-click the Details box header to customize the view and display the ID number.
Continued on next page

Courses
5-7
Course Outline Window, continued
To create or modify unit and block names, click the buttons below the Outline box. To add or delete lessons, use the << or >> arrow buttons below the Details box. The following explanations cover each of the buttons in detail.
Outline Box Buttons Insert Button
This button will display the Insert Course Item window. The unit or block title is entered in this window. The parameters are passed along with the lesson filename to the run-time module for the lesson. This feature is used by Nida to enable special lesson features in Nida CAI lessons and can be used to pass parameters to Non-Nida CAI lessons.
Remove Button
This button is used to delete an entire unit or block. Highlight the item to be deleted and click the Remove button. All of the lessons assigned to that unit or block will be sent back into the database. Remove will not delete individual lesson titles. To add or delete individual lessons, use the << or >> arrow buttons under the Details box.
Modify Button
This button is used to change a unit or block title. Highlight the unit or block and click the Modify button to access the Modify Course Item window.

Course and Lesson Management
5-8
Course Outline Window, continued Borrow Button
If you are creating a new course that essentially has many of the same lessons as a Nida course, Scores Pro can help you complete the task faster. The Borrow button is used to insert a Nida course outline in the Outline box for you to modify to your specifications. Clicking the Borrow button will generate a Warning window reminding you that any information in the Outline box will be removed. Since this is a new course and the outline is empty, click Yes to continue. The Borrow Course Listing window will appear.
Borrow Course Listing
The Borrow Course Listing displays all of the courses in your current database except the course currently being edited. Highlight a course from the list and click OK to copy the course outline into the Outline box for your new course.

Courses
5-9
Adding or Deleting Courses from an Outline
Once the borrowed course is in the Outline box for your new course, you can add or remove lessons. Expand or contract the unit (U) or block (B) sections by double-clicking the “U” or “B” symbol. This process works the same way the plus (+) and minus (–) signs do in a Windows file list. Highlight a lesson in the Details box and click the << button to add the lesson to your outline. This button always inserts the item above the current selection (highlight bar) in the Outline box. Highlight a lesson in the Outline box and click the >> button to remove it from your outline.

Course and Lesson Management
5-10
Example - Building a Course Outline
In the example above: Clicking the >> arrow button would remove the Voltage Divider Circuits lesson from the course. Clicking the << arrow button would add the Trigonometry Pre-Test to the Complex DC Circuits unit of the course. Since lessons are always added above the highlighted bar in the Outline box, this action would position the Pre-Test (appropriately) as the first lesson in the unit. To add the Trigonometry Post-Test as the last lesson in the unit, we would highlight the <empty – Complex DC Circuits> line in the Outline box and the Post-Test in the Details box. Pressing the << arrow button would position the lesson just below Meter Loading, as a conclusion for the Complex DC Circuits unit. To add an additional unit, we would highlight the last <empty> line and click the Insert button under the Outline box.
Courses
5-11
Edit Lesson Information
Once your course information is entered and your course outline is created, the next step is to customize parameters for each lesson in the course. Lesson parameters determine how an individual lesson is treated as the student moves through the course. The Course Properties window displays these lesson parameters and allows you to adjust them to meet your program requirements. To access the Course Properties window, highlight the course, right-click, and select Edit Lesson Info from the context menu.
Course Properties Window
The course outline will be displayed with the current parameters listed for each lesson. Again, expand or contract the unit (U) or block (B) sections by double-clicking the “U” or “B” symbol. To change a parameter, access the Course Details window by highlighting the lesson and clicking the Details button. See the Course Details window on the next page.

Course and Lesson Management
5-12
Course Details Window
The Course Details window allows one of three options to be selected for the lesson specified under the title bar (Optional, Prerequisite Checking, or Required) and values to be entered for Weight and Permission. Each of the parameters is discussed below.
Optional Option
This option overrides any prerequisite checking assigned to the student menu. It allows the instructor to exempt certain lessons on a student's menu as prerequisites. Students are not required to take a lesson tagged as Optional to move forward in their course menu. Additionally, Scores Pro will not factor grades earned in this lesson into the student's data.
Prerequisite Checking Option
All Nida CAI Pro lessons are defaulted to Prerequisite Checking. This option tags the lesson as a prerequisite for students to advance in their course menu. The instructor must enable the student’s CAI Pro menu prerequisite checking in Scores Pro for this to take effect.
Continued on next page

Courses
5-13
Course Details Window, continued Required Option
This option ensures that Scores Pro factors the lesson score into the student’s data. All scores, even zeros from uncompleted lessons, are averaged into the student’s final score.
Weight Field
This parameter allows the instructor to establish a weight for the grade of the lesson in relation to other lessons in the course. Scores Pro ranks a lesson with the weight of 100 equally with all other lessons with a 100 weight. To place less emphasis on the score of a particular lesson, the weight field can be reduced to any number from 1-1000.
Formula: ∑
∑ ×=
i
ii
weight
gradeweightAverage
Permission Field
This parameter allows you to set levels of student access to the lesson. Permission levels of 1 to 32,000 can be set, with 0 providing the lowest level of access and 32,000 the highest. Students are assigned permission levels and can only access lessons with the same or lower permission number. This feature is used when multiple levels of students will be taking the same course or to ensure that students do not advance beyond the level desired by the instructor.
Course and Lesson Management
5-14
Use the following Step-Action Table to assist you in creating a new course title.
Step-Action Table #5-1: CREATING A NEW COURSE TITLE
STEP ACTION COMMENTS
1. Open Scores Pro, open your database, and click the Courses tab.
The Course Listing will be displayed.
2. Right-click the Course Listing select Add Course from the context menu.
The Course Information window will be displayed.
3. Fill in the ID and Title fields. These fields must be filled in to continue.
4. Fill in the Level and Credits fields as appropriate.
These are optional fields and do not need to be filled in to continue.
5. Fill in the Optional Fields if desired.
Refer to the Filtering section of Chapter 3, Basic Management, in this Guide for details if necessary.
6. Click the Add button. The ID field will increment by one and the Title field will be empty.
7. Click the Close button. The Course Listing will be displayed, showing the new course you have just created.
8. Proceed to the next Step-Action Table to create an outline for your new course.
Modifying Courses
To modify existing courses, follow the Step-Action Tables on the next two pages. The process is the same as for creating a new course.

Courses
5-15
Step-Action Table #5-2: CREATING OR MODIFYING A COURSE OUTLINE
STEP ACTION COMMENTS
1. For a new course, you must first create the title. For an existing course, proceed to Step 2.
Follow the steps in the previous Step-Action Table.
2. Open the Course Listing if it is not already displayed. Highlight the desired course title, right-click, and select Edit Course Outline from the context menu.
The Course Outline window will be displayed.
3. To add units, highlight <empty> in the Outline box. Click the Insert button and enter the unit title.
Continue inserting units until your course outline is complete. Use the Remove and Modify buttons to delete or change highlighted unit titles.
4. To add blocks within a unit, highlight the <empty> associated with the unit and click the Insert button.
To expand the units, click the U symbol. Use the Remove and Modify buttons to delete or change highlighted block titles.
5. To add a lesson: – In the Details box, highlight
the lesson you want to add. – In the Outline box, highlight
the lesson under the target position.
– Click the <<
arrow button.
The lesson will be inserted into the outline above the highlight bar in the Outline box. Highlight the <empty> line associated with each block or unit to place lessons in that part of the outline.
6. To remove a lesson: – Highlight the lesson in the
Outline box. – Click the >>
arrow button.
The Remove button under the Outline box will not delete lessons; it is used only for removing unit or block titles.
7. Click OK to end.
The Course Listing will be displayed.

Course and Lesson Management
5-16
Step-Action Table #5-3: CUSTOMIZING LESSON PARAMETERS IN A NEW OR EXISTING COURSE
STEP ACTION COMMENTS
1. For a new course, you must first create the title and outline. For an existing course and outline, proceed to Step 2.
Follow the steps in the previous two Step-Action Tables.
2. Open the Course Listing if it is not already displayed. Highlight the desired course, right-click, and select Edit Lesson Info from the context menu.
The Course Properties window will be displayed.
3. To expand a unit, click the U symbol.
A list of blocks contained in the unit will appear (if any). Click the B symbol to expand the block. A list of lessons contained in the unit or block will then be displayed.
4. Highlight the desired lesson and click the Details button.
The Course Details window will be displayed, with the lesson title above the option buttons.
5. Select the option button for the appropriate Prerequisite level.
Lessons can be designated as prerequisites so that a student must complete them before moving forward in the course, or they can be marked to make sure the lesson score is included as a factor in the student's record.
6. Enter the Weight parameter. Enter the Permission parameter.
100 in the Weight field means the lesson is ranked equally with all other lessons that have been assigned 100. A lower number (1-99) causes less emphasis to be placed on the lesson. Students are assigned permission levels and can only access lessons with the same or lower permission number.
7. Click the OK button on the Course Details window.
The Course Properties window will be displayed, showing the corrected parameters.
8. Click the OK button on the Course Properties window.
The Course Listing will be displayed.
Your course has now been successfully created or modified.

Lessons
5-17
Lessons
Each course is made up of one or more lessons. These lessons can be:
Nida lessons
lessons you've created with a specific application
lessons containing instructor written messages or project instructions
simple grade entry windows for performance based
lessons
a combination of any of the above
Managing Lessons
The first step in managing lessons is to ensure that each lesson appears correctly in the Lesson Listing, which shows all the lessons that you have available to you. Only those lessons that are displayed in the Lesson Listing can be accessed for building courses. Therefore, it is very important to ensure the lessons supporting your courses are properly entered into the database.

Course and Lesson Management
5-18
Lesson Listing
Lessons are organized into courses from the Lesson Listing. To access the Lesson Listing, open a Scores Pro database and click the Lessons tab at the bottom of the window. See the Lesson Listing example below.
New lessons can be added to the database. Existing lessons can be modified or deleted from the database. Details are provided in this section for adding, modifying, and deleting lessons. The first step of this process is to understand the various details of a lesson. Access the Lesson Detail Information window by highlighting a lesson on the Lesson Listing, right-clicking, and selecting either Add Item or Edit Item Info from the context menu. The Lesson Detail Information window is shown on the next page, followed by an explanation of each detail.

Lessons
5-19
Lesson Detail Information
The Lesson Detail Information window contains fields and boxes for defining each lesson. As you can identify in the figure above, the fields are:
ID
File
Title and the boxes are:
Lesson Type
Exam Type
Storage
Section Tags
Optional Fields Requirements for field entries and option selections will vary, depending on the Lesson Type. Fields and options are discussed on the following pages.

Course and Lesson Management
5-20
ID and File Fields
These fields are used by Scores Pro and CAI Pro to identify lessons in the database. Depending on the lesson type, one or the other or both fields require an entry.
Nida lessons require only an ID field entry.
Filenames with an .RTF extension are placed in the Nida98\Lessons directory and use the number in the ID field to identify the lesson in the database.
Non-Nida lessons require a File field entry, with particular emphasis on the filename extension. The extension must be the standard application program extension (for example, .PPT for PowerPoint). Non-Nida lessons are usually placed in a subdirectory under \nida98\lessons or in a separate directory appropriate for the type of file.
Title Field
The Title field is used for every lesson, regardless of lesson type. The entry in this field will be the title that appears in each of the Scores Pro listings and on the CAI Pro student menus.

Lessons
5-21
Lesson Types
Lesson types are used to define different lesson applications for use in CAI Pro. Examine the Lesson Type box from the Lesson Detail Information window: For example, an instructor with a special project for the students to complete has prepared a handout for them to follow during the project. For this application, the Project lesson type would be used, to list the project name on the student’s menu and allow the project handout to be displayed on the student computer for reading or printing out. In addition, the Project lesson type would provide a field for the instructor to enter a project grade into the student's record. A description of each lesson type is presented below.
Unknown
This lesson type is currently inoperative. Nida has reserved this type to provide custom lesson types, should one of the existing lesson types not meet your specific needs.
Continued on next page

Course and Lesson Management
5-22
Lesson Types, continued Manual Entry
This lesson type allows manual entry of grades into the student records from Scores Pro. It is also used to record attendance, extra credit, or special recognition that instructors wish to include as part of the overall grade. The student’s menu, viewed in CAI Pro, will not display a line for this type.
Project
This lesson type incorporates the features of Manual Entry and Text Window. It allows the incorporation of messages or instructions to be included as part of a lesson and allows the instructor to manually enter a grade in CAI Pro at the completion of the assignment. Students selecting this item from their lesson menu will access a Rich Text Format file from which they receive their instructions. The .RTF file is accessed from the Nida98/Lessons directory.
Continued on next page

Lessons
5-23
Lesson Types, continued CAI Lesson
This lesson type applies to lessons that are developed by Nida.
CAI Lesson – Non-Nida
There are several different types of lessons that will run in CAI Pro. For example, PowerPoint presentations, virtual electronics software packages, or any other non-Nida developed lessons can be added to the student’s lesson menu. Lessons developed with application software different from Nida lessons are assigned this lesson type. Due to the variety of software packages on the market and potential program conflicts with Nida courseware, Scores Pro is not designed to record results for tests included in non-Nida lessons. However, student retention data for non-Nida lessons can be captured if the Nida Quester program is used to create the test independently. This test would be listed as a separate item on the student's lesson menu.
Continued on next page

Course and Lesson Management
5-24
Lesson Types, continued Quester Test
Quester is part of an optional test-writing program available from Nida. This lesson type allows access to Quester edit windows for developing tests to support your non-Nida lesson, customize Nida quizzes and tests, or develop a custom stand-alone test.
Text Window
The Test Window lesson type allows text messages or documents to be accessed from the student’s lesson window. Grades are not sought or recorded. This lesson type is used for lessons provided for informational purposes only and will not be recorded as part of the student’s grade.

Lessons
5-25
Lesson Detail Information Window Exam Type Box
The Exam Type selection box identifies the type of feedback desired for each lesson. Each lesson type is compatible with certain exam types. If no feedback is required, None should be selected. Count is used only when the Test button is selected. The table below shows the exam type that works best with each lesson type.
Lesson Information Table
Lesson Type Exam Type
Unknown - -
Manual Entry None
Project Test or None
CAI Lesson Quiz or Test
CAI Lesson – Non-Nida None
Quester Test Test
Text Window None

Course and Lesson Management
5-26
Lesson Detail Information Storage Box
The Storage box is currently defaulted to “Student” and is inactive.
Section Tags Box
Section Tags are fields Nida uses in filtering lesson titles. For example, with the Section Tags set above, only the Math lessons in the Basic Electronics Courses would be displayed on the Lesson Listing.
Optional Fields Box
The Optional Fields box allows you to enter filter names for the lessons you develop for quick and easy access.

Lessons
5-27
CAI Lessons (Nida Lessons)
Your Scores Pro Management System comes preloaded with the Nida lessons and courses you purchased for your program. Look at the information in the following figure. This configuration is typical of a Nida developed lesson.
Typical Lesson Detail Information Window for Nida Lessons
Basic ID Information
All Nida lessons show a number in the ID field. CAI Pro and Scores Pro use these specifically assigned Nida identification numbers from the database to run the lessons. Consequently, an entry in the File field is not required for Nida lessons. Do not change Lesson Detail Information of Nida developed lessons unless directed to do so by a Nida Curriculum Specialist.
Lesson Type
The option selected in the Lesson Type box for Nida lessons is always CAI Lesson. This identifies the lesson as a Nida-developed program that is recognized and accessed from the database solely by the ID number.

Course and Lesson Management
5-28
User Developed Lessons
You can create your own lessons to add to the database. These can be simple messages and instructions, projects, tests, or full-blown CAI lessons that you develop with your own computer software.
.RTF Files
Messages, instructions, or projects can be created with a word processor. When you add this type of lesson to the Scores Pro database, you will:
assign an ID number, which Scores Pro will use as the reference for your lesson in the database.
save the file to the Nida98\Lessons directory.
Continued on next page

Lessons
5-29
User Developed Lessons, continued Your CAI Lessons
You can develop your own CAI lessons with software programs that you have available to you. This type of lesson must be saved with the extension that is standard for the software you are using and placed in a subdirectory that you create. When you add this lesson to the database, you will use the File field and the ID field on the Lesson Detail Information window. The full path of the lesson (including drive, directory, and filename with extension) must be entered in the File field. CAI Pro will use this information to identify the lesson in the database. To be able to run a lesson created with a non-Nida application, CAI Pro needs information on that application. To provide this information, we use REGISTRY OVERRIDES. Registry overrides are explained in Chapter 4, CAI Pro.

Course and Lesson Management
5-30
Variables
You can use VARIABLES to make it easier to add non-Nida lessons to your database. Instead of writing the entire path in the File field of the Lesson Detail Information window, you can substitute a one-word variable to provide the necessary path information. Once you have defined a variable to a certain directory, all you will need to enter in the File field is the variable and the filename. Using variables saves time when you have a number of lessons to enter. It also reduces the likelihood of lesson access problems due to errors in entering lengthy path strings.
A variable used in Scores Pro must also be defined in CAI Pro. Each Student station must define the variable path as appropriate for your system configuration.
Defining Variables
To define a variable in Scores Pro, select Options|Variables from the menu bar. To define a variable in CAI Pro, the Instructor Options must be enabled. (Refer to Chapter 4, CAI Pro for details on enabling the Instructor Options, if necessary.) Select Options|Variables from the menu bar. The Variables Definition window will be displayed.

Lessons
5-31
Variables Definition Window
Some items listed are created by Nida and cannot be modified. These items appear on the list in gray text. User-defined variables appear in black text, and these items can be modified at will.

Course and Lesson Management
5-32
Use the following Step-Action Table to define variables and make your Lesson Detail entry easier.
Step-Action Table #5-4: DEFINING VARIABLES
STEP ACTION COMMENTS
1. From Scores Pro or CAI Pro, select Options|Variables.
In CAI Pro, the Instructor Options must first be activated. The Variables Definition window will be displayed.
2. Click the Add button. A variable line will appear with the name “new”.
3. Click the word "new" and change it to the word you have chosen for your variable.
It is a good idea to make your variable names 8 characters or less for reduced possibility of error.
4. Click the Value section of the line and carefully enter the path your variable will represent.
On network systems, the path will normally lead to the server; however, variables can be locally maintained on each Student station.
5. Click the OK button to set the variable.
The Listing previously displayed will appear in full view.
6. To modify your variable: Open the Variables Definition window per Step #1. Click the Value section of the appropriate line and make the required changes. Click the OK button to update the variable.

Lessons
5-33
Registry Overrides
There are two requirements for running a lesson created with a non-Nida application:
1. The file name entered in the Scores Pro Lesson Detail Information window must end with the application's extension, such as .PPT for PowerPoint presentations or .DOC for Microsoft Word files.
2. Registry Overrides must be identified and added to CAI Pro.
CAI Pro identifies the lesson by the filename extension and uses information from the Registry Overrides to launch the appropriate program that will run it. As for variables, each Student station in a stand-alone or multi-user configuration must be modified with the Registry Overrides. Network systems need only update the shared copy of CAI Pro.
The figure above shows a typical non-Nida lesson entry in the Lesson Detail Information window. Notice that the File field uses the variable “extra” and ends in .ppt. The .ppt application extension must be registered in CAI Pro.

Course and Lesson Management
5-34
Adding Registry Overrides
To register a non-Nida program application for use in CAI Pro, select Options|Lessons from the CAI Pro menu bar. The Lessons Options window will be displayed. Click the Other tab to reach the following window.
Click the Add button to reach the Applications Properties screen.
Continued on next page

Lessons
5-35
Adding Registry Overrides, continued Override Type Box
The Override Type box allows you to identify the specific Registry Override file extension for the non-Nida application. In the File Class (*.???) field, enter the extension unique to your lesson application. Example: .ppt for PowerPoint. The Lesson ID field is used by Nida to run unique applications within a lesson. This option should be used only when directed by a Nida curriculum specialist.
Command Line and Startup Directory Fields
These fields are for entering the command and startup directory path for the application being registered. Use the Browse button to search your drive for the correct paths. From Browse, click the application file and select OK to automatically fill in these fields as well as the application icon.
Set Icon Button
The icon will be set automatically to the application's primary icon. If you wish to change the icon to an alternate one, click Set Icon and choose from the application's alternate icon set.

Course and Lesson Management
5-36
Use the following Step-Action Table to add a registry to CAI Pro for running a non-Nida developed lesson.
Step-Action Table #5-5: ADDING A REGISTRY TO CAI PRO
STEP ACTION COMMENTS
1. Open CAI Pro and select Options|Lessons.
The Instructor Options must be activated. (Refer to Chapter 4, CAI Pro for details on enabling the Instructor Options, if necessary.) The Lesson Options window will be displayed.
2. Click the Other tab. The Registry Overrides box is displayed.
3. Click the Add button. The Applications Properties window will be displayed.
4. To choose the Override Type, click the File Class (*.???) option button and enter the extension.
Be sure to include the asterisk and period prior to the three letters of the extension.
5. Enter the Command Line and Startup Directory paths in the appropriate fields.
Use the Browse button to easily locate the desired application.
6. Check the Icon box for the proper icon.
If you desire an alternate icon, click the Set Icon button to change the image.
7. Click OK on the Application Properties screen.
The Lesson Options Other tab will be displayed. Notice that your new extension appears with the application icon.
8. Click OK on the Lesson Options window.
The CAI Pro opening window will be displayed.

Lessons
5-37
Adding Non-Nida Lessons to Your Database
To start, be sure you are familiar with the Lesson Detail Information window. Refer to the descriptions beginning on Page 5-19 if necessary. It is important to realize a preliminary step is required to add a lesson to the database so it will appear on the Lesson Listing. You must actually create the lesson first and place it in the directory that will appear in the path entry of the Lesson Detail Information File field.
Fill in the fields as appropriate for ID, File, and Title fields. See the table on the following page for details.

Course and Lesson Management
5-38
To determine which fields are required for your particular lesson type, use the Lesson Information Table below. For further information, refer to the full explanation of the identification protocol beginning on Page 5-19.
Lesson Information Table
Lesson Type ID/File Field Entry Exam Type
Unknown - - - -
Manual Entry Filename None
Project ID number
(and file with .RTF ext in Nida98\Lessons directory)
Test or None
CAI Lesson Nida ID number Quiz or Test
CAI Lesson – Non-Nida
Filename with application's extension None
Quester Test ID number Test
Text Window ID number
(and file with .RTF ext in Nida98\Lessons directory)
None
When you have filled in the appropriate fields for your lesson type, define the rest of the properties for your lesson by selecting an option in each group box. Use the table above to determine the Exam type you should use.
Click the Add button. Your new lesson will be displayed in the Lesson Listing

Lessons
5-39
Use the following Step-Action Table to add non-Nida lessons to your Scores Pro database.
Step-Action Table #5-6: ADDING NON-NIDA LESSONS TO YOUR DATABASE
STEP ACTION COMMENTS
1. Create your new lesson, message, instructions, test, or project using your supporting application.
For projects, messages, or instructions, use a word processor and save the file as an .RTF file in the Nida98/Lessons directory. For non-Nida CAI lessons, create a directory under Nida98 and save the file to the created directory with the standard extension for the application you've used.
2. Open the Scores Pro database. Select File|Open Database from the Scores Pro menu bar or click the Open Database button on the toolbar. The Lesson Listing will be displayed.
3. Select the Lessons tab. The Lesson Listing will be displayed.
4. Right-click the Lesson Listing and select Add Item from the context menu.
The Lesson Detail Information window will be displayed.
5. Fill in the ID, File, and Title fields as appropriate.
Refer to the table on Page 5-38 to determine which field(s) are required for your particular lesson type. ID numbers must be an exact duplication from the Nida98/Lessons directory. File field entries must indicate the full path established in Step 1.
8. Select the appropriate lesson option from each box on the Lesson Detail Information window.
Refer to the option descriptions beginning on Page 5-21 if necessary.
9. Click the Add button to enter the lesson in the database.
Notice that the fields clear and the ID number increments by one each time you select Add.
10. Click the Close button to exit. The new Lesson Listing will be displayed.

Course and Lesson Management
5-40
Item Analysis
Scores Pro incorporates a Lesson Item Analysis feature that assists the instructor/administrator in evaluating and validating questions within a lesson.
This feature displays:
1. the lesson ID number
2. the number of sessions the lesson has supported during the time period indicated
3. the Test and Question numbers
4. the average score attained for each test question
5. each question’s distractors with the percentage of students choosing each distractor
6. the number of students who attempted each question
Continued on next page

Item Analysis
5-41
Item Analysis, continued
Examples of what the information contained in the Item Analysis can be used to determine:
Exceptionally easy or difficult questions Which questions appear to the students most often The average selected answer to a question The strength of a lesson in teaching a particular objective
The Item Analysis data can easily be captured and copied to an Access database or equivalent.
Step-Action Table #5-7: ANALYZING LESSON ITEMS
STEP ACTION COMMENTS
1. Open Scores Pro and the desired database.
2. Select the Lessons tab.
3. Highlight the lesson that you wish to analyze.
Use the scroll bar on the right side of the window to assist you in locating the lesson.
4. Right-click the lesson title and select Item Analysis.
The Item Analysis dialog box will be displayed.
5. Enter the beginning and ending dates of your analysis query.
The dates can be entered in either of the following formats:
MM-DD-YY MM/DD/YY
6. Click Start. When the analysis is complete, the Processing Record field will display the number of records reviewed and the analysis data will be displayed.
7. To save the data to another application, highlight the data, right-click, select Copy, and paste in desired location.
The data can be pasted into any spreadsheet, database, or word processor.
8. Click Close to exit the Item Analysis.
The Lessons Listing will be displayed.

Course and Lesson Management
5-42
Quester
5-43
Quester – The Test Making Program
Quester, an optional program available from Nida, is designed for creating computer-delivered quizzes or tests. Because of the program's popularity, we have included Quester in this manual.
Operating within the latest Windows technology, Quester allows the user to select questions from a series of pre-developed Question Banks and save them as a fully functional computer-delivered test. During the development phase, questions in the bank may be viewed in simple text mode or full graphic interactive mode. Similar questions can be grouped by category or objective to aid in analysis of individual student progress and feedback. A single Quester test can contain up to ten different categories with a total of fifty questions per test. Tests are saved under a unique filename and registered as being randomly generated or fixed delivery. New questions may be added to existing question banks or new banks can be created using ToolBook II Instructor 6.5 or higher, also a program sold separately.

Course and Lesson Management
5-44
Quester Program Contents
The Quester program comes complete with everything needed to make your first computer-delivered tests. A set of question banks with hundreds of questions is provided for the DC, AC, Analog, and Digital units. Additional question banks may be purchased separately for the following subjects:
Basic Mathematics Algebra Calculus Trigonometry Computer Math Microprocessors
Quester Installation
Insert the Quester CD ROM into your computer and select Quester from the Nida Installation Wizard window. Read the Software License Agreement and select the Accept button if you agree.

Quester
5-45
Directory Setup
Quester will default to the C:\Nida Software directory on your computer. It is recommended that you accept the default setting. If you choose to select a different location, be advised that all reference made to the Nida Software directory will need to be modified to your new destination directory.
Installation Options
It is recommended that you accept the two default Taskbar and Desktop Options checked. However, these options have no direct effect on the operation of the Quester Program and are provided as conveniences for starting the program.

Course and Lesson Management
5-46
Registration Information
Registration information must be entered in order for the software to operate. Fill in the Company or School Name and City, State fields with your individual information. If you are installing an evaluation copy, enter EVALUATION in the Registration Number field. If you are installing a fully registered copy, locate the registration form that accompanied your Quester software package. Enter the registration number as shown on the registration form. When your registration information has been entered, click the Next button. All program files will be copied to your hard drive, and you will be returned to the Nida Installation Wizard window at the end of the installation process. Click the Exit button on the Nida Installation Wizard window. Double-click the Quester icon on your desktop to open Quester.

Quester
5-47
System Operation
If Quester is not open, double-click the Quester icon on the desktop to open it. The following window will be displayed.
Test Information Window
Select File|New from the menu bar. The Test Information window will appear. Enter a title in the Title field. This title will appear on the first page of the test when it is selected by a student. For example, if your test covers the first block of instruction in DC Circuits, you might entitle the test “Basic DC Circuits”.

Course and Lesson Management
5-48
Test Options
Selections offered in the Test Options box allow you to determine how the test is delivered to the student.
Timed
This option offers the choices of No, Yes, or Local. No means that the option is not active. No timing control will be established for this test. Yes means that the option is active, and entries must be made in the two fields to the right to define the time a student may spend on each question. When Local is selected, the local CAI Pro setting will control the option. For example, if No is selected, this test can never be administered as a timed test. If Yes is selected, this test will always be a timed test. If Local is selected, whatever is set at the local computer will determine the timing for this test.
Sequence
This option offers the choices of Random, In Order, or Local. Select Random or In Order at the time of development to ensure that the test will always be delivered as selected. Select Local to allow the local computer to determine how the test will be delivered.
Continued on next page

Quester
5-49
Test Options, continued Quiz Mode
This option offers the choices of Local, Single Pass, Multi-Pass, or Full Pass. Single Pass will permit the student to see each question once. There is no skip option and all questions must be answered as they are presented. There is no option for review in this mode. Multi-Pass will permit the student to skip questions. Skipped questions may be answered later; however, a student is not permitted to change an answer that has already been entered. Full Pass will permit the student the most flexibility in taking a test. During Full Pass, a student may skip or review questions and change answers. Local may offer any of the options, depending on what is set in CAI Pro on the local computer.
Critique Mode
This option offers the choices of Local, No Review, Incorrect Only, and All Questions. These options mean exactly what their names indicate.
Passing Grade
To set the passing grade at the time the test is created, enter a percentage in this field. For example, 70% will require the student to answer 7 out of 10 questions correctly in order to pass a test. Local will accept the local computer default.
Disable View
Normally during a lesson, students are allowed to view their own records in CAI Pro. However, during the administration of a comprehensive measurement, it may not be desirable to allow a student to view the correct and incorrect answers that are available in the CAI Pro report. Checking this option will disable the view function in CAI Pro.

Course and Lesson Management
5-50
Creating a Quester Test
From the menu bar on the opening Quester window, select File|New. The Quester Test Creation window will appear, with its two boxes: the Test box and the Banks box. Right-click the empty Test box to display a context menu. Click Add, and Test 1 will appear. Multiple versions of a test may be created within one test file. For our example, though, we will create only a single test in this file. Highlight Test 1 and right-click. Select Add Category and fill in the category name. Repeat two more times to create a total of three categories. Your Test window will look like the one shown below, with 3 categories under Test 1.
Categories can be named for the objective they represent or the subject type. For example, Category 1 could be named Basic Mathematics and all the questions under that heading will be basic math questions. Category 2 might be named Basic DC Circuits, and so on. It is possible to add up to 10 different categories per test. Right-click and choose Delete to remove a category.

Quester
5-51
Selecting Question Banks
Right-click the Banks box on the Quester Test Creation window and select Open banks from the context menu. The Add Quester Bank file listing will appear. Highlight 90000300.bni and notice that a description of the bank or bank name is displayed in the box at the bottom of the window. Click the Open button and the bank will appear in the Banks box of the Quester file window. Repeat the process and open banks 90001100.bni (DC Circuits, Block 1) and 90001300.bni (DC Circuits, Block 3). Your Quester Test Creation window will look like the one below.

Course and Lesson Management
5-52
Adding Questions to the Test
Once you have selected the necessary Question Banks and they appear in the Banks window, you are ready to add questions to your test. In the Test window, highlight the category into which you want to place the questions. For this example, select 1. Math. Click the small plus (+) sign next to the Trigonometry bank in the Banks window. This will display the areas from which questions may be selected within the subject area of trigonometry.
For this example, click the small plus sign next to 5. Angle Formulas.
Continued on next page

Quester
5-53
Adding Questions to the Test, continued
There are twenty questions available on the trigonometry subject called Angle Formulas. (You can see 17 of them in the figure below.) With 1. Math still highlighted in the Test box, double-click question numbers 1, 2, and 3 in the Banks box. Notice that the questions are added to your Test 1 under the Math category.
Continue this process until you have selected all the questions you want to include in your test, up to a maximum of fifty questions for a file.

Course and Lesson Management
5-54
Sample Quester Test
After you have selected all your questions, your test might look like the example shown below.
You have created a test with three categories and ten questions.
Viewing Questions in the Banks
To this point, you have been using the text mode for selecting questions for your test. The visual mode can also be used for selecting questions for your test. This format allows you to see the question with the graphics included, just as the student will see it. To enable the visual mode, highlight a question and right-click. When the context menu appears, choose View. After a few seconds, the test question bank will be loaded into the run time module, and you will be able to select questions for your test in the visual mode. Press F5 to add the current page to the test. Press ESCAPE to view the Topics menu. Press F2 to return to the Quester Test Creation window.

Quester
5-55
Saving Your Test TEMPLATE
Select File|Save and give your Quester test a filename. The filename must be eight characters long and begin with a letter. For example, you might use T9000001. This name will serve as the ID number for your course. Caution: You have not created a functional test yet. You have only created the template from which the test will be generated. The file you have just saved will have an extension of .TSI.
Creating the Test Itself
From the template you have just saved, you will create the test that students will be able to take. Select File|Build ToolBook File from the Test Creation window menu bar. Quester will construct your test. When the process is complete, you will have a new file named T9000001.tbk. Place this file in the Nida98\Lessons directory. Use the Step-Action Table on the following page to enter your lesson (test) into your database.

Course and Lesson Management
5-56
Step-Action Table #5-8: ADDING A QUESTER TEST TO THE DATABASE
STEP ACTION COMMENTS
1. Create your Quester test and place the .TBK file in the Nida98\Lessons directory.
See the Quester section of this chapter for guidance, if necessary.
2. Open the Scores Pro. Double-click the Scores Pro icon on your desktop or select Start|Programs|Nida Software| Scores Pro.
3. Open a database. Click the Lessons tab.
Select File|Open Database from the Scores Pro menu bar or click the Open Database button on the toolbar. The Lesson Listing will be displayed.
4. Right-click the Lesson Listing and select Add Item from the context menu.
The Lesson Detail Information window will be displayed.
5. Enter the 8-character filename of your test in the Lesson Detail Information ID field.
Leave the File field blank. Scores Pro and CAI Pro will use the ID number to identify your test in the database.
6. Enter a name for your test in the Title field.
The name will appear in all Scores Pro listings and CAI Pro menus.
7. Enable Quester Test as the Lesson Type option.
8. Enable Test as the Exam Type option, and enter the number of questions in your test.
For our sample test, enter the number 10.
9. Make entries in the Section Tags box and the Optional Fields box if desired.
10. Click the Add button to enter the test in the database.
11. Click Close to exit the Lesson Detail Information window.
The Lesson Listing will be displayed, with your new Quester test included.
Use the following Step-Action Table to add the Quester test you've created to the database.

Proctored Testing
5-57
Proctored Testing Overview
The Scores Pro Management System provides instructors with the ability to safeguard and deny access to Unit, Block, and Quester tests displayed on the student menu. Until the student is authorized to take the test and a proctor is present to oversee the testing session, the student cannot access the menu item protected by the proctor authorization code. During the creation or modification of a course outline, the instructor adds the proctor authorization code to individual lessons or tests. Students can always view the lesson or test title on their individual CAI Pro menu; however, they cannot access the menu item without a proctor authorization code.
Proctor Authorization Codes
Proctor Authorization Codes are letters, numbers, variables, or a combination of all three, entered in CAI Pro by the proctor, facilitator, or classroom instructor. Entry of the code in the CAI Pro Proctor Authorization window allows student access to the protected menu item. Replaceable variables allow the code to be dynamic, preventing the student from using the code at a later date if viewed during proctor entry.
Format
Proctor Authorization Codes can be up to 20 characters in length. Codes can be made up of a combination of fixed letters and numbers. All codes begin with a /P immediately followed by the code letters and/or numbers.

Course and Lesson Management
5-58
Proctor Authorization Codes Replaceable Variables
The Proctor Authorization Code can be created using fixed data and/or replaceable variables. Replaceable variables add an increased level of security by constantly changing the Proctor Authorization Code, making it difficult to determine or duplicate if the code structure is not known. Replaceable Variable entries consist of years, months, days, hours, or minutes. For example, when a Minute replaceable variable is used, proctors enter the time shown on the computer clock plus or minus 5 minutes.
The following list describes the replaceable variables available.
Replaceable Variable Syntax Chart (Case-sensitive)
Syntax Description Example yyyy 4-digit year %2002% yy 2-digit year %02% mm 2-digit month %01% = January m 1 or 2-digit month %9% = September dd 2-digit day of the month %25% = 25th day of the month d 1 or 2-digit day of the month %7% = 7th day of the month hh 2-digit hour (24) %15% = 3pm h 1 or 2-digit hour %8% = 8am nn 2-digit minute %55% n 1 or 2-digit minute %15% M First letter of the month name %J% = January, June, or July
MM First two letters of the month %JA% = January D First letter of the day of the week %T% = Tuesday or Thursday
DD First two letters of the day %TH% = Thursday
SN First numerical sequence in the Station name
%03% = 3rd assigned workstation
SI1 First character in the student ID %A% = First character in student ID “Ada004”
SI2 First two characters in student ID %Ad% = First two characters in student ID “Ada004”
SI3 First three characters in the student ID
%Ada% = First three characters in student ID “Ada004”
SI4 First four characters in the student ID
%Ada0% = First four characters in student ID “Ada004”

Proctored Testing
5-59
Setting Proctor Authorization Codes
Setting up Proctor Authorization Codes is accomplished by entering the code in the Parameters field of the Modify Course Item dialog box. See the Setting Proctor Authorization Codes Step-Action Table for details on accessing the Modify Course Item dialog box. Once a code has been set, the Course Outline will display the code next to the menu item being protected.
Conventions
When entering proctor codes into Scores Pro, it is important to remember two conventions: 1. All entries must begin with a /P. 2. Each variable must be preceded and followed by a percent sign
(%).
The following table describes some examples of Proctor Authorization Code entries.
Proctor Authorization Code Examples
Parameter Field Entry Description Proctor Authorization Entry
/PJOE Fixed letter code JOE
/P12345 Fixed number code 12345
/P%MM% Replaceable variable code: first two letters of the current month
In January - JA In March - MA In August - AU
/PJOE123%MM%
Combination code: fixed letter + fixed number + first two letters of current month
In January - JOE123JA In March - JOE123MA In August - JOE123AU
/P%DD%%nn%
2 variable code: first two letters of the current day of the week and the computer clock minute
On Tuesday at 2:07: TU02 through TU12 (allows ± 5 minutes)
/PJOE%dd% Combination code: fixed letter and two digit day of the month
On January 25 – JOE25 On July 25 - JOE25

Course and Lesson Management
5-60
Proctor Authorization Codes Windows Unmodified Course Outline
Modify Course Item Window with Parameters Field Entry
Course Outline Modified

Proctored Testing
5-61
Use the following Step-Action Table to assign a Proctor Authorization Code to a lesson or test.
Step-Action Table #5-9: ASSIGNING PROCTOR AUTHORIZATION CODES TO LESSONS AND TESTS
STEP ACTION COMMENTS
1. Open Scores Pro. From your desktop, double-click the Scores Pro icon; or, select Start|Programs|Nida Software|Scores Pro. The default password is NIDA1.
2. Open your database.
3. Select the Courses tab.
4. Highlight the course that contains the lesson or test to be protected.
5. Right-click and select Edit Course Outline from the context menu.
The Course Outline window will be displayed.
6. Highlight the desired lesson or test, located in the Outline dialog box.
If the lesson or test is not part of the Course Outline, modify your course outline. Refer to Table #5-2 for information on how to modify your course outline.
7. Click the Modify button. The Modify Course Item dialog box will be displayed.
8. Enter the desired Proctor Authorization Code parameter syntax into the Parameters field.
Refer to the Replaceable Variable Syntax Chart for replaceable variable options. You must start each syntax with a /P. Replaceable variables require a percent (%) sign before and after the variable. Syntax must not exceed 20 characters.
9. Click OK to close the Modify Course Item box.
10. Check that the Proctor Authorization Code syntax appears next to the desired lesson or test in the Outline.
If it does not appear, highlight the lesson or test item again and click the Modify button. Repeat Step 8.
11. Click OK to close the Course Outline window.
You must remake Key Disks or complete a Setup Home Directories function for the modified course to refresh the User’s files.

Course and Lesson Management
5-62

6-1
CHAPTER 6CHAPTER 6CHAPTER 6CHAPTER 6 –––– SYSTEM MAINTENANCE SYSTEM MAINTENANCE SYSTEM MAINTENANCE SYSTEM MAINTENANCE AND AND AND AND TROUBLESHOOTINGTROUBLESHOOTINGTROUBLESHOOTINGTROUBLESHOOTING
Overview
The following Step-Action Tables will assist you in keeping your Nida courseware finely tuned for optimum, trouble-free performance.
System Maintenance
Your Scores Pro system requires periodic maintenance tasks to keep your system running in tip-top shape. These tasks include:
backing up your database
archiving your old database files
installing updates This chapter includes Step-Action Tables to guide you through some of the more frequently required maintenance tasks.
Troubleshooting
Occasionally, your system may not operate properly. When this occurs, a little troubleshooting might often be the simple key to identifying and correcting the problem. In the last section of this chapter, we have provided trouble-shooting guides to help you resolve the most common faults you are likely to encounter.
Technical Support
If the information in this chapter does not completely help you in completing a task or troubleshooting a problem, do not despair! Call the Nida Corporation technical support phone number (1-800-327-NIDA), or email us at [email protected] for quick and friendly assistance.

System Maintenance and Troubleshooting
6-2
Scores Pro Database Backups and Archives
You should BACK UP your Scores Pro databases:
on a regular basis
prior to installing any update or upgrade It is a good idea to ARCHIVE the databases for classes, semesters, or school years, as soon as you have completed the particular time period.
Home Directories
In network installations, it is not necessary to back up Users' Home Directories. Information in these files:
is copied into the databases when you run the Import (Merge) function
can be recreated using the Setup Home Directories function
of Scores Pro
Safeguard Exception
If for some reason a User’s Home Directory is deleted, the actual *.REC files are not recreated during the Setup Home Directories function. Students will not be able to use the View Records function in CAI Pro to look at records they posted prior to the loss. The records will be posted in Scores Pro, however, and can be printed out for the student to view.

Backing Up and Archiving
6-3
Use the following table to assist you in backing up/archiving your Scores Pro database.
Step-Action Table #6-1: BACKING UP AND ARCHIVING YOUR SCORES PRO DATABASE
STEP ACTION COMMENTS
To back up or archive a Scores Pro database, copy all of the files from the folder that contains the database. You may use compression software to minimize the size of your archives.
1. Ensure that Scores Pro is closed and not running.
CAUTION: Completing a network backup with Scores Pro open could cause file lockup. Automatic network backups are not recommended if there is any chance that the backup will be performed when the Scores Pro database is open.
2. To locate the Scores Pro database, right-click the Start button and select Explore.
Typical Scores Pro installations place the database in X:\Nida98\Instruct\Database (where X is the letter designating the drive).
3. Click Database to display its contents in the Explore window.
The database folders will be displayed.
4. Copy the contents of the folders to the archive or backup media. (Zip the files first to save space when archiving the database.)
It is not necessary to archive the $$USER$$ folder (or subfolders) that may appear in each database. These folders contain temporary files used to update the users' subdirectories in a network installation.
5. Close Explore to end the task.
TO RESTORE A DATABASE: Use Explore to copy the backed up/archived database into the X:\Nida98\Instruct\Database directory.

System Maintenance and Troubleshooting
6-4
Removing Duplicate Data
If the student results in your database have been consistently imported using the “Reprocess All Data” option, there is a high probability that the database is cluttered with redundant information. Duplicate data is evident when you view student records under the Students or Classes tab. Scores Pro gives you the ability to remove superfluous details with the Remove Duplicate Data feature found in the Options menu.
Removal Process
The Remove Duplicate Data feature searches your database and removes any data with that has been imported into the database more than once. The process can take from 5 to 30 minutes, depending on the size of your database.
Remove Duplicate Data Warning Message
When you begin the removal process, Scores Pro will display a warning about backing up your database before proceeding:
The default response is set to No in order to build in the opportunity for you to perform the appropriate backup(s) before you proceed with the removal function. It is always a good idea to begin any database maintenance function with a backup routine. See the Step-Action Table on the previous page for assistance in performing the backup/archiving procedure.
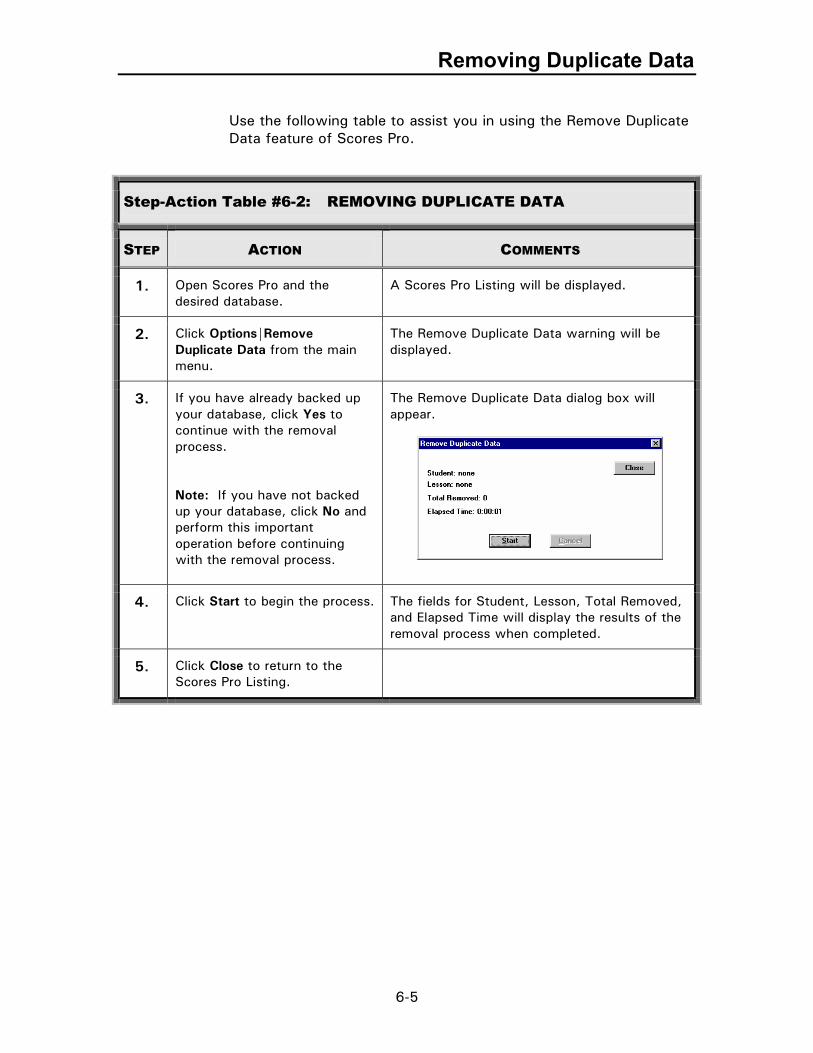
Removing Duplicate Data
6-5
Use the following table to assist you in using the Remove Duplicate Data feature of Scores Pro.
Step-Action Table #6-2: REMOVING DUPLICATE DATA
STEP ACTION COMMENTS
1. Open Scores Pro and the desired database.
A Scores Pro Listing will be displayed.
2. Click Options|Remove Duplicate Data from the main menu.
The Remove Duplicate Data warning will be displayed.
3. If you have already backed up your database, click Yes to continue with the removal process. Note: If you have not backed up your database, click No and perform this important operation before continuing with the removal process.
The Remove Duplicate Data dialog box will appear.
4. Click Start to begin the process. The fields for Student, Lesson, Total Removed, and Elapsed Time will display the results of the removal process when completed.
5. Click Close to return to the Scores Pro Listing.

System Maintenance and Troubleshooting
6-6
Transferring Data
There will be times when you need to move data from one Scores Pro database to another. Scores Pro provides the Transfer Data function to assist you in moving the data in one easy task. Any item in the database (lessons, courses, instructors, students, or classes) can be transferred with the Transfer Data feature.
Reasons for Transferring Data
Some of the reasons for transferring data are:
1. Lessons created for one database are desired in another.
2. A special course developed in a database is shared among several databases.
3. At the end of a student’s training, the complete student
record file is transferred to an archive database.
4. A particular database has been created to manage presentations, Quester tests, or special text lessons. Individual items are transferred to the appropriate database for use.
Transfer Data Process
The Transfer Data feature will transfer the highlighted item and all associated files attached to that item. For example, if a class is transferred, the Transfer Data feature will transfer the class files and all associated instructor, student, course, and lesson files. If a student is transferred into an archive database, the Transfer Data feature will transfer the student file and all of the student’s records.
"COPY" (Not "MOVE")
The Transfer Data feature creates a copy of the item being transferred into the new database. If the item is no longer needed in the originating database, the Delete command must be used to remove it.

Transferring Data
6-7
Use the following table to assist you in transferring data from one Scores Pro database to another.
Step-Action Table #6-3: TRANSFERRING DATA
STEP ACTION COMMENTS
1. Open Scores Pro and the desired (source) database.
2. Select the item to be transferred.
Click the appropriate View tab at the bottom of the window and highlight the item on the Listing.
3. Select File|Transfer Data from the main menu.
The Select Destination Database dialog box will be displayed.
4. Select the destination database. Double-click the path tree to expand or close folders.
5. Click OK. A message will be displayed indicating the items transferred. If the item is already present in the destination database, a message will be displayed and the transfer will stop.
8. Click OK. The message box will close and the transfer will be complete.

System Maintenance and Troubleshooting
6-8
Administering Home Directories (Networks Only)
The Administer Home Directories feature is one of the functions that is unique to a Network configuration of Scores Pro. It serves as a basic clean-up routine for the Users' directory.
What the Administer Home Directories Feature Does
The Administer Home Directories feature:
1. removes unregistered students from the master class indexes
2. purges each individual student home directory of menus no longer assigned
3. adjusts the class list and adds any new members to the
Users’ directory when a class is modified
Using the Administer Home Directories Feature
Since administering home directories is a function that should be performed often, details and directions for performing it are listed in Chapter 3 - Basic Management.

Installing Updates
6-9
Installing Updates
Periodically, Nida Corporation may send you an update to your Scores Pro/CAI Pro software. These software updates are intended to keep your Nida management system running smoothly and your courseware current with our latest version. Use the following tables to assist you in installing your Scores Pro and CAI Pro updates.
Step-Action Table #6-4: UPDATING A STAND ALONE SYSTEM
STEP ACTION COMMENTS
1. Insert the Update CD-ROM or floppy disk into the appropriate drive on the Student computer.
2. From the Update menu, select Stand-Alone, Student Workstation.
Follow the directions as they appear.
3. When the update process has finished, click Exit to return to the desktop.
Remove the Update software disk.
4. Repeat for all Student workstations.
5. Insert the Update CD-ROM or floppy disk into the appropriate drive on the Instructor workstation.
6. From the Update menu, select Stand-Alone, Instructor Workstation.
Follow the directions as they appear.
7. When the update process is finished, click Exit to return to the desktop

System Maintenance and Troubleshooting
6-10
Step-Action Table #6-5: UPDATING A NETWORK SYSTEM – DOS TO WINDOWS CONVERSION
STEP ACTION COMMENTS
1. Insert the Update CD-ROM or floppy disk into the appropriate drive on the Server.
2. From the Update menu, select the installation for your system configuration.
Select Peer-to-Peer or Client/Server.
3. Select Server software and uncheck the Include Instructor Access checkbox.
4. Enter the existing path to the \Nida98 directory.
Steps 1-4 update the server software.
5. Insert the Update CD-ROM or floppy disk into the appropriate drive on the Instructor and Student workstations.
If the auto-run feature of your CD-ROM begins the installation procedure, click the Exit button.
6. Open CAI Pro and select Options|System.
7. Select the Student Records tab and write down the user’s path. ___________________________
The user’s path can be found in the Users' Directory (Home or Root) field under LAN.
8. Select the Directories tab and write down the Lessons path. ___________________________
The Lessons path can be found in the Lessons path field.
9. Click OK in the Systems Options dialog box and exit CAI Pro.
Continued on next page

Network System Updates
6-11
Step-Action Table #6.5, continued: NETWORK SYSTEM UPDATE – DOS TO WINDOWS CONVERSION
STEP ACTION COMMENTS
10. Right-click the CAI Pro icon and select Properties. Select the Shortcut tab and write down the contents of the “Start In:” field. ___________________________
11. Right-click the Scores Pro icon and select Properties. Select the Shortcut tab and write down the contents of the “Start In:” field. ___________________________
12. Click Start|Run and open the installation on the CD-ROM.
Use the Browse feature to locate install.exe on your CD-ROM drive.
13. Click the Scores Pro icon on the Installation window.
The information collected in Steps 6-11 is used during the installation process.
14. Ensure the path information is correct for each step of the installation.
If the path information is not identical to the information collected in Steps 6-11, change the installation defaults to match your paths.
15. When the installation is complete, click Exit to return to the desktop.
16. Repeat Steps 12-14 at each Student and Instructor workstation.

System Maintenance and Troubleshooting
6-12
Step-Action Table #6-6: NETWORK SYSTEM UPDATE – TOOLBOOK VERSION UPDATE
STEP ACTION COMMENTS
1. Insert the Update CD-ROM or floppy disk into the appropriate drive on the Server.
2. From the Update menu, select the installation for your system model.
Select Peer-to-Peer or Client/Server.
3. Select Server software and uncheck the Include Instructor Access checkbox.
4. Enter the existing path to the \Nida98 directory.
Steps 1-4 update the server software.
5. Insert the Update CD-ROM or floppy disk into the appropriate drive on the Instructor and Student workstations.
6. Start CAI Pro and select Options|System.
7. Click the Directories tab.
8. Change the Toolbook commands that are affected by the new version. Be sure to retain the current path information.
Example: To update from Version 6.5 to Version 7.2, change:
G:\Lessons\tb60run.exe %1
to
G:\Lessons\tb70run.exe %1
9. When the changes are complete, click Exit to return to the desktop.

Network System Updates
6-13
Step-Action Table #6-7: NETWORK SYSTEM UPDATE – TOOLBOOK COURSEWARE
STEP ACTION COMMENTS
1. Insert the Update CD-ROM or floppy disk into the appropriate drive on the Server.
2. From the Update menu, select the installation for your system model.
Select Peer-to-Peer or Client/Server.
3. Select Server software and uncheck the Include Instructor Access checkbox.
4. Enter the existing path to the \Nida98 directory.
Steps 1-4 update the server software.
5. When the installation is complete, click Exit to return to the desktop.
System Maintenance and Troubleshooting
6-14
Updating Lessons/Courses
On occasion, Nida Corporation will send you updates to your lessons or courses. Additionally, course updates can be found on the Nida FTP site and downloaded to a temporary file. The Update Lessons/Courses feature installs individually updated files for lessons and courses to all of the Scores Pro databases. Full courseware updates are usually loaded from a CD-ROM. Use the installation procedure in Chapter 2 that is appropriate for your configuration. This feature is found on the main menu under Options, but it is enabled only when all Scores Pro databases are closed.
Use the following table to assist you in updating your Scores Pro database with new lessons and courses.
Step-Action Table #6-8: UPDATING LESSONS AND COURSES
STEP ACTION COMMENTS
1. Open Scores Pro. Close any Scores Pro databases that may be open.
2. Select Options|Update Lessons/Courses from the main menu.
The Update Course/Lesson Data dialog box will be displayed.
3. Enter the path to the floppy disk, CD-ROM, or temporary directory where the lessons/courses update is located.
4. Click OK. The Update Lessons/Courses feature will: – overwrite existing course or lesson files – add new lessons and courses to the database.
5. When the process is complete, click OK to exit.
Troubleshooting - Power Source
6-15
Overview
The following Step-Action Tables will help you with some of the more common problems you might encounter.
Power Source
Trainers are set up at the factory to run on 120 V. If your power supply is 220 V – 240 V, the trainer must be reconfigured according to the steps in the following table:
Step-Action Table #6-9: MY POWER SOURCE IS 220 V – 240 V
STEP ACTION NOTES
1. Gain access to the rear of the trainer.
Turn off and unplug your trainer!
2. Disconnect the AC power cord from the rear of the trainer.
3. Using the Nida screwdriver, insert the screwdriver blade into the slot, and gently pry out the line voltage AC fuse pack from the trainer.
The slot is located on the bottom edge of the power cord receptacle.
4. Remove the fuse from the holder.
5. Invert the holder 180º and install the fuse on the other side of the fuse holder.
6. Insert the fuse holder into the trainer in the inverted position.
Align the 240 V arrow with the power arrow at the base of the fuse holder.
7. Connect the AC power cord.
Your trainer is now set for 240 V.

System Maintenance and Troubleshooting
6-16
Communication
Use the following Step-Action table if your trainer will not communicate with your computer:
Step-Action Table #6-10: TRAINER WILL NOT COMMUNICATE WITH MY COMPUTER
STEP ACTION NOTES
1. Check the following: • Trainer is ON and “Manual Mode”
is displayed on the LCD. • The RJ11 connector on the
interface cable is connected to the CAI port on the trainer.
• The 9-pin connector on the
interface cable is connected to Com 1 on your computer.
2. Assign a different Com Port to the trainer.
Refer to "Testing the Interface" on Page 2-54 of this Guide.
3. Check that your Com Port is active. Use a mouse to test your computer's Com Port for proper operation.
4. If these steps fail to establish communications, call Nida at 1-800-327-NIDA.

Troubleshooting - Garbled Text
6-17
Garbled Text
Some computer video cards may not recognize certain DOS commands that are used in a few of our advanced lessons. Use this Step-Action Table to enable your computer to use a video driver utility to operate these lessons:
Step-Action Table #6-11: TEXT IS GARBLED WHEN I VIEW LESSONS USING SEARCH LESSONS
STEP ACTION NOTES
1. Identify the video card in your computer.
Click Start|Settings|Control Panel, select the System icon, and click the Device Manager tab to access the properties of the monitor(s).
2. Select Options|System from the CAI Pro screen menu bar.
Password = Eval
3. Select the Commands tab.
4. Find the video driver command line that matches your video card and remove the word REM from the beginning of the line.
5. Enable “Load Commands” by checking the box.
6. Click OK to return to the CAI Pro screen.
7. Reopen the lesson.
8. Call Nida if you need additional assistance.

System Maintenance and Troubleshooting
6-18

Appendix A
Scores Pro Reports


Appendix A-1
SCORES PRO REPORTS Scores Pro can generate many reports for your course management needs. The following table lists the reports available in Scores Pro and the steps to access them. The reports are listed by TAB, as they appear from left to right at the bottom of the Scores Pro management screen.
Report How to Access It Report How to Access It
Lesson Listing Select the Lesson tab Right-click Select Print/Preview
Course Listing Select the Course tab Right-click Select Print/Preview
Instructor Listing
Select the Instructor tab Right-click Select Print/Preview
Student Listing Select the Student tab Right-click Select Print/Preview
Student Report Select the Student tab Highlight desired student
and right-click Select Student Reports Highlight desired student
and right-click Select Student Report
(Expand units for detailed report)
Right-click Select Print/Preview
Student Listing with Grades
Select the Student tab Highlight any student and
right-click Select Student Reports Right-click Select Print/Preview
Class Listing Select the Classes tab Right-click Select Print Preview
Student Session Report
Open Individual Student Report
Prior to selecting Print/Preview, highlight desired lesson from course outline
Right-click Select Lesson Report Right-click Select Print/Preview
Class Report Select the Classes tab Highlight desired class
and right-click Select Class Report Right-click Select Print/Preview

Appendix A-2
STUDENT REPORT FIELDS The following table shows the fields available in the Scores Pro Student Report and describes what each field represents.
Field
Description
Overall Count
Number of embedded or drill & practice questions answered
Overall Average
Average score of embedded and drill & practice questions
Overall Best
Highest score attained in embedded or drill & practice sections, when a lesson has been taken numerous times
Overall Count, Average
Column lists both Overall count and Overall average scores
Overall Count, Best
Column lists both Overall count and Overall best score
Final Count
Number of lesson quiz or test questions answered
Final Average
Average score of lesson quiz and/or test questions
Final Best
Highest quiz or test score attained, when a lesson has been taken numerous times
Final Count, Average
Column lists both final count and average scores
Final Count, Best
Column lists both final count and best scores
Combined Count
Total count of all questions answered
Combined Average
Total average of all questions answered
Combined Best
Highest score attained for a session
Combined Count-Average
Column lists total count and average scores
Combined Count-Best
Column lists total count and best scores
Pre-Test
Test score attained the first time through a lesson
Post-Test
Test score attained the last time through a lesson
Weight
Value of a lesson compared to other lessons
Appendix B
Error Messages and Codes

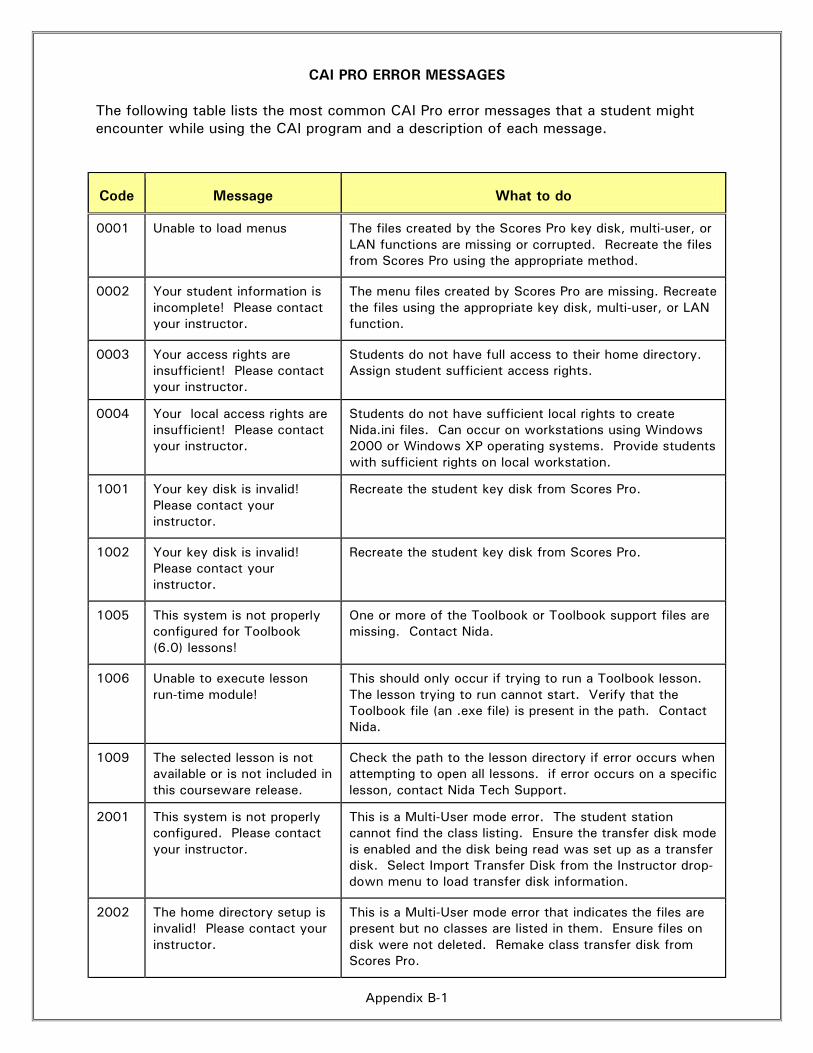
Appendix B-1
CAI PRO ERROR MESSAGES
The following table lists the most common CAI Pro error messages that a student might encounter while using the CAI program and a description of each message.
Code
Message
What to do
0001 Unable to load menus The files created by the Scores Pro key disk, multi-user, or LAN functions are missing or corrupted. Recreate the files from Scores Pro using the appropriate method.
0002 Your student information is incomplete! Please contact your instructor.
The menu files created by Scores Pro are missing. Recreate the files using the appropriate key disk, multi-user, or LAN function.
0003 Your access rights are insufficient! Please contact your instructor.
Students do not have full access to their home directory. Assign student sufficient access rights.
0004 Your local access rights are insufficient! Please contact your instructor.
Students do not have sufficient local rights to create Nida.ini files. Can occur on workstations using Windows 2000 or Windows XP operating systems. Provide students with sufficient rights on local workstation.
1001 Your key disk is invalid! Please contact your instructor.
Recreate the student key disk from Scores Pro.
1002 Your key disk is invalid! Please contact your instructor.
Recreate the student key disk from Scores Pro.
1005 This system is not properly configured for Toolbook (6.0) lessons!
One or more of the Toolbook or Toolbook support files are missing. Contact Nida.
1006 Unable to execute lesson run-time module!
This should only occur if trying to run a Toolbook lesson. The lesson trying to run cannot start. Verify that the Toolbook file (an .exe file) is present in the path. Contact Nida.
1009 The selected lesson is not available or is not included in this courseware release.
Check the path to the lesson directory if error occurs when attempting to open all lessons. if error occurs on a specific lesson, contact Nida Tech Support.
2001 This system is not properly configured. Please contact your instructor.
This is a Multi-User mode error. The student station cannot find the class listing. Ensure the transfer disk mode is enabled and the disk being read was set up as a transfer disk. Select Import Transfer Disk from the Instructor drop-down menu to load transfer disk information.
2002 The home directory setup is invalid! Please contact your instructor.
This is a Multi-User mode error that indicates the files are present but no classes are listed in them. Ensure files on disk were not deleted. Remake class transfer disk from Scores Pro.

Appendix B-2
CAI PRO ERROR MESSAGES, continued
Code
Message
What to do
3001 Unable to obtain log in information! Please contact your instructor.
This is a network error when Network Log in mode is selected and the student login info cannot be found. Ensure the log in variable is set by examining the log in script in accordance with the system LAN instructions. Contact the LAN administrator.
3002 The system is not properly configured! Please contact your instructor.
This is a network error when Menu Control is selected and ID info cannot be found. Check the student ID information and home directory path.
3003 The system is not properly configured! Please contact your instructor.
This is a network error when Menu Control is selected and ID info is found but the class information is missing. Ensure student is registered in the appropriate class.
3011 Your home directory setup is invalid! Please contact your instructor.
This error displays when in the Network Login mode and the home directory ID info cannot be found. Check student listing for correct student home information. Contact your LAN administrator.
3012 Your home directory setup is invalid! Please contact your instructor.
This error displays when in the Network Log in mode and the home directory class list cannot be found. Check student listing for correct student home information. Contact your LAN administrator.
3013 Your home directory setup is invalid! Please contact your instructor.
This error displays when in the Network Log in mode and the home directory class list is present but the assigned class cannot be found. Ensure student is still enrolled in desired class.
3021 Your home directory setup is invalid! Please contact your instructor.
Occurs if Scores Pro is configured as a menu-controlled network and the path or drive letter is incorrect. Check path and drive letter designations in Scores Pro system.

Appendix B-3
SYSTEM RUNTIME ERROR CODES
The following table lists the most common operating system runtime error codes and a description of each code. These codes are generated by Windows and MSDOS in response to situations that arise during the execution of a program. They are usually caused by interaction with the operating system and the workstation hardware.
Code
Description
Code
Description
1
Invalid function number
157
Unknown media type
2
File not found
158
Unknown media type
3
Path not found
159
Printer out of paper
4
Too many open files
160
Device write fault
5
File access denied
161
Device read fault
6
Invalid file handle
162
Hardware failure
12
Invalid file access code
200
Division by zero
15
Invalid drive number
201
Range check error
16
Cannot remove current directory
202
Stack overflow error
17
Cannot rename across drives
203
Heap overflow error
18
No more files
204
Invalid pointer operation
100
No more files
205
Floating point overflow
101
Disk write error
206
Floating point underflow
102
File not assigned
207
Invalid floating point operation
103
File not open
208
Overlay manager not installed
104
File not open for input
209
Overlay file read error
105
File not open for output
210
Object not initialized
106
Invalid numeric format
211
Call to abstract method
150
Disk is write protected
212
Stream registration error
151
Bad drive request
213
Collection index out of range
152
Drive not ready
214
Collection overflow error
154
CRC error in data
215
Arithmetic overflow error
156
Disk seek error
216
General protection fault

Appendix B-4
IDAPI RUNTIME ERROR CODES
The table below contains the most common IDAPI (Integrated Database Application Programming Interface) runtime error codes encountered when using the Scores Pro and CAI Pro applications that use the IDAPI libraries to access the information in the Scores Pro database. Other than errors like “Not Enough Disk Space” (error code 2503), these errors should not arise during normal use of the software. Code
Error
Description
0000
DBIERR_NONE
No error
2201
DBIERR_BOF
Beginning of virtual table
2202
DBIERR_EOF
End of virtual table
2205
DBIERR_NOCURREC
No current record
2206
DBIERR_RECNOTFOUND
Record was not found
2503
DBIERR_NODISKSPACE
Not enough disk space
2601
DBIERR_KEYVIOL
Key violation
2606
DBIERR_DETAILRECORDEXIST
Cannot modify or delete this master record
260A
DBIERR_DETAILTBLOPENERR
Detail table open failed
260F
DBIERR_DETAILTABLESEXIST
Detail table exists (cannot delete, rename...)
2701
DBIERR_OUTOFRANGE
Number out of range (e.g., field no)
2702
DBIERR_INVALIDPARAM
Generic invalid parameter
2706
DBIERR_INVALIDHANDLE
Invalid handle to the functions
2708
DBIERR_PRIMARYKEYREDEFINE
Cannot redefine primary key
270D
DBIERR_PRIMARYKEYREDEFINE
Index does not exist
2710
DBIERR_INVALIDFLDTYPE
Invalid field type
2728
DBIERR_INVALIDRESTRTBLORDER
Invalid ordering of the tables during restructure
272E
DBIERR_INVALIDBLOBHANDLE
Invalid blob handle (in record buffer)
273D
DBIERR_INCOMPATRECSTRUCTS
Incompatible record structures
2740
DBIERR_INVALIDINDEXTYPE
Invalid index type
2803
DBIERR_FILEBUSY
File busy
280A
DBIERR_GROUPLOCKED
File busy
280D
DBIERR_NEEDEXCLACCESS
Need exclusive access

Appendix B-5
IDAPI RUNTIME ERROR CODES, continued
Code
Error
Description
2A01
DBIERR_NOTBLOB
Field is not a blob
2A03
DBIERR_BLOBNOTOPENED
Blob not opened
2A04
DBIERR_NA
Operation not applicable
2A0B
DBIERR_TABLEREADONLY
Table is read only
2B02
DBIERR_NOENOENT
No such file or directory
2B64
DBIERR_NOTEXACT
Not exact read/write
2C01
DBIERR_NETINITERR _NETWORK
Net init failed
2C06
DBIERR_NETMULTIPLE _NETWORK
Multiple net files in use
2E5D
DBIERR_TODENNOT
???(Call Nida)


Appendix C
Scores Pro Tutorials

Scores Pro Tutorial Key Disk Configuration
Prepared by
Nida Corporation 300 S. John Rodes Boulevard
Melbourne, Florida
Appendix C-1


Scores Pro Tutorial KEY DISK CONFIGURATION
Appendix C-3
Scores Pro Tutorial - Key Disk Configuration This tutorial is designed to step you through the basic features of the Nida Scores Pro Management Software when your system is configured to use Key Disks for student records transfer. We suggest that you complete this tutorial prior to using the system in an actual classroom environment. For a more complete explanation of total system operation and integration, refer to your Nida Pro User's Guide or on-line help files. Let’s begin! Basic Tutorial There are nine basic functions that must be performed by the instructor in order to use the Scores Pro Management System. These functions include: (1) Opening the Database, (2) Configuring Your System, (3) Adding Instructors, (4) Adding Students, (5) Building Classes, (6) Making Key Disks, (7) Running Lessons, (8) Reviewing Student Results, and (9) Merging Data. If you have not installed your Scores Pro software, refer to the instructions in Chapter 2 of the Nida Pro User's Guide before continuing. 1. Opening the Database
a. Click the Scores Pro icon or select Start|Programs|Nida Software|Scores Pro from the Windows taskbar.
b. When the System Password dialog box appears, enter NIDA1 and select OK. c. Select File|Open Database from the menu bar. Highlight the database, Tutorial,
listed under c:\nida98\instruct\database\tutorial and select OK. d. When the database has opened, observe the 5 tabs at the bottom of the
window labeled Lessons, Courses, Instructors, Students, and Classes. These five areas contain specific information defined by their names that make up the database. Clicking on a desired tab will open that area of the database. In this tutorial, we will explore the Instructors, Students, and Classes tabs.
2. Configuring Your System for Key Disk (This function is normally completed during the installation and setup procedures in Chapter 2)
a. Select Options|System from the menu bar to open the Options block. Click the
Type tab if the Type block is not in view. Enable the Key Disk function by clicking the check box adjacent to Key Disk. Deselect any other function that is enabled. Click the Configuration tab and enable the Regular feature in the Import block. Click the Directories tab and enter the name of your school in the Banner field. Click OK.

KEY DISK CONFIGURATION Scores Pro Tutorial
Appendix C-4
2. Configuring Your System for Key Disk, continued b. Select Options|Grades from the menu bar to open the Grades Display Options
block. Change the passing grade to 80. Click OK. c. You have now changed the system settings to enable the Key Disk function,
display your school name on the opening window, and require a higher grade for a student to pass a course.
3. Adding Instructors
a. Select the tab marked Instructors.
b. When the instructor database is open, there should be one instructor listed:
(1) Bird, Robin 888-88-8888
c. Right-click and select Add Instructor from the context menu.
d. The Instructor Information dialog box should be displayed with the Basic Information tab selected.
e. The blue instructor information fields must be filled in before a record can be established. The black instructor information fields are optional but help in sorting and identifying instructors. If this is the first time you have entered an instructor, the ID field will be empty. When an additional instructor is entered, the ID field will automatically increment one number from the previously entered number. The information in this field can be changed as required. Enter the new instructor information as shown below. Use the tab key to move from field to field. Insure the information is correct but DO NOT select Add at this time. Proceed to step (f).
(1) ID: 999-99-9999 (2) First: Steven (3) Middle: B. (4) Last: Smith (5) Title: Instructor (6) Specialty: Electronics

Scores Pro Tutorial KEY DISK CONFIGURATION
Appendix C-5
3. Adding Instructors, continued f. In the Instructor Information dialog box, select the Photo tab. Be sure the
option button next to External is selected and enter “%photos%\sample8.pcx” in the File field. A sample instructor picture should appear. If the photo does not appear, check your filename for the proper backslashes, percent signs, and spelling. Also, check that there are no spaces. Select Add and then Close.
g. Steven B. Smith should now be shown in the Instructor Listing. 4. Adding Students
a. Select the tab marked Students.
b. When the student database is open, there should be five students listed:
(1) Doe, John 111-11-1111 (2) Green, William 222-22-2222 (3) Jackson, Jane 333-33-3333 (4) Stone, Lawrence 444-44-4444 (5) House, Jill 555-55-5555
c. Right-click and select Add Student from the context menu.
d. The Student Information dialog box should be displayed with the Basic Information tab selected.
e. The blue student information fields must be filled in before a record can be
established. The black student information fields are optional but help in sorting and identifying students. If this is the first time you have entered a student, the ID field will be empty. When an additional student is entered, the ID field will automatically increment one number from the previously entered number. The information in this field can be changed as required. Enter the new student information as shown below. Use the tab key to move from field to field. Insure the information is correct but DO NOT select Add at this time. Proceed to step (f).
(1) ID: 123-45-6789 (2) First: Mary (3) Middle: Ann (4) Last: Adams (5) Title: Student (6) Specialty: Electronics (7) Default Course ID: 1000-T

KEY DISK CONFIGURATION Scores Pro Tutorial
Appendix C-6
4. Adding Students, continued f. In the Student Information dialog box, select the Photo tab. Be sure the option
button next to External is selected and enter “%photos%\sample6.pcx” in the File field. A sample student picture should appear. Select Add and then Close.
g. Mary Ann Adams should now be shown in the Student Listing. 5. Building Classes a. Select the tab marked Classes.
b. When the class database is open, there should be one class listed:
(1) Tutorial Course TUT001 Bird, Robin
c. Right-click and select Add Class from the context menu. The Class Information dialog box should be displayed. The ID, Course, and Instructor fields must be filled in while the Optional Fields may be left empty.
d. Enter the information as shown below. Locate the Course and Instructor in the drop-down list to fill in each field.
(1) ID: TUT002 (2) Course: 1000-T Tutorial Course (3) Instructor: 999-99-9999 Smith, Steven (4) Field 1: (5) Field 2: (6) Field 3:
When the information is correct, select Add and then Close.
e. Highlight class number TUT002 and right-click. Click Select Students from the context menu.
f. With the Select Students dialog box displayed, highlight Lawrence Stone and use the left move button “<<“ to move him into the class. Lawrence Stone should appear as student number 1 in the left window, and the highlight bar should have moved one student down in the right window. Highlight and move Jill House and Mary Adams into the class. Select OK when finished.

Scores Pro Tutorial KEY DISK CONFIGURATION
Appendix C-7
6. Making Key Disks
a. Select the tab marked Classes.
b. Highlight class TUT002, right-click, and select Make/Modify Class Key Disk.
c. The Key Disk Setup dialog box opens for class number TUT002. Highlight Mary Adams and select Make. You can set the Prerequisite Checking and Passing Scores in this Key Disk Setup dialog box by clicking the Options button. Insert a blank disk into your computer and select Make. When this operation is complete, the class information will be displayed in the Disk Info box. If you assigned more than one course to the same student, each course will be displayed in the Disk Info box.
d. Close all open dialog boxes.
7. Running Lessons
a. At this point in the tutorial, you have performed all necessary tasks needed for a student to run lessons.
b. Close or minimize Scores Pro.
c. Select Start|Programs|Nida|CAI Pro from the Windows taskbar or click the CAI
Pro Icon.
Remember, if Instructor is not displayed on the menu bar, select Help, About. Press the CTRL & SHIFT keys simultaneously and release. Click the Help/About OK button. The Instructor option should be visible.
d. Check the configuration of the CAI system by selecting Options|System from
the menu bar. Click the Student Records tab if it is not in view, and ensure that a check mark is in the Key Disk box. If not, click the box to enable the Key Disk function. Deselect any other check boxes.
e. Insert the newly created Key Disk into drive “A”.
f. We need some data to play with, so go ahead and take a lesson by clicking
Lessons on the menu bar and selecting a lesson from the menu. To save time (and sometimes embarrassment), proceed to the test and randomly enter answers. If the lesson you chose does not have a test, choose another lesson by pressing the F4 function key and following the prompts to return you to the lessons menu.

KEY DISK CONFIGURATION Scores Pro Tutorial
Appendix C-8
8. Reviewing Student Results in CAI Pro
a. Select Student| View Records from the menu bar.
b. From the outline, select the lesson you have just taken.
c. When the Lesson Results window opens, review the student information shown.
d. Click a question in the Responses window to display the question help file. 9. Merging Data
a. Close or minimize CAI Pro.
b. Maximize or reopen Scores Pro.
c. Select the Lightning Bolt button from the toolbar.
d. Since we are using the Key Disk Option, ensure that the Import Path is set to A:. Select Process from the Import Student Results dialog box. When the process is complete, select Close.
e. Select the Classes tab (if not selected), highlight TUT002, and right-click.
Select Class Reports and review student records. Mary’s (your) score should be updated, reflecting the score from your session. Use the navigation arrow buttons on the menu bar or continue to right-click and select additional reports from the context menu to view Mary's records in greater detail.
Congratulations! You have completed the Key Disk Tutorial.
You are now ready to complete the Scores Pro Common Features Tutorial.
Scores Pro Tutorial Multi-User Configuration
Prepared by
Nida Corporation 300 S. John Rodes Boulevard
Melbourne, Florida
Appendix C-9


Scores Pro Tutorial MULTI-USER CONFIGURATION
Appendix C - 11
Scores Pro Tutorial - Multi-User Configuration This tutorial is designed to step you through the basic features of the Nida Scores Pro Management Software when your system is configured to use a Transfer Disk to move student records from the Instructor’s computer to the Student computers. We suggest that you complete this tutorial prior to using the system in an actual classroom environment. For a more complete explanation of total system operation and integration, refer to your Nida Pro User's Guide or on-line help files. Let’s begin! Basic Tutorial There are nine basic functions that must be performed by the instructor in order to use the Scores Pro Management System. These functions include: (1) Opening the Database, (2) Setting Multi-User System Options, (3) Adding Instructors, (4) Adding Students, (5) Building Classes, (6) Using the Transfer Function, (7) Running a Transfer Disk Lesson, (8) Exporting Student Data, and (9) Merging Data. If you have not installed your Scores Pro software, refer to the instructions in Chapter 2 of the Nida Pro User's Guide before continuing. 1. Opening the Database
a. Click the Scores Pro icon or select Start|Programs|Nida Software|Scores Pro from the Windows taskbar.
b. When the System Password dialog box appears, enter NIDA1 and select OK.
c. Select File|Open Database from the menu bar. Highlight the database, Tutorial,
listed under c:\nida98\instruct\database\tutorial and select OK.
d. When the database has opened, observe the 5 tabs at the bottom of the window labeled Lessons, Courses, Instructors, Students, and Classes. These five areas contain specific information defined by their names that make up the database. Clicking on a desired tab will open that area of the database. In this tutorial, we will explore the Instructors, Students, and Classes tabs.
2. Setting Multi-User System Options (This function will normally be completed during the installation and setup
procedures in Chapter 2.) a. Select Options|System from the menu bar to open the Options block. Click the
Type tab if the Type block is not in view. Enable the Multi-user functions by clicking the check box adjacent to Multi-user. Click the Configuration tab and enable the Regular feature in the Import block. Click the Directories tab and change the Banner text to read the name of your school. Click OK.

MULTI-USER CONFIGURATION Scores Pro Tutorial
Appendix C - 12
2. Setting Multi-User System Options, continued b. Select Options|Grades from the menu bar to open the Grades Display Options
block. Change the passing grade to 80. Click OK. c. You have now changed the system settings to enable the Transfer Disk
function, display your school name on the opening window, and require a higher grade for a student to pass a course.
3. Adding Instructors
a. Select the tab marked Instructors.
b. When the instructor database is open, there should be one instructor listed: (1) Bird, Robin 888-88-8888
c. Right-click and select Add Instructor from the context menu. d. The Instructor Information dialog box should be displayed with the Basic
Information tab selected. e. The blue instructor information fields must be filled in before a record can be
established. The black instructor information fields are optional but help in sorting and identifying instructors. If this is the first time you have entered an instructor, the ID field will be empty. When an additional instructor is entered, the ID field will automatically increment one number from the previously entered number. The information in this field can be changed as required. Enter the new instructor information as shown below. Use the tab key to move from field to field. Insure the information is correct but DO NOT select Add at this time. Proceed to step (f).
(1) ID: 999-99-9999 (2) First: Steven (3) Middle: B. (4) Last: Smith (5) Title: Instructor (6) Specialty: Electronics
f. In the Instructor Information dialog box, select the Photo tab. Be sure the option button next to External is selected and enter “%photos%\sample8.pcx” in the File field. A sample instructor picture should appear. Select Add and then Close.
g. Steven B. Smith should now be shown in the Instructors Listing.

Scores Pro Tutorial MULTI-USER CONFIGURATION
Appendix C - 13
4. Adding Students
a. Select the tab marked Students.
b. When the student database is open, there should be five students listed: (1) Doe, John 111-11-1111 (2) Green, William 222-22-2222 (3) Jackson, Jane 333-33-3333 (4) Stone, Lawrence 444-44-4444 (5) House, Jill 555-55-5555
c. Right-click and select Add Student from the context menu. d. The Student Information dialog box should be displayed with the Basic
Information tab selected. e. The blue student information fields must be filled in before a record can be
established. The black student information fields are optional but help in sorting and identifying students. If this is the first time you have entered a student, the ID field will be empty. When an additional student is entered, the ID field will automatically increment one number from the previously entered number. The information in this field can be changed as required. Enter the new student information as shown below. Use the tab key to move from field to field. Insure the information is correct but DO NOT select Add at this time. Proceed to step (f).
(1) ID: 123-45-6789 (2) First: Mary (3) Middle: Ann (4) Last: Adams (5) Title: Student (6) Specialty: Electronics (7) Default Course ID: 1000-T f. When you are using the Transfer Disk function, you need to specify a home
directory for each student. To assign Mary Adams a home directory, select the Network tab and enter "Mary" into the Home field. First names are easy to remember and track when assigning home directories. We will not password the students in this tutorial.
g. Select the Photo tab. Be sure the radio button next to External is selected and
enter “%photos%\sample6.pcx” in the File field. A sample student picture should appear. Select Add and then Close.
h. Mary Ann Adams should now be shown in the Student Listing.

MULTI-USER CONFIGURATION Scores Pro Tutorial
Appendix C - 14
5. Building Classes a. Select the tab marked Classes.
b. When the class database is open, there should be one class listed: (1) Tutorial Course TUT001 Bird, Robin
c. Right-click and select Add Class from the context menu. The Class Information dialog box should be displayed. The ID, Course, and Instructor fields must be filled in while the Optional Fields may be left empty.
d. Enter the information as shown. Locate the Course and Instructor in the drop-down list to fill in each field.
(1) ID: TUT002 (2) Course: 1000-T Tutorial Course (3) Instructor: 999-99-9999 Smith, Steven (4) Field 1: (5) Field 2: (6) Field 3: When the information is correct, select Add and then Close.
e. Highlight class number TUT002 and right-click. Click Select Students from the context menu.
f. With the Select Students dialog box displayed, highlight Lawrence Stone and
use the left move button “<<“ to move him into the class. Lawrence Stone should appear as student number 1 in the left window, and the highlight bar should have moved one student down in the right window. Highlight and move Jill House and Mary Adams into the class. Select OK when finished.

Scores Pro Tutorial MULTI-USER CONFIGURATION
Appendix C - 15
6. Using the Transfer Disk Function a. Check Lawrence's and Jill’s student information to ensure that their first names
are listed in the Home fields of the Network dialog box. To do this for each student, highlight the name, right-click, select Edit Student Info, select the Network tab, and enter the first name in the field. Click OK.
b. From the Class tab, highlight the TUT002 Tutorial Course. Right-click and select
Make Class Transfer Disk. Insert your disk into the floppy drive. Click OK. You have just created a transfer disk. Close or minimize Scores Pro.
c. Select Start|Programs|Nida Software|CAI Pro from the Windows taskbar or
double-click the CAI Pro icon.
Remember, if Instructor is not displayed on the menu bar, select Help|About. Press the CTRL+SHIFT keys simultaneously and release. Click the Help|About OK button. The Instructor option should be visible.
d. Select Options|System from the menu bar. Passwords in CAI Pro are usually in
all caps. Select the Student Records tab if it is not in view. Deselect Key Disk and enable Multi-User. The User's Directory (Root) should read “C:\Nida98\users”. Click OK.
e. Select Instructor|Import Transfer Disk from the menu bar. These options will be
greyed out if the Multi-User option is not enabled. (Try it sometime when you have it configured for Key Disk.) Enter the password and insert your Transfer Disk into the floppy drive. Click OK. Your student roster is now loaded in the student station.

MULTI-USER CONFIGURATION Scores Pro Tutorial
Appendix C - 16
7. Running a Transfer Disk Lesson a. Click Lessons in the menu bar. If your disk has more than one course loaded on
it, a Select Class window will appear. Highlight the TUT002 Tutorial Course to view your class roster. Highlight Mary Ann Adams and click OK.
b. Select a lesson from the lesson menu. Notice that Mary’s record is protected by
a password when you attempt to open the lesson. Remember, we did not assign Mary a password in the Student Info section of Scores Pro. Click OK without entering anything in the password field.
c. We need some data to play with, so go ahead and take the lesson. To save
time (and sometimes embarrassment), proceed to the test and randomly enter answers. If you chose a lesson without a test, use the function F4 key to access the lesson menu and exit. Go back and choose another lesson. When complete, exit the lesson.
8. Exporting Student Data a. Select Instructor|Export Results from the menu bar. Enter the instructor
password and highlight the TUT002 Tutorial Course. Insert your export disk into the floppy drive. Click OK. The student data is now being transferred to your floppy disk. When complete, click OK.
9. Merging Data a. Close CAI Pro. Open or maximize Scores Pro. Click the Lightening Bolt button
on the toolbar. Ensure that Transfer Data is enabled, insert your Transfer Disk into drive A, and click Process. Click OK as necessary.
b. Highlight the TUT002 Tutorial Course from the Class tab. Right-click and select
Class Report from the context menu. Mary’s (your) score should be updated, reflecting the score from your session.
Congratulations! You have completed the Multi-User Tutorial.
You are now ready to complete the Scores Pro Common Features Tutorial.

Scores Pro Tutorial Network Configuration
Prepared by
Nida Corporation 300 S. John Rodes Boulevard
Melbourne, Florida
Appendix C - 17


Scores Pro Tutorial NETWORK CONFIGURATION
Appendix C - 19
Scores Pro Tutorial - Network Configuration This tutorial is designed to step you through the basic features of the Nida Scores Pro Management Software when your system is configured to run on a Local Area Network (LAN). We suggest that you complete this tutorial prior to using the system in an actual classroom environment. For a more complete explanation of total system operation and integration, refer to your Nida Pro User's Guide or on-line help files. Let’s begin! Basic Tutorial There are ten basic functions that must be performed by the instructor in order to use the Scores Pro Management System. These functions include: (1) Opening the Database, (2) Setting System Options, (3) Adding Instructors, (4) Adding Students, (5) Building Classes, (6) Setting Up Home Directories, (7) Running Lessons on a Network, (8) Viewing Student Data, (9) Merging Data, and (10) Administering Home Directories. If you have not installed your Scores Pro software, refer to the instructions in Chapter 2 of the Nida Pro User's Guide before continuing.
1. Opening the Database
a. Click the Scores Pro icon or select Start|Programs|Nida Software|Scores Pro from the Windows taskbar.
b. When the System Password dialog box appears, enter NIDA1 and select OK.
c. Select File|Open Database from the menu bar. Highlight the database, Tutorial,
listed under c:\nida98\instruct\database\tutorial and select OK.
d. When the database has opened, observe the 5 tabs at the bottom of the screen labeled Lessons, Courses, Instructors, Students, and Classes. These five areas contain specific information defined by their names that make up the database. Clicking on a desired tab will open that area of the database. In this tutorial, we will explore the Instructors, Students, and Classes tabs.
2. Setting System Options for Networks (This function is normally competed during the installation and setup procedures in Chapter 2)
a. Select Options|System from the menu bar to open the Options block. Click the
Type tab if the Type block is not in view. Enable the Network function by clicking the check box adjacent to Network. Deselect Key Disk if enabled. Click the Configuration tab and enable the Advanced feature in the Import block. Click the Directories tab and change the Banner to read the name of your school. Click OK.

NETWORK CONFIGURATION Scores Pro Tutorial
Appendix C - 20
2. Setting System Options for Networks, continued b. Select Options|Grades from the menu bar to open the Grades Display Options
block. Change the passing grade to 80. Click OK.
c. You have now changed the Scores Pro system settings to enable the Network functions, display your school name on the opening screen, and require a higher grade for a student to pass a course.
3. Adding Instructors
a. Select the tab marked Instructors.
b. When the instructor database is open, there should be one instructor listed:
(1) Bird, Robin 888-88-8888
c. Right-click and select Add Instructor from the context menu.
d. The Instructor Information dialog box should be displayed with the Basic Information tab selected.
e. The blue instructor information fields must be filled in before a record can be
established. The black instructor information fields are optional but help in sorting and identifying instructors. If this is the first time you have entered an instructor, the ID field will be empty. When an additional instructor is entered, the ID field will automatically increment one number from the previously entered number. The information in this field can be changed as required. Enter the new instructor information as shown below. Use the tab key to move from field to field. Insure the information is correct but DO NOT select Add at this time. Proceed to step (f).
(1) ID: 999-99-9999 (2) First: Steven (3) Middle: B. (4) Last: Smith (5) Title: Instructor (6) Specialty: Electronics
f. In the Instructor Information dialog box, select the Photo tab. Be sure the option
button next to External is selected and enter “%photos%\sample8.pcx” in the File field. A sample instructor picture should appear. If the photo does not appear, check your filename for the proper backslashes, percent signs, and spelling. Also, check that there are no spaces. Select Add and then Close.
g. Steven B. Smith should now be shown in the Instructors Listing.
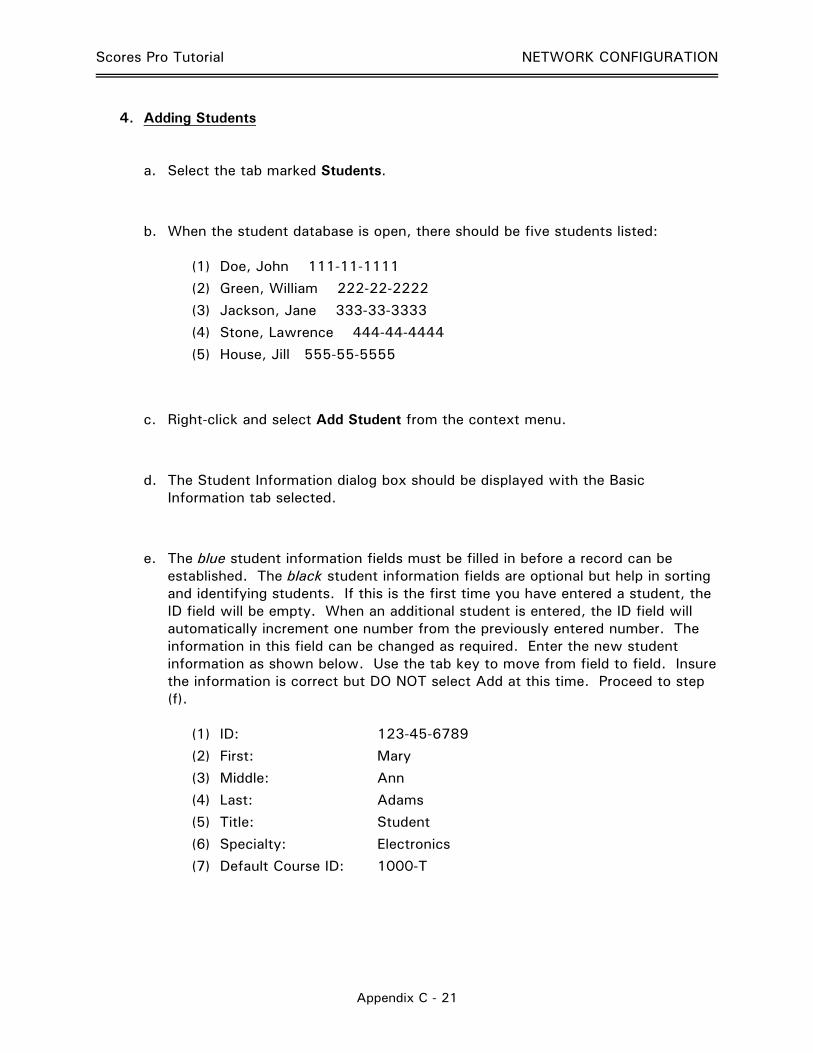
Scores Pro Tutorial NETWORK CONFIGURATION
Appendix C - 21
4. Adding Students
a. Select the tab marked Students.
b. When the student database is open, there should be five students listed:
(1) Doe, John 111-11-1111 (2) Green, William 222-22-2222 (3) Jackson, Jane 333-33-3333 (4) Stone, Lawrence 444-44-4444 (5) House, Jill 555-55-5555
c. Right-click and select Add Student from the context menu.
d. The Student Information dialog box should be displayed with the Basic Information tab selected.
e. The blue student information fields must be filled in before a record can be established. The black student information fields are optional but help in sorting and identifying students. If this is the first time you have entered a student, the ID field will be empty. When an additional student is entered, the ID field will automatically increment one number from the previously entered number. The information in this field can be changed as required. Enter the new student information as shown below. Use the tab key to move from field to field. Insure the information is correct but DO NOT select Add at this time. Proceed to step (f).
(1) ID: 123-45-6789 (2) First: Mary (3) Middle: Ann (4) Last: Adams (5) Title: Student (6) Specialty: Electronics (7) Default Course ID: 1000-T

NETWORK CONFIGURATION Scores Pro Tutorial
Appendix C - 22
4. Adding Students, continued f. When you are using the Network function, you need to specify a home directory
for each student. For network systems using the Direct or Network Login options of Scores Pro, obtain the home directory names from your network administrator. This tutorial assumes you are using the Menu Control option of Scores Pro. To assign Mary Adams a home directory, select the Network tab and enter "Mary" into the Home field. First names with the initial of the last name are easy to remember and track when assigning home directories using the Menu Control option. We will not password the students in this tutorial.
g. Select the Photo tab. Be sure the option button next to External is selected and
enter “%photos%\sample6.pcx” in the File field. A sample student picture should appear. Select Add and then Close.
h. Mary Ann Adams should now be shown in the Student Listing.
5. Building Classes
a. Select the tab marked Classes.
b. When the class database is open, there should be one class listed:
(1) Tutorial Course TUT001 Bird, Robin
c. Right-click and select Add Class from the context menu. The Class Information dialog box should be displayed. The ID, Course, and Instructor fields must be filled in while the Optional Fields may be left empty.
d. Enter the information as shown. Locate the Course and Instructor in the drop-down list to fill in each field.
(1) ID: TUT002 (2) Course: 1000-T Tutorial Course (3) Instructor: 999-99-9999 Smith, Steven (4) Field 1: (5) Field 2: (6) Field 3:
When the information is correct, select Add and then Close.

Scores Pro Tutorial NETWORK CONFIGURATION
Appendix C - 23
5. Building Classes, continued e. Highlight class number TUT002 and right-click. Click Select Students from the
context menu.
f. With the Select Students dialog box displayed, highlight Lawrence Stone and use the left move button “<<” to move him into the class. Lawrence Stone should appear as student number 1 in the left window, and the highlight bar should have moved one student down in the right window. Highlight and move Jill House and Mary Adams into the class. Select OK when finished.
6. Setting Up Home Directories
a. With Scores Pro in the Network configuration, whenever you build or modify a class, you must use the Setup Home Directories function. Additionally, each student in the class will need a home directory specified in his/her individual student data record. Remember, if your network is configured with the Direct or Network Login options of Scores Pro, the student's individual home directory will be assigned by your network administrator. Again, we are using the Menu Control option for this tutorial. We already assigned a home directory to Mary Adams earlier in the tutorial but we now need to assign one to Lawrence Stone and Jill House. To assign each of them a home directory, select the Students tab at the bottom of the screen, highlight each name, right-click, and select Edit Student Info. For each of the students, select the Network tab and enter the respective first name into the Home field. We will not use student passwords in our tutorial; however, when establishing a student database under Menu Control, you will want to enter a password in the box. Passwords are usually entered using the student's ID number or the last four digits of his/her SSN. Click OK.
b. From the Classes tab, highlight the TUT002 Tutorial Course you created earlier. Right-click and select Set Up Home Directories. The User's Directory (Home or Root) and User List Directory should read “X:\USERS” (or the path assigned by your network administrator). Also, ensure that the LAN option is set to Menu Control for this tutorial. Click OK and minimize Scores Pro.
Remember: Each time you make changes to a class roster in Scores Pro, you must select
Setup Home Directories and click OK to enable the changes on your LAN. c. Select Start|Programs|Nida|CAI Pro from the Windows taskbar or click the CAI
Pro icon.

NETWORK CONFIGURATION Scores Pro Tutorial
Appendix C - 24
6. Setting Up Home Directories, continued If Instructor is not displayed on the menu bar, select Help, About. Press the CTRL+SHIFT keys simultaneously and release. Click the Help|About OK button. The Instructor options are now enabled. Another method of accessing the Instructor options is to hold down the CTRL+SHIFT keys while the application is starting and the registration dialog box will be displayed.
d. Select Options|System from the menu bar. If you have not changed the password, it will be in caps while in CAI Pro. Select the Student Records tab if it is not in view. Deselect Key Disk and enable LAN. The User's Directory (Root) should read “X:\USERS” (or the path assigned by your network administrator). Ensure that the LAN option selected (Direct Map, Network Login, Menu Control) is set to the same setting selected in Scores Pro. Select the Directories tab. Again, ensure that the paths for Nida Programs, Lessons, and Help Files are correct as assigned by your network administrator. Click Temporary Directory in the “Run from” options section. Ensure “C:\M3\Temp” is displayed in the command line. Select the Options tab. Check Unzip Lessons if not already checked. Select the Profiles tab. Enable Local Settings from the Use section and Configuration 1 from the System section. Click OK.
e. Select Options|General from the menu bar. The Student Options box sets the ability and level of question feedback you allow the student to view. View-Lesson Only will provide only the student’s test grade while View-Question Help allows student access to test question answers. Change the Banner text to reflect your school’s name. Other Student Applications enables or disables added features such as calculators, drawing programs, and word processor programs. Click OK.
7. Running a Lesson on the Network
a. Click Lessons in the menu bar. If your system is managing more than one class, a Select Class window will appear. In Menu Control only, a class roster will follow. Highlight the TUT002 Tutorial Course to view your class roster. Highlight Mary Ann Adams and click OK.
b. Select a lesson from the lesson menu. Notice that Mary’s record is protected by a password when you attempt to open the lesson. Remember, we did not assign Mary a password in the Student Info section of Scores Pro. Click OK without entering anything in the password field.

Scores Pro Tutorial NETWORK CONFIGURATION
Appendix C - 25
7. Running a Lesson on the Network, continued c. We need some data to play with, so go ahead and take a lesson by clicking
Lessons on the menu bar and selecting a lesson from the menu. To save time (and sometimes embarrassment), proceed to the test and randomly enter answers. If the lesson you chose does not have a test, choose another lesson by pressing the F4 function key and following the prompts to return you to the lessons menu. When finished, exit the lesson.
8. Reviewing Student Results in CAI Pro
a. Select Student|View Records from the menu bar.
b. From the outline, select the lesson you have just taken.
c. When the Lesson Results window opens, review the student information shown.
d. Click a question in the Responses window to display the question help file. When finished, close or minimize CAI Pro.
9. Merging Student Data
a. Open or maximize Scores Pro. Click the Lightening Bolt button on the toolbar. Ensure the Key Disk/Home Directory option button is enabled. Set the Import Path line to read “X:\Users” (or the path assigned by your LAN administrator).
b. The Options box allows you some flexibility in obtaining records. Check the Check Subdirectories box to merge all previously unmerged records on your network. If you wish to merge only one student’s record, leave this box disabled and provide the student’s full path in the Import Path line. Click Process. A Message window will indicate how many records were processed. Click OK.
c. Select the Classes tab (if not selected), highlight TUT002, and right-click. Select Class Reports and review student records. Mary’s (your) score should be updated, reflecting the score from your session. Use the navigation arrow buttons on the menu bar or continue to right-click and select additional reports from the context menu to view Mary's records in greater detail.

NETWORK CONFIGURATION Scores Pro Tutorial
Appendix C - 26
10. Administering Home Directories
a. There will be times when you will need to remove classes or student data from the student home directory. The Administer Home Directories function is used to remove students who are no longer registered for a class or to remove a class that is no longer in session. This function removes the student or class from the menus in CAI Pro only. It will not affect your Scores Pro database. Removing students or classes prevents unauthorized students from entering into the Nida system.
CAUTION: Before removing students or classes from the User directory, perform a MERGE function to ensure all records are transferred to your database.
b. Select the Classes tab in Scores Pro if it is not already open. Right-click the window and select Administer Home Directories from the context menu. Ensure that the User’s Root directory and User List Directory are the same as in the Setup Home Directories dialog box.
c. In the List box, select the Current Classes option button. The classes listed represent the classes that are currently in your system and can be accessed via the CAI Pro Select Class menu. Highlight TUT002 Tutorial Course in the List box. Click the Remove button. A warning box will appear to remind you that you are about to remove a class and all of its unmerged records. Click Yes. You have now removed that class from the CAI Pro menu.
d. Select the Unregistered Students option button in the List box. This list represents the students who are currently on the CAI Pro roster but are not registered in a current class. Highlight Mary Adams and click the Remove button. A warning box will appear to remind you that you are about to remove Mary and her records not previously merged. Click Yes. You have now removed Mary Adams from the CAI Pro roster. Click Close to return to the Class Listing.
Congratulations! You have completed the Network Tutorial.
You are now ready to go on to the Scores Pro Common Features Tutorial.

Scores Pro Tutorial Common Features
All Configurations
Prepared by
Nida Corporation 300 S. John Rodes Boulevard
Melbourne, Florida
Appendix C - 27


Scores Pro Common Features Tutorial ALL CONFIGURATIONS
Appendix C - 29
Scores Pro Common Features Tutorial for all Configurations This tutorial is designed to step you through the features of the Nida Scores Pro Management Software. These features will be helpful in your day-to-day management of classes, students, and courses. You must complete the Scores Pro tutorial for your system configuration before attempting to complete this tutorial. During this tutorial, you will perform several new functions. They are: (1) Using Filters, (2) Customizing/Printing Reports, (3) Customizing Courses, (4) Adding New Lessons, and (5) Customizing CAI Pro. 1. Using Filters a. The first feature we want to explore in this section is the filtering feature. First,
we need to assign our list of students to two teams: the blue team and the gold team. To do this, select the Student tab, highlight John Doe, right-click, and choose Edit Student Info. Select the User tab from the Student Information window. Type the word “gold” in Field 1. Click OK to return to the student listing. Repeat this routine for each student, alternating assignments in Field 1 between the blue and gold teams.
b. Right-click anywhere on the student listing and select Filters. Highlight the
Field 1 line and click the Expr/From column. Enter the following info: [Bb]lue . Entering an upper case and lower case “b” in brackets will prompt the filter to ignore case sensitivity. Make sure that the “ .* ” is following the word “blue”. Click the box preceding “Field 1" and note that a check appears in the box. This will activate the filter. Click OK. Your student list now shows only the students on the blue team.
c. Right-click anywhere on the student listing and select Filters again. Highlight
the Last Name line and click the word “Expression”. Use the arrow key and select “Range”. Click the Expr/From column and enter an “A”. Click the To column and enter an “M”. Check the box preceding “Last” to activate this filter.
d. Your student list should now show only blue team students whose last name
begins with A through M. e. To remove the filters, right-click anywhere on the student listing, select Filters,
highlight the line you wish to deselect, and click the box again. Click OK. All of the students should now be displayed on the student list.
If you ever find a window that is missing data, check for filters before panicking!

ALL CONFIGURATIONS Scores Pro Common Features Tutorial
Appendix C - 30
2. Customizing/Printing Reports a. Select the Classes tab and highlight the TUT002 course. Right-click and select
Class Report. When the class report window is displayed, right-click the grey bar at the top of the Class listing to display the Item Selection box. The list on the left side of the box displays all of the fields available. The list on the right side displays the fields selected in your report. Use the double arrow (<< >>) buttons to move fields to and from the Selected Items list. Use the up and down arrow buttons to arrange the order of your selected items.
b. Customize the report to list: ID Last, First Middle Final Count Final Average Final Best Click OK when finished customizing. c. Right-click and select Preview, Listing. Select Zoom from the View menu and
highlight Fit Width. Try selecting Fit Height and Best Fit and leave in the view you most prefer. On the report, use the pointer to adjust the width of the columns by left-clicking the column lines and dragging them to a new location. You can also customize the field list from this window by right-clicking the red bar at the top of the report. Try it.
d. To print your report, right-click and select Print or click the printer toolbar
button. 3. Customizing Courses
a. Your quarter or semester schedule may require you to shorten or lengthen a Nida CAI course. With Scores Pro, modifying Nida courses is as easy as pointing and clicking. Let’s try it. Click the Courses tab to display the list of courses included with your tutorial database.
b. The first course in your list should be the Tutorial Course, 1000-T. c. Let’s continue by adding a new course to the database. Right-click and select
the Add Course option from the context menu.

Scores Pro Common Features Tutorial ALL CONFIGURATIONS
Appendix C - 31
3. Customizing Courses, continued d. The Course Information dialog box should be displayed. Enter ID Number
1001-T in the ID Box. This field must be filled in. e. Enter the title, Sample Course in the Title box. f. Enter a number 1 in the Level box and a number 3 in the Credits box. Optional
Fields are for filtering. Leave these blank for purposes of this tutorial. g. Click Add and then Close. Notice that the newly created course, 1001-T,
Sample Course is now shown in the Course listing. h. Once the course description is defined, you need to add the lessons that will
make up this new course. Highlight your Sample Course and right-click. Select Edit Course Outline from the context menu.
i. The Course Outline dialog box should be displayed. We will now create a
course by adding Units and Lessons. 1. Highlight the word <empty> in the Outline window. 2. Click Insert to open the Insert Course Item window. Enter the title Basic and
click OK. 3. Click Insert again, enter the title Advanced, and click OK. 4. Double-click the “U” next to the word Basic and highlight the word
<empty> in the Basic drop down tree. 5. In the Details window, highlight the lesson called Addition and Subtraction.
Next, click the double arrows “<<“ to add the lesson to your new course. Click the double arrows again to automatically add Multiplication and Division. Find the Nida lesson called Switches, Fuses and Breakers. It should be around lesson number 80. Find Conductors, Insulators & Semiconductors, and click the double arrows again.
6. Double click the “U” next to the word Advanced and highlight <empty> in
the Advanced tree. In the Details window, highlight the lessons Kirchhoff’s Laws (around 110), Norton’s Theorem, and Thevenin’s Theorem. Notice that each time a lesson is selected, the highlight bar increments by one lesson. When finished, click OK to close the window.
j. You may need to consult the Nida Pro User's Guide to accomplish the next step.
Create a new class, with your new course, an instructor, and students; then make a Key Disk, Transfer Disk, or use your network Setup Home Directories function (depending on your system configuration) to assign the new course. Open CAI Pro and run some lessons in your new course.

ALL CONFIGURATIONS Scores Pro Common Features Tutorial
Appendix C - 32
4. Adding New Lessons a. Open Scores Pro and click the Lessons tab to display a list of lessons included
with your database. The only lessons that will be displayed are those associated with the courses that you purchased and are licensed to use. The Scores Pro Management System is designed to run all computer file formats. Because of this special feature, it is possible for you to incorporate your own custom courseware. For example, you may have created a presentation using a word processor or presentation software application. These files can be added to the lessons database of Scores Pro and later may be added to a course as we did in the previous section.
b. Compare the first six lessons listed in the database to the list shown below.
Notice that we have added a Lesson Format column in the tutorial to show you what type of files have been included.
No. Lesson Title Lesson Type Lesson ID Lesson Format 1. Sample Overview Text 1001-T RTF 2. Video Field Trip CAI-X 1002-T AVI 3. Instructor Presentation CAI-X 1003-T PPT 4. Interactive Project Text 1004-T RTF 5. Design Project CAI-X 1005-T EWB 6. Internet Project CAI-X 1006-T HTML c. Let’s begin by adding a new lesson to the database. For this exercise, we will
use a BMP file that has been provided. Right-click and select Add Item from the context menu.
d. The Lesson Details Information dialog box should be displayed. Enter the
number 1007-T in the ID box. e. Enter the title, My Sample Lesson. f. Click CAI Lesson type and check the Non-Nida box under CAI Lesson. g. Enter the string %media%\misc\tut-2.bmp in the File window. This feature
permits the use of variables when file locations may change on student computers.
h. Click None under Exam Type and then click ADD to add the new lesson to the
database. Close the Lesson Detail Information box. i. Note that the newly created lesson, 1007-T - My Sample Lesson, is now shown
in the Lesson listing.

Scores Pro Common Features Tutorial ALL CONFIGURATIONS
Appendix C - 33
4. Adding New Lessons, continued j. Select the Courses tab and add the new lesson to your Sample Course created
in the last section. Place My Sample Lesson in the Advanced section. k. Update your Key Disk, Multi-User disk, or network directories as you did earlier.
Minimize Scores Pro. l. Open or maximize CAI Pro. Select Options|Variables from the menu bar. Add
the variable media if it is not already listed. The value should be X:\Nida98\media (or the path assigned by your network administrator. Use the drive letter C in Key Disk or Multi-User configurations.) Click OK to return to the CAI Pro window.
m. Try out your new lesson. If your lesson will not open, use Explorer to check
the correct path. In some cases, the media variable needs to read: X:\Nida98\Lessons\media (or the path assigned by your administrator). See Step 4.l. to make this change.
5. Customizing CAI Pro
a. CAI Pro provides the instructor with many choices during setup of student options in CAI Pro. The instructor can allow student access to lesson questions, calculators, WordPad, and review modes. Select Options|General from the menu bar. In the Student Options box, select Search, View, and Question Help. This will allow student access to the Search Lessons and View Records options under the Student drop-down menu. In the Other Student Applications box, check the Active option to allow calculator and WordPad access. You may also change the Banner Text from the General Options box.
b. Select Options|Lessons from the menu bar. Click the Appearance tab if it is not
already selected. This window allows you to select the position of the lesson window on your monitor and adjust for the width and height. Select the Full Screen button.
c. Click the Quiz Options tab. The Lesson Mode determines what type of quizzes
you are including in each lesson. Select Open Learning. The Quiz mode determines how many chances a student gets to answer each quiz question. Select Full Pass. The Critique Mode allows the student access to full question review, wrong answer only review, or no question review. Select All Questions. The Test box places a time limit on the quizzes. Leave this one unchecked. Finally, the Passing Grade determines the minimum score to move on when prerequisite checking is enabled. Enter 80 if not already defaulted.

ALL CONFIGURATIONS Scores Pro Common Features Tutorial
Appendix C - 34
5. Customizing CAI Pro, continued
d. Click the Other Lessons tab. This window allows path entries for other applications that are opened when running Non-Nida lessons. For details on this window, refer to the Nida Pro User’s Guide.
e. Click OK to return to the CAI Pro window. Your school name should be
displayed if you changed it in the Options, General window. Open a lesson and take the quiz. Try skipping questions, going back and answering skipped questions, and going back and changing answers.
f. Exit the lesson. Select View Records from the Student drop-down menu. Highlight the lesson you just completed and click it to open the lesson report. Select a question that was answered wrong and double-click to access the question review mode. Click Enter to access the next question.
g. Exit the View Records function and close CAI Pro.
Congratulations! You have completed the Scores Pro Common Features Tutorial.
You are now ready to close the tutorial database and create your own database.

Appendix D
Typical Client Server Network Setup Example


Appendix D-1
Typical Scores Pro Client/Server Network Installation This installation sheet is designed to assist you in installing your Scores Pro/CAI Pro software on a Client/Server network system. Use the Network Mapping table on page D-4 as a guide for setting up user access rights or sharing server directories. Directory Structure and Required Access The installation program will build a directory structure as follows: \Nida98 \Instruct \Lessons \Student Students need read and file-scan access to the \Nida98\Lessons and \Nida98\Student directories. Instructors need full access to the entire \Nida98 system. You will also need a home directory, eight characters or less, under a common root for each student (or instructor). Students need read/write/create access to their own home directories and instructors need full access to all student home directories. Installation Instructions Software must be installed on the server, and both Instructor and Student access must be set up. The installation program will take UNC path names; however, verification of the complete operation of the system using UNC names has not been completed, so it is recommended that you map one or more drive letters to the \Nida98 and \Users directories. For example: F: - Server (directory) in which to load the Nida software G: - Server (directory) in which the \User folder resides
I. Software Installation A. Create a “Nida98” and “Users” directory on the server. B. Map the drives using [Nida98] and [Users] respectively as share names for the
directories you created. C. Start the installation program and select Scores Pro. D. Select Client/Server Network, click Next, and click Next again. E. Select Software Installation (on Server), uncheck "Include Instructor Access"
(unless you intend to use the server as an Instructor station), and click Next. F. Enter F:\ for the "Nida Software" and click Next. G. Follow the rest of the prompts to install the software.
This will install all of the software on the server and set it up to be shared.

Appendix D-2
Typical Scores Pro Client/Server Network Installation, continued
II. Instructor Access Setup
A. Provide a drive map to the server. (See the Network Mapping table on page D-4 for details.)
B. On each Instructor computer, start the installation program and select Scores
Pro.
C. Select Client/Server Network, click Next, and click Next again.
D. Select Instructor Workstation.
E. Select either Direct Map or Windows Registry and click Next.
Direct Map means that as part of the user's login, you will map a drive letter (like X:) directly to the home directory.
Windows Registry means that you will provide access to the user's root, and the Nida software will extract the user's login name from the registry. The user's login name is the same as his/her subdirectory under the user's root (e.g., Bill Green logs in as billg and has a home directory of G:\BILLG).
1. Direct Map: Fill in the proper paths and click Next.
For the example, fill in:
CAI Lessons - F:\Lessons Student Software - F:\Student Instructor Software - F:\Instruct User's Root - G: User's Home Directory - X:
2. Windows Registry: Fill in the proper paths and click Next.
For the example, enter:
CAI Lessons - F:\Lessons Student Software - F:\Student Instructor Software - F:\Instruct User's Root - G:
F. Continue through the rest of the dialogs.
G. Run the IDAPI installation to install the Borland Database Engine. The IDAPI
installation instructions can be found in Chapter 2. This will provide access to the instructor portion of the software (Scores Pro).
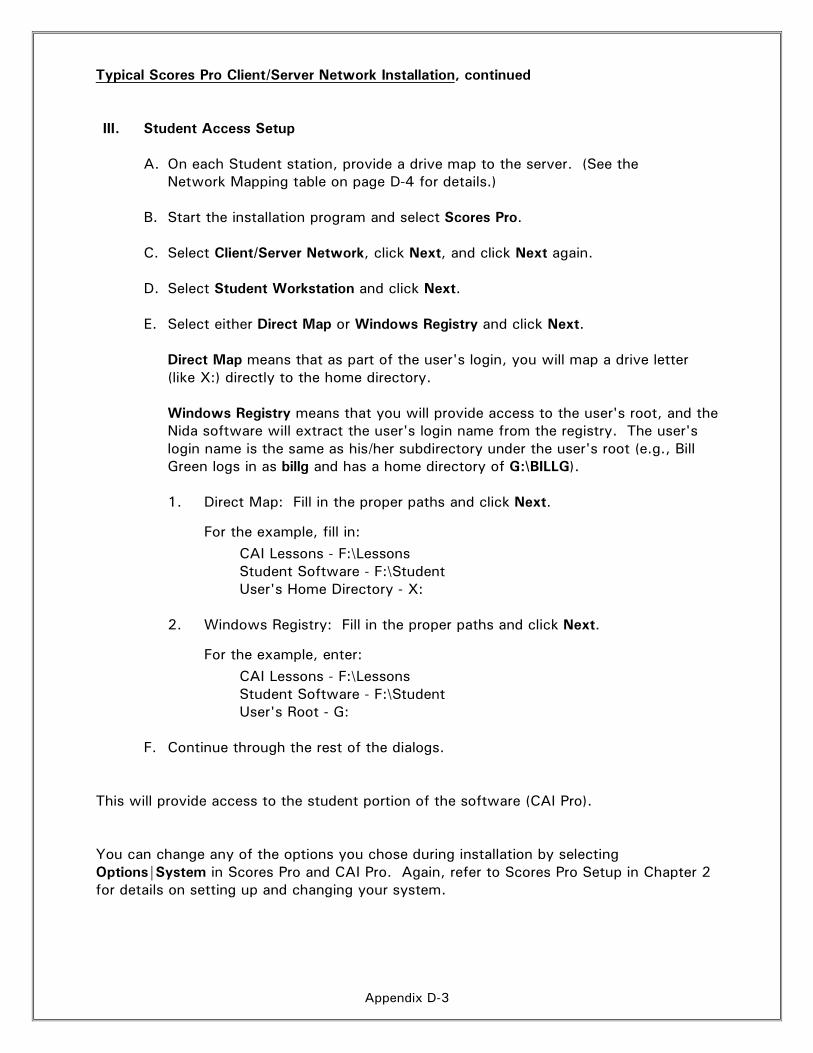
Appendix D-3
Typical Scores Pro Client/Server Network Installation, continued III. Student Access Setup
A. On each Student station, provide a drive map to the server. (See the
Network Mapping table on page D-4 for details.)
B. Start the installation program and select Scores Pro.
C. Select Client/Server Network, click Next, and click Next again.
D. Select Student Workstation and click Next.
E. Select either Direct Map or Windows Registry and click Next.
Direct Map means that as part of the user's login, you will map a drive letter (like X:) directly to the home directory. Windows Registry means that you will provide access to the user's root, and the Nida software will extract the user's login name from the registry. The user's login name is the same as his/her subdirectory under the user's root (e.g., Bill Green logs in as billg and has a home directory of G:\BILLG).
1. Direct Map: Fill in the proper paths and click Next.
For the example, fill in:
CAI Lessons - F:\Lessons Student Software - F:\Student User's Home Directory - X:
2. Windows Registry: Fill in the proper paths and click Next.
For the example, enter:
CAI Lessons - F:\Lessons Student Software - F:\Student
User's Root - G:
F. Continue through the rest of the dialogs. This will provide access to the student portion of the software (CAI Pro). You can change any of the options you chose during installation by selecting Options|System in Scores Pro and CAI Pro. Again, refer to Scores Pro Setup in Chapter 2 for details on setting up and changing your system.

Appendix D-4
Network Mapping
(NT or Novell)
User Access Rights
Server Instructor Student
Server 1 F: F: \Nida98 [Nida98] \Lessons RWC Read Only \Instruct RWC NONE \Student RWC Read Only Direct Map Network Login Menu Control Server 2 \Users [Users] G: RWC G: Read Only G: Read Only \Billg RWC \Jillh X: RWC G: RWC RWC \Larrys RWC etc
Note: RWC indicates Full Access
Scores Pro/CAI Pro Settings
Field Direct Map Network Login Menu Control
Nida Programs F:\Lessons F:\Lessons F:\Lessons
Lessons F:\Lessons F:\Lessons F:\Lessons
Help F:\Lessons\Help F:\Lessons\Help F:\Lessons\Help
User Root: X: G: G:
User List: N/A N/A G:


Index
Index - 1
A
Access levels, changing...................2-52 Accessing
communications options of CAI Pro…….............................4-21
general options ...........................4-26 lesson......................................... 4-3 lesson options.............................4-37 reports.......................................3-63 system options ...........................4-44
Adding class..........................................3-28 courses to an outline..................... 5-9 instructor ...................................3-15 non-Nida lessons to database…. ...5-37,
5-39 Quester test to database ..............5-56 questions to Quester test .............5-52 registry overrides................ 5-34, 5-36 student information .....................3-22 students to a class ......................3-26
Administering home directories.......... 3-44, 3-49, 6-8 LAN home directories...................3-45
All Questions option, Critique Mode box………...................................4-35
Analyzing lesson items ....................5-41 Appearance tab, Lesson Options
window…...................................4-28 Applications
accessing and using.....................4-16 instructor control of accessibility ...4-24
Applications Properties window, General Options ..........................4-25
Archiving Scores Pro database........... 6-3 Assessment option, Lesson Mode
box……. ....................................4-30 Assigning curriculum
Key Disk ....................................3-30 Multi-User ..................................3-35 Network.....................................3-41
Assigning proctor authorization codes to lessons and tests............5-61
Assigning students to a class ...........3-29 Authorization, Proctor .....................5-57
B
Backing up Scores Pro database......... 6-3 Banner, changing ........................... 2-51 Basic tab
Instructor information.................. 3-10 Student information .................... 3-16
Bookmarking Lessons ....................... 4-5 Borrow Course listing ....................... 5-8
C
CAI lesson type ............................. 5-23 Class
adding....................................... 3-28 listing........................................ 3-23
Class data, importing...................... 3-38 Class information dialog box ............ 3-24 Classes, creating/modifying ............. 3-24 Communication options of CAI Pro,
accessing .................................. 4-21 Communication, troubleshooting ...... 6-16 Communications link, verifying
operational readiness of ............... 4-20 Communications Setup window,
Trainer Communications .............. 4-19 Configuration selection ..................... 1-3 Configuration summary
Client Server ................................ 1-5 Key Disk...................................... 1-4 Multi-User.................................... 1-4 Peer-to-Peer Network (Workgroup) .. 1-5
Configuration tab ........................... 2-46 Import options............................ 3-51
Connecting trainer to computer ........ 2-53 Course
creating.............................. 5-4, 5-14 details ....................................... 5-12 information window ...................... 5-4 listing.......................................... 5-3 properties .................................. 5-11
Course outline borrowing courses ........................ 5-8 creating/modifying .........5-6, 5-9, 5-15 example .................................... 5-10
Courses tab..................................... 5-2

Index
Index - 2
Courseware options box Client/Server Network ..................2-41 Key Disk ..................................... 2-8 Multi-User ..................................2-16 Peer-to-Peer Network ...................2-28
Creating classes.......................................3-24 course ................................5-4, 5-14 course outline ......................5-6, 5-15 database, Scores Pro .................... 3-7 Key Disk ....................................3-34 lessons, your own .......................5-28 proctor authorization code ............5-58 Quester test ...................... 5-50, 5-55 variables, lesson path...................5-32
Critique Mode box, Quiz tab .............4-35 Curriculum, assigning
Key Disk ....................................3-30 Multi-User ..................................3-35 Network.....................................3-41
Customizing lesson parameters .......................5-16 report ........................................3-67 report data .................................3-64
D
Database anatomy, Scores Pro..................... 3-6 backups and archives.................... 6-2 creating new................................ 3-7 opening....................................... 3-8 restoring ..................................... 6-3 searching ...................................3-71
Date column, Sessions box ............... 4-8 Deleting
courses from an outline ................. 5-9 Directories tab, System Options
window….......................... 2-47, 4-40 Directory setup box
Client/Server Network ..................2-33 Key Disk ..................................... 2-4 Multi-User ..................................2-11 Peer-to-Peer Network ...................2-20
DOS to Windows network update .....6-10 Duplicate data, removing .................. 6-5
E
Editing lesson information ................5-11 Enabling Instructor Options ..............4-18 Exact Permission Levels, Options
tab……… ...................................4-41 Exam types....................................5-25
Exit Lesson Results window, Responses box ........................... 4-11
Export and Import Buttons, Profiles tab…… ...................................... 443
Export data dialog box .................... 3-54 Exporting student records to
Transfer Disk…........................... 3-56
F
Failing grade alert........................... 3-63 Filters........................................... 3-69 Final column, Sessions box................ 4-9 Format
Proctor Authorization Code .......... 5-57 Full Pass option, Quiz Mode box....... 4-35
G
Garbled text, troubleshooting........... 6-17 General Options window, Instructor
Options ..................................... 4-22 General Options, Accessing ............. 4-26
H
Hardware connection...................... 2-53 Hardware requirements ..................... 1-2 Home directories
administering .....................3-44, 3-49 backups ...................................... 6-2 setup ................................3-41, 3-48
I
IDAPI executable............................ 2-42 Ignore Sessions, Import options ....... 3-52 Import
configuration.............................. 3-50 options, Configuration tab............ 3-51
Import and Export Buttons, Profiles tab…… .......................... 4-43
Import process............................... 3-57 Importing
class data .................................. 3-38 student results ...................3-57, 3-60 Transfer Disk to student
workstation………. .................. 3-40 Importing student results
Multi-User.................................. 3-54 Network .................................... 3-50
Incorrect Only option, Critique Mode box…… ............................ 4-35

Index
Index - 3
Installation Options box Client/Server Network ..................2-30 Key Disk ..................................... 2-3 Multi-User ..................................2-10 Peer-to-Peer Network ...................2-18
Installation steps ............................. 2-1 Client/Server Network ..................2-29 Key Disk ..................................... 2-2 Multi-User ................................... 2-9 Peer-to-Peer Network ...................2-17
Installing updates............................. 6-9 lessons/courses...........................6-14 network DOS to windows.............6-10 network ToolBook courseware ......6-13 network ToolBook version ............6-12 stand alone system....................... 6-9
Instructor drop-down menu ..............4-17 Instructor information............. 3-10, 3-15
Basic tab....................................3-10 Internet tab ................................3-13 Photo tab ...................................3-12 User tab.....................................3-14
Instructor Mode, Options tab............4-41 Instructor Options...........................4-17
Enabling During Loading ...............4-18 Enabling from within CAI Pro ........4-18
Instructor software options box Client/Server Network ..................2-38 Key Disk ..................................... 2-5 Multi-User ..................................2-13 Peer-to-Peer Network ...................2-24
Internet tab Instructor information...................3-13 Student information .....................3-20
Introduction to Nida Pro.................... 1-1 Item Analysis feature ......................5-40
K
Key Disk creating/making.................. 3-31, 3-34 setup.........................................3-31 student menu options ..................3-33
Keyword tab, Search for Lesson window…...................................4-13
L
LAN home directories administering ..............................3-45 setup.........................................3-42
Lesson accessing .................................... 4-3 detail information........................ 5-19 detail information for Nida
lessons……….......................... 5-27 listing........................................ 5-18 non-Nida, adding to database. ..... 5-37,
5-39 parameters, customizing .............. 5-16 search for a ............................... 4-12 searching for by Lesson Title ........ 4-15 tab, Lesson Options window ........ 4-29 types ........................................ 5-21 weight ...................................... 5-13
Lesson Information editing....................................... 5-11 table .................................5-25, 5-38
Lesson Mode box, Lesson tab .......... 4-30 Lesson Options
accessing .................................. 4-37 window, Instructor Options .......... 4-27
Lessons tab..................................... 5-2 Load Commands, Options tab .......... 4-41
M
Making Key Disk.................................... 3-31 Transfer Disk .....................3-36, 3-39
Manual entry lesson type ................ 5-22 Maximizing your training time ............ 4-2 Menu bar, Scores Pro ....................... 3-2 Menu options, student
Key Disk.................................... 3-33 Multi-User.................................. 3-37 Network .................................... 3-43
Message bar, Scores Pro................... 3-5 Modifying course outline ................. 5-15 Multi-Pass option, Quiz Mode box .... 4-34
N
Network tab, Student information..... 3-18 No Quiz option, Lesson Mode box .... 4-31 No Review option, Critique Mode
box…….. ................................... 4-35
O
Obj. (Objective) column, Responses box…........................................ 4-10

Index
Index - 4
Open Learning option, Lesson Mode box….. ......................................4-31
Opening database ............................ 3-8 Options tab, Systems Options
window……................................4-41 Other Student Applications box,
General Options window ..............4-24 Other tab, Lesson Options window....4-36 Over. (Overall) column, Sessions box.. 4-9 Overview, Scores Pro ....................... 3-1
P
Passing Grade, Quiz tab...................4-33 Passwords, changing.......................2-52 Passwords tab, Systems Options
window….......................... 2-48, 4-42 Permission level..............................5-13 Photo tab
Instructor information...................3-12 Student information .....................3-19
Planning matrix ............................... 1-7 Power source, troubleshooting..........6-15 Pre-installation check ....................... 2-1 Prerequisite checking.......................5-12 Pre-Test/Post-Test option, Lesson
Mode box...................................4-30 Printing a report............ 3-66, 3-67, 3-68 Proctor Authorization Codes.............5-57 Profiles tab, System Options
window……................................4-43 Project lesson type..........................5-22
Q
Quester .........................................5-43 adding test to database ................5-56 creating test ...............................5-50 directory setup............................5-45 installation..................................5-44 operation....................................5-47 question banks, selecting..............5-51 registration information ................5-46 sample test.................................5-54 saving template...........................5-55 viewing questions in the banks......5-54
Quester Test lesson type .................5-24 Question banks ..............................5-51 Quick Setup box, System Options
windows ....................................4-38 Quiz Mode box, Quiz tab .................4-34 Quiz tab, Lesson Options window .....4-32
R
Recommended preliminary lessons...... 4-2 Registration information box
Client/Server Network ................. 2-40 Key Disk...................................... 2-7 Multi-User.................................. 2-15 Peer-to-Peer Network .................. 2-27
Registry overrides ..................4-36, 5-33 adding...............................5-34, 5-36
Remove Duplicate Data feature .......... 6-4 Removing students from a class....... 3-27 Replaceable variables, proctor
authorization codes ..................... 5-58 Report
accessing .................................. 3-63 customizing ............................... 3-67 printing .................... 3-66, 3-67, 3-68
Report data customizing ............................... 3-64 viewing ..................................... 3-61
Required factoring of lesson score .... 5-13 Response column, Responses box .... 4-11 Responses box, Lesson Results
window….. ................................ 4-10 Restoring Scores Pro database ........... 6-3 Restrict Quiz Attempts to One
Session option, Quiz tab .............. 4-33
S
Score column, Responses box.......... 4-11 Score, required factoring ................. 5-13 Scores Pro
database anatomy......................... 3-6 Instructor information.................. 3-10 menu bar ..................................... 3-2 message bar ................................ 3-5 overview ..................................... 3-1 toolbar ........................................ 3-5
Scores Pro setup............................ 2-43 checking system options.............. 2-50 system configuration ................... 2-44
Search for a lesson by Lesson Title .......... 4-15 for lesson .................................. 4-12
Search Lessons Option ................... 4-12 Search, database, Scores Pro........... 3-71 Select Students window ................. 3-26 Sessions box, Lesson Results
window…….. ............................... 4-8

Index
Index - 5
Setup filters.........................................3-69 home directories................. 3-41, 3-48 LAN home directories...................3-42
Single Pass option, Quiz Mode box....4-34 Software requirements ..................... 1-2 Structured Learning option, Lesson
Mode box...................................4-31 Student
assigning to a class ............ 3-26, 3-29 removing from a class ..................3-27
Student drop-down menu.................. 4-4 Student information ............... 3-16, 3-22
Basic tab....................................3-16 Internet tab ................................3-20 Network tab ...............................3-18 Photo tab ...................................3-19 User tab.....................................3-21
Student menu options Key Disk ....................................3-33 Multi-User ..................................3-37 Network.....................................3-43
Student Options box, General Options window .....................................4-23
Student record, view........................ 4-6 Student Records tab, System
Options window..........................4-39 Student software options box
Client/Server Network ..................2-37 Key Disk ..................................... 2-4 Multi-User ..................................2-12 Peer-to-Peer Network ...................2-23
Subjects tab, Search for Lesson window…...................................4-14
Syntax Chart, Replaceable Variables - Proctored Testing………. ............5-58
System maintenance ........................ 6-1 System Options
accessing ...................................4-44 checking ....................................2-50 window .....................................4-38
System Options box Configuration tab.........................2-46 Directories tab ............................2-47 Passwords tab ............................2-48 Type tab ....................................2-45
System worksheet ........................... 1-9
T
Taskbar and Desktop Options box Client/Server Network ................. 2-39 Key Disk...................................... 2-6 Multi-User.................................. 2-14 Peer-to-Peer Network .................. 2-25
Technical support............................. 6-1 Template, Quester.......................... 5-55 Test Data window, Communications
Setup........................................ 4-20 Testing the interface....................... 2-54 Testing, Proctored.......................... 5-57 Text Window lesson type................ 5-24 Time column, Sessions box ............... 4-9 Timed option, Quiz tab.................... 4-33 Toolbar, Scores Pro .......................... 3-5 ToolBook courseware network
update……................................. 6-13 ToolBook version network update..... 6-12 Trainer Communications.................. 4-19 Transfer Data function ...................... 6-6 Transfer Disk
exporting student records ............ 3-56 importing to student workstation .. 3-40 making ..............................3-36, 3-39
Troubleshooting communication........................... 6-16 garbled text ............................... 6-17 general ........................................ 6-1 power source ............................. 6-15
Type tab ....................................... 2-45
U
Unknown lesson type ..................... 5-21 Unzip Lessons, Options tab ............. 4-41 Update Lessons/Courses feature ...... 6-14 Updates, installing............................ 6-9 Use and System options, Profiles
tab……...................................... 4-43 User tab
Instructor information.................. 3-14 Student information .................... 3-21

Index
Index - 6
V
Validation Disk box Client/Server Network ..................2-40 Key Disk ..................................... 2-7 Multi-User ..................................2-15 Peer-to-Peer Network ...................2-26
Variables, lesson path ............ 5-30, 5-32 Variables, replaceable (proctor
authorization codes).....................5-58 Verifying operational readiness of
communications link ....................4-20 View
Quester questions in the banks......5-54 question text, Lesson Results
window….. .............................4-11 report data .................................3-61 Student Options box, General
Options window.......................4-23 student record ............................. 4-6
W
Weight of lesson in course ...............5-13 Worksheet, system .......................... 1-9