NIBP250 User’s Guide - BIOPAC · synchrony with the cyclic arterial expansion and contraction,...
18
NIBP250 User’s Guide Noninvasive Blood Pressure Measurement System 42 Aero Camino, Goleta, CA 93117 Telephone: 805-685-0066 Facsimile: 805-685-0067 [email protected] www.biopac.com
-
Upload
nguyendien -
Category
Documents
-
view
225 -
download
0
Transcript of NIBP250 User’s Guide - BIOPAC · synchrony with the cyclic arterial expansion and contraction,...
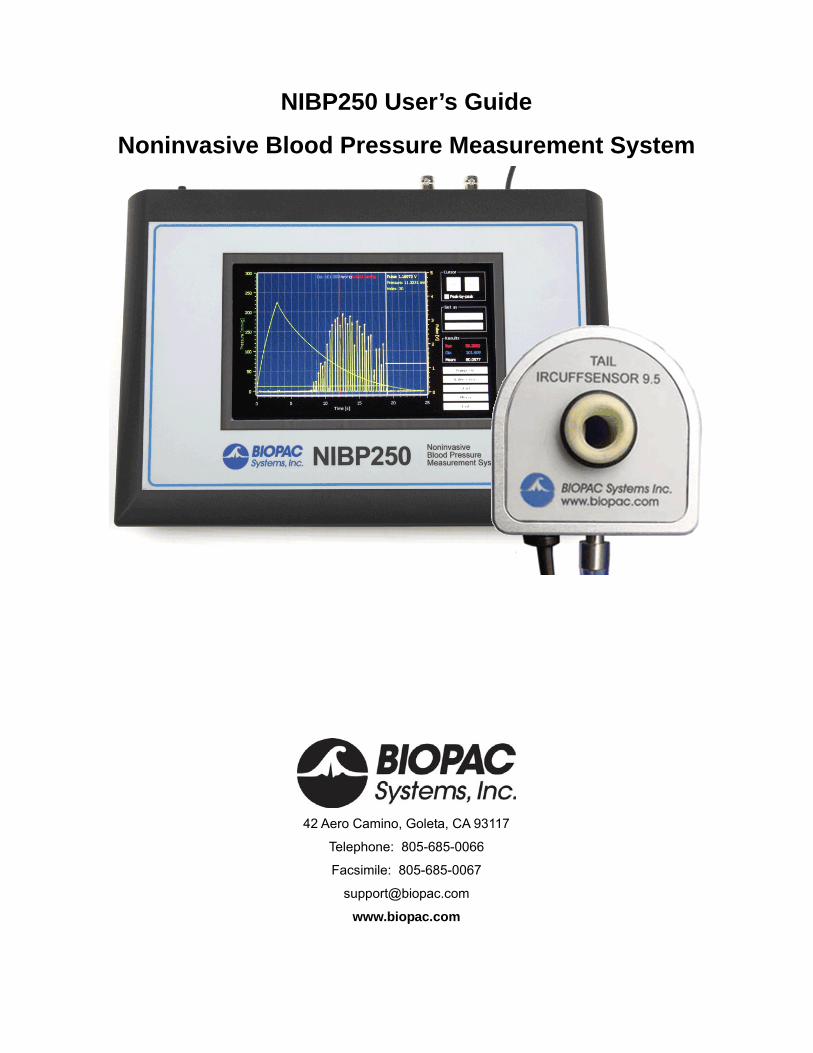
NIBP250 User’s Guide
Noninvasive Blood Pressure Measurement System
42 Aero Camino, Goleta, CA 93117
Telephone: 805-685-0066
Facsimile: 805-685-0067
www.biopac.com

NIBP250 User’s Guide
Table of Contents
User's Manual 1. Introduction.............................................................................................................................. 3 1.1. General Description........................................................................................................................................ 3 1.2. Theory of Measurement ................................................................................................................................. 3 1.3. What’s Included in System............................................................................................................................. 3 1.4. Animal Preparation ......................................................................................................................................... 4
2. User Interface and Connections ...................................................................................................................... 4 2.1. Front Panel..................................................................................................................................................... 4
2.2. Rear Panel.................................................................................................................................................... 5 2.3. Sensor ............................................................................................................................................................ 5 2.4. Main Screen ................................................................................................................................................... 6
2.4.1. Measurement Analysis View................................................................................................................... 7 2.5. Menu Window................................................................................................................................................. 8
2.5.2. Options.................................................................................................................................................... 9 2.5.3. Calibration............................................................................................................................................... 9
2.6. Results List..................................................................................................................................................... 9 3. Usage ............................................................................................................................................................ 10
3.1. Start-up and preparation............................................................................................................................... 10 3.2. Acquisition .................................................................................................................................................... 10 3.3. Analysis ........................................................................................................................................................ 10 3.4. Working with Saved Results......................................................................................................................... 11 3.5. Turning Off.................................................................................................................................................... 11 3.6. Result File .................................................................................................................................................... 12 3.7.External Memory Units .................................................................................................................................. 12 3.8. Firmware Update.......................................................................................................................................... 12 3.9. Calibration .................................................................................................................................................... 13
3.9.1. Calibration Check.................................................................................................................................. 13 3.9.2. Recalibration ......................................................................................................................................... 13
3.10 Triggers ....................................................................................................................................................... 13 4. Using the NIBP250 with a BIOPAC MP Acquisition System ........................................................................... 14
4.1. Connections ............................................................................................................................................. 14 4.2. Software Setup in AcqKnowledge............................................................................................................ 14
5. Technical Specifications ................................................................................................................................ 15 6. Troubleshooting............................................................................................................................................. 16
6.1. Tail Pulse signals are not regular. ................................................................................................................ 16 6.2. Compressor runs continuously..................................................................................................................... 16 6.3. There is leakage from the tubing and Tail Cuff Sensor connections............................................................ 16
7. Accessories ................................................................................................................................................... 17 8. Maintenance and Care .................................................................................................................................. 18
8.1. Service Policy............................................................................................................................................... 18 8.2. Cleaning Procedures.................................................................................................................................... 18
8.2.1. Monitor & Sensor Housing Cleaning Procedures ................................................................................. 18
Index of Figures
Figure 1: Front Panel ................................................................................................................................................. 4 Figure 2: Rear Panel.................................................................................................................................................. 5 Figure 3: Sensor ........................................................................................................................................................ 5 Figure 4: Main Screen ............................................................................................................................................... 6 Figure 5: Analysis View.............................................................................................................................................. 7 Figure 6: Menu window ............................................................................................................................................. 8 Figure 7: General Tab Settings................................................................................................................................. 8 Figure 8: Date/Time Properties window .................................................................................................................... 8 Figure 9: Options Tab Settings .................................................................................................................................. 9 Figure 10: Calibration Tab Settings ........................................................................................................................... 9 Figure 11: Results List ............................................................................................................................................. 10 Figure 12: Location of Systolic and Diastolic Pressures ......................................................................................... 11
Page 2 of 18 www.biopac.com
Noninvasive Blood Pressure Monitoring System
User's Manual 1. Introduction
1.1. General Description
The NIBP250 noninvasive blood pressure monitor is a stand-alone device for measuring the blood pressure of small animals. The NIBP250 has a convenient touch screen LCD user interface and includes a built-in Tail Cuff Sensor pump that automatically inflates the cuff to occlude the blood vessels in the tail of a rat or similar small animal. Once the pump reaches maximum inflation point the cuff slowly deflates, providing a linear drop in pressure. Using the simple touch screen interface, the blood pressure points are easily marked for analysis. The NIBP250 returns marked values for systolic and diastolic blood pressures and calculated values for mean blood pressure and heart rate. The NIBP250 does not require a data acquisition system or computer to analyze the data, but can interface with existing BIOPAC data acquisition platforms and third-party systems when combining other physiological signals.
1.2. Theory of Measurement
The NIBP250 noninvasive blood pressure system uses an adapted version of the well-known ‘Oscillometric Technique1. Oscillometric Technique was first demonstrated in 1876 and involves the observation of oscillations in the sphygmomanometer cuff pressure, which are in turn caused by the oscillations of blood flow, i.e., the pulse. An electronic version of this method is sometimes used in long-term measurements and general practice. This method relies on a sphygmomanometer cuff with an electronic pressure sensor (transducer) to observe cuff pressure oscillations. By use of this type of sensor, the NIBP250 automatically acquires BP data, and controls the automatic inflation and deflation of the cuff.
The cuff is initially inflated to a pressure in excess of the systolic arterial pressure and then reduced over a period of about 30 seconds to just below diastolic pressure. When blood flow is nil (cuff pressure exceeding systolic pressure) or unimpeded (cuff pressure below diastolic pressure), cuff pressure will be essentially constant. When blood flow is present but restricted, the cuff pressure (monitored by the pressure sensor,) will vary periodically in synchrony with the cyclic arterial expansion and contraction, i.e., it will oscillate. The systolic and diastolic pressures are computed using an algorithm, and the computed results displayed.
For human use, blood pressure cuffs are snugly wrapped around the upper arm at roughly heart level. The blood flow rate in the upper arm is measured to determine whether the flow is impeded (systolic) or unimpeded (diastolic). For use in small laboratory animals, the cuff is placed around the tail. However, the blood flow rate in the tail is normally too low for the oscillations to be detected with a sphygmomanometer cuff. The NIBP250 system accurately measures systolic and diastolic pressure levels using a Tail Cuff Infrared Pulse Sensor to detect blood flow pulsations. To enhance measurement accuracy, it’s advisable to gradually heat the tail of the animal using the optional Tail Heating Unit.
1.3. What’s Included in System
Each NIBP250 system includes: 1 - amplifier unit (switching power supply works for 110 V or 220 V) 1 - cuff/sensor
o size 11 mm is included, but can be specified as 9.5 mm or 13 mm when ordering o optional MRI-compatible cuff/sensors available as add-ons: 9.5 mm, 11 mm, or 13 mm
1 - restrainer (size medium is included, but can be specified as small or large when ordering) 1 - Pulse cable to MP System or third-party A/D hardware 1 - Pressure cable to MP System or third-party A/D hardware
1 Pickering, TG; Hall, JE; Appel, LJ et al. (2005). "Recommendations for blood pressure measurement in humans
and experimental animals: Part 1: blood pressure measurement in humans: a statement for professionals from the Subcommittee of Professional and Public Education of the American Heart Association Council on High Blood Pressure Research". Hypertension 45 (5): 142–61.
[email protected] Page 3 of 18
NIBP250 User’s Guide
1.4. Animal Preparation
1. Turn the Animal Heating Chamber on.
2. Set the temperature value (press and hold P.Set and then press the up or down arrow to reach the desired value).
For accurate noninvasive blood pressure measurement, the animal or its tail should be warmed to 32°C.
3. Press the Heater button to start heating to the selected temperature value.
4. Place the animal inside the RESTRAINER “Animal Holder” (select the suitable size for the animal’s size/weight).
Leave the tail outside.
Adjust the length to obtain a position where the animal has limited movement.
5. Place the RESTRAINER (with the animal) in the heating section of the Animal Heating Chamber.
6. Wait approximately 30 minutes for the animal to reach the selected temperature.
7. Remove the RESTRAINER from the Animal Heating Chamber.
8. Connect the Tail Cuff-Sensor to the animal’s tail.
9. Verify that the sensor fits the tail correctly. The sensor should be attached between the mid-point of tail and base of tail (spinal column).
10. Wait for the animal to relax and become inactive before starting measurements.
Prior to conducting the experiment, condition the animal by putting it inside the holder several times a day and repeat the tail heating each time. It is also advisable to turn on the sensor a few times so the animal becomes familiar with the feel of the occlusion process.
2. User Interface and Connections
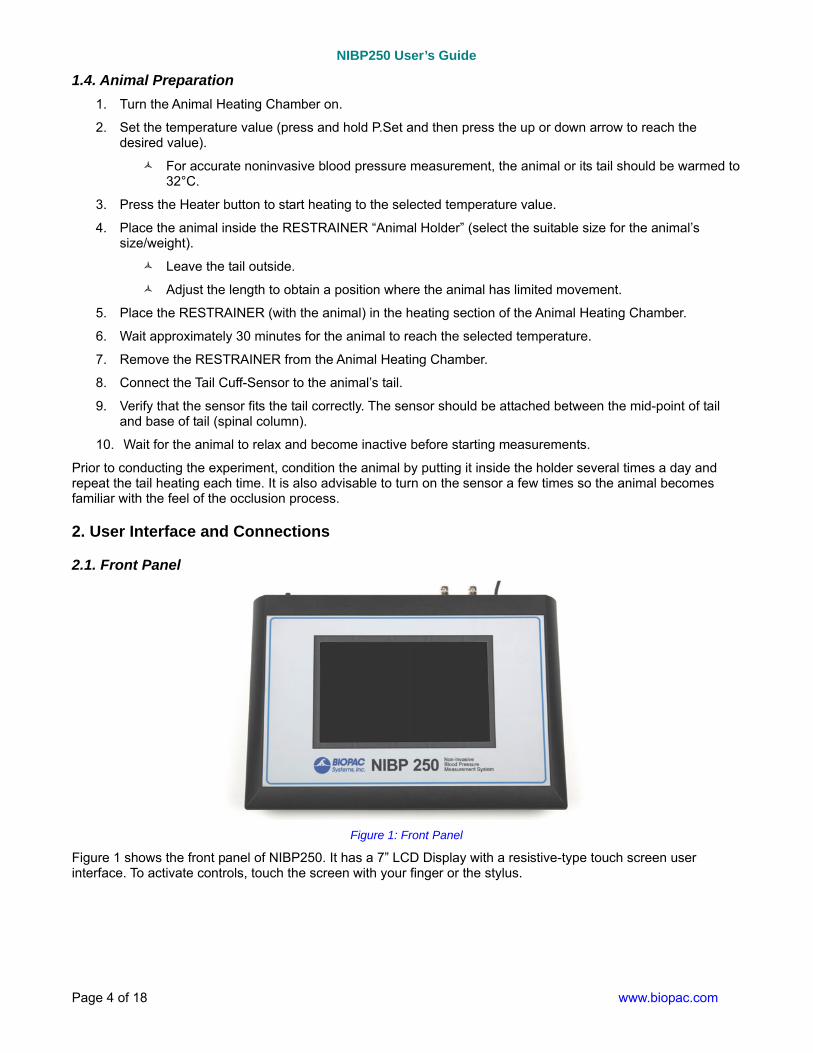
2.1. Front Panel
Figure 1: Front Panel
Figure 1 shows the front panel of NIBP250. It has a 7” LCD Display with a resistive-type touch screen user interface. To activate controls, touch the screen with your finger or the stylus.
Page 4 of 18 www.biopac.com
Noninvasive Blood Pressure Monitoring System
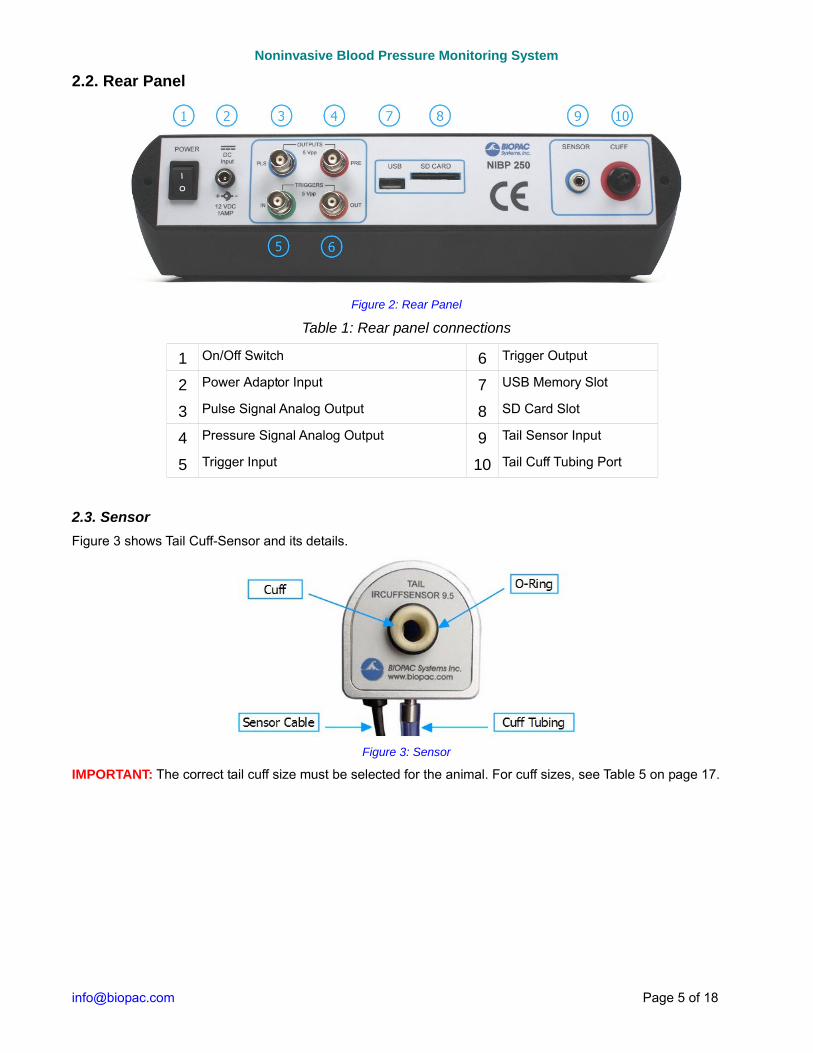
2.2. Rear Panel
Figure 2: Rear Panel
Table 1: Rear panel connections
1 On/Off Switch 6 Trigger Output
2 Power Adaptor Input 7 USB Memory Slot
3 Pulse Signal Analog Output 8 SD Card Slot
4 Pressure Signal Analog Output 9 Tail Sensor Input
5 Trigger Input 10 Tail Cuff Tubing Port
2.3. Sensor
Figure 3 shows Tail Cuff-Sensor and its details.
Figure 3: Sensor
IMPORTANT: The correct tail cuff size must be selected for the animal. For cuff sizes, see Table 5 on page 17.
[email protected] Page 5 of 18
NIBP250 User’s Guide
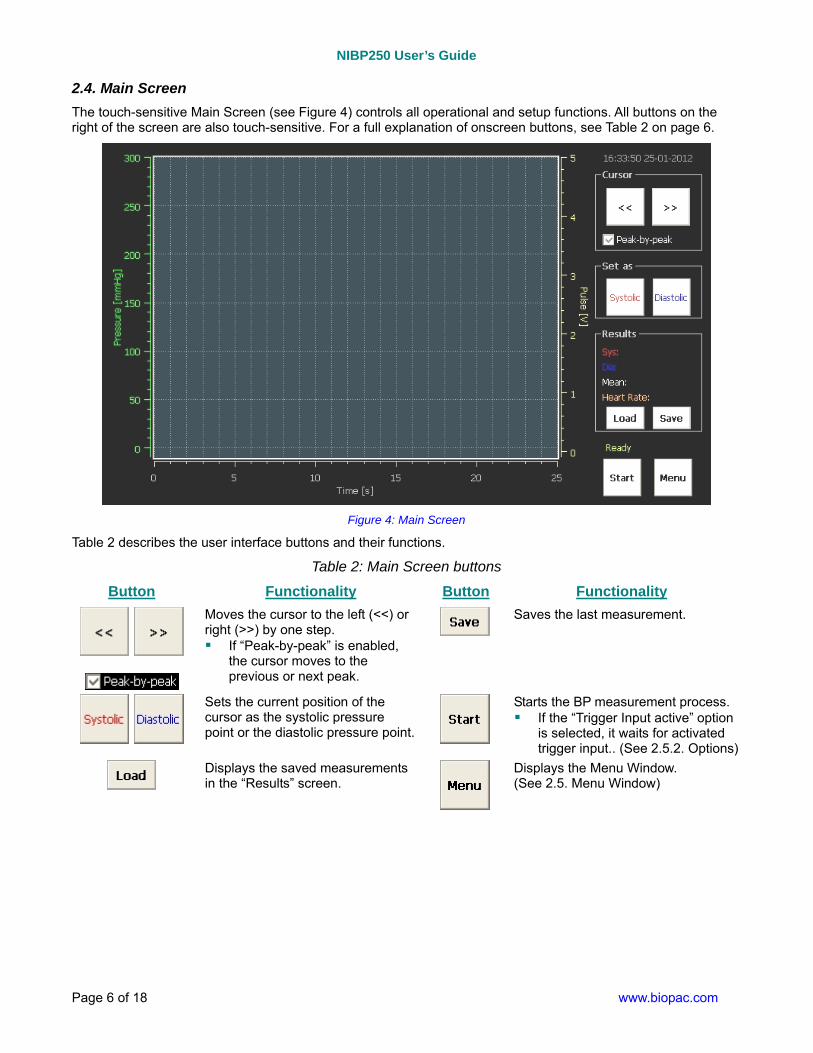
2.4. Main Screen
The touch-sensitive Main Screen (see Figure 4) controls all operational and setup functions. All buttons on the right of the screen are also touch-sensitive. For a full explanation of onscreen buttons, see Table 2 on page 6.
Figure 4: Main Screen
Table 2 describes the user interface buttons and their functions.
Table 2: Main Screen buttons
Button Functionality Button Functionality
Moves the cursor to the left (<<) or right (>>) by one step. If “Peak-by-peak” is enabled,
the cursor moves to the previous or next peak.
Saves the last measurement.
Sets the current position of the cursor as the systolic pressure point or the diastolic pressure point.
Starts the BP measurement process. If the “Trigger Input active” option
is selected, it waits for activated trigger input.. (See 2.5.2. Options)
Displays the saved measurements in the “Results” screen.
Displays the Menu Window. (See 2.5. Menu Window)
Page 6 of 18 www.biopac.com
Noninvasive Blood Pressure Monitoring System
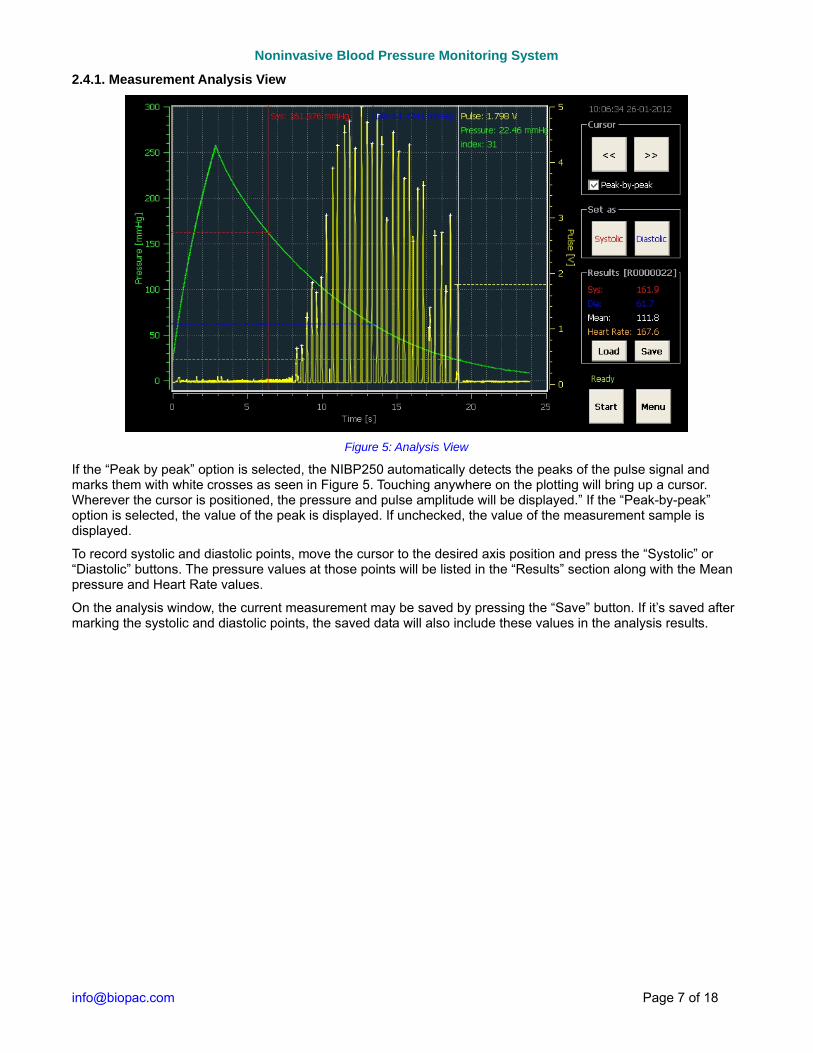
2.4.1. Measurement Analysis View
Figure 5: Analysis View
If the “Peak by peak” option is selected, the NIBP250 automatically detects the peaks of the pulse signal and marks them with white crosses as seen in Figure 5. Touching anywhere on the plotting will bring up a cursor. Wherever the cursor is positioned, the pressure and pulse amplitude will be displayed.” If the “Peak-by-peak” option is selected, the value of the peak is displayed. If unchecked, the value of the measurement sample is displayed.
To record systolic and diastolic points, move the cursor to the desired axis position and press the “Systolic” or “Diastolic” buttons. The pressure values at those points will be listed in the “Results” section along with the Mean pressure and Heart Rate values.
On the analysis window, the current measurement may be saved by pressing the “Save” button. If it’s saved after marking the systolic and diastolic points, the saved data will also include these values in the analysis results.
[email protected] Page 7 of 18
NIBP250 User’s Guide
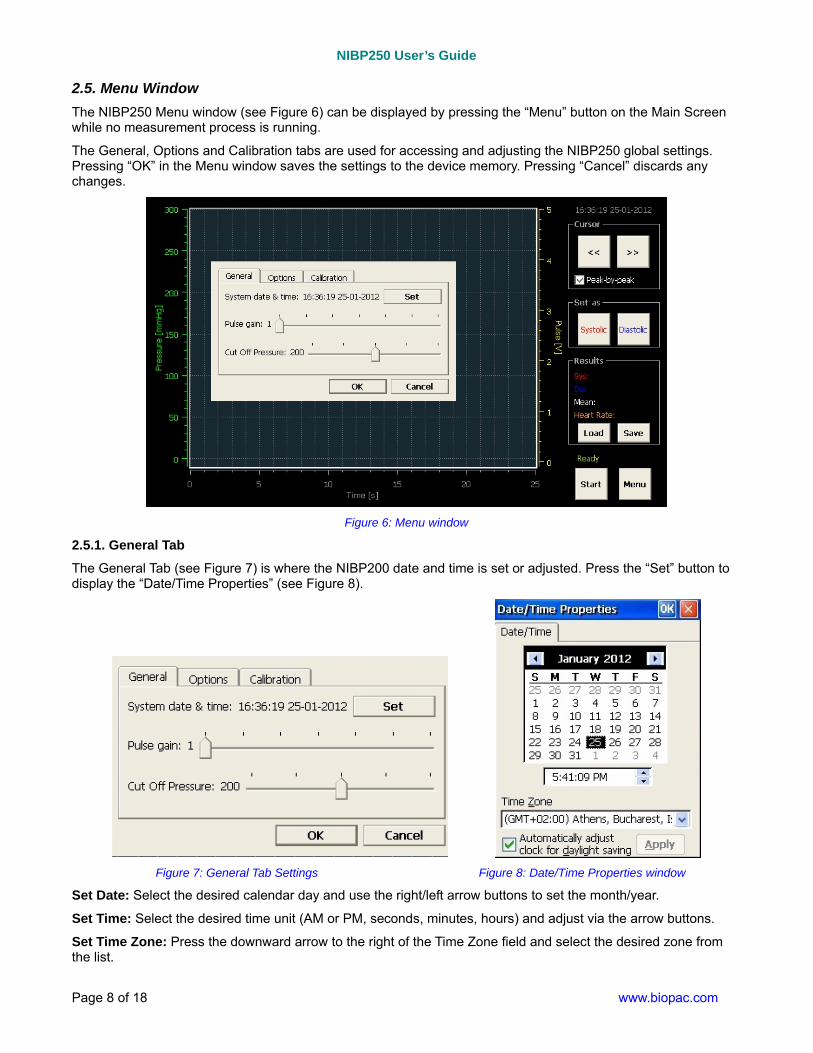
2.5. Menu Window
The NIBP250 Menu window (see Figure 6) can be displayed by pressing the “Menu” button on the Main Screen while no measurement process is running.
The General, Options and Calibration tabs are used for accessing and adjusting the NIBP250 global settings. Pressing “OK” in the Menu window saves the settings to the device memory. Pressing “Cancel” discards any changes.
Figure 6: Menu window
2.5.1. General Tab
The General Tab (see Figure 7) is where the NIBP200 date and time is set or adjusted. Press the “Set” button to display the “Date/Time Properties” (see Figure 8).
Figure 7: General Tab Settings Figure 8: Date/Time Properties window
Set Date: Select the desired calendar day and use the right/left arrow buttons to set the month/year.
Set Time: Select the desired time unit (AM or PM, seconds, minutes, hours) and adjust via the arrow buttons.
Set Time Zone: Press the downward arrow to the right of the Time Zone field and select the desired zone from the list.
Page 8 of 18 www.biopac.com
Noninvasive Blood Pressure Monitoring System
After setting the Date/Time Properties, click “OK” at the top right of the window to accept the new settings. To discard settings without saving changes, click the “X” button.
The “Pulse gain” and the “Cut Off Pressure” are adjusted by moving the sliders left or right. Click OK to accept any modified settings. Click Cancel to discard.
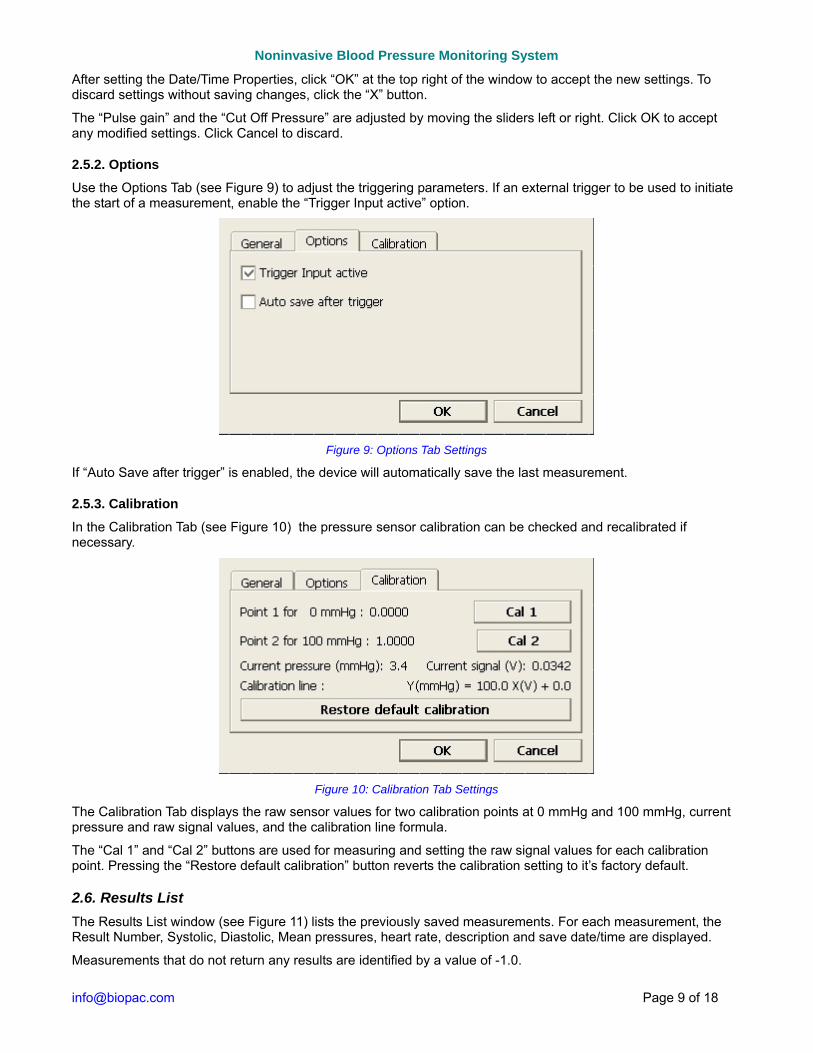
2.5.2. Options
Use the Options Tab (see Figure 9) to adjust the triggering parameters. If an external trigger to be used to initiate the start of a measurement, enable the “Trigger Input active” option.
Figure 9: Options Tab Settings
If “Auto Save after trigger” is enabled, the device will automatically save the last measurement.
2.5.3. Calibration
In the Calibration Tab (see Figure 10) the pressure sensor calibration can be checked and recalibrated if necessary.
Figure 10: Calibration Tab Settings
The Calibration Tab displays the raw sensor values for two calibration points at 0 mmHg and 100 mmHg, current pressure and raw signal values, and the calibration line formula.
The “Cal 1” and “Cal 2” buttons are used for measuring and setting the raw signal values for each calibration point. Pressing the “Restore default calibration” button reverts the calibration setting to it’s factory default.
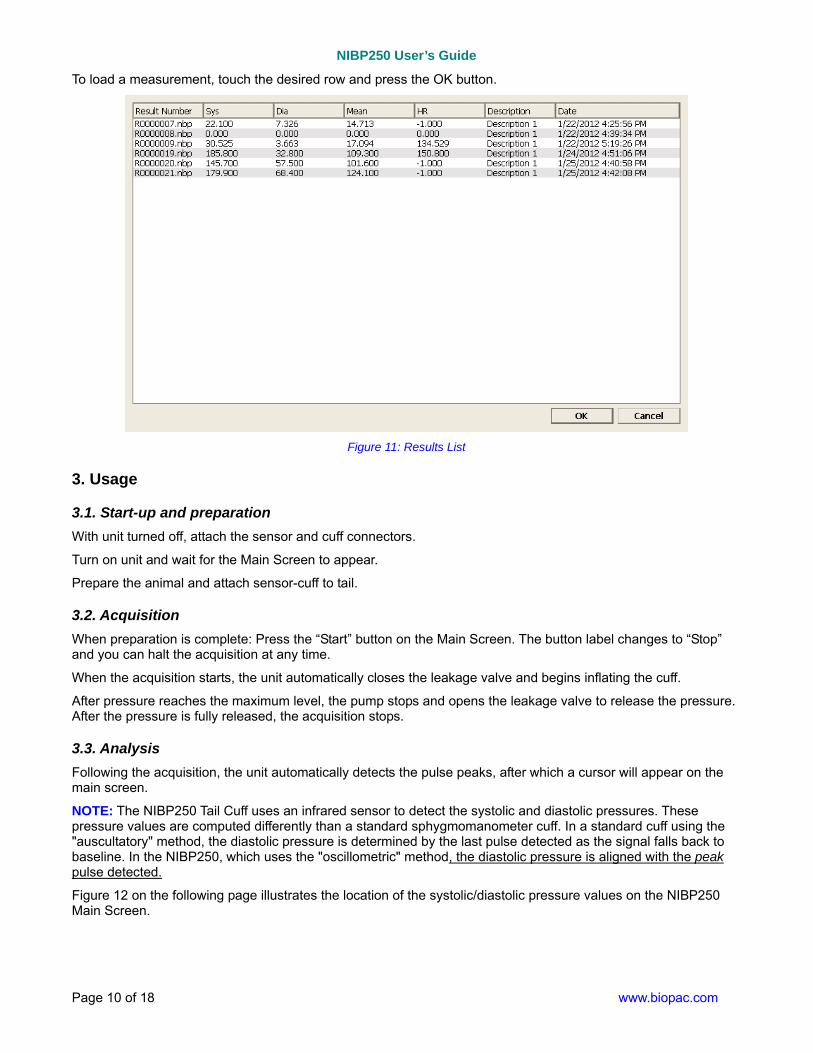
2.6. Results List
The Results List window (see Figure 11) lists the previously saved measurements. For each measurement, the Result Number, Systolic, Diastolic, Mean pressures, heart rate, description and save date/time are displayed.
Measurements that do not return any results are identified by a value of -1.0.
[email protected] Page 9 of 18
NIBP250 User’s Guide
To load a measurement, touch the desired row and press the OK button.
Figure 11: Results List
3. Usage
3.1. Start-up and preparation
With unit turned off, attach the sensor and cuff connectors.
Turn on unit and wait for the Main Screen to appear.
Prepare the animal and attach sensor-cuff to tail.
3.2. Acquisition
When preparation is complete: Press the “Start” button on the Main Screen. The button label changes to “Stop” and you can halt the acquisition at any time.
When the acquisition starts, the unit automatically closes the leakage valve and begins inflating the cuff.
After pressure reaches the maximum level, the pump stops and opens the leakage valve to release the pressure. After the pressure is fully released, the acquisition stops.
3.3. Analysis
Following the acquisition, the unit automatically detects the pulse peaks, after which a cursor will appear on the main screen.
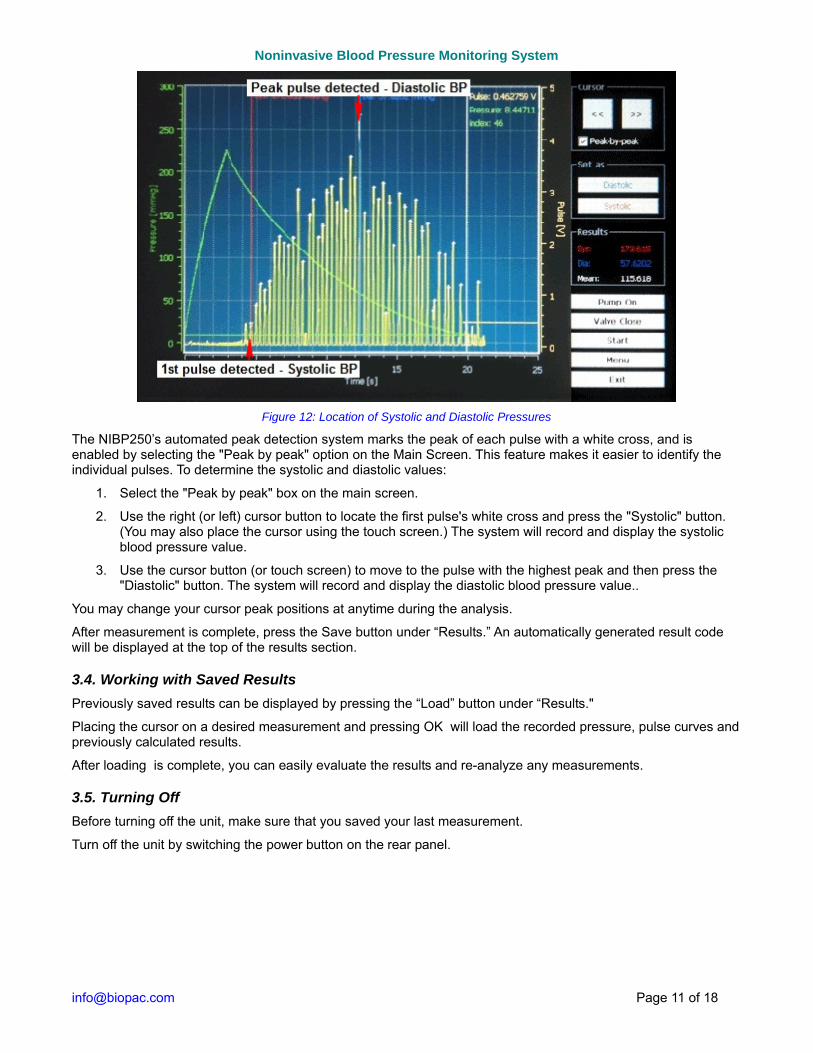
NOTE: The NIBP250 Tail Cuff uses an infrared sensor to detect the systolic and diastolic pressures. These pressure values are computed differently than a standard sphygmomanometer cuff. In a standard cuff using the "auscultatory" method, the diastolic pressure is determined by the last pulse detected as the signal falls back to baseline. In the NIBP250, which uses the "oscillometric" method, the diastolic pressure is aligned with the peak pulse detected.
Figure 12 on the following page illustrates the location of the systolic/diastolic pressure values on the NIBP250 Main Screen.
Page 10 of 18 www.biopac.com
Noninvasive Blood Pressure Monitoring System
Figure 12: Location of Systolic and Diastolic Pressures
The NIBP250’s automated peak detection system marks the peak of each pulse with a white cross, and is enabled by selecting the "Peak by peak" option on the Main Screen. This feature makes it easier to identify the individual pulses. To determine the systolic and diastolic values:
1. Select the "Peak by peak" box on the main screen.
2. Use the right (or left) cursor button to locate the first pulse's white cross and press the "Systolic" button. (You may also place the cursor using the touch screen.) The system will record and display the systolic blood pressure value.
3. Use the cursor button (or touch screen) to move to the pulse with the highest peak and then press the "Diastolic" button. The system will record and display the diastolic blood pressure value..
You may change your cursor peak positions at anytime during the analysis.
After measurement is complete, press the Save button under “Results.” An automatically generated result code will be displayed at the top of the results section.
3.4. Working with Saved Results
Previously saved results can be displayed by pressing the “Load” button under “Results."
Placing the cursor on a desired measurement and pressing OK will load the recorded pressure, pulse curves and previously calculated results.
After loading is complete, you can easily evaluate the results and re-analyze any measurements.
3.5. Turning Off
Before turning off the unit, make sure that you saved your last measurement.
Turn off the unit by switching the power button on the rear panel.
[email protected] Page 11 of 18
NIBP250 User’s Guide
3.6. Result File
After measurements are performed, the pressure and pulse signals (including the analysis results) can be saved to NIBP internal memory, SD Card or USB Memory. If you insert any external memory NIBP250 uses it instead of its internal storage.
Measurements are stored in the directory named as “NIBP” and assigns an unique name to each; i.e., “Rxxxxxx.nbp”. The “xxxxxxx” denotes the unique number for the measurement in the directory.
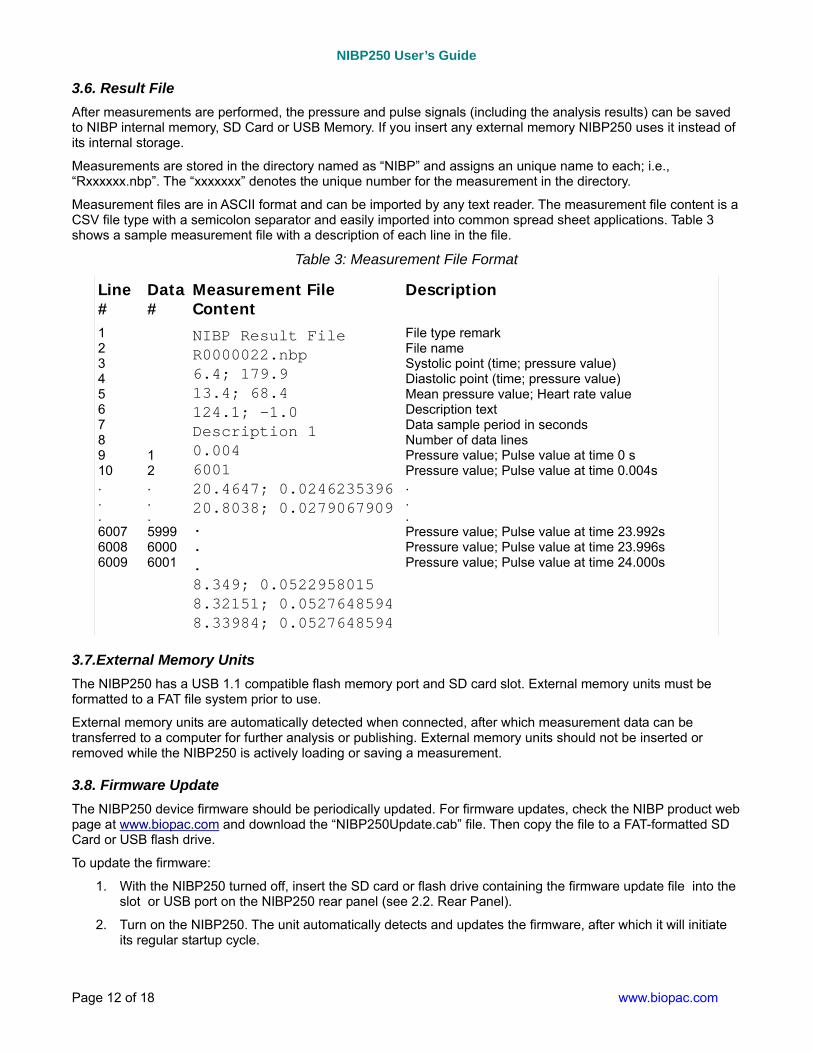
Measurement files are in ASCII format and can be imported by any text reader. The measurement file content is a CSV file type with a semicolon separator and easily imported into common spread sheet applications. Table 3 shows a sample measurement file with a description of each line in the file.
Table 3: Measurement File Format
Line#
Data#
Measurement File Content
Description
1 2 3 4 5 6 7 8 9 10 . . . 6007 6008 6009
1 2 . . . 5999 6000 6001
NIBP Result File R0000022.nbp 6.4; 179.9 13.4; 68.4 124.1; -1.0 Description 1 0.004 6001 20.4647; 0.024623539620.8038; 0.0279067909. . . 8.349; 0.0522958015 8.32151; 0.05276485948.33984; 0.0527648594
File type remark File name Systolic point (time; pressure value) Diastolic point (time; pressure value) Mean pressure value; Heart rate value Description text Data sample period in seconds Number of data lines Pressure value; Pulse value at time 0 s Pressure value; Pulse value at time 0.004s . . . Pressure value; Pulse value at time 23.992s Pressure value; Pulse value at time 23.996s Pressure value; Pulse value at time 24.000s
3.7.External Memory Units
The NIBP250 has a USB 1.1 compatible flash memory port and SD card slot. External memory units must be formatted to a FAT file system prior to use.
External memory units are automatically detected when connected, after which measurement data can be transferred to a computer for further analysis or publishing. External memory units should not be inserted or removed while the NIBP250 is actively loading or saving a measurement.
3.8. Firmware Update
The NIBP250 device firmware should be periodically updated. For firmware updates, check the NIBP product web page at www.biopac.com and download the “NIBP250Update.cab” file. Then copy the file to a FAT-formatted SD Card or USB flash drive.
To update the firmware:
1. With the NIBP250 turned off, insert the SD card or flash drive containing the firmware update file into the slot or USB port on the NIBP250 rear panel (see 2.2. Rear Panel).
2. Turn on the NIBP250. The unit automatically detects and updates the firmware, after which it will initiate its regular startup cycle.
Page 12 of 18 www.biopac.com
Noninvasive Blood Pressure Monitoring System
3.9. Calibration
The NIBP250 is factory calibrated. User calibration of the pressure sensor prior to first use is not required. However, if desired, the sensor can be checked for calibration accuracy and recalibrated if necessary.
The Calibration Tab is displayed by pressing the main screen “Menu” button (see 2.5.3. Calibration). When the Calibration Tab is displayed, NIBP250 automatically closes the leakage valve to keep the pressure constant during the calibration check or recalibration process.
3.9.1. Calibration Check
To check the calibration:.
1. With NIBP250 is turned off, disconnect Tail Cuff-Sensor.
2. Turn on NIBP250 and display the Calibration Tab using the main screen “Menu” button.
3. Verify that Tail Cuff Tubing Port (see 2.2. Rear Panel) is open to atmosphere.
4. Check the “Current Pressure” value on the screen and verify that it displays 0.0 mmHg. If not, then recalibration is necessary.
5. Connect a manometer and an inflation bulb to Tail Cuff tubing port on the rear panel (see 2.2. Rear Panel).
6. Verify that there is no leakage in the setup.
7. Using the inflation bulb, increase the system pressure to 100 mmHg. Be careful not to over-inflate the cuff..
8. Compare the pressure value shown by the manometer and the “Current Pressure” value on the NIBP250's screen.
9. If the two values match, the calibration is validated. If not, recalibration is necessary.
3.9.2. Recalibration
1. With the NIBP250 turned off, disconnect the Tail Cuff-Sensor.
2. Turn on NIBP250 and display the Calibration Tab.
3. Verify that the Tail Cuff Tubing Port (see 2.2. Rear Panel) is open to atmosphere.
4. Press “Cal 1” button to record the sensor signal at 0 mmHg.
5. Connect a manometer and an inflation bulb to Tail Cuff tubing port on the rear panel (see 2.2. Rear Panel).
6. Verify that there is no leakage in the setup.
7. Using the inflation bulb, increase the system pressure to 100 mmHg.
8. Press “Cal 2” button to record the sensor signal at 100 mmHg.
9. Press “OK” button to save the new calibration parameters.
3.10 Triggers
The NIBP250 has trigger input and output connections. The trigger input has a TTL-compatible circuit and a pull-up resistor. To start a measurement using the trigger, Enable the “Trigger Input option” checkbox in the Options Tab (see 2.5.2. Options) and then press the “Start” button. NIBP250 will wait until the trigger is initiated before acquiring the measurement . To trigger the measurement the trigger input signal must be set low.
The trigger output also has a TTL-compatible circuit. The output starts at 0 volts and increases to 5 volts during the measurement process.
[email protected] Page 13 of 18
NIBP250 User’s Guide
4. Using the NIBP250 with a BIOPAC MP Acquisition System
4.1. Connections
1. Connect the CBL150-PRE cable* a. BNC to the pressure output on the back panel of the NIBP250. b. Other end to A1 on the front of the UIM100C unit
2. Connect the CBL150-PLS cable* a. BNC to the pulse output on the back panel of the NIBP250. b. Other end to A2 on the front of the UIM100C unit.
3. Connect the IRSENSOR a. Black cord to the sensor input on the back panel of the NIBP250. b. Tubing in the cuff on the front panel of the NIBP250.
4. Connect the power a. AC300 adapter to the 12V DC input on the back panel of the NIBP250. b. AC300 to Mains power.
5. Switch the NIBP250 POWER on. *CBL150-PRE and CBL150-PLS cables are used with BIOPAC MP150 Data Acquisition Unit with AcqKnowledge software only. For use with BIOPAC MP36/35 Data Acquisition Unit with BSL PRO software, use the CBL35-PRE for Step 1 and CBL35-PLS for Step 2.
NOTE: BIOPAC recommends connecting the CBL150-PRE cable to the first channel (A1) so that the pressure wave is automatically displayed above the pulse waveform.
4.2. Software Setup in AcqKnowledge
1. Laun ch AcqKnowledge
2. Select the “Create/Record a new experiment” option.
3. Select MP150 > Set Up Channels > “Add New Module...”
a. From the new module list, select UIM100C-A1 (or whichever channel CBL150-PRE pressure cable is connected to) and click “Add.”
b. From the UIM100C Transducer list, select “NIBP250 – Small Animal Tail BP, Pressure” and click OK.
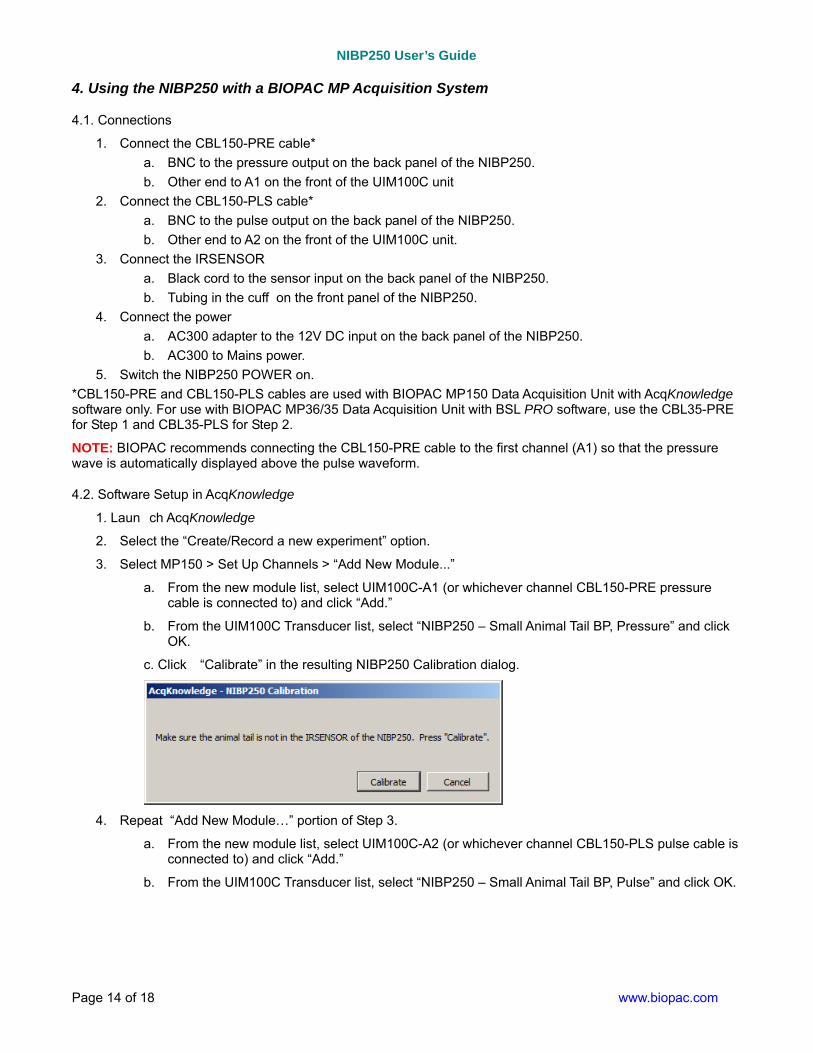
c. Click “Calibrate” in the resulting NIBP250 Calibration dialog.
4. Repeat “Add New Module…” portion of Step 3.
a. From the new module list, select UIM100C-A2 (or whichever channel CBL150-PLS pulse cable is connected to) and click “Add.”
b. From the UIM100C Transducer list, select “NIBP250 – Small Animal Tail BP, Pulse” and click OK.
Page 14 of 18 www.biopac.com

Noninvasive Blood Pressure Monitoring System
5. Technical Specifications
Table 4: Technical Specifications
Specification Value Cut-off Pressure Range 100 – 300 mmHg (adjustable by 50mmHg steps)
Pressure Accuracy 300 mmHg Full Scale 1%
Pressure Sensitivity 0.1 mmHg
Pressure Signal Output 300 mmHg / 3 Volt DC
Pulse Gain Levels x1, x2, x4, x5, x8, x16, x32 (adjustable)
Pulse Signal Output 0 - 5 Volt DC
LCD Display 7” 800x480 TFT
User Interface Resistive Touch Panel
Analog outputs Two BNC connectors for uncalibrated pressure and pulse signals
Triggers Two BNC connectors for TTL Compatible trigger input and output signals
Power Supply 12 Volt 2 Amp – External
[email protected] Page 15 of 18

NIBP250 User’s Guide
6. Troubleshooting
6.1. Tail Pulse signals are not regular.
The animal may be under stress, resulting in excessive tail movement. Remove the animal from the RESTRAINER holder until it calms down before continuing with the experiment.
The tail may not be sufficiently warmed or cooled down. Put the animal in the Tail Heater Chamber and repeat the heating process. Make sure the tail temperature is 32 C.
Tail Cuff sizing may be incorrect. Check Table 5 on the following page for sizing descriptions.
Tail Cuff Sensor position may be incorrect. Try re-attaching the sensor in a different location on the tail. The optimal location is between the mid-point of tail and base of tail (spinal column).
6.2. Compressor runs continuously
Immediately Turn off the NIBP250 system.
Remove the Tubing from the Cuff connector on the rear panel of NIBP250
Turn the system back on.
Close the air outlet by pressing the finger on the Cuff output and press the “Start” button. The compressor will work for a few seconds and stop (please inform BIOPAC if the Compressor does not stop). The pressure chart should be viewable on the screen.
If the Compressor stops automatically, it means that the system is working normally.
6.3. There is leakage from the tubing and Tail Cuff Sensor connections.
Make sure the tubing connections are securely attached.
Page 16 of 18 www.biopac.com
Noninvasive Blood Pressure Monitoring System
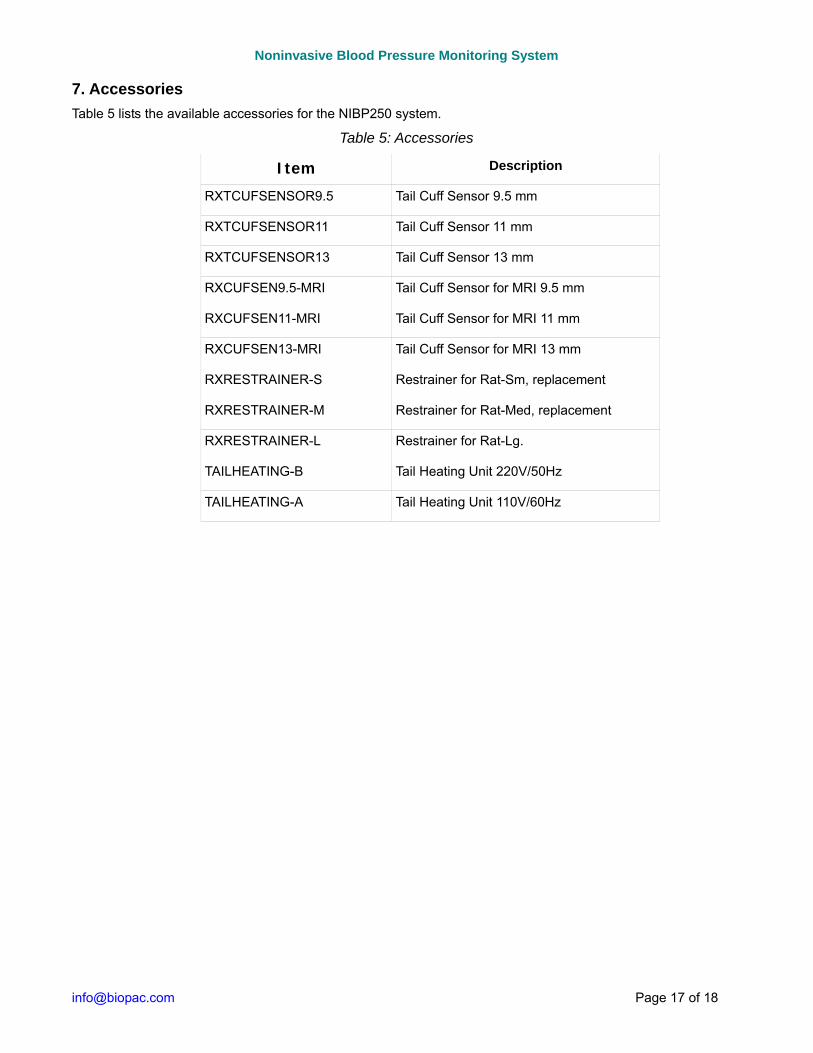
7. Accessories
Table 5 lists the available accessories for the NIBP250 system.
Table 5: Accessories
Item Description
RXTCUFSENSOR9.5 Tail Cuff Sensor 9.5 mm
RXTCUFSENSOR11 Tail Cuff Sensor 11 mm
RXTCUFSENSOR13 Tail Cuff Sensor 13 mm
RXCUFSEN9.5-MRI Tail Cuff Sensor for MRI 9.5 mm
RXCUFSEN11-MRI Tail Cuff Sensor for MRI 11 mm
RXCUFSEN13-MRI Tail Cuff Sensor for MRI 13 mm
RXRESTRAINER-S Restrainer for Rat-Sm, replacement
RXRESTRAINER-M Restrainer for Rat-Med, replacement
RXRESTRAINER-L Restrainer for Rat-Lg.
TAILHEATING-B Tail Heating Unit 220V/50Hz
TAILHEATING-A Tail Heating Unit 110V/60Hz
[email protected] Page 17 of 18
NIBP250 User’s Guide
Page 18 of 18 www.biopac.com
8. Maintenance and Care
8.1. Service Policy
The display unit of the NIBP250 does not require any routine maintenance. Should service be required, it should be performed by a qualified technician. All maintenance and repair procedures should be directed to BIOPAC.
To obtain information on or order repair parts, contact BIOPAC
BIOPAC Systems, Inc.
42 Aero Camino, Goleta, CA 93117
Telephone: 805-685-0066
Facsimile: 805-685-0067
E-mail: [email protected]
Web: www.biopac.com
For authorization and instructions for repair service, contact your local Field Service Representative. Provide the following information:
Your Name Unit Serial Number
Your Institution Sensor Size
Address Describe the problem
Telephone Number
Facsimile Number
E-mail Address
You will be advised of the corrective action to take.
8.2. Cleaning Procedures
Warning: Do not sterilize the sensor by autoclaving (steaming), irradiation or ethylene oxide (ETO). Do not soak sensor or any part of the NIBP250 system in any solution or water.
8.2.1. Monitor & Sensor Housing Cleaning Procedures The monitor and sensor may be cleaned on an as-needed basis. To clean the monitor and sensor dampen a cloth with a commercial, nonabrasive cleaner and wipe the surfaces lightly. Always apply the solution to the cloth, not directly to the monitor and sensor. Do not immerse any part of the NIBP250 system.
Rev. 06.07.2013