Delivering High-Availability Web Services with NGINX Plus on AWS

Page 1 of 16
NGINX Plus on the AWS Cloud
Quick Start Reference Deployment
September 2016
Last updated: August 2017 (see revisions)
Carmen Puccio and Santiago Cardenas
Solutions Architects, Amazon Web Services (AWS)
in collaboration with NGINX, Inc.
Contents
Overview ................................................................................................................................. 2
Architecture ............................................................................................................................ 3
Prerequisites .......................................................................................................................... 4
Specialized Knowledge ....................................................................................................... 4
Technical Requirements ..................................................................................................... 5
Deployment Steps .................................................................................................................. 5
Step 1. Prepare an AWS Account ........................................................................................ 5
Step 2. Subscribe to the NGINX Plus AMI ........................................................................ 5
Step 3. Launch the Quick Start .......................................................................................... 5
Step 4. Test the Deployment ..............................................................................................8
Next Steps ............................................................................................................................ 13
Troubleshooting ................................................................................................................... 14
Additional Resources ........................................................................................................... 14
GitHub Repository ............................................................................................................... 15
Document Revisions ............................................................................................................ 15

Amazon Web Services – NGINX Plus on the AWS Cloud August 2017
Page 2 of 16
This Quick Start deployment guide was created by Amazon Web Services (AWS) in
partnership with NGINX, Inc.
Quick Starts are automated reference deployments that use AWS CloudFormation
templates to launch, configure, and run the AWS compute, network, storage, and other
services required to deploy a specific workload on AWS.
Overview
This Quick Start reference deployment guide provides step-by-step instructions for
deploying NGINX Plus on the Amazon Web Services (AWS) Cloud.
NGINX Plus is an application delivery platform built on NGINX, an open-source web server
and reverse proxy for high-traffic sites. NGINX Plus adds technical support and enterprise-
ready features for advanced load balancing, web and mobile acceleration, application
security, monitoring, and management; learn more at https://www.nginx.com/products/.
This Quick Start provides a reference architecture for NGINX Plus that you can deploy and
use on AWS. You can use the Quick Start to bootstrap a production deployment of NGINX
Plus on AWS, or as a starting point to build your POC in a test environment.
This Quick Start also deploys the nginx-asg-sync integration software, which supports
scaling by monitoring Auto Scaling groups and adding or removing backend instances from
the NGINX Plus configuration as necessary.
If you want to customize the default architecture, you can adjust the template settings or
use the template as a baseline for your own implementation. Moving the solution to a
production environment may require additional configuration and security changes to
support your individual deployment needs. For more information about configuring
NGINX Plus, see https://www.nginx.com/resources/admin-guide.

Amazon Web Services – NGINX Plus on the AWS Cloud August 2017
Page 3 of 16
Architecture Deploying this Quick Start with the default parameters builds the following NGINX Plus
environment on the AWS Cloud.
Figure 1: Quick Start architecture for NGINX Plus on AWS
The Quick Start deploys the following services and components:
A virtual private cloud that spans two Availability Zones. Each Availability Zone
includes one public and one private subnet.

Amazon Web Services – NGINX Plus on the AWS Cloud August 2017
Page 4 of 16
In the public subnets, managed NAT gateways to allow outbound internet access for
resources in the private subnets.
In the public subnets, Linux bastion hosts in an Auto Scaling group to allow inbound
Secure Shell (SSH) access to Amazon Elastic Compute Cloud (Amazon EC2)
instances in public and private subnets.
In the private subnets, an NGINX Plus Auto Scaling group so your NGINX Plus load
balancing instances can maintain application availability and can scale up and down
automatically according to conditions you define. These NGINX Plus instances
distribute traffic to the NGINX web application instances within the VPC in an
active/active scenario. Each NGINX Plus instance is deployed with an additional
piece of software (nginx-asg-sync) that allows NGINX Plus to quickly detect any
changes in the number of web application instances based on Auto Scaling event
notifications.
A Classic Load Balancer that provides inbound access to the NGINX Plus Auto
Scaling group via HTTP load balancing over port 80.
In the private subnets, two NGINX web applications, each deployed in an Auto
Scaling group. These groups simulate a Multi-AZ web application farm that receives
traffic from the NGINX Plus front-end load balancing Auto Scaling group. These
groups are named NGINX Webapp1 and NGINX Webapp2. Each web application is a
simple web page that is served by the open-source NGINX software.
Prerequisites
Specialized Knowledge
Before you deploy this Quick Start, we recommend that you become familiar with the
following AWS services. (If you are new to AWS, see the Getting Started Resource Center.)
Amazon VPC
Amazon EC2
Elastic Load Balancing
Auto Scaling
The Quick Start also assumes familiarity with NGINX Plus and the nginx-asg-sync
software. For more information, see the NGINX Plus and nginx-asg-sync documentation.

Amazon Web Services – NGINX Plus on the AWS Cloud August 2017
Page 5 of 16
Technical Requirements
The AWS Quick Start uses Amazon Machine Images (AMIs) from the AWS Marketplace.
Before you launch the Quick Start, you must subscribe to the NGINX Plus – Amazon Linux
AMI from the AWS Marketplace. For instructions, see step 2 in the next section.
Deployment Steps
Step 1. Prepare an AWS Account
1. If you don’t already have an AWS account, create one at https://aws.amazon.com by
following the on-screen instructions.
2. Use the region selector in the navigation bar to choose the AWS Region where you want
to deploy NGINX Plus on AWS.
3. Create a key pair in your preferred region.
4. If necessary, request a service limit increase for the Amazon EC2 t2.micro instance
type. You might need to do this if you already have an existing deployment that uses this
instance type, and you think you might exceed the default limit with this reference
deployment.
Step 2. Subscribe to the NGINX Plus AMI
1. Log in to your AWS account at https://aws.amazon.com.
2. Open the NGINX Plus – Amazon Linux AMI page in AWS Marketplace, and choose
Continue.
3. Review the settings and read the terms and conditions for software usage, and then
choose Accept Terms.
4. You’ll get a confirmation page confirming your subscription, and an email confirmation
will be sent to the account owner.
5. When you receive the confirmation email for your subscription, proceed with step 3.
Step 3. Launch the Quick Start
1. Deploy the AWS CloudFormation template into your AWS
account.
The template is launched in the US West (Oregon) region by
default. You can change the region by using the region
selector in the navigation bar.
Launch

Amazon Web Services – NGINX Plus on the AWS Cloud August 2017
Page 6 of 16
This stack takes around 25 minutes to create.
Note You are responsible for the cost of the AWS services used while running this
Quick Start reference deployment. There is no additional cost for using this Quick
Start. See the pricing pages for each AWS service you will be using for full details.
You can also download the template to use it as a starting point for your own
implementation.
2. On the Select Template page, keep the default setting for the template URL, and then
choose Next.
3. On the Specify Details page, review the parameters for the template. Enter values for
the parameters that require your input. For all other parameters, you can customize the
default settings provided by the template.
Network Configuration:
Parameter label (name) Default Description
Availability Zones
(AvailabilityZones)
Requires input The specific Availability Zones you want to use
for the subnets in the VPC. This field displays
the available zones within your selected region.
The Quick Start uses two Availability Zones
from your list and preserves the logical order
you specify.
VPC CIDR
(VPCCIDR)
10.0.0.0/16 CIDR block for the VPC.
Private Subnet 1 CIDR
(PrivateSubnet1CIDR)
10.0.0.0/19 CIDR block for private subnet 1 located in
Availability Zone 1.
Private Subnet 2 CIDR
(PrivateSubnet2CIDR)
10.0.32.0/19 CIDR block for private subnet 2 located in
Availability Zone 2.
Public Subnet 1 CIDR
(PublicSubnet1CIDR)
10.0.128.0/20 CIDR block for the public DMZ subnet 1
located in Availability Zone 1.
Public Subnet 2 CIDR
(PublicSubnet2CIDR)
10.0.144.0/20 CIDR block for the public DMZ subnet 2
located in Availability Zone 2.
Allowed Bastion External Access
CIDR
(RemoteAccessCIDR)
Requires input Allowed CIDR block for external SSH access to
the bastion host. We recommend that you set
this value to a trusted CIDR block.

Amazon Web Services – NGINX Plus on the AWS Cloud August 2017
Page 7 of 16
Amazon EC2 Configuration:
Parameter label (name) Default Description
Key Pair Name
(KeyPairName)
Requires input Public/private key pair, which allows you to
connect securely to your instance after it
launches. When you created an AWS account,
this is the key pair you created in your preferred
region.
Bastion Instance Type
(BastionInstanceType)
t2.micro EC2 instance type for the bastion host.
NGINX Plus Load Balancer Configuration:
Parameter label (name) Default Description
NGINX Plus Instance Type
(NGINXPlusInstanceType)
t2.micro EC2 instance type for the NGINX Plus load
balancer and web application instances.
NGINX Plus Desired Capacity
(NGINXPlusNodesDesiredCapacity)
2 The desired capacity (number of instances) for
the NGINX Plus Auto Scaling group.
NGINX Plus Min Size
(NGINXPlusNodesMinSize)
2 The minimum size (number of instances) for
the NGINX Plus Auto Scaling group.
NGINX Plus Max Size
(NGINXPlusNodesMaxSize)
5 The maximum size (number of instances) for
the NGINX Plus Auto Scaling group.
Web App Configuration:
Parameter label (name) Default Description
Web App Instance Type
(WebAppInstanceType)
t2.micro EC2 instance type for the NGINX Plus load
balancer and web application (Webapp1 and
Webapp2) instances.
Web App Desired Capacity
(WebAppNodesDesiredCapacity)
2 The desired capacity (number of instances) for
the web application (Webapp1 and Webapp2)
Auto Scaling groups.
Web App Min Size
(WebAppNodesMinSize)
1 The minimum size (number of instances) for
the web application (Webapp1 and Webapp2)
Auto Scaling groups.
Web App Max Size
(WebAppNodesMaxSize)
5 The maximum size (number of instances) for
the web application (Webapp1 and Webapp2)
Auto Scaling groups.

Amazon Web Services – NGINX Plus on the AWS Cloud August 2017
Page 8 of 16
AWS Quick Start Configuration:
Parameter label (name) Default Description
Quick Start S3 Bucket Name
(QSS3BucketName)
aws-quickstart The S3 bucket you have created for your copy of
Quick Start assets, if you decide to customize or
extend the Quick Start for your own use. The
bucket name can include numbers, lowercase
letters, uppercase letters, and hyphens, but
should not start or end with a hyphen.
Quick Start S3 Key Prefix
(QSS3KeyPrefix)
quickstart-nginx-
plus/
The S3 key name prefix used to simulate a
folder for your copy of Quick Start assets, if you
decide to customize or extend the Quick Start
for your own use. This prefix can include
numbers, lowercase letters, uppercase letters,
hyphens, and forward slashes.
When you finish reviewing and customizing the parameters, choose Next.
4. On the Options page, you can specify tags (key-value pairs) for resources in your stack
and set advanced options. When you’re done, choose Next.
5. On the Review page, review and confirm the template settings. Under Capabilities,
select the check box to acknowledge that the template will create AWS Identity and
Access Management (IAM) resources.
6. Choose Create to deploy the stack.
7. Monitor the status of the stack. When the status is CREATE_COMPLETE, the
NGINX Plus deployment is complete.
8. You can use the URL displayed in the Outputs tab for the stack to view the resources
that were created.
Step 4. Test the Deployment
1. Copy the DNS value for NGINXPlusLink from the Outputs tab. This is the public
DNS name that you can use to test that NGINX Plus load balancing instances are up and
running in an Auto Scaling group after deployment.

Amazon Web Services – NGINX Plus on the AWS Cloud August 2017
Page 9 of 16
Figure 2: Outputs tab after successful deployment
2. Because the NGINX Plus instances are in an Auto Scaling group behind Elastic Load
Balancing, you should navigate to the Load Balancers section in Amazon EC2 and
verify that your instances are in service, as illustrated in Figure 3. It will take a few
minutes for the instances to go into service because they have to pass the healthy
threshold for health checks.
Figure 3: Checking for NGINX load balancer instances

Amazon Web Services – NGINX Plus on the AWS Cloud August 2017
Page 10 of 16
3. When you’ve verified that the NGINX Plus instances are in service, paste the value of
NGINXPlusLink into your browser to open a demo landing page for testing.
4. Follow the instructions on the demo landing page illustrated in Figure 4 to view the
Webapp1 or Webapp2 application.
Figure 4: NGINX Plus landing page
5. After you follow the link for one of the Webapp servers, you can check the Auto
Refresh button or refresh your browser to see NGINX Plus load-balance among the
servers in the Webapp group.
Amazon Web Services – NGINX Plus on the AWS Cloud August 2017
Page 11 of 16
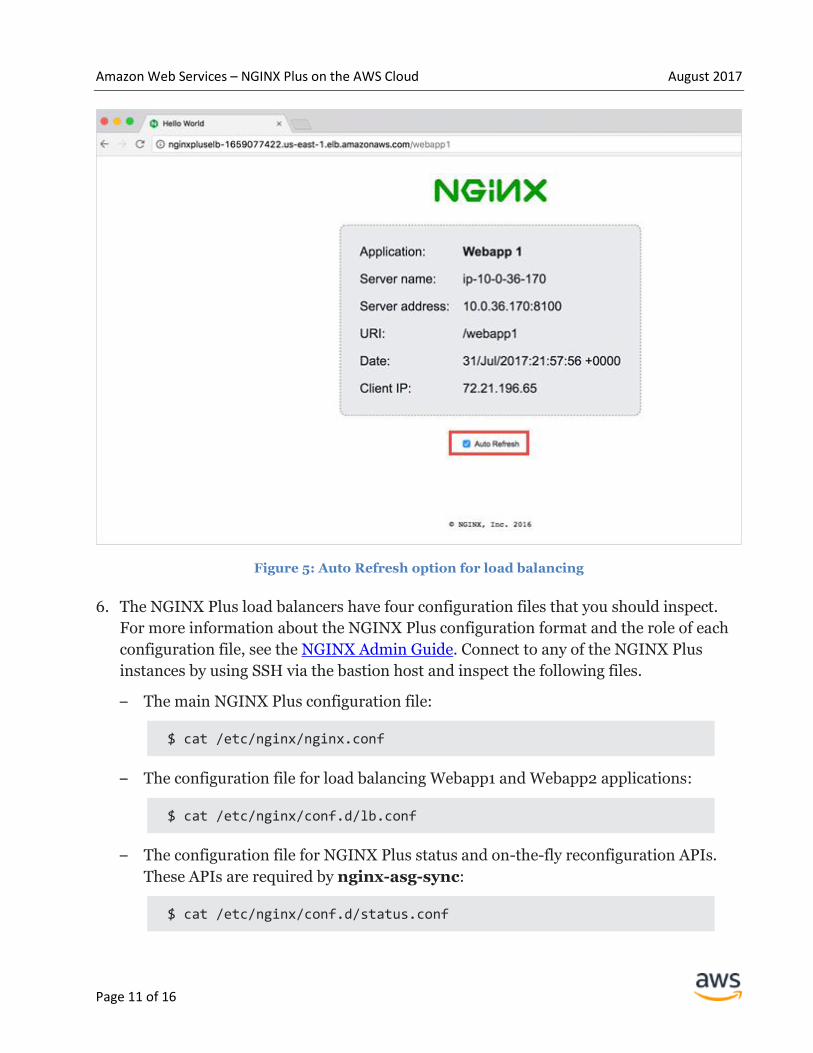
Figure 5: Auto Refresh option for load balancing
6. The NGINX Plus load balancers have four configuration files that you should inspect.
For more information about the NGINX Plus configuration format and the role of each
configuration file, see the NGINX Admin Guide. Connect to any of the NGINX Plus
instances by using SSH via the bastion host and inspect the following files.
– The main NGINX Plus configuration file:
$ cat /etc/nginx/nginx.conf
– The configuration file for load balancing Webapp1 and Webapp2 applications:
$ cat /etc/nginx/conf.d/lb.conf
– The configuration file for NGINX Plus status and on-the-fly reconfiguration APIs.
These APIs are required by nginx-asg-sync:
$ cat /etc/nginx/conf.d/status.conf

Amazon Web Services – NGINX Plus on the AWS Cloud August 2017
Page 12 of 16
– The nginx-asg-sync configuration file:
$ cat /etc/nginx/aws.yaml
7. Each Webapp is a web page that is served by the NGINX open-source software installed
in the VPC. Connect to each Webapp instance by using SSH via the bastion host and
inspect the following NGINX configuration files.
– The main NGINX configuration file for both Webapp1 and Webapp2:
$ cat /etc/nginx/nginx.conf
– Webapp1:
$ cat /etc/nginx/conf.d/webapp1.conf
– Webapp2:
$ cat /etc/nginx/conf.d/webapp2.conf
The NGINX Plus load balancing Auto Scaling group has two scaling policies associated with
it to allow the NGINX Plus servers to scale in response to demand. These two simple scaling
policies are associated with CPUUtilization metric alarms in Amazon CloudWatch. They
are used to add and remove instances as CPU utilization increases or decreases over time,
while respecting the Auto Scaling group’s desired, minimum, and maximum settings you
specified during launch.

Amazon Web Services – NGINX Plus on the AWS Cloud August 2017
Page 13 of 16
Figure 6: Scaling policies for NGINX Plus Auto Scaling group
Next Steps
Now that you have the Quick Start up and running, we recommend using the following
NGINX Plus resources to extend and customize your NGINX Plus configuration:
HTTP load balancing
Configuring live activity monitoring
Note The Quick Start already configures live activity monitoring. The dashboard
and the API are available via port 8080 of each NGINX Plus instance. However, for
security reasons, we didn’t expose the instances to the public subnet. If you would
like to configure secure access to the NGINX Plus dashboard, we recommend using a
combination of NGINX Plus features, such as SSL termination with client SSL
certificate verification and HTTP basic authentication, and AWS security groups.
Accessing and using NGINX Plus JSON status data
Using nginx-asg-sync
Using NGINX Plus – Follow the instructions in this guide to take advantage of NGINX
Plus features such as load balancing, content caching, security, web application firewall,
and many more.

Amazon Web Services – NGINX Plus on the AWS Cloud August 2017
Page 14 of 16
Troubleshooting
Q. I encountered a CREATE_FAILED error when I launched the Quick Start.
A. If AWS CloudFormation fails to create the stack, we recommend that you relaunch the
template with Rollback on failure set to No. (This setting is under Advanced in the
AWS CloudFormation console, Options page.) With this setting, the stack’s state will be
retained and the instance will be left running, so you can troubleshoot the issue. (Look at
the log files in /var/log/cfn-init.log.)
Important When you set Rollback on failure to No, you’ll continue to
incur AWS charges for this stack. Please make sure to delete the stack when
you’ve finished troubleshooting.
For additional information, see Troubleshooting AWS CloudFormation on the AWS
website.
Q. I encountered a size limitation error when I deployed the AWS Cloudformation
templates.
A. We recommend that you launch the Quick Start templates from the location we’ve
provided or from another S3 bucket. If you deploy the templates from a local copy on your
computer, you might encounter template size limitations when you create the stack. For
more information about AWS CloudFormation limits, see the AWS documentation.
Additional Resources
AWS services
AWS CloudFormation
https://aws.amazon.com/documentation/cloudformation/
Amazon EC2
https://docs.aws.amazon.com/AWSEC2/latest/UserGuide/
Amazon VPC
https://aws.amazon.com/documentation/vpc/
Elastic Load Balancing
https://aws.amazon.com/documentation/elastic-load-balancing/
Auto Scaling
https://aws.amazon.com/documentation/autoscaling/

Amazon Web Services – NGINX Plus on the AWS Cloud August 2017
Page 15 of 16
NGINX Plus
NGINX Plus
https://www.nginx.com/products/
NGINX Plus on AWS
https://www.nginx.com/products/nginx-plus-aws/
NGINX Plus Admin Guide
https://www.nginx.com/resources/admin-guide/
Auto Scaling NGINX Plus on AWS
https://www.nginx.com/blog/load-balancing-aws-auto-scaling-groups-nginx-plus/
NGINX Plus Dynamic Reconfiguration
https://www.nginx.com/products/on-the-fly-reconfiguration/
Quick Start reference deployments
AWS Quick Start home page
https://aws.amazon.com/quickstart/
GitHub Repository You can visit our GitHub repository to download the templates and scripts for this Quick
Start, to post your feedback, and to share your customizations with others.
Document Revisions
Date Changes In sections
August 2017 Updated architecture and added new features:
nginx-asg-sync integration software
Auto Scaling groups for NGINX web
applications
Linux bastion host infrastructure and
portability improvements
Template updates and changes
throughout guide
September 2016 Initial publication —

Amazon Web Services – NGINX Plus on the AWS Cloud August 2017
Page 16 of 16
© 2017, Amazon Web Services, Inc. or its affiliates, and NGINX, Inc. All rights reserved.
Notices
This document is provided for informational purposes only. It represents AWS’s current product offerings
and practices as of the date of issue of this document, which are subject to change without notice. Customers
are responsible for making their own independent assessment of the information in this document and any
use of AWS’s products or services, each of which is provided “as is” without warranty of any kind, whether
express or implied. This document does not create any warranties, representations, contractual
commitments, conditions or assurances from AWS, its affiliates, suppliers or licensors. The responsibilities
and liabilities of AWS to its customers are controlled by AWS agreements, and this document is not part of,
nor does it modify, any agreement between AWS and its customers.
The software included with this paper is licensed under the Apache License, Version 2.0 (the "License"). You
may not use this file except in compliance with the License. A copy of the License is located at
http://aws.amazon.com/apache2.0/ or in the "license" file accompanying this file. This code is distributed on
an "AS IS" BASIS, WITHOUT WARRANTIES OR CONDITIONS OF ANY KIND, either express or implied.
See the License for the specific language governing permissions and limitations under the License.