Nextera DNA Library Preparation for NGS Express · Application Guide- Nextera DNA Library...
49
Nextera DNA Library Preparation for NGS Express Application Guide PerkinElmer 2200 Warrenville Road Downers Grove, IL 60515 [email protected] Document Number 8860050 Revision A Copyright ©2012, PerkinElmer, Inc. All Rights Reserved
Transcript of Nextera DNA Library Preparation for NGS Express · Application Guide- Nextera DNA Library...

Nextera DNA Library Preparation
for NGS Express
Application Guide
PerkinElmer 2200 Warrenville Road
Downers Grove, IL 60515
Document Number 8860050
Revision A
Copyright ©2012, PerkinElmer, Inc.
All Rights Reserved

Application Guide- Nextera DNA Library Preparation on the NGS Express
PerkinElmer 2
Trademark Acknowledgement
is a registered trademark of PerkinElmer, Inc.
VersaTip™ is a trademark of PerkinElmer, Inc.
JANUS® is a registered trademark of PerkinElmer, Inc.
WinPrep® is a registered trademark of PerkinElmer, Inc.
Nextera, MiSeq, and illumina are trademarks or registered trademarks of Illumina, Inc.
Agencourt ® and AMPure® are registered trademarks of Beckman Coulter Genomics, Inc.
Application Guide- Nextera DNA Library Preparation on the NGS Express
PerkinElmer 3
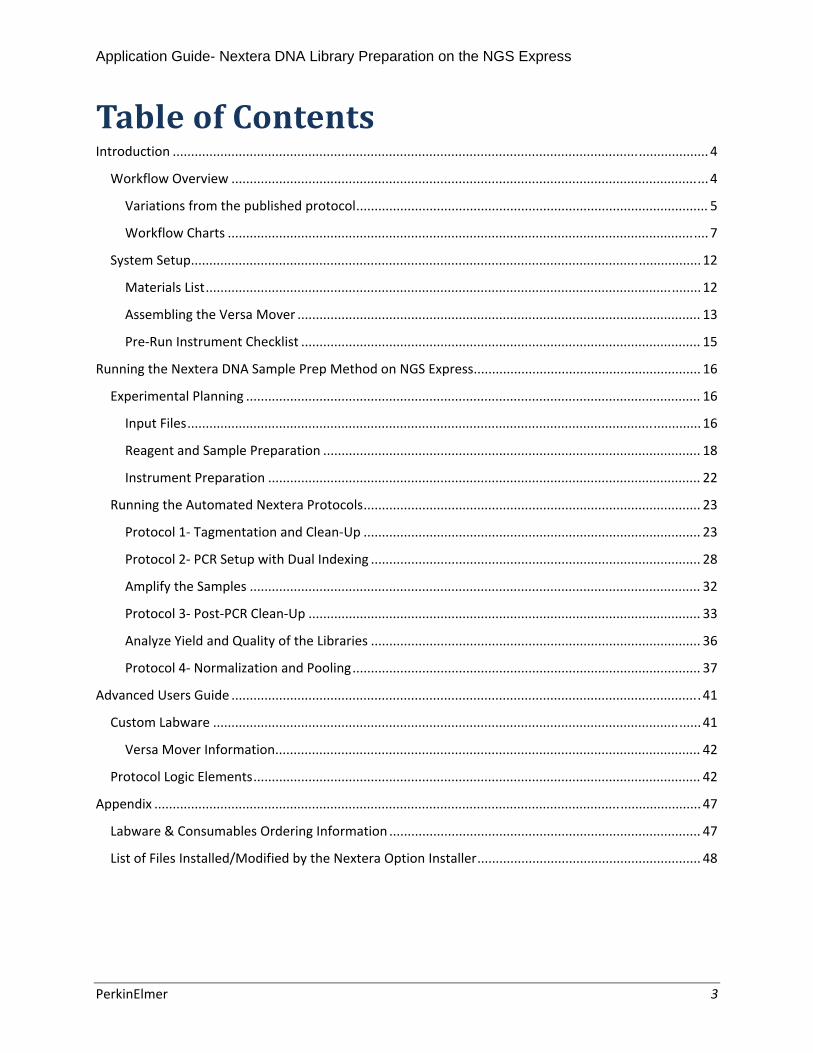
TableofContentsIntroduction .................................................................................................................................................. 4
Workflow Overview .................................................................................................................................. 4
Variations from the published protocol ................................................................................................ 5
Workflow Charts ................................................................................................................................... 7
System Setup........................................................................................................................................... 12
Materials List ....................................................................................................................................... 12
Assembling the Versa Mover .............................................................................................................. 13
Pre‐Run Instrument Checklist ............................................................................................................. 15
Running the Nextera DNA Sample Prep Method on NGS Express .............................................................. 16
Experimental Planning ............................................................................................................................ 16
Input Files ............................................................................................................................................ 16
Reagent and Sample Preparation ....................................................................................................... 18
Instrument Preparation ...................................................................................................................... 22
Running the Automated Nextera Protocols ............................................................................................ 23
Protocol 1‐ Tagmentation and Clean‐Up ............................................................................................ 23
Protocol 2‐ PCR Setup with Dual Indexing .......................................................................................... 28
Amplify the Samples ........................................................................................................................... 32
Protocol 3‐ Post‐PCR Clean‐Up ........................................................................................................... 33
Analyze Yield and Quality of the Libraries .......................................................................................... 36
Protocol 4‐ Normalization and Pooling ............................................................................................... 37
Advanced Users Guide ................................................................................................................................ 41
Custom Labware ..................................................................................................................................... 41
Versa Mover Information.................................................................................................................... 42
Protocol Logic Elements .......................................................................................................................... 42
Appendix ..................................................................................................................................................... 47
Labware & Consumables Ordering Information ..................................................................................... 47
List of Files Installed/Modified by the Nextera Option Installer ............................................................. 48
Application Guide- Nextera DNA Library Preparation on the NGS Express
PerkinElmer 4
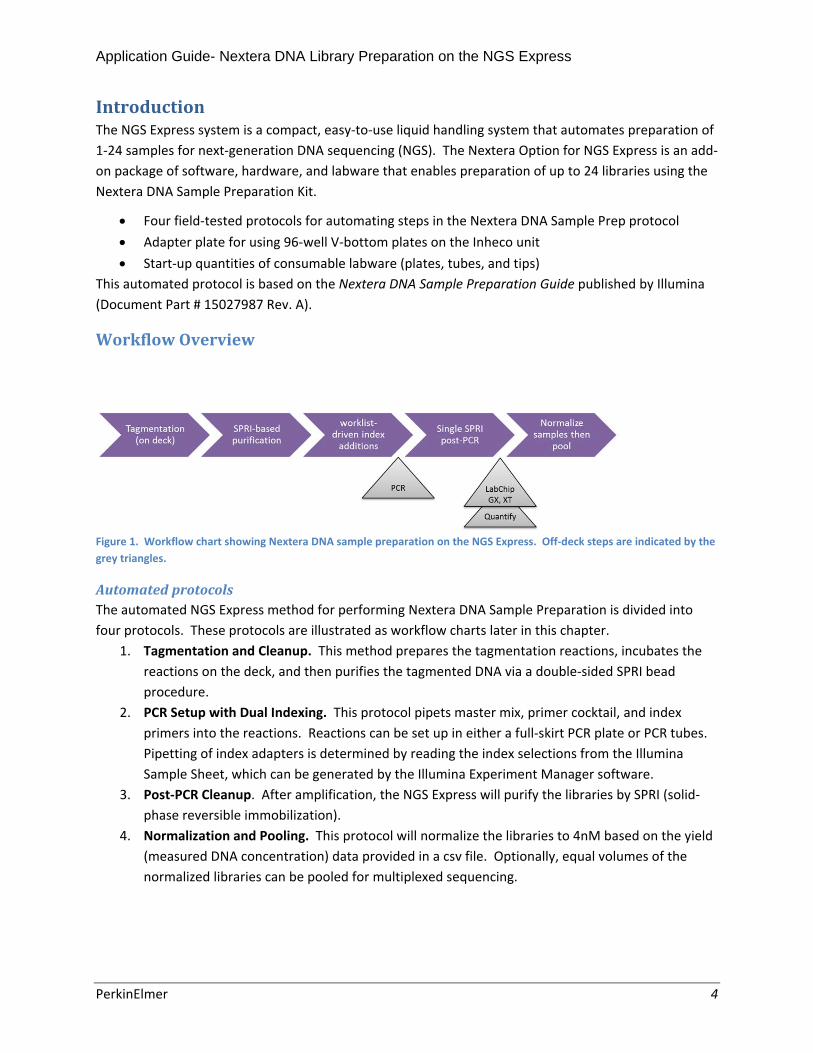
IntroductionThe NGS Express system is a compact, easy‐to‐use liquid handling system that automates preparation of
1‐24 samples for next‐generation DNA sequencing (NGS). The Nextera Option for NGS Express is an add‐
on package of software, hardware, and labware that enables preparation of up to 24 libraries using the
Nextera DNA Sample Preparation Kit.
Four field‐tested protocols for automating steps in the Nextera DNA Sample Prep protocol
Adapter plate for using 96‐well V‐bottom plates on the Inheco unit
Start‐up quantities of consumable labware (plates, tubes, and tips)
This automated protocol is based on the Nextera DNA Sample Preparation Guide published by Illumina
(Document Part # 15027987 Rev. A).
WorkflowOverview
Figure 1. Workflow chart showing Nextera DNA sample preparation on the NGS Express. Off‐deck steps are indicated by the
grey triangles.
AutomatedprotocolsThe automated NGS Express method for performing Nextera DNA Sample Preparation is divided into
four protocols. These protocols are illustrated as workflow charts later in this chapter.
1. Tagmentation and Cleanup. This method prepares the tagmentation reactions, incubates the
reactions on the deck, and then purifies the tagmented DNA via a double‐sided SPRI bead
procedure.
2. PCR Setup with Dual Indexing. This protocol pipets master mix, primer cocktail, and index
primers into the reactions. Reactions can be set up in either a full‐skirt PCR plate or PCR tubes.
Pipetting of index adapters is determined by reading the index selections from the Illumina
Sample Sheet, which can be generated by the Illumina Experiment Manager software.
3. Post‐PCR Cleanup. After amplification, the NGS Express will purify the libraries by SPRI (solid‐
phase reversible immobilization).
4. Normalization and Pooling. This protocol will normalize the libraries to 4nM based on the yield
(measured DNA concentration) data provided in a csv file. Optionally, equal volumes of the
normalized libraries can be pooled for multiplexed sequencing.

Application Guide- Nextera DNA Library Preparation on the NGS Express
PerkinElmer 5
VariationsfromthepublishedprotocolThe process of automating sample preparation protocols sometimes requires that specific methods
for accomplishing certain steps be changed. The NGS Express method for Nextera DNA Sample
Preparation varies from the published Illumina manual method in a few ways:
On‐Deck Tagmentation. To provide more walk‐away time from the instrument, the tagmentation
reaction conditions were optimized to be performed on the deck of the NGS Express. Time is
increased from 5 minutes to 10 minutes and the temperature locator is set to 58°C. As shown in
Figure 2 below, equivalent results between the on‐deck and thermocycler incubation conditions are
obtained.
Figure 2. Comparison of on‐deck and in‐machine tagmentation conditions. Analysis of size distribution on a LabChip GX with
High Sensitivity chip show nearly identical size distributions of the two samples.
Use of SPRI instead of spin filter for tagmentation cleanup. To decrease manual intervention, a
magnetic bead‐based method for purifying the tagmentation reactions was implemented. In order
to dissociate the tagmentase enzyme from the DNA, guanidine HCl is added to a net concentration
of 4 M. Two sequential additions of AMPure bead reagent are effective at purifying the DNA from

Application Guide- Nextera DNA Library Preparation on the NGS Express
PerkinElmer 6
the rest of the tagmentation reaction components, as shown in Figure 3.
Figure 3. Efficiency of guanidine for tagmentation cleanup.
Bead Drying Conditions. In order to speed up the drying process and insure complete bead
dryness, washed beads are dried at 55°C for 7 minutes.
Mixing Conditions. All bead mixing is performed by pipetting. Twenty aspirate/dispense cycles are
performed whenever adding AMPure reagent to samples or resuspending beads.
ApproximateProtocolRunTimesProtocol Time for 4 Samples Time for 24 Samples
Tagmentation and CleanUp 1 hour 45 minutes 2 hours 45 minutes
PCR Setup with Dual Indexing 5 min 24 min
Post‐PCR Cleanup 50 min 1 h 45 min
Normalization and Pooling 3 min 12 min

Application Guide- Nextera DNA Library Preparation on the NGS Express
PerkinElmer 7
WorkflowCharts
Figure 4. Workflow chart for on‐deck tagmentation and stopping the reaction. Protocol 1 covers these steps as well as those
on the next page.
Application Guide- Nextera DNA Library Preparation on the NGS Express
PerkinElmer 8
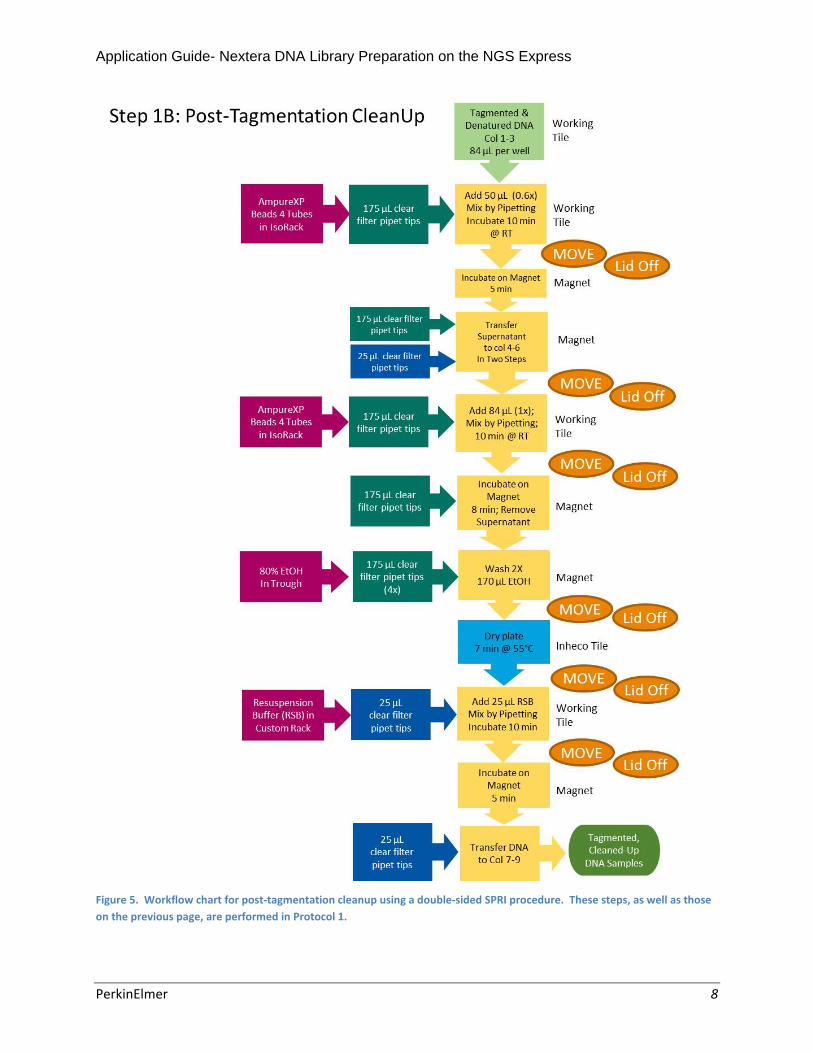
Figure 5. Workflow chart for post‐tagmentation cleanup using a double‐sided SPRI procedure. These steps, as well as those
on the previous page, are performed in Protocol 1.

Application Guide- Nextera DNA Library Preparation on the NGS Express
PerkinElmer 9
Figure 6. Workflow chart for PCR setup, showing worklist generation from the customer‐provided Illumina Sample Sheet.
The steps outlined in tis figure are performed by Protocol 2.

Application Guide- Nextera DNA Library Preparation on the NGS Express
PerkinElmer 10
Figure 7. Workflow chart for post‐PCR cleanup via a single SPRI magnetic bead method. The steps shown above are
performed by Protocol 3.
Application Guide- Nextera DNA Library Preparation on the NGS Express
PerkinElmer 11
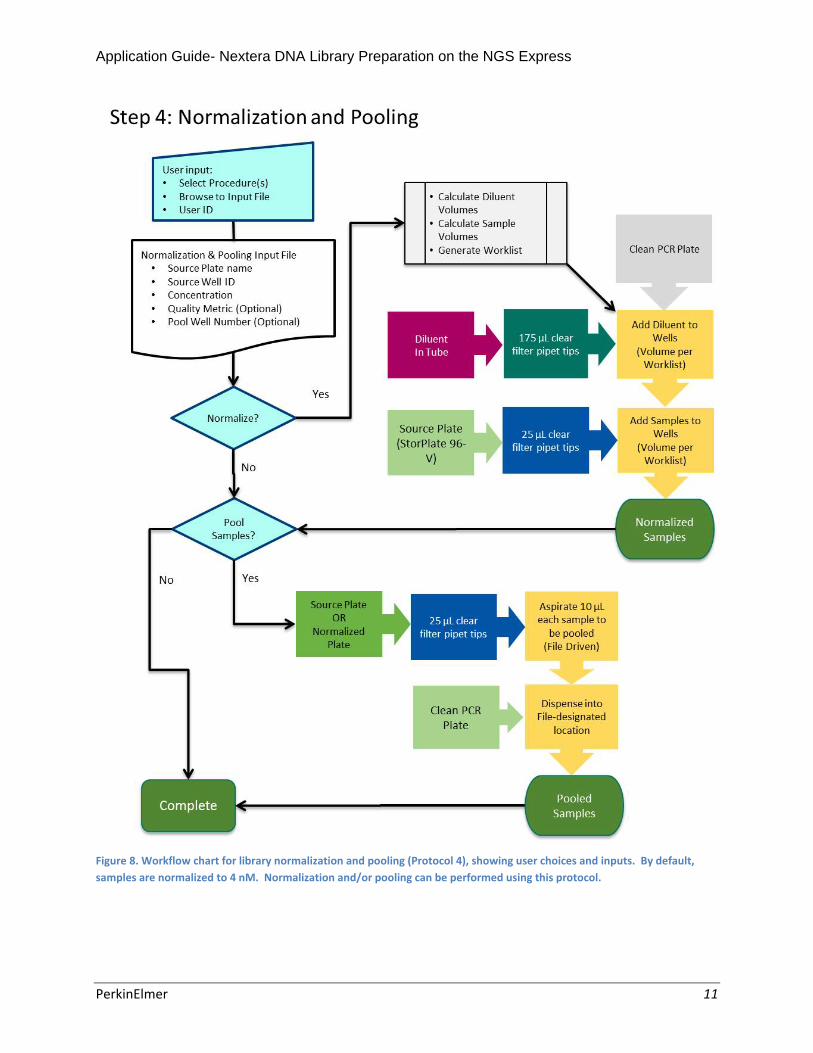
Figure 8. Workflow chart for library normalization and pooling (Protocol 4), showing user choices and inputs. By default,
samples are normalized to 4 nM. Normalization and/or pooling can be performed using this protocol.

Application Guide- Nextera DNA Library Preparation on the NGS Express
PerkinElmer 12
SystemSetup
MaterialsListIncluded in the Option Package:
Software CD
Adapter Tile, 96‐well V‐bottom (for Inheco)
Disposable Tip‐ 25 µL, Clear, Sterile Filter Tips
Disposable Tip‐ 175 µL, Clear, Sterile Filter Tips
StorPlate, polypropylene, V‐bottom, 450 µL capacity
Microtubes, screw cap, 0.5 mL
Microtubes, screw cap, 2.0 mL
Hard‐Shell PCR plates, 96‐well
Eppendorf IsoRack (included with the NGS Express System)
Reagents Required but not Supplied:
Item Vendor Part No.
Nextera DNA Sample Preparation Kit (24 samples) Illumina FC‐121‐1030
Associated Nextera Index Kit (24 indices, 96 samples) Illumina FC‐121‐1011
AMPure Beads, 60 mL Beckman Coulter A63881
8M Guanidine HCL Sigma 50937
Water, molecular biology grade general lab supplier
Ethanol, molecular biology grade general lab supplier

Application Guide- Nextera DNA Library Preparation on the NGS Express
PerkinElmer 13
AssemblingtheVersaMoverThe Versa Mover system can move a plate among the three front positions of the NGS Express deck.
This provides automated plate movement among the magnet tile, heating/cooling tile, as well as a
standard tile. The following chart provides information on the components of the Versa Mover system
so you can understand how it works. Use the Place page within the NGS Express software for step‐by‐
step instructions on placement of each piece on the deck of the instrument.
The VersaLift tool has two functions: it links the
For error‐free operation, please:
Place a universal (un‐notched) disposable lid in the lifting tool.
Make sure the plate type you are using matches the Inheco adapter plate type.
Verify that the position of each part matches that shown in deck setup drawing in the software
before starting each run.
Chart:ImagesandDescriptionsofVersaMoverHardware
LabwareDescription
ComponentImage(s) AdditionalInfo
Base‐ this is a
custom support
tile that is
placed on the
deck to hold a
Lifting Tool
w/Lid and/or a
plate in the
carrier Basket
Requires the Basket in order to
hold a plate.
Note the ‘FRONT’ engraved in the
base and make sure it faces the
user.
Base + Basket‐
this pair of
labware holds a
plate on the
Working Tile.

Application Guide- Nextera DNA Library Preparation on the NGS Express
PerkinElmer 14
Base + Magnet‐
this labware
can support the
lifting tool with
lid.
Base + Magnet
+ Basket‐ this
3‐piece
assembly forms
the “Magnet
Tile” and holds
a plate.
VersaLift‐ this
labware is the
‘handle’ for the
basket and also
holds the
disposable lid.
A lid MUST be present for the
Versamover to work correctly.
The spring clip on the front of the
lifting tool allows you to replace
the lid as desired.
The plastic pieces may be putty
colored on your hardware.
Inheco + 96‐V
Adapter Tile‐
special
geometry to
match the
StorPlate 96‐V
from
PerkinElmer.
Photograph of Inheco + inserted 96‐V adapter on
the deck.
Image of 96‐V adapter only
Application Guide- Nextera DNA Library Preparation on the NGS Express
PerkinElmer 15
Pre‐RunInstrumentChecklistThe day before your automation run, the following steps should be performed:
Place the insert for the IsoRack chiller block insert into a ‐20C freezer. It is recommended that
you place the block upside down to keep the bottom foil surface as flat as possible.
Fill the system liquid carboy with de‐ionized water (house‐distilled or de‐ionized; Milli‐Q is also
suitable). This will allow the system liquid to de‐gas overnight, which will reduce air bubbles in
the line during the next day’s run.
Application Guide- Nextera DNA Library Preparation on the NGS Express
PerkinElmer 16
RunningtheNexteraDNASamplePrepMethodonNGSExpress
ExperimentalPlanningBefore starting the automated run, a number of details must be determined, including:
How many samples you will be running?
Which barcoded adapters will you use on which samples?
Will you normalize and/or pool your samples?
InputFilesThe Nextera Option for NGS Express performs some pipetting steps based on user‐provided input files,
which are described below. For efficient sample processing, be ready to supply these files during the
run.
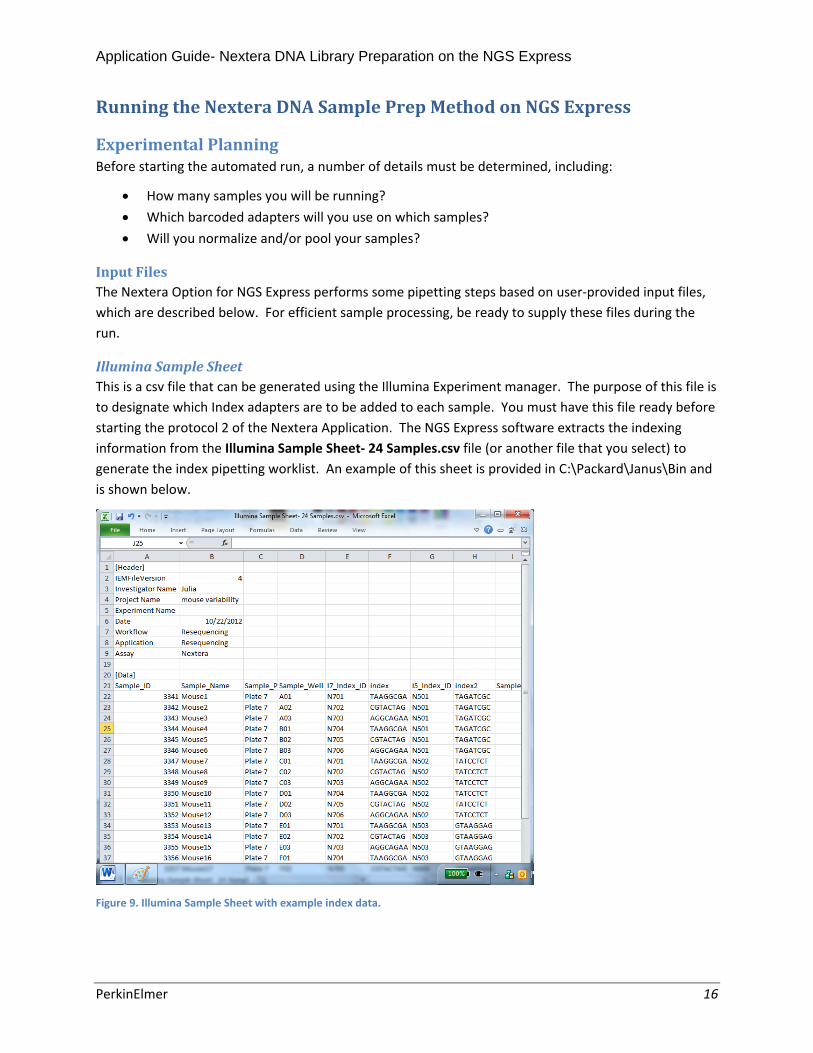
IlluminaSampleSheetThis is a csv file that can be generated using the Illumina Experiment manager. The purpose of this file is
to designate which Index adapters are to be added to each sample. You must have this file ready before
starting the protocol 2 of the Nextera Application. The NGS Express software extracts the indexing
information from the Illumina Sample Sheet‐ 24 Samples.csv file (or another file that you select) to
generate the index pipetting worklist. An example of this sheet is provided in C:\Packard\Janus\Bin and
is shown below.
Figure 9. Illumina Sample Sheet with example index data.

Application Guide- Nextera DNA Library Preparation on the NGS Express
PerkinElmer 17
This sheet can be created by the Illumina Experiment Manager (IEM), or you can edit the provided
template, Illumina Sample Sheet‐24 Samples.csv. It must be a .csv (comma‐separated values) file and
the format should be the same as the “Illumina Sample Sheet” as exported by IEM version 4. Specifically:
First row of data is in row 22
Well ID is in column 4 (D)
Index 1 (I7 info) is in column 5 (E)
Index 2 (I5 info) is in column 7 (G)
Include in the file only those rows/wells that you wish to process
Your file need not be named as the one above, but it must be in CSV format and have the .csv extension.
If you have a different data structure (data locations within the file are different from above) that you
wish to routinely use, the protocol will need to be edited.
Normalization&PoolingWorklistIn order to perform automated library normalization and pooling, a .csv file that tells the NGS Express
the concentrations of your libraries and how they should be pooled must be provided. Library
concentrations (determined by your method of choice) are entered into the worksheet and the pool
number is specified. The NGS Express automatically calculates the required volumes of sample and
diluent to pipet in order to normalize the samples. It is recommended that you edit the provided
template NexteraNormPoolingWorklist.csv and change only the numbers in columns C and F. The
template file is located in C:\Packard\Janus\Bin and is shown below:
Figure 10. Nextera normalization and pooling worklist.
Application Guide- Nextera DNA Library Preparation on the NGS Express
PerkinElmer 18
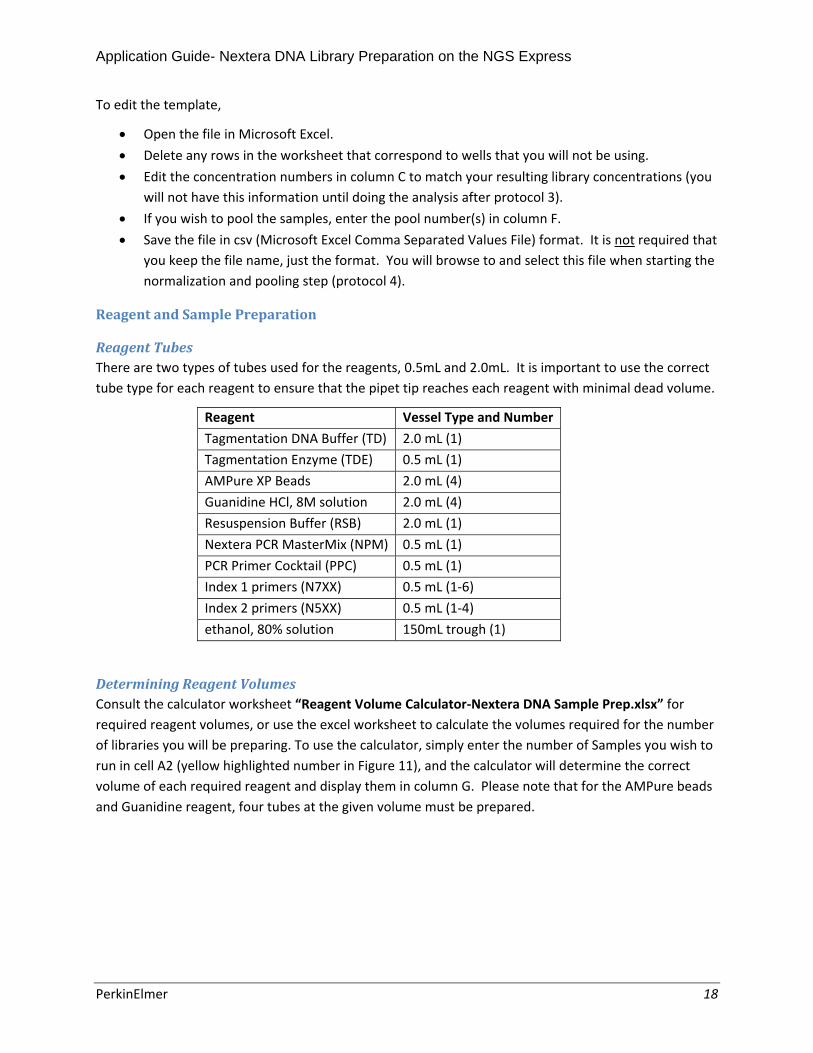
To edit the template,
Open the file in Microsoft Excel.
Delete any rows in the worksheet that correspond to wells that you will not be using.
Edit the concentration numbers in column C to match your resulting library concentrations (you
will not have this information until doing the analysis after protocol 3).
If you wish to pool the samples, enter the pool number(s) in column F.
Save the file in csv (Microsoft Excel Comma Separated Values File) format. It is not required that
you keep the file name, just the format. You will browse to and select this file when starting the
normalization and pooling step (protocol 4).
ReagentandSamplePreparation
ReagentTubesThere are two types of tubes used for the reagents, 0.5mL and 2.0mL. It is important to use the correct
tube type for each reagent to ensure that the pipet tip reaches each reagent with minimal dead volume.
Reagent Vessel Type and Number
Tagmentation DNA Buffer (TD) 2.0 mL (1)
Tagmentation Enzyme (TDE) 0.5 mL (1)
AMPure XP Beads 2.0 mL (4)
Guanidine HCl, 8M solution 2.0 mL (4)
Resuspension Buffer (RSB) 2.0 mL (1)
Nextera PCR MasterMix (NPM) 0.5 mL (1)
PCR Primer Cocktail (PPC) 0.5 mL (1)
Index 1 primers (N7XX) 0.5 mL (1‐6)
Index 2 primers (N5XX) 0.5 mL (1‐4)
ethanol, 80% solution 150mL trough (1)
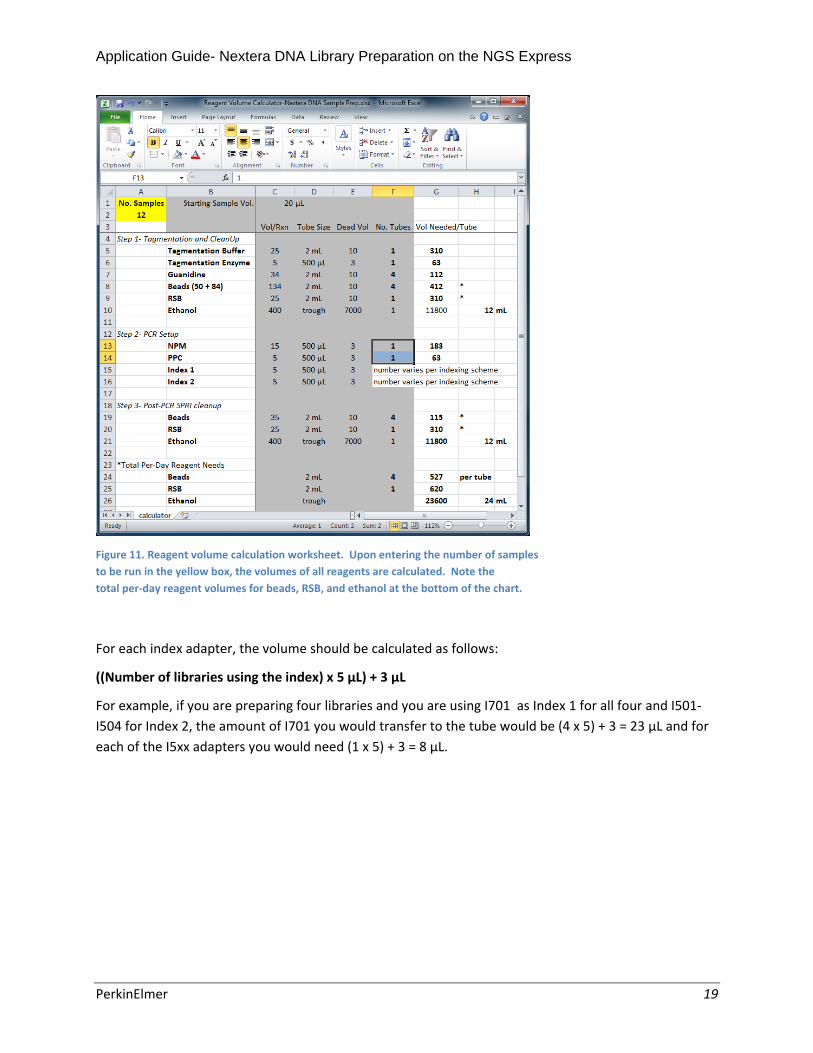
DeterminingReagentVolumesConsult the calculator worksheet “Reagent Volume Calculator‐Nextera DNA Sample Prep.xlsx” for
required reagent volumes, or use the excel worksheet to calculate the volumes required for the number
of libraries you will be preparing. To use the calculator, simply enter the number of Samples you wish to
run in cell A2 (yellow highlighted number in Figure 11), and the calculator will determine the correct
volume of each required reagent and display them in column G. Please note that for the AMPure beads
and Guanidine reagent, four tubes at the given volume must be prepared.
Application Guide- Nextera DNA Library Preparation on the NGS Express
PerkinElmer 19
Figure 11. Reagent volume calculation worksheet. Upon entering the number of samples
to be run in the yellow box, the volumes of all reagents are calculated. Note the
total per‐day reagent volumes for beads, RSB, and ethanol at the bottom of the chart.
For each index adapter, the volume should be calculated as follows:
((Number of libraries using the index) x 5 µL) + 3 µL
For example, if you are preparing four libraries and you are using I701 as Index 1 for all four and I501‐
I504 for Index 2, the amount of I701 you would transfer to the tube would be (4 x 5) + 3 = 23 µL and for
each of the I5xx adapters you would need (1 x 5) + 3 = 8 µL.
Application Guide- Nextera DNA Library Preparation on the NGS Express
PerkinElmer 20
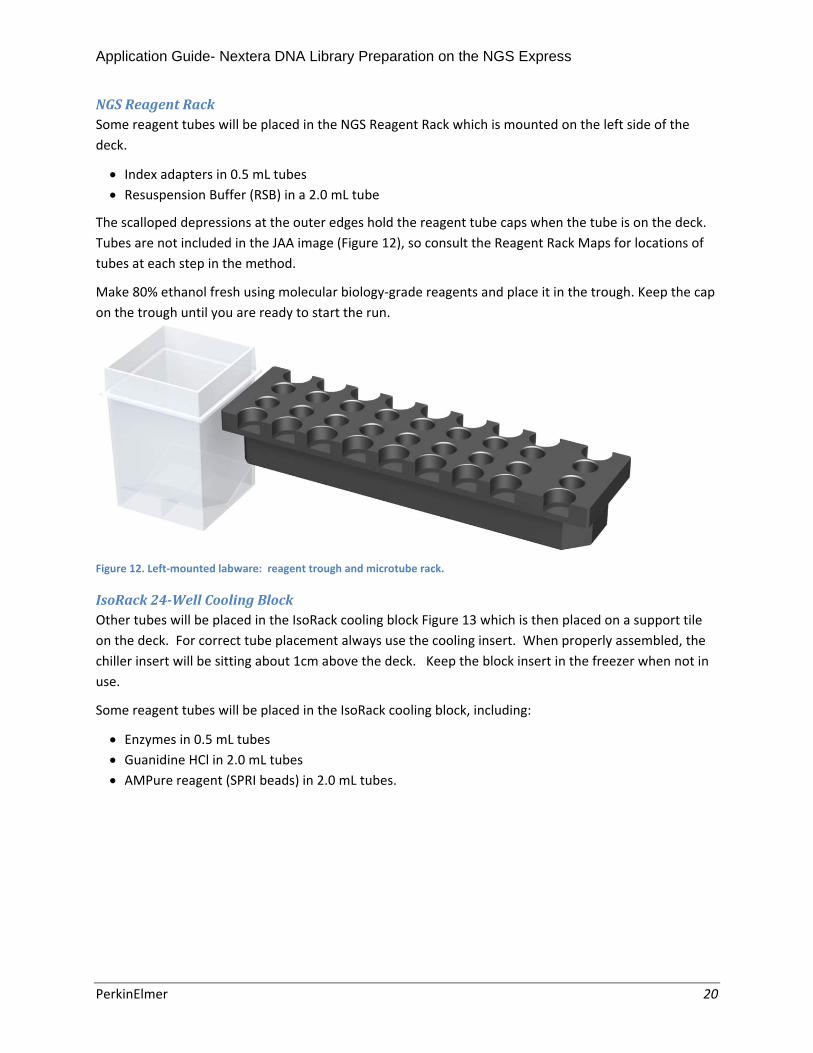
NGSReagentRackSome reagent tubes will be placed in the NGS Reagent Rack which is mounted on the left side of the
deck.
Index adapters in 0.5 mL tubes
Resuspension Buffer (RSB) in a 2.0 mL tube
The scalloped depressions at the outer edges hold the reagent tube caps when the tube is on the deck.
Tubes are not included in the JAA image (Figure 12), so consult the Reagent Rack Maps for locations of
tubes at each step in the method.
Make 80% ethanol fresh using molecular biology‐grade reagents and place it in the trough. Keep the cap
on the trough until you are ready to start the run.
Figure 12. Left‐mounted labware: reagent trough and microtube rack.
IsoRack24‐WellCoolingBlockOther tubes will be placed in the IsoRack cooling block Figure 13 which is then placed on a support tile
on the deck. For correct tube placement always use the cooling insert. When properly assembled, the
chiller insert will be sitting about 1cm above the deck. Keep the block insert in the freezer when not in
use.
Some reagent tubes will be placed in the IsoRack cooling block, including:
Enzymes in 0.5 mL tubes
Guanidine HCl in 2.0 mL tubes
AMPure reagent (SPRI beads) in 2.0 mL tubes.
Application Guide- Nextera DNA Library Preparation on the NGS Express
PerkinElmer 21
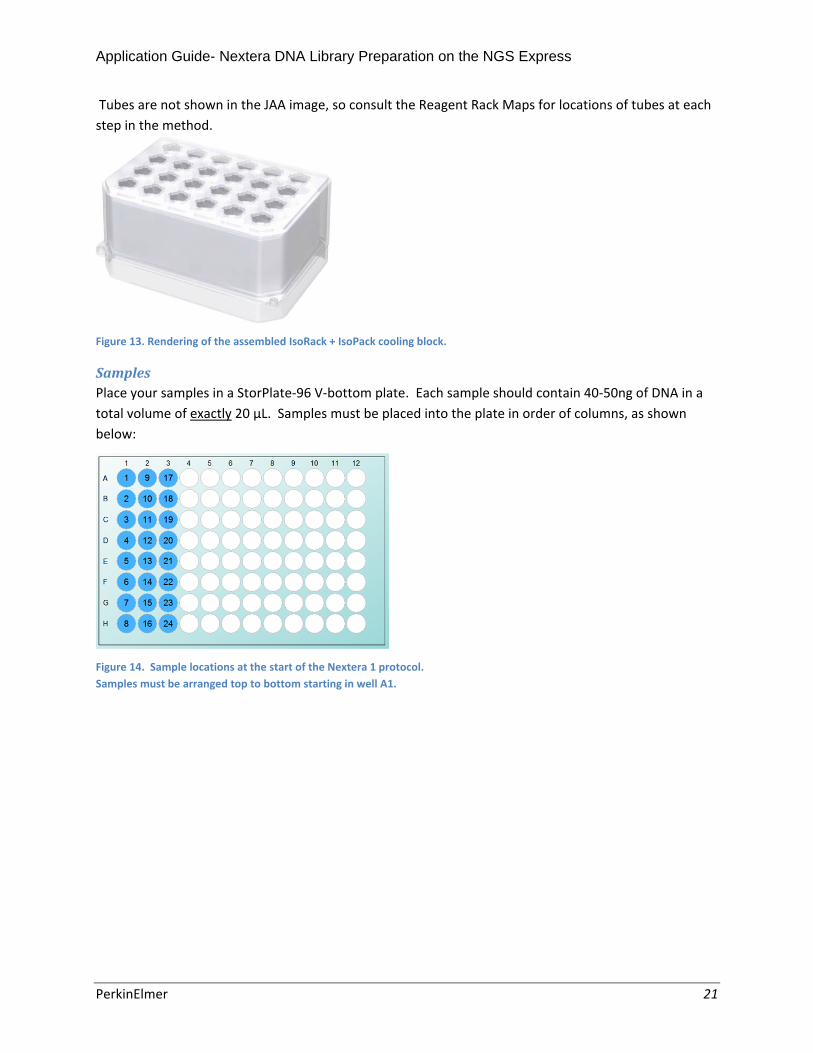
Tubes are not shown in the JAA image, so consult the Reagent Rack Maps for locations of tubes at each
step in the method.
Figure 13. Rendering of the assembled IsoRack + IsoPack cooling block.
SamplesPlace your samples in a StorPlate‐96 V‐bottom plate. Each sample should contain 40‐50ng of DNA in a
total volume of exactly 20 µL. Samples must be placed into the plate in order of columns, as shown
below:
Figure 14. Sample locations at the start of the Nextera 1 protocol.
Samples must be arranged top to bottom starting in well A1.

Application Guide- Nextera DNA Library Preparation on the NGS Express
PerkinElmer 22
InstrumentPreparationClean, degassed water must be available throughout the instrument operation to maintain proper
pipetting performance and avoid delays in the protocol. The following actions must be performed each
day, prior to starting any protocol runs.
CheckFluidLevels Check the System Liquid level‐ Check the volume of water in the carboy. If it is less than half full,
you should add fresh deionized water to it.
Check the waste container‐ to avoid overflow, make sure the waster container is empty or near
empty.
PrimetheSystemAll air bubbles must be removed from the fluid path for optimal pipetting performance. To flush the
system liquid path,
1) Open the NGS Express software by clicking on the icon.
2) Go to the Maintain tab and find the “Prime the Varispan Fluid Path” activity.
3) Click the Start Maintenance button to initiate the system priming routine.
Figure 15. Maintain tab shown with Prime Varispan path highlighted.

Application Guide- Nextera DNA Library Preparation on the NGS Express
PerkinElmer 23
RunningtheAutomatedNexteraProtocolsNow that your experiment is planned and your reagents and system are ready, you can proceed with the
automated run.
Protocol1‐TagmentationandClean‐UpThis protocol performs the following actions on your samples:
Addition of tagmentation buffer and enzyme, and mixing by pipetting the samples several times.
• On‐deck incubation of the tagmentation reactions. To eliminate a manual interaction, the
tagmentation takes place on the deck. Both time and temperature are increased relative to the
manual method. The results are equivalent.
• Double‐sided SPRI cleanup of the tagmented samples. Chilled Guanidine HCl is added to
dissociate the tagmentase enzyme from the DNA and cool the reaction. With guanidine as a
denaturant, a double‐sided SPRI can be used to clean up the tagmentation reaction and avoid
the manual spin‐column method.
Consult the Workflow Chart for more details on the steps being performed by the NGS Express.
To Start the Protocol,
1. Open the NGS Express software by clicking on the icon. The list of available
protocols will appear.
2. Select the protocol “Nextera 1_Tagmentation and Clean‐Up” by clicking on it
once.
3. Questions related to this protocol will appear in the lower panel.
a. Enter the number of samples you want to process.
b. If you wish to generate a Run Report, leave the checkbox checked. If checked, a report
will be generated including the following:
i. Name or User ID‐ this optional file allows you to record which operator is
running the instrument.
ii. Kit Barcode‐ use the handheld barcode scanner or type in the kit barcode. This
information will be saved in the Run Report.

Application Guide- Nextera DNA Library Preparation on the NGS Express
PerkinElmer 24
4. Place the labware and reagents on the deck.
a. Click on the Place icon in the top green bar.
b. Follow the instructions in the Place tab of the software for placing support tiles, tips,
and plates on the deck. Note that your sample plate must be in the basket in the front
left position on the deck, as shown in Figure 17.
Figure 17. Place page of NGS Express software showing the location of the sample plate on the deck for Nextera protocol 1.
Figure 16. Select Protocol Screen, with Nextera 1 protocol selected and related questions
shown.
Application Guide- Nextera DNA Library Preparation on the NGS Express
PerkinElmer 25
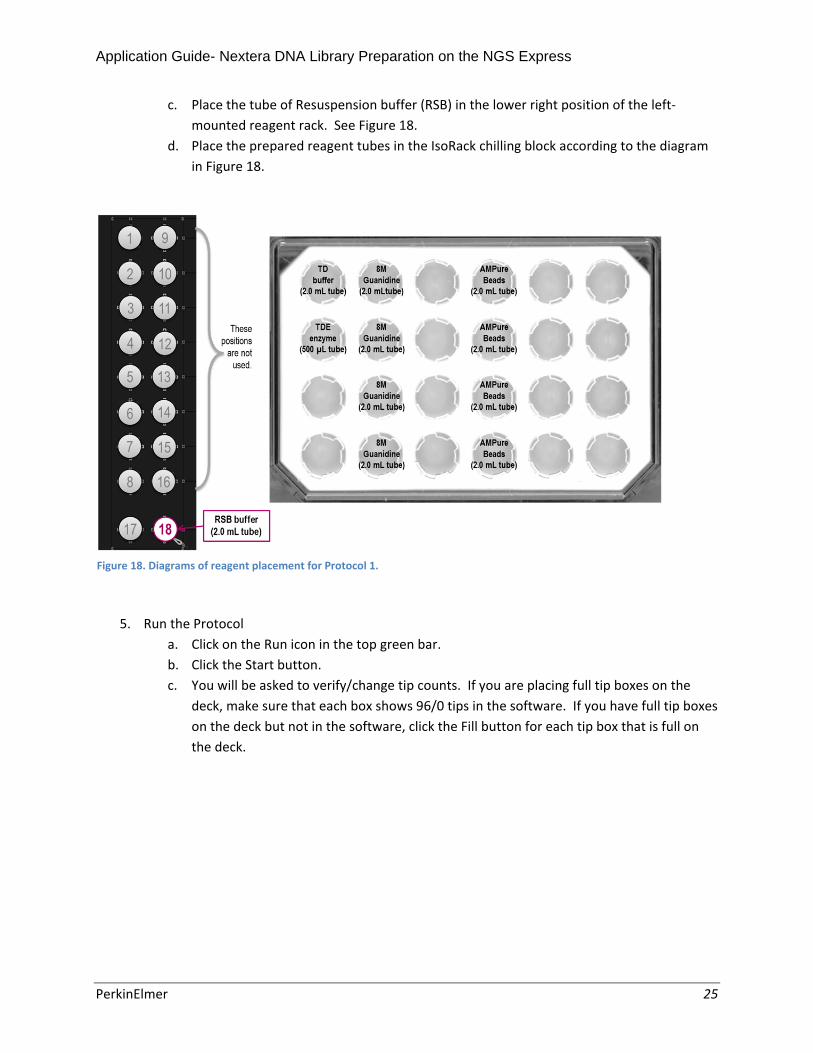
c. Place the tube of Resuspension buffer (RSB) in the lower right position of the left‐
mounted reagent rack. See Figure 18.
d. Place the prepared reagent tubes in the IsoRack chilling block according to the diagram
in Figure 18.
5. Run the Protocol
a. Click on the Run icon in the top green bar.
b. Click the Start button.
c. You will be asked to verify/change tip counts. If you are placing full tip boxes on the
deck, make sure that each box shows 96/0 tips in the software. If you have full tip boxes
on the deck but not in the software, click the Fill button for each tip box that is full on
the deck.
Figure 18. Diagrams of reagent placement for Protocol 1.

Application Guide- Nextera DNA Library Preparation on the NGS Express
PerkinElmer 26
Figure 19. Interface for refilling tip boxes in JAA.
d. Click OK to commence the run.
e. Verify the location of the samples, and then click OK.
Consult the Workflow Chart for details on the steps being performed by the NGS Express.
When the protocol is complete, a message will appear:
Figure 20. NGS Express screen showing completion of protocol 1.

Application Guide- Nextera DNA Library Preparation on the NGS Express
PerkinElmer 27
Your samples will be in the plate on the magnet tile, in the wells shown below:
Figure 21. Sample locations at the completion of protocol 1.
It is not necessary to remove the sample plate‐ the next protocol will transfer the samples from the
plate on the magnet to the PCR vessel.

Application Guide- Nextera DNA Library Preparation on the NGS Express
PerkinElmer 28
Protocol2‐PCRSetupwithDualIndexingThis protocol performs all of the pipetting required to set up the PCR reactions in a PCR plate or strip
tubes, including:
Addition of Nextera PCR Master Mix to PCR plate/tubes
Addition of PCR Primer Cocktail
Addition of I7 and I5 index adapters
Transfer of tagmented, cleaned‐up DNA to the PCR tubes/plate
This protocol requires some user inputs: the choice of plate or strip tubes for the PCR vessel, and
selection of index adapters to be used for each sample. For the latter, the Illumina Sample Sheet is
used to provide the indexing information. A description of this file is located in the Illumina Sample
Sheet section on page 16 of this document.
To Start the Protocol,
1. Verify that the correct Illumina sample sheet is on the NGS Express computer.
2. Click the Select icon in the green bar near the top of the screen.
3. Select the protocol “Nextera 2_PCR Setup with Dual Indexing” by clicking on it once.
4. Questions related to this protocol will appear in the lower panel.
Application Guide- Nextera DNA Library Preparation on the NGS Express
PerkinElmer 29
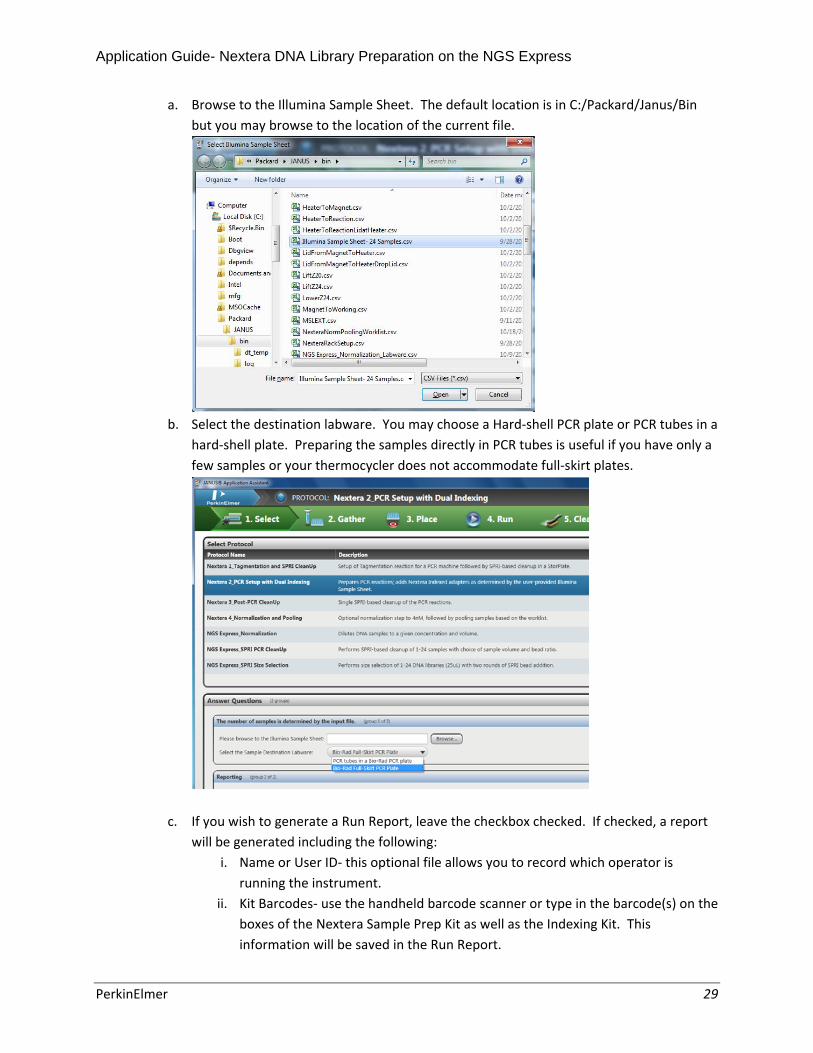
a. Browse to the Illumina Sample Sheet. The default location is in C:/Packard/Janus/Bin
but you may browse to the location of the current file.
b. Select the destination labware. You may choose a Hard‐shell PCR plate or PCR tubes in a
hard‐shell plate. Preparing the samples directly in PCR tubes is useful if you have only a
few samples or your thermocycler does not accommodate full‐skirt plates.
c. If you wish to generate a Run Report, leave the checkbox checked. If checked, a report
will be generated including the following:
i. Name or User ID‐ this optional file allows you to record which operator is
running the instrument.
ii. Kit Barcodes‐ use the handheld barcode scanner or type in the barcode(s) on the
boxes of the Nextera Sample Prep Kit as well as the Indexing Kit. This
information will be saved in the Run Report.

Application Guide- Nextera DNA Library Preparation on the NGS Express
PerkinElmer 30
iii. A copy of the selected Illumina Sample sheet will be archived with the Run
Report files.
5. Place Labware and Reagents
a. Click on the Place icon in the upper green bar and follow the instructions to place the
labware on the deck.
b. Note the replacement of the 175 µL tips in position B4 with 25 µL tips.
c. The samples from step 1 should still be on the magnet tile; this protocol will transfer the
DNA from columns 7‐9 of the plate on the magnet tile to the PCR vessel chosen above.
Figure 22. Place screen showing placement of source samples for the start of Nextera protocol 2.
d. Place the prepared reagent tubes in the left‐mounted custom rack and IsoRack
according to the diagram in Figure 23.

Application Guide- Nextera DNA Library Preparation on the NGS Express
PerkinElmer 31
e. Place the correct labware (a hard‐shell PCR plate with or without strip tubes) on the
center rear support tile at location B4. Please note:
i. A hard‐shell PCR plate must be present regardless of whether you are using
tubes or preparing reactions directly in the plate.
ii. If tubes are used, they must be placed in the wells of a hard‐shell plate in order
of columns as shown in the well map below.
Figure 24. PCR setup destination well locations. If using PCR tubes they must
be placed in the wells of a hard‐shell PCR plate in the positions shown.
6. Run the Protocol
a. Click on the Run icon in the top green bar.
b. Click the Start button.
c. You will be asked to verify/change tip counts. This protocol requires five 25 µL tips per
sample. If you are running 8 samples or less you do not need to replenish any tips.
Figure 23. Reagent tube placement for Nextera protocol 2.
Application Guide- Nextera DNA Library Preparation on the NGS Express
PerkinElmer 32
d. You will be asked to verify sample and plate locations. Click OK to proceed.
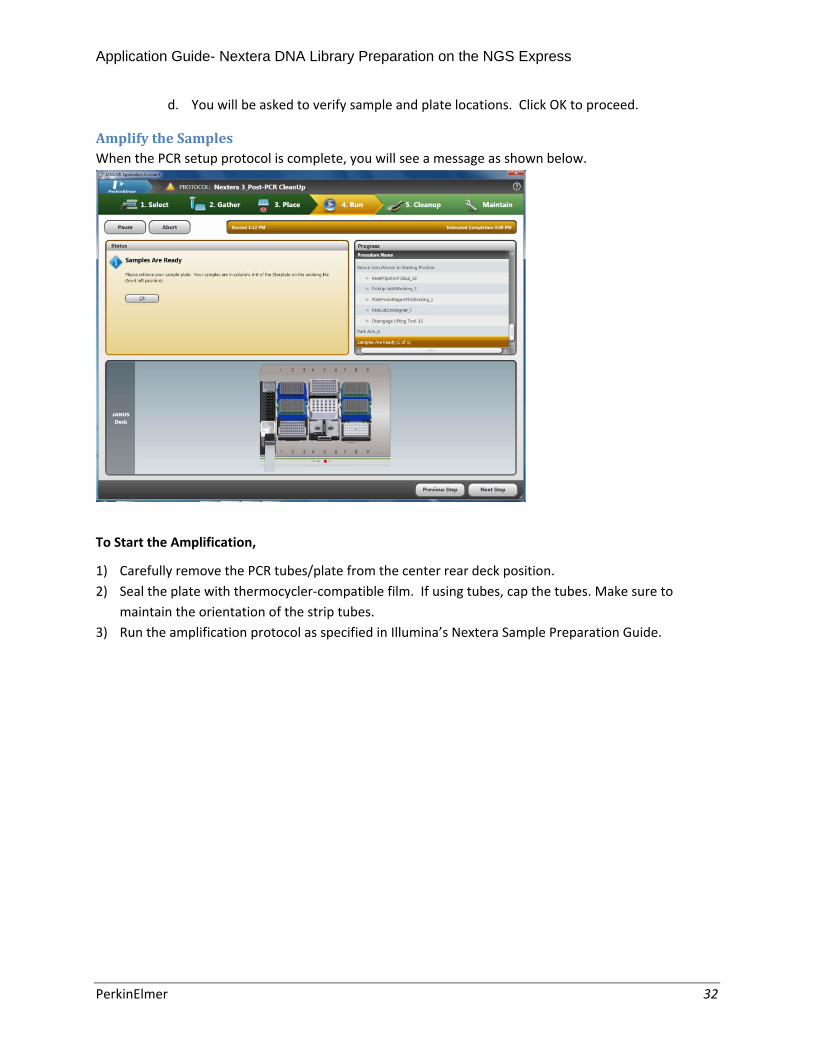
AmplifytheSamplesWhen the PCR setup protocol is complete, you will see a message as shown below.
To Start the Amplification,
1) Carefully remove the PCR tubes/plate from the center rear deck position.
2) Seal the plate with thermocycler‐compatible film. If using tubes, cap the tubes. Make sure to
maintain the orientation of the strip tubes.
3) Run the amplification protocol as specified in Illumina’s Nextera Sample Preparation Guide.
Application Guide- Nextera DNA Library Preparation on the NGS Express
PerkinElmer 33
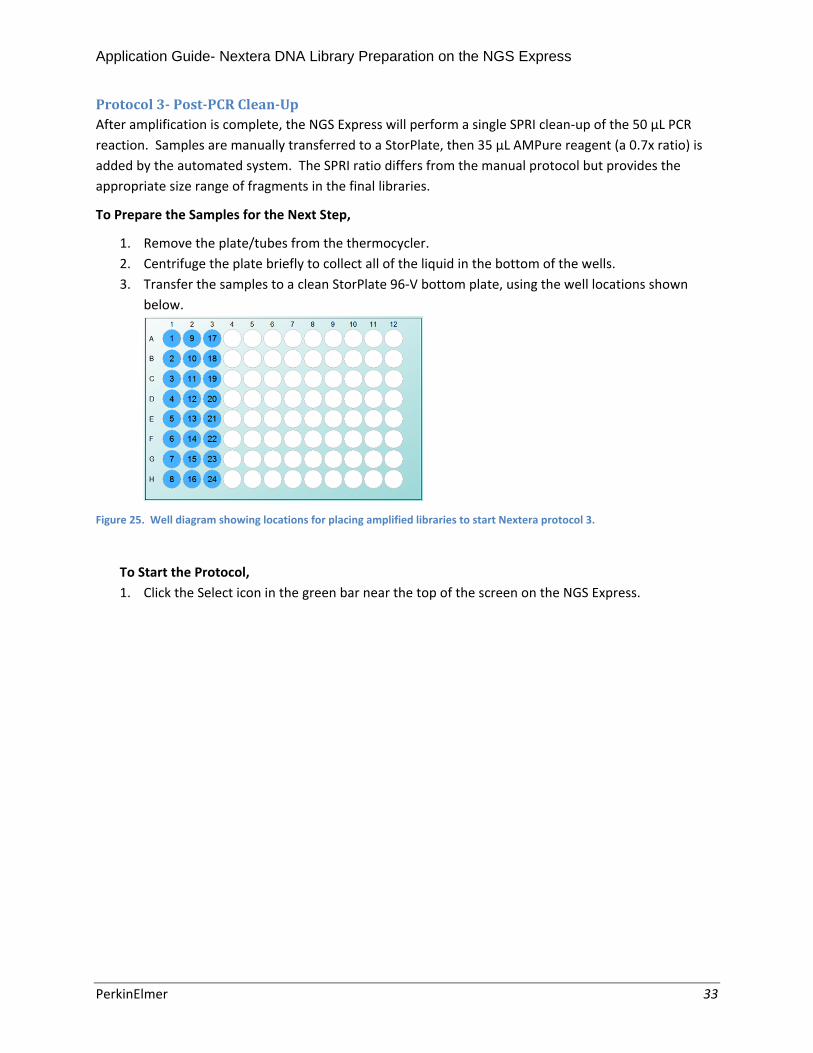
Protocol3‐Post‐PCRClean‐UpAfter amplification is complete, the NGS Express will perform a single SPRI clean‐up of the 50 µL PCR
reaction. Samples are manually transferred to a StorPlate, then 35 µL AMPure reagent (a 0.7x ratio) is
added by the automated system. The SPRI ratio differs from the manual protocol but provides the
appropriate size range of fragments in the final libraries.
To Prepare the Samples for the Next Step,
1. Remove the plate/tubes from the thermocycler.
2. Centrifuge the plate briefly to collect all of the liquid in the bottom of the wells.
3. Transfer the samples to a clean StorPlate 96‐V bottom plate, using the well locations shown
below.
Figure 25. Well diagram showing locations for placing amplified libraries to start Nextera protocol 3.
To Start the Protocol,
1. Click the Select icon in the green bar near the top of the screen on the NGS Express.
Application Guide- Nextera DNA Library Preparation on the NGS Express
PerkinElmer 34
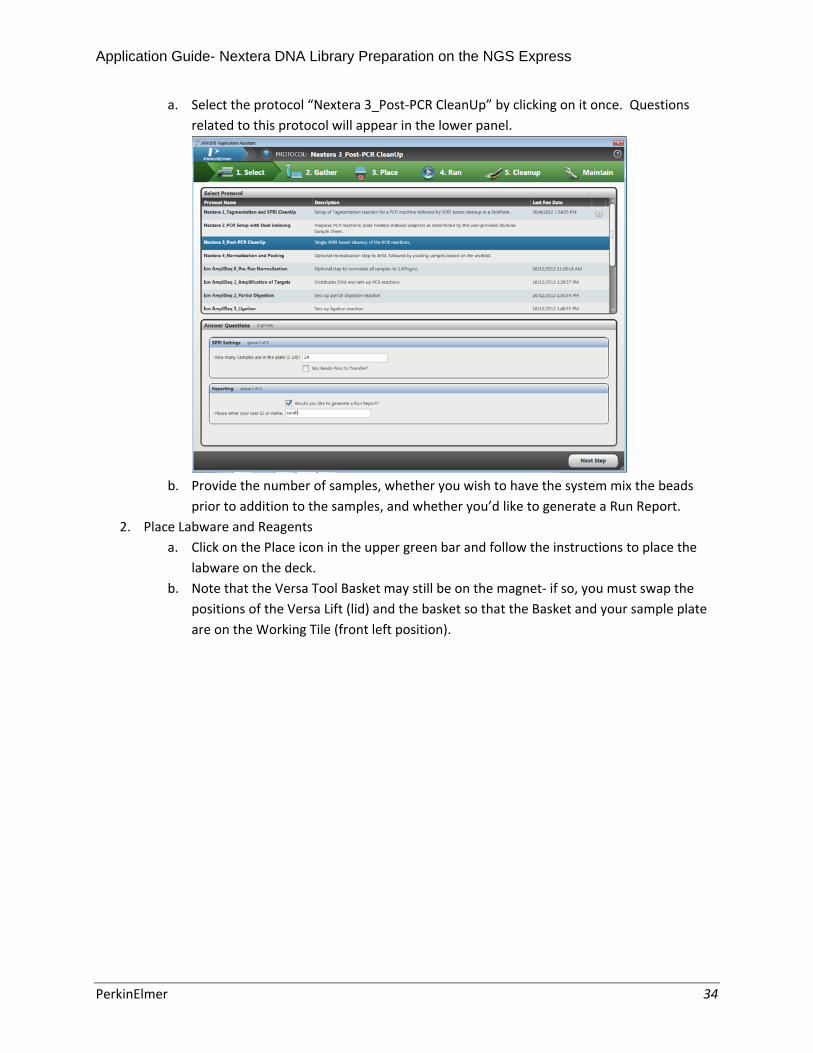
a. Select the protocol “Nextera 3_Post‐PCR CleanUp” by clicking on it once. Questions
related to this protocol will appear in the lower panel.
b. Provide the number of samples, whether you wish to have the system mix the beads
prior to addition to the samples, and whether you’d like to generate a Run Report.
2. Place Labware and Reagents
a. Click on the Place icon in the upper green bar and follow the instructions to place the
labware on the deck.
b. Note that the Versa Tool Basket may still be on the magnet‐ if so, you must swap the
positions of the Versa Lift (lid) and the basket so that the Basket and your sample plate
are on the Working Tile (front left position).

Application Guide- Nextera DNA Library Preparation on the NGS Express
PerkinElmer 35
c. If you are processing 12 or fewer samples, you can rotate the waste plate 180° and re‐
use it to collect the waste for this SPRI clean‐up.
d. Place the prepared reagent tubes in the left‐mounted custom rack and IsoRack
according to the diagram in Figure 26.
Figure 26. Reagent placement for Nextera protocol 3.
Application Guide- Nextera DNA Library Preparation on the NGS Express
PerkinElmer 36
3. Run the protocol
a. Click on the Run icon in the top green bar.
b. Click the Start button.
c. You will be asked to verify/change tip counts. Note that the tips counts from the 175 µL
tips will be remembered from step 1, so you can start with partially full tip boxes if you
are running fewer than 12 samples.
d. Click OK to continue.
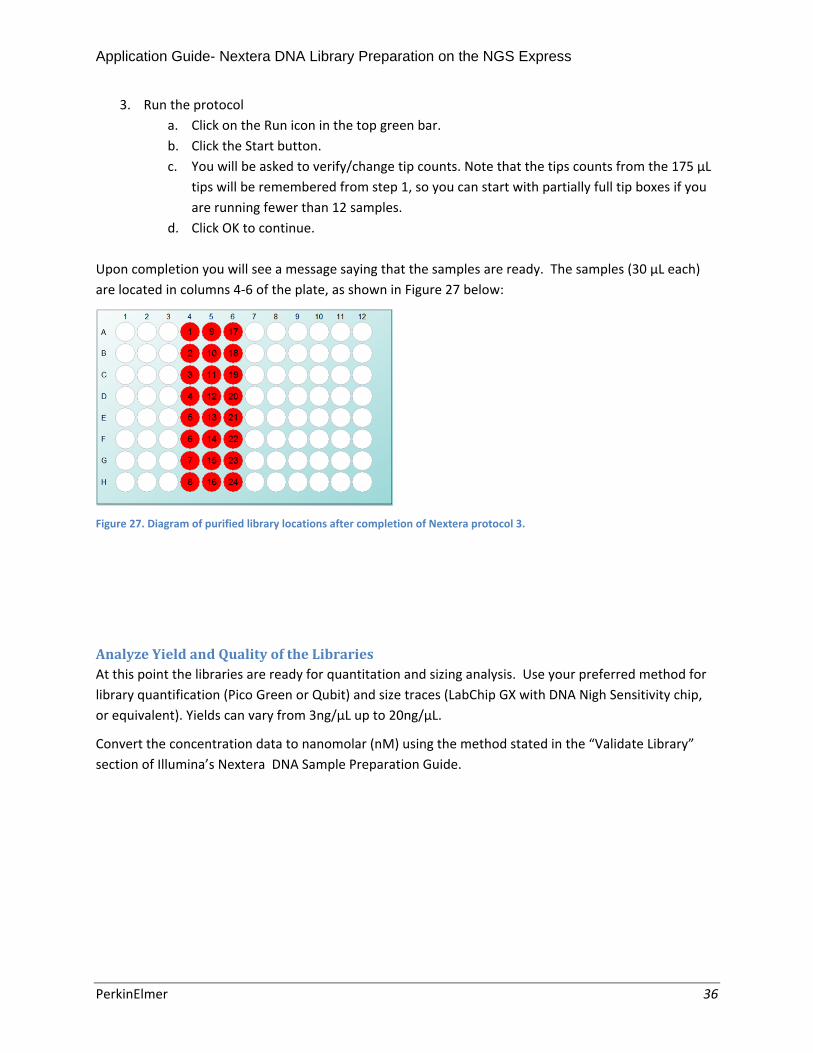
Upon completion you will see a message saying that the samples are ready. The samples (30 µL each)
are located in columns 4‐6 of the plate, as shown in Figure 27 below:
Figure 27. Diagram of purified library locations after completion of Nextera protocol 3.
AnalyzeYieldandQualityoftheLibrariesAt this point the libraries are ready for quantitation and sizing analysis. Use your preferred method for
library quantification (Pico Green or Qubit) and size traces (LabChip GX with DNA Nigh Sensitivity chip,
or equivalent). Yields can vary from 3ng/µL up to 20ng/µL.
Convert the concentration data to nanomolar (nM) using the method stated in the “Validate Library”
section of Illumina’s Nextera DNA Sample Preparation Guide.

Application Guide- Nextera DNA Library Preparation on the NGS Express
PerkinElmer 37
Protocol4‐NormalizationandPoolingNGS Express performs normalization of samples based on the concentration data, read from a csv file
that you will provide when starting the protocol. In addition it is possible to pool the samples.
Normalization and pooling are performed separately; the samples are first normalized to 4nM, and then
equal volumes of the normalized samples are combined to create the pools. You will choose at run time
whether you wish to normalize and/or pool the samples.
Before running the protocol, you must first edit the NexteraNormPoolingWorklist.csv file with your
actual concentration data in units of nM. It is recommended that you edit the provided template and
change only the numbers in columns C and F. The template file is located in C:\Packard\Janus\Bin and is
shown below:
To edit the template,
Open the file in Microsoft Excel.
Delete any rows in the worksheet that correspond to wells that you will not be using.
Edit the concentration numbers in column C to match your resulting library concentrations in
nanomolar (nM).
o IMPORTANT‐ the concentrations must be the actual nanomolar concentration in each
well and should not contain any units.
If you wish to pool the samples, enter the pool number(s) in column F. The pool number
corresponds to the well number in the Pooled plate according to the well map below:

Application Guide- Nextera DNA Library Preparation on the NGS Express
PerkinElmer 38
Save the file in csv (Microsoft Excel Comma Separated Values File) format. It is not required that you
keep the file name, just the format. You will browse to and select this file when starting the protocol.
NOTE: This protocol is pre‐configured to prepare 25 µL of DNA normalized to 4nM, per Illumina’s
Nextera protocol. To change these settings, consult the DNA Normalization User’s Guide or contact your
product specialist.
To Start the Protocol,
1. Click the Select icon in the green bar near the top of the screen on the NGS Express.
Select the protocol “Nextera 4_Normalization and Pooling” by clicking on it once. Questions related to
this protocol will appear in the lower portion of the screen, as shown below.
a. You have the option to normalize the samples, pool the samples, or perform both
procedures. If you choose to normalize and pool the samples, the normalized samples
will be used to create the pools.
Application Guide- Nextera DNA Library Preparation on the NGS Express
PerkinElmer 39
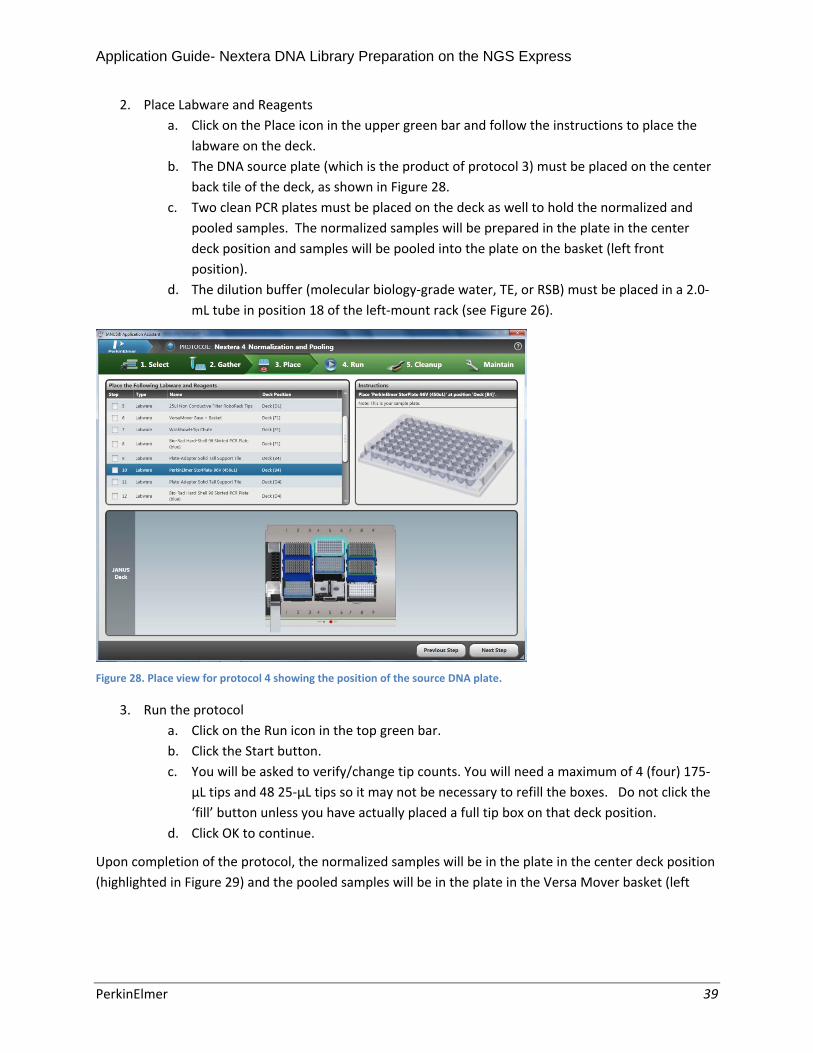
2. Place Labware and Reagents
a. Click on the Place icon in the upper green bar and follow the instructions to place the
labware on the deck.
b. The DNA source plate (which is the product of protocol 3) must be placed on the center
back tile of the deck, as shown in Figure 28.
c. Two clean PCR plates must be placed on the deck as well to hold the normalized and
pooled samples. The normalized samples will be prepared in the plate in the center
deck position and samples will be pooled into the plate on the basket (left front
position).
d. The dilution buffer (molecular biology‐grade water, TE, or RSB) must be placed in a 2.0‐
mL tube in position 18 of the left‐mount rack (see Figure 26).
Figure 28. Place view for protocol 4 showing the position of the source DNA plate.
3. Run the protocol
a. Click on the Run icon in the top green bar.
b. Click the Start button.
c. You will be asked to verify/change tip counts. You will need a maximum of 4 (four) 175‐
µL tips and 48 25‐µL tips so it may not be necessary to refill the boxes. Do not click the
‘fill’ button unless you have actually placed a full tip box on that deck position.
d. Click OK to continue.
Upon completion of the protocol, the normalized samples will be in the plate in the center deck position
(highlighted in Figure 29) and the pooled samples will be in the plate in the Versa Mover basket (left

Application Guide- Nextera DNA Library Preparation on the NGS Express
PerkinElmer 40
front position).
Figure 29. Deck layout for normalization and pooling. Normalized samples are in the center PCR plate (highlighted), source
samples are in the center back StorPlate, and pooled samples (if prepared) will be in the PCR plate in the basket (front left)
position.

Application Guide- Nextera DNA Library Preparation on the NGS Express
PerkinElmer 41
AdvancedUsersGuideThe NGS Express has been designed to run wholly within the JANUS Application Assistant (JAA)
interface. In most cases customers will not need to enter the protocol development software
(WinPrep). However the following information will be helpful if you find you need to make some
changes to the protocols you are running.
NOTE: All files are installed as read‐only to prevent accidental changes. It is recommended that if you
wish to change a protocol or labware definition, you back up the original file(s), and then make the files
of interest read‐write via the Properties function in Windows.
CustomLabware
Left‐mountreagentrackThe NGS Custom Rack has 18 tube positions plus a trough position. For
Nextera, each well is configured for a specific tube type:
Wells 1‐16: Sarstedt 0.5 mL tube
Wells 17‐18: Sarstedt 2.0 mL tube
Well 19: 150 mL trough
If not using Sarstedt tubes, you may need to edit the well bottom of the
well(s) affected. Note the well numbering, shown in Figure 30, to make
certain that you are editing the correct well.
The left‐mounted hardware is not physically attached to the calibrated
deck; in order to optimize pipetting positions, the labware definition file
“NGS Reagent Rack Custom_Nextera DNA Sample Prep (left edge).lab”
may need to be edited.
NOTE: to maintain efficient pipetting, it is vital that the X position be
identical across all wells in column 1, as well as column 2; in addition, the Y
spacing among wells 1‐16 must be 18 mm.
IsoRackNote that the well numbering in the labware maintains the WinPREP
convention and does not reflect the numbering imprinted on the rack
itself. Figure 31 shows the well numbering and tube type for this piece of
labware, as determined by the labware file "IsoRack 24 Custom_Nextera
DNA Sample Prep.lab".
Figure 30. Custom rack
well numbering.

Application Guide- Nextera DNA Library Preparation on the NGS Express
PerkinElmer 42
Figure 31. Well numbering and tube capacity (mL) for the
labware file "IsoRack 24 Custom_Nextera DNA Sample Prep.lab"
DeckPlacementofLabwareNote that the left‐mounted labware overlaps Column 1 in the WinPREP software. In order to place
labware items in column 1 on the deck, hold down the Alt key while dragging with the mouse to allow
placement of multiple pieces of labware on the same spot or overlapping to any degree.
VersaMoverInformationIf you open any of the NGS protocols in WinPREP you will notice multiple layers of labware where the
Versa Mover parts are (Row F). In order for the Versa Mover to work correctly multiple labware, each
with its own support labware, must be present in those positions. If you need to change the labware
(for example replacing a plate type), be very careful to arrange all of the other labware correctly as it
was in the original protocol. Additional information about Versa Mover functionality and labware can
be found in the Installation and Support Guide (Document No. 8860049).
ProtocolLogicElementsThis section describes unique scripts and protocol logic built into the Nextera protocols.
Nextera2_PCRSetupwithDualIndexingThe dual‐indexing capability in the Nextera 2 protocol is driven by a MSL script function that generates
two worklists (one for each index) based on the Illumina Sample Sheet. In the WinPREP protocol, the
Generate Pipetting Worklist node controls how this user input file is read and converted into the two
worklists that drive the addition of the indexing primers. As shown below, the worklist can be
configured for different input file formats, a different source rack, etc.

Application Guide- Nextera DNA Library Preparation on the NGS Express
PerkinElmer 43
Notes on the script arguments:
The argument szMasterWorklistPath is asking for the name of the input file. This is set to Var:
Ask User so that you can browse to a unique file each time. The file Illumina Sample Sheet‐ 24
samples.csv is provided as a demonstration file as well as a template illustrating the correct
format and structure.
szReagentTubeNumbersPath.csv is the argument calling for the location of the reagents by tube
number. It does not specify which rack, only the position within the reagent rack. The value,
NexteraRackSetup.csv ,states the location of each individual index tube in a rack. This file can
be edited if required to use a different set of barcodes. There is no header for this file, as shown
in Figure 32.
The argument szPipettingWorklistPath is where the name of the output file is specified. Note
that for the value given, two files will be generated named with 1 or 2 at the end. For example,
a value of ReagentPipettingWorklist.csv will yield, upon protocol execution, two files:
ReagentPipettingWorklist1.csv and ReagentPipettingWorklist2.csv. Two separate worklists are
generated so that each destination well is visited only once per procedure.
The argument szDestinationPlate is asking for the deck name of the plate where the PCR
reactions will be set up. The value Var: Ask User in this case allows the customer to choose
whether to prepare the reactions in a PCR plate or tubes sitting in the plate. The initial user
query entries match the names of the deck labware and this information is put into the reagent
pipetting worklists.
The argument szReagentRack refers to the deck name of the labware where the indexes are
located. By default this is the NGS Custom Rack, which is the left‐mounted reagent rack. There
are sixteen (16) positions for 500 µL tubes in this rack that are available for indexes. If you wish

Application Guide- Nextera DNA Library Preparation on the NGS Express
PerkinElmer 44
to use more indexes you will need to designate a different source rack by changing the value for
this argument.
The argument nColumnOffset refers to the destination wells. By default (0) the PCR reactions
will be set up in the first 3 columns. If you want to set up the reactions in another location on
the plate, you would change the value to an integer representing the number of columns to
move the samples to the right. For example if nColumnOffset = 6, the PCR reactions will be set
up starting in Column 7.
The last four arguments describe the structure of the input data (Master Worklist) file. The
defaults correspond to the Illumina Sample Sheet as exported by Illumina Experiment Manager
File Version 4 (software version 1.3).
Figure 32. NexteraRackSetup.csv
Upon running the protocol, all of the rack, plate, and reagent information is synthesized, the reagent
pipetting worklists get generated, and pipetting of indexes is executed accordingly. A view of one of

Application Guide- Nextera DNA Library Preparation on the NGS Express
PerkinElmer 45
the pipetting worklists is shown below.
Figure 33. Example of reagent pipetting worklist generated in protocol 2, showing the choice of destination plate and well
location for each index adapter to be pipetted.
Nextera4_NormalizationandPoolingThe normalization and pooling protocol utilizes the “DNA Normalization for EnSpire” option, which is
included in the NGS Express.
1. The sample information must be provided in the form of a worklist file. The file must be in csv
format with data located as described in the Normalization & Pooling Worklist section on page
17. If you wish to change the default file structure (such as location of data within the file) you
can edit the “Create Normalization Worklist” node of the protocol in WinPREP.

Application Guide- Nextera DNA Library Preparation on the NGS Express
PerkinElmer 46
The protocol “Nextera 4_Normalization and Pooling” has been configured for Nextera libraries, as
shown in Figure 34 below.
Figure 34. Normalization parameter settings as shown in WinPREP.
If you need to change any of these parameters, you will need to edit the protocol in WinPREP. The
dialog box is found in the WinPREP protocol under step 1, “Set Normalization Parameters”. Open this
procedure and click Edit Parameters to open the dialog box shown in Figure 34.
For additional details on the normalization function, see document no. 8860023B, “JANUS Nucleic Acid
Normalization for EnSpire” which is available on the normalization installer CD (P/N 8701686/B).

Application Guide- Nextera DNA Library Preparation on the NGS Express
PerkinElmer 47
Appendix
Labware&ConsumablesOrderingInformation
TipsDisposable Tip‐ 25ul, Clear, Sterile Filter Tips, qty 960 PerkinElmer 6000689
Disposable Tip‐ 175ul, Clear, Sterile Filter Tips, qty 960 PerkinElmer 6000685
PlatesandLidsStorPlate, PP, V‐bottom, 450 µL capacity, pack of 50 PerkinElmer 6008290
Hard‐Shell PCR plates, 96‐well, pack of 50 Bio‐Rad HSP‐9631
Lid‐ Universal, polystyrene, pack of 100 Seahorse (various distributors) 200856‐100
Tubes,Caps,andRacksScrew‐cap microtube, 2.0 mL capacity Sarstedt 72.609.711
Screw cap microtube, 0.5 mL capacity Sarstedt 72.730.711
Caps for microtubes, blue Sarstedt 65.716.723
Cooling Block, 24 positions, for 1.5 mL tubes Eppendorf 022510240

Application Guide- Nextera DNA Library Preparation on the NGS Express
PerkinElmer 48
ListofFilesInstalled/ModifiedbytheNexteraOptionInstallerNew files have been added to the Bin, Labware Files, and Performance Files folders.
Option‐SpecificProtocolFilesAdded: Nextera 1_Tagmentation and SPRI
CleanUp.MPT
Nextera 2_PCR Setup with Dual Indexing.MPT
Nextera 3_Post‐PCR CleanUp.MPT
Nextera 4_Normalization and Pooling.MPT
Illumina Sample Sheet‐ 24 Samples.csv
NexteraNormPoolingWorklist.csv
NexteraRackSetup.csv ReportConfig_Nextera1.csv ReportConfig_Nextera2.csv ReportConfig_Nextera3.csv ReportConfig_Nextera4.csv
CommonFilesAdded: AlignTips_NGS.MPT
DailyClean_NGS.MPT
FlushSysLiq_NGS.MPT
JAA AlignTips_NGS.MPT
JAA Clean_NGS.MPT
JAA Prime_NGS.MPT
PickupTipTest_NGS.MPT
Random XY Test_NGS.MPT
Left Rack Test.MPT
Versa Mover Library.MPT
Versa Mover Test.mpt
NGS.s NGSReporting.s NGS Express_Normalization.MPT
NGS Express_SPRI PCR CleanUp.MPT
NGS Express_SPRI Size Selection.MPT
NGSExpress_NormalizationWorklist.csv
ReportConfig_NGS_Normalization.csv
ReportConfig_NGS_PCR_Cleanup.csv ReportConfig_NGS_SizeSelection.csv NGS_PCR 96_WinPREP_Template.MPT
NGS_StorPlate 96‐V_WinPREP_Template.MPT
NGSReportingTemplate.MPT
LabwareFiles‐Consumables: IsoRack 24 Custom_Nextera DNA Sample
Prep.lab
NGS Reagent Rack Custom_Nextera DNA
Sample Prep (left edge).lab
Bio‐Rad Hard‐Shell 96 PCR for Magnet.lab
Bio‐Rad Hard‐Shell 96 PCR Skirted (blue).lab
Invitrogen MicroAmp 96‐PCR with base.lab
IsoRack 24‐well Cooling Block with 1500uL tube.lab
IsoRack 24‐well Cooling Block with 2000uL tube.lab
IsoRack 24‐well Cooling Block with 500uL tube.lab
IsoRack 24‐Well Custom Cooling Block.lab
PCR tubes in Bio‐Rad Hard‐Shell Plate.lab PerkinElmer StorPlate 96‐V (PP).lab
Seahorse 10mL Square 24‐Pyr (PP).lab
175ul Conductive Filter RoboRack Tips.lab 175ul Non Conductive Filter RoboRack Tips.lab
25ul Conductive Filter RoboRack Tips.lab 25ul Non Conductive Filter RoboRack Tips.lab
LabwareFiles‐CustomHardware: Inheco 96‐PCR Plate Support 33mm.lab
Inheco 96‐V Plate Support.lab Rack_18 Custom Microtube+Trough (left
edge).lab
VM_Base_LiftSupport.lab
VM_Base_PlateSupport.lab
VM_Inheco96PCR_LiftSupport.lab
VM_Inheco96PCR_PlateSupport.lab
VM_Inheco96V_LiftSupport.lab
VM_Inheco96V_PlateSupport.lab
VM_Mag_LiftSupport.lab
VM_Mag_PlateSupport.lab
VM_VersaLift.lab

Application Guide- Nextera DNA Library Preparation on the NGS Express
PerkinElmer 49
Washbowl+Tip Chute (left edge).lab
Tip alignment plate.lab
PlateMoverFiles‐DoNotEdit: HeaterToMagnet.csv
HeaterToReaction.csv HeaterToReactionLidatHeater.csv LidFromMagnetToHeater.csv
LidFromMagnetToHeaterDropLid.csv
LiftZ20.csv LiftZ24.csv LowerZ24.csv
MagnetToWorking.csv
ParkLidHeaterToMagnet.csv
ParkLidHeaterToWorking.csv
ParkLidMagnetToWorking.csv
ParkLidWorkingToMagnet.csv
PlateMagnetToHeaterLidatR.csv
ReactionToHeater.csv ReactionToHeaterLidOn.csv ReactionToMagnet.csv
PerformanceFilesThe following performance files have been created expressly for the NGS Express and were validated
with 250‐µL syringes.
AMPure XP_Blowout_DT‐175uL_S250.prf
AMPure XP_Blowout_DT‐25uL_S250.prf
AMPure XP_Waste_DT‐175uL_S250.prf
Ethanol 80%_Blowout_DT‐175uL_S250.prf Ethanol 80%_Waste_DT‐900uL_S250.prf
Glycerol 10%_Blowout_DT‐25uL_S250.prf Glycerol 10%_Waste_DT‐25uL_S250.prf
PEG 20%_Blowout_DT‐25uL_S250.prf PEG 20%_Waste_DT‐175uL_S250.prf
PEG 20%_Waste_DT‐900uL_S250.prf
Water_Blowout_DT‐175uL_S250.prf
Water_Blowout_FT_S250.prf
Water_Waste_DT‐175uL_S250.prf
Water_Waste_DT‐900uL_S250.prf
Water_Waste_FT_S250.prf
ModifiedWinPREPFilesThe following common WinPREP files (in Bin unless otherwise noted) are modified by the installer, and
are backed up prior to modification:
Categories.xml
CleanupActivityList.xml
DiagnosticTests.csv LabwareImagesInfo.XML
MaintainActivityList.xml
Msl.ini
MSLEXT.csv
C:\Packard\JANUS\InstrumentLayout\InstrumentLayout.xml