Newton Apple MessagePad Handbook
196
Apple MessagePad Handbook K
Transcript of Newton Apple MessagePad Handbook

Apple MessagePadHandbook
K

C O N T E N T S
Communications regulation information v
Preface
Safety, care, and maintenance vii
1 Quick Start 1
Setting up your MessagePad and finding out about thecapabilities of your MessagePad.
2 Learning the Basics 13
Learning the essentials for using your MessagePad.
3 Writing and Drawing 41
Learning about handwriting, drawing, and recognition.
4 Using the Notepad 81
Creating notes and other stationery.
5 Using the Name File 93
Keeping track of names, addresses, and telephone numbers.
6 Using the Date Book: Calendar and To Do List 113
Recording and viewing your appointments and calendar notes,setting alarms, and keeping your to-do list.
7 Managing and Using Items in the Extras Drawer 151
Learning how to manage the Extras Drawer and use built-inapplications stored there.
8 Organizing and Finding Information 209
Organizing your information into folders and searching forinformation.
iii
K Apple Computer, Inc.© 1995 Apple Computer, Inc. All rights reserved. 1 Infinite Loop Cupertino, CA 95014-2084(408) 996-1010
Every effort has been made to ensure that the information in this manual is accurate.Apple is not responsible for printing or clerical errors.
Apple, the Apple logo, LaserWriter, the light bulb logo, Macintosh, MessagePad,Newton, and StyleWriter are trademarks of Apple Computer, Inc., registered in the U.S. and other countries.
Adobe, Adobe Illustrator, Adobe Photoshop, and PostScript are trademarks of AdobeSystems Incorporated, which may be registered in certain jurisdictions.
Centronics is a registered trademark of Centronics Data Computer Corporation.
DeskJet, HP, and LaserJet are registered trademarks of Hewlett-Packard Co.
Duracell is a registered trademark of Duracell, Inc.
Epson is a registered trademark of Seiko Epson Corp.
Exposure is a registered trademark of Preferred Publishers, Inc.
Microsoft is a trademark, and Windows is a registered trademark, of Microsoft Corp.
QuarkXPress is a registered trademark of Quark, Inc.
SuperPaint is a registered trademark of Aldus Corporation
Tektronix is a registered trademark of Tektronix, Inc.
This product is powered by Advanced RISC Machine’s high performance, power efficient, 32-bit RISC microprocessor.
For more information call:m USA: 408-399-5199m UK: 44-223-400400m Japan: 81 44 850 1301m email [email protected]
Simultaneously published in the United States and Canada.
Mention of third-party products is for informational purposes only and constitutesneither an endorsement nor a recommendation. Apple assumes no responsibility withregard to the performance or use of these products.

Communications regulation information
FCC statement
This equipment has been tested and found to comply with the limits for a Class Bdigital device in accordance with the specifications in Part 15 of FCC rules. Seeinstructions if interference to radio or television reception is suspected.
Radio and television interference
The equipment described in this manual generates, uses, and can radiate radio-frequency energy. If it is not installed and used properly—that is, in strict accordancewith Apple’s instructions—it may cause interference with radio and televisionreception.
This equipment has been tested and found to comply with the limits for a Class Bdigital device in accordance with the specifications in Part 15 of FCC rules. Thesespecifications are designed to provide reasonable protection against such interferencein a residential installation. However, there is no guarantee that interference will notoccur in a particular installation.
You can determine whether your computer system is causing interference by turning itoff. If the interference stops, it was probably caused by the computer or one of theperipheral devices.
If your computer system does cause interference to radio or television reception, try tocorrect the interference by using one or more of the following measures:
m Turn the television or radio antenna until the interference stops.
m Move the computer to one side or the other of the television or radio.
m Move the computer farther away from the television or radio.
m Plug the computer into an outlet that is on a different circuit from the television or radio. (That is, make certain the computer and the television or radio are on circuits controlled by different circuit breakers or fuses.)
If necessary, consult an Apple-authorized service provider or Apple. See the serviceand support information that came with your Apple product. Or, consult anexperienced radio/television technician for additional suggestions. You may find thefollowing booklet helpful: Interference Handbook (stock number 004-000-00493-1).This booklet, prepared by the Federal Communications Commission, is available fromthe U.S. Government Printing Office, Washington, DC 20402.
Important Changes or modifications to this product not authorized by AppleComputer, Inc., could void the FCC certification and negate your authority to operatethe product.
v
9 Routing Information 219
Learning to print, fax, beam, and send electronic mail.
10 Using Assist and Acessing On-Screen Help 249
Learning how to speed up your work and access the on-screen help.
11 Using Storage and Application Cards 259
Inserting, ejecting, and using storage and application cards.
12 Backing Up and Restoring Information 271
Making a backup of the information in your MessagePad andrestoring information.
13 Viewing Newton Books 277
Viewing, printing, and faxing Newton books using yourMessagePad.
14 Troubleshooting 291
Solutions to common problems.
Appendix A 307
Removing and replacing batteries.
Appendix B 317
Service and support information.
Appendix C 321
eWorld setup and registration.
Appendix D 327
Compatibility information.
Index 331
iv
P R E F A C E
Safety, care, and maintenance
As you work with your Apple MessagePad device, followthese safeguards to protect yourself and the device. Failureto comply with these safeguards may cause injury, andresulting damage to the device may not be covered bywarranty.
Screen care
m Take care not to break the glass screen. Don’t drop theMessagePad. Don’t subject it to any strong impact. Don’t putit into your back pocket because, if you sit on it, the glassmay break.
m Don’t press too hard on the screen when writing, drawing,or tapping. Don’t forcefully jab or hit the screen.
m Be careful not to scratch the screen. Use only the pen thatcame with your MessagePad. Don’t use ink pens or any othersharp object.
m Clean the screen frequently to ensure that dust and grit donot build up on the surface. Clean the screen only with a softdry cloth—such as a cloth made for cleaning eyeglasses. Donot use solvents or eyeglass cloths that may contain solvents.
viivi
This product was tested for FCC compliance under conditions that included the use ofApple peripheral devices and Apple shielded cables and connectors between systemcomponents. It is important that you use Apple peripheral devices and shielded cablesand connectors between system components to reduce the possibility of causinginterference to radios, television sets, and other electronic devices. You can obtainApple peripheral devices and the proper shielded cables and connectors through anApple-authorized dealer. For non-Apple peripheral devices, contact the manufactureror dealer for assistance.
DOC statement
DOC Class B Compliance This digital apparatus does not exceed the Class B limits forradio noise emissions from digital apparatus as set out in the interference-causingequipment standard entitled “Digital Apparatus,” ICES-003 of the Department ofCommunications.
Observation des normes—Classe B Cet appareil numérique respecte les limites debruits radioélectriques applicables aux appareils numériques de Classe B prescritesdans la norme sur le matériel brouilleur : “Appareils Numériques”, NMB-003 édictéepar le ministre des Communications.

Heat, moisture, dust
m Keep the device away from extreme heat. Don’t leave it onthe dashboard or in the trunk of a car or near a heater. Heatcan damage the screen, the plastic case, and internal parts ofthe MessagePad.
m Use the device only in environments where the temperatureis between 32° F and 104° F (0° C and 40° C). Temperaturesoutside that range can cause the MessagePad to malfunction.Extreme heat or cold can damage the MessagePad.
m Don’t leave the device any place that is extremely dusty,damp, or wet. Dust and moisture can damage theMessagePad and cause it to malfunction.
m If the MessagePad gets wet, remove the main batteries andallow the unit to dry for at least 24 hours.
m If the MessagePad gets wet while it’s plugged in with an optional power adapter, unplug the power adapter beforeyou do anything else.
ix
Pen care
m Keep the tip of the pen that came with your MessagePadclean by occasionally rubbing it gently with a soft dry cloth.Do not use solvents.
m Don’t use the pen that came with your MessagePad to pressthe Reset button. Using your MessagePad pen only to writeon the screen will prolong the life of the pen and that of the screen. Use a pencil or a ballpoint pen to press the Reset button.
Cleaning the case
m Clean the plastic surfaces only with isopropyl alcohol(rubbing alcohol) and a soft dry cloth. Do not use other solvents.
Cables, ports, card slot
m Never leave the card slot empty. If you don’t have a storageor application card in it, leave the plastic protection cardinstalled.
m Keep the ports covered when you’re not using them.
m Make sure your MessagePad is off before you connect serialor LocalTalk cables.
m Do not use cables that are frayed or otherwise damaged.Hold a cable only by its connector—the plug, not the cord—when connecting or disconnecting it.
m Never force a connector into a port if the connector and portdo not join easily. Make sure that the connector matches theport and that it’s properly aligned before you attach it.
viii

Removing and replacing the lid
m You can use your MessagePad with the lid in place or youcan remove the lid.
To remove the lid, pull it straight out from the hinge (whereit attaches to the MessagePad case). Hold the lid close to the hinge. You may have to pull hard.
To replace the lid, snap the hinges straight into place.
x

This section gives you a brief tour of the MessagePad withthe Newton 2.0 operating system and the capabilities it offers you.
This chapter will help you with the following:
m A quick look at the different parts of your MessagePad
m Setting up your MessagePad
m Using the Newton Tour and Handwriting Instructor to learnmore about your MessagePad
Before you set up your MessagePad, it is important for youto learn the different parts of your MessagePad.
1
C H A P T E R
1
Quick Start

Setting up your MessagePad
Setting up your MessagePad involves installing the batteries,removing the pen, opening the lid, turning on theMessagePad, and adjusting the screen contrast. You shouldalso go through the Setup application.
To set up your MessagePad, follow these steps:
1 Make sure the screen lid is closed.
2 Slide off the battery compartment cover.
3Quick Start
A quick look
The bottom of your MessagePad is where you installbatteries and lock or unlock a card you’ve inserted.
2 Chapter 1

4 Slide the battery compartment cover back on.
5 Remove the pen from your MessagePad.
Push and release the end of the pen to take it out.
5Quick Start
3 Install four AA batteries in the battery compartment. Makesure you position each battery’s + and – terminalsaccording to the diagram in the compartment (the batteriesdon’t all have the same orientation). If you install thebatteries wrong way, they may leak and damage yourMessagePad. Leaking batteries may be hazardous.
The tab that you pull to remove the batteries should stickout as shown above the topmost battery.
Alkaline batteries last about two to three weeks in normaluse. NiCd batteries last approximately one to two weeks.
A rechargeable battery pack is also available as an option, oryou can use a power adapter. For more information, see theOptional note later in this chapter.
4 Chapter 1

7 Slide the on/off switch down and let it go. The switch slidesback to its original position. This turns the MessagePad on (if it was off) and off (if it was on).
8 Make sure the MessagePad is turned on. If you don’t seeanything on the screen, adjust the screen contrast by turningthe thumbwheel on the side of the MessagePad.
7Quick Start
6 Open the screen lid by pressing in (not down) on the latchat the bottom of the MessagePad and lifting the lid.
The lid is hinged at the top and snaps in place on the back ofyour MessagePad.
6 Chapter 1

Going through the Setup application
After you turn your MessagePad on for the first time youshould see the Welcome screen for the Setup application.You may have to adust the screen contrast by turning thethumbwheel on the side of the MessagePad.
The Setup application lets you personalize your MessagePad.It also allows you to align the pen correctly with the screenand to set the date and time, along with your handwritingstyle.
m When you see the Welcome screen, follow the instructionson each screen.
m If the Welcome screen doesn’t appear, press the Resetbutton (inside the battery compartment) gently with a pencilor ballpoint pen. Don’t use the pen that came with yourMessagePad to press the Reset button.
9Quick Start
Optional: If you purchased the Newton power adapter, youcan connect it to your MessagePad and plug it in to conservebattery power. The power adapter plugs into the portbeneath the rubber flap marked with the ¯ icon.
An optional rechargeable battery pack is also available. Whenthe optional battery pack is installed and the power adapteris plugged in, the battery pack recharges.
Learning how to tap
One of the main ways you interact with your MessagePad isby using the pen that came with your MessagePad to tapitems, such as buttons or words, or to write information.
To tap, you simply touch the pen to the screen. If you wantto tap a button or word, you can tap on any part of thebutton or word. Don’t press too hard on the screen whenwriting, drawing, or tapping.
8 Chapter 1

m Tap Extras ´ to open the Extras Drawer, tap the foldertab and, in the list that appears, tap Setup. Tap Tour.
The Handwriting Instructor
The Handwriting Instructor is an interactive tutorial thatteaches the basics of writing on your MessagePad. Knowingthe best writing techniques is important for using yourMessagePad effectively. The Handwriting Instructor is a goodway for you to become knowledgeable about recognitionand about setting writing and drawing preferences in theMessagePad.
You can access the Handwriting Instructor two ways:
m If you go through the Newton Tour, tap the HW Instructorbutton Ó on the last screen.
m Tap Extras ´ to open the Extras Drawer, tap the foldertab, then tap Setup. Tap HW Instructor Ó.
11Quick Start
Pressing the Reset button resets the operating system to aclean state and turns the MessagePad on again. (This will noterase any information stored in the MessagePad’s internalmemory.) The Welcome screen for Setup should nowappear. Follow the instructions on each screen.
On the last screen of the Setup sequence, you can changeany information you entered. If you want to learn moreabout the features of your MessagePad, it’s best to tap Tourand go through the Newton Tour. Tap Done if theinformation you entered is correct and you don’t want toview the tour.
Learning more about your MessagePad
Your MessagePad has a tour and a handwriting instructor tohelp you learn more about using your MessagePad.
The Newton Tour
The Newton Tour is a brief tour that highlights the featuresand capabilities of your MessagePad. It’s a good way for youto become oriented with the MessagePad.
You can access the Newton Tour two ways:
m Tap Tour on the last screen of the setup sequence.
10 Chapter 1

Writing Practice
Once you’ve gone through the Handwriting Instructor, youmay want to practice writing. You can use Writing Practice tosee how well the MessagePad is interpreting your writing. Bypracticing in this area, you may be able to change yourwriting style to improve text recognition.
To access Writing Practice:
m Tap Extras ´ to open the Extras Drawer, tap the foldertab, then tap Setup. Tap Writing Practice W.
You’re now ready to explore your MessagePad. To learnmore about the basic features of your MessagePad and howto use them, take a few minutes to go through the nextchapter, “Learning the Basics.”
12 Chapter 1

This chapter is a short tutorial that will help you learn theessentials for using your MessagePad.
The chapter is divided into six parts:
Part 1: Navigating in the MessagePad
Part 2: Entering information
Part 3: Routing information
Part 4: Organizing and finding information
Part 5: Getting help within the MessagePad
Part 6: Using storage cards
13
C H A P T E R
2
Learning the Basics

15Learning the Basics
Part 1: Navigating in the MessagePad
In this part, you will find out how to move around todifferent areas of your MessagePad.
The Backdrop
Turn on your MessagePad (if it isn’t already on). When youfirst receive your MessagePad, the Notepad is set as thedefault backdrop application, or background, that you seewhen you close all other applications. You can set anotherapplication as the backdrop. For more information, see“Creating a Backdrop” in the chapter “Managing and UsingItems in the Extras Drawer.”
The Notepad
You use the Notepad for writing and drawing. The Notepadalways contains at least one item—and it can contain manyitems. You go to different items by tapping the arrowbuttons ˛ in the center at the bottom of the screen.
An item can be bigger than the screen. You also use thearrow buttons to scroll through a large item.
For more detailed information on the Notepad, see thechapter “Using the Notepad.”
14 Chapter 2
Along the separator barthere are useful buttonsand information
Along the status barthere are useful buttons
Status bar
Separator bar
Information on thesebuttons is on thefollowing pages
Shows the current time anddate; tap here to go to Clockand set a daily alarm, minutetimer, and time and date
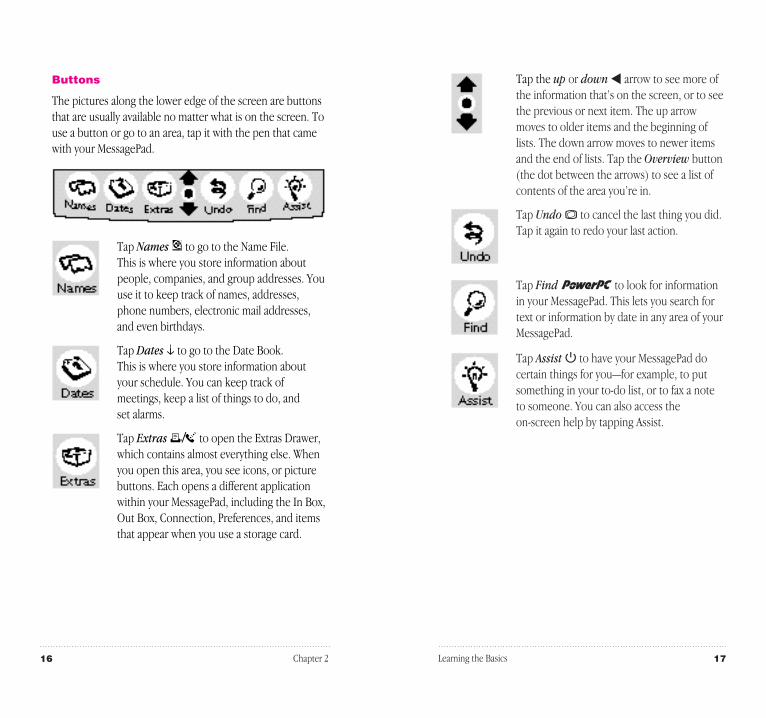
Tap the up or down ˛ arrow to see more ofthe information that’s on the screen, or to seethe previous or next item. The up arrowmoves to older items and the beginning oflists. The down arrow moves to newer itemsand the end of lists. Tap the Overview button(the dot between the arrows) to see a list ofcontents of the area you’re in.
Tap Undo fl to cancel the last thing you did.Tap it again to redo your last action.
Tap Find † to look for informationin your MessagePad. This lets you search fortext or information by date in any area of yourMessagePad.
Tap Assist ® to have your MessagePad docertain things for you—for example, to putsomething in your to-do list, or to fax a noteto someone. You can also access the on-screen help by tapping Assist.
17Learning the Basics
Buttons
The pictures along the lower edge of the screen are buttonsthat are usually available no matter what is on the screen. Touse a button or go to an area, tap it with the pen that camewith your MessagePad.
Tap Names ‰ to go to the Name File. This is where you store information aboutpeople, companies, and group addresses. Youuse it to keep track of names, addresses,phone numbers, electronic mail addresses,and even birthdays.
Tap Dates ¬ to go to the Date Book. This is where you store information aboutyour schedule. You can keep track ofmeetings, keep a list of things to do, and set alarms.
Tap Extras ´ to open the Extras Drawer,which contains almost everything else. Whenyou open this area, you see icons, or picturebuttons. Each opens a different applicationwithin your MessagePad, including the In Box,Out Box, Connection, Preferences, and itemsthat appear when you use a storage card.
16 Chapter 2

Picture button
This button looks different depending on the item, such as anote or weekly meeting. When you tap the button a slipappears showing information about the item. For example, ifyou tap the small picture button for a note, you see a slipthat has the note’s title, date, and the time the note wascreated. You also see the amount of storage space the noteuses, and where the note is stored in memory.
Folder button F
The Folder button allows you to file items from the Notepad,name cards, and icons in the Extras Drawer into folders thatyou create and name.
Folder tab
The folder tab tells you in which folder an item is located.Tap it to select another folder to view.
19Learning the Basics
There are some other buttons and symbols that you’ll seeoften while using your MessagePad. Some of these arelocated at the bottom of the screen, along the status bar,while others are located toward the top of the screen, nearthe separator bar.
18 Chapter 2
This is an example of a folder tab
Tap the Information button to accesson-screen help and to set preferences
Tap the New button tocreate a new item
Tap the Keyboardbutton to “type” on anon-screen keyboard
Tap the Folder button tofile this item in a folder
Tap the Routing buttonto print, fax, beam,send as electronic mail,duplicate, or delete an item
Tap the Recognitionbutton to control theway your MessagePadrecognizes yourhandwriting anddrawing
Tap this picture button to seemore information on an item
Tap the folder tab to change which folder you are currently viewing
This shows the title or thedate the item was created

Checkbox
Checkboxes are found in several places in the MessagePadand can be used in different ways. Checkboxes are used toidentify completed items or tasks in the Checklist stationeryin the Notepad and the To Do List in the Date Book. In theoverview of some applications, you can use checkboxes toselect multiple items for routing or filing.
Close box X
You can leave or close any application or slip by tapping the X in the lower-right corner. This is called the close box.If you get lost, tap every close box you see until the Notepadon the screen.
Preferences π
There are two types of preferences—global and local. Globalpreferences affect your MessagePad and all applications ingeneral, such as sound effects and styles. For moreinformation on these, see the section “Prefs” in the chapter“Managing and Using Items in the Extras Drawer.” Localpreferences relate only to a particular application. For moreinformation, see the chapter for an application.
21Learning the Basics
Routing button µ
The Routing button allows you to route, or send items. Every item in the Notepad, Name File, and Date Book hasthis button. You can use the Routing button to print, fax,beam, or mail the item. You can also use this button todelete or duplicate an item.
Information button ;
The Information button provides immediate access to theon-screen help and preferences related to the applicationyou are viewing.
Recognition button Ú
This button controls the way your MessagePad recognizesyour writing and drawing and allows you to set yourhandwriting preferences. You use this control to have yourhandwriting recognized as text or leave it as “electronic ink,”or ink text. You also use this control to smooth the lines andcurves in your drawings, or leave them as they are.
Keyboard button _
The Keyboard button displays an on-screen keyboard thatyou can use to enter information. The default keyboard is Typewriter, but several other keyboards are alsoavailable–Numeric, Phone, and Time/Date. To use another keyboard, tap the Keyboard button while the on-screen keyboard is displayed and in the list that appears,tap your choice.
New button
The New button allows you to create something new such asa new note, name card, or meeting.
20 Chapter 2

Part 2: Entering information
In this part, you’ll learn about the different ways to enterinformation and the different areas in your MessagePadwhere you can enter information.
Ways to enter information
Before you enter information, you must tap the pen on the screen where you want the information to be placed. A caret ^ appears and shows you where the information willbe placed.
There are several ways to enter information into yourMessagePad.
m One way is to write with the pen that came with yourMessagePad.
m A second way is to use an on-screen keyboard. To do this,tap the Keyboard button _ at the bottom of the screen. A standard typewriter keyboard appears; use the pen to tapout information on the keyboard.
23Learning the Basics
Slips
When you go to different areas of your MessagePad or whenyou tap buttons, a slip may appear. Slips are boxes with grayborders where you enter specific information. For example,when you tap the Folder button F to file an item in theNotepad, a slip appears for you to “fill out.”
If a slip is small, you can move it around on the screen. To move a slip, tap and hold the pen on the white dot at thetop of the slip, called the picture hanger, then drag the slipwhere you want.
Sound effects
If you have sound effects selected in Prefs, you hear varioussound effects when you perform certain actions, such astapping a button. These sounds are random and the toneshave no particular significance.
22 Chapter 2
Tap and hold the pen onthe picture hanger tomove the slip around onthe screen

A list appears showing different types of items you cancreate. For instance, in the Notepad you can create a newitem using different types of stationery, such as notes(similar to lined paper), checklists, and outlines. Once youchoose the type of item you want to use or create, a newitem or slip appears for you to enter information.
In some applications, such as the Notepad, you may be ableto add information to an existing item. To do this, tap theAdd button at the bottom of the screen and, from the listthat appears, tap your choice.
Some areas, such as the Name File, Date Book, and TimeZones, also have a Show button you use to displayinformation in different formats.
Erasing information
You can quickly erase information by “scrubbing” it. Toscrub, draw a zigzag line over the words or phrase. Go backand forth at least four times. For more information, see thechapter “Writing and Drawing.”
25Learning the Basics
To use a different keyboard, tap the Keyboard button _a second time and from the list that appears, tap yourchoice. When you are finished using the on-screen keyboard,tap X on the bottom right to close it.
m Another convenient way to enter or choose information isusing the diamond. Tap a diamond u or the word next to it to see a list of choices. Then tap your choice in the list that appears.
Places to enter information
There are various places to enter information in yourMessagePad, including the Notepad, Name File, and Date Book.
m To get to the Notepad, leave all other areas by tapping everyX, or close box. If Notepad is not the default backdrop, it willappear as an icon in the Extras Drawer.
m To go to the Name File or Date Book, tap Names ‰ or Dates¬ at the bottom of the screen.
In each of these areas, you create a new item (such as a note,name card, or appointment) by tapping the New button.This button is located near the bottom of the screen.
24 Chapter 2
Tap here to add informationto an existing item
Tap here to seedifferent views in theapplication you are in
This is a diamond

To route an item right away
To route an item right away, open the routing slip and fillout the necessary information. Then tap the button at thelower-right corner of the slip next to the X (it will be namedafter the action you are performing, such as Print). In the listthat appears, tap Now.
To route an item at a later time or date
To route an item later, open the routing slip and fill out thenecessary information, then tap the button at the lower-rightcorner of the slip next to the X (it will be named after theaction you are performing, such as Print). In the list thatappears, tap Later. The item is then placed in the Out Box inthe Extras Drawer until you go there and send it.
To route an item that is in the Out Box
To route an item that is stored in the Out Box, tap Extras´, tap the folder tab and, from the list that appears, tapUnfiled Icons. (If you filed the Out Box in another folder, tapthat folder’s name.) Tap Out Box o, and a list of itemswaiting to be routed is shown. Tap the checkbox next to theitem you want to route. (To route more than one item, tapthe checkbox next to each item you want to route.) TapSend and, in the list that appears, tap your choice.
27Learning the Basics
Part 3: Routing information
Every item in the Notepad, Name File, and Date Book has aRouting button µ. You use this button to route, or send,information to another place. For instance, you can print, fax, or beam items or send them via electronicmail. You can also duplicate or delete items using theRouting button.
The Routing button resembles an envelope. When you tap it,a list appears. Tap your choice and a routing slip appears.You then enter information on the slip to tell yourMessagePad what to do with the item. The return address isat the top left and the place, or address, where the item isgoing is in the center.
Once you have filled out the routing slip, you are ready tosend the item. You may have to connect your MessagePad to the appropriate device, such as a printer or fax modem,before you route items.
For more information, see the chapter “RoutingInformation.”
26 Chapter 2
Example of a routing slip for an item that is being printed

Tap the name of the folder you want to see. The first item inthat folder is displayed on the screen. To see other items inthe folder, tap the up and down arrows ˛. To see a list of allitems in that folder, tap the Overview button ˛.
To create folders
You can have global and local folders. Global folders appearin all applications, while local folders appear only in aparticular application.
To create a folder, tap the Folder button and, in the slip thatappears, tap New. A slip appears. Write the name of thefolder on the blank line. The folder’s name can consist of upto 30 characters and/or numbers.
Tap X to close the slip. The folders are automaticallyupdated and the folder slip appears with the name of thenew folder.
To rename or delete an existing folder
You can edit the name of an existing folder or delete a folderat any time. Tap the Folder button F. A folder slip appears. Tap the button next to the name of the folder you want tochange, then tap Edit Folder. A slip appears with the name of the folder shown.
To change the name, scrub it out and rewrite it. For moreinformation on entering information, see the chapter“Writing and Drawing.”
29Learning the Basics
Part 4: Organizing and findinginformation
Your MessagePad allows you to file information in existingfolders or in folders that you create using the Folder button.You can also find information within many areas of yourMessagePad by tapping Find †.
Organizing information in your MessagePad
Some areas in the MessagePad have a Folder button. You usethis to file items into a folder. You can file Notepad items,name cards, and icons that are in the Extras Drawer.
To file an item
While you are viewing the item you want to file, tap theFolder button F. A slip appears. Tap the name of the folderwhere you want to file the item, then tap File.
To view items in a folder
Go to the area you want to view, such as the Notepad. Tapthe folder tab.
28 Chapter 2
Tap the folder tab to choose whichfolder you want to view
Tap this checkbox to create a local folder in the Name File

For more information on organizing and searching forinformation, see the chapter “Organizing and FindingInformation.”
Part 5: Getting help within the MessagePad
In this section, you’ll learn the different ways you can gethelpful information within the MessagePad. You will also findout how to get your MessagePad to help you perform tasks.
Accessing on-screen help
On-screen help is available at any time on the MessagePad.It contains basic information on how to perform varioustasks.
You can access the on-screen help several ways:
m Tap Extras ´ to open the Extras Drawer. Tap the foldertab, and in the list that appears, tap Help. Then tap the Helpicon h.
m Tap the Information button ; in an application and in thelist that appears, tap Help. You see help for that applicationor topic.
31Learning the Basics
To delete the folder, tap Delete. A slip appears asking if youreally want to delete the folder. Tap OK.
Tap X to close the slip. A slip appears asking if you want tochange the name of the folder. Tap OK to change the name.The folder name is updated and the revised folder nameappears in the folder slip.
Finding information in your MessagePad
You can find text information or information by date bytapping the Find button †, located near thebottom of the screen. You can then look for informationeverywhere in your MessagePad, in the current application,or in selected areas that you choose.
To find information, tap the Find button †. In theslip that appears, tap Look for and and tap your choice.Enter the information you want to find on the line after“Look for.”
Tap where you want to find the information—Everywhere, in the application you are currently viewing, or Selected. (Ifyou choose Selected, a list appears of the various areas youcan search. Tap the desired areas; checkmarks appear nextto them.) Tap Find †. Items that match are listedon the screen. To see a specific item, tap it in the list. If onlyone item is found, you go directly to that item.
30 Chapter 2
This is an example of aFind slip in the Notepad

m Tap Assist ®, and in the slip that appears, tap the How Do I?button.
Using on-screen help
The on-screen help is organized by topics and subtopics.The topics cover main areas, while the subtopics list specific tasks.
To find out how to do a specific task, tap a topic. A list ofsubtopics appears beneath it. Tap one of those to see theinformation.
When you are finished viewing a subtopic, tap Topics to go back to the list of topics, or tap X to leave the on-screenhelp.
33Learning the Basics32 Chapter 2

Part 6: Using storage cards
You can use PCMCIA Type I and Type II cards with yourMessagePad. There are three kinds of cards: applicationcards (also called titles), storage cards (which add morestorage space to your MessagePad), and special-purposecards (such as modems).
When you insert a card, make sure you push it all the way into its slot and lock the locking tab. When you lock thelocking tab, the MessagePad takes a few moments toexamine the card. When it’s ready to use the card, a slipappears with information about the card.
Important You should never use or store the MessagePadwhile the card slot is empty. If you get any dirt or dust in thecard slot the system may fail. After removing a card, alwaysinsert another one, or insert the protective plastic card thatcame with your MessagePad.
Warning You may remove cards while the MessagePad ison. However, don’t remove a card while the MessagePad isstill using it, or you may lose the information stored on thecard. Wait 5–10 seconds after storing or using something onthe card before you remove it. If you remove a card, you mayhave to reinsert it temporarily.
35Learning the Basics
Using Assist to perform tasks automatically
Your MessagePad can help you work more quickly andeffectively by automatically performing some tasks for you.These include faxing, scheduling, mailing, finding text,printing, and entering items in your To Do list.
Tap Assist ®. A slip appears.
Tap the diamond u next to the word Please and tap a choicefrom the list or write your request on the line. Then tap Do.A slip appears where you enter the appropriate information.When you are done, tap the button near the bottom of thescreen to perform the action (tap Schedule, for instance, toschedule a meeting).
For more information, see the chapter “Using Assist andAccessing On-Screen Help.”
34 Chapter 2

5 Push the card all the way in to make sure it’s connectedproperly, then lock the card in the slot by pushing thelocking tab.
Application cards
Application cards contain software in a variety of categories,including financial tools, business and personal productivity,travel guides, reference information, and games.
To use an application card:
1 Insert the card. Make sure you push it all the way into its slotand lock the locking tab.
Wait for a slip to appear indicating that the MessagePad hasexamined the card. Tap X to close the slip.
2 Tap Extras ´ to open the Extras Drawer. An icon for theapplication appears in the Extras Drawer.
3 Tap the icon and follow the instructions that came with theapplication.
37Learning the Basics
To remove the plastic card that came with your MessagePadand insert an application card or storage card:
1 Unlock the card slot by pushing down the locking tab.
2 Release the card by pushing the release lever, which pushesthe card out of the slot.
3 Take the card out.
4 Insert the new card in the card slot. The card fits only oneway; don’t force it.
36 Chapter 2

Storage card choices
When you insert a storage card, a slip appears showing youinformation on the card.
m To store new information automatically, check “Save newinfo and packages on this card.”
m To make a copy of all the information stored in the internalmemory of your MessagePad, tap Backup. This does notback up information or application packages that are storedon the card.
m If there is a backup on the card, a Restore button appears.Tapping Restore allows you to restore information from thecard to your MessagePad.
Using a card from an earlier system software version
You can use storage cards in your MessagePad that wereformatted with an earlier version of the Newton operatingsystem. You can choose to mount the card as read-only or toconvert the information on the card.
39Learning the Basics
Storage cards
You can use storage cards to store new information, transferinformation, and make a backup copy of all the informationin your MessagePad.
You can use any Apple storage card with the MessagePad.Other cards may also work, including SRAM (static random-access memory) cards that have their own batteries. Askyour Apple-authorized dealer for more information.
Preparing a new storage card
Storage cards that are new or that have been used ondevices other than the MessagePad need to be erased andformatted before you can use them.
If you insert such a card, the MessagePad displays thismessage.
Warning Tapping Erase deletes all the information on the card.
Tap Erase if you want to use the card in your MessagePad.After the MessagePad erases and formats the card, a boxappears with a number of choices.
38 Chapter 2
This shows the status of the card lock switch (lockedor unlocked)

Important Some of the application information developedfor earlier versions of the Newton operating system may notbe compatible. If you experience problems, check with thesoftware publisher for information about an upgrade.
Insert the card. A warning slip appears.
m If you tap “Mount read-only,” you can read and use someinformation, and you’ll still be able to use the card in thedevice that created the information.
m If you tap Convert, the card will be reformatted and anyinformation on the card will be converted. This will erase allinformation on the card.
Warning After converting a card, you won’t be able to useit with a device that uses an earlier version of the Newtonoperation system unless you reformat the card. All of theinformation on the card will be erased.
40 Chapter 2

41
C H A P T E R
This chapter teaches you how best to write and draw on theMessagePad. There are several methods and tools you canuse to enhance recognition, correct mistakes, andmanipulate text and drawings. Go through the chapter tofind the best tools to suit your needs.
If you want to go through a brief tutorial about writing, youcan use the HW Instructor. To access this, tap Extras ´to open the Extras Drawer, tap the folder tab and in the listthat appears, tap Setup. Then tap HW Instructor Ó.
3
Writing and Drawing

Your MessagePad is also sensitive to the way your writing isspaced. In normal writing or text there is a clear differencebetween the amount of space separating letters within wordsand the amount of space separating words themselves. Themore distinct and consistent you make this difference whenyou write on your MessagePad, the better recognition tendsto be. A control slider in the Handwriting Recognition Slipallows you to let your MessagePad know whether yourwriting tends to be widely spaced or more tightly crowded.Experimenting with this setting may result in improvedaccuracy.
For most people, the MessagePad tends to deliver the bestoverall recognition accuracy if you select “Printing” as yourhandwriting style. This means you must print using separateletters only. You must take care to lift the pen betweencharacters when you write.
Some people naturally join letters occasionally (that is, theydon’t lift the pen) even when they print. If this is your style,or if you mix cursive and printed styles when writing, youshould select “Cursive” as your handwriting style. Both styleswill then be recognized, even when mixed, although overallaccuracy may be somewhat decreased.
43Writing and Drawing
About recognition
This section offers a general description of handwritingrecognition used in the MessagePad and discussses some ofthe factors that may affect how well the MessagePadrecognizes your handwriting.
When you write on your MessagePad, you write charactersusing the normal printed or cursive alphabets, as well asnumbers, punctuation, and gestures. Often you’ll writeEnglish words, but not always.
The MessagePad tries to detect when you are writing Englishwords, abbreviations, and common expressions. It uses alarge dictionary to aid in recognizing them faster and moreaccurately. When you write things that are neither simplenumbers nor English words (such as initials, dates,telephone numbers, file names, or serial numbers) yourMessagePad tries to match the characters you write to thecommon patterns used for things such as dates and phonenumbers. If no such pattern can be discerned, yourMessagePad does its best to recognize the charactersindividually.
Generally speaking, your MessagePad is somewhat better atrecognizing poorly formed characters if they are written inEnglish words (or other items that are in the MessagePad’sdictionary). When you’re writing things such as license platenumbers, you’ll find that extra care in forming yourcharacters neatly contributes to improved accuracy.
Your MessagePad distinguishes characters and words in partby detecting pauses in your writing. It’s a good idea whenwriting to complete each character without pausing too longbefore it’s finished, and similarly to complete your wordswithout pausing in the middle.
42 Chapter 3
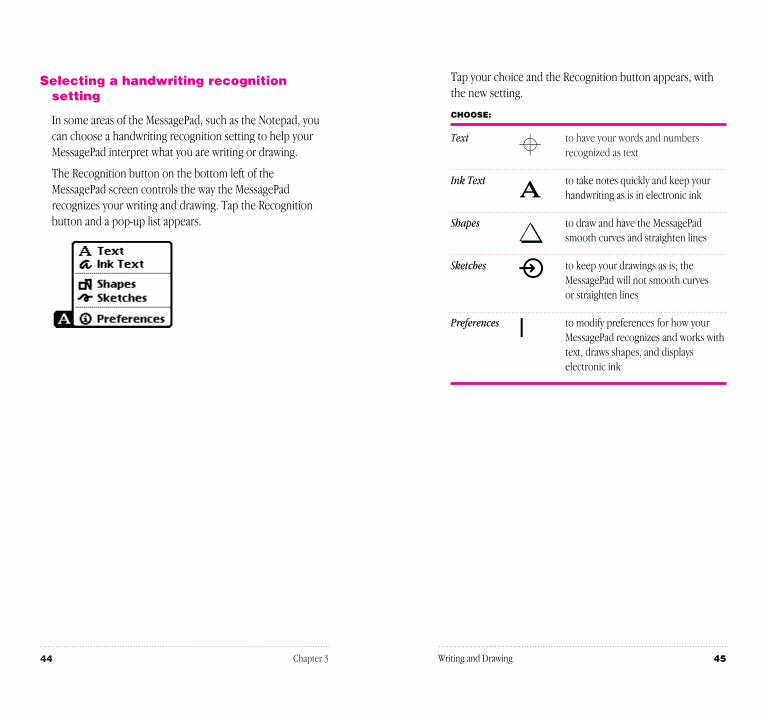
Tap your choice and the Recognition button appears, withthe new setting.
CHOOSE:
Text A to have your words and numbersrecognized as text
Ink Texta
to take notes quickly and keep yourhandwriting as is in electronic ink
ShapesS
to draw and have the MessagePadsmooth curves and straighten lines
Sketches ) to keep your drawings as is; theMessagePad will not smooth curves or straighten lines
Preferencesi
to modify preferences for how yourMessagePad recognizes and works withtext, draws shapes, and displayselectronic ink
45Writing and Drawing
Selecting a handwriting recognitionsetting
In some areas of the MessagePad, such as the Notepad, youcan choose a handwriting recognition setting to help yourMessagePad interpret what you are writing or drawing.
The Recognition button on the bottom left of theMessagePad screen controls the way the MessagePadrecognizes your writing and drawing. Tap the Recognitionbutton and a pop-up list appears.
44 Chapter 3

Setting your handwriting recognitionpreferences
Using the Recognition button, you can also choosePreferences. This lets you set how your MessagePadrecognizes your handwriting.
To set your handwriting preferences:
1 Tap the Recognition button Ú and, in the list that appears,tap Preferences.
2 In the slip that appears, select the appropriate settings, thentap X to close the slip. The settings are discussed in furtherdetail in the following pages.
Handwriting styles: Printing and Cursive
The MessagePad uses different methods to recognizeseparate, disconnected printing and cursive writing that hasconnected letters. It is important that you choose ahandwriting style and write that way.
You can switch back and forth between handwriting styles asyour needs change. But you need to write consistently in theway you’ve chosen. When you change your writing style, youmust also change the style setting in the HandwritingRecognition slip.
The highest overall recognition accuracy is achieved whenyou print, using letters that are separate and not connected.
m Select Printing as your style when you write manyexpressions that are not whole words or commonabbreviations. If you select Printing, you must lift the pen upbetween characters so that characters are separated andeasily distinguishable from one another.
m Select Cursive as your style when you write and some or allof the characters are joined, or connected.
47Writing and Drawing46 Chapter 3
Tap here to set additionalwriting options or to usethe default settings
Tap here to align thepen and screen
Tap this checkbox to setyour MessagePad for aguest user
Tap the pen on theslider and move it to setyour word spacing
Tap a button next to Printing orCursive to select your writing style

Some options may or may not appear, depending on whichwriting style you selected—Printing or Cursive. Tap an optionin the list and in the slip that appears, enter the appropriateinformation. The various options are described below.
Text Editing Settings
Use this to set the scaling of ink text, whether or not toinsert words at the caret, and to automatically add newwords to your word list.
m Ink Text Scaling—Tap the diamond u and, in the list theappears, tap No Scaling, 75% Scaling, or 50% Scaling.
m If the checkbox next to “Insert new words at caret” ischecked, you can tap the pen on the screen to place thecaret ^. Anything you write on the screen will then be placedat the caret. If the checkbox is not checked, your writingappears wherever you wrote it on the screen.
m If the checkbox next to “Add new words to Personal WordList” is checked, any words the MessagePad interprets thatare not already in a word list, (such as someone’s last name)are automatically placed in your personal word list.
49Writing and Drawing
Word spacing
When you write, your MessagePad must decide whichgroups of pen strokes to cluster together into words, alongwith what words these strokes represent.
You can improve your MessagePad’s ability to distinguishboundaries between words by writing your characterssomewhat close together and your words somewhat farapart. Use the slider in the Handwriting Recognition slip toset how far apart your words are. This will help yourMessagePad recognize words more easily.
Tips on word spacing
m If your MessagePad tends to run your words or expressionstogether, try writing them farther apart.
m If your MessagePad tends to break apart your words orexpressions, you should write the characters closer together.
m If you want to deliberately combine two separate words intoone, write the second word extremely close to the first word.
m If you want to separate a string of characters into two words,be sure to leave extra space between the two expressions.
Other options
You can set additional preferences by using the Optionsbutton. Tap the Options button and a list appears.
48 Chapter 3

“Learn my handwriting” is used to help your MessagePadlearn your handwriting. If this option is selected (checked),the MessagePad accumulates information about your writingstyle based on whether recognition was correct or not. Theletter forms in Letter Shapes will change as the MessagePadlearns how you write. The accuracy of recognition willimprove if your handwriting is consistent. If “Learn myhandwriting” is not checked, the MessagePad will not learnyour handwriting and recognition will be the same as whenyou first started to use your MessagePad.
Letter Shapes
This option only appears if you selected Cursive as yourwriting style. You use Letter Shapes to help the MessagePadimprove handwriting recognition by identifying letter shapesyou don’t use.
Your settings do not prevent the MessagePad fromrecognizing the letters if you write them in other ways. Asthe MessagePad learns to recognize your handwriting, itchanges the Letter Shapes settings automatically.
51Writing and Drawing
Handwriting Settings
This option only appears if you selected Cursive as yourwriting style. Use this to add letter-by-letter recognition tothe MessagePad and to indicate whether you want theMessagePad to learn your handwriting.
Letter-by-letter recognition controls the MessagePad’s abilityto recognize text that is not in its dictionary. If a word is notin the dictionary, the MessagePad uses letter-by-letterrecognition to interpret the word. If letter-by-letterrecognition is turned off (not checked) and the word is notfound in the dictionary, the MessagePad displays the wordclosest from the dictionary.
For example, if you wrote the word “snapko,” theMessagePad would only be able to recognize that word ifletter-by-letter recognition is selected, since “snapko” is notin the dictionary.
“Letter-by-letter in fields” controls recognition in the NameFile and in fields in other applications. “Letter-by-letter innotes” controls recognition in the Notepad. Some people getgood results if they turn letter-by-letter recognition off innotes but on in fields. Fields typically have more unusualwords in them and it’s usually better to have letter-by-letterturned on. Since most words in the Notepad are wordsfound in the dictionary, it is sometimes better not to select“Letter-by-letter in notes.”
50 Chapter 3
Tap a letter or characterto go to it
Tap the arrows to goto the next character
Tips for better handwriting recognition
Writing is one of the most convenient ways to putinformation into your MessagePad. There are several tips tokeep in mind while you are writing. Most of these tips arecommon sense, and they’ll help the MessagePad interpretyour handwriting more accurately.
m Write at an even pace.
Don’t pause in the middle of a word. Finish what youwrite–don’t go back to a word to change it until you’vefinished writing it.
m You don’t have to wait for a word to be recognized tocontinue writing.
m Write simply and neatly.
Avoid adding flourishes, like serifs, to your letters. Don’twrite at too much of an angle or slant your characters. Closeyour letters properly.
m Exaggerate the space between words, but not betweenletters.
This helps your MessagePad determine when one word endsand another one begins.
m Write capital letters and tall letters (such as t and l) so theyare twice as tall as small letters.
m Correct as you go.
Write a few words, then wait while your MessagePadrecognizes them. If there are mistakes, go back and fix themone at a time. If you don’t, your MessagePad will assume theword is correct and will adjust its recognition accordingly.
53Writing and Drawing
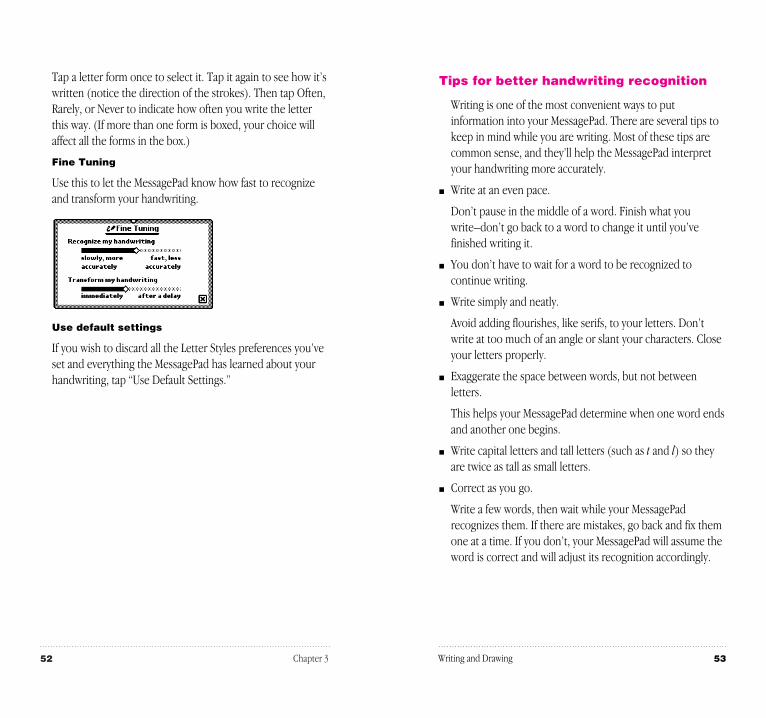
Tap a letter form once to select it. Tap it again to see how it’swritten (notice the direction of the strokes). Then tap Often,Rarely, or Never to indicate how often you write the letterthis way. (If more than one form is boxed, your choice willaffect all the forms in the box.)
Fine Tuning
Use this to let the MessagePad know how fast to recognizeand transform your handwriting.
Use default settings
If you wish to discard all the Letter Styles preferences you’veset and everything the MessagePad has learned about yourhandwriting, tap “Use Default Settings.”
52 Chapter 3

m If you want to separate a string of characters into two words,be sure to leave extra space between the two expressions.
Using the on-screen keyboard
The MessagePad has four on-screen keyboards: a typewriterkeyboard and three types of numeric keyboards (forentering calculations, telephone numbers, and time/date).
Displaying and moving a keyboard
There are several ways to view the on-screen keyboard.
m Tap the Keyboard button _ near the bottom of the screen.Tap the Keyboard button again and in the list that appears,tap the type of keyboard you want to use.
m Tap a misrecognized word twice, then tap the keyboard atthe bottom of the list that appears.
m Tap twice anywhere you’re writing, such as in a note, on aDate Book page, or in blanks you need to fill, and a keyboardwill appear.
To move a keyboard, tap and hold down the pen on thepicture hanger on the keyboard slip and drag to it where youwant the keyboard on the screen.
Changing the layout of the typewriterkeyboard
If you want a different text keyboard arrangement, use theLocale preferences to change the keyboard layout.
1 Tap Extras ´ to open the Extras Drawer.
55Writing and Drawing
m When dotting your i’s, keep the dot close to and above the i.Make sure it doesn’t look like an accent mark.
m When you cross t’s, make sure you don’t cross any other tallletters. Make the cross horizontal, not slanted.
m Don’t crowd words at the edge of the screen.
m Make parentheses bigger than tall letters.
m Keep punctuation close to the word. If your MessagePadturns a punctuation mark into a letter, you’re leaving toomuch space between the word and the punctuation.
m Write colons and semicolons from top to bottom and makethem half as tall as capital letters.
m Write exclamation points the same size as tall letters.
m Make slashes long and slanted.
m If your MessagePad is having problems recognizing certainletters or characters, go to Letter Styles and identify theletter forms you use.
More on word spacing
You can improve your MessagePad’s ability to distinguishboundaries between words by writing your characterssomewhat close together and your words somewhat farapart.
m If your MessagePad tends to run your words or expressionstogether, try writing them farther apart.
m If your MessagePad tends to break apart your words orexpressions, you should write the characters closer together.
m If you want to deliberately combine two separate words intoone, write the second word extremely close to the first word.
54 Chapter 3

To enter an accent mark above or below a letter, tap theaccent mark first and then tap the letter. You can alsoexpand an expression into a word with accented characters.For more information, see the section “Using the Word List.”
Erasing text and drawings
You erase text and pictures by “scrubbing” them out with azigzag line.
m The zigzag must go back and forth at least four times.
m You can draw the zigzag in any of four orientations.
m Draw the zigzag with sharp corners, making each segmentabout the same length.
m Don’t draw the zigzag so it loops or crosses over itself.
m The zigzag lines should go well above and below the word ordrawing.
57Writing and Drawing
2 Tap the folder tab and in the list that appears, tap Setup s.(If you filed Prefs in another folder, tap that folder’s name.)
3 Tap Prefs π and, in the slip that appears, tap Locale ©.
4 Tap Keyboard, then tap the keyboard layout you want.
Entering symbols and other specialcharacters
To use accent marks, you must use the keyboard. YourMessagePad does not recognize handwritten accent marks.
Display the typewriter keyboard on the screen. Then tap theOption key, or the Option key and then the Shift key, to seethe available special characters (such as symbols, accentmarks, and accented letters).
56 Chapter 3

Correcting a misinterpreted word
There are several ways you can correct words that theMessagePad has misinterpreted.
One letter corrections
If only one letter is wrong, write the correct letter over theincorrect one. Correct only one letter at a time.
Scrubbing
You can “scrub” the word out to erase it and then rewritethe word. To scrub, draw a zigzag line over the word orphrase. Make sure the line goes back and forth at least fourstrokes. For more information, see “Erasing Text andDrawings” earlier in this chapter.
Using the pop-up list
You can double-tap on a word. A list appears.
59Writing and Drawing
YOU CAN SCRUB OUT
a single word
a group of words
a whole shape
part of a shape
selected text and drawings (start the zigzag outside the selection to avoid moving it)
a single letter (make sure you scrub overthe letter at least four times)
58 Chapter 3
Keyboard button
Corrector button
Try letters appears if you select Cursive as your writing style

Selecting text and drawings
To select an item, hold down the pen near the item until aheavy mark appears under the pen (the MessagePad makes asqueak), and draw the mark over or around the item. If the sound effects in Prefs π are turned off, you won’t hear the squeak.
To select words, draw the highlighting mark across them.
To select text on more than one line, draw the highlightingmark from the beginning of the first word to the end of thelast word.
To select several whole lines of text, draw the highlightingmark vertically through the lines of text.
To select lines in a shape, draw the highlighting mark alongthe lines.
61Writing and Drawing
m If the correct word is in the list, tap it.
m If the correct word is not in the list, you can tap theCorrector button L or the Keyboard button _ to rewrite or retype the word. If you selected Cursive as yourhandwriting style, you can also tap Try letters to let theMessagePad try to recognize the word again, using letter-by-letter recognition.
If you tap the Corrector button L in the list, you can writedirectly over a letter to change it. You can also tap once onthe letter and in the list that appears, tap a choice—thelower- or upper-case version of the existing letter, Delete, orInsert. You can also tap a blank space to add punctuationmarks or another word, as well as to delete or insert a space.
If you tap the Keyboard button _ in the list, the on-screenkeyboard appears. Tap out the word.
If you tap “Try letters,” the MessagePad uses letter-by-letterrecognition instead of its dictionary to interpret the word. Itthen displays its best guess. This is useful if you don’t haveletter-by-letter recognition turned on and you wrote a wordthat is not likely to be in the dictionary. It is also helpful ifyou wrote a word and the MessagePad guessed a number, orif you wrote an unusual combination of letters and numbersthat wasn’t recognized.
60 Chapter 3
Tap the arrows to move tothe next character

2 Double-tap in the selection.
Your MessagePad places an arrow on each word as it isrecognized and then converts the entire phrase. If words aremisinterpreted, you can use the correction techniquesdescribed earlier in this chapter.
Using the caret ^
You can insert a word or phrase at a specific place on thescreen using the caret. If you choose to enter text without acaret, the text is placed in the general area where you wrote.
To use the caret, follow these steps:
1 Tap the Recognition button Ú and in the list that appears,tap Preferences π.
2 Tap Options and in the list that appears, tap Text EditingSettings.
3 Tap the checkbox next to “Insert new words at caret.”
4 Go back to the item where you want to insert text.
5 Tap the pen where you want the word(s) to go on thescreen.
A caret appears where the words will be placed.
63Writing and Drawing
To select groups of text or drawings, circle them with thehighlighting mark. The MessagePad puts a box around thethings you select.
To deselect an item, tap the pen anywhere outside theselection.
Converting your handwriting to text
If you wrote something using the Ink Text or Sketchesrecognition setting, you can convert the ink text to text atany time.
m To convert a single word, double-tap on it. An arrow appearsas it is converted.
m To convert more than one word, follow these steps:
1 Select the words or phrases you want to convert to text.Hold down the pen near the item until a heavy mark appearsunder the pen (the MessagePad makes a squeak), and drawthe mark over or around the items.
Your writing is surrounded by a black box.
62 Chapter 3

Moving text or drawings
You can move words or drawings around on the screen. Tomove an item, you first have to select it. Hold down the pennear the item until a heavy mark appears under the pen (theMessagePad makes a squeak), and draw the mark over oraround the word.
To move an item around on the screen, hold the pen insidethe selection, and move the pen to where you want the item.
To move an item to a different application:
1 Go to the item and select it.
2 Hold the pen inside the selection and move it to the top,left, or right of the screen.
The item becomes a miniature box and moves to the“clipboard.” You’ll see the box on the right edge of the screen.
65Writing and Drawing
6 Write the new word or words anywhere on the screen and itis placed at the caret.
Copying text or drawings
You can duplicate a drawing or words and phrases. First youmust select them. Hold down the pen near the item until aheavy mark appears under the pen (the MessagePad makes asqueak) and draw the mark over or around the item.
Then, copy the selected item by tapping twice inside theselection, keeping the pen down on the second tap. Thenmove the pen to move the duplicate away. You can also usethis technique to copy items in the clipboard.
64 Chapter 3
When you hold the penon the selection, theentire item appears foryou to move around onthe screen
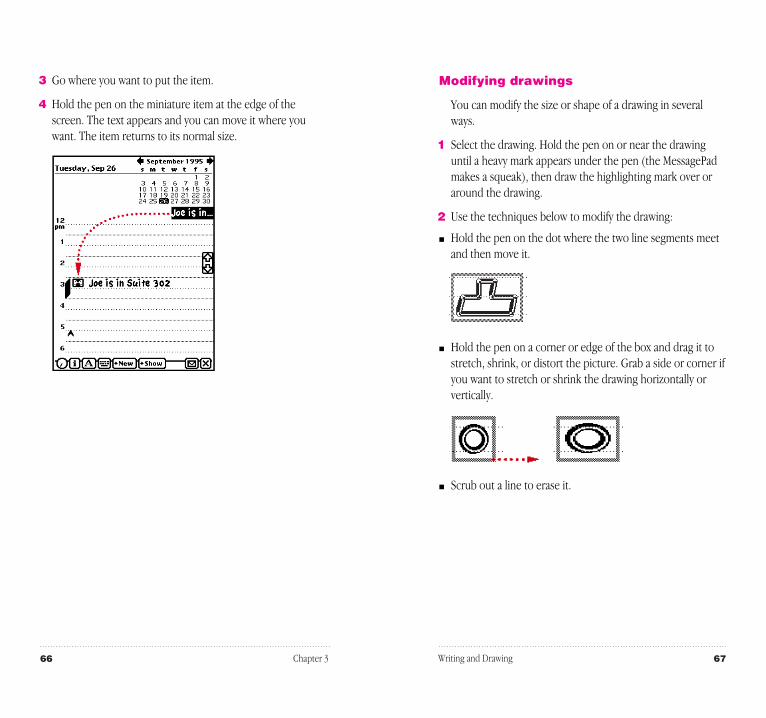
Modifying drawings
You can modify the size or shape of a drawing in severalways.
1 Select the drawing. Hold the pen on or near the drawinguntil a heavy mark appears under the pen (the MessagePadmakes a squeak), then draw the highlighting mark over oraround the drawing.
2 Use the techniques below to modify the drawing:
m Hold the pen on the dot where the two line segments meetand then move it.
m Hold the pen on a corner or edge of the box and drag it tostretch, shrink, or distort the picture. Grab a side or corner ifyou want to stretch or shrink the drawing horizontally orvertically.
m Scrub out a line to erase it.
67Writing and Drawing
3 Go where you want to put the item.
4 Hold the pen on the miniature item at the edge of thescreen. The text appears and you can move it where youwant. The item returns to its normal size.
66 Chapter 3

Adding punctuation
Sometimes punctuation marks can be misinterpreted byyour MessagePad. You can quickly add punctuation marks byusing the caret or the on-screen keyboard.
To add punctuation marks using the caret:
1 Tap the pen where you want the punctuation mark toappear. A caret appears.
2 Tap the caret.
In the slip that appears, tap the punctuation mark you want.
The punctuation mark you selected is placed at the caret.
You can also use the punctuation slip to add carriage returnsand spaces to phrases and to delete characters.
69Writing and Drawing
Formatting text and drawings
Inserting space in text and joining words
To insert space in text, draw carets and lines as shown. Thetop of the caret should line up with the baseline of theletters. Draw the caret in one stroke; do not use a separatestroke for each side of the caret.
It’s best if you aim the tip of the pen at the baseline. If youare joining words, the top of the caret should be at thebaseline.
Inserts space for a single letter
Joins two words
Inserts space for a word (the longer theline, the bigger the space)
Inserts space for a single line
Inserts space for several lines (the longerthe vertical line, the bigger the space)
Breaks the line and inserts space for several lines
Another way to insert a space in text is to use the built-incaret. Tap the caret where you want to add a space or acarriage return.
68 Chapter 3
Tap here to delete a space
Tap here to add acarriage return
Tap here to add a space

Changing the styles and line thicknessesof text and drawings
You can change the style and size of text and the thicknessof lines and shapes.
1 Select the text, line, or shape you want to change. (If youwant to set styles before you write or draw anything, makesure nothing is selected.)
Hold down the pen near the item until a heavy mark appearsunder the pen (the MessagePad makes a squeak), and drawthe mark over or around the word.
2 Tap Extras ´ to open the Extras Drawer.
3 Tap the folder tab and in the list that appears, tap UnfiledIcons. (If you filed Styles in another folder, tap that name.)
4 Tap Styles º.
5 In the slip that appears, tap your choices.
If you want to move the Styles box, hold the pen on thepicture hanger and drag it.
71Writing and Drawing
Capitalizing words
To change how a word is capitalized, select the word byholding down the pen near the item until a heavy markappears under the pen (the MessagePad makes a squeak),and draw the mark over or around the word. Then draw avertical line over the word as shown.
draw from bottom to top Ò; becomes “Apple”
draw from top to bottom ¬; becomes “apple”
draw from bottom to top Ò; becomes “APPLE”
draw from top to bottom ¬; becomes “apple”
When you’re changing the initial capitalization of a word,make sure that there is no space selected before the word. If there is, the first letter of the word does not change.
70 Chapter 3

Indenting and using tabs
You can indent a paragraph after it’s written. (Make sureyou’ve selected “Insert new words at caret” in the TextEditing Settings within the Handwriting Recognition slip.(See the section “Setting Your Handwriting Preferences”earlier in this chapter.) Tap the pen at the beginning of thesentence. The caret appears. Tap the Keyboard button _(make sure the Typewriter keyboard is selected), then tapthe tab key on the keyboard.
Using the word list
When you write text or convert ink text, the MessagePadrecognizes the words by comparing the words you write tothe word list in the MessagePad. The MessagePad canrecognize words more easily if they are in its word list.Words in the word list cannot exceed 30 characters.
To see your personal word list, follow these steps:
1 Tap the Keyboard button _.
The keyboard appears. (If the Typewriter keyboard is notshown, tap the Keyboard button again and in the list thatappears, tap Typewriter.)
73Writing and Drawing
6 You can make the following choices:
m Font—Choose Fancy, Simple, or Casual (only applicable toText)
m Size—Choose 9, 10, 12, or 18 point size (only for Text andInk Text)
m Style—Choose Plain, Bold, or Underline
m Pen—Choose a pen width of 1, 2, 3, or 4 point size
7 When you are finished making your selections, tap X to closethe slip.
Changing paragraph margins
1 Select the paragraph by drawing a selection box around it.
Hold down the pen near the item until a heavy mark appearsunder the pen (the MessagePad makes a squeak), and drawthe mark over or around the paragraph.
Note: Selecting text by drawing a line through it does notcreate a selection box. You must select by drawing aroundthe paragraph.
2 Hold the pen on the left or right edge of the box and move it.
72 Chapter 3

The capitalization you use when you add a word determineshow it’s capitalized when the MessagePad recognizes theword the next time you write it. Words entered in lowercaseletters (for example, “jet”) will be capitalized according tocontext. Words entered with letters capitalized (for example,“Jet,” or “JET”) will always be capitalized as they are in the list.
To add a word to the list, tap it out on the keyboard, thentap Add.
m If the word is not already in the MessagePad’s list, it is addedto your personal word list.
m If the word is in the MessagePad’s list, a message appearstelling you that the word is already in the list. (It may be thatyou typed a capitalized or lower-case version of the word.)Tap Yes to add the word or No not to add it.
To remove a word in the list, go to it in the list and tap it.Then tap Remove. The word is automatically deleted.
Teaching the MessagePad to recognizeabbreviations
You can write an abbreviation or shortened form of a wordand have the MessagePad recognize it as the expanded word.For instance, if you write the word “example” a lot, you canchoose to write “ex” and have the MessagePad automaticallyrecognize this as “example.” You can also use this method tointerpret and expand a word with accented characters.
You can expand a word in two ways. You can add the wordto your word list and expand it at the same time. Or, you canexpand a word or expression that is already in your word list.
75Writing and Drawing
2 Tap the Dictionary button d in the lower-left corner of the on-screen keyboard.
The word list appears.
Viewing the word list
You can review the words you’ve added to the word list, sothat you can add more words or remove words you nolonger use.
To review the word list, tap a letter along the bottom of thelist to go to that letter in the list. You can also tap the up anddown arrows ˛ to go through the list.
Adding or removing words in the list
You should add words that you are likely to use often, andremove words that you don’t use often. Adding more than athousand words or so may cause memory problems.
74 Chapter 3
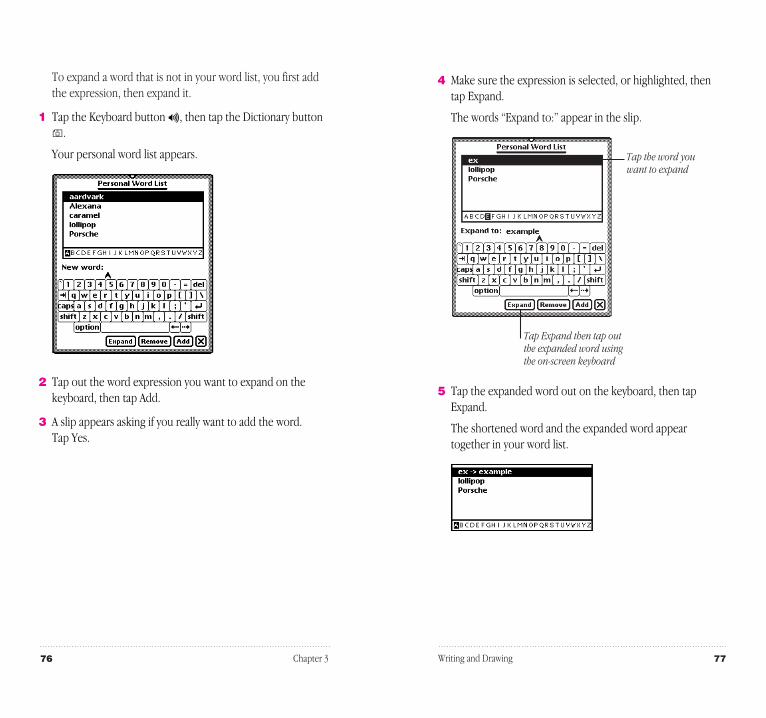
4 Make sure the expression is selected, or highlighted, thentap Expand.
The words “Expand to:” appear in the slip.
5 Tap the expanded word out on the keyboard, then tapExpand.
The shortened word and the expanded word appeartogether in your word list.
77Writing and Drawing
To expand a word that is not in your word list, you first addthe expression, then expand it.
1 Tap the Keyboard button _, then tap the Dictionary buttond.
Your personal word list appears.
2 Tap out the word expression you want to expand on thekeyboard, then tap Add.
3 A slip appears asking if you really want to add the word. Tap Yes.
76 Chapter 3
Tap the word you want to expand
Tap Expand then tap outthe expanded word usingthe on-screen keyboard

The shortened word and the expanded word appeartogether in your word list.
Setting up a guest user
You can set up your MessagePad for a guest user and havethat person enter preferences for his or her writing style.
To do this, tap the Recognition button Ú, and in the list thatappears, tap Preferences π.
In the slip that appears, tap the checkbox next to “Configurefor guest user.” Have the guest user set his or her writingpreferences in the slip while it’s still open.
When the guest user is finished using your MessagePad, tapthe checkbox next to “Configure for guest user” to deselectit. All handwriting settings now revert to your settings.
For additional help and practice
To get information on writing while you are using theMessagePad, you can go through the Handwriting Instructor.This interactive tutorial helps you learn about writing on theMessagePad. To see how well your MessagePad recognizesyour handwriting you can use Writing Practice.
To use the Handwriting Instructor or Writing Practice:
1 Tap Extras ´ to open the Extras Drawer.
2 Tap the folder tab, and in the list that appears, tap Setup s.
3 Tap HW Instructor Ó or Writing Practice W.
79Writing and Drawing
To expand a word that is already in your list:
1 Tap the Keyboard button _, then tap the Dictionary buttond.
Your personal word list appears.
2 Go to the word in the list, tap it, then tap Expand.
2 Tap out the expanded word on the on-screen keyboard.
3 Tap Expand.
78 Chapter 3
Tap the word you want to expand
Tap Expand, then tap out the expanded word using the on-screen keyboard

The Notepad is like a long roll of paper—it always contains atleast one item. You can use it to write and draw notes andother items.
The Notepad is initially set as the default application, orbackdrop, that you see when you close all other applications.When the Notepad is the backdrop, it is always open, thoughit may be hidden underneath other things. To see theNotepad, you must close everything else by tapping all theX’s you see.
Creating a new item in the Notepad
You can create several types of items, called stationery.
m Note—Use this to write or draw.
m Checklist—Use this to create a list of items you can check off.
m Outline—Use this to outline reports or documents.
If you have other applications installed, you may see othertypes of stationery as well.
81
C H A P T E R
4
Using the Notepad

If you are writing, tap the pen where you want your words toappear on the screen. A caret appears. You can now writeanywhere on the screen and the information is placed at thecaret. If you are drawing, your drawings appear whereveryou draw them on the screen.
Creating and using a checklist or outline
The checklist stationery can be used to create a list of entriesthat you can check off as you complete them. The outline issimilar to the checklist, but you don’t have the ability tocheck off entries.
When you create a new checklist or outline, a small circleappears on the left. This is where your first entry will beplaced. The checklist also includes a checkbox to the left ofthe circle.
83Using the Notepad
To create a new item:
1 Tap all X to return to the Notepad.
If you’ve changed the backdrop to an application other thanthe Notepad, tap Extras ´ to open the Extras Drawer,then tap Notes.
2 Tap New.
A list appears showing the different types of items, orstationery, you can create.
3 Tap the type of item you want to create.
A blank note, checklist, or outline appears.
You are now ready to write or draw. To learn how to enterinformation into the various types of stationery, refer to oneof the next sections, “Creating a Note” or “Creating andUsing a Checklist or Outline.”
To create a new item of the same type as the item you areviewing, draw a horizontal line across the screen. A new itemappears.
Creating a note
Tap the Recognition button Úand from the list that appears,tap your choice—Text, Ink Text, Shapes, or Sketches.
82 Chapter 4
This is an example of a note
Your handwriting ortext is placed at the caret

2 Tap one of the buttons near the bottom of the screen tocreate another entry.
You can create up to eight levels in the checklist and outline stationery.
85Using the Notepad
1 Enter your first entry by writing with the pen, or double-tapanywhere on the screen to use the on-screen keyboard totap out the entry.
The information is placed at the caret, next to the open circle.
84 Chapter 4
This is an example ofan outline
A new entry is placed at the caret
This is an example of a checklist
Tap this button to create an entry that is at a lower level than the one you just created
Tap this button to create an entry that is at a higher level than the oneyou just createdTap this button to create
an entry that is at thesame level as the oneyou just created

Collapsing and expanding items in a checklist or outline
To collapse an entry and everything beneath it, tap the opencircle next to the entry. The circle is then filled in.
87Using the Notepad
Checking off entries in a checklist
To check off entries completed, tap the checkbox next to anentry. When you check an entry, all entries below thatheading are also checked off.
Moving entries to different levels
You can move an entry to a higher or lower level. Tap thebullet next to the entry and drag it where you want it togo–to the right, or left, up, or down.
86 Chapter 4
When you tap thecheckbox on this entry,the entries below it arealso checked off
The filled-in circle tellsyou that there areentries below this one

Listing all of the items in the Notepad
1 Tap the Overview button ˛.
A list of items appears.
2 Do one of the following:
m To go to a particular item, tap the item.
m To see more of the list (if it’s longer than one screen), tapthe up and down arrows ˛—the down arrow moves youcloser to the end of the list, the up arrow moves you closerto the beginning of the list.
89Using the Notepad
To expand an entry and everything below it, tap the filledcircle. It becomes an open circle and all entries are shown.
Viewing items in the Notepad
To see other items, tap the up and down arrows. All items in the Notepad are sorted by the date and time they werecreated. Tap up to see older notes; tap down to see newer ones.
Viewing a long item
Go to the item you want to see and tap the up or downarrows to move through the item.
88 Chapter 4
This entry is nowexpanded and you can see everythingbeneath it
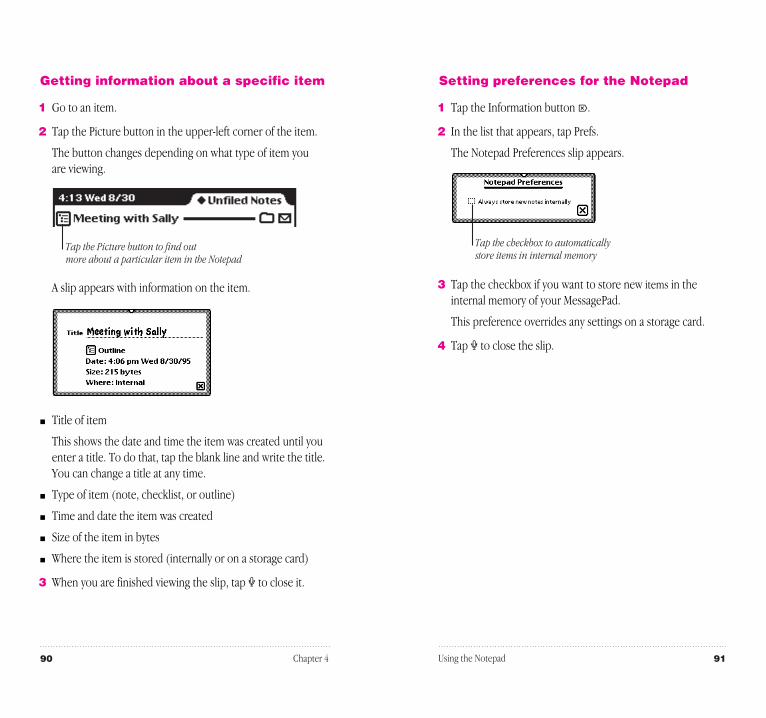
Setting preferences for the Notepad
1 Tap the Information button ;.
2 In the list that appears, tap Prefs.
The Notepad Preferences slip appears.
3 Tap the checkbox if you want to store new items in theinternal memory of your MessagePad.
This preference overrides any settings on a storage card.
4 Tap X to close the slip.
91Using the Notepad
Getting information about a specific item
1 Go to an item.
2 Tap the Picture button in the upper-left corner of the item.
The button changes depending on what type of item you are viewing.
A slip appears with information on the item.
m Title of item
This shows the date and time the item was created until youenter a title. To do that, tap the blank line and write the title.You can change a title at any time.
m Type of item (note, checklist, or outline)
m Time and date the item was created
m Size of the item in bytes
m Where the item is stored (internally or on a storage card)
3 When you are finished viewing the slip, tap X to close it.
90 Chapter 4
Tap the Picture button to find out more about a particular item in the Notepad
Tap the checkbox to automatically store items in internal memory

Faxing, beaming, mailing, duplicating, ordeleting items
1 Go to the item you want to route.
To select more than one item, tap the Overview button ˛and in the list that appears, tap the checkbox next to eachitem you want to route.
2 Tap the Routing button µ.
3 In the list that appears, tap your choice.
For more information, see the chapter “RoutingInformation.”
92 Chapter 4
These two items are selected

You can use the Name File as an address book to storeinformation about people, companies, and group addresses.The Name File contains name cards that you create. Eachcard has information such as name, address, telephonenumbers, electronic mail addresses, and notes. You can alsocreate your own field labels for information.
Tap Names ‰ to go to the Name File. Tap it again to putaway the Name File. You can also tap X in the lower-rightcorner of the Name File to put it away.
93
C H A P T E R
5
Using the Name File
This is a sample name card

5 When you are finished, tap X to close the slip.
If you want to add other information to the card, tap the Add button and see the next section “Adding Information to a Card.”
95Using the Name File
Creating a new name card for a person or company
You can create a name card for a person or a company. To do this, follow these steps:
1 Tap Names ‰ to open the Name File.
2 Tap New.
3 In the list that appears, tap Person N or Company Ç.
4 In the slip that appears, enter the appropriate information.
94 Chapter 5
This is an example of the slip you see for a person
This is an example of the slip you see for a company

4 When you are finished, tap X to close the slip.
To see the information, tap Show and in the list that appears,tap All Info.
Creating custom field labels
You can create your own field labels for name cards if youwant to enter information that is not in the Add pop-up list,such as Department.
1 Go to the card and tap Add.
2 In the list that appears, tap Custom.
A slip appears for you to enter the name of the field.
3 Tap the pen on a blank line.
The caret appears.
4 Enter the name of the new field.
5 Tap X to close the slip.
Another slip appears with the field label you just created.
97Using the Name File
Adding information to a card
You can add information to a name card at any time.
1 Go to the card and tap Add.
The Add button appears in both the Card and All Info views,but not in the Overview.
2 In the list that appears, tap the type of information you wantto add. For each type of card you can add the following typesof information:
Person—company, address, phone, e-mail address, pagernumber, dates, affiliate, and notes
Company—affiliate, address, phone, e-mail, and notes
Group—notes
You can also create custom fields of information for eachtype of card. See the section “Creating Custom Field Labels.”
If you enter a birthday or anniversary in the Dates field for aperson, it is automatically entered as an annual event in theDate Book.
3 In the slip that appears, enter the appropriate information.
96 Chapter 5
Tap Add to enter additional information to a card
Write the new field name here
Tap on another line to create additional field labels
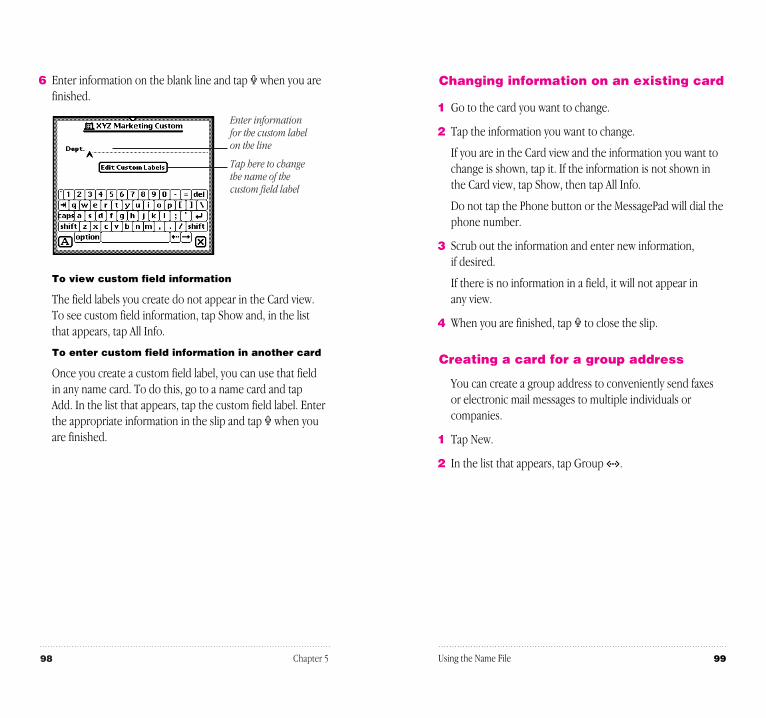
Changing information on an existing card
1 Go to the card you want to change.
2 Tap the information you want to change.
If you are in the Card view and the information you want tochange is shown, tap it. If the information is not shown inthe Card view, tap Show, then tap All Info.
Do not tap the Phone button or the MessagePad will dial thephone number.
3 Scrub out the information and enter new information, if desired.
If there is no information in a field, it will not appear in any view.
4 When you are finished, tap X to close the slip.
Creating a card for a group address
You can create a group address to conveniently send faxes or electronic mail messages to multiple individuals orcompanies.
1 Tap New.
2 In the list that appears, tap Group G.
99Using the Name File
6 Enter information on the blank line and tap X when you arefinished.
To view custom field information
The field labels you create do not appear in the Card view.To see custom field information, tap Show and, in the listthat appears, tap All Info.
To enter custom field information in another card
Once you create a custom field label, you can use that fieldin any name card. To do this, go to a name card and tap Add. In the list that appears, tap the custom field label. Enterthe appropriate information in the slip and tap X when youare finished.
98 Chapter 5
Enter information for the custom label on the line
Tap here to change the name of the custom field label

Viewing the Name File
To see other cards, tap the up and down arrows ˛. Tap upto see cards toward the beginning of the alphabet; tap downto see cards toward the end. You can also tap a lettered tabto see cards within that letter range. If you tap the letteredtab a second time, you will see cards that are filed under thesecond letter on the tab.
1 Tap the Overview button ˛.
A list of your name cards appears.
To see other cards in the folder, tap the up and down arrows ˛ to move through the list.
Changing a card’s appearance
There are several different styles, or layouts, that you canchoose for a name card.
1 Go to the card.
2 Tap Show and in the list that appears, tap All Info.
101Using the Name File
3 In the slip that appears, enter the appropriate information.
4 When you are finished, tap X to close the slip.
The new group address card is added to your Name File.
To add or delete entries in a group address
Go to the group address card and tap the group name or thePicture button next to it.
The group address slip appears. Make any changes and whenyou are finished, tap X to close the slip.
100 Chapter 5
Tap here if you want to change the folder you are viewing
This is the list of cards located in the currently selected folderTap the checkbox to see
the list of only those inthe group address
Use the scroll arrows to move up and downin the list, if necessary
Tap the diamond and then tap Faxes or EMail address
Enter the name of the group here
Tap a checkbox next to an entry to select it
Tap the folder you want to view
Tap the diamond and from the list that appears, tap the number you want in the group address

Adding and viewing notes
You can add a note to a name card and view notes attachedto cards.
To add a note
1 Go to the card.
2 Tap Add and in the list that appears, tap Notes.
3 In the slip that appears, enter your information.
Tap the Recognition button Ú in the lower left if you wantto change the recognition setting for the note. Tap the scrollarrows ≈ on the right to move down in the note if you needmore space.
4 When you are finished, tap X to close the slip.
103Using the Name File
3 Tap Card Style or the picture of the card.
A slip of different card styles appears.
4 Tap the style you want to use.
The selected style now has a thick border around it.
5 To see the new card style, tap X, tap Show and, in the listthat appears, tap Card.
102 Chapter 5
Shows the current card style
Tap a style to select it

3 In the list that appears, tap Prefs π.
The Names Preferences slip appears.
4 Enter or change any information.
m Tap a circle under “Sort by:” to select how you want theMessagePad to sort your name cards. Only name cards withinformation in the selected field will appear.
m Tap the checkbox to beam your note information with name cards.
m Tap the checkbox if you want to store new items in theinternal memory of your MessagePad.
This preference overrides any settings on a storage card.
5 Tap X to close the slip.
If you changed the sorting preference, you now see thecards in the new sort order.
105Using the Name File
To view a note
1 Go to the card.
2 Tap Show and in the list that appears, tap All Info.
The note text appears in quotation marks if it was written astext and as [Notes] if it was written using a combination oftext, ink text, shapes, or sketches.
3 Tap the note shown on the screen.
The note slip appears. Tap the scroll arrows ≈ to move upand down in the note.
You can find text in a note attached to a name card bytapping Find. For more information, see the chapter“Organizing and Finding Information.”
Setting preferences
You can set preferences for the Name File to choose howthe cards are sorted, whether you want to beam noteinformation with a card, and whether or not to store newnames internally.
1 Tap Names ‰ to open the Name File, if it’s not already open.
2 Tap the Information button ;.
104 Chapter 5
The default sorting order is alphabetical by the person’s last name, company name, or name of group.
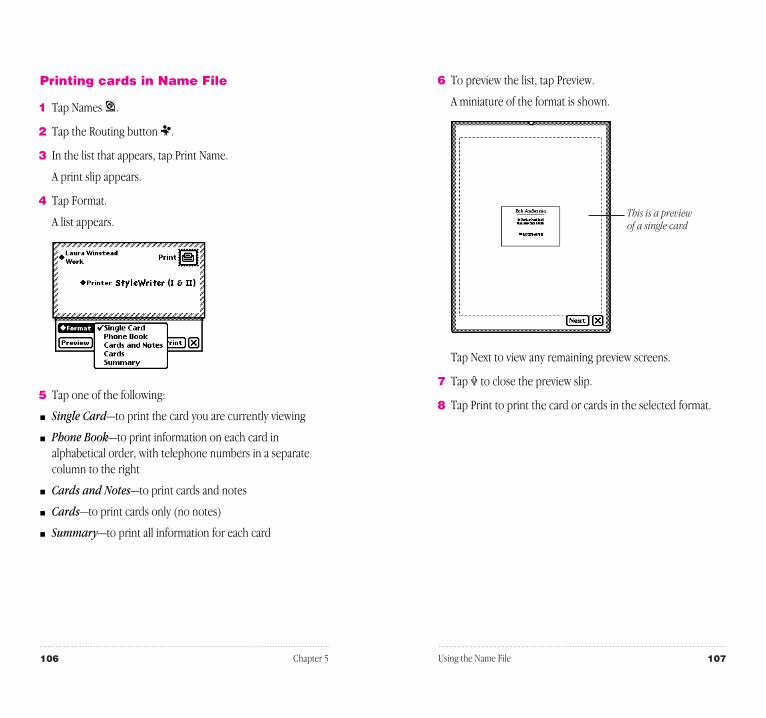
6 To preview the list, tap Preview.
A miniature of the format is shown.
Tap Next to view any remaining preview screens.
7 Tap X to close the preview slip.
8 Tap Print to print the card or cards in the selected format.
107Using the Name File
Printing cards in Name File
1 Tap Names ‰.
2 Tap the Routing button µ.
3 In the list that appears, tap Print Name.
A print slip appears.
4 Tap Format.
A list appears.
5 Tap one of the following:
m Single Card—to print the card you are currently viewing
m Phone Book—to print information on each card inalphabetical order, with telephone numbers in a separatecolumn to the right
m Cards and Notes—to print cards and notes
m Cards—to print cards only (no notes)
m Summary—to print all information for each card
106 Chapter 5
This is a preview of a single card

Important The MessagePad’s dialing feature does notwork with all phones. Some phones, such as PBX phones, donot recognize the tones that come out of the MessagePad’sspeaker.
Tip: You can include letters in a phone number (forexample, 1-800-SOS-APPL), but only capital letters will beinterpreted as numbers. When you dial the phone or send a fax, your MessagePad uses the phone pad numberscorresponding to the letters you enter. However, the lettersQ and Z do not appear on the phone pad and will not dialany corresponding number if they are entered.
To have the MessagePad place a call
1 Initiate the call. There are several ways to place a call:
m In the Overview, tap a phone number.
m In the Card or All Info view, tap the Phone button q.
m Tap Assist ® and tap the diamond next to “Please.” In thelist that appears, tap Call. Enter the name or number on the line, then tap Do.
109Using the Name File
Faxing, beaming, mailing, duplicating, or deleting cards
1 Go to the card.
To select more than one name card, tap the Overviewbutton ˛ and, in the list that appears, tap the checkbox nextto each card you want to route.
2 Tap the Routing button µ.
3 In the list that appears, tap your choice.
For more information, see the chapter “Routing Information.”
Dialing telephone numbers
You can place a call while you are in the Name File. You canalso tap Assist or use the Calls application in the ExtrasDrawer to make calls.
Warning If you connect your modem to a digital telephoneline, it may damage the modem or your MessagePad.
Important Because of local telephone regulations, tonedialing through the MessagePad speaker may not beavailable in some countries.
The MessagePad can look up phone numbers in the NameFile and dial them for you, using the speaker or an optionalmodem. When you enter phone numbers (for example, inthe Name File), always include the area code. Based on theinformation in Time Zones and Owner Info, yourMessagePad will decide whether to dial an area code andwhether to include prefixes and calling card numbers.
For more information, see the chapter “Managing and UsingItems in the Extras Drawer.”
108 Chapter 5

3 Tap Call.
If you’re dialing through the speaker, position theMessagePad’s speaker at the center of the telephonemouthpiece.
The number is dialed and a message appears telling you theMessagePad is dialing.
Note: If you tapped “Log” in the Call slip, the call isautomatically logged in the Calls application in the ExtrasDrawer and you’ll see a different screen after you tap Call.For more information, see “Calls” in the chapter “Using Built-in Applications in the Extras Drawer.”
111Using the Name File
2 In the slip that appears, enter the appropriate information.
If you want to use a modem to dial, make sure both themodem and the telephone you’re using are connected tothe same line. See the modem manual for details.
110 Chapter 5
Tap here to change the name or phone number you want to call
Tap here to change the locationyou are calling from
Tap here to selecthow you are dialing
Tap Assist if you need to enter a prefix or creditcard number
Tap here to log this call in the Calls application
The Date Book has two parts: a calendar that you use tokeep track of meetings and events, and a daily to-do list,which forwards unfinished items to the current date.
Tap Dates ¬ to go to the Date Book. Tap it again to put awaythe Date Book. You can also tap X in the lower-right cornerof the Date Book to put it away.
113
C H A P T E R
6
Using the Date Book:Calendar and To Do List

Scheduling meetings and events
You can create a variety of items in the calendar, includingsingle, weekly, and other repeating meetings, along withsingle, multi-day, and annual events. Meetings are time-based and events are date-based. You can also add notes tocalendar items and set alarms for them.
Scheduling a meeting
You can schedule a single, one-time meeting or a repeating meeting. (To schedule a weekly meeting, see the next section.)
1 Tap Dates ¬.
2 Tap New.
3 From the list that appears, tap Meeting M.
4 Enter the information in the slip that appears.
115Using the Date Book: Calendar and To Do List
Summary of the Calendar
114 Chapter 6
Events are shown inthe top left corner
Each meeting has a marker, button, and title
Tap the scroll arrows to move up and down in the schedule
Tap Show to see different views of the Date Book
Tap New to createa new item in
the Date Book ora new To Do task
Tap here to add a note to this meeting
Write the title of the meeting here
Tap a diamond next to an entry to enterinformationTap the arrows to move to
the next or previous month
Tap the month and a list appears; you can choose to see the last 3 months,next 9 months, or today
Tap a date to go to it
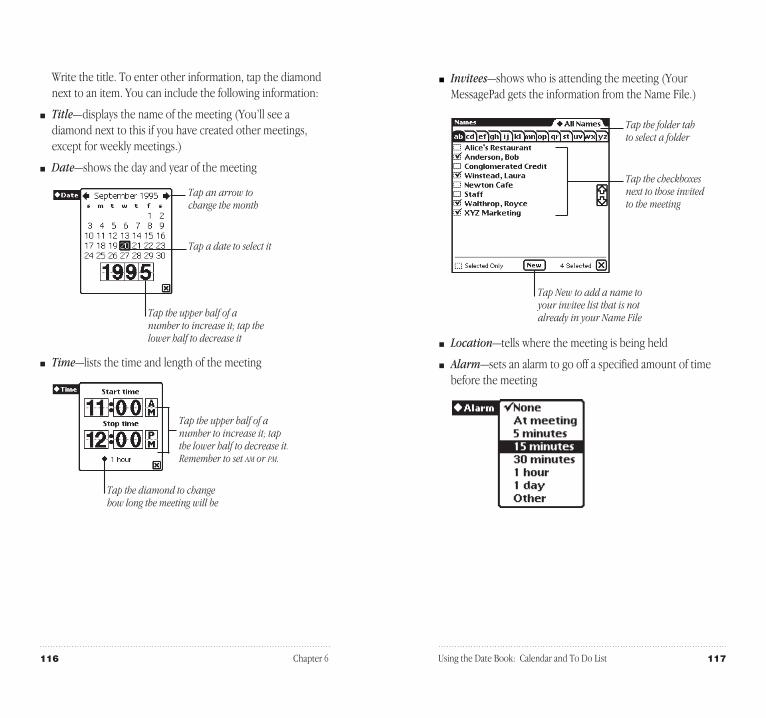
m Invitees—shows who is attending the meeting (YourMessagePad gets the information from the Name File.)
m Location—tells where the meeting is being held
m Alarm—sets an alarm to go off a specified amount of timebefore the meeting
117Using the Date Book: Calendar and To Do List
Write the title. To enter other information, tap the diamondnext to an item. You can include the following information:
m Title—displays the name of the meeting (You’ll see adiamond next to this if you have created other meetings,except for weekly meetings.)
m Date—shows the day and year of the meeting
m Time—lists the time and length of the meeting
116 Chapter 6
Tap the upper half of a number to increase it; tap the lower half to decrease it. Remember to set AM or PM.
Tap the diamond to change how long the meeting will be
Tap the checkboxes next to those invited to the meeting
Tap New to add a name to your invitee list that is not already in your Name File
Tap an arrow to change the month
Tap a date to select it
Tap the folder tab to select a folder
Tap the upper half of a number to increase it; tap the lower half to decrease it

Scheduling a weekly meeting
You can schedule a meeting for the same day and time each week.
1 Tap Dates ¬.
2 Tap New.
3 From the list that appears, tap Weekly Meeting Â.
4 Enter the information in the slip that appears.
Write the title. To enter other information, tap the diamondnext to an item. You can include the following information:
m Title—displays the name of the meeting (You’ll see adiamond next to this if you have created other weeklymeetings.)
m Time—lists the time and length of the meeting
m Invitees—shows who is attending the meeting
119Using the Date Book: Calendar and To Do List
m Repeat—tells how often the meeting repeats, if necessary
m Add Notes—allows you to add additional information aboutthe meeting
This is an example of a meeting slip that has been filled out.
5 When you are finished entering information, tap X to closethe slip.
118 Chapter 6
Tap the folder tab to select a folder
Tap the checkboxes next to those invited to the meeting
Tap New to add a name to your invitee list that is not already in your Name File

This is an example of a Weekly Meeting slip that has beenfilled out.
5 When you are finished entering information, tap X to closethe slip.
Scheduling an event
You can schedule an event on a particular day.
1 Tap Dates ¬.
2 Tap New.
3 From the list that appears, tap Event e.
4 Enter the information in the slip that appears.
Write the title. To enter other information, tap the diamondnext to an item. You can include the following information:
121Using the Date Book: Calendar and To Do List
m Location—tells where the meeting is being held
m Alarm—sets an alarm to go off a specified amount of timebefore the meeting
m Dates—shows the beginning day and year of the meetingand the end date (if it’s not ongoing)
m Add Notes—allows you to add additional information aboutthe meeting
120 Chapter 6
Tap an arrow to change the month
Tap this diamond to set how often the meeting will be scheduled
Tap a date to select it
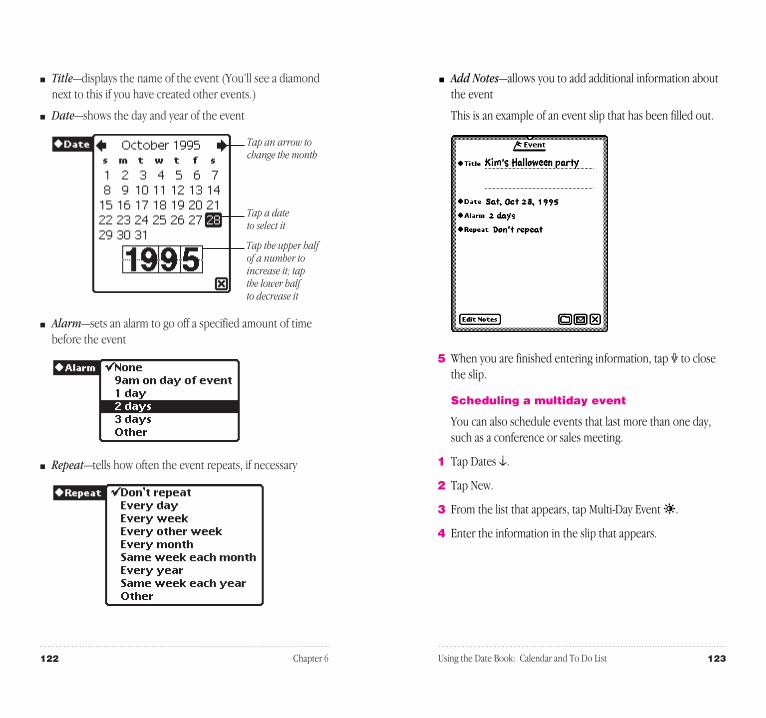
m Add Notes—allows you to add additional information aboutthe event
This is an example of an event slip that has been filled out.
5 When you are finished entering information, tap X to closethe slip.
Scheduling a multiday event
You can also schedule events that last more than one day,such as a conference or sales meeting.
1 Tap Dates ¬.
2 Tap New.
3 From the list that appears, tap Multi-Day Event ¸.
4 Enter the information in the slip that appears.
123Using the Date Book: Calendar and To Do List
m Title—displays the name of the event (You’ll see a diamondnext to this if you have created other events.)
m Date—shows the day and year of the event
m Alarm—sets an alarm to go off a specified amount of timebefore the event
m Repeat—tells how often the event repeats, if necessary
122 Chapter 6
Tap an arrow to change the month
Tap a date to select it
Tap the upper half of a number toincrease it; tap the lower half to decrease it

This is an example of a Multi-Day Event slip that has beenfilled out.
5 When you are finished entering information, tap X to closethe slip.
Scheduling an annual event
Use this to include events that occur on one day each year,such as birthdays or anniversaries.
1 Tap Dates ¬.
2 Tap New.
3 From the list that appears, tap Annual Event å.
4 Enter the information in the slip that appears.
125Using the Date Book: Calendar and To Do List
Write the title. To enter other information, tap the diamondnext to an item. You can include the following information:
m Title—displays the name of the event (You’ll see a diamondnext to this if you have created other multiday events.)
m Alarm—sets an alarm to go off a specified amount of timebefore the event
m Dates—shows the date the event occurs
m Add Notes—allows you to add additional information aboutthe event
124 Chapter 6
Tap an arrow to change the month
Tap this diamond to set the length of the event

This is an example of an Annual Event slip that has been filled out.
5 When you are finished entering information, tap X to closethe slip.
Adding notes to an existing meeting or event
You can annotate a meeting or event and add additionalinformation about the item.
1 Tap Dates ¬.
2 Tap the Picture button or the title. The meeting or event slip appears.
127Using the Date Book: Calendar and To Do List
Write the title. To enter other information, tap the diamondnext to an item. You can include the following information:
m Title—displays the name of the event (You’ll see a diamondnext to this if you have created other annual events.)
m Alarm—sets an alarm to go off a specified amount of timebefore the event
m Dates—shows the dates the event occurs on
m Add Notes—allows you to add additional information aboutthe event
126 Chapter 6
Tap an arrow to change the month
Tap this diamond to set how often the event occurs
Tap a date to select it
This is the Picture button for a meeting

Scheduling overlapping meetings
You can set two meetings for overlapping times by placingthem side by side. Schedule the first meeting, then do one ofthe following:
m Draw a vertical line near the middle of the calendar, next tothe first meeting, creating a marker and Picture button forthe second meeting. Then write the second meeting titlenext to the new Picture button or tap the Picture button andenter the appropriate information in the slip that appears.
m Tap the pen at the approximate time of the second meetingto place the caret, then write the name of the meeting.
m Schedule the second meeting at a different time, then moveit. For more information, see the section “Moving Items inthe Date Book.”
129Using the Date Book: Calendar and To Do List
3 Tap Add Notes.
4 Enter the information in the Meeting Notes slip that appears.
5 Tap X to close the notes slip, then tap X to close themeeting slip.
Using the alarm to notify you
When an alarm goes off, a message appears on theMessagePad screen. You can also choose to have theMessagePad play a sound when the alarm goes off.
To set the type of sound and volume for an alarm:
1 Tap Extras ´, then tap the folder tab and tap Setup.
2 Tap Prefs π, then tap Alarm ≥.
For more information, see the section “Prefs” in the chapter“Managing and Using Items in the Extras Drawer.”
128 Chapter 6
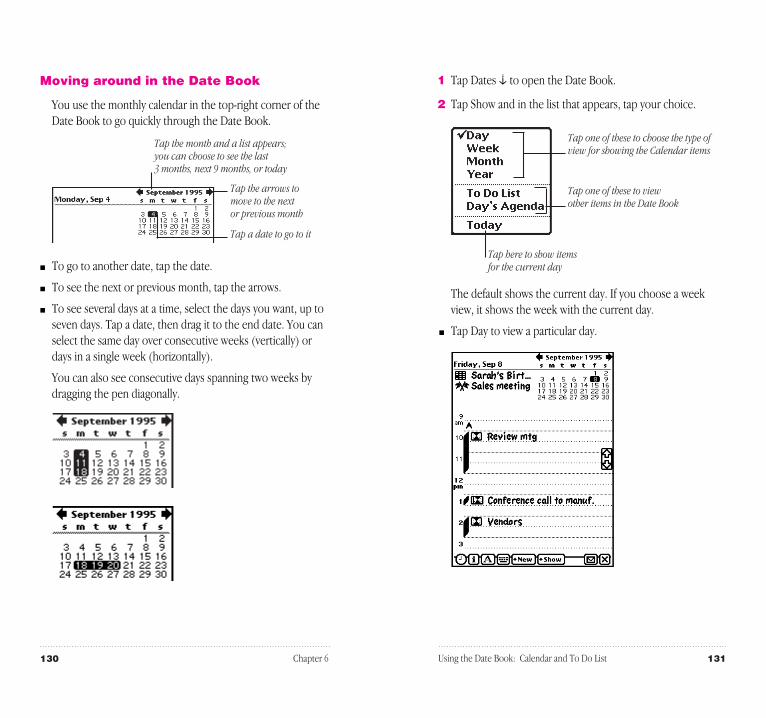
1 Tap Dates ¬ to open the Date Book.
2 Tap Show and in the list that appears, tap your choice.
The default shows the current day. If you choose a weekview, it shows the week with the current day.
m Tap Day to view a particular day.
131Using the Date Book: Calendar and To Do List
Moving around in the Date Book
You use the monthly calendar in the top-right corner of theDate Book to go quickly through the Date Book.
m To go to another date, tap the date.
m To see the next or previous month, tap the arrows.
m To see several days at a time, select the days you want, up toseven days. Tap a date, then drag it to the end date. You canselect the same day over consecutive weeks (vertically) ordays in a single week (horizontally).
You can also see consecutive days spanning two weeks bydragging the pen diagonally.
130 Chapter 6
Tap one of these to view other items in the Date Book
Tap one of these to choose the type ofview for showing the Calendar items
Tap here to show itemsfor the current day
Tap the month and a list appears;you can choose to see the last 3 months, next 9 months, or today
Tap a date to go to it
Tap the arrows to move to the next or previous month

m Tap Month to see one month at a time. The dark bandsrepresent meetings and events and the flags representevents.
To go to a particular date in the month, tap the day in either the large month view or the mini-calendar in theupper-right corner.
To go to another month, you can:
m Tap the name of the month and, from the list thatappears, tap your choice.
m Tap the arrows next to the name of the month.
m Tap the up and down arrows.
133Using the Date Book: Calendar and To Do List
m Tap Week to see the overview for a particular week.
132 Chapter 6

m Tap Day’s Agenda to see meetings, events, and to-do tasksfor the day you are viewing. Tap the Picture button for anitem to see more information about it.
m Tap Today to go quickly to today’s schedule.
Viewing items in the Date Book
You can use the Overview to see a list of items in the DateBook. There are several ways to do this, depending uponwhat you want to see.
m Meetings and events—Tap Show and in the list that appears,tap Day. Tap the Overview button.
m To Do Tasks—Tap Show and in the list that appears, tap ToDo List. Tap the Overview button.
m Meetings, events, and to-do tasks—Tap Show and in the listthat appears, tap Day’s Agenda. Tap the Overview button.
135Using the Date Book: Calendar and To Do List
m Tap Year to see a distant date. An eight-month calendarappears. Tap the up and down arrows ˛ to see moremonths. You can tap the month or the date you want to see.
m Tap To Do List to see your tasks.
For more information, see the section “Using the To Do List”later in this chapter.
134 Chapter 6

If you change the time or date of the meeting, theMessagePad automatically moves it to the new time or date.
If you don’t change the time or date of the meeting, it willappear next to the item in the day’s schedule. To move theitem to another time or date, see the next section, “MovingItems in the Date Book.”
Moving items in the Date Book
You can quickly move meetings or events to a different timeor date or change the length of a meeting or event.
Moving a meeting within the same day
To move a meeting to a different time in the same day, holdthe pen on the Picture button for the meeting or event.Move the item to the desired time.
Another way to do this is to tap the Picture button for themeeting, tap Time and, in the slip that appears, tap the new time.
137Using the Date Book: Calendar and To Do List
Duplicating meetings or events
To duplicate a meeting or event:
1 Tap Dates ¬.
2 Go to a specific date.
3 Tap the Picture button for the meeting or event. TheMeeting slip appears.
4 Tap the Routing button µ.
5 From the list that appears, tap Duplicate.
A copy of the selected item slip appears.
6 Change any information, if necessary.
136 Chapter 6

To change the time of a meeting, tap the Picture button andmove it to the new time. Tap the scroll arrows ≈ on the rightif you need to move up or down in the schedule.
Using the To Do List
The Date Book includes a daily To Do list that forwardsunfinished items to the current date.
Creating a To Do Task
1 Tap Dates ¬.
2 Tap New.
139Using the Date Book: Calendar and To Do List
Moving a meeting to another date
To move a meeting or event to a different date, tap thePicture button for the meeting, tap Dates and, in the slip thatappears, tap the new date.
You can also hold the pen on the Picture button for themeeting or event and drag it all the way to the right or leftedge of the screen. It becomes selected in a highlighted box.Tap the date on the calendar that you want to move themeeting to. Hold the pen on the selection and move it to thetime you want on the selected day.
If you want to move it within the same week, tap Show, thentap Week. Tap the Picture button for the meeting and moveit to the new date.
Changing the length of a meeting
To change the length of a meeting:
m Hold the pen on the marker for the meeting until it turnswhite and move the marker.
m Tap the Picture button for a meeting, tap Time, and in theslip that appears, tap the new time.
138 Chapter 6
This meeting was moved from 2 PM
to 11 AM
Tap the scroll arrows to move up or down in the schedule
The marker was moved from 3 PM to 4 PM

m Reminder—allows you to set a reminder of how many daysin advance to start displaying the To Do task
m Repeat—allows you to repeat the task
141Using the Date Book: Calendar and To Do List
3 In the list that appears, tap To Do Task.
4 Enter the information in the slip that appears.
To enter information, tap the diamond next to the item youwant to enter. You can include the following information:
m Title—displays what the task is
m Date—lists the date you want to do this task
m Priority—sets a numbered priority to the task
140 Chapter 6
Tap an arrow to change the month
Tap a date to select it
Tap the upper half of a number to increase it; tap the lower half to decrease it
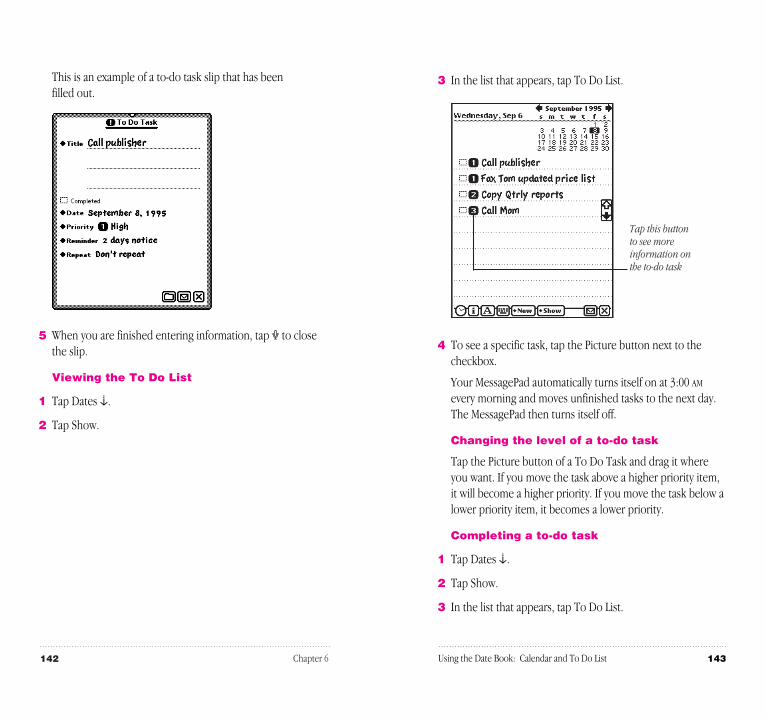
3 In the list that appears, tap To Do List.
4 To see a specific task, tap the Picture button next to thecheckbox.
Your MessagePad automatically turns itself on at 3:00 AM
every morning and moves unfinished tasks to the next day.The MessagePad then turns itself off.
Changing the level of a to-do task
Tap the Picture button of a To Do Task and drag it whereyou want. If you move the task above a higher priority item,it will become a higher priority. If you move the task below alower priority item, it becomes a lower priority.
Completing a to-do task
1 Tap Dates ¬.
2 Tap Show.
3 In the list that appears, tap To Do List.
143Using the Date Book: Calendar and To Do List
This is an example of a to-do task slip that has been filled out.
5 When you are finished entering information, tap X to closethe slip.
Viewing the To Do List
1 Tap Dates ¬.
2 Tap Show.
142 Chapter 6
Tap this button to see more information on the to-do task

Duplicating a to-do item
1 Tap Dates ¬.
2 Go to a specific date.
3 Tap Show.
4 In the list that appears, tap To Do List.
5 Tap the Picture button next to the checkbox of the item youwant to duplicate.
6 Tap the Routing button µ.
7 Tap Duplicate.
A copy of the task appears in the list. You can tap its pictureto change any information.
Other ways to create meetings and to-dotasks
There are several ways you can create meetings and to dotasks without using the New button.
If you are in the Day view and want to create a new meeting,tap the pen on the line at the approximate time, then writethe word. You can also draw a vertical line to create a newmeeting marker.
If you are in the To Do List view and want to create a newtask, tap the pen on a line and write the information.
145Using the Date Book: Calendar and To Do List
4 Tap the checkbox next to any items you have finished.
Tasks that are completed move to the bottom of the list.
Deleting a to-do task
1 Tap Dates ¬.
2 Tap Show.
3 In the list that appears, tap To Do List.
4 Tap the Picture button next to the checkbox of the item youwant to delete.
5 Tap the Routing button µ.
6 Tap Delete.
144 Chapter 6
Completed tasks have a checkmark in the box and are placed at the bottom of the to-do list

m To Do Tasks
Tap the Overview button ˛ in the To Do List view. Tap thecheckbox next to each task you want to delete. Tap the scrollarrows ≈ to see tasks in the past and future. When you arefinished selecting tasks, tap the Routing button µ and, inthe list that appears, tap Delete.
m Meetings, events, and to-do tasks
Tap the Overview button ˛ in the Day’s Agenda view. Tapthe checkbox next to each item you want to delete. Tap thescroll arrows ≈ to see items in the past and future. When youare finished selecting items, tap the Routing button µ and,in the list that appears, tap Delete.
Setting preferences for the Date Book
1 Tap Dates ¬.
2 Tap the Information button ;.
3 In the list that appears, tap Prefs.
The Dates Preferences slip appears.
147Using the Date Book: Calendar and To Do List
Faxing, beaming, mailing, and duplicating meetings, events, and to-do tasks
1 Go to the item.
To select more than one item, tap the Overview button ˛and, in the list that appears, tap the checkbox next to eachitem you want to route.
2 Tap the Routing button µ.
3 In the list that appears, tap your choice.
For more information, see the chapter “RoutingInformation.”
Deleting meetings, events, and to-dotasks
You can free up internal memory by deleting items in theDate Book that are old and out of date.
To delete a single meeting, event, or to-do task, go to theitem, tap its Picture button, and tap the Routing button µ.In the list that appears, tap Delete.
To delete more than one item use the overview. There areseveral ways to do this, depending upon what you want todelete.
m Meetings and events
Tap the Overview button ˛ in the Day view. Tap thecheckbox next to each meeting or event you want to delete.Tap the scroll arrows to see days in the past and future.When you are finished selecting items, tap the Routingbutton µ and, in the list that appears, tap Delete.
146 Chapter 6
Tap one of these buttons to set the first day of the week
Tap these diamonds to sethow much time in advanceyou want an alarm to go off
Tap these checkboxes tostore new information inthe internal memory of theMessagePad regardless ofwhether a storage card is inserted

To set a default alarm time for events
1 Tap the diamond u next to “Default alarm time for events.”
2 From the list that appears, tap your choice.
To set an alarm time other than those shown, tap Other andenter the number of days.
149Using the Date Book: Calendar and To Do List
4 Enter the appropriate information, then tap X to close the slip.
Setting a default alarm time for meetings
1 Tap the diamond next to “Default alarm time for meetings.”
2 From the list that appears, tap your choice.
To set an alarm time other than those shown, tap Other andenter the appropriate information.
148 Chapter 6
Write a number here
Then tap the diamond to set the notice for the alarm
Write anumber here

This chapter contains information about the Extras Drawerand is divided into two parts.
Part 1: Managing the Extras Drawer
Use the first part of this chapter to learn how to manage theExtras Drawer and the items in it.
Part 2: Using the Built-In Applications in the Extras Drawer
Use the second part of this chapter to learn how to use thevarious built-in applications that are found in the ExtrasDrawer.
151
C H A P T E R
7
Managing and Using Items in the Extras Drawer

The following folders are present when you first receive yourMessagePad:
m Unfiled Icons—contains many of the icons for the built-inapplications, such as the In Box and Out Box, Calls,Calculator, Formulas, Time Zones, Connection, Card, Styles,and Clock
m Setup—contains Prefs, Owner Info, Setup, Newton Tour, HWInstructor, and Writing Practice
m Help—includes the on-screen help application for theNewton operating system (help files from other applicationsyou install are also located here)
m Extensions—for filing fonts, system extensions, and someapplications
m Storage—contains data from all of your applications
You can create new folders and edit existing folder names ifyou like. For more information, see the chapter “Organizingand Finding Information.”
153Managing and Using Items in the Extras Drawer
Part 1: Managing the Extras Drawer
The Extras Drawer contains icons for applications you cantap to go to different areas of your MessagePad, other thanthe Name File, Date Book, and Notepad. If you install moreapplications, either internally or on a storage card, the ExtrasDrawer may contain more icons for these applications.
To open the Extras Drawer, tap Extras ´. Tap Extrasagain to close the drawer. You can also tap X to put it away.
You can also manage the information and applications in theExtras Drawer. As in many areas of the MessagePad, theExtras Drawer is organized by folders.
152 Chapter 7
The checkmark shows which folder you are currently viewing
This is a list of other folders in the Extras Drawer, including ones that you create (such as Shareware)
Tap one of these to select which storagelocation you want to view–the MessagePadonly, a storage card only, or bothTap the folder tab to view the
contents of another folder inthe Extras Drawer
These are the typical icons filed in the Unfiled Icons folder (the contents of your Unfiled Icons folder may look different)
Tap Rotate to change theorientation of the screen

Checking memory used in built-inapplications
Some applications have information filed in the Storagefolder of the Extras Drawer. These files contain data andother information specific to that application. You can seethe number of items in each application and the amount of memory these items take up. You can also route and file this data.
1 Tap Extras ´ to open the Extras Drawer.
2 Tap the folder tab, then tap Storage.
The Storage folder shows an icon ¨ for each information file.
3 Tap the icon for the application you want to see.
A slip appears, showing the number of items in theapplication and the amount of internal memory these itemstake up. If you have a card installed, it will list thisinformation for the card also.
m To delete items in storage for the application, tap Delete. A warning message appears, asking if you want to delete allthe items. Tap OK.
155Managing and Using Items in the Extras Drawer
Setting where new information is stored
All new items you create in the Notepad, Name File, andDate Book are stored internally in the MessagePad, unlessyou specify otherwise.
You can store new information automatically on a storagecard. To do this:
1 Insert a storage card.
2 Tap Extras ´ to open the Extras Drawer.
3 Tap the folder tab, tap Unfiled Icons, then tap Card B. (Ifyou filed Card in another folder, tap the name of that folder,then tap Card B.)
4 In the slip that appears, tap “Save new info and packages onthis card.”
5 Tap X to close the slip.
Any new information you create on your MessagePad willnow be stored on that card.
154 Chapter 7
This is the informationthat appears when you tap the Names Storage icon
Tap here to save all new information on this card
This icon indicates whether thecard is unlocked or locked

Checking the available memory
1 Tap Extras ´ to open the Extras Drawer.
2 Tap the Information button ; and, in the list that appears,tap Memory Info.
A slip appears showing you the amount of internal memoryused. If you have a storage card inserted, the memory usedon the card is also listed.
Changing the backdrop
The backdrop is the default application, or background, yousee when you close all other applications. When you firstreceive your MessagePad, the backdrop is set to theNotepad. You can change the backdrop—for example, if you use a specific application, such as Name File, more thanthe Notepad.
When you make an application other than the Notepad thebackdrop, a Notes icon n appears in the Extras Drawer thatyou use to access the Notepad.
If you need to reset your MessagePad for any reason bytapping the Reset button, the backdrop does not change. Ifyou do a hard reset (erasing all of the information on yourMessagePad), the backdrop reverts to the Notepad.
157Managing and Using Items in the Extras Drawer
m To file the items into a folder in the internal memory or on a storage card, tap the Folder button F. In the slip thatappears, select the appropriate information, then tap File. Amessage appears asking if you want to file the information.Tap OK.
4 When you are finished viewing the slip, tap X to close it.
Checking the battery status and setting the sound volume
To check the amount of power left in your batteries orchange the volume of sound, tap Extras ´ to open theExtras Drawer.
m Look at the battery gauge in the lower-right corner of theExtras Drawer. This indicates how much power is left.
m To change the volume, press the pen on the volume sliderand move it right or left (to the right is higher volume).
156 Chapter 7
This shows the amount of memoryused and the amountthat is available
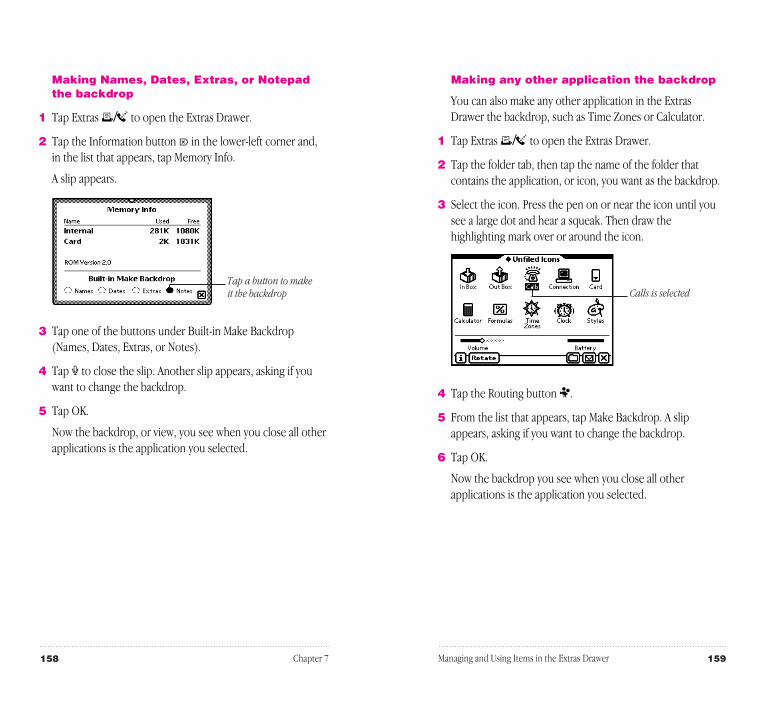
Making any other application the backdrop
You can also make any other application in the ExtrasDrawer the backdrop, such as Time Zones or Calculator.
1 Tap Extras ´ to open the Extras Drawer.
2 Tap the folder tab, then tap the name of the folder thatcontains the application, or icon, you want as the backdrop.
3 Select the icon. Press the pen on or near the icon until yousee a large dot and hear a squeak. Then draw thehighlighting mark over or around the icon.
4 Tap the Routing button µ.
5 From the list that appears, tap Make Backdrop. A slipappears, asking if you want to change the backdrop.
6 Tap OK.
Now the backdrop you see when you close all otherapplications is the application you selected.
159Managing and Using Items in the Extras Drawer
Making Names, Dates, Extras, or Notepadthe backdrop
1 Tap Extras ´ to open the Extras Drawer.
2 Tap the Information button ; in the lower-left corner and,in the list that appears, tap Memory Info.
A slip appears.
3 Tap one of the buttons under Built-in Make Backdrop(Names, Dates, Extras, or Notes).
4 Tap X to close the slip. Another slip appears, asking if youwant to change the backdrop.
5 Tap OK.
Now the backdrop, or view, you see when you close all otherapplications is the application you selected.
158 Chapter 7
Calls is selectedTap a button to make it the backdrop

Deleting icons
You can delete icons in several ways:
m Scrub the icon you want to delete.
m Select the icon, tap the Routing button µ and, in the list thatappears, tap Delete. A message appears asking if you reallywant to delete it. Tap OK.
m Go to the folder in the Extras Drawer that contains the icon.Tap the Overview ˛ button and tap the checkbox next toeach icon you want to delete. Tap the Routing button µ. Inthe list that appears, tap Delete. A message appears asking ifyou really want to delete it. Tap OK.
Viewing items in the Extras Drawer
You can view items in the Extras Drawer in two ways—byicon (default view) and as a list. To see a list, or overview, of items, go to a folder in the Extras Drawer and tap theOverview button ˛.
161Managing and Using Items in the Extras Drawer
Selecting, moving, and deleting icons
You can select icons and move them around in the ExtrasDrawer to change their position. You can also delete iconsfrom the Extras Drawer, except for built-in applications.
Selecting and moving icons
To select an icon, hold down the pen on or near the itemuntil a heavy mark appears under the pen (the MessagePadmakes a squeak), and draw the mark over or around theicon. (If the sound effects in Prefs are turned off, you won’thear the squeak.) The icon is selected.
To select several icons at once, draw so the mark goes overor around all of the icons you want to select.
To move an icon, select it. Press and hold the pen on theselection and drag the icon where you want to place it.
160 Chapter 7
This is the list view ofthe Extras Drawer
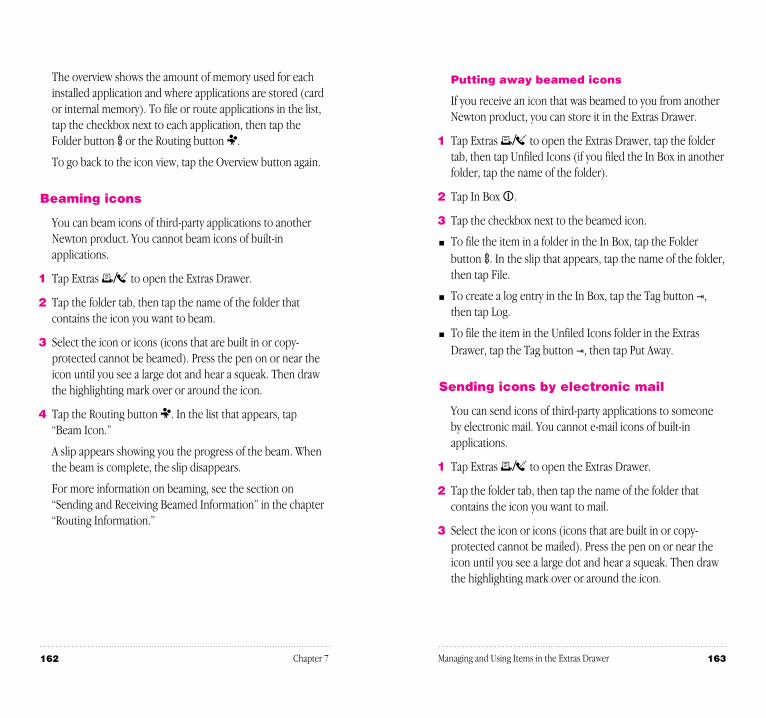
Putting away beamed icons
If you receive an icon that was beamed to you from anotherNewton product, you can store it in the Extras Drawer.
1 Tap Extras ´ to open the Extras Drawer, tap the foldertab, then tap Unfiled Icons (if you filed the In Box in anotherfolder, tap the name of the folder).
2 Tap In Box I.
3 Tap the checkbox next to the beamed icon.
m To file the item in a folder in the In Box, tap the Folderbutton F. In the slip that appears, tap the name of the folder,then tap File.
m To create a log entry in the In Box, tap the Tag button t,then tap Log.
m To file the item in the Unfiled Icons folder in the ExtrasDrawer, tap the Tag button t, then tap Put Away.
Sending icons by electronic mail
You can send icons of third-party applications to someoneby electronic mail. You cannot e-mail icons of built-inapplications.
1 Tap Extras ´ to open the Extras Drawer.
2 Tap the folder tab, then tap the name of the folder thatcontains the icon you want to mail.
3 Select the icon or icons (icons that are built in or copy-protected cannot be mailed). Press the pen on or near theicon until you see a large dot and hear a squeak. Then drawthe highlighting mark over or around the icon.
163Managing and Using Items in the Extras Drawer
The overview shows the amount of memory used for eachinstalled application and where applications are stored (cardor internal memory). To file or route applications in the list,tap the checkbox next to each application, then tap theFolder button F or the Routing button µ.
To go back to the icon view, tap the Overview button again.
Beaming icons
You can beam icons of third-party applications to anotherNewton product. You cannot beam icons of built-inapplications.
1 Tap Extras ´ to open the Extras Drawer.
2 Tap the folder tab, then tap the name of the folder thatcontains the icon you want to beam.
3 Select the icon or icons (icons that are built in or copy-protected cannot be beamed). Press the pen on or near theicon until you see a large dot and hear a squeak. Then drawthe highlighting mark over or around the icon.
4 Tap the Routing button µ. In the list that appears, tap“Beam Icon.”
A slip appears showing you the progress of the beam. Whenthe beam is complete, the slip disappears.
For more information on beaming, see the section on“Sending and Receiving Beamed Information” in the chapter“Routing Information.”
162 Chapter 7

Part 2: Using the Built-In Applications in the Extras Drawer
The Extras Drawer contains built-in applications you can usefor a variety of purposes.
m Calculator c—for simple arithmetic calculations
m Calls Q—for making and logging telephone calls
m Card B—for choosing what information to store on astorage card and for backing up and restoring information
m Clock Å—for setting the time and date, a daily alarm, and a timer
m Connection k—for connecting to applications running onyour desktop computer using serial, modem, and AppleTalkconnections
m Formulas ∞—for conversions and financial calculations
m Help h—for accessing information on how to perform tasks
m HW Instructor Ó—for learning the basics of writing andrecognition
m In Box I—for receiving electronic mail, beamedinformation, and other items
m Out Box o—for storing items waiting to be printed or sentas faxes, beamed information, and electronic mail
m Newton Tour ‹—for learning the basics of the MessagePad
m Owner Info 9—for setting owner and worksite information
m Prefs π—for fine-tuning your MessagePad
165Managing and Using Items in the Extras Drawer
4 Tap the Routing button µ and in the list that appears, tap Mail.
A mail slip appears.
5 Enter the appropriate information.
6 Tap Mail.
Rotating the screen
You can rotate the screen and use your MessagePad in alandscape, or horizontal, mode.
Note: Not all applications work in a rotated, or landscape,mode. A message will appear asking you to return to portrait mode.
1 Tap Extras ´ to open the Extras Drawer.
2 Tap the Rotate button on the status bar at the bottom of thescreen.
The MessagePad rebuilds the display and in a few seconds,the screen rotates to a landscape view.
To return the screen to the default view, tap the Rotatebutton again.
164 Chapter 7

Tap the up and down arrows ˛ to see more calculations.You can scroll up to 30 lines.
To copy calculations, select the text (numbers and symbols)you want, then move it to the edge of the screen or towhatever is behind the calculator (such as the Notepad orthe Date Book).
You cannot copy numbers or calculations from otherapplications into the Calculator.
Note: If you divide by certain values, such as zero or thesquare root of a negative number, you’ll hear a “bell” to letyou know that this calculation is impossible.
Calls Q
You use Calls to keep track of your phone calls and to placecalls. If you want to use a modem to place the call, makesure both the modem and the telephone are connected tothe same line. See the documentation that came with yourmodem for more information.
To place a call
1 Tap New and in the slip that appears, enter the appropriateinformation.
You can tap a diamond u to enter the name or date. If you don’t choose when you want to make the call, theMessagePad uses the current time and date.
167Managing and Using Items in the Extras Drawer
m Setup s—for entering personal information and settings
m Styles º—for choosing the appearance of text and lines
m Time Zones z—for setting your location and determiningtimes around the world
m Writing Practice W—for practicing writing
In addition, your MessagePad contains various informationfiles for certain applications. These files are found in theStorage folder.
Calculator c
You use the Calculator to to perform various calculations.You can also copy information from the Calculator toanother area.
166 Chapter 7

3 Tap Using and in the list that appears, tap one of thefollowing:
m Modem—if you’re using a modem to dial the number
m Speaker—to have your MessagePad’s speaker dial the phonenumber
m Telephone—to dial the phone number manually
4 If you need to dial a prefix or use a credit-card number tomake the call, tap Assist and in the slip that appears, enterthe necessary information. Then tap X to close the slip.
5 Tap Call.
If you’re dialing through the speaker, hold the mouthpieceof your phone near the MessagePad’s speaker. If you’redialing through the modem, wait until the modem hasfinished dialing, then pick up your telephone handset.
The time, date, and telephone number appear in the call slipas the call is made. At the bottom right is a timer that showsyou the duration of the call.
169Managing and Using Items in the Extras Drawer
2 Tap Place Call.
A slip appears.
168 Chapter 7
Tap here to change the worksite you are calling from
Tap Name to change the call recipient or the phone number
The Add to Namesbutton allows you tocreate a new card inthe Name File frominformation in the slip
Tap Using tochoose how youwill make the call
Tap Assist to add a prefix or credit-card number
You can write notes orother information inthis area

Deleting calls
To delete a call, go to it and tap the Routing button µ. In the list that appears, tap Delete. To delete more than onecall, tap the Overview button ˛, then tap the checkbox nextto each call you want to delete. Tap the Routing button µand in the list that appears, tap Delete. A message appearsasking if you want to delete all selected items. Tap OK.
Filing entries
You can file log entries in Calls into existing folders or onesthat you create. To file an entry, go to it and tap the Folderbutton F. In the slip that appears, enter the appropriateinformation, then tap File.
To file multiple entries at one time, tap the Overview button ˛, then tap the checkbox next to each entry you want to file. Tap the Folder button F and in the slip thatappears, enter the appropriate information, then tap File.
171Managing and Using Items in the Extras Drawer
6 When you are finished, tap Hang Up and, in the list thatappears, tap a choice.
The end time of the call is then recorded in the log, alongwith any information you’ve written.
Your choice then appears under the entry, along with theduration of the call.
7 If this call was made to someone you would like to add toyour Name File, tap the Add to Names button K.
8 When a message appears asking if you want to add this newname, tap Yes.
Viewing calls
To view calls in a particular folder, tap the folder tab and inthe list that appears, tap the name of the folder you want to see.
To go through the calls, tap the up and down arrows ˛. Tosee a list of calls, tap the Overview button ˛. To view aparticular call, tap its Picture button or title.
170 Chapter 7

Clock Å
You use the Clock application to set a daily alarm andminute timer, change the time and date, and set other clockoptions. You can also access the Clock by tapping the timeand date in the upper left corner of the Notepad.
1 Tap Set.
2 In the list that appears, tap your choice.
A slip appears.
173Managing and Using Items in the Extras Drawer
Setting Phone preferences
Tap the Information button ; and in the list that appears,tap Prefs. Enter the appropriate information, then tap X toclose the slip.
Card B
You tap Card to get information on a storage card that isinserted in your MessagePad. You also use this to back up,restore, and erase information on the card.
For more information, see the chapter “Backing Up andRestoring Information.”
172 Chapter 7
The clock face shows a night scenefrom 6 PM to 6 AM and a day sceneat all other times
Tap here and choose tofile or delete the log
Tap here to choose toreceive calls using atelephone or modem
Tap Restore to copy information from a backup on a card to your MessagePad
Tap Erase to deleteinformationon a card
This is the name of the card
This shows information for the card
Tap Backup to copy onto acard information andpackages that are stored on internal memory

m Time/Date
m Options
4 When you are finished, tap X to close the slip. Tap X again toclose the Clock.
175Managing and Using Items in the Extras Drawer
3 Enter the appropriate information.
m Daily Alarm
To set the type and volume of an alarm, tap Extras ´, tapthe folder tab, then tap Setup. (If you stored Prefs in anotherfolder, tap that choice.) Tap Prefs π and, in the slip thatappears, tap Alarm ≥. Another slip appears. Enter theappropriate information and tap X to close the slip.
m Minute Timer
After the set number of minutes, the timer sounds and amessage will appear. If you want the timer to go off again,tap Snooze and, in the list that appears, tap the number of minutes.
174 Chapter 7
Tap the checkboxto turn the alarmon and off
Tap the upper half of a number to increase it; tap the lower half to decrease it. Tap a letter to change from AM to PM and vice versa
Tap the upper half of a number to increase it; tap the lower half to decrease it
Tap the upper half of a number to increase it; tap the lower half to decrease it. Tap a letter to change from AM to PM and vice versa
Tap the arrows to change the month or year
Tap month and, in the list that appears, tap a month

Connecting via modem
Modem connections may not be available for someconnection applications.
1 Tap “Connect via” and, in the list that appears, tap Modem.
2 Enter the appropriate information.
3 If you need to dial a prefix or use a credit card number tomake the call, tap Assist ®. In the slip that appears, enterthe necessary information. Then tap X to close the slip.
4 Tap Connect. A slip appears showing you the progress of the connection.
177Managing and Using Items in the Extras Drawer
Connection k
You use Connection to make connections to desktopcomputers using applications and to install packages fromyour desktop. You can use serial, modem, or AppleTalkconnections.
For more information on connecting to your desktop, seethe documentation that came with your connectionsoftware.
Connecting via serial
1 Tap “Connect via” and, in the list that appears, tap Serial.
Make sure a serial cable is connected to the communicationport of your MessagePad and to the appropriate port onyour desktop computer.
2 Tap Connect. A slip appears showing you the progress of theconnection.
176 Chapter 7
Tap here to change theowner or worksite
Tap here to choose which worksite to connect to

Setting connection preferences
While you are in Connection, tap the Information button ;.In the list that appears, tap Prefs. A slip appears.
Tap the checkboxes next to the preferences you want toselect. When you are finished, tap X to close the slip.
m Save password—This saves the password you set up in yourconnection software. This prevents others from creating orrestoring a backup file without your permission.
m Remove exact duplicates when importing—Each entrymust be exact in every way (the only field that is not checked is the last modified time). This may slow down the import process.
m Stop connection if no activity—The connection is stoppedafter approximately one minute if there is no response onthe desktop.
m Always backup all information—If this is not checked, you can back up selected applications only using yourconnection software.
179Managing and Using Items in the Extras Drawer
Connecting via AppleTalk
1 Tap “Connect via” and, in the list that appears, tap AppleTalk.
2 Tap “Connect to” and, in the list that appears, tap theworksite or computer you want to connect to.
If you tap “other computer,” a slip appears. Tap thecomputer you want to connect to.
If you tap Other Worksite, a slip appears. Enter informationabout the worksite, then tap X to close the slip.
3 Tap Connect. A slip appears showing you the progress of theconnection.
178 Chapter 7
Tap here to choose which worksite to connect to
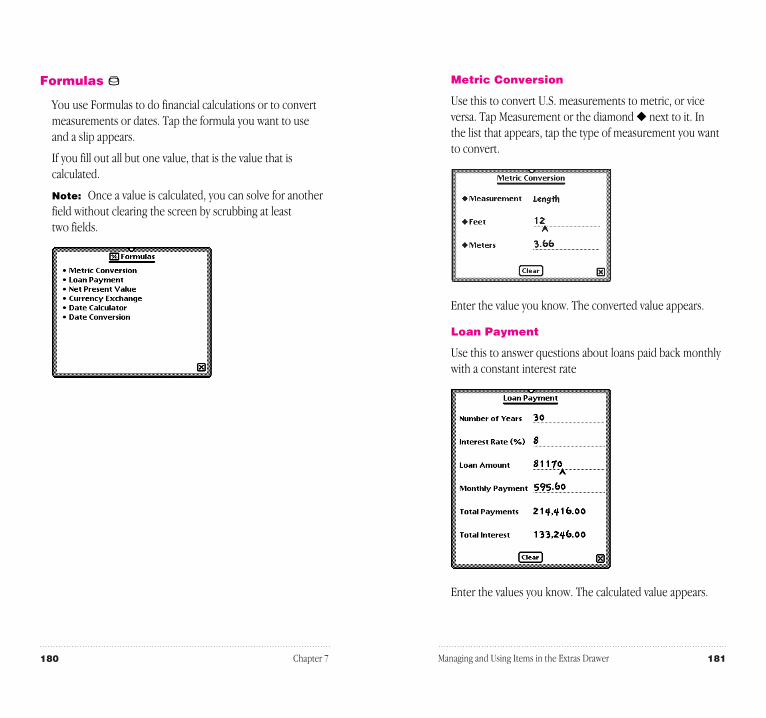
Metric Conversion
Use this to convert U.S. measurements to metric, or viceversa. Tap Measurement or the diamond u next to it. In the list that appears, tap the type of measurement you wantto convert.
Enter the value you know. The converted value appears.
Loan Payment
Use this to answer questions about loans paid back monthlywith a constant interest rate
Enter the values you know. The calculated value appears.
181Managing and Using Items in the Extras Drawer
Formulas ∞
You use Formulas to do financial calculations or to convertmeasurements or dates. Tap the formula you want to useand a slip appears.
If you fill out all but one value, that is the value that iscalculated.
Note: Once a value is calculated, you can solve for anotherfield without clearing the screen by scrubbing at least two fields.
180 Chapter 7

Tap the diamond u to change the country and currency.Enter the value you know. The converted value appears.
Date Calculator
Use this to determine the number of days between two datesor the date that is a specified number of days from anotherdate.
Enter the values. Tap the diamond u to enter the start andend dates or write the number of days.
Date Conversion
Use this to determine the day of the week, week in the year,and day in the year for a particular date.
Tap the diamond u to enter the date. The calculated valueappears in the space below.
183Managing and Using Items in the Extras Drawer
Net Present Value
Use this to answer questions about periodic interest andpayments.
Enter the values you know. To indicate money you’re payingout, write the amount as a negative number. To indicatemoney you’re receiving, write the amount as a positivenumber. Do not include a percent sign when you writeinterest rates. The calculated value appears.
Currency Exchange
Use this to convert from one currency to another or todetermine an exchange rate.
182 Chapter 7
This shows the numberof days since the yearbegan and the daysuntil the year ends.

HW Instructor Ó
The Handwriting Instructor is an interactive tutorial thatteaches the basics of writing. Knowing the best writingtechniques is important for using your MessagePadeffectively. The Handwriting Instructor is a good way for youto become knowledgeable about recognition and settingwriting and drawing preferences in the MessagePad.
You can access the instructor two ways:
m Tap the HW Instructor icon Ó on the last screen of theNewton Tour.
m Go to the folder where the HW Instructor Ó is filed. (If youdidn’t file or delete it, it is in the Setup folder.) Tap the HWInstructor icon Ó.
After going through the tutorial, you may want to delete it tofree up more memory. *See the section “Selecting, Moving,and Deleting Icons” for more information.*You may want to make a backup on a card before you delete the package.
In Box I and Out Box o
You use the In Box and Out Box (also known as the I/O Box)to manage items that you route. The In Box contains itemsthat have been routed to you, such as incoming faxes,beamed messages, and electronic mail. The Out Boxcontains items that you have routed or that are waiting to be routed.
185Managing and Using Items in the Extras Drawer
Help h
The on-screen help provides you with quick informationabout the MessagePad. Tap a topic and a list of tasksappears.
Tap a subtopic and information on that task appears.
Tap Topics to view the main help screen again or tap X toleave Help.
184 Chapter 7

Viewing the Out Box
Tap Out Box o. If any items are in the Out Box, a listappears. To view items in a specific folder, tap the folder tab,and in the list that appears, tap the folder you want to see.
To view a specific item, tap the item. A slip appears withinformation about the item. When you are finished viewingit, tap X to close the slip.
You can view items sorted by date, the way they were routed(transport), or by their status (unread, read, and so on). Seethe next section, “Setting Preferences for the I/O Box.”
187Managing and Using Items in the Extras Drawer
Viewing the In Box
Tap In Box I. A list of items appears, if there are any. Toview items in a specific folder, tap the folder tab, and in thelist that appears, tap the folder you want to see.
To view a specific item, tap the item. A slip appears withinformation about the item. When you are finished viewingit, tap X to close the slip.
You can view items sorted by date, the way they were routed(service), or by their status (unread, read, and so on). See“Setting Preferences for the I/O Box” later in this chapter.
186 Chapter 7
Tap Receive toreceive a fax, beam,
update, or e-mail
Tap the folder tab to change the folderyou are viewing
Tap the checkbox next to an item to select it
Tap the Tag button to put away or to log items
Tap the folder tab to change the folder you are viewing
Tap Send to sendselected items
Tap the checkbox nextto an item to select it
Tap here to readdress a selected item

After going through the tour, you may want to delete it tofree up more memory. *See the section “Selecting, Movingand Deleting Icons” for more information.*You may want to make a backup on a card before you delete the package.
Owner Info 9
This contains information about owners and worksites thatyou set up. This information is used in various routing slipswhen you print, fax, beam, and mail items, place telephonecalls, and make connections to other computers.
An owner is a person who uses the MessagePad. Theinformation under Owner can include: name, address,company, telephone and pager numbers, electronic mailaddresses, credit card and bank account information,birthday and anniversaries, and an electronic signature. Youcan set up several owners or several personas for the sameowner if, for example, you want a separate identity for aprivate business.
A worksite is a place where an owner establishes his or heraddress and affiliated information. For example, you can setup two worksites—one for your home and one for youroffice. Worksite information can include: telephonenumbers and dialing prefixes, printer, connection, andelectronic mail information. You can create severalworksites.
189Managing and Using Items in the Extras Drawer
Setting Preferences for the I/O Box
You can set preferences for how you want to view items inthe In Box and Out Box, as well as showing logged items,and choosing to store items in the internal memory.
Go to the In Box or Out Box. Tap the Information button ;,and in the list that appears, tap Prefs. Set the appropriateinformation.
When you are finished selecting preferences, tap X to closethe slip.
Newton Tour ‹
The Newton Tour is a brief tour that highlights the featuresand capabilities of your MessagePad. It takes only a fewminutes to go through and is a good way for you to becomefamiliar with the MessagePad.
You can access the tour two ways:
m Tap Tour on the last screen of the setup sequence.
m Go to the folder where the Newton Tour is filed. (If youdidn’t file or delete it, it is in the Setup folder.) Tap theNewton Tour icon ‹.
188 Chapter 7

3 In the slip that appears, enter the appropriate information.
4 When you are finished, tap X to close the slip.
Creating a worksite
To create a worksite, follow these steps:
1 Tap Owner Info 9.
A slip appears with the current owners and worksites listed.
2 Tap New and in the list that appears, tap Worksite &.
191Managing and Using Items in the Extras Drawer
Creating an owner
When you first received your MessagePad, you probablywent through the Setup application. This sets up basicowner information for you. If you want to create anotherowner, follow these steps:
1 Tap Owner Info 9.
A slip appears with the current owners and worksites listed.
2 Tap New and in the list that appears, tap Owner (.
190 Chapter 7

To see a list of all of the owners and worksites, tap theOverview button ˛. To go to a specific owner or worksite, tap it.
Setting preferences for Owner Info
Tap Owner Info 9 and, in the slip that appears, tap theInformation button ;. Tap Prefs and, in the slip thatappears, enter any appropriate information. Tap X to close the slip.
Tap the checkbox if you want to protect your Owner Info.Then, anytime Owner Info is accessed, a keypad appears toenter the security Personal Identification Number, or PIN.(You must select a PIN before doing this. See “Prefs.”)
Prefs π
There are several different preferences you can set in Prefs.
193Managing and Using Items in the Extras Drawer
3 In the slip that appears, enter the appropriate information.
4 When you are finished, tap X to close the slip.
Adding or changing information for anowner or worksite
Go to the owner or worksite card you want to modify. Toadd information, tap Add and, in the list that appears, tapyour choice. A slip appears. Enter the appropriateinformation, then tap X to close the slip.
To change information, tap on the text you want to change.A slip appears. Scrub the information, then enter the newinformation.
Viewing owner and worksite information
Go to the card you want to view and tap Show. In the listthat appears, tap Card to see the name card view, or tap All Info to see all of the information entered.
192 Chapter 7
This automatically setsthe area code and e-mailaccess number

3 On the confirmation slip that appears, tap your PIN again,then tap “ent.”
New buttons appear in the Security slip.
4 Tap “Ask For PIN” and, in the slip that appears, tap yourchoice—every time you turn on your MessagePad, once anhour, once a day, or never.
Entering your PIN
When your MessagePad asks for your PIN, a keypad appears.Tap your PIN, then tap “ent.”
To change your password
Tap Change PIN. Tap your current PIN on the keypad, thentap “ent.” Then tap a new password on the keypad and tap“ent.” A confirmation slip appears. Tap your new PIN again,then tap “ent.”
To remove the password
Tap Remove PIN. Tap your current PIN on the keypad, thentap “ent.”
195Managing and Using Items in the Extras Drawer
m Tap a topic and a slip appears. Enter the appropriateinformation. The various preferences you can set areexplained in detail on the following pages.
Security x
To prevent unauthorized people from using yourMessagePad you can set a password, or PersonalIdentification Number (PIN), that your MessagePad asks foronce a day, once an hour, or each time it’s turned on.
Important Write your PIN down and store it in a safeplace.
Warning If you forget your PIN you won’t be able to backup your information and you will have to do a hard reset inorder to use your MessagePad.
1 Tap Set PIN. A slip appears.
2 Tap your PIN on the keypad, then tap “ent.”
194 Chapter 7
You can specify when to enter your PINeach time you turn on your MessagePad,once an hour, once a day, or never
Tap your PIN on the keypad
Tap “ent” when you are finished
Tap “del” to delete a number

Alarm ≥
You can use this to set the type and volume of the alarm.
Tap “Persistent Alarms” to see a notification slip and hear aseries of beeps at intervals of several seconds, when thealarm goes off. You can choose to snooze and, after theselected time, the alarm begins again.
Sleep ˘
To save power, the MessagePad turns itself off if you haven’tused it for a specified period of time. (Slide the on/off switchto turn the MessagePad back on.)
Tap the diamond u or the word Sleep. In the list thatappears, tap the time you want your MessagePad to turn off.
197Managing and Using Items in the Extras Drawer
Locale ©
Use this area to choose which country’s standards to use.This affects things such as the date, time, keyboard, andpaper size.
Tap a diamond u and in the list that appears, tap your choice:
m Country—to set your country
m Keyboard—to choose the type of keyboard layout you use
m Paper Size—to choose the size of paper you use for printingand faxing
Sound ˆ
You can use this to set the type and volume of the alertsound for things like the minute timer. You can also chooseto hear sound effects when you are using the pen and doingother things on your MessagePad, such as scrubbing ordeleting an item.
196 Chapter 7
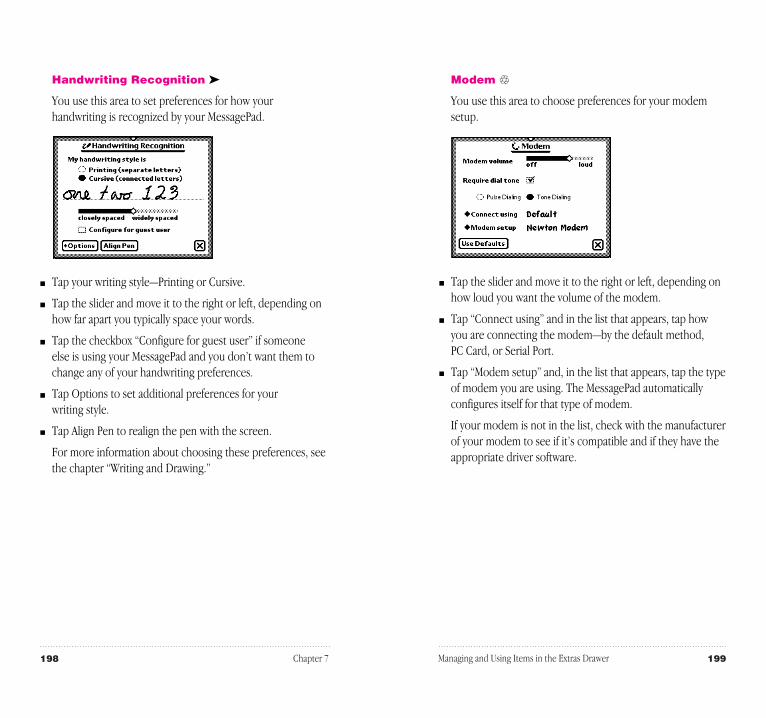
Modem 7
You use this area to choose preferences for your modemsetup.
m Tap the slider and move it to the right or left, depending onhow loud you want the volume of the modem.
m Tap “Connect using” and in the list that appears, tap howyou are connecting the modem—by the default method, PC Card, or Serial Port.
m Tap “Modem setup” and, in the list that appears, tap the typeof modem you are using. The MessagePad automaticallyconfigures itself for that type of modem.
If your modem is not in the list, check with the manufacturerof your modem to see if it’s compatible and if they have theappropriate driver software.
199Managing and Using Items in the Extras Drawer
Handwriting Recognition „
You use this area to set preferences for how yourhandwriting is recognized by your MessagePad.
m Tap your writing style—Printing or Cursive.
m Tap the slider and move it to the right or left, depending onhow far apart you typically space your words.
m Tap the checkbox “Configure for guest user” if someone else is using your MessagePad and you don’t want them tochange any of your handwriting preferences.
m Tap Options to set additional preferences for your writing style.
m Tap Align Pen to realign the pen with the screen.
For more information about choosing these preferences, seethe chapter “Writing and Drawing.”
198 Chapter 7

Styles º
You can change the font, style, and size of text, and thethickness of lines and shapes.
1 Select the text, line, or shape you want to change. (If youwant to set styles before you write or draw, make surenothing is selected.)
2 Tap Extras ´ to open the Extras Drawer.
3 Tap the folder tab and in the list that appears, tap UnfiledIcons. (If you filed Prefs in another folder, tap that name.)
4 Tap Styles º.
5 In the slip that appears, tap your choices.
If you want to move the Styles box, hold the pen on thepicture hanger and drag it.
6 You can make the following choices:
m Font—Choose Fancy, Simple, or Casual
m Size—Choose 9,10, 12, or 18 point size
m Style—Choose Plain, Bold, or Underline
m Pen—Choose a pen width of 1, 2, 3, or 4 point size
7 When you are finished making your selections, tap X to closethe slip.
201Managing and Using Items in the Extras Drawer
Setup s
You use the Setup application to personalize yourMessagePad. It allows you to set the time, date, and ownerinformation, align the pen with the screen, set yourhandwriting style, and enter an electronic signature.
When you first received your MessagePad and turned it on,you should’ve seen the Welcome screen of the Setupapplication and taken a few minutes to go through the seriesof screens.
If you did not go through the Setup application, and wouldlike to do so, go to the folder where Setup is filed. (If youdidn’t file it in another folder, it is in the Setup folder.) TapSetup s. The Welcome screen appears.
Follow the instructions on each screen. On the last screen,you can change any information you entered, tap Tour to goto the Newton Tour, or tap Done if you are finished andwant to use your MessagePad. Tap your choice.
200 Chapter 7

At the top is your current time zone, based on the worksiteinformation. To change this, tap the diamond. In the list thatappears, choose which worksite you want to be your currenttime zone. To choose another city, tap Other City. In the slipthat appears, tap a city, then tap X to close the slip.
Setting a second time zone
A second time zone is listed near the bottom of the TimeZones slip. You can set this if you travel or want to see thetime and date for a particular city. The distance from yourcurrent time zone is also listed.
m Tap the diamond u next to the second time zone to changeit. Then tap a city in the list.
203Managing and Using Items in the Extras Drawer
Time Zones z
You use this application to tell your MessagePad which cityyou’re in (or closest to). Your home time zone determinesyour e-mail access number. You can also set a second timezone if you’re traveling to get information on specific citiesand countries.
Setting your current time zone
When you tap Time Zones z, the following slip appears.
202 Chapter 7
This is the home city; tapthe diamond to change it
This is the away city; tapthe diamond to change it
Tap New to addinformation about a citythat’s not in the list
Tap the Routing button to delete information on a city
Tap Show to see different items
Tap a tab to see a list of different cities
Tap a city to select it
Tap the scroll arrows to move up and down in the list

GMT Offset—This is the Greenwich Mean Time Offset, whichtells how many hours the city’s time is from GMT. Cities to the east have positive values. Cities to the west havenegative values.
m To erase the second time zone listed, tap the Routing button µ, then tap Delete.
Seeing different views
You can view information several different ways. Tap Showand in the list that appears, tap your choice.
m World Map—this default view displays the world map withyour current and second time zones listed.
m All Info—shows information on the city and country listed inyour second time zone.
205Managing and Using Items in the Extras Drawer
m To change the country, tap the diamond u next to the name of the country and, from the list that appears, tap your choice.
m If the city you want is not listed, pick the closest city or tapNew to enter information for the new city.
Tapping “Closest City” automatically sets the area code,country, time zone, and prefix for dialing.
204 Chapter 7
Tap a tab to see a list of different countries; tap it again to see the countries filed under the second letter on the tab, and so forth
Tap the scroll arrows to move up and down in the list
Tap a country to select it
Change the city’s area code here
Tap a diamond to change or select information
Enter the name of the city here

m Two Clocks—displays two clocks showing the time and datefor each time zone.
Writing Practice W
Once you’ve gone through the Handwriting Instructor, youmay want to practice writing. You can use Writing Practice tosee how well the MessagePad can interpret your writing. Bypracticing in this area, you may be able to adapt your writingstyle to improve text recognition.
To use Writing Practice, go to the folder where it is filed. (Ifyou didn’t file it in another folder, it is in the Setup folder.)Tap Writing Practice W.
207Managing and Using Items in the Extras Drawer
m Notes—Allows you to enter notes on the second time zone.
m City Info—Shows information on the city in your secondtime zone.
You can add and delete cities in Time Zones. If you delete acity that already existed (you did not add it), you can onlyget this information back if you do a hard reset. See thechapter “Troubleshooting” for more information.
m Country Info—shows information on the country in yoursecond time zone.
206 Chapter 7
Write the suggested word here
This shows how theMessagePad wouldrecognize what youwrote
Tap here toaccess differentkinds of words
Tap Same Word to try andimprove your score (percentage)
Enter the country’s dialing code here
Tap a diamond to change or select information
Tap a diamond to change or select information
Enter the city’s area code here

You can organize the information in your MessagePad byfiling things in folders that you can create and name. You canalso use your MessagePad to find any text information that isstored in the internal memory of your MessagePad or on astorage card.
Organizing information
You can file name cards, items in the Notepad, calls, andicons in the Extras Drawer into folders. If you create a newitem while you’re in a folder, the new item will automaticallybe stored in that folder. If you create an item while you’relooking at a list of all your items or cards, the new item orcard goes into the Unfiled folder.
Using global and local folders
The MessagePad has two types of folders–global and local.Global folders exist in every location on your MessagePad,while local folders appear only in the application they arecreated in. You can create up to 12 global and 12 localfolders. One exception is in the Extras Drawer, where youcan only create local folders.
209
C H A P T E R
8
Organizing and FindingInformation

If you’re in one folder and move an item to another folder,the item will seem to disappear, because it movesimmediately to another folder.
Filing multiple items and cards
You can put a number of items or name cards in a folder allat once.
1 Go to the Notepad or Name File.
2 Tap the folder tab, then tap the name of the folder you wantto view.
3 Tap the Overview button ˛.
A list of all the items or cards in that folder appears.
4 Tap the checkbox next to each item or card you want to file.
A checkmark appears in the box next to each selected item.
211Organizing and Finding Information
For example, you may want to create a folder called“Friends” in the Name File and you don’t want that folder toshow up in any other application. You can make the“Friends” folder local to the Name File.
Your MessagePad comes with four global folders that arealready named—Unfiled, Business, Miscellaneous, andPersonal. These folders, except for Unfiled, can be renamedor deleted.
Note: If you reach the limit of 12 global folders and want tocreate another folder, a message appears telling you that thefolder will be created only in the current application (so itbecomes a local folder). If you reach the limit of 12 globaland 12 local folders, a message appears telling you that youcannot create any more folders.
You can also file items into folders on a storage card. Formore information, see “Filing Information on a StorageCard” in the chapter “Using Storage and Application Cards.”
Putting items from the Notepad or namecards into folders
1 Go to the item you want to file.
2 Tap the Folder button F.
The folder slip appears.
3 Tap the name of the folder you want the item to be storedin, then tap File.
210 Chapter 8
These two items are selected and will be filed
Tap the name of thefolder you want to filethe item in
Tap File to file the item into the selected folder

4 Tap the Folder button F and in the slip that appears, tap thename of the folder that you want to file the icons in.
5 Tap File.
Viewing items by folder
1 Go to a specific area, such as the Notepad, Name File, orExtras Drawer.
2 Tap the folder tab.
A list appears.
3 Tap the folder you want to view.
Items stored in that folder appear. Tap Overview ˛ to see alist of all of the items.
Creating, renaming, and deleting folders
The MessagePad comes with several existing folders. You cancreate additional folders and you can delete and renamefolders.
1 Go to the application you want, such as Notepad, Name File,or Extras Drawer.
213Organizing and Finding Information
5 Tap the Folder button F and in the slip that appears, tap thename of the folder that you want to file the items or cards in.
6 Tap File.
Putting icons from the Extras Drawer into folders
You can select icons in the Extras Drawer and put them intodifferent folders.
1 Tap Extras ´ to open the Extras Drawer.
2 Tap the folder tab and from the list that appears, tap thename of the folder the icons are in that you want to file(usually this is the Unfiled Icons folder).
3 Select an icon by placing the pen on or near the icon until a heavy mark appears under the pen and you hear a squeak.Then draw the highlighting mark over or around the icon.
You can select more than one icon to file at a time.
212 Chapter 8
This icon is selected

Finding information
The MessagePad makes it easy to find specific pieces ofinformation no matter where you have put them in yourMessagePad. You can search for:
m whole words written in text
m the first letters of words written in text
m more than one word at a time written in text
m information created before a certain date
m information created on a certain date
m information created after a certain date
To find information:
1 Tap the Find button †.
2 Tap the diamond u next to “Look for.”
A list appears.
215Organizing and Finding Information
2 Tap the Folder button F.
The folder slip appears.
3 Do one of the following:
m To create a new folder, tap New. Write the name of the newfolder and tap X to close the slip.
m To rename a folder, tap Edit Folder. Scrub the name of thefolder and write the new name. Tap X to close the slip. (Theitems in the folder remain there.)
m To delete a folder, choose the folder, tap Edit Folder, thentap Delete. (The items inside the folder move to the Unfiledfolder.)
4 Tap X when you are finished.
214 Chapter 8
Write the name of the new folder on the blank line
Tap New to create a new folder
Tap here to create a local folder, just for the application you are in
Tap Edit Folder torename or delete anexisting folder

4 Choose where you want to look for the information.
m Tap Everywhere to search the Notepad, Name File, DateBook, In Box, Out Box, To Do List, and Calls.
m Tap the current application.
m Tap Selected to search only specific areas or applications inyour MessagePad. In the list that appears, tap the checkboxnext to each area you want to search. The selected areas are checked.
5 Tap Find.
m If the MessagePad finds only one item, it displays the item.
217Organizing and Finding Information
3 Do one of the following:
m Tap “text” to search for information that is in text format(not ink text). Enter the words or characters you want to findon the dotted line.
m Tap “dates before,” “dates on,” or “dates after” to select adate. A slip appears.
To move to another month, tap the arrows. To change theyear, tap the upper half of a number to increase it, and thelower half to decrease it. Tap a day to select it. When youhave selected the date, tap X to close the slip.
216 Chapter 8
Tap the scroll arrows to move up and down in the list
Selected areas have acheckmark in the box
Enter the text you want to find
Tap the upper half of anumber to increase it;tap the lower half todecrease it
Tap a date to select it
Tap the arrows tochange the month
Tap here to select a date; a slip appears.

m If the MessagePad finds more than one item, it displays a listof the items it found.
Tap the title of an item to go to it. Tap the Overview button˛ to go back to the list of found items.
218 Chapter 8

You can use your MessagePad to send and receiveinformation. This includes printing, faxing, beaming, and sending electronic mail. You can also duplicate anddelete items.
Printing
You can use the following printers:
m Apple personal printers, including StyleWriter I and IIprinters, the Personal LaserWriter 300, and the PersonalLaserWriter LS (you cannot use ImageWriter printers)
m Apple network printers, including the LaserWriter Select 360,and most LaserWriter printers (with the exception of theLaserWriter Select 300 and 320 printers)
m If you have the Newton Print Pack, printers using a parallel(Centronics-type) interface, such as the Epson LQ, Epson FX,HP DeskJet, HP LaserJet, Canon BubbleJet, PortableStyleWriter, and printers that emulate them
The MessagePad does not have to be connected to a printerwhen you choose to print an item. You can place the item inyour Out Box until you want to print it.
219
C H A P T E R
9
Routing Information

3 Tap the Information button ; and, in the list that appears,tap Print Preferences.
4 In the slip that appears, select the appropriate information.
m To see status messages while you are printing, tap thecheckbox next to “Show status dialogs” (this is selected bydefault).
m To set when you want to print an item, tap “When printing”and, in the list that appears, tap “Send now,” “Send later,” or“Specify when.” “Send now” prints the item right away.“Send later” places the item in the Out Box until you decideto print it. “Specify when” gives you a choice of Now or Laterwhen you fill out the routing slip.
m To choose what to do with an item after printing it, tap“After printing” and in the list that appears, tap File, Log, orDelete.
5 When you are finished, tap X to close the slip.
221Routing Information
Connecting your MessagePad to a printer
To connect an Apple printer, plug one end of the printer orserial cable into the communication port on the side of yourMessagePad and the other end into the printer.
If you are using a network printer, plug a LocalTalk box intoyour MessagePad and connect it to another LocalTalk box.The second LocalTalk box can either be on the network orplugged directly into the printer.
To connect a printer that has a parallel (Centronics-type)interface, you need the Newton Print Pack, available fromyour Apple-authorized Newton dealer.
Important If possible, use a power adapter when printing.
Preparing to print
m Make sure you have filled out an owner and worksite inOwner Info. The information will be used in your returnaddress when you print memos or letters.
m Choose a paper size in the Locale preferences.
m Set your print preferences.
Setting print preferences
You can choose print preferences that are best for you.
1 Tap Extras F to open the Extras Drawer, tap the folder tab,then tap Unfiled Icons. (If you filed the In Box in anotherfolder, tap that folder’s name.)
2 Tap In Box I.
220 Chapter 9

To select a personal printer, tap your printer’s name in thelist if you see it. If not, tap Choose Other Printer and in theslip that appears, tap your choice.
To select a network printer, tap Choose Network Printer andin the slip that appears, tap your choice. If you don’t seeyour printer, make sure you’re connected to the network.
223Routing Information
Printing an item
1 Go to the item you want to print.
2 Tap the Routing button µ and, in the list that appears, tap Print.
A routing slip appears. Enter the appropriate information.
m Tap the diamond u at the top left of the slip to change yourworksite.
m Tap Printer.
222 Chapter 9
Tap your printer
Tap X when you are finished selecting your printer
Tap here to setyour location
Tap Printer to select the type of printer
Tap Preview to seewhat the pageswill look like
Tap Print to printthe item or transferit to the Out Box
Tap Format to choose a format
Tap Choose NetworkPrinter if yourMessagePad is connected to a network printer
Tap Choose Other Printer to selecta printer that is not listed

Preparing to send and receive faxes
m Make sure you’ve filled out an owner and worksite in OwnerInfo. The information will be used in your return address.
m Fill in the information requested for Modem preferences inPrefs. For more information, see “Prefs” in the chapter“Managing and Using Items in the Extras Drawer.”
If you are using a phone system that doesn’t have a dial tone,make sure “Require dial tone” is not checked.
m Set your fax preferences.
Setting fax preferences
You can choose fax preferences that are best for you.
1 Tap Extras ´ to open the Extras Drawer, tap the foldertab, then tap Unfiled Icons. (If you filed the In Box inanother folder, tap that folder’s name.)
2 Tap In Box I.
225Routing Information
m Tap Format and in the list that appears, tap a selection.
If you choose a format that that requires an addressee, suchas Memo or Letter, fill in the addressee’s information, thentap X to close the slip. If the addressee is in the Name File,write the first or last name, tap the diamond, then tap thefull name to copy the Name File information automatically.
m Tap Preview to see what the pages will look like.
Tap Next to see other pages. Tap X when you are finished.
3 Tap Print.
Faxing
If you have a Newton-compatible fax modem, you can usethe MessagePad to send and receive faxes. The MessagePaddoes not have to be connected to a fax modem when youchoose to fax an item. The item waits in your Out Box untilyou are connected to a fax modem.
Connecting your MessagePad to a faxmodem
To connect a fax modem, see the instructions that came withthe device.
224 Chapter 9
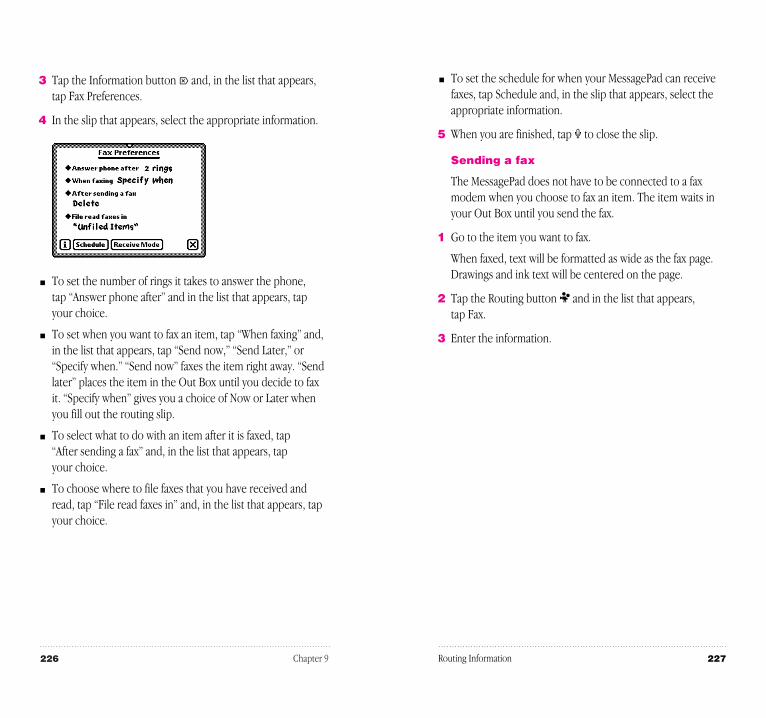
m To set the schedule for when your MessagePad can receivefaxes, tap Schedule and, in the slip that appears, select theappropriate information.
5 When you are finished, tap X to close the slip.
Sending a fax
The MessagePad does not have to be connected to a faxmodem when you choose to fax an item. The item waits inyour Out Box until you send the fax.
1 Go to the item you want to fax.
When faxed, text will be formatted as wide as the fax page.Drawings and ink text will be centered on the page.
2 Tap the Routing button µ and in the list that appears, tap Fax.
3 Enter the information.
227Routing Information
3 Tap the Information button ; and, in the list that appears,tap Fax Preferences.
4 In the slip that appears, select the appropriate information.
m To set the number of rings it takes to answer the phone, tap “Answer phone after” and in the list that appears, tapyour choice.
m To set when you want to fax an item, tap “When faxing” and,in the list that appears, tap “Send now,” “Send Later,” or“Specify when.” “Send now” faxes the item right away. “Sendlater” places the item in the Out Box until you decide to faxit. “Specify when” gives you a choice of Now or Later whenyou fill out the routing slip.
m To select what to do with an item after it is faxed, tap “After sending a fax” and, in the list that appears, tap your choice.
m To choose where to file faxes that you have received andread, tap “File read faxes in” and, in the list that appears, tapyour choice.
226 Chapter 9

m Tap Format and in the list that appears, tap a format.
If you choose a format that that requires an addressee, suchas Memo or Letter, fill in the addressee’s information, thentap X to close the slip. If the addressee is in the Name File,you can write the first or last name, tap the diamond u, thentap the full name to copy the Name File informationautomatically.
m Tap Cover Page and, in the list that appears, tap your choice.
If you want to send notes on the cover page, tap Notes andwrite what you want to appear on the cover page. Tap Xwhen you are finished.
m Check the box to select fine or standard resolution.
m Tap the checkbox next to “Manually connect” if you don’twant the modem to dial the fax number. (See the nextsection, “Manual Dialing.”)
m Tap Preview to see what the pages will look like.
Tap Next to see other pages. Tap X when you are finished.
4 Tap Fax.
229Routing Information
m Tap the diamond u at the top left of the slip to change yourworksite.
m Tap Name to select who you want to fax the item to. If thename is not in the list that appears, tap Other Names and inthe name card overview, tap the name. To change the faxnumber you are sending the item to, tap the diamond unext to the fax number in the name card overview.
228 Chapter 9
Tap here to changeyour worksite
Tap Name to choose a name from your Name File or add a newname
Tap Format to choose aformat, and tap CoverPage to select whether youwant a cover page or not
Tap Preview to seewhat the pageswill look like
Tap Notes to add anote to your fax
The receiving fax number is shown
Tap Fax to fax the item ortransfer it to the Out Box

Receiving a fax
1 Tap Extras ´ to open the Extras Drawer, tap the foldertab, then tap Unfiled Icons. (If you filed the In Box inanother folder, tap that folder’s name.)
2 Tap In Box I.
3 Tap Receive and in the list that appears, tap Fax.
A slip appears, asking if you want to wait for the call orconnect manually.
m If you tap Wait For Call, the MessagePad prepares the faxmodem and waits for the fax telephone call. Once theconnection is made, a slip appears showing you the status ofthe fax.
m If you tap Manually Connect, a slip appears with instructions.Follow these instructions, then tap Fax. Once the connectionis made, a slip appears showing you the status of the fax.
Viewing a fax
You can view items that have been faxed to you in severalformats.
1 Tap Extras ´ to open the Extras Drawer, tap the foldertab, then tap Unfiled Icons. (If you filed the In Box inanother folder, tap that folder’s name.)
2 Tap In Box I.
231Routing Information
Manual dialing
Sometimes you may need to dial the fax number yourself; forexample, when asking an operator for a particular extensionor faxing on a telephone connection that you’ve alreadyestablished.
1 Connect the MessagePad to a fax modem. Make sure aphone is connected to the same line. (See your modemmanual for instructions.)
2 Be sure to check the “Manually Connect” box. Send a fax.
3 Dial the number on your phone and wait until you hear ahigh-pitched tone on the other end of the line.
4 Tap Fax.
5 Wait about eight seconds, until you hear sounds from themodem speaker.
6 Hang up the phone.
Using Assist to send a fax
If the text of the fax includes the recipient’s name, and if therecipient has a fax number in the Name File, you can tapAssist ® to have the MessagePad automatically fax the item. To do this, select the recipient’s name, tap Assist ®, and tapPlease. In the list that appears, tap Fax. Tap Do and enter theinformation in the Fax slip that appears. Tap Fax to send the fax.
230 Chapter 9

4 Tap Tools and in the list that appears, tap a choice to seedifferent views of the item or to rotate the image.
m Show Thumbnail—displays small thumbnails of the pages
m Fit In Window—allows you to see the entire fax image onthe MessagePad screen
m Original Size—displays the item in the size it was originallysent
m Full Resolution—displays an image pixel for pixel
m Enlarge Fax—enlarges the item
m Rotate right; Rotate 180°; Rotate left—rotates the image onthe screen
5 To reply to a fax, tap the Tag button t. Write information onthe fax and send it with your annotations.
6 Tap X when you are finished.
233Routing Information
3 Tap the faxed item you want to view.
A viewer appears showing you the information.
232 Chapter 9
Tap Tools to view thefax in different ways
Tap the Tag button toput away or log the
item or reply
Tap the Folder button tofile the item in a folder
Indicates who sent the fax and when it was received
Tap the Routing buttonto print the item

4 Select the appropriate information.
m Tap the checkbox next to “Receive beams automatically” ifyou want your MessagePad to be able to receive beamsautomatically. Receiving automatically uses more batterypower.
m Tap the checkbox next to “Show status dialogs” if you wantto see status messages while you are beaming.
m To set when you want to beam an item, tap “When beaming”and, in the list that appears, tap “Send now,” “Send later,” or“Specify when.” “Send now” beams the item right away.“Send later” places the item in the Out Box until you decideto beam it. “Specify when” gives you a choice of Now orLater when you fill out the routing slip.
m To select what to do with an item after it is beamed, tap“After beaming” and in the list that appears, tap your choice.
m To set which folder to place beamed information that youhave already read, tap “File read items in” and in the list thatappears, tap your choice.
5 When you are finished, tap X to close the slip.
235Routing Information
Sending and receiving beamedinformation to another Newton product
You can send information from one Newton product toanother using an infrared beam. The infrared windows onthe Newton devices should point directly at each other andshould be less than 1 meter (about 3 feet) apart—closer inbright sunlight.
Setting beam preferences
You can choose beam preferences that are best for you.
1 Tap Extras ´ to open the Extras Drawer, tap the foldertab, then tap Unfiled Icons. (If you filed the In Box inanother folder, tap that folder’s name.)
2 Tap In Box I.
3 Tap the Information button ; and, in the list that appears,tap Beam Preferences.
A slip appears.
234 Chapter 9

Receiving beamed information
There are two ways you can receive beamed information.
Receiving beams automatically
If you have set your MessagePad to receive beamsautomatically (see “Setting Beam Preferences” earlier in thischapter), you can receive beams any time. Make sure theinfrared windows on both Newton devices are pointeddirectly at each other and that there’s a clear line of sightbetween them. A slip appears showing you the progress ofthe beam. Receiving automatically uses more battery power.
Receiving beams manually
If you haven’t set up your MessagePad to receive beamsautomatically, follow these steps:
1 Tap Extras ´ to open the Extras Drawer, tap the foldertab, then tap Unfiled Icons. (If you filed the In Box inanother folder, tap that folder’s name.)
2 Tap In Box I.
3 Tap Receive and in the list that appears, tap Beam ı.
Make sure the infrared windows on both Newton devices arepointed directly at each other, that there’s a clear line ofsight between them, and that the other Newton product isready to receive your beam.
The item appears in the In Box.
237Routing Information
Beaming an item
1 Go to the item you want to beam.
2 Tap the Routing button µ and, in the list that appears, tapBeam.
Make sure the infrared windows on both Newton devices arepointed directly at each other, that there’s a clear line ofsight between them, and that the other Newton product isready to receive your beam (see the next section, “ReceivingBeamed Information”).
4 Tap Beam.
A slip appears showing you the status of the beam. TheMessagePad tries to beam the item for about two minutes. Ifit doesn’t succeed, a message appears in the Out Box andthe item stays in the Out Box until you try again.
236 Chapter 9

Using electronic mail
You can use electronic mail, or e-mail, to send and receivetext messages, packages, and entire items from the Notepad,Name File, Date Book, Calls, or In and Out Boxes.
To send and receive e-mail you must have
m a Newton-compatible modem and the cables required toconnect it to the phone line and to your MessagePad (seeyour modem manual for more information)
m an e-mail account (see Appendix C, “eWorld Setup andRegistration”)
Important Because of local regulations, electronic mailoptions may be different or unavailable in some countries.
You can mail items from the Notepad, Name File, Date Book,Calls, or In Box and Out Box.
Connecting your MessagePad to a modem
To connect a modem, see the instructions that came withthe device. The MessagePad does not have to be connectedto a modem when you choose to send an item. Items to bemailed wait in the Out Box until you decide to mail them.
239Routing Information
Viewing beamed items
If you received the beam automatically, tap the star at thetop center of the screen and in the slip that appears, tap I/OBox. A slip with the beamed information appears.
If you received the beam manually, go to the In Box and tapthe item.
When you’re finished viewing the item, tap X to close it.
238 Chapter 9
Indicates who sent the beam and when it was received
Tap the Tag button toput away or log the item
Tap the Folder button tofile the item in a folder
Tap the Routing buttonto print the item

3 Tap the Information button ; and in the list that appears,tap eWorld Preferences.
4 In the slip that appears, select the appropriate information.
m Tap “When connecting” and in the list that appears, chooseto browse or download your mail.
“Browse mail” is the default. In this mode, when you areconnected to a host you only see titles; the mail has not yet been downloaded. To download an item, tap it.
If you selected “Download mail,” your mail is downloadedautomatically when you connect.
m Tap a checkbox next to an item to disconnect automaticallyafter you send e-mail, strip Internet headers from the e-mail addresses (from persons who sent you mail using theInternet), or to show status dialogs as mail is being sent and received.
m Tap “When mailing” and, in the list that appears, tap “Sendnow,” “Send later,” or “Specify when.” “Send now” mails theitem right away. “Send later” places the item in the Out Boxuntil you decide to mail it. “Specify when” gives you a choiceof Now or Later when you fill out the routing slip.
241Routing Information
Preparing to send and receive e-mail
m Make sure you’ve filled out an owner and worksite in Owner Info. The information will be used in your returnaddress and for dialing. If you want to avoid long-distancecharges, you can change the e-mail access number in Owner Info.
m Fill in the information requested for Modem preferences inPrefs. For more information, see “Prefs” in the chapter“Managing and Using Items in the Extras Drawer.”
If you are using a phone system that doesn’t have a dial tone,make sure “Require dial tone” is not checked.
m If you are using an eWorld account, set your eWorldpreferences.
Setting eWorld preferences
You can set various e-mail preferences that are best for you.
1 Tap Extras ´ to open the Extras Drawer, tap the foldertab, then tap Unfiled Icons. (If you filed the In Box inanother folder, tap that folder’s name.)
2 Tap In Box I.
240 Chapter 9

2 Tap the Routing button µ and in the list that appears, tapMail.
3 In the slip that appears, enter the appropriate information.
4 Tap Mail.
5 If you tapped Now, enter the appropriate information in theslip that appears.
m Tap Options and choose one of the following:
243Routing Information
m Tap “After mailing” and in the list that appears, choose tofile, log, or delete items after mailing them.
m Tap “File read items in” and in the list that appears, tap thename of the folder you want to file all items in, then tap Set.
m Tap Mail Font to change the style as you view your mail. Ifyou put an item away, it remains in the style you chose.
m Tap Auto Delivery and in the slip that appears, enterinformation on when you want to automatically send orreceive e-mail.
5 When you are finished, tap X to close the slip.
Sending e-mail
1 Go to the item you want to send.
If you want to mail a package, go to where the package isstored in the Extras Drawer or on a storage card. Select thepackage by pressing the pen on or near the package iconuntil you see a large dot and hear a squeak. Then draw thehighlighting mark over or around the icon.
242 Chapter 9
Tap here to change thereturn address
Tap these diamonds andin the list that appears, tap the names of the recipients
Tap Subject and in the slip that appears, enter a subject
Tap Show Text to see what the text looks like
Tap the upper half of a number to increase it; tap the lower half to decrease it
Tap each day that you want to send e-mail on
The times and days e-mail willautomatically be sent are listed
Tap this checkbox toautomatically enablemail delivery
Tap Add to add a delivery time; tapRemove to delete a delivery time
Tap here to change thereturn address
This is the access numberentered by the MessagePad

4 In the slip that appears, enter the appropriate information.
m Tap Options and choose one of the following:
m Retrieve Unread Mail—this places items that have not yetbeen read in the In Box; they are logged as “Remote” ifyou are in Browse mode. To read an item later, tap it. It isthen logged as Read.
m Retrieve Read Mail—this places items that have beenread in the In Box; they are logged as “Read”
m Retrieve Sent Mail—this places items that have been sentin the In Box; they are logged as “Sent”
m Tap Assist ® to change the access number, add a prefix, orenter credit-card information.
5 Tap Connect.
A slip appears showing you the status of the connection.
245Routing Information
m Retrieve Unread Mail—this places items that have not yetbeen read in the In Box; they are logged as “Remote” ifyou are in Browse mode. To read an item later, tap it. It isthen logged as Read.
m Retrieve Read Mail—this places items that have beenread in the In Box ; they are logged as “Read”
m Retrieve Sent Mail—this places items that have been sentin the In Box; they are logged as “Sent”
m Tap Assist ® to change the access number, add a prefix, orenter credit-card information.
6 Tap Connect.
Receiving electronic mail
You can receive messages and packages via e-mail.
1 Tap Extras ´ to open the Extras Drawer, tap the foldertab, then tap Unfiled Icons. (If you filed the In Box inanother folder, tap that folder’s name.)
2 Tap In Box I.
3 Tap Receive and in the list that appears, tap eWorld.
244 Chapter 9
Tap here to change thereceiving address
This is the access number automaticallyentered by the MessagePad

m Tap the Tag button t and, in the list that appears, tap yourchoice:
m Put Away—places items where they should logically go(for example, text messages are placed in the Notepad)
m Log—enters Read as the status of the message in the In Box
m Forward—forwards the item to someone via e-mail
m Reply—sends a reply via e-mail
You may also see an option to Add to Names, which createsa name card in the Name File for the sender and includes thesender’s e-mail information.
Using downloaded packages
Packages that are sent to you via e-mail must be put away inthe Extras Drawer before you can use them. To download apackage, go to the In Box and tap the item. Tap the Tagbutton t and in the list that appears, tap Put Away. Thepackage is placed in the Extras Drawer.
Replying to and forwarding electronic mail
When viewing an item in the In Box, tap the Tag button tand in the list that appears, tap Reply or Forward. Space iscreated to enter a reply or to forward message. The item is automatically tagged as “Pending.” Tap Send and a routing slip appears. Enter the appropriate information, then tap Mail.
247Routing Information
Viewing e-mail messages
To view items that are received as e-mail, do the following:
1 Tap Extras ´ to open the Extras Drawer.
2 Tap the folder tab, then tap Unfiled Icons. (If you filed the InBox in another folder, tap that folder’s name.)
3 Tap In Box I.
4 Tap the item you want to view.
It appears on the screen.
5 You can now do one of the following:
m Tap the Folder button F to file the item
m Tap the Routing button µ to print, fax, or beam it, as well asto duplicate or delete it
246 Chapter 9

Routing items in the Out Box
You can place items in the Out Box to route at a later time ordate. Items that have not been sent are logged as “Ready.”
To route these items, do the following:
1 Tap Extras ´ to open the Extras Drawer.
2 Tap the folder tab, then tap Unfiled Icons. (If you filed theOut Box in another folder, tap that folder’s name.)
3 Tap Out Box o.
4 Tap the item you want to route or the checkbox next to it.
You can select multiple items, but they must all be routedthe same way (for example, all faxes or all e-mail). To do this,tap the checkbox next to each item you want to select.
5 Tap Send and in the list that appears, tap your choice.
A slip appears showing you the status of the connection. Theitem is then logged as “Sent.”
248 Chapter 9

You can have the MessagePad automatically perform certaintasks for you using Assist. The tasks that can be performedinclude sending faxes or electronic mail, dialing telephonenumbers, scheduling, setting the time and date, finding text,printing, and entering items in your To Do list. You can alsotap Assist to access on-screen help.
You can make requests in several ways:
m Tap Assist ® and, in the slip that appears, tap the diamondu to choose from a list of requests the MessagePadunderstands, or write your request on the blank line.
m Write your request and select it (such as a name from a notein the Notepad, for example), then tap Assist ®.
249
C H A P T E R
10
Using Assist and Accessing On-Screen Help

5 Enter any other necessary information.
6 When you’re finished, tap the button near the bottom of theslip to perform the action (tap Schedule, for instance, toschedule the meeting).
Writing your request
1 Write at least one word of your request, beginning with arequest word or one of its synonyms.
251Using Assist
Using the Assist button
1 Make sure no text is selected, then tap Assist ®.
A slip appears.
2 You can enter your request in two ways:
m Write your request on the line.
m Tap the diamond u next to the word Please. From the listthat appears, tap the request word you want.
The word appears on the line.
3 Add more words if you like, such as a name or date.
You may find it easier to add the details in the confirmationslip.
4 Tap Do.
A confirmation slip appears with some information alreadyentered, based on your request.
250 Chapter 10
This is an example of a confirmation slip that appears when you make a schedulerequest from Assist

Using the correct request words
The MessagePad understands the following requests andtheir synonyms. (If you have other applications installed onyour MessagePad, the other applications may use additionalrequest words.)
m Call to dial a telephone number
Synonyms: phone, ring, dial
Call Bob at home looks in the Name File to find Bob’shome phone number, then puts it in the call slip.
m Fax to fax the item on the screen
Synonyms: none
Fax Anderson opens a fax slip with the name Anderson andAnderson’s fax number filled in.
m Find to search for text
Synonyms: locate, search for, look for
Find Linda opens a find slip and enters “Linda.”
m Mail to send the item on the screen as electronic mail
Synonyms: email, send
Mail Anderson opens a mail slip with the name Andersonfilled in.
m Print to print the item on the screen
Synonyms: none
Print opens a print slip for the item on the screen.
253Using Assist
2 Select the request. Place the pen on or near the item until aheavy mark appears under the pen and you hear a squeak.Draw the highlighting mark over or around the item.
3 Tap Assist ®.
The MessagePad interprets the request and a confirmationslip appears with some information already entered, basedon your request.
4 Enter other necessary information.
5 When you’re finished, tap the button near the bottom of theslip to perform the action (tap Schedule, for instance, toschedule the meeting).
252 Chapter 10
Example of selected text from a checklist

m Time to look up the time in a city or country
Synonyms: time in, the time in, what time, what is the time,what is the time in, what time is it, what time is it in
Time displays the Time Zone map.
Time in Paris opens the Time Zone map and shows thetime in Paris.
Tips on using Assist
The MessagePad infers important information to help youcarry out your requests.
m Your MessagePad knows which area in the MessagePad youare using, which makes it easy to request assistance. Forexample, if you tap Assist ®, tap the diamond u, and tapPrint, your MessagePad assumes you want to print the itemyou’re looking at.
m Your MessagePad also knows the last thing you did. Forexample, if you write a name, tap Assist ®, tap the diamond u, and tap Fax, your MessagePad assumes youwant to fax the item you’re looking at to the person whosename you previously wrote.
m Your MessagePad knows what you select. For example, if youselect a name from an item in the Notepad, tap Assist ®, tapthe diamond u, and tap Mail, the MessagePad assumes youwant to mail electronically the note you’re looking at to theperson whose name you selected.
255Using Assist
m Remember to add a reminder to your to-do list
Synonyms: remember to, don’t forget to, don’t let me forget to, to do, remind, remind me, remind me to
Remember to backup Monday opens a to-do slip withMonday’s date and “backup” as the subject.
m Schedule to add a meeting or event to your calendar
Synonyms: meet, meet me, meet with, talk to, talk with,breakfast, breakfast with, brunch, brunch with, lunch, lunch with, dinner, dinner with, holiday, birthday, b-day,bday, anniversary
Lunch Linda opens a schedule slip. The date and timedepend on when you make the request.
IF YOU MAKE THE MESSAGEPAD ASSUMES THE REQUEST LUNCH WILL BE:
before noon today at noon
before 2:00 PM the next half hour
after 2:00 PM tomorrow at noon
specifying a day first occurrence of that day at noon
If the MessagePad’s assumption is wrong, you can makecorrections in the confirmation slip.
254 Chapter 10

3 If necessary, tap a topic to see the list of subtopics.
4 Tap a subtopic.
The information on that subject is shown.
5 When you are finished viewing information, tap Topics to go back to the list of topics, or tap X to leave the on-screen help.
257Using Assist
Accessing on-screen help using Assist
On-screen help is available at any time on the MessagePad.On-screen help contains basic information on how toperform various tasks.
To access the on-screen help:
1 Make sure no text is selected, then tap Assist ®.
A slip appears.
2 Tap “How Do I?”
A list of help topics appears. The on-screen help is organizedby topics and subtopics. The topics cover main areas, whilethe subtopics list specific tasks.
256 Chapter 10
Tap X to close the on-screen help
Tap Topics to go backto the main list of
topics and subtopics
This is a topic; subtopicsappear below it

You can use PCMCIA Type I and Type II cards with yourMessagePad. There are three types of cards: applicationcards (also called titles), storage cards (which add morestorage space to your MessagePad), and accessory cards(such as modems).
Inserting and removing cards
Before you can use a card, you must remove the plastic cardthat came with your MessagePad.
1 Unlock the card slot by pushing down the locking tab.
259
C H A P T E R
11
Using Storage and Application Cards

When you insert the card, make sure you push it all the wayinto its slot and lock the locking tab. When you lock thelocking tab, your MessagePad takes a few moments toexamine the card. When your MessagePad is ready to use thecard, a slip appears with information about the card.
What you see next on your MessagePad depends on whattype of card you inserted:
m New storage card—A message appears telling you the cardcannot be read and you need to erase all of the informationon it. See the next section, “Using Storage Cards.”
m Previously used storage card—A slip appears showing thename of the card. See the next section, “Using StorageCards.”
m Application card—An icon appears in the Extras Drawer.See the section “Using Application Cards” later in thischapter.
Important After removing a card, always insert anothercard or insert the protective plastic card that came with your MessagePad. Never use or store your MessagePad whilethe card slot is empty.
Warning You may remove cards while your MessagePad ison. However, do not remove a card while your MessagePadis still using it, or you may lose the information stored on thecard. If you want to remove a card, wait 5–10 seconds afterstoring or using the card.
261Using Storage and Application Cards
2 Release the card by pushing the release lever, which pushesthe card out of the slot.
3 Take the card out.
4 Insert the new card in the card slot. The card fits only oneway; don’t force it.
5 Push the card all the way in to make sure it’s connectedproperly, then lock the card in the slot by pushing up thelocking tab.
260 Chapter 11

2 Tap Erase.
You’ll see another warning message asking if you really wantto erase the information on the card.
3 Tap Erase.
After your MessagePad erases and formats the card, a slipappears showing information about the card.
4 Tap X to close the slip.
263Using Storage and Application Cards
Using storage cards
You can use storage cards to store new information and tomake a backup of the information in your MessagePad
You can use any Apple storage card with your MessagePad.Other cards may also work, including SRAM (static random-access memory) cards that have their own batteries. Askyour Apple-authorized dealer for more information.
Preparing a new storage card
Storage cards that are new or that have been used ondevices other than a MessagePad need to be erased andformatted before you can use them.
Note: To use a card that has been used in a device with anearlier version of the Newton operating system, see the nextsection, “Using a Card Formatted with an Earlier Version ofthe Newton Operating System.”
1 Insert the new storage card.
A message appears.
Warning Tapping Erase erases all of the information anddata on the card, including packages or a backup.
262 Chapter 11
This icon shows whether ornot the card is unlocked orlocked
You can create a title for a card by scrubbing “Card” and writing another name

Filing information on a storage card
You can file name cards, items in the Notepad, calls, andicons in the Extras Drawer in folders on a storage card.
1 Go to the item you want to file.
To file an icon from the Extras Drawer, you must first selectit. See the section “Putting Icons from the Extras Drawer intoFolders” in the chapter “Organizing and FindingInformation.” You cannot move built-in icons, such asFormulas, to a folder on a storage card.
2 Tap the Folder button F and, in the slip that appears, tap thename of the card and the name of the folder.
3 Tap File.
The item is now stored on the card. A small triangle appearson the Folder button F for the item, unless it’s stored in theExtras Drawer.
265Using Storage and Application Cards
Using a card formatted with an earlierversion of the Newton operating system
You can use storage cards in your MessagePad that wereformatted with an earlier version of the Newton operatingsystem. You can choose to read or convert the card.
Insert the card. A warning slip appears.
m If you tap “Mount read-only,” you can view your informationand packages, but you cannot edit them. You’ll still be ableto use the card with a Newton product that has an earlierversion of the Newton operating system.
m If you tap “Convert,” the MessagePad converts the card’sformat and data so the data can be used with the Newton 2.0operating system. A warning message appears telling youthat converting the card will make it unusable on aMessagePad that has an earlier version of system software.Tap Convert to convert the card.
Important Some applications and application data may notbe compatible with the Newton 2.0 operating system. Pleasecontact the software publisher for more information aboutcompatibility or an upgrade.
264 Chapter 11
Tap a circle to select the folderto file an item in
Tap the circle next to the card name to select it
The triangle on theFolder button tells youthat this note is filed, or stored, on a card
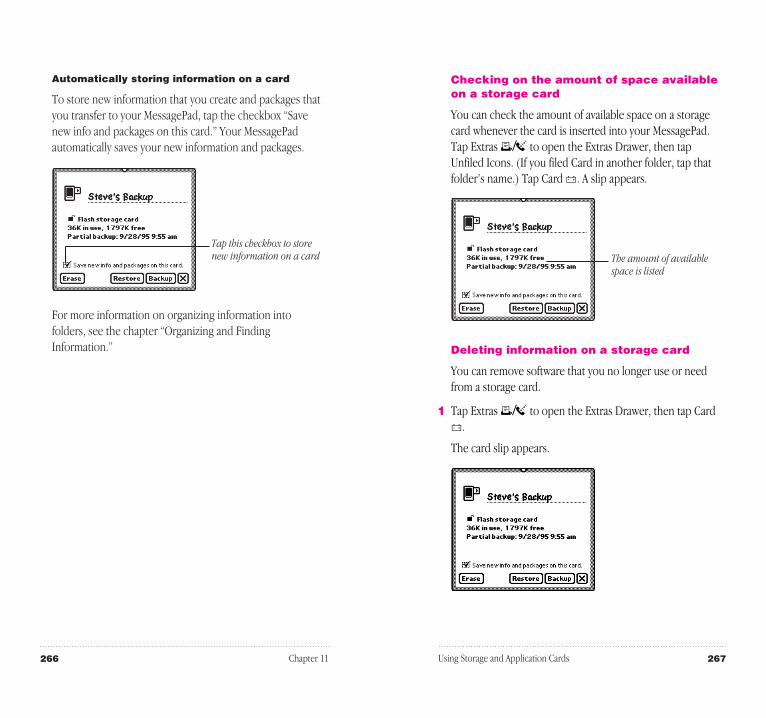
Checking on the amount of space availableon a storage card
You can check the amount of available space on a storagecard whenever the card is inserted into your MessagePad.Tap Extras ´ to open the Extras Drawer, then tapUnfiled Icons. (If you filed Card in another folder, tap thatfolder’s name.) Tap Card B. A slip appears.
Deleting information on a storage card
You can remove software that you no longer use or needfrom a storage card.
1 Tap Extras ´ to open the Extras Drawer, then tap CardB.
The card slip appears.
267Using Storage and Application Cards
Automatically storing information on a card
To store new information that you create and packages thatyou transfer to your MessagePad, tap the checkbox “Savenew info and packages on this card.” Your MessagePadautomatically saves your new information and packages.
For more information on organizing information intofolders, see the chapter “Organizing and FindingInformation.”
266 Chapter 11
Tap this checkbox to storenew information on a card The amount of available
space is listed
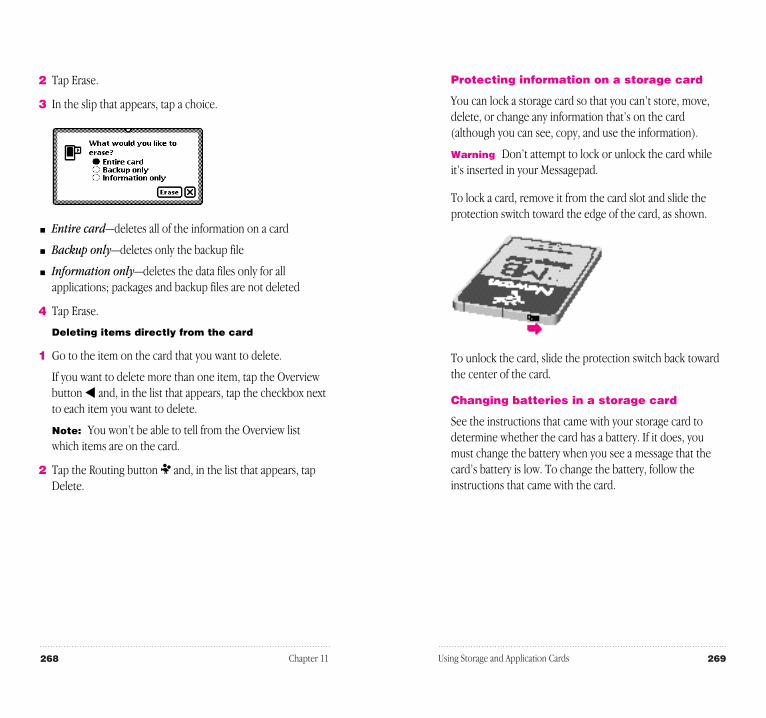
Protecting information on a storage card
You can lock a storage card so that you can’t store, move,delete, or change any information that’s on the card(although you can see, copy, and use the information).
Warning Don’t attempt to lock or unlock the card whileit’s inserted in your Messagepad.
To lock a card, remove it from the card slot and slide theprotection switch toward the edge of the card, as shown.
To unlock the card, slide the protection switch back towardthe center of the card.
Changing batteries in a storage card
See the instructions that came with your storage card todetermine whether the card has a battery. If it does, youmust change the battery when you see a message that thecard’s battery is low. To change the battery, follow theinstructions that came with the card.
269Using Storage and Application Cards
2 Tap Erase.
3 In the slip that appears, tap a choice.
m Entire card—deletes all of the information on a card
m Backup only—deletes only the backup file
m Information only—deletes the data files only for allapplications; packages and backup files are not deleted
4 Tap Erase.
Deleting items directly from the card
1 Go to the item on the card that you want to delete.
If you want to delete more than one item, tap the Overviewbutton ˛ and, in the list that appears, tap the checkbox nextto each item you want to delete.
Note: You won’t be able to tell from the Overview listwhich items are on the card.
2 Tap the Routing button µ and, in the list that appears, tapDelete.
268 Chapter 11

Using application cards
Application cards contain software in a variety of categories,including financial tools, business and personal productivitytools, travel guides, reference information, and games.
To use an application card:
1 Insert the card. Make sure you push it all the way into its slotand lock the locking tab.
Wait for a slip to appear indicating that the MessagePad hasexamined the card.
2 Tap Extras ´ to open the Extras Drawer.
An icon for the application appears in the Extras Drawer.
3 Tap the icon and follow the instructions that came with theapplication.
270 Chapter 11
You can back up and restore information from yourMessagePad to a storage card. A copy of all the informationin your MessagePad is called a backup, which you use torestore the information in the unlikely event that yourMessagePad seriously malfunctions and loses theinformation.
To keep your MessagePad information safe, you shouldalways have a recent copy of all the information in yourMessagePad. You can keep a backup on a storage card.
Backing up information to a storage card
1 Insert a storage card.
A slip appears indicating that the MessagePad has recognizedthe card.
Warning Each storage card can store only one backup. Ifthere’s already a backup stored on the card, it will be erasedto make room for the new one. (Other information on thecard is not erased.)
271
C H A P T E R
12
Backing Up and Restoring Information

5 Tap the applications you want to back up.
If you want to make a backup copy of everything on yourMessagePad, tap All. Tap it again to deselect all applications.To back up all of the packages stored in the internal memory(not including the built-in applications), tap the checkboxnext to Backup all packages.
6 Tap Backup.
7 If you have a backup already stored on the card, a messageappears telling you that the new backup will replace theinformation that is there. Tap OK.
A slip appears showing you the progress of the backup.When the MessagePad is finished backing up theinformation, the progress slip goes away. A Restore buttonnow appears on the card slip.
273Backing Up and Restoring Information
2 Tap Extras ´ to open the Extras Drawer.
3 Tap Card B.
The card slip appears.
4 Tap Backup.
A backup slip appears.
272 Chapter 12
Tap the scroll arrowsto move up anddown in the list
Tap Backup all packages ifyou want to make a backupof the packages stored in theinternal memory
Tap All to back up allof your information(this doesn’t includepackages)
Tap here to make a backupof your information
Tap the checkbox nextto each applicationyou want to back up

2 Tap Restore.
A slip appears. Tap the applications and packages you wantto restore. If you want to restore everything, tap All. Tap itagain to deselect all applications.
3 Tap Restore.
A message appears asking you whether you want to haveyour MessagePad completely erased first, or whether youwant to restore selected information.
275Backing Up and Restoring Information
Restoring information from a storage card
If something causes you to lose information stored on yourMessagePad, you can restore it if you’ve made a backup on astorage card.
1 Insert the storage card with the backup information.
The card slip appears.
274 Chapter 12
Tap the checkbox next to each application youwant to restore
Tap All to select allinformation
Tap the checkbox next to the packages you want to restore
Tap All to restore all packages

4 Tap your choice.
A slip appears showing you the progress of the restoration.When your MessagePad is finished restoring the information,a slip appears telling you to restart your MessagePad.
5 Tap Restart.
276 Chapter 12

You can use the Newton Book Reader application to view aNewton book on the MessagePad. When you install aNewton book on your MessagePad, the package appearswith its own icon and title. The Newton Book Readerautomatically becomes available on your MessagePad whenyou install a book package.
Using Newton Book Reader, you can:
m open a Newton book
m move from page to page to view the book
m open a table of contents to jump to a specific topic
m set bookmarks to move quickly to a particular pagewhenever you want
m make annotations in the text
m copy and paste text (but not edit text)
m print or fax a book
277
C H A P T E R
13
Viewing Newton Books

Viewing pages
After you open a book, the document text appears on thescreen.
You can move page by page through a document.
To move forward or backward through a book:
m Tap the up or down arrows ˛ to turn a page.
279Viewing Newton Books
Opening a book on your MessagePad
You can only have one Newton book open at a time.
m If you installed the book in the internal memory of your MessagePad, you can find the book icon in the Extras Drawer.
m If you installed the book on a storage card, you must tapExtras ´, then tap Card B to see the book icon.
To open a book:
1 Tap Extras ´ to open the Extras Drawer, then locate thebook icon.
If the book is on a storage card, tap Card B to see thecontents of the storage card.
2 Tap the book icon.
278 Chapter 13
An example of aNewton book iconinstalled in the internal memory
An example of aNewton book

Using Newton Book Reader controls
When a book is open, two buttons appear in the bottomright corner of the document. To see the Newton BookReader controls, tap the Book Control button V on the left.To close the book, tap X.
These controls allow you to view and annotate the Newtonbook.
Note: In smaller-size books, you will automatically see all ofthe controls.
You can mark up and make notes on a book. You can hideor display the annotations whenever you want. You can alsoprint or fax the book if your MessagePad is connected to aprinter or a fax modem.
281Viewing Newton Books
Using a table of contents
A Newton book may have a table of contents that lists thetopics in the book. You can quickly view a particular topic bytapping it.
To use the Table of Contents window to see a specific topic:
1 Tap the Overview button ˛.
The Contents slip appears listing the topics of the book. Youcan tap the scroll arrows ≈ on the right side to movethrough the table of contents, if necessary.
2 Tap the topic you want to view.
If there are subtopics in the table of contents, then thoseappear below the main topic.
3 If desired, tap a subtopic in the list.
280 Chapter 13
Use these scroll arrowsto move up and down inthe table of contents
Tap here to open the NewtonBook Reader controls
Tap here to close the book
Tap here to annotate
a book
Tap here to go to a specific page
Tap here to close the controls
Tap here to print or faxTap here to seta bookmark
Tap here to get informationabout the book, access help,and set preferences
Tap here to close the book
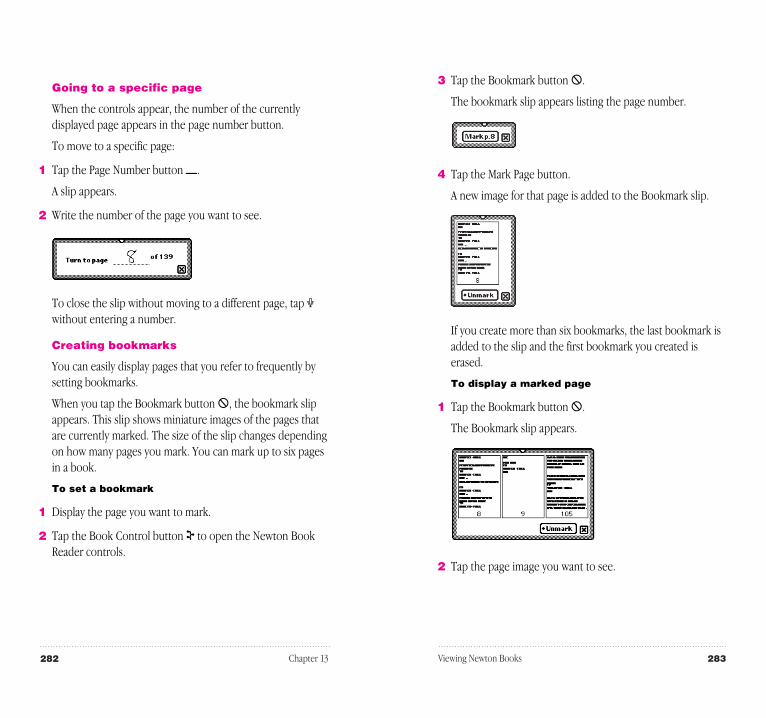
3 Tap the Bookmark button J.
The bookmark slip appears listing the page number.
4 Tap the Mark Page button.
A new image for that page is added to the Bookmark slip.
If you create more than six bookmarks, the last bookmark isadded to the slip and the first bookmark you created iserased.
To display a marked page
1 Tap the Bookmark button J.
The Bookmark slip appears.
2 Tap the page image you want to see.
283Viewing Newton Books
Going to a specific page
When the controls appear, the number of the currentlydisplayed page appears in the page number button.
To move to a specific page:
1 Tap the Page Number button 1.
A slip appears.
2 Write the number of the page you want to see.
To close the slip without moving to a different page, tap Xwithout entering a number.
Creating bookmarks
You can easily display pages that you refer to frequently bysetting bookmarks.
When you tap the Bookmark button J, the bookmark slipappears. This slip shows miniature images of the pages thatare currently marked. The size of the slip changes dependingon how many pages you mark. You can mark up to six pagesin a book.
To set a bookmark
1 Display the page you want to mark.
2 Tap the Book Control button V to open the Newton BookReader controls.
282 Chapter 13

Copying parts of a book
You can select and copy any text in a book. You can movethe copied text to another application.
To copy parts of a Newton book
1 Go to the part of the Newton book you want to copy.
2 To select the item, hold the pen down on or near the itemuntil a heavy mark appears and you hear a squeak. Thendraw the highlighting mark over or around the item.
Your MessagePad places a box around the selected item.
285Viewing Newton Books
The Bookmark slip disappears and the page you selected isshown on the screen.
To erase bookmarks
1 Tap the Bookmark button J.
The Bookmark slip appears.
2 Tap Unmark.
A list appears.
3 Tap the page you want to unmark, or tap All Marks to eraseall bookmarks.
The picture of the unmarked page disappears from the slip.
284 Chapter 13
Selected text to copy

5 Open the application where you want the selectedinformation to appear.
The small box indicating the selected item is on the side ofthe screen.
287Viewing Newton Books
3 Drag the selected item to one of the sides of the screen.
The item becomes a small box, waiting for you to place it inanother document.
4 Tap X to close the book.
286 Chapter 13
Selected text becomes a box
The box with theselected informationappears here

Annotating books
You can add your own annotations to a book by tapping theMarkup button.
You cannot edit a Newton book on your MessagePad. Youcan however, mark the copy by writing, drawing, or typingtext from the on-screen keyboard. You can also hide yourannotations. After marking up a book, you can print it or faxit with your annotations.
To annotate a book:
1 Tap the Markup button j.
2 Make the annotations you want.
You can write, draw, or use the on-screen keyboard. Youcannot select text in the book, but you can select, move, anderase (scrub) your annotations.
To hide your annotations, tap the Markup button j again.
289Viewing Newton Books
6 Drag the box from the side of the screen to where you wantit to be placed.
The information appears and is still selected.
7 Tap the selection to deselect it.
The information is in its new location.
288 Chapter 13

Printing and faxing a Newton book
You can print or fax all or part of a Newton book when yourMessagePad is connected to a printer or fax modem. If youannotated the book, your annotations will be shown as wellwhen you tap Format to select a format.
To print or fax a book
1 Connect your MessagePad to a printer, a fax modem, or faxmodem card.
See the chapter “Routing Information” for information onhow to connect the MessagePad to a printer or fax modem.
2 Open the book you want to print or fax.
3 Tap the Book Control button V to see the Book Readercontrols.
4 Tap the Routing button µ.
5 In the list that appears, tap Print Book or Fax.
A page number slip appears on top of a print or fax slip.
6 Write the page numbers you want to print.
7 Tap X to close the page number slip.
8 Enter the appropriate information in the print or fax slip.
Tap Format to choose a format. You can select to print or faxwith or without the annotations.
9 Tap Print Book or Fax.
290 Chapter 13

This chapter describes common problems and suggestssolutions. If, after trying the suggested solutions, you still can’t solve the problem, call 1-800-SOS-APPL (1-800-767-2775) in the United States. Outside the UnitedStates, contact your local Apple-authorized dealer.
Many of the procedures in this section are described in moredetail in various chapters. Topics in this chapter include:
m Pressing Reset
m The screen
m Personal Identification Number (PIN)
m When the MessagePad sends you a message
m Writing and drawing
m Power and batteries
m Electronic mail
m Printing, faxing, and dialing
m Modems
m Beaming
m Other
291
C H A P T E R
14
Troubleshooting

Hard reset
You can also do a “hard reset.” If you’ve done a soft resetand your MessagePad still doesn’t work properly, call 1-800-SOS-APPL to find out if there’s anything else you cando, before you do a “hard reset.”
Warning A “hard reset” erases all of the data andinformation in the MessagePad’s internal memory. Thisincludes any third-party applications that were already onyour MessagePad when you bought it and any applicationsthat you stored on the internal memory (including theNewton Tour and HW Instructor). It also erases informationyou have stored, such as name cards, items in the Notepad,calls, and pages in the Date Book. This procedure does notremove the MessagePad’s built-in programs, operatingsystem software, or system updates.
To do a hard reset:
1 Remove any storage or application cards that are inserted inthe MessagePad.
2 Take off the battery cover.
3 Press and hold down the Reset button in the batterycompartment. Continue holding down the Reset button andmove the on/off switch down.
4 Hold the Reset button for two seconds, then release it whilecontinuing to hold down the on/off switch. Continueholding down the on/off switch until a message appears on the MessagePad asking if you want to erase your data completely.
5 Tap Yes. Another slip appears telling you that all of the datawill be erased.
293Troubleshooting
Pressing Reset
You can use the Reset button to do a “soft reset” or a “hard reset.”
Soft reset
If your MessagePad is working erratically, the simplestsolution is to reset the operating system. This is known as a “soft reset.”
1 Press the Reset button (inside the battery compartment) fortwo seconds.
Use a pencil or a ballpoint pen. Don’t use your MessagePadpen to press the Reset button. Using your MessagePad penonly to write on the screen will prolong the life of the penand the screen.
If the MessagePad was on, it will restart itself. If theMessagePad was off, it will turn itself on.
Note: Pressing Reset does not erase the information thatyou have stored in your MessagePad, and it solves manyproblems.
2 Check the time in the Date and Time preferences wheneveryou press Reset. (Your MessagePad’s clock may lose sometime when you press Reset.)
292 Chapter 14

I forgot my eWorld password.
In the United States, contact Apple Online Services and beprepared to give your password verification code (whateveryou wrote on the “Password Verification” line when youregistered for a new eWorld account). See the informationfor eWorld Mail. Outside the United States, contact yourlocal Apple-authorized dealer.
When the MessagePad sends you a message
I get a message saying the internal memory orstorage card is full.
m Close any unused applications.
m Delete some applications, such as the Newton Tour or HW Instructor. (You can always make a backup copy andthen delete them.)
m Check to see how much available space there is on yourMessagePad and any storage card you have inserted. TapExtras ´, then tap the Information button ;. In the listthat appears, tap Memory Info.
m You can also change the default storage settings. Tap Extras´, then tap Card B. If you want, tap the checkbox nextto “Store new info and packages on this card.”
There is nothing to undo.
Your MessagePad can undo only the last change you made.Then, if you tap it again, it will redo your last action. Thereare some actions the MessagePad cannot undo, such asbacking up and restoring information.
295Troubleshooting
6 Tap OK.
All of the information on your MessagePad (including anypackages you loaded and other applications that are notbuilt-in) is erased and your MessagePad reverts to thedefaults set at the factory.
Check the time in the Date and Time preferences wheneveryou press Reset. (The MessagePad’s clock may lose sometime when you press Reset.)
The screen
The screen appears too light or too dark.
m Adjust the contrast.
m Adjust your viewing angle.
m Adjust the surrounding lighting.
m Make sure your MessagePad is not too hot or too cold (it’s designed to be used in temperatures between 32° F and104° F (0° C and 40° C).
Personal Identification Number (PIN)
I forgot my PIN.
Your only option is to do a hard reset. This will erase all ofthe data and information on your MessagePad. If you set aPIN in the future, remember to record the PIN in a safe placeand always keep your information backed up. See theinstructions in the section “Pressing Reset” earlier in this chapter.
The MessagePad doesn’t recognize my password.
Tap your Personal Identification Number (PIN) on thekeypad again.
294 Chapter 14

The MessagePad can’t store anything on astorage card because it’s write-protected.
Take the card out of your MessagePad and turn off the card’swrite-protection by sliding the switch on the exposed edgeof the card.
The storage card may be full. Tap Extras ´, tap theInformation button ;, then tap Memory Info. In the slip thatappears, you’ll see how much space is left on the card.
Writing and drawing
I’m not tapping where I think I’m tapping.
You need to realign the pen. Tap the Recognition button Ú
and, in the list that appears, tap Preferences. Tap Align Penand follow the instructions on the screen. Tap X to close the slip.
I want my MessagePad to convert my handwritingto text, but it doesn’t.
Make sure you’ve selected the Text recognition setting Ú.
If you are using the Text recognition setting, but yourhandwriting wasn’t converted, the MessagePad may havebeen too busy—for example, sending a fax or receivingbeamed information—to convert your handwriting. Scrubout the handwritten text and try again or double-tap theword to try converting again.
I wrote information in Ink Text. Can I convert it to text?
Yes. Select your handwriting and tap it twice. To convert asingle word, tap it twice.
297Troubleshooting
My MessagePad is asking for a card I’ve removed.
Reinsert the card.
Warning Do not insert any card except the one asked for.Information on the second card could get corrupted.
If the card isn’t available, you can start over by using a pencilor ballpoint pen to press the Reset button inside the batterycompartment (do not use the MessagePad pen to press thereset button). However, if you do not reinsert the card, youmay lose information stored on it.
My MessagePad says it is out of memory andsuggests that I restart it.
Your MessagePad has no more memory available tocomplete your request. Tap the Restart button; usually thiscorrects the problem.
To avoid this situation in the future:
m Don’t run too many applications at once. Close applicationswhen you are no longer using them; even if you’re not doing anything in an open application, it still takes upvaluable memory.
m Limit the number of background activities. Uncheck the“Receive beams automatically” checkbox in the Beampreferences. Don’t receive calls using the modem (in theCalls preferences). Log out of eWorld before continuing withother activities. Wait for an item to finish printing beforecontinuing with another activity (don’t, for example, write in the Notepad while a print job is active). Close all otherapplications before attempting any communication.
m Remove unneeded applications. Even if you never use oropen an application in internal memory or on a storage card,its presence takes up a small amount of memory. Limitingthe number of packages you have installed may be enoughto avoid out-of-memory situations.
296 Chapter 14

When I write numbers, phone numbers, dates, ortimes, the MessagePad interprets them as words.
Use an on-screen keyboard to enter the numericinformation. If the on-screen keyboard is not open, tap the Keyboard button _ twice and, in the list that appears,tap the type of keyboard you want to use. If the on-screenkeyboard is open, tap the Keyboard button _ once more.When you are finished using the on-screen keyboard, tap X.
You might want to use Writing Practice and practice writingnumeric information. To use this, tap Extras ´, tap thefolder tab and tap Setup (if you filed Writing Practice inanother folder, tap that name). Tap Writing Practice W.
The MessagePad changes my drawings tosomething else.
The Shape recognition setting ß cleans up your shapes. If you don’t want the MessagePad to do this, select theSketches recognition setting ‚.
My writing doesn’t appear under the tip of the pen.
Realign the pen. Tap Extras ´ to open the ExtrasDrawer, tap the folder tab, then tap Setup. (If you filed Prefsin another folder, tap the name of it.) Tap Prefs π and, inthe slip that appears, tap Handwriting Recognition „. In theslip that appears, tap Align Pen. Follow the instructions on the screen.
Your words will go where the caret is. Make sure the caret isturned on. Tap the Recognition button Ú, tap Preferences,then tap Options. Tap Editing Settings. Tap the checkboxnext to “Insert new words at caret.”
299Troubleshooting
The MessagePad misinterpreted a word I wrote.
When you select the Text recognition setting Ú, theMessagePad uses a word list to interpret the words you’rewriting. You can use the on-screen keyboard to enter theword in the MessagePad’s word list.
m To correct a word, tap it twice. If the correct word is not inthe list, use the corrector L or the on-screen keyboard _ toenter the word correctly.
m Make sure the checkbox next to “Add new words to PersonalWord List” is checked. To do this, tap Extras ´, tap thefolder tab, then tap Setup (if you filed Prefs in a differentfolder, tap the name of that folder). Tap Prefs π, then tapHandwriting Recognition „. Now tap Options and, from thelist that appears, tap Text Editing Settings.
m Check the options in the Handwriting Recognitionpreferences to make sure they reflect your own writing style.
The MessagePad interprets my handwriting tooslowly.
Check the settings in the Handwriting Preferences. You canalso select the Ink Text recognition setting : to keep yourhandwriting as is and stored as ink text, which can berecognized later if you want.
When I erase by scrubbing, the scrub mark turnsinto letters.
Try again more slowly. Make sure your scrub mark is a zigzagwith at least four line segments joined at sharp angles. Makesure your scrub mark goes well above and below the word.
Long jagged lines appear on the screen while I’mwriting or drawing.
Be careful not to rest your hand on the screen while you’rewriting or drawing. You may be writing too lightly.
298 Chapter 14

Electronic mail
Electronic mail does not work.
eWorld is not available in all countries. If you purchased yourMessagePad outside the U.S., check the materials youreceived with your MessagePad for more information. If youpurchased your MessagePad in the U.S., but want to use e-mail outside the U.S., call the Apple Online ServicesHelpline. You can find the phone number in the eWorldinformation you received with your MessagePad.
I got disconnected while I was registering.
First, open the battery compartment and use a pencil orballpoint pen to press the Reset button. Then repeat theregistration process. If you are disconnected again, call theApple Online Services Helpline. You can find the phonenumber in the eWorld information you received with yourMessagePad.
My credit card number isn’t being accepted.
Check to be sure that you have entered the numbercorrectly. No spaces are required.
Note: To prevent credit card fraud, a credit card numbercan be used only once to register for eWorld, unless youmake special arrangements by calling the Apple OnlineServices Helpline (see your eWorld information for thenumber).
The account name I requested was rejected.
Your account name must have 3 to 12 characters (letters ornumbers only) and must begin with a letter. The name mustnot be assigned to another user.
301Troubleshooting
Power and batteries
I can’t turn the MessagePad on.
m If you’ve recently replaced the batteries, press the Resetbutton.
m Make sure that each battery’s + and – terminals arepositioned properly and that the batteries are fresh.
m If you’ve connected a power adapter to the MessagePad,make sure it’s plugged into a working outlet. If it’s pluggedinto a power strip, make sure the power strip is turned on.
m Try adjusting the screen contrast.
m Press the Reset button in the battery compartment.
My batteries don’t last as long as they used to.
Setting the MessagePad to receive beams automatically usesextra battery power. Also, the more you use thecommunication port for faxing, mailing, and printing, thefaster the batteries will lose power.
If you’re using an optional rechargeable battery pack, it mayhave reached the end of its life. Dispose of it safely andlegally and get a new one.
Important Use only alkaline batteries or a rechargeablebattery pack designed for your MessagePad.
The batteries leaked and my MessagePad won’t work.
Any damage caused by leaking batteries is not covered bythe warranty.
300 Chapter 14

Printing, faxing, and dialing
I couldn’t print.
m Make sure you’ve selected the correct type of printer.
m Check all the cable connections.
m Turn the printer off, wait 30 seconds, and turn it back on;then try again.
I don’t see my network printer in the list.
m Check your cable connections.
m Check the network hardware between the MessagePad andthe printer.
My return address is missing from faxes andprintouts.
Make sure you’ve entered information for an owner andworksite. Tap Extras ´, tap the folder tab, tap Setup, andtap Owner Info 9.
The MessagePad dialed the wrong number.
m Make sure you’re using the appropriate calling options forthe phone from which you are placing the call.
m The MessagePad’s dialing feature does not work with allphones. Some phones, such as PBX phones, do notrecognize the tones of the MessagePad’s speaker.
303Troubleshooting
There is no dial tone.
Make sure that your modem has adequate power frombatteries or a power adapter and that it is connected to aworking telephone line. You may be using a phone systemthat does not generate a dial tone (as is the case with someanalog PBX systems). Tap Extras ´, tap the folder tab,tap Setup, tap Preferences π, then tap Modem 7. In theslip that appears, make sure the checkbox next to “Requiredial tone” is not checked.
The local access number won’t answer.
Make sure that the number you are dialing is correct andappropriate for your location. If you need to dial a numberto get an outside line, enter that number, followed by acomma, before the access phone number.
I lost the connection while transmitting.
Make sure you turn off call waiting while using the modem.Contact your local phone company if you need instructions.
When I try to connect, my modem doesn’t dial or Iget a “Please wait” message.
Open the battery compartment and use a pencil or ballpointpen to press the Reset button. Then try to connect again.
The MessagePad says that “No modem isconnected” when my Newton-compatible faxmodem is connected.
If your modem has batteries, make sure they are fresh andproperly installed. Make sure your phone is on the hook.
I can’t seem to solve my eWorld problem.
If you still can’t solve your problem, call the Apple OnlineServices Helpline (see your eWorld information for thenumber).
302 Chapter 14

Beaming
I’m not getting items that are beamed to me.
m Make sure the infrared windows on the Newton devices arepointing directly at each other and are less than 1 meter(about 3 feet) apart—closer in bright sunlight.
m You may not have chosen to receive beams automatically. To receive beams automatically, go to the In Box I, tap the Information button ; and, in the list that appears, tapBeam Prefs. Tap the checkbox next to “Receive beamsautomatically.”
Other
The MessagePad has gotten wet.
If the MessagePad gets wet while it’s plugged in using anoptional power adapter, unplug the power adapter beforeyou do anything else.
Remove the main batteries and allow the unit to dry for atleast 24 hours.
The time or date is wrong.
Tap Extras ´, tap the folder tab, then tap Unfiled Icons.(If you filed Clock in another folder, tap that folder’s name.)Tap Clock C, then tap Set. In the list that appears, tapTime/Date, then set the correct date and time.
The MessagePad’s clock may lose time when you press theReset button. Check the time and date in Clock C wheneveryou press Reset.
305Troubleshooting
The phone is not dialing the correct phonenumber when I use the speaker to dial.
m Try changing the distance between the phone handset andthe MessagePad’s speaker. Try changing the orientation ofthe phone handset and the MessagePad’s speaker.
m You can also try using different phones or a different phonesystem.
Extra numbers appear in the phone number I’mtrying to call.
m Make sure the following settings are correct: Time/Datesettings in Clock Å, Time Zones z, and Locale © in Prefs π.
m Verify that the local dialing information area code is correctfor the location you are dialing.
Modems
I get a message saying my modem is notresponding or a warning about using digital lines.
m If you are using an external fax modem, check to make sure the batteries in the modem are good. Check all of thecable connections. Make sure you are using a standardanalog phone line and you are getting a dial tone. Reset your MessagePad.
m If you are using a PCMCIA fax modem, make sure themodem is locked in the card slot. Check all of the cableconnections. Make sure you are using a standard analogphone line and you are getting a dial tone. Reset yourMessagePad.
304 Chapter 14

Many of my items seem to be missing.
m You may be looking at the contents of only one folder.
m If you filed or stored information on a storage card, you needto insert the card to view those items.
Nothing happens when I tap buttons at the bottom of the screen (such as the Overview button).
When a lot of information is stored in an area, theMessagePad may take a few seconds to display it.
I want to erase everything stored in theMessagePad.
See the section “Pressing Reset” earlier in this chapter.
306 Chapter 14

307
A P P E N D I X
A
Installing and ReplacingBatteries
Your MessagePad uses:
m a set of four AA alkaline batteries or a rechargeable batterypack
m a DL2032 lithium backup battery
To see the battery level indicator, tap Extras ´ to openthe Extras Drawer. At the bottom of the screen on the rightside, you see the battery level.
The black portion of the gauge shows the remaining batterypower.

Battery warnings
The MessagePad displays a warning when the battery level islow.
When you first see the warning, you have less than an hourof power left in your main batteries.
If you don’t change the batteries in time, the MessagePadturns itself off automatically to save the information in itsmemory. You can turn the MessagePad back on once you’vereplaced the batteries or plugged in a power adapter.
The MessagePad displays a similar warning when the backupbattery level is low.
Batteries—rechargeable
You can use a rechargeable battery pack instead of alkalinebatteries. Use only the battery pack designed for yourMessagePad. Follow the instructions that come with thebattery pack.
If you buy a rechargeable battery pack, you also need apower adapter or a charging station.
When the MessagePad is plugged in, the battery packrecharges automatically. You can use the charging station torecharge two battery packs at the same time (one in theMessagePad and another in the charging station). See theinstructions that come with the charging station.
308 Appendix A
Important Do not use individual rechargeable batteries inyour MessagePad. The battery level indicator is not calibratedfor that type of battery and may drain too much power fromthe batteries, reducing their ability to stay charged.
Replacing batteries
Warning Never take out both the main batteries and thebackup battery at the same time. If you do, the MessagePadwill lose information that it needs to operate properly.
Replacing the main batteries
Warning When replacing the main batteries:
m Make sure each battery’s + and – ends are in the correctposition. Follow the diagram in the battery holder or batterycompartment. If you install batteries the wrong way, thebatteries may leak and damage your MessagePad. Leakingbatteries may be hazardous and any damage caused byleaking batteries is not covered by your warranty.
m Replace all the main batteries at the same time. Don’t mixold and new batteries.
m Install only alkaline batteries or a rechargeable battery packdesigned specifically for your MessagePad.
Warning Do not use individual rechargeable nickel-cadmium (NiCd) batteries. The battery level indicator is notcalibrated for that type of battery.
309Installing and Replacing Batteries
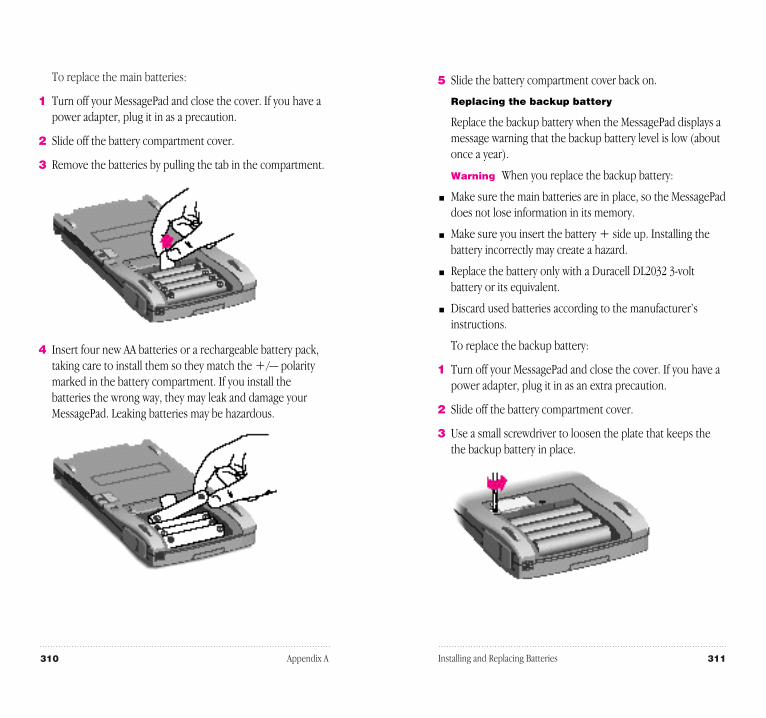
5 Slide the battery compartment cover back on.
Replacing the backup battery
Replace the backup battery when the MessagePad displays amessage warning that the backup battery level is low (aboutonce a year).
Warning When you replace the backup battery:
m Make sure the main batteries are in place, so the MessagePaddoes not lose information in its memory.
m Make sure you insert the battery + side up. Installing thebattery incorrectly may create a hazard.
m Replace the battery only with a Duracell DL2032 3-voltbattery or its equivalent.
m Discard used batteries according to the manufacturer’sinstructions.
To replace the backup battery:
1 Turn off your MessagePad and close the cover. If you have apower adapter, plug it in as an extra precaution.
2 Slide off the battery compartment cover.
3 Use a small screwdriver to loosen the plate that keeps thethe backup battery in place.
311Installing and Replacing Batteries
To replace the main batteries:
1 Turn off your MessagePad and close the cover. If you have apower adapter, plug it in as a precaution.
2 Slide off the battery compartment cover.
3 Remove the batteries by pulling the tab in the compartment.
4 Insert four new AA batteries or a rechargeable battery pack,taking care to install them so they match the +/— polaritymarked in the battery compartment. If you install thebatteries the wrong way, they may leak and damage yourMessagePad. Leaking batteries may be hazardous.
310 Appendix A

6 Put in a new Duracell DL2032 3-volt battery or its equivalent.Make sure the battery is + side up.
7 Put back the plate that keeps the backup battery in place.Insert its right end into the slot before you lower the left end(the end with the screw).
8 Tighten the screw.
Be careful not to overtighten it.
9 Slide the battery compartment cover back on.
313Installing and Replacing Batteries
4 Lift the plate off the backup battery.
5 Use a small screwdriver to pry the old backup battery out ofits compartment.
312 Appendix A

m To avoid battery leakage or lost data, replace the batteries assoon as they become weak.
m In normal circumstances, turn off the MessagePad only byusing the on/off switch to avoid losing information.
315Installing and Replacing Batteries
Battery tips
m Batteries are inherently hazardous due to internal causticmaterials and high energy levels. For this reason, alwayshandle batteries carefully. Do not drop, puncture,disassemble, mutilate, or incinerate batteries.
m Do not leave batteries in hot places.
m Never remove the main batteries and the backup batteryfrom the MessagePad at the same time. If you do, theMessagePad will lose information that it needs to operateproperly. If such an information loss occurs, you mustrestore the MessagePad’s information from a backup copy.
m Use only alkaline AA batteries or the rechargeable batterypack designed for your MessagePad. The battery indicatordoesn’t work with other types of batteries, and yourMessagePad can run out of power with little or no warning.
m Always turn off the MessagePad before changing thebatteries, to minimize the chance of losing your information.
m Follow instructions carefully when replacing the backupbattery. Make sure you insert the battery + side up;installing the battery incorrectly may cause a hazard.
m Do not short-circuit battery terminals—that is, do not touchboth terminals with a metal object at the same time. Doingso may cause an explosion or a fire.
m Do not install both old and new AA batteries; replace all 4alkaline AA batteries at the same time to ensure optimumbattery life.
m Recharge only rechargeable battery packs, and followinstructions carefully when recharging. Failing to do so maycause a hazard.
314 Appendix A

317
A P P E N D I X
B
Service and Support
Apple User Assistance
When you purchase your MessagePad you receive “up andrunning” support from Apple for as long as you own yourMessagePad. Our trained staff members are ready to helpyou with the following topics:
m Installation and setup
m Basic product use
m Configuration
m Compatibility with other hardware and software products
m Hardware and software troubleshooting
The Apple User Assistance Center is open in the UnitedStates from 6:00 AM to 6:00 PM Pacific time, Monday throughFriday, excluding holidays. To call Apple User Assistance inthe United States, dial 1-800-SOS-APPL (1-800-767-2775).
In Australia, call 1-800-0023-980In Canada call 1-800-263-3394In the United Kingdom, call FREE 0800-639866
Outside the countries listed above, contact your local Apple-authorized reseller.

When you have a question, look for the answer in thishandbook. The handbook provides information about allaspects of using your MessagePad and is designed to helpyou find the information you need quickly and easily.
Apple’s automated product information system can alsoprovide you with information about your MessagePad, 24hours a day, 7 days a week. Information is available by fax, oryou can listen to recorded information about Newtonproducts, as well as other Apple products. To call theautomated product information system in the United States,dial 1-800-SOS-APPL.
Your Apple warranty and Apple repairservices
Your MessagePad comes with the Apple One-Year LimitedWarranty, covering all remedial repairs (repairs requiredbecause of defects in workmanship). In the United States, ifyou suspect your MessagePad needs repair services, call 1-800-SOS-APPL. Our trained staff members will help indetermining if service is needed and will explain Apple’smail-in repair options.
If you are outside the United States and need to have yourin-warranty MessagePad repaired, you can take it to anyApple-authorized service provider for repair at no charge.Please refer to the Apple One-Year Limited Warrantyincluded with your MessagePad for more information.
318 Appendix B
Extended service agreement
To cover repairs after your warranty expires, Apple offers theAppleCare extended service agreement. AppleCare providesan unlimited number of remedial repairs, including bothparts and labor. For more information, dial 1-800-776-2333 inthe United States.
The AppleCare program may not be available in all countries.Check with your local Apple-authorized service provider forthe extended service agreements available in your area.
319Service and Support

321
A P P E N D I X
C
eWorld Setup and Registration
You can set up an eWorld account and use the electronicmail address you get to send and receive e-mail.
Before you begin, you need the following:
m A Newton-compatible modem and the appropriate cables.
m A standard analog phone line. See the instructions that camewith your modem for more information.
m An eWorld access phone number. In most places you canuse a local phone number to access eWorld, therebyavoiding long-distance charges. The access numbers for theUnited States are stored in the internal memory of theMessagePad. If your city is not listed, you can choose theclosest city to yours in your worksite information. If youneed access numbers for other areas, see the information oneWorld Mail that came with your MessagePad.
m Your registration certificate number and password, whichare printed on the information on eWorld Mail that camewith your MessagePad. (In some countries, your MessagePadcomes with a reply card that you can use to order the brochure.)
m A credit card. eWorld charges are billed to your VISA,MasterCard, American Express, or Discover card.

When you first get your MessagePad, there is an electronicmail message already in your In Box that you should read toset up an eWorld account.
3 Tap the Picture button or the title of the “Congratulations”message to view the message.
The e-mail message appears.
323eWorld Setup and Registration
You should also:
m Set the Modem preferences (see the chapter “Managing andUsing Items in the Extras Drawer”).
m Make sure you enter an owner and a worksite in Owner Info 9 see the chapter “Managing and Using Items in theExtras Drawer”). You can change your access number in your worksite.
m Set your location in Time Zones z (see the chapter“Managing and Using Items in the Extras Drawer”).
m Connect a Newton-compatible modem to your MessagePad(see the instructions that came with your modem).
Registering for a new eWorld account
1 Tap Extras ´ to open the Extras Drawer.
2 Tap the folder tab, tap Unfiled Icons, then tap In Box I. (If you filed In Box in another folder, tap the name of thatfolder, then tap In Box I.)
322 Appendix C
Tap here to see the e-mail message

Enter your name, billing address, and your credit cardaccount information. Enter the registration certificatenumber and password that is printed on the eWorld Mailinformation that came with your MessagePad.
You will also need to choose and enter a passwordverification. This is different from your password, perhapsyour mother’s maiden name.
7 When you are finished, a message appears telling you toconnect a modem. Connect your modem (make sure you’veset up preferences for your modem) and tap OK.
Using an existing eWorld account
If you already have an eWorld account established, you canuse it to send and receive e-mail with your MessagePad.
If you already entered your e-mail account and passwordinformation in your owner card (see Owner Info 9 in the Extras Drawer ´), you are ready to send and receive e-mail.
If your e-mail information is not entered, you have two waysto enter it:
m Tap Extras ´, tap Setup, then tap Owner Info 9. (If youfiled Owner Info in another folder, tap the folder tab andchoose the folder, then tap Owner Info 9.) Tap on yourowner card, tap Add and, in the list that appears, tap E-Mail.In the slip that appears, enter the appropriate informationand tap X when you are finished.
m Follow steps 1–4 in “Registering For a New eWorld Account.”In step 5, tap “Use an existing account,” then tap SetUp. A slip appears asking you to enter your e-mail account andpassword information. Enter the information and tap X toclose the slip.
325eWorld Setup and Registration
4 Read through the message, tapping the up and down arrowkeys to see more of the message. When you are finished, goback to the top of the message and tap Sign Up.
5 In the slip that appears, tap “Create a new account,” then tapSet Up.
A slip appears.
6 You will be instructed to go through a series of slips andenter the appropriate information. Tap Continue to go tothe next slip.
324 Appendix C
After you’ve readthrough the message,tap Sign Up to set up an eWorld account

327
A P P E N D I X
D
Compatibility Information
Your MessagePad uses the Newton 2.0 operating system.You can beam and mail items and share storage cardsbetween another Newton device with the Newton 2.0operating system and your MessagePad.
There are some limitations, however, when you are beamingor mailing items from your MessagePad to a device that hasan earlier version of the Newton operating system. There arealso some limitations when a device with an earlier versionof the Newton operating system is beaming or mailing itemsto your MessagePad. You may also run into problems whenusing storage cards in devices with different versions of theNewton operating system.
The next few pages show you the details of compatibilitybetween your MessagePad and devices with an earlierversion of the Newton operating system.

NEWTON 2.0 OS TO NEWTON 2.0 OS FEATURE COMPATIBILITY
BEAMING
Faxes Yes
Icons (application packages) Yes
Name Cards
m Person Yes
m Company Yes
m Group Yes
Owner Cards Yes
Worksite Cards Yes
Beam My Card Yes
Calls Yes
Meetings Yes
To Do Tasks Yes
Checklists and Outlines Yes
Notes Yes
MAILING
Faxes No
Calls Yes
Icons (application packages) Yes
Name Cards Yes
Meetings Yes
To Do Tasks Yes
STORAGE CARDS
Interchangability Yes
328 Appendix D
NEWTON 2.0 OS TO AN EARLIER NEWTON OS
BEAMING
Faxes No
Icons (application packages) No
Name Cards
m Person Yes (no 2.0 info, no ink text)
m Company Yes (no 2.0 info, no ink text)
m Group No
Owner Cards Yes
Worksite Cards No
Beam My Card No
Calls No
Meetings Yes (no 2.0 info)
To Do Tasks Yes (no 2.0 info)
Checklists and Outlines Yes (converted to note with tabs)
Notes Yes (ink text converted to sketchwith some formatting loss)
MAILING
Faxes No
Calls No
Icons (application packages) No
Name Cards Yes (no 2.0 info, no ink text)
Meetings Yes (no 2.0 info)
To Do Tasks Yes (no 2.0 info)
STORAGE CARDS
Interchangability No
329Compatibility Information

If your device has system software earlier than the Newton2.0 operating system, you can beam and mail certain types ofinformation to a Newton product with the Newton 2.0operating system.
Here’s what you can do:
Beam—name cards for a person or company, meetings, to-do tasks (that have no sketches or shapes), and items in theNotepad
Mail—name cards and meetings
Storage cards—you can share storage cards share withdevices that have the Newton 2.0 operating system only ifyou choose “Mount read-only” (not “Convert”). For moreinformation, see the chapter “Using Storage and ApplicationCards.”
330 Appendix D

331
A
AA batteries 4, 307, 310, 314.See also batteries
abbreviationsrecognizing 75–78writing with 42
accent marks, entering56–57
access numberse-mail 202, 240problems with 302in U.S. 321
account, e-mail 239,321–325
AC power adapter. See poweradapter
adapter. See power adapterAdd button 25
to add information to acard 96–98, 192
to add notes to namecards 103
to add to word list 74–75to create custom field
labels 97–98to expand words 75–78
Adding Notes menu(Calendar)
events 123, 124, 126,127–128
meetings 118, 120Add Notes button (Date
Book) 128 addresses
entering in Name File 16on e-mail systems 321group 99–100
recipient 229return, for e-mail 240 return, for faxing 225 return, for printing 220
agenda items, viewing 135alarm, setting 197
in Clock 165, 174in Date Book 128,
148–149Alarm button 128Alarm menu (Calendar)
meetings 117, 120events 122, 124, 126
Align Pen button (ExtrasDrawer) 198, 297, 299
alkaline batteries 4, 300, 307,309, 310, 314. See alsobatteries
All Info button, to view carditems 96, 97, 98, 101,104, 192
All Info option (Time Zone) 205
All Marks button, to erasebookmarks 284
alphabet, scrolling in NameFile 101
alphabetical order, of namecards 106
annual events, scheduling125–127. See alsoCalendar; events
Annual Event button (DateBook) 125
Apple automated productinformation system 318
I N D E X

beamingautomatically 235, 305between Newton
products 234icons 162–163manually 235, 237name cards 108Notepad items 92power use and 235problems with 236, 305receiving beams 165,
185, 237and Routing button 20,
26, 92, 108, 162setting preferences for
104–105, 234–235, 305storing items in Out Box
165, 185to-do tasks 146
birthdaysentering in Name File 16,
96, 125entering in Owner
Info 189Bookmark button 282,
283, 284bookmarks, for Newton
books 282–284books. See Newton booksbrowsing e-mail 241built-in applications
165–207, 265, 293Business (global folder) 210buttons, picture 16–17. See
also specific buttons
C
cables, safety tips viii
calculations, using keyboard for
Calculator (Extras Drawer)copying calculations from
166–167error bell 167folder for 165movinguses of 152
Calendar (Extras Drawer). adding notes to 127–128deleting items from
146–147diagram 114moving around in
130–135recurring meetings or
events 119–121,125–127
rescheduling 137–139scheduling events
121–127scheduling meetings
115–121symbols used in 133viewing 130–135
Call button, to place callsfrom MessagePad 109,111, 169
calling card calls 108, 176, 245
call request words 253Calls application
(Extras Drawer)e-mailing from 239finding information
in 217Hang Up button 170logging calls into 110
333Index
AppleCare extended serviceagreement 319
Apple Online ServicesHelpline 301, 302
AppleTalk, connections via165, 177–178
application cards 34, 36, 259, 270
applicationsbuilt-in 154, 165–207,
265, 293managing 152–164
appointments. See events;meetings; to-do tasks
area codes 108, 204, 304arrow buttons 14, 17“Ask for PIN” option (Extras
Drawer) 195Assist, using 249–254. See
also specific tasksto dial 108, 177, 230to get help 32, 256–257How Do I? button 256to perform tasks 33,
230, 249to place calls 109–110,
168, 169, 253request words and
253–255tips on using 255writing request for
251–252Assist button 17, 250–251Auto Delivery button, for
sending/receiving e-mail 242
automatic performance. SeeAssist; specific tasks
away city (Time Zones) 202
B
backdropdefined 14Notepad as default
application 14, 81setting default 157–159
background. See backdropbacking up on a storage card
37, 165, 172, 271–273Backup button 272band symbol (Calendar) 133batteries. See also power
adapterAA 4, 307, 310, 314alkaline 4, 300, 307, 309,
310, 314backup 308battery level indicator
156, 307, 309conserving 8, 235, 300duration of 4, 300installing 3–5, 307–315leaking 4, 300, 309,
310, 315low-battery message
269, 308in modem 304nickel-cadmium (NiCd) 4,
309orientation of 4, 300, 309,
310, 314rechargeable battery pack
4, 8, 300, 307, 308, 314recharging 8, 309remaining power 156replacing 309–313in storage cards 40, 269tips for using 314–315types of 4
battery level indicator 156,307, 309
332 Index

closing 174folder for 152, 153setting 173–175uses of 165, 173
Close box X 21Closest City button (Time
Zones) 204communication port 220company names, entering in
Name File 16compatibility information
327–330conferences, scheduling. See
Calendar; events;meetings
“Configure for guest user”option 79, 198
congratulations message323–324
Connect button, 176, 177,178, 244
Connection application(Extras Drawer) 16,152, 165, 176–179
connecting via AppleTalk165, 177–178
connecting via modem 177
connecting via serial 176folder for 152setting preferences
for 179uses of 165, 176
contrast, adjusting 3, 7, 9,10, 294
Control button (NewtonBook Reader) 290
control slider, handwriting 43
Convert button, to reformatstorage cards 39, 264
copying. See duplicatingcorrecting misinterpreted
words 59–60Corrector button, to correct
handwriting 59, 60countries
date formats ande-mail and 239, 300exchange rates and
182–183looking up time in 254service and support
in 318setting Locale preference
for 196time zone and 204tone dialing in 108
Country Info option (TimeZones) 206
cover page, fax 229 Currency Exchange formula
182–183cursive writing 43, 47, 198.
See also handwritingcurved lines, drawing
335Index
placing calls from 108,167–170
setting preferences for 172
uses of 152, 165, 167call waiting, modem
problems and 302canceling requests, Undo
button for 17“cannot be read” message
37, 262Canon BubbleJet
printers 219capitalization
changing to lower case 70text recognition and 75in telephone
numbers 109Card application
(Extras Drawer)folder for 152, 153uses of 165, 172, 267
Card button 154to store information
automatically 154to view owner
and worksite information 192
card lock switch 38, 269cards. See application cards;
name cards; storagecards; specific names
Cards (Printing option) 106Cards and Notes (Printing
option) 106card slot
empty 34, 261inserting card in 34–35locking 261protecting 34, 261removing card from 260
safety tips xiiiunlocking 34, 154, 259
card style (Name File)choosing 101–102
caretand creating notes 82to enter information 23to insert new words 49,
63–64to insert punctuation 69to insert space 129positioning 68writing without 63
case, cleaning viiiChange PIN button 195characters. See handwritingcheckboxes, defined 21checklist (stationery) 81–88Choose Network Printer
button 223Choose Other Printer
button 223cities. See also Locale;
Time Zoneadding 202–204, 206area codes 204away 202deleting 206distance from 203home 202looking up time in 255
City Info option (TimeZones) 206
cleaning the MessagePadvii–x
Clipboardcopying items in 64moving items to 65–66
Clock application (Extras Drawer)
accessing 173
334 Index

deselecting drawings andtext 62
desktop computers,connecting to 176–179
dialing phone numberswith Calls application
108, 111, 169dialing options 169manually 169, 229, 230from Name File 99,
108–109problems with 303–304speaker for 111, 169using Assist for 108,
168, 253dial tone missing 225, 240,
302, 304diamond, for lists of
choices 24Dictionary button
to expand words in wordlist 78
to expand words not inword list 76
to interpret words 60and text recognition 50to view word list 74
dictionary, internal 42. Seealso word list
digital telephone line,warning 108
DL 2032 battery 307, 311,313. See also batteries
down arrow. See arrow buttons
downloading e-mail packages 247
drawings
changing line thickness71–72, 201
changing size of 67duplicating 64faxing 227formatting 68moving 65in notes 83scrubbing 57, 67selecting 61–62
Duplicate button, formeetings or events 136
duplicatingclipboard items 64drawings 64internal memory 38note cards 108Notepad items 92to-do tasks 145
E
Edit Folder button 29, 214.See also folders
electronic ink 102. See alsoink text
electronic mail (e-mail)access number 202, 240,
244, 321account for 239, 240account name
rejected 301addresses 16, 240, 321Assist and 33, 255Auto Delivery button 242browsing 241forwarding 247hardware requirements
for 239
337Index
D
Daily Alarm option (Clock)173, 174
damage to the MessagePad4, 108
date. See also Calendar;Clock
setting 9, 165, 173–175, 200
wrong 305date-based Calendar items
115Date Book (Extras Drawer) .
See also Calendar; to-do list
adding items to 24,115–129
closing 113creating to-do items in
139–142deleting items from 144,
146–147, 293duplicating to-do tasks
in 145e-mailing from 239finding information in
214–217mailing items from. See
electronic mailmoving around in
130–135opening 16, 24, 113, 131setting alarm in 128,
148–149setting preferences for
147–149viewing items in 135,
142–143Date Calculator formula 183
Date Conversion formula 183
Dates application (Extras Drawer)
as default backdrop 158Dates button, defined 16
to change meeting date 138
Dates menu (Calendar)events 122, 124, 126meetings 116, 120
Day button (Date Book), toview one day 131, 135
Day’s Agenda button (DateBook) 135
defaultsbackdrop 157–159card sorting order 105eWorld 241Date Book 131handwriting 52keyboard 20setting, for events 149setting, for meetings 148Time Zone 205
Delete buttondeleting 26. See also erasing;
scrubbingfolders 213–214icons 161name cards 108Notepad items 92notes 92phone logs 171printed items 221stored items 155to-do tasks 144, 146–147with sound 196words 58word list items 75
336 Index

Expand button, forabbreviated words 77, 78
expandingchecklists 86outlines 88words 75–78
extended service agreement 319
Extensions folder 153Extras, as backdrop 158Extras button 16, 152
moving checklist entries 86
Extras Drawer 16, 151–153,165–166
aligning pen in 198, 299backing up to storage card
with 165, 172,271–273
battery level indicator in156, 307, 309
built-in applications165–207, 265
Calculator application in152, 165, 166–167
Calls application in 108,152, 165, 167–172
Card application in 152,165, 172, 267
changing keyboard layoutin 55–56
changing line or shapethickness in 71–72, 201
changing text style in71–72, 201
Clock application in 152,165, 173–175, 304, 305
closing 152Connection application in
152, 165, 176–179creating Notepad items in
81–88deleting icons from
160, 161faxes received in 231filing icons into folders
19, 209, 212–213folders in 152, 209–214Formulas application in
152, 165, 180–183help in 31–32, 79, 153,
165, 184Handwriting Instructor
application in 11, 41,79, 153, 165, 185
In Box in 152, 165,185–186, 188
installing applications in 152
and memory capacity ofstorage cards 157, 267, 295
Newton book icons in 278
Newton Tour in 10–11,153, 165, 184, 188–189, 200
opening 16, 152Out Box in 152, 165, 185,
187–188Owner Info application in
153, 165, 189–193Prefs application in 153,
165, 193–199
339Index
on Internet 241logging sent/received
items 244–255password 295preparing to send 240problems with 301–302receiving 165, 244–245replying to 247retrieving from
In Box 245sending 242–244sending automatically 33,
242, 255sending icons 163–164sending In Box items 239sending to multiple
parties 99sending name cards 108sending Notepad
items 92sending packages 242sending to-do tasks 146setting preferences for
240–242status of connection 245storing in Out Box 165system requirements
for 239viewing messages
246–247English, entering words
in 42envelope icon. See Routing
buttonErase button, to erase
storage cards 37,262–263, 268
erasing. See also deleting;scrubbing
bookmarks 284entire MessagePad 157,
194, 293–294name card information 99storage cards 37, 172,
262–263, 268Event button, to
schedule 121events. See also Calendar;
Date Bookadding notes to 123, 124,
126, 127–128setting alarm for 122, 124,
126annual 124–127changing information
137–139setting date for 122,
124, 126duplicating 136–137multiday 123–125one-time 115, 121–123recurring 122scheduling 115, 121–127symbol for 133titling 122, 124, 126viewing list of 135
Everywhere button, to findinformation 30, 217
eWorld accountcharges for 321pre-existing 325problems with 302registering for 322–325setting preferences for
241–242eWorld button 244exchange rate formula
182–183
338 Index

Assist button and 33automatically 33by date 215–216in In Box 217by letter 216multiple items 218by word 216
find request, using Assist 253Fine Tuning (handwriting
recognitionpreference) 52
Fit in Window option, forfaxes 233
flag symbols (Calendar) 133Folder button, defined 19folder tab, defined 19folders
creating 19, 29, 213–214deleting 29–30, 213–214in Extras Drawer 152,
209–214filing items in 28, 156,
162, 209, 246filing multiple items in
210–211filing onto storagecards 210, 265
global 29, 209–210local 29, 209–210organizing 209–214preinstalled 153renaming 29–30,
213–214viewing items in 28–29
fontschanging 201, 242filing in folders 153selection 73
forgetting security passwordfor e-mail 295for MessagePad 194, 294
formattingfor faxing 227–229name cards 106for printing 106, 222–224text and drawings 68
Formulas application (Extras Drawer)
Currency Exchange182–183
Date Calendar 183Date Conversion 183folder for 152, 153Loan Payment 181Metric Conversion 181Net Present Value 182uses of 165, 180
forwarding an e-mailmessage 247
G
getting help. See helpgetting started. See Newton
Tour; Setup applicationglobal folders 29, 209–210GMT offset 205group addresses, entering in
Name File 16, 99–100Group button 99guest user, setting up
79, 198
H
handwriting. See alsohandwritingrecognition
combining styles 104control slider 43, 48, 198converting to text
62–64, 297correcting 56–60cursive 43, 47, 198
341Index
receiving beamedinformation in 165,185, 237
receiving e-mail andpackages in 165,244–245
registering for eWorld in 322
routing items from OutBox 27, 248
setting alarm in 128,148–149, 165, 174
setting beam preferencesin 234–236
setting e-mail preferencesin 240–242
setting fax preferences in225–227
setting print preferencesin 220–221
Setup application in 153,166, 174, 200
Styles application in 152,166, 201
Time Zones application in152, 166, 202–207
Unfiled Icons folder in 71,152–153, 201
using application cards in259, 270
viewing e-mail messagesin 246–247
viewing faxes in 231viewing items in 161–162Writing Practice tutorial in
12, 79, 153, 166, 207
F
fax cover page 229faxes
enlarging 233receiving 231replying to 233sending 224, 227sending drawings 227viewing 231
faxing 224–233Assist and 33, 230, 255automatically 33, 230, 255by manual dialing
229, 230to multiple parties 99name cards 108Newton books 281, 290Notepad items 92power use and 235, 237preparing for 225–227problems 303–304return address and 225setting preferences for
225–227storing in Out Box 165to-do tasks 146
fax request, using Assist for 253
field labels, creating custom97–98
File button 210for printed items 221
File to Names button, toplace a call 170
filing. See foldersfinancial calculations,
formulas for 180–183Find button 17, 28, 104, 215finding information 30
340 Index

filing onto storage cards 265
selecting and moving 160In Box (Extras Drawer) 16,
152, 165, 185–186, 188e-mailing from 239eWorld in 322faxes received in 231finding information
in 217receiving e-mail in
165, 244retrieving mail from
244–245setting preferences
for 188viewing 186
indenting paragraphs 73information
backing up 37, 165, 172,271–273
entering on stationery82–88
entering, tips on 23–25searching for 30, 33,
215–218Information button 20
to check memoryavailability 157
defined 20to get help 31location of 18
infrared beam. See beaminginfrared windows, pointing
236, 305initials, writing 42Ink Text (handwriting
recognition setting)converting to text 62
creating a note in 82–83defined 45recognizing later 298
inserting cards inMessagePad 34–36,259–261
installing applications 152installing batteries 3–5,
307–315interest rate formulas 181Interference Handbook vinterference, radio and
television v–viInternet e-mail 241Invitees list, for meetings
117–119I/O Box. See In Box; Out BoxI/O Box button, to view
beamed items 238
K
Keyboard button, defined 20keyboard, on-screen 2
and accents 55–56adding to word list with
74–75changing layout 55–56correcting writing with
60, 299default 20entering information with
23–24expanding words with
76, 78Locale preferences 55making corrections
with 298moving 55numeric 55
343Index
guest user style 79, 198poorly formed
characters 42printed 43, 47, 198scrubbing 25, 57–58setting preferences for
20, 44–52, 198slow interpretation by
MessagePad 298styles 47switching styles 47tutorial 11, 41, 79, 153,
165, 185Handwriting Instructor
tutorial (ExtrasDrawer)
accessing 11, 41, 79, 185folder for 153uses of 165, 185
handwriting recognition. Seealso handwriting
about 42–43capitalization and 75changing style setting 47control slider 43, 48, 198Fine Tuning 52Handwriting Settings
49–50improving 48, 50–51,
53–54, 207Ink Text setting 44–45letter-by-letter 50–51Letter Shapes 50–51in Name File 50in Notepad 50Option button and 48Preferences setting 44–45Recognition button,
defined 20
setting preferences for46–52, 198, 193
Sketches setting 44–45Shapes setting 44–45Text Editing Settings 48Text Only setting 44–45Use Default Settings 52
Handwriting Settingspreference 43, 48–50
Hang Up button (Calls) 170hard reset 157, 194, 206,
292–294. See also softreset
hardware maintenance vii–xhelp 31–33. See also Assist,
usingwith handwriting 79with Newton operating
system 153on-screen 31–32, 165,
184, 256–257Help folder 153Help icon 31highlighting. See selectinghome city (Time Zone) 202How Do I? button (Assist)
32, 256HW Instructor button 11,
41, 79
I, J
icons, in Extras Drawer 152beaming 162–163built-in 165–207, 265, 293deleting 160, 161e-mailing 163–164filing beamed 163filing into folders 19, 209,
212–213
342 Index

Mail Font button, to changee-mail font 242
mail request, using Assist for 253
Make Backdrop button, tochange default 159
manual dialing 169, 229, 230map (Time Zone) 205margins, changing 72–73Mark Page button, to set a
bookmark 283Markup button, to annotate a
book 289Measurement menu
(Formulas) 181measurements, formulas for
converting 180–183Meeting button, for
scheduling 115Meeting Notes slip,
sample 128meetings. See also Calendar;
Date Book; eventsadding notes to 118, 120,
127–128setting alarm for 117, 120changing information
137–139setting date for 116, 120duplicating 136–137invitees list 117, 119setting location of
117, 120multiday. See eventsone-time 115–118overlapping 129scheduling 115–121, 129,
137–139symbol for 133setting time of 116, 119titling 116, 119
viewing list of 135weekly 118–121
memorychecking availability of
155–156, 157, 162, 295freeing 146, 185out of memory
message 296problems caused by word
list 74Memory Info button
to change backdrop 157for storage card
information 297MessagePad
backing up 165, 271–273compatibility information
327–330connecting to a modem
239–242diagram 2keyboard choices 55–56learning basics about. See
Newton Tourlocking 34, 259moving around in 14–22problems turning on 300resetting 157restarting 276setting up 3–9
MessagePad pen. See penmessages. See specific
messagesMetric Conversion
formulas 181mini-calendar 133Minute Timer option (Clock)
173, 174Miscellaneous (global
folder) 210
345Index
punctuation marks 69setting preferences for
55–56, 196symbols 56–57types of 20, 55–56viewing word list with
73–74
L
Later button 27to beam items 235to e-mail items 164, 241to fax items 226to print items 221to print or fax Newton
books 290to route items 27
letter-by-letter recognition50–51, 60
layoutof keyboard 55–56of name cards 101–102
“Learn my handwriting”preference 51
“Letter-by-letter in fields”preference 50
“Letter-by-letter in notes”preference 50
letters,erasing 57–58writing 60
Letter Shapes preference51–52
lid, removing and replacing3, 6
light bulb button, for help 16
lineschanging thickness of
71–72, 201erasing 67
selecting 61–62lithium backup battery 307.
See also batteriesLoan Payment formula 181Locale option (Prefs) 196
changing keyboard layoutand 55
local folders, 29, 209–210LocalTalk boxes 220Location menu (Calendar)
117, 120locking a storage card
34–36, 40, 154, 261, 269
locking MessagePad tab 34, 259
Log buttonfor beamed
information 163for printed items 221
logging e-mail 244–255logging phone calls 110,
169–171long-distance calls, avoiding
charges 240, 321“Look for” option 30, 215.
See also findinginformation
low-battery message, forstorage cards 269, 308
lower-case letters, changingto upper case 70, 75
M
Mail buttonto e-mail icons 163–164to send e-mail
241–244, 247mail features. See
electronic mail
344 Index

viewing 101Names application, as default
backdrop 158Names button 16
to access Name File 93, 94
Names Preferences slip 105Net Present Value
formula 182network printers 219,
220, 223New button, defined 20Newton Book Reader
application 277controls for 281–290
Newton booksannotating 281, 289bookmarks for 282–284copying 285–288icons 278opening 278Page Number button 282printing and faxing 290using table of
contents 280viewing pages 279, 281
Newton-compatible modem 224
Newton modem, forreceiving e-mail 239
Newton operating systemand Help application 153using old version 262,
264, 327, 330Newton power adapter. See
power adapterNewton Print Pack 219, 220Newton Tour (Extras
Drawer)accessing 10–11
folder for 152, 153uses of 165, 184,
188–189, 200Next button 224nickel-cadmium (NiCd)
batteries 4, 309note stationery 81–83Notepad. See also notes
beaming from 92creating new items on
81–88as default backdrop
application 14, 81deleting items from
92, 293drawing on 14duplicating items on 92faxing from 92filing items into folders
209, 210filing items onto storage
cards 265finding information
in 217e-mailing from 239going to 24listing items 89mailing from 92setting preferences for 91writing on 14viewing items 88–89
Notepad Preferences slip 91notes. See also Notepad
adding to calendar127–128
adding to name card 103buttons for 85creating duplicates 82creating new 24, 82–83viewing 103–104
347Index
misinterpreted words,correcting 55, 59–60
modembatteries 304connecting to MessagePad
239, 325connections via 165,
177, 199damaging the 108dialing with a
108–110, 169Newton-compatible 224,
239, 322problems with 302, 304setting preferences for
193, 199, 322Modem button 177Month button
(Calendar) 133multiday events 123–125.
See also eventsMulti-Day Event button
(Calendar) 123
N
Name button 228name cards
adding information to96–98, 192
adding notes to 103alphabetical order 106beaming 108changing appearance
101–102changing or adding
information on 99creating 94–95erasing 108, 293duplicating 108faxing 108
filing into folders 19, 209,210, 211–212
filing onto storage cards 265
mailing 108sample 93sorting 104–105style 101
Name Card slip, sample 94, 95
Name File 16, 93adding notes to 101–104changing information in
104–105choosing Card Style for
101–102creating a name card in
94–95creating to-do tasks
in 138dialing a phone number in
108–109e-mailing from 239entering addresses in 16entering phone numbers
in 108faxing in 109finding information
in 217going to 24opening 16printing cards from
106–107Routing button and 20,
26, 106scheduling events 121,
123, 125scheduling meetings
115, 119setting preferences for
104–105
346 Index

to view found item list 218
to view name cards 101to view Newton
books 280owner
defined 189entering new 190–191
Owner button 190Owner Info button 190,
191, 193Owner Information
application (ExtrasDrawer)
creating an owner190–191
creating a worksite191–192
entering 200, 322for faxing 225folder for 152, 153for printing 220security precautions
and 192for sending/receiving
e-mail 240setting preferences
for 193uses of 165viewing information
192–193
P, Q
package, e-maildownloading 247saving 266sending 242,
Page Number button 282paper size, setting Locale
preference for 196choosing for printing 220
paragraphschanging margins for
72–73indenting 73selecting 61–62
password 194–195. See alsoPIN
entering 325failure to recognize
294, 295forgetting 194verification 325
PBX telephones 109, 302, 303
PC Card modem connector 199
PCMCIA Type I and Type IIcards 34, 259. See also cards
pen, MessagePadaligning with screen 198,
200, 297, 299choosing point size of 72learning to use 8problem using 299removing from
MessagePad 3, 5“Persistent Alarms”
option 197Personal (global folder) 210personal identification
number. See PINpersonalizing the
MessagePad 9, 200personal word list.
See word listPhone Book (Printing
option) 106Phone button, to place calls
99, 109
349Index
Notes, as backdropapplication 158
Notes option (Time Zone) 206
Now button 27to beam items 235to e-mail items 164, 241to fax items 226to print items 221to print or fax Newton
books 290to route items 27
numbersmisinterpreted as
words 299writing 42
Numeric keyboard 20
O
on/off switch 7, 293, 315on-screen help 32
accessing 31–32, 165,184, 256–257
Assist button for 17on-screen keyboard. See
keyboardoperating system. See
Newton operatingsystem
Options (Clock) 173, 175Options button
to retrieve e-mail243–245
to set handwritingpreferences 48–49, 198
Options key, for viewingkeyboard 56 48–49
organizing information28–30, 209–213
Other City button 203Other Names button 228
Other Worksite button 178Out Box (Extras Drawer) 16,
152, 165, 185, 187–188beamed items held in
165, 235e-mail held in 165,
239, 241fax items held in 165,
224, 226finding information
in 217print requests held in
165, 219, 221routing items from
27, 248sending items to 27, 221setting preferences
for 188viewing 187
outline stationery 81–82,83–85
out of memory message 296overlapping meetings 128.
See also meetingsOverview button 17
to delete Extras Draweritems 161–162
to delete phone call logs 171
to delete scheduled items146–147
to file multiple items infolders 211
to place calls 109problems with 306to route name cards 108to view Date Book
items 135to view Extras Drawer
items 161to view folders 29
348 Index

Preferences (HandwritingRecognition setting)
creating a note and82–83
defined 45prefixes, telephone 204, 244Prefs application (Extras
Drawer)folder for 152, 153to set alarm 128to set Connection
preferences 179to set Date Book
preferences 147to set Name File
preferences 104to set Notepad
preferences 91to set Owner Info
preferences 192to set phone
preferences 172setting preferences in
193–199uses of 165
preinstalled folders 210, 213Preview button 107, 222,
224, 228, 229Print Book button 290Print button 107, 222, 224Printer button 222Printers
choosing 219, 222–223, 303
connecting 220network 220, 223, 303problems with 303
Print Name button 106printing. See also
handwriting, printedAssist button and 33, 255automatically 33, 255
choosing a printer 219Newton books 281, 290preparing for 220problems 303–304setting preferences for
220–221print request, using Assist
for 253Priority menu, of to-do
tasks 140privacy. See passwordprotecting owner
information 193punctuation
adding to text 60, 69writing 54
Put Away buttonfor beamed
information 162X (X) button for 21
R
rechargeable battery pack 4,8, 300, 307, 308, 314.See also batteries
recipient addresses 229Recognition button,
to align pen with screen 297
to change handwritingrecognition setting 103
to create a note 82–83defined 20to set handwriting
preferences 46to set up guest user 79to use the caret 63
recognizing text. Seehandwritingrecognition
Redo button 17
351Index
phone calls. See telephone calls
Phone keyboard 20Picture button 19
to add notes to Calendar 127
to change Calendar items136–137
defined 19to delete scheduled
items 146to download e-mail 241to duplicate Calendar
items 136–137for information about
Notepad items 90to schedule overlapping
meetings 128to view agenda items 137,
138, 139to view e-mail 241to view eWorld
message 323picture hanger, defined 22pictures. See drawingsPIN
changing 195forgetting 194, 294entering 195MessagePad request for
194, 195removing 195
Place Call button 168placing calls. See Calls;
dialing; telephone callspoint size selection 72, 201pop-up word list 59–60ports
communication 176safety tips viii
poweravailability 156, 302
conserving 235, 237power adapter
as backup power source 311
instead of batteries 4,220, 308
plugging in 8printing with 220problem with 300unplugging ix
Preferences 16Alarm 148–149, 193, 197beaming 234–235, 305Calls 172Connection 179Date Book 147–149defined 21e-mail 240–242eWorld 240–242Extras Drawer 16faxing 226global 21handwriting 20,
44–52, 198Handwriting Recognition
46, 193, 198In Box 188I/O Box 188local 21modem 193, 199, 322Locale 193, 196Name File 104Notepad 91Out Box 188Owner Info 193printing 220–221Security 193, 194–195Sleep 193, 197Sound 193, 196telephone 172Time Zone 202–207
350 Index

to print or fax a Newtonbook 290
to route Extras Draweritems 162
to send e-mail 242routing later 27routing now 27
S
scaling of ink text 49Schedule button, for
faxing 226schedule request, using
Assist for 254scheduling. See also
Calendar; Date BookAssist button and 33
screenadjusting contrast on 3, 7,
9, 10, 294aligning pen with 198,
200, 297, 299rotating image on 294
screen lidopening 3, 6removing and replacing x
screen window, and beaming236, 305
scrolling 14. See also arrow buttons
scrubbingbook annotations 289defined 25letters 57–58owner information 192problems with 298shapes 57–58with sound 196words 57–58
searching. See findinginformation
security. See password; PINSecurity option (prefs)
194–195Selected button, to find
information 30, 217selecting text and drawings
61–62separator bar 18Serial button 176serial, connections via
165, 176Serial Port modem
connector 199service and support
AppleCare extendedservice agreement 319
Apple User Assistance317–318
telephone numbers 291, 317
warranty and repair318–319
Set menu (Clock) 173Set PIN button 194setting up MessagePad 3–9setting preferences. See
preferencessetting volume 128, 156,
174, 199Setup application
contents of 153getting started with 3,
9–10uses of 166, 174, 200
Setup folder 153, 185, 188, 207
shapeschanging line thickness
71–72, 201modifying 67problems with 299
353Index
release lever on MessagePad34, 259
Remember request, usingAssist for 254
reminders, of to-do tasks 141
Remove PIN button 195removing cards from
MessagePad 34–36,259–261
removing password 195renaming folders 213–214Repeat menu
of events 122of meetings 118of to-do tasks 141
request words (Assist)using correct 253–255writing, on
MessagePad 251“Require dial tone” option
225, 240, 302Reset button, inside
MessagePad 9–10resetting the MessagePad
157, 194to erase all information
10, 157, 306hard reset 157, 194, 206,
292–294for modem problem 304for problem solving 292,
296, 300soft reset 292
Restart button 297restarting the MessagePad
276. See also resettingRestore button 38, 273, 275restoring information from
storage card 165,274–276
Retrieve Read Mail option244, 245
Retrieve Sent Mail option244, 245
Retrieve Unread Mail option244, 245
return addressof e-mail items 240of faxed items 225missing 303of printed items 220
Rotate button 152routing
by beam 234–238by e-mail 239–247by fax 224–233from Out Box 248by printing 219–224
rotating screen image 233Routing button
to beam items 236, 246to change backdrop 159defined 20, 26to delete Date Book items
144, 146–147to delete e-mail
messages 246to delete phone logs 171to delete a storage
card 268to delete time zone
information 202, 205to duplicate Date Book
items ?????to duplicate e-mail
messages 246to e-mail icons 163–164to fax e-mail messages
246to print an item 222–224,
238, 246
352 Index

“Mount read-only” buttonand 38, 264
new 37, 261, 262–263old 264preparing for use 37, 262removing 34, 259–261restoring information
from 165, 172,274–276
storing information on37–38, 154
titling 263transferring information
on 37uses 37, 262used 261write protection
error 296storage card slot 34Storage folder 153, 166Styles application (Extras
Drawer)folder for 152, 153setting preferences
for 201uses of 162
styleshandwriting 47text 201
Styles box 71, 201Styles button 71, 201Summary (printing
option) 106support. See service and
supportsymbols
entering 56–57used in Date Book 133
synonyms for request words253–255
system failure, and emptycard slot 34
T
table of contents, in NewtonBooks 280
tabs, using 73, 101Tag button 163
to download packages 247
prefixes for 204to process beamed
items 238to process e-mail
messages 246–247to reply to a fax 233
tapping, learning how 8telephone calls. See also Calls
applicationdeleting logs of 170, 172dialing feature 99,
108–109filing into folders 209logging 110, 169–171placing 109–111,
167–170Assist and 108, 168using a modem for 167to wrong number 303
telephone numberscapital letters in 109entering in Name File 16entering in Owner
Info 189keyboard for 20, 55prefixes for 204problems with 304
textchanging capitalization
of 70
355Index
scrubbing 57–58selecting 61–62
Shapes (handwritingrecognition setting)
defined 45creating a note and 82smoothing lines and 299
Show button 25to view owner
and worksite information 192
to view time zoneinformation 202, 205
signature, electronic 189Single Card (printing
option) 106size of Notepad items 90Sketches (handwriting
recognition setting)defined 45creating a note and 82leaving shapes as is 299
Sleep, setting timer for 197Sleep option (Prefs) 197slider,
handwriting 43volume 156, 199
slips 22Snooze button 174snooze option (Alarm) 197software. See also
application cardsinstalling 36
software, built-in 165, 207,265, 293
soft reset 292. See also hard reset
software problems. See troubleshooting
sorting cardsby date 186
by service 186setting preferences for
104–105, 186–187by status 186by transport 187
sound effects 22, 61of alarm 128, 197changing volume 156setting preferences
for 196Sound option (Prefs) 196space. See also word
spacing 68speaker
for dialing 111, 169,problems with 304
special-purpose cards 34.See also storage cords
SRAM cards 3, 292stationery 25
creating 81–85status bar 18storage cards 16, 34–40. See
also cardsbacking up on 37, 165,
172, 271–273changing batteries
40, 269“Convert” option 39, 264erasing information on
37, 172, 262, 267–268filing icons on 265formatting 37, 262full 295, 297inserting 34–36, 259–261locking and unlocking
34–36, 40, 154, 261, 269
memory availability 157,267, 295
354 Index

to-do tasksbeaming 146titling 140
tone dialing 108Tools button, to view a
fax 233Topics button 184, 257tour. See Newton TourTour button (Newton Tour)
10–11, 188troubleshooting
batteries 300beaming problems 305date and time wrong 305dialing problems 303–304drawing problems
297–299electronic mail
problems 301faxing problems 303–304heat problems ixmessages from
MessagePad 295missing items 306modem problems 304password problems
294–295power problems 300printing problems
303–304Reset button for 291–294screen problems 294wet MessagePad 305writing problems
297–299Try Letters button 59–60turning on MessagePad 3, 7turning off MessagePad 7tutorials
Handwriting Instructor11, 41, 79, 185, 207
for MessagePad 13–39Newton Tour 10–11, 153,
165, 184, 188–189, 200Writing Practice 12, 79,
153, 166, 207, 299Two Clocks option (Time
Zone) 207typefaces. See fontsTypewriter, as default
keyboard 20typing accent marks 56–57
U
Undo button 17Unfiled (global folder) 210Unfiled Icons folder
(Extras Drawer)to open In Box 163to open Styles application
71, 152–153, 201unlock switch, for inserted
card 269up arrow. See arrow buttonsupgrading storage cards 264upper-case letters. See
capitalizationuser. See ownerUsing button, to place calls
168, 169
V
viewing Extras Drawer items161–162
viewing faxes 231–233viewing In Box 86viewing Name File 101viewing Newton book pages
279, 281viewing Notepad items
88–89
357Index
changing style of 71–72,201
converting handwriting to62–64, 297
correcting 55, 59–60formatting 68modifying 67moving 65–66punctuation marks 54,
60, 69scrubbing 58style 72
Text Editing Settings option 48
and using the caret 63Text Only (handwriting
recognition setting)creating a note and 82defined 45
text recognition. Seehandwritingrecognition
text scaling preferences 49third-party applications,
erasing 293thumbnail, viewing
fax as 233thumbwheel 7time 165. See also Calendar;
Clock applicationchecking, after reset
292, 294entering AM and PM 116setting 9, 173–175, 200wrong 305
time-based Calendar items 115
Time button, to changeCalendar items 137
Time/Date option (Clock)173, 175, 304, 305
Time menu
meetings 116, 119to-do tasks 140
timer 165. See also Clockapplication
setting 173–175Time request, using Assist
for 255Time Zones application
(Extras Drawer)and e-mail access
number 202deleting information 205folder for 152, 153and problem solving 304setting current 202–203setting second 203–205uses of 166views of 205–207
Time Zones button 202Title menu
events 122, 124, 126meetings 116, 119to-do tasks 140
titles. See application cardsToday button 135To Do List 134. See also
Date Bookadding an item to
139–143, 145completing tasks in
143–144deleting items from 144duplicating items in 145entering items
automatically 33finding information
in 217Assist button and 33viewing 142–143
To Do List button 135, 143,144, 145
To Do Task button 140
356 Index

viewing owner and worksiteinformation 192–193
volumeof alarm 128, 156, 174of modem 199
volume slider 156, 199
W
warranty and repair service318–319
Week button 132, 138Weekly Meeting button 119weekly meetings 119–121.
See also meetingsWelcome screen (Setup) 9,
10, 200wet MessagePad 305word list 48
adding corrected word to59–60, 298
adding words to 74–75expanding words in
75, 78expanding words not in
75–77memory capacity for 74pop-up 59–60removing words from 75viewing 73–74
words. See also word listduplicating 64expanding 75–78finding 214scrubbing 58
word spacing 48, 53, 54–55World Map view
(Time Zone) 205worksite
changing information192, 228
creating 190defined 189and faxing 225and printing 220and sending/receiving
e-mail 240setting information
165, 177and time zone 202–203
Worksite button 191writing. See also handwriting
in English 42guest user style 79, 198Handwriting
Instructor 11improving recognition 11in a note 83practicing 11punctuation 42setting preferences 11
Writing Practice tutorial(Extras Drawer)
accessing 12, 79, 299folder for 153uses of 12, 166, 207,for problem solving 299
X, Y
Year button 134yearly events,
scheduling 125–127.See also events
Z
zigzag line, for scrubbing 25,57–58
problems with 298
358 Index