Newsletter September 2018 - Zen Internet
12
1 Surrey Association of Woodturners Newsletter September 2018 Reports, News and Views from North West Surrey New Members Welcome to Mr John Sadler Member No. 764 Welcome to Mr Larry G Clark Member No. 765 Welcome to Mr David Foker Member No. 766 PAID UP MEMBERSHIPS for 2018 are 138 (As of going to press) Items for the Diary 12 th to 14 th October D&M Tool Show (We’re on Record Stand) Pen Making Tuition 20 th October Princes Mead Shopping Centre Club Demonstrators 21 st October Painshill Park Autumn Tree Festival Club Demonstrators 28 th October Open Day – Do not miss! Club Event 9th November Simon Hope Professional Turner 18 th November Workshop Day Club Tuition 2 nd December Axminster Basingstoke Store Club Demonstrators 14th December Christmas Practical night Club Demonstrators Open Day Top Tip As you should now be aware Axminster and Olivers Woodturning are to be at our open day. To ensure that you get what you want you can contact them direct beforehand and they will be able to bring the items with them on the day. For Axminster contact: Mr Simon Jones Tel: 01256 637477 E-mail: [email protected] For Olivers Woodturning Contact: Eddie Oliver Tel: 01233 613992 E-mail: [email protected] TOP TIP’s and articles If you have a tip or article to share please email it to Colin Spain at the address shown in contacts at back of this newsletter. If a tip keep it short, and if we are happy with it, I will include it in one of the newsletters.
Transcript of Newsletter September 2018 - Zen Internet
1
Surrey Association of Woodturners
Newsletter September 2018 Reports, News and Views from North West Surrey
New Members
Welcome to Mr John Sadler Member No. 764 Welcome to Mr Larry G Clark Member No. 765 Welcome to Mr David Foker Member No. 766
PAID UP MEMBERSHIPS for 2018 are 138 (As of going to press)
Items for the Diary
12th to 14th October D&M Tool Show (We’re on Record Stand) Pen Making Tuition
20th October Princes Mead Shopping Centre Club Demonstrators
21st October Painshill Park Autumn Tree Festival Club Demonstrators
28th October Open Day – Do not miss! Club Event
9th November Simon Hope Professional Turner
18th November Workshop Day Club Tuition
2nd December Axminster Basingstoke Store Club Demonstrators
14th December Christmas Practical night Club Demonstrators
Open Day Top Tip
As you should now be aware Axminster and Olivers Woodturning are to be at our open day. To ensure that you get what you want you can contact them direct beforehand and they will be able to bring the items with them on the day.
For Axminster contact: Mr Simon Jones Tel: 01256 637477
E-mail: [email protected]
For Olivers Woodturning Contact: Eddie Oliver Tel: 01233 613992 E-mail: [email protected]
TOP TIP’s and articles If you have a tip or article to share please email it to Colin Spain at the address shown in contacts at back of this newsletter. If a tip keep it short, and if we are happy with it, I will include it in one of the newsletters.

2
John’s Jottings September 2018
A bit different this month. Recently it was brought to my attention regarding a matter that could affect us woodturners, and that is the Offensive Weapons Bill. In a recent announcement it states:- “The government has moved forward with its proposed legislation (the draft Offensive Weapons Bill) to ban the delivery of bladed articles purchased online to residential addresses. The Home Office has released the first draft of the new Offensive Weapon Bill on 19 June 2018”. I decided that I had to write to my MP Mr Gove, my letter to him is below; it might be worth any of his constituents who are members of the club writing to him as their MP. Dear Mr Gove, I am writing to you in my capacity as chairman of the Surrey Association of Woodturners who meet once a month in the Mytchett Community Centre in your constituency. Our concern is the Offensive Weapons Bill. Whilst we applaud your efforts to try to reduce knife crime, we are worried by the loose definition of a “bladed product” contained in the bill, that is----
a) It is or has a blade
b) It is capable of causing serious injury to a person which involves cutting that person’s
skin.
This definition could reasonably said to include the majority of the tools in my workshop. I am aware that there is allowance for bladed products to be sent through the post or via a carrier to a residential address where it is being used as a registered business, which will include a self-employed person working from their home. However that will only apply to about 5 of the 150 members of our association, the rest are mostly retired hobby turners. As with much of the retail economy the woodturning supply industry is shrinking in the number of outlets that are available to the hobbyist, so we have to resort to the internet to purchase our tools and consumables. I understand that there is a “defence” listed in section 16 ---- Reasonable belief that the buyer bought the bladed product for use for relevant sporting purposes or for the purpose of historical re-enactment. May I ask you please to add to the defences in section 16, TO PERMIT THE DELIVERY TO PRIVATE INDIVIDUALS WHO ARE NOT BUSINESSES, OF BLADED ITEMS SPECIFICALLY DESIGNED FOR WOODTURNING. I have taken the liberty of including a flyer for our Association’s Open Day on the 28 th October at the Mytchett Centre where I would be delighted to welcome you and show you what we do. Yours sincerely
John Sherwood. Latest news: I have now had a reply from Mr Gove thanking me for the letter and he is passing my concerns onto the relevant department for consideration. This is important to us as it could affect on line tool purchasing of turning chisels.
3
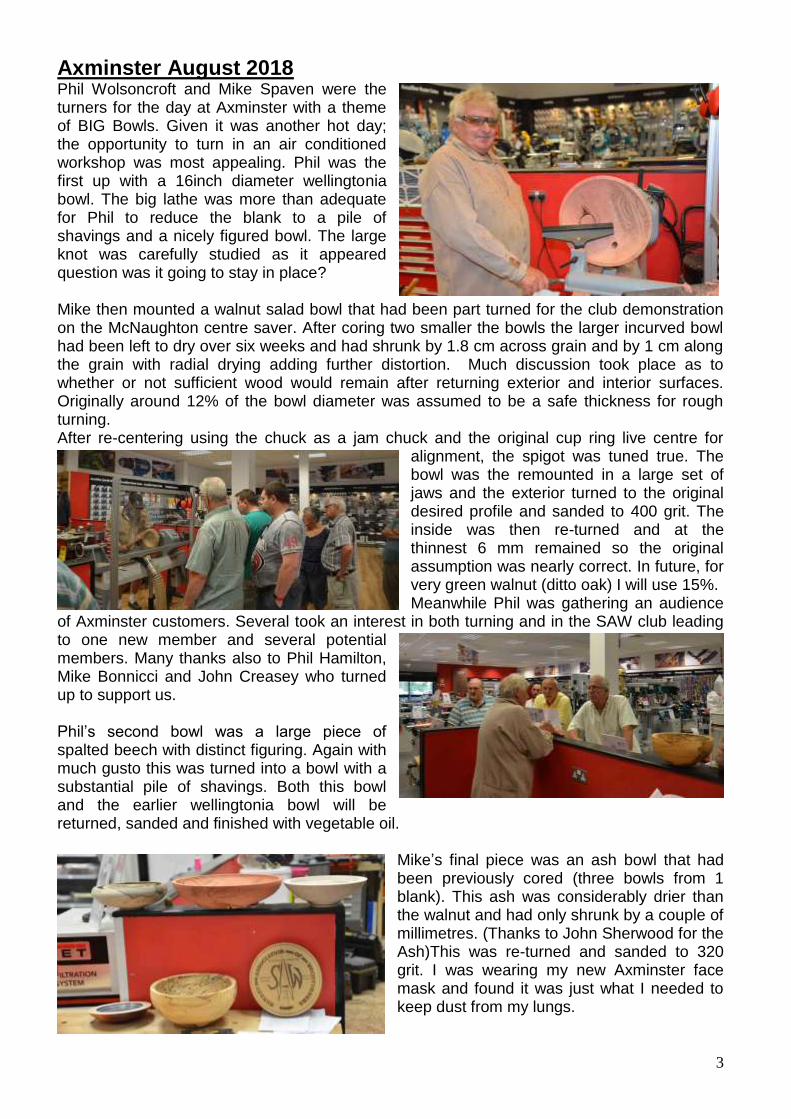
Axminster August 2018 Phil Wolsoncroft and Mike Spaven were the turners for the day at Axminster with a theme of BIG Bowls. Given it was another hot day; the opportunity to turn in an air conditioned workshop was most appealing. Phil was the first up with a 16inch diameter wellingtonia bowl. The big lathe was more than adequate for Phil to reduce the blank to a pile of shavings and a nicely figured bowl. The large knot was carefully studied as it appeared question was it going to stay in place? Mike then mounted a walnut salad bowl that had been part turned for the club demonstration on the McNaughton centre saver. After coring two smaller the bowls the larger incurved bowl had been left to dry over six weeks and had shrunk by 1.8 cm across grain and by 1 cm along the grain with radial drying adding further distortion. Much discussion took place as to whether or not sufficient wood would remain after returning exterior and interior surfaces. Originally around 12% of the bowl diameter was assumed to be a safe thickness for rough turning. After re-centering using the chuck as a jam chuck and the original cup ring live centre for
alignment, the spigot was tuned true. The bowl was the remounted in a large set of jaws and the exterior turned to the original desired profile and sanded to 400 grit. The inside was then re-turned and at the thinnest 6 mm remained so the original assumption was nearly correct. In future, for very green walnut (ditto oak) I will use 15%. Meanwhile Phil was gathering an audience
of Axminster customers. Several took an interest in both turning and in the SAW club leading to one new member and several potential members. Many thanks also to Phil Hamilton, Mike Bonnicci and John Creasey who turned up to support us. Phil’s second bowl was a large piece of spalted beech with distinct figuring. Again with much gusto this was turned into a bowl with a substantial pile of shavings. Both this bowl and the earlier wellingtonia bowl will be returned, sanded and finished with vegetable oil.
Mike’s final piece was an ash bowl that had been previously cored (three bowls from 1 blank). This ash was considerably drier than the walnut and had only shrunk by a couple of millimetres. (Thanks to John Sherwood for the Ash)This was re-turned and sanded to 320 grit. I was wearing my new Axminster face mask and found it was just what I needed to keep dust from my lungs.

4
Practical Night August 2018
It seemed that the club had gone into holiday mode as numbers attending were quite low. However we had five fine club turners, two of whom were demonstrating at the practical night for the first time at our club.
Max Bennett was turning small table legs for his dolls house furniture. These were in yew and were just over two inches long. It was quite a job turning beads on those legs.
Next along was Keith Mosley making his debut as a club demonstrator. He had chosen to turn square edge bowls with some texturing and colour. Keith first turned a spigot and then the outside shape of the bowl. The bowl had quite a large rim so finger safety was important. The blank was then reversed into the C jaws and the top surface smoothed off. Before taking out the inside of the bowl the top surface was textured (or “marked” is a current jargon word on some arty websites). Keith used the Axminster equivalent of the Dremel with a rotary chisel. This is a fearsome little tool. It is basically a triangle plate on a stem and on each corner is a very small cutter piece. This is one of Frank Sudol’s designs. The texturing is tidied up with a rotary wire brush. Colour is applied at this stage before finishing with a coat of polish. Another handy piece of kit that Keith was using looked like a rubber dog bowl into which the bowl was placed to keep it steady during texturing.
Phil Hamilton was turning what he described as an emerging bowl. This involved gluing two pieces of wood together with a paper joint, turning a dome in the end grain as one would turn a spigot. The two pieces are split along the paper joint; this gives you two pieces with half of a solid bowl protruding from the end. One of these is then hot melt glued to a pre-marked wooden carrier that fitted the lathe jaws. If the gluing is on the correct pencil line the semi-circle on the end of the block will rotate about the axis enabling the inside to be removed. When the timber is removed from the lathe you have a very simple egg cup and depending on the length of the timber, a plate for soldiers.

5
Mel Martin again was amazing the onlooker as he turned more of his dolls house goblets. The audience is usually very quiet as you are just wondering what will happen as Mel says that the feel of the tool is as important as sight to know what is going on. Then we come to the club’s answer to “Dave Springett”, Don Bell. Don was starting to turn cubes within cubes. This involved starting with a perfectly sawn cube of timber that will fit directly into the mega Axminster jaws. Then a hollow is turned in the first face with just enough wood left on the edges to hold the creation together. The final surface is smoothed off with a sharp parting tool. The other five faces are then turned in rotation. If the depth is right and in this case about 8mm the side of the hollow will pierce the neighbouring sides to give the impression of a cube suspended within a cube. Then you can start on the next layer.
I wish to take this opportunity to thank all of the demonstrators for their time and effort in the preparation for the evening. It made a very interesting evening. The competition on the stage with the theme of Armistice produced eleven entries and they were all different in concept and gave us lots to think about for the Open Day tabletop competition.
John Sherwood

6
Rural Life September Classic car day After watching the weather forecasts for a week all of which were NO Rain, it was great to turn up on the Saturday knowing it was going to be warm and dry. The extreme weather risk assessment was not needed. Rodney arrived first and Mike and Rodney prepared the workshop for our turning activities. This usually means moving benches and arranging some of the Rural Life on-going maintenance work to provide safe spaces for the lathes, tools and most important - the coffee system.
Paul Raubusch was doing his stint as turner in residence and regularly popped in for a chat with his dog-the very lively Oscar. Mike Bonnicci also dropped in during the Sunday. It is always good to see other club members supporting both SAW activities as well as the venue. The Saturday proved to be a very quiet day with few visitors but it does provide time for an orderly set up, much quiet banter and time to turn amongst friends. Anna Marie and Mike Bennett were the other turners. Putting up the gazebo went quickly and the new tables provided by Rural Life were a big improvement on the trestles and old doors. Rodney had his puzzle palace set up and was turning bowls and snow men. Anna Marie was turning jewellery and micro eyes for some of her pet animal turnings. Mike Bennett was turning bowls and small goblets. Mike Spaven was finishing off some of his cored bowls from the May club demonstration.
We set Rodney up in the main entrance with the very carefully placed sign “Do not move”. This of course referred to the cart behind Rodney. This position would have provided a challenge to Mike and Max Bennett due to their height but Rodney fitted into the position nicely. Sunday was a lot more lively with the arrival of over a hundred classic cars and stands. The Hillman Imp club set up camp outside
the workshop.
We had a constant stream of people coming in to be entertained by Rodney and Mike B with the puzzles. The organisation by Rural Life was faultless and a big thanks to them for their support.

7
It is strange but a relationship can be built with visitors who routinely come to Rural Life. One couple 2 years ago talked to Paul Nesbitt who said he would happily turn something from wood that they brought in. Well last September Andy brought in a nice 12 Inch elm blank and asked for a bowl. As Paul was not there, I picked up the challenge and produced not one but two bowls for him. He asked for a dedication to be added to the foot for his daughter who had just graduated from Uni. The elm turned well but was quite hard. Attention to grain tear was needed due to interlocked grain. The bowl finished well with Chestnut finishing oil. Needless to say a happy customer and I had a chance to turn some of the rare elm.
We also raised some funds for Rural life from our turning and one kind gentleman added a further pound to the pot Mike Spaven mentioned the need for dust/ respiratory protection in the last news letter. Several of the club turners now actively use dust protection some when doing sanding and others as protection for more general turning activities. Like our eyes we only have 1 set! Please, if you do have time please come to see your club at these events. We are always in need of folk to both turn and steward. There is no need to bring your lathe just turn up with some wood and your favourite turning tools. We support each other during the day and provide friendly advice, banter and support.
By Mike Spaven

8
Club night demonstration Friday 13th July 2018 - Kevin Hutson
Kevin told us his first experience with wood turning was around 25 years ago with a small Black & Decker drill attachment lathe. He was completely enthralled by the different shapes and configurations that could be achieved and progressed from this lathe onto a larger and more professional machine. His woodturning skill is all self-taught as his background is in joinery. He said the biggest influence for his work is Oriental architecture, but he also goes to the V&A and looks at ceramics and glass blowers for inspiration.
Kevin started the evening by showing us some of the commercial turning that he has done. He said that for this he uses joinery pine, also known as red pine, as it is superior to the prepared B&Q pine. He went on to explain the need to keep tool rest and bed clean due to resin from the pine, he uses furniture polish rather than WD40 as this tends to get too greasy and if using sycamore can become impregnated. Kevin made a candle stick concentrating on the use of the skew chisel. Kevin used a bowl gouge to quickly rough down the shape and then moved over to the skew. Starts by using 2mm from heel of skew chisel, said that if you go higher up the tool will get dig-in and split the wood. Kevin uses the skew chisel just slightly high of centre rather than right on the top of the wood and starts with the tool handle down and brings it up very slowly to start the cut, a smooth slow motion gives the best finish. Kevin then added beads to the centre of the candle stick using the heel of the skew to roll the beads and then used the point of the skew to add definition between the beads. He would then usually sand 240, 400, 600 grits.
Kevin said he doesn’t polish on the lathe, he waits until he has a few items turned and he then uses an airbrush with cellulose sanding sealer thinned 50/50 in summer and 70/30 in winter. He then applies Libron liming wax with either an excellent quality tea towel or his best white T-shirt, followed by an airbrushed layer of the Libron wax thinned with cellulose sanding sealer. He builds up three layers like this.
Kevin’s main demonstration was a square edge lidded box. Kevin said that all his work is designed around the size of the jaws as he doesn’t turn off the foot when he is finished. This is handy as he can then remount work if damaged anywhere. Uses ring faceplate for his work. Box is made from beech 3inch high, base 2inch and lid 1inch with a 4 &3/4 diameter. Set up for attaching faceplate ring, mark wood corner to corner then with compass marks out internal diameter of faceplate ring, ensures that it is attached centrally, uses 1/2inch or 5/8 screws to attach. One of Kevins boxes http://www.khutson.co.uk/
Kevin starts by making the base; he draws a rough outline of what he wants to remove on one side of the wood as a guide. He used 3/8 and ¼ inch bowl gouges. Kevin starts by cutting using the very centre of the tool and forming a “V” cut from the corners in and from the base out. He then works to form the base and then takes the form up. Kevin said it is important to keep repositioning the tool rest to minimise the gap between the work and the tool. Kevin hollows the base slightly, so it is more stable when it stands and forms the foot by cutting a dove tail for the jaws to hold with a Sorby micro skew and then refining with a small spindle gouge. He then refines the outside shape of the bowl. Kevin said it is easier to sand out small ridges left in the work than tears. Kevin worked from the square corners in to the bowl and

9
bowl out to the corners to blend in the curve between them. Kevin made a point that when sanding he only does the bowl section on the lathe and will use a power drill and pads to sand the corners while it is stationary. The piece is then reversed in the chuck to start hollowing the bowl. Kevin starts by cutting the square edges, to match the shape of the top to the curve of the bottom; He does this first before hollowing the bowl as there is more stability in the wood. Kevin then hollows out the centre of the bowl, stopping to check depth and wall thickness along the way. He uses the centre of the chisel to cut the sides and then moves to the first few mm of the bottom edge of the wing to get a sheer almost scraping cut along the bottom of the bowl. The lid is set up on the faceplate ring in the same manner as when starting the base. Again he did a rough sketch of what he wanted on the wood and worked on cutting the corners first, ensuring he left wood in the middle to form a spigot to fit inside the base, which he did with the spindle gouge. Inside the spigot he measured for the size of the jaws and made a recess so that the piece could be held to finish the top of the lid. The piece was then reversed, and the faceplate ring removed. Again Kevin starts by cutting a “V” into the wood between where the handle will be and the outside edge, and he then widens this out to the corners, matching the curve of the underside. Kevin finishes the outside edges (corners) first before doing the handle as there is more wood which makes it more stable when cutting the corners. Once the corners are done, Kevin uses a smaller gouge and works on shaping the handle, doing a slight hollow in the top and then cuts down using the spindle gouge to shape the handle. He then smoothes over and blends in the curve of the lid. Kevin used the point of the skew to cut in some decorative rings in the lid and used a pencil to add some dark colour to the rings as a contrast. Kevin told us that for his Gallery work, he uses American ash & maple sometimes walnut for inlays, he buys from a company in Sussex, air dried, square edged. Uses lots of liming wax on the ash, including a blue wax which is no longer available, which he particularly likes using. When asked why he does not turn round he said two reasons, 1- wastes lots of wood 2- you can’t see the profile of what your turning. Kevin said he has MDF profiles of all his shapes, and he lays these on the boards he buys to get the best yield. This is because he is a production turner, although he creates pieces he makes multiple of each of his pieces. Kevin gave us lots of handy tips throughout his demonstration, some are listed below:
• Methods to produce a neat square shoulder on your turning
1. Mark the shoulder and use a square with a Stanley knife to break the fibres
2. Wrap some masking tape round the piece and this will prevent the breakage / tear out.
• Roughing chisel sharpened on an angle, can use to rough cylindrical work and then due to
angle acts as a shearing cut like when a joiner or carpenter turns their plane on the edge to
shear the wood. This gives the maximum finish from the tool.
• Sharpening tips: He uses a standard dry grinder with white Norton stone and then a buffing
wheel, he used to use ones from Stiles & Bates or Axminster but found stitching quite loose,
and he now uses buffing wheel which is very tight with stitching that is about 5mm apart. Grind
on white wheel then buff, buffs about 4-5times before re-grinding. Uses buffing compound
applied direct to wheel. Buffs inside and outside of the tool.
• Flattens tool handle on two sides with sander when gets new tools so that they do not roll off
work surface, also adds colour to these sanded sections so each tool is easily recognisable
when laid on surface amongst other tools.
• Grind “ears” off gouges to prevent dig-ins
• Has two screw holes drilled into the inner section of his face plate ring, makes it easier to turn
out the screw holes.
• Double bevel on gouges, allows more movement of chisel inside of bowl and prevents the heel
rub when deeper in the bowl.
• To get rid end grain tear out marks Kevin uses liquid paraffin and then 400/600grit and finds
that this really cuts the wood and removes any tear marks.
Anna-Marie Bennett

10
Chris Grace – 14th September Club night
Chris very kindly stepped in at short notice to demonstrate for us tonight. Chris demonstrated how to make a Christmas tree box, which is made up in 4 sections. Section 1 - Pot Base: Chris uses the bottom wing of spindle gouge to clean up face of wood. He used his thumb in trailing mode, well away from tool rest to check if rounded. When turning Chris wraps his little finger around the tool rest, this is to ensure that he does not roll back in his chair when he gets a good cut going. Chris uses a cork faceplate and pressure to act as friction drive to turn wood to fit into jaws. Cork faceplate made of wooden block in jaws and cork floor tile added to front. He uses a Steb centre in the tail stock, saying it’s his preferred centre as grips well when needed and only leaves a very small divot in wood. Wood turned to 75mm to fit into jaws (you should check what size your jaws are for best fit). Chris mentioned that the cork faceplate can have cork all the way to the edge or even over the edge if being used for the inside of a bowl and can also be made in different sizes and shapes to suit individual projects. Chris started by drilling in 15mm with Forstner bit, he uses carbide cutting tips as said gives a better cut, this will take the trunk later, he then made a chucking spigot. Chris uses his own double ended tool for making the spigot, parting style tool to cut diameter then a shaped tool, which is ground to the angle of his jaws to cut the dovetail. Remount on spigot to hollow out box, using a spindle gouge – slightly asymmetric to help when using to drill, Chris cuts a small
cone to help find centre first, then drills in by pushing and wiggling tool in circular motion, said the wiggling ensures the drill hole is just bigger than the gouge so it doesn’t bind in the hole. Chris pointed out that stability is the key when doing this and said he rests his elbow on the tail stock to help with stability. Chris then widens the hollow to size with a scooping out motion with the tip of the spindle gouge. As it gets to near the correct size he transitions from the scooping cut, to cut the bottom, to a lower wing sheer
scraping cut, to cut the sides. Chris refined the finish by using a scraper in trailing motion and very light cuts. Then turned piece around and used cork friction chuck with Steb centre in the 15mm deep hole in the base to bring outside to desired diameter. Section 2 - Tree Top (Pot Lid): Mark centre of wood (see top tip below) put between centres. He uses continental style spindle gouge fingernail profile to rough down. Starts at one corner and nibbles away moving further towards the centre and making larger cuts towards the
11
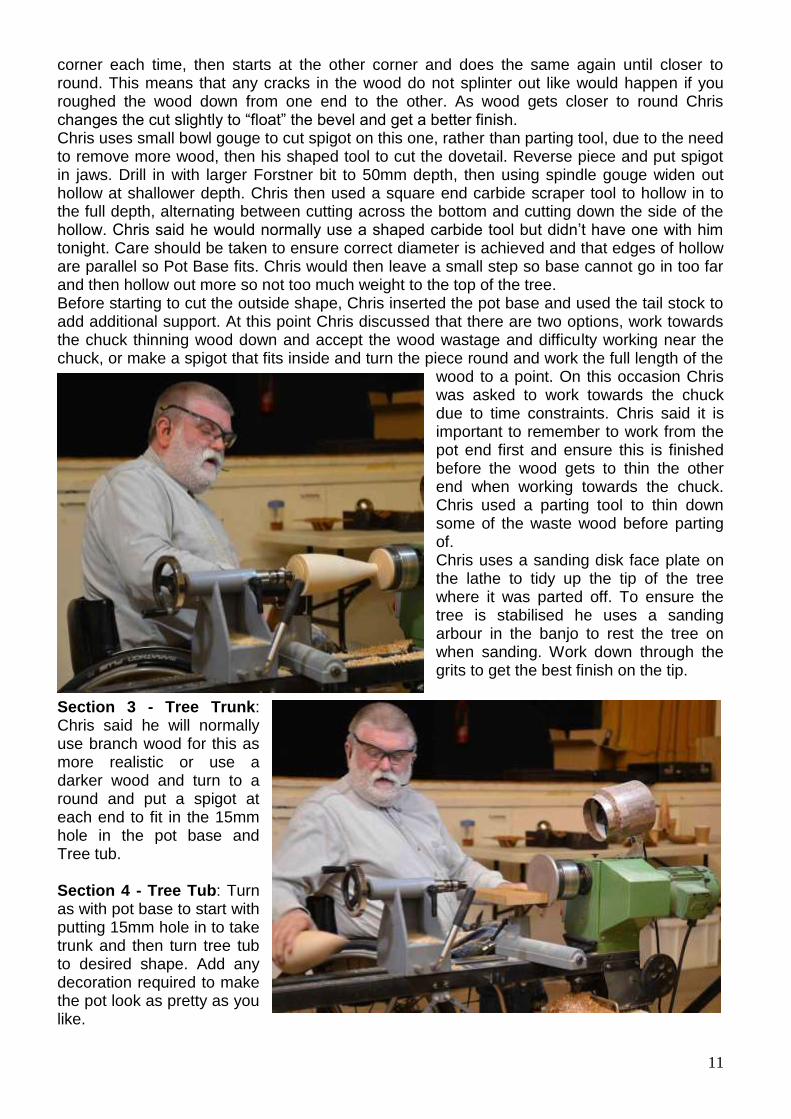
corner each time, then starts at the other corner and does the same again until closer to round. This means that any cracks in the wood do not splinter out like would happen if you roughed the wood down from one end to the other. As wood gets closer to round Chris changes the cut slightly to “float” the bevel and get a better finish. Chris uses small bowl gouge to cut spigot on this one, rather than parting tool, due to the need to remove more wood, then his shaped tool to cut the dovetail. Reverse piece and put spigot in jaws. Drill in with larger Forstner bit to 50mm depth, then using spindle gouge widen out hollow at shallower depth. Chris then used a square end carbide scraper tool to hollow in to the full depth, alternating between cutting across the bottom and cutting down the side of the hollow. Chris said he would normally use a shaped carbide tool but didn’t have one with him tonight. Care should be taken to ensure correct diameter is achieved and that edges of hollow are parallel so Pot Base fits. Chris would then leave a small step so base cannot go in too far and then hollow out more so not too much weight to the top of the tree. Before starting to cut the outside shape, Chris inserted the pot base and used the tail stock to add additional support. At this point Chris discussed that there are two options, work towards the chuck thinning wood down and accept the wood wastage and difficulty working near the chuck, or make a spigot that fits inside and turn the piece round and work the full length of the
wood to a point. On this occasion Chris was asked to work towards the chuck due to time constraints. Chris said it is important to remember to work from the pot end first and ensure this is finished before the wood gets to thin the other end when working towards the chuck. Chris used a parting tool to thin down some of the waste wood before parting of. Chris uses a sanding disk face plate on the lathe to tidy up the tip of the tree where it was parted off. To ensure the tree is stabilised he uses a sanding arbour in the banjo to rest the tree on when sanding. Work down through the grits to get the best finish on the tip.
Section 3 - Tree Trunk: Chris said he will normally use branch wood for this as more realistic or use a darker wood and turn to a round and put a spigot at each end to fit in the 15mm hole in the pot base and Tree tub. Section 4 - Tree Tub: Turn as with pot base to start with putting 15mm hole in to take trunk and then turn tree tub to desired shape. Add any decoration required to make the pot look as pretty as you like.

12
Chris was fantastic at sharing his experience and top tips with everyone.
Chris’ top tips: • Roughing and initial shaping done using a continental pattern spindle gouge, with wings
cut back to finger nail grind. Benefits are a more secure tang than normal spindle
roughing gouges and less flex in gouge.
• Outer corners of jaws rounded off slightly to make sure they don’t catch on hands and
no problem if back of tool catches them. Enables you to work closer to the chuck
without so much worry.
• Turns wood several times in jaws before tightening so that any muck caught in jaws
falls out and get best fit.
• Use masking tape to mark depth on drill and make a flag with the tape, that way as
soon as the flag twitches you know you have drilled deep enough. (See photo top
right)
• Sand with lowest grit required first, don’t be afraid to use 40grit etc. Sand using right
angle power drill and pads as this gives more control, Chris hand sands along the grain
before moving to next grit.
• For marking centre use an engineering scriber with tip turned around and a far less
acute point ground on it. So as not to damage fibres of wood only push in lightly to start
with and at an angle so that you can walk the point back to centre if the grain pushes
the tool off.
• For quick drilling on lathe, set up blow gun one side and extractor the other side of work
piece. Blow gun cools drill and pushes shaving out and extractor takes them away.
• When drilling after clearing the swarf always insert drill back in to hole while lathe is
stationary then restart lathe, as it is very easy for a spur on the drill to catch on the
edge of the hole if trying to re-enter the hole while lathe running, meaning you will not
have a neat and tidy hole.
• Make an “Idiot” sheet for each project, helps to remind you of the steps and makes it
easier to reproduce.
• Prefers to use callipers with split collet as this allows you to make big adjustments
without having to unscrew for a long time.
• Makes tool rests from angle iron attached to a post, that way can make to your required
length. Chris has about 30 at home of which he only purchased three and they vary in
length from 1 inch to about 30inches.
• For Sorby interchangeable tool post a tip is that Subaru Impreza wheel nuts have the
same thread on them and can be purchased cheaper, these can be welded to the angle
iron.
By Anna- Marie Bennett