Network Operations - Panasonic Instructions Network Operations LCD Projector Commercial Use SO-K2TA...
27
Operating Instructions Network Operations LCD Projector Commercial Use SO-K2TA This manual explains the network operation of the projector. For information other than the network operation, such as the usage, inspection and replacement of parts, see “Operating Instructions - Projector Operations”. ENGLISH Model No. PT-EX16K
Transcript of Network Operations - Panasonic Instructions Network Operations LCD Projector Commercial Use SO-K2TA...

Operating Instructions Network Operations
LCD Projector Commercial Use
SO-K2TA
This manual explains the network operation of the projector. For information other than the network operation, such as the usage, inspection and replacement of parts, see “Operating Instructions - Projector Operations”.
ENGLISH
Model No. PT-EX16K

2
Contents
The illustrations and screenshots in this manual may be different from those on your computer.Expressions used in this document
Pages to reference within this document are indicated as (See page ○○), and pages to reference in the supplemental “Operating Instructions - Projector Operations” are indicated as (See page ○○ of the Projector Operations).
Request Regarding Security · · · · · · · · · · · · · · · · · · · · · · · · · · · · · · · · · · · · · · · · · · · · ·3What you can do · · · · · · · · · · · · · · · · · · · · · · · · · · · · · · · · · · · · · · · · · · · · · · · · · · · · · · ·3Check your computer · · · · · · · · · · · · · · · · · · · · · · · · · · · · · · · · · · · · · · · · · · · · · · · · · · ·4
Necessary environment for computers to be connected · · · · · · · · · · · · · · · · · · · · · · · · · · · · · · · · 4NETWORK menu · · · · · · · · · · · · · · · · · · · · · · · · · · · · · · · · · · · · · · · · · · · · · · · · · · · · · · ·5
Displaying the NETWORK menu · · · · · · · · · · · · · · · · · · · · · · · · · · · · · · · · · · · · · · · · · · · · · · · · · · · · 5Projector name · · · · · · · · · · · · · · · · · · · · · · · · · · · · · · · · · · · · · · · · · · · · · · · · · · · · · · · · · · · · · · · · · · 6Network setup · · · · · · · · · · · · · · · · · · · · · · · · · · · · · · · · · · · · · · · · · · · · · · · · · · · · · · · · · · · · · · · · · · · 7Network control · · · · · · · · · · · · · · · · · · · · · · · · · · · · · · · · · · · · · · · · · · · · · · · · · · · · · · · · · · · · · · · · · 8Network status · · · · · · · · · · · · · · · · · · · · · · · · · · · · · · · · · · · · · · · · · · · · · · · · · · · · · · · · · · · · · · · · · · 9Network factory default · · · · · · · · · · · · · · · · · · · · · · · · · · · · · · · · · · · · · · · · · · · · · · · · · · · · · · · · · · ·10
Connecting with Wired LAN · · · · · · · · · · · · · · · · · · · · · · · · · · · · · · · · · · · · · · · · · · · · ·10Computer operation · · · · · · · · · · · · · · · · · · · · · · · · · · · · · · · · · · · · · · · · · · · · · · · · · · · · · · · · · · · · · ·10
Using Web Browser · · · · · · · · · · · · · · · · · · · · · · · · · · · · · · · · · · · · · · · · · · · · · · · · · · · · 11Accessing from the Web browser · · · · · · · · · · · · · · · · · · · · · · · · · · · · · · · · · · · · · · · · · · · · · · · · · · ·11
PJLink protocol · · · · · · · · · · · · · · · · · · · · · · · · · · · · · · · · · · · · · · · · · · · · · · · · · · · · · · ·23Control commands · · · · · · · · · · · · · · · · · · · · · · · · · · · · · · · · · · · · · · · · · · · · · · · · · · · · · · · · · · · · · · 23PJLink security authorization · · · · · · · · · · · · · · · · · · · · · · · · · · · · · · · · · · · · · · · · · · · · · · · · · · · · · 23
Control commands via LAN · · · · · · · · · · · · · · · · · · · · · · · · · · · · · · · · · · · · · · · · · · · · ·24When WEB Control administrator rights password is set (Protect mode) · · · · · · · · · · · · · · · · · · · · · · 24When WEB Control administrator rights password is not set (Non-protect mode) · · · · · · · · · · · · · · · · · · · 25
Glossary · · · · · · · · · · · · · · · · · · · · · · · · · · · · · · · · · · · · · · · · · · · · · · · · · · · · · · · · · · · · ·26Trademarks · · · · · · · · · · · · · · · · · · · · · · · · · · · · · · · · · · · · · · · · · · · · · · · · · · · · · · · · · ·26

3
Request Regarding SecurityWhen using this product, security breaches of the type described below are conceivable.
Leakage of your private information via this product• Illegal operation of this product by a malicious third-party• Harm to or cessation of operation of this product by a malicious third-party•
Be sure to implement sufficient security measures.
Set passwords, and limit the users that are permitted login access.• Make sure the password is as hard to guess as possible.• Change the password periodically.• Panasonic Corporation and its affiliated companies never directly ask customers for their password. Do not give • out your password even if directly asked by a third-party representing themselves as Panasonic Corporation.Always use on a network that has safety protection such as a firewall implemented.•
<WEB control> (See page 11)The following operations are possible when using WebBrowser.
Setting and adjusting the projector• Displaying the projector status• Setting for message transmission•
<PJLink> (See page 23)Compatible with PJLink Class 1. The following operations can be performed from a computer when PJLink protocol is used.
Setting the projector• Querying the projector status•
<Command control>(Refer to “Serial terminal” in “Technical Information” of the Projector Operation manual)You can control the projector from a computer, using the control commands of the serial terminals.
What you can do

4
Check your computerNecessary environment for computers to be connectedFirst, check your computer to see whether or not it has a wired LAN• function. “Glossary” (See page 26)Before connecting the projector to the computer, be sure to check the following settings.•
Wired LAN
Check 1 For LAN cableIs the cable properly connected?• Use LAN cable that is compatible with category 5 or above.•
Check 2 Wired LAN settings<Computer with a built-in wired LAN function>
Is your wired LAN switched on?• <Computer without a built-in wired LAN function>
Is your wired LAN adapter properly recognized?• Is your wired LAN adapter switched on?• Install the wired LAN adapter driver beforehand. • For details on how to install the driver, refer to the instructions accompanying the wired LAN adapter.
Check 3 For WebBrowserWebBrowser is necessary to use WEB control.• Compatible OS : Windows XP/Windows Vista/Windows 7, Mac OS X v10.4/v10.5/v10.6• Compatible WebBrowser : Internet Explorer 7.0/8.0/9.0, Safari 4.0/5.0 (Mac OS)•
Do not touch the LAN terminal or the metal part of the LAN cable, the static electricity may discharge from ourhand (body) causing a malfunction.

5
NETWORK menuTo connect the projector and the computer by changing the setting at the time of purchase, change the setting by displaying the menu with the following procedure.
Displaying the NETWORK menu
Press the <MENU> button on remote control.1 The main menu appears.
Select [NETWORK] with the ▲▼ buttons.2 The network menu appears.
Press the <SELECT> button.3 You can select the sub-menu item.
Unavailable items on the menu screen are grayed out and cannot be selected.

6
NETWORK menu (continued)
Projector name You can change the projector name to be displayed on the network.
Press ▲▼ to select [Projector name], and press <SELECT> button. 1
Select characters with the ▲▼◄► buttons 2 and press the <SELECT> button to enter the projector name.
Select [SET] with the ▲▼◄► buttons and press 3 the <SELECT> button.Select [CANCEL] to undo the changes and then press the <SELECT> button.
Select [YES] or [No] with the ▲▼◄► buttons and 4 press the <SELECT> button.
PT-EX16K Projector name

7
NETWORK menu (continued)
Network setupYou can make detailed wired LAN settings.
Press ▲▼ to select [Network setup], and press <SELECT> button.1 The detailed [Network setup] screen will be displayed.
Press ▲▼ to select an item, and change the setting according to the instructions.2 DHCP (DHCP client function)
On: If a DHCP server exists in the network to which the projector is connected, the IP address will automatically be acquired.
Off: If a DHCP server does not exist in the network to which the projector is connected, additionally set [IP address], [Subnet mask ] and [Default gateway ].
IP address (Display of IP address and setting) Enter the IP address if DHCP server is not used.
Subnet mask(Displaying and setting the subnet mask) If not using a DHCP server, enter the subnet mask.
Default gateway (Display of gateway address and setting) Enter the gateway address if DHCP server is not used.
DNS Sets IP address of the DNS server. “Glossary” (See page 26)
Press ▲▼◄► to select [Set], and press <SELECT> button.3 Save the current network settings.
Before using the DHCP server, make sure the DHCP server is already functioning.For details of IP address, subnet mask, gateway and DNS, ask the network administrator.
Default wired LAN settingsThe following settings are set before the projector leaves the factory.
DHCP OffIP address 192.168.10.100Subnet mask 255.255.255.0Default gateway 192.168.10.1DNS 1DNS 2

8
NETWORK menu (continued)
Network controlSet when you want to control the projector from a computer connected to the network.
Press ▲▼ to select [Network control].1
Press <SELECT> button or the ► button to access the submenu. 2 Select [WEB control], [PJLink control], [Command control], [AMX D.D.] items with the ▲▼ buttons.
For more details about AMX D.D., visit http://www.amx.com/.
9
NETWORK menu (continued)
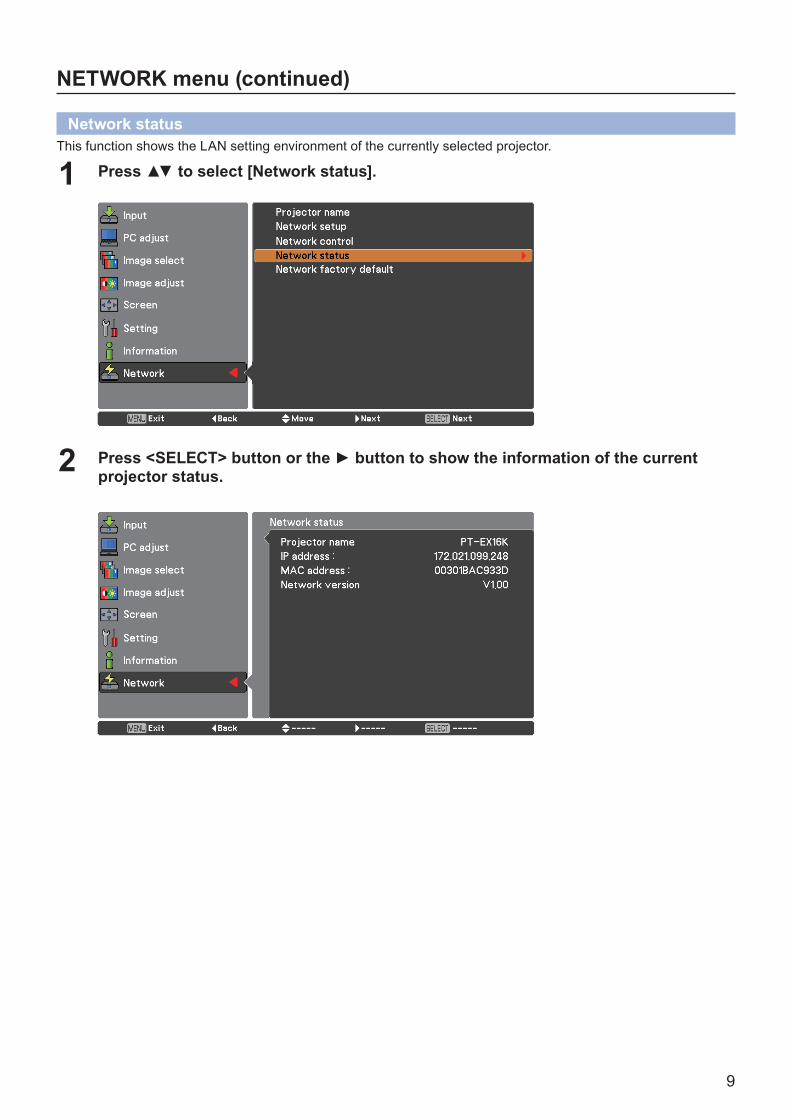
Network statusThis function shows the LAN setting environment of the currently selected projector.
Press ▲▼ to select [Network status].1
Press <SELECT> button or the ► button to show the information of the current 2 projector status.

10
NETWORK menu (continued)
Connecting with Wired LANComputer operation
Connection can be made with wired LAN. However, confirm to your system administrator on network settings before changing any settings.
Turn on the computer.1 Make the network setting according to your system administrator.2 If the projector settings are the default settings, the computer can be used with the following network settings.
DHCP OffIP address 192.168.10.101Subnet mask 255.255.255.0Default gateway 192.168.10.1DNS 1DNS 2
Network factory defaultYou can reset the network setting to the factory default of the projector.
Press ▲▼ to select [Network factory default], and press <SELECT> button. 1
A confirmation box appears and select [Yes] and then press <SELECT> button. Another 2 confirmation box appears and select [Yes] and then press <SELECT> button.

11
Using Web BrowserAccessing from the Web browser
Activate the Web browser in the personal computer.1 Enter the IP address set by the projector into the URL input field of the Web 2 browser.
Enter your “User name” and “Password”.3 The factory default settings are user1 (user privileges) or admin1 (administrator privileges) for the use name and panasonic (lowercase letters) for the password.
Click [OK] to display the Projector status 4 page.“Projector status” page is displayed.
Avoid activating two or more Web browser simultaneously to work out setting or control actions.Change the password first of all.Administrator privileges enable the use of all functions. User privileges enable the use of only “Projector status”,
“Network status”, “Basic control”, “Advanced control”, and “Change password”.If the password is incorrectly entered three times in a row, the lock is set for several minutes.If you want to control the projector using a Web browser, set [Network control] in the network menu to [On].

12
Using Web Browser (continued) Description of each item
1 Page selection tabs Click these to switch pages.2 Monitor information button
Click this item, and the status of the projector is displayed.
3 Projector control button Click this item to display the projector control page.
4 Detailed set up button Click this item to display the advanced settings page.
5 Change password button Click this button to display the password change
page. 6 Language switch button Click this button to switch language between English
and Japanese.
5432
1
Projector status pageClick [Status], then [Projector status] to display the Status information page.This page displays the projector statuses established for the items shown below.
1 Displays the type of projector.2 Displays the firmware version of the projector
main unit.3 Displays the power source status.4 Displays the selection of the lamps.5 Displays the serial number of the projector.6 Displays the firmware version of the network.7 Displays the shutter status.
8 Displays the lamp power status.9 Displays the status of input switch.10 Displays the intake temperature status of the projector.11 Displays the optics module temperature status of the projector.12 Displays the usage time of each lamp.13 Displays the self diagnostics information. (See page 13)14 Displays the operating time of the projector.
12
34
56789101112
1413
6

13
Using Web Browser (continued)
Error information pageIf [Error (Detail)] is displayed in the self-diagnosis information display column on the [Projector status] screen, click the part to display the details of the error.
Depending on the nature of the error, the projector may be placed in the standby mode for its own protection.•
When [FAILED] has appeared for an item
Parameter DescriptionMAIN CPU BUS Trouble has occurred in the microcomputer circuitry. Consult your dealer.FAN Trouble has occurred in the fan or its drive circuit. Consult your dealer.
INTAKE AIR TEMPERATUREIntake air temperature is high. It could be because it is used in an environment of high temperature such as close to a heating device, etc., the air intake is blocked, or the air filter is clogged.
EXHAUST AIR TEMPERATURE Exhaust air temperature is high. Exhaust may be blocked, or high altitude mode may be set wrong.
LAMP REMAIN TIME The lamp runtime has exceeded the prescribed cumulative time, and it is now time to replace the lamp.
LAMP STATUS The lamp has failed to light.Wait a short while for the lamp to cool off, and then turn on the power.
INTAKE AIR TEMP.SENSOR Trouble has occurred in the sensor used to detect the intake air temperature.Consult your dealer.
EXHAUST AIR TEMP.SENSOR Trouble has occurred in the sensor used to detect the exhaust air temperature.Consult your dealer.
BATTERY The backup battery has been run out. Consult your dealer.AIRFLOW SENSOR Trouble has occurred in the sensor used to detect the airflow volume. Consult your dealer.COVER OPEN Installation of lamp cover is incomplete. Check the installation of the lamp cover.FILTER UNIT The air filter unit is not mounted. Confirm the installation of the air filter unit.
AIR FILTER Too much dust is on the air filter.Following the procedure described on page 26 of the “Operating Instructions - Projector Operations”, unplug the AC power cord and clean the air filter.
OK: Normal operationFAILED:Occurrence of trouble

14
Using Web Browser (continued)
Network status pageDisplays the current configuration information of the network.
Displays the configuration details of wired LAN.
Basic control pageTo move from another page, click [Projector control], then [Basic control].
1 Power On/Off control2 Use these to select the input signals
3 Switches image mode4 Turn on or off the Shutter function
1
2
3
4

15
Using Web Browser (continued)
Detail control pageClick [Projector control], then [Advanced control] to display the Detail control page.
1 Execute Auto setup function 2 Operations on Image adjust 3 Operations on Screen mode 4 Operations on Rear/Ceiling
1
2
3
4
9 Operations on Test pattern 10 Return to factory default setting
5 Operations on Keystone function 6 Operations on Lens shift 7 Operations on Zoom 8 Operations on Focus
5
6
78
9
10

16
Using Web Browser (continued)
Change Password pageClick [Change password].
1 Administrator2 User
Administrator mode1 Account2 Currentusernameinputfield3 Currentpasswordinputfield4 Newusernameinputfield5 Newpasswordinputfield6 Newpasswordinputfield(re-enterforconfirmation)7 Buttonforexecutingpasswordchange
User account1 Account2 Newusernameinputfield3 Newpasswordinputfield4 Newpasswordinputfield(re-enterforconfirmation)5 Buttonforexecutingpasswordchange
User modeA user can change password only.
1 Currentpasswordinputfield2 Newpasswordinputfield3 Newpasswordinputfield(re-enterforconfirmation)4 Buttonforexecutingpasswordchange
-Whenchangingtheadministratoraccount,both“Currentusername”and“Currentpassword”arerequired.-Noaccountisnotavailable.-Administratoraccountanduseraccountshouldbediffered.
2
1
7654321
543
21
43
2
1

17
Using Web Browser (continued)
Network config pageYou can make detail network settings on projector, when connecting without the administrator authority or when connecting through an access point (infrastructure mode).
LAN settings
Click [Detailed set up] in the menu.1 Select the items to change and click [Next].2 The settings window appears, showing the current settings.To change the LAN settings, click [Change].To return to the previous window, click [Back].
Complete the detailed settings and click [Next].3 When [Next] is clicked, the next page appears, enabling you to complete the detailed settings as desired.Settings performed here are the same as the settings performed with the [Network] menu of the projector.
Click [Submit].4 The settings will be registered.
Changing the setting of LAN while connected with LAN might disconnect the connection.

18
Using Web Browser (continued)
Ping test pageThis page makes it possible to check whether the network is connected to the e-mail server, POP server, DNS server, etc.Click [Detailed set up], then [Ping test] to display the Ping test page.
Display which appears when the connectionwas successful.
Display which appears when the connectionfailed.
1 Enter the IP address of the server to be tested.2 Button for conducting the test.
21

19
Using Web Browser (continued)
E-mail setup pageWith this projector, if a problem occurs or if the lamp usage time reaches a set value, an e-mail message can be sent to one or more preset e-mail addresses (maximum two addresses).Click [Detailed set up], then [E-mail set up] to display the E-mail setup page.
1 Select ENABLE to use the e-mail function.2 Enter the IP address or server name of the e-mail
server (SMTP). The DNS server must be set if the server name is entered.
3 Enter the e-mail address of the projector. (maximum 63 characters)
4 The user can enter the location of, for example, the installed projector so that the recipient may easily identify the originator of the e-mail. (maximum 63 characters)
5 The user can modify the minimum time interval of temperature warning mail. The default value is 60 minutes. In this case, the user cannot send another mail for 60 minutes after sending previous temperature warning mail even the set warning temperature is reached again.
6 Select the temperature of the intake sensor at which to send a warning message.
1 Enter the E-mail Address1 of your desired recipient.2 Select the conditions for sending e-mail. MAIL CONTENTS: Select [NORMAL] or [SIMPLE].
ERROR: An error is detected by self-diagnosis.LAMP1-4 RUNTIME: Remaining lamp service time has reached the value set in the field.INTAKE AIR TEMPERATURE: Intake air temperature has reached the value set in the field.
6
5
4
3
2
1
2
1

20
Using Web Browser (continued)
E-mail setup page (continued)
1 Enter the E-mail Address2 of your desired recipient.2 Select the conditions for sending e-mail. MAIL CONTENTS: Select [NORMAL] or [SIMPLE].
ERROR: An error is detected by self-diagnosis.LAMP 1-4 RUNTIME: Remaining lamp service time has reached the value set in the field.INTAKE AIR TEMPERATURE: Intake air temperature has reached the value set in the field.
Authentication set up pageThe POP/SMTP server is set on this page when POP/SMTP authentication is required for mail transmissions.Click [Detailed set up], then [Authentication set up] to display the Authentication server setup page.
1 Select the authentication method specified by your Internet service provider.
2 Set this if SMTP authentication has been selected.
3 POP server name field Available input characters: Alphanumeric characters (A - Z, a - z, 0 - 9), hyphen (-), period (.)
4 POP/SMTP server user name field
5 POP/SMTP server password field6 Enter the port number for the SMTP server
(normally “25”).7 Enter the port number for the POP server
(normally “110”).8 Button to update settings
87654
32
1
1
2

21
Using Web Browser (continued)
Contents of mail sent Mail with the contents shown below is sent when the e-mail settings have been established.

22
Using Web Browser (continued)
Mail with the contents shown below is sent when an error has occurred.
Command port set up pageSet the port number to be used with command control.Click [Detailed set up] → [Command port set up].
1 Input the port number to be used with command control2 Setting update button
12

23
PJLink protocolThe network function of the projector supports PJLink class 1, and the PJLink protocol can be used to perform projector setting and projector status query operations from a computer.
Control commandsThe following table lists the PJLink protocol commands that can be used to control the projector.
Command Control details Notes
POWR Power supply controlParameters0 = Standby1 = Power ON
POWR ? Power supply status queryParameters0 = Standby 1 = Power ON2 = Cool-down in progress
INPT Input selection Parameters11:RGB 1 12:RGB 2 31:DIGITAL 1 32: DIGITAL 2 33: DIGITAL 346:AUX1 21:VIDEO 1 22:VIDEO 2 13:RGB 3 25: VIDEO 5 47:AUX2 48:AUX3 49:AUX4
INPT ? Input selection query
AVMT AV MUTE control Parameters30 = AV MUTE mode off31 = AV MUTE mode onAVMT ? AV MUTE status query
ERST ? Error status query
Parameters1st byte : Indicates fan errors, range 0 – 22nd byte : Indicates lamp errors, range 0 – 23rd byte : Indicates temperature errors, range 0 – 24th byte : Fixed at 05th byte : Indicates filter errors, range 0 – 26th byte : Indicates other errors, range 0 – 2
Definitions for each value from 0 to 2 are as follows.0 = No error known 1 = Warning 2 = Error
LAMP ? Lamp status queryParameters1st digits (1 – 5 digits) : Lamp cumulative operating time2nd digit : 0 = Lamp off, 1 = Lamp on
INST ? Input selection list query The following are returned as parameters.“ 11 12 31 32 33 21 22 13 25 46 47 48 49”
NAME ? Projector name query The name set for [NAME CHANGE] in [NETWORK] is returned.INF1 ? Manufacturer name query “Panasonic” is returned.INF2 ? Model name query Answer the model name with EX16KINF0 ? Other information query Information such as version number is returned.CLSS ? Class information query “1” is returned.
PJLink security authorizationWhen using PJLink with security authorization, either of the password set for administrator privileges and the password set for user privileges with Web browser control can be used as the password for PJLink (See page 16).When using PJLink without security authorization, set use without the password for administrator privileges and the password for user privileges of Web browser control.For specifications regarding PJLink, refer to the Japan Business Machine and Information System Industries
Association website. URL http://pjlink.jbmia.or.jp/

24
Control commands via LANWhen WEB Control administrator rights password is set (Protect mode)
Connection method
Obtain the IP address and port number (Initial set value = 1024) of the projector and 1) make a request for connection to the projector.Acquire the IP address from the menu screen of the projector, and the port number from the WEB control page.IP address : Obtain from MAIN MENU → [Network] → [Network status]Port No. : Acquire from the WEB control “Detailed set up” → “Command port setting” page
There is a response from the projector.2) Response data
Data section Blank Mode Blank Random number section
Termination symbol
“NTCONTROL”(ASCII string)
‘ ’0x20
‘1’0x31
‘ ’0x20
“zzzzzzzz”(ASCII code hexadecimal
number)
(CR)0x0d
9 bytes 1 byte 1 byte 1 byte 8 bytes 1 byteMode : 1 = Protect mode
Generate a 32-byte hash value from the following data using MD5 algorithm.3) “xxxxxx:yyyyy:zzzzzzzz”xxxxxx : Administrator rights user name for WEB CONTROL (Default user name is “admin1”)yyyyy : Password of above administrator rights user (Default password is “panasonic”)zzzzzzzz : 8-byte random number obtained in Step 2
Command transmission method
Transmit using the following command format.
Transmitted dataHeader Data section Termination symbol
Hash value(See above
<Connection method>)
‘0’0x30
‘0’0x30
Control command(ASCII string)
(CR)0x0d
32 bytes 1 byte 1 byte Undefined length 1 byte
Receive dataHeader Data section Termination symbol
‘0’0x30
‘0’0x30
Control command(ASCII string)
(CR)0x0d
1 byte 1 byte Undefined length 1 byte
Error responseError message Termination symbol
“ERR1”“ERR2”“ERR3”“ERR4”“ERR5”“ERRA”
Undefined control commandOut of parameter rangeBusy state or no-acceptable periodTimeout or no-acceptable periodWrong data lengthPassword mismatch
(CR)0x0d
4 bytes 1 byte

25
Control commands via LAN (continued)
When WEB Control administrator rights password is not set (Non-protect mode)
Connection method
Obtain the IP address and port number (Initial set value = 1024) of the projector and 1) make a request for connection to the projector.Acquire the IP address from the menu screen of the projector, and the port number from the WEB control page.IP address : Obtain from MAIN MENU → [Network] → [Network status]Port No. : Acquire from the WEB control “Detailed set up” → “Command port setting” page
There is a response from the projector.2) Response data
Data section Blank Mode Termination symbol“NTCONTROL”(ASCII string)
‘ ’0x20
‘0’0x30
(CR)0x0d
9 bytes 1 byte 1 byte 1 byteMode : 0 = Non-protect mode
Command transmission method
Transmit by the following command format.
Transmitted dataHeader Data section Termination symbol
‘0’0x30
‘0’0x30
Control command(ASCII string)
(CR)0x0d
1 byte 1 byte Undefined length 1 byte
Receive dataHeader Data section Termination symbol
‘0’0x30
‘0’0x30
Control command(ASCII string)
(CR)0x0d
1 byte 1 byte Undefined length 1 byte
Receive dataError message Termination symbol
“ERR1”“ERR2”“ERR3”“ERR4”“ERR5”“ERRA”
Undefined control commandOut of parameter rangeBusy state or no-acceptable periodTimeout or no-acceptable periodWrong data lengthPassword mismatch
(CR)0x0d
4 bytes 1 byte

26
Glossary
Item Descriptions See page
DNS Abbreviation for Domain name system. This function sets IP address of the DNS server.
710
DHCP Abbreviation for Dynamic Host Configuration Protocol. This function automatically assigns IP addresses to the connected equipment. If a device with the DHCP server function is present within a LAN, it automatically assigns IP addresses to the connected equipment
710
Default gateway The devices that are used for different network standards from yours. Default Gateway enables a connection with other network, by adjusting bilateral differences such as communication protocols. If no gateway is specified for the IP address of access destination, data will be sent to the host set as the default gateway.
710
IP address Internet Protocol (IP) is a protocol for distributing data, and the address corresponding to the data distribution destination is called the IP address. The same IP address cannot be used within the same LAN.
710
LAN Abbreviation for Local Area Network. This is a network with a relatively narrow range such as inside a company.
7
Subnet This limits the range of the IP addresses assigned to computers in order to divide the network into a number of sections during TCP/IP connection. The value used to divide the network at this time is called the subnetmask.
710
TrademarksMicrosoft• ® and its logos, Windows®, Windows® XP, Windows Vista®, Windows® 7, and Internet Explorer® are the registered trademarks or trademarks of Microsoft Corporation in the United States and/or other countries.Macintosh, Mac OS and Safari are the trademarks of Apple Inc. registered in the United States and other • countries.PJLink is a pending trademark in Japan, the United States and other countries and regions.• Other company names, product names or other names noted in this manual are trademarks or registered • trademarks of the respective companies. Note that ® and ™ marks are not indicated in the text of this manual.
Notes:Unauthorized use or reproduction of part or all of this manual is strictly prohibited.• Panasonic cannot be held liable for any effects resulting from the use of this manual.• Panasonic reserves the right to revise this manual contents without notice.•

Web Site : http://panasonic.net/avc/projector/© Panasonic Corporation 2011