Netra T2000 Server Product Notes
36
Sun Microsystems, Inc. www.sun.com Submit comments about this document at: http://www.sun.com/hwdocs/feedback Netra ™ T2000 Server Product Notes Part No. 819-5840-16 April 2009, Revision A
Transcript of Netra T2000 Server Product Notes
Sun Microsystems, Inc.www.sun.com
Submit comments about this document at: http://www.sun.com/hwdocs/feedback
Netra™ T2000 Server Product Notes
Part No. 819-5840-16April 2009, Revision A

Please
Copyright 2009 Sun Microsystems, Inc., 4150 Network Circle, Santa Clara, California 95054, U.S.A. All rights reserved.
Sun Microsystems, Inc. has intellectual property rights relating to technology that is described in this document. In particular, and withoutlimitation, these intellectual property rights may include one or more of the U.S. patents listed at http://www.sun.com/patents and one ormore additional patents or pending patent applications in the U.S. and in other countries.
This document and the product to which it pertains are distributed under licenses restricting their use, copying, distribution, anddecompilation. No part of the product or of this document may be reproduced in any form by any means without prior written authorization ofSun and its licensors, if any.
Third-party software, including font technology, is copyrighted and licensed from Sun suppliers.
Parts of the product may be derived from Berkeley BSD systems, licensed from the University of California. UNIX is a registered trademark inthe U.S. and in other countries, exclusively licensed through X/Open Company, Ltd.
Sun, Sun Microsystems, the Sun logo, Java, docs.sun.com, Netra, Sun Ray, Sun Fire, SunVTS, and Solaris are trademarks or registeredtrademarks of Sun Microsystems, Inc. in the U.S. and in other countries.
All SPARC trademarks are used under license and are trademarks or registered trademarks of SPARC International, Inc. in the U.S. and in othercountries. Products bearing SPARC trademarks are based upon an architecture developed by Sun Microsystems, Inc.
The OPEN LOOK and Sun™ Graphical User Interface was developed by Sun Microsystems, Inc. for its users and licensees. Sun acknowledgesthe pioneering efforts of Xerox in researching and developing the concept of visual or graphical user interfaces for the computer industry. Sunholds a non-exclusive license from Xerox to the Xerox Graphical User Interface, which license also covers Sun’s licensees who implement OPENLOOK GUIs and otherwise comply with Sun’s written license agreements.
U.S. Government Rights—Commercial use. Government users are subject to the Sun Microsystems, Inc. standard license agreement andapplicable provisions of the FAR and its supplements.
DOCUMENTATION IS PROVIDED "AS IS" AND ALL EXPRESS OR IMPLIED CONDITIONS, REPRESENTATIONS AND WARRANTIES,INCLUDING ANY IMPLIED WARRANTY OF MERCHANTABILITY, FITNESS FOR A PARTICULAR PURPOSE OR NON-INFRINGEMENT,ARE DISCLAIMED, EXCEPT TO THE EXTENT THAT SUCH DISCLAIMERS ARE HELD TO BE LEGALLY INVALID.
Copyright 2009 Sun Microsystems, Inc., 4150 Network Circle, Santa Clara, Californie 95054, États-Unis. Tous droits réservés.
Sun Microsystems, Inc. possède les droits de propriété intellectuels relatifs à la technologie décrite dans ce document. En particulier, et sanslimitation, ces droits de propriété intellectuels peuvent inclure un ou plusieurs des brevets américains listés sur le sitehttp://www.sun.com/patents, un ou les plusieurs brevets supplémentaires ainsi que les demandes de brevet en attente aux les États-Unis etdans d’autres pays.
Ce document et le produit auquel il se rapporte sont protégés par un copyright et distribués sous licences, celles-ci en restreignent l’utilisation,la copie, la distribution, et la décompilation. Aucune partie de ce produit ou document ne peut être reproduite sous aucune forme, par quelquemoyen que ce soit, sans l’autorisation préalable et écrite de Sun et de ses bailleurs de licence, s’il y en a.
Tout logiciel tiers, sa technologie relative aux polices de caractères, comprise, est protégé par un copyright et licencié par des fournisseurs deSun.
Des parties de ce produit peuvent dériver des systèmes Berkeley BSD licenciés par l’Université de Californie. UNIX est une marque déposéeaux États-Unis et dans d’autres pays, licenciée exclusivement par X/Open Company, Ltd.
Sun, Sun Microsystems, le logo Sun, Java, docs.sun.com, Netra, Sun Ray, Sun Fire, SunVTS, et Solaris sont des marques de fabrique ou desmarques déposées de Sun Microsystems, Inc. aux États-Unis et dans d’autres pays.
Toutes les marques SPARC sont utilisées sous licence et sont des marques de fabrique ou des marques déposées de SPARC International, Inc.aux États-Unis et dans d’autres pays. Les produits portant les marques SPARC sont basés sur une architecture développée par SunMicrosystems, Inc.
L’interface utilisateur graphique OPEN LOOK et Sun™ a été développée par Sun Microsystems, Inc. pour ses utilisateurs et licenciés. Sunreconnaît les efforts de pionniers de Xerox dans la recherche et le développement du concept des interfaces utilisateur visuelles ou graphiquespour l’industrie informatique. Sun détient une license non exclusive de Xerox sur l’interface utilisateur graphique Xerox, cette licence couvrantégalement les licenciés de Sun implémentant les interfaces utilisateur graphiques OPEN LOOK et se conforment en outre aux licences écrites deSun.
LA DOCUMENTATION EST FOURNIE "EN L’ÉTAT" ET TOUTES AUTRES CONDITIONS, DÉCLARATIONS ET GARANTIES EXPRESSESOU TACITES SONT FORMELLEMENT EXCLUES DANS LA LIMITE DE LA LOI APPLICABLE, Y COMPRIS NOTAMMENT TOUTEGARANTIE IMPLICITE RELATIVE À LA QUALITÉ MARCHANDE, À L’APTITUDE À UNE UTILISATION PARTICULIÈRE OU ÀL’ABSENCE DE CONTREFAÇON.
Netra T2000 Server Product Notes
The Netra T2000 Server Product Notes provide last-minute information regarding yourNetra™ T2000 server.
Topics include:
■ “Shipping Kit Contents” on page 1
■ “Hardware Notes” on page 2
■ “Software Notes” on page 19
■ “Documentation Notes” on page 25
Note – Sun™ is not responsible for the availability of third-party web sitesmentioned in this document. Sun does not endorse and is not responsible or liablefor any content, advertising, products, or other materials that are available on orthrough such sites or resources. Sun will not be responsible or liable for any actualor alleged damage or loss caused by or in connection with the use of or reliance onany such content, goods, or services that are available on or through such sites orresources.
Shipping Kit ContentsThe shipping kit might contain different items than those described on the packinglist. For example, to promote eco-responsibility, the kit might no longer contain theRJ-45 Ethernet cable, the antistatic wriststrap, or other ancillary items. Alternatively,serial adapters, fasteners, or other items not listed on the packing list might beincluded to enhance the customer experience. Contact Sun Microsystems, Inc. topurchase the items you need. These ancillary items also might be available atcomputer supply stores.
1
Hardware Notes
Surge ProtectionThe Netra T2000 server does not require an additional surge protector for the AC orDC power configurations if the facility has a surge protector that limits voltagesurges to less than 2000 volts. You can, however, install a surge protector if your siterequires an additional protector.
New Storage ConfigurationThe Netra T2000 server is now available with 4 hard drives in the 8-coreconfiguration. There is no optical media drive in this configuration. Hot-swapping ofthese drives and mass storage assembly replacement procedures are similar enoughthat the existing administration and service documentation is sufficient.
New PCI TraySome Netra T2000 servers are shipping with a slightly different PCI tray design thanthat described in the documentation. The functionality of the trays are identical, asare the PCI card type locations.
PCI Card RetainersYour Netra T2000 server (or the included accessory kit) might not have the upgradedPCI card retainers to support the LM320 SCSI card in slots PCI-X2 and PCI-X3. Ifyou require support for this card in either of these slots, please contact your Sunrepresentative.
AC Power Supply FansWhen the system is in standby mode and 12 VDC power is off, the power supplyfans might or might not be spinning.
2 Netra T2000 Server Product Notes • April 2009
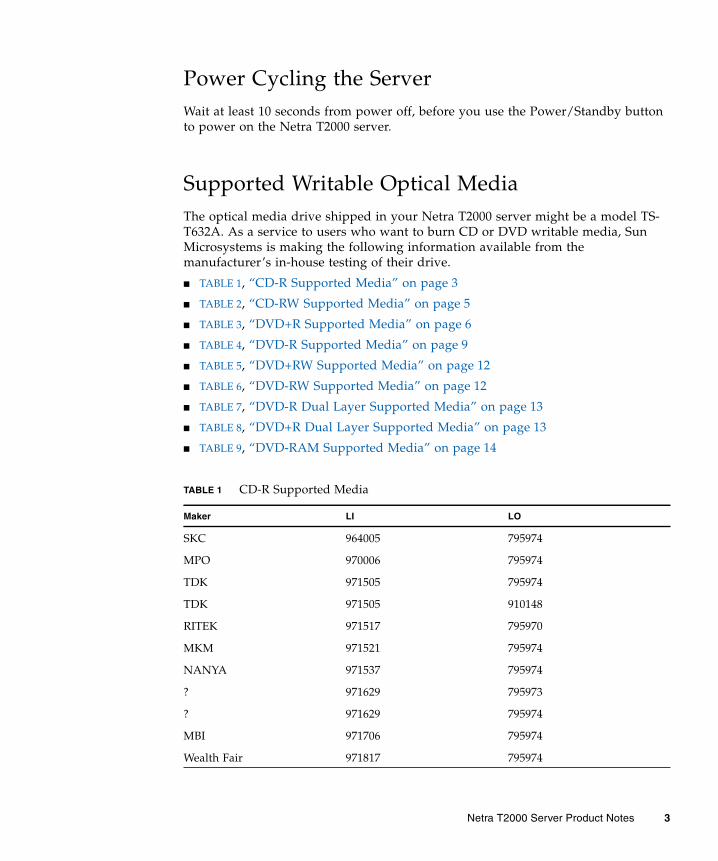
Power Cycling the ServerWait at least 10 seconds from power off, before you use the Power/Standby buttonto power on the Netra T2000 server.
Supported Writable Optical MediaThe optical media drive shipped in your Netra T2000 server might be a model TS-T632A. As a service to users who want to burn CD or DVD writable media, SunMicrosystems is making the following information available from themanufacturer’s in-house testing of their drive.
■ TABLE 1, “CD-R Supported Media” on page 3
■ TABLE 2, “CD-RW Supported Media” on page 5
■ TABLE 3, “DVD+R Supported Media” on page 6
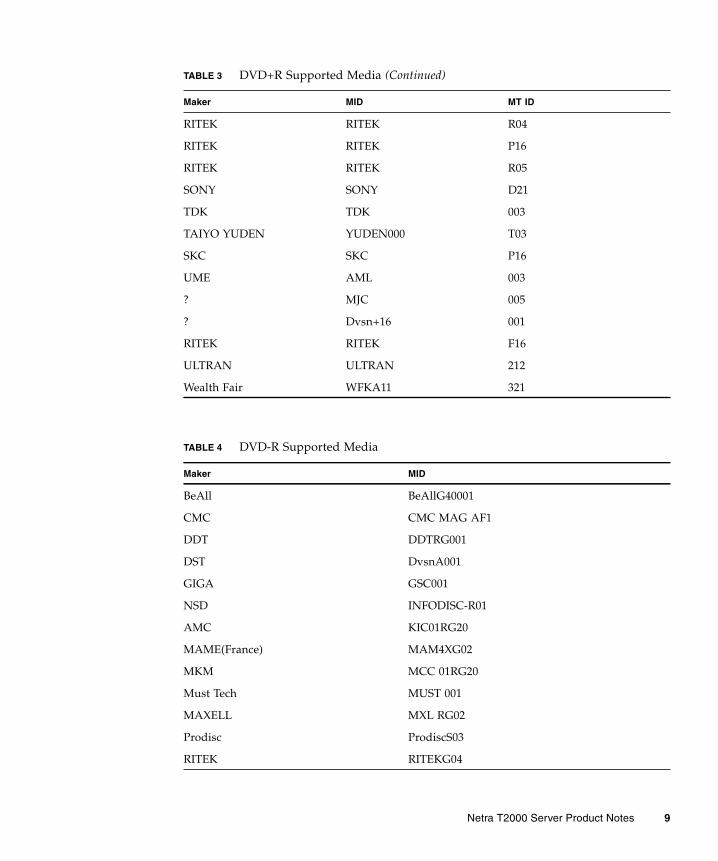
■ TABLE 4, “DVD-R Supported Media” on page 9
■ TABLE 5, “DVD+RW Supported Media” on page 12
■ TABLE 6, “DVD-RW Supported Media” on page 12
■ TABLE 7, “DVD-R Dual Layer Supported Media” on page 13
■ TABLE 8, “DVD+R Dual Layer Supported Media” on page 13
■ TABLE 9, “DVD-RAM Supported Media” on page 14
TABLE 1 CD-R Supported Media
Maker LI LO
SKC 964005 795974
MPO 970006 795974
TDK 971505 795974
TDK 971505 910148
RITEK 971517 795970
MKM 971521 795974
NANYA 971537 795974
? 971629 795973
? 971629 795974
MBI 971706 795974
Wealth Fair 971817 795974
Netra T2000 Server Product Notes 3
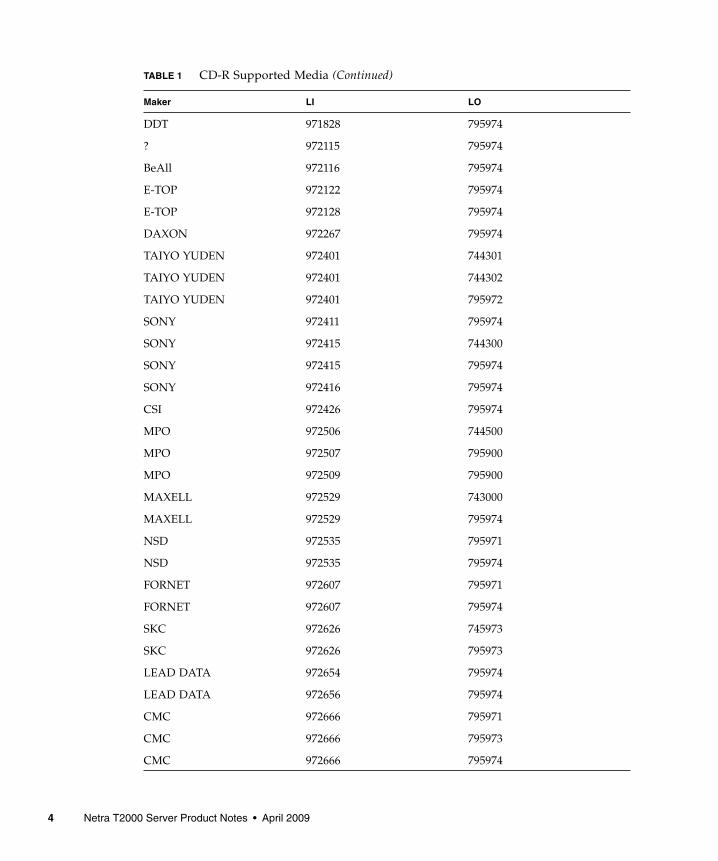
DDT 971828 795974
? 972115 795974
BeAll 972116 795974
E-TOP 972122 795974
E-TOP 972128 795974
DAXON 972267 795974
TAIYO YUDEN 972401 744301
TAIYO YUDEN 972401 744302
TAIYO YUDEN 972401 795972
SONY 972411 795974
SONY 972415 744300
SONY 972415 795974
SONY 972416 795974
CSI 972426 795974
MPO 972506 744500
MPO 972507 795900
MPO 972509 795900
MAXELL 972529 743000
MAXELL 972529 795974
NSD 972535 795971
NSD 972535 795974
FORNET 972607 795971
FORNET 972607 795974
SKC 972626 745973
SKC 972626 795973
LEAD DATA 972654 795974
LEAD DATA 972656 795974
CMC 972666 795971
CMC 972666 795973
CMC 972666 795974
TABLE 1 CD-R Supported Media (Continued)
Maker LI LO
4 Netra T2000 Server Product Notes • April 2009
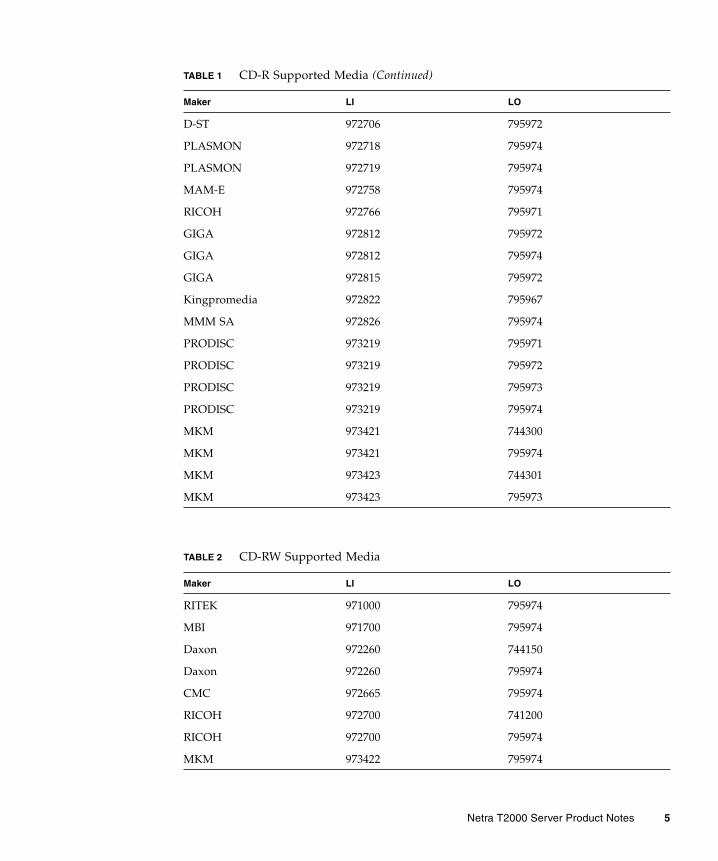
D-ST 972706 795972
PLASMON 972718 795974
PLASMON 972719 795974
MAM-E 972758 795974
RICOH 972766 795971
GIGA 972812 795972
GIGA 972812 795974
GIGA 972815 795972
Kingpromedia 972822 795967
MMM SA 972826 795974
PRODISC 973219 795971
PRODISC 973219 795972
PRODISC 973219 795973
PRODISC 973219 795974
MKM 973421 744300
MKM 973421 795974
MKM 973423 744301
MKM 973423 795973
TABLE 2 CD-RW Supported Media
Maker LI LO
RITEK 971000 795974
MBI 971700 795974
Daxon 972260 744150
Daxon 972260 795974
CMC 972665 795974
RICOH 972700 741200
RICOH 972700 795974
MKM 973422 795974
TABLE 1 CD-R Supported Media (Continued)
Maker LI LO
Netra T2000 Server Product Notes 5
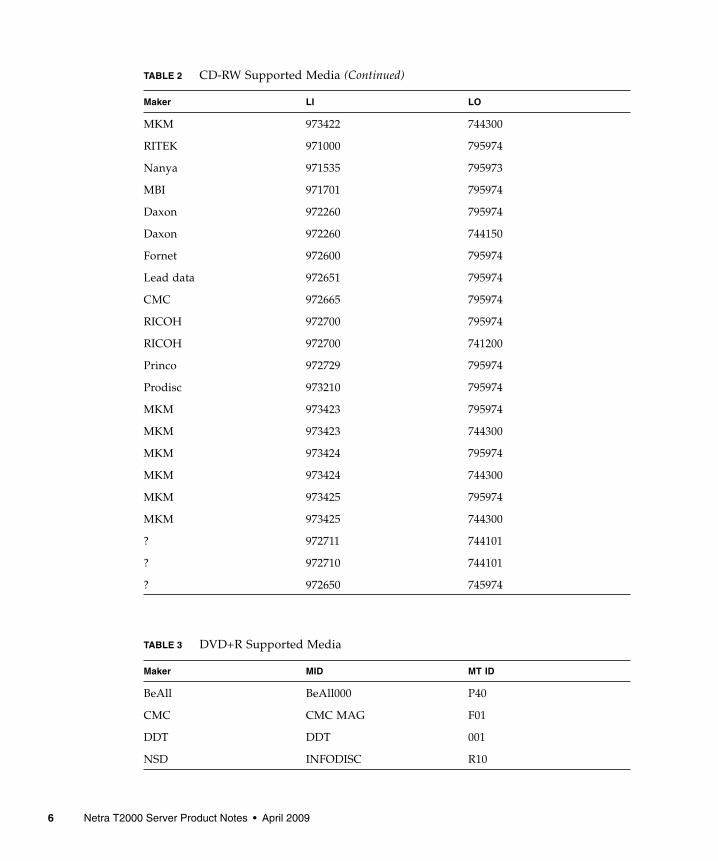
MKM 973422 744300
RITEK 971000 795974
Nanya 971535 795973
MBI 971701 795974
Daxon 972260 795974
Daxon 972260 744150
Fornet 972600 795974
Lead data 972651 795974
CMC 972665 795974
RICOH 972700 795974
RICOH 972700 741200
Princo 972729 795974
Prodisc 973210 795974
MKM 973423 795974
MKM 973423 744300
MKM 973424 795974
MKM 973424 744300
MKM 973425 795974
MKM 973425 744300
? 972711 744101
? 972710 744101
? 972650 745974
TABLE 3 DVD+R Supported Media
Maker MID MT ID
BeAll BeAll000 P40
CMC CMC MAG F01
DDT DDT 001
NSD INFODISC R10
TABLE 2 CD-RW Supported Media (Continued)
Maker LI LO
6 Netra T2000 Server Product Notes • April 2009
INFOSCIENCE IS01 001
MAXELL MAXELL 001
MBI MBIPG101 R03
MKM MCC 002
OPTODISC OPTODISC OR4
PHILIPS PHILIPS C08
RICOH RICOHJPN R01
RITEK RITEK R02
TDK TDK 001
INTERAXIA VDSPMSAB 001
UME AML 002
CMC CMC MAG E01
DAXON DAXON AZ2
DDT DDT 002
E-TOP EMDP 000
NSD IMC JPN R01
NSD INFODISC R20
INFOMEDIA INFOME R20
INFOSCIENCE IS02 001
ISSM ISSM 001
AMC KIC00000 S80
LEADDATA LD S03
MAM-E MAM M02
MAXELL MAXELL 002
MBI MBIPG101 R04
MKM MCC 003
Eastgate MICRON 001
MPO MPOMEDIA 080
NANYA NANYA CLX
OPTODISC OPTODISC OR8
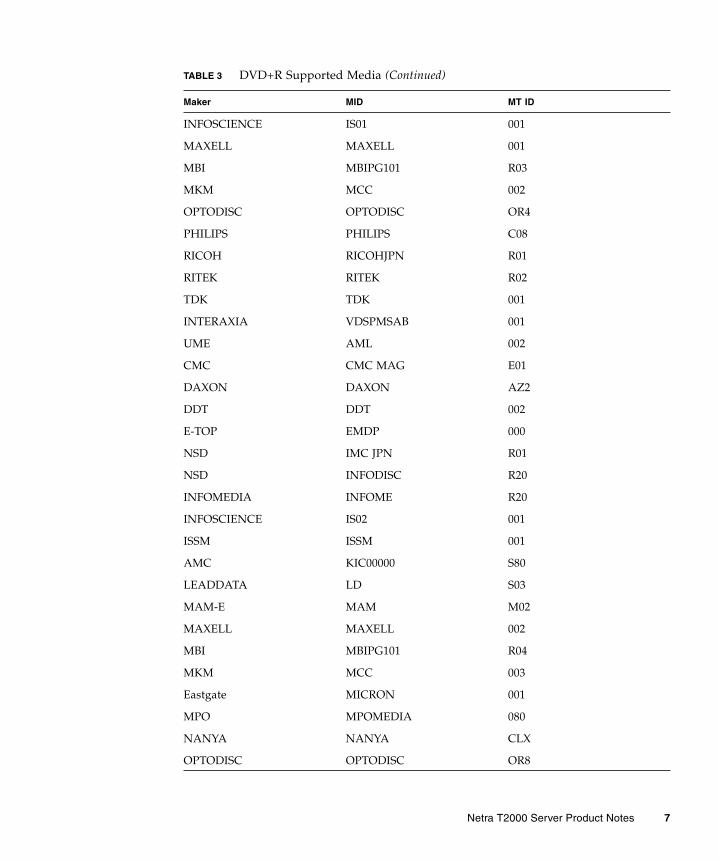
TABLE 3 DVD+R Supported Media (Continued)
Maker MID MT ID
Netra T2000 Server Product Notes 7
PHILIPS PHILIPS 081
POSTECH POS R01
Prodisc PRODISC R03
RICOH RICOHJPN R02
RITEK RITEK R03
SONY SONY D11
TDK TDK 002
Wealth Fair WFKA11 211
TAIYO YUDEN YUDEN000 T02
BeAll BeAll000 PG0
CMC CMC MAG M01
DAXON DAXON AZ3
DAXON DAXON CY3
E-TOP EMDPAZ01 000
INFOMEDIA INFOME R30
INFOSCIENCE IS03 001
ISSM ISSM 003
LEADDATA LD S04
LGE LGEP16 001
MAXELL MAXELL 003
MBI MBIPG101 R05
MKM MCC 004
MUST MUST 006
NANYA NANYA FLX
NSD NSD R40
OPTODISC OPTODISC R16
POSTECH POS R05
Prodisc PRODISC R04
Prodisc PRODISC R05
RICOH RICOHJPN R03
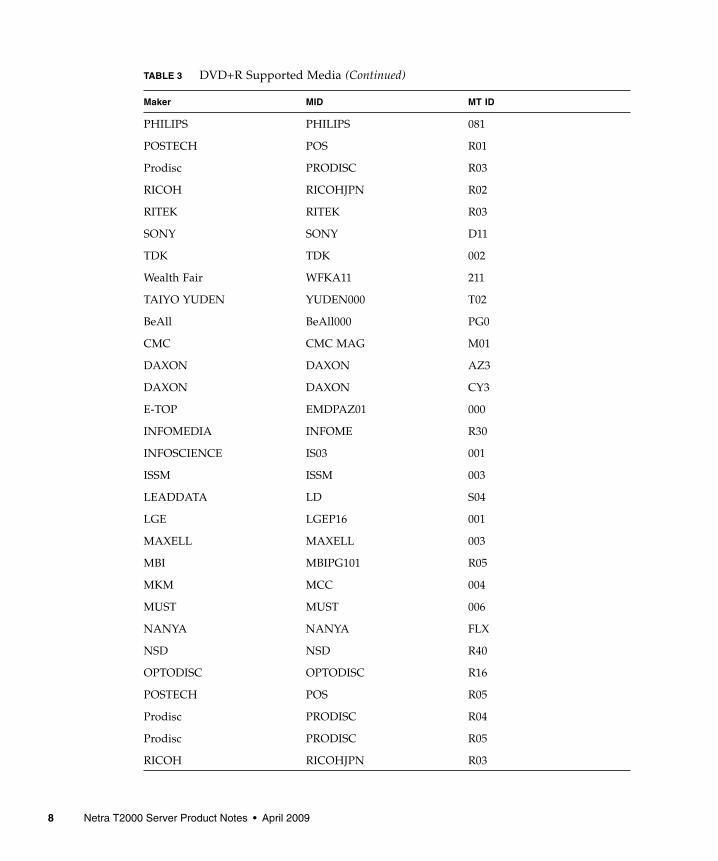
TABLE 3 DVD+R Supported Media (Continued)
Maker MID MT ID
8 Netra T2000 Server Product Notes • April 2009
RITEK RITEK R04
RITEK RITEK P16
RITEK RITEK R05
SONY SONY D21
TDK TDK 003
TAIYO YUDEN YUDEN000 T03
SKC SKC P16
UME AML 003
? MJC 005
? Dvsn+16 001
RITEK RITEK F16
ULTRAN ULTRAN 212
Wealth Fair WFKA11 321
TABLE 4 DVD-R Supported Media
Maker MID
BeAll BeAllG40001
CMC CMC MAG AF1
DDT DDTRG001
DST DvsnA001
GIGA GSC001
NSD INFODISC-R01
AMC KIC01RG20
MAME(France) MAM4XG02
MKM MCC 01RG20
Must Tech MUST 001
MAXELL MXL RG02
Prodisc ProdiscS03
RITEK RITEKG04
TABLE 3 DVD+R Supported Media (Continued)
Maker MID MT ID
Netra T2000 Server Product Notes 9
TDK TTG01
TY TYG01
NSD UTJR001001
CMC CMC MAG AE1
DAXON DAXON008S
DDT DDT02RG20
DST Dvsn-80
FUJIFILM FUJIFILM03
GIGA GSC003
GIGA GSC004
NSD IMC JPN R01
NSD INFODISC-R20
INFOMEDIA INFOMEDIAR20
ISSM ISSMR01
AMC KIC01RG080
LEADDATA LEADDATA S03
LGE LGE08
MKM MCC 02RG20
Must Tech MUST 003
MAXELL MXL RG03
OPTODISC OPTODISCR008
Plasmon Plasmon1A
POSTECH POSG06
PRINCO PRINCO8X02
PRODISC ProdiscF01
PRODISC ProdiscS04
RITEK RITEKG05
SONY SONY08D1
TDK TTG02
TDK TTH01
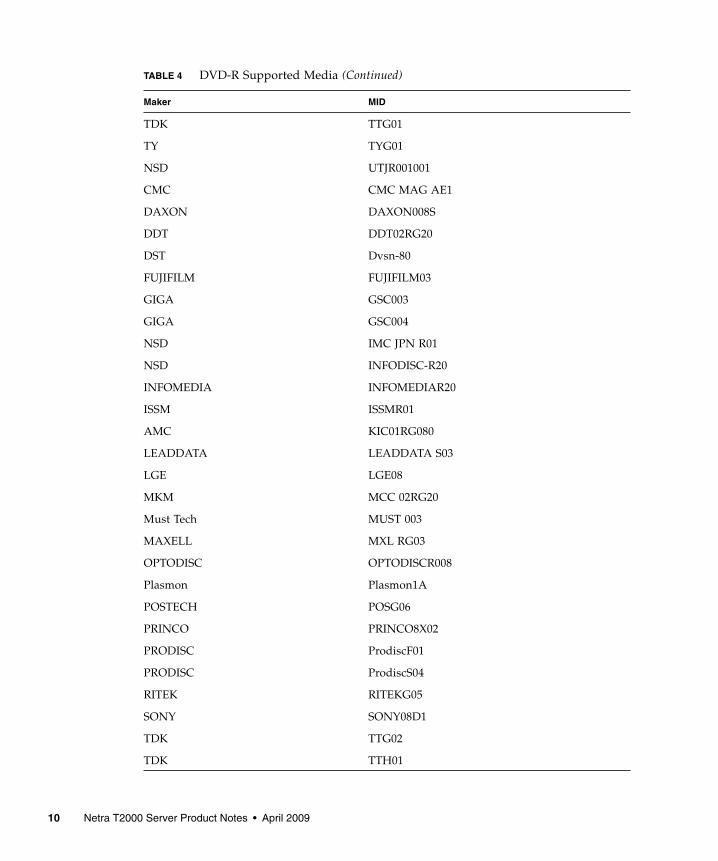
TABLE 4 DVD-R Supported Media (Continued)
Maker MID
10 Netra T2000 Server Product Notes • April 2009
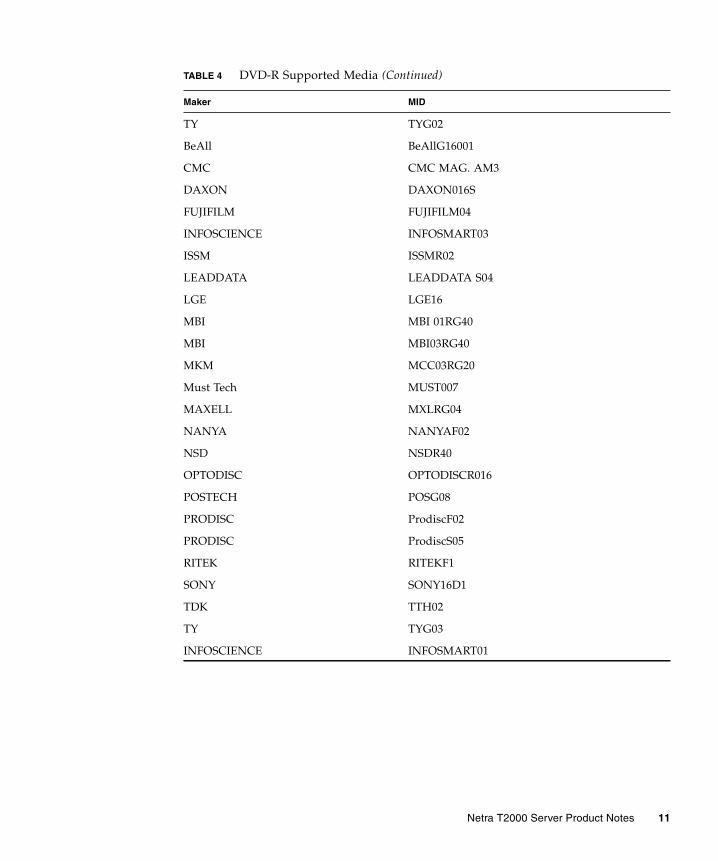
TY TYG02
BeAll BeAllG16001
CMC CMC MAG. AM3
DAXON DAXON016S
FUJIFILM FUJIFILM04
INFOSCIENCE INFOSMART03
ISSM ISSMR02
LEADDATA LEADDATA S04
LGE LGE16
MBI MBI 01RG40
MBI MBI03RG40
MKM MCC03RG20
Must Tech MUST007
MAXELL MXLRG04
NANYA NANYAF02
NSD NSDR40
OPTODISC OPTODISCR016
POSTECH POSG08
PRODISC ProdiscF02
PRODISC ProdiscS05
RITEK RITEKF1
SONY SONY16D1
TDK TTH02
TY TYG03
INFOSCIENCE INFOSMART01
TABLE 4 DVD-R Supported Media (Continued)
Maker MID
Netra T2000 Server Product Notes 11
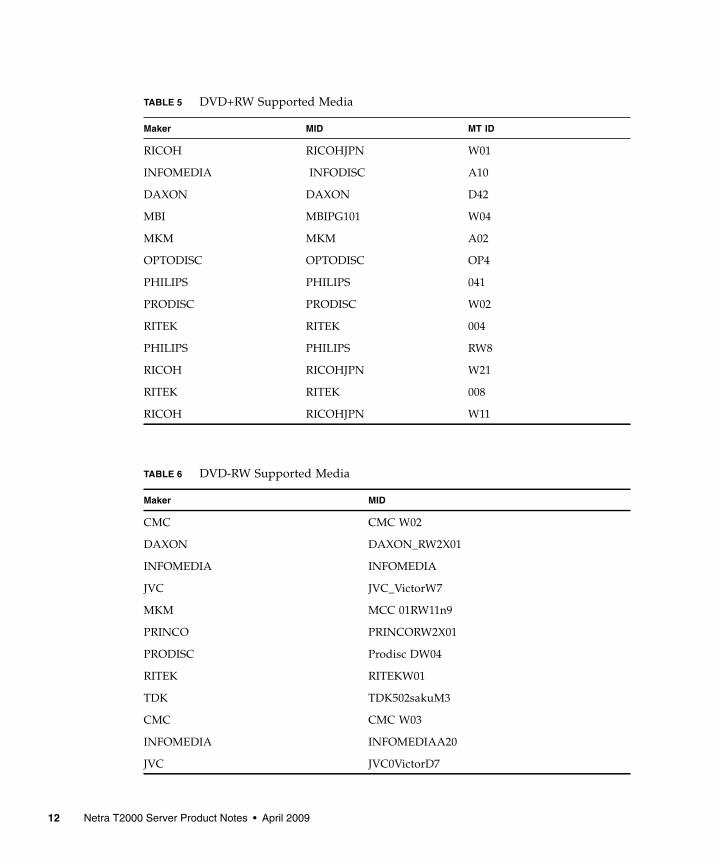
TABLE 5 DVD+RW Supported Media
Maker MID MT ID
RICOH RICOHJPN W01
INFOMEDIA INFODISC A10
DAXON DAXON D42
MBI MBIPG101 W04
MKM MKM A02
OPTODISC OPTODISC OP4
PHILIPS PHILIPS 041
PRODISC PRODISC W02
RITEK RITEK 004
PHILIPS PHILIPS RW8
RICOH RICOHJPN W21
RITEK RITEK 008
RICOH RICOHJPN W11
TABLE 6 DVD-RW Supported Media
Maker MID
CMC CMC W02
DAXON DAXON_RW2X01
INFOMEDIA INFOMEDIA
JVC JVC_VictorW7
MKM MCC 01RW11n9
PRINCO PRINCORW2X01
PRODISC Prodisc DW04
RITEK RITEKW01
TDK TDK502sakuM3
CMC CMC W03
INFOMEDIA INFOMEDIAA20
JVC JVC0VictorD7
12 Netra T2000 Server Product Notes • April 2009
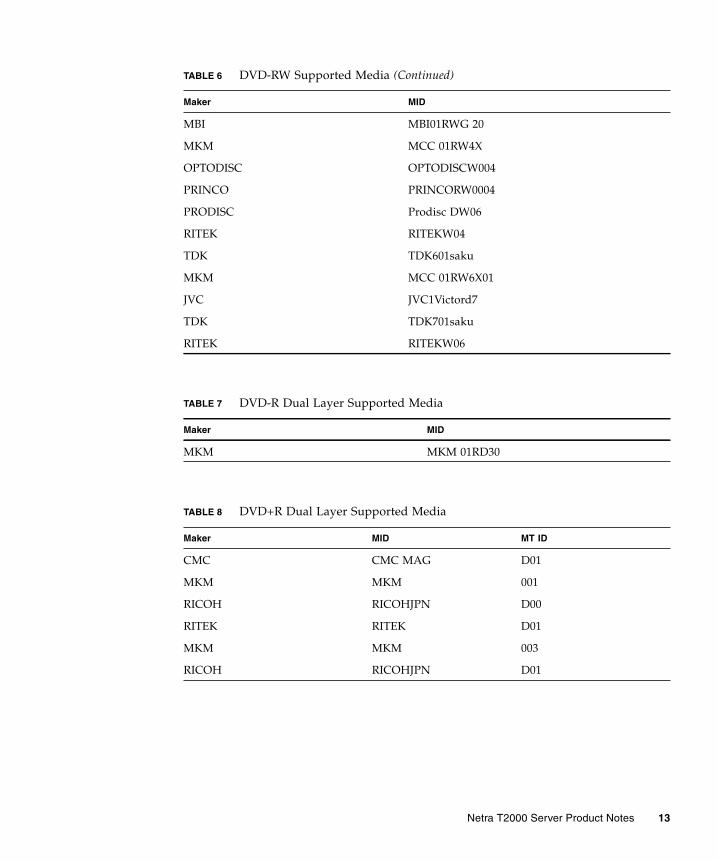
MBI MBI01RWG 20
MKM MCC 01RW4X
OPTODISC OPTODISCW004
PRINCO PRINCORW0004
PRODISC Prodisc DW06
RITEK RITEKW04
TDK TDK601saku
MKM MCC 01RW6X01
JVC JVC1Victord7
TDK TDK701saku
RITEK RITEKW06
TABLE 7 DVD-R Dual Layer Supported Media
Maker MID
MKM MKM 01RD30
TABLE 8 DVD+R Dual Layer Supported Media
Maker MID MT ID
CMC CMC MAG D01
MKM MKM 001
RICOH RICOHJPN D00
RITEK RITEK D01
MKM MKM 003
RICOH RICOHJPN D01
TABLE 6 DVD-RW Supported Media (Continued)
Maker MID
Netra T2000 Server Product Notes 13
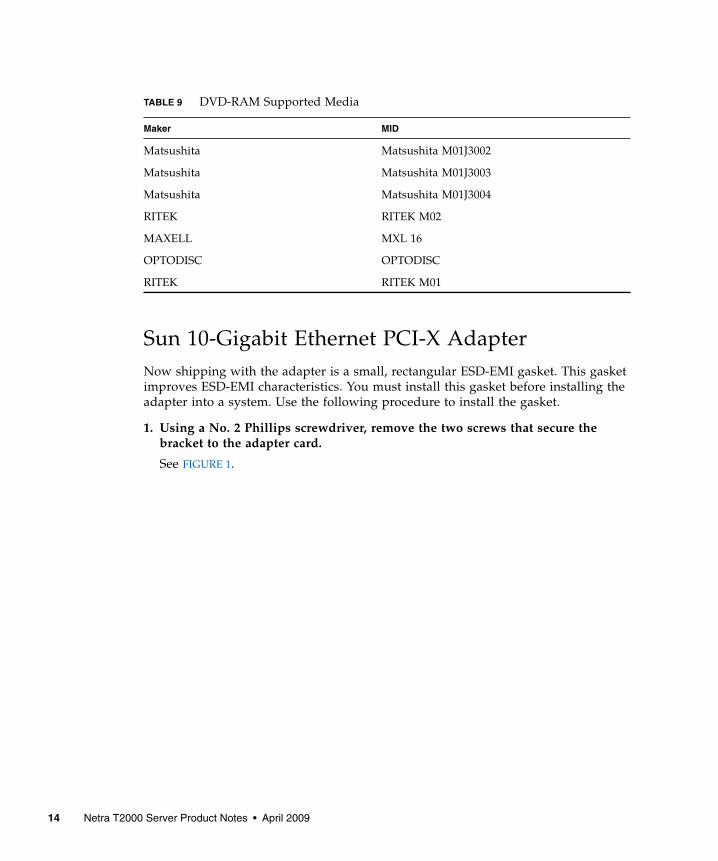
Sun 10-Gigabit Ethernet PCI-X AdapterNow shipping with the adapter is a small, rectangular ESD-EMI gasket. This gasketimproves ESD-EMI characteristics. You must install this gasket before installing theadapter into a system. Use the following procedure to install the gasket.
1. Using a No. 2 Phillips screwdriver, remove the two screws that secure thebracket to the adapter card.
See FIGURE 1.
TABLE 9 DVD-RAM Supported Media
Maker MID
Matsushita Matsushita M01J3002
Matsushita Matsushita M01J3003
Matsushita Matsushita M01J3004
RITEK RITEK M02
MAXELL MXL 16
OPTODISC OPTODISC
RITEK RITEK M01
14 Netra T2000 Server Product Notes • April 2009
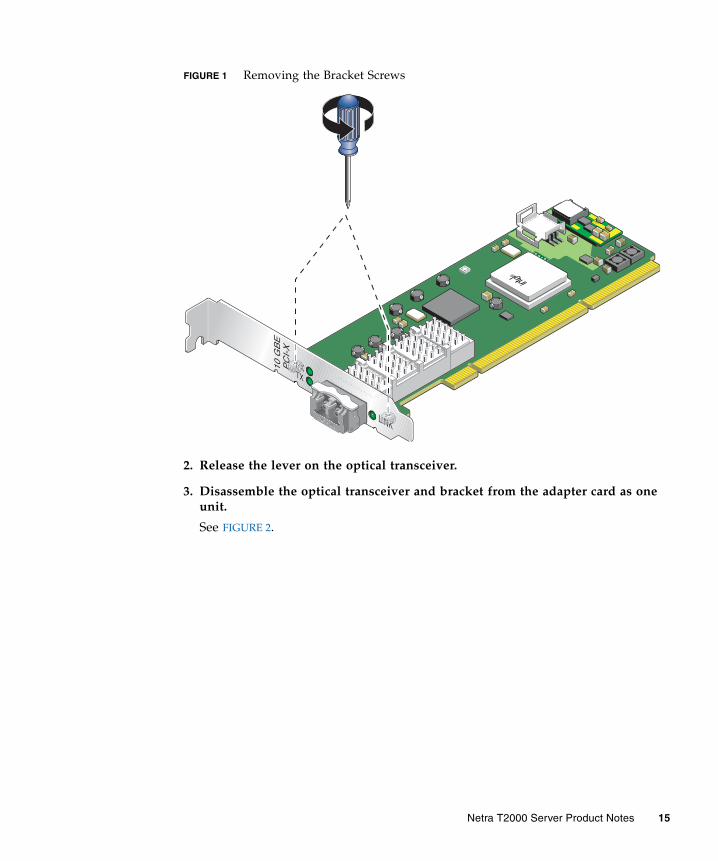
FIGURE 1 Removing the Bracket Screws
2. Release the lever on the optical transceiver.
3. Disassemble the optical transceiver and bracket from the adapter card as oneunit.
See FIGURE 2.
Netra T2000 Server Product Notes 15
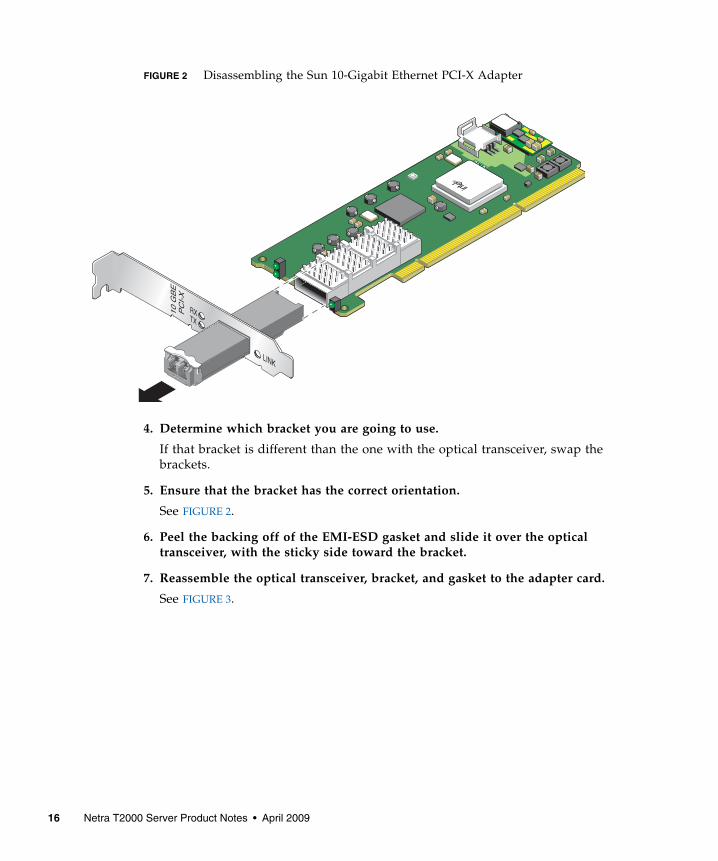
FIGURE 2 Disassembling the Sun 10-Gigabit Ethernet PCI-X Adapter
4. Determine which bracket you are going to use.
If that bracket is different than the one with the optical transceiver, swap thebrackets.
5. Ensure that the bracket has the correct orientation.
See FIGURE 2.
6. Peel the backing off of the EMI-ESD gasket and slide it over the opticaltransceiver, with the sticky side toward the bracket.
7. Reassemble the optical transceiver, bracket, and gasket to the adapter card.
See FIGURE 3.
16 Netra T2000 Server Product Notes • April 2009
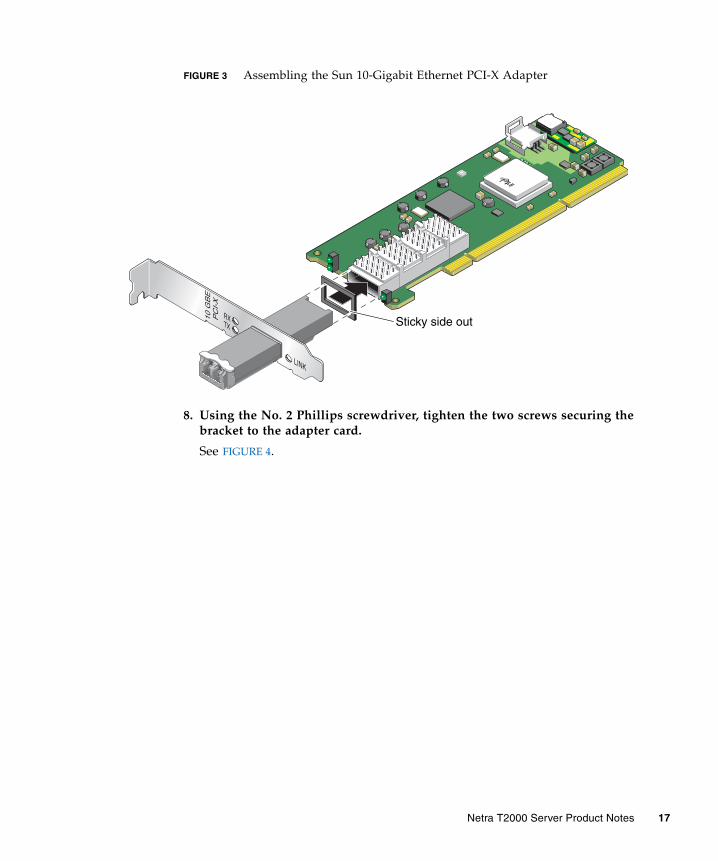
FIGURE 3 Assembling the Sun 10-Gigabit Ethernet PCI-X Adapter
8. Using the No. 2 Phillips screwdriver, tighten the two screws securing thebracket to the adapter card.
See FIGURE 4.
Sticky side out
Netra T2000 Server Product Notes 17
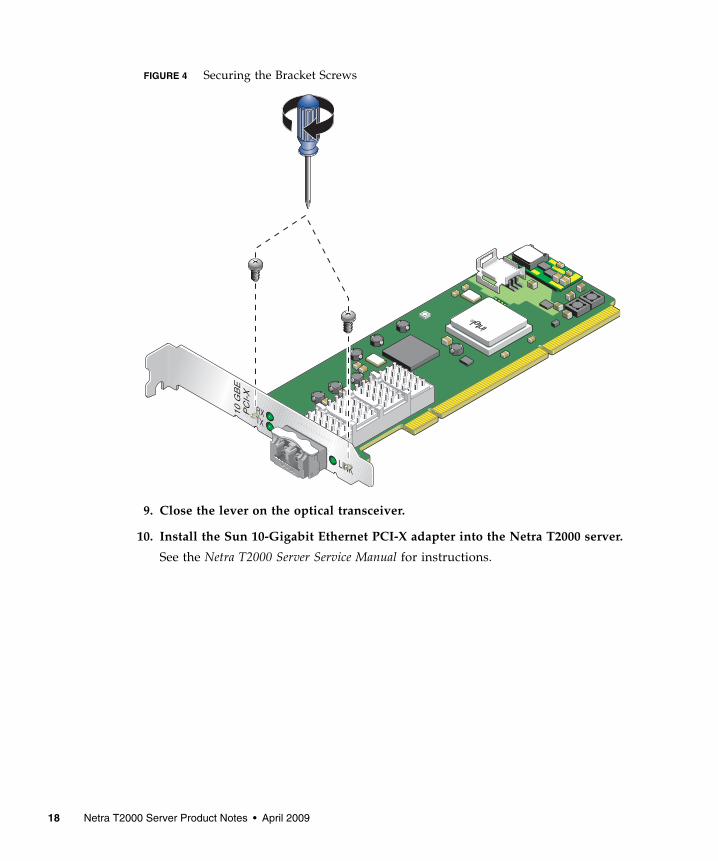
FIGURE 4 Securing the Bracket Screws
9. Close the lever on the optical transceiver.
10. Install the Sun 10-Gigabit Ethernet PCI-X adapter into the Netra T2000 server.
See the Netra T2000 Server Service Manual for instructions.
18 Netra T2000 Server Product Notes • April 2009
Software Notes
Transition From the ipge to the e1000g NetworkDriver
About the ipge and e1000g Network DriversThe ipge network driver was a temporary support mechanism for the Intel PCI-Express network interfaces found on SPARC® based servers. The driver wasprovided in the following releases of the Solaris™ 10 software:
■ Solaris 10 3/05 HW2
■ Solaris 10 1/06
■ Solaris 10 6/06
Presently, and with the release of Solaris 10 11/06, the new Sun standard e1000gnetwork driver is available. The e1000g driver provides additional features such aslink aggregation, as well as superior performance in most environments.
Transitioning from the ipge driver to the e1000g driver will circumvent thefollowing issues:
■ 6386498 - ipge trouble talking to switch forced to 100/full
■ 6445862 - Solaris 10 U2 on Sun Fire™ T2000 Sun Ray™ server panics due to ipgedriver
■ 6233824 - ipge driver external loopback test (netlbtest) does not work
■ 6331252 - Ophir based network devices are unreliable in back-to-backconfiguration
■ 6191165 - Under heavy load ipge driver can exit a thread uncleanly whenunplumbed
■ 6287035 - Onboard network ports (ipge) on Sun Fire T2000 showing inconsistentbehavior
■ 6324131 - Activity LED remains on even though no traffic is passing through
Netra T2000 Server Product Notes 19
Conditions of the TransitionWhen transitioning from the ipge network driver to the e1000g network driver,consider the following conditions:
■ The transition script automatically transitions all Sun network configuration filesfrom using ipge to e1000g network interface. This transition results in a newe1000g network interface name. All device instances remain intact.
■ The transition script is unable to transition third-party applications or user scriptsthat have the ipge network interface name embedded. Failure to manuallyconvert such applications at the time the transition script is run might result inapplication failure. Because failure modes are application-dependent, it is notpossible to predict specific application symptoms and error messages.Applications most likely to be affected by the transition are firewalls.
■ Presently, Sun Cluster systems cannot upgrade to the e1000g network driver. Thetransition script detects this condition and automatically exits.
Transitioning From the ipge to the e1000g NetworkDriver1. Install patch 118833-18 or later, or install Solaris 10 11/06 software or later.
2. Install the e1000g transition patch, 123334-01 or later.
3. Run the transition script, /usr/sbin/e1000g_transition -b, delivered inpatch 123334.
The -b argument allows you to back out the script, should there be complications.See “Conditions of the Transition” on page 19.
More InformationSee Sun Alert Notification 102502 for more information about the transition from theipge to the e1000g driver. The notification is available online at:
http://sunsolve.sun.com/search/document.do?assetkey=1-26-102502-1&searchclause=102502
20 Netra T2000 Server Product Notes • April 2009
NIC Data Integrity IssuesIf the e1000g network driver is configured for use with the Intel Gigabit Ethernetcard, there might be data integrity issues during periods of high stress on thenetwork interfaces. When the system is under high network stress, application datacould be corrupted. Data corruption can only be detected by the application or if theuser sees unexpected application data.
● To determine if you have an Intel Gigabit Ethernet Card installed, type thiscommand as superuser:
If an Intel Gigabit Ethernet Card is installed, the output contains a string in theform of e1000gx. Where x is 0, 1,2,...
Workaround: Add the following to the /etc/system file as superuser:
Supported Firmware and Software VersionsThe following firmware and software version are the minimum supported versionsfor the Netra T2000 server:
■ Solaris 10 1/06 - 6/06 Operating System
■ Sun system firmware 6.2.1, which includes Advanced Lights Out Manager(ALOM) CMT 1.2.1 software
■ SunVTS™ 6.2 software
■ Sun Management Center 4.0 software
Suggested Patches and PackagesSun Microsystems continually strives to improve software and applications.Developments in the functionality of the Solaris 10 6/06 and earlier operatingsystem have necessitated the following patches to provide your server with optimalperformance:
■ 123252-01 — SunOS 5.10: platform/SUNW, Netra-T2000 patch
■ 119578-27 — SunOS 5.10: FMA patch
# ifconfig -a
set ip:dohwcksum=0
Netra T2000 Server Product Notes 21
The following patches supplement the Solaris 10 11/06 and later Operating Systemand provide enhancement:
■ 124753-02 — Firmware 6.3.7
■ 126238-01 — prtdiag picl features point patch
■ 126237-01 — drivers and scadm features point patch
■ 125122-01 — ntwdt point patch
The patches are available for download at:
http://sunsolve.sun.com
nalmtest of SunVTS Hangs6424423 — The nalmtest of SunVTS 6.2 might hang while running.
Workaround: You can leave SunVTS or nalmtest hung (as this should not effectother processes on the system) or reboot the server.
Critical Alarm Upon Boot6421462 — Upon booting the Netra T2000 server, the critical alarm LED might beilluminated, yet there is no error.
Workaround: Reset the critical alarm through the system controller using thefollowing ALOM command:
System Panic From Solaris 10 6/06 Optical MediaDrive Boot6453703 — Booting the Netra T2000 server from the optical media drive with aversion of Solaris 10 6/06 or earlier will cause a system panic. The Solaris 10 6/06DVD or CD-ROM does not have the necessary patches for the Netra T2000. See“Suggested Patches and Packages” on page 21. If you must boot the server from theoptical media drive, use a later version of the Solaris Operating System.
sc> setalarm critical off
22 Netra T2000 Server Product Notes • April 2009
FMA Error Continuously Reported6438060 — After a reboot, FMA continuously reports SUNOS-8000-1L messages forereport.io.pci.sec-rserr. This is a fault in the FMA software. This situation isunder investigation.
Critical Fault in PCI-Express Subsystem6457637 — In a Sun Cluster configuration, a critical fault in the PCI-Expresssubsystem is reported.
Workaround: Perform the following steps:
1. Edit the /etc/system file to contain the following lines:
2. Clear the FMA errors:
3. Clear the faults in the system controller through the ALOM prompt:
set pcie:pcie_aer_ce_mask=0x1set segkmem_lpsize=0x400000
# fmadm repair fault-identifier# cd /var/fm/fmd# rm e* f* c*/eft/* r*/*# fmadm reset cpumem-diagnosis# fmadm reset cpumem-retire# fmadm reset eft# fmadm reset io-retire
sc> showfaults -vID Time FRU Fault0 Aug 4 22:01 hc://product-id=SUNW,Netra-T2000/component=IOBD Host detected fault, MSGID:SUN4-8000-75 UUID: fault-identifier
sc> clearfault fault-identifierClearing fault from all indicted FRUs...Fault cleared.
Netra T2000 Server Product Notes 23
Console Output Is Slow6453191 — The console output from the serial ports appears to be at 1200 baud. Theroot cause of this behavior is from 6405226 and 6450614.
Workaround: Upgrade to firmware version 6.3.7 with patch 124753-02 or later toresolve this problem.
ALOM and POST Reports Conflict6454648 — The power-on self-test reports an error in the IO-bridge test, yet ALOMdoes not. There are two conditions to this situation, ALOM does not test the IO-bridge and POST is falsely reporting the error.
Workaround: Add three entries to the ASR database. Edit the asr.cfg file to havethe following lines:
node asr_entry pcie-pcix1 {key = "pcie-pcix1";alt = "IOBD/PCI-BRIDGE1";nac = "IOBD/PCI-BRIDGE1";path = "/@780/@0/@8/@0";reason = [ 0x00 ];postbits = 0x10000000000000;
}
node asr_entry pcie-pcix2 {key = "pcie-pcix2";alt = "IOBD/PCI-BRIDGE2";nac = "IOBD/PCI-BRIDGE2";path = "/@7c0/@0/@1/@0";reason = [ 0x00 ];postbits = 0x2000000000000000;
}
node asr_entry pcie-pcix3 {key = "pcie-pcix3";alt = "IOBD/PCI-BRIDGE3";nac = "IOBD/PCI-BRIDGE3";path = "/@7c0/@0/@9/@0";reason = [ 0x00 ];postbits = 0x4000000000000000;
}
24 Netra T2000 Server Product Notes • April 2009
Cluster Interconnects Go Up and Down6328986, 6467860 — Sun Cluster 3.1u4 customers wanting to use the on-boardGigabit Ethernet ports or ports from a PCIe network interface card and the e1000gnetwork driver for cluster interconnects, require an Ethernet switch.
Efforts are underway to resolve this situation.
System Clock Drift6565947 — In some Netra T2000 servers, the system clock drifts by as much as 20seconds per day. Additionally, the ALOM real-time clock corrects the system clockevery two hours. Upon correction, the system clock jumps approximately twoseconds.
Workaround: Perform one of the following actions:
■ Configure the Netra T2000 server as a Network Time Protocol (NTP) client.
■ Edit the /etc/system file to contain the following line:
Reboot the system.
Documentation Notes
Differences of InformationThere are differences between the Netra T2000 server documentation and labelsapplied to the server itself. These differences occur because the information ispresented in the context of its need. For example, the serial connector is labeled witheither the word "serial" or "A". This label identifies a type of signal and its standardconnector. The server documentation provides more information about that signal,its parameters, and the connector pinout. The same holds true for the server servicelabel, as it provides a summary or overview of service procedures. More explicit anddetailed procedures are described in the server service manual.
set sys_tick_freq=0x3b9ea648
Netra T2000 Server Product Notes 25
Additional Documentation SupportThe Sun Fire T2000 server and Netra T2000 server share certain characteristics. Youcan consult the Sun Fire T2000 Server Product Notes, 819-2544-18, as an additionaldocumentation support resource.
PCI Cable to U-Plate FastenersIn section 2.3.6 of the Netra T2000 Server Service Manual, 819-5841-10, the procedureto remove the PCI tray describes removing the U-plate. Earlier versions of the NetraT2000 server did not have hook-and-loop fasteners on the underside of the U-plate,to which the PCI cables are attached.
For newer versions of the Netra T2000 server, you must take an additional step ofunfastening the PCI cables from the underside of the U-plate before you remove theU-plate.
Accordingly, you must take the additional step of attaching the PCI cables to theunderside of the U-plate, after installing the U-plate.
scadm Command Not SupportedIn Chapter 2, Advanced Lights Out Management, of the Netra T2000 ServerAdministration Guide, use of the scadm command is discussed. The Netra T2000server supports the scadm command with the following software installed:
■ Solaris 10 11/06 or later operating system
■ Firmware 6.3.7 or later
■ Point patch 126237-01 or later
PCI Slots Incorrectly IdentifiedThe Netra T2000 documentation incorrectly identifies the PCI slots. The correctlabeling is seen in FIGURE 5.
26 Netra T2000 Server Product Notes • April 2009
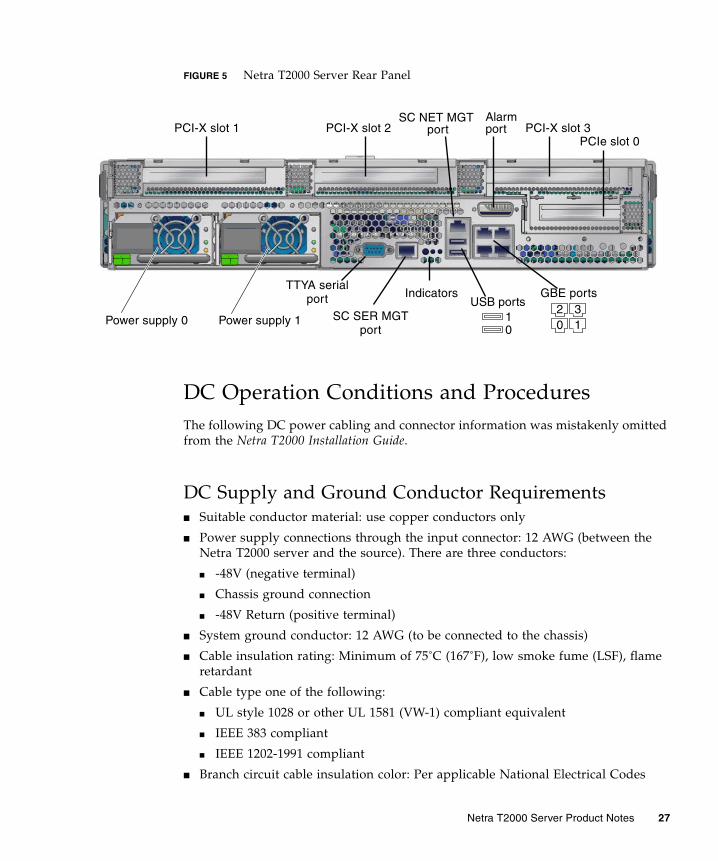
FIGURE 5 Netra T2000 Server Rear Panel
DC Operation Conditions and ProceduresThe following DC power cabling and connector information was mistakenly omittedfrom the Netra T2000 Installation Guide.
DC Supply and Ground Conductor Requirements■ Suitable conductor material: use copper conductors only
■ Power supply connections through the input connector: 12 AWG (between theNetra T2000 server and the source). There are three conductors:
■ -48V (negative terminal)
■ Chassis ground connection
■ -48V Return (positive terminal)
■ System ground conductor: 12 AWG (to be connected to the chassis)
■ Cable insulation rating: Minimum of 75˚C (167˚F), low smoke fume (LSF), flameretardant
■ Cable type one of the following:
■ UL style 1028 or other UL 1581 (VW-1) compliant equivalent
■ IEEE 383 compliant
■ IEEE 1202-1991 compliant
■ Branch circuit cable insulation color: Per applicable National Electrical Codes
Power supply 0 Power supply 1
TTYA serialport
SC SER MGTport
Indicators
01
USB portsGBE ports
20 1
3
SC NET MGTport
AlarmportPCI-X slot 1 PCI-X slot 2 PCI-X slot 3
PCIe slot 0
Netra T2000 Server Product Notes 27
■ Grounding cable insulation color: Green/yellow
Note – Depending on the DC power source, the -48V (negative terminal) might bemarked with a minus (-) symbol, and the -48V Return (positive terminal) might bemarked with a positive (+) symbol.
Overcurrent Protection Requirements■ Overcurrent protection devices must be provided as part of each equipment rack.
■ Circuit breakers must be located between the DC power source and the NetraT2000 server. Use one 20 A double-pole, fast trip DC-rated circuit breaker for eachpower supply unit.
Note – Overcurrent protection devices must meet applicable national and localelectrical safety codes and be approved for the intended application.
Assembling the DC Input Power Cable1. Identify the parts that you will use to assemble the DC input power cable
(FIGURE 6).
The following DC connection parts are required to assemble one or more DC powerinput cables. These cables connect the -48V DC input source(s) to the power supplyunits.
■ DC input plugs
■ Strain relief housings
■ Cage clamp operating lever
■ Tie wraps
28 Netra T2000 Server Product Notes • April 2009
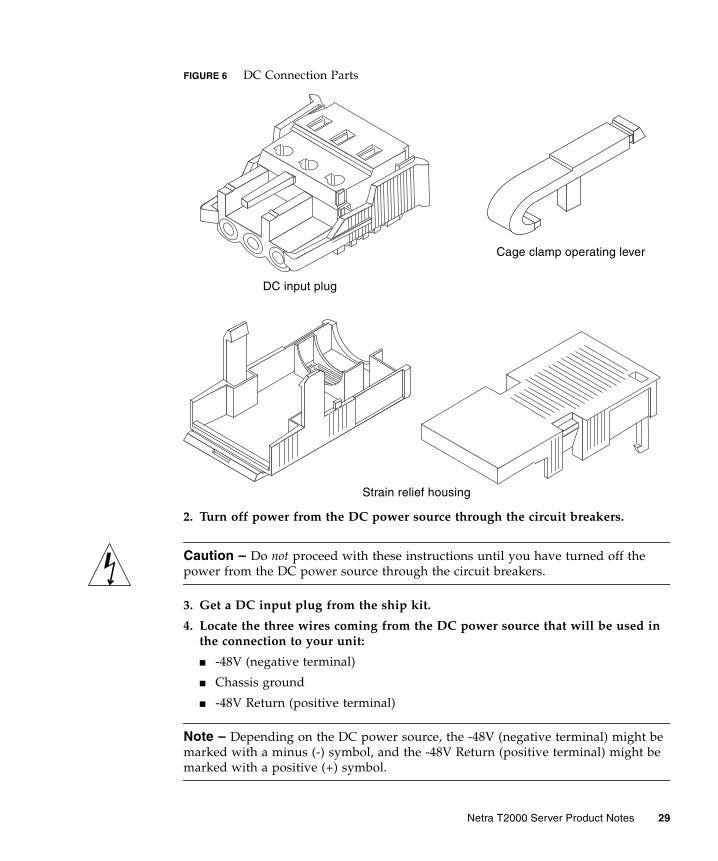
FIGURE 6 DC Connection Parts
2. Turn off power from the DC power source through the circuit breakers.
Caution – Do not proceed with these instructions until you have turned off thepower from the DC power source through the circuit breakers.
3. Get a DC input plug from the ship kit.
4. Locate the three wires coming from the DC power source that will be used inthe connection to your unit:
■ -48V (negative terminal)
■ Chassis ground
■ -48V Return (positive terminal)
Note – Depending on the DC power source, the -48V (negative terminal) might bemarked with a minus (-) symbol, and the -48V Return (positive terminal) might bemarked with a positive (+) symbol.
DC input plug
Strain relief housing
Cage clamp operating lever
Netra T2000 Server Product Notes 29
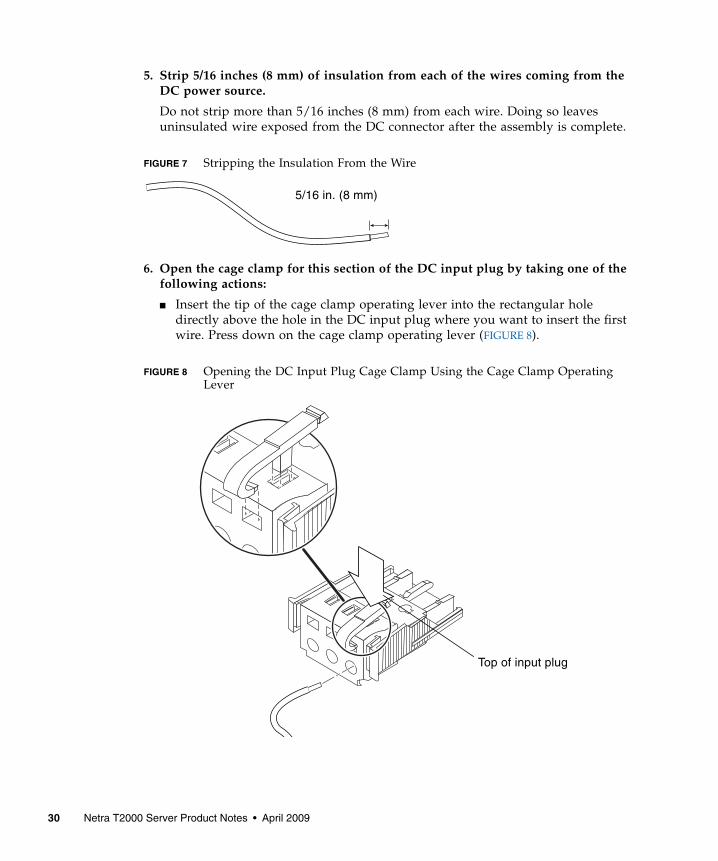
5. Strip 5/16 inches (8 mm) of insulation from each of the wires coming from theDC power source.
Do not strip more than 5/16 inches (8 mm) from each wire. Doing so leavesuninsulated wire exposed from the DC connector after the assembly is complete.
FIGURE 7 Stripping the Insulation From the Wire
6. Open the cage clamp for this section of the DC input plug by taking one of thefollowing actions:
■ Insert the tip of the cage clamp operating lever into the rectangular holedirectly above the hole in the DC input plug where you want to insert the firstwire. Press down on the cage clamp operating lever (FIGURE 8).
FIGURE 8 Opening the DC Input Plug Cage Clamp Using the Cage Clamp OperatingLever
5/16 in. (8 mm)
Top of input plug
30 Netra T2000 Server Product Notes • April 2009
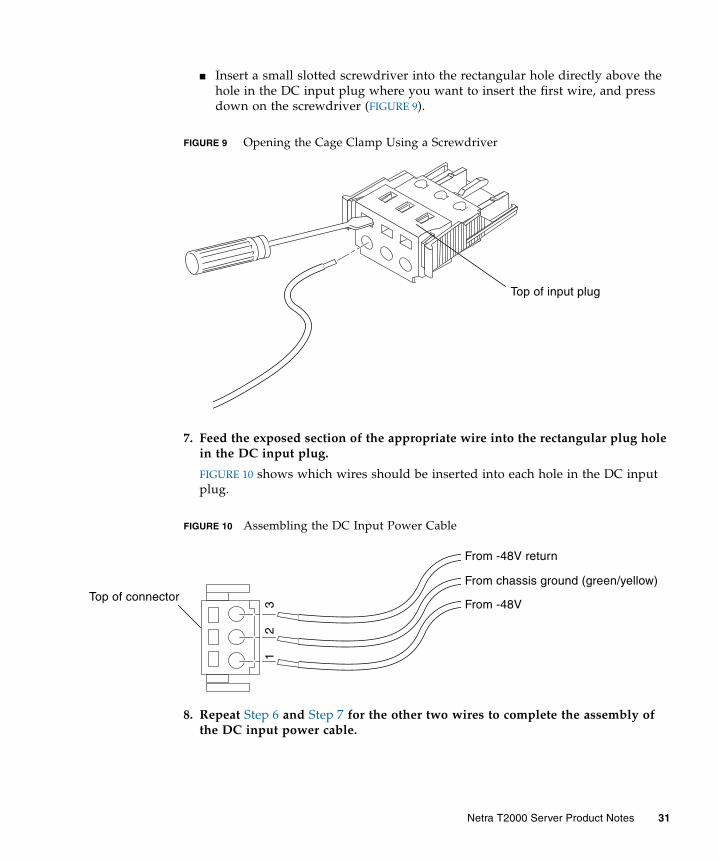
■ Insert a small slotted screwdriver into the rectangular hole directly above thehole in the DC input plug where you want to insert the first wire, and pressdown on the screwdriver (FIGURE 9).
FIGURE 9 Opening the Cage Clamp Using a Screwdriver
7. Feed the exposed section of the appropriate wire into the rectangular plug holein the DC input plug.
FIGURE 10 shows which wires should be inserted into each hole in the DC inputplug.
FIGURE 10 Assembling the DC Input Power Cable
8. Repeat Step 6 and Step 7 for the other two wires to complete the assembly ofthe DC input power cable.
Top of input plug
Top of connector
From -48V return
From chassis ground (green/yellow)
From -48V
12
3
Netra T2000 Server Product Notes 31
9. Repeat Step 4 through Step 8 to create as many DC input power cables as youneed for your unit.
You need two DC input power cables for each of the power supplies.
If you need to remove a wire from the DC input plug, insert the cage clampoperating lever or a small screwdriver into the slot directly above the wire and pressdown (FIGURE 8 and FIGURE 9). Pull the wire from the DC input plug.
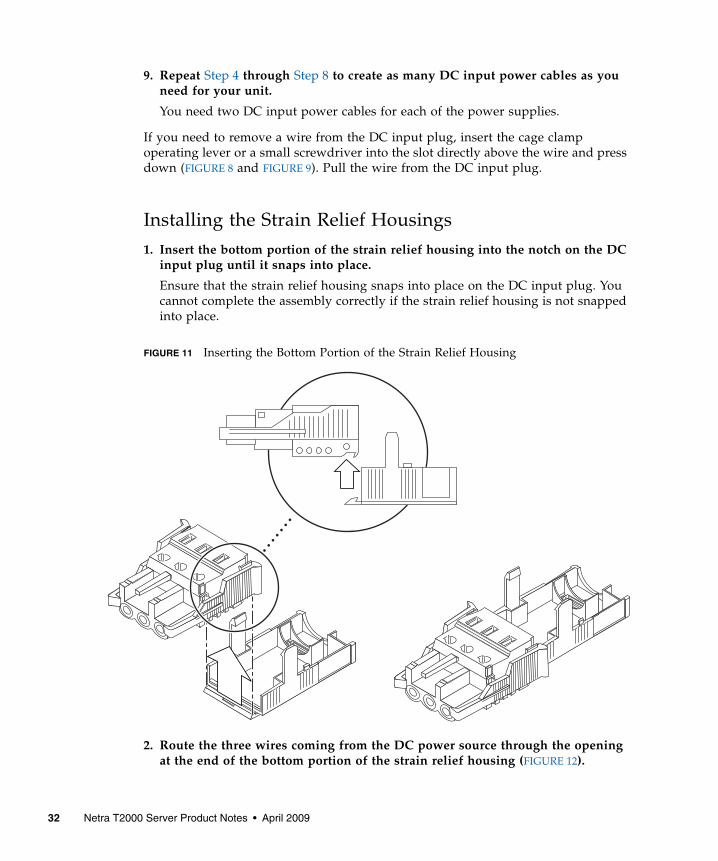
Installing the Strain Relief Housings1. Insert the bottom portion of the strain relief housing into the notch on the DC
input plug until it snaps into place.
Ensure that the strain relief housing snaps into place on the DC input plug. Youcannot complete the assembly correctly if the strain relief housing is not snappedinto place.
FIGURE 11 Inserting the Bottom Portion of the Strain Relief Housing
2. Route the three wires coming from the DC power source through the openingat the end of the bottom portion of the strain relief housing (FIGURE 12).
32 Netra T2000 Server Product Notes • April 2009
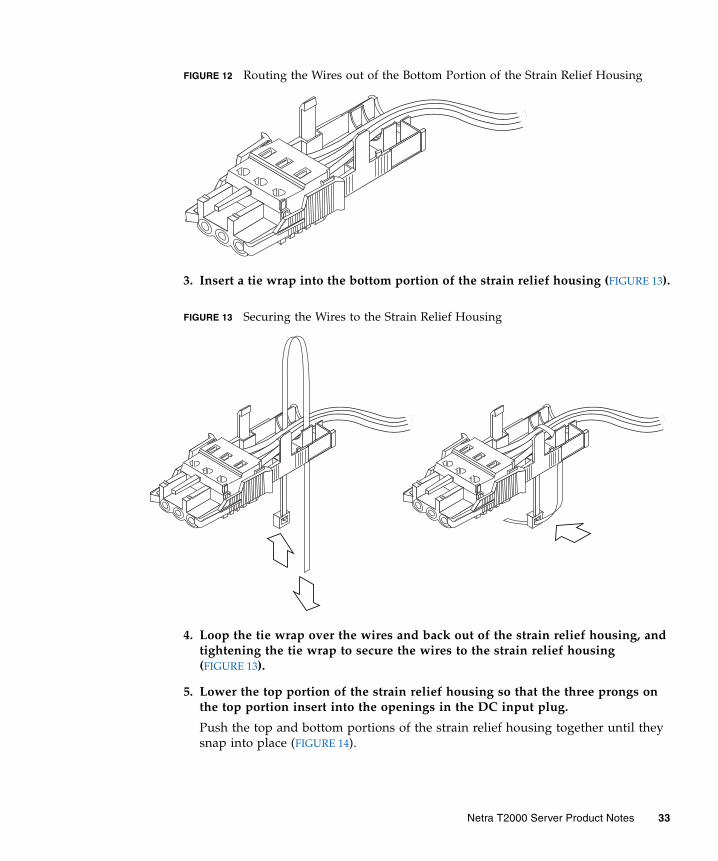
FIGURE 12 Routing the Wires out of the Bottom Portion of the Strain Relief Housing
3. Insert a tie wrap into the bottom portion of the strain relief housing (FIGURE 13).
FIGURE 13 Securing the Wires to the Strain Relief Housing
4. Loop the tie wrap over the wires and back out of the strain relief housing, andtightening the tie wrap to secure the wires to the strain relief housing(FIGURE 13).
5. Lower the top portion of the strain relief housing so that the three prongs onthe top portion insert into the openings in the DC input plug.
Push the top and bottom portions of the strain relief housing together until theysnap into place (FIGURE 14).
Netra T2000 Server Product Notes 33
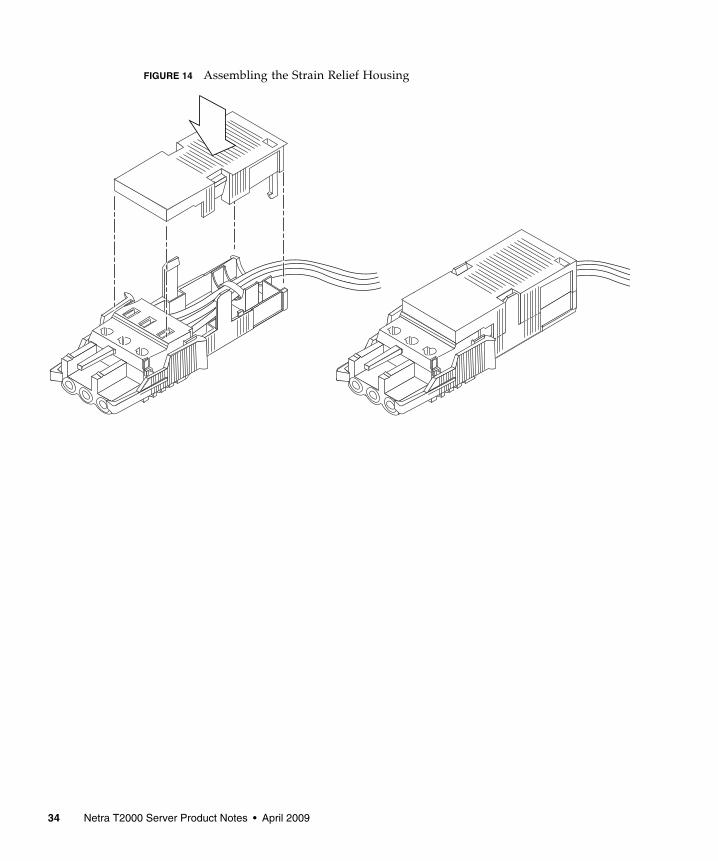
FIGURE 14 Assembling the Strain Relief Housing
34 Netra T2000 Server Product Notes • April 2009