NetIQ Performance Endpoints 5download.netiq.com/products/s/pe/documentation/NetIQ_PE_UserGuid… ·...
56
NetIQ Performance Endpoints 5.1 User Guide November 2012
Transcript of NetIQ Performance Endpoints 5download.netiq.com/products/s/pe/documentation/NetIQ_PE_UserGuid… ·...
NetIQ Performance Endpoints 5.1
User Guide
November 2012

Legal Notice
THIS DOCUMENT AND THE SOFTWARE DESCRIBED IN THIS DOCUMENT ARE FURNISHED UNDER AND ARE SUBJECT TO THE TERMS OF A LICENSE AGREEMENT OR A NON-DISCLOSURE AGREEMENT. EXCEPT AS EXPRESSLY SET FORTH IN SUCH LICENSE AGREEMENT OR NON-DISCLOSURE AGREEMENT, NETIQ CORPORATION PROVIDES THIS DOCUMENT AND THE SOFTWARE DESCRIBED IN THIS DOCUMENT "AS IS" WITHOUT WARRANTY OF ANY KIND, EITHER EXPRESS OR IMPLIED, INCLUDING, BUT NOT LIMITED TO, THE IMPLIED WARRANTIES OF MERCHANTABILITY OR FITNESS FOR A PARTICULAR PURPOSE. SOME STATES DO NOT ALLOW DISCLAIMERS OF EXPRESS OR IMPLIED WARRANTIES IN CERTAIN TRANSACTIONS; THEREFORE, THIS STATEMENT MAY NOT APPLY TO YOU.
For purposes of clarity, any module, adapter or other similar material ("Module") is licensed under the terms and conditions of the End User License Agreement for the applicable version of the NetIQ product or software to which it relates or interoperates with, and by accessing, copying or using a Module you agree to be bound by such terms. If you do not agree to the terms of the End User License Agreement you are not authorized to use, access or copy a Module and you must destroy all copies of the Module and contact NetIQ for further instructions.
This document and the software described in this document may not be lent, sold, or given away without the prior written permission of NetIQ Corporation, except as otherwise permitted by law. Except as expressly set forth in such license agreement or non-disclosure agreement, no part of this document or the software described in this document may be reproduced, stored in a retrieval system, or transmitted in any form or by any means, electronic, mechanical, or otherwise, without the prior written consent of NetIQ Corporation. Some companies, names, and data in this document are used for illustration purposes and may not represent real companies, individuals, or data.
This document could include technical inaccuracies or typographical errors. Changes are periodically made to the information herein. These changes may be incorporated in new editions of this document. NetIQ Corporation may make improvements in or changes to the software described in this document at any time.
U.S. Government Restricted Rights: If the software and documentation are being acquired by or on behalf of the U.S. Government or by a U.S. Government prime contractor or subcontractor (at any tier), in accordance with 48 C.F.R. 227.7202-4 (for Department of Defense (DOD) acquisitions) and 48 C.F.R. 2.101 and 12.212 (for non-DOD acquisitions), the government’s rights in the software and documentation, including its rights to use, modify, reproduce, release, perform, display or disclose the software or documentation, will be subject in all respects to the commercial license rights and restrictions provided in the license agreement.
© 2012 NetIQ Corporation and its affiliates. All Rights Reserved.
For information about NetIQ trademarks, see https://www.netiq.com/company/legal/.

Contents
About this Book and the Library 5About NetIQ Corporation 7
1 Introducing Performance Endpoints 9
2 Endpoint Initialization File 11
2.1 ALLOW. . . . . . . . . . . . . . . . . . . . . . . . . . . . . . . . . . . . . . . . . . . . . . . . . . . . . . . . . . . . . . . . . . . . . . . . 112.2 SECURITY_AUDITING . . . . . . . . . . . . . . . . . . . . . . . . . . . . . . . . . . . . . . . . . . . . . . . . . . . . . . . . . . . 122.3 AUDIT_FILENAME . . . . . . . . . . . . . . . . . . . . . . . . . . . . . . . . . . . . . . . . . . . . . . . . . . . . . . . . . . . . . . 122.4 ENABLE_PROTOCOL. . . . . . . . . . . . . . . . . . . . . . . . . . . . . . . . . . . . . . . . . . . . . . . . . . . . . . . . . . . . 132.5 Configuring Endpoints for Large-Scale Customization . . . . . . . . . . . . . . . . . . . . . . . . . . . . . . . . . . . 13
3 HP-UX 15
3.1 System Requirements . . . . . . . . . . . . . . . . . . . . . . . . . . . . . . . . . . . . . . . . . . . . . . . . . . . . . . . . . . . . 153.2 Installing the Endpoint . . . . . . . . . . . . . . . . . . . . . . . . . . . . . . . . . . . . . . . . . . . . . . . . . . . . . . . . . . . . 153.3 Unattended Installation for HP-UX . . . . . . . . . . . . . . . . . . . . . . . . . . . . . . . . . . . . . . . . . . . . . . . . . . . 163.4 What Happens During Installation . . . . . . . . . . . . . . . . . . . . . . . . . . . . . . . . . . . . . . . . . . . . . . . . . . . 163.5 Removing the Endpoint Package. . . . . . . . . . . . . . . . . . . . . . . . . . . . . . . . . . . . . . . . . . . . . . . . . . . . 173.6 Configuring HP-UX Endpoints . . . . . . . . . . . . . . . . . . . . . . . . . . . . . . . . . . . . . . . . . . . . . . . . . . . . . . 173.7 Starting an HP-UX Endpoint . . . . . . . . . . . . . . . . . . . . . . . . . . . . . . . . . . . . . . . . . . . . . . . . . . . . . . . 183.8 Stopping an HP-UX Endpoint. . . . . . . . . . . . . . . . . . . . . . . . . . . . . . . . . . . . . . . . . . . . . . . . . . . . . . . 193.9 How to Tell Whether an HP-UX Endpoint Is Active . . . . . . . . . . . . . . . . . . . . . . . . . . . . . . . . . . . . . . 193.10 Disabling Automatic Startup. . . . . . . . . . . . . . . . . . . . . . . . . . . . . . . . . . . . . . . . . . . . . . . . . . . . . . . . 193.11 Logging and Messages . . . . . . . . . . . . . . . . . . . . . . . . . . . . . . . . . . . . . . . . . . . . . . . . . . . . . . . . . . . 19
4 IBM AIX 21
4.1 System Requirements . . . . . . . . . . . . . . . . . . . . . . . . . . . . . . . . . . . . . . . . . . . . . . . . . . . . . . . . . . . . 214.2 Installing the Endpoint . . . . . . . . . . . . . . . . . . . . . . . . . . . . . . . . . . . . . . . . . . . . . . . . . . . . . . . . . . . . 214.3 Unattended Installation for AIX . . . . . . . . . . . . . . . . . . . . . . . . . . . . . . . . . . . . . . . . . . . . . . . . . . . . . 224.4 What Happens During Installation . . . . . . . . . . . . . . . . . . . . . . . . . . . . . . . . . . . . . . . . . . . . . . . . . . . 224.5 Removing the Endpoint Package. . . . . . . . . . . . . . . . . . . . . . . . . . . . . . . . . . . . . . . . . . . . . . . . . . . . 234.6 Configuring AIX Endpoints . . . . . . . . . . . . . . . . . . . . . . . . . . . . . . . . . . . . . . . . . . . . . . . . . . . . . . . . . 234.7 Starting an AIX Endpoint . . . . . . . . . . . . . . . . . . . . . . . . . . . . . . . . . . . . . . . . . . . . . . . . . . . . . . . . . . 244.8 Stopping an AIX Endpoint . . . . . . . . . . . . . . . . . . . . . . . . . . . . . . . . . . . . . . . . . . . . . . . . . . . . . . . . . 244.9 How to Tell Whether an AIX Endpoint Is Active . . . . . . . . . . . . . . . . . . . . . . . . . . . . . . . . . . . . . . . . . 254.10 Disabling Automatic Startup. . . . . . . . . . . . . . . . . . . . . . . . . . . . . . . . . . . . . . . . . . . . . . . . . . . . . . . . 254.11 Logging and Messages . . . . . . . . . . . . . . . . . . . . . . . . . . . . . . . . . . . . . . . . . . . . . . . . . . . . . . . . . . . 25
5 Linux 27
5.1 System Requirements . . . . . . . . . . . . . . . . . . . . . . . . . . . . . . . . . . . . . . . . . . . . . . . . . . . . . . . . . . . . 275.2 Installing the RPM-Based Endpoint for Linux. . . . . . . . . . . . . . . . . . . . . . . . . . . . . . . . . . . . . . . . . . . 285.3 Removing the RPM Endpoint Package . . . . . . . . . . . . . . . . . . . . . . . . . . . . . . . . . . . . . . . . . . . . . . . 285.4 Installing the Cobalt-Based Endpoint for Linux . . . . . . . . . . . . . . . . . . . . . . . . . . . . . . . . . . . . . . . . . 295.5 Removing the Cobalt Endpoint Package . . . . . . . . . . . . . . . . . . . . . . . . . . . . . . . . . . . . . . . . . . . . . . 30
Contents 3
4 Con
5.6 Installing the TAR-Based Endpoint for Linux . . . . . . . . . . . . . . . . . . . . . . . . . . . . . . . . . . . . . . . . . . . 305.7 Removing the TAR-Based Endpoint Package . . . . . . . . . . . . . . . . . . . . . . . . . . . . . . . . . . . . . . . . . . 315.8 What Happens During Installation . . . . . . . . . . . . . . . . . . . . . . . . . . . . . . . . . . . . . . . . . . . . . . . . . . . 315.9 Configuring Linux Endpoints . . . . . . . . . . . . . . . . . . . . . . . . . . . . . . . . . . . . . . . . . . . . . . . . . . . . . . . 325.10 Starting a Linux Endpoint . . . . . . . . . . . . . . . . . . . . . . . . . . . . . . . . . . . . . . . . . . . . . . . . . . . . . . . . . . 335.11 Stopping a Linux Endpoint . . . . . . . . . . . . . . . . . . . . . . . . . . . . . . . . . . . . . . . . . . . . . . . . . . . . . . . . . 345.12 How to Tell Whether a Linux Endpoint Is Active . . . . . . . . . . . . . . . . . . . . . . . . . . . . . . . . . . . . . . . . 345.13 Automatically Starting the Endpoint . . . . . . . . . . . . . . . . . . . . . . . . . . . . . . . . . . . . . . . . . . . . . . . . . . 355.14 Disabling Automatic Startup. . . . . . . . . . . . . . . . . . . . . . . . . . . . . . . . . . . . . . . . . . . . . . . . . . . . . . . . 355.15 Logging and Messages . . . . . . . . . . . . . . . . . . . . . . . . . . . . . . . . . . . . . . . . . . . . . . . . . . . . . . . . . . . 355.16 Increasing the Number of Concurrent Connections . . . . . . . . . . . . . . . . . . . . . . . . . . . . . . . . . . . . . . 36
6 Microsoft Windows 37
6.1 System Requirements . . . . . . . . . . . . . . . . . . . . . . . . . . . . . . . . . . . . . . . . . . . . . . . . . . . . . . . . . . . . 386.2 Installing the Endpoint . . . . . . . . . . . . . . . . . . . . . . . . . . . . . . . . . . . . . . . . . . . . . . . . . . . . . . . . . . . . 396.3 Removing the Endpoint Software. . . . . . . . . . . . . . . . . . . . . . . . . . . . . . . . . . . . . . . . . . . . . . . . . . . . 416.4 Configuring Windows Endpoints . . . . . . . . . . . . . . . . . . . . . . . . . . . . . . . . . . . . . . . . . . . . . . . . . . . . 426.5 Starting the Endpoint . . . . . . . . . . . . . . . . . . . . . . . . . . . . . . . . . . . . . . . . . . . . . . . . . . . . . . . . . . . . . 436.6 Stopping the Endpoint . . . . . . . . . . . . . . . . . . . . . . . . . . . . . . . . . . . . . . . . . . . . . . . . . . . . . . . . . . . . 436.7 Disabling Your Screen Saver . . . . . . . . . . . . . . . . . . . . . . . . . . . . . . . . . . . . . . . . . . . . . . . . . . . . . . . 436.8 Using the SetAddr Utility . . . . . . . . . . . . . . . . . . . . . . . . . . . . . . . . . . . . . . . . . . . . . . . . . . . . . . . . . . 436.9 Disabling Automatic Startup. . . . . . . . . . . . . . . . . . . . . . . . . . . . . . . . . . . . . . . . . . . . . . . . . . . . . . . . 456.10 How to Tell Whether a Windows Endpoint Is Active . . . . . . . . . . . . . . . . . . . . . . . . . . . . . . . . . . . . . 456.11 Logging and Messages . . . . . . . . . . . . . . . . . . . . . . . . . . . . . . . . . . . . . . . . . . . . . . . . . . . . . . . . . . . 45
7 Web-Based Performance Endpoint 47
7.1 Running the Web-Based Endpoint . . . . . . . . . . . . . . . . . . . . . . . . . . . . . . . . . . . . . . . . . . . . . . . . . . . 477.2 Error Handling . . . . . . . . . . . . . . . . . . . . . . . . . . . . . . . . . . . . . . . . . . . . . . . . . . . . . . . . . . . . . . . . . . 487.3 Compatibility with Other Endpoints . . . . . . . . . . . . . . . . . . . . . . . . . . . . . . . . . . . . . . . . . . . . . . . . . . 487.4 Stopping the Web-Based Endpoint . . . . . . . . . . . . . . . . . . . . . . . . . . . . . . . . . . . . . . . . . . . . . . . . . . 48
8 Sun Solaris 49
8.1 System Requirements . . . . . . . . . . . . . . . . . . . . . . . . . . . . . . . . . . . . . . . . . . . . . . . . . . . . . . . . . . . . 498.2 Installing the Endpoint . . . . . . . . . . . . . . . . . . . . . . . . . . . . . . . . . . . . . . . . . . . . . . . . . . . . . . . . . . . . 498.3 Admin File for Default Solaris Installation . . . . . . . . . . . . . . . . . . . . . . . . . . . . . . . . . . . . . . . . . . . . . 518.4 Unattended Installation for Solaris . . . . . . . . . . . . . . . . . . . . . . . . . . . . . . . . . . . . . . . . . . . . . . . . . . . 518.5 What Happens During Installation . . . . . . . . . . . . . . . . . . . . . . . . . . . . . . . . . . . . . . . . . . . . . . . . . . . 528.6 Removing the Endpoint Package. . . . . . . . . . . . . . . . . . . . . . . . . . . . . . . . . . . . . . . . . . . . . . . . . . . . 528.7 Configuring Solaris Endpoints . . . . . . . . . . . . . . . . . . . . . . . . . . . . . . . . . . . . . . . . . . . . . . . . . . . . . . 528.8 Starting a Solaris Endpoint. . . . . . . . . . . . . . . . . . . . . . . . . . . . . . . . . . . . . . . . . . . . . . . . . . . . . . . . . 538.9 Stopping a Solaris Endpoint . . . . . . . . . . . . . . . . . . . . . . . . . . . . . . . . . . . . . . . . . . . . . . . . . . . . . . . . 548.10 How to Tell If a Solaris Endpoint Is Active . . . . . . . . . . . . . . . . . . . . . . . . . . . . . . . . . . . . . . . . . . . . . 548.11 Disabling Automatic Startup. . . . . . . . . . . . . . . . . . . . . . . . . . . . . . . . . . . . . . . . . . . . . . . . . . . . . . . . 548.12 Logging and Messages . . . . . . . . . . . . . . . . . . . . . . . . . . . . . . . . . . . . . . . . . . . . . . . . . . . . . . . . . . . 55
tents
About this Book and the Library
The NetIQ AppManager product (AppManager) is a comprehensive solution for managing, diagnosing, and analyzing performance, availability, and health for a broad spectrum of operating environments, applications, services, and server hardware.
AppManager provides system administrators with a central, easy-to-use console to view critical server and application resources across the enterprise. With AppManager, administrative staff can monitor computer and application resources, check for potential problems, initiate responsive actions, automate routine tasks, and gather performance data for real-time and historical reporting and analysis.
Intended AudienceThis guide provides information for individuals responsible for installing an AppManager module and monitoring specific applications with AppManager.
Other Information in the LibraryThe library provides the following information resources:
Installation Guide for AppManager Provides complete information about AppManager pre-installation requirements and step-by-step installation procedures for all AppManager components.
User Guide for AppManager Control Center Provides complete information about managing groups of computers, including running jobs, responding to events, creating reports, and working with Control Center. A separate guide is available for the AppManager Operator Console.
Administrator Guide for AppManager Provides information about maintaining an AppManager management site, managing security, using scripts to handle AppManager tasks, and leveraging advanced configuration options.
Upgrade and Migration Guide for AppManager Provides complete information about how to upgrade from a previous version of AppManager.
Management guides Provide information about installing and monitoring specific applications with AppManager.
Help Provides context-sensitive information and step-by-step guidance for common tasks, as well as definitions for each field on each window.
The AppManager library is available in Adobe Acrobat (PDF) format from the AppManager Documentation page of the NetIQ Web site.
About this Book and the Library 5

6 NetIQ Performance Endpoints 5.1 User Guide

About NetIQ Corporation
NetIQ, an Attachmate business, is a global leader in systems and security management. With more than 12,000 customers in over 60 countries, NetIQ solutions maximize technology investments and enable IT process improvements to achieve measurable cost savings. The company’s portfolio includes award-winning management products for IT Process Automation, Systems Management, Security Management, Configuration Audit and Control, Enterprise Administration, and Unified Communications Management. For more information, please visit www.netiq.com.
Contacting Sales SupportFor questions about products, pricing, and capabilities, please contact your local partner. If you cannot contact your partner, please contact our Sales Support team
Contacting Technical SupportFor specific product issues, please contact our Technical Support team.
Contacting Documentation SupportOur goal is to provide documentation that meets your needs. If you have suggestions for improvements, click Add Comment at the bottom of any page in the HTML versions of the documentation posted at www.netiq.com/documentation. You can also email [email protected]. We value your input and look forward to hearing from you.
Worldwide: www.netiq.com/about_netiq/officelocations.asp
United States and Canada: 888-323-6768
Email: [email protected]
Web Site: www.netiq.com
Worldwide: www.netiq.com/Support/contactinfo.asp
North and South America: 1-713-418-5555
Europe, Middle East, and Africa: +353 (0) 91-782 677
Email: [email protected]
Web Site: www.netiq.com/support
About NetIQ Corporation 7

Contacting the Online User CommunityQmunity, the NetIQ online community, is a collaborative network connecting you to your peers and NetIQ experts. By providing more immediate information, useful links to helpful resources, and access to NetIQ experts, Qmunity helps ensure you are mastering the knowledge you need to realize the full potential of IT investments upon which you rely. For more information, please visit http://community.netiq.com.
8 NetIQ Performance Endpoints 5.1 User Guide
1 1Introducing Performance Endpoints
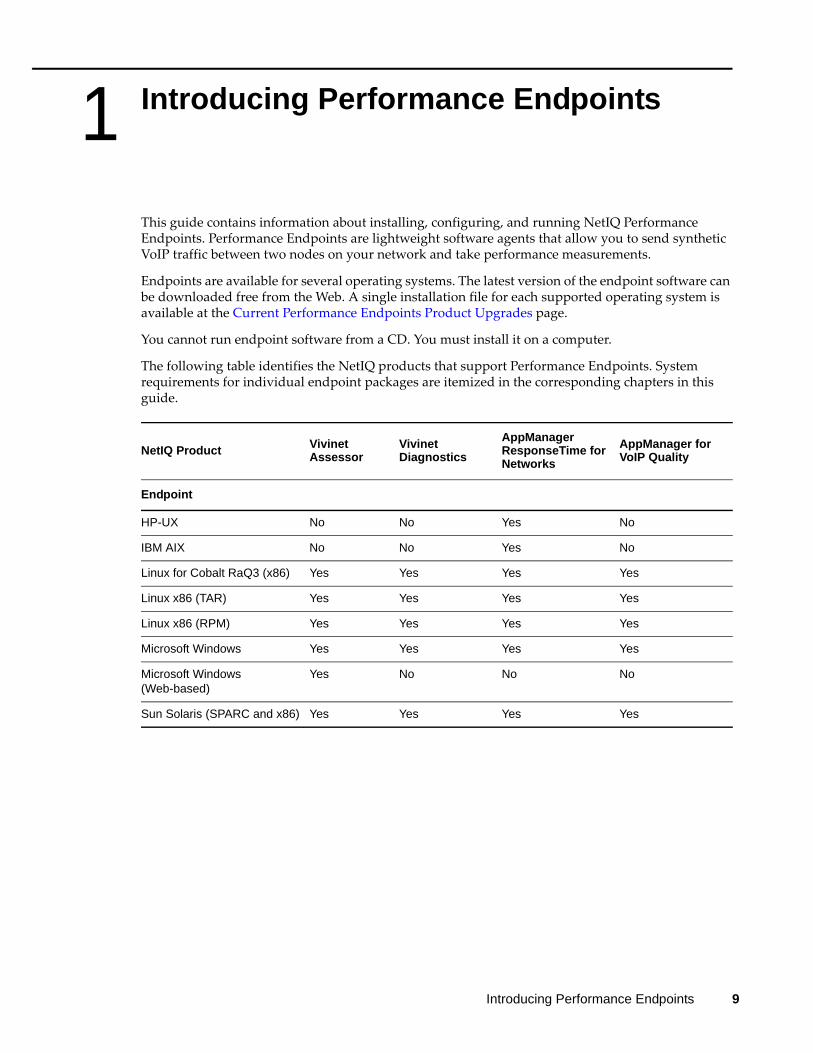
This guide contains information about installing, configuring, and running NetIQ Performance Endpoints. Performance Endpoints are lightweight software agents that allow you to send synthetic VoIP traffic between two nodes on your network and take performance measurements.
Endpoints are available for several operating systems. The latest version of the endpoint software can be downloaded free from the Web. A single installation file for each supported operating system is available at the Current Performance Endpoints Product Upgrades page.
You cannot run endpoint software from a CD. You must install it on a computer.
The following table identifies the NetIQ products that support Performance Endpoints. System requirements for individual endpoint packages are itemized in the corresponding chapters in this guide.
NetIQ Product Vivinet Assessor
Vivinet Diagnostics
AppManager ResponseTime for Networks
AppManager for VoIP Quality
Endpoint
HP-UX No No Yes No
IBM AIX No No Yes No
Linux for Cobalt RaQ3 (x86) Yes Yes Yes Yes
Linux x86 (TAR) Yes Yes Yes Yes
Linux x86 (RPM) Yes Yes Yes Yes
Microsoft Windows Yes Yes Yes Yes
Microsoft Windows (Web-based)
Yes No No No
Sun Solaris (SPARC and x86) Yes Yes Yes Yes
Introducing Performance Endpoints 9

10 NetIQ Performance Endpoints 5.1 User Guide
2 2Endpoint Initialization File
An endpoint initialization file is installed with each Performance Endpoint. With this file, you can perform the following tasks:
Restrict the use of this endpoint to specific AppManager, Vivinet Diagnostics, or Vivinet Assessor consoles
Control which access attempts are logged in an audit file Change the filename of the audit file Enable only particular protocols on this endpoint for setup connections
On most operating systems, this file is named endpoint.ini. This file has the same format and structure on all supported operating systems.
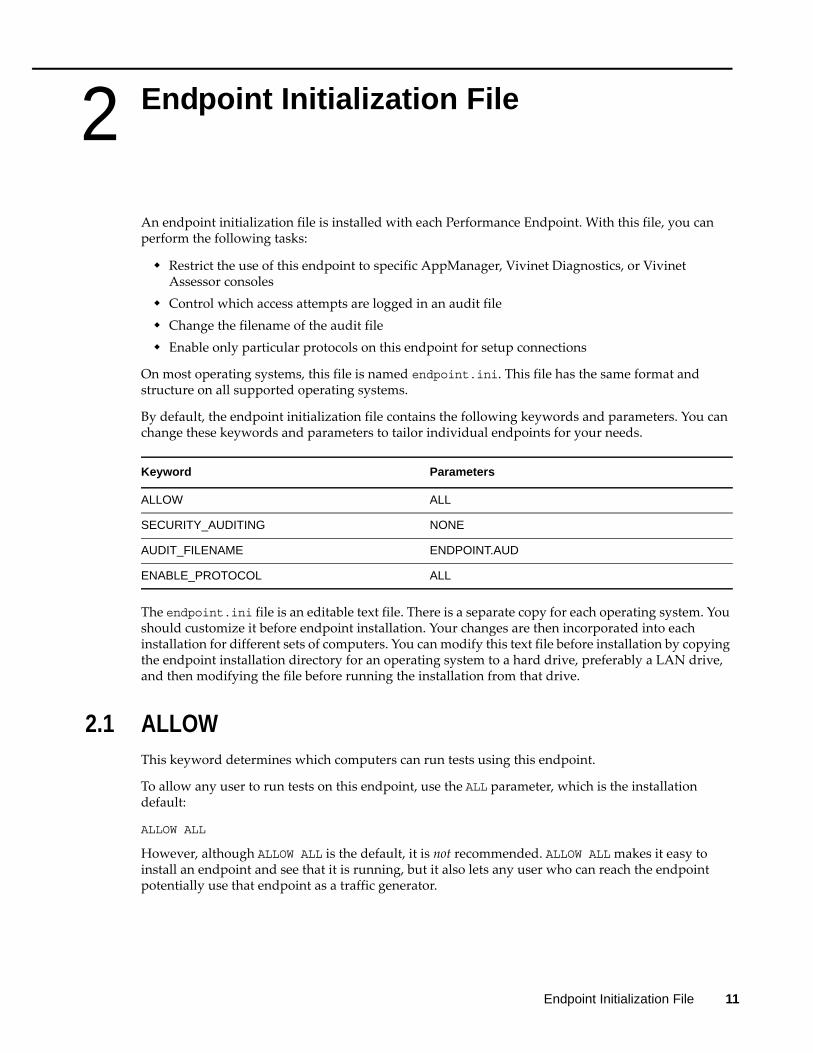
By default, the endpoint initialization file contains the following keywords and parameters. You can change these keywords and parameters to tailor individual endpoints for your needs.
The endpoint.ini file is an editable text file. There is a separate copy for each operating system. You should customize it before endpoint installation. Your changes are then incorporated into each installation for different sets of computers. You can modify this text file before installation by copying the endpoint installation directory for an operating system to a hard drive, preferably a LAN drive, and then modifying the file before running the installation from that drive.
2.1 ALLOWThis keyword determines which computers can run tests using this endpoint.
To allow any user to run tests on this endpoint, use the ALL parameter, which is the installation default:
ALLOW ALL
However, although ALLOW ALL is the default, it is not recommended. ALLOW ALL makes it easy to install an endpoint and see that it is running, but it also lets any user who can reach the endpoint potentially use that endpoint as a traffic generator.
Keyword Parameters
ALLOW ALL
SECURITY_AUDITING NONE
AUDIT_FILENAME ENDPOINT.AUD
ENABLE_PROTOCOL ALL
Endpoint Initialization File 11
To allow only specific users to run tests with this endpoint, remove the ALLOW ALL line and identify one or more specific computers by their network addresses. You can specify more than one address per protocol. For example,
ALLOW TCP 192.86.77.120ALLOW TCP 192.86.77.121
Specify a connection-oriented protocol (that is, TCP) as the first parameter and provide its corresponding network address as the second parameter. Endpoints listen only for incoming tests on connection-oriented protocols, such as TCP. Datagram tests are set up and results are returned using their “sister” connection-oriented protocol. Thus, UDP tests are set up using TCP.
The network address in TCP/IP must be in dotted notation.
Endpoints do not respond to endpoint discovery requests unless the IP address of the computer is specifically allowed, or unless ALLOW ALL is specified. This prevents the user of a computer from finding endpoints to which it should not have access.
You cannot use the ALLOW parameter to restrict access from one endpoint to another endpoint. The ALLOW parameter can be used only to permit or prevent access from specific computers to the endpoint at which the parameter is defined.
To restrict your endpoint to access only your own computer, specify your own IP network address rather than 127.0.0.1. Specify 127.0.0.1, the equivalent of localhost, to allow another user who specifies localhost as Endpoint 1 to access your computer as Endpoint 2.
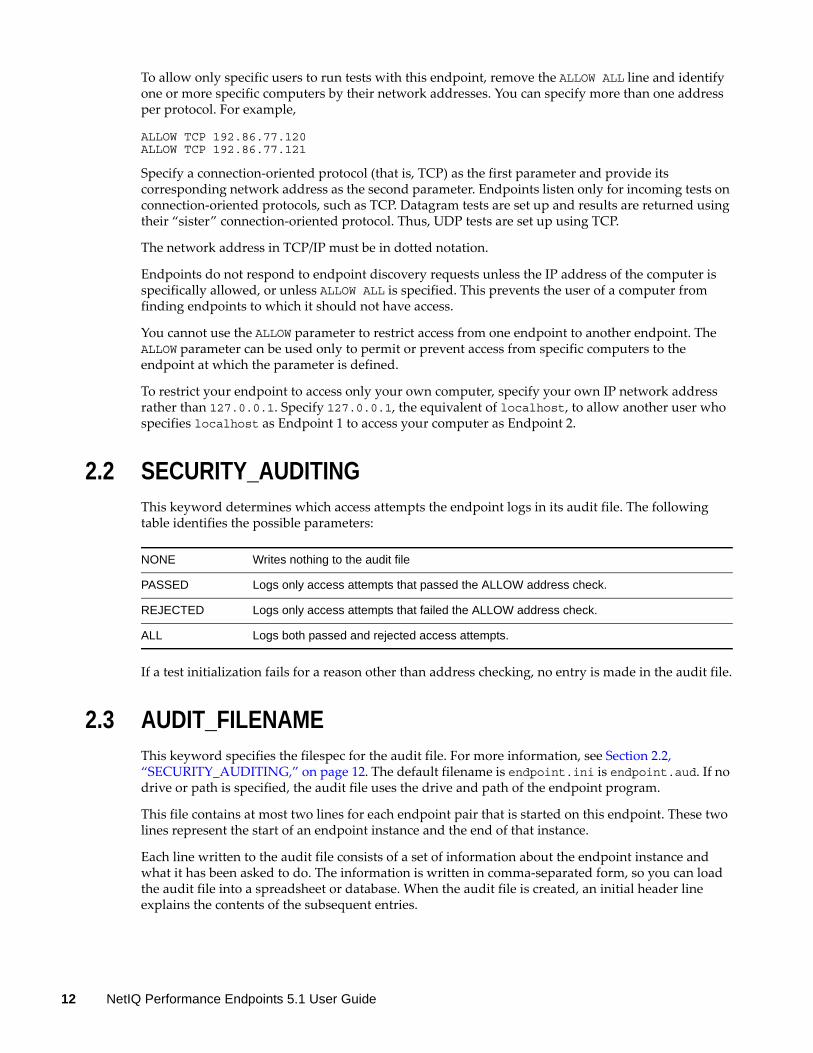
2.2 SECURITY_AUDITINGThis keyword determines which access attempts the endpoint logs in its audit file. The following table identifies the possible parameters:
If a test initialization fails for a reason other than address checking, no entry is made in the audit file.
2.3 AUDIT_FILENAMEThis keyword specifies the filespec for the audit file. For more information, see Section 2.2, “SECURITY_AUDITING,” on page 12. The default filename is endpoint.ini is endpoint.aud. If no drive or path is specified, the audit file uses the drive and path of the endpoint program.
This file contains at most two lines for each endpoint pair that is started on this endpoint. These two lines represent the start of an endpoint instance and the end of that instance.
Each line written to the audit file consists of a set of information about the endpoint instance and what it has been asked to do. The information is written in comma-separated form, so you can load the audit file into a spreadsheet or database. When the audit file is created, an initial header line explains the contents of the subsequent entries.
NONE Writes nothing to the audit file
PASSED Logs only access attempts that passed the ALLOW address check.
REJECTED Logs only access attempts that failed the ALLOW address check.
ALL Logs both passed and rejected access attempts.
12 NetIQ Performance Endpoints 5.1 User Guide
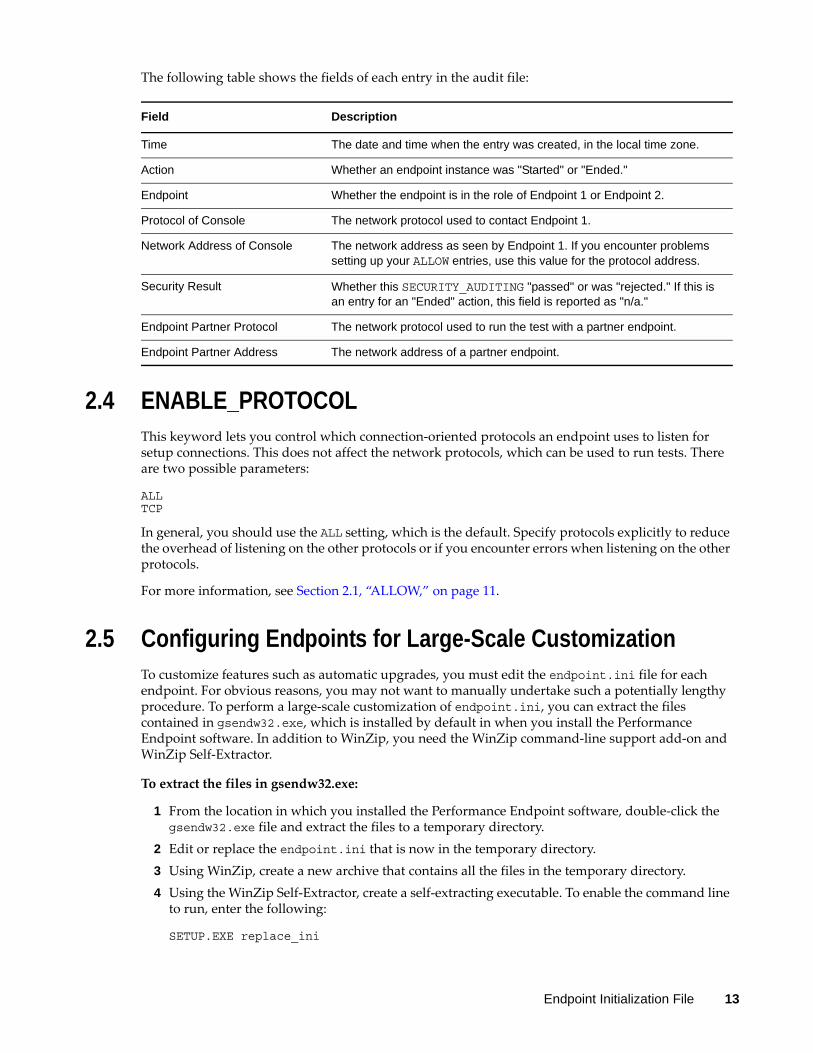
The following table shows the fields of each entry in the audit file:
2.4 ENABLE_PROTOCOLThis keyword lets you control which connection-oriented protocols an endpoint uses to listen for setup connections. This does not affect the network protocols, which can be used to run tests. There are two possible parameters:
ALLTCP
In general, you should use the ALL setting, which is the default. Specify protocols explicitly to reduce the overhead of listening on the other protocols or if you encounter errors when listening on the other protocols.
For more information, see Section 2.1, “ALLOW,” on page 11.
2.5 Configuring Endpoints for Large-Scale CustomizationTo customize features such as automatic upgrades, you must edit the endpoint.ini file for each endpoint. For obvious reasons, you may not want to manually undertake such a potentially lengthy procedure. To perform a large-scale customization of endpoint.ini, you can extract the files contained in gsendw32.exe, which is installed by default in when you install the Performance Endpoint software. In addition to WinZip, you need the WinZip command-line support add-on and WinZip Self-Extractor.
To extract the files in gsendw32.exe:
1 From the location in which you installed the Performance Endpoint software, double-click the gsendw32.exe file and extract the files to a temporary directory.
2 Edit or replace the endpoint.ini that is now in the temporary directory.3 Using WinZip, create a new archive that contains all the files in the temporary directory.4 Using the WinZip Self-Extractor, create a self-extracting executable. To enable the command line
to run, enter the following:
SETUP.EXE replace_ini
Field Description
Time The date and time when the entry was created, in the local time zone.
Action Whether an endpoint instance was "Started" or "Ended."
Endpoint Whether the endpoint is in the role of Endpoint 1 or Endpoint 2.
Protocol of Console The network protocol used to contact Endpoint 1.
Network Address of Console The network address as seen by Endpoint 1. If you encounter problems setting up your ALLOW entries, use this value for the protocol address.
Security Result Whether this SECURITY_AUDITING "passed" or was "rejected." If this is an entry for an "Ended" action, this field is reported as "n/a."
Endpoint Partner Protocol The network protocol used to run the test with a partner endpoint.
Endpoint Partner Address The network address of a partner endpoint.
Endpoint Initialization File 13
Now, anyone who runs the executable you created will automatically have the endpoint installed using the endpoint.ini file you customized.
To create a file that silently self-installs with a custom endpoint.ini:
1 Double-click the gsendw32.exe file and extract the files to a temporary directory.2 Edit or replace the endpoint.ini that is now in the temporary directory.3 Create a custom response file, such as customer.iss. For example, enter
SETUP -noinst -r -f1.\customer.iss
4 Using WinZip, create a new archive that contains all the files in the temporary directory.5 Using the WinZip Self-Extractor, create a self-extracting executable; for the command line to run,
enter the following:
SETUP.EXE replace_ini -s -f1.\CUSTOMER.ISS
Now, anyone who runs the file you created will automatically have the endpoint installed using customer.iss as the response file, and the endpoint.ini file that is installed will be the customized version you created.
14 NetIQ Performance Endpoints 5.1 User Guide
3 3HP-UX
This chapter explains the installation, configuration, and operation of the Performance Endpoint software for Hewlett-Packard HP-UX 10.10 or later. Because of their lack of effective multi-threading support, HP-UX versions 9.0 and earlier are not supported.
The NetIQ AppManager ResponseTime for Networks module supports the use of endpoints installed on HP-UX computers.
3.1 System Requirements The computer on which you install the HP-UX endpoint package has the following system requirements:
3.2 Installing the EndpointEnsure you are logged in as a “root” user. The commands and parameters discussed in the following procedures are case-sensitive. Use the combination of uppercase and lowercase letters as shown.
To install the endpoint:
1 Use the rm command to ensure a clean temporary install directory. This example uses /tmp. 2 Download the endhpxr.tar.Z file to the /tmp directory.
NOTE: The endpoint filename is endhpxr.tar.Z (with a capital Z). However, your Web browser might change the filename to all lowercase. Therefore, when you specify the filename in the Save As dialog box, you should capitalize the Z at that time.
3 Uncompress the endpoint by using the uncompress command:
cd /tmp uncompress endhpxr.tartar -xvf endhpxr.tar
4 From the directory where you downloaded the endpoint, run the endpoint installation script:
./endpoint.install
Requirement Notes
HP-UX Version 10.10 at minimum, with TCP/IP networking and corresponding networking hardware installed and configured.
Version 10.10 supports IP Multicast.
Compatible network protocol software for RTP, TCP, and UDP
HP-UX 15
5 You will see the license agreement, presented with the more command. Press the spacebar until the end of the agreement is displayed. You are asked whether you accept the terms and conditions of the agreement. If you do, enter accept_license.
6 The endpoint installs itself in /opt/NetIQ. During installation, you will see several status messages. Pay close attention to the output. If the installation is successful, you see the following message: “Installation of endpoint was successful.”If you see the following message, review the entire output from the install script for an explanation of the warnings and further instructions.
Notice! There were potential problems with migrating from $oldInstallPath to $installPath. Review the warnings displayed above for further explanation.
7 If you need the disk space after installing the endpoint, you can delete the temporary directory and installation script. The installation script and temporary directory are not removed automatically. To remove the temp files, enter the following:
rm -fr temprm endpoint.installrm endhpxr.tar
8 When installation is complete, see Section 3.6, “Configuring HP-UX Endpoints,” on page 17 to ensure your endpoint is ready to be used in ResponseTime monitoring.
3.3 Unattended Installation for HP-UXYou can install the endpoint silently, that is, without providing additional user input.
Complete the steps, as described in Section 3.2, “Installing the Endpoint,” on page 15 through the tar command. Next, run the endpoint installation, adding the accept_license parameter:
./endpoint.install accept_license
3.4 What Happens During InstallationDuring installation, the endpoint is installed into the /opt/NetIQ directory. The directory is created with the following contents:
The executable programs The README file Various install and uninstall programs Directory cmpfiles. This directory contains files with the .cmp file extension. These files contain
data of different types, such as typical text or binary data. These files are used by the endpoint as data on SEND commands. The different data types can be used to vary the data compression performance of your network hardware and software.
File endpoint.ini. For more information, see Chapter 2, “Endpoint Initialization File,” on page 11.
The installation program stops any copy of the endpoint program that may currently be running and starts a copy of the newly installed endpoint. You can run tests immediately, without a reboot.
No changes are made to the PATH environment variable of the root user.
Installation also performs the following additional actions:
Copies a startup/shutdown script to the /sbin/init.d directory
16 NetIQ Performance Endpoints 5.1 User Guide
Links the startup/shutdown script to /sbin/rc2.d/S900endpoint. This is invoked by HP-UX when the computer boots up.
Links the startup/shutdown script to /sbin/rc1.d/K100endpoint. This is invoked by HP-UX when the computer is shut down.
Copies a configuration file to the /sbin/rc.config.d directory. This file should be modified to control whether the endpoint starts when your system boots. By default, the endpoint will start upon reboot.
3.5 Removing the Endpoint PackageTo remove the endpoint, enter the following at a command prompt. You must be logged in as root to run this command:
/opt/NetIQ/endpoint.remove
The command removes all files from /opt/NetIQ, except for files added to this directory that were not present at installation, such as the endpoint.ini file, or any other files you may need if you reinstall the product. This command does not remove the /opt/NetIQ directory.
3.6 Configuring HP-UX EndpointsThe endpoint dynamically configures its own programs, so you do not have to update the configuration files for your communications software. However, your communications software must be configured and running correctly. The following steps guide you through this verification.
1 Determine the network addresses of the computers to be used in tests.2 Verify the network connections.
3.6.1 Configuration for TCP/IP
The RTP, TCP, and UDP protocols use TCP/IP software for network communications. TCP/IP offers two forms of network addresses: IP addresses and domain names. An IP address is a 32-bit numeric address represented in dotted notation, such as 199.72.46.202. As an alternative, you can use domain names, which are in a format that is easier to recognize and remember. To use domain names, you need either a Domain Name Server (DNS) set up in your network or an /etc/hosts file on each computer.
3.6.2 Determining the IP Address
Use one of the following methods to determine the IP address of the local computer you are using:
From the Hewlett Packard System Administration Manager (SAM) interface, open the Networking/Communications menu and select Network Interface Cards.
Enter the following at a command prompt: netstat -in
You may have several network interfaces. If you are using a LAN network, for example, look at the output for the lan0 interface. Your local IP address is shown in the “Address” column.
HP-UX 17
3.6.3 Testing the TCP/IP Connection
Ping is a simple utility program, included in all TCP/IP implementations. To check the connection from one computer to another, enter the following at a command prompt:
ping xx.xx.xx.xx 64 1
Replace the x’s with the IP address of the target computer. If Ping returns a message that says
1 packets transmitted, 1 packets received, 0% packet loss
then the Ping worked. Otherwise, there will be a delay, and then you will see
1 packets transmitted, 0 packets received, 100% packet loss
This error indicates the Ping failed, and you cannot reach the target computer.
Before testing with TCP/IP, ensure you can run Ping successfully from the AppManager console computer to each computer serving as Endpoint 1, and between each pair of endpoints involved in a test.
3.6.4 Sockets Port Number
TCP/IP applications use their network address to decide which computer to connect to in a network. They use a sockets port number to decide which application program to connect to within a computer.
The TCP/IP sockets port number for endpoints is 10115. This port number is used during the initialization of a test. During the actual running of the test, other port numbers are used. If the script specifies “port_number=AUTO” on the CONNECT_ACCEPT command, additional ports are dynamically acquired from the protocol stack. Otherwise, the endpoint issuing the CONNECT_ACCEPT commands, usually Endpoint 2, uses the port number specified in the script.
3.7 Starting an HP-UX EndpointOn HP-UX, the endpoint program starts automatically each time HP-UX is rebooted. Screen output goes to file /var/opt/NetIQ/endpoint.console. To see any error messages generated at this endpoint, enter the following command:
tail -f /var/opt/NetIQ/endpoint.console
Detailed information about the start and stop of each individual connection pair is written to file endpoint.aud. The contents of this file vary depending on how you set the SECURITY_AUDITING keyword in your endpoint.ini file. For more information, see Chapter 2, “Endpoint Initialization File,” on page 11.
You can manually start the endpoint program at a command prompt. Ensure you are logged in as a “root” user. To start the endpoint, enter:
/opt/NetIQ/endpoint &
The “&” parameter indicates to HP-UX that the endpoint program should run in the background. The screen output from the endpoint program is interleaved with other UNIX commands. Press Enter to enter more commands.
If you manually start the endpoint, consider redirecting its output to the endpoint.console file. You can tell by the time stamp of the file when the endpoint program was started and stopped.
If the endpoint program is already running, you get the following message: CHR0183: The endpoint program is already running. Only one copy is allowed at a time.
18 NetIQ Performance Endpoints 5.1 User Guide
3.8 Stopping an HP-UX EndpointThe endpoint program has a special command-line option, -k. To stop an endpoint program, enter the following from a command prompt. You must be logged in as root to run this program.
/opt/NetIQ/endpoint -k
The -k command-line option stops all endpoint processes running on that computer. You should see the message “Sent exit request to the running endpoint,” which indicates the endpoint program has been sent a request to stop.
If the request to stop is not handled correctly by the running endpoint program, use the UNIX kill -TERM command. Avoid using kill -9 to stop the running endpoint program. It does not clean up what has been created
If the endpoint fails, stops abnormally, or encounters assertion conditions, you may need to perform additional cleanup. If the endpoint is still running, try to stop it using the endpoint -k or kill -TERM command.
Next, enter the following command:
rm /var/opt/NetIQ/.NETIQ.ENDPOINT.PID
3.9 How to Tell Whether an HP-UX Endpoint Is ActiveYou can use a traditional UNIX command to determine whether the endpoint program is active. At a command prompt, enter the following:
ps -ef | grep endpoint
If the endpoint program is running, you will see output similar to the following:
root 2516 1 0 Apr 22 ? 0:00 /opt/NetIQ/endpoint
3.10 Disabling Automatic StartupTo disable automatic startup, edit the /etc/rc.config.d/endpoint file so the START_ON_INIT variable is set to 0 (zero).
3.11 Logging and MessagesMost error messages encountered on an endpoint are returned to the AppManager console computer. However, some may be logged to the /var/opt/NetIQ/endpoint.log file. To view an error log, use the program named FMTLOG. FMTLOG reads from a binary log file, and writes its formatted output to stdout. Here is the syntax of the FMTLOG command:
/opt/NetIQ/fmtlog log_filename >output_filename
For example, enter the following to write a readable ASCII version of the error log to a filename myoutput:
/opt/NetIQ/fmtlog /var/opt/NetIQ/endpoint.log >myoutput
The endpoint code performs internal checking on itself. Our software captures details related to the problem in an ASCII text file. Assertion failures are written to the file /var/opt/NetIQ/assert.err. Save a copy of the file and send it to [email protected] for problem determination.
HP-UX 19
3.11.1 CORE and CMA_DUMP.LOG Files
NetIQ has seen situations in which the endpoint core dumps on HP-UX. The operating system then creates two files:
a file named cma_dump.log written to the /opt/NetIQ or /tmp directory a file named core written to /opt/NetIQ.
If a core dump occurs, save a copy of the core and cma_dump.log files and return them to [email protected] for debugging.
3.11.2 Message CHR0181
You may receive the error message CHR0181 while running a test. If the error was detected at the HP-UX computer, it says the endpoint program on HP-UX has run out of system semaphores. Each instance of Endpoint 1 requires a system semaphore. You can use the HP-UX SAM facility to increase the number of available system semaphores. Use the following procedure and the HP-UX SAM facility to change the kernel configurable parameters:
1 As a root user, start SAM by typing sam.2 Open the Kernel Configuration menu.3 Open the Configurable Parameters menu.4 Update the semmap, semmni, semmns, and semmnu parameters as necessary.
After changing the kernel parameters, reboot HP-UX to have the changes take effect. See your HP-UX System Administration Tasks manual for the definitions of these parameters.
3.11.3 Messages CHR0174, CHR0204, CHR0210, and CHR0245
You may see one of these error messages if you exceed the soft file limit per process allowed by HP-UX. You can verify this by searching the /var/opt/NetIQ/endpoint.console file for the following text:
%Internal DCE Threads problem (version CMA BL10+), terminating execution.% Reason: cma__ts_open: fd is too large% See 'cma_dump.log' for state information.
You may need to stop and restart the endpoint program using the methods outlined in Section 3.7, “Starting an HP-UX Endpoint,” on page 18 and Section 3.8, “Stopping an HP-UX Endpoint,” on page 19. You can use the HP-UX SAM facility to increase the number of open files allowed per process by changing the maxfiles kernel configurable parameters.
20 NetIQ Performance Endpoints 5.1 User Guide
4 4IBM AIX
This chapter explains the installation, configuration, and operation of the Performance Endpoint software for IBM AIX on the RISC System/6000 (RS/6000).
The NetIQ AppManager ResponseTime for Networks module supports the use of endpoints installed on HP-UX computers.
4.1 System Requirements The AIX endpoints have the following system requirements:
4.2 Installing the EndpointEnsure you are logged in as a “root” user. The commands and parameters discussed here are case-sensitive. Use the combination of uppercase and lowercase letters as shown.
To install the endpoint:
1 Use the rm command to ensure a clean temporary install directory. Then save the endpoint to that directory. This example uses /tmp.
2 Download the endaixr.tar.Z file to the /tmp directory.3 Uncompress the endpoint file by using the uncompress command:
cd /tmp uncompress endaixr.tartar -xvf endaixr.tar
4 From the directory where you downloaded the endpoint, run the endpoint installation script:
./endpoint.install
5 You will see the license agreement, presented with the more command. Press the spacebar until the end of the agreement is shown.
6 You are asked whether you accept the terms and conditions of the agreement. If you do, enter accept_license and press Return.
Requirement Notes
IBM AIX on RS/6000 Version 4.1.4 at minimum, with TCP/IP networking and corresponding networking hardware installed and configured.
Version 4.1.4 supports IP Multicast.
Compatible network protocol software for RTP, TCP, and UDP
IBM AIX 21
The endpoint installs itself in /usr/lpp/NetIQ. During installation, you will see several status messages. Pay close attention to the output. If the installation is successful, you see the message “Installation of endpoint was successful.”If you see the following message, review the entire output from the install script for an explanation of the warnings and further instructions.
Notice! There were potential problems with migrating from $oldInstallPath to $installPath. Review the warnings displayed above for further explanation.
If you need the disk space after installing the endpoint, delete the temporary directory and installation script. The installation script and temporary directory are not removed automatically.
To remove the temp files, enter:
rm -fr temprm endpoint.installrm endaixr.tar
For more information, see Section 4.6, “Configuring AIX Endpoints,” on page 23.
4.3 Unattended Installation for AIXYou can install the AIX endpoint silently, that is, without providing any additional user input.
Complete the steps, as described in Section 4.2, “Installing the Endpoint,” on page 21 through the tar command. Next, run the endpoint installation, adding the accept_license parameter:
./endpoint.install accept_license
4.4 What Happens During InstallationDuring installation, the endpoint is installed into the /usr/lpp/NetIQ directory. A directory is created with the following contents:
The executable programs The README file Various install and uninstall programs Directory cmpfiles. This directory contains files with the .cmp file extension. These are files
containing data of different types, such as typical text or binary data. These files are used by the endpoint as data on SEND commands. The different data types can be used to vary the data compression performance of your network hardware and software.
File endpoint.ini. For more information, see Chapter 2, “Endpoint Initialization File,” on page 11.
The installation program stops any copy of the endpoint program that may currently be running and starts a copy of the newly installed endpoint. You can run tests immediately, without a reboot.
The endpoint software performs the following tasks so the endpoint is started every time your system boots:
Copies the rc.netiq initialization script to the /etc directory. Updates /etc/inittab to invoke /etc/rc.netiq
No changes are made to the PATH environment variable of the root user.
22 NetIQ Performance Endpoints 5.1 User Guide
4.5 Removing the Endpoint PackageUse the following command to remove the endpoint. You must be logged in as root to run this program:
/usr/lpp/NetIQ/endpoint.remove
The remove program removes the files from /usr/lpp/NetIQ, except for any files added to this directory that were not present at installation, such as the endpoint.ini file, and does not delete the directory. The remove program does not automatically delete files that have been added to the directory that you may need if you reinstall the product.
4.6 Configuring AIX EndpointsThe endpoint dynamically configures its own programs, so you do not have to update the configuration files for your communications software. However, your communications software must be configured and running correctly. The following steps guide you through this verification.
1 Determine the network addresses of the computers to be used in tests.2 Verify the network connections.
4.6.1 Configuration for TCP/IP
The RTP, TCP, and UDP protocols use TCP/IP software for network communications. TCP/IP offers two forms of network addresses: IP addresses and domain names. An IP address is a 32-bit numeric address. It is represented in dotted notation, such as 199.72.46.202. As an alternative, use domain names, which are in a format that is easier to recognize and remember. To use domain names, you need either a Domain Name Server (DNS) set up in your network or an /etc/hosts file on each computer.
4.6.2 Determining the IP Address
Use one of the following methods to determine the IP address of the local computer you are using:
For the IBM System Management Interface Tool (SMIT), open the Communications Applications and Services menu, then the TCP/IP menu, and then the Minimum Configuration & Startup menu. Next, select the network interface used to reach other endpoints (for example, en0 or tr0). SMIT displays the network interface configuration. Your host IP address is in the Internet ADDRESS field.
Enter the following at a command prompt: netstat -in
You may have several network interfaces. If you are using a LAN network, for example, look at the output for the en0 interface. Your local IP address is shown in the “Address” column.
4.6.3 Testing the TCP/IP Connection
Ping is a simple utility program, included in all TCP/IP implementations. To test the connection from one computer to another, enter the following at a command prompt:
ping xx.xx.xx.xx 64 1
IBM AIX 23
Replace the x’s with the IP address of the target computer. If Ping returns a message that says “1 packets transmitted, 1 packets received, 0% packet loss,” the Ping worked. Otherwise, there will be a delay, and then you will see the following message:
1 packets transmitted, 0 packets received, 100% packet loss
This error message indicates the Ping failed, and you cannot reach the target computer.
Ensure you can run Ping successfully from the AppManager console computer to each computer serving as Endpoint 1, and between each pair of endpoints involved in a test, before starting your testing with TCP/IP.
4.6.4 Sockets Port Number
TCP/IP applications use their network address to decide which computer to connect to in a network. They use a Sockets port number to decide which application program to connect to within a computer.
The TCP/IP sockets port number for endpoints is 10115. This port number is used during the initialization of a test. During the actual running of the test, other port numbers are used.
4.7 Starting an AIX EndpointThe endpoint program starts automatically each time AIX is rebooted. It sends its screen output to file/var/adm/endpoint.console. To see any error messages generated at this endpoint, enter the following command:
tail -f /var/adm/endpoint.console
The detailed information about the start and stop of each individual connection pair is written to file endpoint.aud. The contents of this file vary depending on how you set the SECURITY_AUDITING keyword in your endpoint.ini file. For more information, see Chapter 2, “Endpoint Initialization File,” on page 11.
Instead of automatic startup, you can choose to manually start the endpoint program at a command prompt. Ensure you are logged in as a “root” user. To start the endpoint, enter the following:
/usr/lpp/NetIQ/endpoint &
The “&” parameter indicates to AIX the endpoint program should run in the background. The screen output from the endpoint program is interleaved with other UNIX commands. Just press Return to enter more commands.
If you manually start the endpoint, consider redirecting its output to the endpoint.console file. You can tell by the time stamp of the file when the endpoint program was started and stopped.
If the endpoint program is already running, you get the following message: CHR0183: The endpoint program is already running. Only one copy is allowed at a time.
4.8 Stopping an AIX EndpointThe endpoint program has a special command-line option, -k. To stop an endpoint program, enter the following command from a command prompt. You must be logged in as root to run this program:
/usr/lpp/NetIQ/endpoint -k
24 NetIQ Performance Endpoints 5.1 User Guide

The -k command stops any endpoint process running on that computer. You should see the message “Sent exit request to the running endpoint,” which indicates the endpoint program has been sent a request to stop.
If the request to stop is not handled correctly by the running endpoint program, use the UNIX kill -TERM command.
If the endpoint fails, stops abnormally, or encounters assertion conditions, you may need to perform additional cleanup. If the endpoint is still running, try to stop it using the endpoint -k or kill -TERM command.
Next, enter the following command:
rm /var/adm/.NETIQ.ENDPOINT.PID
4.9 How to Tell Whether an AIX Endpoint Is ActiveYou can use a traditional UNIX command to determine whether the endpoint program is active. At a command prompt, enter:
ps -ef | grep endpoint
If the endpoint program is running, you will see output similar to the following:
root 9888 1 0 19:19:54 - 0:00 /usr/lpp/NetIQ/endpoint -G 7477 -T 3root 7477 1 0 18:37:47 - 0:00 /usr/lpp/NetIQ/endpoint
4.10 Disabling Automatic StartupTo disable automatic startup, comment out or remove the following lines from the /etc/rc.netiq script:
if test -f $installPath/endpoint; then echo "Starting the NetIQ Endpoint."$installPath/endpoint 1>$outputPath/endpoint console 2>&1 &fi
4.11 Logging and MessagesAlthough most error messages encountered on an endpoint are returned to the AppManager console, some may be logged to disk. Errors are saved in a file named endpoint.log, in the /var/adm directory. To view an error log, use the program named FMTLOG. FMTLOG reads from a binary log file, and writes its formatted output to stdout. Use the following FMTLOG command:
/usr/lpp/NetIQ/fmtlog /var/adm/endpoint.log >output_filename
The endpoint code performs a lot of internal checking on itself. Our software captures details related to the problem in an ASCII text file named assert.err in the /var/adm directory. Save a copy of the file and send it to us via email for problem determination.
You may receive message CHR0181 while running a test. If the error was detected at the AIX computer, it says the endpoint program on AIX has run out of system semaphores. Each instance of Endpoint 1 requires a system semaphore. The maximum number of semaphores is not configurable on AIX. It is hard-coded to a large value (4096). To avoid this problem, stop other programs that use semaphores, or decrease the number of connection pairs that use the AIX computer as Endpoint 1.
IBM AIX 25

26 NetIQ Performance Endpoints 5.1 User Guide
5 5Linux
This chapter explains the installation, configuration, and operation of the Performance Endpoint software for Linux. The Linux endpoints run on the following Linux platforms:
Red Hat Linux for x64 and x86 processors. Versions 6.1 and later ship with a current version of the Performance Endpoint.
SUSE Linux for x64 and x86 processors Cobalt Web Server RaQ3 for x86 processors Other Linux systems that incorporate the Linux kernel 2.0 (or later) with threading support on
x86 processors, such as Caldera Systems.
For Linux endpoints, there are three types of installation procedures. The basic procedure uses TAR files, which should be used for Slackware and Linux systems other than Red Hat or Cobalt.
The following NetIQ products support the use of endpoints installed on all supported Linux platforms:
AppManager ResponseTime for Networks module AppManager for VoIP Quality module Vivinet Assessor Vivinet Diagnostics
5.1 System Requirements The Linux endpoints have the following system requirements:
Requirement Notes
A computer capable of running Linux For Cobalt servers: the RaQ3 system, which uses an Intel x86 processor, gives good performance
For x64 computers: AMD Opeteron 64-bit systems or Intel Xeon 64-bit systems
For x86 computers: a CPU such as an Intel 80386, 80486, a member of the Pentium family, or equivalent. A Pentium or better is recommended.
Linux 27
5.2 Installing the RPM-Based Endpoint for LinuxUse the RPM-based (x86 processor) installation if you are installing the endpoint on Red Hat Linux.
Ensure you are logged in as a “root” user. The commands and parameters discussed here are case-sensitive. Use the combination of uppercase and lowercase letters as shown in the following procedure.
To install the endpoint:
1 Use the rm command to ensure a clean temporary install directory (this example uses /tmp).2 Save the endlnxr.rpm file to the /tmp directory.3 Use the RPM command to install the endpoint:
cd /tmp rpm -Uvh endlnxr.rpm
During installation, you will see several status messages. When the installation is successful, you see the message “Installation of endpoint was successful.”If you see the following message, review the entire output from the install script for an explanation of the warnings and further instructions.
Notice! There were potential problems with migrating from $oldInstallPath to $installPath. Review the warnings displayed above for further explanation.
After you complete installation, see Section 5.9, “Configuring Linux Endpoints,” on page 32 to ensure your endpoint is ready to be used in testing and monitoring.
5.3 Removing the RPM Endpoint PackageUse the following command to remove the endpoint. You must be logged in as root to run this program:
rpm -e endpoint
Linux kernel 2.0. with support for pthreads, which is at least version 2.0.6 of glibc
TCP/IP networking and corresponding networking hardware must be installed and configured, plus ELF support. Some older installations of Linux may not have this installed.
At the www.tldp.org Web site, you can find information about Linux, as well as download the glibc-2.0 file. The endpoint installation procedures check for this file, because it is required to run the endpoint.
NetIQ has tested with Red Hat (kernel 2.0.32).
Red Hat 5.0 or later is required for IP Multicast.
Red Hat 8.0 or later is required for IPv6.
NetIQ has also tested with Slackware 3.6.
Compatible network protocol software for RTP, TCP, and UDP
Requirement Notes
28 NetIQ Performance Endpoints 5.1 User Guide
The command removes all files from /usr/local/NetIQ, except for files added to the directory that were not present at installation, such as the endpoint.ini file. This command does not delete the directory. The command does not automatically delete files added to the directory that you may need if you reinstall the product.
If anything goes wrong during the process of uninstalling the endpoint, a reinstalled endpoint may not run. You may need to do some extra cleanup. Check for the hidden file /usr/local/NetIQ/.NETIQ.ENDPOINT.PID. You can use the ls -a command to view hidden files. Then enter the following command to delete it:
rm /usr/local/NetIQ/.NETIQ.ENDPOINT.PID
5.4 Installing the Cobalt-Based Endpoint for LinuxUse the Cobalt installation to install the endpoint for x86 (RaQ3) on a Cobalt Web server. Some prerequisite levels of Cobalt software are needed to operate the Performance Endpoint on a Cobalt Web server.
Typically, when you install an endpoint, you can automatically upgrade from the previous version of the endpoint. However, when you upgrade the endpoint on a Cobalt RaQ3 (x86) computer, you must remove the previous version of the endpoint, following the directions in Section 5.5, “Removing the Cobalt Endpoint Package,” on page 30. Then install the new version of the endpoint.
If you attempt to install Endpoint 5.1 without removing a previous version, you get a message stating, “Error uninstalling RPM.” This message indicates the upgrade failed.
To install the endpoint:
1 Use the rm command to ensure a clean temporary install directory (this example uses /tmp).2 Save the file appropriate for your operating system to the /tmp directory.3 Access the “Welcome to Cobalt” page on the Cobalt Web Server and click the link for the RaQ
Server Management section. 4 Enter the username and password for the Administrator.5 On the Server Management dialog box, click Maintenance and then click Install Software.6 In the Software to install field, enter the location of the package. If you are using the Browse
function, ensure the filename and extension are in lowercase.
/tmp/endcbl3.pkg
7 If prompted, enter the password for the Administrator. 8 Click Install a ‘.pkg’ package.
NOTE: After the endpoint is installed, a message stating the endpoint has been installed is shown. If you do not see this message, go to the server management panel and browse the box labeled “Software on the Cobalt Server.” This contains a list of products installed on the Cobalt computer. You should see a line that reads, “Performance Endpoint X.X,” where X.X is the release number of the Performance Endpoint software
After you complete installation, see Section 5.9, “Configuring Linux Endpoints,” on page 32 to ensure your endpoint is ready to be used in testing and monitoring.
Linux 29
5.5 Removing the Cobalt Endpoint PackageYou must be logged in as the root user to remove the endpoint package. Do not use the RPM command to remove the Cobalt endpoint.
To remove the Cobalt endpoint package:
1 Stop the endpoint program if it is running. 2 Enter the following command at a command prompt:
/bin/sh /var/lib/cobalt/uninstallers/endpoint-5.1.uninst
NOTE: The actual command depends on the version of the endpoint installed. If you have a different version installed, for instance version 5.0, run the endpoint-5.0.uninst command instead.
3 After the endpoint-5.1.uninst script has completed, enter the following command:
/usr/admserv/cgi-bin/.cobalt/install/install.cgi
4 At the prompt, press [Ctrl] + [D]. The endpoint has been removed.
If anything goes wrong during the process of uninstalling the endpoint, a reinstalled endpoint may not run. You may need to do some extra cleanup. Check for the hidden file /usr/local/NetIQ/.NETIQ.ENDPOINT.PID by using the ls -a command. Enter the following:
rm /usr/local/NetIQ/.NETIQ.ENDPOINT.PID
5.6 Installing the TAR-Based Endpoint for LinuxUse the TAR-based installation to install the endpoint on any x86 Linux platform other than Red Hat or Cobalt RaQ3 Web Server.
Ensure you are logged in as a “root” user. The commands and parameters discussed in the following procedures are case-sensitive. Use the combination of uppercase and lowercase letters as shown.
5.6.1 Installing from the Web
To install the endpoint:
1 Use the rm command to ensure a clean temporary install directory (this example uses /tmp).2 Save the endpoint to the /tmp directory.3 Uncompress the endpoint by using the uncompress command:
cd /tmp uncompress endlnxr.tartar -xvf endlnxr.tar
4 From the directory where you downloaded the endpoint, run the endpoint installation script:
./endpoint.install
The endpoint installs itself in /usr/local/NetIQ. During installation, you will see several status messages. When the installation is successful, you see the message “Installation of endpoint was successful.”
30 NetIQ Performance Endpoints 5.1 User Guide
If you see the following message, review the entire output from the install script for an explanation of the warnings and further instructions.
Notice! There were potential problems with migrating from $oldInstallPath to $installPath. Review the warnings displayed above for further explanation.
The installation script and temporary directory are not removed automatically if the installation is successful. If you need the disk space after installing the endpoint, you may delete the temporary directory and installation script.
To remove the temp files, enter:
rm -fr temprm endpoint.install
After you complete installation, see Section 5.9, “Configuring Linux Endpoints,” on page 32 to ensure your endpoint is ready to be used in testing and monitoring.
5.6.2 Unattended Installation for TAR-Based Linux
You can install the endpoint silently, that is, without providing any additional user input.
Complete the steps, as described in Section 5.6, “Installing the TAR-Based Endpoint for Linux,” on page 30, through the tar command. Then, run the endpoint installation, adding the accept_license parameter:
./endpoint.install accept_license
5.7 Removing the TAR-Based Endpoint PackageUse the following command to remove the TAR-based (x86) Linux endpoint. You must be logged in as root to run this program:
/usr/local/NetIQ/endpoint.remove
The command removes all files from /usr/local/NetIQ, except for files added to the directory that were not present at installation, such as the endpoint.ini file. This command does not delete the directory. The command does not automatically delete files added to the directory that you may need if you reinstall the product.
If anything goes wrong during the process of uninstalling the endpoint, a reinstalled endpoint may not run. You may need to do some extra cleanup. Check for the hidden file /var/local/NetIQ/.NETIQ.ENDPOINT.PID by using the ls -a command. This file should be manually removed. Enter the following command:
rm /var/local/NetIQ/.NETIQ.ENDPOINT.PID
5.8 What Happens During InstallationDuring installation, the endpoint is installed in the /usr/local/NetIQ directory. The directory is created with the following contents:
The executable programs The README file Various install and uninstall programs
Linux 31
The directory cmpfiles. This directory contains files with the .cmp file extension. These are files containing data of different types, such as typical text or binary data. These files are used by the endpoint as data on SEND commands. The different data types can be used to vary the data compression performance of your network hardware and software.
The endpoint.ini file. For more information, see Chapter 2, “Endpoint Initialization File,” on page 11.
The installation program stops any copy of the endpoint program currently running and starts a copy of the newly installed endpoint. You can run tests immediately, without restarting your computer.
The endpoint software displays information on how to update your system to have the endpoint start automatically upon restarting.
No changes are made to the PATH environment variable of the root user.
5.9 Configuring Linux EndpointsThe endpoint dynamically configures its own programs, so you do not have to update the configuration files for your communications software. However, your communications software must be configured and running correctly. Take the following steps to verify your network is ready for testing and monitoring:
1 Determine the network addresses of the computers for use in tests.2 Verify the network connections.
5.9.1 Configuration for TCP/IP
The TCP and UDP protocols use TCP/IP software for network communications. TCP/IP offers two forms of network addresses: IP addresses and domain names. An IP address is a 32-bit numeric address. It is represented in dotted notation, such as 199.72.46.202. As an alternative, use domain names, which are in a format that is easier to recognize and remember. To use domain names, you need either a Domain Name Server (DNS) set up in your network or an /etc/hosts file on each computer.
5.9.2 Determining the IP Address for TAR and RPM Linux
To determine the IP address of the local computer you are using, enter the following at a command prompt:
/sbin/ifconfig
5.9.3 Determining the IP Address for Cobalt
Access the Welcome to Cobalt page on the Cobalt Web Server and click the link to the RAQ Server Management section.
After you enter the Administrator username and password, the IP address is shown on the Server Management Page.
32 NetIQ Performance Endpoints 5.1 User Guide
5.9.4 Testing the TCP Connection
Ping is a simple utility program, included in all TCP/IP implementations. To test the connection from one computer to another, enter the following at a command prompt:
ping xx.xx.xx.xx -c 1
Replace the x’s with the IP address of the target computer. If Ping returns a message that says
1 packets transmitted, 1 packets received, 0% packet loss
then the Ping worked. Otherwise, there will be a delay, and you will see the following message:
1 packets transmitted, 0 packets received, 100% packet loss
This error message indicates the Ping failed, and you cannot reach the target computer.
From your AppManager, Vivinet Assessor, or Vivinet Diagnostics console computer, ensure you can run Ping successfully to each computer serving as Endpoint 1, and between each pair of endpoints involved in a test, before starting your testing with TCP/IP.
5.9.5 Sockets Port Number
TCP/IP applications use their network address to decide which computer to connect to in a network. They use a sockets port number
to decide which application program to connect to within a computer.
The TCP/IP sockets port for endpoints is 10115. This port number is used during the initialization of a test; during the actual running of the test, other port numbers are used.
In Vivinet Assessor, you can configure the port number that is used.
5.10 Starting a Linux EndpointThe endpoint program starts automatically each time Linux is rebooted.
On Slackware, it sends its screen output to the /var/adm/endpoint.console file. On Red Hat and Cobalt, it sends its screen output to the /var/local/endpoint.console file.
If you want to see any error messages generated at this endpoint, enter one of the following:
for Slackware:
tail -f /var/adm/endpoint.console
for Red Hat or Cobalt:
tail -f /var/local/endpoint.console
The detailed information about the start and stop of each individual connection pair is written to file endpoint.aud. The contents of this file vary depending on how you set the SECURITY_AUDITING keyword in your endpoint.ini file. For more information, see Chapter 2, “Endpoint Initialization File,” on page 11.
Instead of automatic startup, you can choose to manually start the endpoint program at a command prompt. Ensure you are logged in as a “root” user. To start the endpoint, enter the following:
/usr/local/NetIQ/endpoint &
Linux 33
The “&” parameter indicates to Linux the endpoint program should run in the background. The screen output from the endpoint program is interleaved with other UNIX commands. Just press Return to enter more commands.
If you manually start the endpoint, consider redirecting its output to the endpoint.console file. You can tell by the time stamp of the file when the endpoint program was started or stopped.
If the endpoint program is already running, you get the following message: CHR0183: The endpoint program is already running. Only one copy is allowed at a time.
Use the ps command to check all running processes and ensure the endpoint is running. For more information, see Section 5.12, “How to Tell Whether a Linux Endpoint Is Active,” on page 34.
If you repeatedly get error message CHR0183 but it appears the endpoint is not running, you may need to do some extra cleanup. Check for the hidden file /usr/local/NetIQ/NETIQ.ENDPOINT.PID by using the ls -a command. This file should be manually removed.
5.11 Stopping a Linux EndpointThe endpoint program has a special command-line option, -k. To stop an endpoint program, go to a command prompt on the same computer and enter the following. You must be logged in as root to run this program:
/usr/local/NetIQ/endpoint -k
The -k command-line option stops any endpoint process running on that computer. You should see the message “Sent exit request to the running endpoint,” which indicates the endpoint program has been sent a request to stop.
If the request to stop is not handled correctly by the running endpoint program, you can use the UNIX kill -TERM command. Avoid using kill -9 to stop the running endpoint program.
If the endpoint fails, stops abnormally, or encounters assertion conditions, you may need to perform additional cleanup. If the endpoint is still running, try to stop it using the endpoint -k or kill -TERM command.
Then enter the following command:
rm /usr/local/NetIQ/.NETIQ.ENDPOINT.PID
5.12 How to Tell Whether a Linux Endpoint Is ActiveUse a traditional UNIX commands t determine whether a Linux endpoint is active. At a command prompt, enter the following:
ps axf | grep endpoint
If the endpoint program is running, you will see output similar to the following:
366 p0 S 0:00 \_ /usr/local/NetIQ/endpoint367 p0 S 0:00 | \_ /usr/local/NetIQ/endpoint368 p0 S 0:00 | \_/usr/local/NetIQ/endpoint369 p0 S 0:00 | \_ /usr/local/NetIQ/endpoint
34 NetIQ Performance Endpoints 5.1 User Guide
5.13 Automatically Starting the EndpointFor the endpoint to automatically start when your computer restarts, you must update your system rc scripts.
If your Linux system uses rc.local, which is used by older Linux systems such as Slackware, add the following line to the rc.local file:
/usr/local/NetIQ/endpoint 1>>/var/local/endpoint.console 2>&1 &
Do not forget the ampersand (&) at the end of the line. If this character is not included, the boot process does not continue, and you may be unable to log in at the Console.
If you have previously installed the endpoint in a Ganymede directory, the install script displays the following message:
The endpoint install directory now uses $installPath instead of $oldInstallPath. If your rc.local referenced $oldInstallPath, you should change it to use the new directory.
If your Linux system is more recent, it probably supports System V init rc scripts. Red Hat software uses this type of init rc files. Copy usr/local/NetIQ/rc2exec.lnx to the appropriate places. For example, with Red Hat Linux 5.0, you may run these commands:
cp /usr/local/NetIQ/rc2exec.lnx /etc/rc.d/init.d/endpointln -fs /etc/rc.d/init.d/endpoint /etc/rc.d/rc2.d/S81endpointln -fs /etc/rc.d/init.d/endpoint /etc/rc.d/rc3.d/S81endpointln -fs /etc/rc.d/init.d/endpoint /etc/rc.d/rc6.d/K81endpoint
For Red Hat Linux 5.2 or later, or for Cobalt, the recommended commands are as follows:
cp /usr/local/NetIQ/rc2exec.lnx /etc/rc.d/init.d/endpoint/sbin/chkconfig endpoint reset
5.14 Disabling Automatic StartupIf you run a Linux system that uses rc.local to invoke applications, remove the invocation of /usr/local/NetIQ/endpoint from /etc/rc.d/rc.local.
If you use a Linux system that supports System V init rc scripts, remove /etc/rc.d/rc2.d/S81endpoint from /etc/rc.d/rc2.d.
If you are using Red Hat Linux versions 5.2 or later, or Cobalt Web server, and have enabled automatic startup through the CHKCONFIG utility, you can use the CHKCONFIG utility to disable automatic startup:
/sbin/chkconfig -del endpoint
5.15 Logging and MessagesMost error messages encountered on an endpoint are returned to the AppManager, Vivinet Assessor, or Vivinet Diagnostics console computer. However, some may be logged to disk. Errors are saved in the following file:
On Slackware, file /var/adm/endpoint.log On Red Hat or Cobalt, file /var/local/endpoint.log
Linux 35
To view an error log, use the program named FMTLOG. FMTLOG reads from a binary log file, and writes its formatted output to stdout. Use one of the following FMTLOG commands:
/usr/local/NetIQ/fmtlog /var/adm/endpoint.log >output_filename/usr/local/NetIQ/fmtlog /var/local/endpoint.log >output_filename
The endpoint code does a lot of internal checking on itself. The software captures details related to the problem in an ASCII text file:
On Slackware, file /var/adm/assert.err On Red Hat or Cobalt, file /var/local/assert.err
Save a copy of the file and send it to NetIQ Technical Support for problem determination.
You may receive message CHR0181 while running a test. If the error was detected at the Linux computer, it says the endpoint program on Linux has run out of system semaphores. Each instance of Endpoint 1 requires a system semaphore. The maximum number of semaphores is not configurable on Linux, which is hard-coded to a large value (128). To avoid this problem, stop other programs that use semaphores or decrease the number of tests that use the computer as Endpoint 1.
5.16 Increasing the Number of Concurrent ConnectionsSome parameters are tuned in Linux by rebuilding the Linux kernel. You can change the number of concurrent endpoint connections. Consult your Linux documentation for information about increasing the maximum open files allowed per process, which probably involves redefining NR_FILES and other macros. Alternatively, search Linux newsgroups on the Web for something like “max open files per process.”
36 NetIQ Performance Endpoints 5.1 User Guide
6 6Microsoft Windows
This chapter explains the installation, configuration, and operation of the Performance Endpoint software for Microsoft Windows.
The following NetIQ products support endpoints installed on all supported Windows platforms:
AppManager ResponseTime for Networks module AppManager for VoIP Quality module Vivinet Assessor Vivinet Diagnostics
Microsoft Windows 37
6.1 System RequirementsThe computer on which you want to install the endpoint for Microsoft Windows must meet the following requirements:
6.1.1 Installing qWAVE to Monitor QoS Settings
For the endpoint to properly monitor QoS settings on a computer running Windows Server 2012 or Windows Server 2008 R2, you need to install the Quality Windows Audio Video Experience (qWAVE) feature, and the associated service must be running.
The qWAVE feature is enabled by default on computers running Windows 8 and Windows 7.
Requirement Notes
Microsoft Windows operating system One of the following, with the latest service packs installed:
Windows Server 2012
Windows 8 (32-bit or 64-bit)
Windows Server 2008 R2
Windows Server 2008 (32-bit or 64-bit)
Windows 7 (32-bit or 64-bit)
Windows Vista (32-bit or 64-bit)
Windows XP (32-bit or 64-bit)
Windows Server 2003 (32-bit or 64-bit)
For IP Quality of Service (QoS):
Windows Server 2012, Windows 8, Windows Server 2008 R2, and Windows 7 require the Quality Windows Audio Video Experience (qWAVE) feature. For more information, see Section 6.1.1, “Installing qWAVE to Monitor QoS Settings,” on page 38.
Windows Vista and Windows Server 2008 (non-R2) do not support setting DSCP bits.
Windows XP and Windows Server 2003 require that the DisableUserTOSSetting DWORD registry value is present and set to zero. For more information, see Section 6.1.2, “Enabling QoS for a Windows Server 2003 or Windows XP Computer,” on page 39.
For IP Multicast: Windows XP is required.
NOTE: To allow VoIP RTP traffic to run on dynamic ports, you must disable the Windows firewall on any Windows 7 or Windows Server 2008 R2 computer on which Performance Endpoint software is running.
Compatible network protocol software for RTP, TCP, and UDP
TCP/IP software is provided as part of the network support with all supported versions of Windows.
Quality of Service (QoS) support for TCP/IP is available in all supported versions of Windows that support QoS, except for Windows Vista and Windows Server 2008 (non-R2).
38 NetIQ Performance Endpoints 5.1 User Guide

To install qWAVE:
1 Launch the Windows Server Manager.
NOTE: You can also install qWAVE by running the following at a command prompt: servermanagercmd -install qwave
2 Select Features in the tree on the left, and then select Add Features in the right-hand pane. 3 From the feature list, select Quality Windows Audio Video Experience. 4 Click Next, and then click Install. 5 After the qWAVE installation completes, reboot the server.
6.1.2 Enabling QoS for a Windows Server 2003 or Windows XP Computer
To enable QoS settings on endpoints running Windows Server 2003 or Windows XP, you must add the DisableUserTOSSetting DWORD registry value to each endpoint computer. Add the following DWORD registry value at the endpoints:
HKEY_LOCAL_MACHINE\SYSTEM\CurrentControlSet\Services\Tcpip\Parameters\DisableUserTOSSetting = 0
Reboot the endpoint computers after you edit the registry settings.
NOTE: Windows Server 2008 R2 and Windows 7 do not require the DisableUserTOSSetting registry value.
6.2 Installing the EndpointEnsure your networking software is working correctly before installing the endpoint software. For more information, see the Help for your networking software, and Section 6.4, “Configuring Windows Endpoints,” on page 42.
NOTE: Before installing the endpoint on a Windows 2000 computer, close any other network applications. During the endpoint installation, Windows 2000 recycles the protocol stack, causing some client applications to lose connectivity to their servers. Some of these applications do not retry their connectivity before exiting and must be restarted.
The endpoint for Microsoft Windows is installed as a service and runs as a service. To successfully install the endpoint, you must be logged in with Administrator authority. The permissions of the directory where the endpoint is installed must also be set to allow the SYSTEM (the operating system) full control permission on all files in the NetIQ\Endpoint directory or the directory where you installed the endpoint, plus any relevant subdirectories.
The security implementation in Windows Server 2003 differs noticeably from that in earlier versions of Windows. Before you install the endpoint on Windows Server 2003, ensure your user account is running in “Install” mode and not in “Execute” mode.
To change the mode so you have the necessary installation privileges, run the following at a command prompt:
change user /install
Microsoft Windows 39
If you try to install from the wrong mode, the installation on Windows Server 2003 fails with the following message: The InstallShield-generated file that allows uninstallation is missing.
6.2.1 Installing from the Web
To install the endpoint:
1 Save the endpoint download package to a directory on a local hard drive.2 Navigate to the endpoint file, gsendw32.exe, and double-click it to begin installation.3 The first dialog box after the Setup dialog box lets you select the directory where the endpoint
will be installed. You should install it on a local hard disk of the computer you are using. If you install on a LAN drive, the additional network traffic may influence your performance results. The default directory is \Program Files\NetIQ\Endpoint, on your boot drive.
4 If you have a previous installation of the endpoint, you will be asked if you want it removed. If you click Yes, the previous installation is removed, and the new installation continues. If you click No, the install program exits with no changes to your existing installation because a new version cannot be added until the old version is removed. It then adds Endpoint (the endpoint program) as a service.
5 The next dialog box contains two check boxes. The first check box lets you opt to install pre-built data files. You should clear this box. This
feature is for Chariot users only. Check the second box to start the endpoint installation. If you leave this box cleared, the
endpoint starts when you restart the computer. No window is shown while the endpoint is running because it runs as a service.
Windows services are controlled from the Services dialog box inside the Control Panel. To restart a service without restarting Windows, use the Services dialog box.
You can also manually start the endpoint after installation. For more information, see Section 6.5, “Starting the Endpoint,” on page 43.
To prevent the endpoint from running automatically on startup, see the section titled Section 6.9, “Disabling Automatic Startup,” on page 45. You can manually restore the setting.
After you complete installation, see Section 6.4, “Configuring Windows Endpoints,” on page 42 to ensure your endpoint is ready for testing and monitoring.
6.2.2 Unattended Installation
Unattended, or silent, installation, is available for the endpoints for Windows. You install an endpoint once, by hand, while the install facility saves your input in an answer file. You can then install that same endpoint silently on other computers, that is, without providing input other than the answer file.
To perform silent installation:
1 Run gsendw32.exe. An answer file called update.iss is created in the \Updates subdirectory of the directory where you installed the endpoint.
2 Specify the “-s” option on SETUP. Ensure the answers documented in the answer file update.iss are appropriate for the silent installation.
40 NetIQ Performance Endpoints 5.1 User Guide

3 If the update.iss file is not in the same directory as setup.exe, specify the path and filename with the “-f1” option. The following example shows how to install using the update.iss file in the \Program Files\NetIQ\Endpoint directory on a NetIQ n: LAN drive:
SETUP -s -f1n:\Program Files\NetIQ\Endpoint\update.iss
If you do not specify the path and filename with -f1, the default filename is setup.iss. Do not mix the .iss files among different Windows operating systems because their endpoint installations require slightly different input.
It is common to use unattended install from a LAN drive. Ensure you copied all files for each type of endpoint into a single directory, rather than into separate diskette images, and ensure you created your initial update.iss file from that directory. Unattended install does not keep track of diskette label information, and will need user input if you install from separate disk images. You probably do not want your unattended install to ask you for n:\disk1\, n:\disk2\, and so on.
6.2.3 What Happens During Installation
During installation, the endpoint is installed by default into the \Program Files\NetIQ\Endpoint directory. The directory is created with the following contents:
The executable programs The README file The directory Cmpfiles. This directory contains files with the .CMP file extension. These are files
containing data of different types, such as typical text or binary data. These files are used by the endpoint as data on SEND commands. The different data types can be used to vary the data compression performance of your network hardware and software.
The endpoint.ini file. For more information, see Chapter 2, “Endpoint Initialization File,” on page 11.
The endpoint is installed as a service, which means nothing is visible while the endpoint is running. During installation, the endpoint is configured to automatically start when the system reboots. A service can be controlled from the Services dialog box inside the Control Panel. For more information, see Section 6.5, “Starting the Endpoint,” on page 43.
6.3 Removing the Endpoint SoftwareYou can use the Add or Remove Programs or Programs and Features option from the Control Panel to uninstall the endpoint software.
If the uninstallation program is unable to uninstall the endpoint, you can manually uninstall the endpoint. For more information, see NetIQ Knowledge Base article NETIQKB345.
Microsoft Windows 41
6.4 Configuring Windows EndpointsThe endpoint program uses network application programming interfaces, such as Sockets, for all of its communications. The endpoint dynamically configures its own programs, so you do not have to update the configuration files for your communications software. However, your communications software must be configured and running correctly. The following steps guide you through this verification process.
1 Determine the network addresses of the computers to be used in tests.2 Select a service quality.3 Verify the network connections.
6.4.1 Configuration for TCP/IP
The RTP, TCP, and UDP protocols use TCP/IP software for network communications. TCP/IP offers two forms of network addresses: IP addresses and domain names. An IP address is a 32-bit numeric address. It is represented in dotted notation, such as 199.72.46.202. As an alternative, use domain names, which are in a format that is easier to recognize and remember. To use domain names, you need either a Domain Name Server (DNS) set up in your network or an /etc/hosts file on each computer.
6.4.2 Determining the IP Address
To determine the local IP address for a Windows computer, enter the following at a command prompt:
IPCONFIG
If your TCP/IP stack is configured correctly, your output will look like the following (this output is taken from Windows XP):
Windows IP ConfigurationEthernet adapter Local Area Connection:IP Address. . . . . . . . . : 10.10.44.3Subnet Mask . . . . . . . . : 255.255.255.0Default Gateway . . . . . . : 10.10.44.254
The local IP address is shown in the first row. In this example, it is 10.10.44.3.
To determine a the local hostname for a Windows computer, enter the following at a command prompt:
HOSTNAME
The current hostname is shown in the first row.
6.4.3 Testing the TCP/IP Connection
Ping is a simple utility program, included in all TCP/IP implementations. To check the connection from one computer to another, enter the following at a command prompt:
ping xx.xx.xx.xx
Replace the x’s with the IP address of the target computer. If Ping returns a message that says “Reply from xx.xx.xx.xx ...,” the Ping worked. If it says “Request timed out,” the Ping failed, and you have a configuration problem.
42 NetIQ Performance Endpoints 5.1 User Guide

From your AppManager, Vivinet Assessor, or Vivinet Diagnostics console computers, ensure you can run Ping successfully to each computer serving as Endpoint 1, and between each pair of endpoints involved in a test, before starting your testing with TCP/IP.
6.5 Starting the EndpointBy default, the endpoint service is configured to start automatically, which means you will not see a window for the program when it is running. Because the endpoint runs as a service, you do not have to be logged into your computer for the endpoint to run.
Only a user ID with Administrator authority is permitted to start or stop Windows services.
If you stop the endpoint service, you can restart it without restarting Windows. Use one of the following methods to restart the endpoint service:
At a command prompt, enter net start netiqendpoint In the Services dialog box, select NetIQ Endpoint and click Start (or Play). For example, to
restart endpoint.exe in Windows XP, navigate to the Services dialog box, right-click NetIQ Endpoint, and select Restart. The status changes to “started” when the service is successfully started.
NOTE: A single running copy of the endpoint service handles one or more concurrent tests.
6.6 Stopping the EndpointOnly a user ID with Administrator authority is permitted to start or stop Windows services.
Use one of the following methods to stop the endpoint service:
At a command prompt, enter the following:
net stop netiqendpoint
In the Services dialog box, right-click NetIQ Endpoint and select Stop. The status is blank when the endpoint program has stopped.
6.7 Disabling Your Screen SaverScreen savers can significantly lower the throughput measured by an endpoint. You should disable your screen saver at endpoint computers while running tests, Diagnoses, or Assessments.
6.8 Using the SetAddr UtilityThis topic is applicable only for endpoints used with NetIQ AppManager.
Endpoints for Windows operating systems ship with a utility that helps you quickly create virtual IP addresses on Windows endpoint computers. Virtual addresses are useful when you are testing hundreds or even thousands of endpoint pairs using only a few computers as endpoints. To all intents and purposes, the traffic on the network is identical, whether you are using “real” or virtual addresses.
Microsoft Windows 43
When you install a Windows endpoint, Setaddr.exe for 32-bit Windows is automatically installed in the same directory. For 64-bit Windows, a 64-bit version of Setaddr.exe is installed. The two versions of SetAddr cannot be used across operating systems with different architectures.
The usage is as follows:
setaddr [-dr] -a N -f Addr -t Addr -i Addr -s Addr | -l[a] | -da | -ds -f Addr -s Addr
where “N” indicates the adapter number of the NIC card you are assigning virtual addresses to, and “Addr” indicates the virtual addresses or subnet mask you are assigning to it.
Options:
-l List all network adapters-la List all network adapters and their IP addresses-a Adapter to modify (number given by -l options)-dr Delete a range of addresses-da Delete all addresses-ds Delete a single address-f From address-t To address-i Increment by-s Subnet Mask
The -d flags cannot be used to delete a computer’s primary IP address.
The -i flag lets you determine how the range of addresses will be created. This is an optional field. By default, SetAddr increments the range by one in the final byte only. This “increment by” value is represented as “0.0.0.1”. Enter a value (0-255) for each byte of the 4-byte IP address. A value of 1 specifies that the address values in that byte will be incremented by one when SetAddr creates the range. For example, enter
setaddr -f 10.40.1.1 -t 10.40.4.250 -i 0.0.1.1 -s 255.255.0.0
SetAddr creates 1000 virtual addresses.
Known Limitations:
IPv4 only. SetAddr only works on computers with fixed IP addresses. DHCP-enabled adapters cannot be
used. Before testing, restart the computer that has the NIC to which you assigned virtual IP addresses.
SetAddr modifies some Windows Registry keys, and restarting is required for the changes to take effect.
The number of virtual addresses you can assign to a single adapter depends on the protocol stack and the size of the Windows Registry. NetIQ benchmarked measurements using computers running up to 2500 virtual addresses, which is a recommended limit.
No checking is done to ensure that thousands of addresses are not being created. More TCP/IP stack resources are required to manage virtual addresses.
You may only add Class A, B, and C virtual IP addresses. Loopback addresses and Class D and E IP addresses are invalid. Valid address ranges, then, are 1.x.x.x to 233.x.x.x, excluding 127.x.x.x.
44 NetIQ Performance Endpoints 5.1 User Guide
6.9 Disabling Automatic StartupTo disable the automatic starting of the endpoint:
1 Navigate to the Services dialog box and then double-click NetIQ Endpoint.2 In the Startup type field, select Manual.3 Click OK to save the new setting and exit the dialog box. The endpoint will no longer start
automatically when you restart the computer. However, you can manually start the endpoint.
6.10 How to Tell Whether a Windows Endpoint Is ActiveThe Status field in the Services dialog box shows whether the NetIQ Endpoint service has started.
You can also use the Windows Performance Monitor program to look at various aspects of the endpoint. Start Performance Monitor by double-clicking its icon in the Administrative Tools group. Click Edit > Add to Chart. Select the Process object and the Endpoint instance. Then add the counters you are interested in, such as thread count or % of processor time. In the Steady state (that is, no tests are active), Thread Count will show about six threads active for the endpoint. The exact number depends on the number of protocols in use.
6.11 Logging and MessagesMost error messages encountered on an endpoint are returned to the AppManager, Vivinet Assessor, or Vivinet Diagnostics console computer. However, some may be logged to disk. Errors are saved in a file named ENDPOINT.LOG, in the directory where you installed the endpoint. To view an error log, use the command-line program named FMTLOG.EXE. The program FMTLOG.EXE reads from a binary log file, and writes its formatted output to stdout. Use the following FMTLOG command:
FMTLOG log_filename > output_file
The endpoint performs extensive internal cross-checking to catch unexpected conditions early. If an assertion failure occurs, the file assert.err is written to the directory where you installed the endpoint.
Microsoft Windows 45

46 NetIQ Performance Endpoints 5.1 User Guide
7 7Web-Based Performance Endpoint
Unlike the endpoints for other supported platforms, the Web-based Performance Endpoint is not designed to be installed on a computer. Users of the Web-based endpoint can run it from the Web or save it to a local hard disk, but as soon as they restart or log out of the computer where it is running, the endpoint stops running.
Endpoints for other operating systems run as long as the computers where they are installed are running. The Web-based endpoint stops running as soon as the user logs out or restarts. Nothing has been written to the Windows Registry on the computer where it ran.
NetIQ Vivinet Assessor supports the use of the Web-based endpoint.
7.1 Running the Web-Based EndpointTo run the Web-based endpoint on your local computer, use the Web browser on that computer to navigate to www.netiq.com/support/pe/upgrade.asp. Click the link labeled Microsoft Windows - web-based.
You are then asked whether you want to run the endpoint software from its present location or save it to disk. To prevent errors during diagnoses, run the Web-based endpoint installation as an Administrator.
Click to select one of the following options.
Run from Location: If the download is successful, you will see a message stating the endpoint has been started. Click OK to close the message. There is nothing else you need to do. The endpoint is ready for monitoring with AppManager and for VoIP Readiness Assessments with Vivinet Assessor.
Save to Disk: Save the software to the folder where you save your temporary files, such as Temp. Navigate to the folder where you saved the endpoint. Right-click on the endpoint.exe file and select Run as Administrator to start the endpoint. You will see a message stating the endpoint has been started. Click OK to close the message. After you start the endpoint, there is nothing else you need to do. The endpoint is ready for monitoring with AppManager and for VoIP Readiness Assessments with Vivinet Assessor.
NOTE: You can save the endpoint anywhere on a local hard disk. When you restart the computer, a copy of the executable endpoint.exe is still on your hard drive, but it will not run until you restart it. Restart the executable by double-clicking it in Windows Explorer.
Web-Based Performance Endpoint 47
7.2 Error HandlingUnlike endpoints for other operating systems, the Web-based endpoint does not log the errors it encounters. However, it does report errors to the Vivinet Assessor console.
In the case of a connection failure or other failure during testing, the endpoint vanishes silently. The Console will notify you that it can no longer reach the endpoint. You should return to the Web and re-enable the endpoint in the case of such a failure.
7.3 Compatibility with Other EndpointsThe Web-based endpoint cannot run on a computer where another endpoint is already running. For example, you cannot run the Web-based endpoint on a computer where the endpoint for Microsoft Windows is installed and running. When you attempt to download it, you will receive an error message.
Correspondingly, if the Web-based endpoint is running on a computer, you can install one of the conventional endpoints on that computer. However, the conventional endpoint will not start running automatically once the installation completes. If the Web-based endpoint is running, you must either stop it before installing another endpoint, or else restart the computer after you complete the installation. The new endpoint will then start running automatically because the Web-based endpoint will no longer be present.
7.4 Stopping the Web-Based EndpointThe Web-based endpoint stops automatically when you restart your computer or log out. However, you can also stop the endpoint manually.
To stop the Web-based endpoint:
1 Navigate to the Windows Task Manager.2 On the Processes tab, highlight the endpoint.exe process. 3 Click End Process to stop the endpoint and remove it from your computer.
48 NetIQ Performance Endpoints 5.1 User Guide
8 8Sun Solaris
This chapter explains the installation, configuration, and operation of the Performance Endpoint software for Sun Solaris version 2.4 or later. The endpoints operate on the “SPARC” and “x86” versions of Solaris.
SPARC computers contain CPUs made by Sun Microsystems and others. x86 computers contain CPUs made by Intel, AMD, Cyrix, or others.
The following NetIQ products support the use of endpoints installed on all supported versions of Sun Solaris:
AppManager ResponseTime for Networks module AppManager for VoIP Quality module Vivinet Assessor Vivinet Diagnostics
8.1 System Requirements The endpoint program for Sun Solaris has the following system requirements:
8.2 Installing the EndpointEnsure you are logged in as a “root” user. The commands and parameters discussed here are case-sensitive. Use the combination of uppercase and lowercase letters as shown.
NOTE: To install version 5.1 of the Endpoint for Sun Solaris over a previous version of the endpoint, modify the admin file to contain “instance=overwrite” and “conflict=nocheck.”
To install the endpoint:
1 Use the rm command to ensure a clean temporary install directory (this example uses /tmp).
Requirement Notes
A computer capable of running Sun Solaris
For SPARC computers, any system seems to give good performance.
For x86 computers, use a CPU such as an Intel 80386, 80486, a member of the Pentium family, or equivalent. A Pentium or better is recommended.
Sun Solaris version 2.4 or later With TCP/IP networking and corresponding networking hardware installed and configured. This version also supports IP Multicast.
Sun Solaris 49

For SPARC systems: Download the endsunr.tar.Z file to the /tmp directory. Uncompress the endpoint file by using the uncompress command:
cd /tmp uncompress endsunr.tar tar -xvf endsunr.tar
For x86 systems: Download the ends86r.tar.Z file to the /tmp directory. Uncompress the endpoint file by using the uncompress command:
cd /tmp uncompress ends86r.tar tar -xvf ends86r.tar
2 Install the endpoint package using the pkgadd command:
pkgadd -d /tmp endpoint
The pkgadd command is not part of the endpoint installation. It is part of the standard Solaris installation and can be found in the /usr/bin directory.
3 You will see the license agreement, presented with the pg command. Press the spacebar until the end of the agreement is displayed.
4 You are asked whether you accept the terms and conditions of the agreement. If you do, enter accept_license.
5 You are asked the following question:
This package contains scripts which will be executed with super user permission during the process of installing this package. Do you want to continue with the installation of this package [y,n,?]
Enter a lowercase “y” to complete the installation script. About 20 lines of text give the status of the installation. When it is finished, the last line reads, “Installation of <endpoint> was successful.”If you see the following message, please review the entire output from the install script for an explanation of the warnings and further instructions.
Notice! There were potential problems with migrating from $oldInstallPath to $installPath. Review the warnings displayed above for further explanation.
6 Use the following commands to delete the archive contents from the temporary working directory:
cd /tmp rm -fr endpoint rm ends86r.tar
After you complete installation, see Section 8.7, “Configuring Solaris Endpoints,” on page 52 to ensure your endpoint is ready to be used in monitoring, Analyses, and Diagnoses.
50 NetIQ Performance Endpoints 5.1 User Guide
8.3 Admin File for Default Solaris InstallationThe admin file defines default installation actions to be taken when administrative input is required during install, for example, whether to allow a new package to overwrite an older version, whether an installation can be run with super user authority, and so on. The admin file is found in /var/sadm/install/admin/default. The man pages (“man -s 4 admin”) describe its format and content; please read the man pages if you are unfamiliar with the admin file.
To install version 5.1 of the Endpoint for Sun Solaris over a previous version of the endpoint, you need to modify the admin file to contain “instance=overwrite” and “conflict=nocheck.”
If you want non-interactive install capability, modify the admin file to contain “action=nocheck” so the endpoint package scripts can be run with super user authority.
8.4 Unattended Installation for SolarisUnattended, or silent, installation is available for the Sun Solaris endpoint. You install an endpoint once, manually, while the install facility saves your input in a response file. You can then install that same endpoint silently on other computers, that is, without providing input other than the response file.
To perform a silent installation:
1 Complete the steps described in Section 8.2, “Installing the Endpoint,” on page 49 using the tar command.
2 Create a response file, using the pkgask command:
pkgask -r /tmp/endpoint.response -d /tmp endpoint
3 The endpoint license agreement is displayed with the pg command. Press the spacebar until the end of the agreement is displayed.
4 You are asked whether you accept the terms and conditions of the agreement. If you do, enter accept_license.You should see the following displayed:
Response file </tmp/endpoint.response> was created.Processing of request script was successful.
5 Use the following command to install other Solaris endpoints in unattended mode (this single command is split over two lines):
pkgadd -n -a /tmp/endpoint/root/opt/NetIQ/admin -r /tmp/endpoint.response -d /tmp endpoint
The pkgadd command is not part of the endpoint installation. It is part of the standard Solaris installation and can be found in the /usr/bin directory.
When pkgadd is finished, the last line reads, “Installation of <endpoint> was successful.”
If you see the following message, review the entire output from the install script for an explanation of the warnings and further instructions.
Notice! There were potential problems with migrating from $oldInstallPath to $installPath. Review the warnings displayed above for further explanation.
You can use the response file to install the endpoint on each of your Sun Solaris computers.
Sun Solaris 51
8.5 What Happens During InstallationDuring installation, the endpoint is installed into the /opt/NetIQ directory. The directory is created with the following contents:
The executable programs The README file Various install and uninstall programs The directory cmpfiles. This directory contains files with the .cmp file extension. These are files
containing data of different types, such as typical text or binary data. These files are used by the endpoint as data on SEND commands. The different data types can be used to vary the data compression performance of your network hardware and software.
The endpoint.ini file. For more information, see Chapter 2, “Endpoint Initialization File,” on page 11.
The installation program stops any copy of the endpoint program that may currently be running and starts a copy of the newly installed endpoint. You can run tests immediately, without a reboot.
The endpoint installation copies an S81endpoint initialization script to the /etc/rc2.d directory so the endpoint is started every time your system boots.
No changes are made to the PATH environment variable of the root user.
8.6 Removing the Endpoint PackageUse the following command to remove the endpoint package. You must be logged in as root to run pkgrm:
pkgrm endpoint
Enter a lowercase “y” when you are asked whether you want to remove this package. About ten lines of text give the status of the uninstallation. When the remove program is finished, the last line reads, “Removal of <endpoint> was successful.”
The remove program removes the files from /opt/NetIQ, except for any files added to this directory that were not present at installation, such as the endpoint.ini file, and does not delete the directory. The remove program does not automatically delete files that have been added to the directory that you may need if you reinstall the product.
8.7 Configuring Solaris EndpointsThe endpoint dynamically configures its own programs, so you do not have to update the configuration files for your communications software. However, your communications software must be configured and running correctly. The following steps guide you through this verification.
1 Determine the network addresses of the computers to be used in tests.2 Verify the network connections.
52 NetIQ Performance Endpoints 5.1 User Guide
8.7.1 Configuration for TCP/IP
The RTP, TCP, and UDP protocols use TCP/IP software for network communications. TCP/IP offers two forms of network addresses: IP addresses and domain names. An IP address is a 32-bit numeric address. It is represented in dotted notation, such as 199.72.46.202. As an alternative, use domain names, which are in a format that is easier to recognize and remember. To use domain names, you need either a Domain Name Server (DNS) set up in your network or an /etc/hosts file on each computer.
8.7.2 Determining the IP Address
Use one of the following methods to determine the IP address of the local computer you are using:
In the Sun OpenWindows graphical user interface, right-click on the outer desktop background and select Workstation Info to display Workstation Information about your computer, including your local Internet address.
Enter the following at a command prompt: netstat -inYour local IP address is shown in the left-hand column, if there are active connections.
8.7.3 Testing the TCP/IP Connection
Ping is a simple utility program, included in all TCP/IP implementations. To check the connection from one computer to another, enter:
ping xx.xx.xx.xx
Replace the x’s with the IP address of the target computer. If Ping returns a message that says “xx.xx.xx.xx is alive,” the Ping worked.
Otherwise, there will be a delay, and you will see “no answer from xx.xx.xx.xx.” This error message indicates the Ping failed, and you cannot reach the target computer.
From your AppManager, Vivinet Assessor, or Vivinet Diagnostics console computer, ensure you can run Ping successfully from to each computer serving as Endpoint 1, and between each pair of endpoints involved in a test, before starting your testing with TCP/IP.
8.7.4 Sockets Port Number
TCP/IP applications use their network address to decide which computer to connect to in a network. They use a sockets port number
to decide which application program to connect to within a computer.
The TCP/IP sockets port for endpoints is 10115. This port number is used during the initialization of a test; during the actual running of the test, other port numbers are used.
8.8 Starting a Solaris EndpointThe endpoint program starts automatically each time Solaris is rebooted. It sends its screen output to file /var/adm/endpoint.console. To see error messages generated at this endpoint, enter the following command:
tail -f /var/adm/endpoint.console
Sun Solaris 53
The detailed information about the start and stop of each individual connection pair is written to file endpoint.aud. The contents of this file vary depending on how you set the SECURITY_AUDITING keyword in your endpoint.ini file. For more information, see Chapter 2, “Endpoint Initialization File,” on page 11.
You can choose to manually start the endpoint program at a command prompt. Ensure you are logged in as a “root” user. To start the endpoint, enter:
/opt/NetIQ/endpoint &
The “&” parameter indicates to Solaris the endpoint program should run in the background. The screen output from the endpoint program is interleaved with other UNIX commands. Press Return to enter more commands.
If you manually start the endpoint, consider redirecting its output to the endpoint.console file. You can tell by the time stamp of the file when the endpoint program was started and stopped.
If the endpoint program is already running, you get the following message, “CHR0183: The endpoint program is already running. Only one copy is allowed at a time.”
8.9 Stopping a Solaris EndpointThe endpoint program has a special command-line option, -k. To stop the endpoint program, go to a command prompt on the same computer and enter the following. You must be logged in as root to run this program:
/opt/NetIQ/endpoint -k
The -k command-line option stops any endpoint program running on that computer. You should see the message “Sent exit request to the running endpoint,” which indicates the endpoint program has been sent a request to stop.
If the request to stop is not handled by the running endpoint program correctly, you may need to use the UNIX kill -TERM command.
If the endpoint fails, stops abnormally, or encounters assertion conditions, you may need to perform additional cleanup. If the endpoint is still running, try to stop it using the endpoint -k or KILL -TERM command. Then, enter the following command:
rm /var/adm/.NETIQ.ENDPOINT.PID
8.10 How to Tell If a Solaris Endpoint Is ActiveYou can use a traditional UNIX command to determine whether the endpoint program is active. At a command prompt, enter:
ps -ef | grep endpoint
If the endpoint program is running, it shows up with the following string in the rightmost column of the output, “/opt/NetIQ/endpoint.”
8.11 Disabling Automatic StartupTo disable automatic startup, remove the /etc/rc2.d/S81 endpoint file.
54 NetIQ Performance Endpoints 5.1 User Guide
8.12 Logging and MessagesMost error messages encountered on an endpoint are returned to the AppManager, Vivinet Assessor, or Vivinet Diagnostics console computer. However, some may be logged to the endpoint.log file in the/var/adm directory. To view an error log, use the NetIQ program named FMTLOG. FMTLOG reads from a binary log file, and writes its formatted output to stdout. Use the following FMTLOG command:
/opt/NetIQ/fmtlog log_filename >output_filename
The endpoint code does a lot of internal checking on itself. The software captures details related to the problem in an ASCII text file named assert.err in the /var/adm directory. Save a copy of the file and email it to NetIQ Technical Support for problem determination.
You may receive message CHR0181 while running a test. If the error was detected at the Sun Solaris computer, it says the endpoint program on Sun Solaris has run out of system semaphores. Each instance of Endpoint 1 requires a system semaphore. The maximum number of semaphores is not configurable on Sun Solaris; it is hard-coded to a large value. To avoid this problem, stop other programs that use semaphores or decrease the number of tests that use the computer as Endpoint 1.
Sun Solaris 55

56 NetIQ Performance Endpoints 5.1 User Guide