Nero Video Manual - Nero KnowHowWith Nero 4K video editing, you now have Ultra HD support on hand:...
134
Video Manual
Transcript of Nero Video Manual - Nero KnowHowWith Nero 4K video editing, you now have Ultra HD support on hand:...
VideoManual

Nero Video Manual
2 © 2018 Nero AG and Subsidiaries. All rights reserved.
Table of Content
1. Start Successfully .................................................................................................................................. 6
1.1. About Nero Video ......................................................................................................................... 6
1.2. Versions of Nero Video ................................................................................................................. 6
1.3. System Requirements ................................................................................................................... 7
2. Application Workflow and Interface ..................................................................................................... 8
2.1. Working with Nero Video ............................................................................................................. 8
2.1.1. Saving a Project ..................................................................................................................... 9
2.1.2. Opening a Project ................................................................................................................ 10
2.2. Header Bar .................................................................................................................................. 10
2.2.1. Tools: Erasing a Rewritable Disc ......................................................................................... 12
2.2.2. Tools: Displaying Disc Info ................................................................................................... 13
2.2.3. Tools: Finalizing a Disc ......................................................................................................... 13
2.2.4. Tools: Burning a Disc Image ................................................................................................ 14
2.2.5. Options: Application Settings Window ............................................................................... 14
2.2.6. General Tab ......................................................................................................................... 14
2.2.7. Folders Tab .......................................................................................................................... 15
2.2.8. Editing Tab .......................................................................................................................... 15
2.2.9. Options: Recording Format Options Window ..................................................................... 16
2.2.10. General Tab ......................................................................................................................... 16
2.2.11. Smart Encoding ................................................................................................................... 17
2.2.12. [Disc Format] Tab ................................................................................................................ 18
2.2.13. Options: Nero MediaBrowser ............................................................................................. 20
2.3. Drag Your Files Here Area ........................................................................................................... 22
3. Capturing and Importing from Camera and External Devices ............................................................ 23
3.1. Capturing ..................................................................................................................................... 23
3.1.1. Capturing of Digital and Analog Videos .............................................................................. 23
3.1.2. Import of AVCHD Footage ................................................................................................... 24
3.2. Capture Video Screen ................................................................................................................. 24
3.2.1. Preview Scan Window ......................................................................................................... 26
3.2.2. Video Device Properties Window ....................................................................................... 26
3.2.3. Audio Device Properties Window ....................................................................................... 27
3.3. Setting a TV Card ......................................................................................................................... 27

Nero Video Manual
3 © 2018 Nero AG and Subsidiaries. All rights reserved.
3.4. Capturing Video to Hard Drive .................................................................................................... 30
3.4.1. Pre-Scanning Video Captures .............................................................................................. 33
3.5. Record Directly to Disc ................................................................................................................ 34
4. Editing Videos ..................................................................................................................................... 36
4.1. Video Editing ............................................................................................................................... 36
4.1.1. Switching Between the Editing Modes ............................................................................... 37
4.1.2. Movie Options Window ...................................................................................................... 38
4.1.3. Preview Area ....................................................................................................................... 39
4.1.4. Media Area .......................................................................................................................... 40
4.1.4.1. Nero Seamless Music ...................................................................................................... 41
4.1.5. Effect Palette ....................................................................................................................... 41
4.1.5.1. Tilt Shift Effect ................................................................................................................. 42
4.1.5.2. Properties Area ............................................................................................................... 43
4.1.6. General Handling in Express Editing ................................................................................... 46
4.1.7. General Handling in the Advanced Editing Mode ............................................................... 48
4.1.8. Track Handling in the Advanced Editing Mode ................................................................... 52
4.1.9. Clip Handling in the Advanced Editing Mode...................................................................... 53
4.1.10. Arranging Screen ................................................................................................................. 55
4.1.11. Toolbar ................................................................................................................................ 56
4.1.11.1. Nero RhythmSnap ........................................................................................................... 57
4.1.11.2. Nero Picture in Picture (PiP) Effects ................................................................................ 58
4.1.11.3. Movie Wizard .................................................................................................................. 60
4.1.11.4. Ad Spotter Window ......................................................................................................... 62
4.1.11.5. Music Grabber Window .................................................................................................. 63
4.1.12. Preview and Trim Window .................................................................................................. 64
4.1.13. Fit Slide Show to Music Feature .......................................................................................... 66
4.1.14. Fit Music to Project Feature ................................................................................................ 66
4.1.15. Handling of Windows Live Movie Maker Projects .............................................................. 67
4.2. Making Movie ............................................................................................................................. 67
4.2.1. Detecting Commercials ....................................................................................................... 69
4.2.2. Searching for Music Clips .................................................................................................... 70
4.2.3. Detecting Video Scenes ....................................................................................................... 71
4.2.4. Choosing a Movie Template ............................................................................................... 71

Nero Video Manual
4 © 2018 Nero AG and Subsidiaries. All rights reserved.
4.2.5. Recording a Narration File .................................................................................................. 73
4.3. Movie Editing in Express Editing ................................................................................................. 73
4.3.1. Moving and Positioning Files (Express Editing) ................................................................... 74
4.3.2. Fitting the Display Duration of Pictures (Express Editing) .................................................. 75
4.3.3. Inserting Nero Picture in Picture Templates (Express Editing) ........................................... 75
4.3.4. Inserting Transitions (Express Editing) ................................................................................ 76
4.3.5. Adding an Effect (Express Editing) ...................................................................................... 77
4.3.6. Adding a Text Effect (Express Editing)................................................................................. 77
4.4. Movie Editing in Advanced Editing ............................................................................................. 78
4.4.1. Creating Chapters in Timeline (Advanced Editing) ............................................................. 79
4.4.2. Adding a Text Effect (Advanced Editing) ............................................................................. 80
4.4.3. Editing Effects (Advanced Editing) ...................................................................................... 81
4.4.4. Adding an Effect (Advanced Editing) ................................................................................... 83
4.4.5. Editing Transitions (Advanced Editing) ............................................................................... 83
4.4.6. Inserting Transitions (Advanced Editing) ............................................................................ 84
4.4.7. Inserting Nero Picture in Picture Templates (Advanced Editing)........................................ 85
4.4.8. Fitting the Display Duration of Pictures (Advanced Editing) ............................................... 86
4.4.9. Cutting and Trimming Audio and Video Clips (Advanced Editing) ...................................... 87
4.4.10. Moving and Positioning Files (Advanced Editing) ............................................................... 88
5. Exporting Videos ................................................................................................................................. 90
5.1. Export Video Screen .................................................................................................................... 90
5.2. Exporting Video to File ................................................................................................................ 92
5.3. Exporting Audio to File ................................................................................................................ 93
5.4. Exporting Video to Camera ......................................................................................................... 94
5.5. Exporting Video to Web .............................................................................................................. 95
5.6. Exporting Video to Send it as E-Mail ........................................................................................... 96
6. Disc Project Creation ........................................................................................................................... 98
6.1. Content Screen............................................................................................................................ 98
6.2. Creating and Editing a Disc Project ........................................................................................... 101
6.2.1. Creating Chapters Manually .............................................................................................. 104
6.2.2. Creating Chapters Automatically ...................................................................................... 104
6.2.3. Editing Chapters ................................................................................................................ 105
7. Menu Creation .................................................................................................................................. 107

Nero Video Manual
5 © 2018 Nero AG and Subsidiaries. All rights reserved.
7.1. Edit Menu Screen ...................................................................................................................... 107
7.1.1. Templates Tab ................................................................................................................... 109
7.1.2. Customize Tab ................................................................................................................... 110
7.1.3. Template Settings Palette ................................................................................................. 111
7.1.4. Properties for Background and Intro Video Palette ......................................................... 112
7.1.5. Button Properties .............................................................................................................. 114
7.1.6. Properties of Graphic Objects ........................................................................................... 117
7.1.7. Content Palette ................................................................................................................. 118
7.1.8. Buttons and Graphic Objects Palettes .............................................................................. 119
7.1.9. Disc/Project Palette .......................................................................................................... 119
7.1.10. Select Start Position Window ............................................................................................ 121
7.1.11. Edit Background Audio Window ....................................................................................... 121
7.1.12. Select Poster Frame Window ............................................................................................ 122
7.1.13. Shadow Settings Window ................................................................................................. 122
7.2. Levels ......................................................................................................................................... 123
7.3. Creating Menu .......................................................................................................................... 124
8. Disc Project Preview .......................................................................................................................... 126
8.1. Preview Screen .......................................................................................................................... 126
8.2. Showing a Preview .................................................................................................................... 127
9. Burn Options ..................................................................................................................................... 128
9.1. Burn Options Screen ................................................................................................................. 128
9.2. Burning a Disc............................................................................................................................ 130
9.3. Burning an Image File................................................................................................................ 131
9.4. Writing to Hard Drive Folders ................................................................................................... 133

Nero Video Manual
6 © 2018 Nero AG and Subsidiaries. All rights reserved.
1. Start Successfully
1.1. About Nero Video
Nero Video is a powerful editing and authoring program designed for both beginners and
advanced users. It allows you to capture, import, trim, and arrange your media. Two
different modes within the same interface allow you to choose between single-track and
multi-track editing. In the Express Editing mode, you can create projects fast and easily:
Trim and arrange your clips and add effects for great results in no time. For full control,
use the Advanced Editing mode with its multi-track timeline, even more effects, key
frames, and much more.
With hundreds of video effects, themes, and a picture-in-picture effect generator, Nero
Video allows you to create pro-looking movies and slide shows. Use key frames on your
effects, or create your own effect templates to give your projects a special look. Add
transitions and text effects to complete your projects.
When authoring your video projects, create chapter marks for a quick and easy navigation
on disc, and choose your favorite menu from the many 2D and 3D menu templates. You
can also create your own, fully customized menu before burning your project to disc or
disc image. Share your projects by burning them onto DVD-Video or Blu-ray disc. If you
simply want to share the main movie of your project, use one of the various export options
such as the Export to Web feature.
With Nero 4K video editing, you now have Ultra HD support on hand: import, edit and
output high-quality movies with this powerful feature.
Capture, edit, author, export – when it comes to media, Nero Video is your tool for pro-
looking, great results!
1.2. Versions of Nero Video
Nero Video is available in different versions with a varying feature range. Depending on
the Nero product you purchased, your version of Nero Video may be limited and may not
include the full feature range.
Essentials or OEM software may also differ from the full version in a more or less broad
functional range. Note that the feature limitations of your Essentials version depend on
the co-contractor's choice.

Nero Video Manual
7 © 2018 Nero AG and Subsidiaries. All rights reserved.
1.3. System Requirements
Nero Video is part of the Nero product you have installed. Its system requirements are the
same. Detailed system requirements of this and all other Nero products can be found in
the Support section on our Web site www.nero.com.

Nero Video Manual
8 © 2018 Nero AG and Subsidiaries. All rights reserved.
2. Application Workflow and Interface
2.1. Working with Nero Video
The user interface for Nero Video consists of a main window with a header bar, the Drag
your files here area, and several selection lists. The order of the selection lists reflects the
general functional principle of Nero Video: input – edit – output (Capture & Import –
Edit – Create & Export).
Basically, working with Nero Video starts with the selection of a task on the Home screen.
You then complete the task by navigating through the different steps that are displayed
in a separate screen for each individual step.
Clicking the Help menu in the header bar opens a menu that offers the option of
accessing online help as well as viewing the version number and other registration data.
To go to the next or previous screen, click the Next or Back button in the navigation bar.
If necessary, you will be prompted to save the project, as the changes you have made will
otherwise be lost.
A project consists essentially of four steps:
Selecting a task
Select what you would like to do by moving the cursor over the menu item.
This manual contains a chapter for each task that describes all of the steps required for its
completion.
Completing a task
Depending on the task, you will have to go through various steps until you reach the end.
Each individual step consists of a new screen. To help you to know where you are and
what you need to do, each screen comes with a name and a brief description. In addition,
each screen furthermore contains tooltips, detailed information, and explanations for the
various buttons, icons, and menus.
Both Undo and Redo buttons are available on screens in which you can perform different
actions. These buttons allow you to quickly undo or redo the last performed action. In this
way, you can try out a number of features in Nero Video risk-free without having to discard
the entire project if you do not like the change.
For each screen, the manual contains a chapter in which all areas are described in detail.

Nero Video Manual
9 © 2018 Nero AG and Subsidiaries. All rights reserved.
Burning
Burning marks the end of a project. For this you should define the burning parameters
and click the Burn button. Depending on the type of project you are working on and the
burner connected to the system, a number of different entries are available for selection.
After burning
Once you have finished burning you can decide what you would like to do next: launch
the media player and view your project or create covers and labels for the disc using Nero
CoverDesigner. Of course, you can also save the project or start a new one.
2.1.1. Saving a Project
Once you have started working with your project, occasionally you may want to interrupt
your work, resume it at a later time, or burn it.
A project file (*.nvc) saves the project data – information about file paths and layout
– after you have started work on your project. This means that you can interrupt your work
at any time and resume the project at a later point or burn it on disc. The contents of a
project file can only be opened with Nero Video. The file size of a saved project is
significantly smaller than a disc image.
A Disc image (image file) is the precise picture of the project data to be burned. You can
burn the finished image as often as you like at a later stage, but it requires just as much
space on the hard drive as the project to be burned.
As well as being burned to disc or as a disc image, some projects can also be captured to
hard drive folders, memory stick or SD card, provided there is enough space.
To save a project, proceed as follows:
1. Click the Save button in the lower task bar of the main window.
The Save As window is opened.
2. Enter the desired file name in the File name input field and click the Save button.
You have saved the project and can open it again later to continue working on it or
burn it.

Nero Video Manual
10 © 2018 Nero AG and Subsidiaries. All rights reserved.
Nero Video does not allow you to start multiple projects within one project. You can
only create and edit projects one after another. Therefore, it is not possible to load two
project files (*.nvc or *.wlmp files) into one single project. If you have two different projects
that you want to combine, export one of them to a video file via the Export button and
add the resulting video file to the project which has not been exported.
2.1.2. Opening a Project
To open a saved project, proceed as follows:
1. On the Home screen, select the desired project type by clicking the respective entry
in the Edit selection list (Open Nero Video Project or Open Windows Live Movie
Maker Project).
A window is opened.
2. Browse to the location where your project file is stored.
3. Select the project file and click the Open button.
The project is opened in the video editing screen.
You have opened an existing project and can now continue to edit it or burn it.
Nero Video does not allow you to start multiple projects within one project. You can
only create and edit projects one after another. Therefore, it is not possible to load two
project files (*.nvc or *.wlmp files) into one single project. If you have two different projects
that you want to combine, export one of them to a video file via the Export button and
add the resulting video file to the project which has not been exported.
2.2. Header Bar
The header bar in Nero Video offers various tools, options and help topics. It also allows
you to return to the Home screen from any point within the application by clicking
the Home button.
The following entries are available in the Tools menu:
Erase Disc
Erases rewritable discs. The Erase Rewritable Disc window is opened; the
erasing method is adjustable.
Before a disc can be erased, the burner must contain a rewritable disc.

Nero Video Manual
11 © 2018 Nero AG and Subsidiaries. All rights reserved.
Disc Info
Shows information about the inserted disc (e.g. type of disc, available storage
capacity, number of sessions, and tracks). The Disc Info window is opened.
Insert the disc that you want to know more about and select the drive in which
it is located.
Finalize Disc
Finalizes the DVD-VFR (video mode) or DVD+VR disc. The Disc
Finalization window is opened.
Make
Covers and
Labels
Starts Nero CoverDesigner.
Only available if Nero CoverDesigner is installed.
Note that Nero CoverDesigner is not installed automatically with Nero Classic.
However, it can be downloaded for free from the Download section
at www.nero.com or via Nero ControlCenter and used together with Nero
Classic.
Nero CoverDesigner is used to create and print labels and booklets for burned
discs. Please see the separate Nero CoverDesigner user manual for full
instructions on how to make professional-looking covers and labels.
Burn Disc
Image
Opens the Open window which allows you to browse for and select an image
file. After you have opened an image file, the Burn Options screen is
displayed.
Nero
MediaHome Starts Nero MediaHome.
The following entries are available in the Options menu:
Application
Settings
Opens the Application Settings window which allows you to configure
general settings regarding the application. This includes e.g. the folders in
which files are saved and the default duration settings for transitions etc.
Recording
Format
Options
Edits the default options when creating a video. The Recording Format
Options window is opened.
As long as no disc format has been selected, the video options for all
supported formats are shown. After selecting a disc format, only the tab for
the current disc format is displayed.
Movie
Options
Opens the Movie Options window in which you can define all settings for the
content area.
Only available on the video editing screen.

Nero Video Manual
12 © 2018 Nero AG and Subsidiaries. All rights reserved.
The following entries are available in the Help menu:
Help Topics (F1) Opens the help file.
Online Tutorials Links to the video tutorials on the official Nero Web site.
Keyboard
Shortcuts
Opens the Keyboard shortcuts window which shows all keyboard
shortcuts available in Nero Video.
Download
Content Allows you to download additional media content.
Upgrade Allows you to view upgrade information on your Nero product.
Nero on the
Web Opens your Web browser with the official Nero Web site being displayed.
About Nero
Video Opens the About Nero Video window.
2.2.1. Tools: Erasing a Rewritable Disc
Using Nero Video, you can erase rewritable discs, i.e. discs with the RW specification, as
long as your recorder supports this feature. Two erase methods are available for this
purpose:
Quick erasing does not remove the data physically from the disc, but instead only makes
it inaccessible by erasing the references to existing content. The data can be restored!
Full erasing removes the data from the disc by overwriting it with zeros. The contents
cannot be restored with conventional methods. Repeated full erasing increases the
probability that third parties will not be able to reconstruct the contents.
To erase a rewritable disc, proceed as follows:
1. In the header bar, select the Tools > Erase Disc menu entry.
The Erase Rewritable Disc window is opened.
The Tools options (Erase Disc, Disc Info and Finalize Disc) can be started from
the Tools menu in the header bar at any time.
2. In the top drop-down menu, select the burner in which the disc has been inserted.
3. Click the Erase button.
The erase procedure starts.

Nero Video Manual
13 © 2018 Nero AG and Subsidiaries. All rights reserved.
Sometimes it can take a long time to erase a rewritable disc completely.
You have erased a rewritable disc.
2.2.2. Tools: Displaying Disc Info
To display information about a disc that has been inserted, proceed as follows:
1. In header bar, select the Tools > Disc Info menu entry.
The Disc Info window is opened.
The Tools options (Erase Disc, Disc Info and Finalize Disc) can be started from
the Tools menu in the header bar at any time.
2. Select the burner in which the disc has been inserted from the drop-down menu.
You have displayed information on the disc that is inserted.
2.2.3. Tools: Finalizing a Disc
Nero Video is available in different versions with a varying feature range. Depending
on the Nero product you purchased, your version of Nero Video may be limited and may
not include the full feature range.
If you have a limited version of Nero Video without the features mentioned here, you can
upgrade your Nero product at www.nero.com to get the full version of Nero Video with
all features.
To finalize a DVD-VR/-VFR (video mode)/+VR/+R or DVD+RW disc with videos and to
prevent further processing, proceed as follows:
1. In the header bar, select the Tools > Finalize Disc menu entry.
The Disc Finalization window is opened.
The Tools options (Erase Disc, Disc Info and Finalize Disc) can be started from
the Tools menu in the header bar at any time.
2. Insert the disc you want to finalize and select the drive where the disc is located in
the Select a recorder drop-down menu.
3. Click the Refresh button to display information about the disc you have inserted.
Nero Video Manual
14 © 2018 Nero AG and Subsidiaries. All rights reserved.
4. In the Menus to create on the disc drop-down menu, choose whether you want to
create a new menu on your disc, keep an existing menu or not create a menu at all.
5. Click the Start button.
You have finalized a DVD.
2.2.4. Tools: Burning a Disc Image
To burn a disc image, proceed as follows:
1. On the Home screen, select the Tools > Burn Disc Image menu entry.
A window is opened.
2. Select the desired image file type in the drop-down menu.
3. Browse to the location where your image file is stored.
4. Select the image file and click the Open button.
The image file is opened in the Burn Options screen.
You have opened a disc image and can now burn it.
2.2.5. Options: Application Settings Window
The Application Settings window contains the General, Folders and Editing tabs. You
can customize Nero Video to your own personal requirements here.
You can open the Application Settings window via the Options menu in the header bar.
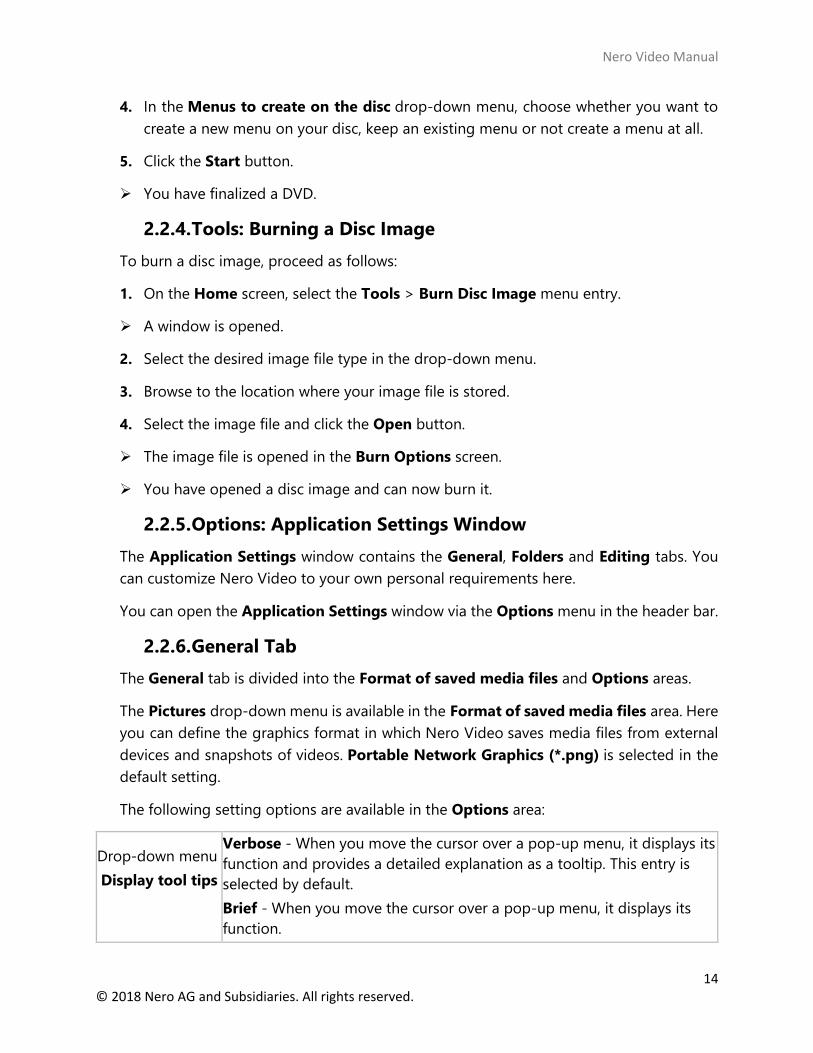
2.2.6. General Tab
The General tab is divided into the Format of saved media files and Options areas.
The Pictures drop-down menu is available in the Format of saved media files area. Here
you can define the graphics format in which Nero Video saves media files from external
devices and snapshots of videos. Portable Network Graphics (*.png) is selected in the
default setting.
The following setting options are available in the Options area:
Drop-down menu
Display tool tips
Verbose - When you move the cursor over a pop-up menu, it displays its
function and provides a detailed explanation as a tooltip. This entry is
selected by default.
Brief - When you move the cursor over a pop-up menu, it displays its
function.
Nero Video Manual
15 © 2018 Nero AG and Subsidiaries. All rights reserved.
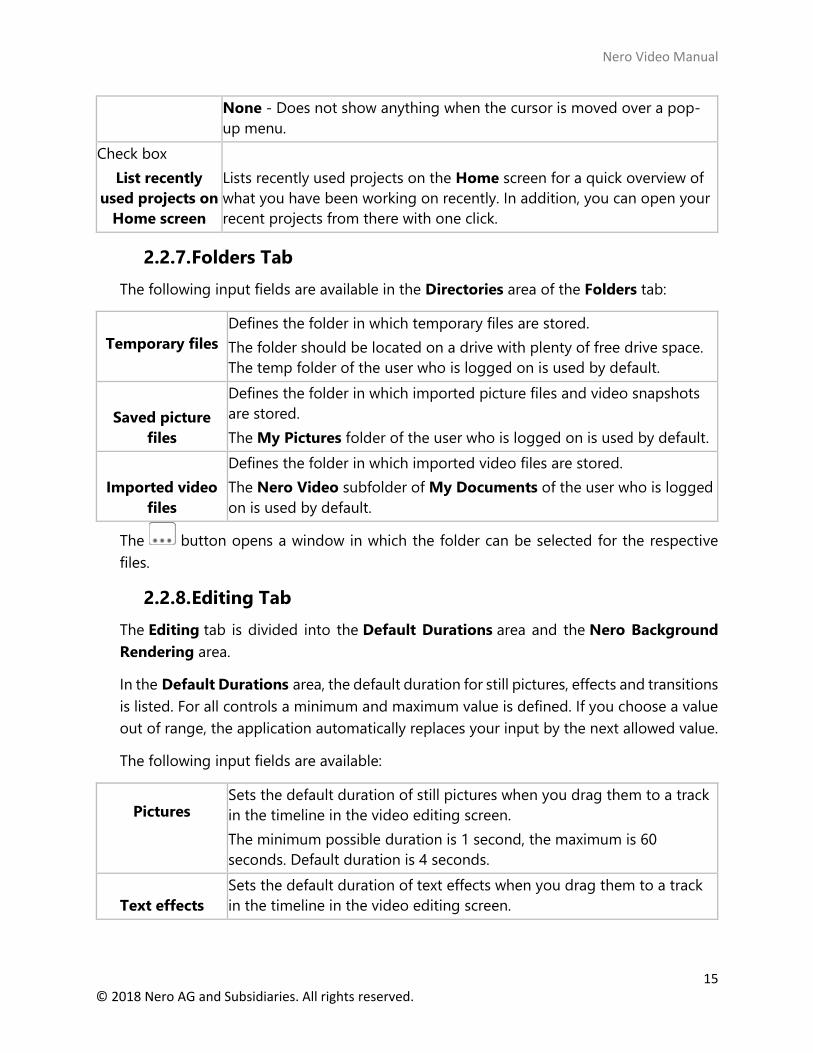
None - Does not show anything when the cursor is moved over a pop-
up menu.
Check box
List recently
used projects on
Home screen
Lists recently used projects on the Home screen for a quick overview of
what you have been working on recently. In addition, you can open your
recent projects from there with one click.
2.2.7. Folders Tab
The following input fields are available in the Directories area of the Folders tab:
Temporary files
Defines the folder in which temporary files are stored.
The folder should be located on a drive with plenty of free drive space.
The temp folder of the user who is logged on is used by default.
Saved picture
files
Defines the folder in which imported picture files and video snapshots
are stored.
The My Pictures folder of the user who is logged on is used by default.
Imported video
files
Defines the folder in which imported video files are stored.
The Nero Video subfolder of My Documents of the user who is logged
on is used by default.
The button opens a window in which the folder can be selected for the respective
files.
2.2.8. Editing Tab
The Editing tab is divided into the Default Durations area and the Nero Background
Rendering area.
In the Default Durations area, the default duration for still pictures, effects and transitions
is listed. For all controls a minimum and maximum value is defined. If you choose a value
out of range, the application automatically replaces your input by the next allowed value.
The following input fields are available:
Pictures Sets the default duration of still pictures when you drag them to a track
in the timeline in the video editing screen.
The minimum possible duration is 1 second, the maximum is 60
seconds. Default duration is 4 seconds.
Text effects
Sets the default duration of text effects when you drag them to a track
in the timeline in the video editing screen.

Nero Video Manual
16 © 2018 Nero AG and Subsidiaries. All rights reserved.
The minimum possible duration is 1 second, the maximum is 60
seconds. Default duration is 4 seconds.
Master effects
Sets the default duration of video effects when you drag them to
the Master Effects track in the timeline in the video editing screen.
The minimum possible duration is 1 second, the maximum is 60
seconds. Default duration is 4 seconds.
Video Transitions
Sets the default duration of video transitions when you drag them to a
track in the timeline in the video editing screen.
The minimum possible duration is 1 second, the maximum is 10
seconds. Default duration is 1 second.
Audio Transitions
Sets the default duration of audio transitions when you drag them to a
track in the timeline in the video editing screen.
The minimum possible duration is 1 second, the maximum is 10
seconds. Default duration is 1 second.
The following check box is available in the Nero Background Rendering area:
Enable Nero
Background
Rendering
If this check box is selected, time-consuming effects are rendered in the
background to ensure smooth preview capacity while you edit your
project.
2.2.9. Options: Recording Format Options Window
You can change the settings that affect the encoding of future projects in the Recording
Format Options window. The tabs for all supported formats are displayed until you have
selected a disc format. After selecting a disc format, only the respective format appears.
You can open the Recording Format Options window at any time from the Options
menu in the header bar. The window is also opened if you select Custom Capturing and
customize the video settings when recording a video.
2.2.10. General Tab
The General tab is divided into the Video mode and SmartEncoding areas.
In the Video mode area, the color transmission system is defined specifically. This
guarantees that videos can be displayed on the existing playback devices. The following
entries are available in the drop-down menu:
PAL
Selects the PAL video mode, which is used in Europe as well as in
Australia, South America, and many African and Asian countries.

Nero Video Manual
17 © 2018 Nero AG and Subsidiaries. All rights reserved.
NTSC
Selects the NTSC video mode, which is used in extensive parts of
America and some East Asian countries.
[Country]
Automatically sets the correct video mode for the selected country.
If you are unsure about the video mode that is used in your country,
select your country from the country list.
The following settings options are available in the SmartEncoding area:
Drop-down menu
SmartEncoding
Allows you to select the SmartEncoding option that is used when
exporting or burning video projects.
Automatic (recommended): Determines automatically whether video
and audio material is re-encoded. Nero Video checks, among other
things, how much space is available for the project and then determines
which compatible segments are re-encoded. This saves a lot of time for
large-scale projects, so that you achieve your goal much faster.
In some cases, video and audio material which is not 100% compatible
with the target format will nevertheless not be re-encoded, depending
on the source material and the project settings. The resulting disc or
output file might not be playable on every player. To make sure that
only video and audio material which is 100% compatible with the target
format will not be re-encoded, select the Standard check box.
The Automatic entry is selected by default.
Disable: Deactivates SmartEncoding. Video and audio material which is
already compatible with the target format is still re-encoded.
Check box
Standard
With this option, only video and audio material which is 100%
compatible with the target format is not re-encoded.
Only available if the Automatic (recommended) SmartEncoding option
has been selected.
This check box is cleared by default.
2.2.11. Smart Encoding
SmartEncoding is a feature in Nero Video which can effectively shorten the time required
for transcoding (converting) your video projects.
Video files can be created using different codecs. Each codec involves a certain file format.
Depending on the target format you choose for your project in Nero Video, the video files
you have used in your project might not be compliant to the target format. Therefore,

Nero Video Manual
18 © 2018 Nero AG and Subsidiaries. All rights reserved.
these video files will have to be transcoded (converted) into the target format. This can be
a very time-consuming process.
The SmartEncoding feature analyzes the video files that you have added to your project
and checks if they are compliant or partially compliant to the selected target format. Parts
which are compliant to the target format will not be re-encoded; this can save a lot of
time. If the SmartEncoding feature is enabled, it is applied when you export your project
to a video file, or when you burn your project onto a disc or save it onto hard drive. When
you export your project to a video file, Nero Video automatically preselects the target
format which requires the least re-encoding of your project.
The following target formats are supported by the SmartEncoding feature:
- MPEG-1
- MPEG-2 SD
- MPEG-2 HD
- MPEG-2 HD 24p
- AVCHD
- AVCHD 24p
- AVCHD 1080/60p, 50p
- MPEG-2 HD to Blu-ray Disc
- MPEG-2 HD 24p to Blu-ray Disc
- AVC to Blu-ray Disc
- AVC 24p to Blu-ray Disc
2.2.12. [Disc Format] Tab
On the tab of a respective disc format the video options can be customized within the
scope of the profile play.
The following setting options are available:
Drop-down menu
Video format
Defines the video mode. This guarantees that videos can be displayed
on the existing playback devices.
Drop-down menu
Aspect ratio Defines the desired aspect ratio.
Nero Video Manual
19 © 2018 Nero AG and Subsidiaries. All rights reserved.
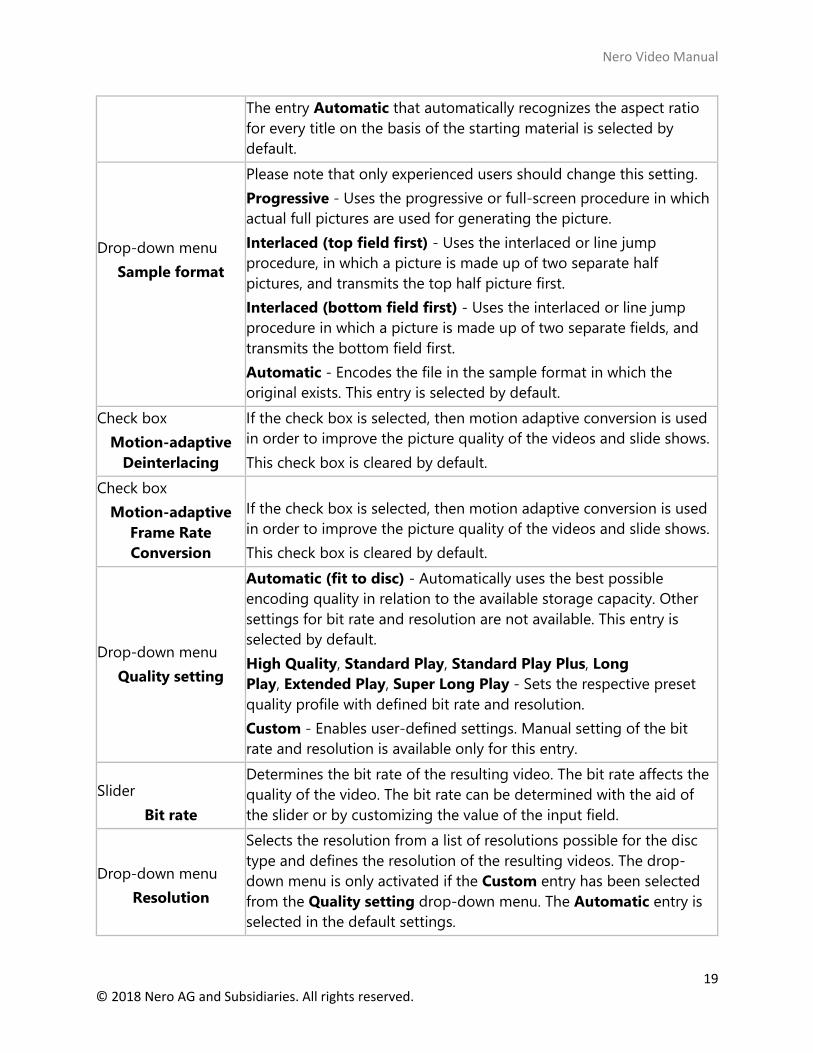
The entry Automatic that automatically recognizes the aspect ratio
for every title on the basis of the starting material is selected by
default.
Drop-down menu
Sample format
Please note that only experienced users should change this setting.
Progressive - Uses the progressive or full-screen procedure in which
actual full pictures are used for generating the picture.
Interlaced (top field first) - Uses the interlaced or line jump
procedure, in which a picture is made up of two separate half
pictures, and transmits the top half picture first.
Interlaced (bottom field first) - Uses the interlaced or line jump
procedure in which a picture is made up of two separate fields, and
transmits the bottom field first.
Automatic - Encodes the file in the sample format in which the
original exists. This entry is selected by default.
Check box
Motion-adaptive
Deinterlacing
If the check box is selected, then motion adaptive conversion is used
in order to improve the picture quality of the videos and slide shows.
This check box is cleared by default.
Check box
Motion-adaptive
Frame Rate
Conversion
If the check box is selected, then motion adaptive conversion is used
in order to improve the picture quality of the videos and slide shows.
This check box is cleared by default.
Drop-down menu
Quality setting
Automatic (fit to disc) - Automatically uses the best possible
encoding quality in relation to the available storage capacity. Other
settings for bit rate and resolution are not available. This entry is
selected by default.
High Quality, Standard Play, Standard Play Plus, Long
Play, Extended Play, Super Long Play - Sets the respective preset
quality profile with defined bit rate and resolution.
Custom - Enables user-defined settings. Manual setting of the bit
rate and resolution is available only for this entry.
Slider
Bit rate
Determines the bit rate of the resulting video. The bit rate affects the
quality of the video. The bit rate can be determined with the aid of
the slider or by customizing the value of the input field.
Drop-down menu
Resolution
Selects the resolution from a list of resolutions possible for the disc
type and defines the resolution of the resulting videos. The drop-
down menu is only activated if the Custom entry has been selected
from the Quality setting drop-down menu. The Automatic entry is
selected in the default settings.

Nero Video Manual
20 © 2018 Nero AG and Subsidiaries. All rights reserved.
Slider/Input field
Encoding quality
fine tuning
Determines the quality level of the encoder to be used. The encoding
quality can be determined with the aid of the slider or by customizing
the value in the input field.
Drop-down menu
Encoding mode
Fast encoding (1-pass) - Encodes the video in a single pass.
Encoding is faster, but the quality is inferior.
High Quality (2-pass VBR) - Encodes the video in two passes with
variable data rate. Encoding takes longer, but the quality is better.
VBR stands for Variable Bit Rate and means that individual periods in
a video are encoded using different, suitable data rates: Scenes with a
lot of movement are encoded with a higher bit rate than scenes with
less movement.
Drop-down menu
Audio formats
Chooses which audio format is used when recoding the project.
The Automatic entry is selected by default.
AC3 5.1 - Encodes audio data in the AC3 audio format with 6 channel
surround sound. (5.1 means: 5 channels with the full frequency range
and one bass channel.)
AC3 2.0 - Encodes audio data in the AC3 audio format in stereo.
MPEG Audio - Encodes audio in MPEG-1 (layer 2). This option is only
available in PAL video mode.
LPCM - Encodes audio data in LPCM. This option is only available in
NTSC video mode.
2.2.13. Options: Nero MediaBrowser
Nero MediaBrowser is a tool which you can use to easily find, view and access media files
and add them to your project. More precisely, with Nero MediaBrowser you can access a
media library which contains all your media files that were indexed by Nero MediaHome.
Nero MediaBrowser and the media library come with Nero MediaHome and are
installed together. You will find further information in the Nero MediaHome manual.
Nero MediaBrowser is designed to be accessed in several Nero applications, but is also
available as a standalone application.
To use Nero MediaBrowser within a Nero application, open Nero MediaBrowser via
the button. When you double-click a media file or select it and click the Add button
in Nero MediaBrowser, the media file will be added to your current project.
To use Nero MediaBrowser with a non-Nero application, open Nero MediaBrowser via the
Windows start menu or its tile, depending on your operating system. You will then be able

Nero Video Manual
21 © 2018 Nero AG and Subsidiaries. All rights reserved.
to add media files to any active application by dragging the desired media file onto the
application. When you double-click a media file in Nero MediaBrowser, it is opened in its
default program.
Nero MediaBrowser features the same categories (Photos & Videos, and Music) as Nero
MediaHome. There are different views available for each category: Clicking one of the
entries in the upper part of the list (for example Faces) displays the same view as when
clicking the corresponding tabs in Nero MediaHome. Also, the same scroll bar as in Nero
MediaHome is used. This is either the standard scroll bar or the dynamic scroll bar.
The following views are available for the Photos & Videos category, referring to the
corresponding views in Nero MediaHome:
All Photos &
Videos
Displays all photos and videos sorted in chronological order by creation
date.
Faces Displays all photos in which faces of persons have been detected and
named listed in alphabetical order. Faces are grouped into stacks; you
can access one of the stacks by double clicking it.
Find Displays all existing tags enabling you to create a query.
Album
Displays the content of smart albums (e.g. Recently added) and user
generated albums.
The following views are available for the Music category, referring to the corresponding
views in Nero MediaHome:
Albums Displays all audio tracks sorted in alphabetical order by album.
Artists Displays all audio tracks sorted in alphabetical order by artist.
Genres Displays all audio tracks sorted in alphabetical order by genre.
Titles Displays all audio tracks sorted in alphabetical order by title.
Playlist
Displays the content of smart playlists (e.g. Recently played) and user
generated playlists.
The Options window is opened when you click the button on the upper task bar. The
options refer directly to Nero MediaHome.
Library
Displays the Library settings area.
All monitored folders are displayed in the respective Watched folders or
drives area. If you want to add additional media folders, click the Add
Manually button and select the desired folder from the navigation tree.
Click the Add Automatically button to have Nero MediaHome perform
a search for new media folders on your computer. To exclude certain
media types (music, videos, or photos) from a folder, click the respective

Nero Video Manual
22 © 2018 Nero AG and Subsidiaries. All rights reserved.
button to the right of the folder. To delete a folder from the application's
watchlist, hover your cursor over the listed folder and click
the button.
You can also just drag files or folders to Nero MediaHome. A window
automatically opens and asks if you want to add the folder(s) to the
library.
In the General area you can select to list your external playlists (such as
iTunes) as entries in the navigation tree of Nero MediaHome.
2.3. Drag Your Files Here Area
The Drag your files here area is located on the Home screen of Nero Video. It allows you
to start video projects simply by dropping photos or media clips onto the designated area.
Depending on the file format of the items you drop onto the area, you will either be asked
what kind of project you want to start, or the video editing screen will be displayed directly.
The following rules apply when you drop media clips onto the area:
Video clips: You will be asked if you want to edit the video clip or burn a video disc. If
you decide to burn a video disc, you can select the desired disc type in the next
window.
If you want Nero Video to remember the type of project you selected last time when
dropping a video clip, select the Remember my selection check box.
Audio clips: The video editing screen will be displayed directly.
Photos: The video editing screen will be displayed directly.

Nero Video Manual
23 © 2018 Nero AG and Subsidiaries. All rights reserved.
3. Capturing and Importing from Camera and External Devices
3.1. Capturing
Nero Video provides a convenient interface for capturing and importing video footage as
well as for viewing and recording digital TV broadcasts. Depending on what device the
video footage or broadcast comes from, either capturing or importing is involved to
transfer the video to your computer.
If you want to transfer video from an external capture device to your computer to use it
in a project at a later time, proceed as described in Capturing Video to Hard Drive.
If you want to create a disc and capture/import a video for this specific project, you should
select the relevant option in the Create & Export category (e.g. Blu-ray Disc or DVD) on
the Home screen, and then click the Import > Capture button in the Content screen.
This way, you can capture the video and work on your project simultaneously.
3.1.1. Capturing of Digital and Analog Videos
Capturing is a way of transferring audio and video from an external source (e.g.
a DV camera) onto your PC and creating a digital video file in the process. Depending on
the external source, a certain hardware setup is required. Nero Video provides the
software interface required for capturing.
Analog Video Tape
Video footage on analog video tape (VHS, S-VHS, Video8, Hi8) has to be converted to a
digital format when it is transferred to the PC. For the capturing process, connect your
camera to a built-in video capture card or external A/D video capture device; these devices
convert the analog video signal into a digital one.
Digital Video Tape
Video footage on digital video tape (DV, HDV, Digital8) is transferred to the PC without
any quality loss (i.e. in so-called native quality) as there is no signal conversion involved
during the capturing process. To capture digital video tape footage, you need to connect
your camera to your PC via FireWire (also called iLink or IEEE 1394).
Digital TV
Digital TV is viewed and captured on the PC via a TV capture device. It comes in different
flavors and standards: Standard definition (SD) digital TV (terrestrial/satellite/cable) makes
use of MPEG-2 formats and comes in different television standards, e.g. Europe (DVB) and
USA (ATSC). High Definition (HD) broadcasting in most cases is transferred via MPEG-4
formats that provide higher compression rates with HD quality.

Nero Video Manual
24 © 2018 Nero AG and Subsidiaries. All rights reserved.
3.1.2. Import of AVCHD Footage
AVCHD cameras save video recordings directly to a disc, flash drive, or internal hard drive
(MPEG-4 format). As digital files are created during this process, you can simply import
the footage by using the appropriate option in Nero Video.
For AVCHD cameras that record to DVD, insert the camera DVD into your computer's DVD
drive and import the video footage with the Import from AVCHD > Disc entry in
the Capture & Import selection list on the Home screen.
For AVCHD cameras that record to hard drive, connect the camera to your PC and import
the video footage with the Import from AVCHD > Hard Drive entry in the Capture &
Import selections list on the Home screen.
For AVCHD cameras that record to flash drive, connect the memory card to your computer
via the corresponding interface and then import the video footage with the Import from
AVCHD > Camera entry in the Capture & Import selection list on the Home screen.
3.2. Capture Video Screen
The Capture Video screen is displayed when you select the Capture from Camera or
TV entry of the Capture selection list on the Home screen.
On the Capture Video screen all the connected devices are shown on the Capture
device selection menu. Besides the desired capture device, the capture template can be
selected here.
For detail settings and the capture procedure, the screen is divided into two areas, the
preview area on the left and the information area that shows the most important settings
of the target file.
Clicking the Configure button opens the window for adjusting the detail settings of the
video options.
Clicking the respective button on the right screen margin opens the Video Device
Properties or Audio Device Properties window. You can change the detail settings in
both windows, if the connected capture device offers configuration options.
The following option buttons are available for the selection of the capturing template:
Native
capturing
Optimizes all parameters based on the selected capture device and
captures the video in the format specified by the capture device.
The Native capturing option button is selected in the default settings.
Capturing in the default settings is recommended.

Nero Video Manual
25 © 2018 Nero AG and Subsidiaries. All rights reserved.
Custom
capture
template
Adjusts the detail settings of the parameters. You can select the desired
target format.
In the preview area you can use the Position buttons next to the time code display to
move to a certain position within the video title. Furthermore, the following setting options
are available:
Button
Starts playback.
Button
Stops playback.
Button
Starts capture.
Button
/ Rewinds/Fast forwards the video.
Button Switches to full screen mode. You can return to window mode by pressing
the Esc key.
Button Set the timer that enables specifying the capturing start time, end time and
capturing time.
Button
Scans the tape and shows a thumbnail in the scene gallery for each
recognized scene. Here the desired scene for capturing can be selected.
Only available for DV-/HDV cameras in the VCR mode.
Button
/
Switches to the next/previous channel.
Only available for TV cards.
Slider
Increases or decreases the speed in the playback of the preview of DV-
/HDV camera by up to 6 times. As soon as the slider is released it
automatically jumps back to the central position and plays the tape back at
the normal speed.
Only available for DV-/HDV cameras in the VCR mode.
Jog dial Navigates through the capture on a frame-by-frame basis.
Only available for DV-/HDV cameras in the VCR mode.
Activate the Enable capture device audio playback check box in the lower right part of
the screen if you want to enable playback on the capture device. This setting does not
affect playback of captured video files.

Nero Video Manual
26 © 2018 Nero AG and Subsidiaries. All rights reserved.
3.2.1. Preview Scan Window
In the Capture Pre-scan window, it is possible to pre-scan the tape of your DV-/HDV
camera.
The window is divided into a preview area on the left and the scene gallery on the right in
which a thumbnail is shown for each recognized scene. Here the desired scenes for capture
can be chosen.
In the case that you have not customized the setting for the capture in the Capture
Video screen or if you wish to change the settings, all the options for the choice of the
capture template are also available here.
The Native Capturing option button is selected in the default settings. Capturing in the
default settings is recommended.
The following buttons are available:
Start Scan
Starts the scan process and shows a thumbnail of each recognized scene in
the scene gallery.
Delete Removes the marked scenes from the scene gallery.
Merge Connects marked scenes.
Capture Begins the transmission of the chosen scenes to the hard drive.
Cancel Cancels the procedure and closes the window.
3.2.2. Video Device Properties Window
The following tabs are available in the Video Device Properties window:
Format
Sets the frame rate, color compression process and output format to
correspond to the way the video is to be burned onto the disc.
In the case of analog capture devices, clicking the Configure button starts
the device test. You can select the video source here (video, composite or S-
video).
General Sets values such as brightness, sharpness or contrast using the sliders.
Channels
Displays all available channels of the selected device. Here you can select the
required channel for your capture.
Clicking the Manage TV Channel Groups button displays the last screen of
the TV wizard again, and you can edit, add or remove groups and assigned

Nero Video Manual
27 © 2018 Nero AG and Subsidiaries. All rights reserved.
channels. The TV wizard screen displays the available channels and groups of
all installed capture devices.
If you click the Channel Setting button, you can once again configure a TV
card on a step-by-step basis using the TV wizard.
3.2.3. Audio Device Properties Window
The following areas are available in the Audio Device Properties window.
Device
settings Defines the audio source.
Audio input
Defines the audio inputs (e.g. CD player, line, microphone). Click the icon
to display the available options.
3.3. Setting a TV Card
To set up a capture device for digital and analog video, a recording card that meets
the requirements of the manufacturer must be installed or must be already integrated in
the PC at the factory
Nero Video provides simultaneous support for multiple TV cards, TV cards with dual
tuner, and/or hybrid tuner cards. You will find a list of supported TV cards on our web
page under www.nero.com.
If you have connected a TV card to your PC and open the Capture Video screen for the
first time, all connected devices are displayed in the Capture device drop-down menu.
The following requirement must be fulfilled:
A TV card is connected to your PC and switched on.
To configure a TV card using the TV wizard, proceed as follows:
5. Select the Capture from Camera or TV selection list entry on the Home screen.
The Capture Video screen is displayed.
6. If you have several devices connected to your PC, select the required device in
the Capture device drop-down menu.
7. Click the button.

Nero Video Manual
28 © 2018 Nero AG and Subsidiaries. All rights reserved.
The Video Device Properties window opens.
8. Click the Channels tab.
9. Click the Channel Setting button.
The first screen of the TV wizard, Analog TV Channel Search, is displayed. This wizard
prompts you to make all the necessary entries step by step.
10. Select your country in the Select country drop-down menu.
When configuring DVB-S TV cards, you must select the satellite instead of the country
in the Select your satellite configuration field.
When configuring DVB-C TV cards, you must select the appropriate frequency range
instead of the country.
11. Choose between Antenna and Cable as the signal source in the Select source
type drop-down menu.
The Select source type drop-down menu is not available when configuring digital TV
cards (DVB-T, DVB-S, DVB-C).
12. Click the Start Search button to start the search.
The search starts. You are kept informed about the search progress and the number
of channels found in the Search Status area.
13. Click the Next button.
The second screen of the TV wizard, TV Channel Edit, is displayed. You can order,
rename or remove the channels as required.
14. Click the Up and/or Down buttons.
The order of the available channels is changed.
15. Highlight the channels you do not want and click the Remove button.
The channels are deleted.
16. If you want to coordinate the channels of a number of TV cards with each other:
a. Highlight a desired channel and click the Rename button.
The Rename Channel window is opened.

Nero Video Manual
29 © 2018 Nero AG and Subsidiaries. All rights reserved.
b. Enter the name you want in the Rename Channel text field and click
the OK button.
The channel is renamed.
Nero Video regards TV channels with the same name – so-called "physical" channels
– on different tuner cards as the same "logical" channel. This means that a logical channel
can contain one or more physical channels.
The channels are automatically coordinated with each other during the channel search.
Only the logical channels will be displayed in Nero Video following configuration in the
TV wizard.
17. Click the Next button.
The third screen of the TV wizard, Manage TV Channel Groups, is displayed. You can
sort the channels in existing topic groups or in groups according to your requirements.
18. Click the Add button on the TV Channel Groups tab.
The Add Group window is opened.
19. Enter the desired name of the group in the Add Group text field and click
the OK button.
The group is created.
20. Click the TV Channels to Groups tab.
21. Select the group you want to edit in the Modify your groups drop-down menu.
22. Highlight the channels you want to assign to this group in the Available
Channels area and click the >> button.
The highlighted channels are shown in the Modify your groups area.
23. Click the Down and/or Up buttons.
The order of the channels within the group is adjusted.
24. Click the Finish button.
The TV wizard is closed and the Capture Video screen is displayed.
You have configured the TV card.

Nero Video Manual
30 © 2018 Nero AG and Subsidiaries. All rights reserved.
3.4. Capturing Video to Hard Drive
To set up a capture device for digital and analog video, a recording card that meets
the requirements of the manufacturer must be installed or must be already integrated in
the PC at the factory.
You need a lot of free space on your hard drive to capture a video. Make sure that
there is enough space available to capture the entire video. Capturing video from a
capture card requires about 3-30MB of hard disk space per second depending on the
resolution and the data format of your video. A DV capture via a FireWire card (IEEE 1394)
uses up to 3.6 MB of hard drive space per second.
The following requirements must be fulfilled:
No applications are running that place a high demand on the processor.
There are no applications running in full-screen mode.
The workstation is not blocked during the entire capture process.
There is sufficient space on your hard drive.
To capture a video on the hard drive, proceed as follows:
1. Connect the digital or analog capture device to the PC using the corresponding cables
and switch it on.
2. Select the Capture from Camera or TV selection list entry on the Home screen.
The Capture Video screen and a window are displayed. The window recommends
the Native capturing choice.
3. Select the capture device in the Capture device drop-down menu.
The capture device may be in Camera mode or in VCR mode.
In Camera mode, the video signals are continuously transferred from the capture device
to the PC, and you can view the current video signal in the preview area. In the case of a
DV video camera, everything in the picture area frame of the video camera is displayed in
the preview dialog box.
A TV card is always in Camera mode as there is a constant video signal coming in and
there is no way of pausing, rewinding/fast forwarding or restarting the video signal.

Nero Video Manual
31 © 2018 Nero AG and Subsidiaries. All rights reserved.
In VCR mode, the video already exists on tape (or another medium). To capture that video,
you need to insert the tape into your video device and play it back. You can also
rewind/fast forward through the whole tape to play back specific scenes.
Digital video cameras can be set to either Camera mode or VCR mode. Please check the
manufacturer's instructions on how to do this.
Analog video cameras are automatically in VCR mode.
Depending on whether the capture device is in Camera or VCR mode, some buttons are
not available.
4. Choose between the Native capturing and Custom capture template option
buttons in the upper right section of the window.
Native capturing transfers the video without losing information during conversion
in the format specified by the capture device.
The Native capturing option button is selected in the default settings. Capturing with
Native capturing is recommended.
5. If the Custom capture template option button is selected:
a. Select the desired format in the drop-down menu.
The Profile drop-down menu appears in the Details area.
b. Select the desired Profile.
The output file settings are displayed in the Details area under Output File.
6. If you want to adjust the detail settings, click the Configure button.
A window is opened.
a. Make the desired detail settings and click the OK button.
The output file settings are adjusted.
7. If you use an analog capture device, start the playback on the capture device.
If you are using a digital capture device and it is in VCR mode, control the tape using
the buttons.
You will see the current scene in the preview area.

Nero Video Manual
32 © 2018 Nero AG and Subsidiaries. All rights reserved.
You can scan the tape of your DV/HDV camera in advance. A thumbnail of each scene
is displayed. Here you can select the desired scene for your capture. Clicking the button
opens the Pre-scan capture window.
8. Check playback from the capture device in the preview area.
9. If you want to change the video settings:
a. Click the button.
The Video Device Properties window is opened.
b. Make the desired settings and close the window.
The video settings are adjusted.
10. If you want to select an external audio source for capture:
a. Click the button.
The Audio Device Properties window is opened.
b. Make the desired settings and close the window.
The audio settings are adjusted.
11. If you want to save the video file to a folder other than the default folder:
a. Click the Browse button.
The Choose a location for your captured files window is opened.
b. Browse to the desired location.
c. Click the Save button.
12. Click the button.
Capturing starts and the picture that was recently captured appears.
13. Click the same button again to stop capturing.
A selection list is displayed. It contains captured files that have not yet been assigned
to a project.
14. If you want to capture other videos from the same source, repeat the previous two
steps.

Nero Video Manual
33 © 2018 Nero AG and Subsidiaries. All rights reserved.
15. If you want to view the captured video:
a. Select the desired video in the selection list.
b. Click the button.
The captured video is displayed in the preview area.
16. Click the Next button.
The screen with the menu Select what you want to do next is displayed.
You have captured a video on the hard drive and can now edit it.
3.4.1. Pre-Scanning Video Captures
Scans the tape of your DV/HDV camera and shows a thumbnail of each recognized scene
in the scene gallery. Here the desired scene for the capture can be selected.
To set up a capture device for digital and analog video, a recording card that meets
the requirements of the manufacturer must be installed or must be already integrated in
the PC at the factory.
You need a lot of free space on your hard drive to capture a video. Make sure that
there is enough space available to capture the entire video. Capturing video from a
capture card requires about 3-30MB of hard disk space per second depending on the
resolution and the data format of your video. A DV capture via a FireWire card (IEEE 1394)
uses up to 3.6 MB of hard drive space per second.
The following requirements must be fulfilled:
No applications are running that place a high demand on the processor.
There are no applications running in full-screen mode.
The workstation is not blocked during the entire capture process.
There is sufficient space on your hard drive.
A DV/HDV camera is connected to the PC by means of the corresponding cables and
is in the VCR mode.
The Capture Video screen is displayed.
To scan a video before capture and to take over selected scenes to the hard drive, proceed
as follows:

Nero Video Manual
34 © 2018 Nero AG and Subsidiaries. All rights reserved.
1. Click the button.
The Pre-Scan window is opened.
2. Click the Start Pre-Scan button.
The tape is scanned. Progress can be followed in the window.
A thumbnail is shown for every scene in the scene gallery in the Pre-Scan window.
3. If individual scenes are not to be taken over on the hard drive, select the desired scenes
in the scene gallery and click the Delete button.
The scenes are removed from the scene gallery.
4. If individual scenes are to be combined into one, mark the desired scenes in the scene
gallery and click the Combine button.
The scenes are combined into one.
5. In the case that you have not customized the settings for the capture in the Capture
Video screen or if you wish to change the settings, carry out your wishes now.
6. Click the Capture button.
The capture is started and the desired scenes are transmitted.
A selection list is displayed in the Capture Video screen. The list box shows captured
files that are not assigned to a project.
You have scanned a video before capture and taken over selected scenes from the
hard drive.
3.5. Record Directly to Disc
If you create an editable DVD by means of a capture device, you can transfer the desired
data (e.g. camera captures) directly to disc, i.e. without buffering.
Nero Video is available in different versions with a varying feature range. Depending
on the Nero product you purchased, your version of Nero Video may be limited and may
not include the full feature range.
If you have a limited version of Nero Video without the features mentioned here, you can
upgrade your Nero product at www.nero.com to get the full version of Nero Video with
all features.

Nero Video Manual
35 © 2018 Nero AG and Subsidiaries. All rights reserved.
To set up a capture device for digital and analog video, a recording card that meets
the requirements of the manufacturer must be installed or must be already integrated in
the PC at the factory.
If you have installed a DVD-RW/+RW burner and insert a DVD-RW or DVD+RW disc,
you can use Nero Video to create editable DVD disc formats and DVD-Video: DVD-VFR
(video mode) and DVD+VR.
In comparison to DVD-Video, the advantage of these disc formats is that the content can
be changed later on. This means that you can edit the movies, insert new passages, delete
scenes that you do not want to see, or overwrite the disc. However, a disadvantage is that
you cannot create individual menus.
The DVD-VFR (video mode) and DVD+VR disc formats are compatible with DVD-Video
and can be played on nearly any commercial DVD player.
The following requirements must be fulfilled:
A capture device for digital or analog video is installed and connected to the PC.
No applications are running that place a high demand on the processor.
There are no applications running in full-screen mode.
The workstation is not blocked during the entire capture process.
To create an editable DVD directly via a capture device, proceed as follows:
1. Insert a rewritable disc into the disc burner.
2. Turn the capture device on and launch Nero Video.
3. Select the Record Directly to Disc selection list entry on the Home screen.
4. If more than one disc burner is installed on your PC, select the disc burner in which
you have inserted the rewritable disc in the drop-down menu.
The Capture Video screen is displayed.
5. If the TV card has not yet been configured, proceed as described in the Setting a TV
Card chapter.
6. Proceed as described in the Capturing Video to Hard Drive chapter.
You have created an editable disc directly via a capture device.
Nero Video Manual
36 © 2018 Nero AG and Subsidiaries. All rights reserved.
4. Editing Videos
4.1. Video Editing
Nero Video is available in different versions with a varying feature range. Depending
on the Nero product you purchased, your version of Nero Video may be limited and may
not include the full feature range.
If you have a limited version of Nero Video without the features mentioned here, you can
upgrade your Nero product at www.nero.com to get the full version of Nero Video with
all features.
The video editing screen is displayed when you select one of the entries of the Edit
selection list or the Import File entry of the Capture & Import selection list on the Home
screen. Additionally, you can access the video editing screen via the Edit button on the
Content screen.
In the video editing screen, you can compile media files into a movie or slide show, cut
videos that you have added and/or work with effects and transitions according to your
requirements. You can also add comments and audio clips for background music.
The video editing screen offers two different modes for video editing: the Express Editing
mode and the Advanced Editing mode. Creating and editing your projects in one mode
or the other differs in many points.
Both modes are available on the video editing screen. You can switch between the two
modes via the Express Editing and Advanced Editing buttons on the left of the screen.
These buttons also show which mode you are currently in: The button of the active mode
is highlighted.
The displays of both modes are designed similarly – they include a preview area in the
upper left of the screen, and various palettes on the upper right of the screen. The content
area in the lower part of the screen is changed dynamically, according to the mode you
have selected. A toolbar separates the upper part from the lower part of the video editing
screen and is valid for both modes.
The size of the preview, palettes, and content area can be changed the same way you
would change the size of a window – simply move the cursor to the border between two
areas and wait for the cursor to change into a double-sided arrow. You can then move the
border to make the areas larger or smaller.
The Express Editing mode is kept easy and does not offer as many possibilities as the
Advanced Editing mode. It includes only one main video/picture track in the content

Nero Video Manual
37 © 2018 Nero AG and Subsidiaries. All rights reserved.
area, with two additional audio tracks for Music and Narration. The Express Editing
mode is recommended for users who are not too experienced with video editing yet, or
for more experienced users who want to create a simple project with very little effort.
The Advanced Editing mode offers multiple video and audio tracks and more editing
options in general. It is suitable for more elaborate projects including the use of key
frames.
4.1.1. Switching Between the Editing Modes
Nero Video is available in different versions with a varying feature range. Depending
on the Nero product you purchased, your version of Nero Video may be limited and may
not include the full feature range.
If you have a limited version of Nero Video without the features mentioned here, you can
upgrade your Nero product at www.nero.com to get the full version of Nero Video with
all features.
When editing a project in the video editing screen, switching between the Express
Editing and the Advanced Editing modes is generally possible. When you start in
the Express Editing mode, but find that you need more tracks or features to edit your
project, you can switch to the Advanced Editing mode and continue editing your project.
However, as soon as you start editing in the Advanced Editing mode, you can only go
back to the Express Editing mode without transferring the changes you made in
the Advanced Editing mode.
Generally, the following rules apply when switching between the two modes:
If your project is empty, you can switch between the two modes without any
consequences.
If you start in the Express Editing mode, edit your project, then switch to
the Advanced Editing mode, you can save your Express Editing project status in an
*.nvc project file. You can then always go back to that status, even after editing your
project in the Advanced Editing mode.
If you edit a project in the Advanced Editing mode which you initially started in
the Express Editing mode and want to switch back to the Express Editing mode, your
changes to the project will not be transferred to the Express Editing mode. However,
you can save your Advanced Editing project status in an *.nvc project file. You can
then always go back to that status, even after editing your project in the Express
Editing mode.

Nero Video Manual
38 © 2018 Nero AG and Subsidiaries. All rights reserved.
If you edited a project in a certain mode, this mode will be displayed when closing and
re-opening the project.
If you started a project in the Advanced Editing mode, switching to the Express
Editing mode is possible, but the content of your project will not be transferred. You
will start with an empty content area in the Express Editing mode. When you switch
back to the Advanced Editing mode, you can resume the project you started in
the Advanced Editing mode.
4.1.2. Movie Options Window
In the Movie Options window you can set up all settings for the content area.
When you click the Make > Movie or Slide Show button in the Content screen,
the Movie Options window is opened automatically before the video editing screen is
displayed according to the chosen settings.
In the video editing screen, you can reopen the Movie Options window to change the
current setting options by selecting the Movie Options entry from the Options menu in
the header bar. Please consider that the content in the content area is adapted to your
changes.
Various setting options are provided on the left. A summary of the selected settings is
shown in an Information display on the right. The following setting options are available:
Input field
Movie name
Defines or changes the name of the movie which is used as the title name
in the Content screen and which is visible on buttons in the menu when
burning the movie to a disc.
Option buttons
Resolution
Selects the resolution from a list of possible resolutions and defines the
resolution of the resulting video.
Ideally, you should use the settings with which your source material was
recorded.
Drop-down
menu
Frame rate
Allows you to select the frame rate.
Depending on the resolution you have selected, different frame rate
options are available. TV resolutions do not offer as many different frame
rate options as HDTV resolutions do.
Ideally, you should use the settings with which your source material was
recorded.

Nero Video Manual
39 © 2018 Nero AG and Subsidiaries. All rights reserved.
Drop-down
menu
Audio
Chooses which audio format is used.
The Stereo (2 Channel) option button is selected by default.
Clicking the Advanced Settings button in the lower left of the screen opens
the Advanced Settings window. You should only change the expert settings if you are
sufficiently familiar with this area of video encoding. The Advanced Settings button is
only available for changes; it is not available for the initial content area set up.
4.1.3. Preview Area
You can preview your project and edit (scale, rotate) clips in the preview area in the upper
left of the video editing screen. Shift the current position by dragging the timeline slider
on the time scale.
The following setting options are available in the preview area:
Button with
pop-up menu
Playback
quality
Allows you to define the preview playback quality of your project.
Depending on the option you have selected in the Movie
Options window, the Low, Medium, and High entries are available.
Button Switches to full screen mode.
A control panel is displayed in the lower area of the full screen. To return
to window mode, press the Esc key on your keyboard.
Button with
pop-up menu
Tools
Allows you to select the desired editing tools: You can choose to display
rulers, guide lines, as well as a safe area which marks the outer 10 percent
of the total menu width and height as protected from title editing and the
outer 5 percent of the total menu width and height as generally protected.
The Snap to Guide tool sets the clip to the guide if you come near a
guide. The Snap to Object tool sets clips to each other if you come at 10
pixels to the snap line of an object with another one. Snap lines are left,
right, bottom, top, horizontal center, and vertical center of both clips.
Button
Creates a snapshot of the displayed position in the video title.
Button
/ Jumps to the next or previous edit (from all tracks).

Nero Video Manual
40 © 2018 Nero AG and Subsidiaries. All rights reserved.
Button
/ Jumps to the next or previous frame.
Button
Stops the playback of the movie.
Button
/ Begins/pauses the playback of the movie.
Jog wheel
Navigates through the project on a frame-by-frame basis.
4.1.4. Media Area
On the My Media palette in the upper right of the video editing screen you can search
for the desired media clips. Here, you can also import clips that can then be added to the
project. Click the Import drop-down menu on the right to import more clips from various
sources, e.g. from Nero MediaBrowser or an AVCHD camera, into Nero Video. Click
the Capture entry to display the Capture Video screen.
The different media types are displayed on single tabs. You can arrange the media within
these tabs by selecting the desired entry in the Arrange by drop-down menu. Use
the Show drop-down menu to narrow the selection of files that is displayed.
You can choose to see your media listed in thumbnail view (Large thumbnails or Small
thumbnails) or List view; the Small thumbnails view is activated by default.
The following tabs are available on the My Media palette:
Videos
Provides imported video clips and subclips.
You can create subclips from your videos via the Scene Detection entry in
the context menu. The whole source clip stays available on the tab after
pre-trimming, the resulting subclips are listed below.
Pictures Provides imported pictures.
Audio Provides imported audio clips.
Double-click any video clip, picture, or self-imported audio clip to open a Preview window
in which you can pre-trim the item into sub clips and view metadata information such as
the storage path. To preview Nero Seamless Music clips, select List view and click
the Play button displayed in the lower left corner of the preview picture.

Nero Video Manual
41 © 2018 Nero AG and Subsidiaries. All rights reserved.
The Download Content button allows you to download the Nero Content Pack.
The Nero Content Pack includes additional content such as theme packs, disc menus, and
effects to enhance your various projects in Nero Video. Note that the Download
Content button is only displayed if the additional content is not yet installed.
4.1.4.1. Nero Seamless Music
The Nero Seamless Music category on the Audio tab offers audio clips which
dynamically adapt their duration to the length of your project. This means that the audio
clips are not simply shortened or stretched – while their duration is adapted, their inner
structure and dynamic is kept so that they still have an intro, main part, and outro. To
make use of this feature, simply drag an audio clip of the Nero Seamless Music category
onto the timeline; the audio clip duration and structure will be adjusted automatically.
4.1.5. Effect Palette
Nero Video is available in different versions with a varying feature range. Depending
on the Nero product you purchased, your version of Nero Video may be limited and may
not include the full feature range.
If you have a limited version of Nero Video without the features mentioned here, you can
upgrade your Nero product at www.nero.com to get the full version of Nero Video with
all features.
All transitions, as well as audio, video and text effects, clip art and backgrounds are
available – split by category – on the Effect Palette in the upper right area of the video
editing screen. In the Express Editing mode, the different categories are available on
single tabs. The Show drop-down menu to the right of the tabs lists the subcategories of
each category. In the Advanced Editing mode, the different categories are available in a
navigation tree. To view the subcategories, click the button in front of the respective
category.
In both modes, you can add single items of the categories to the Favorites subcategory
via the context menu. You can also choose between the Large thumbnails view and
the List view via the respective buttons.
The following categories are available:
Video Effect Offers various effects which can be applied to video clips or pictures. These
effects also include Express Video Effects which e.g. brighten the items in
your project or increase or reduce their contrast with values defined in per

Nero Video Manual
42 © 2018 Nero AG and Subsidiaries. All rights reserved.
cent. This way, you do not have to edit the single properties of each item
manually – you can simply apply a matching Express Video Effect to
enhance your video clips or pictures. Other Express Video Effects are e.g.
the Fast Motion or Slow Motion effects.
The My Effects subcategory allows you to select the video effects which you
have previously customized and saved.
Audio Effect
Offers various effects which can be applied to video or audio clips. These
effects also include Express Audio Effects which e.g. reduce or increase the
bass or the treble of the items in your project in values defined in
dB. Reverb and Vintage effects are also available. This way, you can enhance
your video or audio clips or simulate that they were recorded under different
conditions.
The My Effects subcategory allows you to select the audio effects which you
have previously customized and saved.
Text
Offers Single Line and Multiline text effects which can be applied to video
clips and pictures.
The My Texts subcategory allows you to select the text effects which you
have previously customized and saved.
Transition
Offers various transitions for video clips and pictures. They allow you to
create a smooth transition from one video clip or picture to the other.
The My Transitions subcategory allows you to select the transitions which
you have previously customized and saved.
Clip Art Offers various clip arts which can be applied on top of video clips or pictures.
Backgrounds
Offers various backgrounds which can e.g. be used as an empty intro or outro
picture on top of which you can put text, or as a background for self-made
picture-in-picture effects.
4.1.5.1. Tilt Shift Effect
The Tilt Shift Effect is one of the various Video Effects offered in Nero Video. The effect
is available in different predefined versions in the Express Video Effects subcategory and
as a customizable effect in the Camera subcategory.
The Tilt Shift Effect makes the people and objects in your video clips and pictures appear
as miniature scale models. The optical illusion is achieved by focusing on a certain area of
the clip or picture while blurring the surroundings of this area. At the same time, color

Nero Video Manual
43 © 2018 Nero AG and Subsidiaries. All rights reserved.
saturation, contrast, and speed are increased to give the people and objects a toy or
“plastic” look.
Although the Tilt Shift Effect can be applied to any video clip or picture, the effect works
better if the video clip or pictures have been taken under certain conditions. It is
recommended that you use long shot and place yourself above (i.e. on a higher level than)
the people and objects when taking the video clip or pictures – just as if you were already
looking at a miniature scenery.
4.1.5.2. Properties Area
Nero Video is available in different versions with a varying feature range. Depending
on the Nero product you purchased, your version of Nero Video may be limited and may
not include the full feature range.
If you have a limited version of Nero Video without the features mentioned here, you can
upgrade your Nero product at www.nero.com to get the full version of Nero Video with
all features.
The Properties area is only available in the Advanced Editing mode.
The Properties area on the Effect Palette in the upper right of the screen shows the
properties of selected or highlighted objects you dragged and dropped to the content
area of your project from the My Media palette or Effect Palette. The specific properties
of the single transitions and effects are displayed here and the basic effects of pictures,
audio clips, and video clips are listed by default.
If you want to edit an object you dragged and dropped to the content area, it has to be
selected and the timeline slider has to be positioned on the clip. Otherwise, all setting
options in the Properties area remain gray.
The following basic effects are available:
Audio Level
Standard audio effect that allows you to adjust the volume of a respective clip.
Available for audio and video clips only.
Anchor
Point
Sets the position of the anchor point of the clip. You can either choose a
predefined position by activating one of the Corner buttons on the right or
select your own position in the input fields on the left. The center point is
selected by default.
Available for video clips and pictures only.

Nero Video Manual
44 © 2018 Nero AG and Subsidiaries. All rights reserved.
Position
Positions the clip at the desired position or sets it horizontally or vertically
centered. You can also position a selected clip in the preview area in the upper
left of the screen.
Available for video clips and pictures only.
Scale
Scales (enlarges or downsizes) either the whole item or selected key frames by
entering the desired percentage into the input fields. The Fit to
screen template is selected by default; it will change to Custom if you enter
any percentage into the input fields. The Scale and Fit and Original
Size templates are also available.
The lock is closed by default, horizontal and vertical scale can only be adapted
proportionally. Click the icon to unlock and enter different values.
You can also scale a selected clip in the preview area in the upper left of the
screen.
Available for video clips and pictures only.
Rotation
Selects the level of rotation by the number entered in the Rotation input field:
positive for clockwise and negative for counter-clockwise.
You can also rotate a selected clip in the preview area in the upper left of the
screen. Click the lower left corner of the preview frame and keep the mouse
key pressed while you drag the clip to the desired level.
Available for video clips and pictures only.
Opacity
Adapts the transparency either of the whole clip or - with the help of key
frames - of defined positions.
Available for video clips and pictures only.
Additionally, you can easily drag and drop more or optional effects from the Effect
Palette to a clip. All additional effects are listed below the basic effects in the lower part
of the Properties area. If multiple clips are selected in the content area of your project,
the same effect is assigned to each of the selected clips and listed in each clip's respective
list of effects in the Properties area. Effects are rendered top to bottom. You can modify
the order of optional effects per drag-and-drop function.
Clicking the button at the left side of any effect's headline expands an extended area
which shows the respective effect's setting options. You can adjust these individual
properties.

Nero Video Manual
45 © 2018 Nero AG and Subsidiaries. All rights reserved.
The following setting options are always available:
Button
/
Enables or disables additional effects temporarily. If you activate the button
for one of the basic effects, it will be performed in its default setting (e.g.
Opacity = 100%).
Check box
and controls
Use key
frames
Select the check box to add a key frames track for the respective effect below
the respective main clip in the content area.
As long as you have not chosen individual key frame positions on a track, the
effect settings are valid for the whole clip. Once you created single key
frames, effect settings are valid for chosen positions. A single key frame at the
start and at the end of the clip is always added by default.
You can add, select and/or delete single key frames with help of the controls.
(Only available when the Use key frames check box is selected.)
Click the Create key frame button to add a key frame to the chosen timeline
slider position. Click the Go to the next key frame/Go to the previous key
frame buttons to select the key frames on the timeline. If you click the main
button again, a highlighted key frame is deleted (Delete key frame).
Additionally, you can choose from three interpolation methods.
The Linear interpolation method sets a constant alteration rate from single
key frame to key frame; this method is set by default.
The Bezier interpolation method sets a smooth step-up from key frame to
key frame that softly fades away. The Hold interpolation method abruptly
changes to a chosen value without gradual transition.
Button
Delete
Removes the effect from the item in your project.
Not available for basic effects.
The following button is additionally available for the effects and transitions of the Video
Effect, Audio Effect, Text, and Transition categories:
Save
Allows you to save a customized version of the effect or transition. After
saving, you can choose the customized effect from the My Effects , My
Texts, or My Transitions subcategories.
Only one transition can be applied to a video clip or picture at once. If you drop a second
transition, the first transition is replaced. Clicking the button at the left side of any
transition's headline expands an extended area which shows the respective transition's
setting options. You can adjust these individual properties.

Nero Video Manual
46 © 2018 Nero AG and Subsidiaries. All rights reserved.
The following setting options are always available:
Button
/ Enables / disables a transition temporarily.
Input field
Duration
Displays and defines the duration of the transition.
The duration is set to one second by default.
Buttons
Alignment
Defines if a transition is aligned more to the left (end at cut), more to the right
(start at cut), or if it stays centered between two clips.
A transition is centered between two clips by default.
Button
Delete
Removes the transition.
You can also press the Del key on your keyboard to delete a selected transition
from your project.
4.1.6. General Handling in Express Editing
The Express Editing mode in the video editing screen is displayed by default when you
select the Make > Slide Show entry in the Content screen.
The content area of the Express Editing mode includes three tracks:
The main track with a display for Text, Video/Picture, Audio, and the respective
transitions in between
The Music track
The Narration track
The main track offers a thumbnail view for every video clip or picture which is added to
the project. Video clips are always indicated by filmstrips to distinguish them from
pictures. Every first (non-black) frame is displayed as a thumbnail. Below each thumbnail
the duration and title of the clip are displayed.
You can drag and drop new clips or pictures from the My Media palette to the
placeholders at the end of the track as well as transitions from the Effect Palette. To
change the position of a clip or picture, simply drag the respective item to the new position
and drop it between two other items. Transitions can be placed between any two clips.
You can move, trim or delete narrations and soundtracks; all other items in the track keep
their position.
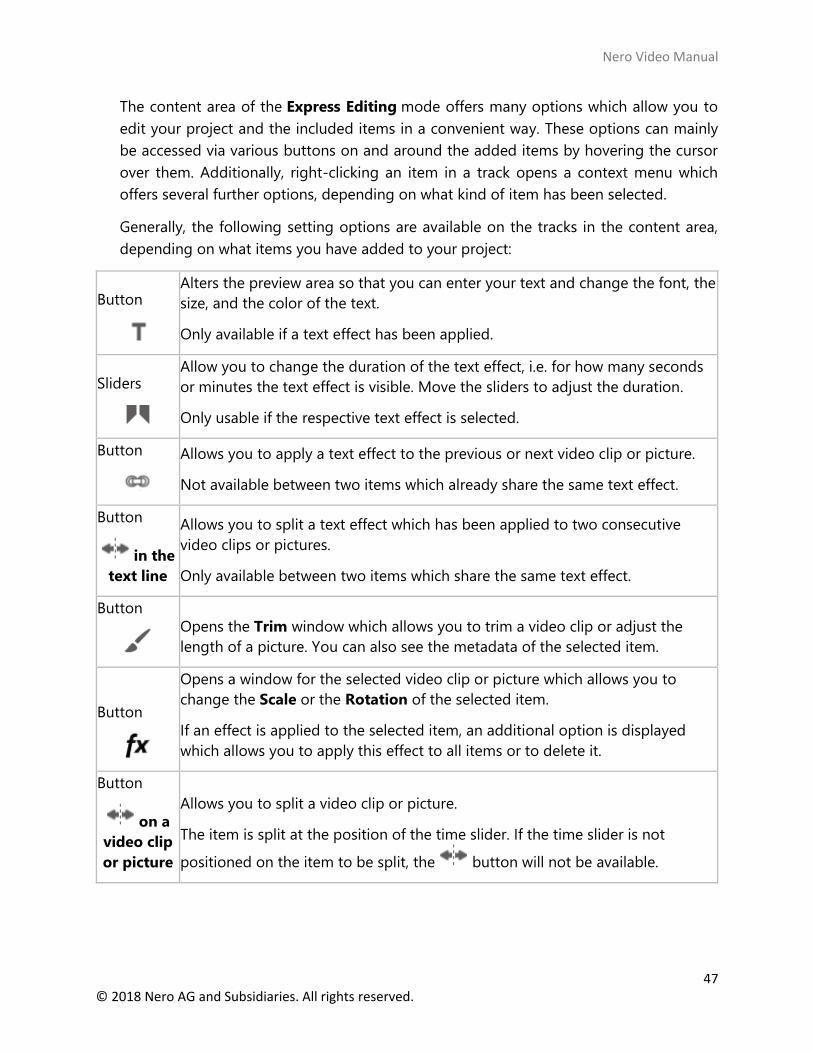
Nero Video Manual
47 © 2018 Nero AG and Subsidiaries. All rights reserved.
The content area of the Express Editing mode offers many options which allow you to
edit your project and the included items in a convenient way. These options can mainly
be accessed via various buttons on and around the added items by hovering the cursor
over them. Additionally, right-clicking an item in a track opens a context menu which
offers several further options, depending on what kind of item has been selected.
Generally, the following setting options are available on the tracks in the content area,
depending on what items you have added to your project:
Button Alters the preview area so that you can enter your text and change the font, the
size, and the color of the text.
Only available if a text effect has been applied.
Sliders Allow you to change the duration of the text effect, i.e. for how many seconds
or minutes the text effect is visible. Move the sliders to adjust the duration.
Only usable if the respective text effect is selected.
Button Allows you to apply a text effect to the previous or next video clip or picture.
Not available between two items which already share the same text effect.
Button
in the
text line
Allows you to split a text effect which has been applied to two consecutive
video clips or pictures.
Only available between two items which share the same text effect.
Button
Opens the Trim window which allows you to trim a video clip or adjust the
length of a picture. You can also see the metadata of the selected item.
Button
Opens a window for the selected video clip or picture which allows you to
change the Scale or the Rotation of the selected item.
If an effect is applied to the selected item, an additional option is displayed
which allows you to apply this effect to all items or to delete it.
Button
on a
video clip
or picture
Allows you to split a video clip or picture.
The item is split at the position of the time slider. If the time slider is not
positioned on the item to be split, the button will not be available.
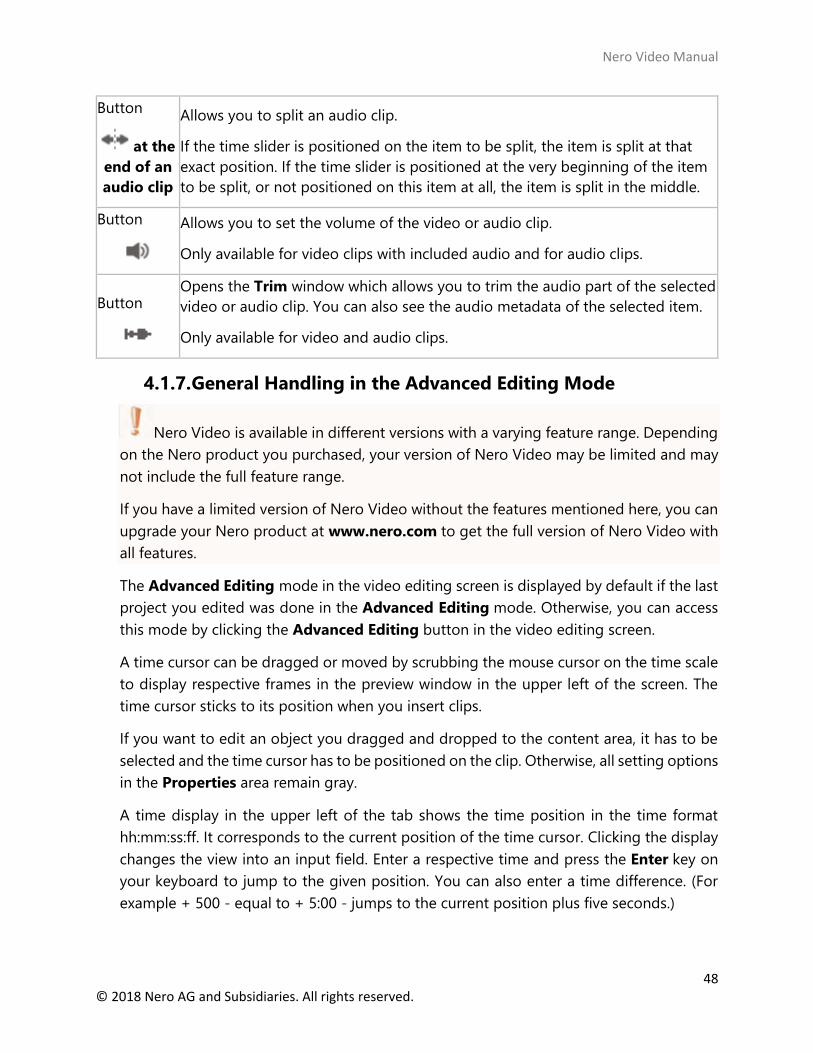
Nero Video Manual
48 © 2018 Nero AG and Subsidiaries. All rights reserved.
Button
at the
end of an
audio clip
Allows you to split an audio clip.
If the time slider is positioned on the item to be split, the item is split at that
exact position. If the time slider is positioned at the very beginning of the item
to be split, or not positioned on this item at all, the item is split in the middle.
Button Allows you to set the volume of the video or audio clip.
Only available for video clips with included audio and for audio clips.
Button Opens the Trim window which allows you to trim the audio part of the selected
video or audio clip. You can also see the audio metadata of the selected item.
Only available for video and audio clips.
4.1.7. General Handling in the Advanced Editing Mode
Nero Video is available in different versions with a varying feature range. Depending
on the Nero product you purchased, your version of Nero Video may be limited and may
not include the full feature range.
If you have a limited version of Nero Video without the features mentioned here, you can
upgrade your Nero product at www.nero.com to get the full version of Nero Video with
all features.
The Advanced Editing mode in the video editing screen is displayed by default if the last
project you edited was done in the Advanced Editing mode. Otherwise, you can access
this mode by clicking the Advanced Editing button in the video editing screen.
A time cursor can be dragged or moved by scrubbing the mouse cursor on the time scale
to display respective frames in the preview window in the upper left of the screen. The
time cursor sticks to its position when you insert clips.
If you want to edit an object you dragged and dropped to the content area, it has to be
selected and the time cursor has to be positioned on the clip. Otherwise, all setting options
in the Properties area remain gray.
A time display in the upper left of the tab shows the time position in the time format
hh:mm:ss:ff. It corresponds to the current position of the time cursor. Clicking the display
changes the view into an input field. Enter a respective time and press the Enter key on
your keyboard to jump to the given position. You can also enter a time difference. (For
example + 500 - equal to + 5:00 - jumps to the current position plus five seconds.)

Nero Video Manual
49 © 2018 Nero AG and Subsidiaries. All rights reserved.
If you want to adapt the area of your compilation that will actually be transcoded or
exported into a video, you can activate the Enable WorkSpace entry in the context menu
of the time scale and move the Workspace Mark In and Workspace Mark Out markers
to shorten the active (white) workspace. However, files to the left and right of the markers
(gray space) stay fully available for editing.
The following setting options are available in the left columns of the content area:
Button
Hide Track /
Show Track
Allows you to deactivate the preview of whole tracks.
A cleared check box in Video tracks deactivates the preview of video tracks.
A disabled loudspeaker in Audio tracks deactivates the preview of audio
tracks.
Button
Lock Track /
Unlock Track
Locks the entire track so that further editing is prevented.
For example, when you add or move clips by pressing the Shift button,
clips in locked tracks are not shifted to the right.
The following setting options are available on the lower task bar of the content area:
Button
Switch to
minimal
timeline view
Allows you to adjust the height view of the different tracks. All tracks are
displayed in small height.
In addition, you can adjust the height of the tracks manually by dragging
the separator to the respective position.
Button
Switch to
mixed
timeline view
Allows you to adjust the height view of the different tracks. The video tracks
are displayed in extended height and all audio tracks are displayed in
smaller height.
In addition, you can adjust the height of the tracks manually by dragging
the separator to the respective position.
The tracks are displayed in mixed timeline view by default.
Button
Switch to
extended
timeline view
Allows you to adjust the height view of the different tracks. All tracks are
displayed in extended height.
In addition, you can adjust the height of the tracks manually by dragging
the separator to the respective position.
Drop-down
menu
New Track
Creates a new track in the content area. Tracks are rendered from bottom to
top. You can choose if you want to add a pure video track, a pure audio
track or a video track with audio.

Nero Video Manual
50 © 2018 Nero AG and Subsidiaries. All rights reserved.
You can also create a new track by moving selected clips beyond the top
video or audio track. Drop the clips when a white insert line appears.
Button
Show all
objects in the
timeline
Adjusts the content area view to display the full range of the clips in the
project.
Slider
Zoom Zooms into the timeline view or zooms out to give an overview.
You can choose from several tools that change the mouse cursor to suit your respective
editing needs on the timeline. The following setting options are available in the right
border area of the content area:
Create
Chapter
Marker
Allows you to create a new chapter marker at a selected time cursor
position on the time scale. A position marker for each created chapter is
displayed on the time scale. If you add chapters between existing ones, the
consecutive numbering is adapted.
Renaming single chapters is possible via the Rename Chapter
Marker entry in the context menu. You can jump from position marker to
position marker with a click on the < Go to next chapter marker / Go to
previous chapter marker > arrows.
Selected chapters can be deleted by clicking the Delete Chapter
Marker button. An additional Delete all Chapter Markers entry is available
via the context menu.
Standard Tool
Allows you to select clips in the timeline. Press the Shift key on your
keyboard to select multiple clips.
Selected clips are highlighted. Associated clips are selected and highlighted
automatically.
Rectangular
Marquee
Selects multiple clips by dragging the mouse on the timeline. This has the
same effect as clicking single clips while pressing the Shift key on your
keyboard.
Keep the button pressed to display the Select track tool, Select track
backward tool, and Select track forward tool entries. The appearance of
the cursor is changing according to the selected tool.
Select track
forward tool Selects all clips to the right of the point you click in a track.

Nero Video Manual
51 © 2018 Nero AG and Subsidiaries. All rights reserved.
Keep the button pressed to display the Select track tool, Select track
backward tool and Rectangular Marquee entries.
Select track
backward tool
Selects all clips to the left of the point you click in a track.
Keep the button pressed to display the Select track tool, Rectangular
Marquee, and Select track forward tool entries.
Select track
tool
Selects all clips in the track you click.
Keep the button pressed to display the Rectangular Marquee, Select track
backward tool, and Select track forward tool entries.
Cutter
Cuts a clip in two parts. If a video contains an associated audio clip, the
audio clip is also cut.
Keep the button pressed to display the Roll Tool and Slip Tool entries.
Roll Tool
Adjusts the out point and the in point of two adjacent clips simultaneously.
Only the touch or edit point between the two clips moves while the total
display duration of both clips on the timeline is retained.
Click in an area of 10 dots to the left or right of the touch point of two
adjacent clips to select both clips and change into the "roll mode". By
scrubbing the mouse, the edit point is rolled.
Of course, an edit point cannot be rolled outside the total duration of a
respective clip. The roll tool might be useful if you want to fit two clips into
a shorter timeline gap and still need to find the perfect cutout combination
to use.
Keep the button pressed to display the Slip Tool and Cutter entries.
Available for video clips only.
Slip Tool
Changes the in and out point of a cut clip on the timeline. When scrubbing
the clip, the total duration of the file is shown. Surrounding clips are not
affected.
Adjusting the visible segment of a clip by scrubbing to the left and right
does not change its position or duration on the timeline. Instead, scrubbing
changes what cutout appears in the timeline.
Of course, if the total duration of the file is the same as the duration of the
clip in the timeline, slipping will not have an effect. The slip tool might be
useful if you want to fit a clip into a timeline gap and still need to decide
which outcut of the source file is the best to fill the space.

Nero Video Manual
52 © 2018 Nero AG and Subsidiaries. All rights reserved.
Keep the button pressed to display the Cutter and Roll Tool entries.
Available for video clips only.
Magnet
Aligns a dragged clip to another in the timeline if its border hovers an area
within 10 dots left or right to the border of the other clip. You can also align
dragged clips to clips in other tracks.
A catch marker is displayed if the clips are aligned to each other. Catch
markers are only displayed if the Magnet is activated.
The Magnet is activated by default.
Colored markers can be applied to single clips (Label) as well as single positions
within a clip (Nero Clip Marker). They are available via the Label and Nero Clip
Marker entry in the context menu. These markers in various colors serve only as an
orientation guide for labeling single clips or positions.
When you no longer need a certain label, select the transparent label via the Label entry
in the context menu. To remove a clip marker, select it in the timeline and press
the DEL key to delete it.
4.1.8. Track Handling in the Advanced Editing Mode
The content area in the Advanced Editing mode contains a number of tracks which are
rendered from bottom to top. New pure video tracks and combination tracks are added
above the current top track. New pure audio tracks are added below the recent
bottom track. Double-clicking a track's title column selects the name so that you can
rename it.
You can delete empty tracks via the respective entry in the context menu. The function
automatically deletes all empty tracks in the tracks area. In any event, the default tracks
always remain.
The following tracks are available by default:
Master Effects
Contains the master effects. Effects applied to this track are always
rendered to the resulting video output of all tracks.
The Master Effects track is always on top of all other tracks. It cannot be
renamed or deleted.
Video 2
Contains the video clips and pictures of the second track.
Video 2 and Audio 2 are associated or linked by default.

Nero Video Manual
53 © 2018 Nero AG and Subsidiaries. All rights reserved.
Audio 2
Contains the audio clips of the second track.
Video 2 and Audio 2 are associated or linked by default.
Video 1
Contains the video clips and pictures of the first track.
Video 1 and Audio 1 are associated or linked by default.
Audio 1
Contains the audio clips of the first track.
Video 2 and Audio 2 are associated or linked by default.
Music Contains pure audio clips (e.g. for the use of background music).
Narration Contains pure audio clips (e.g. for the use of narration clips).
4.1.9. Clip Handling in the Advanced Editing Mode
When you drag a clip from the media area to a track in the content area, the clip's duration
is displayed. The duration is determined by the timescale setting - the opacity setting is
set to 50% so that the items underneath are visible. The preview area in the upper left of
the video editing screen temporarily shows the frame at the position of the insert marker
instead of the frame at the position of the timeline slider.
You can drag multiple video clips or pictures from the media area to a track in the content
area. The dropped items are then arranged successively and aligned to each other.
If clips are linked to the one you selected in the timeline (like a video clip with
included audio), the linked clip is also highlighted. Both clips in a link are affected when
you trim, move, or copy one of them. You can detach the link via the Unlink Audio &
Video entry in the context menu. Vice versa, if one independent video and one audio clip
are selected, you can apply a link via the Link Audio & Video entry in the context menu.
It is not possible to link multiple audio clips to one video clip.
You can insert clips into the content area in various combinations. The following basic
rules or consequences apply for dragged clips:
Video clip with
included audio
When dropped in a combination track, video and audio are added.
When dropped in a video track, video is added and audio is ignored.
When dropped in an audio track, audio is added and video is ignored.
Video clip
without audio
When dropped in a combination track, video is added and audio stays
empty.

Nero Video Manual
54 © 2018 Nero AG and Subsidiaries. All rights reserved.
When dropped in a video track, video is added.
When dragged over an audio track, a Forbidden cursor is shown.
Audio clip
without video
When dropped in a combination track, audio is added and video stays
empty.
When dropped in an audio track, audio is added.
When dragged over a video track, a Forbidden cursor is shown.
You can insert clips into the content area and edit them there in various ways. The
following basic rules or consequences apply for clip handling:
Selecting clips Clicking a clip selects and highlights the respective clip in the timeline.
Linking and
unlinking clips
If clips are linked to the one you selected in the timeline (like a video clip
with included audio), the linked clip is also highlighted. Both clips in a
link are affected when you trim, move, or copy one of them.
You can detach the link via the Unlink Audio & Video entry in the
context menu. Vice versa, if one independent video and one audio clip
are selected, you can apply a link via the Link Audio & Video entry in
the context menu. It is not possible to link multiple audio clips to one
video clip.
Fitting clips into
gaps (Shifting)
If necessary, the width of a dragged clip is adjusted to fit into the gap it
is dropped to. In this case, the end of the clip is truncated.
To fit a clip into a gap without cutting it, keep the Shift key on your
keyboard pressed while dropping the clip. All items in all tracks to the
right of the insert marker's position are shifted to the right. The offset is
according to the duration of the dropped clip.
This way it is also possible to divide a clip on a track by dropping a new
clip in the middle of the existing clip. The right part is shifted to the right
together with all other track objects to the right of the insert marker.
Moving clips
(Copy and paste)
A selected clip can be moved within a track or between tracks. Basically
the same rules apply for moving as for inserting per drag-and-drop
function.
Selected clips can be copied to the clipboard (simultaneously press
the Ctrl + C keys on your keyboard) and pasted to another timeline
position (simultaneously press the Ctrl + V keys on your keyboard). The
clips are inserted at the position of the timeline slider.

Nero Video Manual
55 © 2018 Nero AG and Subsidiaries. All rights reserved.
Trimming clips
A clip is added in full length (or in its pre-trimming length if you have
trimmed it before).
The default length of a picture is 4 seconds. You can trim a clip down to a
minimum of 1 frame and to the maximum of the respective media file. To
display left or right trim cursors, hover your standard mouse cursor over
the sides of a selected clip. A preview of the potentially first or last frame
is shown in the preview area. Double-click any clip to open
a Trim window in which you can trim the item on an exact frame by
frame basis.
If two clips (audio and video) are associated with each other, both clips
are trimmed.
Deleting clips
Selected clips can be deleted by pressing the Del key on your keyboard.
Press the Shift + Del keys on your keyboard to remove selected clips
and to also shift all remaining clips to the left.
4.1.10. Arranging Screen
The Arranging Screen allows you to easily rearrange the content you have added to your
project. It is opened when you click the button in the content area. The screen then
expands and covers the whole video editing screen.
The Arranging Screen gives you an overview of the video clips and pictures you have
added to the content area. Each item is displayed as a thumbnail. With the thumbnail
overview, you can easily decide whether you want to change the order of the video clips
and pictures. If you want to change the order, you can simply drag the respective item to
the desired position. When you are finished, click the button to return to the normal
view of the video editing screen.
When you edit your project in the Arranging Screen, the following rules apply:
Only one track is shown in the Arranging Screen – the main track in the Express
Editing mode, and the first track from below (usually the Video 1 track) in
the Advanced Editing mode.
The Arranging Screen only shows video clips and pictures, even if these items include
audio or have audio clips linked to them.
Linked audio is moved with a video clip or picture only if it is in the same track.
Unlinked audio and linked audio clips added to another track than the video clip or
picture will not be moved.

Nero Video Manual
56 © 2018 Nero AG and Subsidiaries. All rights reserved.
You can right-click an item in the Arranging Screen to open a context menu. This
context menu allows you to Trim or Delete the selected item.
Gaps are closed automatically when deleting or trimming an item in the Arranging
Screen.
4.1.11. Toolbar
The toolbar is located between the palettes area on the upper right and the content area
in the lower part of the video editing screen.
The following setting options are available in the toolbar:
Drop-down menu
Nero RhythmSnap
Allows you to start the rhythm detection for audio clips that you have
added to your project. Additionally, you can e.g. add new rhythm
markers or remove all rhythm markers.
Button
Nero PiP
Opens the Nero PiP Effects window in which you can choose
between various Nero Picture in Picture Effect templates. These
templates allow you to create multitrack overlay projects in just a few
steps.
The templates are sorted by the number of elements, i.e. placeholders,
available per template. Each template has a certain number of
placeholders which you can replace with the desired video clips or
pictures after inserting the template.
You can also change the duration and insert setting options in this
window.
Button
Themes
Opens the Themes window in which you can choose files and set up
basic editing options for your movie. You will find templates for
various themes such as birthday or wedding.
Each template amends your project by a theme-based intro and outro
video and automatically inserts various suitable (text) effects,
transitions, as well as background music into the content area.
Drop-down menu
Fit Music
Offers the Fit Slide Show to Music and the Fit Music to
Project entries.
The Fit Slide Show to Music feature allows you to extend or shorten
your slide show automatically so that it has the same duration as the
music you have added to your project.

Nero Video Manual
57 © 2018 Nero AG and Subsidiaries. All rights reserved.
The Fit Music to Project feature allows you to automatically adjust
the duration of the added music to the duration of the project.
Button
Record Audio
Opens the Audio Recording Settings window in which you can
record a narration (a spoken comment) for single clips in the content
area.
By default, the narration is recorded to the Narration track at the
position of the timeline slider but it can be moved to any free audio
track position.
Button
Duration
Opens the Duration window in which you can choose between
three Insert mode options and the corresponding duration.
The Shift entry is selected by default.
The Auto fill gap option button is only available when a gap is left
between a single selected clip and the following item on a track.
Drop-down menu
Movie Detection
Scene Detection - Starts a scene detection of a selected clip in the
content area. The detected subclips are inserted back into the track,
thereby replacing the source clip. They can be edited separately.
Ad Spotter - Opens the Ad Spotter window in which all settings can
be defined so that Nero Video can search for and delete commercial
sequences in your captured files from your project.
Music Grabber - Opens the Music Grabber window in which all the
settings can be defined to search for music clips in movies.
Only available if a single clip is selected in the content area.
4.1.11.1. Nero RhythmSnap
The Nero RhythmSnap feature allows you to detect the rhythm of audio clips that you
have added to your project. The single beats of the rhythm are visualized as markers in
the respective track and work like a magnet: when you drag video clips or pictures onto
the content area and get close to a rhythm marker, the dragged item “snaps” to this
marker. With this feature, you can e.g. create slide shows in which the pictures change to
the rhythm of the music.
You can access the rhythm detection feature and relevant editing options via
the menu as well as the context menu. The following entries are
available:

Nero Video Manual
58 © 2018 Nero AG and Subsidiaries. All rights reserved.
Rhythm Detection
Starts the rhythm detection of the marked audio clip. After the
detection is completed, the Nero RhythmSnap window is opened.
Readjust
Videos/Pictures to
Rhythm
Readjusts the video clips/pictures to the detected rhythm markers. The
duration you have set for pictures is kept or only slightly altered so
that the structure of your project will be kept.
Add New Rhythm
Marker
Allows you to manually add new rhythm markers. Move the position
marker to the desired position before selecting this entry.
Remove all Rhythm
Markers Allows you to remove all rhythm markers at once.
The Nero RhythmSnap window is opened when you select the Rhythm Detection menu
entry. The following setting options are available:
Display with slider
Detected rhythm
markers
Displays the number of detected rhythm markers. The slider allows
you to change the amount of rhythm markers which will be inserted.
Check box
Use transitions
between videos /
pictures
Inserts a transition between two items when you snap them together
at the position of a detected rhythm marker.
Rhythm detection also works for audio tracks of video clips. Note that you have to
unlink the video from the audio track before you can use the Readjust Videos/Pictures
to Rhythm function. To unlink video and audio, select the Unlink Video and Audio entry
in the context menu of a video clip.
4.1.11.2. Nero Picture in Picture (PiP) Effects
Nero Video is available in different versions with a varying feature range. Depending
on the Nero product you purchased, your version of Nero Video may be limited and may
not include the full feature range.
If you have a limited version of Nero Video without the features mentioned here, you can
upgrade your Nero product at www.nero.com to get the full version of Nero Video with
all features.
The Nero Picture in Picture Effects feature allows you to easily create multitrack overlay
projects with animated picture-in-picture effects in just a few steps. You can choose
between many different templates in the Nero PiP Effects window. Each template has a

Nero Video Manual
59 © 2018 Nero AG and Subsidiaries. All rights reserved.
certain number of placeholders and is specifically animated; some of them also have
different backgrounds to choose from.
The templates are sorted by their number of placeholders. Depending on the mode you
are in, the display differs after you have selected a template and inserted it into your
project. In the Advanced Editing mode, each placeholder occupies one video track in the
content area. In the Express Editing mode, the template is represented by one thumbnail
in the content area, but the single placeholders are visible in the preview area. To replace
the placeholders with video clips and pictures, you can drag the desired items from the My
Media palette and drop them onto the respective placeholders in the preview area or in
the content area. Additionally, you can also edit an item in the content area first before
dropping it onto a placeholder.
Nero PiP Effects Window
The Nero PiP Effects window is opened after clicking the Nero PiP button, with
the Template tab being displayed. It allows you to choose between various Nero Picture
in Picture Effect templates and to watch an animated preview of them.
The following setting options are available on the Template tab of the Nero PiP
Effects window:
Area
Template selection
Displays the available Nero Picture in Picture Effect templates and
allows you to choose one. The templates are divided according to the
number of elements, i.e. placeholders, within the respective template.
Area
Preview
Displays an animated preview of the Nero Picture in Picture Effect
template you have selected in the template selection area.
Drop-down menu
Background
Displays the available backgrounds for the Nero Picture in Picture
Effect template you have selected in the template selection area and
allows you to choose one.
Only available if backgrounds are available for the selected Nero
Picture in Picture Effect template.
On the Settings tab of the Nero PiP Effects window, you can define the insert setting
options for the Nero Picture in Picture Effect templates.
The following option buttons are available on the Settings tab:
Duration/Insert
mode
Includes the Duration input field and, if you are in the Advanced
Editing mode, the Insert mode drop-down menu.
The Duration input field allows you to define the duration of the
selected Nero Picture in Picture Effect template. Every Nero Picture
in Picture Effect template has a default and a minimum duration.

Nero Video Manual
60 © 2018 Nero AG and Subsidiaries. All rights reserved.
The Insert mode drop-down menu allows you to choose between
three insert setting options. They determine how the Nero Picture in
Picture Effect template is inserted into the timeline.
Use gap: This is the default setting. Inserts the template into the gap
to the right of the time cursor.
Only available if the gap has at least the length of the template you
want to insert.
Overwrite: Inserts the template according to the duration you have
selected, without adjusting its length to the gap. If the template is
longer than the gap to the right of the time cursor, the video
clips/audio clips/pictures or parts of these items to the right of the
template are overwritten by the template.
Shift: Shifts the video clips/audio clips/pictures to the right of the time
cursor and positions them after the template.
Auto fill gap
Inserts the template into the gap to the right of the time cursor. The
duration of the template is automatically adjusted and cannot be
manually modified.
Only available if the time cursor is placed in a gap that has at least the
length of the template you want to insert. If the time cursor is placed
at the end of the last video clips/audio clips/pictures in the timeline,
the default duration of the template is used.
The Download Content button allows you to download the Nero Content Pack.
The Nero Content Pack includes additional content such as theme packs, disc menus, and
effects to enhance your various projects in Nero Video. Note that the Download
Content button is only displayed if the additional content is not yet installed.
4.1.11.3. Movie Wizard
Nero Video is available in different versions with a varying feature range. Depending
on the Nero product you purchased, your version of Nero Video may be limited and may
not include the full feature range.
If you have a limited version of Nero Video without the features mentioned here, you can
upgrade your Nero product at www.nero.com to get the full version of Nero Video with
all features.
In the Themes window you can choose themes and set up basic editing options for your
movie. The window is opened when you click the Themes button in the upper right of the
content area in the video editing screen.

Nero Video Manual
61 © 2018 Nero AG and Subsidiaries. All rights reserved.
The Download Content button allows you to download the Nero Content Pack.
The Nero Content Pack includes additional content such as theme packs, disc menus, and
effects to enhance your various projects in Nero Video. Note that the Download
Content button is only displayed if the additional content is not yet installed.
A list of categories and respective templates is available on the left. The category palettes
can be expanded to display the templates in a thumbnail view. By default, the wizard
chooses the first template of the first category which is not listed in the Basic category.
Of course, if Basic is your only template category, the first basic template is set by default.
Additionally, the following setting options are available in the Titles area on the right:
Input field
Opening title
Shows the default text for the intro title of the selected template. You
can modify the text. Other text attributes such as font and alignment
are pre-defined by the template and can be modified after the
template has been inserted in the timeline.
In case the selected template does not contain an intro section, the
input field is grayed out.
Input field
Closing title
Shows the default text for the outro text of the selected template.
You can modify the text. In contrast to the intro text, line breaks are
allowed. Other text attributes such as font and alignment are pre-
defined by the template and can be modified after the template has
been inserted in the timeline.
In case the selected template does not contain an outro section, the
input field is grayed out.
The following setting options are available in the Modify Original Movie area on the
right:
Check box
Apply Pan & Zoom
effects to still
pictures
Enables Pan & Zoom effects for slides. If disabled, the wizard ignores
Pan & Zoom effects.
If the selected template does not contain a Pan & Zoom effect
group or a Pan & Zoom effect for still pictures, the check box
remains gray.
Check box
Apply scene
detection to video
clips
Runs a scene detection before applying the selected theme. If
disabled, no scene detection is performed.
The check box is cleared by default.

Nero Video Manual
62 © 2018 Nero AG and Subsidiaries. All rights reserved.
The following setting options are available in the Music area on the right:
Check box
Apply theme music
If the check box is selected, the theme music defined in the template
is added to the content area. If the check box is cleared, the Movie
Wizard does not add the theme music to your project.
If the selected template does not contain theme music, this check box
as well as the balance slider underneath are grayed out.
The check box is cleared by default.
Slider
Balance
Specifies the volume level of the theme music (such as intro and
outro sounds) in contrast to the volume level of all other audio clips
which are already available in the timeline.
If you do not move the slider, both Music and My Clips have the
same audio level.
4.1.11.4. Ad Spotter Window
In the Ad Spotter window all settings can be defined for Nero Video to be able to search
for commercials in your captured files and to remove them directly from the project.
Carry out the desired settings in the left top Settings area. The Sensitivity slider defines
the sensitivity of the auto recognition. A higher sensitivity has the result that small
indications to advertising sequences in the video are also recognized as hits and are then
shown in the results. The found video and commercial sequences are shown on a film
strip. The commercial sequences have a red border.
At the top right of the window, sequences that are found can be played back in the preview
area and detailed corrections can be carried out.
In the preview area, with the aid of the position marker on the scroll bar, you can move to
a specific position within the video clip. You can also use the Position buttons next to the
time code display. Start and end markings appear for the found commercial and video
sequences. Furthermore, the following buttons are available:
Starts playback.
Pauses playback.
Stops playback.

Nero Video Manual
63 © 2018 Nero AG and Subsidiaries. All rights reserved.
/
Shortens the video sequence by removing the part between the start and the
position marking or the position and the end marking. You can also customize
the video sequence by moving the start and end markings on the scroll bar.
This item is only displayed if you have placed the position mark on the scroll bar.
Otherwise a gray button is shown.
In addition, the following setting options are available in the window:
Button
Start Starts the search in the selected video clip.
Check
box
Combine
If the check box is selected, then all the found commercial sequences are
compiled into one sequence. This also applies to the video sequences.
Button
Generate
Inserts the video without the commercial sequences back into its previous place
in the project.
Button
Cancel Cancels the procedure and closes the window.
4.1.11.5. Music Grabber Window
In the Music Grabber window all settings for identifying music clips in video clips can be
selected. Recognized music clips can be inserted into the project or can be saved as a pure
audio file that is separate from the video. In the saving, Nero Video supports the WAV,
MP3, WMA, and Ogg formats.
Define your desired settings in the Settings area in the top left area. The Sensitivity slider
defines the sensitivity of the auto-recognition. A higher sensitivity has the result that also
small indications to music clips will be recognized as hits and shown as results. The found
music sequences are shown on a film strip. At the top right in the preview area, found
sequences can be played back and, if necessary, detailed corrections can be carried out.
In the preview area with the aid of the position marker on the scroll bar you can move to
a specific position within the video title. You can also use the Position buttons next to the
time code display. A start and end marking is shown on the picture list of the preview area
for each found music clip. Furthermore, the following buttons are available:
Starts playback.

Nero Video Manual
64 © 2018 Nero AG and Subsidiaries. All rights reserved.
Pauses playback.
Stops playback.
/
Shortens the music clip between the start and position markings or the position
and the end markings. The music clip can also be customized by moving the start
and end markings on the scroll bar.
This item is only displayed if the position marking is placed on the picture scroll
bar. Otherwise a gray button is shown.
Additionally, the following buttons are available in the window:
Start Starts the search in the selected video clip.
Add to
project
Cuts out found sequences from the whole movie and inserts the desired music
clips into the project.
Save to
file(s)
Saves desired music clips as pure audio files.
In the saving, Nero Video supports WAV, MP3, WMA, and Ogg formats.
Cancel Cancels the procedure and closes the window.
4.1.12. Preview and Trim Window
Double-clicking any item in the media area or in the content area opens
the Preview or Trim window. Two tabs are available in both windows. You can use the
setting options in these windows to pre-trim or trim audio and video clips as well as
pictures in your timeline.
On the Metadata tab information like file name, file size, or the storage path is displayed.
Depending on the media file type you selected, the setting options on the second tab are
adapted accordingly. A preview or waveform view is available on all three item tabs.
Click the OK button in the lower right to save the changes and close the window.
On the Video and Audio tab, you can shift the current position by dragging the timeline
slider on the time scale. Clicking the buttons in the left-most and right-most position of
the time scale moves the scale. You can set desired Mark In and Mark Out points by
moving the respective buttons directly on the time scale or with help of the input fields
below. Keep the button pressed and move the currently chosen length on the time
scale to find the best cut from the full video or audio clip.

Nero Video Manual
65 © 2018 Nero AG and Subsidiaries. All rights reserved.
The following setting options are available on the Video and Audio tab:
Slider
Zoom Zooms into the time scale view or zooms out to give an overview.
Button
/ Jumps to the Mark In/Mark Out position on the time scale.
Button
/ Jumps to the next or previous frame.
Button
Begins the playback of the video or audio clip.
Jog wheel
Navigates through the preview on a frame-by-frame basis.
Buttons
/
Defines the start/end position of the active video or audio clip by placing the
mark in/mark out point at the position of the time cursor.
However, items on the time scale left of the mark in and right of the mark out
remain fully available for editing.
Input field
Mark
In/Mark Out
Defines the start/end position of the active video or audio clip via the entered
values.
However, items on the time scale left of the Mark In and right of the Mark
Out remain fully available for editing.
Input field
Length
Shows the display duration of the selected item.
If in the Trim window you change the duration to a new length that is longer
than the available free space on the respective timeline track, an information
window offers you to either overwrite or move the following clip.
Button
Make
Subclips
Creates subclips from your video or audio clips. The whole source clip stays
available after pre-trimming. The resulting subclips are listed below.
Only available in the Preview window.
The following setting option is available on the Picture tab:
Input field
Length
Shows the display duration of the selected item.
Additionally, the following rule is valid for the Advanced Editing mode: If in
the Trim window you change the duration to a new length that is longer than
the available free space on the respective track, an information window offers
you to either overwrite or move the following clip.

Nero Video Manual
66 © 2018 Nero AG and Subsidiaries. All rights reserved.
4.1.13. Fit Slide Show to Music Feature
The Fit Slide Show to Music feature allows you to extend or shorten your slide show
automatically so that it has the same duration as the music you have added to your
project. Note that your project can only contain pictures, but no video clips.
With the Fit Slide Show to Music feature, Nero Video will adjust the duration of each
picture in your slide show so that the duration of the slide show as a whole matches the
duration of your music.
If the music duration is longer than the slide show duration, the following rule applies:
Based on the total duration of the music, Nero Video will calculate how many seconds
have to be added to each picture to make the slide show duration match the music
duration. It does not matter if the pictures all have the same duration or different
durations; Nero Video will calculate an average value that has to be added to each picture
so that the total duration of the music is reached.
If the music duration is shorter than the slide show duration, the following rule applies:
Based on the total duration of the music, Nero Video will calculate how many seconds
have to be removed from each picture to make the slide show duration match the music
duration. It does not matter if the pictures all have the same duration or different
durations; Nero Video will calculate an average value that has to be removed from each
picture so that the total duration of the music is reached. Note that the minimum duration
of a picture is 2 seconds – if the slide show is still too long for the music, you will be asked
what you want to do in order to match the music duration (e.g. remove some pictures).
You can select the Fit Slide Show to Music feature from the Fit Music drop-down menu
in the toolbar or the context menu in the content area. Make sure to right-click next to an
item, but not the item directly to open the corresponding context menu. Also note that
pictures and music must be added to the content area; otherwise the feature will be
grayed out.
4.1.14. Fit Music to Project Feature
The Fit Music to Project feature allows you to automatically adjust the duration of the
added music to the duration of the project. The project is not limited to pictures and can
also contain video clips.
With the Fit Music to Project feature, the music will either be cut at the end of a project
or it will be looped until the project is finished. If you have added several audio clips, Nero
Video will automatically apply matching audio fades, i.e. a fade-in effect for the first audio

Nero Video Manual
67 © 2018 Nero AG and Subsidiaries. All rights reserved.
clip, a crossfade effect between two audio clips, and a fade-out effect for the last audio
clip.
You can select the Fit Music to Project feature from the Fit Music drop-down menu in
the toolbar or from the context menu in the content area. Make sure to right-click next to
an item, but not the item directly to open the corresponding context menu. Also note that
pictures/videos and music must be added to the content area; otherwise the function will
be grayed out.
4.1.15. Handling of Windows Live Movie Maker Projects
Nero Video allows you to import *.wlmp projects created with Windows Live Movie Maker.
These projects are treated as any other project you have created with Nero Video - they
can be edited, saved, exported, and burned, according to your wishes.
Windows Live Movie Maker is a Microsoft program which allows you to create slide
show and video projects. These projects can be saved as a *.wlmp project file in Windows
Live Movie Maker.
Note that Windows Live Movie Maker is only available on Windows Vista and Windows 7
operating systems.
You can open a Windows Live Movie Maker project via the Edit > Open Windows Live
Movie Maker Project selection list on the Nero Video Home screen. Before entering the
video editing screen, you will be asked whether you want to edit your project in
the Express Editing mode or the Advanced Editing mode. After that, the video editing
screen is displayed, and you can work on the project as usual.
Nero Video does not allow you to start multiple projects within one project. You can
only create and edit projects one after another. Therefore, it is not possible to load two
project files (*.nvc or *.wlmp files) into one single project. If you have two different projects
that you want to combine, export one of them to a video file via the Export button and
add the resulting video file to the project which has not been exported.
4.2. Making Movie
Nero Video is available in different versions with a varying feature range. Depending
on the Nero product you purchased, your version of Nero Video may be limited and may
not include the full feature range.
Nero Video Manual
68 © 2018 Nero AG and Subsidiaries. All rights reserved.
If you have a limited version of Nero Video without the features mentioned here, you can
upgrade your Nero product at www.nero.com to get the full version of Nero Video with
all features.
To make a movie or slide show, proceed as follows:
1. In the Home screen, select the Make Slide Show, Make Express Movie, or Make
Advanced Movie option.
The Movie Options window is opened.
If you are in the Content screen and want to create a movie or slide show for your
project, click the Make > Movie or Slide Show button.
2. Enter a title for the movie in the Movie name input field.
The name is used as the title name in the Content screen and visible on buttons in
the menu when burning the movie to a disc.
3. Choose the adequate settings options for the content area and click the OK button.
The video editing screen is displayed according to the chosen settings. If media files
are already available, they are displayed on the My Media palette in the media area
at the top right.
4. If you want to add media files that are on your computer, click the Import > Import
File entry in the upper right of the My Media palette.
A window is opened.
5. Select the desired media files and click the Open button.
The files are added to the media area. For a better overview, different media types
are automatically arranged in single tabs.
6. Select video clips that you want to add to your movie and drag them from
the Videos tab to desired positions on a track.
7. Select pictures that you want to add to your movie or slide show and drag them from
the Pictures tab to the desired positions on a track.
Video clips and pictures are added to the content area.
8. If you want to add background music to your movie or slide show, drag audio clips
from the Audio tab on the My Media palette to the desired position on a track.

Nero Video Manual
69 © 2018 Nero AG and Subsidiaries. All rights reserved.
With two pure sound tracks, you can also place several audio clips on top of one
another in Nero Video. For example, a narration (a spoken comment) can be provided on
the Narration track while music plays simultaneously on the Music track.
If you want to add transitions between individual media items or add narrations,
effects, or text effects to your project, follow the detailed descriptions in the respective
subchapters.
9. If you are satisfied with the movie or slide show, click the Next button in the lower
right corner of the main window. You can examine the status of your composition in
the preview area at any time.
The Select what you want to do next screen is displayed.
You have made a movie or slide show and can now add additional titles to your
project or create a menu.
4.2.1. Detecting Commercials
In Nero Video it is possible to search for commercials in a captured file and to remove
them directly from your project.
The following requirement must be fulfilled:
The desired video clip is displayed in the video editing screen.
To search for commercials and to remove them from your video clip, proceed as follows:
1. Select the respective clip in the content area.
2. Click the Movie Detection > Ad Spotter button.
The Ad Spotter window is opened.
3. If you wish to increase the sensitivity of the auto-recognition (High) or reduce it (Low),
customize the slider.
4. Click the Start button.
The video clip is searched for commercial sequences.
The number of found commercial sequences is shown above the film strip. The
individual video and commercial sequences are highlighted on the film strip. The
commercial sequences have a red border.
On the scroll bar in the preview area the individual sequence start and end markings
are also shown. Here, detailed corrections can be carried out if necessary.

Nero Video Manual
70 © 2018 Nero AG and Subsidiaries. All rights reserved.
5. Click the Generate button.
The video clip is inserted without the commercial sequences at the previous position
in the project.
You have removed the Web sequences from your movie.
4.2.2. Searching for Music Clips
In Nero Video you can search for music sequences in a video clip. Recognized music
sequences can be added to your project as music clips (similar to a music video) or saved
separately from the video clip as a pure audio file. In the saving, Nero Video supports the
WAV, MP3, WMA, and Ogg formats.
The following requirement must be fulfilled:
The desired video clip is displayed in the video editing screen.
To search for music sequences in a video clip, proceed as follows:
1. Click the Movie Detection > Music Grabber button.
The Music Grabber window is opened.
2. If you wish to increase the sensitivity of the auto-recognition (High) or reduce it (Low),
customize the slider.
3. Click the Start button.
The video clip is searched for music sequences.
The number of music sequences is shown above the film strip. The individual music
sequences are highlighted on the film strip. On the scroll bar in the preview area the
individual music sequence start and end markings are also shown. Here, detailed
corrections can be carried out if necessary.
4. If you wish to incorporate the found music sequences into your project as music clips,
click the Add to project button.
The found music sequences will be cut out and inserted into your project as music
clips.
5. If you wish to save the music sequences as pure audio files:
a. Click the Save to file(s) button and select the desired format.
A browser window is opened.
Nero Video Manual
71 © 2018 Nero AG and Subsidiaries. All rights reserved.
b. In the displayed directory tree select the desired storage location and click the
OK button.
The audio file is exported and saved.
You have searched for music sequences in a video clip.
4.2.3. Detecting Video Scenes
The following requirement must be fulfilled:
The desired video title is displayed in the video editing screen.
To detect scenes in a video clip, proceed as follows:
1. Select the desired video clip in the timeline.
2. Click the Movie Detection > Scene Detection button.
The Scene Detection window is opened.
3. If you want to change the sensitivity settings of the analysis:
a. Move the Sensitivity slider to a higher or lower percentage.
b. Move the Minimum Scene Length slider to a shorter or longer scene length
setting.
c. Click the Start button.
The chosen video file is analyzed. The number of detected scenes is displayed
in the Results area of the window.
4. Click the Apply button.
The clip in the timeline is cut into single scenes.
You have detected scenes in a video clip and can now edit the independent scenes.
4.2.4. Choosing a Movie Template
Nero Video is available in different versions with a varying feature range. Depending
on the Nero product you purchased, your version of Nero Video may be limited and may
not include the full feature range.
If you have a limited version of Nero Video without the features mentioned here, you can
upgrade your Nero product at www.nero.com to get the full version of Nero Video with
all features.

Nero Video Manual
72 © 2018 Nero AG and Subsidiaries. All rights reserved.
In the Themes window you can choose files and set up basic editing options for your
movie. You will find templates for various themes such as birthday or wedding. Each
template amends your project with a theme-based intro and outro video and
automatically inserts various suitable (text) effects, transitions and background music into
the content area.
The following requirements must be fulfilled:
The video editing screen is displayed.
You have inserted at least one video clip into the content area.
To use a theme-based template, proceed as follows:
1. Click the Themes button.
The Themes window is opened. A list of categories and respective templates is
available on the left. The category palettes can be expanded to display the templates
in a thumbnail view.
2. Select the desired theme on the left.
3. Add your desired intro title in the Opening title input field on the left. Other text
attributes such as font and alignment are pre-defined by the template and can be
modified after the template has been inserted in the timeline.
4. Add your desired outro title in the Closing title input field on the left. In case the
selected template does not contain an intro or outro section, the input fields are
grayed out.
5. If you want to add theme music that is defined in the template to the content area,
select the Apply theme music check box in the Music area.
6. Move the Balance slider to adjust the volume level of the theme music added by the
template in contrast to all other audio clips available in the timeline.
7. Click the OK button.
The items of the theme-based template as well as the intro and outro video are
inserted into the content area.
You have selected a theme-based template.

Nero Video Manual
73 © 2018 Nero AG and Subsidiaries. All rights reserved.
4.2.5. Recording a Narration File
You can record a narration (a spoken comment) for single clips in the content area. By
default, the narration is recorded to the Narration track at the position of the timeline
slider, but it can be moved to any free audio track position.
The following requirement must be fulfilled:
The video editing screen is displayed.
To record an audio comment and add it to your project, proceed as follows:
1. Move the timeline slider to the desired position on the timeline.
2. Click the Record Audio button.
The Audio Recording Settings window is opened.
3. If you want to change the storage location or need to change the device settings for
the audio input, make all preparations for the recording now.
4. Click the OK button.
The recording starts.
5. Record your speech.
You can see the recording time in the lower right of the progress window.
6. Click the button to stop recording.
A window informs you about the successful creation and saving of the audio file.
7. Click the OK button.
The recording is added to the timeline.
You have recorded an audio comment and added it to your project.
4.3. Movie Editing in Express Editing
The Express Editing mode allows you to create simple, yet professional-looking projects
with little effort. The Express Editing mode is kept easy and therefore does not offer as
many possibilities as the Advanced Editing mode. The Express Editing mode includes
only one main video/picture track in the content area, with two additional audio tracks
for Music and Narration. You can add effects, transitions, and text to the items in your
project and do some basic trimming. For a multitrack effect, you can use the Nero
PiP feature.

Nero Video Manual
74 © 2018 Nero AG and Subsidiaries. All rights reserved.
Nero Video is available in different versions with a varying feature range. Depending
on the Nero product you purchased, your version of Nero Video may be limited and may
not include the full feature range.
If you have a limited version of Nero Video without the features mentioned here, you can
upgrade your Nero product at www.nero.com to get the full version of Nero Video with
all features.
4.3.1. Moving and Positioning Files (Express Editing)
The following requirements must be fulfilled:
The desired items are displayed in the video editing screen.
You are in the Express Editing mode.
To move and reposition single video clips, pictures, narration or background music clips
in the content area, proceed as follows:
1. If you want to reposition a video clip or picture on the main track:
2. Drag the selected item on the timeline.
While dragging, a slim time cursor shows where the item will be positioned when you
drop it. The timeline in the content area moves back or forth when you drag the item
to the border area.
3. Drop the item to the desired position.
The item is repositioned.
4. If you want to move a narration or background music clip on the respective tracks:
a. Drag the selected item on the timeline.
The timeline in the content area moves back or forth when you drag the item
to the border area. You can also move the item from the Narration up to a
position on the Music track and vice versa.
b. Drop the item to the desired position.
The item is repositioned.
You have arranged all video clips, pictures, narration, or background music clips in
your project. You can now also customize the specific properties of selected effects or
add a theme-based template.

Nero Video Manual
75 © 2018 Nero AG and Subsidiaries. All rights reserved.
You can also move and reposition your video clips and pictures via the Arranging
Screen. The Arranging Screen is opened when you click the button in the content
area. It gives you an overview of the video clips and pictures you have added to your
project. Each item is displayed as a thumbnail. If you want to change the order of the video
clips and pictures, you can simply drag the respective item to the desired position.
4.3.2. Fitting the Display Duration of Pictures (Express Editing)
▪You can adjust the display time for the pictures of a project or slide show as desired. You
can specify a default display time for still pictures, effects, and transitions that you add to
the project in the Default Duration Values area of the Application Settings window. In
addition, you can adjust the display time of the pictures already added to the content area
to this new default value.
The following requirements must be fulfilled:
The desired files are displayed in the video editing screen.
You are in the Express Editing mode.
To adjust the display duration of single or multiple pictures in a project, proceed as follows:
1. If you want to adjust the display duration of a single picture, select the respective item
in the timeline.
2. If you want to adjust the display duration of selected pictures, keep pressing
the Ctrl key on your keyboard and select all respective items in the timeline.
3. Click the Duration button.
The Duration window is opened.
4. Enter the desired display duration in the Duration input field.
5. Click the OK button.
The display duration is adapted in the timeline.
You have adjusted the display duration of single or multiple pictures in a project.
4.3.3. Inserting Nero Picture in Picture Templates (Express
Editing)
With the Nero Picture in Picture Effects feature, you can insert Nero Picture in Picture
Effect templates into the timeline.

Nero Video Manual
76 © 2018 Nero AG and Subsidiaries. All rights reserved.
The following requirements must be fulfilled:
The video editing screen is displayed.
You are in the Express Editing mode.
To insert a Nero Picture in Picture Effect template into the timeline, proceed as follows:
1. Click the Nero PiP button.
The Nero PiP Effects window is opened with the Template tab being displayed.
2. Select the desired template in the template selection area on the left side of the
window.
An animated preview of the selected template is displayed on the right side of the
window.
3. If backgrounds are available for the selected template, select the desired background
in the Background drop-down menu.
4. To change the duration for the selected template, click the Settings tab and enter the
desired duration value in the Duration input field.
5. Click the OK button.
The Nero Picture in Picture Effect template is inserted in the timeline. It is displayed
as one thumbnail. You can now replace the placeholders with the desired video clips
and pictures by dragging them from the My Media palette or the content area and
dropping them onto the respective placeholders in the preview area.
4.3.4. Inserting Transitions (Express Editing)
Transitions can be used to link the individual video clips or pictures that were added to a
project.
The following requirements must be fulfilled:
The desired files are displayed in the video editing screen.
You are in the Express Editing mode.
To insert a transition, proceed as follows:
1. Click the Transition tab on the Effect Palette.
The subcategories of transitions are listed in the Show drop-down menu on the right
of the tab.

Nero Video Manual
77 © 2018 Nero AG and Subsidiaries. All rights reserved.
2. Choose a desired subcategory of transitions from the Show drop-down menu on the
right of the tab.
The transition types of the selected group are displayed
3. Drag the desired transition from the Effect Palette to the respective placeholder
between two clips.
Items with transitions are identified in the content area by a colored icon. Items without
a transition are indicated in the content area by a gray icon.
4. You have inserted a transition.
4.3.5. Adding an Effect (Express Editing)
You can overlay the added video clips, audio clips, or pictures of a project with effects.
The following requirements must be fulfilled:
The desired items are displayed in the video editing screen.
You are in the Express Editing mode.
To add effects to your project, proceed as follows:
1. Click the Video Effects or the Audio Effects tab on the Effect Palette.
The subcategories of effects are listed in the Show drop-down menu on the right of
the tab.
2. Choose a desired subcategory of effects from the Show drop-down menu on the right
of the tab.
The effect types of the selected group are displayed.
3. Drag the desired effect from the Effect Palette to the respective item on the timeline.
The effect is added to the selected item in the content area.
You have added effects to your project.
4.3.6. Adding a Text Effect (Express Editing)
You can overlay the added video clips or pictures of a project with text effects. Depending
on the selected text effect, you can customize the various detail settings.
The following requirements must be fulfilled:
The video editing screen is displayed.

Nero Video Manual
78 © 2018 Nero AG and Subsidiaries. All rights reserved.
You are in the Express Editing mode.
To add a text effect to your project, proceed as follows:
1. Click the Text tab on the Effect Palette.
The subcategories of text effects are listed in the Show drop-down menu on the right
of the tab.
2. Choose a desired subcategory of text effects from the Show drop-down menu on the
right of the tab.
The text effect types of the selected group are displayed.
3. Drag the desired text effect from the Effect Palette to an empty text field in the main
track.
The text effect is added to the content area.
4. Click the button on the right side of the text field in the content area.
The preview area is altered and shows the setting options for the respective text effect.
5. Enter the desired text in the text input field in the middle of the preview area.
6. If you want to change the font and its corresponding settings, click the Fonts button.
The Fonts window is opened.
a. Select the desired font, size, and color.
b. Click the button to close the Fonts window.
The text you have entered is adjusted according to the changes you have made
in the Fonts window.
c. Click the Done button in the upper left of the preview area.
All changes you have made to the text and its font are applied.
You have added a text effect to your project.
4.4. Movie Editing in Advanced Editing
The Advanced Editing mode allows you to create projects with multiple video and audio
tracks and offers many editing options. It is suitable for more elaborate projects including
the use of key frames. You can also edit effects and transitions, cut the clips of your project
conveniently, and create chapters within your project.

Nero Video Manual
79 © 2018 Nero AG and Subsidiaries. All rights reserved.
Nero Video is available in different versions with a varying feature range. Depending
on the Nero product you purchased, your version of Nero Video may be limited and may
not include the full feature range.
If you have a limited version of Nero Video without the features mentioned here, you can
upgrade your Nero product at www.nero.com to get the full version of Nero Video with
all features.
4.4.1. Creating Chapters in Timeline (Advanced Editing)
You can manually add chapters to the content area of your project. You can edit and
rename chapters as well as reposition or remove individual chapter markings.
The following requirements must be fulfilled:
The video editing screen is displayed.
You are in the Advanced Editing mode.
To create and edit chapters, proceed as follows:
1. Position the timeline slider on the timeline and click the Create Chapter
Marker button in the right border area of the content area.
A position marker for a new chapter is displayed above the time scale.
2. Repeat the previous step to add more chapters.
A position marker is added for each chapter. If you add chapters between existing
ones, the consecutive numbering is adapted.
3. If you want to move an existing chapter, select the respective position marker and drag
it to the desired position. Use the buttons to the left and right (Go to the previous
chapter marker / Go to the next chapter marker) to navigate from chapter to
chapter.
The chapter is moved to the desired position. You can move the position of the
individual chapter markers within the compilation up to the next chapter mark.
4. If you want to rename an existing chapter:
a. Double-click the respective position marker on the timeline.
The chapter name display is changed into an input field.
b. Enter the desired chapter name.

Nero Video Manual
80 © 2018 Nero AG and Subsidiaries. All rights reserved.
The chapter is renamed.
An additional Rename Chapter Marker entry is available via the context menu.
5. If you want to delete a chapter, select the respective position marker and click
the Delete Chapter Marker button. Use the buttons to the left and right (Go to the
previous chapter marker / Go to the next chapter marker) to navigate from chapter
to chapter.
The chapter is deleted.
An additional Delete all Chapter Markers entry is available via the context menu.
You have created and edited the chapters.
4.4.2. Adding a Text Effect (Advanced Editing)
You can overlay the added video clips or pictures of a project with text effects. Depending
on the text effect selected, you can customize the various detail settings.
A Master Effects track is also available in the content area. Effects applied to this
track are always rendered to the resulting video output of all tracks.
To add a master effect, simply position a desired effect on the Master Effects track (like
you would add any video clip to the timeline) and customize it like other effects.
The following requirements must be fulfilled:
The video editing screen is displayed.
You are in the Advanced Editing mode.
To add a text effect to your project, proceed as follows:
1. Click the Text category on the Effect Palette.
The subcategories of text effects are listed in the navigation tree.
2. Choose a desired subcategory of text effects from the navigation tree.
The text effect types of the selected group are displayed.
3. Drag the desired text effect from the Effect Palette to a video track on the timeline.
You can position the effect in the content area to run parallel with a specific item.
The text effect is added to the content area.

Nero Video Manual
81 © 2018 Nero AG and Subsidiaries. All rights reserved.
4. Position the timeline slider on the text effect in the timeline and double-click the text
effect.
The preview area is altered and shows the setting options for the respective text effect.
5. Enter the desired text in the text input field in the middle of the preview area.
6. If you want to change the font and its corresponding settings, click the Fonts button.
The Fonts window is opened.
a. Select the desired font, size, and color.
b. Click the button to close the Fonts window.
The text you have entered is adjusted according to the changes you have made
in the Fonts window.
7. Click the Done button in the upper left of the preview area.
All changes you have made to the text and its font are applied.
8. If you want to change other settings of the text effect, click the button to the left of
the Text Effect headline in the Properties area of the Effect Palette.
An extended area is displayed which shows the setting options for the
respective text effect.
a. Make any additional settings as desired, depending on the selected effect.
The text effect is adjusted to your requirements.
9. If you want to change the duration or position of your text effect, proceed as described
in the Moving clips chapter.
You have added a text effect to your project.
4.4.3. Editing Effects (Advanced Editing)
The basic effects of video clips, audio clips, or pictures and the additional effects you
added are customized the same way.
The following requirements must be fulfilled:
The desired items are displayed in the video editing screen.
You are in the Advanced Editing mode.
Nero Video Manual
82 © 2018 Nero AG and Subsidiaries. All rights reserved.
To customize the properties of single effects, proceed as follows:
1. Select the item with the respective effect you want to edit in the content area.
2. Click the Effect Palette.
The list of basic effects and all additional effects added to the item is displayed in
the Properties area. Effects are rendered top to bottom, you can modify the order of
optional effects with the drag-and-drop function.
As long as you have not chosen individual key frame positions on a track, the effect
settings are valid for the whole item.
3. If you want to create single key frames that will only enable the effect settings for those
positions that were chosen:
a. Select the Use key frames check box in the effect's headline.
A key frames track is displayed below the respective main item in the content
area. Additional controls are displayed next to the check box in
the Properties area.
b. Position the timeline slider on the timeline and click the Create key
frame button to add a single key frame.
The key frame is displayed on the key frames track.
c. Repeat the previous step to add more key frames.
If you want to delete an existing key frame, select the respective key frame and click
the Delete key frame button. Use the buttons to the left and right (Go to the previous
key frame / Go to the next key frame) to navigate from key frame to key frame.
4. If you want to (temporarily) disable an additional effect in your project, disable the
option button to the left of the effect's name in the headline. Enable the option button
once more to activate the effect again.
5. Click the button on the left side of any effect's headline.
An extended area is displayed which shows the effect's individual setting options.
6. Adapt the respective effect's settings in the expanded area to your requirements.
The changes are adjusted in the content area.
You have customized the properties of single effects in your project.

Nero Video Manual
83 © 2018 Nero AG and Subsidiaries. All rights reserved.
4.4.4. Adding an Effect (Advanced Editing)
You can overlay the added video clips, audio clips, or pictures of a project with effects.
Depending on the selected effect, you can customize properties such as intensity and
speed.
The following requirements must be fulfilled:
The desired items are displayed in the video editing screen.
You are in the Advanced Editing mode.
To add effects to your project, proceed as follows:
1. Click the Video Effects or the Audio Effects category on the Effect Palette.
The subcategories of effects are listed in navigation tree.
2. Choose a desired subcategory of effects from the navigation tree.
The effect types of the selected group are displayed.
3. Drag the desired effect from the Effect Palette to the respective video clip, audio clips,
or picture on the timeline.
The effect is added to the selected item in the content area.
All additional effects of an item are listed below the basic effects in the lower area of
the Properties area. You can customize the specific properties of the effects here.
A Master Effects track is also available in the content area. Effects applied to this
track are always rendered to the resulting video output of all tracks.
To add a master effect, simply position a desired effect on the Master Effects track (like
you would add any video clip to the timeline) and customize it like other effects.
You have added effects to your project.
4.4.5. Editing Transitions (Advanced Editing)
Transitions can be used to link the individual video clips, audio clips, or pictures that were
added to a project.
The following requirements must be fulfilled:
The desired transition is added in front of a selected item in the content area of the
video editing screen.

Nero Video Manual
84 © 2018 Nero AG and Subsidiaries. All rights reserved.
You are in the Advanced Editing mode.
To edit the properties of a transition in a project, proceed as follows:
1. Select the transition in the content area.
If you want to simply remove a selected transition, press the Del key on your
keyboard.
2. Click the Effect Palette.
In the Properties area, click the button at the left side of the transition's headline.
An extended area is displayed which shows the respective transition's setting options.
The duration is set to one second by default, but it can be adapted to your specific
needs.
3. If you want to adapt the duration of the transition, insert the desired length into
the Duration input field.
A transition is centered between two clips by default but it is possible to move it.
4. If you want to change the alignment more to the left (end at cut) or right (start at cut),
click the respective button in the transition's headline.
5. Adapt the respective transition's settings in the expanded area to your requirements.
The changes are adjusted in the content area.
You have edited the properties of a transition in your project.
4.4.6. Inserting Transitions (Advanced Editing)
Transitions can be used to link the individual video clips, audio clips, or pictures that were
added to a project.
The following requirements must be fulfilled:
The desired items are displayed in the video editing screen.
You are in the Advanced Editing mode.
To insert a transition, proceed as follows:
1. Click the Transition category on the Effect Palette.
The subcategories of transitions are listed in the navigation tree.
2. Choose a desired subcategory of transitions from the navigation tree.

Nero Video Manual
85 © 2018 Nero AG and Subsidiaries. All rights reserved.
The transition types of the selected group are displayed.
3. Drag the desired transition from the Effect Palette onto the respective item.
The transition is added in front of the selected item in the content area.
You have inserted a transition.
4.4.7. Inserting Nero Picture in Picture Templates (Advanced
Editing)
With the Nero Picture in Picture Effects feature, you can insert Nero Picture in Picture
Effect templates into the timeline.
The following requirements must be fulfilled:
The video editing screen is displayed.
You are in the Advanced Editing mode.
To insert a Nero Picture in Picture Effect template into the timeline, proceed as follows:
1. Click the Nero PiP button.
The Nero PiP Effects window is opened with the Template tab being displayed.
2. Select the desired template in the template selection area on the left side of the
window.
An animated preview of the selected template is displayed on the right side of the
window.
3. If backgrounds are available for the selected template, select the desired background
in the Background drop-down menu.
4. To change the duration or the insert settings for the selected template, click
the Settings tab.
5. If you want to change the duration and insert settings manually, select
the Duration / Insert mode option button.
6. Enter the desired duration value in the Duration input field and select the desired
insert setting option in the Insert mode drop-down menu.
7. If you want Nero Video to automatically calculate the duration of the template, select
the Auto fill gap option button.
8. Click the OK button.
Nero Video Manual
86 © 2018 Nero AG and Subsidiaries. All rights reserved.
The Nero Picture in Picture Effect template is inserted in the timeline. You can now
replace the placeholders with the desired video clips and pictures by dragging them
from the My Media palette or the content area and dropping them onto the
respective placeholders either in the content area or in the preview area.
4.4.8. Fitting the Display Duration of Pictures (Advanced Editing)
You can adjust the display time for the pictures of a project or slide show as desired. You
can specify a default display time for still pictures, effects, and transitions that you add to
the compilation in the Default Duration Values area of the Application
Settings window. In addition, you can adjust the display time of the pictures already
added to the content area to this new default value.
The following requirements must be fulfilled:
The desired items are displayed in the video editing screen.
You are in the Advanced Editing mode.
To adjust the display duration of single or multiple pictures in a project, proceed as follows:
1. If you want to adjust the display duration of a single picture, select the respective item
in the timeline.
2. If you want to adjust the display duration of selected pictures, keep pressing
the Ctrl key on your keyboard and select all respective items in the timeline.
3. If you want to adjust the display duration of your slide show project in a timeline track:
a. Click the Select track tool in the right border area of the content area.
All items in the track are selected.
b. Click the Duration button.
The Duration window is opened.
Additionally, to the duration itself, you can choose between three insert settings
options. The Shift entry is selected by default. All items to the right of your selected
picture are shifted to the right. The Overwrite entry adapts the display duration without
moving the following items in the timeline. (If no items are available to the right, the entry
remains gray.) The Use Gap entry adapts the duration by filling the gap between the
selected and the following item in the timeline. (As long as no gap is left, the entry remains
gray.)

Nero Video Manual
87 © 2018 Nero AG and Subsidiaries. All rights reserved.
c. Enter the desired display duration in the Duration input field.
d. Click the OK button.
The display duration is adapted in the timeline.
You have adjusted the display duration of single or multiple pictures in a project.
4.4.9. Cutting and Trimming Audio and Video Clips (Advanced
Editing)
When cutting or trimming audio or video clips in Nero Video, the original file is not
changed; instead the cut information is stored in the project.
The following requirements must be fulfilled:
The desired clips are displayed in the video editing screen.
You are in the Advanced Editing mode.
To cut or trim an audio or video clip, proceed as follows:
1. If you want to cut a clip:
a. Select the respective clip in the content area.
b. Click the button in the right border area of the content area.
The standard mouse cursor changes into a cutter.
c. Move the mouse cursor or cutter to the desired cutting position on the timeline.
In case of video clips, the exact cutting position is displayed in the preview area.
d. Click the left mouse button.
The clip is cut at the desired position. Both parts are listed in the content area.
e. Click the Standard tool button in the right border area of the content area to
change back to the standard mouse cursor.
2. If you want to trim a clip at the start or end:
a. Select the respective clip in the content area.
b. Move the mouse cursor over the left (start) or right (end) border area of the
clip.
The icon is displayed.

Nero Video Manual
88 © 2018 Nero AG and Subsidiaries. All rights reserved.
c. Keep the left mouse button pressed and shorten the clip by dragging the
mouse.
In case of video clips, the exact trimming position is displayed in the preview
area.
d. Release the mouse button at the desired position.
The clip is trimmed according to your requirements.
Trimmed parts in your clips are temporarily disabled. If you want to enable the
trimmed parts again, simply drag back the clip to its full size.
Double-click any item to open a Trim window in which you can trim the item on an
exact frame-by-frame basis.
You have cut or trimmed an audio or video clip.
4.4.10. Moving and Positioning Files (Advanced Editing)
The following requirements must be fulfilled:
The desired files are displayed in the video editing screen.
You are in the Advanced Editing mode.
To move and reposition single video clips, pictures, narration or background music clips
in the content area, proceed as follows:
1. To reposition a video clip, picture, narration or background music clip on the respective
track, drag the selected item on the timeline.
When you drag a clip from the media area to a track in the timeline, the clip's duration
is displayed. The duration is determined by the timescale setting - the opacity setting
is set to 50% so that the objects underneath are visible. The preview area in the upper
left of the video editing screen temporarily shows the frame at the position of the
insert marker instead of the frame of the timeline slider.
The catch marker aligns a dragged clip to another in the timeline if the clip's border
hovers over an area within 10 dots left or right to the border of the other. You can
align dragged clips to clips in other tracks, too.
The timeline in the content area moves back or forth when you drag the item to the
border area. You can also move item file from one track to another.

Nero Video Manual
89 © 2018 Nero AG and Subsidiaries. All rights reserved.
2. Drop the item to the desired position.
The item is repositioned.
If necessary, the width of a dragged clip is adjusted according to fit into the gap in
which it is dropped to. In this case, the end of the clip is truncated.
To fit a clip into a gap without cutting it, keep the Shift key on your keyboard pressed
while dropping the clip. All objects in all tracks right to the position of the insert marker
are shifted to the right. The offset is according to the duration of the dropped clip.
This way it is also possible to divide a timeline clip by dropping a new clip in the middle
of the existing clip. The right part is shifted to the right together with all other track objects
to the right of the insert marker.
If you want to detach the link of a video clip to its audio file to edit or move them
independently, click the Unlink Audio & Video entry in the context menu.
You have arranged all video clips, pictures, narration, or background music clips in
your compilation. You can now also customize the specific properties of selected
effects or add a theme based template.
You can also move and reposition your video clips and pictures via the Arranging
Screen. The Arranging Screen is opened when you click the button in the content
area. It gives you an overview of the video clips and pictures you have added to your
project. Each item is displayed as a thumbnail. If you want to change the order of the video
clips and pictures, you can simply drag the respective item to the desired position.

Nero Video Manual
90 © 2018 Nero AG and Subsidiaries. All rights reserved.
5. Exporting Videos
5.1. Export Video Screen
The Export Video screen is displayed when you click the Export button in the lower task
bar of the main window. It can be divided into three areas: the preview area for playing
the movie back, a selection area to the right of that, which lists the export options, and
the Format and Profile drop-down menus in the area below that.
All data that results for the output file is displayed in the Output file area. You can click
the Browse button to select the storage location for the output file. If you want to add
the output file to the Nero MediaHome library, simply select the relevant check box.
Adapted format and profile drop-down menus are available for each export option. Click
the Configure button to open a window to adjust the detail settings.
Depending on the export template chosen, the output format, aspect ratio, quality
settings, bit rate, resolution, encoding mode and/or audio quality will change.
The following export options are available in the selection area:
Export video to
file Exports a movie to a video file.
Export audio to
file
Exports the audio track from a video to an audio file. The WMA, WAV,
and Ogg formats are available.
The exported audio file can be edited externally and re-imported
into Nero Video.
Export video to
camera
Exports a movie to a tape in the camera.
Nero Video automatically sets all parameters according to the attached
camera and the Format and Profile drop-down menus are not
available.
Only available if a camera is connected to your PC and is switched on.
Export to Web
Exports a movie to the Internet in a file size adjusted accordingly.
Communities normally limit the maximum length of a video file to 10
minutes with a maximum file size of 100 MB. If the movie is too long, an
error message is displayed and Nero Video cancels the procedure.
Export video and
send it as an e-
mail attachment
Exports a movie, adjusted to an appropriate file size, to send as an e-
mail attachment.
The MPEG-1 and MP4 formats are available. You can choose between 1
MB, 2 MB, 5 MB or Custom.

Nero Video Manual
91 © 2018 Nero AG and Subsidiaries. All rights reserved.
The export file can be attached to a new e-mail from the default e-mail
application or saved to the hard drive.
If you have selected the Export video to file export option, the following export
templates are available:
AVI Contains all codecs provided by your operating system.
AVI (DV) AVI-DV type 1 and 2
WMV
Pocket PC; Broadband; Portable Device; DVD Quality; HD 720p; HD
1080p and HD 1080i
Custom - All parameters are set to a medium value but can be
customized within the scope of the WMV play.
Flash Video Flash Video (FLV)
MPEG-1
VCD compatible - All parameters in the video options are predefined
and cannot be changed, with the exception of the frame rate.
Custom - All parameters are predefined in accordance with VCD, but
can be customized within the capabilities of the MPEG-1 format.
MPEG-2
DVD-Video compatible and SVCD compatible
HDV HD1; HDV HD2 (1080i); HDTV 1080i, Editable Blu-ray Disc
compatible
Custom - All parameters are predefined in accordance with DVD-Video.
The parameters of all profiles are predefined and can be customized
within the capabilities of the MPEG-2 format.
MP4
PSP, MPEG4 3GPP; MPEG4
The parameters of all profiles are predefined and can be customized
within the capabilities of the respective profile.
AVC
PSP AVC; PSP AVC (480x272), PSP AVC (720x480), PSP AVC
(640x480), PS3 AVC, iPod/iPhone AVC, AVC
The parameters of all profiles are predefined and can be customized
within the capabilities of the respective profile.
AVC NVIDIA
CUDA
PSP AVC; PSP AVC (480x272), PSP AVC (720x480), PSP AVC
(640x480), PS3 AVC, iPod/iPhone AVC, AVC
The parameters of all profiles are predefined and can be customized
within the capabilities of the respective profile.
To use the CUDA technology, a supported NVIDIA graphic card must be
connected to the PC.
AVC Intel(R)
Media SDK
PSP AVC; PSP AVC (480x272), PSP AVC (720x480), PSP AVC
(640x480), PS3 AVC, iPod/iPhone AVC, AVC
Nero Video Manual
92 © 2018 Nero AG and Subsidiaries. All rights reserved.
The parameters of all profiles are predefined and can be customized
within the capabilities of the respective profile.
To use the Intel(R) Media SDK technology, a supported Intel(R) graphic
card must be connected to the PC.
AVC AMD App
Acceleration
PSP AVC; PSP AVC (480x272), PSP AVC (720x480), PSP AVC
(640x480), PS3 AVC, iPod/iPhone AVC, AVC
The parameters of all profiles are predefined and can be customized
within the capabilities of the respective profile.
To use the AMD App Acceleration technology, a supported ATI graphic
card must be connected to the PC.
AVCHD / Blu-ray
AVCHD compatible, Blu-ray Video compatible
To burn a disc in AVCHD disc format, a supported DVD burner must be
connected to the PC.
To burn a Blu-ray disc, a supported Blu-ray burner must be connected
to the PC.
5.2. Exporting Video to File
In the Export Video screen, you have various options for exporting a movie that you
created in Nero Video in addition to burning it to disc.
The following requirement must be fulfilled:
The Content or video editing screen is displayed.
To export a movie as a file to the hard drive, proceed as follows:
1. Click the Export button in the lower task bar of the main window.
The Export Video screen is displayed.
In the Select what you want to do next selection, choose the Export option.
2. Select the Export video to file export option in the selection area.
The drop-down menus for output format and profile are displayed accordingly.
3. Select the desired format in the Format drop-down menu and the desired profile in
the Profile drop-down menu.
The selected export template primarily specifies the output type and playback quality.
4. If you want to make changes to the export settings:
a. Click the Configure button.
Nero Video Manual
93 © 2018 Nero AG and Subsidiaries. All rights reserved.
A window is opened.
b. Make the desired changes and click the OK button.
5. If you want to save the video to another folder and/or under a name other than the
name displayed in the Output File display panel:
a. Click the Browse button.
The Select a location for the video file window is opened.
b. Browse to the desired location.
c. Enter the desired file name in the File Name input field and click
the Save button.
6. Click the Export button.
The export starts. Progress while exporting is displayed in the same window. Once the
export is complete, a window is opened.
7. Click the OK button.
Nero Video automatically returns to the screen that was displayed before the export.
You have exported a movie to the hard drive.
5.3. Exporting Audio to File
In the Export Video screen, you have various options for exporting a movie that you
created in Nero Video in addition to burning it to disc.
The following requirement must be fulfilled:
The Content or video editing screen is displayed.
To export a movie's audio track, proceed as follows:
1. Click the Export button.
The Export Video screen is displayed.
2. Select the Export audio to file export option in the selection list.
The drop-down menus for output format and profile are displayed accordingly.
3. If you want to make changes to the export settings:
a. Click the Configure button.
A window is opened.

Nero Video Manual
94 © 2018 Nero AG and Subsidiaries. All rights reserved.
b. Make the desired changes and click the OK button.
4. If you want to save the video to another folder and/or under a name other than the
name displayed in the Output file display panel:
a. Click the Browse button.
The Select a storage location for the video file window is opened.
b. Browse to the desired location.
c. Enter the desired file name in the File Name input field and click the Save
button.
5. Click the Export button.
The export starts. Progress while exporting is displayed in the same window. Once the
export is complete, a window is opened.
6. Click the OK button.
Nero Video automatically returns to the screen that was displayed before the export.
You have exported a movie's audio track. The exported audio file can be edited
externally and re-imported into Nero Video.
5.4. Exporting Video to Camera
In the Export Video screen, you have various options for exporting a movie that you
created in Nero Video in addition to burning it to disc.
This feature is only available if a camera is connected to your PC and is switched on.
The camera must be in VCR mode.
The following requirement must be fulfilled:
The Content or video editing screen is displayed.
To export a movie to camera, proceed as follows:
1. Click the Export button.
The Export Video screen is displayed.
In the Select what you want to do next selection, choose the Export option.
2. Select the Export video to camera export option in the selection area.

Nero Video Manual
95 © 2018 Nero AG and Subsidiaries. All rights reserved.
The format is automatically adjusted to the camera connected.
3. Click the Export button.
The export starts. Progress while exporting is displayed in the same window. Once the
export is complete, a window is opened.
4. Click the OK button.
Nero Video automatically returns to the screen that was displayed before the export.
You have exported a movie to the camera.
5.5. Exporting Video to Web
In the Export Video screen, you have various options for exporting a movie that you
created in Nero Video in addition to burning it to disc.
The following requirement must be fulfilled:
The Content or video editing screen is displayed.
To export a movie to the Internet, proceed as follows:
1. Click the Export button.
The Export Video screen is displayed.
2. Select the Export to Web export option in the selection area.
The Profile drop-down menu is displayed.
3. Select the desired quality for the output file from the Profile drop-down menu.
The quality details for the selected profile are displayed in the Output file area below
the Profile drop-down menu.
4. Click the Export button.
A window informs you that your video must now be converted to an export file.
Communities normally limit the maximum length of a video file to 10 minutes with a
maximum file size of 100 MB. If the movie is too long, an error message is displayed
and Nero Video cancels the procedure.
5. Click the Yes button.
The video is exported to a file. Progress is displayed in the same window.

Nero Video Manual
96 © 2018 Nero AG and Subsidiaries. All rights reserved.
After your video is converted, the Upload to web window is opened. The communities
available for uploading media are displayed on the left side of the window.
When starting the export feature, Nero checks whether new configuration files are
available. A window informs you if there are any recommended or required updates.
6. Select the desired community.
7. Log into your account of the selected community using your user name and your
password.
The input fields of the selected community are displayed accordingly.
8. Enter a title and brief description of your video in the Title and Description input
fields, as well as any other information depending on the selected community.
9. You must agree to the terms of use for the communities in order to upload files. Select
the appropriate check boxes at the bottom of the window.
The Upload button is enabled once you have made all the required entries.
10. Click the Upload button.
The export starts. Progress while exporting is displayed in the same window. Nero
Video automatically returns to the screen that was displayed before the export.
You have exported a movie to the Internet.
5.6. Exporting Video to Send it as E-Mail
In the Export Video screen, you have various options for exporting a movie that you
created in Nero Video in addition to burning it to disc.
The following requirement must be fulfilled:
The Content or video editing screen is displayed.
To export a movie to send via e-mail, proceed as follows:
1. Click the Export button.
The Export Video screen is displayed.
2. Select the Export video and send it as an e-mail attachment export option in the
selection area.
The drop-down menus are displayed accordingly.

Nero Video Manual
97 © 2018 Nero AG and Subsidiaries. All rights reserved.
3. In the upper drop-down menu, select the desired format.
4. In the bottom drop-down menu, select the desired maximum file size.
5. If you want to make changes to the export settings:
a. Click the Configure button.
A window is opened.
b. Make the desired changes and click the OK button.
6. If you want to save the video to another folder and/or under a name other than the
name displayed in the Output File display panel:
a. Click the Browse button.
The Select a storage location for the video file window is opened.
b. Browse to the desired location.
c. Enter the desired file name in the File Name input field and click the Save
button.
7. Click the Export button.
The export starts. Progress while exporting is displayed in the same window. Once the
export is complete, a window is opened.
8. Click the OK button.
Nero Video automatically returns to the screen that was displayed before the export.
You have exported a movie to send via e-mail.

Nero Video Manual
98 © 2018 Nero AG and Subsidiaries. All rights reserved.
6. Disc Project Creation
6.1. Content Screen
The Content screen is displayed when you select one of the entries of the Create &
Export selection list on the Home screen.
When you start a project via the Create & Export selection list on the Home screen,
you will subsequently go through the following screens:
Content > Edit Menu > Preview > Burn Options
You can always go back and forth between the screens, but you cannot skip any of the
screens.
In the Content screen you can create a project according to your requirements and
arrange titles of a compilation.
A "project" refers to the process that begins when the video is first opened and ends
when the movie is finished or exported. A project can be saved in a project file that will
include all the performed changes. It can be reopened at a later time. The project file has
the extension *.nvc (Nero Video Compilation).
You can play back every title in the preview area in the upper left. The added titles are
listed in the content area right next to the preview area. Each video title is shown with a
thumbnail and information on the file name, length of the video, and number of chapters.
In addition all existing chapters can be displayed or rendered invisible as desired
with the aid of the buttons. The beginning of each chapter is indicated by the chapter
mark on the scroll bar in the preview area; an exception to this is the first chapter because
its beginning is also the beginning of the video title.
Chapters are sections in a video title that you can access on your player using the
Back and Next buttons without having to fast forward or rewind. Initially, each video title
contains only one chapter. You can add new chapters manually or automatically.
The advantage that chapters have is that they allow the user to jump directly to individual
chapters within a video without having to fast forward or rewind.
If you have selected the Create chapters automatically check box in the lower right part
of the screen, chapter marks are automatically created during the burn process for quicker

Nero Video Manual
99 © 2018 Nero AG and Subsidiaries. All rights reserved.
navigation with the remote control. However, these chapter entries do not have menu
entries.
You can change the disc type next to the capacity bar of the overall memory used in the
lower area of the screen. The indication of available space is adjusted accordingly. The
total available space depends on which project you are editing. If the disc you are using
is a DVD-1 or DVD-9 (with 7.95 GB capacity) instead of a DVD with 4.38 GB storage
capacity, select the correct disc type in the drop-down menu. If the disc you are using is a
CD, select either the 74 or 80 minutes capacity in the menu. For Blu-ray Disc projects, the
Blu-ray (25GB) and Blu-ray DL (50GB) entries are available.
A large variety of titles can be created depending on the type of disc (VCD/SVCD -
up to 98 titles; DVD-Video/miniDVD, DVD-VFR - up to 99 titles). No titles are created in
DVD+VR projects.
With the aid of the buttons in the right-hand area of the screen it is possible to insert and
arrange titles into your project. The following selection entries are available in the Import
selection list:
Import Files
Adds video files that are saved on the hard drive (e.g. your vacation
video) to the project. A window is opened.
Import From
Nero
MediaBrowser
Opens the Nero MediaBrowser window which allows you to import files
added to the media library.
Capture Captures a video. The Capture Video screen is displayed.
Import Disc Imports items from an existing disc.
Import From
AVCHD Camera
Imports videos that are saved in an AVCHD project directly from camera
and other supported devices.
Import AVCHD
From Disc Imports videos that are saved in an AVCHD project (on DVD).
Import AVCHD
From Hard Drive
Imports videos that are saved in an AVCHD project (on memory card or
hard drive).
Import
PowerPoint®
Files
Imports PowerPoint files and adds them to the project as new titles. A
window is opened in which you can specify the duration of the single
slides.
In addition, the following buttons are available:
Make Creates a movie or a slide show. The video editing screen is displayed.
Edit Opens the Movie Options window that shows recording format
information. Afterwards, the video editing screen is displayed. Editing a

Nero Video Manual
100 © 2018 Nero AG and Subsidiaries. All rights reserved.
video can include, for example, creating transitions, cutting scenes or
creating a sound track.
Delete Deletes selected media titles.
Move Up Moves selected media titles up.
Move Down Moves selected media titles down.
Join Combines several video titles to form a single title.
In the preview area you can use the position marker on the scroll bar to move to a certain
position within the video title. You can also use the Position buttons next to the time code
display. Furthermore, the following setting options are available when a video has been
marked in the content area:
Button
Starts playback.
Button
Stops playback.
Button
/ Jumps to the previous/next frame.
Button
/ Jumps to the start/end of the file.
Drop-down
menu
Add chapter - Inserts a chapter mark at the position of the position
marker on the scroll bar.
Add chapter for each video - Inserts a chapter mark with the title at the
start of each video.
Auto-detect chapters - Starts the automatic chapter recognition through
which the program places a chapter mark automatically for each scene.
Remove chapter - Deletes selected chapter marks.
Remove all chapters - Deletes all previously created chapter marks of the
title.
Individual entries are only available when you have placed the position
mark on the scroll bar.
Button
Cuts a video title at the position of the position marker. Both parts are
listed in the content area.
Only available when you have placed the position marker on the scroll
bar.
Button
/
Shortens a video by removing the part between the start and the position
marking or the position and end marking.

Nero Video Manual
101 © 2018 Nero AG and Subsidiaries. All rights reserved.
Only available when you have placed the position marker on the scroll
bar.
Select the Never use black thumbnails check box in the lower right part of the screen if
you do not want the application to use black thumbnails in menus. Instead, the first non-
black thumbnail is found and displayed.
6.2. Creating and Editing a Disc Project
If your burner supports an editable disc format, the Editable DVD format is also
displayed in the Make DVD option.
There may be differences when editing titles and movies due to the differences in
the DVD-VFR (video mode) and DVD+VR specifications. However, the process is
essentially identical to the process described in this chapter.
To create and edit a disc project, proceed as follows:
1. On the Home screen, select the AVCHD, Blu-ray Disc, DVD, Super Video CD, or
Video CD selection entry and, if available, the desired disc type (e.g. DVD-Video or
Editable DVD).
The Content screen is displayed.
2. To capture a video for your project:
a. Click the Import > Capture button.
The Capture Video screen is displayed.
b. Proceed as described in the Capturing Video to Hard Drive chapter.
3. If you have already captured a video or want to add a video saved on the hard drive:
a. Click the Import > Import Files button.
A window is opened.
b. Select the files you want and click the Open button.
The video titles are added to the project.
4. If you want to add videos that are stored on a disc:
a. Insert the disc in a drive on your computer.
b. Click the Import > Import Disc button.
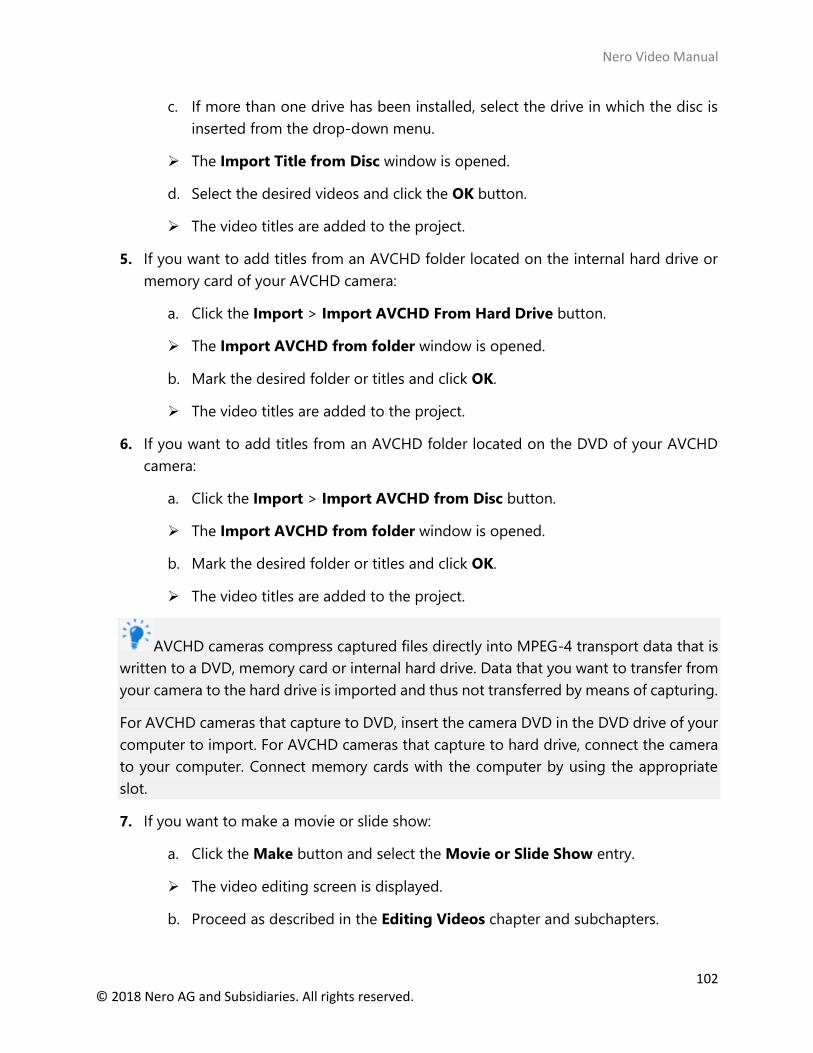
Nero Video Manual
102 © 2018 Nero AG and Subsidiaries. All rights reserved.
c. If more than one drive has been installed, select the drive in which the disc is
inserted from the drop-down menu.
The Import Title from Disc window is opened.
d. Select the desired videos and click the OK button.
The video titles are added to the project.
5. If you want to add titles from an AVCHD folder located on the internal hard drive or
memory card of your AVCHD camera:
a. Click the Import > Import AVCHD From Hard Drive button.
The Import AVCHD from folder window is opened.
b. Mark the desired folder or titles and click OK.
The video titles are added to the project.
6. If you want to add titles from an AVCHD folder located on the DVD of your AVCHD
camera:
a. Click the Import > Import AVCHD from Disc button.
The Import AVCHD from folder window is opened.
b. Mark the desired folder or titles and click OK.
The video titles are added to the project.
AVCHD cameras compress captured files directly into MPEG-4 transport data that is
written to a DVD, memory card or internal hard drive. Data that you want to transfer from
your camera to the hard drive is imported and thus not transferred by means of capturing.
For AVCHD cameras that capture to DVD, insert the camera DVD in the DVD drive of your
computer to import. For AVCHD cameras that capture to hard drive, connect the camera
to your computer. Connect memory cards with the computer by using the appropriate
slot.
7. If you want to make a movie or slide show:
a. Click the Make button and select the Movie or Slide Show entry.
The video editing screen is displayed.
b. Proceed as described in the Editing Videos chapter and subchapters.

Nero Video Manual
103 © 2018 Nero AG and Subsidiaries. All rights reserved.
8. If you want to edit a media title:
a. Highlight the title in the content area.
b. Click the Edit button.
The video editing screen is displayed.
c. Edit your movie or slide show as described in the Editing Videos chapter and
subchapters.
9. If you have already added several titles to your project and want to move a media title,
select the media title and click the Move Up or Move Down button.
The media title is moved to the desired position.
10. If you want to add chapters to a video title in your compilation, proceed as described
in the Creating Chapters chapter.
11. If you want to reposition or remove existing chapters of a video title, proceed as
described in the Editing Chapters chapter.
12. If you want to cut a title:
a. Move the slider on the scroll bar in the preview area to the position where you
want to cut.
b. Click the button.
The video title is cut and the new titles are listed as single new titles.
13. If you want to combine several video titles to form a single title:
a. Highlight the video titles in the content area.
b. Click the Join button.
A window is opened.
c. Click the Yes button.
The selected video titles are combined to form a single new title.
14. If you want to remove a media title from the project, select the media title and click
the Delete button.
The media title is removed from the project.

Nero Video Manual
104 © 2018 Nero AG and Subsidiaries. All rights reserved.
You have created and edited a disc project and can now arrange a menu for your
project in the Edit Menu screen.
6.2.1. Creating Chapters Manually
You can manually add chapters to a video title of your project.
The following requirement must be fulfilled:
The Content screen is displayed.
To create a chapter manually, proceed as follows:
1. Highlight the desired video title in the content area.
2. Move the slider on the scroll bar in the preview area to the position where the new
chapter should begin.
3. Click the > Add chapter button.
The chapter is created, a chapter mark is set on the scroll bar in the preview area and
the chapter is added to the chapter list in the content area. In addition all existing
chapters can be displayed or rendered invisible as desired with the aid of the
buttons.
4. Repeat the last two steps to add more chapters.
You have manually created new chapters.
6.2.2. Creating Chapters Automatically
Chapters can be automatically created for a video title in your project.
The following requirement must be fulfilled:
The Content screen is displayed.
To create chapters automatically, proceed as follows:
1. Highlight the desired video title in the content area.
2. Click the > Auto-detect chapters button.
The Chapter Detection window is opened.
3. If you want to look for chapter marks with high sensitivity, move
the Sensitivity slider to the right.
Move the Sensitivity slider to the left if you want to use less sensitivity when looking
for chapter marks.

Nero Video Manual
105 © 2018 Nero AG and Subsidiaries. All rights reserved.
4. If you want to reduce or increase the minimum length of a chapter, move
the Minimum chapter length slider accordingly.
5. If you want to keep existing chapters, select the Keep previous chapter marks check
box.
6. Click the Start button.
Automatic chapter recognition is performed. This may take some time. The window
shows how many chapters were detected using these settings.
7. Click the Apply button.
The chapters are created, chapter marks are set on the scroll bar in the preview area
and the chapters are added to the chapter list. In addition all existing chapters can be
displayed or rendered invisible with the aid of the buttons.
You have created chapters automatically.
6.2.3. Editing Chapters
You can edit and rename chapters, reposition or remove individual chapter markings, as
well as delete all existing chapter marks. You can move the position of the individual
chapter marks within the start and end positions of the video title up to the next chapter
mark.
The following requirement must be fulfilled:
The Content screen is displayed.
To edit a chapter, proceed as follows:
1. Highlight the desired video title in the content area.
All existing chapter marks of the respective title are displayed on the scroll bar in the
preview area.
2. If you want to move an existing chapter mark, click the respective mark on the scroll
bar in the preview area and drag it to the desired position.
3. If you want to delete a chapter, mark it in the content area and click the > Remove
chapter button.
The chapter is deleted.
4. If you want to delete all chapters of a title, mark the video title and click
the > Remove all chapters button.

Nero Video Manual
106 © 2018 Nero AG and Subsidiaries. All rights reserved.
All chapter marks are deleted.
You have edited the chapters.

Nero Video Manual
107 © 2018 Nero AG and Subsidiaries. All rights reserved.
7. Menu Creation
7.1. Edit Menu Screen
Nero Video is available in different versions with a varying feature range. Depending
on the Nero product you purchased, your version of Nero Video may be limited and may
not include the full feature range.
If you have a limited version of Nero Video without the features mentioned here, you can
upgrade your Nero product at www.nero.com to get the full version of Nero Video with
all features.
The Edit Menu screen is displayed after you have added the desired media items to your
project (Content screen). It is a follow-up screen of the Content screen and cannot be
displayed directly by selecting a task on the Home screen.
When you start a project via the Create & Export selection list on the Home screen,
you will subsequently go through the following screens:
Content > Edit Menu > Preview > Burn Options
You can always go back and forth between the screens, but you cannot skip any of the
screens.
You can select menu templates and/or templates that meet your requirements in the Edit
Menu screen. In the normal editing mode, editing remains limited to the most important
features. Additional customization options are available in Advanced Editing.
You can choose the individual form and design of the menu in the advanced editing mode.
You can place and edit your own graphical items and text on the menu, modify, delete
and create various button options, as well as create links between any buttons, menus and
videos.
In the preview and compilation area of the screen on the left, the menu items of the title
or chapter menus are displayed according to the selected template. If the intro video is
selected, the preview shows a still of the video. Here, you can directly edit the individual
items of the template. Selected objects are identified by a frame and can then for example
be adjusted for size, rotated or moved.
The Templates and Customize tabs are available on the right. You can also make
changes to objects on the respective palettes.

Nero Video Manual
108 © 2018 Nero AG and Subsidiaries. All rights reserved.
A capacity bar below the compilation area shows how much space your project occupies
on the selected medium.
The following buttons are available on the navigation scroll bar in the compilation area:
Create New
Menu
Creates an empty menu without links in the layout of the template that was
last selected.
Only available in Advanced Editing. Not available for Smart3D templates.
Delete
Deletes a style item from the template. All items except the background can
be deleted.
Only available in Advanced Editing.
Save As
Template
Saves a template with all changes made. The Save As Template window is
opened.
If you want to save your own menu template, you have to specify and save the
title and chapter menu separately, even if both are based on the same
template.
Not available for Smart3D templates.
Previous /
Next Menu
Page
Goes to the next or previous page of the title or chapter menu that was
selected in the menu view.
If a title or chapter menu consists of several pages, the thumbnails are
displayed one above the other.
Only available in normal editing if a menu has several pages.
Toggle
Move
Cursor
If the button is activated, it is possible to move desired areas of an enlarged
menu page in the visible range of the compilation window with the hand
cursor.
Only available when the visible compilation area is enlarged.
Zoom In Enlarges the visible compilation area up to 500%.
Zoom Out Reduces the visible compilation area to 100%.
View If the Show Guidelines option is activated, Nero Video fades in a guideline
grid in the compilation area.
If the Show Safe Area option is enabled, Nero Video displays the frame of the
safe zone in the compilation area.

Nero Video Manual
109 © 2018 Nero AG and Subsidiaries. All rights reserved.
If the Show Button Numbers option is enabled, Nero Video assigns each
button in the compilation area a number. This option is only available
in Advanced Editing.
Order
Changes the arrangement of graphics and text fields of a template. Marked
items can be moved to the back or front by one level. They can also be moved
to the very back or very front.
The background picture always stays on the back level, buttons stay on the
front level.
Only available in Advanced Editing.
Snap to
Guidelines
If the Snap to Guidelines button is activated, items that move in the
compilation area automatically line up to the horizontal and vertical
guidelines.
The Download Content button allows you to download the Nero Content Pack.
The Nero Content Pack includes additional content such as theme packs, disc menus, and
effects to enhance your various projects in Nero Video. Note that the Download
Content button is only displayed if the additional content is not yet installed.
7.1.1. Templates Tab
Nero Video is available in different versions with a varying feature range. Depending
on the Nero product you purchased, your version of Nero Video may be limited and may
not include the full feature range.
If you have a limited version of Nero Video without the features mentioned here, you can
upgrade your Nero product at www.nero.com to get the full version of Nero Video with
all features.
Select a desired template from the Standard2D, Animated2D and Smart3D categories
on the Templates tab. In addition, you can save your own templates in the My Menu
Templates category.
If you select a Smart3D menu, please note that a graphics card with 3D acceleration
must be connected to the computer. The Advanced Editing is not available for Smart3D
menus.
If problems arise when editing the menu, make sure that you have installed the current
version of the graphics driver.

Nero Video Manual
110 © 2018 Nero AG and Subsidiaries. All rights reserved.
The following drop-down menus are available:
Menus to
use
Defines whether the menu should be created as a title and chapter menu or
simply as a title menu. You can also choose not to create a menu.
Category
Specifies the category from which the template can be selected. The My
Menu Templates option shows saved templates.
You can give your videos an appropriate graphic background with a menu
template from the Standard2D group. The menu contains a layout for the
title and chapter menu.
You can give your videos predefined background animations with a menu
template from the Animated2D group - including matching intro video and
scoring. The menu contains a layout for the title and chapter menu, as well as
background music for the intro video and menu pages.
You can give your videos a starting animation and three-dimensional menus
with a menu template from the Smart3D group. The menu templates are
based on dynamic 3D scenes with animated menu transitions and predefined
scorings.
7.1.2. Customize Tab
The number of palettes that are displayed on the Customize tab depends on the selected
mode. Clicking the title bar of the palette closes or opens the palette.
Some of the functions mentioned here are restricted or not available in the Essentials
version. You can always upgrade your Essentials version at www.nero.com to get the full
version with all the functions.
Nero Video automatically starts in normal editing mode with the Compact Menu View.
A thumbnail is displayed for the intro video and title, as well as for each chapter menu.
Unused components remain gray. If a title or chapter menu consists of several pages, the
thumbnails are displayed one above the other.
Select the Advanced Editing check box to go to Advanced Editing with Extended
Menu View. The intro video and each page of the individual menus are displayed as
thumbnails.
Only go to Advanced Editing if you have experience editing menus.
If you select the box, a window appears that indicates you are about to enter
advanced editing mode. Links between menus and buttons are not created dynamically

Nero Video Manual
111 © 2018 Nero AG and Subsidiaries. All rights reserved.
based on project content. Therefore, video titles, menus and buttons that are not added
after opening advanced editing mode must be manually linked to each other.
Advanced Editing is not available for Smart3D templates.
The following palettes are available:
Properties
Displays a customized area for each menu item marked in the compilation area.
You can make any setting changes here.
Content
Lists all titles and chapters of the project in an overview.
Not available for Smart3D menus.
Only available in Advanced Editing.
Buttons
Offers sets of predefined buttons in the Thumbnail buttons, Text-only
buttons and Navigation buttons categories.
Not available for Smart3D menus.
Objects
and Clip
Art
The Standard objects category offers a selection of pre-defined graphic objects,
drawing items such as circles, rectangles or lines, as well as clip art. The category
also includes an empty text box.
You can import your own graphic files into the My objects category.
Not available for Smart3D menus.
Only available in Advanced Editing.
Disc /
Project
The Disc Settings area offers settings that customize the playback of the disc
according to your requirements. In addition, you can check the customized
navigation of your menus for completeness.
In the Project Settings area you can simplify the menu editing by individual
additional guide lines.
Template
Settings
Offers a number of theme-related versions for Smart3D menus.
Only available for Smart3D menus.
7.1.3. Template Settings Palette
If you have selected a Smart3D template on the Templates tab, you can customize the
menu transitions according to your requirements in the Template Settings palette and,
depending on the menu template selected, choose between different theme versions.

Nero Video Manual
112 © 2018 Nero AG and Subsidiaries. All rights reserved.
Only available for Smart3D menus.
The following setting options are available:
Option button
Default
transitions Enables all transitions of the selected template.
Option button
Custom
transitions
Enables the Options button.
Clicking this button opens the Transition Settings window that displays
all the transitions of the selected template. You can disable individual
transitions and/or the background audio of the transitions.
Drop-down
menu
[Topic]
Defines the desired theme version of the selected menu template.
The drop-down menu and the number of options depend on the selected
template.
Button
Options
Opens a window in which you can customize individual properties of the
menu independent of a theme. You can also combine theme items here.
The drop-down menu and number of options depends on the selected
template.
Not available for all Smart3D menus.
7.1.4. Properties for Background and Intro Video Palette
If the background is enabled in the compilation area, the Properties palette is divided
into the Background, Background Audio, Animation and Interaction areas.
The Spreading area is only available in normal editing mode.
The Background and Animation areas are not available for Smart3D menus.
If an Intro Video is displayed in the compilation area, the Background and Background
Audio areas are also available. The Linkage area is also available in Advanced
Editing mode.
The following setting options are available in the Background area:
Drop-down
menu
Background
Specifies whether a picture or video should be imported into the
background of the template or whether the background should be a solid
color. In the default settings, the Predefined background entry is selected
that provides every template with a suitable background.

Nero Video Manual
113 © 2018 Nero AG and Subsidiaries. All rights reserved.
If you select the Picture file or Video file option, a window opens in which
you can select the desired file. The path to the selected file is then displayed
in the selection area.
The number of drop-down menus that are displayed for detailed settings
depends on the selected option.
Slider/Input
field
Position
Moves the selected picture or video to the correct position. Detailed settings
(e.g. aligning the position of the same picture in the intro video and on the
menu pages) can be performed easily with the aid of the input field.
Background pictures are placed on the screen without black borders.
Only available for background pictures and videos.
Button
Options
Defines the detail settings of the background video. The Select Start
Position window opens.
Only available for background videos.
Drop-down
menu
Color
Defines the desired color as the background color.
Only available for background color.
The following setting options are available in the Background Audio area:
Drop-down
menu
Audio
Defines an audio file as background music or disables the background
music.
If you select the Custom option, a path appears for selecting a desired file.
The Predefined Audio option, which is stored for each Animated 2D and
Smart3D template with the appropriate scoring, is selected in the default
settings.
Button
Options
Defines the detail settings of the background music. The Background
Audio window is opened.
Only available if you selected the Custom option in the Audio drop-down
menu.
The following setting options are available in the Animation area:
Input field
Duration Defines the duration of animation for the respective menu.
Check box
Fit to audio
duration
If this check box is selected, the respective menu is displayed over the full
playback duration of the selected background audio file.
In the Interaction area you can specify whether the menu responds to input when playing
back the disc. The following drop-down menus are available:

Nero Video Manual
114 © 2018 Nero AG and Subsidiaries. All rights reserved.
Highlight
color
Defines the color used to highlight marked buttons.
You can also specify the Opacity in percent.
Activation
color
Defines the color used to highlight enabled buttons.
You can also specify the Opacity in percent.
Autorun
action
If desired, it specifies a video title or chapter to automatically start after a
timeout. As an alternative you can also rotate through the pages of the
menu.
No automation is selected in the default settings (i.e. the None option is
enabled).
Not available for Smart3D menus.
Delay
Defines the timeout duration after which the selected automation begins.
Not available for Smart 3D menus.
The following drop-down menu is available in the Spreading area:
Title/Chapter
number per
menu
Defines the number of titles or chapters that are shown per menu page. The
number per page is freely selectable as long as the maximum number for the
selected menu template is not exceeded.
If the Evenly entry is selected, Nero Video divides the number of titles or
chapters equally over the menu page. For instance, a total of eight titles are
divided to four on a menu page.
If the Standard setting is selected in the default settings, then the titles and
chapters are automatically distributed so that the maximum number of
selected menu templates per menu page is achieved. For instance, in the case
of eight titles, and depending on the capacity, six might be positioned on the
first menu page and the other two on another.
The following setting options are available in the Linkage area:
Drop-down
menu
Link to
Defines to which page of the menu the intro video should link to.
Drop-down
menu
Transition
Defines a transition for the link, if desired.
Button
Options
Opens the Transitions window.
Depending on the selected transition you can specify the detail settings
here. You can also specify the duration of the transition; a period of one
second is selected in the default settings.
7.1.5. Button Properties

Nero Video Manual
115 © 2018 Nero AG and Subsidiaries. All rights reserved.
▪If a button is activated in the compilation area the Properties palette is divided into
the Linkage, Appearance, Font, Text, and Transformation areas.
In Smart3D menus, the Linkage and Transformation areas are not available,
the Appearance area is only available for buttons, not for the header or footer.
To edit a desired item, enable it in the compilation area. The highlighted area is identified
by a red frame and sizing handles. You have three options when editing a Thumbnail
button to set the focus. If the focus lies on the entire button, it can be moved or adjusted
proportionally in size. If the focus lies on the text item of the button, the length of the text
field can be adjusted and moved within the button. If the focus lies on the text in the text
item, the input can be edited.
In Smart3D templates, the focus lies on the entire button. Buttons, headers and footers
cannot be deleted in Smart3D menus; additional objects cannot be added or moved. They
also cannot be adjusted in size. The position marks of the headers and footers are used
to simplify editing and are not visible in your menu later on. Even if you do not use headers
and/or footers, they do not have to be deleted.
The Linkage area is only available in Advanced Editing.
The following setting options are available in the Linkage area:
Drop-down
menu
Link to
Defines where the button should link. All available destinations of the
project (video title, all chapters and slide shows) are displayed in the drop-
down menu.
Drop-down
menu
Transition
Defines a transition for the link, if desired.
Button
Options
Opens the Properties window. Depending on the selected transition, you
can specify the detail settings here. You can also specify the duration of the
transition; a period of two seconds is selected in the default settings.
Drop-down
menu
Button
number
Manually specifies the numbering of the buttons.
Nero Video automatically numbers all the buttons of a template. The
number is not displayed in the editable text field of a button. When you edit
the menu and reposition buttons, Nero Video maintains the numbering.
Any adjustment to the text (e.g. font) is automatically adopted.
If a button is assigned a different number (A), Nero Video automatically
assigns the number that is now available (B) to the button with the number
(A) that has been selected for the new assignment.
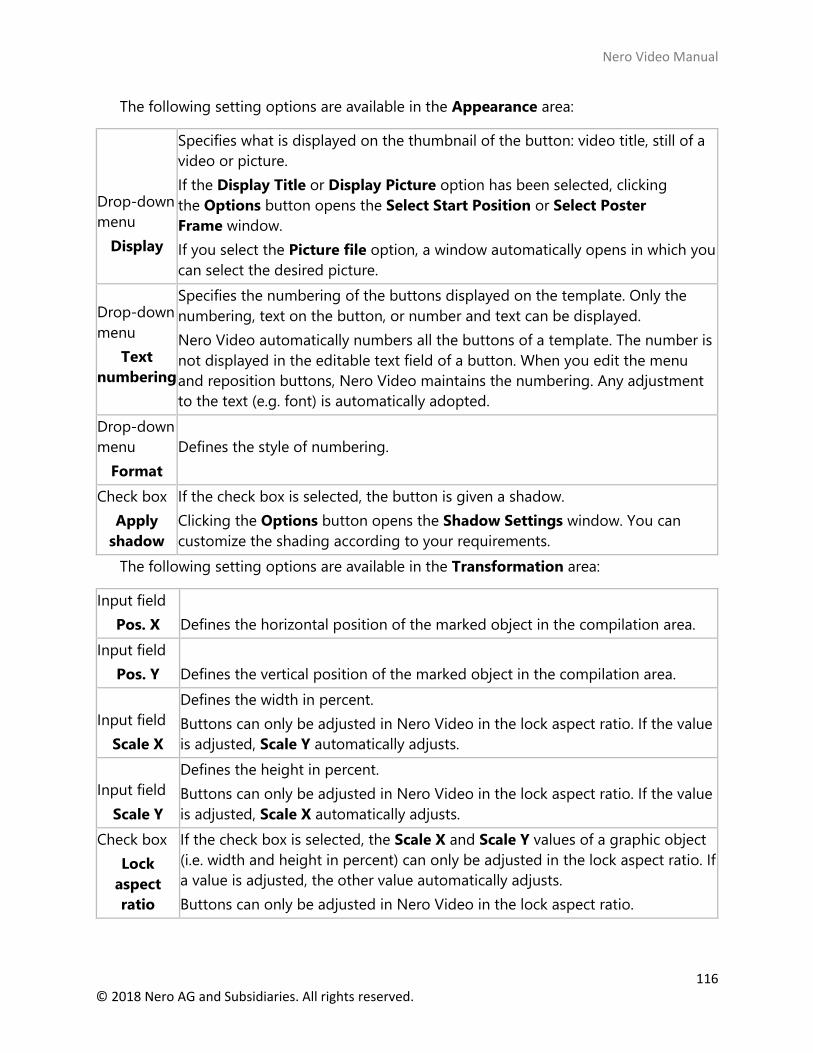
Nero Video Manual
116 © 2018 Nero AG and Subsidiaries. All rights reserved.
The following setting options are available in the Appearance area:
Drop-down
menu
Display
Specifies what is displayed on the thumbnail of the button: video title, still of a
video or picture.
If the Display Title or Display Picture option has been selected, clicking
the Options button opens the Select Start Position or Select Poster
Frame window.
If you select the Picture file option, a window automatically opens in which you
can select the desired picture.
Drop-down
menu
Text
numbering
Specifies the numbering of the buttons displayed on the template. Only the
numbering, text on the button, or number and text can be displayed.
Nero Video automatically numbers all the buttons of a template. The number is
not displayed in the editable text field of a button. When you edit the menu
and reposition buttons, Nero Video maintains the numbering. Any adjustment
to the text (e.g. font) is automatically adopted.
Drop-down
menu
Format
Defines the style of numbering.
Check box
Apply
shadow
If the check box is selected, the button is given a shadow.
Clicking the Options button opens the Shadow Settings window. You can
customize the shading according to your requirements.
The following setting options are available in the Transformation area:
Input field
Pos. X Defines the horizontal position of the marked object in the compilation area.
Input field
Pos. Y Defines the vertical position of the marked object in the compilation area.
Input field
Scale X
Defines the width in percent.
Buttons can only be adjusted in Nero Video in the lock aspect ratio. If the value
is adjusted, Scale Y automatically adjusts.
Input field
Scale Y
Defines the height in percent.
Buttons can only be adjusted in Nero Video in the lock aspect ratio. If the value
is adjusted, Scale X automatically adjusts.
Check box
Lock
aspect
ratio
If the check box is selected, the Scale X and Scale Y values of a graphic object
(i.e. width and height in percent) can only be adjusted in the lock aspect ratio. If
a value is adjusted, the other value automatically adjusts.
Buttons can only be adjusted in Nero Video in the lock aspect ratio.

Nero Video Manual
117 © 2018 Nero AG and Subsidiaries. All rights reserved.
Input field
Rotation
Rotates the selected item.
Input field
Opacity Defines the opacity of the button.
You can customize the font and size of the text in the Font area. In Smart3D templates
you can enter an individual title for your buttons in the Text area or enter desired text in
the header and/or footer. In all other template categories, the following drop-down
menus are available in the Text area:
Text Color Defines the color of the text.
Horizontal alignment Defines the horizontal alignment of the text: centered, left or right.
Vertical alignment Defines the vertical alignment of the text: top, middle or bottom.
7.1.6. Properties of Graphic Objects
▪If a graphic object is activated in the compilation area, the Properties palette is divided
into Appearance and Transformation areas.
To edit a desired item, activate it in the preview area. The outer highlighted area is
identified by red sizing handles. With the aid of the focus, the entire surface can be moved
or adjusted proportionally in size.
In addition, green nodes mark the corners on all polygon standard formats and the end
points on lines. All polygons can be edited simply by clicking one of the nodes or end
points. By selecting a node or an end point with a click, it is marked and can be moved or
deleted. New node points can be inserted at any place with a double click. A surface object
must consist of at least three points; a linear object of at least starting and end points.
The following setting options are available in the Appearance area:
Drop-down menu
Fill color
Defines the fill color of a graphic item.
Only available when the focus is positioned on a standard form
(drawing item).
Drop-down menu
Border color
Defines the color of the margin/frame of a graphic object.
Only available when the focus is positioned on a standard form
(drawing item).
Drop-down menu
Line thickness
Defines the thickness of the margin/frame of a graphic object.
Only available when the focus is positioned on a standard form
(drawing item).

Nero Video Manual
118 © 2018 Nero AG and Subsidiaries. All rights reserved.
Check box
Apply shadow
If the check box is selected, the button is given a shadow.
Clicking the Options button opens the Shadow Settings window.
You can customize the shading according to your requirements.
The following setting options are available in the Transformation area:
Input field
Pos. X
Defines the horizontal position of the marked object in the
compilation area.
Input field
Pos. Y
Defines the vertical position of the marked object in the compilation
area.
Input field
Scale X Defines the width in percent.
Input field
Scale Y Defines the height in percent.
Check box
Lock aspect ratio
If the check box is selected, the Scale X and Scale Y values of a
graphic object (i.e. width and height in percent) can only be adjusted
in the lock aspect ratio. If a value is adjusted, the other value
automatically adjusts.
Input field
Rotation Rotates the selected item.
Input field
Opacity Defines the opacity of the graphic object.
7.1.7. Content Palette
▪ Only available in Advanced Editing.
Not available for Smart3D menus.
On the Content palette, all the titles and chapters of the project that you have compiled
in the Content screen are listed in a navigation tree.
Using the drag-and-drop function, you can link any title in the list to a desired button and
thereby define the target of a link. If the title is dragged into the compilation for the first

Nero Video Manual
119 © 2018 Nero AG and Subsidiaries. All rights reserved.
time or again without a specific button marked, Nero Video automatically creates a
default button and links it to the video.
Note that all menu items on the template remain linked when you make changes!
If a new link is assigned to a button, the old link is lost (i.e. it is not automatically assigned
to another button). The same menu item can be linked via multiple buttons.
7.1.8. Buttons and Graphic Objects Palettes
▪ The graphic objects are only available in Advanced Editing.
First, you can select the category of the available items in the Buttons or Objects and
Clip Art palettes. The available buttons or graphics from the selected category are listed
in the preview area of both palettes. With the Apply or the Add button, the view of a
button is customized to your menu template or graphics are added.
Available on the Buttons palette are the categories Thumbnail buttons, Text-only
buttons, and Navigation buttons. The sets of Navigation buttons always consist of
three buttons (one each for Back, Next and Back to Main Menu).
Available on the Objects and Clip Art palette are the Standard objects, My
objects, Bubbles, Fields, Frames, and Lines entries. The default objects include drawing
items such as circles, rectangles and lines as well as clip arts. The My objects folder
contains all pictures that have been imported into Nero Video.
You can select and combine individual buttons in Advanced Editing only. You can
also customize existing template buttons and add new ones. Links must be manually
assigned to buttons that you add.
7.1.9. Disc/Project Palette
The Disc/Project palette is divided into the Disc Settings, Project Settings, and Button
Numbering areas.
The following pop-up menus are available in the Disc Settings area.
Drop-down menu
First play item
Defines the title that is played first after inserting the disc into a player.
Only available in Advanced Editing. In normal editing mode, the intro
video is automatically played or the title menu is displayed.

Nero Video Manual
120 © 2018 Nero AG and Subsidiaries. All rights reserved.
Drop-down menu
Title Menu
Defines the menu that is displayed when the Title button is pressed
on the remote control.
Only available in Advanced Editing. In normal editing mode, the title
menu is automatically displayed.
Drop-down menu
End action
Defines whether the menu is displayed again after playback of a title is
complete (enabled in the default settings) or whether the next title (by
number) is played automatically.
Drop-down menu
Additional folder
Nothing only saves the pictures in the slide show.
Original pictures saves the pictures in the original format as well.
Original pictures are saved on the disc in the ORIGPICS folder.
HTML browsing gallery creates an HTML version of the slide show
that can be displayed on any computer with a browser. You can
display the HTML browser gallery by opening the INDEX.HTM file on
the disc.
PC slide show creates an executable file on the disc; this can be
opened on any Windows computer. The executable file for the
computer slide show has the name slideshow.exe.
Only available if a slide show has been inserted into your project.
Button
Check Project
Checks the menu for unlinked or overlaying buttons (title and/or
chapter), for orphaned menu pages as well as for videos and/or slide
shows of the project that are not linked to the menu.
A detailed overview of problems with a short error description is listed
in a window.
Only available in Advanced Editing.
The following setting options are available in the Project Settings area:
Drop-down menu
Number of guides
Inserts a further horizontal and vertical guide line into the grid in the
compilation area or removes lines.
Nero Video creates an even lattice network. However, the lines can be
moved as desired with the mouse and can be positioned as desired in
the compilation area.
Check box
Never use black
thumbnails
If the check box is selected, Nero Video ensures that the thumbnails of
the buttons show the first frame of the linked video title and not only
a black picture.

Nero Video Manual
121 © 2018 Nero AG and Subsidiaries. All rights reserved.
The following check box is available in the Button Numbering area:
Restart numbering
on each menu page
When this check box is selected, the button numbers will start with 1
on each new menu page. When the check box is cleared, the buttons
are numbered continuously throughout the menu.
This box is selected by default in the default setting.
Only available in normal editing.
7.1.10. Select Start Position Window
In the Select Start Position window you can define which section of a linked video is
displayed in the background of a menu side, in the background of the intro video or in
the thumbnail view of the Thumbnail button.
The controller on the navigation strip shows the start position in the video. The duration
of the video is automatically customized to the duration of the menu and is displayed
graphically by a darker bar on the navigation strip. You can define the desired start
position by moving the controller (and bar) on the navigation strip. Or the start position
can be defined by entering an exact starting time in the input field below. You can also
use the Position buttons next to the time code display.
Additionally, the following setting options are available:
Button
Plays the video back in the preview area of the window.
Button
Stops the preview.
Button Fades the audio in or out during playback in the menu (each one
second).
Button with slider Customizes the sound level of the playback. Click the button to mute
the sound.
7.1.11. Edit Background Audio Window
In the Edit Background Audio window you can define which section of the selected audio
file is played as the menu's background music. For this purpose, the file is depicted in the
top area of the window in wave form.

Nero Video Manual
122 © 2018 Nero AG and Subsidiaries. All rights reserved.
The controller on the navigation strip shows the start position in the audio file. The
duration of the background music is automatically customized to the duration of the
menu. You can define the desired start position by moving the controller on the navigation
strip. Alternatively, the start position can be defined by entering the exact starting time in
the input field below. You can also use the Position buttons next to the time code display.
The following setting options are available:
Button
Plays the audio file.
Button
Stops playback.
Button
Fades the audio in or out during playback in the menu (each one second).
Button with
slider Customizes the sound level of the playback. Click the button to mute the
sound.
7.1.12. Select Poster Frame Window
In the Select Poster Frame window you can define which picture of a linked video is
displayed in the thumbnail view of the Thumbnail button.
The controller on the navigation strip shows the position of the picture in the video. You
can specify the picture to be used by moving the controller.
The following buttons are available:
Plays the video back in the preview area of the window.
Stops the preview.
7.1.13. Shadow Settings Window
If the Apply shadow check box in the Properties palette is selected, the selected button
or graphic object is given a shadow. Clicking the Options button opens the Shadow
Settings window.

Nero Video Manual
123 © 2018 Nero AG and Subsidiaries. All rights reserved.
You can adjust the detail settings of the shading in the Shadow Settings window. The
changes you make are directly visible in the menu area. Click the Cancel button to discard
the changes, or the OK button to apply them.
The following setting options are available:
Drop-down menu
Light source
Defines the desired angle of the virtual light source in relation to the
object.
Slider
Opacity
Defines the desired shadow transparency in percent. An opacity of 0
means that the shadow is invisible.
Slider
Distance Defines the distance between the object and the shadow (in pixels).
Slider
Widen
Defines the scatter degree of the shadow (in percent). The scatter is
added to the size of the shadow.
Slider
Blur
Defines the blurring degree of the shadow.
In the default settings the shadow has an exact contour which gives a
blurring degree of 0%.
Drop-down menu
Color Defines the desired color of the shadow.
7.2. Levels
A menu can have up to two levels in addition to the intro video. The main or title menu
consists of all the video titles in the project. Each video title is represented by a button
consisting of a thumbnail and a button text. If a video title has more than one chapter, a
video title submenu is generated. Each chapter of the respective video title is represented
by a button in the chapter menu.
When making changes, you can adjust the levels of the menu independently. You can
select the layout of each menu from existing menu templates. Menu templates are
subdivided into individual menu template groups for a better overview.
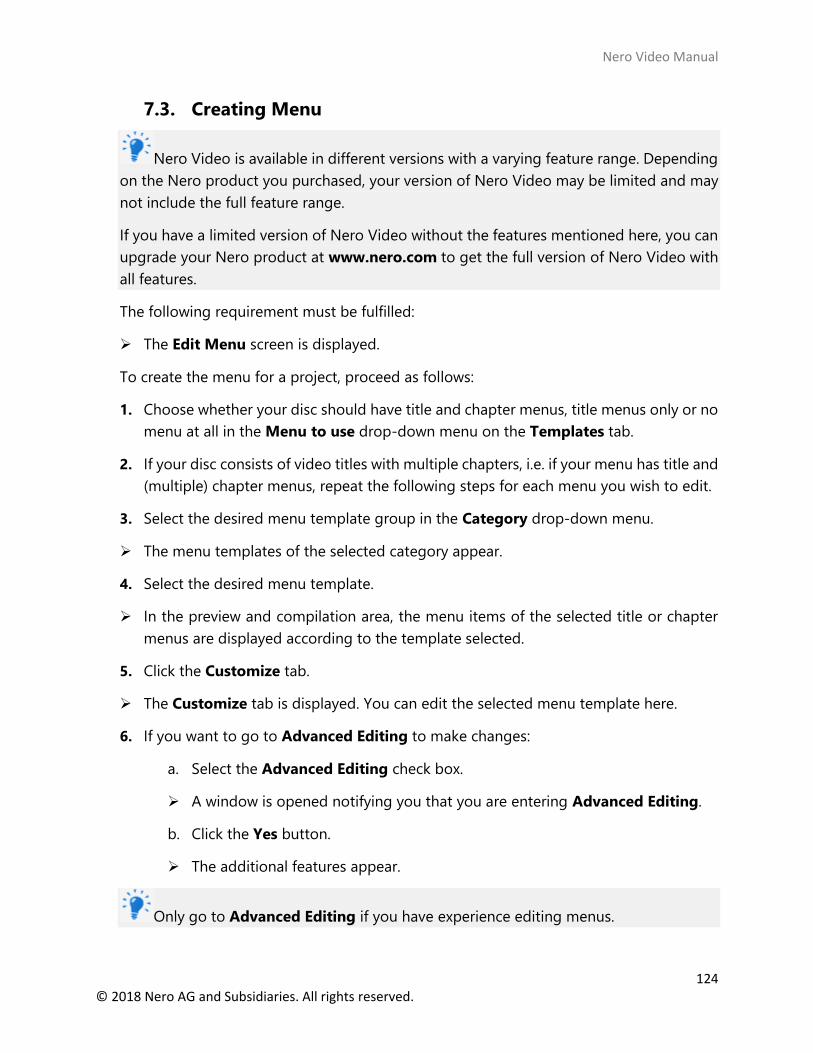
Nero Video Manual
124 © 2018 Nero AG and Subsidiaries. All rights reserved.
7.3. Creating Menu
Nero Video is available in different versions with a varying feature range. Depending
on the Nero product you purchased, your version of Nero Video may be limited and may
not include the full feature range.
If you have a limited version of Nero Video without the features mentioned here, you can
upgrade your Nero product at www.nero.com to get the full version of Nero Video with
all features.
The following requirement must be fulfilled:
The Edit Menu screen is displayed.
To create the menu for a project, proceed as follows:
1. Choose whether your disc should have title and chapter menus, title menus only or no
menu at all in the Menu to use drop-down menu on the Templates tab.
2. If your disc consists of video titles with multiple chapters, i.e. if your menu has title and
(multiple) chapter menus, repeat the following steps for each menu you wish to edit.
3. Select the desired menu template group in the Category drop-down menu.
The menu templates of the selected category appear.
4. Select the desired menu template.
In the preview and compilation area, the menu items of the selected title or chapter
menus are displayed according to the template selected.
5. Click the Customize tab.
The Customize tab is displayed. You can edit the selected menu template here.
6. If you want to go to Advanced Editing to make changes:
a. Select the Advanced Editing check box.
A window is opened notifying you that you are entering Advanced Editing.
b. Click the Yes button.
The additional features appear.
Only go to Advanced Editing if you have experience editing menus.

Nero Video Manual
125 © 2018 Nero AG and Subsidiaries. All rights reserved.
If you select the box, a window appears that indicates you are about to enter advanced
editing mode. Links between menus and buttons are not created dynamically based on
project content. Therefore, video titles, menus and buttons that are not added after
opening advanced editing mode must be manually linked to each other.
Advanced Editing is not available for Smart3D templates.
7. Highlight the menu you want to edit in the Menu View.
8. If you want to make changes:
a. Mark the style item you want to edit in the preview and compilation area.
Additional palettes may appear or disappear on the Customize tab. Clicking
the title bar of a palette displays all areas.
b. Adjust the desired settings on the palettes.
Any changes are displayed in the preview and compilation area.
9. If you want to save the adjusted menu as a menu template:
a. Click the Save As Template button.
The Save As Template window is opened.
b. Enter a name in the Template name input field.
c. Select the Create new subcategory option in the Add to subcategory drop-
down menu.
d. Enter the name for the new menu template group in the New group
name input field and click the OK button.
The customized menu is saved as a menu template.
You have edited the menu and can now view the entire project in the preview area.

Nero Video Manual
126 © 2018 Nero AG and Subsidiaries. All rights reserved.
8. Disc Project Preview
8.1. Preview Screen
The Preview screen is displayed after you have added the desired media items to your
project (Content screen) and created and edited the menu of your project (Edit Menu
screen). It is a follow-up screen of the Edit Menu screen and cannot be displayed directly
by selecting a task on the Home screen.
When you start a project via the Create & Export selection list on the Home screen,
you will subsequently go through the following screens:
Content > Edit Menu > Preview > Burn Options
You can always go back and forth between the screens, but you cannot skip any of the
screens.
In the Preview screen, you can play part of a disc to test it before actually burning it. Using
the cursor or the remote control, you can test how the disc behaves when played back on
a compatible player. In the menu, all of the buttons can be used normally so that you can
view your finished work.
If a menu contains animated items, pre-rendering is required before you can view the
menu with its animations. Clicking the Pre-render button opens the Menu Animation
Preview window in which the menu is pre-rendered and the background animations can
be viewed. Without pre-rendering, the standard picture is shown as the video background.
The following setting options are available on the virtual remote control:
Button
Moves the mark up or down, to the left or right. Click the center to confirm the
mark at its position and start the marked item.
Button
Title Displays the title menu.
Button
Menu Displays the last menu used.
Button
Plays the current media title.
Button
Stops playback.

Nero Video Manual
127 © 2018 Nero AG and Subsidiaries. All rights reserved.
Button
/ Switches to the previous/next chapter.
Icon with
slider
Customizes the sound level of the playback.
8.2. Showing a Preview
The following requirement must be fulfilled:
The Preview screen is displayed.
To display the preview for a project, proceed as follows:
1. Click the buttons for the desired actions on the virtual remote control.
2. If the menu contains animated items, the Pre-render button is displayed.
3. Click the Pre-render button.
The Menu Animation Preview window is opened. While the menu animation is being
calculated, the current status appears in the progress bar.
4. Click the Close button.
5. If you are satisfied with the preview, click the Next button.
The Burn Options screen is displayed.
You have displayed the preview and can now burn your project.
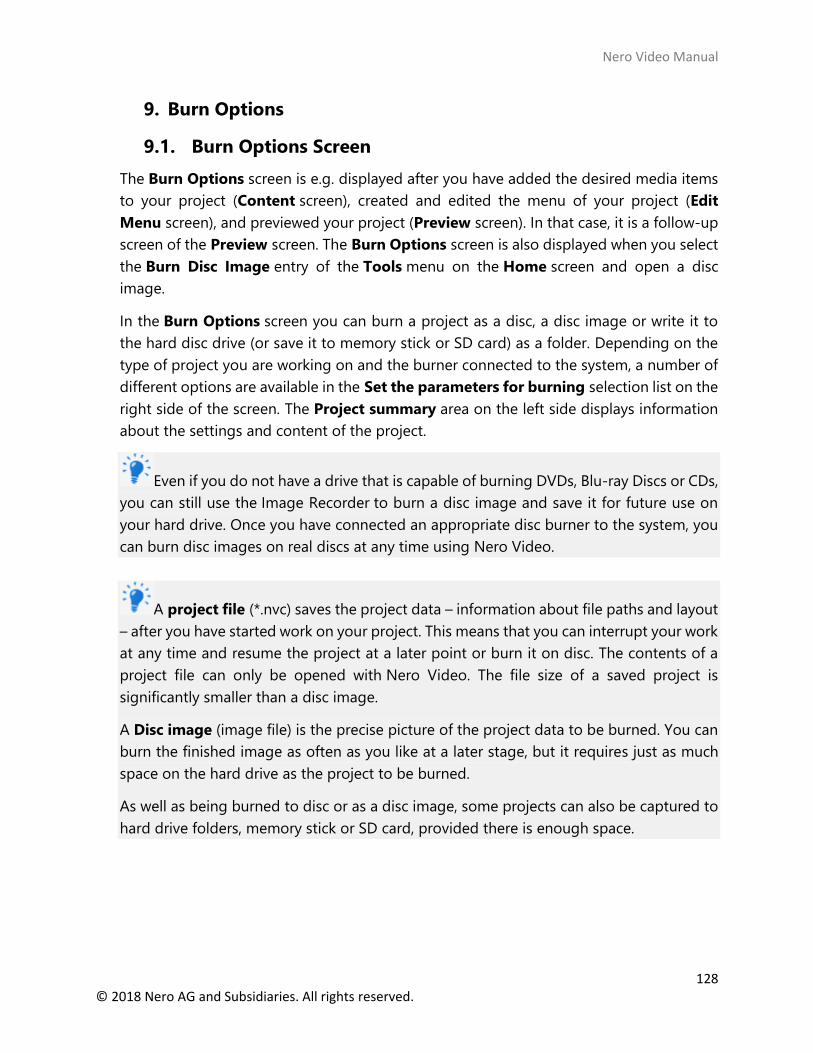
Nero Video Manual
128 © 2018 Nero AG and Subsidiaries. All rights reserved.
9. Burn Options
9.1. Burn Options Screen
The Burn Options screen is e.g. displayed after you have added the desired media items
to your project (Content screen), created and edited the menu of your project (Edit
Menu screen), and previewed your project (Preview screen). In that case, it is a follow-up
screen of the Preview screen. The Burn Options screen is also displayed when you select
the Burn Disc Image entry of the Tools menu on the Home screen and open a disc
image.
In the Burn Options screen you can burn a project as a disc, a disc image or write it to
the hard disc drive (or save it to memory stick or SD card) as a folder. Depending on the
type of project you are working on and the burner connected to the system, a number of
different options are available in the Set the parameters for burning selection list on the
right side of the screen. The Project summary area on the left side displays information
about the settings and content of the project.
Even if you do not have a drive that is capable of burning DVDs, Blu-ray Discs or CDs,
you can still use the Image Recorder to burn a disc image and save it for future use on
your hard drive. Once you have connected an appropriate disc burner to the system, you
can burn disc images on real discs at any time using Nero Video.
A project file (*.nvc) saves the project data – information about file paths and layout
– after you have started work on your project. This means that you can interrupt your work
at any time and resume the project at a later point or burn it on disc. The contents of a
project file can only be opened with Nero Video. The file size of a saved project is
significantly smaller than a disc image.
A Disc image (image file) is the precise picture of the project data to be burned. You can
burn the finished image as often as you like at a later stage, but it requires just as much
space on the hard drive as the project to be burned.
As well as being burned to disc or as a disc image, some projects can also be captured to
hard drive folders, memory stick or SD card, provided there is enough space.

Nero Video Manual
129 © 2018 Nero AG and Subsidiaries. All rights reserved.
Depending on the type of project you are working on and the burner connected to the
system, the following options are available in the Set the parameters for
burning selection list:
Burn To
Defines the desired disc burner. All disc burners available in the system
are displayed.
If you want to burn the project as a disc image, select the Image
Recorder option. The current destination is shown in the display in the
lower right of the screen.
Write to Hard
Disk Folder
Opens the Select a location for the project window.
Define the desired storage path or folder. It is displayed in the Current
destination display in the lower right of the screen.
Write to
Memory Stick
Opens the Select a location for the project window.
Define the desired storage path or folder. It is displayed in the Current
destination display in the lower right of the screen.
Write to SD
Card
Opens the Select a location for the project window.
Define the desired storage path or folder. It is displayed in the Current
destination display in the lower right of the screen.
Volume Name Displays a dialog box. You can specify a name for the disc.
Recording
Settings
Displays a dialog box. You can change the desired Settings for
recording here.
The following setting options are available in the dialog box of the Recording Settings:
Drop-down
menu
Speed
Allows you to choose the burning speed.
Only available when burning to a disc burner.
Check box
Determine
maximum
speed
Before burning, the program verifies whether the disc burner is capable of
burning the session with the selected write speed.
Check box
Write
If this check box is selected, Nero Video carries out burning immediately
after a speed test.
When writing to an image file, this check box is automatically enabled.

Nero Video Manual
130 © 2018 Nero AG and Subsidiaries. All rights reserved.
Drop-down
menu
Book Type
setting
Defines the book type. The Automatic option is selected by default.
The drop-down menu is only displayed for supported disc burners.
The following entries are available in the Book Type setting drop-down menu:
Automatic Automatically defines the most compatible book type for this disc.
DVD-ROM Sets the book type to DVD-ROM.
Physical disc
type Leaves the book type unchanged as specified on the DVD disc.
Current
recorder setting Applies the book type setting from the disc burner.
9.2. Burning a Disc
The following requirement must be fulfilled:
The Burn Options screen is displayed.
To burn a project to a disc, proceed as follows:
1. Insert a writable disc in the desired burner.
2. Select the Burn To entry and the desired burner.
The Burn button appears in the window in the lower right corner.
3. Select the Volume Name option.
A dialog area is displayed.
4. Enter the desired name for the disc in the input field. Characters that are not permitted
in the disc name are automatically converted to underscores (_).
5. Select the Recording Settings option.
The Settings for recording dialog area appears.
6. In the Speed drop-down menu, select the speed that the burner should use to write
to the disc.
7. If you want to perform a speed test, select the Determine maximum speed check
box.

Nero Video Manual
131 © 2018 Nero AG and Subsidiaries. All rights reserved.
Before burning, the program verifies whether the burner is capable of burning the
session with the selected writing speed. In addition, it also verifies if all files selected
for burning are actually available.
8. If you want to burn the disc on positive verification, select the Write check box.
9. If Nero Video is capable of changing the book type with your burner and you want to
make the changes to the book type, select the desired option in the Book Type
setting drop-down menu.
10. Click the Burn button in the lower right of the screen.
The Burning screen is displayed. The project files are converted into the appropriate
format and then burned to the disc. The priority determines how much computing
power is assigned to the burn process. Normally, you should not change this setting.
11. If you want to change the priority of the burn process, select the relevant entry from
the Priority drop-down menu.
12. If you would like your PC to shut down automatically after successfully burning a disc,
select the Shut down computer when finished check box.
As soon as the burn process has finished, a window is opened.
13. If you do not want to save a log file for the burn process, click the No button.
14. If you would like to save a log file:
a. Click the Yes button.
A window is opened.
b. Select the desired folder in the Location drop-down menu.
c. Enter the desired file name in the File Name input field and click
the Save button.
You have burned a disc and can now burn the project again or save it, start a new
project or create covers and labels.
9.3. Burning an Image File
Even if you do not have a drive that is capable of burning DVDs, Blu-ray Discs or CDs,
you can still use the Image Recorder to burn a disc image and save it for future use on
your hard drive. Once you have connected an appropriate disc burner to the system, you
can burn disc images on real discs at any time using Nero Video.

Nero Video Manual
132 © 2018 Nero AG and Subsidiaries. All rights reserved.
The following requirement must be fulfilled:
The Burn Options screen is displayed.
To burn a project as a disc image, proceed as follows:
1. Select the Burn To > Image Recorder entry.
The Burn button appears in the window in the lower right corner.
2. Select the Volume Name option.
A dialog area is displayed.
3. Enter the desired name for the disc in the input field. Characters that are not permitted
in the disc name are automatically converted to underscores (_).
4. Select the Recording Settings option.
The Settings for recording dialog area is displayed.
5. If you want to burn the project directly to the disc without temporarily storing the disc
structure on the hard drive first, select the Use Burn-at-once check box.
6. Click the Burn button in the lower right of the screen.
A window is opened.
7. Select the desired folder for the image file in the Location drop-down menu.
8. Enter the desired file name in the File Name input field and click the Save button.
The Burning screen is displayed. The project files are converted into the appropriate
format and then burned as a disc image. The priority determines how much computing
power is assigned to the burn process. Normally, you should not change this setting.
9. If you want to change the priority of the burn process, select the relevant entry from
the Priority drop-down menu.
10. If you would like your PC to shut down automatically after successfully burning a disc,
activate the Shut down computer when finished check box.
As soon as the burn process has finished, a window is opened.
11. If you do not want to save a log file for the burn process, click the No button.
12. If you would like to save a log file:
a. Click the Yes button.

Nero Video Manual
133 © 2018 Nero AG and Subsidiaries. All rights reserved.
A window is opened.
b. Select the desired folder in the Location drop-down menu.
c. Enter the desired file name in the File Name input field and click
the Save button.
You have written a disc image and can now burn the project again or save it, start a
new project or create covers and labels.
9.4. Writing to Hard Drive Folders
The following requirement must be fulfilled:
The Burn Options screen is displayed.
To write a project as a folder to the hard drive, memory stick or SD card proceed as follows:
1. Select the respective option from the Set the parameters for burning selection list,
e.g. Write to Hard Drive Folder.
The Select a location for the project window is opened.
2. In the folder tree, click the folder where the files are to be saved and then click
the OK button.
The Write button appears in the window in the lower right corner.
3. Select the Volume Name option.
A dialog area is displayed.
4. Enter the desired name for the disc in the input field. Characters that are not permitted
in the disc name are automatically converted to underscores (_).
5. Click the Write button.
The Burning screen is displayed. The project files are converted into the appropriate
format and then written as a folder to the target folder. The priority determines how
much computing power is assigned to the process. Normally, you should not change
this setting.
6. If you want to change the priority of the write process, select the relevant entry from
the Priority drop-down menu.
7. If you would like your PC to shut down automatically after successfully writing to the
target folder, activate the Shut down computer when finished check box.
As soon as the write process has finished, a window is opened.

Nero Video Manual
134 © 2018 Nero AG and Subsidiaries. All rights reserved.
8. If you do not want to save a log file for the write process, click the No button.
9. If you would like to save a log file:
a. Click the Yes button.
A window is opened.
b. Select the desired folder in the Location drop-down menu.
c. Enter the desired file name in the File Name input field and click
the Save button.
You have written a project into a target folder and can now burn the project again or
save it, start a new project or create covers and labels.