neoTextil - Inèdit Software · nT VirtualVision Introduction – 5/35 Introduction Overview...
35
1 neoTextil Version: 8.0.26 Last update: 16-08-2017 nT VirtualVision USER MANUAL
-
Upload
truongtuyen -
Category
Documents
-
view
212 -
download
0
Transcript of neoTextil - Inèdit Software · nT VirtualVision Introduction – 5/35 Introduction Overview...

1
neoTextil
Version: 8.0.26 Last update: 16-08-2017
nT VirtualVision
USER MANUAL

2
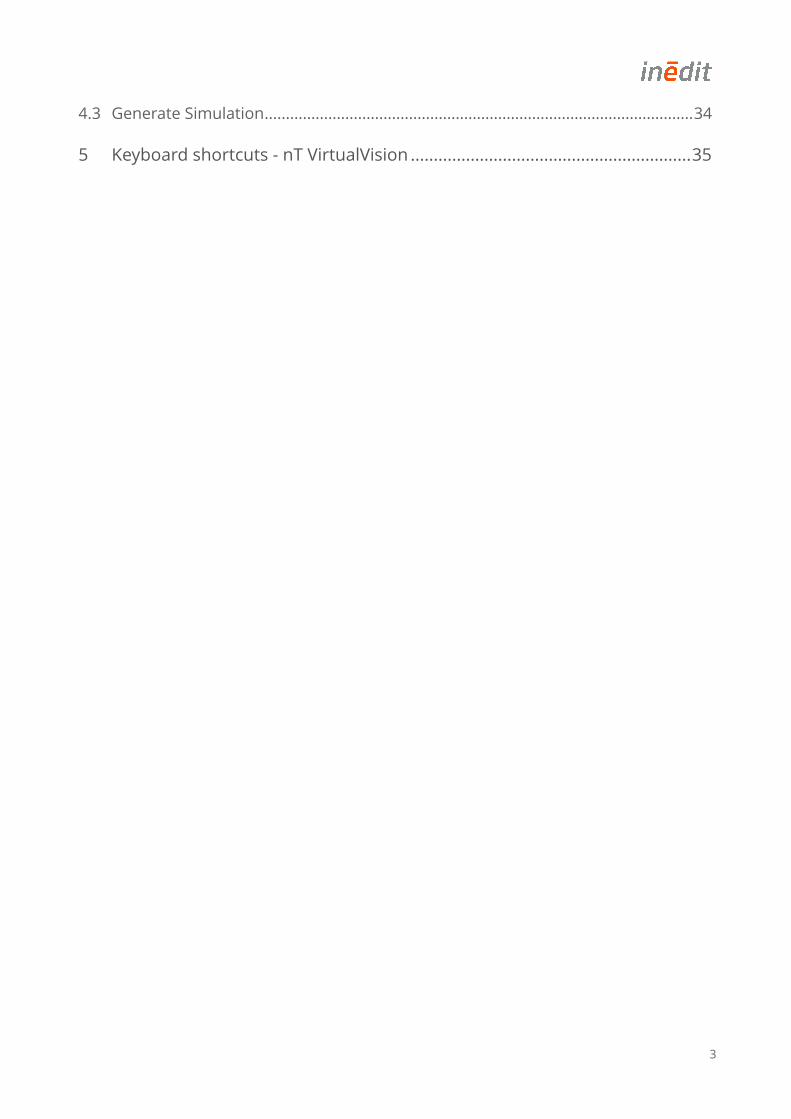
Table of Contents
1 Introduction..........................................................................................................5
1.1 Overview ..........................................................................................................................5
1.2 New Features...................................................................................................................5
2 Get Started with nT VirtualVision.......................................................................6
2.1 Image File Requirements for nT VirtualVision .............................................................6
2.2 Creation of Paths and Channels ...................................................................................7
2.2.1 Channels ...................................................................................................................................................... 7
2.2.2 Shadow Channel ......................................................................................................................................... 9
2.3 Open nT VirtualVision...................................................................................................10
2.4 User Interface nT VirtualVision....................................................................................10
2.5 nT VirtualVision Tools ...................................................................................................11
2.6 Preferences nT VirtualVision........................................................................................13
2.6.1 Grid ............................................................................................................................................................. 13
2.6.2 Selection..................................................................................................................................................... 16
2.6.3 Color Picker................................................................................................................................................ 16
2.6.4 Preview....................................................................................................................................................... 16
3 Creation of Panels..............................................................................................18
3.1 Real Size Measuring......................................................................................................18
3.2 Panel Creation...............................................................................................................18
3.2.1 Panel Definition......................................................................................................................................... 21
3.2.2 Panel Re-Sizing .......................................................................................................................................... 22
3.2.3 Panel Rotation........................................................................................................................................... 25
3.3 Panel Groups.................................................................................................................29
4 Creation of Simulation ......................................................................................30
4.1 Preview Modes ..............................................................................................................30
4.2 Assigning Texture or Color...........................................................................................31
4.2.1 Color ........................................................................................................................................................... 31
4.2.2 Texture ....................................................................................................................................................... 33
4.2.3 Setups......................................................................................................................................................... 34
3
4.3 Generate Simulation.....................................................................................................34
5 Keyboard shortcuts - nT VirtualVision .............................................................35
Copyright
© Inèdit Software all rights reserved. The software described herein is property of the manufacturer, for the exclusive use of the registered users. The total or partial reproduction of the program is prohibited, as well as all its support materials, by electronic, mechanical, photographic or any other means, without the express written authorization of the © Inèdit Software. All trademark mentioned in this manual is Copyright of its owners.
Support Material
In our web http://www.inedit.com/en/downloads you will find further support materials such as video tutorials, apart from all the information of the programs and solutions of Inèdit. For technical support and phone support information, please visit http://www.inedit.com/. If you think you can help us improve manual contents, you can send your suggestions to [email protected].
About the Documentation
In this manual you will find descriptions of the options that the program offers and extensive explanations of the various processes and aspects involved in this application.
• Tips and Notes will help you through the software’s workflow.
• Attentions and Warnings will help you avoid making mistakes in the workflow’s process.
nT VirtualVision Introduction – 5/35
Introduction
Overview
neoTextil 8 VirtualVision is a module that allows to create simulations of objects in order to apply textures on them, obtaining a photorealistic result. It is specially designed for interior design, interior decoration, fashion, graphic design, automobile design, etc.
New Features
This version of neoTextil 8 VirtualVision provides the following new features :
> Improvements in special characters names.
nT VirtualVision Get Started with nT VirtualVision – 6/35
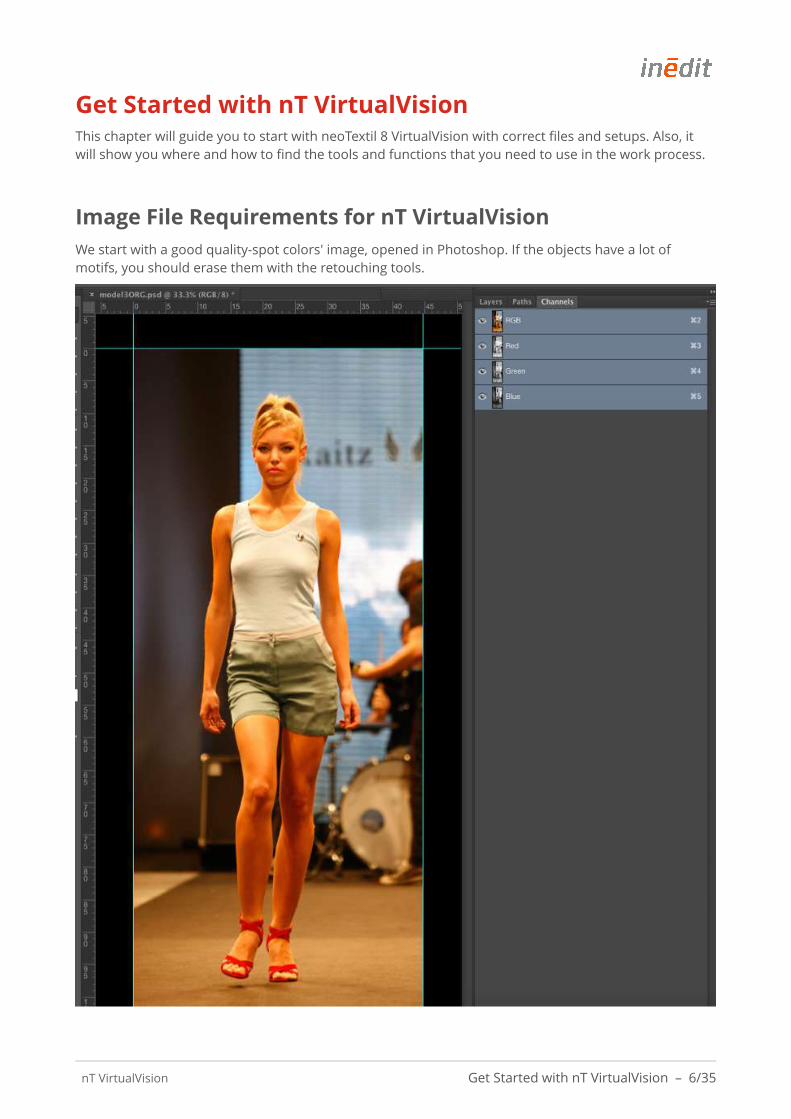
Get Started with nT VirtualVisionThis chapter will guide you to start with neoTextil 8 VirtualVision with correct files and setups. Also, it will show you where and how to find the tools and functions that you need to use in the work process.
Image File Requirements for nT VirtualVisionWe start with a good quality-spot colors' image, opened in Photoshop. If the objects have a lot of motifs, you should erase them with the retouching tools.
nT VirtualVision Get Started with nT VirtualVision – 7/35
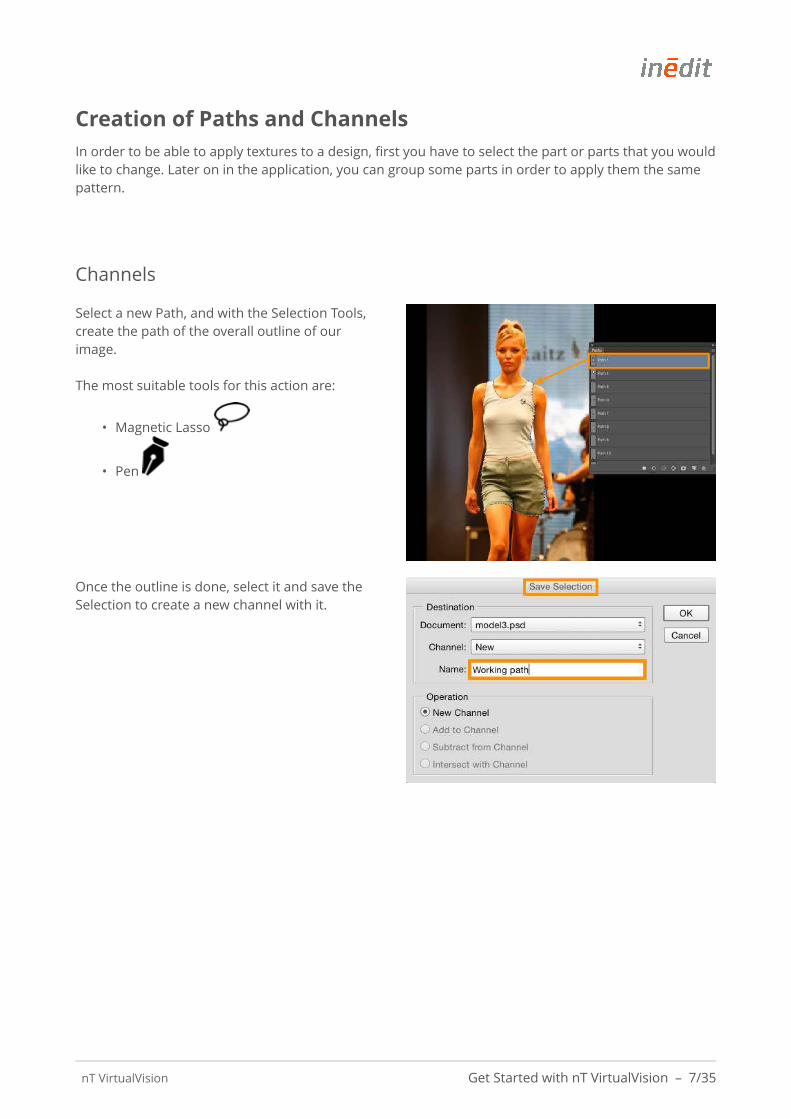
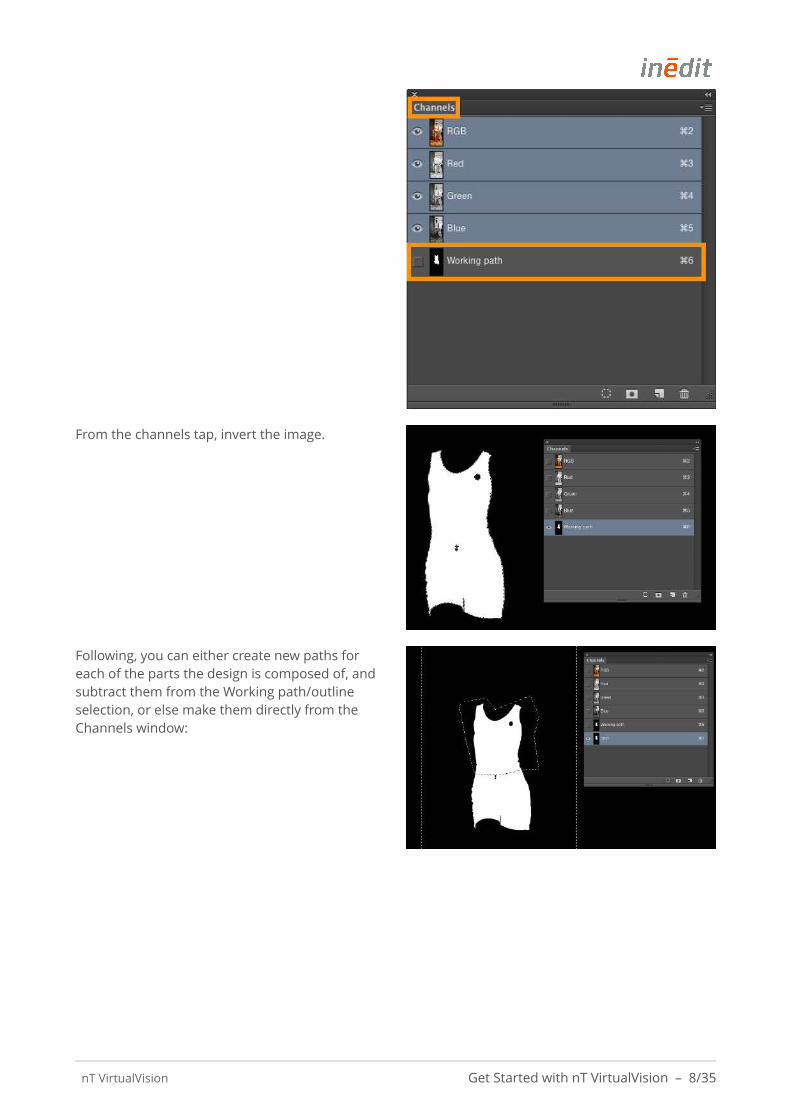
Creation of Paths and ChannelsIn order to be able to apply textures to a design, first you have to select the part or parts that you would like to change. Later on in the application, you can group some parts in order to apply them the same pattern.
Channels
Select a new Path, and with the Selection Tools, create the path of the overall outline of our image.
The most suitable tools for this action are:
• Magnetic Lasso
• Pen
Once the outline is done, select it and save the Selection to create a new channel with it.
nT VirtualVision Get Started with nT VirtualVision – 8/35
From the channels tap, invert the image.
Following, you can either create new paths for each of the parts the design is composed of, and subtract them from the Working path/outline selection, or else make them directly from the Channels window:

nT VirtualVision Get Started with nT VirtualVision – 9/35
Shadow Channel
The last channel to create is the Shadow Channel. Choose the less contrasted RGB channel and with best white levels from the image, and duplicate it.
If you like, you can modify the shadows channel from the Photoshop Adjustments options:
Most common tool to adjust the shadow is changing the Levels, but you can also alter curves, etc.

nT VirtualVision Get Started with nT VirtualVision – 10/35
Open nT VirtualVisionDisplay the drop-down option list from File | Automate and click on nT Virtual Vision 8…:
User Interface nT VirtualVisionLet's take a look at the plugin interface to understand its key elements.
1. Simulation and OK & Cancel - Once you've got a simulation done, click 'OK' to save the modifications and return to Photoshop. With 'Cancel' you will go back to Photoshop without keeping the changes. 'Simulation' will generate the simulation file with the texture or colors, and export it in Photoshop with a new name.
nT VirtualVision Get Started with nT VirtualVision – 11/35
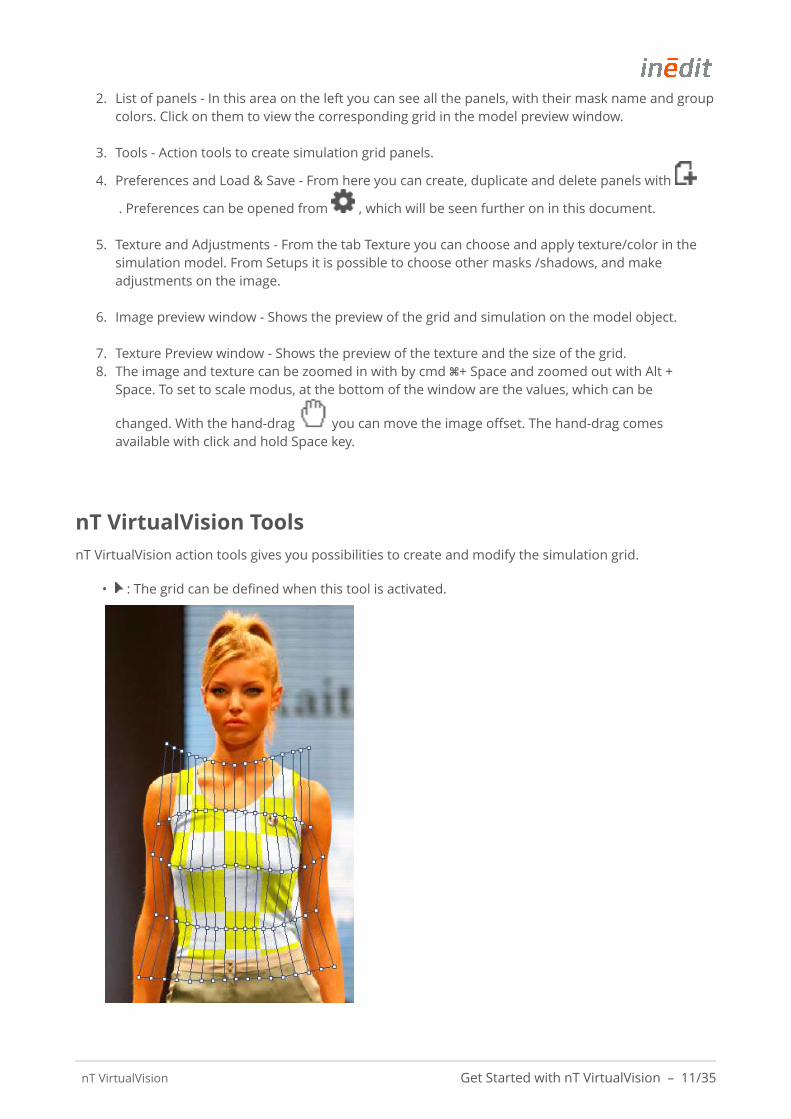
2. List of panels - In this area on the left you can see all the panels, with their mask name and group colors. Click on them to view the corresponding grid in the model preview window.
3. Tools - Action tools to create simulation grid panels.
4. Preferences and Load & Save - From here you can create, duplicate and delete panels with
. Preferences can be opened from , which will be seen further on in this document.
5. Texture and Adjustments - From the tab Texture you can choose and apply texture/color in the simulation model. From Setups it is possible to choose other masks /shadows, and make adjustments on the image.
6. Image preview window - Shows the preview of the grid and simulation on the model object.
7. Texture Preview window - Shows the preview of the texture and the size of the grid.8. The image and texture can be zoomed in with by cmd ⌘+ Space and zoomed out with Alt +
Space. To set to scale modus, at the bottom of the window are the values, which can be
changed. With the hand-drag you can move the image offset. The hand-drag comes available with click and hold Space key.
nT VirtualVision ToolsnT VirtualVision action tools gives you possibilities to create and modify the simulation grid.
• : The grid can be defined when this tool is activated.
nT VirtualVision Get Started with nT VirtualVision – 12/35
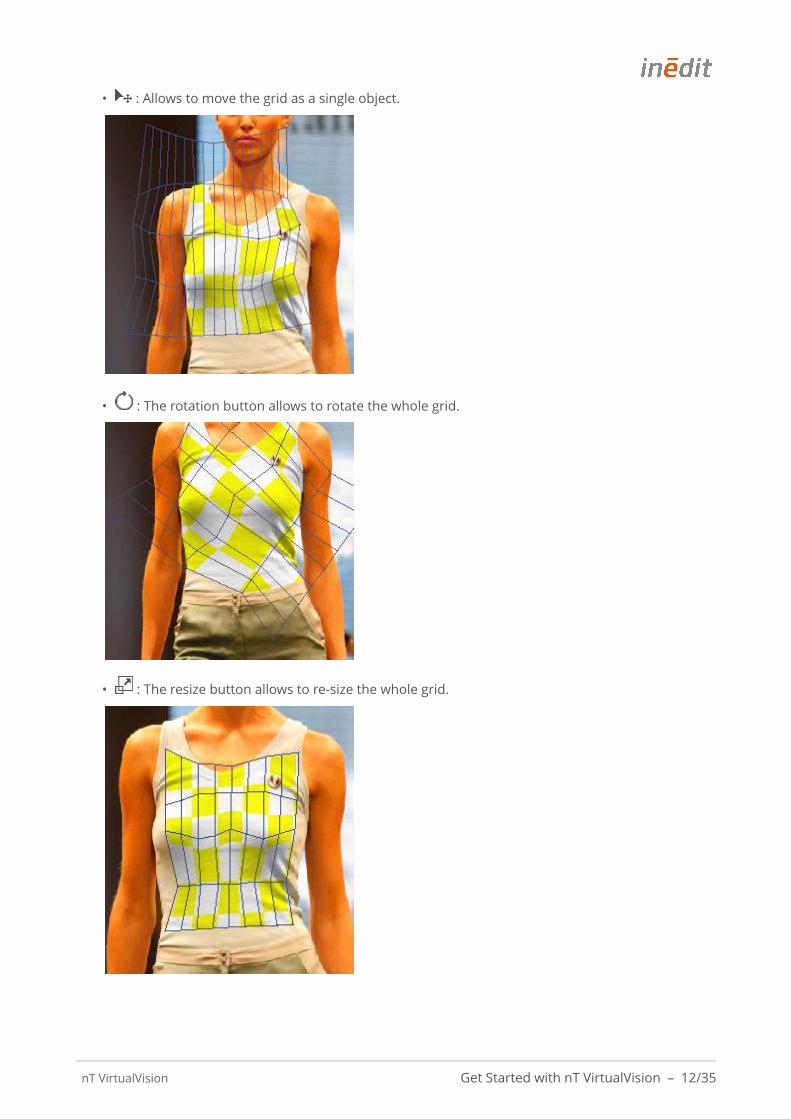
• : Allows to move the grid as a single object.
• : The rotation button allows to rotate the whole grid.
• : The resize button allows to re-size the whole grid.

nT VirtualVision Get Started with nT VirtualVision – 13/35
• : The ruler button allows to measure two points in the image and give it another measurement.
• : Definition of panel buttons. These two buttons allow to add and remove lines for the grid when we want to give it shape. The lines are both horizontal and vertical.
• : Grid mode preview button. When this button is activated we apply the square-default pattern to the panels.
• : Preview texture/color buttons. When these buttons are activated we can see texture or color applied to the panels, in Low or High Quality.
Preferences nT VirtualVisionThis chapter will guide you to start with neoTextil 8 VirtualVision with correct files and setups. Also, it will show you where and how to find the tools and functions that you need to use in the work process.
The option Preferences in VirtualVision opens a window where some parameters can be adjusted.
Grid
The Grid adjustments are applied to the size of the checks that monitor the design size, and also its color.

nT VirtualVision Get Started with nT VirtualVision – 14/35
Next you can see the same view mode with two different check sizes:
nT VirtualVision Get Started with nT VirtualVision – 15/35
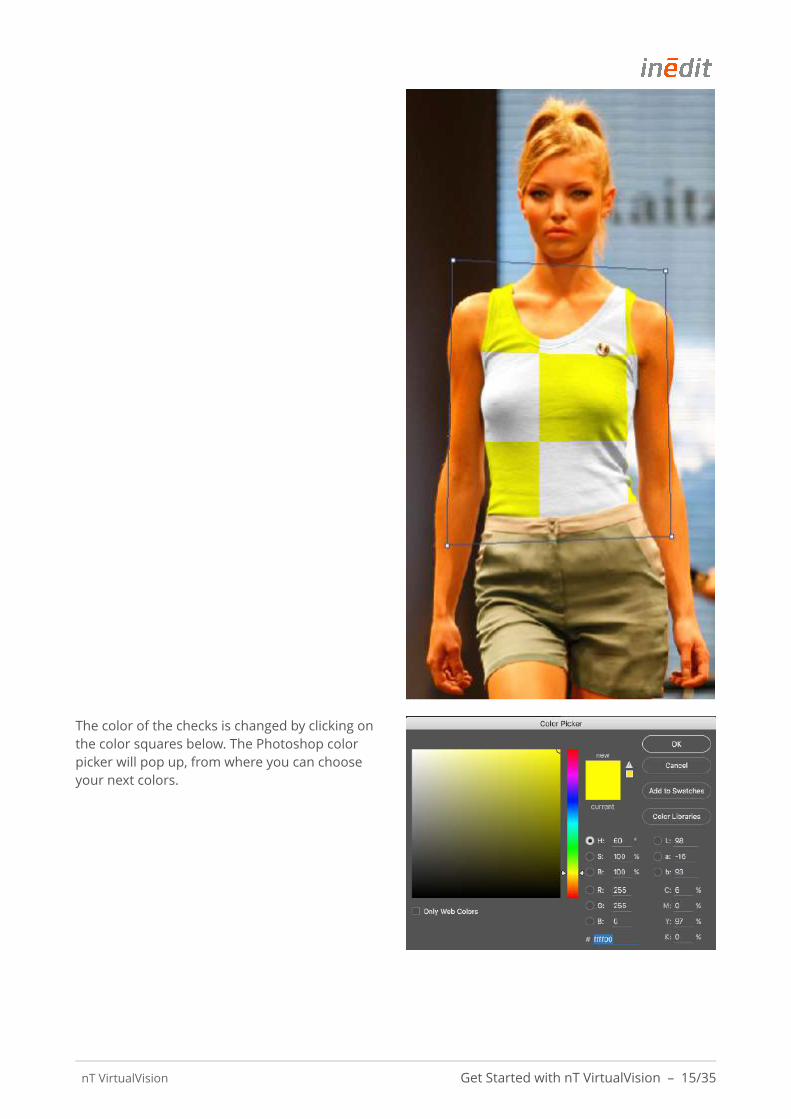
The color of the checks is changed by clicking on the color squares below. The Photoshop color picker will pop up, from where you can choose your next colors.
nT VirtualVision Get Started with nT VirtualVision – 16/35
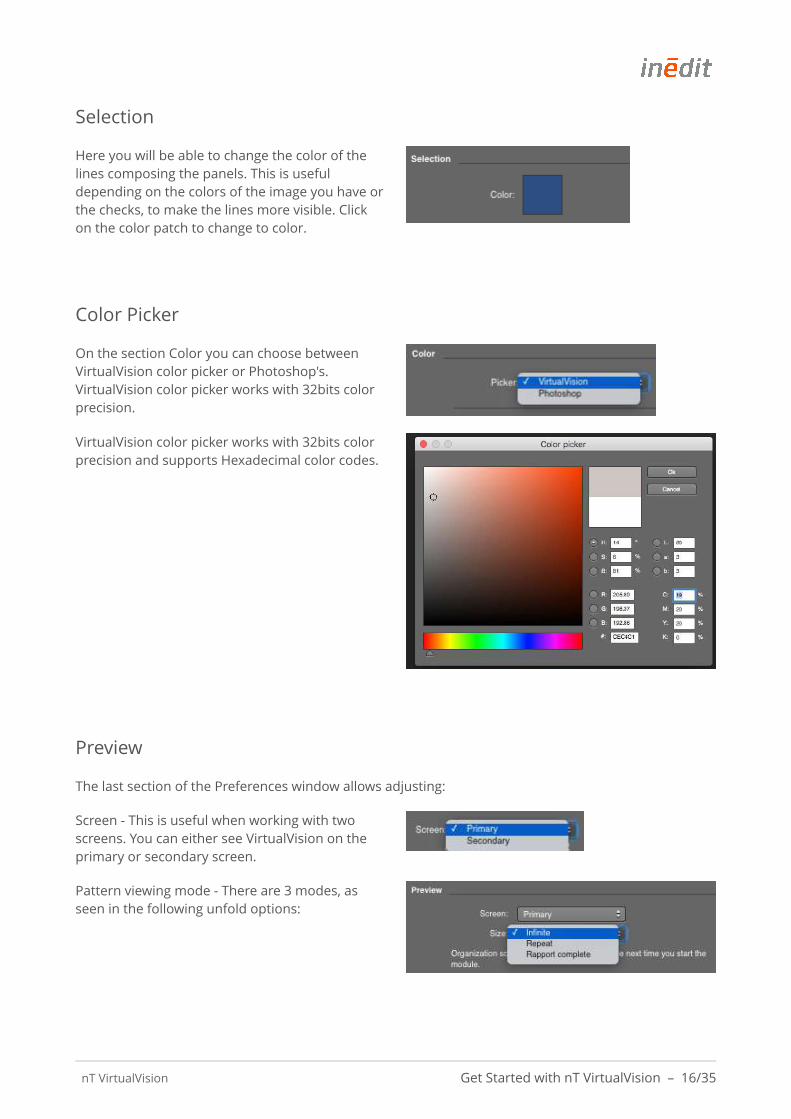
Selection
Here you will be able to change the color of the lines composing the panels. This is useful depending on the colors of the image you have or the checks, to make the lines more visible. Click on the color patch to change to color.
Color Picker
On the section Color you can choose between VirtualVision color picker or Photoshop's. VirtualVision color picker works with 32bits color precision.
VirtualVision color picker works with 32bits color precision and supports Hexadecimal color codes.
Preview
The last section of the Preferences window allows adjusting:
Screen - This is useful when working with two screens. You can either see VirtualVision on the primary or secondary screen.
Pattern viewing mode - There are 3 modes, as seen in the following unfold options:

nT VirtualVision Get Started with nT VirtualVision – 17/35
An example of preview Repeat mode:

nT VirtualVision Creation of Panels – 18/35
Creation of PanelsThis chapter explains the function of VirtualVision object panel creation. Once the advanced image preparation in Photoshop™ is done, you can start to make the panels.
Real Size MeasuringChoose a standard size item on your image, i.e. average distance between shoulders. Click on the ruler tool, then click on one of the ends, drag the cursor to the other desired end, and release the mouse button. A line will appear, that you will be able to re-measure:
It measures the real image size, which provides a realistic size to the whole image. nT VirtualVision will automatically calculate the rest of objects with the given measure.
Panel CreationPress The new Panel button, located below the List of panels space, and a small window will pop-up, where we will select New:
To create a new panel, we must define de 4 corners anchoring-angles of the grid.
Start by the top left angle with one click, and continue defining the other vertexes clockwise, always with double click, until you close the grid.
If you set points between the angles, you must set the same amount of points for each side.

nT VirtualVision Creation of Panels – 19/35
The following dialog indicates how to make the steps. Press Continue to start setting the anchoring angles.
Once you have the panel, the Panel Settings dialog pops-up:
First give the panel a name, and then identify it with one of the channels created in Photoshop, which is named Mask in nT Virtual Vision.

nT VirtualVision Creation of Panels – 20/35
Finally, choose the Shadow channel that you created and press OK:
Your new panel will then appear on the panels list, at first without any grouping.

nT VirtualVision Creation of Panels – 21/35
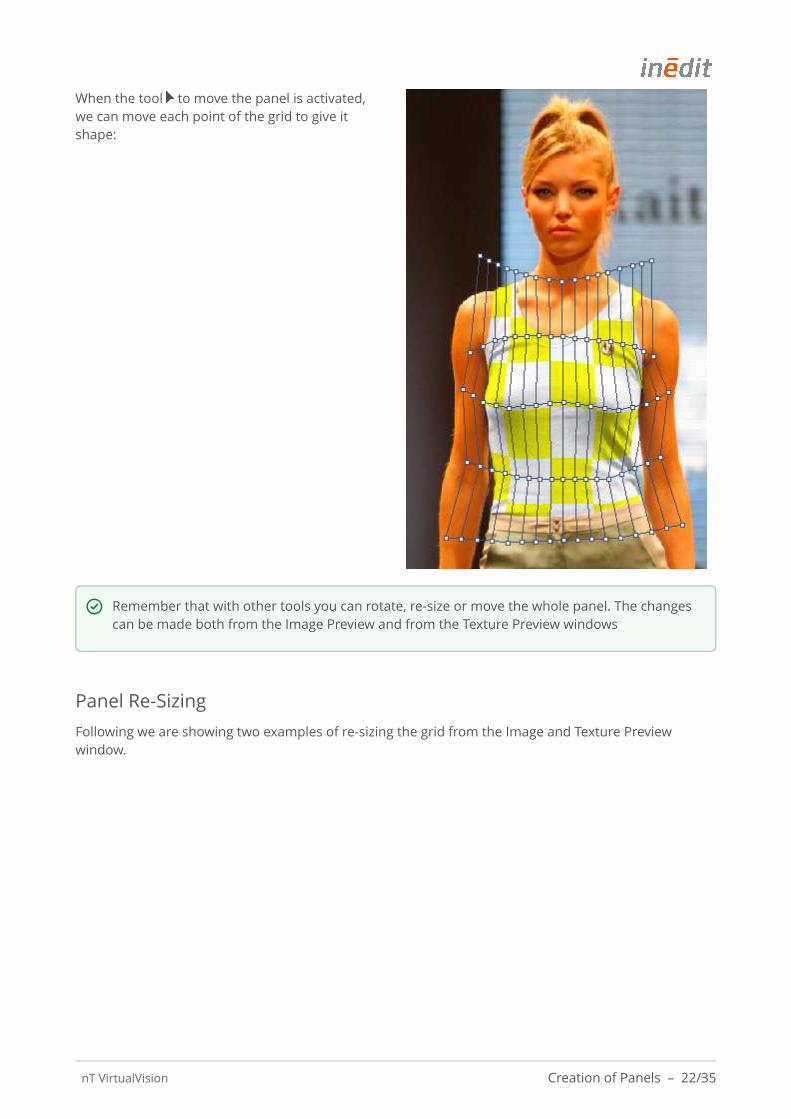
Panel Definition
With the tools we define the panels, adding and subtract ing vertical and horizontal lines, that will help us define the grid, following the shape of the object.
nT VirtualVision Creation of Panels – 22/35
When the tool to move the panel is activated, we can move each point of the grid to give it shape:
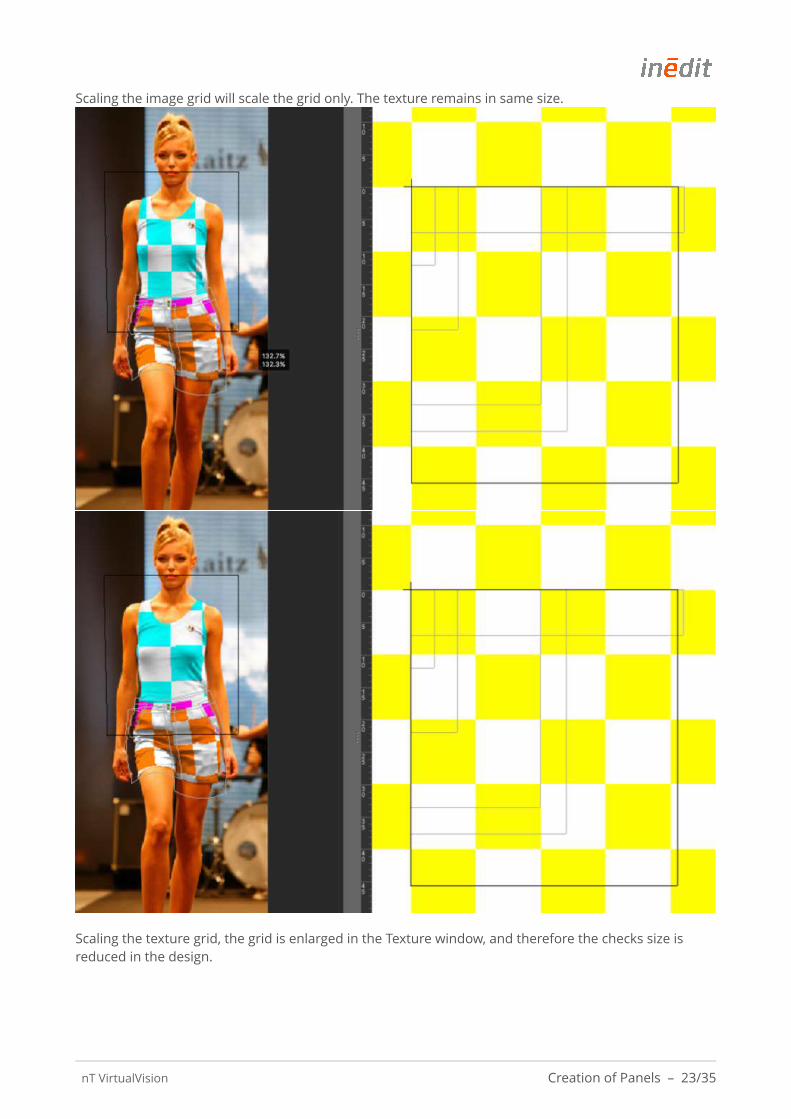
Panel Re-Sizing
Following we are showing two examples of re-sizing the grid from the Image and Texture Preview window.
Remember that with other tools you can rotate, re-size or move the whole panel. The changes can be made both from the Image Preview and from the Texture Preview windows
nT VirtualVision Creation of Panels – 23/35
Scaling the image grid will scale the grid only. The texture remains in same size.
Scaling the texture grid, the grid is enlarged in the Texture window, and therefore the checks size is reduced in the design.

nT VirtualVision Creation of Panels – 24/35

nT VirtualVision Creation of Panels – 25/35
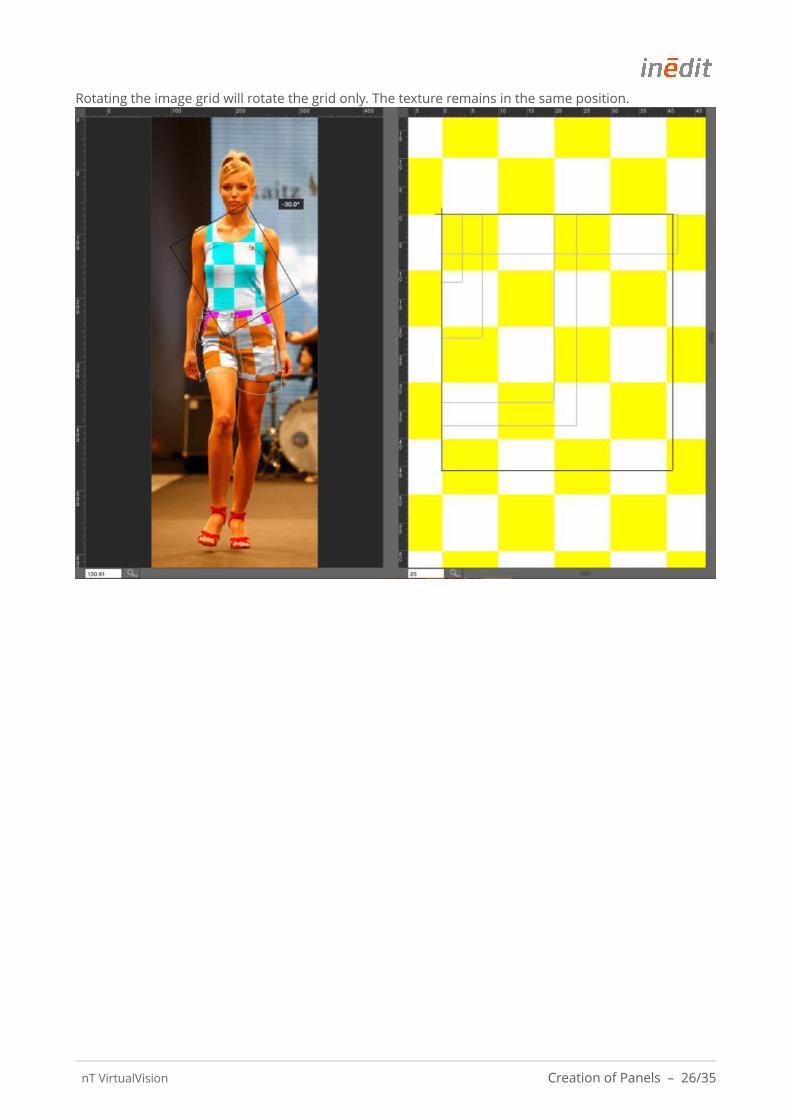
Panel Rotation
Following we are showing two examples of rotating the grid from the Image and Texture Preview window.
nT VirtualVision Creation of Panels – 26/35
Rotating the image grid will rotate the grid only. The texture remains in the same position.
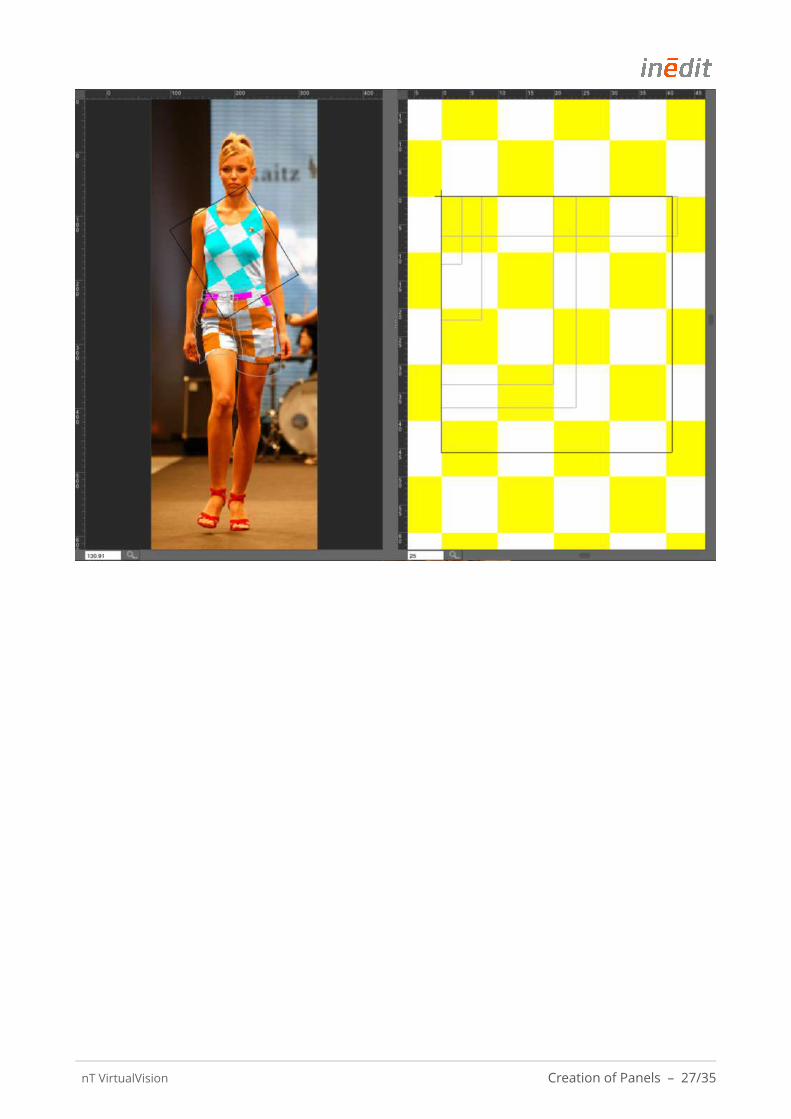
nT VirtualVision Creation of Panels – 27/35
nT VirtualVision Creation of Panels – 28/35
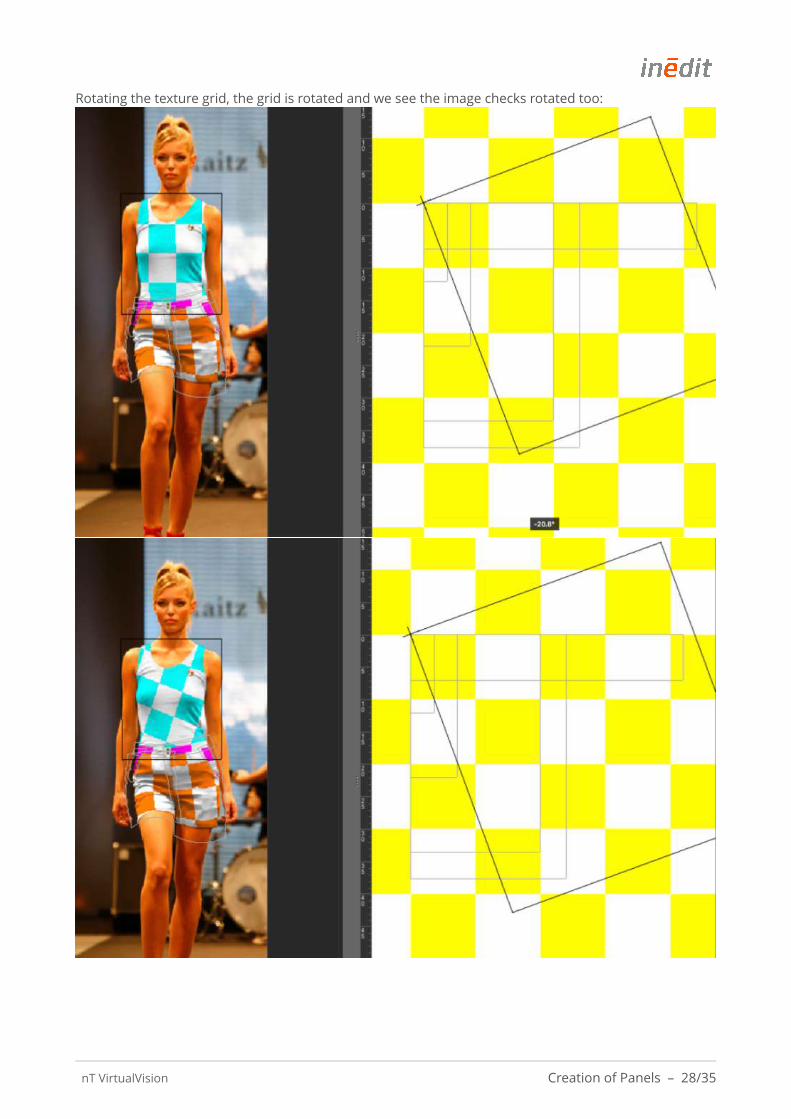
Rotating the texture grid, the grid is rotated and we see the image checks rotated too:
nT VirtualVision Creation of Panels – 29/35
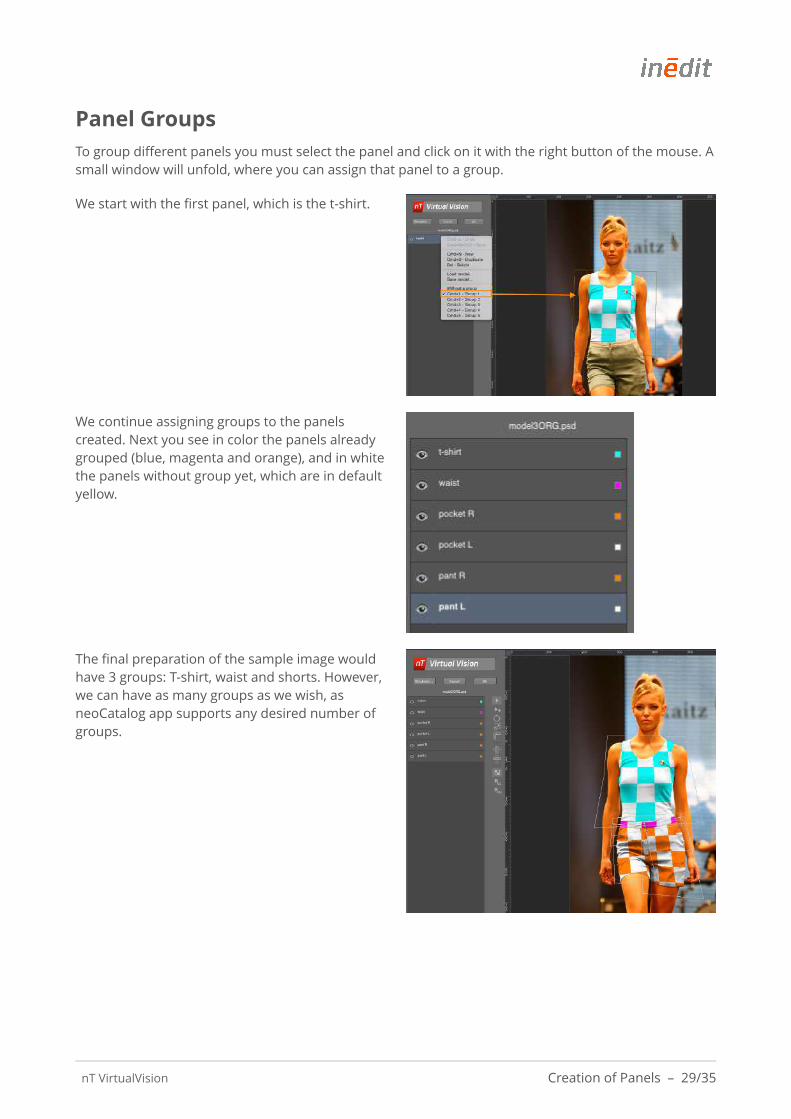
Panel GroupsTo group different panels you must select the panel and click on it with the right button of the mouse. A small window will unfold, where you can assign that panel to a group.
We start with the first panel, which is the t-shirt.
We continue assigning groups to the panels created. Next you see in color the panels already grouped (blue, magenta and orange), and in white the panels without group yet, which are in default yellow.
The final preparation of the sample image would have 3 groups: T-shirt, waist and shorts. However, we can have as many groups as we wish, as neoCatalog app supports any desired number of groups.

nT VirtualVision Creation of Simulation – 30/35
Creation of SimulationThis chapter explains the main function of neoTextil 8 VirtualVision: Creating a VirtualVision simulation of texture or color. Once the panel preparation is done, you can start to make the virtual simulation.
Preview Modes
There are three preview modes, that we select clicking the tools .
This first and simplest, which is intended to be used as working method, is the Grid mode:
The second, Low quality mode, displays the panels with textures in low quality, used to get quick previews.

nT VirtualVision Creation of Simulation – 31/35
The third mode is the High quality, which displays the panels with high quality textures, exactly as they will be exported.
Assigning Texture or ColorTo apply a texture or a color to any of the panels, or all of them, you
must have the tools selected. Next, select any panel from the list of panels, or else you can select it from the image preview. The Texture dialog will become activated:
Color
If you wish to apply a color, select the button next to the white square.
nT VirtualVision Creation of Simulation – 32/35
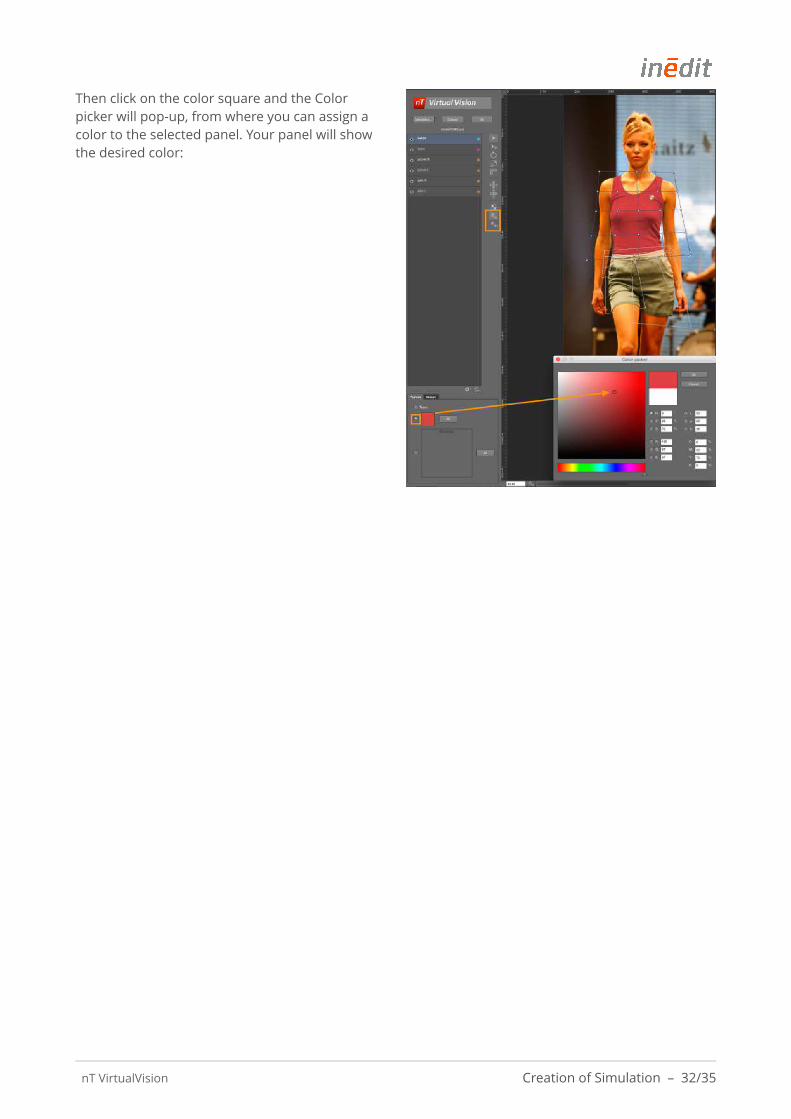
Then click on the color square and the Color picker will pop-up, from where you can assign a color to the selected panel. Your panel will show the desired color:

nT VirtualVision Creation of Simulation – 33/35
You can apply the color to all the panels, by selecting the All button on the right:
Texture
To apply designs to your panels, select to have an image in the Texture dialog. Then, click on the empty square to choose it from your computer.
Images need to be RGB image in order to be applied.
nT VirtualVision Creation of Simulation – 34/35
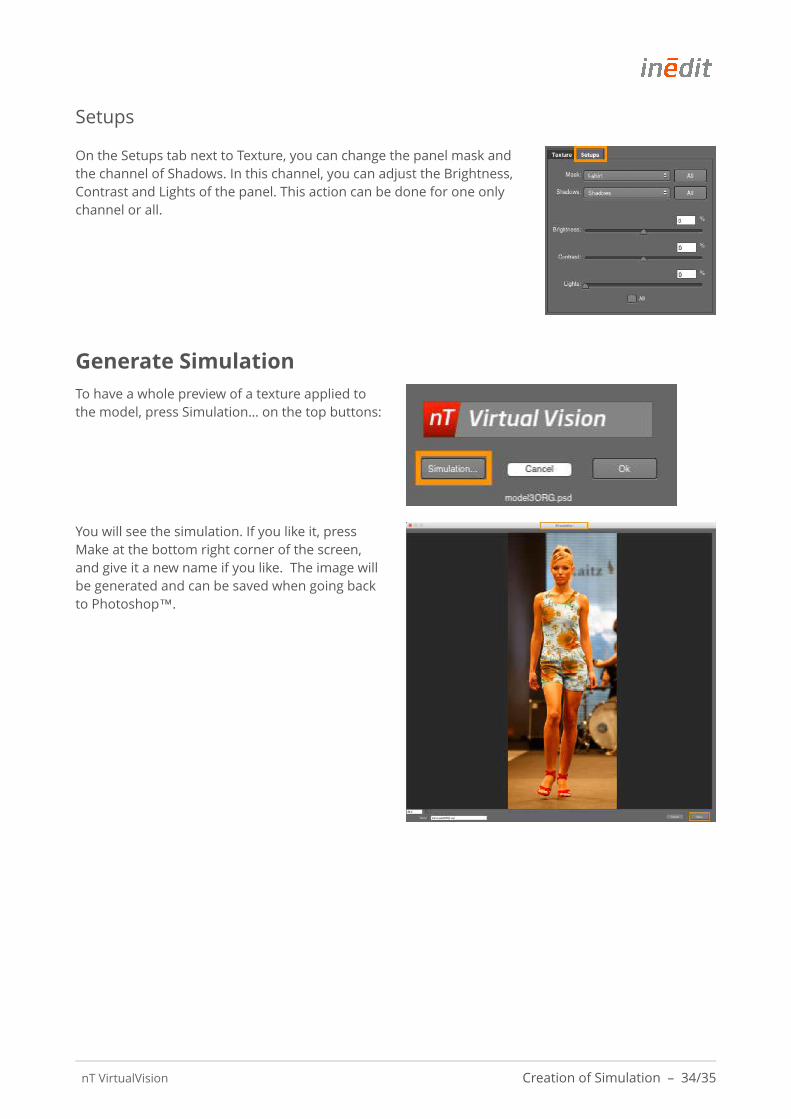
Setups
On the Setups tab next to Texture, you can change the panel mask and the channel of Shadows. In this channel, you can adjust the Brightness, Contrast and Lights of the panel. This action can be done for one only channel or all.
Generate SimulationTo have a whole preview of a texture applied to the model, press Simulation… on the top buttons:
You will see the simulation. If you like it, press Make at the bottom right corner of the screen, and give it a new name if you like. The image will be generated and can be saved when going back to Photoshop™.

nT VirtualVision Keyboard shortcuts - nT VirtualVision – 35/35
Keyboard shortcuts - nT VirtualVisionPress Ctrl and Alt (on PC) and ⌘ and Option (on Mac)
⌘ + N New panel.
⌘ + D Duplicate panel.
⌘ + Alt Change to the following preview mode.
⌘ + K Preferences
Alt + T Change the texture image of the selected panel.
⌘ + Alt + C Cancel the creation of the panels (Mac only).
Del / Sup Delete the selected panel.
A Direct selection tool.
V Selection tool.
R Rotation tool.
S Scale tool.
I Measure tool.