NEOREST AIRBATH™ - totousa.com · NEOREST ® AIRBATH™ Limited ... Otherwise, abnormal...
46
Instruction Manual Thank you for your recent purchase of the NEOREST® AIRBATH™. Please read the enclosed information to ensure the safe use of your product. Introduction Important safety instructions................................2 Operational instructions .......................................5 The controller .......................................................7 Names of parts ....................................................9 Before using it for the first time..........................11 Care and cleaning .............................................26 Purging/draining the AIRBATH™.......................27 Air nozzle cap ....................................................29 Lighting modules ...............................................30 Controller ...........................................................30 Head rest ...........................................................31 Sanitizing the tub ...............................................32 Function module ................................................33 Drain plug ..........................................................13 Cleaning the tub ................................................14 Controller stand .................................................15 Filling the tub with hot water ..............................16 Air blower operation...........................................17 Cascade water flow operation ...........................18 Using the underwater lighting ............................19 Lowering the bath temperature (Cooling water)...20 Raising the bath temperature (Heating water) ..21 Adding more hot water (Add water) ..................22 Using the preference buttons ...........................23 Changing the settings ........................................25 Long periods of disuse ......................................35 When you think something might be wrong ......37 Specifications ....................................................42 Operation Maintenance Trouble- shooting NEOREST ® AIRBATH™ Limited Warranty................................................44
Transcript of NEOREST AIRBATH™ - totousa.com · NEOREST ® AIRBATH™ Limited ... Otherwise, abnormal...

Instruction Manual
Thank you for your recent purchase of the NEOREST® AIRBATH™. Please read the enclosed information to ensure the safe use of your product.
Introduction
Important safety instructions................................2
Operational instructions.......................................5
The controller.......................................................7
Names of parts ....................................................9
Before using it for the first time..........................11
Care and cleaning .............................................26
Purging/draining the AIRBATH™.......................27
Air nozzle cap ....................................................29
Lighting modules ...............................................30
Controller ...........................................................30
Head rest ...........................................................31
Sanitizing the tub ...............................................32
Function module ................................................33
Drain plug ..........................................................13
Cleaning the tub ................................................14
Controller stand .................................................15
Filling the tub with hot water..............................16
Air blower operation...........................................17
Cascade water flow operation ...........................18
Using the underwater lighting............................19
Lowering the bath temperature (Cooling water)...20
Raising the bath temperature (Heating water) ..21
Adding more hot water (Add water) ..................22
Using the preference buttons ...........................23
Changing the settings........................................25
Long periods of disuse ......................................35
When you think something might be wrong ......37
Specifications ....................................................42
Operation
Maintenance
Trouble-shooting
NEOREST® AIRBATH™
Limited Warranty................................................44

1
Important safety instructionsIntroduction
READ AND FOLLOW ALL INSTRUCTIONS.SAVE THIS INSTRUCTION with your installation manual.
Use this unit only for its intended use as described in this manual. Do not use attachments not recommended by TOTOUSA, Inc.
Failure to follow the important safety instructions will void the warranty.
If you move, please give this "Instruction Manual" to the person who will occupy your home after you.
This "Instruction Manual" includes various symbols indicating how to use the product safely and properly, how to avoidinjury to you and to others and how to avoid damage to property. These symbols and their meanings are described below.
Symbol
Warning This indicates the possibility of a fatality or a serious personal injury if the symbol is ignoredand the product is mishandled.
This indicates the possibility of a personal injury or only physical damage if the symbol isignored and the product is mishandled.
Meaning
CautionThe symbols shown below are displayed in the "Instruction Manual" or on the product so that consumers will be able touse the product safely and properly. Please study the content closely and use the product properly and in accordance withthis Instruction Manual.
Symbol"Prohibited" activity that must be avoided.
Do not disassemble.
Meaning
"Mandatory" activity that must be done.
Please be sure to connect to ground.
When using water heaters or other equipmentwith this product, please follow the applicablehandling instructions for that equipment.Mistaken or improper handling can causeunforeseen accidents or breakdowns.
WarningDo not, under any circumstances, disassemble, repair or modify.Otherwise, abnormal operation, injury, fire or electric shock could result.Additionally, leaking water could contaminate or ruin household property.Do not take
apart
Do not use with any voltage but the one specified (120 VAC, 60Hz).Otherwise, a fire could result.
Prohibited
Water temperature in excess of 38°C may be injurious to your health.Check and adjust water temperature before use.Risk of hyperthermia and possible drowning.High
temperaturewarning
Do not use a AIRBATH™ unless all suction guards are installed to prevent body and hair entrapment.Risk of accidental injury or drowning.
Prohibited
Children should not use a AIRBATH™ without adult supervision.Risk of accidental injury or drowning.
Prohibited

Intro
duct
ion
2
WarningDo not use kerosene, gasoline, benzene or other flammable substances around the equipment. Otherwise, a fire could result which could cause a burn.
Prohibited
Confirm that the grounding (D-type grounding) work has been completed. Electric shock or breakdown could result if the product has not been grounded. Please ask your local installer aboutgrounding your product.Connect to
ground
Do not bend, handle the power cords roughly or place heavy objects on them. Otherwise, a fire or electric shock could result.
Prohibited
Ask your retailer, contractor or specialist about installation or moving your equipment.If you try to install or move it yourself and something has not been done properly, fire or electrical shock could result. Additionally, leaking water could contaminate or ruin household property.Always do
this.
Do not look directly into the lighting element of the underwater lights. Otherwise, eye injury might result.
Prohibited
Do not drain the tub while bathing. Otherwise, your hands, legs or hair might be drawn into the drain, with the possibility of injury or drowning.
Prohibited
Do not stand on the edge of the AIRBATH™. Otherwise, you may slip and hurt yourself.
Prohibited
Do not submerge yourself or thrash around in the tub. Otherwise, injury or drowning may result.
Prohibited
To avoid injury, exercise care when entering or exiting a AIRBATH™.
Always dothis.
Do not grasp the headrest when entering the tub.There is a chance that the headrest will come off and injury or drowning will result.
Prohibited
Do not supply water with a temperature any higher than 158°F (70°C) to the equipment.Otherwise, there is a chance of reduced equipment life, damage, scalding or leakage that could wet and cause damage tohousehold property. Also, do not supply water with a temperature lower than 113°F (45°C) for your safety.Prohibited
When using the shower, always turn on the cold water first and then slowly turn on the hot water,adjusting to your preferred temperature.Otherwise, there is a risk of scalding from very hot water if the hot water is turned on first or quickly.Always do
this
When turning off the shower, be sure to turn the hot water off first.Otherwise, there is a risk of scalding the next time the shower is used from hot water still remaining in the pipes.
Always dothis
Let the cold water run for a while after using high-temperature hot water in the shower. Otherwise, there is a risk of scalding the next time the shower is used from hot water still remaining in the pipes.
Always dothis
Do not run hot water over 120°F (49°C) through the shower.Otherwise, there is a chance of damage to the shower head, scalding or injury.Please check local code.Prohibited
Always keep the cold water supply pressure higher than the hot water supply pressure but not by morethan 14.5 psi (0.1MPa).If the hot water supply pressure is higher than the cold water supply pressure, there will be a risk of being unable to adjustthe water temperature normally or of scalding.
Always dothis
Check for leaks and loose fittings around the product and piping. There is a chance that deterioration, wear and the like will damage parts, leading to scalding, injury or leaks that coulddamage household property.Always do
this
When using high-temperature hot water, do not touch the spout or the shower hose directly. A hot spout or shower hose could cause a burn.
Do not touch

3
Introduction
WarningThe check valve needs to be exchanged regularly for security.If the check valve doesn't function normal, it can cause the water to back up.It can cause water leaks and other unexpected accidents.Always do
this
Install to permit access for servicing, install this unit in accordance with the NationalElectrical Code (NEC) NFPA 70 and Canadian Electrical Code, Part 1.
Always dothis
The electrical circuit supplied for the AIRBATH™ must include a suitable ground fault circuit interrupter(GFCI) as required by NEC article 680.70. The unit must be connected only to a supply circuit that isprotected by a ground fault circuit interrupter (GFCI). Such GFCI should be provided by the installer andshould be tested on a routine basis. To test the GFCI, push the reset button. Power should be restored. Ifthe GFCI fails to operate in this manner, the GFCI is defective. If the GFCI interrupts power without thetest button being pushed there is a ground current flowing, indicating the possibility of electric shock.Do not use this AIRBATH™. Disconnect the AIRBATH™ and have the problem corrected by a qualifiedservice representative before using.Risk of electric shock.
Do not permit electric appliances (such as a hair dryer, lamp, telephone, radio, or television)within 1.5 m of this AIRBATH™.Risk of electric shock.Prohibited
Always dothis
For permanently connected units, a green colored terminal (or wire connector marked “G”, “GR”, or“Ground”, or “Grounding”) is provided within the terminal compartment. To reduce the risk of electricshock, connect this terminal or connector to the grounding terminal of your electric service or supplypanel with a conductor equivalent in size to the circuit conductors supplying the equipment.
Connect toground
The suction fitting in this AIRBATH™ is sized to match the specific water flow created by the pump.Should the need arise to replace the suction fitting or the pump, be sure that the flow rates arecompatible. Never operate the unit if the suction fitting are broken or missing. Never replace a suctionfitting with one rated less than the flow rate marked on the original suction fitting.
Prohibited
Install at least 5 feet (1.5m) from all metal surfaces. As an alternative, the AIRBATH™ may be installedwithin 5 feet of metal surfaces if each metal surface is permanently connected (bonded) by a minimumNo. 8 AWG (8.4 mm sq.) solid copper conductor attached to the wire connector on the grounding luginside the controller on the terminal box.
Always dothis
At least two lugs marked “bonding lugs” are provided on the external surface or on the inside of thesupply terminal box/compartment. To reduce the risk of electric shock, connect the local commonbonding grid in the area of the AIRBATH™ to these terminals with an insulated or bare copper conductornot smaller than No. 6 (10 mm sq.).
Always dothis
Do not use drugs or alcohol before or during the use of an AIRBATH™ equipped with heater to avoidunconsciousness and possible drowning.Risk of accidental injury or drowning.The use of alcohol, drugs, or medication can greatly increase the risk of fatal hyperthermia.
Prohibited
People with infectious diseases should not use an AIRBATH™.
Prohibited
Persons using medications should consult a physician before using the AIRBATH™ since somemedication may induce drowsiness, while other medication may affect heart rate, blood pressure andcirculation.The use of alcohol, drugs, or medication can greatly increase the risk of fatal hyperthermia.
Always dothis
Pregnant or possibly pregnant women should consult a physician before using the AIRBATH™.
Always dothis
Do not use the AIRBATH™ immediately following strenuous exercise.
Prohibited
Prolonged immersion in the AIRBATH™ may be injurious to your health.
Prohibited

Intro
duct
ion
4
CautionDo not aim the air bubbles directly at the eyes, nose or ears.Doing so could lead to an infection.
Prohibited
Do not run the AIRBATH™ with the air bubbler caps removed.Water remaining in the pipes could splash up into the eyes or mouth,risking injury, when draining the tub or if the tub is run while empty. Please replace the air bubbler caps properly before operating theAIRBATH™.
Do not use when there is a possibility of freezing.If this is done, the pipes could rupture and water could contaminate or ruin household property.
Do not drop things into the tub or use undue force.Never drop or insert any object into any opening.Doing so could cause cracking and leaks.Prohibited
Prohibited
Prohibited
Do not hit or drop the plated parts.Doing so could crack the plated surfaces, leading to injury. If the plated surfaces should ever crack, please replace thecracked part immediately with a new part.Prohibited
Do not let hot water splash outside the AIRBATH™.Water splashing out of the AIRBATH™ could cause flooding outside the bathing area and problems in other rooms (mold,peeling wallpaper, flooring damage, etc.)Prohibited
Do not pour paint thinner, other solvents or chemicals down the drain.Doing so could damage or dissolve the drain path, leading to leaks.
Prohibited
Do not use bath oils. Do not use bath salts containing sulfur, salts, or acids.Doing so could discolor the bathtub; damage the pipes or pumps, leading to leaks.
Prohibited
Do not use foaming, chlorine-based or anti-mold cleansers.The gases that are produced in reactions with water or moisture can corrode or degrade the stainless steel or other metals.
Prohibited
When cleaning, do not use the following cleansers or tools.Doing so could cause product problems or an adverse reaction in people, depending upon how they are used.
Prohibited
● Cleansers labeled "acidic"These could cause discoloration or staining of the surface.● Cleansers labeled "alkaline"These could cause discoloration or staining of the surface.● Paint thinner, acetone or other solventsThese could cause discoloration or staining of the surface. Additionally, there is also a chance of damaging the drain pathand subsequent leakage.● ChemicalsThese could cause discoloration or staining of the surface. Additionally, there is also a chance of damaging the drain pathand subsequent leakage.● Cleansers containing chlorineThese could cause discoloration or staining of the surface. Additionally, the drain plug and plated surfaces could becomecorroded.● Metal scrubbersThese will scratch and damage the surface of the bathing area and bathtub.● Cleansers or polishing powdersThese will cause scratching.● Nylon scrubbersThese will scratch and damage the surface of the bathing area and bathtub.
After using a cleanser, rinse the area well within five minutes.If the surface is left with cleanser in place, the bathtub could become discolored or cracks could develop.
Always dothis

5
CautionDo not expose to fire or flame.Please do not approach the bathing area with lit cigarettes or other burning material. Doing so could cause a fire or burns.
Prohibited
Do not leave items out that rust easily.Leaving hairpins, razors or other items that rust easily in the bathing area could leave rust marks on the surface.
Prohibited
If cosmetics or similar substances get on the product, wash it with water immediately.Leaving cleansing lotions, hair treatment, hair coloring or similar agents on the surface could cause discoloration.
Prohibited
Do not sit on or climb onto the function module, shower lid, pillow, or controller stand.Doing so could cause a fall or injury.Components may deform and/or break.
Introduction
Always dothis
When not using the product for long periods, turn off the breaker. This could prevent an unforeseen accident.
Avoid powerful forces and impacts. Damage could lead to leaks, which could lead to water damage of household property.
Prohibited
When not using for long periods, shut off the water main or the plumbing fixtures completely.Otherwise, leaks or other unforeseen accidents could result.
Always dothis
Operate the shower handle slowly.Turning it off rapidly can cause a loud "boom" (water hammer), which will have an impact on the plumbing fixtures, whichcould lead to leaks and water damage to household property. Water hammer arrestors are recommended to beinstalled in the plumbing system to minimize water hammer.
Always dothis
Do not put controller near ears. It sometimes produces loud noises and could contribute to hearing damage.
Prohibited
Always dothis
Do not apply grease to the hinge part of the shower lid.It can affect the open/close function of the lid. It can get heavier or lighter, close suddenly and catch your finger.
Prohibited
Do not remove the shower lid.You may be injured or the shower lid may be damaged. If it is removed, please re-attach it.
Prohibited
Introduction
Operational instructionsPlease observe the following.
Do not allow an excess of water in the shower box.There is a drainage tray inside, but an overflow can cause water leaks.
Be careful with the shower lid when it's open.The corner of the lid can cause you injury.
Do not close the shower lid if the shower head is not inside.It may damage the shower.
In the event of lightning storms, immediately turn off the product or shut off the circuit breaker.Lightning can cause temporary current surges, which may cause damage.
Use only genuine parts with this product.Otherwise, an unforeseen accident could result.

Intro
duct
ion
6
Keep the area around the product neat.If the area is messy, with weeds, sawdust, boxes or other debris, you may find cockroaches or spiders' nests inside the equipment,which could cause damage or fire.
Keep the AIRBATH™ neat and clean.If there is bath water residue, trace amounts of copper ions in the water could react with the fatty acids in the soap, causing a bluish tinge.
Clean out the AIRBATH™ intake filter carefully.This is to prevent pump damage.
Do not intentionally pour water over the controller.It is water resistant, but large amounts of water can cause damage.
Do not cover the AIRBATH™ intake with a towel or washcloth.Do not put things in the intake.This can cause damage to the equipment.
Do not use with water from a hot spring, well water or ground water.Depending on the water quality, foreign matter could adhere to the plumbing fixtures in the equipment, causing corrosion or leakage.
Do not block the nozzle or air nozzle cap.Doing so could cause problems.
Do not apply pressure inside the nozzle or run water through it.Water could get inside the air pump and break it.
Nozzle
Air nozzle cap
Do not pour hot water over the controller or subject it to impact.Doing so could break it.
Do not pour hot water over the AIRBATH™ intake port or otherfittings or subject them to impact.Direct contact between the AIRBATH™ surface and hot water in excess of140°F (60°C) can damage the surface.Dropping or striking the tub with makeup bottles or other hard objects cancause scratches.
Do not use emulsion-type bath additives.White powder may remain inside the pump or plumbing fittings, causing cloudy water to spray out when using the air blower orshoulder warmer.For other types of bath additives, please read the instructions carefully and use them properly.
When using bath bubbles, do not run the air blower or shoulder warmer.Doing so will generate a large amount of bubbles and the bubbles could remain in the pump or in the plumbing fittings.

7
The controllerIntroduction
Setting the languageThe controller can be set to the following languages.� English (Initial Setting) � Chinese (Simplified) � Chinese (Traditional) � Thai
>>> P. 25
❈ This owner's manual explains how to operate the controller screens when they are set to English. When referring tothe owner's manual, please set the language to English.
Pushing the buttons
Please press the buttons lightly with a finger near the center (the small raised area).
Touch!Wo~b~ble! Crunch!
Good Example
Bad Example
� Each button may have its own feel, but this is normal.� The buttons may not work if they are not pressed near the center.� It will not work to press two or more buttons at the same time.� The buttons may not work when pressed while wearing gloves.
❈ Please do not place objects near the controller or cover it with towels. It may stop working.
Audio guide functions
Audio description of operations.
❈ When the speaker is emitting sound, there may be some noise (sounds like rushing air), but this is normal. If the sound bothers you, turn down the volume or turn off the audio guide. >>> P. 25
Activating air bath system.

Intro
duct
ion
8
Button status
Buttons displaying a � or a � indicate their operating mode or the fact that that they are on or off.
When the lower four buttons are on, the backlighting looks orange.
There are three states. The left edge (■) indicates the selected mode. The display changes each time a button is pressed.
The backlighting looks blue.
Turning off the display
If a specific amount of time passes without any controller operations after all operations have stopped, then the screen willgo out by itself. Pressing a button (there is no display) will turn the screen on and make operation possible.
Turn the on/off button to off.Or, after around 30 minutes, if the equipment has not been running or if no buttons have been pressed.ON
ScreenOFFScreen
OFFScreen
If a button is pressed (Any button at all.) DarkScreen
Or, after around 10 minutes, if the equipment has not been running or if no buttons have been pressed.
The backlighting will go dark after about 10 seconds, when nothing is running.
The screen is lit and the control will work.
The screen will be dark.
Other
There may be times when the display flashes or when there are streaks of color or brightness in the backlighting, butthese are not things that will affect the operation of the controller. Please be aware of that in advance.There may be times when the controller will stop working in close proximity (around 20 inches (50 cm)) to anincandescent light or in direct sunlight. Please adjust the angle of the controller stand or darken the surroundings beforecontinuing.

9
Names of partsIntroduction
Function module❈ The diagram shows a sample installation
Supplementary Protector cover
Connect ion for tubhot water spout
Cold water shut of f valve Hot water shut of f valve
Water drain lug(with strainer)
Water drain lug(with strainer)
Connect ion for cold water
Connect ion for hot water
Water heater(Not included with th is product)
Funct ion module
Hot water supplyHot water supply
Coldwatersupply
Hot water
To hot water tub spout
To ci rcui t breaker
Bathtub
Controller
Drainplug
Head rest(2)
Controller stand
Shoulder-warmer water outlets (2)Recirculates bath water in through theintake port and out through this out let .
Tub f i l l outletHot wa te r f l ows ou t a f te r thetempera tu re ’s been ad jus ted inthe func t ion modu le , f i l l i ng thetub w i th ho t wa te r .
One-touch drain
Intake port( for shoulder-
warming water)
Spotlight module (2)( for underwater l ight ing)
Air nozzle cap( for detect ing water level)
Air nozzle cap (15)For the air b low
Shower( for c leaning the tub)
Lid opens upward
Hot water knobShower hose
Shower head
Hose port
Cold water knob
(with overf low)

Intro
duct
ion
10
Controller screen
O F FS c r e e n
O NS c r e e n
Example : When the four lower bu t tons are a l l on .
O NS c r e e n
Example : When the four lower bu t tons are a l l o f f .
On/off buttonAct ivates the ON screen(The Purge button is of f . )
Setting buttonTo change volume and other set t ings P.25
Hot/cold water buttonsTo adjust the temperature of the bath water whi le bathing. P.20 21
Water temperature/level buttonDisplays when the fill tub button is on.
P.16
Shoulder warmer mode settings buttonDisplays when the shoulder warmer button is on.
P.18
Air blow modesettingbutton
Displays when the air blow button is on.
P.17
Underwater lightingmode settings buttonDisplays when the underwater lighting button is on.
P.19
Preferred sett ings buttonTo start operat ing at your preferred set t ings.
P.23
P.27
Purge buttonDrains remaining water f rom the pipes.
P.16
Fil l tub buttonFi l ls the tub with hot water.
These will not work if there is no water in the tub. Please run at least 8 inches (20 cm) into the tub.
P.17Air blow button
P.18
Shoulder warmer button
P.19
Underwaterl ighting button
On/off buttonAct ivates the OFF screen.

11
Before using it for the first timeIntroduction
Procedure for first-time use
Cold water valve
Hot water valve
Water heater(Not included with product)
Function module
Hot waterHot water
Hot waterSupply temperature:140-158°F (60-70°C)Water pressure:29 psi ~ 108.75 psi(0.2 ~ 0.75 MPa) (flowing)
Water pressure: 29 psi ~ 108,75 psi (0.2 ~ 0,75 MPa) (flowing)
When there is no hot and cold water from the shower toclean the tub with, open the inspection port (installed onsite) that is located near the shower and check thewater shut off valve.
※
1※
Turn the circuit breaker on.2
Remove cover ofcircuit breaker
3
Turn on the power leveron the Supplementary Protector.
4
Replace the Supplementary Protector cover.
5
Turn on the hot and cold water valves connected to the function module
The position of the sjut off valves will vary depending upon site.Please turn the shut off valves on and supply hot andcold water to the function module.
ON
OFF
Power leverSupplementary ProtectorCover
Coldwater
To c i rcui t breaker

Intro
duct
ion
12
Precautions for first-time bathing
The temperature of the hot water into the function module must be at least 140°F (60°C). (158°F (70°C) or less).If the temperature of the hot water supply is low, it won't be possible to fill the tub with water at the temperature set using the controller.The function module mixes the hot and cold water, releasing it from the outlet to fill the tub with warm water, so the temperature of thewater coming from the outlet is always lower than that of the hot water supply.
The hot and cold water pressure to the function module must be at least 29 psi (0.2 MPa) (when flowing). (lessthan 108.75 psi (0.2 ~ 0.75 MPa).Always keep the cold water supply pressure higher than the hot water supply pressure but not by more than 14.5 psi (0.1 MPa). If the pressure is low, the water will not flow like a waterfall. Also, it will take a long time to fill the tub.
Please keep about 8 inches (20 cm) of water in the tub while bathing.If the water level is low, there may be some functions that don't work, like the shoulder warmer.
The tub has foot rests for your feet for maintaining a proper bathing position in the tub.Please avoid sliding into the tub by keeping your hands on the rim of the tub or your feet on the foot rests.
Rim of tub
Head rest
Head rest
Foot rest
Please do not grasp the head rests.They could come out, and injury or drowning could result.
For a pleasant bathing experience, please change the water in the tub daily.We also recommend draining the water out of the tub soon after bathing.
When draining the tub, run the water draining function to remove the residual water from the pipes.If the water is frequently left in the tub until the next day or if the tub is drained but the residual water not removed, residue could buildup in the pipes, causing an offensive odor.
Nice and clean
>>> P. 27

13
Drain plugOperation
One-touch drainThis is a drain plug that can be opened and closed with the single touch of a button.
Please press the button slowly. If it is pressed too quickly, it could pop the drain plug out of place.
Filling the tub Draining the tub
One-touch drain button
The bottom is an overflow valve.
Drain plug
Button is flat
Drain plug is closed
Button is recessed
Drain plug is open
Opens or closeswith each push
Ope
ratio
n
14
Cleaning the tubRunning the water
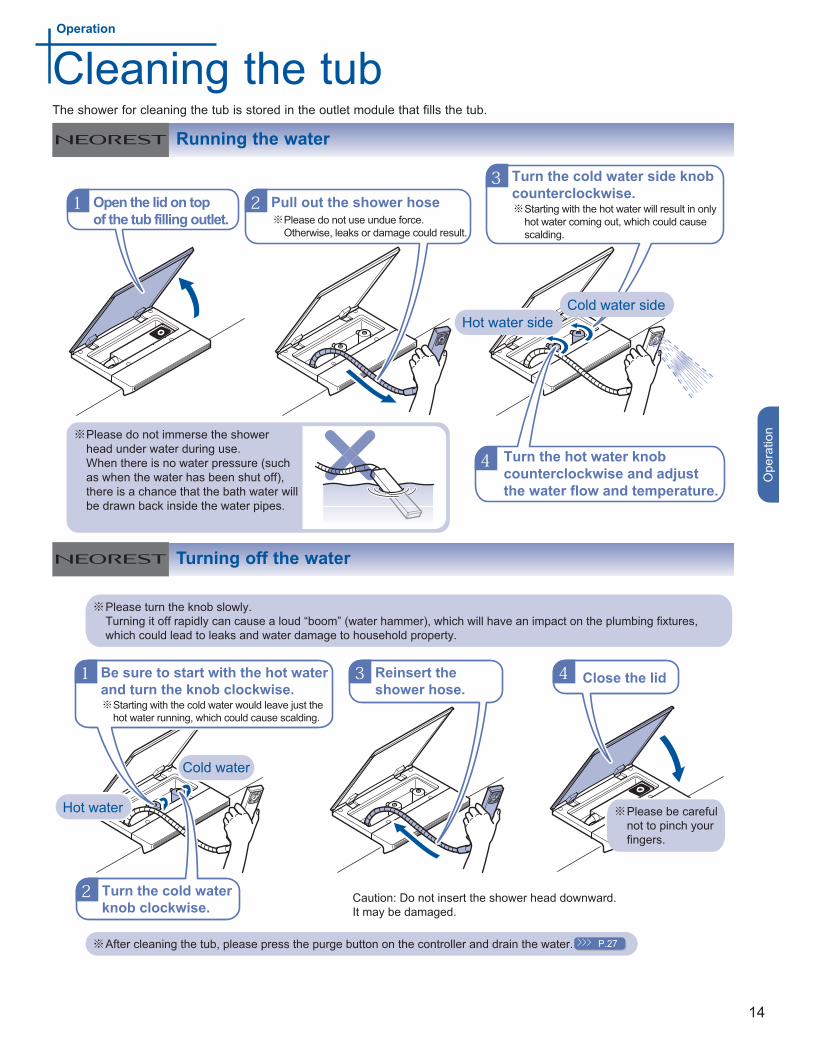
The shower for cleaning the tub is stored in the outlet module that fills the tub.
Please do not immerse the shower head under water during use. When there is no water pressure (such as when the water has been shut off), there is a chance that the bath water will be drawn back inside the water pipes.
※
21※
3※
4
Open the lid on top of the tub filling outlet.
Pull out the shower hosePlease do not use undue force. Otherwise, leaks or damage could result.
Turn the cold water side knob counterclockwise.
Starting with the hot water will result in only hot water coming out, which could cause scalding.
Turn the hot water knob counterclockwise and adjust the water flow and temperature.
Cold water sideHot water side
Turning off the water
After cleaning the tub, please press the purge button on the controller and drain the water. ※
Please turn the knob slowly. Turning it off rapidly can cause a loud “boom” (water hammer), which will have an impact on the plumbing fixtures, which could lead to leaks and water damage to household property.
※
P.27
Please be careful not to pinch your fingers.
※
4 Close the lid 3 Reinsert the shower hose.
1※
2
Be sure to start with the hot water and turn the knob clockwise.
Starting with the cold water would leave just the hot water running, which could cause scalding.
Turn the cold water knob clockwise.
Hot water
Cold water
Caution: Do not insert the shower head downward.It may be damaged.
Operation

15
Controller standOperation
The controller stand rotates 90°.Please rotate it so that it is easy to use.
❈ Please do not apply too much force, otherwise it could break. ❈ The controller stand may seem harder to rotate after it has been used for a while compared with when it was new.
This is because the inner parts adjust with use and become more settled. The controller is not broken.❈ The room temperature must be under 122°F (50°C). Otherwise, damage may result.
Controller stand90°

Ope
ratio
n
16
Filling the tub with hot waterThe tub is filled with water at a preset temperature. The process stops automatically when the preset water level isreached.
When the remote control screen does not appear on the display at left, please press the
※
The temperature of the water coming from the outlet that fills the tub and the temperature settings will not necessarily match due to such factors as ambient temperature and water pipe length. Please use these as a guide.
※
The water level is a guide for filling the tub when empty. If there is water still in the tub, the water level will vary.
※
The temperature and level of the water for filling the tub will be stored in memory.
※
After around 10 seconds (but at most 30 seconds), warm water will begin to flow from the outlet.
If the remote control is not used, the system returns to auto after around one minute.
P.22
5 4 3 2 1
≈ 143 gal. (550 L); ≈ 15.5" (39 cm) ≈ 130 gal. (500 L); ≈ 14.5" (36 cm)≈ 117 gal. (450 L); ≈ 13" (33 cm) ≈ 104 gal. (400 L); ≈ 12" (30 cm) ≈ 91 gal. (350 L); ≈ 11" (27 cm)
Setting Guide Water level
113 111 109 108 106 104 102 100 99 97 95Low (cold)
45 44 43 42 41 40 39 38 37 36 35
°F °C
Temperature(Guide)
1 Close the drain plug and turn the On/Off button to on.
When the tub has been filled, a melody will be played and then stop.
When you want to stop filling the tub, turn the
Setting the tub water temperature and level.
2
3
Turn on the
4Press the
InitialSetting
Initial Setting
Water level
to off.
(The water flow will stop after about 10 seconds.)
Operation

17
Air blower operationOperation
Oscillating
Runs at the bubble intensity settings.
5→4→...→1→2→...→5.. . The bubble intensity changes as follows:
Normal
Pulsating
5 4
3 (Initial settings)2 1
Cannot be set
Cannot be set
5→1→5→1→...
Mode Bubble intensity Description of operations
Turn the On/Off button to on.
The operating mode and bubble intensity settings are stored in memory.
Air will come out of the air nozzle cap.
If the remote control is not used, the system returns to auto after around one minute.
P.25
P.16
Press
Normal operation
Other operation
Fill the tub with water
After starting operations15 minutes has gone by on the time.The time settings on the timer can be set to approximately 30 minutes.
When you want to stop the air blower, press the
Change the screen.
Set the operating mode and the bubble intensity.
Turn the
The bubble intensity is varied suddenly as follows:
or , the system will automatically stop after approximately
to off.

Ope
ratio
n
18
Cascade water flow operation
WeakMediumStrong
Operating mode
Do this with the On/Off button pressed on.
The bathtub won’t function unless it has water in it. Please put at least 8 inches (20 cm) of water in the tub.
Please be forewarned that tepid water that is inside the pipes will first flow from the outlet during initial operation.The system can also be set so that the shoulder warmer goes through a warm-up operation automatically once the tub fills up.
The operating mode setting is stored.
P.25
P.25
Initial setting
Press the
1 Fill the tub with water. P.16
After starting operations15 minutes has gone by on the time.
The time settings on the timer can be set to approximately 30 minutes.
When you want to stop the shoulder warmer, press the
2
Set the operating mode.3
to on.
or , the system will automatically stop after approximately
to off.
Operation

19
Using the underwater lightingOperation
Colors
The warm colors go on in order.
The specified color goes on.
COLORPALETTES
All colors (Initial Settings) Cool Colors
Warm Colors Light Blue
BlueBlue GreenLight Green
GreenOrange
RedPink
PurpleWhite
The cool colors go on in order.
All colors go on in order.
Operating Mode Description of Operation
Do this with the On/Off button pressed on.
The operating mode setting is stored.
The underwater spot lights will go on.It is effective to darken the bathing area to enjoy a light show.
If the remote control is not used, the system returns to auto after around one minute.
>>> P.25
P.16
5Press
1 Fill the tub with water.
After starting operations15 minutes has gone by on the time.
The time settings on the timer can be set to approximately 30 minutes.
When you want to stop the underwater lighting, press the
Change the screen.
2
Set the operating mode.
3
Press the
4
to on.
or , the system will automatically stop after approximately
to off.

Ope
ratio
n
20
Lowering the bath temperature(Cooling water)This adds cold water to lower the temperature of the bath water.
This won’t work if the Lower button or the Higher button is on.
※
After about 10 seconds (but at most 30 seconds), cold water will flow from the Fill-Tub outlet.
P.16
1 Switch screens
Turn the Lower button on.
When the bath water has reached the desired temperature, turn off the Lower button.
2
3
4Press
The water flow will stop after about 10 seconds. When the horizontal gauge (approximate 26 gal (100L)) on the screen reaches the end, it will stop automatically.
Please set the On/Off button to on
This won’t work unless there is water in the Air Tub. Put water in the Air Tub.
Turn this button off.
Or, check to see that it is set.
Operation

21
Raising the bath temperature(Heating water)
Operation
This adds hot water to raise the temperature of the bath water.
This won’t work if the Lower button or the Higher button is on.
Please press for one second.The water flow will start after about 10 seconds (but at most 30 seconds).
P.16
1 Switch screens
Turn the Higher button on for one second.
When the bath water has reached the desired temperature, turn off the Higher button.
2
3
4Press
When the horizontal gauge (approximate 26 gal (100L)) on the screen reaches the end, it will stop automatically. The water flow will stop after about 10 seconds.
Please set the On/Off button to on.
This won’t work unless there is water in the Air Tub. Put water in the Air Tub.
Water that is 118°F/48°C will flow from the Fill-Tub outlet. Please be careful of the high temperature.
Turn this button off.
Or, check to see that it is set.
Press for one second

Ope
ratio
n
22
Adding more water (Add water)The amount of water in the tub after using the Fill-Tub feature will vary with the amount of water that was in the tub tobegin with.
The method is the same as for filling the AIRBATH™ Water at the preset temperature will be added to the Air Tub.
P.16
The water level will increase bythe amount of starting water.
The remote control will automatically go back after about one minute without operation.
When starting with less than 6 inches(14 cm) of water in the tub.
If changing the Fill-Tub temperature or water level,please do so.
2
3Press
Approximately 26 gal. (100 L)of water will be added. If thepreset water level is notreached, the AIRBATH™ will fill to the preset level.
When starting with at least 6 inches (14 cm) of water in the tub.
When approximate 26 gal. (100 L) has been added to the AIRBATH™ or the preset water level has been reached, there will be music and the filling will stop automatically. The water flow will stop after about 10 seconds.
4When the desired water level has been reached turn the
off.
Fill AIRBATH™ with preset amount of water
Less than 6” (14 cm) ofwater in the AIRBATH™.
At least 6” (14 cm) ofwater in the AIRBATH™.
Fill AIRBATH™ with approximately26 gal. (100 L)
Fill-tubfeature ends
Fill-Tub feature ends Fills to preset level.
Less than 6”(14cm)
Presetwater level
At least 6”(14 cm)
Starting water
After about 10 seconds (butat most 30 seconds), waterwill flow from the fill-tub outlet.
1Turn on the
Please set the On/Off button to on.
The guide shows a depth of lessthan 6 inches (14 cm) of startingwater.
The guide shows a depth of at least6 inches (14 cm) of starting water.
The amount of water in the tub will vary.
P.16Put water in the AIRBATH™.
+
Example: Water level 3 wouldbe approximately 117 gal (450 L)
Preset waterlevel
Less than thepreset water level
At least the presetwater level
Preset waterlevel
Bath water pour
Bath water pour
Starting water
Agua inicial
Operation

23
Using the preference buttonsOperation
The preference buttons can be set to your preferred operations (air blower, shoulder warmer, underwater lighting).Up to three patterns can be set using the preference buttons.
Configuring the settings
Please set the On/Off button to on.
In this example, we press preference button 1. This won’t work unless there is water in the AIRBATH™. Please have at least 8 inches (20 cm) of water in the AIRBATH™.
When the preference button does not display, please set all four of the lower buttons to off.
Settings are stored.
Operating the air blowerOperating the shoulder warmerOperating the underwater lighting
When the settings have been configured, the display colors of the numeral on the preference button will be reversed.
P.16
P.17
Please set the On/Off button to on.
In this example, we press preference button 1. This won’t work unless there is water in the AIRBATH™. Please have at least 8 inches (20 cm) of water in the AIRBATH™.When the preference button does not display, please set all four of the lower buttons to off.
P.16
P.18
P.19
5
1 Put water in the AIRBATH™.
With water in the AIRBATH™, press one of the three preference buttons.
When you have configured your preferred settings, press the set button and the settings will be complete.
2
Operating the air blower, shoulder warmer or underwater lighting at your preferred settings.
To end operation with the preference button, press the
again.
3
4
1 Put water in the AIRBATH™.
Press one of the three configured (numeral display colors reversed) preference buttons (1 ~ 3) and begin operation.
2
Operation using the preference buttons

Ope
ratio
n
24
In this example, we press preference button 1.
Please set the On/Off button to on.
This won’t work unless there is water in the AIRBATH™. Please have at least 8 inches (20 cm) of water in the AIRBATH™.When the preference button does not display, please set all four of the lower buttons to off.
Settings are stored.
Operating the air blowerOperating the shoulder warmer
Operating the underwater lighting
When the settings have been configured, the display colors of the numeral on the preference button will be reversed.
P.16
P.17
P.18
P.19
The three lower buttons are turned off when these settings are canceled.
3 To end operation with the preference button, press
the
Press one of the three configured (numeral display colors reversed) preference buttons (1 ~ 3) and begin operation.
After approximate 15 minutes, the air blower, shoulder warmer or underwater lighting will turn off automatically.
To restart, please turn one of the on.
The timer can be set for up to about 30 minutes. P.25
5
1 Put water in the AIRBATH™.
When you have configured your preferred settings, press the set button and the settings will be complete.
2
Operating the air blower, shoulder warmer or underwater lighting at your preferred settings.
To end operation with the preference button, press the
or for operation.
3
4
Changing or deleting settings

25
Changing the settingsOperation
Chinese(simplified)
Chinese(traditional)
Thai language *1
Language
Volume
Voice Guide
Contrast
Timer
English
321
OnOff54321
30min15min
OnOff
Menu Settings Comments
:Blue outline = initial setting
The voice guide is in English and part of the display is in English.
Shoulder warmer warm-up operation settings.When starting shoulder warmer operation, cool water inside the shoulder warmer pipes will come out of the shoulder warmer outlet, so this function circulates bath water through the shoulder warmer pipes until the bath is entered. When starting with an empty AIRBATH™ (water level less than 6 inches (14 cm)) and the Fill-Tub button is pressed the shoulder warmer warm-up operation will begin automatically once the AIRBATH™ has filled up. The feature will operate until the shoulder warmer button is pressed. It will also stop automatically after about 60 minutes.
The remote control will automatically go back after about one minute without operation.
4Press the
1 Set the On/Off button to off.
Press the setting button
Select the menu using the menu buttons and the up/down buttons to change the settings.
2
3
Timer settings for the air blower, the shoulder warmer and the underwater lighting.

Mai
nten
ance
26
Care and cleaningMaintenance
Care and cleaning precautions
Cleaning the various parts
Detergents with “acidic” in the label.These can discolor or stain the surface.Detergents with “alkaline” in the label.These can discolor or stain the surface.Detergents containing “chlorine.”These can discolor or stain the surface. Also, they can corrode the plating on the plug and elsewhere.ChemicalsThese can discolor or stain the surface. Also, they can damage the drain and lead to leaks.
Solvents like paint thinner or acetone.These can discolor or stain the surface. Also, they can damage the drain and lead to leaks.Sponges with non-woven fabric, sponges with aluminum, sponges with netting, sponges containing polish, metal scrubbers, Nylon scrubbersThese can leave scratches and cause damage to the surface.Cleansers and polishing powdersThese can cause scratching.
Please do not use the following sorts of detergent or tools when cleaning.There is a chance that doing so could cause problems with the product or affect someone physically.
Prohibited
Tips
Rinse within five minutes of using a cleaning agent.If detergent is left on the surface, the AIRBATH™ might discolor or develop cracks.Always
do this
P.30
Cleaning the plated partsTo remove dirt and debris, please soak a soft cloth in warm or cold water and wring it well. When badly soiled, please use the same cleaning methods as for the AIRBATH™.
Cleaning the intake portIf hair or residue blocks the intake ports, the shoulder warmer will have less force and won’t function fully. It could also cause the pump to break down. Please clean it at least once a week.
Cleaning the AIRBATH™Dirt gets harder to remove the longer it stays in one place.Cleaning the tub after bathing while the AIRBATH™ is still wet makes cleaning up easy. To keep your AIRBATH™ fresh and clean at all times, please be good about cleaning. After applying a bathtub detergent that says “Neutral” on the label with a sponge or cloth, wash, rinse with water within 5minutes and then wipe dry.
Please do not remove the intake port. Hands, feet or hair might become drawn in, causing injury or drowning.
Cleaning the head rest
Cleaning the controller
P.29
P.31
Cleaning the air nozzle cap
P.30Cleaning the lighting module
>>> P.32Sanitizing the tub.
Metal soapWhite residue may form on the AIRBATH™. This is called “metal soap” and once in place, it cannot be removed chemically. “Metal soap” forms in a reaction between the soap, the fats of the body and calcium or other metals in the water.
Spontaneous rustIf red rust appears on the AIRBATH™, please remove it using tooth powder or other agent on a cloth. Red rust is not formed from the AIRBATH™, but from the trace amounts of iron found in tap water, well-water and around construction projects. It is called “spontaneous rust.”
After cleaning the AIRBATH™, please press the purge button on the controller and purge the AIRBATH™. P.27
To remove dirt and debris (which will cause a crack in the water fall) use a thin plastic stick.

27
Purging/draining the AIRBATH™Maintenance
Please purge the AIRBATH™ after draining or cleaning it and remove residual water from inside the pipes. There are two types of purge operations: automatic and manual.
When the On/Off button and setting configuration button are pressed, the standby time will revert to 15 minutes. Setting the Purge button to on will start the purge operation in Step
Automatic purge operationWhen there is at least 8 inches (20 cm) of water remaining in the AIRBATH™, the purge operation will take place automatically when the water is drained from the AIRBATH™.
Air
Less than about 6 inches (14 cm)
Purging the AIRBATH™ removes residualwater from inside the pipes.
Even when the AIRBATH™ has been emptied,there may be some remaining water.
Drain the AIRBATH™
Purge standing by
Residual water
1 Set the On/Off button to off and open the drain plug.
When the AIRBATH™ has been drained to less than about 6 inches (14 cm) of water, the purge operation will go into standby.
2
After fifteen minutes of standby, the system will automatically run the purge operation for two minutes.
3
P.28
When there is not at least 8 inches (20 cm) of water standing in the tub, please run the purge operation manually.
Please leave the drain plug open and empty the AIRBATH™.
Water will flow out of the shoulder warmer outlet from the pump during a purge operation because the circulation pump is also operating.
Set the On/Off button to off
At least about 8 inches (20 cm) of water.

Mai
nten
ance
28
Manual purge operationAfter cleaning the AIRBATH™ with the shower or when there is less than 8 inches (20 cm) of water remaining in the AIRBATH™, the purge operation is carried out manually.
The purge operation will end automatically after about two minutes.●
When you want to stop a purge operation, set the●
The purge operation will end automatically after around two minutes.
When you want to stop the purge operation early, set the
1 Set the On/Off button to off, open the drain plug and empty the AIRBATH™.
Set the Purge button to on.2
Leave the drain plug open and run the operation for an empty AIRBATH™.
Set the On/Off button to off.
The circulation pump in the shoulder warming feature also runs when the draining feature is operating, so water in the pump will come out of the shoulder-warming outlet.
to off.
to off.

29
Air nozzle capMaintenance
When residue blocks the air nozzle cap, the air blower will have less power and will not be able to functionsufficiently. If you find that the air blower has less power, please clean it.
Click!
CautionDo not operate the AIRBATH™ with the air nozzle caps removed. Operation of the AIRBATH™ when it is empty will cause water remaining in the pipes to shoot upward and could be dangerous if it gets in the eyes or mouth.Please keep the air nozzle caps properly attached during operation.
Prohibited
Drain all of the water out of the AIRBATH™.1
Remove the air nozzle capPlease use a smooth plastic tool or similar object to remove the air nozzle cap. (Using your finger to remove it could hurt your finger or fingernail.)
2
3 Remove any debris or residue on the back.
4 Return the air nozzle cap to where it was.

Mai
nten
ance
30
Lighting ModulesNormally, you need only wipe the dirt away with a dry cloth. If they are badly soiled, use a suitable amount of diluted, neutral detergent on a cloth or sponge to wipe themclean.
Please use a soft, slightly damp cloth to wipe the unit.
Cleaning the lighting module coversWhen the space between the lighting module covers and the AIRBATH™ is badly soiled, remove the cover with your hand and use a suitable amount of diluted, neutral detergent on a cloth or sponge to wipe it clean.
Caution
If it is badly soiled, use a suitable amount of diluted, neutral detergent on a cloth or sponge to wipe it clean.When cleaning, if the buttons react, please press on one button and wipe the other sections. The buttons are designed not to react when two or more are pressed.
The product is made of plastic, so please do not wipe it with a dry cloth or sponge. Doing so could cause scratches.
※
To reattach them, please follow the process in reverse.
Do not use any tools when removing the lighting module covers.It might cause damage or leaks.
Never remove any parts other than the lighting module covers.It might cause leaks.
Prohibited
Turn counterclockwise
Controller
Maintenance
Maintenance

31
Head restMaintenance
Clean the head rest twice a month or more, depending upon usage. Use mild soap and water on a clean, soft clothfor routine cleaning. To clean stubborn stains, remove the head rest and the base plate. After removal, clean each of the parts and the shoulder warmer outlet as well. When badly soiled, put some high-quality cleaner recommended for vinyl on a soft cloth or sponge, wash the area,rinse with water within five minutes and then buff dry.
After cleaning, please reattach the pieces as they were.
Remove the head rest.
1
Remove the base plate
3
Clean here.4
Remove the two screws holding the base plate.
2

Mai
nten
ance
32
Sanitizing the tubMaintenance
Flush your system at least once a month. Use the following sequence.
Fill the bath with warm water just above the intake port or leave water in the bath after using.
Add 10 ounces (296 ml) of household bleach (5% - 6% sodium hypochlorite) to the water.
Run the air bath for 5 to 10 minutes. Turn off the air bath and drain.
Rinse the bath surfaces with water (from the shower).
Rinse the surfaces of the jets, filler, overflow cover, drain, etc. and wipe dry with a soft cloth.

33
Function moduleMaintenance
Outside enclosurePlease wipe dirt off of the function module enclosure with a damp cloth and then buff dry.When badly soiled, please use a neutral detergent.
Supplementary Protector Please check the function of the Supplementary Protector two to three times a year. You risk electric shock if you use the AIRBATH™ while the Supplementary Protector is broken,
Water drain lug (with strainer)When debris and other things block the strainers in the water drain plugs, the following will happen, so please keep them clean.
The volume of water flowing out will fall and it will take a long time to fill the AIRBATH™.
The temperature of the water will be unsatisfactory.
After hot water has been run into the air tub from the fill-tub spout, the water remaining in the function module will be very hot. To prevent scalds, please wait until after the equipment has cooled.
Since hot and cold water will come out of the water drain valve, please place a bucket or other container below the function module to catch any water.
The positioning of the shut-off valves will vary by site.
1 Turn off the hot and cold water shut-off valves connected to the connecting port.
Hot water connection
Hot water valveCold water valve
Cold water connection
Off Off
Check to see that power is being supplied.
It is if you can operate the controller.
1
2
After the inspection, turn the power supply lever back on.
4
Reattach the Supplementary Protector cover as it was.
5
Push the test button on the Supplementary Protector
3
Remove the Supplementary Protector cover.
It is functioning normally if the power lever goes from on to off.
Power supply lever
Test button
ON
OFF
Supplementary Protector cover
The water will not flow out like a waterfall.

Mai
nten
ance
34
Please be aware that water in the function module will flow out when removing the water drain plugs.If you are unable to turn the water drain plugs and remove them manually, please insert a screwdriver or similar tool into the hole in the water drain plug and turn it with the tool.
Please keep from scratching or letting debris get on the packing. Otherwise, leaks could develop or debris could get inside the function module and cause problems.
Remove the water drain plugs.
7
3
4
Check to see that water is not flowing from the Fill-Tub outlet and then set the On/Off button to off.
Reattach the water drain plugs to the hot and cold water connections as they were.
4
Use a toothbrush or similar tool to rinse the strainer with water.
Turn on the hot and cold water drain plugs and check to see that no water leaks from around the plugs.
5
6
If the water continues to flow, set the On/Off button to off once again and then start at Step 1 Occasionally, the controller will display error code 572. This is a water shut-off notice. After resetting the error
P.37
Hot water connection
Cold water connection
Water drain plug
Strainer
Packing
Packing
Toothbrush
Water drain plug(with strainer)
Hot water valveCold water valve
Open
Please operate with the On/Off button set to on.
2Set the
Hot water connection
Cold water connection
on the controller to on and wait for about 20 seconds.
, please set the On/Off button to off and proceed to Step
Water drain plug(with strainer)
Open

35
Long periods of disuseTroubleshooting
When the product will not be used for a long period of time, remove the water from the function module and shutoff the power.
After the water flows out of the Fill-Tub, the water in the function module will be quite hot. In order to prevent scalding, please wait until the equipment has cooled off.Hot and cold water will flow out of the water drain plugs, so please place a bucket or other container below the function module to catch the water.
Please be aware that water in the function module will flow out when removing the water drain plugs.If you are unable to turn the water drain plugs and remove them manually, please insert a screwdriver or similar tool into the hole in the water drain plug and turn it with the tool.
Remove the three water drain plugs
3
4
Check to see that water is not flowing from the Fill-Tub outlet and then set the On/Off button to off.
4
If the water continues to flow, set the On/Off button to off once again and then start at Step 1
Occasionally, the controller will display error code 572. This is a water shut-off notice. After resetting the error ,please set the On/Off button to off and proceed to Step
P.37
Water drain plug(with strainer)
Water drain plug 水抜栓 Water drain plug(with strainer)
Please operate with the On/Off button set to on.
Please leave the water drain open.
2Set the on the controller to on and wait for about 20 seconds.
Drain the water out of the AIRBATH™ and empty it.
The positioning of the shut-off valves will vary by site.
1 Turn of the hot and cold shut-off valves of the pipes connected to the connecting ports.
Hot water connecting port
Hot water valveCold water valve
Cold water connecting port
Close Close
Preparation:

Trou
bles
hoot
ing
36
Please follow the procedure in “Before using it for the first time".) ( ) when you want to use it again.
For the shower used to clean the AIRBATH™, please open the inspection door, which is located near the shower (built on site) and turn off the water shut-off valves.
Please keep from scratching or letting debris get on the packing. Otherwise, leaks could develop or debris could get inside the function module and cause problems.
8
Remove the cover from the Supplementary Protector on the function module and turn the power lever on the Supplementary Protector to off.
After removing the water, reattach the water drain plugs to the three places where they were.
Reattach the Supplementary Protector cover as it was.
9 Turn off the circuit breaker.
5
7
P.11
Water drain plug(with strainer)
StrainerPackingPacking
Packing
Please run this with the On/Off button set to off.
Please attach the water drain lug without a strainer to the connection port on the far left.
After around two minutes, the water draining operation will end.
6Turn the on the controller to on and wait until the water draining operation ends.
ON
OFF
Power leverSupplementary ProtectorCover
Water drain plug

37
When you think something mightbe wrong
Troubleshooting
When error codes are displayed.
Please read this before requesting any repairs. If you still have a problem, or if there are no applicable categories, please request repairs.
*Is the AIRBATH™ drain closed?032 Open AIRBATH™
drain
*Is there enough hot water coming from the water heater? ・Please check the temperature and operating settings on the water heater.079 No hot water
Please try it again, after resetting the error.Other -
*Is hot water being supplied to the function module’s cold water connection? ・Please check the plumbing connections to the water heater. ・It could be that high-temperature hot water is flowing through, so please stop
using the equipment.
152Abnormal
incoming watertemperature
572 No water
*Is the water main or shut off valve turned off?*Has the water company turned off the water?*Could the plumbing be frozen?
C04Abnormal rpmin shoulder
warming pump
*Is there enough water in the AIRBATH™?*Is there any debris trapped in the intake port? ・Please clean it out.*Is an intake port blocked?
Error Code Cause Procedure
*Empty the tub, push the purge button and operate the drain. Then re-try filling.
165Unusual
temperature when filling
*Are the main valve and stop valve open?*Is the strainer of the water connection clean? Please clean.*Is there ample water supply pressure?
Error reset methods
You can reset errors by pressing the button that has displayed an error code.

● Are the hot and cold water knobs turned completely off? ● Water dripping from the shower can be from residual water flowing inside the shower head. It is not broken.
Trou
bles
hoot
ing
38
Shower
The water won't turn off.
● Are the water main and the shut off valves turned on far enough? ● Are the knobs turned on far enough? ● Has the water been shut off or could it be frozen?
The hot/cold water doesn't work. There isn't enough flow.
● Does the water heater produce enough hot water? ➞ Please check the temperature and operating settings on thewater heater.
● Is the hot water knob turned on?
The water's always cold.
● Is the cold water knob turned on?The water's always hot.
● Is there debris trapped in the strainers in the hot or cold water connections in the function module? ➞ Please cleanthem.
● Is there enough hot water from the water heater? ➞ Please check the temperature and operating settings on the water heater.➞ Please set the hot water supply temperature to 140 ~ 158°F (60 ~ 70°C).
● Are the water main and the shut-off valves turned on? ● Is there water pressure?
Filling the AIRBATH™
There isn't enough water flowing out.
P. 33
P. 12
● Is the temperature setting on the controller low? ➞ Please increase the setting. ● Is it adding cold water? ● Is there enough hot water coming from the water heater?
➞ Please check the temperature and operating settings on the water heater.➞ Please set the hot water supply temperature to 140 ~ 158°F (60 ~ 70°C).
● Is there debris trapped in the strainers in the hot water connections in the function module? ➞ Please clean them.
● Is there water pressure?
The water is luke warm.P. 16
P. 12P. 33
● Is the Fill-Tub temperature setting too high? ➞ Please lower the setting. ● Is it adding hot water? ➞ Hot water is added at 118.5°F (48°C). ● Is there debris trapped in the strainers in the cold water connections in the function module? ➞ Please clean
them.● Is there water pressure?
The water is too hot.P. 16
P. 12P. 33
● It stops filling automatically when it has filled the AIRBATH™ with around 26 gallons (100 L) or reached the set water level.
It stops filling.
P. 22
● When the AIRBATH™ is filled and there is already water in the AIRBATH™, the water levelwill vary by the amount of water that was in the AIRBATH™.
● Please empty the AIRBATH™ and then drain all of the water out using the purge button.Please try refilling the AIRBATH™ after that.
● Is there debris or residue trapped in the air nozzle caps (for water level detection) on theinside surface of the AIRBATH™? ➞ Please clean them out referring to the cleaning method for air nozzle caps.
The water level varies.
P. 29
P. 22
Air nozzle cap(Water level detector)

39
● Is the fill AIRBATH™ button set to on? ➞ Cooling water cannot be added while filling the AIRBATH™.● Is the water level in the AIRBATH™ low? ➞ It won't work if the water level is low. Please fill the AIRBATH™ to at least 8
inches (20 cm).
Adding cooling water
I can't add cooling water.
● It stops automatically after approximately 26 gallons (100 L) have flowed out.This feature shuts off on its own.
● Did you press the button for at least 1 second? ➞ As a safety feature, the button must be pressed for at least 1 second.Please press the button for at least 1 second.
● Is the fill-AIRBATH™ button set to on? ➞ Heating water cannot be added while filling the AIRBATH™.● Is the water level in the AIRBATH™ low? ➞ It won't work if the water level is low. Please fill the AIRBATH™ to at least 8
inches (20 cm).
Adding warming water
I can't add warming water.
● Is there enough hot water coming from the water heater? ➞ Please check the temperature and operating settings on the water heater.➞ Please set the hot water supply temperature to 140 ~ 158°F (60 ~ 70°C). ➞ Because the function module blends the incoming hot and cold water, the temperature of the water flowing out is
lower than that of the hot water supply. Example: When the temperature of the hot water to the function module is118.5°F (48°C), the temperature of the water that flows out will be less than 118.5°F (48°C).
● Is there debris trapped in the strainers in the hot or cold water connections in the function module? ➞ Please cleanthem.
● Is there water pressure?
The water is luke warm.
P. 12P. 33
P. 20
● It stops automatically after approximately 26 gallons (100 L) have flowed out.This feature shuts off on its own.
P. 21
● Is there debris or residue trapped in the air nozzle caps ➞ Please clean the air nozzle caps.● One of the air nozzle caps on the side (not the bottom) of the AIRBATH™ is for detecting the water level. It doesn't
produce air bubbles.● A safety device will turn off the air pump when the temperature rises. Please wait for a while and try again.
Air blower
I can't add warming water.
● It stops automatically after the time on the time has elapsed.This feature shuts off on its own.
P. 17
● Is the automatic draining operation running to drain the AIRBATH™?This feature starts up on its own.
P. 27
P. 29
● Right after the feature starts, cold water that had been in the pipes might come out. ● The air bubbles near the air nozzle caps on the bottom of the AIRBATH™ feel cool. Please adjust your bathing position.
Cold water or air bubbles come out of the caps.
● When using the air blower, the water in the AIRBATH™ tends to cool off quickly.The water in the AIRBATH™ goes cold too soon.
● It is not broken. The blower has spread debris or residue from the air nozzle caps. ➞ It needs to be cleaned. There is debris or residue around the air nozzle caps.
P. 29

Trou
bles
hoot
ing
40
● Is the water level at least 8 inches (20 cm) when draining the AIRBATH™?➞ When the AIRBATH™ is drained and the water level is low, the automatic AIRBATH™ draining feature won't work.
Please press the purge button to drain the AIRBATH™.● Is the On/Off button set to off? ➞ The automatic draining feature won't work if it is on. Please set it to off. ● Please run the AIRBATH™ draining feature with the purge button after the AIRBATH™ is empty,
➞ Please check the automatic AIRBATH™ draining feature the next time you drain the AIRBATH™.
AIRBATH™ draining feature
The automatic AIRBATH™ draining feature doesn't work, even when I let the water out of the AIRBATH™.
● The circulation pump in the shoulder warming feature also runs when the draining feature is operating, so water in thepump will come out of the shoulder-warming outlet.
Water comes out of the shoulder warming outlet when draining the AIRBATH™.
● Is the water level in the AIRBATH™ low? ➞ It won't work if the water level is low. Please keep at least 8 inches (20 cm)of water in the AIRBATH™.
Shoulder-warming feature
It doesn't work.
● It shuts off automatically when the time on the timer has elapsed. ● Operation may stop when the water level is low. ➞ Please add water and increase the water level in the AIRBATH™.
This feature shuts off on its own.P. 18
● Is the shoulder-warming warm-up feature set to on?When filling the AIRBATH™, the shoulder-warming feature turns itself on.
P. 25
● When interference or noise keeps the detector from sensing the water level in the AIRBATH™, the button display maygo out. ➞ Please wait for a while.
The display for the shoulder-warming feature went out.
● Is the intake port blocked? ➞ Please clean it. ● Has the operation mode been changed? ➞ Please check the operation mode.
There isn't much water flow volume.P. 26
P. 18
● It shuts off automatically when the time on the timer has elapsed.
Underwater lighting
This feature turns itself off.P. 19
● Is the circuit breaker for the power supply turned off?● Has there been a power outage? ● Is the circuit breaker inside the function module turned off? ● Have the display lights been turned off? ➞ Pressing the buttons will turn the lights on.
Controller
The lights on the controller don't work.
P. 11
P. 2
● This is not abnormal. They are the button sensors.There seem to be black holes in the button display modules.

41
● This is not abnormal.➞ There may be times when the color streaks or flashes.➞ When sound comes out of the speaker, the backlighting may flash.
Controller (continued)
The display or backlighting have streaks of color or flash.
● This is not abnormal. ➞ When noise is a problem, please turn down the volume or shut off the voice guide.There is background noise when the voice guide or sound is on.
P. 25
● Has the screen been turned off? ➞ It will go on when the buttons are pressed.The screen display or backlighting went out at some point.
P. 2
● Please refer to button pressing methods.● Are you pressing them slowly or adding too much force after you touch them?
➞ Press the buttons lightly in the center to make them work. ● Are you pressing the button along the edge or in a corner? ➞ Please press near the little raised symbol.● If you press more than one button at a time, they won't respond.
➞ For example, when you are pushing a button with your index finger and your little finger is near another button, thebutton might not respond.
● Are you leaving your finger down, pressing the buttons continuously? ➞ Please lift your finger off of the button for a moment, even if are pressing the same button more than once.
● The buttons may not respond if you are wearing gloves.● Is there dirt or debris on the button? Is there something nearby, a towel for example that is interfering with the
operation?➞ Please clean the buttons.➞ When the buttons won't work even after moving objects out of the way, Please wait about two minutes before trying
again.● Is there too much surrounding light, such as direct sunlight?
➞ The buttons sometimes won't operate in direct sunlight or near incandescent lights (20 inches (50 cm) or so). ➞ Please change the angle of the controller or darken the room.
● Please turn the circuit breaker in the function module off once, back on and then try again.
The buttons won't work.P. 1
● Is the water level in the AIRBATH™ low? ➞ The product won't run if the water level is low. Please keep at least 8 inches (20 cm) of water in the AIRBATH™.
I can't operate the preference buttons.
● Is equipment (like the air blower or underwater lighting) running? ➞ The preference buttons won't display while the equipment is running. Please turn off the equipment.
● When interference or noise keeps the detector from sensing the water level in the AIRBATH™, but button display maygo out. ➞ Please wait for a while.
The preference buttons won't display.

Trou
bles
hoot
ing
42
Specifications Troubleshooting
AIRBATH™
Dimensions x 1 70 7/8" x 55 1/2" x 28 1/2" (1800 mm W, 1410 mm D, 725 mm H)
Weight 353 lbs. (160 kg)
Capacity 161 Gallons (610 L) to overflow line
Material Acrylic synthetic marble
AIRBATH™filling
Outflow ports One
AIRBATH™ filling flow rate Max. 9.1 gal/min (35 L/min) (controlled by function module)
Air blowerNumber of blowers 15 on the bottom of the AIRBATH™
Volume of air Max 153 gal/min (580 L/min) (15 Total, controlled by the function module)
Shoulderwarmer(cascade)
Intake ports One
Outflow ports Two
Flow rate Max 10 gal/min (38L/min) (2 Total, controlled by the function module)
Underwaterlighting
Lighting modules Two
Colors Three pattern types, 10 individual colors (controlled by the function module)
Shower(Two knobs)
Uses Cleaning the AIRBATH™
Water pressure 11.6 ~ 108.75 psi (0.08 ~ 0.75 MPa)
Inlet watertemperature
Hot Please confirm local code (below 158°F (70°C))
Cold 32 ~ 86°F (0 ~ 30°C) (No freezing)
Connectingdiameter, threads
Hot NPT 1/2
Cold NPT 1/2
AIRBATH™ filling connection diameter,threads
NPT 3/4
Controllerstand
Dimensions 9 5/8" x 4 1/2" x 10" (246 mm W, 113 mm D, 255 mm H)
Weight 6.2 lbs. (2.8 kg) (including the controller)
Adjustable arc. 90°
Functionmodule
Dimensions x 2 16 5/8" x 7 1/8" x 18 3/4" (422 mm W, 180 mm D, 476 mm H)
Weight 37.5 lbs. (17 kg)
Rated voltage 120 VAC
Rated frequency 60 Hz
Rated current 5.9A
Horse power 1/6 HP
Rated power consumption 710W
Standby power consumption 5.6W
Installation locations Indoors (Function module only, locations without condensation, dampness or freezing)
Water pressure 29 ~ 108.75 psi (0.20 ~ 0.75 MPa)
Inlet watertemperature
Hot 140 ~ 158°F (60 ~ 70°C)
Cold 32 ~ 86°F (0 ~ 30°C) (No freezing)
Connectiondiameter,threads
Hot NPT 3/4
Cold NPT 3/4
Fill AIRBATH™ NPT 3/4
Safety device Continuous operation prevention device, overcurrent protection device,ground-fault circuit interrupter (GFCI).
❈ 1: The height of the AIRBATH™ includes the frame that supports the AIRBATH™.❈ 2: The function modules external height excludes the connection ports.

43
MEMO

Five Year Limited Warranty – Acrylic ShellOne Year Limited Warranty – Parts and Components
1. TOTO® USA, Inc (TOTO®) warrants its Acrylic Bathtub (excluding components) to be free from manufacturing defectsunder normal use and service for a period of Five (5) Years from the date of purchase. This warranty is extended onlyto be ORIGINAL PURCHASER.
TOTO® USA, Inc (TOTO®) warrants the Air Bath component parts, which include all components of the Acrylic Bathtubother than the acrylic shell, to be free from manufacturing defects under normal use and service for a period of One(1) Year from the date of purchase. This warranty is extended only to the ORIGINAL PURCHASER.
TOTO’s® obligations under this warranty are limited to repair or replacement, at TOTO’s® option, of products or parts foundto be defective, provided that such products were properly installed and used in accordance with all safety, use andinstallation instructions published by TOTO®. FAILURE TO FOLLOW ANY OF THOSE INSTRUCTIONS WILL VOID THEWARRANTY. This warranty does not cover normal wear or tear, which includes, but is not limited to, scratching, glossreduction, staining or alkaline etching of the finish over time.
Warning! TOTO® shall not be responsible or liable for any failure of or damage to, this plumbing product or product componentscaused by either chloramines in the treatment of public water supply or cleaners containing chlorine (calcium hypochlorite). Theuse of a high concentrate of chlorine or chlorine related products can seriously damage the water tight seals. This damage cancause leakage and serious property damage. Use of chlorine or chlorine related products will void the warranty.
2. In addition to the foregoing, this warranty does not apply to the following:
a. Damage or loss sustained in a natural calamity such as fire, earthquake, flood, thunder and/or electricalstorm, etc.
b. Damage or loss resulting from any unreasonable use, misuse, abuse, negligence, or improper maintenance ofthe product.
c. Damage or loss from disassembly, removal, improper repair, or modification of the product.d. Damage or loss resulting from sediments or foreign matter contained in a water system.e. Damage or loss resulting from improper installation or from installation of the product in a harsh and/or
hazardous environment.g. Damage or loss resulting from use of bleach or alkali or acid cleaners or dry (powder) cleaner or any cleaner
that has abrasives.h. Damage or loss resulting from use of nylon or metal scrubbers to clean the tub.i. Damage or loss resulting from failure to use factory equipped cord and plug or use of a loose or faulty
electrical outlet or use of a current or socket other than a 120V, 60Hz electrical current from a GFI (ground,fused) socket.
3. This warranty applies only to the tub and the tub components. This warranty applies only to TOTO® products purchasedand installed in the United States and Canada. TOTO® reserves the right to make such inspections as may be necessaryin order to determine the cause of the defect. TOTO® will not charge for labor or parts in connection with warranty repairsor replacements. TOTO® is not responsible for the cost of removal, return and/or reinstallation of products.
4. To obtain warranty repair service under this warranty, you must take the defective product or deliver it prepaid(shipping and handling) to an authorized TOTO® USA, INC service center. To find the closest authorized dealer,please call 1-800-350-TOTO (8686). If the tub is already installed, call TOTO® Tech Support at 888-295-8134.
5. In order for this limited warranty to be valid, TOTO® USA, INC. must receive the completed attached warrantyregistration card and your proof of purchase within 30 days of the original purchase date.
6. If the danger label which has been placed over the seams on the back of the product’s blower motor is broken orotherwise not intact, this limited warranty is void.
This written warranty is the only warranty made by TOTO®. Repair or replacement as provided under this warranty shall bethe exclusive remedy available to the purchaser. TOTO® shall not be responsible for loss of the product or for otherincidental, special or consequential damages or expenses incurred by the purchaser, or for labor or other cots due toinstallation or removal, or costs of repairs by others, or for any other expense not specifically stated above. TO THEEXTENT PERMITTED BY LAW, TOTO® DISCLAIMS ALL OTHER IMPLIED WARRANTIES INCLUDING THAT OFMERCHANTABILITY AND FITNESS FOR A PARTICULAR PURPOSE. TOTO® ALSO DISCLAIMS ANY LIABILITY FORSPECIAL, INCIDENTAL, OR CONSEQUENTIAL DAMAGES. Some states do not allow limitation of how long an impliedwarranty lasts or the exclusion or limitation of special, incidental or consequential damages, so these limitations andexclusions may not apply to you. This warranty gives the consumer specific legal rights. You may also have other rights thatvary from state to state. This warranty is to the original purchaser only, and excludes product damage due to installationerror, product abuse, or product misuse, whether performed by a contractor, service company, or the consumer.
THIS IS OUR EXCLUSIVE WRITTEN WARRANTY.
Trou
bles
hoot
ing
44
Limited Warranty