NComputing L300 Virtual Desktop
16
NComputing L300 Virtual Desktop Evaluation Guide
Transcript of NComputing L300 Virtual Desktop

NComputing L300 Virtual Desktop
Evaluation Guide

| 2
Table of Contents
NComputing Corporate Overview . . . . . . . . . . . . . . . . . . . . . . . . . . . . . . . . . . . . . . . . . . . . . . . 3
L300 Virtual Desktop Overview . . . . . . . . . . . . . . . . . . . . . . . . . . . . . . . . . . . . . . . . . . . . . . . . . . . . . . . . 3
Computing Delivers Highest User Density per Dollar . . . . . . . . . . . . . . . . . . . . . . . . . . . . . . . . . . . . . . 3
Selective Virtualization at the Server . . . . . . . . . . . . . . . . . . . . . . . . . . . . . . . . . . . . . . . . . . . . . . . . . . . 4
Clients Utilize NComputing’s Own NUMO System-on-Chip . . . . . . . . . . . . . . . . . . . . . . . . . . . . . . . . . 4
Purpose-Built Protocol . . . . . . . . . . . . . . . . . . . . . . . . . . . . . . . . . . . . . . . . . . . . . . . . . . . . . . . . . . . . . . . 4
Deployment Use Cases . . . . . . . . . . . . . . . . . . . . . . . . . . . . . . . . . . . . . . . . . . . . . . . . . . . . . . . . . . . 5
Deploying Two L300 Virtual Desktops on a Supported Windows Platform . . . . . . . . . . . . . . . . . . . . . 5
Installing the NComputing L300 vSpace Host . . . . . . . . . . . . . . . . . . . . . . . . . . . . . . . . . . 6
Set-up End User Devices . . . . . . . . . . . . . . . . . . . . . . . . . . . . . . . . . . . . . . . . . . . . . . . . . . . . . . . . . 9
Establishing a Network Connection . . . . . . . . . . . . . . . . . . . . . . . . . . . . . . . . . . . . . . . . . . . . . . . . . . . 10
Device Set-Up . . . . . . . . . . . . . . . . . . . . . . . . . . . . . . . . . . . . . . . . . . . . . . . . . . . . . . . . . . . . . . . . . . . . . 11
Installing a Second NComputing L300 Virtual Desktop . . . . . . . . . . . . . . . . . . . . . . . . . . . . . . . . . . . . 12
Create New Users with Microsoft Management Console . . . . . . . . . . . . . . . . . . . . . 12
Evaluating the Administrator’s Console . . . . . . . . . . . . . . . . . . . . . . . . . . . . . . . . . . . . . . . . 13
Evaluating the Virtual Desktop . . . . . . . . . . . . . . . . . . . . . . . . . . . . . . . . . . . . . . . . . . . . . . . . . . 14
Legal . . . . . . . . . . . . . . . . . . . . . . . . . . . . . . . . . . . . . . . . . . . . . . . . . . . . . . . . . . . . . . . . . . . . . . . . . . . . . . 16
NComputing L300 Virtual Desktop Evaluation Guide

| 3
NComputing L300 Virtual Desktop Evaluation Guide
NComputing Corporate Overview
NComputing, Inc . is the fastest growing desktop virtualization company in the world with over 20 million daily users in 140 countries . The company’s award-winning, patented technology lowers desktop computing costs, improves manageability, and reduces both energy consumption and e-waste for organizations . NComputing is the perfect solution for unlocking the power and potential of PCs and cloud computing for any size company .
Today’s PCs are so powerful that the vast majority of users only need and use a small fraction of their desktop’s computing capacity . NComputing taps this unused capacity from a single PC, allowing many users to share it simultaneously . Each user’s monitor, keyboard and mouse are connected to a small and highly reliable NComputing access device, which is then connected to the shared PC . NComputing’s award-winning vSpace desktop virtualization software provides each user with a rich multimedia computing experience with its own computing session . This means that each user can access their applications with their own user experience .
• NComputing works with the most common Virtual Desktop Infrastructure solutions such as VMware, Citrix and Microsoft
• NComputing supports Linux and Windows OS
• NComputing also supports many 3rd party peripherals such as one-time password solutions, fingerprint security, optical mouse, and other popular USB 2 .0 devices
NComputing L300 Virtual Desktop Overview
NComputing’s L300 virtual desktop delivers rich full-screen, full-motion multimedia playback; transparent USB redirection; and unparalleled peripheral support . It is a simple-to-deploy, low-cost means to implement a complete virtual desktop infrastructure in hours .
NComputing virtual desktops are more than simply an access device . We provide end-to-end desktop virtualization solutions that include software infrastructure, desktop virtualization protocol and hardware .
The combination of the 3 key elements – software, protocol and hardware – provides a unique price: performance ratio that is unparalleled in the market and provides an unparalleled end-user experience .
NComputing Delivers Highest User Density per Dollar
A core goal of the NComputing solution is to provide virtual desktops to as many users as possible with a minimum amount of hardware and software . Said another way, NComputing focuses on providing the highest user density at the lowest cost per seat, NComputing did careful evaluations of where most processing occurs, how fat a client need to be, and how much server-side compute power is needed for the optimal solution to manage the end-to-end solution cost .
The NComputing L300 maximizes user density per dollar spent by allowing you to use off-the-shelf, generic, PC-class hardware without requiring any extra capabilities . There is no need to spend extra money on custom, complex, purpose-built hardware (such as special graphics cards or co-processing boards) to make the NComputing virtual desktop solution work on the server or client side .
NComputing end-to-end solution delivers a high-end virtual desktop experience at a third the cost of other vendors trying to do a similar thing . The solution is made possible through technology delivered at the server, client, and protocol layers as discussed in the next three sections .

| 4
NComputing L300 Virtual Desktop Evaluation Guide
Selective Virtualization at the Server
No specialized hardware is needed to achieve a high fidelity experience; server CPU utilization is minimized by only virtualizing those things needed for the virtual desktop experience . NComputing calls this a multi-layer virtualization technique . Whereas many solutions virtualize everything on the OS, the vSpace software selectively virtualizes only the necessary elements of the OS and hardware and combines that with session management to provide user and session virtualization while minimizing CPU resource utilization .
NComputing will virtualize things like audio, graphics, video, input devices, and file system access points . This technique allows for greater user density without virtualizing system resources that are of no use to the user . Additionally, the NComputing multi-media subsystem can dynamically detect when multimedia is being used, compress it for transport to the access device and accelerate it for a high-fidelity experience .
This solution is hardware agnostic and does CODEC independent media acceleration . As long as the host server can play the media it can be played at the client . Most desktop virtualization solutions either limit the number of CODECs supported on the server or require that a specific CODEC be supported at the client for client-side rendering .
Clients Utilize NComputing’s Own NUMO System-on-Chip
The NComputing client utilizes a dual-core ARM CPU with embedded media processors that support dynamic bandwidth management and multiple protocols and codecs like UXP and H .264 . The system on a chip (SoC) is intended to be a hybrid of a general purpose computing platform and multi-media player . General purpose clients generally lack local multi-media capabilities, which, in turn, require more software to do the same thing that can be done with the L300 . As a result, traditional thin clients use much more CPU power .
The NComputing solution includes the smallest, necessary multimedia elements at the client to ensure high fidelity multimedia with the least amount of CPU . For traditional thin clients to accomplish the same requires a CPU, GPU, Local Storage, USB Hub and Ethernet controller which can be done with a single, inexpensive SoC . In short, the Numo SoC requires a fraction of the memory, storage and power of a traditional thin client, thus driving down costs at the client .
Purpose-Built Protocol
The NComputing UXP protocol was purpose built with a strong end-user experience in mind for desktop virtualization . Many virtualization solutions were purpose built for server administration, 1:1 desktop virtualization or centralized computing (e .g . PC Blades) . As a result, many of these protocols offer decent experiences, but are expensive and have significant resource overhead to make up for any deficiencies .
NComputing utilizes a single protocol to optimize the user experience plus cost / benefits to the business such as better network utilization . Most protocols need to either be integrated with a 3rd party solution at the client side or server side with API add-ons to achieve what NComputing does in a single protocol . 3rd party integration with API add-ons increases the numbers of processes running between the server and client and consumes more CPU resources, thus driving up cost .
NComputing can also integrate the UXP protocol with our multi-layer virtualization and multimedia subsystems ensuring minimum resource utilization on the host to improve the user experience . No other vendor owns server, client, and protocol like NComputing . This requires other vendors to integrate multiple software components from numerous companies, which, in turn, carry their own overhead and costs in to the system . For those vendors, there is no opportunity to optimize the end-to-end experience and minimize resource utilization because many elements are out of their control .

| 5
NComputing L300 Virtual Desktop Evaluation Guide
Deployment Use Cases:
NComputing’s desktop virtualization strategy is based on simplicity . vSpace is designed to install onto low-end servers or PC-class hardware, quickly transforming it into a multiuser host capable of supporting up to 30 simultaneous users per operating system . When paired with server virtualization infrastructure you can support hundreds of users on a server with a minimal number of operating systems .
The NComputing L300 solution allows you great flexibility to host up to 30 virtual desktops on a single operating system . In the following examples, we provide a step-by-step guide on how to transform a single PC in to three PCs (one host PC and two virtual desktops) . We will review the L300 being deployed from a single host to a single host and virtual desktop and then to a single host and two virtual desktops . The installation of one virtual desktop or many is basically the same .
Deploying Two L300 Virtual Desktops on a Supported Windows Platform
In this scenario we have installed two L300 Virtual desktops to a single host computer . The installation is fast and easy, only requiring a keyboard, monitor, and mouse be connected to the L300 device . Once connected, you will be prompted with a connection screen to enter your user name and password .
For evaluation purposes you can examine the administrator console which is accessible on the host computer . You can also evaluate the user side by looking at the monitor and reviewing the desktop screen from that standpoint . The next sections cover the installation steps and then we look at the administrator’s console and user screen, respectively .

| 6
NComputing L300 Virtual Desktop Evaluation Guide
Installing the NComputing L300 vSpace Host
Installing the L300 Virtual Desktop is quick and easy . The following steps will guide you through the installation:
Step 1: Download the latest version of our vSpace software from the NComputing Software Download Center . Locate the correct software based on product model —L300 Virtual Desktop—and operating system and download the corresponding file . For this example, we are using the Windows platform . NOTE: The current version of vSpace is always located at www .ncomputing .com/downloads
Step 2: After downloading and extracting the installer files, double click the downloaded “ .exe” file to begin the installation process .
Step 3: At the installer’s “Welcome” screen, click on the “Next” button .
Step 4: At the antivirus and firewall warning screen, read and follow the instructions, then click on the “Next” button .
Step 5: At the software End User License Agreement screen, read the agreement . When you are finished, if you agree, click on the “I agree” checkbox, and then click on the “Next” button .
Step 6: At the software Terms of Use screen, please read the terms of use . When you are finished, if you agree, click on the “I agree” checkbox, and then click on the “Next” button .
step 1
step 4

| 7
NComputing L300 Virtual Desktop Evaluation Guide
Step 7: Next, select whether or not to install the vSpace console on this system . The vSpace Network Administration Console is a feature that extends vSpace’s control capabilities, so that multiple host PCs may be administered from one location . You will also have the option to set an administrator password, select whether or not to use an administrator password . If you choose to use an administrator password, enter it and retype it . Click on the “Next” button .
Step 8: At the “Choose destination location” screen, you can install to the default location (recommended), or you can choose a different location . When you are finished, click on the “Next” button .
Step 9: Next, select whether or not to install optional third party software to enhance the media system of your host computer . The default option (recommended) is to install this software to ensure a good multimedia experience . When you are finished, click on the “Next” button .
Step 10: You are now ready to install NComputing vSpace on your host . Click “Install” and the installation with begin .
step 7
step 8

| 8
NComputing L300 Virtual Desktop Evaluation Guide
Step 11: Upon completion of the installation process, you will be prompted to restart the host . Upon restart, you will need to register the vSpace software . This can be done by going to the NComputing program folder under the Windows Start Menu (Start > All Programs > NComputing > vSpace Registration) . Once launched, follow the basic steps for registering your vSpace software . NOTE: If you skip this step, you will have a 30-day timeout of the software
and a 1 hour connection limit per end user device.
step 10

| 9
NComputing L300 Virtual Desktop Evaluation Guide
Set-Up End User Devices
Next, you need to install the monitor, keyboard and mouse and other devices/peripherals to the extra USB ports of the L300 device . The L300 must be connected to the host PC via an Ethernet switch, router, or other network connection . The L300 has USB ports dedicated for mice and keyboards, as indicated by the mouse and keyboard symbols below the horizontally oriented USB ports . The vertically oriented USB ports to the left of the audio connections are for other USB devices .
L300 Connections
2 remote USB 2 .0
speaker jack
microphone jack
USB 1 .1 for keyboard
& mouse
10/100 ethernet
VGA monitor
on/off switch
NOTE: The USB keyboard and mouse ports ONLY support these types of devices. No other types
of USB devices are supported on these ports. The USB keyboard and USB mouse must be directly
connected to these ports and cannot go through a separate USB hub. Peripherals with integrated
USB hubs or combination keyboard/mouse devices are not supported by these ports. Other USB
peripherals can be connected to the vertically oriented ports that are to the left of the audio
ports – note that these generic ports are not active until you have connected to a vSpace session.
| 10
NComputing L300 Virtual Desktop Evaluation Guide
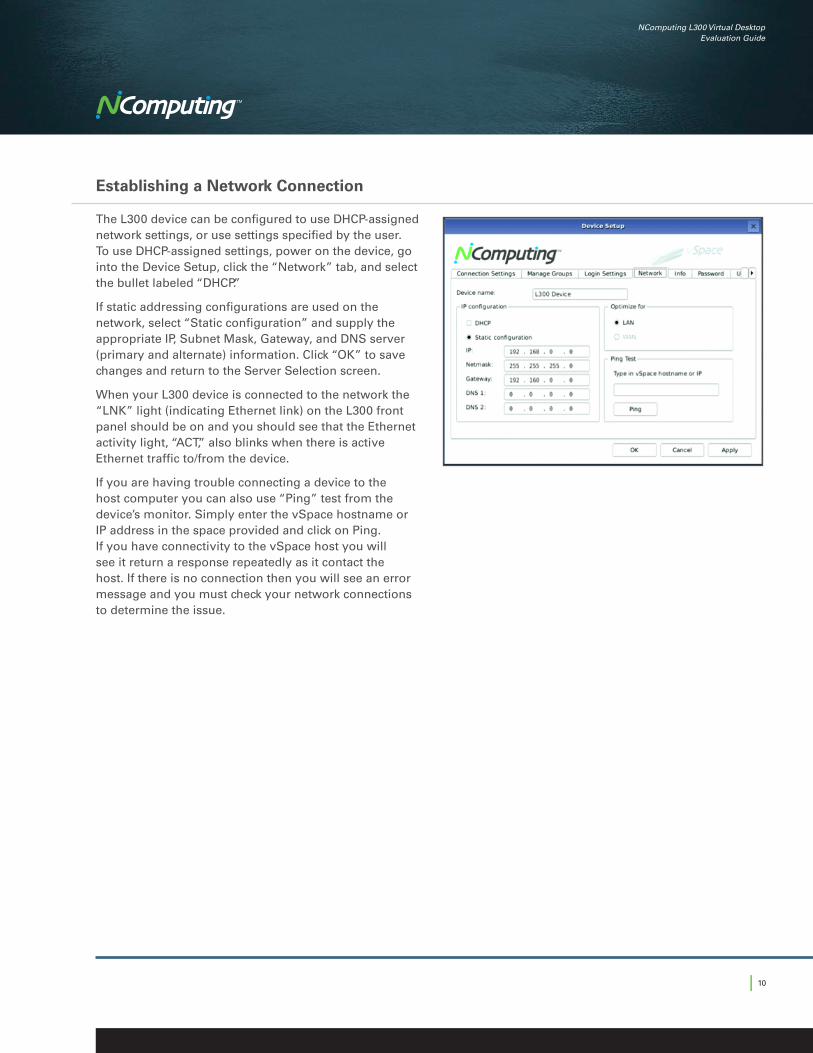
Establishing a Network Connection
The L300 device can be configured to use DHCP-assigned network settings, or use settings specified by the user . To use DHCP-assigned settings, power on the device, go into the Device Setup, click the “Network” tab, and select the bullet labeled “DHCP .”
If static addressing configurations are used on the network, select “Static configuration” and supply the appropriate IP, Subnet Mask, Gateway, and DNS server (primary and alternate) information . Click “OK” to save changes and return to the Server Selection screen .
When your L300 device is connected to the network the “LNK” light (indicating Ethernet link) on the L300 front panel should be on and you should see that the Ethernet activity light, “ACT,” also blinks when there is active Ethernet traffic to/from the device .
If you are having trouble connecting a device to the host computer you can also use “Ping” test from the device’s monitor . Simply enter the vSpace hostname or IP address in the space provided and click on Ping . If you have connectivity to the vSpace host you will see it return a response repeatedly as it contact the host . If there is no connection then you will see an error message and you must check your network connections to determine the issue .

| 11
NComputing L300 Virtual Desktop Evaluation Guide
Device Setup
Once you have connected a keyboard, monitor, and mouse to an L300 device you are ready to configure the device to communicate with the host computer . You L300 device will perform a network scan to locate the available connections . You can either select one of the available connections by highlighting it with your mouse and clicking the Connect button or you can enter a vSpace hostname or IP address and then clicking the Connect button .
Clicking on the Refresh button will rescan the local network searching for available vSpace connections .
There is also a comprehensive device setup section where you can manage the following options:
• Connection Settings: This option allows you to select Auto-connect to a specific vSpace host or Manual connection, which will give you a list of vSpace hosts to connect to .
•Manage Groups: This section allows you to manage groups of vSpace hosts and servers . You can add, modify, and delete hosts and groups with this feature .
•Login Settings: This area allows you to specify the video resolution settings for this device and the colors . You can also enable auto-login settings to include a domain, user, and password . There is also a kiosk mode (no desktop) where you simply specify a program and folder to execute a file automatically at launch .
•Network: This section allows you to configure the IP device name (automatically populated), the IP configuration (DHCP or Static) and WAN/LAN optimization . There is also an option to perform a Ping test to send communication packets to the vSpace host when troubleshooting a connection between the host and end device .
• Info: This is a general information section that provides a summary of hardware serial number, device ID, IP addresses, and so on .
•Password: You can specify a password to enter these end device configuration screens . Setting a password will prevent an end user from modifying any of the above listed settings .
WARNING: the password you set cannot be recovered if lost. You
may want to set a standard password across all your end user
devices minimizing the need to remember multiple passwords.
•Update: You can configure the L300 for automatic firmware updates . By default, automatic updates is disabled .
| 12
NComputing L300 Virtual Desktop Evaluation Guide
Installing a Second NComputing L300 Virtual Desktop
To install a second device simply follow the instructions above to attach a monitor, mouse, and keyboard to another L300 Virtual Desktop device . If you are using DHCP, then the device will automatically obtain an IP address for its use while the session is active . Just like the first device, you can also configure a static IP address .
From the administrator console you will see the second session listed below the first one . You can perform all the same functions on the second device just like the first one .
NOTE: If connecting over 25 users, monitor the Windows Server 2003 and Windows XP 536 MB paged memory limit. If paged memory usage starts to
get above 515MB, we advise not connecting any further users.
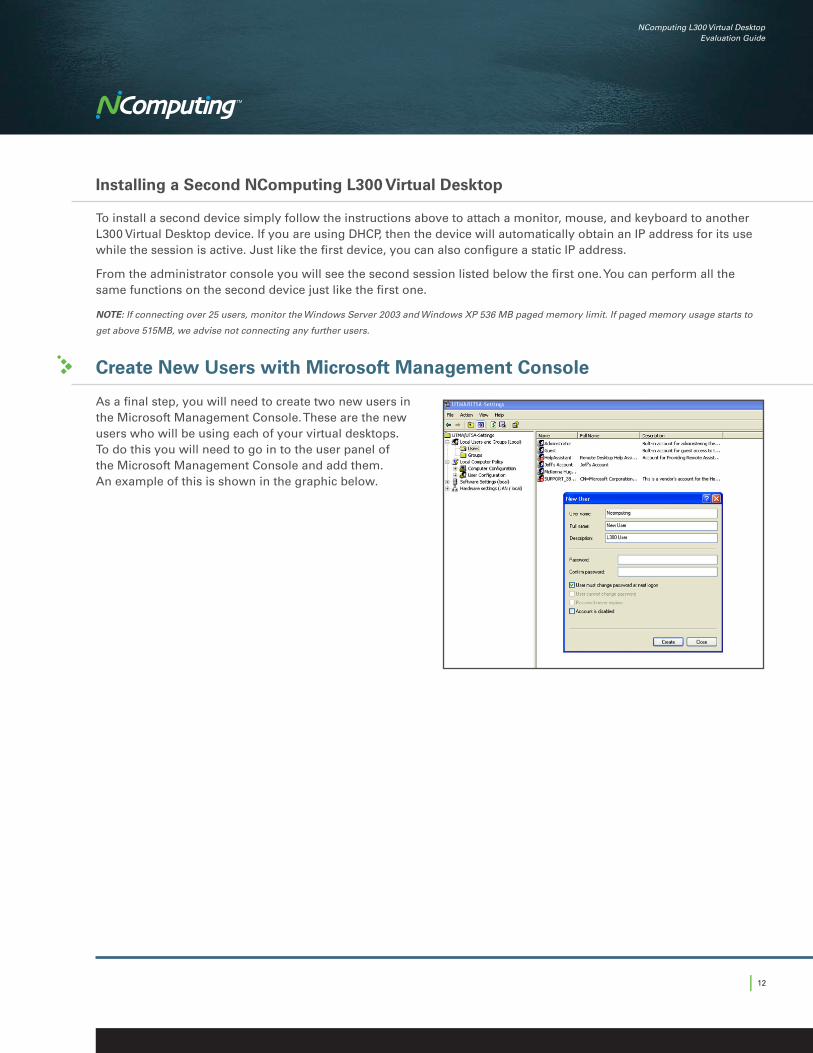
Create New Users with Microsoft Management Console
As a final step, you will need to create two new users in the Microsoft Management Console . These are the new users who will be using each of your virtual desktops . To do this you will need to go in to the user panel of the Microsoft Management Console and add them . An example of this is shown in the graphic below .

| 13
NComputing L300 Virtual Desktop Evaluation Guide
Evaluating the Administrator’s Console
Image A: The L300 console is an MMC (Microsoft Management Console) Snap-in which allows you to manage your users with ease with a console that you most likely have experience with .
By clicking on “Sessions” you can view all the current user sessions connected to the host system . The session information shows you the session name, session ID, IP address, and other handy information relating to the unique session for that user . The following screen shows the main Administrator console with the menu options including the “Session” option .
Image B: As an administrator you can observe any of the current user sessions by highlighting that user’s session clicking on the “View” option . This option allows an administrator to view all activities on the user’s screen .
Image C: As an administrator you can also shut down a user’s session at any time . You can simply highlight a session and click on the “Stop” button at the top of the screen . This will present an option to shut down a user’s session as shown in the following screen .
Image A
Image C
Image B
| 14
NComputing L300 Virtual Desktop Evaluation Guide
Image D: As the administrator you have complete visibility of System Settings showing uptime, number of active sessions, and so on . You can also set an administrator password to protect access to the console . Keep in mind if you should forget the password, you will have to reinstall the console software again, losing any settings that you may have put in place for users and their sessions .
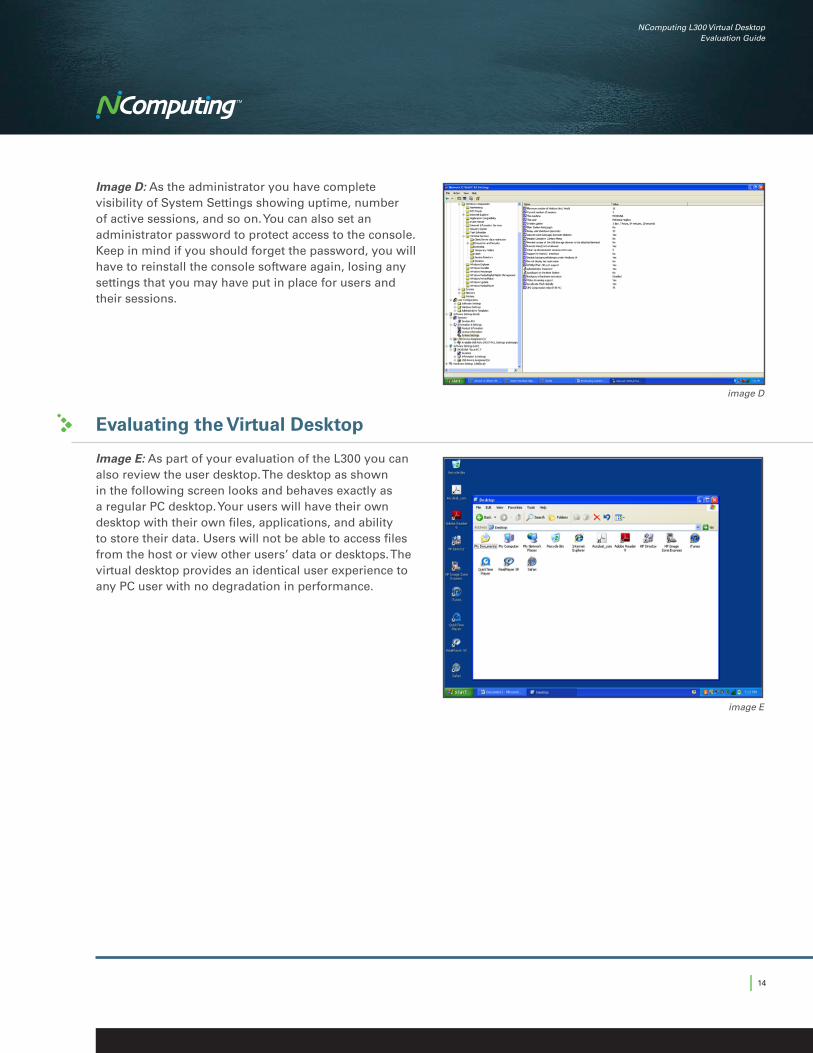
Evaluating the Virtual Desktop
Image E: As part of your evaluation of the L300 you can also review the user desktop . The desktop as shown in the following screen looks and behaves exactly as a regular PC desktop . Your users will have their own desktop with their own files, applications, and ability to store their data . Users will not be able to access files from the host or view other users’ data or desktops . The virtual desktop provides an identical user experience to any PC user with no degradation in performance .
image D
image E

| 15
NComputing L300 Virtual Desktop Evaluation Guide
Image F: User can access the Internet through any browser just like they would from a regular PC .
Image G: Users can access common applications such as Word, Excel, and PowerPoint from the central host . For most applications, you will need to have installed the server versions of applications so that multiple users can access them . User files are stored as part of their own session and are not visible by other users on the system .
NOTE: Windows Server and appropriate client access licenses are
required for multiuser environments using NComputing products. Client
operating systems such as Windows XP, Windows Vista and Windows
7 are appropriate for single user applications such as 1:1 VDI, display
systems and remote access. Additional information on licensing is
available at www .ncomputing .com/mslicensing including frequently
asked questions.image F
image G

| 16
NComputing L300 Virtual Desktop Evaluation Guide
The software described in this evaluation guide is furnished under a license agreement and may be used only in accordance with the terms of the agreement .
Documentation version 1 .00 .1
©Copyright 2010 NComputing Corporation . All rights reserved .
NComputing, the NComputing Logo are trademarks or registered trademarks of NComputing Corporation or its affiliates in the U .S . and other countries . Other names may be trademarks of their respective owners . The product described in this document is distributed under licenses restricting its use, copying, distribution, and decompilation/reverse engineering . No part of this document may be reproduced in any form by any means without prior written authorization of NComputing Corporation and its licensors, if any .
The documentation is provided”as is”and all express or implied conditions, representations and warranties, including any implied warranty of merchantability, fitness for a particular purpose or non-infringement, are disclaimed, except to the extent that such disclaimers are held to be legally invalid. Ncomputing corporation shall not be liable for incidental or consequential damages in connection with the furnishing, performance, or use of this documentation. The information contained in this documentation is subject to change without notice.
1 Lagoon Drive, Suite 110, Redwood City, CA 94065 | Phone: 1-650-594-5800 | Fax: 1-650-594-5801 | ncomputing .com
©Copyright 2003-2010 NComputing, Inc . All rights reserved . NComputing, vSpace, and UXP are the property of NComputing . Other trademarks and trade names are
the property of their respective owners . Specifications subject to change without notice . Performance may vary, depending on the configuration of the shared computer .
EVALUATION GUIDE L300 1A