NC SBI DIVISION OF CRIMINAL INFORMATION...
83
NC SBI DIVISION OF CRIMINAL INFORMATION NETWORK INITIAL INDOCTRINATION TRAINING OMNIXX INTERFACE AND MOBILE TRAINER - OPERATOR GUIDE August 2012 Page 1 of 83 DRAFT
Transcript of NC SBI DIVISION OF CRIMINAL INFORMATION...

NC SBI DIVISION OF CRIMINAL INFORMATION NETWORK
INITIAL INDOCTRINATION TRAINING
OMNIXX INTERFACE AND MOBILE TRAINER - OPERATOR GUIDE
August 2012
Page 1 of 83
DRAFT

Introduction …………………………………………………… Page 3 DCIN General Information …………………………………………………… Pages 3-8 Security and Privacy …………………………………………………… Page 8 Initial Requirements …………………………………………………… Pages 8-9 Getting Started in Omnixx …………………………………………………… Page 9-10 DCIN Overview …………………………………………………… Pages 11-13 Omnixx Force Overview …………………………………………………… Pages 13-56 Omnixx Trainer Overview …………………………………………………… Pages 57-67 Mobile Overview …………………………………………………… Pages 68-76 Written Exercise Instructions …………………………………………………… Page 77 Online Test …………………………………………………… Page 77 Class Attendance …………………………………………………… Page 77 DCIN Misuse …………………………………………………… Pages 78-79 Omnixx Passwords …………………………………………………… Pages 80-81 Workbook Exercises …………………………………………………… Page 82-83 Indoctrination Checklist …………………………………………………… Page 84
Table of Contents
Page 2 of 83
DRAFT
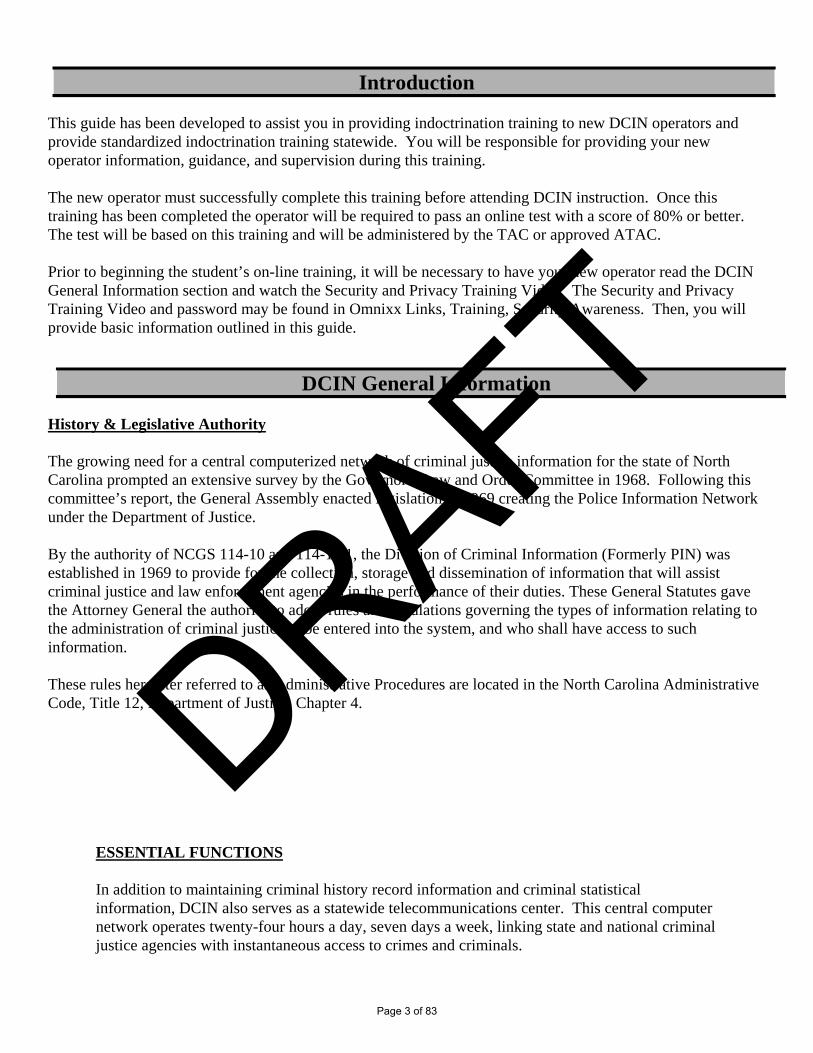
This guide has been developed to assist you in providing indoctrination training to new DCIN operators and provide standardized indoctrination training statewide. You will be responsible for providing your new operator information, guidance, and supervision during this training. The new operator must successfully complete this training before attending DCIN instruction. Once this training has been completed the operator will be required to pass an online test with a score of 80% or better. The test will be based on this training and will be administered by the TAC or approved ATAC. Prior to beginning the student’s on-line training, it will be necessary to have your new operator read the DCIN General Information section and watch the Security and Privacy Training Video. The Security and Privacy Training Video and password may be found in Omnixx Links, Training, Security Awareness. Then, you will provide basic information outlined in this guide.
History & Legislative Authority The growing need for a central computerized network of criminal justice information for the state of North Carolina prompted an extensive survey by the Governor’s Law and Order Committee in 1968. Following this committee’s report, the General Assembly enacted legislation in 1969 creating the Police Information Network under the Department of Justice. By the authority of NCGS 114-10 and 114-10.1, the Division of Criminal Information (Formerly PIN) was established in 1969 to provide for the collection, storage and dissemination of information that will assist criminal justice and law enforcement agencies in the performance of their duties. These General Statutes gave the Attorney General the authority to adopt rules and regulations governing the types of information relating to the administration of criminal justice to be entered into the system, and who shall have access to such information. These rules hereafter referred to as Administrative Procedures are located in the North Carolina Administrative Code, Title 12, Department of Justice, Chapter 4.
ESSENTIAL FUNCTIONS In addition to maintaining criminal history record information and criminal statistical information, DCIN also serves as a statewide telecommunications center. This central computer network operates twenty-four hours a day, seven days a week, linking state and national criminal justice agencies with instantaneous access to crimes and criminals.
Introduction
DCIN General Information
Page 3 of 83
DRAFT
Users of the network not only have the ability to transmit or receive, within seconds, any law enforcement related message, but also have access through DCIN to other law enforcement computers located throughout the state and nation. These computers include: National Crime Information Center (NCIC) Division of Criminal Information Network (DCIN) International Justice & Public Safety Sharing Network (Nlets) Administrative Office of the Courts (AOC) Division of Motor Vehicles (DMV) Canadian Police Information Center (CPIC) National Insurance Crime Bureau (NICB) The high-speed communication links between these computer networks ensure the fast and accurate transmission of the latest data on criminal justice information. SYSTEMS ACCESSED The SBI maintains a computerized network (DCIN) linking local, state and national criminal justice agencies for the collection, organization and retrieval of data on crimes and criminals 24 hours a day. DCIN interfaces with various national and state computer systems and provides access to the following: NC DCIN Files NC Computerized Criminal History Files NC Recovered Vehicle File NC Concealed Handgun Permit File NC Sex Offender Registration File In State Send and Functional Message Capabilities Newsletters NC Government Files NC Department of Transportation, Division of Motor Vehicles (NC Drivers and Vehicle Registration Files) Administrative Office of the Courts (Automated Clerk of Court Files) NC Wildlife Boat Registration Files NCIC Person Files –National Wanted Persons, Missing Persons, Unidentified Persons, Protective Interest File, Immigration Violators File, Foreign Fugitive, Gang,Known or Appropriately Suspected Terrorist File, Protection Order File, Sex Offender Registration File and Supervised Release File. Property Files – Stolen Vehicles, Felony Vehicles, Stolen Parts, Stolen License Plates, Stolen Boats, Stolen Guns, Recovered Guns, Lost Guns, Felony Guns, Stolen Securities, and Stolen Articles.
Page 4 of 83
DRAFT

Interstate Identification Index (III) - National name index of criminal records substantiated by fingerprint cards. ORI File - Used to obtain address and telephone number of US/Canadian law enforcement/criminal justice agencies. Nlets Other States, Federal Government Agencies, Canadian Information – Driver’s Issuance/History, Vehicle Registration, Criminal History Information, Sex Offender Registration, Boat Registration, and Aircraft Registration, Hazardous Material, Wanted/Stolen, Weather and Road Conditions, Administrative Messages and Hit Confirmations. NICB VIN tracking. ORI Files Used to inquire by ORI to obtain agency’s name, address and phone number, or by location for listing of agencies and their ORIs. SECTIONS OF CIIS/DCIN Training Unit Training Specialists provide instruction to NC criminal justice agency personnel in the operation and use of the communication and information network (DCIN). Training needs are evaluated and courses are developed to teach criminal information record-keeping, access, and dissemination of criminal information. Training Specialists also train law enforcement on the NC Sex Offender Registry. Training specialists are regional instructors assigned to SBI District Offices who serve local law enforcement as well as state and federal agencies to provide training and technical support. They also manage state certifications which allow review of SBI and FBI criminal records. Training Specialists perform field audits of law enforcement and criminal justice agencies to determine compliance with state and national rules and regulations regarding appropriate entry, access, use and dissemination of information through the DCIN/NCIC System. Compliance Unit Compliance Unit staff audit records which are entered, modified, cleared, and canceled in the SBI-maintained Division of Criminal Information Network (DCIN) which further links to the FBI-maintained National Criminal Information Center (NCIC). Our unit audits the use of certain criminal justice information obtained through DCIN by local, state, and federal law enforcement agencies to make sure the information is complete, accurate, and up-to-date. DCIN information audited includes stolen vehicles, stolen guns, missing persons, wanted persons, and computerized criminal history record dissemination logs. Non-criminal justice entities which have access to criminal justice information are also audited.
Page 5 of 83
DRAFT

AFIS & Technical Search Unit Our fingerprint technicians perform analysis, comparison, evaluation, and verification of fingerprint images to determine identity. Fingerprint technicians establish criminal history records during the evaluation phase if there is no prior criminal history record. The SBI's fingerprint technicians provide Statewide Automated Fingerprint Identification System (SAFIS) network support and edit electronic fingerprint submissions. SAFIS links a statewide network of Live Scan devices that electronically capture and submit fingerprint images to us. Applicant Processing Unit We process non-criminal justice name and fingerprint background checks for more than 3,000 non-criminal justice agencies. To access our criminal history records, North Carolina law requires an ordinance, federal mandate, state statute, or Governor’s executive order for non-criminal justice agencies to have access to our criminal history records. We process criminal justice applicant fingerprint cards for law enforcement agencies in North Carolina. We also provide information for petitioners seeking restoration of firearm’s rights. Petitioners must complete a consent form for a criminal record check which we process for the restoration of firearms rights. CCH/Triple I Processing Unit We verify and maintain criminal history data for all Live Scan fingerprint submissions that are electronically added to the Computerized Criminal History File (CCH). We manually enter modifications to Live-Scan and mailed-in fingerprint submissions. State and federal records are reviewed and compared, records are verified as belonging to North Carolina, and we take ownership of the records. DDE/NICS Research Unit We process criminal arrests, custody information, and applicant card submissions from mailed-in inked fingerprint cards to a Descriptive Data Entry (DDE) screen for electronic submission to the FBI. Each fingerprint card is manually edited for clarity and mandatory fields to ensure that the charges meet qualifications under NCGS § 15A-502. We process and categorize juvenile fingerprint cards under NCGS § 7B-2102 and NCGS § 7B-2200. We also research final dispositions for the FBI National Instant Criminal Background Check System (NICS). Expungement Unit We process expungement requests and orders, and ensure that the requests meet the legal criteria set by law (NCGS § 15A-145, NCGS § 15A-146, NCGS § 15A-147, NCGS § 90-96, and NCGS § 90-113.14). We check the Computerized Criminal History Files (CCH), the National Crime Information Center (NCIC), and the Administrative Office of the Courts (AOC). If we find legal issues, we contact the attorney, presiding judge, clerk of court, or out-of-state agency. If appropriate, we expunge the criminal history record information denoted by the court order from the CCH
Page 6 of 83
DRAFT
computer system, the FBI's computerized criminal history files, the Imaging System, the NIST Archive database, and we have the record removed from the Automated Fingerprint Identification System (AFIS). Sex Offender Coordination Unit We manage the content on the NC Sex Offender Registry website and ensure compliance with state and federal regulations. Every week, we mail individual verification letters to registered offenders and conduct quality assurance checks of data entered into state and federal databases. We provide support to NC county sheriffs with registration and management of sex offenders. We also work closely with other states to track and monitor offender movements nationwide.
Crime Reporting and Criminal Statistics Units
We administer crime reporting standards for North Carolina and provide support for the 475 law
enforcement agencies that participate in the Uniform Crime Reporting Program. Our crime
statisticians collate and analyze data collected by the SBI to assure quality control. The data is
then compiled into the Uniform Crime Report and disseminated throughout the state and
country. This information about crime reporting statistics is used by the media, the legislature,
local governments and the public. SYSTEM DEFINITIONS CIIS- Criminal Information and Identification Section: CIIS is a section of the State Bureau of Investigation which operates under the NC Department of Justice. CIIS is responsible for the collection, storage and dissemination of information that will assist criminal justice and law enforcement agencies in the performance of their duties. CTO – State Control Terminal Officer: In North Carolina this individual is the Special Agent in Charge of the Criminal Information & Identification Section. DCIN – Division of Criminal Information Network: DCIN is the computer system maintained by the SBI-CIIS to provide for the collection, storage and dissemination of information that will assist criminal justice and law enforcement agencies in the performance of their duties. DMV - Division of Motor Vehicles: DMV is a division of the Department of Transportation. This division is charged with the responsibility for maintaining NC driver’s issuance/history and vehicle registration information. NCIC – National Crime Information Center: NCIC is a section of the Federal Bureau of Investigation. This agency acts as a national repository for Criminal History Information Indexing and the various hot files and Investigative files entered by local, state and federal law enforcement agencies. Nlets – International Justice & Public Safety Sharing Network: Nlets is a criminal justice data communications system that allows terminal agencies to communicate directly with law enforcement/criminal justice agencies nationwide and in Canada. ORI – Originating Routing Identifier: This is the number assigned by NCIC to law enforcement/criminal justice and other approved agencies to identify that agency and type for access to criminal justice information.
Page 7 of 83
DRAFT

TAC – Terminal Agency Coordinator: An individual designated by the agency head to act as a liaison between the agency and CIIS staff. The person assigned to this position is to ensure compliance with state and national regulations pertaining to the use of the criminal justice computer system. (DCIN and the systems it accesses)
The Security and Awareness Training Video is a part of this indoctrination training and may be used as independent training. Several key issues will be readdressed during the indoctrination process as noted in the Student Indoctrination Training Manual. However, it is imperative that each operator who is provided indoctrination training be shown the Security and Awareness Training Video upon completion of the Indoctrination Training. Documentation on the Security and Awareness Training Video Log is also required. The Security and Awareness Training Video and password may be found in Omnixx Links, Resources, Security Awareness Training. The log required for documentation can be found at this location as well. Prior to indoctrination of a new employee, certain requirements must be met. Before beginning training of a new operator, the agency must complete appropriate background screening checks of the operator and enroll the trainee in a DCIN certification class. Classes are available for enrollment via Omnixx Console and/or Omnixx Trainer.
The individual must be fingerprinted utilizing a live scan device and the notation Criminal Justice Employment should be placed in the reason fingerprint block. The agency must also complete appropriate criminal background checks of the state and national criminal history files and Administrative Office of the Courts (AOC) files prior to beginning indoctrination training. If any questionable offenses are located, you should contact the SBI’s Criminal Information & Identification Section in writing on official agency letterhead for clarification of whether or not it is a disqualifying offense for operator certification. The letter may be mailed to: NC State Bureau of Investigation Criminal Information & Identification Section Attn: ASAC Joshua Hickman PO Box 29500 Raleigh, NC 27626 The individual must be enrolled in an appropriate DCIN certification class (at least module 1) at least 48 business hours prior to beginning indoctrination. You are allowed 120 days to indoctrinate the operator, so you may wish to schedule the individual into a class which allows for appropriate time to complete the indoctrination. The enrollment into the DCIN certification class will place the new operator into a trainee status, and will allow the operator to sign in under their own operator ID and Password, giving them access to specific files utilized during the indoctrination program. It is imperative that Omnixx Force and Omnixx Trainer are in an
Security and Privacy
Initial Requirements
Page 8 of 83
DRAFT

“Active” status when initially entering the new operator in Omnixx Console. During this trainee status, the operator must be under the supervision of a certified operator. During the initial phase of training, the trainer will provide one on one training using the Indoctrination Guide. The student will then be released to perform the Student Workbook and Written Exercises independently, but must have a certified operator in the building. The certified operator must be in the building because the student may receive incoming traffic or have questions while completing the student training materials. As the trainer you should establish departmental procedures for assisting and handling incoming traffic. Before your new operator can properly learn to operate the DCIN interface, he/she must know about the equipment you use. Identify agency equipment being utilized to access DCIN and instruct the new operator on the operation, maintenance, and troubleshooting of each piece. During this time of instruction, you may also outline your departmental policy concerning utilization of computer/agency equipment, maintenance, and troubleshooting of each piece.
This chapter will introduce common terminology used in the operation of Omnixx software, primarily Omnixx Force. This chapter will also explain how to properly login to the Omnixx Desktop and access the Omnixx Force application. This Omnixx Force Quick Access Guide assumes that all necessary software has been successfully installed on the computer you will be using. If this is not the case, please contact your Terminal Agency Coordinator (TAC). Terms to Know Before Getting Started Before using the Omnixx software, there are some terms that you will want to become familiar with. Understanding these terms will aid you in the use of this manual, as well as provide you with valuable background information that will help make your use of the Omnixx Force as efficient as possible.
Omnixx™ - Stores all of the application programs and data needed by Omnixx Force, Omnixx Trainer, and Omnixx Console.
Omnixx™ Force - Browser-based desktop application that allows users to send and receive text-based messages over dedicated law enforcement networks.
Omnixx™ Trainer - A browser-based extension of Omnixx that provides on-line certification testing.
Getting Started in Omnixx
Page 9 of 83
DRAFT
DCIN Overview Computer Systems Available Through The DCIN Network Criminal Information & Identification Section (CIIS) 1. Division of the State Bureau of Investigation (SBI).
2. Maintains North Carolina’s statewide computer network for the exchange of law enforcement/criminal justice information.
3. Assigned Identifiers. - Terminal Identifier (TID): unique identifier assigned to a terminal with system access and used to route in-state messages. This identifier may be alphanumeric up to 8 characters. - User Identifier (User ID): unique identifier assigned to each certified operator. Consists of your first name initial, your last name up to 15 characters, and 4 digits which are assigned by user’s agency.
4. SBI Files - Recovered Vehicles: Vehicles in the possession of a law enforcement agency that are not reported stolen and the owner is unknown or cannot be contacted. - Criminal Records: NC criminal records that are substantiated by fingerprint cards. - Concealed Handgun Permits: Status information on individuals who have applied for or have been issued NC concealed handgun permits. - Sex Offender Registration: Persons who have been convicted of certain sex offenses and are required to register in North Carolina. - NC DOJ Customer Support Center is available 24 hours a day at [email protected] or by calling 919.773.7900.
NC Government Computerized Files 1. NC DOT/Division of Motor Vehicles (DMV). - NC Driver’s Issuance/History. - NC Vehicle Registration. 2. NC Wildlife Resources Commission - NC Boat Registration.
3. Administrative Office of the Courts (AOC) - NC criminal court records maintained by each county Clerk of Court.
National Crime Information Center (NCIC) 1. Division of the Federal Bureau of Investigation (FBI).
2. Maintains national law enforcement/criminal justice computer system. 3. Assigns Originating Routing Identifiers (ORI’s): The unique identifier assigned
to every law enforcement and criminal justice agency nationwide. 4. NCIC Files
- Person files – Includes Wanted, Missing, Foreign Fugitives, Protective Interest, Immigration Violators, Gangs, Known or Appropriately Suspected Terrorists, Protection Orders, Sexual Offenders, Convicted Persons on Supervised Release and Identity Theft. - Property files – Includes Stolen Vehicles, Felony Vehicles, Stolen License Plates, Stolen Parts, Stolen Boats, Stolen Guns, Recovered Guns, Lost Guns,
Page 10 of 83
DRAFT

Felony Guns, Stolen Articles, Stolen Securities. - Interstate Identification Index (III): National name index of criminal records substantiated by fingerprint cards. - ORI file: Used to obtain the ORI, address, and telephone number of US law enforcement/criminal justice agencies.
International Justice & Public Safety Information Sharing Network (Nlets)
1. Computer switching center for the exchange of law enforcement and criminal justice information between states and/or Canada.
2. Sources of Information: - Other States and Federal Government Agencies - Canadian Police Information Center – CPIC - National Insurance Crime Bureau – NICB 3. Types of Information Available: - Other States Sex Offender Registration files. - Other States/Canadian Driver Issuance files. - Other States Driver’s History and Boat Registration files. - Other States/Canadian Vehicle Registration files. - Other States/Canadian Criminal History files. - NLETS ORI and Hazardous Material files. - Canadian Wanted/Stolen files. - NICB Vehicle files. - Other States’ Weather and Road Conditions.
- Administrative Messages - free text messages which can be addressed to agencies in other states or Canada. - Hit Confirmation - requests and/or responses to confirm matches obtained from the Stolen/Wanted files.
Access and Policies Originating Routing Identifier (ORI)
1. Agencies that have access are identified by an ORI, which is a nine character alphanumeric identifier.
2. Examples of agencies assigned a full access ORI: - Law enforcement agencies, e.g. city/county police, sheriff, state police/patrol, military police, SBI, railroad and campus university police, communication centers dispatching for a law enforcement agency, etc. - Criminal justice agencies, e.g. district attorney, judge, magistrate, correctional institution, probation/parole, etc.
3. Examples of agencies assigned a limited access ORI: - Non-government law enforcement agencies that are private (company) police with statutory powers of arrest under state law. Includes some hospitals, security agencies, corporations, utility companies, etc. - Limited access ORI’s will normally end with the letter “P”. These agencies are prohibited from accessing state/national criminal history information, Gang/Known or Appropriately Suspected Terrorist, and Immigration Violator files.
Page 11 of 83
DRAFT

4. ORI Files. - Query NLETS ORI File by location or ORI: (TQ) - By location for listing of agencies and their ORI’s.
- By ORI for agency’s name, address, operational time, etc. - Query NCIC ORI File by ORI: (QO)
- Translates ORI into agency’s name, address and phone number. - If ORI is unknown, NLETS ORI inquiry by location must be used. - Each agency is responsible for maintaining accurate address, telephone/fax numbers, etc. (NLETS/TU; NCIC/MO)
Certification Policies 1. Personnel enrolled in a certification class must be under management control of an agency that has been assigned an ORI. 2. Applicant fingerprint cards must be submitted on each person to be certified and upon return from the SBI must be maintained on file by the agency. 3. All personnel who operate a terminal must be certified within 120 days of employment or assignment as a terminal operator. 4. All personnel must pass an on-line test of 80% or higher to become certified in a specific module. 5. Certification is valid for operating any device, including in-house desktop terminals and mobile/wireless devices. 6. Certification is valid for two years. Recertification is necessary for continued access. Test challenge is allowed for recertification only. 7. Each agency shall notify their Training Specialist, by sending an e-mail, within
24 hours when a certified operator leaves that agency’s employment. You may
find the specific e-mail address listed in the links portion of Omnixx Force. This notification will allow staff at CIIS to immediately move the user to the inactive file until the person is employed by another authorized agency.
On-Line Testing Policy 1. TAC must administer all testing of initial and recertification students. 2. Testing will be open book. Students may use their notes from class and their certification manual. 3. Test must be administered in an environment conducive for learning and test taking. 4. TAC must verify identity of person testing and that the person taking the test receives no outside assistance, other than student notes and certification manual. 5. Operators failing the test must wait 24 hours before retesting 6. Cheating or assisting in cheating is fraud and may result in revocation of certification; results of SBI investigation may be turned over to outside agencies as needed (such as Training and Standards) and may involve criminal and/or civil sanctions.
Page 12 of 83
DRAFT
The purpose of this section is to assist the operator in proper sign-on and sign-off procedures for your agency.
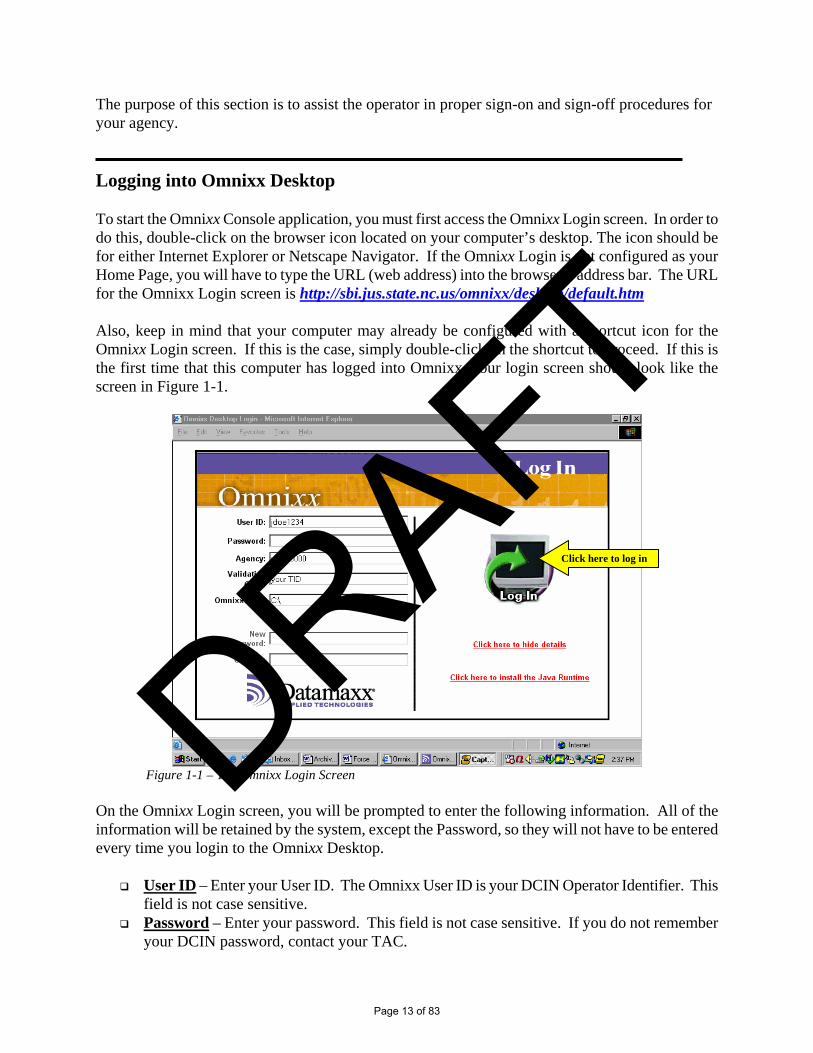
Logging into Omnixx Desktop To start the Omnixx Console application, you must first access the Omnixx Login screen. In order to do this, double-click on the browser icon located on your computer’s desktop. The icon should be for either Internet Explorer or Netscape Navigator. If the Omnixx Login is not configured as your Home Page, you will have to type the URL (web address) into the browser’s address bar. The URL for the Omnixx Login screen is http://sbi.jus.state.nc.us/omnixx/desktop/default.htm Also, keep in mind that your computer may already be configured with a shortcut icon for the Omnixx Login screen. If this is the case, simply double-click on the shortcut to proceed. If this is the first time that this computer has logged into Omnixx, your login screen should look like the screen in Figure 1-1.
Figure 1-1 – The Omnixx Login Screen On the Omnixx Login screen, you will be prompted to enter the following information. All of the information will be retained by the system, except the Password, so they will not have to be entered every time you login to the Omnixx Desktop.
User ID – Enter your User ID. The Omnixx User ID is your DCIN Operator Identifier. This field is not case sensitive.
Password – Enter your password. This field is not case sensitive. If you do not remember your DCIN password, contact your TAC.
Click here to log in
Page 13 of 83
DRAFT
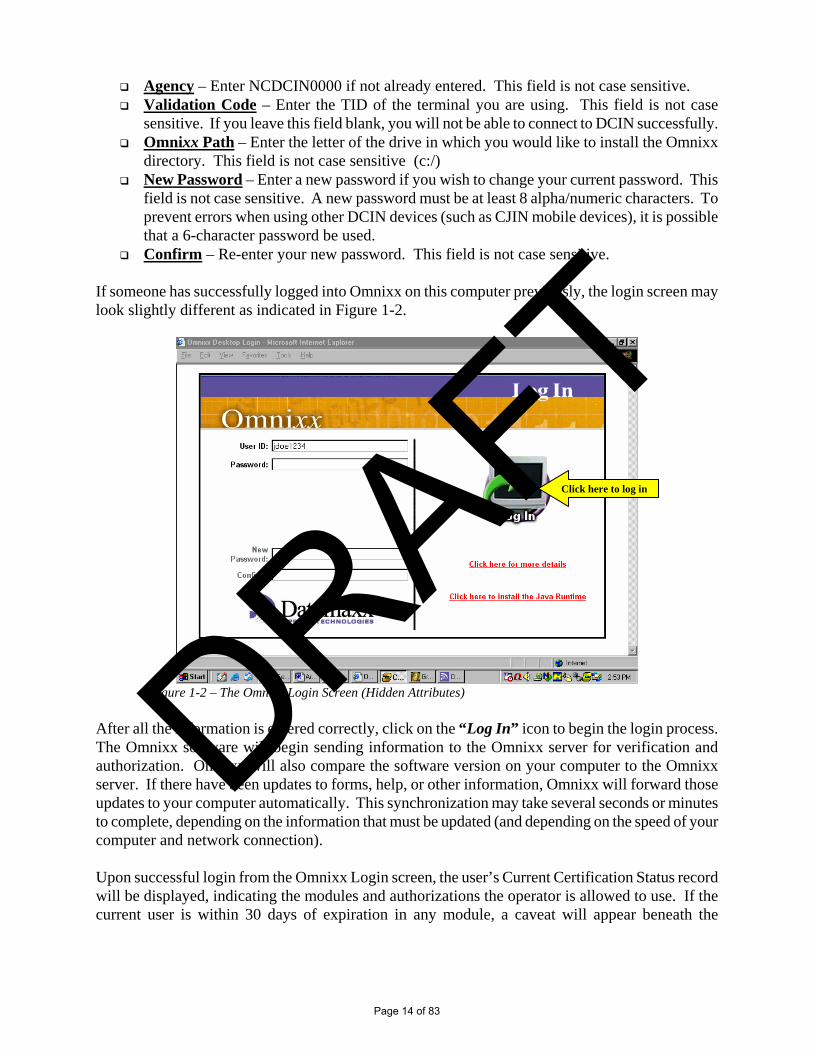
Agency – Enter NCDCIN0000 if not already entered. This field is not case sensitive. Validation Code – Enter the TID of the terminal you are using. This field is not case
sensitive. If you leave this field blank, you will not be able to connect to DCIN successfully. Omnixx Path – Enter the letter of the drive in which you would like to install the Omnixx
directory. This field is not case sensitive (c:/) New Password – Enter a new password if you wish to change your current password. This
field is not case sensitive. A new password must be at least 8 alpha/numeric characters. To prevent errors when using other DCIN devices (such as CJIN mobile devices), it is possible that a 6-character password be used.
Confirm – Re-enter your new password. This field is not case sensitive. If someone has successfully logged into Omnixx on this computer previously, the login screen may look slightly different as indicated in Figure 1-2.
Figure 1-2 – The Omnixx Login Screen (Hidden Attributes) After all the information is entered correctly, click on the “Log In” icon to begin the login process. The Omnixx software will begin sending information to the Omnixx server for verification and authorization. Omnixx will also compare the software version on your computer to the Omnixx server. If there have been updates to forms, help, or other information, Omnixx will forward those updates to your computer automatically. This synchronization may take several seconds or minutes to complete, depending on the information that must be updated (and depending on the speed of your computer and network connection). Upon successful login from the Omnixx Login screen, the user’s Current Certification Status record will be displayed, indicating the modules and authorizations the operator is allowed to use. If the current user is within 30 days of expiration in any module, a caveat will appear beneath the
Click here to log in
Page 14 of 83
DRAFT
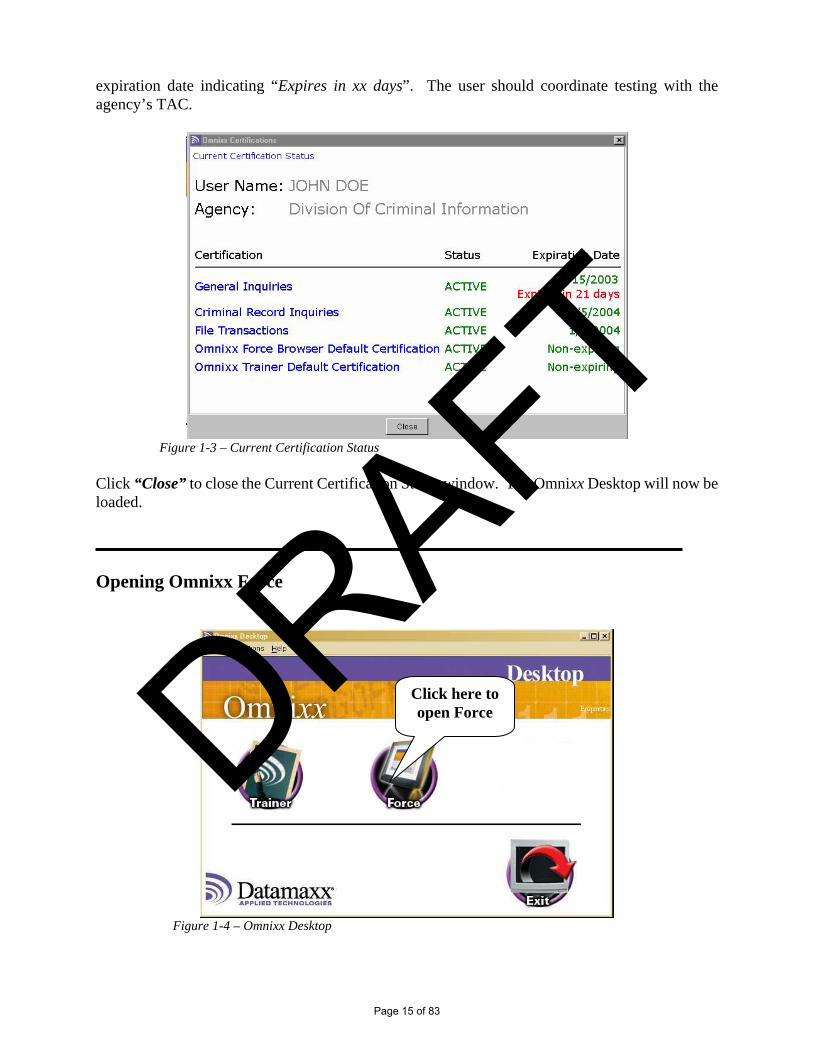
expiration date indicating “Expires in xx days”. The user should coordinate testing with the agency’s TAC.
Figure 1-3 – Current Certification Status Click “Close” to close the Current Certification Status window. The Omnixx Desktop will now be loaded. Opening Omnixx Force
Figure 1-4 – Omnixx Desktop
Click here to open Force
Page 15 of 83
DRAFT

Once the Omnixx Desktop has been loaded, you should see three icons – Force, Trainer and Exit. Force is the application that accesses traditional DCIN transactions. Trainer is used for certification test administration. The Exit icon will log the user off the Omnixx desktop. Click on the icon for the Omnixx Force application. The Omnixx Force application window is then displayed and the user can begin to run desired transactions.
Figure 1.5 – Omnixx Force Application Window (User Interface) Student Exercise: (With Direct Supervision:) – Log on 1. Have the student click on Omnixx Desktop Login Icon and open Omnixx. 2. Explain each field on the screen and what information is contained there.
User ID - Explain to the operator that their User ID is the first initial of their first name, their full last name (up to 12 Characters) and the last four digits of their agency assigned number.
This window is called the Force User Interface
and will be the “main” window for Force
Page 16 of 83
DRAFT
Password - This field is used to sign on once the password has been established. Since this student has not established their password yet, advise them that they need to establish the new password first.
New Password - This field is used to establish the password for the very first time, and can be used in conjunction with the other two password fields to change a password at a later date. Advise the student that this password should be something that they will remember, because if they forget it, they will not be able to sign into the system until they have gone through a procedure to re-establish the password. It must be at least 8 characters long and must contain both letters, numbers and at least one special character. To prevent errors when using other DCIN devices (such as CJIN mobile devices), it is possible that a 6-character password be used. Refer to Appendix 2 – Omnixx Passwords on page 19.
Retype New Password - This field is used to verify that they have typed the password field correctly. Since the password does not show up on the screen as you type it, this is to ensure that no errors were made in typing in the desired password.
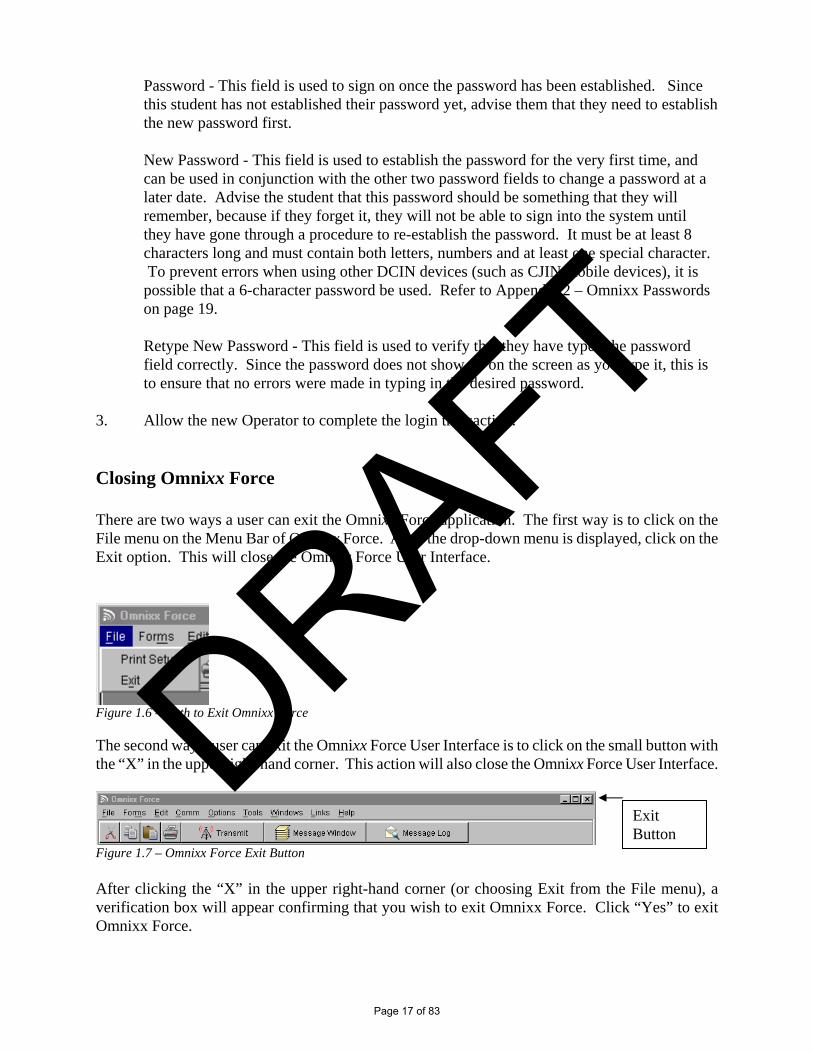
3. Allow the new Operator to complete the login transaction. Closing Omnixx Force There are two ways a user can exit the Omnixx Force application. The first way is to click on the File menu on the Menu Bar of Omnixx Force. After the drop-down menu is displayed, click on the Exit option. This will close the Omnixx Force User Interface.
Figure 1.6 – Path to Exit Omnixx Force The second way a user can exit the Omnixx Force User Interface is to click on the small button with the “X” in the upper right-hand corner. This action will also close the Omnixx Force User Interface.
Figure 1.7 – Omnixx Force Exit Button After clicking the “X” in the upper right-hand corner (or choosing Exit from the File menu), a verification box will appear confirming that you wish to exit Omnixx Force. Click “Yes” to exit Omnixx Force.
Exit Button
Page 17 of 83
DRAFT
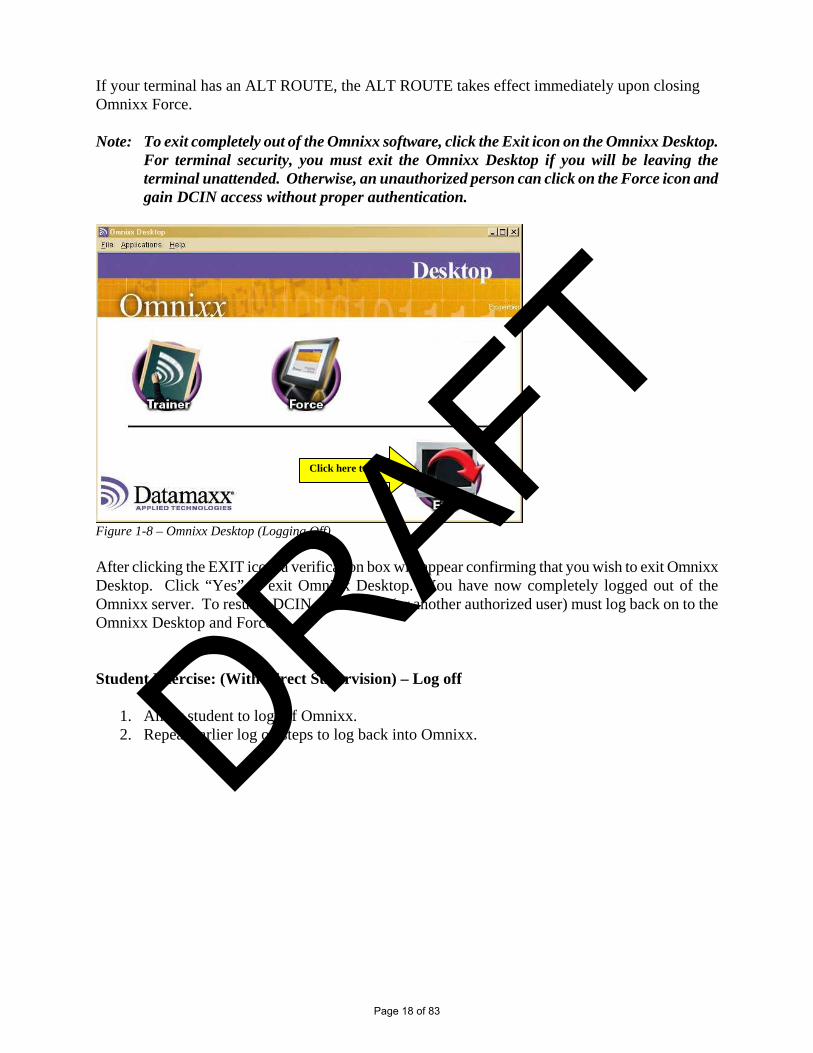
If your terminal has an ALT ROUTE, the ALT ROUTE takes effect immediately upon closing Omnixx Force. Note: To exit completely out of the Omnixx software, click the Exit icon on the Omnixx Desktop.
For terminal security, you must exit the Omnixx Desktop if you will be leaving the terminal unattended. Otherwise, an unauthorized person can click on the Force icon and gain DCIN access without proper authentication.
Figure 1-8 – Omnixx Desktop (Logging Off) After clicking the EXIT icon, a verification box will appear confirming that you wish to exit Omnixx Desktop. Click “Yes” to exit Omnixx Desktop. You have now completely logged out of the Omnixx server. To resume DCIN access, you (or another authorized user) must log back on to the Omnixx Desktop and Force. Student Exercise: (With Direct Supervision) – Log off
1. Allow student to log off Omnixx. 2. Repeat earlier log on steps to log back into Omnixx.
Click here to exit
Page 18 of 83
DRAFT
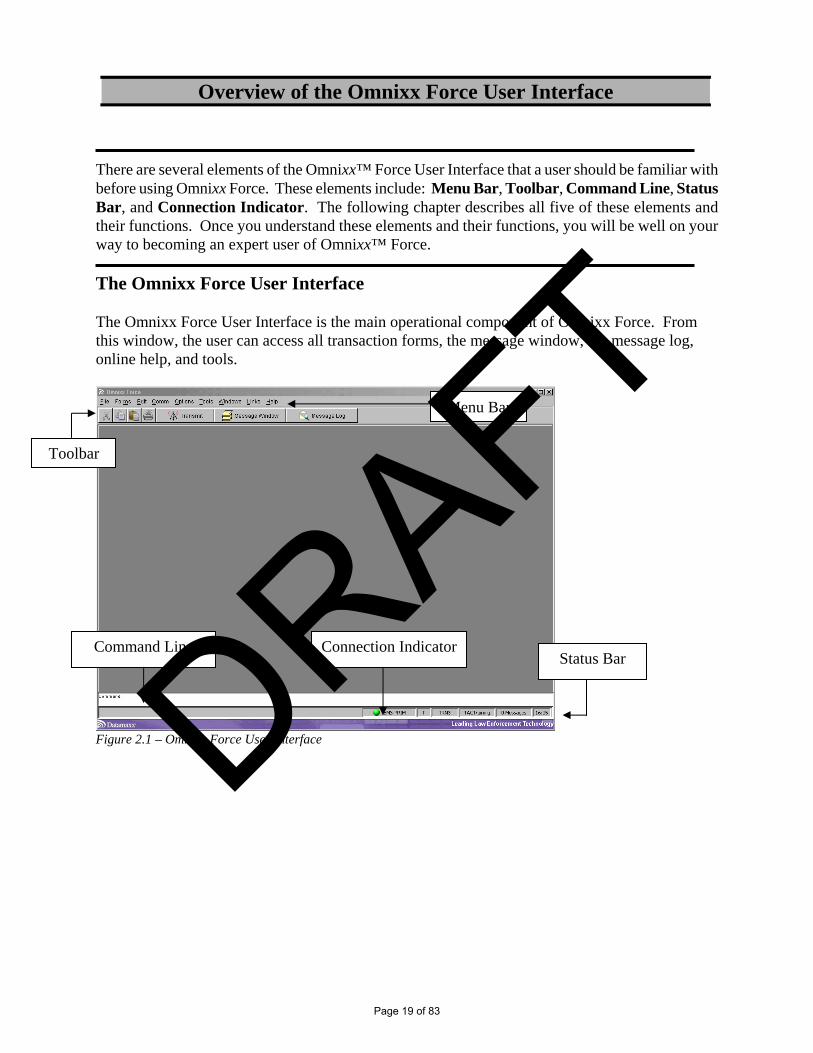
There are several elements of the Omnixx™ Force User Interface that a user should be familiar with before using Omnixx Force. These elements include: Menu Bar, Toolbar, Command Line, Status Bar, and Connection Indicator. The following chapter describes all five of these elements and their functions. Once you understand these elements and their functions, you will be well on your way to becoming an expert user of Omnixx™ Force. The Omnixx Force User Interface The Omnixx Force User Interface is the main operational component of Omnixx Force. From this window, the user can access all transaction forms, the message window, the message log, online help, and tools.
Figure 2.1 – Omnixx Force User Interface
Overview of the Omnixx Force User Interface
Toolbar
Menu Bar
Connection Indicator Command Line Status Bar
Page 19 of 83
DRAFT
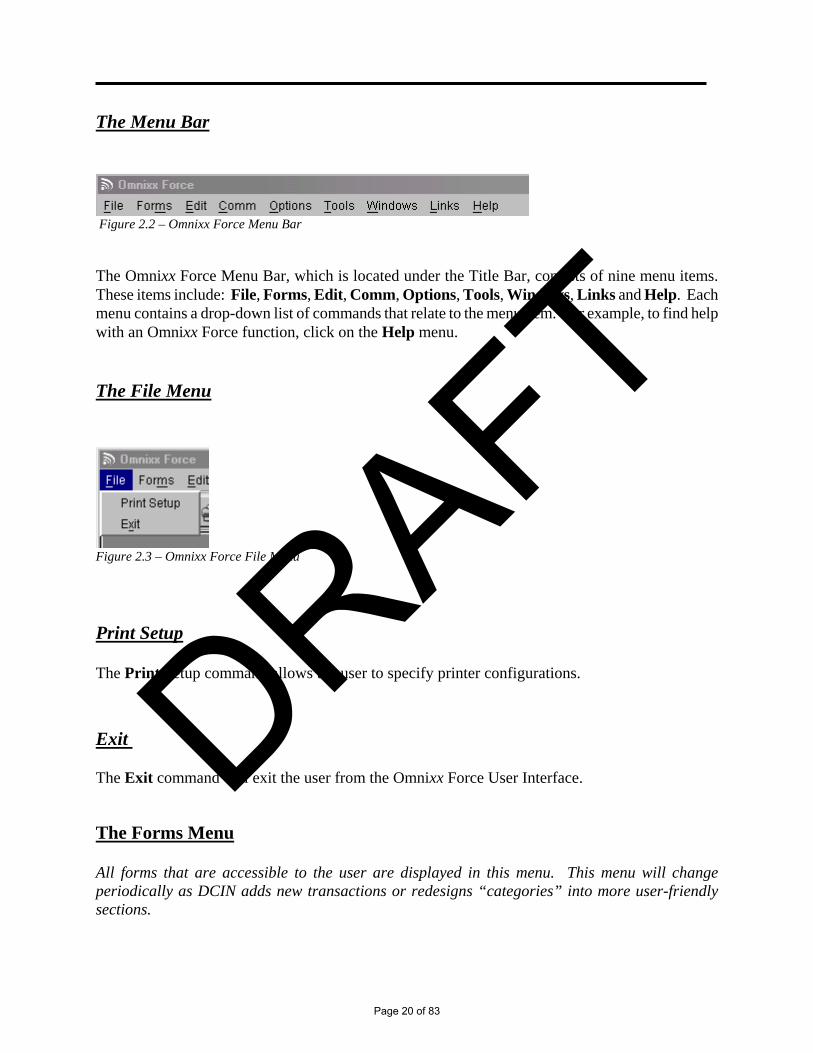
The Menu Bar
Figure 2.2 – Omnixx Force Menu Bar
The Omnixx Force Menu Bar, which is located under the Title Bar, consists of nine menu items. These items include: File, Forms, Edit, Comm, Options, Tools, Windows, Links and Help. Each menu contains a drop-down list of commands that relate to the menu item. For example, to find help with an Omnixx Force function, click on the Help menu.
The File Menu
Figure 2.3 – Omnixx Force File Menu
Print Setup
The Print Setup command allows the user to specify printer configurations.
Exit The Exit command will exit the user from the Omnixx Force User Interface.
The Forms Menu
All forms that are accessible to the user are displayed in this menu. This menu will change periodically as DCIN adds new transactions or redesigns “categories” into more user-friendly sections.
Page 20 of 83
DRAFT
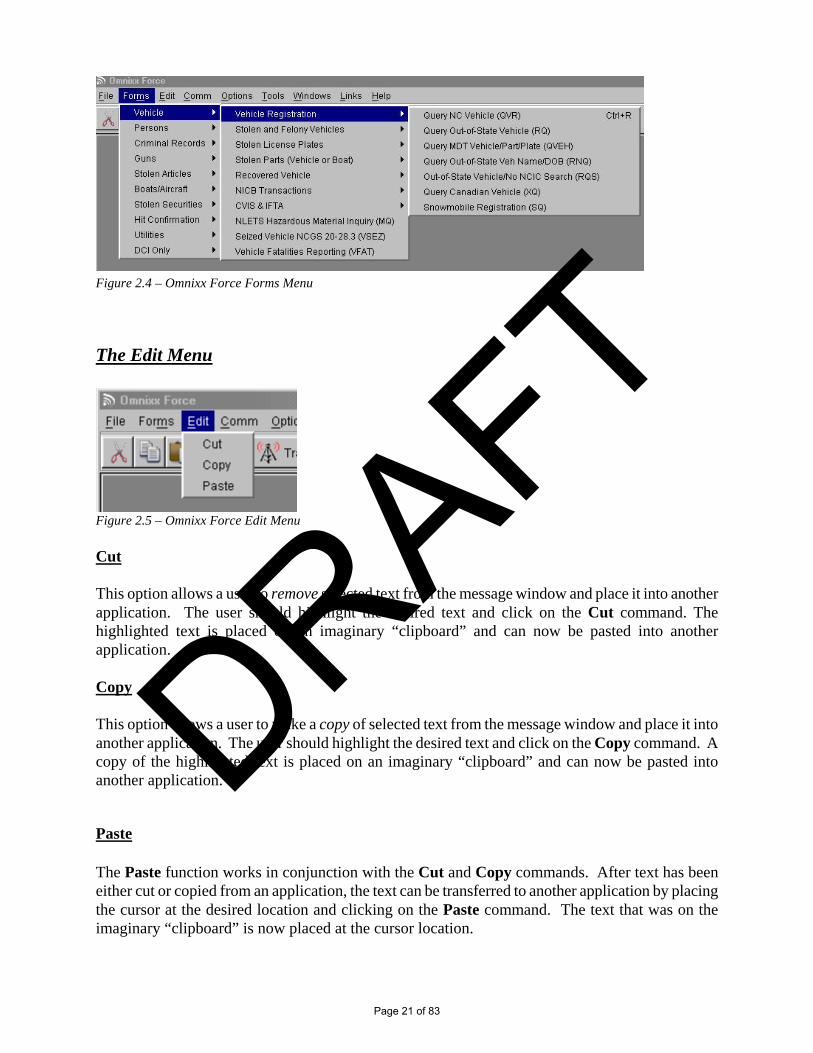
Figure 2.4 – Omnixx Force Forms Menu
The Edit Menu
Figure 2.5 – Omnixx Force Edit Menu Cut This option allows a user to remove selected text from the message window and place it into another application. The user should highlight the desired text and click on the Cut command. The highlighted text is placed on an imaginary “clipboard” and can now be pasted into another application. Copy This option allows a user to make a copy of selected text from the message window and place it into another application. The user should highlight the desired text and click on the Copy command. A copy of the highlighted text is placed on an imaginary “clipboard” and can now be pasted into another application.
Paste
The Paste function works in conjunction with the Cut and Copy commands. After text has been either cut or copied from an application, the text can be transferred to another application by placing the cursor at the desired location and clicking on the Paste command. The text that was on the imaginary “clipboard” is now placed at the cursor location.
Page 21 of 83
DRAFT

The Comm Menu
Figure 2.6 – The Comm Menu Transmit The Transmit function allows the user to transmit a form that has been completed. The user can also transmit by using the Transmit icon on the Toolbar or by pressing Ctrl + T on the keyboard.
The Options Menu
Figure 2.7 – The Options Menu Auto Switch to Message Window* When this function is enabled, the Message Window will automatically open and appear on the Force User Interface whenever a message is received. Omnixx will also display the number of new unread messages in the Status Bar and will activate an audible alert until the messages are read. This function is automatically enabled with each user sign-in, but the user can manually turn this function off by disabling the function in this menu. Auto Print When this feature is enabled, all incoming messages will be printed without any necessary action from the user.
View Command Bar* When this function is enabled, the Command Bar is visible near the bottom of the Force User Interface. This Command Bar allows the user to quickly retrieve specific forms by using the message key without having to use the Forms Menu. This feature is described in more detail later in this manual.
Write Trace File
Page 22 of 83
DRAFT

When this function is enabled, it creates a trace file that can be used to diagnose software problems by technical support staff. This option should be deactivated (not checked) unless the user is requested to activate it for diagnostics by technical support staff.
Check for Form Updates By selecting this option, Omnixx Force will automatically query the Omnixx server for new forms and any associated elements every time a form is opened, and then update these forms if necessary. Since this check is performed during each log-in, this feature should not be activated. * Note: These two options are set as the standard default. Each time a user accesses Omnixx Force, these two options are checked (activated). If an agency wishes to change the default permanently, contact the DOJ Customer Support Center at 919-773-7900.
The Tools Menu
Figure 2.8 – The Tools Menu Synch Files with the Repository This menu item will cause Omnixx to completely reload all forms, help files, and other data to the user’s computer. This will be a very large download and should be done only if the user has been instructed to do so by technical support staff. Message Window This menu item will open the Omnixx Force Message Window where the user will view all messages from the current session. Please see Chapter 4 – “The Omnixx Force Message Window and Message Logs” for more detailed information on this feature.
Page 23 of 83
DRAFT

Figure 2.9 – Omnixx Force Message Window Message Log The Message Log feature allows the user to search and view messages that were sent and received during previous sessions of Omnixx Force. This feature is described in greater detail in Chapter 4 – “The Omnixx Force Message Window and Message Logs”.
Figure 2.10 – Omnixx Force Message Log
Page 24 of 83
DRAFT
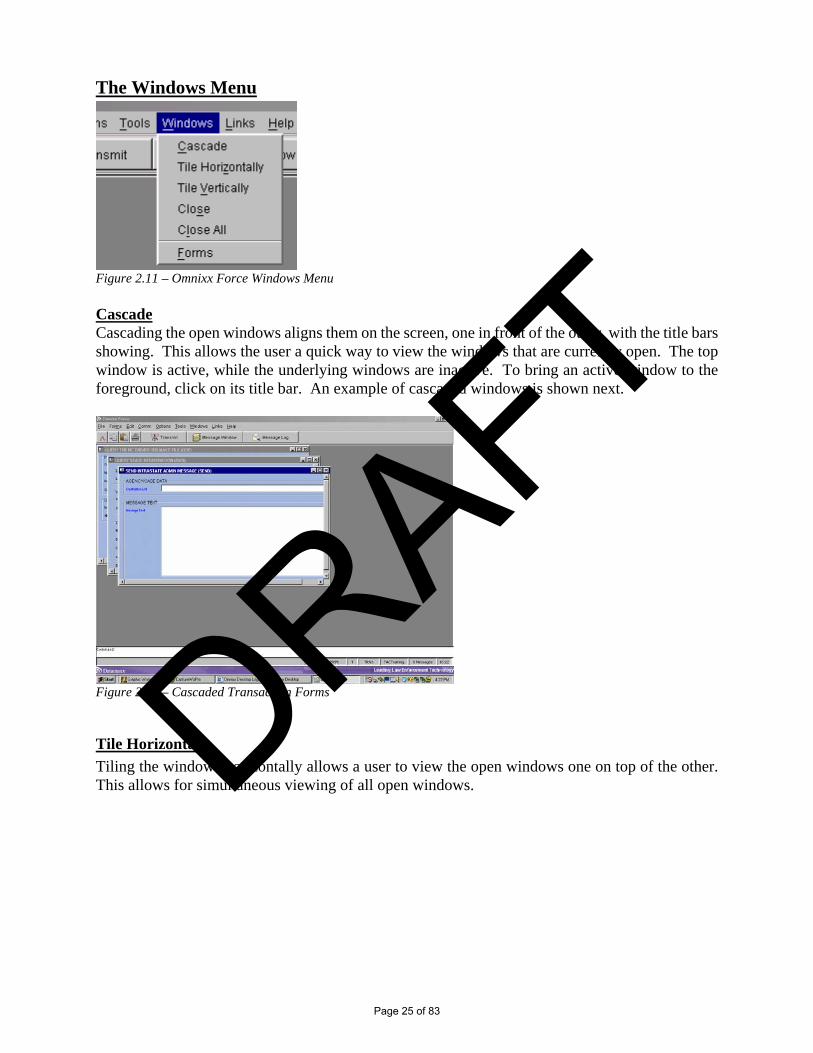
The Windows Menu
Figure 2.11 – Omnixx Force Windows Menu Cascade Cascading the open windows aligns them on the screen, one in front of the other, with the title bars showing. This allows the user a quick way to view the windows that are currently open. The top window is active, while the underlying windows are inactive. To bring an active window to the foreground, click on its title bar. An example of cascaded windows is shown next.
Figure 2.12 – Cascaded Transaction Forms
Tile Horizontal
Tiling the windows horizontally allows a user to view the open windows one on top of the other. This allows for simultaneous viewing of all open windows.
Page 25 of 83
DRAFT

Figure 2.13 – Transaction Forms Tiled Horizontally
Tile Vertical
Tiling the windows vertically allows a user to view the open windows side by side. This allows for simultaneous viewing of all open windows.
Figure 2.14 –Transaction Forms Tiled Vertically
Close
The Close command will close the current active window.
Close All The Close All command will close all open windows in the Omnixx Force interface, but will not exit the program.
Page 26 of 83
DRAFT
Forms The Forms command will open a list box that allows the user to select which form should be the “primary” form (form on top of all other open forms). This is beneficial when multiple forms have been opened.
The Links Menu This section houses general help information regarding DCIN hot files, TAC information, the DCIN monthly notices, “Agencies in North Carolina” information, routing list information and various investigative forms. This section is subject to change as DCIN continues to expand this portion of the Omnixx software. This is a great resource for all DCIN operators.
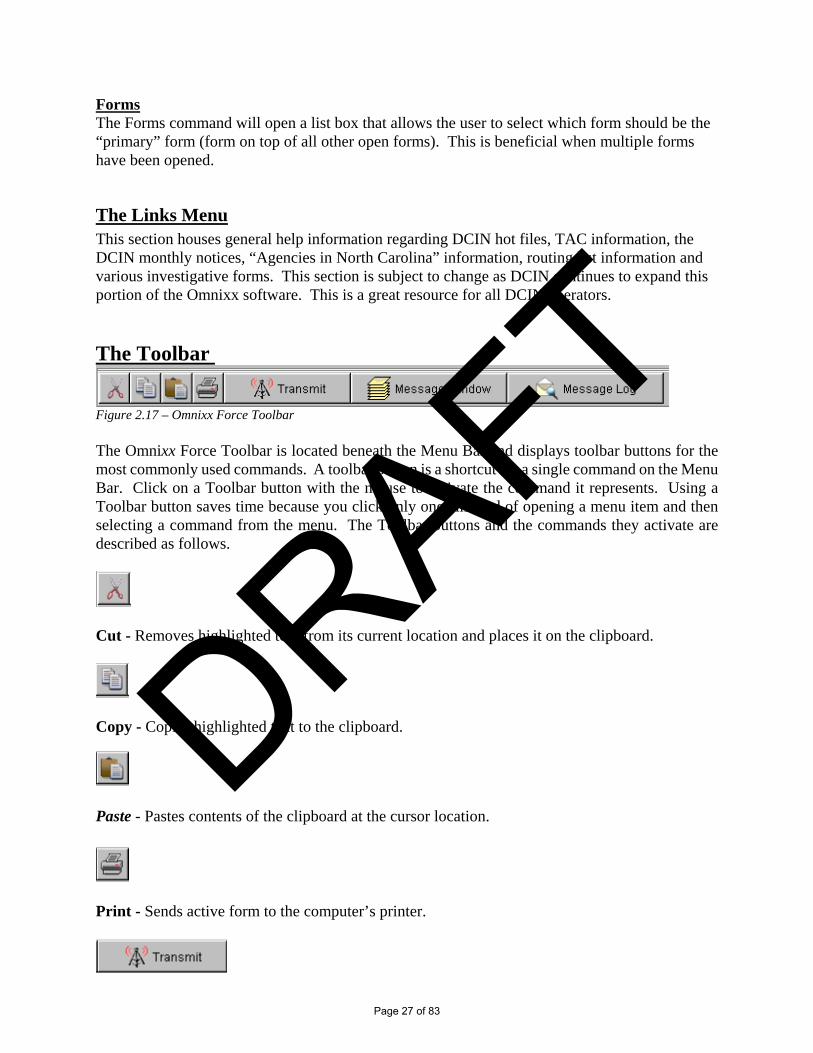
The Toolbar
Figure 2.17 – Omnixx Force Toolbar The Omnixx Force Toolbar is located beneath the Menu Bar and displays toolbar buttons for the most commonly used commands. A toolbar button is a shortcut for a single command on the Menu Bar. Click on a Toolbar button with the mouse to activate the command it represents. Using a Toolbar button saves time because you click only once instead of opening a menu item and then selecting a command from the menu. The Toolbar buttons and the commands they activate are described as follows.
Cut - Removes highlighted text from its current location and places it on the clipboard.
Copy - Copies highlighted text to the clipboard.
Paste - Pastes contents of the clipboard at the cursor location.
Print - Sends active form to the computer’s printer.
Page 27 of 83
DRAFT
Transmit - Transmits a completed transaction form for processing by DCIN.
Message Window - Opens Message Window to display messages received or sent during this Force session.
Message Log - Open Message Log so the user can search for messages in the current message folder or archived logs.
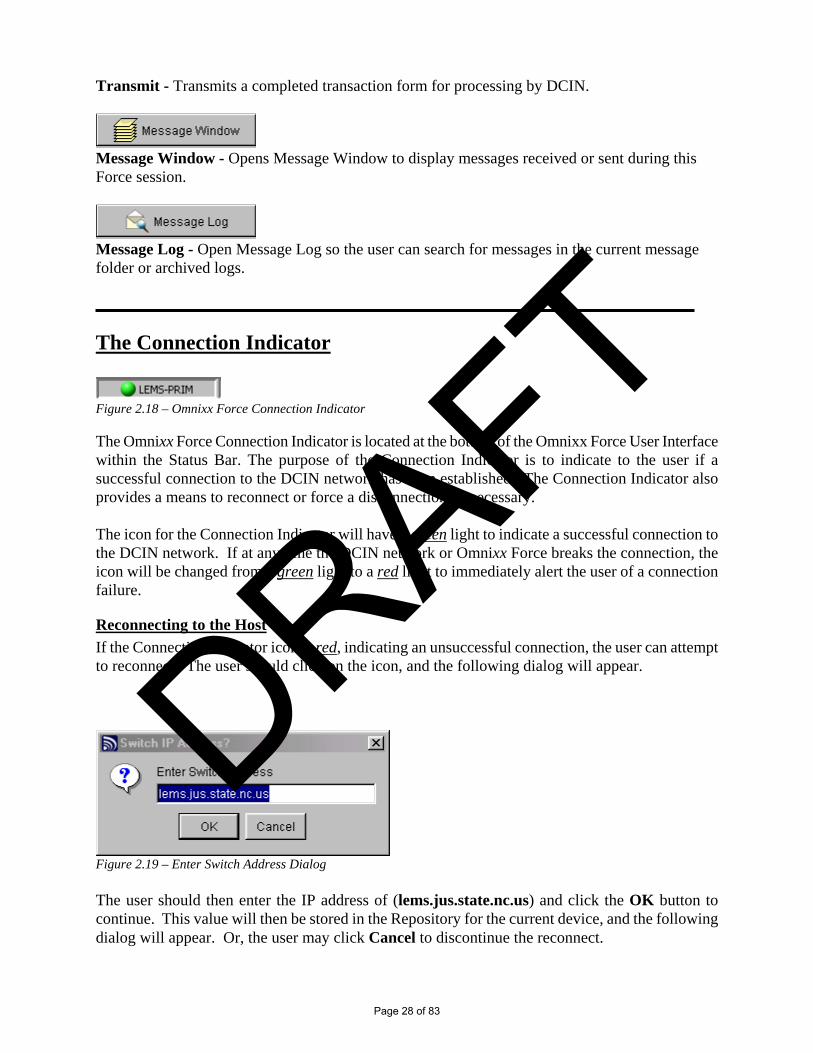
The Connection Indicator
Figure 2.18 – Omnixx Force Connection Indicator The Omnixx Force Connection Indicator is located at the bottom of the Omnixx Force User Interface within the Status Bar. The purpose of the Connection Indicator is to indicate to the user if a successful connection to the DCIN network has been established. The Connection Indicator also provides a means to reconnect or force a disconnection, if necessary. The icon for the Connection Indicator will have a green light to indicate a successful connection to the DCIN network. If at any time the DCIN network or Omnixx Force breaks the connection, the icon will be changed from a green light to a red light to immediately alert the user of a connection failure.
Reconnecting to the Host If the Connection Indicator icon is red, indicating an unsuccessful connection, the user can attempt to reconnect. The user should click on the icon, and the following dialog will appear.
Figure 2.19 – Enter Switch Address Dialog The user should then enter the IP address of (lems.jus.state.nc.us) and click the OK button to continue. This value will then be stored in the Repository for the current device, and the following dialog will appear. Or, the user may click Cancel to discontinue the reconnect.
Page 28 of 83
DRAFT

Figure 2.20 – Enter Switch Port Dialog At this point, the user will need to enter the Switch Port (4000) and click the OK button to initiate the reconnect. This value will then be stored in the Repository for the current device, and a connection will be attempted. To terminate the attempted connection, click the Cancel button. If the connection fails, an error message will be displayed describing the error and the icons will remain red to indicate the failed attempt to connect. The following dialog will be displayed.
Figure 2.21 – Omnixx Force “Can’t Connect to Server” Screen If the connection was unsuccessful, the user should contact NC DOJ Customer Support Center at 919-773-7900. If the connection is successful, the icon will change to a green light to indicate to the user the device is now connected with the DCINN network.
The Command Bar The Command Bar, which is located near the bottom of the screen above the Status Bar, provides for quick keyboard access to commonly used forms. If you know the message key to a particular form, you can quickly access that form using the Command Bar without having to use the Forms Menu. This is explained in greater detail later in this manual. If the Command Bar is not displayed on the Force User Interface, click on Options in the Force Menu Bar, then select View Command Bar.
Figure 2.22 – The Omnixx Force Command Bar
The Status Bar The Status Bar, which is located at the bottom of the screen beneath the Command Bar, provides information regarding the current status of your machine.
Page 29 of 83
DRAFT
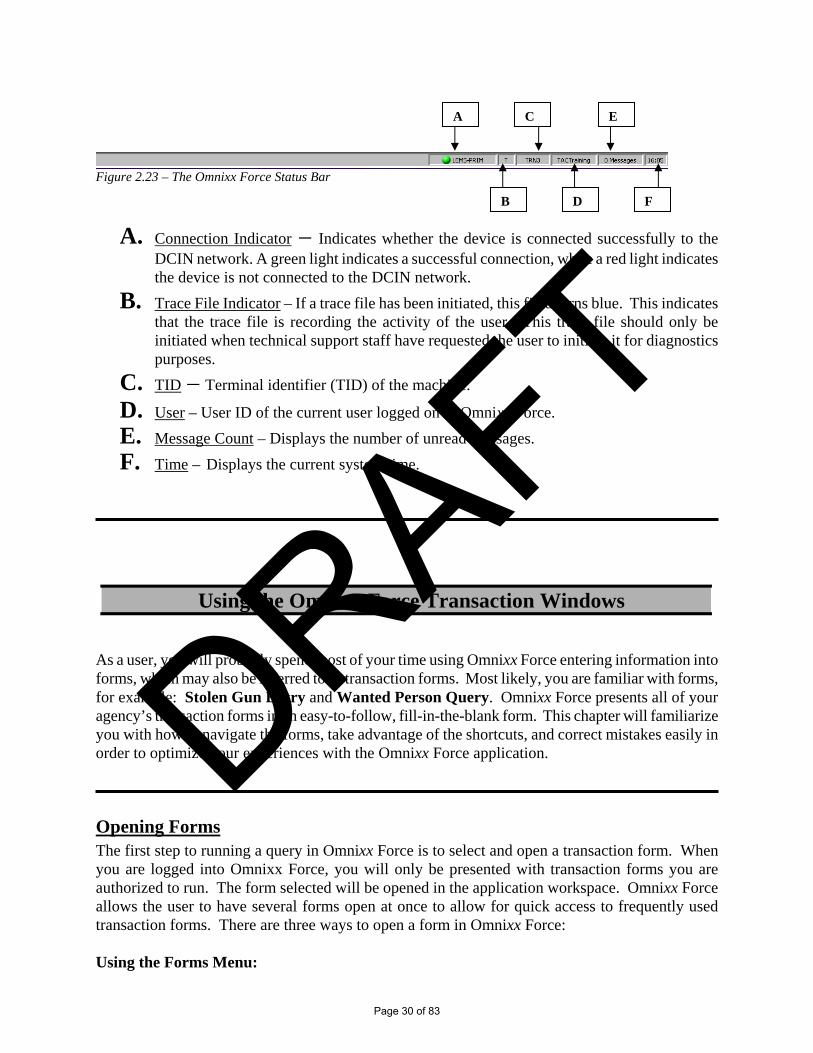
Figure 2.23 – The Omnixx Force Status Bar
A. Connection Indicator – Indicates whether the device is connected successfully to the DCIN network. A green light indicates a successful connection, while a red light indicates the device is not connected to the DCIN network.
B. Trace File Indicator – If a trace file has been initiated, this field turns blue. This indicates that the trace file is recording the activity of the user. This trace file should only be initiated when technical support staff have requested the user to initiate it for diagnostics purposes.
C. TID – Terminal identifier (TID) of the machine. D. User – User ID of the current user logged on to Omnixx Force. E. Message Count – Displays the number of unread messages. F. Time – Displays the current system time.
As a user, you will probably spend most of your time using Omnixx Force entering information into forms, which may also be referred to as transaction forms. Most likely, you are familiar with forms, for example: Stolen Gun Entry and Wanted Person Query. Omnixx Force presents all of your agency’s transaction forms in an easy-to-follow, fill-in-the-blank form. This chapter will familiarize you with how to navigate the forms, take advantage of the shortcuts, and correct mistakes easily in order to optimize your experiences with the Omnixx Force application.
Opening Forms The first step to running a query in Omnixx Force is to select and open a transaction form. When you are logged into Omnixx Force, you will only be presented with transaction forms you are authorized to run. The form selected will be opened in the application workspace. Omnixx Force allows the user to have several forms open at once to allow for quick access to frequently used transaction forms. There are three ways to open a form in Omnixx Force: Using the Forms Menu:
Using the Omnixx Force Transaction Windows
A
B
C
D
E
F
Page 30 of 83
DRAFT
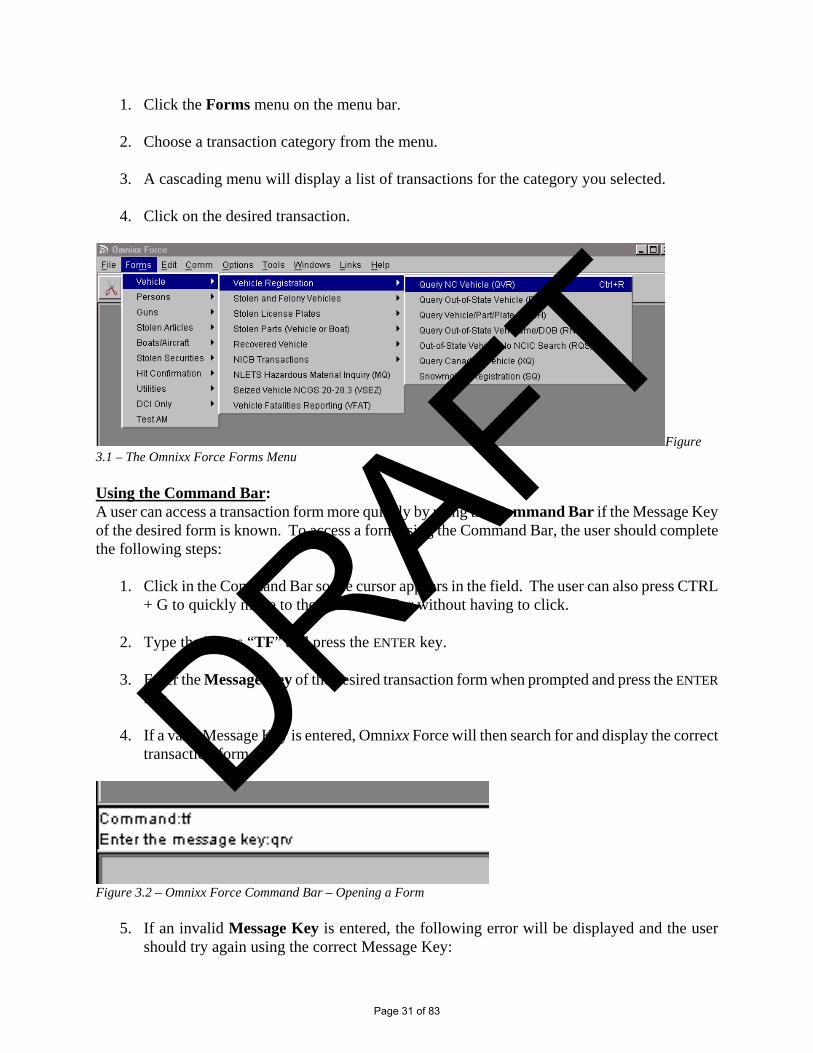
1. Click the Forms menu on the menu bar. 2. Choose a transaction category from the menu. 3. A cascading menu will display a list of transactions for the category you selected.
4. Click on the desired transaction.
Figure 3.1 – The Omnixx Force Forms Menu Using the Command Bar: A user can access a transaction form more quickly by using the Command Bar if the Message Key of the desired form is known. To access a form using the Command Bar, the user should complete the following steps:
1. Click in the Command Bar so the cursor appears in the field. The user can also press CTRL + G to quickly move to the Command Bar without having to click.
2. Type the letters “TF” and press the ENTER key. 3. Enter the Message Key of the desired transaction form when prompted and press the ENTER
key.
4. If a valid Message Key is entered, Omnixx Force will then search for and display the correct transaction form.
Figure 3.2 – Omnixx Force Command Bar – Opening a Form
5. If an invalid Message Key is entered, the following error will be displayed and the user should try again using the correct Message Key:
Page 31 of 83
DRAFT

Figure 3.3 – Omnixx Force Command Bar – Error Message
“Hot keys” A user can quickly access commonly used forms by pressing the CTRL key and the associated letter for the “hot key” on the keyboard. These keys are programmable only by DOJ/IT staff. There are currently only three hot keys programmed:
CTRL + D – NC Driver’s Inquiry CTRL + R – NC Vehicle Registration Inquiry CTRL + N – SEND form (instate text message)
Cursor Movement The TAB key will move the cursor forward through the fields in an Omnixx Force transaction form, one field at a time. Pressing SHIFT + TAB will move the cursor backwards through the fields in an Omnixx Force transaction form, one field at a time.
Elements of a Transaction Form
Figure 3.4 – An Omnixx Force Transaction Form
Page 32 of 83
DRAFT

Fields and Groups A Field is a single text box that is used for entering information.
Figure 3.5 – An Omnixx Force Field A Group is a collection of related fields in an Omnixx Force transaction form. A form can be comprised of one or more groups. For example, the following figure illustrates the “Gun Data” group.
Figure 3.6 – An Omnixx Force “Gun Data” Group Mandatory Fields A Mandatory Field is a field that must be completed in order to transmit an Omnixx Force transaction form. These fields may also be referred to as required fields. Blue colored text is used for the field label on a mandatory field; non-mandatory field labels are in black text. If one of these mandatory fields is not completed, the transaction form will be rejected upon transmission. For this reason, Omnixx Force will not allow a user to TAB out of a mandatory field without first entering valid information. Note: There are also “conditionally” mandatory fields on most forms. For example, when
entering a stolen vehicle, the following fields are mandatory if the license plate was used in the entry: license state of issuance, license plate year of expiration, and license plate type. Omnixx uses black text for all fields that are not always mandatory. To determine the mandatory fields for a form, use Form Help for that specific form (discussed later in this manual). If a user attempts to transmit a form that is missing conditionally mandatory fields, the form will be rejected. The user must correct the error and re-transmit the form.
List Boxes A List Box is a field that contains a pop-up list of valid entries for a particular field (i.e.–NCIC codes) from which you can choose. A user can manually type in the information or choose an item from the pop-up menu. A field that contains a list box is designated by a small box with three dots, located to the right of the field. To access the pop-up menu, click on the box with your mouse, or use the CTRL + DOWN ARROW key command. In the following example, the “Test Indicator” field List Box is shown. To select the desired entry, double-click on it with the mouse and the correct code will be populated into the field. Or, use the up and down arrow keys until the desired code is highlighted and press the SPACE BAR to populate the field with the correct code.
Page 33 of 83
DRAFT
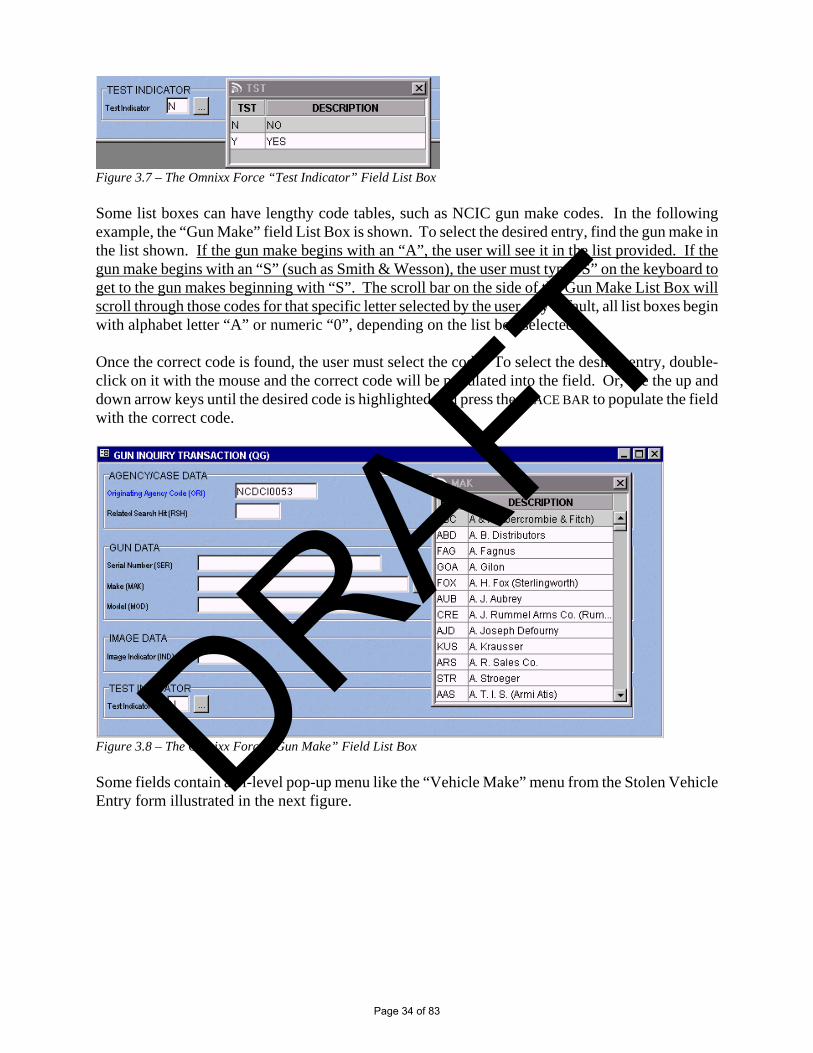
Figure 3.7 – The Omnixx Force “Test Indicator” Field List Box Some list boxes can have lengthy code tables, such as NCIC gun make codes. In the following example, the “Gun Make” field List Box is shown. To select the desired entry, find the gun make in the list shown. If the gun make begins with an “A”, the user will see it in the list provided. If the gun make begins with an “S” (such as Smith & Wesson), the user must type “S” on the keyboard to get to the gun makes beginning with “S”. The scroll bar on the side of the Gun Make List Box will scroll through those codes for that specific letter selected by the user. By default, all list boxes begin with alphabet letter “A” or numeric “0”, depending on the list box selected. Once the correct code is found, the user must select the code. To select the desired entry, double-click on it with the mouse and the correct code will be populated into the field. Or, use the up and down arrow keys until the desired code is highlighted and press the SPACE BAR to populate the field with the correct code.
Figure 3.8 – The Omnixx Force “Gun Make” Field List Box Some fields contain a bi-level pop-up menu like the “Vehicle Make” menu from the Stolen Vehicle Entry form illustrated in the next figure.
Page 34 of 83
DRAFT

Figure 3.9 – The Omnixx Force “Vehicle Make” Bi-level Pop-up Menu The top-pane of the menu contains a list of categories to choose from. Highlight the appropriate category, and the list of possible codes for that category will be displayed in the bottom pane. To change the focus from the top pane to the bottom pane, press the SHIFT key. The desired code can now be selected from the list. You can use the up and down arrow keys to move you through the codes, or you can use the scroll bar on the right. If the vehicle make begins with an “A”, the user will see it in the list provided. If the vehicle make begins with an “F” (such as Ford), the user must type “F” on the keyboard to get to the vehicle makes beginning with “F”. The scroll bar on the side of the Vehicle Make List Box will scroll through those codes for that specific letter selected by the user. By default, all list boxes begin with alphabet letter “A” or numeric “0”, depending on the list box selected. Either double-click on the desired code, or press the SPACE BAR when the correct code is highlighted.
Transmitting a Form After you have finished entering all of the information into a transaction form, you will want to Transmit that form for processing. Omnixx Force gives you several ways to accomplish this. But remember to make sure all mandatory fields have been completed before attempting to transmit. To transmit a transaction form, perform one of the following: Click the Transmit icon on the toolbar. Click on the Comm menu, and select Transmit. Press CTRL + T.
Page 35 of 83
DRAFT
Getting Help in the Omnixx Force Forms Omnixx Force gives you access to useful features in the event that you need help while entering information into a transaction form. These features are: Field Help and Form Help. This section will describe in detail how these features can be beneficial to you, as well as how to access them.
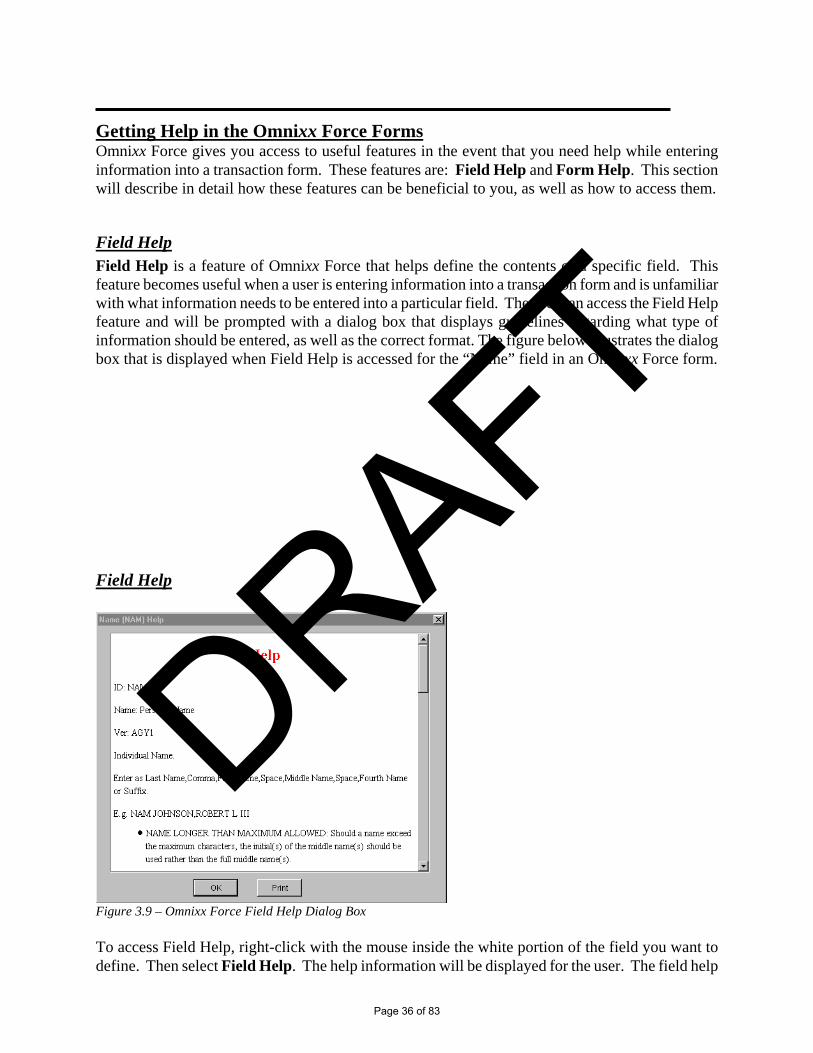
Field Help Field Help is a feature of Omnixx Force that helps define the contents of a specific field. This feature becomes useful when a user is entering information into a transaction form and is unfamiliar with what information needs to be entered into a particular field. The user can access the Field Help feature and will be prompted with a dialog box that displays guidelines regarding what type of information should be entered, as well as the correct format. The figure below illustrates the dialog box that is displayed when Field Help is accessed for the “Name” field in an Omnixx Force form.
Field Help
Figure 3.9 – Omnixx Force Field Help Dialog Box To access Field Help, right-click with the mouse inside the white portion of the field you want to define. Then select Field Help. The help information will be displayed for the user. The field help
Page 36 of 83
DRAFT

may be printed if desired. Once the user is finished reading Field Help, the user must click OK or press the Esc key on the keyboard.
Form Help Form Help consists of a pop-up dialog box that provides helpful information regarding a particular transaction form. Form Help contains information regarding the purpose of the form in question (when to use the form). Form Help also contains the mandatory and conditionally mandatory field information. This information appears in blue text so that it can be found quickly. To see the mandatory field information, scroll to the end of the Form Help. To access Form Help, place your cursor in the desired transaction form on any of the blue background (not inside a field) and right click with your mouse. Then select Form Help with your mouse.
Form Help
Page 37 of 83
DRAFT

Figure 3.10 – Omnixx Force Form Help
Page 38 of 83
DRAFT

Just as it is important to be able to send transactions to the host network, it is equally as important to be able to view the responses to your transactions at your workstation. Also, you will probably want to print some, if not all, of these responses. This will all take place in the Omnixx Force Message Window. It is also important that you be able to search previous messages that may have already been deleted from the Message Window. All incoming and outgoing network messages will be stored in the Message Logs. These Message Logs are stored locally on your device’s hard drive and can be searched to find a specific message, in the event you need to access one of these previously deleted messages. In this chapter, you will learn how to read, print, and delete the responses from your message window. You will also learn how to archive messages and go back and search for specific messages from the log that has been previously erased from the message window.
The Omnixx Force Message Window
Figure 4.1 – Omnixx Force Message Window
A. Start Date – The Start Date notifies the user of the date and time of the earliest message that has been received into the Message Window.
D
E
F
A B
G
C
Page 39 of 83
DRAFT
B. End Date – The End Date notifies the user of the date and time of the most recent message that has been received into the Message Window.
C. Message Summary Area – The Message Summary Area gives the user information regarding a particular message. The date and time of the message, as well as the type, are displayed. A message summary in bold font indicates that particular message has not been read by the user.
D. Selection Checkboxes – Some commands allow a user to work with more than one message at a time. Enabling the selection box on a message indicates that the message is to be included in one of these commands. For example, a user may print multiple messages at once by enabling the checkbox next to several messages and then executing the Print command.
E. Message Icons – These icons notify the user if a particular message was sent or received. The “outbox” icon indicates a sent message and the envelope icon indicates a received message. If the envelope is closed, the user has not read (opened) that particular message. If the envelope is open, the user has read (opened) the message at least once.
F. Type – The Type is another indicator to the user if the message was sent or received.
G. Image – The Image indicator informs the user if there is an image associated with that particular message.
The Omnixx Force Message Window Menu Bar The Omnixx Force Message Window Menu Bar contains two elements, the File Menu and Edit Menu.
The File Menu contains the following functions: Print
The Print command will print the message(s) that were selected by the user. A user selects a message by clicking in the box on the left of the Message Window. A user can also select multiple messages to print. Omnixx will “merge” these messages together into a text document and send to the printer. This “merge print” option allows the user to save paper by printing multiple messages together on a single sheet of paper. Each message is separated by a line to make it easy to read and understand when printed.
Exit The Exit command will close the Message Window.
The Omnixx Force Message Window and Message Log
Page 40 of 83
DRAFT
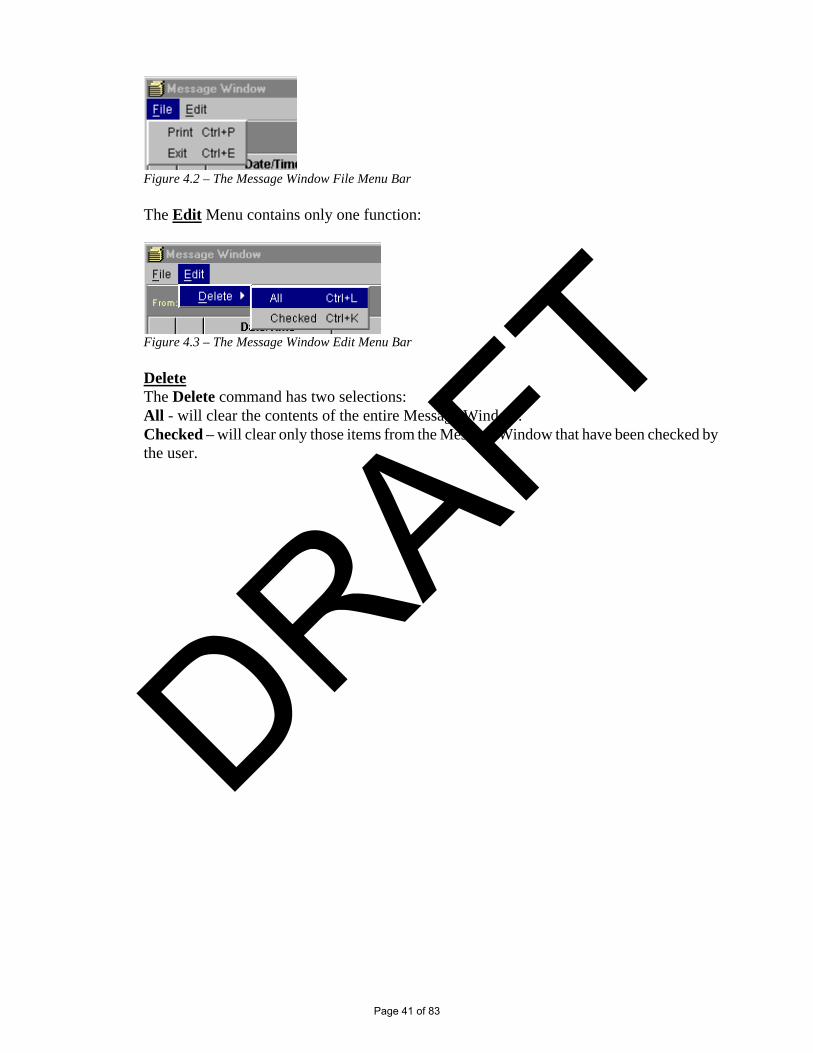
Figure 4.2 – The Message Window File Menu Bar
The Edit Menu contains only one function:
Figure 4.3 – The Message Window Edit Menu Bar Delete The Delete command has two selections: All - will clear the contents of the entire Message Window. Checked – will clear only those items from the Message Window that have been checked by the user.
Page 41 of 83
DRAFT
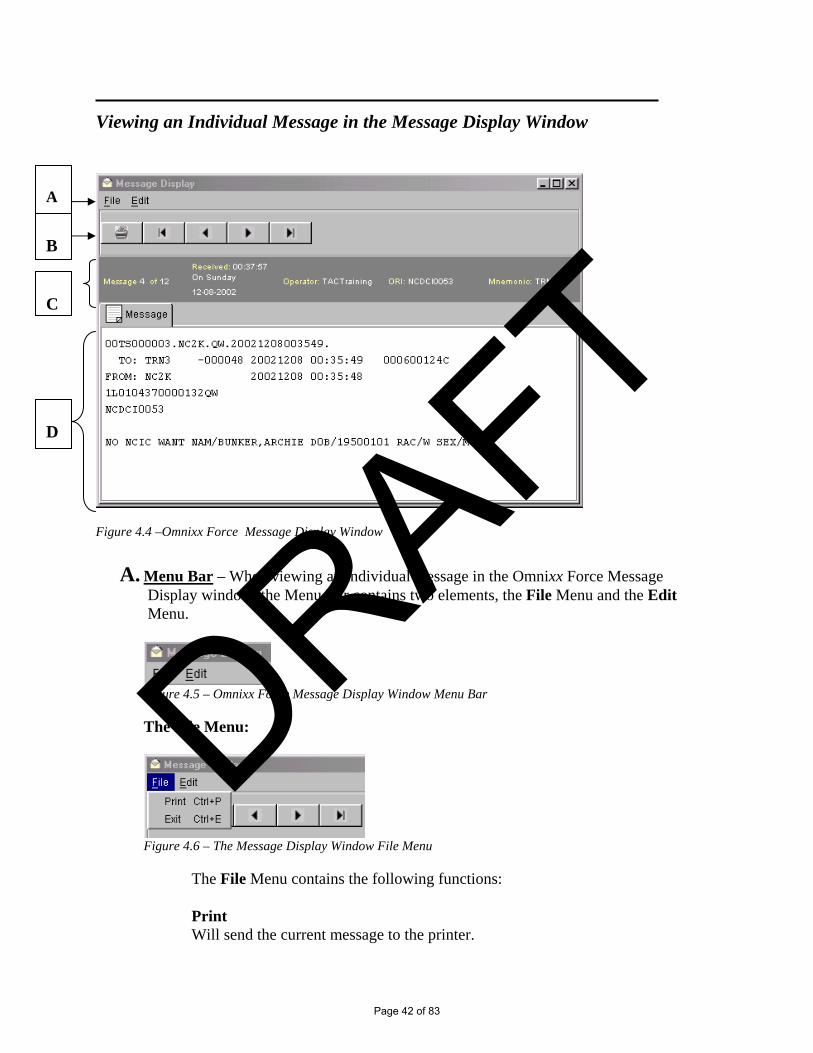
Viewing an Individual Message in the Message Display Window
Figure 4.4 –Omnixx Force Message Display Window
A. Menu Bar – When viewing an individual message in the Omnixx Force Message Display window, the Menu Bar contains two elements, the File Menu and the Edit
Menu.
Figure 4.5 – Omnixx Force Message Display Window Menu Bar The File Menu:
Figure 4.6 – The Message Display Window File Menu
The File Menu contains the following functions:
Print Will send the current message to the printer.
A
B
C
D
Page 42 of 83
DRAFT

Exit Will close the Message Display Window.
The Edit Menu:
Figure 4.7 – Message Display Window Edit Menu
The Edit Menu contains the following functions:
Copy This function copies the text that has been highlighted by the user in the Message Window to the clipboard. Go To The functions First, Last, Next, and Previous listed under the Go To function, allow the user to navigate through the messages contained in the Message Window.
First – Takes the user to the first message listed in the Message Window. Last – Takes the user to the last message listed in the Message Window. Next – Moves the user forward through the Message Window one
message at a time. Previous – Moves the user backward through the Message Window one
message at a time.
B. Toolbar – The Toolbar provides for quick access to the functions that are found on the Menu Bar.
Figure 4.8 – Message Display Window Toolbar
Print Will send the current message to the printer.
First Message Takes the user to the first message listed in the Message Window.
Previous Message Moves the user backward through the Message Window one message at a time.
Page 43 of 83
DRAFT

Next Message Moves the user forward through the Message Window one message at a time.
Last Message Takes the user to the last message listed in the Message Window.
C. Message Chronology – This area contains the following information regarding the current message: The chronological number of the message in the log. If the message was Sent or Received. The date and time of the message. The Operator, ORI, and Mnemonic (TID) of the message.
D. Message Display Window – This area contains the actual text of the current message.
Alternate Ways to View A Sent Message In Omnixx Force, it is possible to view a sent message from the Message Window or the Message Log in a couple of different ways. The options are:
Display Base Format Display in XX Format (where XX stands for the Message Key of the message)
Display Base Format: This function is useful when you want to see the data that you transmitted in the form without having to see the entire form. Only the data that was placed into the form and transmitted is displayed in this table format view.
1. From either the Message Window or the Message Log, right-click on the selected sent message. The following menu will be displayed:
Page 44 of 83
DRAFT
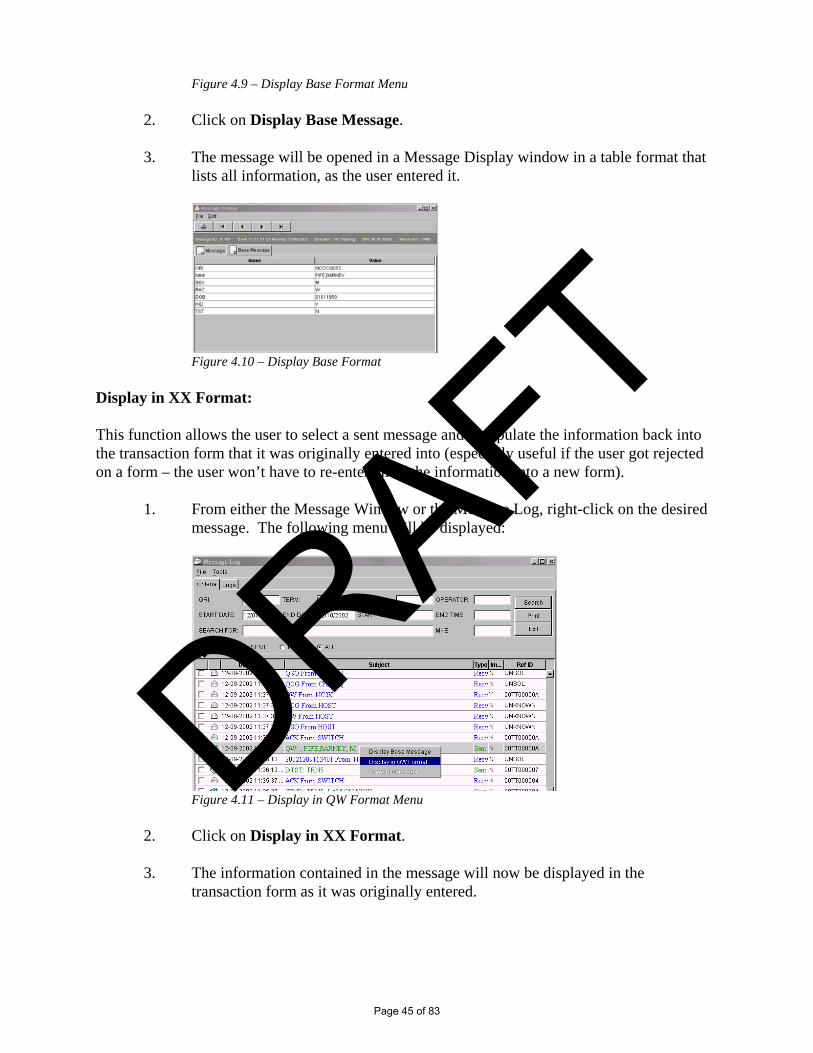
Figure 4.9 – Display Base Format Menu 2. Click on Display Base Message. 3. The message will be opened in a Message Display window in a table format that
lists all information, as the user entered it.
Figure 4.10 – Display Base Format
Display in XX Format: This function allows the user to select a sent message and repopulate the information back into the transaction form that it was originally entered into (especially useful if the user got rejected on a form – the user won’t have to re-enter all of the information into a new form).
1. From either the Message Window or the Message Log, right-click on the desired message. The following menu will be displayed:
Figure 4.11 – Display in QW Format Menu 2. Click on Display in XX Format. 3. The information contained in the message will now be displayed in the
transaction form as it was originally entered.
Page 45 of 83
DRAFT

Figure 4.12 – Display in QW Format
4. Now the user can make the necessary changes and easily transmit the form again.
Forwarding a message In Omnixx Force, it is possible to forward a message that you have received to another user/agency. This is possible from either the Message Window or the Message Log. The information from the message will automatically be entered into a SEND Message form for transmission. To Forward a Received Message:
1. From either the Message Window or the Message Log, right-click on the selected message. The following menu will appear:
Page 46 of 83
DRAFT

Figure 4.13 – Forward Message Menu
2. Click on Forward Message. 3. A SEND Message form will be opened and populated with the text contained in
the message and can then be sent to the desired user/agency.
Figure 4.14 – Forward Message in SEND Form
Page 47 of 83
DRAFT

Searching the Omnixx Force Message Logs In Omnixx Force, a user can search for previous transactions (sent and/or received) during any session of Force. This search capability is very useful in retrieving messages when the message has been cleared from the Message Window or was performed in a previous session of Force. A user can search using a wide range of fields and options. This search option allows the user to select the current message folder (defaults to current unless otherwise indicated) and/or archived message logs if the archived logs are maintained on the computer’s hard drive.
Figure 4.10 – Omnixx Force Message Log Search Screen
A. Title Bar – The Title Bar notifies the user that he/she is currently viewing the Message Log.
B. Menu Bar – The Message Log Menu Bar contains the following two elements:
C F
E
A B
D
Page 48 of 83
DRAFT

The File Menu
Figure 4.11 – Message Log File Menu The Message Log Menu File Menu contains only one function.
Exit This function will close the Message Log.
The Tools Menu
Figure 4.12 – Message Log Tools Menu The Message Log Tools Menu contains only one function.
Archive This function allows the user to archive messages from the current Message Log file. Archiving is discussed in more detail at the end of this chapter.
C. Search Criteria – The user can narrow the search by entering information into the Search Criteria fields. The user can make the search as broad or as narrow as desired by entering as much or as little information into the following fields:
ORI – The ORI used in a form (useful if you service another ORI). Term – This field should be left blank. Unit – This field should be left blank. Operator – The User ID of the message you want to find. Start Date – The search will cover messages that were logged beginning with this
date. (Correct format is: MM/DD/YYYY) End Date – The search will cover messages that were logged up to this date.
(Correct format is: MM/DD/YYYY) Start Time – The search will cover messages that were logged beginning with this
time. (Correct format is HH:MM:SS AM or HH:MM:SS PM) End Time – The search will cover messages that were logged up until this time.
(Correct format is HH:MM:SS AM or HH:MM:SS PM) Search For – A user can enter specific text that is contained in the message they are
searching for. Type – Allows the user to narrow down the search to Sent, Received, or All
messages.
D. Message Type Radio Buttons – These radio buttons allow the user to specify if they want to search Received messages only, Sent messages only, or All
Page 49 of 83
DRAFT

messages. This feature defaults to All, but may be changed by the user.
E. Message Display Window – All messages that meet the criteria specified by the user in the Search Criteria fields will be displayed here.
F. Command Buttons – Provide access to the following functions in the Message Log:
Search: Tells the application to begin searching the Message Log based on the Search Criteria that was entered by the user.
Exit: Will exit the user from the Message Log Search dialog. Print: Allows the user to print selected messages from the Message Log.
Archiving The Omnixx Force Message Log All messages that are sent or received are stored in the current message log folder. Unless messages are archived at logical intervals, this folder will become cumbersome and difficult to manage. Agencies should develop a habit of archiving messages at specific intervals. Depending on the size of the message log, this archiving should be done at least monthly. To archive messages, the user must have the Message Log window open. The user then clicks on the Tools menu, and then selects Archive.
Figure 4.13 – Message Log Tools Menu
Once the user selects this option, a dialog box will appear. The user must enter the beginning date and the ending date for the time period being archived. If the user wishes to archive messages from December 1st through 7th 2002, the user would enter the following:
Figure 4.14 – Message Log Archive Dialog Box
Once the user enters the dates and clicks Archive, the following confirmation response will be received:
Page 50 of 83
DRAFT

Figure 4.15 – Message Log Archive Confirmation To see archived logs, the user should click on the Logs tab on the Message Log window. An example of archived logs is shown below. In order for these logs to be searched when a Message Log search is performed, the log(s) must be selected by clicking the box on the far left on the form.
Figure 4.16 – Archived Log Tab
Moving Archived Logs to External Storage Archived logs are saved in the folder C:\OMNIXX\OmnixxForce\LOGS\ARCHIVE. File names are in the format YYYYMMDD_TO_YYYYMMDD_01.log where YYYYMMDD equals the year, month, and day of the date range of the messages archived. There are two additional files associated with each group of archived messages with the same file name as the log file with a file type of idx or dat. If the user wants to reclaim the hard drive space used by the archived logs after messages have been archived, the three files associated with each group can either be copied to other media such as diskette or CD, or simply deleted from the users hard drive if it is not desired to retain them for later searches.
Figure 4.17 – Archive Folder In order to search archived logs that were copied off to external media at a later time, the log files must be copied back to the hard drive folder named above.
Page 51 of 83
DRAFT

ORI Files Originating Routing Identifier (ORI) - Agencies that have access are identified by an ORI, which is a nine character alphanumeric identifier. - Examples of agencies assigned a full access ORI: - Law enforcement agencies, e.g. city/county police, sheriff, state police/patrol, military police, SBI, railroad and campus university police, communication centers dispatching for a law enforcement agency, etc. - Criminal justice agencies, e.g. district attorney, judge, magistrate, correctional institution, probation/parole, etc. - Examples of agencies assigned a limited access ORI: - Non-government law enforcement agencies that are private (company) police with statutory powers of arrest under state law. Includes some hospitals, security agencies, corporations, utilities company, etc. - Limited access ORI’s will normally end with the letter “P”. These agencies are prohibited from accessing state/national criminal history information, Gang/Known or Appropriately Suspected Terrorist File and Immigration Violator files. ORI Files
- Query NLETS ORI File by location or ORI is called the Terminal Query transaction (TQ). This transaction is used to query by location for listing of agencies and their ORI’s. This transaction may also be used to query by ORI for agency’s name, address, operational time, and
Page 52 of 83
DRAFT

other information. This transaction is also used to search for an agency ORI when only the city or county is known including federal agencies.
This transaction can be used to search for a Canadian ORI. When a search for a Canadian ORI is needed you must use the two character province or territory code in the DRI field.
When a search for an ORI is by city or county the search will be performed even if the spelling of the city is incorrect. A search can be performed on just two characters of city or county name when necessary.
When a search for a federal ORI is needed the three character agency identifier, such as FBI, can be used. An inquiry using DRI/TX and FED/FBI would give you ORIs for FBI offices in the state of Texas.
Student Exercise: Instruct operator to utilize the TQ transaction to look up Dallas Police Department in Dallas, Texas.
- This transaction is used to identify an agency to which an ORI has been assigned, if the agency is still active, and the telephone number and address of agency.
Page 53 of 83
DRAFT
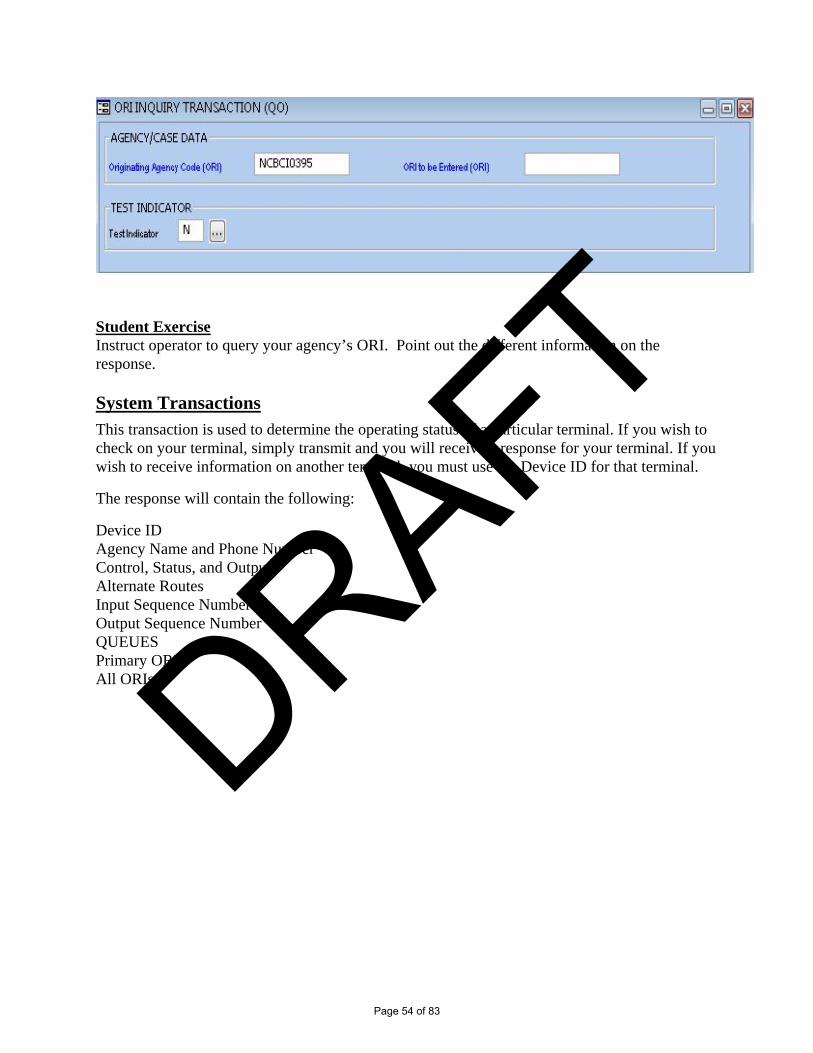
Student Exercise Instruct operator to query your agency’s ORI. Point out the different information on the response. System Transactions This transaction is used to determine the operating status of a particular terminal. If you wish to check on your terminal, simply transmit and you will receive a response for your terminal. If you wish to receive information on another terminal, you must use the Device ID for that terminal.
The response will contain the following:
Device ID Agency Name and Phone Number Control, Status, and Output Alternate Routes Input Sequence Number Output Sequence Number QUEUES Primary ORI All ORIs
Page 54 of 83
DRAFT
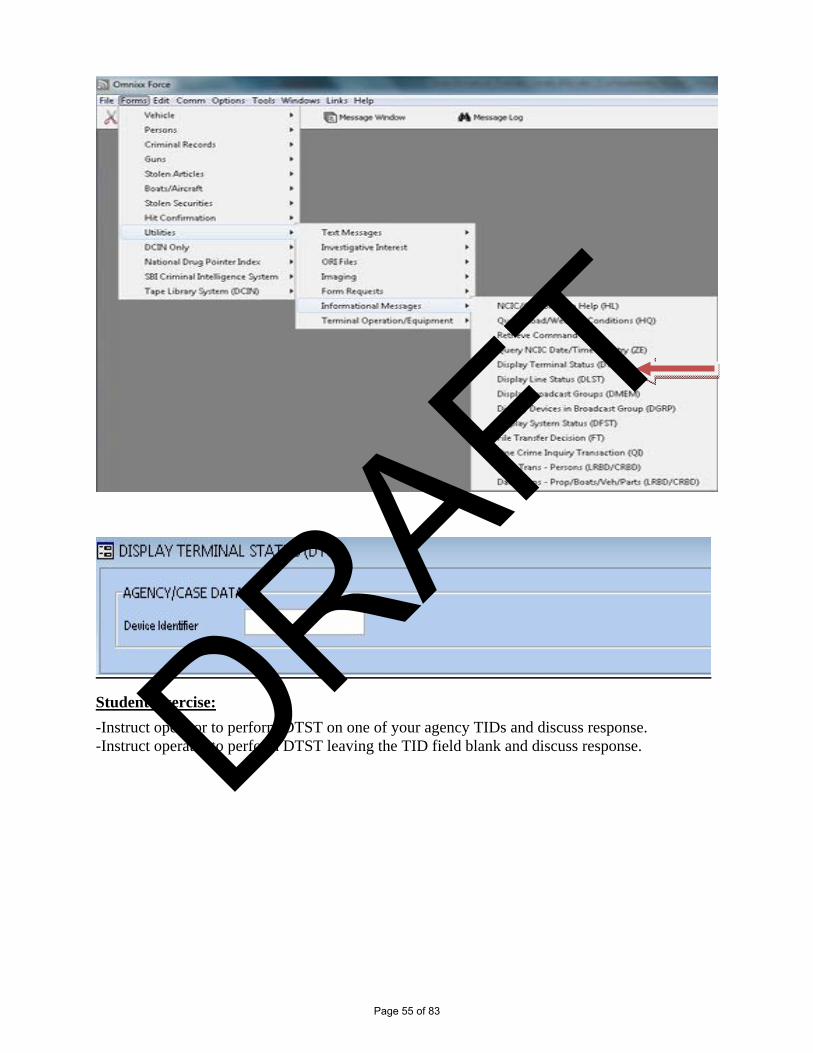
Student Exercise:
-Instruct operator to perform DTST on one of your agency TIDs and discuss response. -Instruct operator to perform DTST leaving the TID field blank and discuss response.
Page 55 of 83
DRAFT

Overview of the Omnixx Trainer User Interface
Once an operator completes the indoctrination training, he/she will be able to start a certification test from a list of available tests. This list of available tests is specific to each user and will not include any tests that they have not been given access to. The timed test will be comprised of a set number of true/false and multiple choice questions randomly generated from a pool of test questions. Upon completion of the certification test, the user will immediately receive their results, which includes pass or fail status, as well as total score, sectional scores, and the date of when the test was taken. When a user passes the certification test, their database record will immediately be updated to reflect their active status. This active status grants them access to the transactions associated with that certification within the Omnixx ™ Force application. The user must successfully complete the certification test for the module(s) before they can access that module and perform transactions. To Take a Certification Test: The user must log into Omnixx Desktop and then click the Trainer Icon. The User’s Certification Status Summary is displayed, indicating the expiration date (which is 15 days from the last day of class) for the test authorization assigned to each module the user is allowed to test. If a user is currently certified and will be taking a re-certification test, the expiration date will provide a 30 day countdown till expiration.
Page 56 of 83
DRAFT

- Click Close to close the User Certification Status Summary. - Now click the Trainer Icon to open Omnixx Trainer.
Page 57 of 83
DRAFT
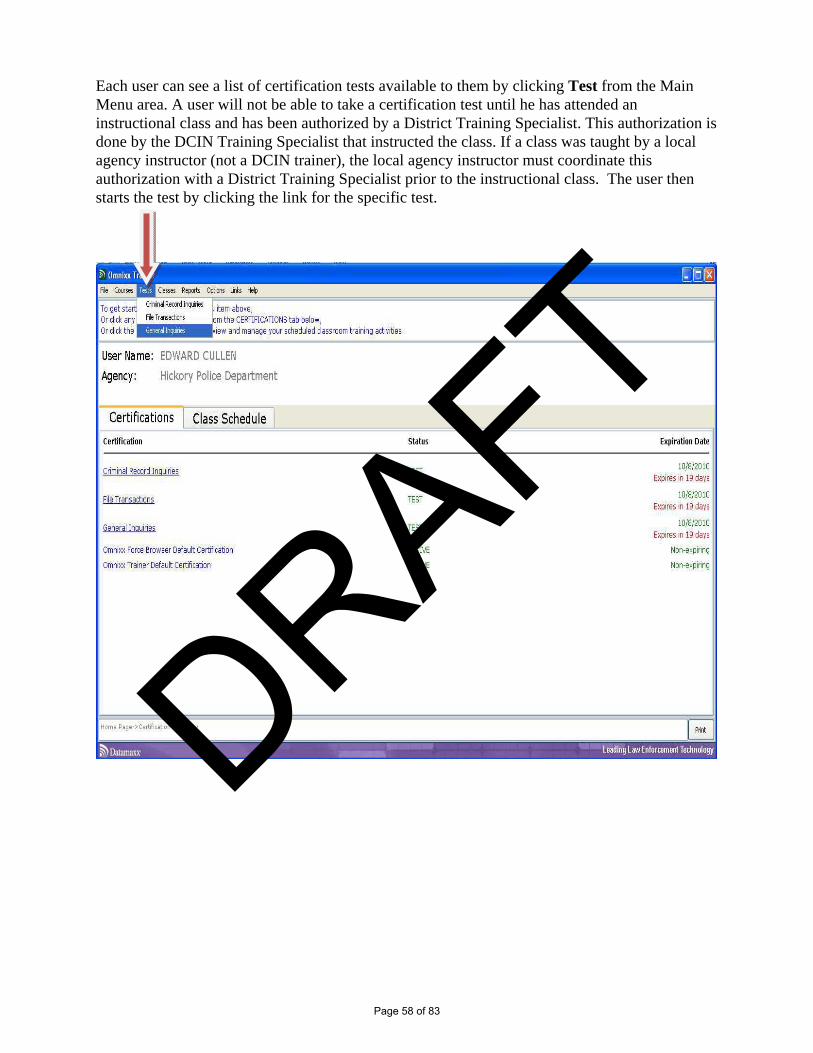
Each user can see a list of certification tests available to them by clicking Test from the Main Menu area. A user will not be able to take a certification test until he has attended an instructional class and has been authorized by a District Training Specialist. This authorization is done by the DCIN Training Specialist that instructed the class. If a class was taught by a local agency instructor (not a DCIN trainer), the local agency instructor must coordinate this authorization with a District Training Specialist prior to the instructional class. The user then starts the test by clicking the link for the specific test.
Page 58 of 83
DRAFT

Once a test has been selected, the user will be presented with an instructional page that provides general information and directions on the testing process. The user must click START TEST in the bottom right corner of the test window to begin the test.
Once the user clicks START, the timer will begin and will be displayed in the top left corner of the test window.
- After clicking START, the first test question will appear. The test question window will display the following items:
- Test Name - Time Remaining - Question Number and Total Number of Questions - Total Number of Questions that Have Been Answered - Submit / Cancel buttons - Test Question - Possible Answers - Navigation Bar
Page 59 of 83
DRAFT

-
- Time Remaining – This timer indicates the amount of time remaining before the exam must be submitted.
- If the time reaches zero (0), the exam will be automatically submitted for grading. - Question Number – Indicates the number of questions answered out of the
maximum number. - Question Review – Allows the ability to review Unanswered Questions only or All Questions. - Cancel – This control button allows the user to cancel the test effectively
discarding all answers. If the user clicks Cancel once the test has started, the test is cancelled and will not count, regardless of the number of questions answered. The test is not graded and cannot be resumed.
- Answers – This area displays the answers (True/False & Multiple Choice). - Question – This area displays the text of the question to be answered.
Navigation Bar
Test Name
Time Remaining Question Number Total of Questions
Total Number of Questions Answered
Submit/Cancel Buttons
Test Question
Possible Answers
Navigation Bar
Page 60 of 83
DRAFT

Allows the user to navigate Back to review a previous question. This can be done until the Time Remaining reflects zero (0) or the Submit /Cancel button is depressed.
Advances user to the next question. It does not matter if they have answered the current question or not, they are still allowed to advance to the next question.
Page 61 of 83
DRAFT

Submitting A Certification Test The user must submit the certification test for grading. A score of 80% or higher is required to gain certification in each module. When the test displays the last test question, the NEXT button grays out and becomes inactive. Even though the last question (number 33, for example) has been answered, the Questions Answered indicator at the top will still indicate one Unanswered Question (32 questions answered). This is normal. In order to review all questions before submitting the test for grading, the user should select the All Questions option at the top of the window. The user should click SUBMIT after answering the last question.
Unanswered Questions All Questions
Page 62 of 83
DRAFT
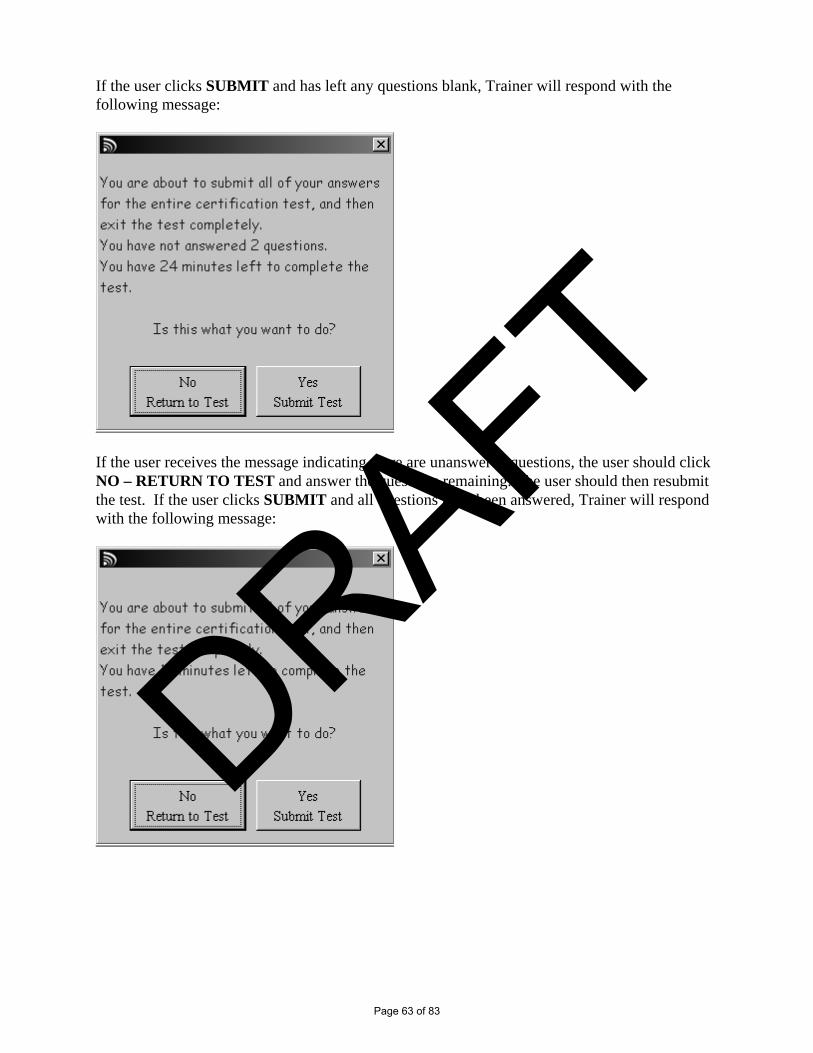
If the user clicks SUBMIT and has left any questions blank, Trainer will respond with the following message:
If the user receives the message indicating there are unanswered questions, the user should click NO – RETURN TO TEST and answer the questions remaining. The user should then resubmit the test. If the user clicks SUBMIT and all questions have been answered, Trainer will respond with the following message:
Page 63 of 83
DRAFT

If the user starts a test but does not complete the test within the time period allotted for the test, Trainer will automatically submit the test for grading.
Test Results Page The Test Results Page contains the total percentage of correct answers on the certification test as well as a graphical representation of the user’s performance on individual sections. The Test Results Page must be printed, signed by the student and the administering TAC, and retained by the TAC for two years. A copy should be printed and given to the student. See an example below: Congratulations, perfect score! This test has been logged and your certification record has been updated. You MUST print this page and provide it to your agency TAC. Failure to provide this printout to your TAC may invalidate your test score. User: EDWARD CULLEN Certification Test: General Inquiries Test Date: September 25, 2010
Page 64 of 83
DRAFT

Reports The user will need to click on the Reports Menu in order to view their certification information: Certification Status Summary – Displays all active certifications, and the expiration date. This is the same information displayed on the Student Home Page. Certification Tests Passed – Displays the name and date that a specific Certification Test was passed. Clicking the Certification Test Name will display the Test Results Page from that test. Certification Tests Failed – Displays the name and date that a specific Certification Test was failed. Clicking the Certification Test Name will display the Test Results Page from that test. Enrollment Summary – Displays a listing of the DCIN Certification classes this user has been enrolled including the dates of the class, instructor’s name, attendance status (yes, no or cancelled), and credit hours.
11
11
Page 65 of 83
DRAFT
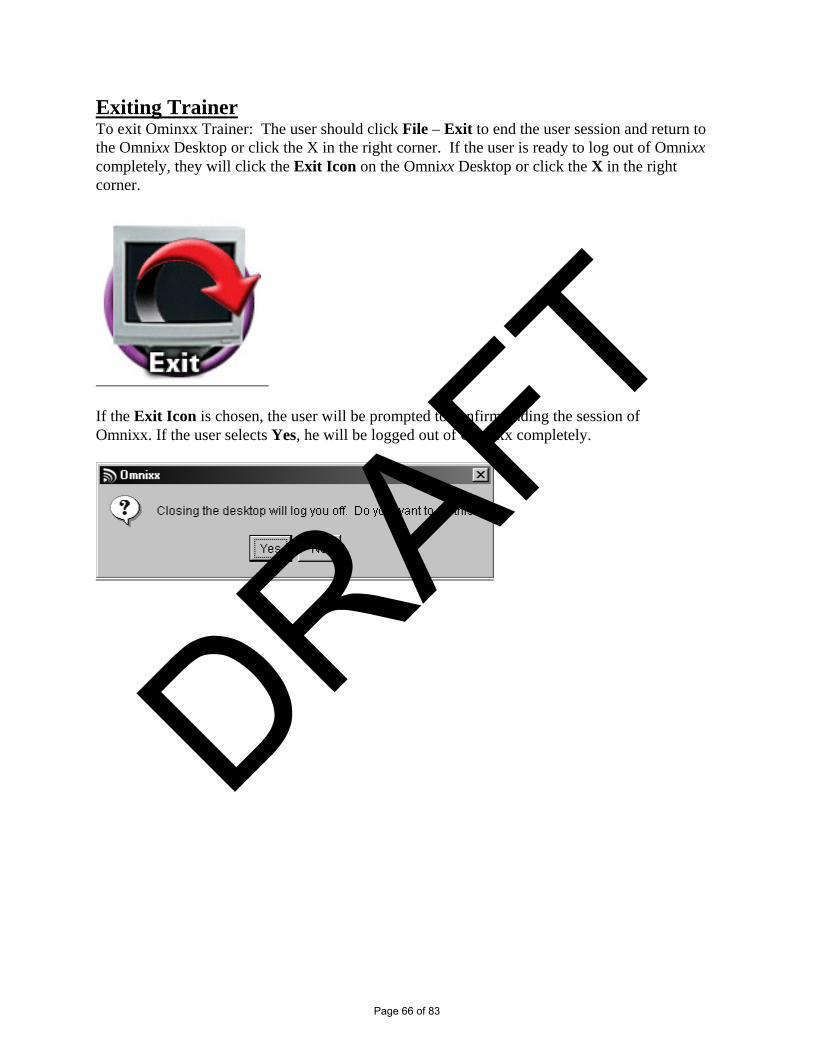
Exiting Trainer To exit Ominxx Trainer: The user should click File – Exit to end the user session and return to the Omnixx Desktop or click the X in the right corner. If the user is ready to log out of Omnixx completely, they will click the Exit Icon on the Omnixx Desktop or click the X in the right corner.
If the Exit Icon is chosen, the user will be prompted to confirm ending the session of Omnixx. If the user selects Yes, he will be logged out of Omnixx completely.
Page 66 of 83
DRAFT
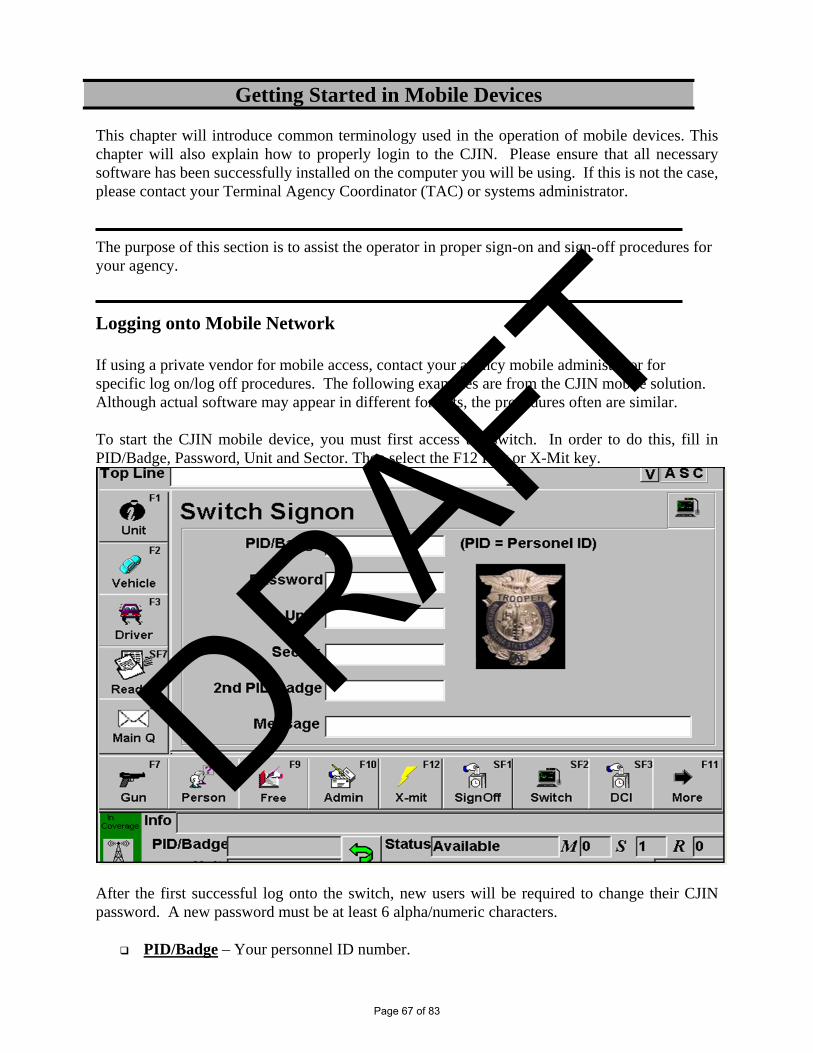
This chapter will introduce common terminology used in the operation of mobile devices. This chapter will also explain how to properly login to the CJIN. Please ensure that all necessary software has been successfully installed on the computer you will be using. If this is not the case, please contact your Terminal Agency Coordinator (TAC) or systems administrator. The purpose of this section is to assist the operator in proper sign-on and sign-off procedures for your agency.
Logging onto Mobile Network If using a private vendor for mobile access, contact your agency mobile administrator for specific log on/log off procedures. The following examples are from the CJIN mobile solution. Although actual software may appear in different formats, the procedures often are similar. To start the CJIN mobile device, you must first access the switch. In order to do this, fill in PID/Badge, Password, Unit and Sector. Then select the F12 Key or X-Mit key.
After the first successful log onto the switch, new users will be required to change their CJIN password. A new password must be at least 6 alpha/numeric characters.
PID/Badge – Your personnel ID number.
Getting Started in Mobile Devices
Page 67 of 83
DRAFT
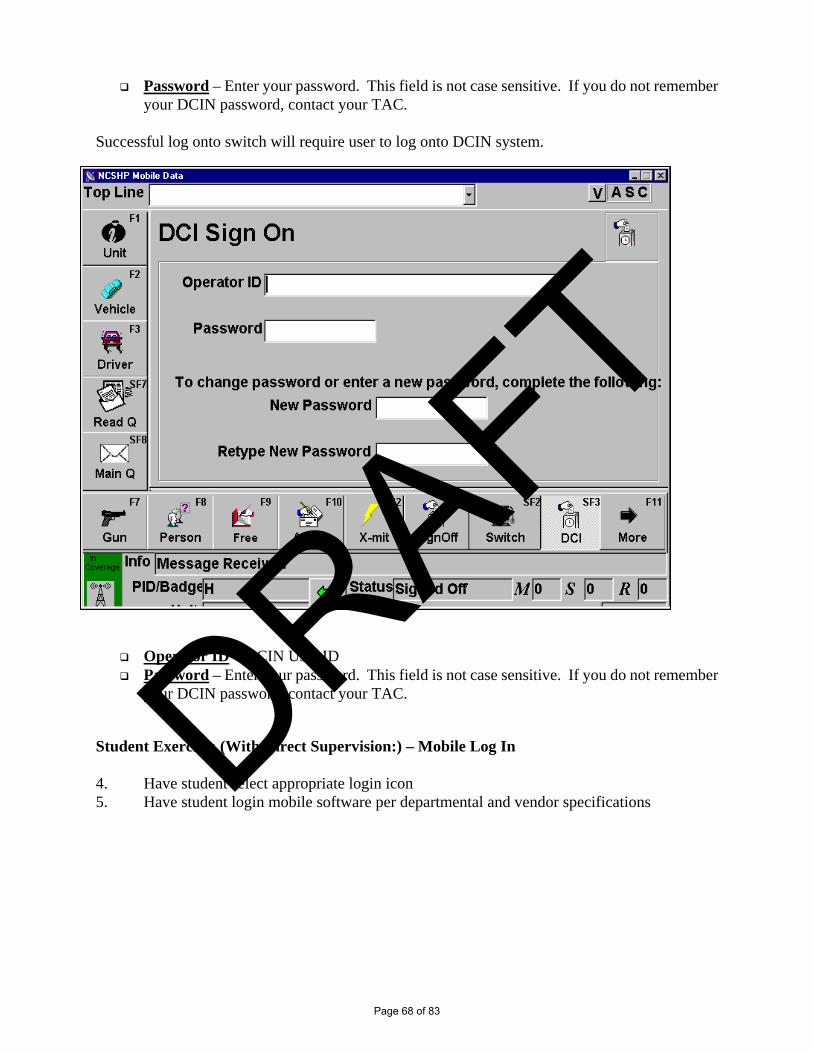
Password – Enter your password. This field is not case sensitive. If you do not remember your DCIN password, contact your TAC.
Successful log onto switch will require user to log onto DCIN system.
Operator ID – DCIN User ID Password – Enter your password. This field is not case sensitive. If you do not remember
your DCIN password, contact your TAC. Student Exercise: (With Direct Supervision:) – Mobile Log In 4. Have student select appropriate login icon 5. Have student login mobile software per departmental and vendor specifications
Page 68 of 83
DRAFT

Logging Off Mobile Device Select Sign Off Icon. Insert PID/Badge number and transmit.
Page 69 of 83
DRAFT
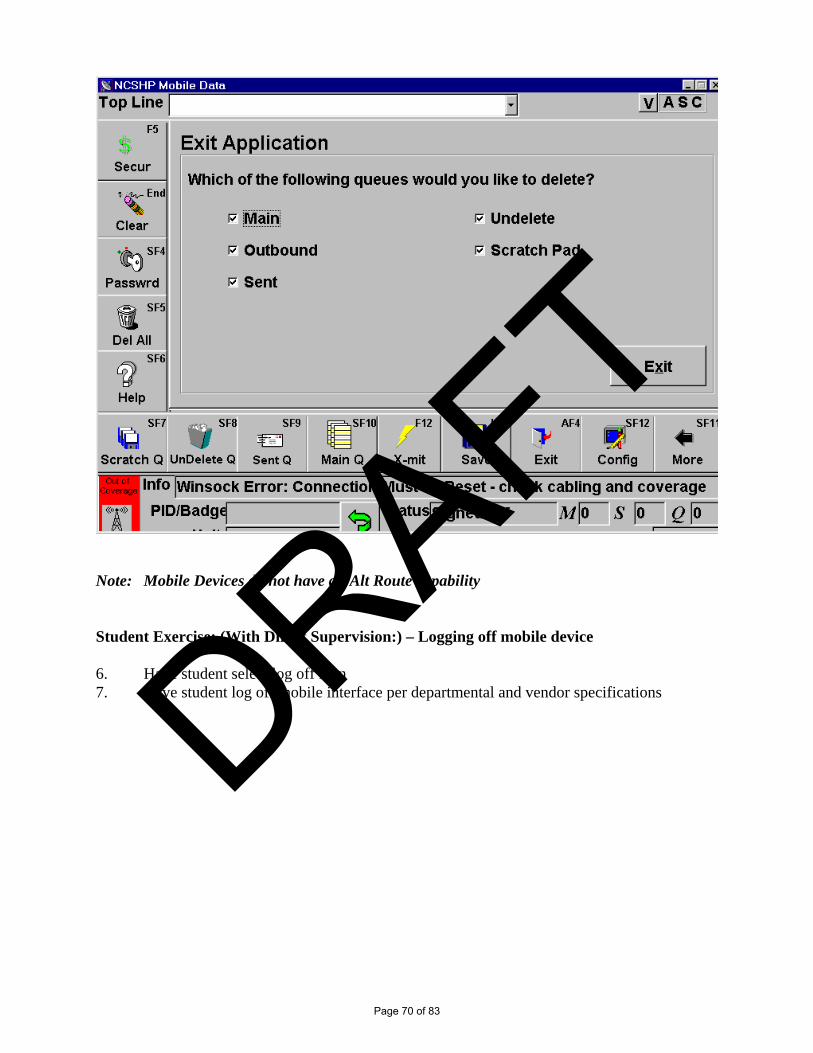
Note: Mobile Devices do not have an Alt Route capability Student Exercise: (With Direct Supervision:) – Logging off mobile device 6. Have student select log off icon 7. Have student log off mobile interface per departmental and vendor specifications
Page 70 of 83
DRAFT
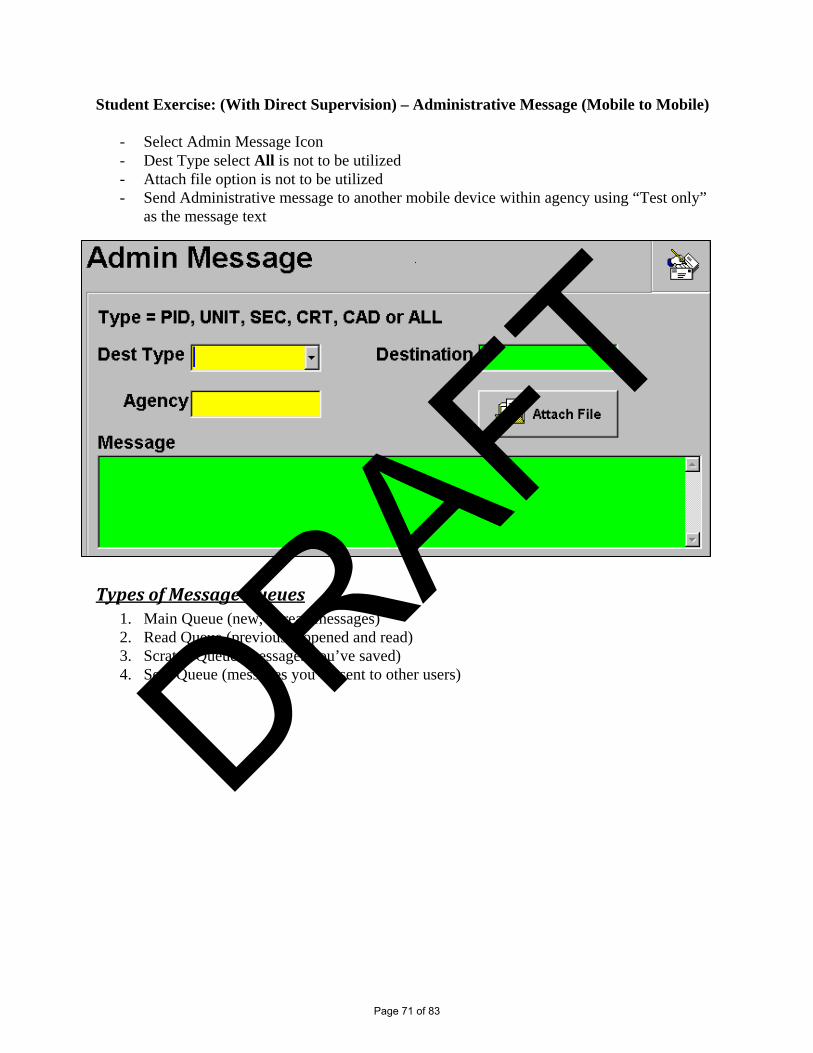
Student Exercise: (With Direct Supervision) – Administrative Message (Mobile to Mobile)
- Select Admin Message Icon - Dest Type select All is not to be utilized - Attach file option is not to be utilized - Send Administrative message to another mobile device within agency using “Test only”
as the message text
TypesofMessageQueues1. Main Queue (new, unread messages) 2. Read Queue (previously opened and read) 3. Scratch Queue (messages you’ve saved) 4. Sent Queue (messages you’ve sent to other users)
Page 71 of 83
DRAFT

Page 72 of 83
DRAFT

�Figure 2.3 – Scratch Pad Screen Mobile Device
Page 73 of 83
DRAFT

�
Page 74 of 83
DRAFT
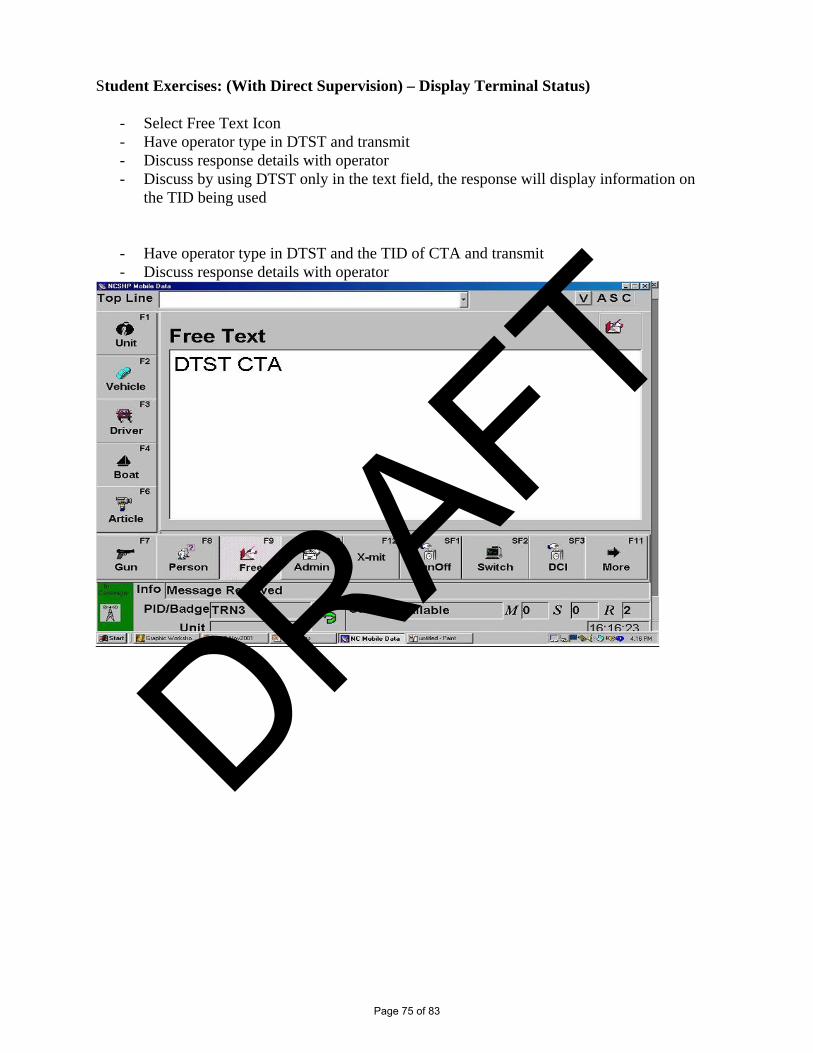
Student Exercises: (With Direct Supervision) – Display Terminal Status)
- Select Free Text Icon - Have operator type in DTST and transmit - Discuss response details with operator - Discuss by using DTST only in the text field, the response will display information on
the TID being used
- Have operator type in DTST and the TID of CTA and transmit - Discuss response details with operator
Page 75 of 83
DRAFT

At this point, you should provide the student with a copy of the written review questions located on pages 81-82. There are several exercises to assist the student in becoming familiar with the menu as well as performing specific transactions. This Trainer’s Guide was simply to make sure that the student had a general idea of the information to facilitate completion of the student training materials.
You do not have to continue with direct individual training at this point, but there should be a certified operator in the building to assure that policies and procedures are followed. This will also provide a resource person from whom the student may receive assistance if they begin to have difficulty in performing the exercises.
Once the student has completed the written review questions, they should take the completed training materials and associated printed documents to the Terminal Agency Coordinator (TAC)/Assistant Terminal Agency Coordinator (ATAC) providing the training, who should review them to make sure the documentation has been completed properly. At this point, the TAC or approved ATAC should administer the test to ensure the student has properly grasped the essential concepts of the initial indoctrination training.
If the student successfully completes the test, then they will be authorized to attend the modules for which they have been enrolled. The student must bring the printed test results which are signed and dated by both the operator and TAC to the first module they are scheduled to attend as proof that successful indoctrination training has occurred.
If a student is unable to successfully complete the test, then further indoctrination training should be utilized to assist the student in grasping the concepts and definitions of the system. If a student is enrolled for a class and is unable to pass the test, it is imperative that your agency cancel their enrollment in that class so that other students can enroll.
The student will then attend class for modules 1-6 as determined by departmental need and completion of appropriate indoctrination training.
Part X - Student Workbook and Written Exercises Student Workbook Exercises
Online Testing
Class Attendance
Page 76 of 83
DRAFT

The North Carolina State Bureau of Investigation, as mandated by the North Carolina Administrative Code (NCAC) and North Carolina General Statutes, is charged with the oversight of the Division of Criminal Information Network (DCIN), North Carolina’s statewide law enforcement communication network. DCIN provides local, state, and federal agencies a means to communicate with both in-state and out-of-state law enforcement agencies. DCIN is also the gateway to other informational systems which include the North Carolina Division of Motor Vehicles (DMV), the FBI’s Criminal Justice Information System (CJIS), and the International Justice and Public Safety Information Network (NLETS) just to name a few. Because of the information available through DCIN its use is restricted by NCAC to criminal justice purposes only.
12 NCAC 04F .0102(a) states any communication that goes over DCIN should be made in the performance of an employee’s or agency’s official duties as they relate to the administration of criminal justice. DCIN communication of a non-criminal justice nature is prohibited. Some common examples of non-criminal justice communication going over DCIN includes: - Checking an individual’s driver’s license, license plate, or other
information for political purposes (background on a political opponent).
- Running a criminal history on a spouse, boyfriend/girlfriend, or family member (could also be misuse of Interstate Identification Index).
- Running DMV information for an individual engaged in the repossession
of vehicles. - Sending an administrative message to confirm meal plans, to have a
conversation, or to send well wishes during a holiday/birthday. - Checking AOC to see if a family member’s criminal case has been
disposed of in court, or to see if a family member has a pending court case. - Running DMV information on an estranged spouse or estranged
boyfriend/girlfriend to see with whom they currently associate. The above are examples of non-criminal justice communication. This list is not all-inclusive.
In instances where a law enforcement official asks a DCIN operator to access or transmit information over DCIN, the operator should make the necessary
Part IX – DCIN Misuse
Page 77 of 83
DRAFT

inquiries to ensure the communication is for criminal justice purposes. Transmission of non-criminal justice communication over DCIN will subject the operator and the operator’s agency to the penalties of 12 NCAC 04G .0102(d). The penalties are: 1. First Offense: Warning penalty against the individual operator.
2. Second Offense: Probation penalty against the individual operator, and
a Warning penalty against the agency if it is the same operator.
3. Third Offense: Suspension of individual operator’s certification, and a Reprimand penalty against the agency if it is the same operator as the second offense.
4. Fourth Offense: Revocation of individual operator’s certification, and a Probation penalty against the agency if it is the same operator as the third offense.
For definitions of “Probation,” “Warning,” “Reprimand,” “Suspension,” and “Revocation,” please see 12 NCAC 04G .0101.
DCIN is a powerful tool which allows law enforcement agencies in North Carolina to both communicate with other law enforcement entities, as well as access sensitive information which allows them to carry out the administration of criminal justice in an effective manner. However, with its use comes great responsibility to ensure it is used for what it was intended: the administration of criminal justice. Failure to use DCIN in this manner subjects both a DCIN operator and their agency to administrative sanctions, and possible civil liability.
Page 78 of 83
DRAFT
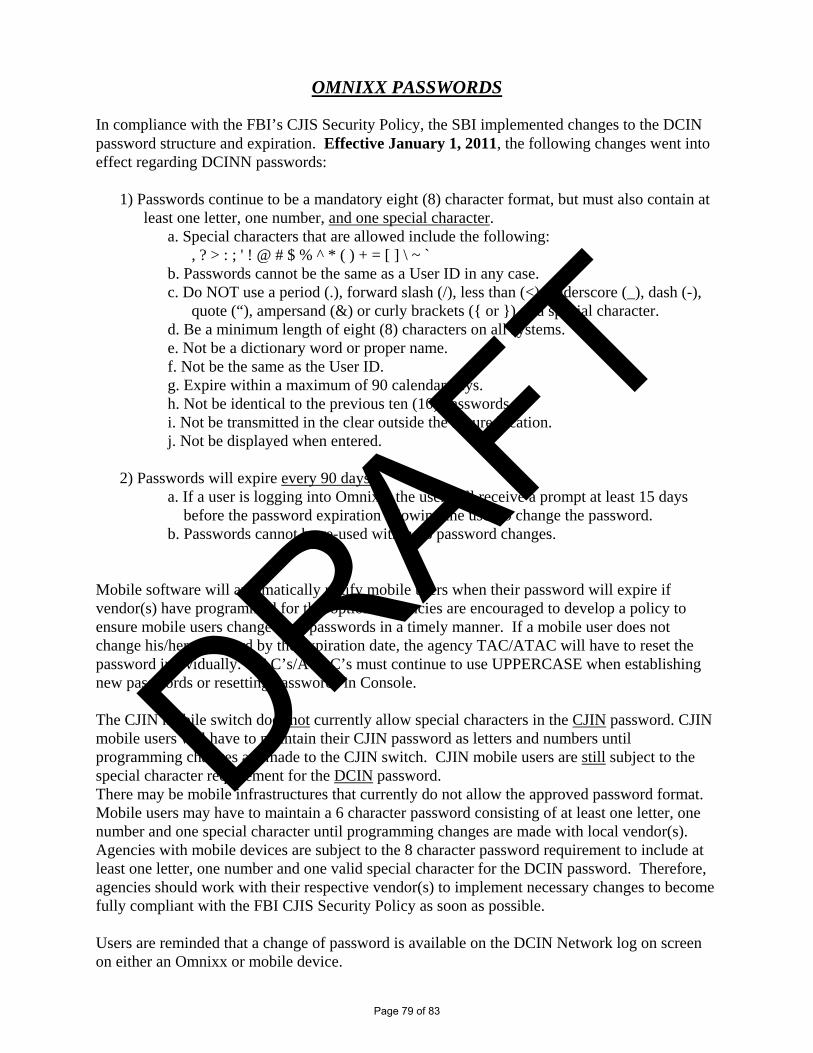
OMNIXX PASSWORDS In compliance with the FBI’s CJIS Security Policy, the SBI implemented changes to the DCIN password structure and expiration. Effective January 1, 2011, the following changes went into effect regarding DCINN passwords:
1) Passwords continue to be a mandatory eight (8) character format, but must also contain at least one letter, one number, and one special character.
a. Special characters that are allowed include the following: , ? > : ; ' ! @ # $ % ^ * ( ) + = [ ] \ ~ `
b. Passwords cannot be the same as a User ID in any case. c. Do NOT use a period (.), forward slash (/), less than (<), underscore (_), dash (-),
quote (“), ampersand (&) or curly brackets ({ or }) as a special character. d. Be a minimum length of eight (8) characters on all systems. e. Not be a dictionary word or proper name. f. Not be the same as the User ID. g. Expire within a maximum of 90 calendar days. h. Not be identical to the previous ten (10) passwords. i. Not be transmitted in the clear outside the secure location. j. Not be displayed when entered.
2) Passwords will expire every 90 days a. If a user is logging into Omnixx, the user will receive a prompt at least 15 days before the password expiration allowing the user to change the password. b. Passwords cannot be re-used within 15 password changes.
Mobile software will automatically notify mobile users when their password will expire if vendor(s) have programmed for this option. Agencies are encouraged to develop a policy to ensure mobile users change their passwords in a timely manner. If a mobile user does not change his/her password by the expiration date, the agency TAC/ATAC will have to reset the password individually. TAC’s/ATAC’s must continue to use UPPERCASE when establishing new passwords or resetting passwords in Console. The CJIN mobile switch does not currently allow special characters in the CJIN password. CJIN mobile users will have to maintain their CJIN password as letters and numbers until programming changes are made to the CJIN switch. CJIN mobile users are still subject to the special character requirement for the DCIN password. There may be mobile infrastructures that currently do not allow the approved password format. Mobile users may have to maintain a 6 character password consisting of at least one letter, one number and one special character until programming changes are made with local vendor(s). Agencies with mobile devices are subject to the 8 character password requirement to include at least one letter, one number and one valid special character for the DCIN password. Therefore, agencies should work with their respective vendor(s) to implement necessary changes to become fully compliant with the FBI CJIS Security Policy as soon as possible. Users are reminded that a change of password is available on the DCIN Network log on screen on either an Omnixx or mobile device.
Page 79 of 83
DRAFT

After entering the old password in the “Current Password” field and new password in the “New Password” field and re-typing it in the “Confirm” field, the user clicks “OK” and receives a notification of successful password change. If you have questions regarding this issue, contact your District Training Specialist. Source: FBI CJIS Security Policy, 5.6.2.1 Standard Authentication (Password) Revised May, 2012
Page 80 of 83
DRAFT

Review Questions 1. The unique identifier assigned to a terminal with DCIN access, which is used to route in-
state messages is a/an: a. ORI b. TID c. UID d. PID 2. The unique identifier assigned by the FBI to every law enforcement and criminal justice
agency nationwide is a/an: a. ORI b. TID c. UID d. PID 3. Operators taking a DCIN on-line test must make _____ or higher to become certified in a
specific module. a. 70% b. 80% c. 90% d. 75% 4. To send an in-state free text message to another agency/terminal within North Carolina
for the exchange of law enforcement/criminal justice related information, the operator would use a/an ________________ transaction.
a. SEND b. Administrative Message (AM) c. Message header d. Utility message 5. The Omnixx feature that allows a user to search for and view messages that were sent
and received during previous sessions of Omnixx Force is the: a. Message Display b. Message Window c. Message Log d. None of the above 6. An operator can receive field help for a specific field (such as name format) in an
Omnixx form by: a. Placing a “?” in the field and transmitting b. Right-clicking within the specific field and selecting Field Help c. Pressing the F1 key with the cursor inside the field d. None of the above 7. Mobile devices are capable of alt-routing messages to other terminal when the mobile
Page 81 of 83
DRAFT

device is not logged onto: a. True b. False 8. DCIN misuse can subject the operator and agency to sanctions by the SBI: a. True b. False
Page 82 of 83
DRAFT
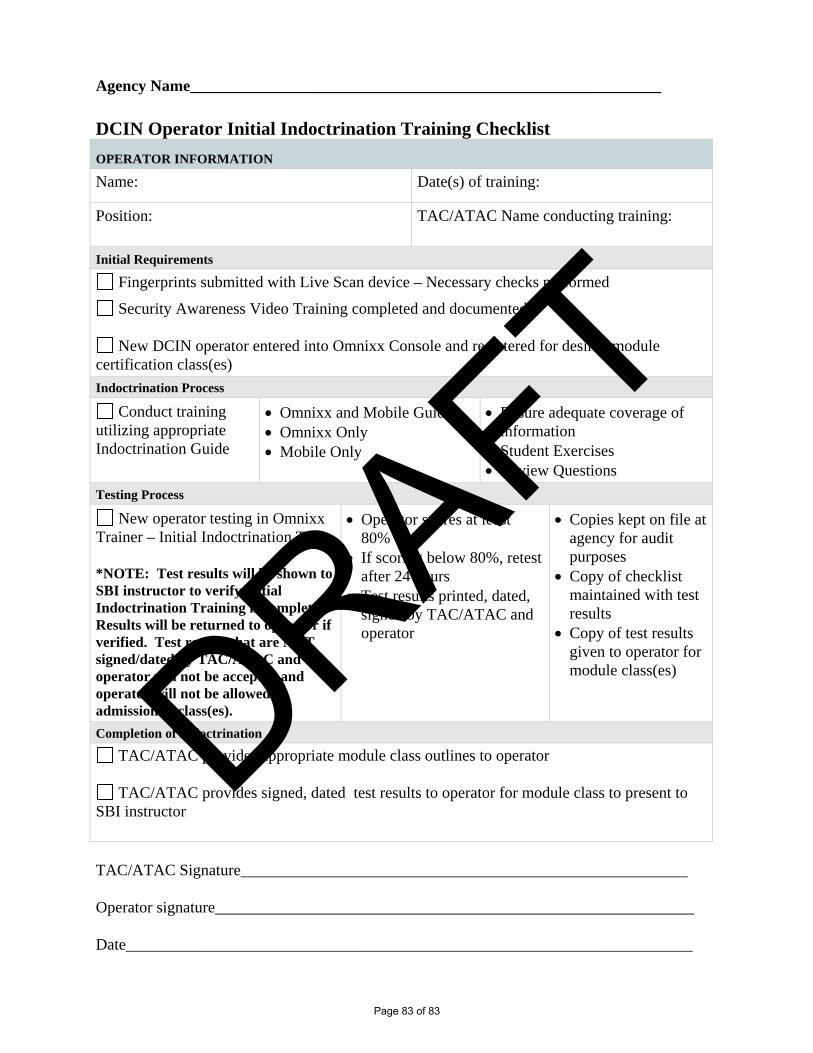
Agency Name___________________________________________________________
DCIN Operator Initial Indoctrination Training Checklist
OPERATOR INFORMATION
Name: Date(s) of training:
Position: TAC/ATAC Name conducting training:
Initial Requirements
Fingerprints submitted with Live Scan device – Necessary checks performed
Security Awareness Video Training completed and documented
New DCIN operator entered into Omnixx Console and registered for desired module certification class(es)
Indoctrination Process
Conduct training utilizing appropriate Indoctrination Guide
Omnixx and Mobile Guide Omnixx Only Mobile Only
Ensure adequate coverage of information
Student Exercises Review Questions
Testing Process
New operator testing in Omnixx Trainer – Initial Indoctrination Test *NOTE: Test results will be shown to SBI instructor to verify initial Indoctrination Training is complete – Results will be returned to operator if verified. Test results that are NOT signed/dated by TAC/ATAC and operator will not be accepted and operator will not be allowed admission to class(es).
Operator scores at least 80%
If scoring below 80%, retest after 24 hours
Test results printed, dated, signed by TAC/ATAC and operator
Copies kept on file at agency for audit purposes
Copy of checklist maintained with test results
Copy of test results given to operator for module class(es)
Completion of Indoctrination
TAC/ATAC provides appropriate module class outlines to operator
TAC/ATAC provides signed, dated test results to operator for module class to present to SBI instructor TAC/ATAC Signature________________________________________________________ Operator signature____________________________________________________________ Date_______________________________________________________________________
Page 83 of 83
DRAFT