NaturalPoint TrackIR Users Manual : Getting Started · NaturalPoint TrackIR Users Manual : Getting...
26
(Click here for the web formatted version) NaturalPoint TrackIR Users Manual version 5.3 Complete Table Of Contents Introduction Forward 1. About NaturalPoint 2. 1. How to use the Manual Quick Start 1. Further Reading 2. 2. Getting Started Minimum Requirements 1. What's Included 2. Hardware Compatibility 3. Software and Hardware Installation System Restore Point 1. Software & Drivers Installation Windows Vista and newer 1. 2. 4. Hardware Placement 5. 3. Using the TrackIR Getting Started Introduction to TrackIR Enhanced 1. Introduction to 6 DOF 2. Third Party Utilities 3. 1. Tracking Types 2. Camera Status LED indicators 3. 4. The TrackIR Software Overview Basic Settings 1. Advanced Settings 2. 1. Size and Layout 2. Main menu 3. Application Options 4. Help menu 5. Information Pane 6. Basic Settings 7. Advanced Settings Profile management Create, Copy, and Delete a Profile 1. Profile Settings 2. Motion Curves 3. 1. Title Management 2. Global Camera Settings 3. 8. Visual Preview 3D View 1. 9. 5. NaturalPoint TrackIR Users Manual : Getting Started 1
Transcript of NaturalPoint TrackIR Users Manual : Getting Started · NaturalPoint TrackIR Users Manual : Getting...

(Click here for the web formatted version)
NaturalPoint TrackIRUsers Manual version 5.3
Complete Table Of Contents
IntroductionForward1. About NaturalPoint2.
1.
How to use the ManualQuick Start1. Further Reading2.
2.
Getting StartedMinimum Requirements1. What's Included2. Hardware Compatibility3. Software and Hardware Installation
System Restore Point1. Software & Drivers Installation
Windows Vista and newer1. 2.
4.
Hardware Placement5.
3.
Using the TrackIRGetting Started
Introduction to TrackIR Enhanced1. Introduction to 6 DOF2. Third Party Utilities3.
1.
Tracking Types2. Camera Status LED indicators3.
4.
The TrackIR SoftwareOverview
Basic Settings1. Advanced Settings2.
1.
Size and Layout2. Main menu3. Application Options4. Help menu5. Information Pane6. Basic Settings7. Advanced Settings
Profile managementCreate, Copy, and Delete a Profile1. Profile Settings2. Motion Curves3.
1.
Title Management2. Global Camera Settings3.
8.
Visual Preview3D View1.
9.
5.
NaturalPoint TrackIR Users Manual : Getting Started
1

Camera View (2D Tracking Data)2. Status Bar
Hot Keys1. Software Status Indicators2.
10.
Gaming Environment6. Limited Warranty7. Trouble Shooting8.
1. Introduction
1.1 Forward
Information in this Users Manual is subject to change without notice and does not represent acommitment on the part of NaturalPoint. The software described in this Users Manual is furnishedunder a license agreement and may be used only in accordance with the terms of said licenseagreement.
This document is copyright 2015 NaturalPoint Inc. All rights reserved. No part of this publicationmay be reproduced in any form, by any means, without express written permission.
TrackIR, TrackIR 4 & TrackIR 4-Pro, TrackIR 5, Vector and NaturalPoint are trademarks ofNaturalPoint Inc.Windows is a trademark of Microsoft. All other trademarks are property of their respectivecompanies.
1.2 About NaturalPoint
NaturalPoint Inc. is pleased to provide you with premium optical tracking devices. We hope thatyou enjoy using your TrackIR.
NaturalPoint3658 SW Deschutes St.Corvallis, OR 97333Telephone: 541-753-6645Fax: 541-753-6689www.naturalpoint.com
2. How to use the Manual
2.1 Quick Start
We strongly recommend reading this manual before using your TrackIR gaming and simulationcontroller. Of course, we know that many of you want to jump in and start experimenting as soon
NaturalPoint TrackIR Users Manual : Getting Started
2
as possible. If that describes you, then you can get going by doing the following:
Read the Installation section thoroughly and follow the instructions described there.Otherwise your TrackIR may not work.
◊
Once the software is installed, connect the TrackIR directly to one of the free USB portsof your computer.
◊
The TrackIR 5 should not be used with unpowered USB hubs.◊ Launch the TrackIR software. There will be a shortcut for it on your desktop.◊ Launch the supported game of your choice.◊ Start enjoying the added dimension TrackIR brings to your gaming!◊
2.2 Further Reading
The TrackIR is a powerful gaming and simulation peripheral and provides a number of options tohelp you achieve the best experience. It is recommended that you read through the manualcompletely for a better understanding of how the product works.
3. Getting Started
3.1 Minimum System Requirements
TrackIR 3 Series hardware or newer◊ Windows Vista or newer◊ 60 megabytes of free hard disk space◊
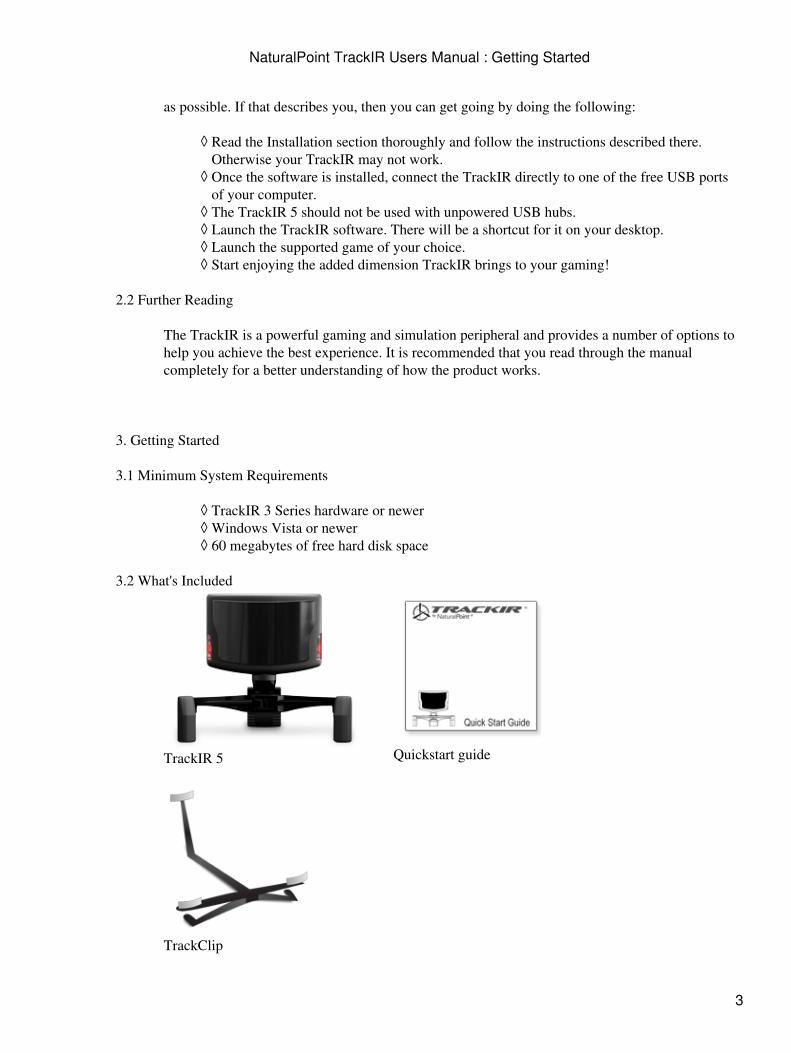
3.2 What's Included
TrackIR 5 Quickstart guide
TrackClip
NaturalPoint TrackIR Users Manual : Getting Started
3
3.3 Hardware Compatibility
The TrackIR version 5.x software can only be used with the TrackIR 3 (with Vector Expansiononly), TrackIR 4, and TrackIR 5 hardware. Older versions of the TrackIR are not compatible, andwill not work with this software. The software will present a warning if incompatible hardware isdetected
3.4 Software and Hardware Installation
Note : For best results, we recommend installing the TrackIR Software before you connect theTrackIR hardware.
3.4.1 System Restore PointIt is recommended that before installing any new hardware or software program, you set a systemrestore point. Windows Vista and Windows 7 provide this feature to allow you to easily reset yoursystem to a previous state. After the software is installed and everything is working fine, setanother restore point. Users that get into the habit of using this feature find they have fewerproblems on their computers.
The System Restore program can be found by clicking :Vista / Windows 7 : Start/Search �restore�/System Restore
3.4.2 Software & Drivers Installation
Note : The TrackIR version 5.x software does not support Windows XP or older.
3.4.2.1 Windows Vista and newer
Visit www.trackir.com to download the latest version of the TrackIR software.Save the installer to your desktop.
1.
Right click on the installer and select "Run as Administrator" then followinstallation instructions.
2.
(Note: Windows Security may display a warning message that it can�t verify thepublisher of the driver software. Click to install the driver software anyway. Thedrivers WILL NOT harm your system.)
3.
When installation is complete, a TrackIR icon will appear on your desktop.4. Plug the TrackIR into a USB port on your computer. For best results, directlyconnect the TrackIR into a USB port on your computer. We do not recommendusing a USB hub of any kind.
5.
NaturalPoint TrackIR Users Manual : Getting Started
4
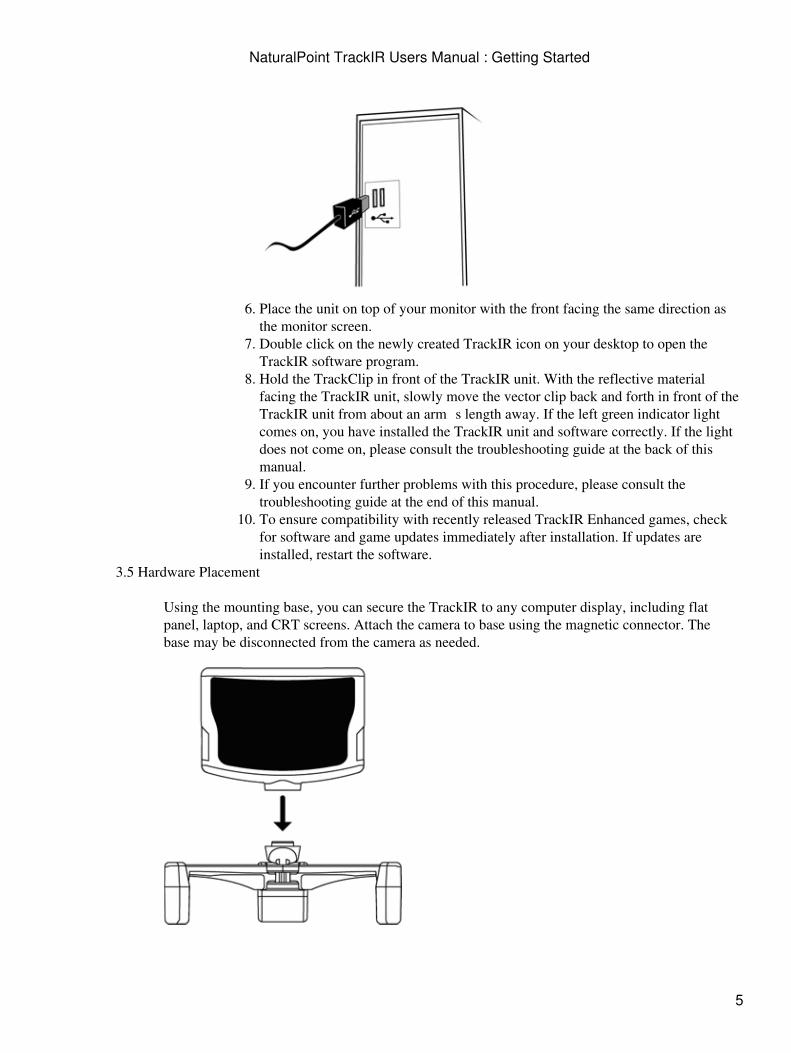
Place the unit on top of your monitor with the front facing the same direction asthe monitor screen.
6.
Double click on the newly created TrackIR icon on your desktop to open theTrackIR software program.
7.
Hold the TrackClip in front of the TrackIR unit. With the reflective materialfacing the TrackIR unit, slowly move the vector clip back and forth in front of theTrackIR unit from about an arm�s length away. If the left green indicator lightcomes on, you have installed the TrackIR unit and software correctly. If the lightdoes not come on, please consult the troubleshooting guide at the back of thismanual.
8.
If you encounter further problems with this procedure, please consult thetroubleshooting guide at the end of this manual.
9.
To ensure compatibility with recently released TrackIR Enhanced games, checkfor software and game updates immediately after installation. If updates areinstalled, restart the software.
10.
3.5 Hardware Placement
Using the mounting base, you can secure the TrackIR to any computer display, including flatpanel, laptop, and CRT screens. Attach the camera to base using the magnetic connector. Thebase may be disconnected from the camera as needed.
NaturalPoint TrackIR Users Manual : Getting Started
5
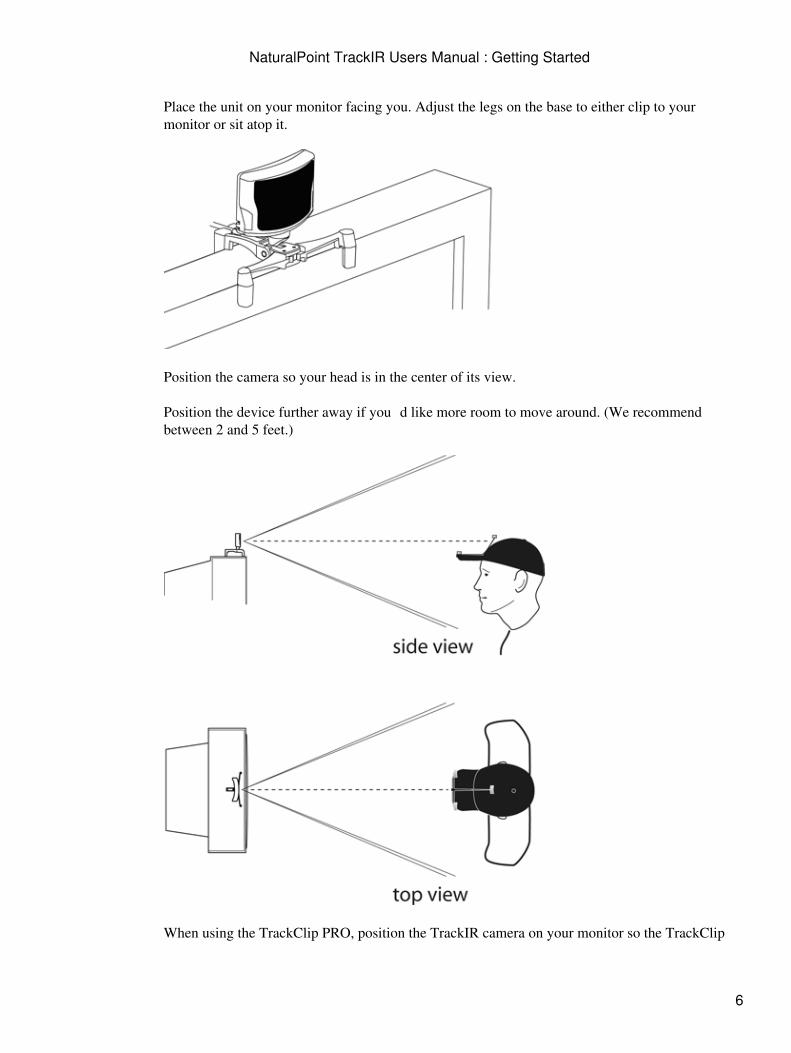
Place the unit on your monitor facing you. Adjust the legs on the base to either clip to yourmonitor or sit atop it.
Position the camera so your head is in the center of its view.
Position the device further away if you�d like more room to move around. (We recommendbetween 2 and 5 feet.)
When using the TrackClip PRO, position the TrackIR camera on your monitor so the TrackClip
NaturalPoint TrackIR Users Manual : Getting Started
6
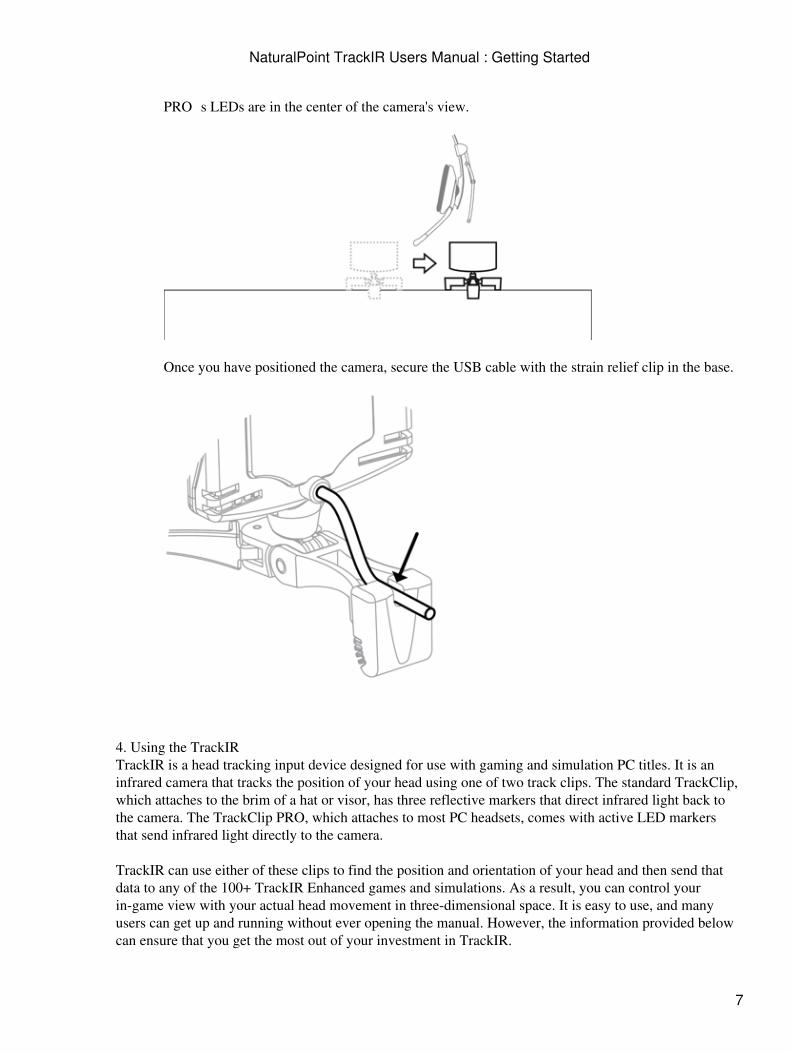
PRO�s LEDs are in the center of the camera's view.
Once you have positioned the camera, secure the USB cable with the strain relief clip in the base.
4. Using the TrackIRTrackIR is a head tracking input device designed for use with gaming and simulation PC titles. It is aninfrared camera that tracks the position of your head using one of two track clips. The standard TrackClip,which attaches to the brim of a hat or visor, has three reflective markers that direct infrared light back tothe camera. The TrackClip PRO, which attaches to most PC headsets, comes with active LED markersthat send infrared light directly to the camera.
TrackIR can use either of these clips to find the position and orientation of your head and then send thatdata to any of the 100+ TrackIR Enhanced games and simulations. As a result, you can control yourin-game view with your actual head movement in three-dimensional space. It is easy to use, and manyusers can get up and running without ever opening the manual. However, the information provided belowcan ensure that you get the most out of your investment in TrackIR.
NaturalPoint TrackIR Users Manual : Getting Started
7
4.1 Getting StartedBefore using your TrackIR gaming controller you should make sure to have all software andhardware properly installed as described in chapter 3. Once the software is installed, you canbegin using your TrackIR by doing the following:
Place the TrackIR on a surface directly in front of your face, and as close to level with thetop of your head as possible. This is usually best accomplished by placing the unit on topof your computer monitor. If using a laptop, the TrackIR can be clipped to the top of yourscreen.
◊
Plug the TrackIR�s USB cable into any available USB port on your computer.◊
Attach the TrackClip to your hat or TrackClip PRO to your headset.◊
Launch the TrackIR software.◊
4.1.1 Introduction to TrackIR EnhancedTrackIR is designed for use with games that are TrackIR Enhanced. TrackIR Enhanced gamesenable TrackIR to work alongside traditional peripherals by controlling the in-game view withyour actual head movement. The TrackIR is intended for use alongside mice, keyboards andjoysticks and does not replace them, though it does replace the traditional function of a joystick�sPOV hat switch. A list of games and simulations that are TrackIR Enhanced can be found on the�Titles� tab of the TrackIR version 5.x software.
New Titles are frequently being added, so check www.trackir.com for updates.
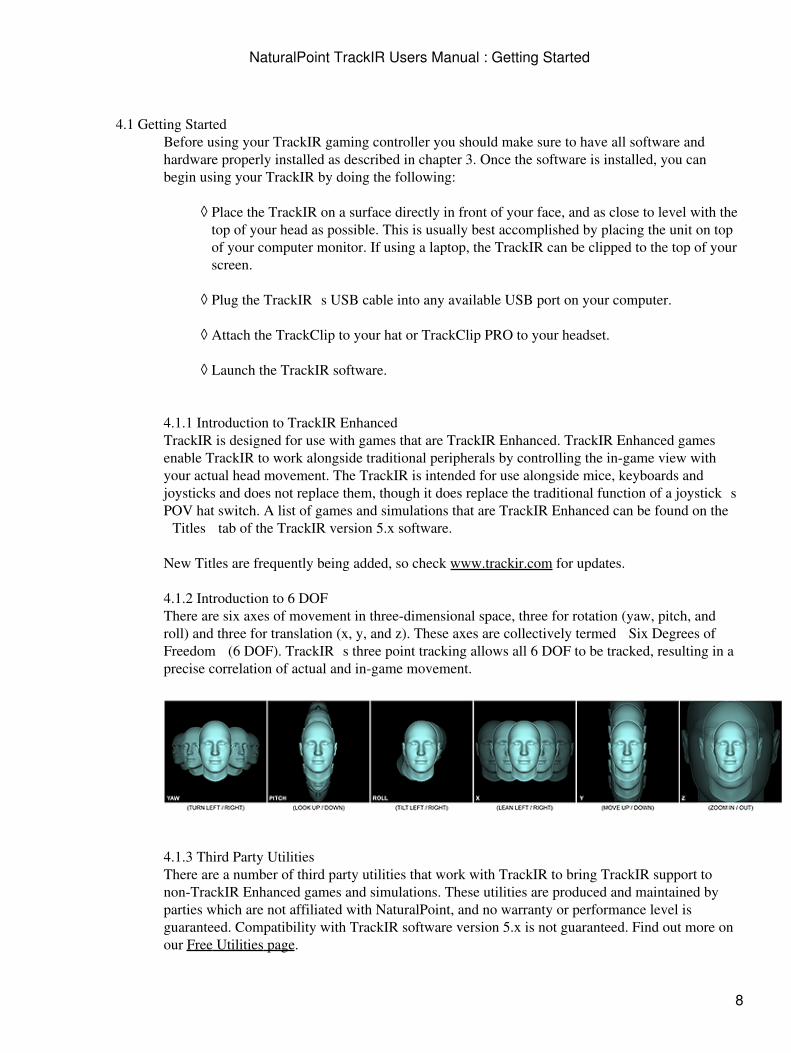
4.1.2 Introduction to 6 DOFThere are six axes of movement in three-dimensional space, three for rotation (yaw, pitch, androll) and three for translation (x, y, and z). These axes are collectively termed �Six Degrees ofFreedom� (6 DOF). TrackIR�s three point tracking allows all 6 DOF to be tracked, resulting in aprecise correlation of actual and in-game movement.
4.1.3 Third Party UtilitiesThere are a number of third party utilities that work with TrackIR to bring TrackIR support tonon-TrackIR Enhanced games and simulations. These utilities are produced and maintained byparties which are not affiliated with NaturalPoint, and no warranty or performance level isguaranteed. Compatibility with TrackIR software version 5.x is not guaranteed. Find out more onour Free Utilities page.
NaturalPoint TrackIR Users Manual : Getting Started
8

4.2 Tracking TypesThere are two types of tracking in the TrackIR software: one for use with the standard TrackClipand one for the TrackClip PRO headset accessory. For information about how to change the"Tracking Target", please see section 5.7.
4.3 Camera Status LED indicatorsThe TrackIR camera has status LEDs which give you visual cues about the status of the TrackIRsoftware. Use the following key to interpret what the state and color of the status LEDs mean:
TrackIR 5
Left Green : A clip IS being tracked.◊ Right Green : A TrackIR Enhanced Title IS running and has registered with the TrackIRsoftware to receive tracking data.
◊
Both Green : A clip IS being tracked, and a TrackIR Enhanced Title IS running and hasregistered with the TrackIR software to receive tracking data.
◊
Both Orange : TrackIR is paused◊ Both Off : A clip is NOT being tracked, and a TrackIR Enhanced Title is NOT runningor registered.
◊
TrackIR 3 & 4
Front Status LED :Off : NO clip is being tracked, and TrackIR Enhanced output is NOT paused.• Green : A clip IS being tracked, and TrackIR Enhanced output is NOT paused.• Orange : A clip IS being tracked, and TrackIR Enhanced output IS paused.• Red : NO clip is being tracked, and TrackIR Enhanced output IS paused.• Flashing Blue or Green : Low power or stand by mode.•
Blue Case LED :Off : There is NO TrackIR Enhanced Title (game or simulation) running.• Glowing Blue : A TrackIR Enhanced Title IS running and has registered with theTrackIR software to receive tracking data.
•
Note : If the Case LED has been disabled in the Tracking : Settings window, itwill not turn on.
•
5. The TrackIR software
5.1 OverviewThe TrackIR software is the interface between TrackIR, TrackIR Enhanced games andsimulations, and you. It must be running in order to use TrackIR. A list of games that are TrackIREnhanced can be found in the Titles tab of the software or on the Enhanced Games page of the
NaturalPoint TrackIR Users Manual : Getting Started
9
TrackIR website.
Once you have determined that a game is TrackIR Enhanced, you can continue to the next step.Verify that the TrackIR software is running before starting the simulation that you wish to usewith TrackIR. Once the game is running, it should be possible to control the view by moving yourhead. Some games may require you to turn on support for the TrackIR in the game menu oractivate the virtual cockpit. If the TrackIR it does not work immediately, please consult thegame's manual or manufacturer support for more details. The Enhanced Games page of theTrackIR website contains hints and tips for supported title compatibility.
5.1.1 Basic SettingsYou can access a few global tracking settings in the Basic Settings section. These settings enableyou to quickly and simply adjust the speed, smoothing, and tracking type for all games. Basicvisual preview options are also available. For details on adjusting Basic Settings, see section 5.6.
5.1.2 Advanced SettingsMany more settings are available to further customize your TrackIR experience. The AdvancedSettings section enables you to manage profiles, edit motion curves, preview tracking and viewcontrol, assign profiles to titles, and adjust camera hardware settings. For details on adjustingAdvanced Settings, see section 5.6.
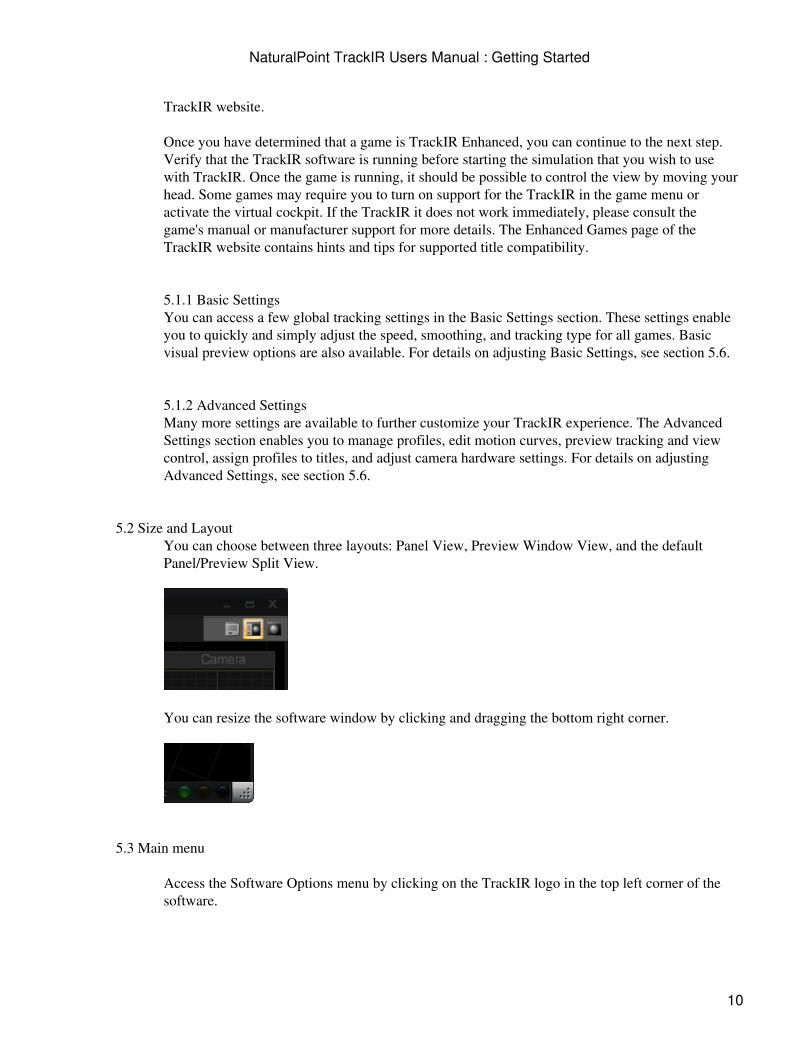
5.2 Size and LayoutYou can choose between three layouts: Panel View, Preview Window View, and the defaultPanel/Preview Split View.
You can resize the software window by clicking and dragging the bottom right corner.
5.3 Main menu
Access the Software Options menu by clicking on the TrackIR logo in the top left corner of thesoftware.
NaturalPoint TrackIR Users Manual : Getting Started
10
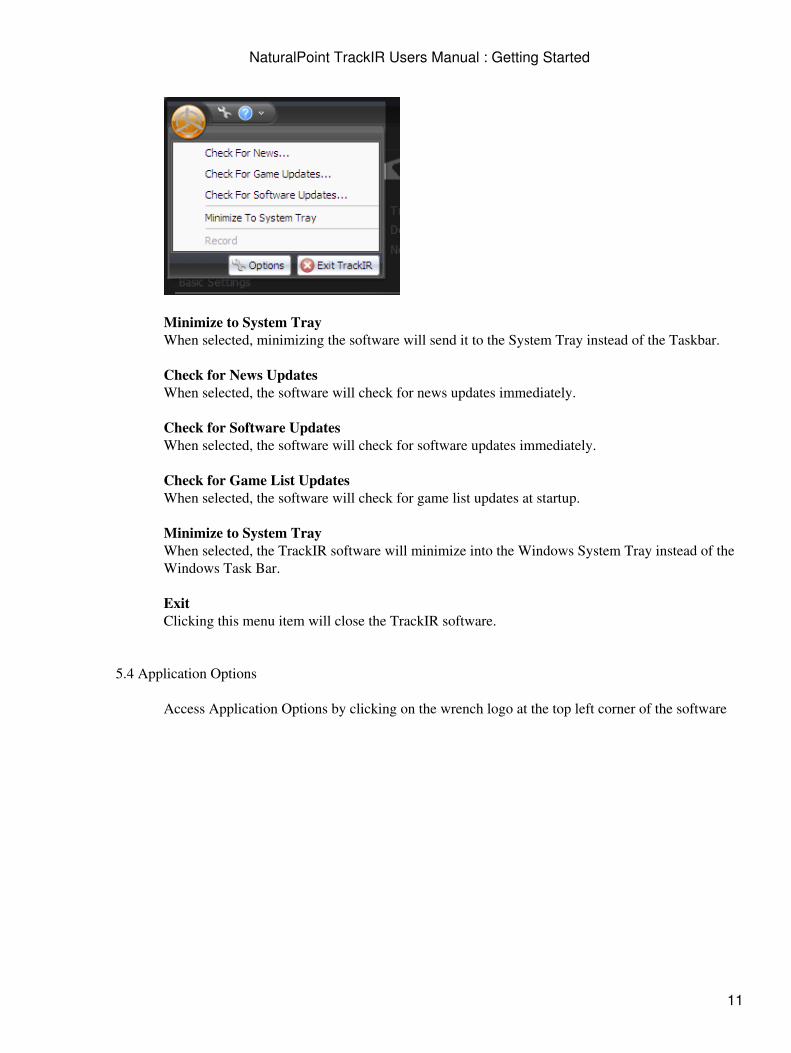
Minimize to System TrayWhen selected, minimizing the software will send it to the System Tray instead of the Taskbar.
Check for News UpdatesWhen selected, the software will check for news updates immediately.
Check for Software UpdatesWhen selected, the software will check for software updates immediately.
Check for Game List UpdatesWhen selected, the software will check for game list updates at startup.
Minimize to System TrayWhen selected, the TrackIR software will minimize into the Windows System Tray instead of theWindows Task Bar.
ExitClicking this menu item will close the TrackIR software.
5.4 Application Options
Access Application Options by clicking on the wrench logo at the top left corner of the software
NaturalPoint TrackIR Users Manual : Getting Started
11
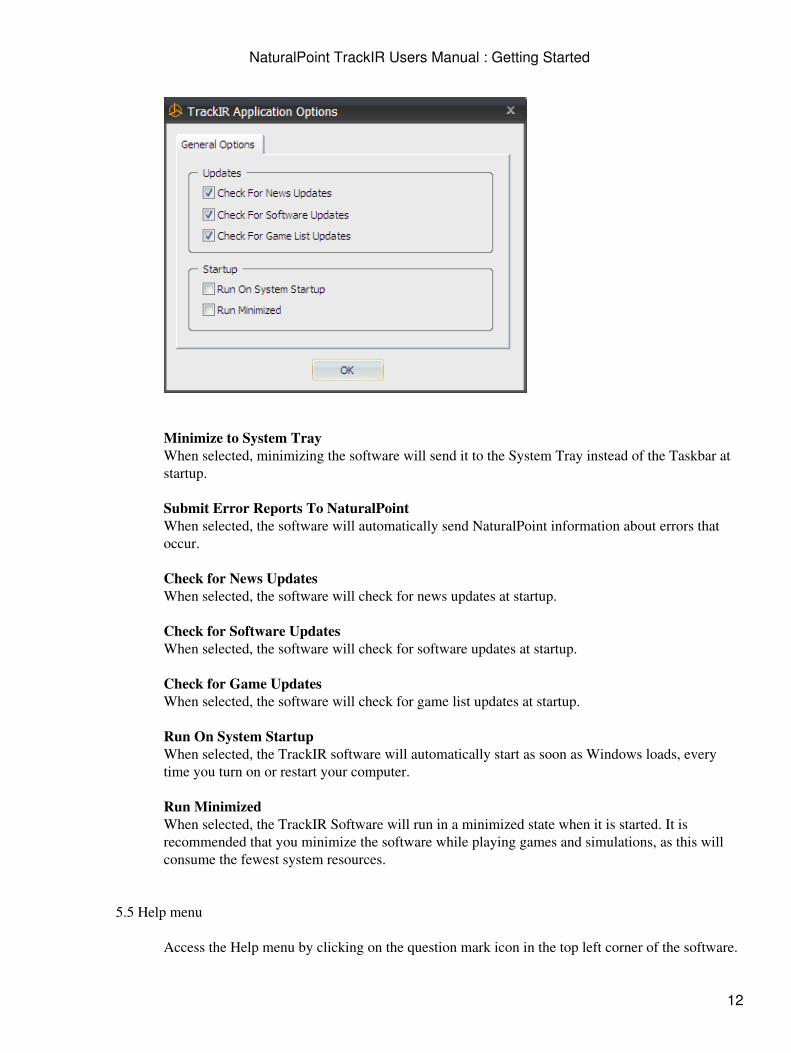
Minimize to System TrayWhen selected, minimizing the software will send it to the System Tray instead of the Taskbar atstartup.
Submit Error Reports To NaturalPointWhen selected, the software will automatically send NaturalPoint information about errors thatoccur.
Check for News UpdatesWhen selected, the software will check for news updates at startup.
Check for Software UpdatesWhen selected, the software will check for software updates at startup.
Check for Game UpdatesWhen selected, the software will check for game list updates at startup.
Run On System StartupWhen selected, the TrackIR software will automatically start as soon as Windows loads, everytime you turn on or restart your computer.
Run MinimizedWhen selected, the TrackIR Software will run in a minimized state when it is started. It isrecommended that you minimize the software while playing games and simulations, as this willconsume the fewest system resources.
5.5 Help menu
Access the Help menu by clicking on the question mark icon in the top left corner of the software.
NaturalPoint TrackIR Users Manual : Getting Started
12
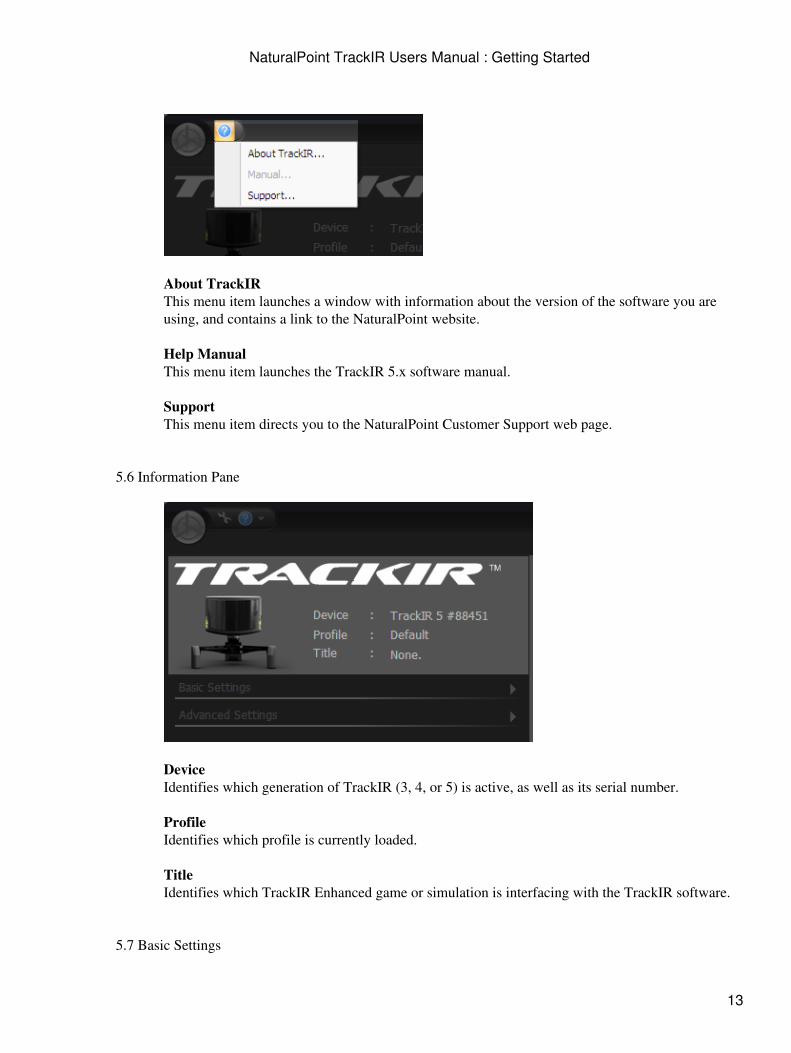
About TrackIRThis menu item launches a window with information about the version of the software you areusing, and contains a link to the NaturalPoint website.
Help ManualThis menu item launches the TrackIR 5.x software manual.
SupportThis menu item directs you to the NaturalPoint Customer Support web page.
5.6 Information Pane
DeviceIdentifies which generation of TrackIR (3, 4, or 5) is active, as well as its serial number.
ProfileIdentifies which profile is currently loaded.
TitleIdentifies which TrackIR Enhanced game or simulation is interfacing with the TrackIR software.
5.7 Basic Settings
NaturalPoint TrackIR Users Manual : Getting Started
13
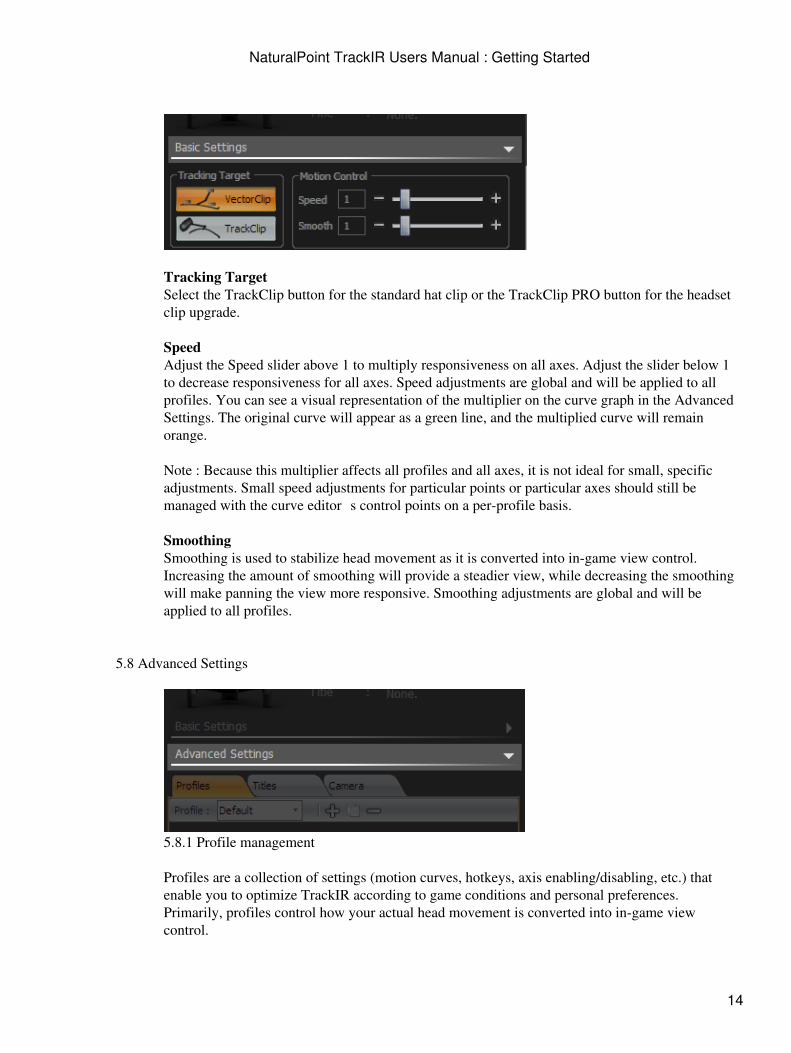
Tracking TargetSelect the TrackClip button for the standard hat clip or the TrackClip PRO button for the headsetclip upgrade.
SpeedAdjust the Speed slider above 1 to multiply responsiveness on all axes. Adjust the slider below 1to decrease responsiveness for all axes. Speed adjustments are global and will be applied to allprofiles. You can see a visual representation of the multiplier on the curve graph in the AdvancedSettings. The original curve will appear as a green line, and the multiplied curve will remainorange.
Note : Because this multiplier affects all profiles and all axes, it is not ideal for small, specificadjustments. Small speed adjustments for particular points or particular axes should still bemanaged with the curve editor�s control points on a per-profile basis.
SmoothingSmoothing is used to stabilize head movement as it is converted into in-game view control.Increasing the amount of smoothing will provide a steadier view, while decreasing the smoothingwill make panning the view more responsive. Smoothing adjustments are global and will beapplied to all profiles.
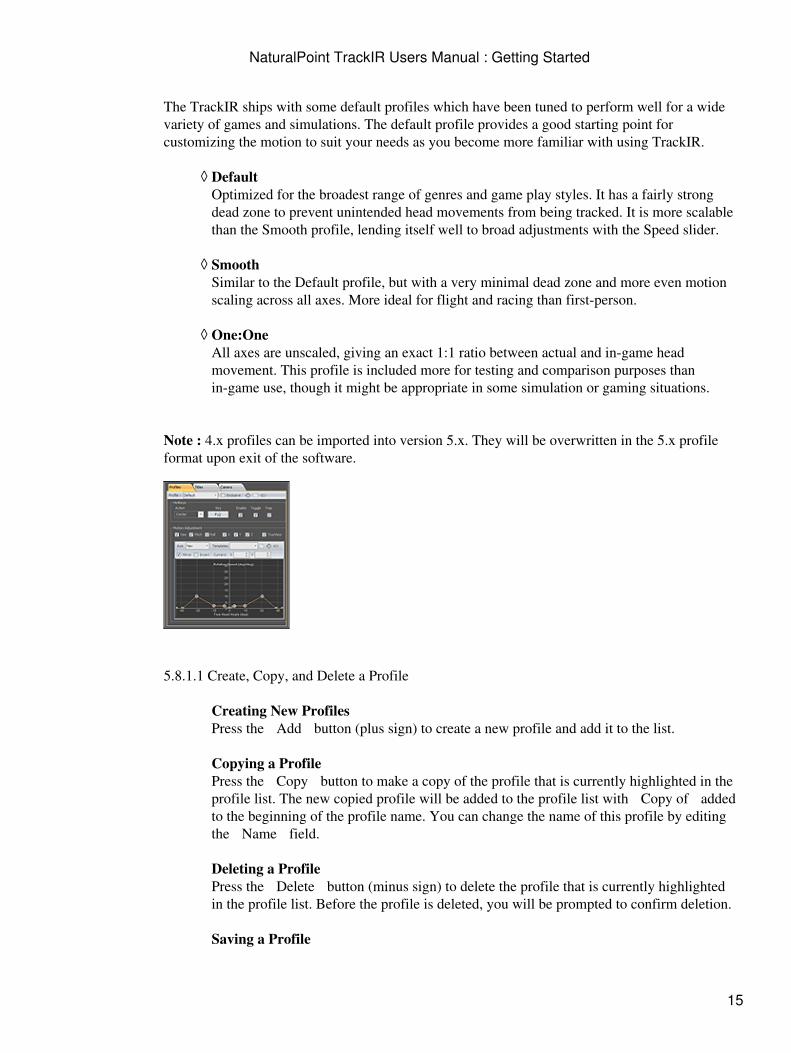
5.8 Advanced Settings
5.8.1 Profile management
Profiles are a collection of settings (motion curves, hotkeys, axis enabling/disabling, etc.) thatenable you to optimize TrackIR according to game conditions and personal preferences.Primarily, profiles control how your actual head movement is converted into in-game viewcontrol.
NaturalPoint TrackIR Users Manual : Getting Started
14
The TrackIR ships with some default profiles which have been tuned to perform well for a widevariety of games and simulations. The default profile provides a good starting point forcustomizing the motion to suit your needs as you become more familiar with using TrackIR.
DefaultOptimized for the broadest range of genres and game play styles. It has a fairly strongdead zone to prevent unintended head movements from being tracked. It is more scalablethan the Smooth profile, lending itself well to broad adjustments with the Speed slider.
◊
SmoothSimilar to the Default profile, but with a very minimal dead zone and more even motionscaling across all axes. More ideal for flight and racing than first-person.
◊
One:OneAll axes are unscaled, giving an exact 1:1 ratio between actual and in-game headmovement. This profile is included more for testing and comparison purposes thanin-game use, though it might be appropriate in some simulation or gaming situations.
◊
Note : 4.x profiles can be imported into version 5.x. They will be overwritten in the 5.x profileformat upon exit of the software.
5.8.1.1 Create, Copy, and Delete a Profile
Creating New ProfilesPress the �Add� button (plus sign) to create a new profile and add it to the list.
Copying a ProfilePress the �Copy� button to make a copy of the profile that is currently highlighted in theprofile list. The new copied profile will be added to the profile list with �Copy of� addedto the beginning of the profile name. You can change the name of this profile by editingthe �Name� field.
Deleting a ProfilePress the �Delete� button (minus sign) to delete the profile that is currently highlightedin the profile list. Before the profile is deleted, you will be prompted to confirm deletion.
Saving a Profile
NaturalPoint TrackIR Users Manual : Getting Started
15
You can save changes to a profile by pressing the �Save� button. Unsaved profilechanges can be kept or discarded by responding to the prompt that appears upon statechange or shutdown.
Note: Profiles are stored in the directory "%AppData%\NaturalPoint\TrackIR 5\Profiles".
5.8.1.2 Profile Settings
NameTo change a profile name, type the new name and then press �enter.�
Exclusive LoadWhen selected, the profile is locked as the only global profile. All TrackIR Enhancedgames will load the exclusively loaded profile. Note that as long as the Exclusive Loadfeature is active, the auto loading of other profiles will be disabled.
HotkeysHotkeys allow you to map keys or buttons on other input devices to perform functions inthe TrackIR software. You can select the keys to be used, turn the hotkey on or off,enable toggle mode, and trap the hotkey. Select the hotkey you wish to edit (Pause,Center, or Precision) from the dropdown menu.
PauseThe Pause hotkey allows you to control whether head tracking data is being sentto the TrackIR Enhanced title. You can pause head tracking to keep the in-gameview fixed, even while your head is moving.
•
CenterThe Center hotkey allows you to re-center your in-game view. Every time theCenter hotkey is pressed, it re-defines your current head position as the newcenter.
•
PrecisionThe Precision hotkey enables precision mode, which temporarily steadies theview by increasing smoothing. When precision mode is disabled, smoothingsettings return to the normal profile preset. Precision mode is commonly used incombat flight simulators when tracking an enemy in your sights to keep the viewas stable as possible.
•
Key ButtonUse to map the hotkey. Clicking these buttons brings up a dialog box that allowsyou to change the key assigned to the function listed next to the button. You canassign keyboard keys, joystick buttons, or mouse buttons as hotkeys.
•
Enable CheckboxTurns the associated hotkeys on and off.
•
Toggle Checkbox•
NaturalPoint TrackIR Users Manual : Getting Started
16

Toggled hotkeys are enabled by a single key press and disabled by a second keypress. Non-toggled hotkeys require the key to be held down for the hotkey to beenabled and released for the hotkey to be disabled.
Trap CheckboxTrapped hotkeys will not be available to any other programs. Untrapped hotkeyswill still perform the hotkey function within the TrackIR software, but can also besimultaneously used in other software that is running alongside TrackIR.
•
Note : Hotkey settings are stored on a per-profile basis.•
Axis CheckboxesCheck to enable head tracking for each particular axis. Uncheck to disable.
TrueViewTrueView takes virtual rotation (yaw, pitch, roll) into account when applying physicaltranslation (x, y, z) movements. This allows you to turn your head to one side, leantoward the monitor, and have your in-game view zoom in the direction you are virtuallyfacing. Disabling TrueView results in physical translation superseding virtual rotation, sothat moving toward the monitor physically always moves the in-game view straightahead, making it impossible to zoom in any direction other than straight ahead.
5.8.1.3 Motion Curves
Each axis can be adjusted to have a faster or slower response to your actual headmovement. The TrackIR software uses motion curves to amplify your real headmovement, allowing complete control of the in-game view with varying degrees of headmovement. Changing the motion curve for an axis allows you to fine-tune the amount ofhead movement used to control your view. It can also be used to create a dead zone,which helps negate small, unintentional head movements when the view is centered.
Select Axis for EditingSelect the desired axis for editing from the Axis dropdown. Once selected, the currentmotion curve will appear in the preview window below.
Using Control Points for Curve EditingThe control points on the graph allow you to change the shape of the curve by clickingand dragging the points. You can manually enter values or fine tune with the arrow keysin the adjustment boxes above the curve.
The X value of a control point represents where your head is in actual 3D space. So, acontrol point with an X value of 15 would represent actual head movement of 15 degrees(rotational) or 15 cm (translational).
NaturalPoint TrackIR Users Manual : Getting Started
17
The Y value of a control point represents its multiplication. So, a control point with a Yvalue of 4 would multiply your actual head movement by 4 at that position. A controlpoint with a Y value of 1 would result in 1:1 head/game movement at that position. Acontrol point with a Y value of .5 would reduce your in game movement to 50% of youractual head movement. A control point with a Y value of 0 would result in no in-gamemovement at that position (a �dead zone�).
Combining the X and Y values into one coordinate determines how much motion scalingwill occur at various points of your actual head movement. For instance, a control pointcoordinate of (15,3) would result in your in-game view control being 3x your actual headmovement when your head is at 15 degrees. So, 15 degrees of real life movement wouldresult in 45 degrees of in-game movement.
Note : You can zoom in on any area on the graph by hovering over it with your mousepointer and using the scroll wheel to move in and out or left-clicking and dragging over aregion. Click the scroll wheel to reset zoom. You can resize the graph by increasing thesize of the entire window or the settings pane
MirrorDeselect the mirror checkbox to manipulate control points on the graph independent oftheir mirrored value. This can be especially useful in optimizing the pitch and zoom axes.
InvertCheck to reverse tracking for each particular axis. Reversing the Pitch, Roll, X, and Zaxes allows for placement of the TrackIR camera behind your head.
LimitCheck to enable 180 degree view limits on rotational axes.
PointManually enter values to precisely adjust the selected control point on the graph.
CurveIf you wish to save a curve that you have created as a template for use with other curvesor profiles, click the �+� next to the Templates dropdown. This will add the curvetemplate to the list. To change the template name, type a new name in the field and thenpress �enter.�
Note : Shifting the curve down to 0 will flatten it, causing it to lose shape when shiftedback up.
TemplatesIf you wish to save a curve that you have created as a template for use with other curvesor profiles, click the �+� next to the Templates dropdown. This will add the curvetemplate to the list. To change the template name, type a new name in the field and thenpress �enter.� Remove a template by pressing the �Delete� button (minus sign). StockTemplates include One:One, Deadzone, Smooth, Fast, and Slow.
NaturalPoint TrackIR Users Manual : Getting Started
18
One:OneAdapted from the One:One default profile, this template is completely unscaled,giving an exact 1:1 ratio between actual and in-game head movement.
•
DeadzoneInspired by the Default profile, this template has moderate speed of motion with alarge dead zone. When head movement is relatively stationary, in-game view willnot move. Movement will slow when crossing the mid-point of axes.
•
SmoothInspired by the Smooth profile, this template has moderate speed of motion witha very slight dead zone. Actual head movement must be more stationary to keepin-game view still than with a dead zone, but movement will be smoother whenmoving across all axes.
•
FastAdapted from the Smooth template, this template has aggressive motion with avery slight dead zone. In-game view control will require less actual headmovement, but actual head movement must be very stationary to keep in-gameview still. Movement will be smooth when moving across all axes.
•
SlowAdapted from the Smooth template, this template has gentle motion with a veryslight dead zone. In-game view control will require more actual head movement,but actual head movement does not need to be as stationary to keep in-game viewstill. Movement will be smooth when moving across all axes.
•
Apply Curve TemplateApply a curve template to the desired axis by selecting it from the Templates.
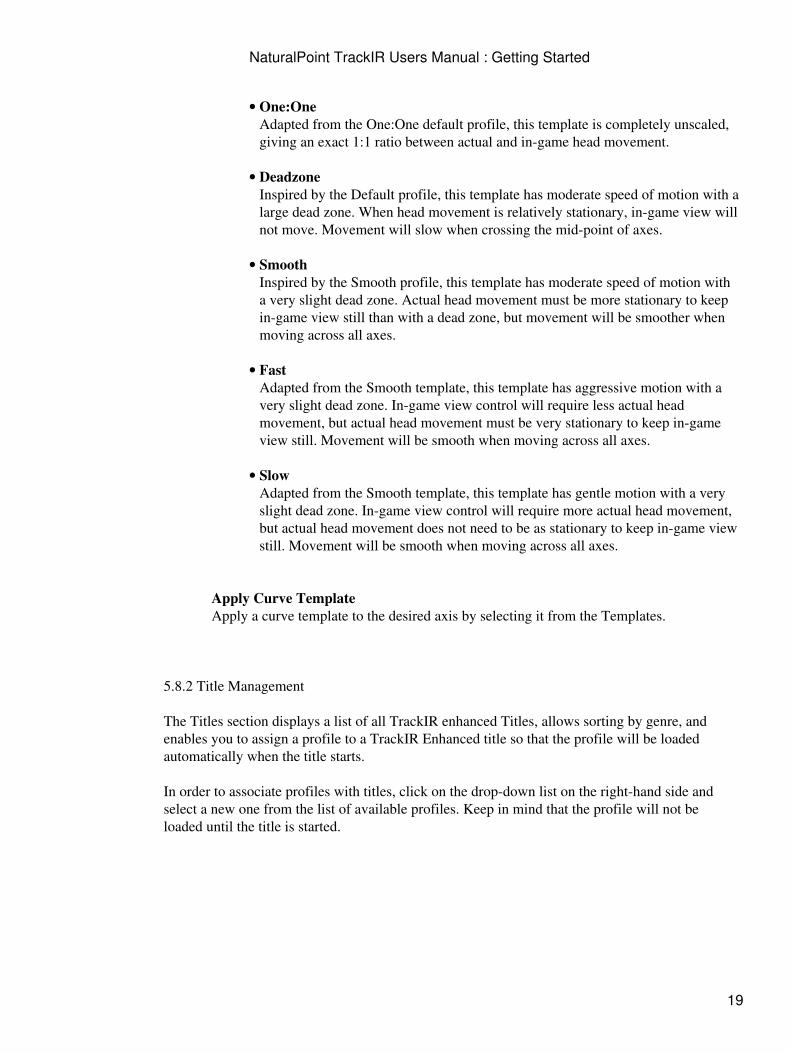
5.8.2 Title Management
The Titles section displays a list of all TrackIR enhanced Titles, allows sorting by genre, andenables you to assign a profile to a TrackIR Enhanced title so that the profile will be loadedautomatically when the title starts.
In order to associate profiles with titles, click on the drop-down list on the right-hand side andselect a new one from the list of available profiles. Keep in mind that the profile will not beloaded until the title is started.
NaturalPoint TrackIR Users Manual : Getting Started
19
To isolate a specific group of titles (either by genre or your favorites list), select the category fromthe Filter dropdown menu.
Note : You can add/remove titles on your favorites list by highlighting the title and clicking the�+� or ��� button. Click the �X� button to clear your favorites list.
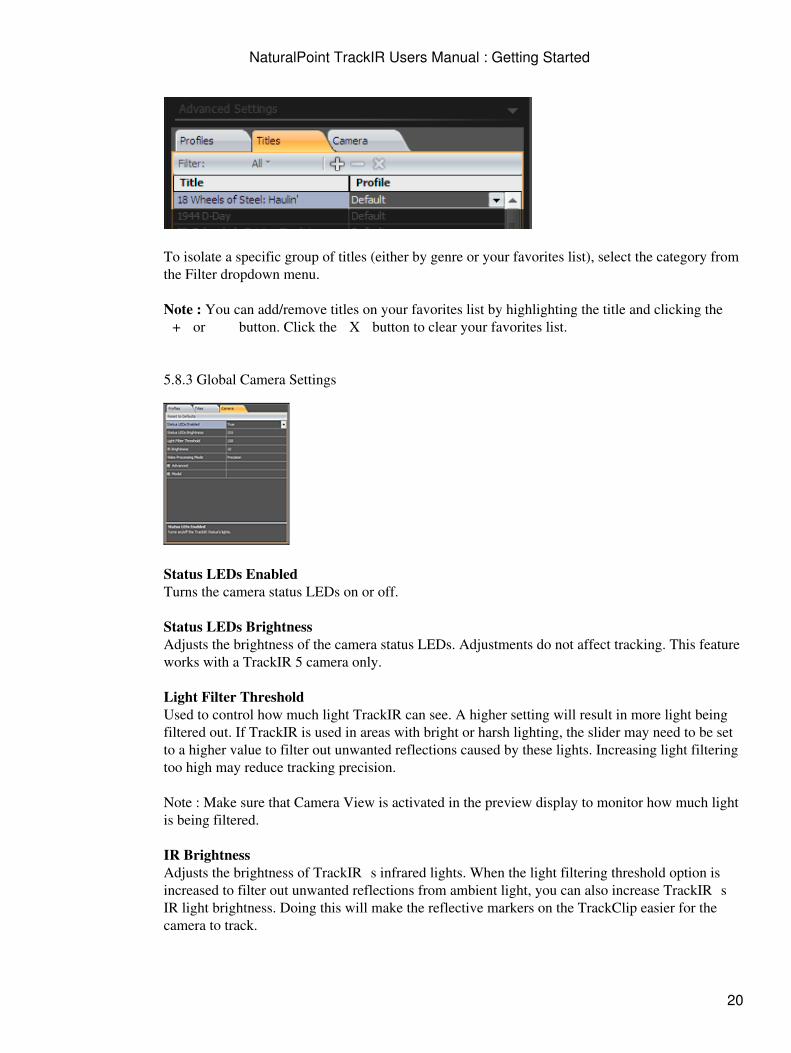
5.8.3 Global Camera Settings
Status LEDs EnabledTurns the camera status LEDs on or off.
Status LEDs BrightnessAdjusts the brightness of the camera status LEDs. Adjustments do not affect tracking. This featureworks with a TrackIR 5 camera only.
Light Filter ThresholdUsed to control how much light TrackIR can see. A higher setting will result in more light beingfiltered out. If TrackIR is used in areas with bright or harsh lighting, the slider may need to be setto a higher value to filter out unwanted reflections caused by these lights. Increasing light filteringtoo high may reduce tracking precision.
Note : Make sure that Camera View is activated in the preview display to monitor how much lightis being filtered.
IR BrightnessAdjusts the brightness of TrackIR�s infrared lights. When the light filtering threshold option isincreased to filter out unwanted reflections from ambient light, you can also increase TrackIR�sIR light brightness. Doing this will make the reflective markers on the TrackClip easier for thecamera to track.
NaturalPoint TrackIR Users Manual : Getting Started
20
Camera RotationChoose the correct rotation of the TrackIR unit if you have clipped the unit to any part of yourmonitor. If TrackIR is upright, then the rotation should be set to 0. If the unit is positioned on itsleft or right side or is upside down, then the rotation should be set to 90, 270 or 180 degreesrespectively.
Video Processing Mode
StandardStandard mode is intended for use with TrackIR 3 or 4. It should only be used withTrackIR 5 under extremely bright lighting conditions when the tracking screen isflickering and tracking is highly unstable. Please consult technical support before usingthis mode with TrackIR 5.
◊
PrecisionPrecision mode is intended for use with TrackIR 5 and cannot be used by previousgenerations. It offers superior resolution and tracking stability.
◊
5.9 Visual Preview
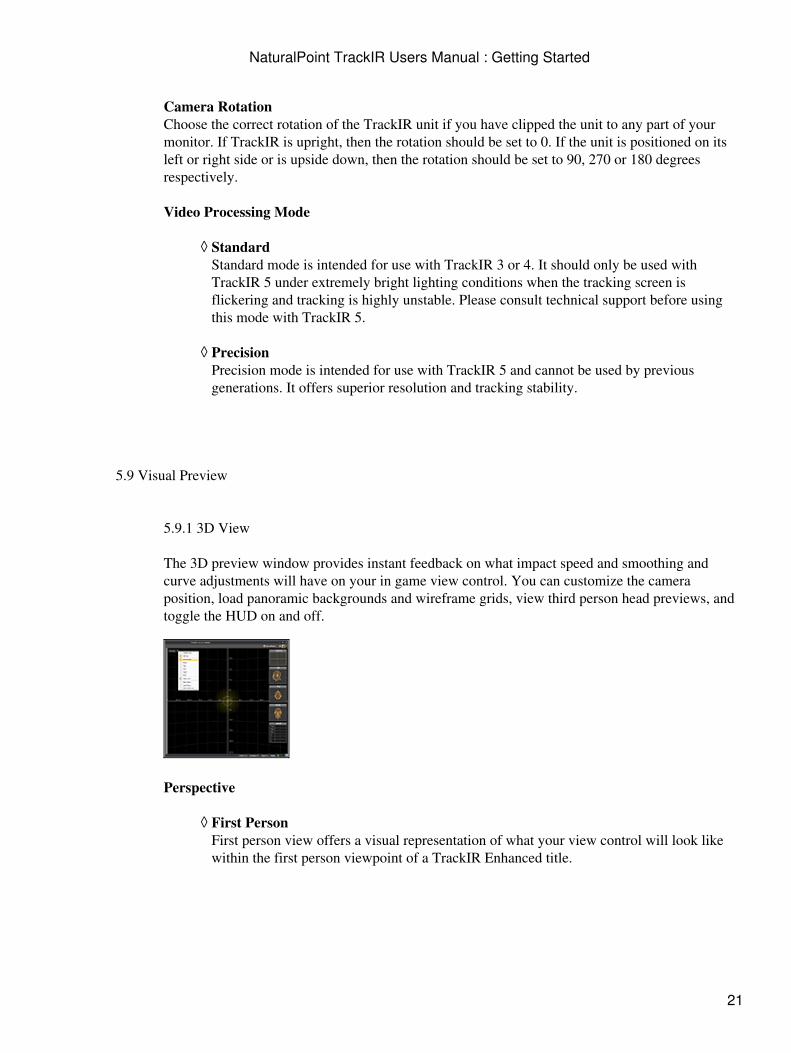
5.9.1 3D View
The 3D preview window provides instant feedback on what impact speed and smoothing andcurve adjustments will have on your in game view control. You can customize the cameraposition, load panoramic backgrounds and wireframe grids, view third person head previews, andtoggle the HUD on and off.
Perspective
First PersonFirst person view offers a visual representation of what your view control will look likewithin the first person viewpoint of a TrackIR Enhanced title.
◊
NaturalPoint TrackIR Users Manual : Getting Started
21

Third PersonThere are many third person viewpoints available, and you can manipulate each byleft-clicking and dragging to change the angle or using the mouse wheel to zoom in orout. Preset viewpoints include: Front, Top, Left, Right, and Rear. The smooth renderedhead model represents your real-life head movement, and the wire-frame overlayrepresents the in-game view control.
◊
Show HUDToggles the HUD (all windows on the 3D View Preview Window) on and off.
Show PanoUse to display a 2D panoramic image to the wireframe sphere. These are helpful for previewingyour current settings in a game-like environment.
Load PanoLoad custom panoramic images by selecting a bitmap in TrackIR 5\Data.
Show Pano GridSelect to remove the wire frame sphere to see just the panoramic image or reapply the sphere afterit has been removed.
Camera WindowThe Camera Window shows a 2D image of what the TrackIR camera is tracking, and what is inits field of view. This helps you adjust the position of yourself and the TrackIR camera to get thebest range of motion and tracking results. Undesired light sources in the camera�s view can alsobe identified using this window.
Left, Top, and Front HeadsThe Left, Top and Front preview windows show a third person view of the head model. Theyrepresent in game view control, giving you instant feedback on how your current settings willtranslate in game.
NaturalPoint TrackIR Users Manual : Getting Started
22
6 DOF DataThis shows the raw head tracking data that TrackIR is detecting.
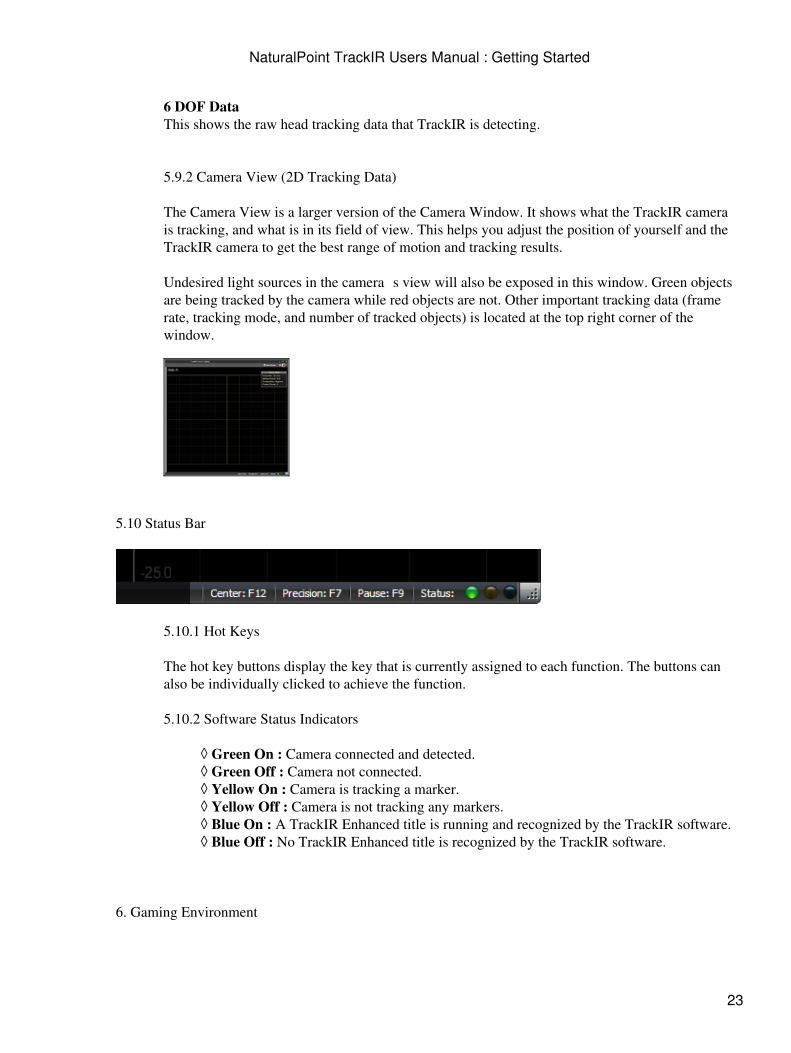
5.9.2 Camera View (2D Tracking Data)
The Camera View is a larger version of the Camera Window. It shows what the TrackIR camerais tracking, and what is in its field of view. This helps you adjust the position of yourself and theTrackIR camera to get the best range of motion and tracking results.
Undesired light sources in the camera�s view will also be exposed in this window. Green objectsare being tracked by the camera while red objects are not. Other important tracking data (framerate, tracking mode, and number of tracked objects) is located at the top right corner of thewindow.
5.10 Status Bar
5.10.1 Hot Keys
The hot key buttons display the key that is currently assigned to each function. The buttons canalso be individually clicked to achieve the function.
5.10.2 Software Status Indicators
Green On : Camera connected and detected.◊ Green Off : Camera not connected.◊ Yellow On : Camera is tracking a marker.◊ Yellow Off : Camera is not tracking any markers.◊ Blue On : A TrackIR Enhanced title is running and recognized by the TrackIR software.◊ Blue Off : No TrackIR Enhanced title is recognized by the TrackIR software.◊
6. Gaming Environment
NaturalPoint TrackIR Users Manual : Getting Started
23

Distance between the TrackIR and the userThe optimum distance between the user and the TrackIR is 24-36 inches. Using the TrackIR within thisrange will achieve the best balance between range of motion and tracking precision. We recommendhaving no more than 4 feet between the reflective target and the front of the TrackIR.
LightingWe recommend turning off or dimming lights in the room and removing any highly reflective materialsthat are directly in the view of the TrackIR�s camera. You can easily check what the TrackIR�s camera isseeing by opening the Camera View.
7. Limited Warranty
NaturalPoint warrants to the original consumer or other end user that this product, the NaturalPointTrackIR, is free from defects in materials and workmanship for a period of one year from the date ofpurchase. During the limited warranty period, and upon proof of purchase (in the form of productregistration) this product will be repaired or replaced at our option, without charge.
This warranty shall be voided if the product is modified, tampered with, misused, or subjected toabnormal working conditions. This warranty does not cover physical damage to the surface of thisproduct. This warranty does not apply when the malfunction results from the use of this product inconjunction with accessories, other products, or peripheral equipment.
Repair or replacement as provided under this warranty is the exclusive remedy of the purchaser.THIS WARRANTY IS IN LIEU OF ALL OTHER WARRANTIES, EXPRESS OR IMPLIED,INCLUDING ANY IMPLIED WARRANTY OF FITNESS OR SUITABILITY FOR A PARTICULARUSE OR PURPOSE, AND NATURALPOINT INC SHALL IN NO EVENT BE LIABLE TOPURCHASER FOR INDIRECT OR CONSEQUENTIAL DAMAGES OF ANY KIND ORCHARACTER.
Some states do not allow the exclusion or limitation or incidental or consequential damages or allowlimitations on how long an implied warranty lasts, so the above limitations and exclusions may not applyto you.
In order for NaturalPoint to honor your return, you MUST receive an RMA number by calling or emailingNaturalPoint, and the return the entire TrackIR package, including all accessories and software to:
NaturalPointAttn: RMA #####-####3658 SW Deschutes St.Corvallis, OR 97333
8 Trouble ShootingIf you are still experiencing difficulty after trying the suggestions in this trouble shooting guide, call1-541-753-6645 or visit our main website at www.naturalpoint.com or our online forums atforums.naturalpoint.com for advanced customer support.
NaturalPoint TrackIR Users Manual : Getting Started
24
8.1 Problem : Software loads and runs, but LED indicator light on unit does not come on; OR you receivea message saying, �The system cannot find the file specified or the software could not connect with theTrackIR device
Possible Causes1. Improper software/ hardware installation.2. Improper unit alignment. (for solution, see placement instructions in section 3.5)
SolutionsIf you connected the TrackIR unit before installing the software, do this:
1a. Shut down the software and wait 30 seconds. Unplug the TrackIR unit from your USB port.Then plug the TrackIR back into your USB port, wait another 30 seconds and restart the software.
1b. Right click on My Computer. Go to Properties. Go to the Device Manager. Double click onNaturalPoint Devices. If you see a device listed as TrackIR 3, 4, or 5 then this is not the problem.
1c. If you see a device listed as unknown or has a yellow and black �?� next to it,remove/uninstall that device. Disconnect the TrackIR unit and reboot. After system restarts,unplug all extraneous USB devices except the keyboard and mouse. Uninstall the NaturalPointsoftware.
Reboot two times. When the system restarts the second time, install the software again.Reboot. After the system comes up, reconnect the TrackIR unit. The camera should now berecognized and the Found New Hardware Wizard should start. Install the software driversaccordingly
Additional Solutions - System RestoreIf step (1c.) did not work, then you can try restoring your system to an earlier time period.If there are no unknown USB devices in the device manager, unplug the camera and then uninstallthe software; otherwise, remove the unknown USB device first, then unplug the camera anduninstall the software.
Perform a system restore to a time before you had your problems. This will clear your registry andreset your system to that day. Any installations of software or hardware since this date will needto be reinstalled again. Once the restore is done and system reboots, unplug all extraneous USBdevices. Leave Mouse and Keyboard plugged in.
Reboot a second time.Now begin the installation of the TrackIR from scratch.Install the software first. Use the latest version from the download section of our website.Plug in the TrackIR unit. The found new hardware wizard should start. Follow the installationinstructions at the beginning of the manual.
8.2 Problem : Erratic tracking, the in-game view �jumps� instead of panning smoothly.
NaturalPoint TrackIR Users Manual : Getting Started
25
Possible CausesInterference from another light source.
Solutions1. Click �Display� then �Camera View.�
2. You should see three green dots in the window. If you see more than three objects in thiswindow, check for highly reflective items or direct light sources in the background. Move theseobjects, move the camera, increase the light filtering on the Camera tab, or reposition yourmonitor.
8.3 Problem : All or some of my Hot Keys will not work.
Possible CausesConflict between selected key function and other system properties, or key already selected as adifferent Hot Key.
SolutionSelect a different key for this function.
8.4 Problem : None of the speed settings for view control feel right.
Possible CauseIncorrect speed settings.
SolutionSee sections 5.7.2 and 5.8.1.3 for information about how to adjust the speed for a profile.
8.5 Problem : In-game view control feels jittery.
Possible CauseNot enough smoothing.
SolutionIncrease smoothing slightly. See section 5.7 for information on how to adjust the smoothing for aprofile.
8.6 Problem : In-game view control feels mushy.
Possible CauseToo much smoothing.
SolutionSee section 5.7 for information on how to adjust the smoothing for a profile.
NaturalPoint TrackIR Users Manual : Getting Started
26