natural slate ventilated façade - cupadanmark.com · advantages of a ventilated facade. the main...
28
INSTALLATION GUIDE | 101, 201 and 301 systems NATURAL SLATE VENTILATED FAçADE
Transcript of natural slate ventilated façade - cupadanmark.com · advantages of a ventilated facade. the main...

INSTALLATION GUIDE | 101, 201 and 301 systems
natural slate ventilated façade

index
CUPACLAD® systems ComPonents
CUPACLAD® 101
CUPACLAD® 201
CUPACLAD® 301
3
8
14
20

CUPACLAD® solutions are lightweight, easy to install and they help to create a modern building appearance. In new constructions and in
renovation works, CUPACLAD® systems can be adapted to every architectural design.
CUPACLAD® is a group of ventilated façade systems CUPA natural slate. the natural slate chosen for the Cupaclad systems has been specially selected to meet the requirements of a façade cladding.
CUPA natural slate is fixed on horizontal battens with different fixing elements. The horizontal battens are fixed over the vertical battens, which are mechanically fixed to the wall, allowing a ventilated cavity.
Invisible fixing system. The
slate is installed horizontally
and it´s fixed with two
stainless steel screws. The
heads of the screws are under
the lap and remain invisible.
Visible fixing system. The
slate is installed horizontally
and it´s fixed with two
stainless steel brackets. The
outer part of the bracket at
the bottom of every slate
remains slightly visible.
Visible or invisible fixing
system. The slate is installed
according to the traditional
way, with vertical orientation.
CUPACLAD® 101 CUPACLAD® 201 CUPACLAD® 301
CUPACLAD® inCLUDes three Different systems, DePenDing on the instALLAtion ProCess AnD the DesireD APPeArAnCe:
3 NATURAL SLATE VENTILATED FAÇADE

Reduction of condensation and
humidity; and elimination of
filtration of rainwater.
NO hUmIDITythe existence of an air cavity behind the cladding gives CUPACLAD® systems the advantages of a ventilated facade. the main advantages are related to the “chimney effect”, effect of continuous ventilation due to the temperature variation between the outside air and the air inside the cavity:
VentiLAteD fAÇADe
CuPaCLAD® systems COmPONENTS
1. natural slate for façade
Natural slate gives unparalleled aesthetics.
This is an ecological, natural, and long lasting
material, and maintains its technical properties
over time.
CUPA natural slate for CUPACLAD® systems
has a thickness between 5 mm and 8.5 mm
depending on the instalation process, has
a riven surface, and was specially selected
for its technical features to provide the best
guarantees for installation in façades.
It is recommended to increase by 5% the total
amount of material to account for wastes due
to corner cuts, windows or singular points.
2. slate fixings
The slate can be fitted to the wooden structure using different kinds of fixings in stainless steel. It all
depends on the selected CUPACLAD® system.
instALLAtion gUiDe
4 NATURAL SLATE VENTILATED FAÇADE

Reduction of structural movements
and cracks in the building.
Energy saving and thermal
comfort, thanks to the cooling of
the building in summer, and the
control of thermal dispersion in
winter.
Increase the durability of the
cladding.
REDUCING STRUCTURAL mOvEmENTS
ENERGy SAvING DURAbILITyOf ThE CLADDING
The vertical battens must have the following
minimum requirements:
+ A minimum treatment class 3 against biohazards
according to EN 335-2, for dampness.
+ Mechanical classification class C 18 according to
EN 18 338.
+ When fixing, the maximum wood moisture
content must be below 20% (by weight).
Vertical battens must be secured to the supporting
wall. The flatness deviation of the support must
not exceed 5mm under the rule of 20cm or 10mm
under the rule of 2m.
3. substructure
Vertical battens
The vertical battens must have a minimum
thickness of 25 mm, and a minimum width of 50
mm.
The maximum distance between vertical battens
is 600mm.
fixing of vertical battens
The type and spacing of fixings for vertical battens
shall be defined in each project by a specialist,
depending on the characteristics of the wall. In any
case it is recommended that the distance between
fixings should not exceed 1 m.
5 NATURAL SLATE VENTILATED FAÇADE
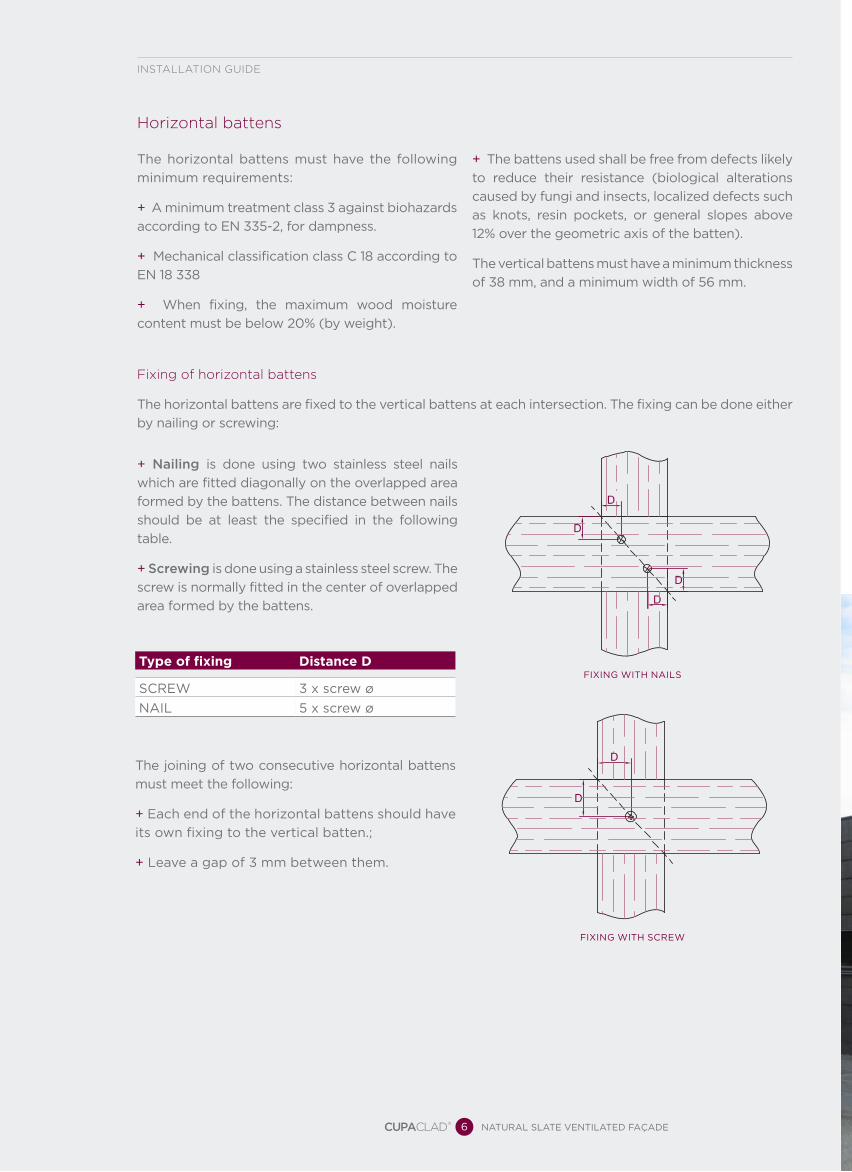
fixing of horizontal battens
The horizontal battens are fixed to the vertical battens at each intersection. The fixing can be done either
by nailing or screwing:
Type of fixing Distance D
SCREW 3 x screw ø
NAIL 5 x screw ø
FIxINg WITh SCREW
+ nailing is done using two stainless steel nails
which are fitted diagonally on the overlapped area
formed by the battens. The distance between nails
should be at least the specified in the following
table.
+ screwing is done using a stainless steel screw. The
screw is normally fitted in the center of overlapped
area formed by the battens.
The joining of two consecutive horizontal battens
must meet the following:
+ Each end of the horizontal battens should have
its own fixing to the vertical batten.;
+ Leave a gap of 3 mm between them.
The horizontal battens must have the following
minimum requirements:
+ A minimum treatment class 3 against biohazards
according to EN 335-2, for dampness.
+ Mechanical classification class C 18 according to
EN 18 338
+ When fixing, the maximum wood moisture
content must be below 20% (by weight).
horizontal battens
+ The battens used shall be free from defects likely
to reduce their resistance (biological alterations
caused by fungi and insects, localized defects such
as knots, resin pockets, or general slopes above
12% over the geometric axis of the batten).
The vertical battens must have a minimum thickness
of 38 mm, and a minimum width of 56 mm.
FIxINg WITh NAILS
instALLAtion gUiDe
6 NATURAL SLATE VENTILATED FAÇADE

height of the building (m)
minimal surface of ventilation (cm2/ml)
≤ 3m 50
from 3 to 6m 65
from 6 to 10m 80
from 10 to 18m 100
from 18 to 24m 115
5. Waterproof membrane
A waterproof membrane must be fitted over the
supporting wall (only for timber houses). Make sure
that the membrane does not cause any issues with
the ventilation of the air cavity once is fitted.
6. flashings
Flashings can be made of galvanized steel,
aluminum or zinc, and are designed to give a
solution for corners, window frames…
7. supporting Wall
The supporting wall must ensure the stability of
the building.
The wall must be sufficiently stable to support
the weight of the cladding and the wind loads
transmitted through the substructure.
CUPACLAD® systems can adapt to almost any
constructive solutions (type of wall, location of
the insulation material...)
4. Air cavity
It is mandatory to have an air gap behind the
slate. To get the air cavity perfectly ventilated,
the following requirements must be met:
+ The gap must be no less than 2cm deep.
+ Must allow enough space for the ventilation in
and out. The surface of the ventilation holes at
the top and bottom of the façade (expressed in
cm per lineal meter of façade) must be at least:
At the base of the façade, the gap is protected
by a ventilation grill.
7 NATURAL SLATE VENTILATED FAÇADE

101SLATE fIxINGS
INSTALLATION STEPS
CUPACLAD® 101 has invisible fixings. two special CUPACLAD® 101 screws in stainless steel are used to fit every slate to the horizontal battens.
Installing a ventilation grill at the bottom of the
façade, and the regular flashings for window
frames, corners…
1 2 fitting of the vertiCal battens
fixing the flashings
600 mm.
max.
8
instALLAtion gUiDe
NATURAL SLATE VENTILATED FAÇADE

9 NATURAL SLATE VENTILATED FAÇADE
101
10
1
Make chalk marks for the vertical installation
guidelines. We advise to mark at least the
vertical joints for every three slates.
3
54
fitting of the horizontal battens
Chalk Marksfitting an additional horizontal batten* at the bottoM of the façade
* PLEASE note the different gap between horizontal battens at the bottom of the façade
* The additional horizontal batten must have a thickness of 10mm.
144 mm.
130 mm.*

6 fixing the slates with the sPeCial CuPaClad® 101 sCrews in stainless steel.
STEP 1
STEP 3
STEP 2
instALLAtion gUiDe
10 NATURAL SLATE VENTILATED FAÇADE

TEChNICAL DRAWINgS CUPACLAD® 101
SYSTEM DETAILS
11 NATURAL SLATE VENTILATED FAÇADE
101

COPINg DETAIL
BASE DETAIL
1. CUPA natural slate2. Special screw CUPACLAD® 1013. horizontal batten4. Additional batten of thickness 10 mm.5. Vertical batten6. Supporting wall7. Ventilation grill
1. CUPA natural slate2. Special screw CUPACLAD® 1013. horizontal batten4. Vertical batten5. Supporting wall6. Coping flashing
WINDOW FRAME DETAILS
1. CUPA natural slate2. Special screw CUPACLAD® 1013. horizontal batten4. Vertical batten5. Supporting wall6. Sill flashing7. Lintel flashing8. Jamb flashing
instALLAtion gUiDe
12 NATURAL SLATE VENTILATED FAÇADE

LATERAL FINISh DETAIL
INTERNAL CORNER DETAIL
ExTERNAL CORNER DETAIL
1. CUPA natural slate2. Special screw CUPACLAD® 1013. horizontal batten4. Vertical batten5. Lateral flashings
CuPaClad® 101
slate dimension 40x20 cm
thickness 7,5 (±25%) mm
Color Blue-black
overlap 5,6 cm
exposure 40 x 14,4 cm
horizontal battens. distance top edge/top edge
14,4 cm
no. slates /m2 17,4
weight/m2 (slate) 30 Kg/m2 approx.
weight per pallet 1500 kg approx.
type of fixings Screw
no. fixings /slate 2 screws/slate
fixings material Stainless steel
Required additional fixing if
L1<L-100
13 NATURAL SLATE VENTILATED FAÇADE
101

201SLATE fIxINGS
INSTALLATION STEPS
CUPACLAD® 201 has visible fixings. it is required to use two special CUPACLAD® 201 brackets in stainless steel to fit every slate to the horizontal battens. the brackets can have both metal and lacquered finish.
1 2 fixing of the vertiCal battens
fixing the flashings
Fixing a ventilation grill at the bottom of the
façade, and the regular flashings for window
frames, corners…
600 mm.
max.
instALLAtion gUiDe
14 NATURAL SLATE VENTILATED FAÇADE

260 mm.
3
5
fixing of the horizontal battens
Positioning and fixing the stainless steel braCkets
Make chalk marks for the vertical installation
guidelines. We advise to mark at least the
vertical joints for every three slates, as well as
the position of the brackets.
4 Chalk Marks
15 NATURAL SLATE VENTILATED FAÇADE
201
20
1

6 fixing the slates
STEP 1
STEP 2
STEP 4
STEP 3
STEP 5
instALLAtion gUiDe
16 NATURAL SLATE VENTILATED FAÇADE

TEChNICAL DRAWINgS CUPACLAD® 201
SYSTEM DETAILS
17 NATURAL SLATE VENTILATED FAÇADE
201

COPINg DETAIL
BASE DETAIL
1. CUPA natural slate2. Special bracket CUPACLAD® 2013. Stainless steel screw 4x30mm4. horizontal batten5. Vertical batten6. Supporting wall7. Ventilation grill
1. CUPA natural slate2. Special bracket CUPACLAD® 2013. Stainless steel screw 4x30 mm4. horizontal batten5. Vertical batten6. Supporting wall7. Coping flashing8. Special screw CUPACLAD® 101
WINDOW FRAME DETAILS
1. CUPA natural slate2. Special bracket CUPACLAD® 2013. Stainless steel screw 4x30mm4. horizontal batten5. Vertical batten6. Supporting wall7. Special screw CUPACLAD® 1018. Still flashing9. Lintel flashing10. Jamb flashing
instALLAtion gUiDe
18 NATURAL SLATE VENTILATED FAÇADE

CuPaClad® 201
slate dimension 60x30 cm
thickness 6 (±25%) mm
slate color grey
overlap 4 cm
exposure 60x26 cm
horizontal battens. distance top edge/top edge
26 cm
no. slates /m2 6,4
weight/m2 (slate) 20 Kg/m2 approx.
weight per pallet 1500 kg approx.
type of fixings Bracket
no. fixings /slate 2 brackets/slate
fixings material Stainless steel
INTERNAL CORNER DETAIL
ExTERNAL CORNER DETAILLATERAL FINISh DETAIL
1. CUPA natural slate2. Special bracket CUPACLAD® 2013. horizontal batten
4. Vertical batten5. Lateral flashing6. Special metallic fixing for lateral finish
Required additional fixing ifL1<L-150
19 NATURAL SLATE VENTILATED FAÇADE
201

301SLATE fIxINGS
INSTALLATION STEPS
CUPACLAD® 301 has both invisible and visible fixings. two nails or two special CUPACLAD® 101 screws per slate are used for an invisible fixing; and one or two hooks per slate for a visible fixing. the fixings must be made of stainless steel.
CUPACLAD® 301 is the traditional method of fixing slates with a triple-lap. Several slate formats can be used as
well as different overlap dimensions. For this reason, the installation of the system CUPACLAD® 301 must be
performed by a specialist slate roofer.
The main installation steps are the followings:
1. Installing a ventilation grill at the bottom of the
façade.
2. Fixing the vertical battens.
3. Fixing the horizontal battens.
4. Fixing an additional horizontal batten at the bottom
of the façade.
5. Chalk Marks.
6. Fixing the slates.
instALLAtion gUiDe
20 NATURAL SLATE VENTILATED FAÇADE

TEChNICAL DRAWINgS CUPACLAD®
SYSTEM DETAILS
Nail system
hook system
21 NATURAL SLATE VENTILATED FAÇADE
301
30
1

COPINg DETAIL
BASE DETAIL
1. CUPA natural slate2. Stainless steel hook3. horizontal batten4. Vertical batten5. Supporting wall6. Ventilation grill
1. CUPA natural slate2. Stainless steel hook3. horizontal batten4. Vertical batten5. Supporting wall6. Coping flashing7. Nail
WINDOW FRAME DETAIL
1. CUPA natural slate2. Stainless steel hook3. horizontal batten4. Vertical batten5. Supporting wall6. Nail7. Sill flashing8. Lintel flashing9. Jamb flashing
instALLAtion gUiDe
22 NATURAL SLATE VENTILATED FAÇADE

This document is an installation guide for CUPACLAD® systems. The seller company cannot be considered responsible if the systems are not installed in accordance with these recommendations. The use of the screw CUPACLAD® 101 and the bracket CUPACLAD® 201 is essential for a correct performance of the systems. The seller will not accept any liability for damages caused by other types of fixings.
FIXATION AVEC UNE VISFIXATION AVEC UNE VISFIXATION AVEC UNE VISFIXATION AVEC UNE VISFIXATION AVEC UNE VISFIXATION AVEC UNE VISFIXATION AVEC UNE VISFIXATION AVEC UNE VISFIXATION AVEC UNE VIS
LATERAL FINISh DETAIL
INTERNAL CORNER DETAIL
ExTERNAL CORNER DETAIL
1. CUPA natural slate2. Stainless steel hook3. horizontal batten
4. Vertical batten5. Lateral finish flashing
Required additional fixing ifL1<L/2
23 NATURAL SLATE VENTILATED FAÇADE
301

24 NATURAL SLATE VENTILATED FAÇADE
101

25 NATURAL SLATE VENTILATED FAÇADE
201

26 NATURAL SLATE VENTILATED FAÇADE
301


CuPaCLAD® systems have been designed and developed by CUPA
45 Moray Placeedinburgh eH3 6BQ – UKPhone +44 0131 22 53 111 | fax: 0131 22 05 [email protected]