
Natural Deduction Proof and Disproof in Jape · Peter Burton, Keith Clarke, Adam Eppendahl, David...
46
Transcript of Natural Deduction Proof and Disproof in Jape · Peter Burton, Keith Clarke, Adam Eppendahl, David...

2

Preface
This manual is a how-to for Jape and my Natural Deduction encoding. Earlier versions contained a gooddeal of logic teaching. That’s been dropped, since now there’s a book (Logic for Programmers, OUP) whichsays it all a good deal better. You will learn about logic by playing with Jape, so I suppose there’s stillteaching in there.
This document was written on a Mac, and the illustrations are all taken from the MacOS X version of Jape.All Japes, on Linux, Solaris, Windows, MacOS X or whereever, run exactly the same code but the interfacescan look slightly different. I haven’t produced different versions of the manual because I think — rather, Ihope — that those differences in fonts, in window controls, in the placing of menus and so on, don’t reallymatter. If I’m wrong then I hope somebody will tell me.
Jape or NDJape?
This manual is really about how Jape, which is capable of working with many different logics, has beenmade to deal with Natural Deduction as described in my book. Instead of talking about what ‘Jape’ doeswhen dealing with→ formulae, I should really talk about what ‘Jape loaded with the I2L encoding’ does.But that’s such a mouthful that I just talk as if there is only one Jape, and all it does is Natural Deduction.
If you’re interested there’s a manual on the website (http://www.japeforall.org.uk) which tells you how toroll your own logic encodings. Best of luck.
Differences from the book
• Jape writes its premises on a single line, separated by commas, instead of using a separate line foreach premise;
• Jape writes quantifications as ∀x.P (x) and ∃y.Q(y) — with a dot between bound variable and predi-cate — instead of ∀x(P (x)) and ∃y(Q(y))
So far as I know, these are the only significant differences.
Any comments?
If Jape doesn’t work for you, it isn’t working, and if it isn’t working I’d like to hear about it.
Please send any comments, thoughts, complaints or whatever to me (see title page for email address). I’lldo my best to reply quickly and if your message is of general interest I’ll put it up on the website (with yourpermission, and hiding your email address from the spambots at least).
3

4
Acknowledgements
I designed and built Jape between 1991 and 2002 whilst I was at Queen Mary College, University of London,working with Bernard Sufrin of the Bernard Sufrin of the Computer Laboratory, Oxford University. I’vecontinued to develop it at Middlesex University since. Bernard worked on the implementation with me forthe first four years or so. That doesn’t describe all he did: his design insights were crucial and without himJape wouldn’t exist or be half as good as it is. His program architecture, which he worked out in the firstfew months of our collaboration, is still in place even though Jape has been rebuilt from the ground up morethan once. He still produces the Jape distributions and running the www.japeforall.org.uk website.
For the rest of it I’ve been strongly influenced by colleagues at Queen Mary, many of whom have madeseminal suggestions which have improved Jape. In alphabetical order I single out Jules Bean, John Bell,Peter Burton, Keith Clarke, Adam Eppendahl, David Pym, Graem Ringwood, Mike Samuels, Paul Taylorand Graham White.
Jape began as an experiment towards the end of an EPSRC research project on the use of symbolic calcula-tors to teach formal reasoning, joint with Steve Reeves and Doug Goldson at Queen Mary, and Tim O’Sheaand Pat Fung at the Open University. A later project, with Pat Fung and James Aczel from the OU, lookedat students using Jape; James’s insightful summary of their difficulties led to a redesign of the treatment ofnatural deduction, and directly to this version of the program.
Jape’s proof engine was originally written in SML and compiled by SMLNJ, with interfaces for differentoperating systems written in C, tcl/tk, Python and I can’t remember what else. In 2002 I ported the engineto OCaml and wrote a system-independent interface module in Java. I’m grateful to the implementers ofall those languages, especially for their decision to provide their software for free. Jape is free too, athttp:www.japeforall.org.uk.
Contents
1 Basics 71.1 Getting started . . . . . . . . . . . . . . . . . . . . . . . . . . . . . . . . . . . . . . . . . . 7
1.2 Finishing a proof . . . . . . . . . . . . . . . . . . . . . . . . . . . . . . . . . . . . . . . . 9
1.3 Saving and restoring your work . . . . . . . . . . . . . . . . . . . . . . . . . . . . . . . . . 9
1.4 Printing and Exporting . . . . . . . . . . . . . . . . . . . . . . . . . . . . . . . . . . . . . 9
1.5 Making Jape work for you . . . . . . . . . . . . . . . . . . . . . . . . . . . . . . . . . . . 9
1.5.1 Only reflect . . . . . . . . . . . . . . . . . . . . . . . . . . . . . . . . . . . . . . . 9
1.5.2 Be brave . . . . . . . . . . . . . . . . . . . . . . . . . . . . . . . . . . . . . . . . 10
1.5.3 Never guess an assumption . . . . . . . . . . . . . . . . . . . . . . . . . . . . . . . 10
2 Gestures: mouse clicks, presses and drags 112.1 Formula selection . . . . . . . . . . . . . . . . . . . . . . . . . . . . . . . . . . . . . . . . 11
2.1.1 Ambiguous formulae click both ways . . . . . . . . . . . . . . . . . . . . . . . . . 11
2.1.2 Greying-out . . . . . . . . . . . . . . . . . . . . . . . . . . . . . . . . . . . . . . . 12
2.2 Subformula selection . . . . . . . . . . . . . . . . . . . . . . . . . . . . . . . . . . . . . . 12
2.3 Dragging . . . . . . . . . . . . . . . . . . . . . . . . . . . . . . . . . . . . . . . . . . . . 13
3 Backward and forward steps 153.1 Making a forward step . . . . . . . . . . . . . . . . . . . . . . . . . . . . . . . . . . . . . 15
3.1.1 Selecting a target conclusion . . . . . . . . . . . . . . . . . . . . . . . . . . . . . . 17
3.1.2 What can go wrong with a forward step? . . . . . . . . . . . . . . . . . . . . . . . 17
3.2 Making a backward step . . . . . . . . . . . . . . . . . . . . . . . . . . . . . . . . . . . . 18
3.2.1 What can go wrong with a backward step? . . . . . . . . . . . . . . . . . . . . . . 18
3.3 Steps which don’t need a selection . . . . . . . . . . . . . . . . . . . . . . . . . . . . . . . 19
4 Rules of thumb for proof search 214.1 Look at the shape of the formula . . . . . . . . . . . . . . . . . . . . . . . . . . . . . . . . 22
5 The steps summarised 235.1 ∧ steps . . . . . . . . . . . . . . . . . . . . . . . . . . . . . . . . . . . . . . . . . . . . . . 23
5.2 → steps . . . . . . . . . . . . . . . . . . . . . . . . . . . . . . . . . . . . . . . . . . . . . 23
5
6 CONTENTS
5.3 ∨ steps . . . . . . . . . . . . . . . . . . . . . . . . . . . . . . . . . . . . . . . . . . . . . . 25
5.4 ¬ steps . . . . . . . . . . . . . . . . . . . . . . . . . . . . . . . . . . . . . . . . . . . . . . 26
5.5 ⊥ (contradiction) steps . . . . . . . . . . . . . . . . . . . . . . . . . . . . . . . . . . . . . 28
5.6 > (truth) step . . . . . . . . . . . . . . . . . . . . . . . . . . . . . . . . . . . . . . . . . . 28
5.7 ∀ steps . . . . . . . . . . . . . . . . . . . . . . . . . . . . . . . . . . . . . . . . . . . . . . 28
5.8 ∃ steps . . . . . . . . . . . . . . . . . . . . . . . . . . . . . . . . . . . . . . . . . . . . . . 30
6 Unknowns, hyp and Unify 316.1 Introducing an unknown . . . . . . . . . . . . . . . . . . . . . . . . . . . . . . . . . . . . 31
6.2 Avoiding unknowns by subformula selection . . . . . . . . . . . . . . . . . . . . . . . . . . 32
6.3 Eliminating an unknown with Unify . . . . . . . . . . . . . . . . . . . . . . . . . . . . . . 33
6.4 Eliminating an unknown with hyp . . . . . . . . . . . . . . . . . . . . . . . . . . . . . . . 33
6.5 Provisos and the privacy condition . . . . . . . . . . . . . . . . . . . . . . . . . . . . . . . 34
7 Disproof 357.1 Getting started . . . . . . . . . . . . . . . . . . . . . . . . . . . . . . . . . . . . . . . . . . 35
7.2 Alternative sequents . . . . . . . . . . . . . . . . . . . . . . . . . . . . . . . . . . . . . . . 36
7.2.1 Selecting a situation . . . . . . . . . . . . . . . . . . . . . . . . . . . . . . . . . . 36
7.2.2 What’s forced ? — colouring, greying, underlining . . . . . . . . . . . . . . . . . . 37
7.3 Making diagrams . . . . . . . . . . . . . . . . . . . . . . . . . . . . . . . . . . . . . . . . 37
7.3.1 Dragging worlds . . . . . . . . . . . . . . . . . . . . . . . . . . . . . . . . . . . . 38
7.3.2 Dragging lines . . . . . . . . . . . . . . . . . . . . . . . . . . . . . . . . . . . . . 38
7.3.3 Dragging formulae . . . . . . . . . . . . . . . . . . . . . . . . . . . . . . . . . . . 38
7.4 Making individuals and predicate instances . . . . . . . . . . . . . . . . . . . . . . . . . . 39
7.5 Exploring reasons . . . . . . . . . . . . . . . . . . . . . . . . . . . . . . . . . . . . . . . . 39
7.6 Completing a disproof . . . . . . . . . . . . . . . . . . . . . . . . . . . . . . . . . . . . . 40
7.7 Printing disproofs . . . . . . . . . . . . . . . . . . . . . . . . . . . . . . . . . . . . . . . . 40
8 Using theorems and stating conjectures 418.1 Using theorems . . . . . . . . . . . . . . . . . . . . . . . . . . . . . . . . . . . . . . . . . 41
8.2 Stating your own conjectures . . . . . . . . . . . . . . . . . . . . . . . . . . . . . . . . . . 43
9 Troubleshooting 459.1 Problems getting started . . . . . . . . . . . . . . . . . . . . . . . . . . . . . . . . . . . . 45
9.2 What if a proof step goes wrong? . . . . . . . . . . . . . . . . . . . . . . . . . . . . . . . . 45

Chapter 1
Basics
1.1 Getting started
If you don’t already have Jape, download it from http://www.japeforall.org.uk. Install it, following theinstructions carefully.
You should have a directory containing the Jape application and a subdirectory called examples. Double-click Jape, and you will see a window like figure 1.1.1
Using the Open New Theory command in the File menu, open examples/natural deduction/I2L.jt. Youshould see several windows containing logical conjectures (claims to be proved), called panels in Jape. TheConjectures panel should look something like figure 1.2 (you will probably have to resize the window tomake it look like this). Double-click any line to begin, or select a line and press the Prove button at thebottom of the panel. You will see a proof window like figure 1.3, and off you go!
1 You may see minor differences. The illustrations in this manual are taken from MacOS X. On Windows and Linux you will seea menu bar in the window and the window title will be Jape. But those differences don’t matter much, so I won’t refer to themagain.
Figure 1.1: The Jape splash screen
7

8 CHAPTER 1. BASICS
Figure 1.2: The Conjectures panel Figure 1.3: A proof window
Figure 1.4: A conjecture panel with a provedconjecture
Figure 1.5: A conjecture panel with provedand disproved conjectures

1.2. FINISHING A PROOF 9
1.2 Finishing a proof
When you have made a proof of a conjecture — no more lines of dots in the proof window — you can saveit: pull down the Edit menu and select Done. The proof window closes, and Jape records the fact that theconjecture is proved, marking its entry in the conjectures panel with a tick in the margin, as illustrated infigure 1.4. If you disprove a conjecture (see chapter 7) then you can record that too, and you get a cross inthe margin. Because classical proof and constructive disproof overlap, you can even get both marks againstthe same conjecture, as illustrated in figure 1.5.
Proof of a conjecture makes it a theorem. You can use theorems in your proofs as if they were additionalNatural Deduction rules (select the theorem in the panel, press the Apply button), and you can review theirproofs using the Show Proof button. See chapter 8 for more information.
1.3 Saving and restoring your work
Jape offers to record your proofs — saved and unsaved — when you quit or when you choose “Save Proofs”or “Save Proofs As ...” from the File menu. It will reload saved proofs using “Open ...”, also from the Filemenu.
1.4 Printing and Exporting
You can print a proof using the Print Proof command on the Edit menu. If you have a disproof on the go (seechapter 7) you can print it using the Print Disproof command, or proof and disproof together using Print.
To make a pdf or ps copy of a proof in a file, use Export Proof, Export Disproof or Export, all on the Editmenu.
1.5 Making Jape work for you
1.5.1 Only reflect
Jape is designed to be easy to use, which means that the mouse and menu and window stuff don’t get in theway of the logic. It’s so easy to use that you can have great fun clicking away, ‘solving’ lots of problemswithout always knowing exactly what you’re doing. That’s ok, because you can learn while you’re havingfun, and you can do things for yourself without asking for help. But it’s obviously not the whole story.
Because Jape is easy to use it brings you quickly to a point where you can ask interesting and importantquestions. The kind of question you are supposed to ask is “is the logic really supposed to work like that?”If there are experts around you can ask them, but if you are on your own you can still ask yourself. Thatisn’t a daft thing to do: educationalists call it reflection, and it’s one of the best ways to learn.
Some logical proofs are hard to believe at first. Some single logical steps are pretty surprising. I hope thatyou will always read through finished Jape proofs to see if you can believe them. If there is a surprise, askyourself: where does the surprise come from? By undoing and redoing steps you can watch the surpriseemerge and explain to yourself why it’s necessary.
Jape’s a machine, and that has disadvantages as well as advantages. The big advantage is that a machinecan do formal calculation — proof and disproof — perfectly, without mistake. The big disadvantage is thatit can’t understand anything about what it’s doing. Jape doesn’t know the difference between a nice proof
10 CHAPTER 1. BASICS
and a nasty one. Sometimes reflection will show you that there is a shorter or prettier proof than the one youhave made. You can always undo your work and try again!
1.5.2 Be brave
We read proofs top-to-bottom most of the time. Novices, reasonably but mistakenly, imagine that proofsare constructed top-to-bottom too: start at line 1 and work forwards. Well, sometimes it is done that way,but at least as often it’s done the other way round, bottom-to-top, starting with the last line and workingbackwards. Be brave and try it! If you stick to forward proof you make life very difficult for yourself, sobravery pays dividends.
Bravery is needed, too, when learning how proof steps work. It’s reasonable when playing with an interactiveprogram to first try only steps that make small changes, but eventually you have to try everything. It’s justlike riding a bike: once you’ve plucked up courage you can’t remember what it felt like to be scared of ∨elim or ∧ intro or whatever. Just do it!
1.5.3 Never guess an assumption
A proof is really a structure of deductions, not a sequence of lines, and its assumption boxes show thatstructure. Reading a proof from top to bottom, every assumption that is introduced must also be dischargedby the use of a rule which makes use of the box. Jape guarantees correct use of assumptions by combiningintroduction and discharge into a single step. Assumptions are introduced (and discharged) by using rules,and the rules that do it — some forward, some backward — are labelled in the menus. Jape helps you, inevery case, by calculating the assumption that you need: there is never a need to guess an assumption.

Chapter 2
Gestures: mouse clicks, presses and drags
Like every other interactive program, Jape accepts instructions through the mouse and the keyboard. Mostlyyou will use the mouse to select a formula or a subformula in the proof window and then to command whatto do with your selection by choosing a command from a menu. The ways that Jape uses the mouse arepretty standard.
2.1 Formula selection
Formula selection is made with a single click (left-click on a multi-button mouse). You click on a formula— a hypothesis above the line of dots or a conclusion below the dots — and Jape highlights your selectionwith an enclosing red box. If you click on a hypothesis you get a downward-facing box as in figure 2.1(a); ifyou click on a conclusion you get an upward-facing box as in figure 2.1(b). You can select both a hypothesisand a conclusion, as in figure 2.1(c).
Clicking on the background — a white part of the proof window — cancels all your selections.
Simple clicks will let you select one conclusion and one hypothesis at a time. Normally a second hypothesisclick cancels the first, but if you hold down the Shift key while you click you can select more than onehypothesis, as shown in figure 2.1(d). And then, also using the Shift key whilst clicking, you can cancelindividual formula selections.
There is no way of selecting more than one conclusion at a time.
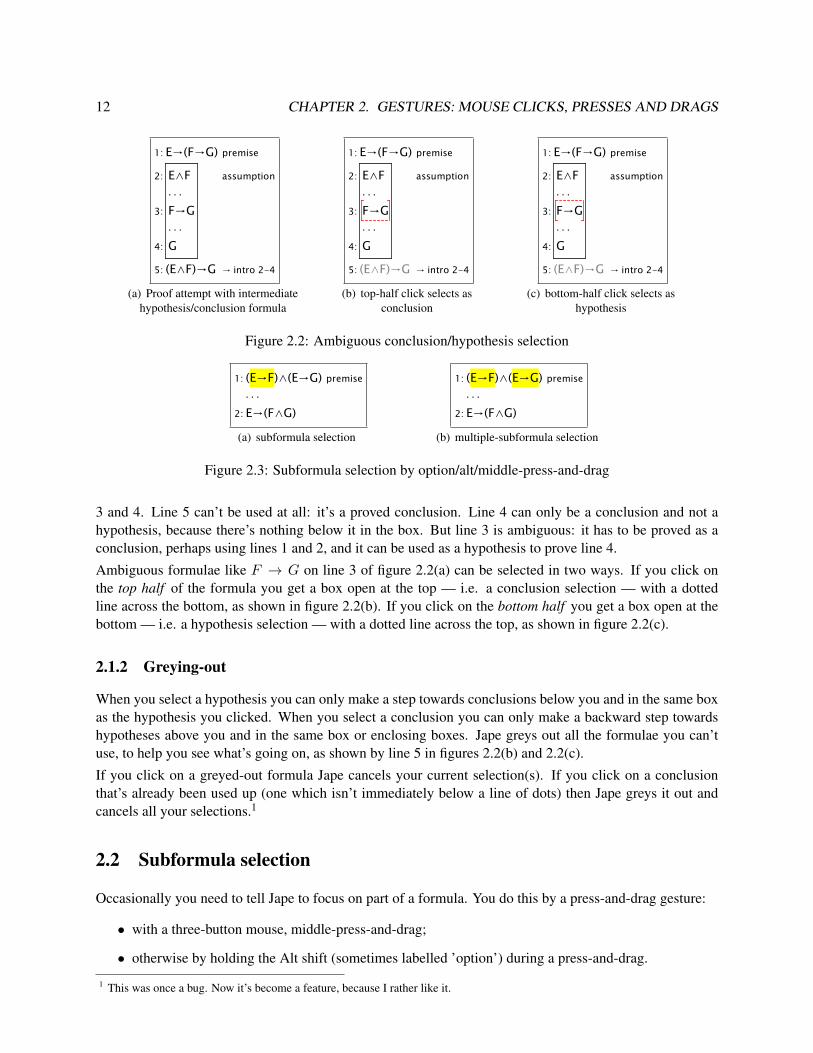
2.1.1 Ambiguous formulae click both ways
In figure 2.2(a) there are open conclusions on lines 3 and 4, each preceded by a line of dots to show thatthere’s work to be done. Lines 1 and 2 aren’t conclusions, and can only be used as hypotheses to prove lines
2:
. . .
E→G
1: E→F, F→G premises
(a) hypothesis selection
2:
. . .
E→G
1: E→F, F→G premises
(b) conclusion selection
2:
. . .
E→G
1: E→F, F→G premises
(c) hypothesis andconclusion
2:
. . .
E→G
1: E→F, F→G premises
(d) multi-hypothesisselection
Figure 2.1: Formula selection by mouse click
11
12 CHAPTER 2. GESTURES: MOUSE CLICKS, PRESSES AND DRAGS
5: (E∧F)→G → intro 2-4
4:
. . .
G
3:
. . .
F→G
2: E∧F assumption
1: E→(F→G) premise
(a) Proof attempt with intermediatehypothesis/conclusion formula
5: (E∧F)→G → intro 2-4
4:
. . .
G
3:
. . .
F→G
2: E∧F assumption
1: E→(F→G) premise
(b) top-half click selects asconclusion
5: (E∧F)→G → intro 2-4
4:
. . .
G
3:
. . .
F→G
2: E∧F assumption
1: E→(F→G) premise
(c) bottom-half click selects ashypothesis
Figure 2.2: Ambiguous conclusion/hypothesis selection
2:
. . .
E→(F∧G)
1: (E→F)∧(E→G) premise
(a) subformula selection
2:
. . .
E→(F∧G)
1: (E→F)∧(E→G) premise
(b) multiple-subformula selection
Figure 2.3: Subformula selection by option/alt/middle-press-and-drag
3 and 4. Line 5 can’t be used at all: it’s a proved conclusion. Line 4 can only be a conclusion and not ahypothesis, because there’s nothing below it in the box. But line 3 is ambiguous: it has to be proved as aconclusion, perhaps using lines 1 and 2, and it can be used as a hypothesis to prove line 4.
Ambiguous formulae like F → G on line 3 of figure 2.2(a) can be selected in two ways. If you click onthe top half of the formula you get a box open at the top — i.e. a conclusion selection — with a dottedline across the bottom, as shown in figure 2.2(b). If you click on the bottom half you get a box open at thebottom — i.e. a hypothesis selection — with a dotted line across the top, as shown in figure 2.2(c).
2.1.2 Greying-out
When you select a hypothesis you can only make a step towards conclusions below you and in the same boxas the hypothesis you clicked. When you select a conclusion you can only make a backward step towardshypotheses above you and in the same box or enclosing boxes. Jape greys out all the formulae you can’tuse, to help you see what’s going on, as shown by line 5 in figures 2.2(b) and 2.2(c).
If you click on a greyed-out formula Jape cancels your current selection(s). If you click on a conclusionthat’s already been used up (one which isn’t immediately below a line of dots) then Jape greys it out andcancels all your selections.1
2.2 Subformula selection
Occasionally you need to tell Jape to focus on part of a formula. You do this by a press-and-drag gesture:
• with a three-button mouse, middle-press-and-drag;
• otherwise by holding the Alt shift (sometimes labelled ’option’) during a press-and-drag.
1 This was once a bug. Now it’s become a feature, because I rather like it.

2.3. DRAGGING 13
Jape highlights the subformula you’ve selected by changing the background colour to yellow, as shown infigure 2.3(a).
If you hold down the add-a-selection key (ctrl on Windows and Linux, command on MacOS X) you canmake more than one subformula selection, as shown in figure 2.3(b). Using the same key combination, youcan cancel and/or modify subformula selections you’ve already made.
Jape restricts subformula selections to well-formed subformulae, as you can discover by experiment. Thatmeans that if you option/alt/middle-click on a connective or a quantifier, a whole subformula is highlighted.If you option/alt/middle-click on a name, only that name is highlighted.
Option/alt/middle-clicking or pressing on a new subformula cancels all other subformula selections, unlessyou hold down the add-a-selection key (Command on MacOS, Ctrl on other systems). Option/alt/middle-clicking on the background — a white part of the proof window — cancels all your subformula selections.
Formula and subformula selections are independent: you can have one without the other, or both, or neither.Cancelling one kind of selection doesn’t cancel the other.
2.3 Dragging
In the disproof pane — see chapter 7 — you can drag formulae, tiles, worlds and lines around to make adiagram. You do it by press-and-drag. See chapter 7 for details.

14 CHAPTER 2. GESTURES: MOUSE CLICKS, PRESSES AND DRAGS

Chapter 3
Backward and forward steps
Because we read proofs forward, top-to-bottom, forward steps are easiest to understand and most proofnovices prefer working forwards. But lots of proofs are difficult working forwards, and some are almostimpossibly difficult. To make proofs in Jape you need to be able to make backward steps as well, and I’vegone to some trouble to force you to recognise the fact. In the Backward menu, shown in figure 3.1, thefirst group of steps above the line work best backwards and the group below that line can be made to workbackward if you try hard. The Forward menu, in figure 3.2, similarly shows steps that work well forwardbefore ones that work forward only with difficulty. ‘hyp’ is hard to classify, so it appears in both menus.
To make a step you select one or more formulae and choose a step from the Backward or Forward menu.The selections you need to make depend on the step you choose, and are detailed in the descriptions of thesteps in later chapters, but in general for a forward step you must choose a hypothesis and for a backwardstep an open (unproved) conclusion.
3.1 Making a forward step
Before you make a forward step you must always select a hypothesis formula. Depending on the kind ofstep, you may have to select more than one hypothesis: for details, see the description of the step later inthis manual — or just try it and see what happens!
Figure 3.1: Backward menu Figure 3.2: Forward menu
15

16 CHAPTER 3. BACKWARD AND FORWARD STEPS
6: (E→F)→(E→G) → intro 2-5
5: E→G → intro 3-4
4:
. . .
G
3: E assumption
2: E→F assumption
1: E→F→G premise
(a) before
7: (E→F)→(E→G) → intro 2-6
6: E→G → intro 3-5
5:
. . .
G
4: F→G → elim 1,3
3: E assumption
2: E→F assumption
1: E→F→G premise
(b) after
Figure 3.3: A sample forward step
4: E→(F∧G) → intro 2-3
3:
. . .
F∧G
2: E assumption
1: (E→F)∧(E→G) premise
(a) hypothesis only selected
5: E→(F∧G) → intro 3-4
4:
. . .
F∧G
3: E assumption
2: E→F ∧ elim 1
1: (E→F)∧(E→G) premise
(b) consequent below hypothesis
Figure 3.4: A forward step without a target conclusion
You can also select a conclusion as well, if you want to. Some steps require a conclusion selection: you canlook up the step in this manual or you can try it out and see what happens.
Once you have made your selection(s), choose your step from the Forward menu.
Jape writes the result of the step — the consequent deduced from the antecedent(s) you selected — justbelow your selection(s). For example, figure 3.3 shows an → elim step with two hypothesis selections.The consequent is line 4 in the ‘after’ picture. Notice that the justification of the step is written against theconsequent.
4: E→(F∧G) → intro 2-3
3:
. . .
F∧G
2: E assumption
1: (E→F)∧(E→G) premise
(a) hypothesis and conclusion selected
5: E→(F∧G) → intro 2-4
4:
. . .
F∧G
3: E→F ∧ elim 1
2: E assumption
1: (E→F)∧(E→G) premise
(b) consequent above conclusion
Figure 3.5: A forward step with a target conclusion

3.1. MAKING A FORWARD STEP 17
8: E∨(F∧G) ∨ elim 2,4-5,6-7
7:
. . .
E∨(F∧G)
6: F assumption
5: E∨(F∧G) ∨ intro 4
4: E assumption
3: E∨G ∧ elim 1
2: E∨F ∧ elim 1
1: (E∨F)∧(E∨G) premise
(a) before: hypothesis and conclusion selected
12: E∨(F∧G) ∨ elim 2,4-5,6-11
11: E∨(F∧G) ∨ elim 3,7-8,9-10
10:
. . .
E∨(F∧G)
9: G assumption
8:
. . .
E∨(F∧G)
7: E assumption
6: F assumption
5: E∨(F∧G) ∨ intro 4
4: E assumption
3: E∨G ∧ elim 1
2: E∨F ∧ elim 1
1: (E∨F)∧(E∨G) premise
(b) after: argument by cases outlined
Figure 3.6: ∨ elim needs a target conclusion
3.1.1 Selecting a target conclusion
Normally Jape writes the result of a forward step just after the hypothesis selection. Sometimes that maynot be convenient, and it may be tidier to write it lower down the proof, just above a conclusion you areworking towards.
In figure 3.4(a) only the hypothesis on line 1 is selected. A forward step — in this case “∧ elim (ignoringright)” — puts its consequent just below the selected hypothesis, as shown in figure 3.4(b).
If you select a target conclusion as well, as in figure 3.5(a), the same step will put its consequent before theline of dots above the selected conclusion, as shown in figure 3.5(b).
3.1.2 What can go wrong with a forward step?
When Jape can’t make a forward step it’s for one of the following reasons. In all cases you’ll get an errormessage which explains the problem.
1. No selected hypothesis.If you don’t select a hypothesis formula, you can’t make a forward step.
2. Not enough selections.Some steps need more than a single hypothesis selection.
3. Wrong hypothesis shape.Most forward steps apply to a particular shape of hypothesis formula. If you select the wrong shape,you can’t make the step.
4. No target conclusion.Two forward steps — ∨ elim, ∃ elim — need a conclusion selection as well as a hypothesis, because

18 CHAPTER 3. BACKWARD AND FORWARD STEPS
2:
. . .
E∧(F∧G)
1: (E∧F)∧G premise
(a) conclusion selected
4: E∧(F∧G) ∧ intro 2,3
3:
. . .
F∧G
2:
. . .
E
1: (E∧F)∧G premise
(b) two new conclusion antecedents
Figure 3.7: A sample backward step
6:
. . .
E∧(F∧G)
5: G ∧ elim 1
4: F ∧ elim 2
3: E ∧ elim 2
2: E∧F ∧ elim 1
1: (E∧F)∧G premise
(a) conclusion selected
7: E∧(F∧G) ∧ intro 3,6
6:
. . .
F∧G
5: G ∧ elim 1
4: F ∧ elim 2
3: E ∧ elim 2
2: E∧F ∧ elim 1
1: (E∧F)∧G premise
(b) one hypothesis, one conclusion antecedent
Figure 3.8: A sample backward step with a relevant hypothesis
the consequent can’t be calculated from the antecedents. Jape writes the result of the step just abovethe target conclusion, and writes the justification next to the selected consequent. For example, seethe ∨ elim step in figure 3.6. The result of the step (there’s quite a lot of it!) is written above line 7 ofthe ‘before’ state, to form lines 7 to 10 of the ‘after’ state.
3.2 Making a backward step
Backward steps work on an open conclusion — a line without a justification, written just below a line of threedots. They may prove it completely, if Jape can find hypotheses to match the antecedents, or the antecedentsmay become unproved conclusions. For example, figure 3.7(a) shows an open conclusion selection, andfigure 3.7(b) shows the effect of a backward ∧ intro step, where each antecedent has become a new openconclusion. Figure 3.8(a) shows the same conclusion selected when there are more hypothesis formulaeavailable, and in figure 3.8(b) only one open conclusion is generated because line 3 matches the antecedentof the ∧ intro step.
In every case the justification of the step is written next to the selected conclusion, the consequent of thestep.
3.2.1 What can go wrong with a backward step?
1. Wrong conclusion shape.

3.3. STEPS WHICH DON’T NEED A SELECTION 19
4: E∧(F∨G) ∧ intro 2,3
3:
. . .
F∨G
2:
. . .
E
1: (E∧F)∨(E∧G) premise
(a) E is the consequent
4: E∧(F∨G) ∧ intro 2,3
3:
. . .
F∨G
2:
. . .
E
1: (E∧F)∨(E∧G) premise
(b) F ∨G is the consequent
Figure 3.9: Conclusion selection to tell Jape where to work
Each backward step, except for contra, applies to a particular shape of consequent formula. If youselect the wrong shape, you can’t make the step.
2. No selected consequent.If there is more than one unproved conclusion, Jape doesn’t try to choose between them. In figure3.7(b), for example, Jape wouldn’t know where to apply a backward step. Selecting an unproved con-clusion, as in figure 3.9, resolves the ambiguity. (Notice in figure 3.9(a) that line 2 is an ambiguoushypothesis/conclusion formula, selected as a conclusion by clicking on it’s top half.)
3. Hypothesis selected.Backward steps (except for ∃ intro) don’t need and can’t make use of a selected hypothesis formula.
3.3 Steps which don’t need a selection
If there is only one formula in the proof that can be selected as a hypothesis, it would be annoying to betold to select it before you can make a forward step. If there’s only one unproved conclusion in the proof, itwould be annoying to be told to select that to make a backward step. If the only possible target conclusionis on the next line to the hypothesis, it would be annoying to be told to select it when a step needs a target.So in all those cases Jape lets you get away without selection, and does the obvious thing.

20 CHAPTER 3. BACKWARD AND FORWARD STEPS

Chapter 4
Rules of thumb for proof search
Rules of thumb1 are guesswork, approximate guides that don’t always work. Proof search is much easier ifyou recognise some simple principles.
1. Almost all the rules work on the shape of a hypothesis or consequent formula. Use the shape as aguide to help you choose a rule.
2. Use rules that introduce assumptions into the proof as early as possible. Those rules are:
• → intro backwards (for the assumption);
• ∨ elim forwards (for the assumptions);
• ¬ intro backwards (for the assumption);
• ∀ intro backwards (for the variable);
• ∃ elim forwards (for the variable and the assumption).
3. ∨ intro works backwards better than it does forwards; but since it throws away half the conclusionyou apply it to, use it very carefully and as late as possible.
4. ¬ elim works better forwards than it does backwards, once the contradictory formulae have beenrevealed.
5. If you use ¬ elim backwards, look for a hypothesis to unify with the unproved conclusion ¬ B (anegated unknown).
6. Classical contra — ‘proof by contradiction’ — can be used as a last resort in any situation. It intro-duces an assumption, and doesn’t mind what shape the consequent is. (Constructive contra is just asapplicable, but since it doesn’t introduce an assumption, it isn’t usually much help.)
1 An inch was originally defined as the width of an adult male thumb, so a ‘rule of thumb’ is an approximate measure, then (bypunning ‘rule’=measurer) an approximate guide.There is a Greek word ‘heuristic’ for rule-of-thumb, but I prefer the old English.Some people object to the English phrase because there was once a folk tradition in England that a man could legally beat hiswife with a stick no thicker than his thumb, and it was popularly called rule of thumb. (There’s a reference, for example, in E.P.Thompson’s Customs in Common.) The tradition was repulsive and mistaken, but (a) it’s been forgotten, except by historians,and (b) the ‘approximate guide’ reading predates it.
21

22 CHAPTER 4. RULES OF THUMB FOR PROOF SEARCH
7. If Jape won’t let you make the proof, you’re doing it wrong. There aren’t any bugs in Jape’s treatmentof Natural Deduction, and all the proofs in the Conjectures and Classical conjectures panels are possi-ble — I’ve done them all. Similarly, all the ones in the Invalid conjectures panel are impossible (theyare included so that you can disprove them — see chapter 7).
8. Don’t be afraid to Undo and Redo to search alternative routes to proof. Jape permits multiple Undosand corresponding Redos.
4.1 Look at the shape of the formula
There is a general principle: logical steps in Natural Deduction almost always simplify a formula, removinga connective (→, ∧, ∨ or ¬) or a quantifier (∀ or ∃) and breaking the formula into its constituent parts.Persuasion (intro) rules do that working backwards, and use (elim) rules do it forwards. To choose a rule,look for the main connective (or the quantifier) in an unproved conclusion or a hypothesis, and use the rulewhich works on that connective (or quantifier).
The way that rules match formulae is so nearly mechanical that I could have set Jape up to choose the relevantrule when you merely double-click on a formula. Because I want you to learn about Natural Deduction andnot just the use of the mouse, I’ve been grandad-ish and set it up so that you have to choose the rules foryourself.

Chapter 5
The steps summarised
5.1 ∧ steps
You use ∧ intro backwards by selecting an A ∧ B conclusion and choosing “∧ intro” from the Backwardmenu. It generates new conclusion lines from the antecedents of the rule, as shown in figures 3.7 and 3.8 onpage 18. I strongly recommend using ∧ intro backwards rather than forwards.
You use ∧ elim forwards by selecting an A → B hypothesis and choosing one of the two versions of thestep from the Forward menu: “∧ elim (preserving left)” deduces A, and “∧ elim (preserving left)” deducesB. The effect is illustrated in figures 3.4 and 3.5 on page 16.
∧ intro forward is also possible: select two hypothesis formulae to be the antecedents and use “→ intro”from the Forward menu. But it’s easier backwards, really it is. The problem in figure 5.1, for example,is easy if the first step is ∧ intro backwards — you have two things to prove and you have to prove themseparately — and impossible almost any other way.
∧ elim backwards is possible, but for some reason or other I didn’t include it (and I’m sure I had a goodreason, so I’m not going to add it now).
5.2 → steps
You use→ intro backward by selecting a A → B conclusion and then choosing “→ intro” from the Back-ward menu. See figure 5.2, for example. Notice that the step introduces a new assumption and therefore anew box (and that’s why it should be used early).
You can use→ elim forward by selecting a A hypothesis and a A → B hypothesis, as shown by the trivialexample in figure 5.3. (Shift-click to select the second hypothesis: if you select the wrong thing either cancelit with a shift-click or click on the background to cancel all your selections, and start again.)
You can also use → elim half-forward, half-backward if you select a A → B hypothesis and a targetconclusion and apply “→ elim” from the Forward menu. Jape writes a new conclusion A followed by a
2:
. . .
(E→F)∧(E→G)
1: E→(F∧G) premise
Figure 5.1: ∧ intro backwards needed
23

24 CHAPTER 5. THE STEPS SUMMARISED
2:
. . .
E→(F→G)
1: (E→F)→G premise
(a) E → (F → G) selected
4: E→(F→G) → intro 2-3
3:
. . .
F→G
2: E assumption
1: (E→F)→G premise
(b) hypothetical argument outlined
Figure 5.2: → intro backward
2:
. . .
G
1: E→F, F→G, E premises
(a) E and E → F selected
3:
. . .
G
2: F → elim 1.1,1.3
1: E→F, F→G, E premises
(b) consequent F deduced
Figure 5.3: → elim forward
4: (E∨F)→(E∨G) → intro 2-3
3:
. . .
E∨G
2: E∨F assumption
1: F→G premise
(a) F → G and target conclusion selected
6: (E∨F)→(E∨G) → intro 2-5
5:
. . .
E∨G
4: G → elim 1,3
3:
. . .
F
2: E∨F assumption
1: F→G premise
(b) consequent G deduced from new open conclusion F
Figure 5.4: → elim half backward, half forward

5.3. ∨ STEPS 25
7: E∧F ∧ intro 5,6
6:
. . .
F
5: E contra (classical) 2-4
4: ⊥ ¬ elim 3,1
3:
. . .
¬E∨¬F
2: ¬E assumption
1: ¬(¬E∨¬F) premise
(a) before: conclusion selected
7: E∧F ∧ intro 5,6
6:
. . .
F
5: E contra (classical) 2-4
4: ⊥ ¬ elim 3,1
3: ¬E∨¬F ∨ intro 2
2: ¬E assumption
1: ¬(¬E∨¬F) premise
(b) after: uncertainty resolved
Figure 5.5: ∨ intro backwards is easy
6: E∧F ∧ intro 4,5
5:
. . .
F
4: E contra (classical) 2-3
3:
. . .
⊥
2: ¬E assumption
1: ¬(¬E∨¬F) premise
(a) before: hypothesis selected
7: E∧F ∧ intro 5,6
6:
. . .
F
5: E contra (classical) 2-4
4:
. . .
⊥
3: ¬E∨_B1 ∨ intro 2
2: ¬E assumption
1: ¬(¬E∨¬F) premise
(b) after: ‘unknown’ formula introduced
Figure 5.6: ∨ intro forwards generates an unknown
consequent B, as shown in figure 5.4. It’s a half-backward step because it introduces a new conclusion.
→ intro forward is just daft, and Jape won’t attempt it. → elim backward is possible, but it introducesunknowns and there’s no real advantage, so I don’t let Jape try.
5.3 ∨ steps
Because ∨ elim forwards implements argument by cases, and because the consequent C can’t be deducedfrom the A∨B antecedent, it generates big proof changes from a small gesture. That frightens novices, butbe brave, because ∨ elim is one of the rules that generates assumptions, so you have to use it as early aspossible in a proof.
∨ intro backwards is destructive — it throws away half a conclusion — so you use it as late as possible,even though it’s very easy to use.
You use ∨ elim forwards by selecting a hypothesis which fits A ∨ B, an open conclusion C (if there’s onlyone available conclusion, and if its on the line below the hypothesis, Jape will let you off the conclusionselection) and “∨ elim” from the Forward menu. See figure 3.6 on page 17, for example. Note that theboxes representing the A leads to C and B leads to C arguments (lines 7-8 and 9-10 in figure 3.6(a), forexample) are written just above the selected conclusion C, and the justification is (of course) written against

26 CHAPTER 5. THE STEPS SUMMARISED
6: ¬E∧¬F ∧ intro 4,5
5:
. . .
¬F
4: ¬E ¬ intro 2-3
3:
. . .
⊥
2: E assumption
1: ¬(E∨F) premise
(a) before: hypothesis ¬(E ∨ F ) and target conclusionselected
7: ¬E∧¬F ∧ intro 5,6
6:
. . .
¬F
5: ¬E ¬ intro 2-4
4: ⊥ ¬ elim 3,1
3:
. . .
E∨F
2: E assumption
1: ¬(E∨F) premise
(b) after: conclusion E ∨ F generated
Figure 5.7: ¬ elim forwards is easy
4: ¬E∧¬F ∧ intro 2,3
3:
. . .
¬F
2:
. . .
¬E
1: ¬(E∨F) premise
(a) before: conclusion ¬F selected
6: ¬E∧¬F ∧ intro 2,5
5: ¬F ¬ intro 3-4
4:
. . .
⊥
3: F assumption
2:
. . .
¬E
1: ¬(E∨F) premise
(b) after: contradiction argument outlined
Figure 5.8: ¬ intro backwards is very easy
the selected conclusion.
∨ intro is easy to use backwards: select an open conclusion, decide which half to keep and which to throwaway, and apply the corresponding step (“∨ intro (preserving left)” or “∨ intro (preserving right)”) from theBackward menu. See figure 5.5, for example.
For some reason that I’ve forgotten, I was persuaded to allow ∨ intro forward. I rather regret it, because thisisn’t a step for novices to use. But, if you must: you select a hypothesis, decide which half of the consequentit has to be, and apply the corresponding step (“∨ intro (inventing left)” or “∨ intro (inventing right)”) fromthe Forward menu. The step always invents an unknown, as illustrated in figure 5.6 by an “inventing right”step, and you have to deal with the unknown somehow (see chapter 6 for suggestions).
If unknowns frighten you, don’t use ∨ intro forwards (the easy way to solve the proof problem in figure 5.6,for example, is ¬ elim forwards from line 1 with target conclusion line 4, producing figure 5.5(a); then ∨intro backwards preserving left produces figure 5.5(b)).
∨ elim backwards would be possible, but not for novices, so I didn’t allow it.
5.4 ¬ steps
¬ elim works best forwards, ¬ intro backwards.
5.4. ¬ STEPS 27
6: ¬E∧¬F ∧ intro 4,5
5:
. . .
¬F
4: ¬E ¬ intro 2-3
3:
. . .
⊥
2: E assumption
1: ¬(E∨F) premise
(a) before: conclusion ⊥ selected
8: ¬E∧¬F ∧ intro 6,7
7:
. . .
¬F
6: ¬E ¬ intro 2-5
5: ⊥ ¬ elim 3,4
4:
. . .
¬_B1
3:
. . .
_B1
2: E assumption
1: ¬(E∨F) premise
(b) after: unknown B1 invented, and two conclusionsgenerated
Figure 5.9: ¬ elim backwards is harder
1:
. . .
E∨¬E
(a) before: conclusion E ∨ ¬E selected
3: E∨¬E contra (classical) 1-2
2:
. . .
⊥
1: ¬(E∨¬E) assumption
(b) after: contradiction argument outlined
Figure 5.10: A sample classical contradiction step
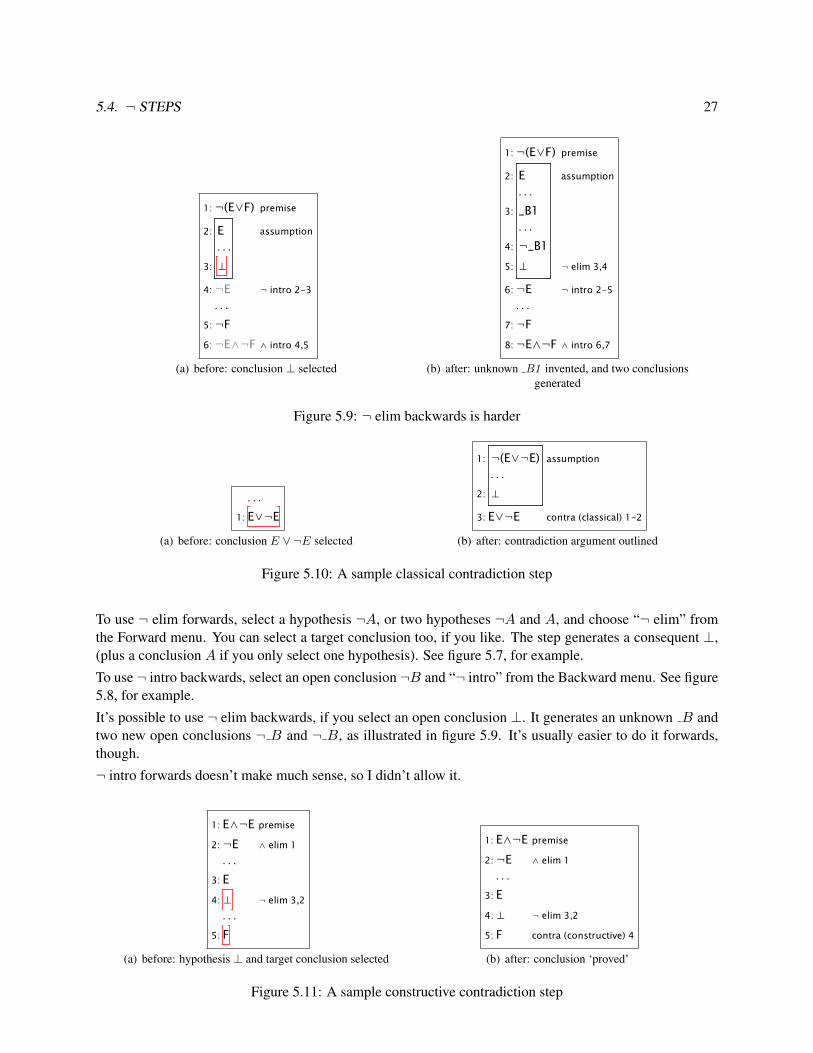
To use ¬ elim forwards, select a hypothesis ¬A, or two hypotheses ¬A and A, and choose “¬ elim” fromthe Forward menu. You can select a target conclusion too, if you like. The step generates a consequent ⊥,(plus a conclusion A if you only select one hypothesis). See figure 5.7, for example.
To use ¬ intro backwards, select an open conclusion ¬B and “¬ intro” from the Backward menu. See figure5.8, for example.
It’s possible to use ¬ elim backwards, if you select an open conclusion ⊥. It generates an unknown B andtwo new open conclusions ¬ B and ¬ B, as illustrated in figure 5.9. It’s usually easier to do it forwards,though.
¬ intro forwards doesn’t make much sense, so I didn’t allow it.
5:
. . .
F
4: ⊥ ¬ elim 3,2
3:
. . .
E
2: ¬E ∧ elim 1
1: E∧¬E premise
(a) before: hypothesis ⊥ and target conclusion selected
5: F contra (constructive) 4
4: ⊥ ¬ elim 3,2
3:
. . .
E
2: ¬E ∧ elim 1
1: E∧¬E premise
(b) after: conclusion ‘proved’
Figure 5.11: A sample constructive contradiction step

28 CHAPTER 5. THE STEPS SUMMARISED
5: ∃y.R(y) contra (classical) 2-4
4: ⊥ ¬ elim 3,1
3:
. . .
∀x.¬R(x)
2: ¬∃y.R(y) assumption
1: ¬∀x.¬R(x) premise
(a) before: ∀x.¬R(x) conclusion selected
7: ∃y.R(y) contra (classical) 2-6
6: ⊥ ¬ elim 5,1
5: ∀x.¬R(x) ∀ intro 3-4
4:
. . .
¬R(i)
3: actual i assumption
2: ¬∃y.R(y) assumption
1: ¬∀x.¬R(x) premise
(b) after: generalised proof outline introduced, withprivate variable i
Figure 5.12: A ∀ intro step backwards
5.5 ⊥ (contradiction) steps
Classical contra is a hard rule to use (there ought to be a blues song about that), but you know you are goingto have to use it for some problems. It only works backwards. Constructive contra is easier if you use itforwards.
To use classical contra, select an open conclusion A and choose “contra (classical)” from the Backwardmenu. It creates a hypothetical contradiction argument with assumption ¬A, as shown in figure 5.10.
To use constructive contra forwards, select a ⊥ hypothesis and an open conclusion, and choose “contra(constructive)” from the Forward menu. See figure 5.11, for example.
Constructive contra backwards is destructive: it throws away whatever conclusion it is applied to. But youcan do it if you want to. Classical contra forwards would be absurd.
5.6 > (truth) step
You can always prove > as an open conclusion: select it and apply “truth” from the Backward menu. Andthat’s all you can do with >: no forward step is possible.
5.7 ∀ steps
∀ intro works backwards, ∀ elim forwards. ∀ intro is worth using early, because it introduces a variable. Theprivacy condition on the ∀ intro step won’t usually bother you, because Jape always invents a new variable(i, i1 , i2 , and so on).
To use ∀ intro backwards, select an open conclusion ∀x.P (x) and choose “∀ intro” from the Backwardmenu. Jape builds the outline of the generalised proof, as illustrated in figure 5.12.
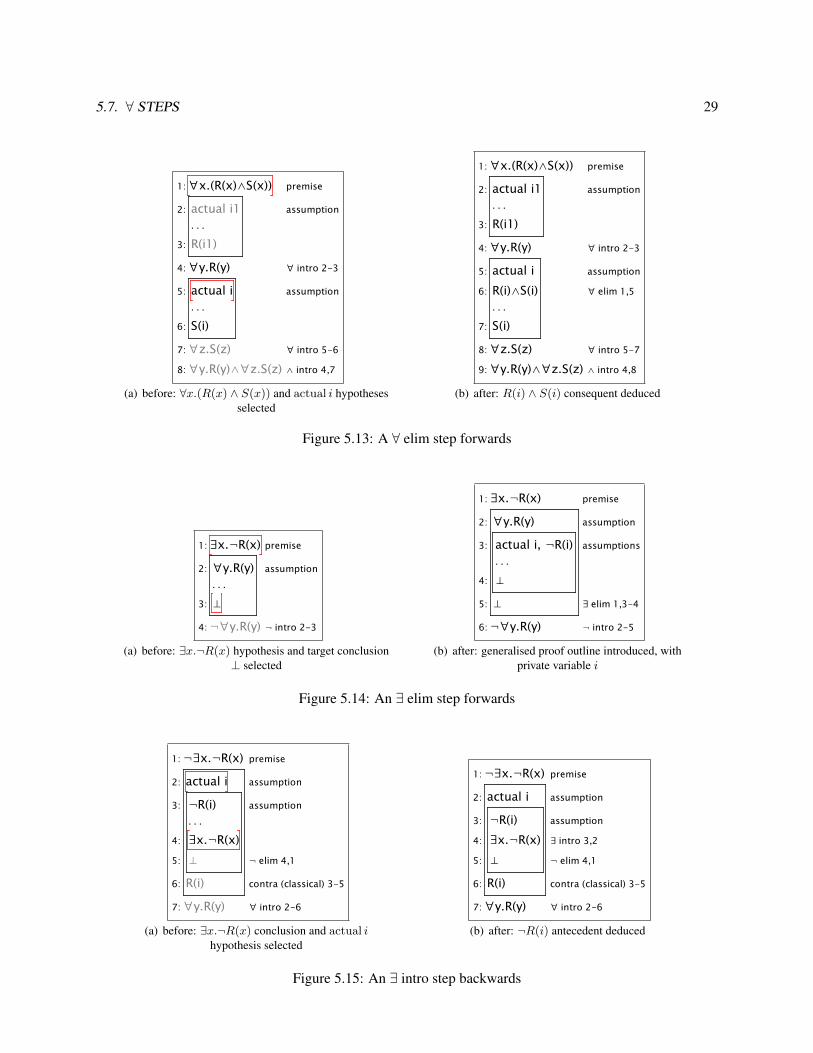
To use ∀ elim forwards, you must select a hypothesis ∀x.P (x) and also actual j, then choose “∀ elim” fromthe Forward menu. The effect is illustrated in figure 5.13.
5.7. ∀ STEPS 29
8: ∀y.R(y)∧∀z.S(z) ∧ intro 4,7
7: ∀z.S(z) ∀ intro 5-6
6:
. . .
S(i)
5: actual i assumption
4: ∀y.R(y) ∀ intro 2-3
3:
. . .
R(i1)
2: actual i1 assumption
1: ∀x.(R(x)∧S(x)) premise
(a) before: ∀x.(R(x) ∧ S(x)) and actual i hypothesesselected
9: ∀y.R(y)∧∀z.S(z) ∧ intro 4,8
8: ∀z.S(z) ∀ intro 5-7
7:
. . .
S(i)
6: R(i)∧S(i) ∀ elim 1,5
5: actual i assumption
4: ∀y.R(y) ∀ intro 2-3
3:
. . .
R(i1)
2: actual i1 assumption
1: ∀x.(R(x)∧S(x)) premise
(b) after: R(i) ∧ S(i) consequent deduced
Figure 5.13: A ∀ elim step forwards
4: ¬∀y.R(y) ¬ intro 2-3
3:
. . .
⊥
2: ∀y.R(y) assumption
1: ∃x.¬R(x) premise
(a) before: ∃x.¬R(x) hypothesis and target conclusion⊥ selected
6: ¬∀y.R(y) ¬ intro 2-5
5: ⊥ ∃ elim 1,3-4
4:
. . .
⊥
3: actual i, ¬R(i) assumptions
2: ∀y.R(y) assumption
1: ∃x.¬R(x) premise
(b) after: generalised proof outline introduced, withprivate variable i
Figure 5.14: An ∃ elim step forwards
7: ∀y.R(y) ∀ intro 2-6
6: R(i) contra (classical) 3-5
5: ⊥ ¬ elim 4,1
4:
. . .
∃x.¬R(x)
3: ¬R(i) assumption
2: actual i assumption
1: ¬∃x.¬R(x) premise
(a) before: ∃x.¬R(x) conclusion and actual ihypothesis selected
7: ∀y.R(y) ∀ intro 2-6
6: R(i) contra (classical) 3-5
5: ⊥ ¬ elim 4,1
4: ∃x.¬R(x) ∃ intro 3,2
3: ¬R(i) assumption
2: actual i assumption
1: ¬∃x.¬R(x) premise
(b) after: ¬R(i) antecedent deduced
Figure 5.15: An ∃ intro step backwards

30 CHAPTER 5. THE STEPS SUMMARISED
5.8 ∃ steps
∃ intro works backwards, ∃ elim forwards. ∃ elim is worth using early, because it introduces a variable. Theprivacy condition on the ∃ elim step won’t usually bother you, because Jape always invents a new variable(i, i1 , i2 , and so on).
To use ∃ elim forwards, you must select a hypothesis ∃x.P (x) and also a target conclusion, and then choose“∃ elim” from the Forward menu. The justification is written next to the target conclusion, and a generalisedproof outline is introduced, as illustrated in figure 5.14.
To use ∃ intro backwards, you must select a conclusion ∃x.P (x) and also a hypothesis actual j, and thenchoose “∃ intro” from the Backward menu. The effect is illustrated in figure 5.15.

Chapter 6
Unknowns, hyp and Unify
When James Aczel looked at novices learning logic with Jape, he pointed out that they found incompletesteps quite disconcerting. Incomplete steps are ones that let you leave out important information so thatyou can fill it in later, when you’ve discovered what it ought to be. You might be allowed to leave out thevariable in an ∃ intro step, for example, and fill it in later.
Jape uses unknowns — names starting with an underscore, like B1 — to stand for formulae which can befilled in later. Even though James persuaded me to eliminate almost all incomplete steps from my treatmentof natural deduction, my users pleaded with me to allow some. So it is possible to introduce unknowns intoa Jape proof, and because of that it’s necessary to know how to get rid of them again.
To understand what follows you have to recognise the distinction between formula selection (red box rounda conclusion or a hypothesis formula) and subformula selection (yellow background behind part or all ofa conclusion or hypothesis formula). Note, in particular, that a subformula selection that encompasses acomplete formula is not the same thing as a formula selection.
6.1 Introducing an unknown
∨ elim backwards takes a formula with an ∨ connective and throws away half of it, because from A you canprove A∨B, and from B you can prove A∨B. Some obsessively-forward reasoners wanted me to allow ∨intro forwards, and just to spite them I did: it’s there in the Forward menu, under the line. Figure 6.1 showshow you can deduce A ∨ B from A by choosing “∨ intro (inventing right)” from the Forward menu.
¬ elim backwards is another good way to get an unknown, illustrated in figure 6.2. There’s only oneunknown in the proof, but it occurs twice.
These are by no means the only way to introduce unknowns into a proof. One very interesting way is toselect a conclusion, choose “Text command” from the File menu, type “apply cut” and press return. You
2:
. . .
∀y.R(y)
1: ¬∃x.¬R(x) premise
(a) before: ∃x.¬R(x) hypothesis selected
3:
. . .
∀y.R(y)
2: ¬∃x.¬R(x)∨_B1 ∨ intro 1
1: ¬∃x.¬R(x) premise
(b) after: unknown B1 introduced in consequent
Figure 6.1: An ∨ intro step forwards
31

32 CHAPTER 6. UNKNOWNS, HYP AND UNIFY
3: ∀y.R(y) contra (constructive) 2
2:
. . .
⊥
1: ¬∃x.¬R(x) premise
(a) before: conclusion is ⊥
5: ∀y.R(y) contra (constructive) 4
4: ⊥ ¬ elim 2,3
3:
. . .
¬_B1
2:
. . .
_B1
1: ¬∃x.¬R(x) premise
(b) after: unknown B1 introduced in antecedents
Figure 6.2: A ¬ elim step backwards
3: ∀y.R(y) contra (constructive) 2
2:
. . .
⊥
1: ¬∃x.¬R(x) premise
(a) before: conclusion ⊥ selected, subformula ¬R(x)selected
5: ∀y.R(y) contra (constructive) 4
4: ⊥ ¬ elim 2,3
3:
. . .
¬¬R(x)
2:
. . .
¬R(x)
1: ¬∃x.¬R(x) premise
(b) after: ¬R(x) used in antecedents of ¬ elim
Figure 6.3: A ¬ elim step backwards with subformula selection
will get an unknown, intermediate between the hypotheses and your conclusion. I leave you to work outhow useful that can be.
6.2 Avoiding unknowns by subformula selection
If you know beforehand what should go in place of the unknown, you can tell Jape what to use at the timeyou make an ∨ intro or ¬ elim step, by subformula selection (alt/option/middle-press-and-drag over theformula or subformula you want to use). Figure 6.3 shows an example: note that the hypothesis is notselected, but ¬R(x) is subformula-selected.
5: ∀y.R(y) contra (constructive) 4
4: ⊥ ¬ elim 2,3
3:
. . .
¬_B1
2:
. . .
_B1
1: ¬∃x.¬R(x) premise
(a) before: subformulae ∃x.¬R(x) and B1 selected
4: ∀y.R(y) contra (constructive) 3
3: ⊥ ¬ elim 2,1
2:
. . .
∃x.¬R(x)
1: ¬∃x.¬R(x) premise
(b) after: instances of B1 replaced by ∃x.¬R(x)
Figure 6.4: Effect of a Unify command

6.3. ELIMINATING AN UNKNOWN WITH UNIFY 33
5: ∀y.R(y) contra (constructive) 4
4: ⊥ ¬ elim 2,3
3:
. . .
¬_B1
2:
. . .
_B1
1: ¬∃x.¬R(x) premise
(a) before: hypothesis ¬∃x.¬R(x) and conclusion¬ B1 selected
4: ∀y.R(y) contra (constructive) 3
3: ⊥ ¬ elim 2,1
2:
. . .
∃x.¬R(x)
1: ¬∃x.¬R(x) premise
(b) after: instances of B1 replaced by ∃x.¬R(x)
Figure 6.5: Effect of hyp on an unknown
Figure 6.6: Proof with proviso
5: ∀y.R(y) ∀ intro 3-4
4:
. . .
R(i)
3: actual i assumption
2: ¬∃x.¬R(x)∨_B1 ∨ intro 1
1: ¬∃x.¬R(x) premise
Provided:i NOTIN _B1
Figure 6.7: Preparation for proviso-violatingunification
6.3 Eliminating an unknown with Unify
If you have an unknown in your proof, and a subformula somewhere in the proof which you want to useto replace the unknown, then subformula selection and the “Unify” command from the Edit menu will dothe job. You subformula-select two or more subformulae which you want to make the same by replacingunknowns (command/control-alt/option/middle-press-and-drag is the gesture you need to make more thanone subformula selection). Figure 6.4 shows an example. Note that there are no formula selections in figure6.4(a), only subformula selections.
6.4 Eliminating an unknown with hyp
The hyp step is really just a cloak for the Unify command: make this selected conclusion the same asthis selected hypothesis (or these selected hypotheses). For example see figure 6.5. Note that making¬∃x.¬R(x) the same as ¬ B1 means making ∃x.¬R(x) the same as B1 .

34 CHAPTER 6. UNKNOWNS, HYP AND UNIFY
Figure 6.8: Jape’s reason for rejecting unification step
6.5 Provisos and the privacy condition
Recall that the ∀ intro and ∃ elim steps introduce a variable — i, i1 , i2 , ... — for private use within ageneralised proof. If a proof attempt doesn’t include unknowns, Jape can enforce the privacy conditioneasily: simply use a variable that isn’t in use already, anywhere in the proof. If there are unknowns about,things aren’t so simple: Jape has to ensure that you don’t unify that unknown with a formula that uses theprivate variable, because that could violate the privacy condition.
Figure 6.6 shows what happens when Jape has to invent a variable and there is an unknown in the proof.It must prohibit the possibility that the formula B1 includes the variable i: it does this with the proviso“i NOTIN B1 ” in the proviso pane below the proof. Figure 6.7 shows preparation for an attempt to violatethe proviso with a Unify command (making B1 , which appears outside the box, the same as R(i) insidethe box). Figure 6.8 shows the error message that Jape generates when you try the unification.
You get the same situation if you try the steps in the other order (∀ intro backwards, ∨ intro forwardsselecting only the hypothesis).

Chapter 7
Disproof
My encoding of natural deduction in Jape deals with disproof by allowing you to make Kripke diagramswhich Jape will check against a sequent to see if they are examples, or counter-examples, or neither. You doit by manipulating blobs, lines and atomic formulae in a disproof pane above the proof.
Jape shows you what is going on by underlining and colouring formulae and subformulae in the sequentand by colouring blobs on the screen. This chapter should, therefore, be read in colour rather than inmonochrome.1
7.1 Getting started
At any point during a proof attempt you can invoke ‘Disprove’ from the Edit menu.2 Jape splits the proofwindow and shows you a Kripke diagram with a single empty world and the proof-attempt sequent (you canselect hypotheses and conclusions to construct an alternative sequent: see below) in a disproof pane abovethe proof pane. The sequent may already be underlined and coloured as in figure 7.1.
The main things to notice in this illustration are
• the blob in the diagram is ringed in red;
• some of the names and connectives in the sequent are coloured magenta, some are grey, and some areblack;
• some of the formulae are underlined and some are not;
• the sequent uses the semantic turnstile �;
• there’s a little green waste bin on the right;
• above the waste bin there are some tiles, each containing an atomic formula.
1 I am aware that use of colour means that some people can’t use Jape as easily as others. This is only the tip of a nasty iceberg:Jape uses a visual presentation to make it easier to understand proof and disproof, and that excludes many people with reducedvisual acuity from using it at all.Contrary to some propaganda, these problems aren’t easy to overcome. But I’d love to try, and I’d love to hear from anybodywho has suggestions to make, advice to offer, technical information to share, guinea-piggery to volunteer, whatever. Messagesto me at the title page address, as usual.
2 There isn’t a Disprove button in the conjecture panels. Perhaps there should be! You have to hit Prove to start a proof attemptand then choose Edit:Disprove.
35

36 CHAPTER 7. DISPROOF
Figure 7.1: Proof attempt with proof pane below and disproof pane above
actual jR(j)
actual j
R(j)
S(j)
actual j, S(j) ⊧ ∀x.(R(x)→S(x))
Figure 7.2: A multi-world situation
R(j)actual j
actual j
R(j)
S(j)
actual j, S(j) ⊧ ∀x.(R(x)→S(x))
Figure 7.3: A single-world situation
In general magenta means ‘forced’, black means ‘unforced’ and grey means ‘irrelevant’.
Because of operating system variations, your window may not look exactly like the illustration, but it willhave the same parts. In other illustrations I show the important bits of the proof and/or disproof panes,without the waste bin and the scroll bars and stuff.
7.2 Alternative sequents
If you select a conclusion in the proof pane (or, if Jape doesn’t want to let you do that, the reason next tothe conclusion) and then hit Edit:Disprove, Jape will use the disproof sequent consisting of the conclusionas consequent and all the hypotheses above it as antecedent formulae. If you select some of the hypothesesas well as the conclusion, they will be used as the antecedents.
You can choose a new disproof sequent at any time, even in the middle of a disproof attempt.
If you want to set up an entirely new challenge, enter it into one of the conjectures panels (New button), hitProve and then Edit:Disprove in the proof window.
7.2.1 Selecting a situation
There is always one selected world in a diagram, ringed in red. The selected world is the root world of thesituation evaluated by Jape. For example, in figure 7.2 the situation is the whole diagram; in figure 7.3 it’s
7.3. MAKING DIAGRAMS 37
E
F
G
E→(F→G) ⊧ (E→F)→G
Figure 7.4: A simple counter-example
actual j actual k R(k)
actual j actual k R(j)
actual j actual k actual j
actual k
R(j)
R(k)
actual j, actual k ⊧ ∃x.(R(x)→R(j)∧R(k))
Figure 7.5: An elaborate counter-example
the single world at top left.
7.2.2 What’s forced ? — colouring, greying, underlining
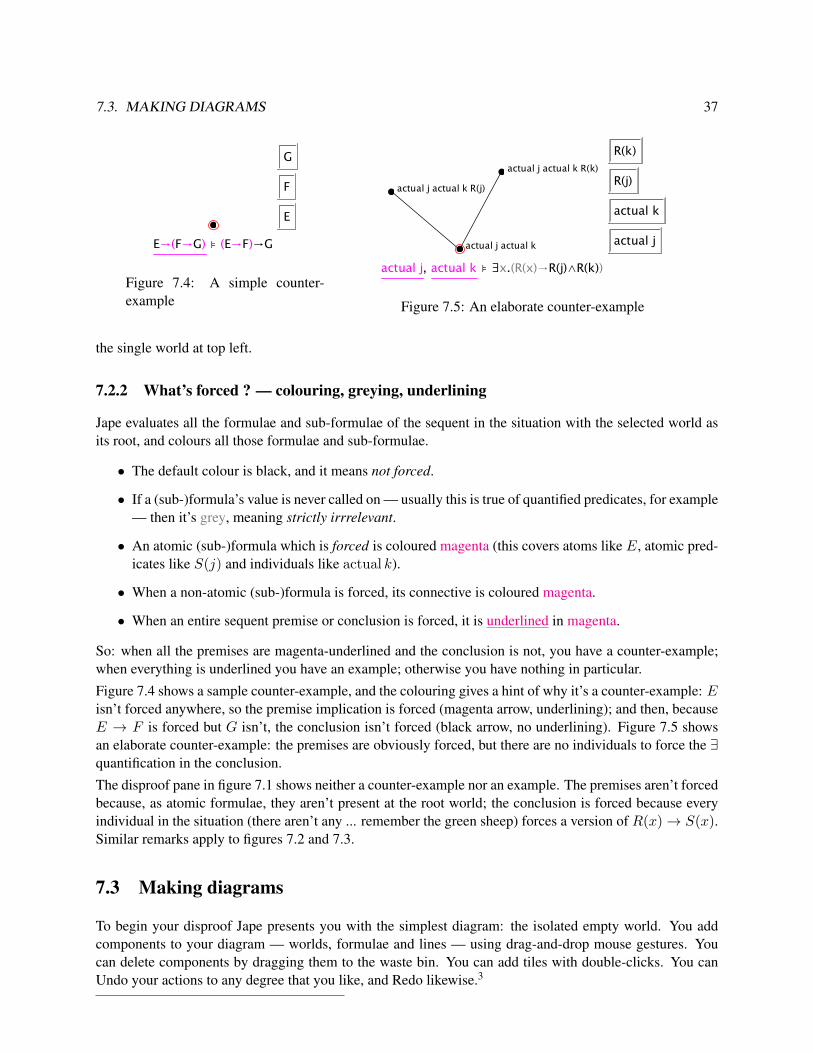
Jape evaluates all the formulae and sub-formulae of the sequent in the situation with the selected world asits root, and colours all those formulae and sub-formulae.
• The default colour is black, and it means not forced.
• If a (sub-)formula’s value is never called on — usually this is true of quantified predicates, for example— then it’s grey, meaning strictly irrrelevant.
• An atomic (sub-)formula which is forced is coloured magenta (this covers atoms like E, atomic pred-icates like S(j) and individuals like actual k).
• When a non-atomic (sub-)formula is forced, its connective is coloured magenta.
• When an entire sequent premise or conclusion is forced, it is underlined in magenta.
So: when all the premises are magenta-underlined and the conclusion is not, you have a counter-example;when everything is underlined you have an example; otherwise you have nothing in particular.
Figure 7.4 shows a sample counter-example, and the colouring gives a hint of why it’s a counter-example: Eisn’t forced anywhere, so the premise implication is forced (magenta arrow, underlining); and then, becauseE → F is forced but G isn’t, the conclusion isn’t forced (black arrow, no underlining). Figure 7.5 showsan elaborate counter-example: the premises are obviously forced, but there are no individuals to force the ∃quantification in the conclusion.
The disproof pane in figure 7.1 shows neither a counter-example nor an example. The premises aren’t forcedbecause, as atomic formulae, they aren’t present at the root world; the conclusion is forced because everyindividual in the situation (there aren’t any ... remember the green sheep) forces a version of R(x)→ S(x).Similar remarks apply to figures 7.2 and 7.3.
7.3 Making diagrams
To begin your disproof Jape presents you with the simplest diagram: the isolated empty world. You addcomponents to your diagram — worlds, formulae and lines — using drag-and-drop mouse gestures. Youcan delete components by dragging them to the waste bin. You can add tiles with double-clicks. You canUndo your actions to any degree that you like, and Redo likewise.3

38 CHAPTER 7. DISPROOF
To move a component of a diagram you put the mouse pointer over it, press (left button on a multi-buttonmouse), hold a moment, then — still pressing — move to a new position, and finally release. Jape showsyou a transparent image of the thing you are dragging, so you can see what you are doing.
To duplicate a component you hold down the alt/option key throughout the gesture (or use the middle buttonon a multi-button mouse) and you drag a new copy of the thing you pressed on.
Sometimes the purpose of the drag is to drop one component onto, or into, another. You drag the firstcomponent until the mouse pointer is over the one you want to drop onto/into. The recipient will changecolour if it’s prepared to accept the drop, and you simply let go while it’s lit up. If the drop fails (you aren’tover a component, or it won’t light up) then the dropped component flies back to base.
7.3.1 Dragging worlds
You can move-drag worlds about the place to make your diagram look nicer. You press on the blob, and youdrag the blob plus any formulae attached to it. Lines connected to the world stay connected, and you candrop it anywhere you like. To preserve the ‘connections only upwards’ principle, Jape will delete a line ifyou drag a world below its parent.
By duplicate-dragging a blob, you drag a copy of the world — the blob plus any formulae attached to it —with a line attaching it to the world it came from. The new world stays where you put it. If it’s above theworld you dragged it from, they will be connected by a line. If it’s level or below, then no line.
You can drag a world onto a line (which lights up to show you are over it) or another world (which lights upditto) and Jape does the obvious thing, adding whatever formulae are necessary to whatever worlds in orderto maintain monotonicity.
If you drag a world to the waste bin it’s deleted, along with all the formulae attached to it and all the linesconnected to it. The bin lights up when it will accept the world; it won’t accept the currently-selected world.
If you drop the world onto another the two worlds are merged. Jape does the correct monotonicity adjust-ments to the diagram by adding formulae to the children of the destination.
7.3.2 Dragging lines
You can drag lines and drop them onto worlds or into the waste bin, as you wish. Jape does the obviousthing in each case (if you can’t guess what that is, just try it!).
If you want to make a line between world A and world B, where A is below B, duplicate-drag A to B anddrop the new world onto B. Jape makes the monotonicity adjustments, adding formulae to B and its childrenas necessary. Dragging from B to A will have some not-very-useful effect (but there’s always Undo!).
7.3.3 Dragging formulae
You can drop a formula on a world, or drag it away from a world, in one of several ways. If a formula isadded to a world then, to preserve monotonicity, it is added to the children of that world as well. If a formulais deleted from a world then it is deleted from all ancestors of that world.
You can drag a formula from a tile and drop it onto a world (the world lights up, of course, to show thatit’s eager to accept; worlds won’t accept a second copy of a formula they already have). The formula isn’tdeleted from the tile, whichever kind of drag gesture you use, because tiles are infinite sources of formula-copies.3 Undo and Redo apply to the last pane you used the mouse in, either proof or disproof.

7.4. MAKING INDIVIDUALS AND PREDICATE INSTANCES 39
E
E
⊧ (¬¬E→E)∨¬E∨¬¬E
Figure 7.6: A counter-example
E
E
⊧ (¬¬E→E)∨¬E∨¬¬E
Figure 7.7: ¬¬E forced hereE
E
⊧ (¬¬E→E)∨¬E∨¬¬E
Figure 7.8: ¬¬E → E forcedhere
E
E
⊧ (¬¬E→E)∨¬E∨¬¬E
Figure 7.9: ¬E forced here
E
E
⊧ (¬¬E→E)∨¬E∨¬¬E
Figure 7.10: Multiple forcing
E
E
⊧ (¬¬E→E)∨¬E∨¬¬E
Figure 7.11: Too much forcing
You can move-drag a formula from one world onto another; it is added to the destination world and deletedfrom the source world. If you duplicate-drag it instead, it is simply added to the destination world.
7.4 Making individuals and predicate instances
If a sequent mentions an individual by including a hypothesis like actual j, then there will be a tile for thatindividual (see figures 7.1, 7.2, 7.3 and 7.5, for example). If there are quantifiers but no individuals you willget a free actual i tile.
If you need more individuals, double-click any “actual ...” tile. Jape uses an obvious numbering algorithmto name the new individual — actual j, for example, generates first actual j1 then actual j2 , and so on.4
If you want to make a new predicate instance, double-click a predicate-instance tile. Jape looks throughyour tiles for unused individuals and uses them to give you a new one. For example if you have a tile forS(j) and tiles for actual j and actual j1 , then double-clicking S(j) gets you S(j1 ), as you might expect. Ifthere’s more than one instance that could be made, Jape shows you the alternatives and asks you to choose.If you don’t have enough individuals to make a new instance, it tells you so.
7.5 Exploring reasons
The hardest thing to explain to a novice is why a particular formula is forced in a particular situation. Figure7.6 shows a particularly ludicrous formula and its counter-example, which really needs explanation. Japeprovides mechanisms which can be some help.
4 It would be nicer if it went i, j, k, i1 , j1 , k1 , i2 , ... One day I’ll make it do that.
40 CHAPTER 7. DISPROOF
actual j actual k
actual j actual k R(j)
actual j
actual k
R(j)
R(k)
actual j, actual k ⊧ ∃x.(R(x)→R(j)∧R(k))
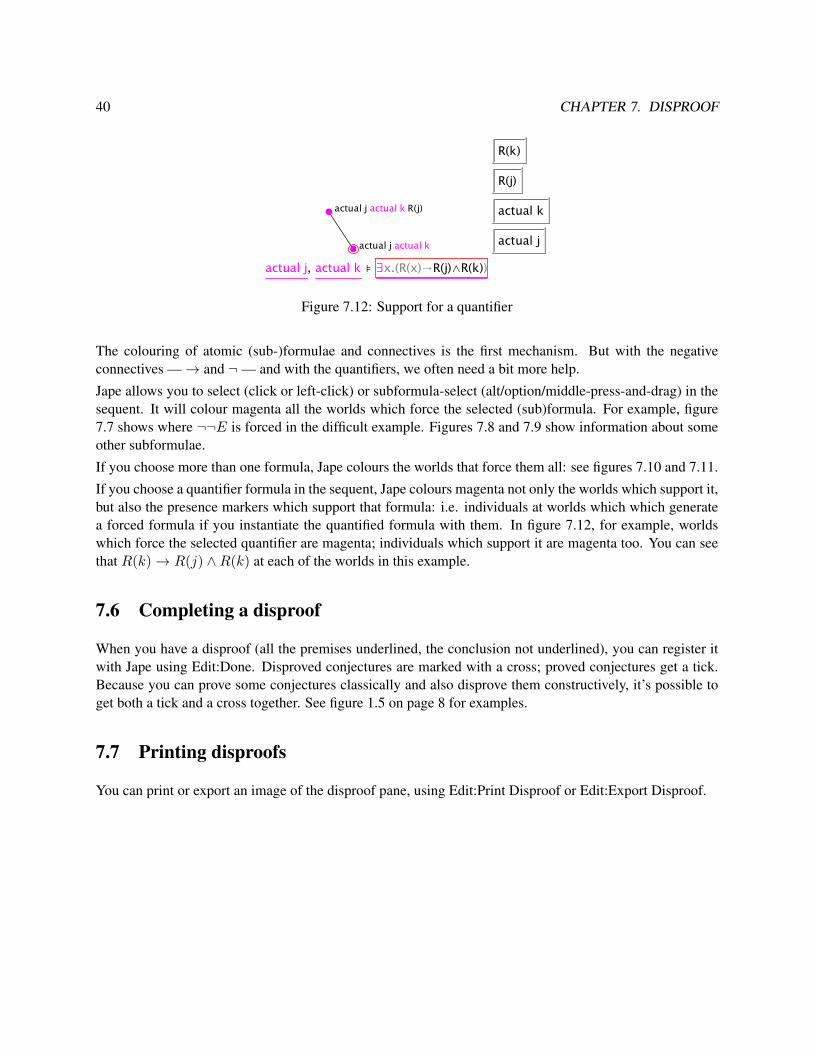
Figure 7.12: Support for a quantifier
The colouring of atomic (sub-)formulae and connectives is the first mechanism. But with the negativeconnectives —→ and ¬— and with the quantifiers, we often need a bit more help.
Jape allows you to select (click or left-click) or subformula-select (alt/option/middle-press-and-drag) in thesequent. It will colour magenta all the worlds which force the selected (sub)formula. For example, figure7.7 shows where ¬¬E is forced in the difficult example. Figures 7.8 and 7.9 show information about someother subformulae.
If you choose more than one formula, Jape colours the worlds that force them all: see figures 7.10 and 7.11.
If you choose a quantifier formula in the sequent, Jape colours magenta not only the worlds which support it,but also the presence markers which support that formula: i.e. individuals at worlds which which generatea forced formula if you instantiate the quantified formula with them. In figure 7.12, for example, worldswhich force the selected quantifier are magenta; individuals which support it are magenta too. You can seethat R(k)→ R(j) ∧R(k) at each of the worlds in this example.
7.6 Completing a disproof
When you have a disproof (all the premises underlined, the conclusion not underlined), you can register itwith Jape using Edit:Done. Disproved conjectures are marked with a cross; proved conjectures get a tick.Because you can prove some conjectures classically and also disprove them constructively, it’s possible toget both a tick and a cross together. See figure 1.5 on page 8 for examples.
7.7 Printing disproofs
You can print or export an image of the disproof pane, using Edit:Print Disproof or Edit:Export Disproof.

Chapter 8
Using theorems and stating conjectures
8.1 Using theorems
A theorem is a proved conjecture, one with a tick next to it in a conjecture panel. Jape lets you use thetheorem
A1, A2, . . . , An ` B
as if it was the rule
A1 A2 . . . An
B
You can apply a theorem backwards or forwards using the Apply button in its conjecture panel.
To work backwards, just select an open conclusion in the proof window, select the theorem in its panel,and press the Apply button. Jape will apply the theorem like any rule, instantiating it to fit the conclusion,making antecedents of its premises and entering them as hypotheses or linking to existing hypotheses ifpossible. See figure 8.1, for example.
Because forward steps take a lot of careful use of behind-the-scenes technology, theorems work best back-wards. But sometimes you must work forwards, and you can do that in two ways.
If your theorem has exactly one premise, you can select a hypothesis to match that premise and apply thetheorem like a forward rule, as illustrated in figure 8.2.
If your theorem has no premises or more than one premise, don’t select a hypothesis but do select a conclu-sion and apply the theorem. It sounds daft but it works: Jape makes a version of the theorem in which all thevariable and formula names are replaced by unknowns and inserts it into the proof, as illustrated in figure8.3. You have to get rid of the unknowns using hyp steps or the Unify command, as described in chapter 6.
1:
. . .
E∨¬E
(a) before: conclusion E ∨ ¬E selected
2: E∨¬E Theorem ¬(¬E∧¬F) ⊢ E∨F 1
1:
. . .
¬(¬E∧¬¬E)
(b) after: hypothesis ¬(¬E ∧ ¬¬E) generated
Figure 8.1: Theorem applied backward
41

42 CHAPTER 8. USING THEOREMS AND STATING CONJECTURES
3: ((E→F)→E)→E → intro 1-2
2:
. . .
E
1: (E→F)→E assumption
(a) before: hypothesis (E → F ) → E selected
4: ((E→F)→E)→E → intro 1-3
3:
. . .
E
2: (E∧F)→E Theorem (E→F)→G ⊢ (E∧F)→G 1
1: (E→F)→E assumption
(b) after: consequent (E ∧ F ) → E generated
Figure 8.2: Single-premise theorem applied forward
2:
. . .
∃y.¬R(y)
1: ¬∀x.R(x) premise
(a) before: conclusion selected
3:
. . .
∃y.¬R(y)
2: _E∨¬_E Theorem E∨¬E
1: ¬∀x.R(x) premise
(b) after: theorem inserted, with unknowns
Figure 8.3: Theorem applied to non-matching conclusion
Figure 8.4: The New Conjecture window

8.2. STATING YOUR OWN CONJECTURES 43
8.2 Stating your own conjectures
Press the “New...” button on any conjectures panel and you see a window like figure 8.4. You type yourconjecture using the keyboard in the normal way, and you can use the buttons provided to get the fancysymbols that aren’t on your keyboard.
Names in a conjecture have to obey certain rules:
• variables must start with x, y, z, i, j or k and can continue with any letter or digit;
• formula or predicate names must start with A, B, C, D, E, F , G, H , P , R, S or T and can continuewith any letter or digit.
If you make a mistake, like leaving out a dot or a bracket in a crucial spot, or typing a name it can’trecognise, Jape will complain. If you make more than one mistake, Jape only spots the first (reading left toright). Sometimes the error messages will be hard to understand: I’m sorry for that, but it’s really hard toimprove them.

44 CHAPTER 8. USING THEOREMS AND STATING CONJECTURES

Chapter 9
Troubleshooting
9.1 Problems getting started
On MacOS / OS X your security settings may stop you running Jape, saying it comes from a unknowndeveloper. There’s a way round this: ctrl-click Jape, choose Open from the little menu that appears, and sayOpen on the alert window that comes up. After that it can be double-clicked as normal.
On Windows and Linux Bernard distributes an ‘installation jar’ – a bundle of stuff that distributes itselfround your filestore. From his website:
It is never appropriate for you to unpack the .jar file, but it turns out that certain file-archivingsoftware on these operating systems tell the operating system that .jar files are archives, and thatopening means unpacking. On a Linux machine the way round this is to java -jar Install...jape.jarfrom a terminal window. On a Windows machine right-click on the jar file, and select the Openwith ... java ... menu entry.
The Jape app can be put anywhere you like. The examples can be anywhere you like.
If you installed Jape and it won’t start properly, throw it all away and install it again. This time follow theinstructions precisely. Then it will work.
9.2 What if a proof step goes wrong?
When you try to apply a rule one of two things can happen. Either the rule applies, and the step goes through,or it doesn’t, and Jape shows you an error message.
Even though a rule does apply and the proof step does go through, it may not turn out to be the right thing todo. Sometimes an apparently successful step can lead to a dead end. Sometimes a step works, but not in theway that you expected — perhaps lots of unknowns suddenly appear in the proof, or there are lots of extralines that you didn’t expect, or lots of lines suddenly disappear.
Whenever something happens that isn’t what you expected, the first stage of a cure is to use the Undocommand from the Edit menu. Undo takes you back one step in the proof, two Undos take you back twosteps, and so on. Using several Undos can move you back from a dead end to an earlier position from whichyou can move forward in a different direction.
You can even recover from Undo! The Redo command (also in the Edit menu) reverses the effect of Undo,two Redos reverse two Undos, and so on. So if you decide, after Undoing, that you really did want to make
45

46 CHAPTER 9. TROUBLESHOOTING
the step after all, Redo will make it again. (If you Undo and make a new proof step, then the one you Undidis gone for ever, like it or not.)
The Undo command allows you to explore if you don’t know what rule or theorem to apply in a proof: youcan experiment with different rules and theorems from the menus until you find one that works. That canbe a bad thing, if you just try things at random until you find one that happens to work, and don’t reflect onwhat you are doing. It’s also the slowest way of finding proofs. But sometimes we all need to search andexperiment (aka “thrash about”), and then Undo and Redo are invaluable. I hope that when you do searchand find a surprising avenue that happens to work,. you will pause to ask yourself why it works. Jape isdesigned to support ‘reflective exploration’ — it helps with the exploring part, and you learn by reflectingon the results.