NATIONAL WOOD FLOORING ASSOCIATION TECHNICAL …
29
NATIONAL WOOD FLOORING ASSOCIATION TECHNICAL PUBLICATION © 2019 NATIONAL WOOD FLOORING ASSOCIATION 121 PART I Substrate Requirements A. Wood flooring may be nailed down over most wood subfloors (except particleboard), as long as they meet the minimum requirements as detailed in the Wood Subfloors chapter. B. Inspect the substrate to ensure it meets all requirements for the flooring being installed. This includes: 1. Type of wood panel subflooring. 2. Subfloor thickness and floor joist/truss spacing requirements. 3. Integrity of the subfloor: All substrates must be sound and free from squeaks and vertical deflection. 4. Flatness: The standard for flatness on a wood substrate with a nail down installation method is ¼” in 10’, or 3/16” in 6’. 5. Moisture test the subfloor in relation to the flooring being used. (See Moisture Testing Wood chapter for testing information.) a. When testing for moisture, both the wood flooring and the subfloor should be evaluated. b. IMPORTANT: Never install a wood floor over a known moisture condition. A known moisture condition is one that you are aware of, and could pose future damage to the flooring, the building, or the occupants. It is compulsory practice to always test for moisture regardless of conditions so that any unknown conditions can become known conditions, which then can be handled appropriately. C. Over solid board subfloors laid on diagonal, install ¾” solid and engineered wood flooring perpendicular to the subfloor board direction or perpendicular to the floor joist/truss direction. D. Over solid board subfloors laid perpendicular to the floor joists, install the ¾” wood flooring on a diagonal to the subfloor board and joist direction. For any wood floor less than ¾” thick, for parquet flooring, or where the desired wood flooring direction differs from what is required, these subfloors must be overlaid with a minimum 19/32 subfloor panel. (Refer to the Wood Subfloors chapter on Double-Layer Subfloor Systems for more detailed information.) INSTALLATION METHODS: Nail-Down Many types of floors can be nailed down in many different situations. No matter the specific job requirements, there are several items that need to be addressed and followed during each installation. When available, the flooring and nailer manufacturer’s instructions should always be followed. This includes all recommendations and requirements that give instruction on preparation, installation, or use of the wood floor. Where manufacturer instructions are unavailable, lack information, or they reference NWFA Guidelines, use the following information.
Transcript of NATIONAL WOOD FLOORING ASSOCIATION TECHNICAL …

N A T I O N A L W O O D F L O O R I N G A S S O C I A T I O N T E C H N I C A L P U B L I C A T I O N
© 2019 NATIONAL WOOD FLOORING ASSOCIATION 121
PART ISubstrate Requirements
A. Wood flooring may be nailed down over most wood subfloors (except particleboard), as long as they meet the minimum requirements as detailed in the Wood Subfloors chapter.
B. Inspect the substrate to ensure it meets all requirements for the flooring being installed. This includes:
1. Type of wood panel subflooring. 2. Subfloor thickness and floor joist/truss
spacing requirements. 3. Integrity of the subfloor: All substrates must
be sound and free from squeaks and vertical deflection.
4. Flatness: The standard for flatness on a wood substrate with a nail down installation method is ¼” in 10’, or 3/16” in 6’.
5. Moisture test the subfloor in relation to the flooring being used. (See Moisture Testing Wood chapter for testing information.)
a. When testing for moisture, both the wood flooring and the subfloor should be evaluated.
b. IMPORTANT: Never install a wood floor over a known moisture condition. A known moisture condition is one that you are aware of, and could pose future damage to the flooring, the building, or the occupants. It is compulsory practice to always test for moisture regardless of conditions so that any unknown conditions can become known conditions, which then can be handled appropriately.
C. Over solid board subfloors laid on diagonal, install ¾” solid and engineered wood flooring perpendicular to the subfloor board direction or perpendicular to the floor joist/truss direction.
D. Over solid board subfloors laid perpendicular to the floor joists, install the ¾” wood flooring on a diagonal to the subfloor board and joist direction. For any wood floor less than ¾” thick, for parquet flooring, or where the desired wood flooring direction differs from what is required, these subfloors must be overlaid with a minimum 19/32 subfloor panel. (Refer to the Wood Subfloors chapter on Double-Layer Subfloor Systems for more detailed information.)
INSTALLATION METHODS: Nail-Down
Many types of floors can be nailed down in many different situations. No matter the specific job requirements, there are several items that need to be addressed and followed during each installation. When available, the flooring and nailer manufacturer’s instructions should always be followed. This includes all recommendations and requirements that give instruction on preparation, installation, or use of the wood floor. Where manufacturer instructions are unavailable, lack information, or they reference NWFA Guidelines, use the following information.

N A T I O N A L W O O D F L O O R I N G A S S O C I A T I O N T E C H N I C A L P U B L I C A T I O N
© 2019 NATIONAL WOOD FLOORING ASSOCIATION122
E. When wood flooring is required to be installed parallel to the floor joists, follow one of these two methods:
1. Add a second layer of minimum 15/32” plywood underlayment to the existing subfloor. (Refer to the Wood Subfloors chapter on Double-Layer Subfloor Systems for more detailed information.)
2. Brace between joists/floor trusses. This should be completed by a qualified professional.
F. For nailing directly to screeds/sleepers, refer to the Screeds/Sleepers chapter for more detailed installation methods.
PART IIFastenersThe purpose of the flooring fastener is to hold the wood floor in place through the duration of its’ service life. The fastener functions by displacing the wood fibers as it is driven into the board. The pressure exerted against the shaft of the fastener is what provides the fastener retention.
A. The components of a flooring fastener: 1. Gauge (g) of a flooring fastener is a measure
of its diameter. The higher the number, the thinner the fastener.
2. Length of wood flooring fasteners may range from 1” to 2½”.
3. Fasteners may have a smooth shank or a barbed shank.
B. Cleats 1. Used as
the primary fastener, and designed specifically for wood floor installations, blind-nailed through the tongue of the board using manual or pneumatic flooring nailers.
2. Cleats are designed and cut specifically for the installation of wood flooring. When the flooring/subflooring shrink/swell from season to season, the ribs/barbs engage the wood fibers and thus increase the resistance to withdrawal.
3. Wood flooring cleats are available in different options:
a. 16g, 18g, and 20g. b. Lengths ranging from 1” to 2”. c. L-cleats and T-cleats, dependent upon
the nailer being used. 4. In general, cleats may be driven into the
flooring at closer intervals (tighter nailing schedule) than staples, without damage to the tongue of the flooring being installed.
NOTES:THE SECOND (TOP) LAYER SHOULD BE ORIENTED PERPENDICULAR TO THE FLOOR FRAMING AND OFFSET BY AMINIMUM 4" AND END JOINTS BY AT LEAST ONE JOIST SPACE. NO BASE LAYER SEAMS SHOULD ALIGN WITHTHE TOP LAYER SEAMS. PANELS MAY ALSO BE LAID ON DIAGONAL TO THE EXISTING SUBFLOORING.
THE SECOND LAYER (15/32" PANEL) SHOULD BE FASTENED WITH RING OR SCREW SHANKED NAILS,PROPRIETARY SCREWS, OR EQUIVALENT, WITH ATTACHMENT ONLY THROUGH THE ENTIRE SUBFLOOR PANEL,BUT NOT PENETRATING THROUGH TO THE FLOOR JOIST.
OPTIONAL: ELASTOMERIC WOOD FLOOR OR SUBFLOOR ADHESIVE
18"
EXISTING SUBFLOOR
JOIST/TRUSS
4" MIN.
MINIMUM 15/32" PLYWOODOR OSB
SOLID OR ENGINEEREDWOOD FLOORING
34"
ALONG WALL-LINE USE AN ELASTOMERICWOOD FLOOR ADHESIVE OR FACE-NAIL
WITH A MINIMUM 18g FASTENER PLACEDEVERY 8-10"
WHEN NECESSARY, ADD ANELASTOMERIC WOOD FLOORADHESIVE TO ASSIST IN THE
INSTALLATION.
WALL ASSEMBLY
12" O.C.
SECTION:SCALE:
1WOOD FLOOR INSTALLATION PARALLEL TO FLOOR JOISTS
3"=1'-0"
111 CHESTERFIELDINDUSTRIAL BLVD.CHESTERFIELD, MO
63005
SHEET#
FLO
OR S
YSTE
MS:
REV. BY:
1
DATE:
2
- -
- -
DRAWN BY: DATE:HD 9-5-19
NWFA
1
WO
OD
FLO
OR IN
STA
LLATI
ON P
ARALL
ELTO
FLO
OR J
OIS
TS
BASE AND SHOE MO LDINGU
WOOD FLOOR INSTALLATION PARALLEL TO FLOOR JOISTS

N A T I O N A L W O O D F L O O R I N G A S S O C I A T I O N T E C H N I C A L P U B L I C A T I O N
© 2019 NATIONAL WOOD FLOORING ASSOCIATION 123
C. Staples 1. Used as
the primary fastener on many wood floor installations, blind-nailed through the tongue of the board using pneumatic flooring nailers.
2. Because each staple penetrates the wood at two points, with two prongs, staples can have a tendency to split the tongues of the flooring when the air pressure from the compressor is set too high for the species being nailed.
3. Staples are available in different options: a. ½” crown staples available in 15.5g. b. Narrow crown (1/4”) staples available
in 16g-20g. c. Lengths for wood flooring ranging from
1¼” to 2”.
D. Cut-nails 1. Like nails made during
the 19th century, cut nails are sheared by machine from steel plates, producing a nail with a distinctive wedge shape that ends in a blunt point. It is this particular profile that gives the nail its authenticity. Cut on all sides to produce four edges, they’re also called “square” nails.
2. These fasteners historically were used to install wood floors, but mostly are used for decorative purposes today.
3. These nails are manually driven into the flooring.
E. Casing nails 1. Slightly larger than the
finish nail with increased holding power, these fasteners are normally hand-driven into the top of the tongue (blind-nailed) or used as a face nail where additional hold power is required.
2. Strong attachment to the subfloor, often not requiring supplemental adhesive.
3. Most-commonly used against pull-up walls. 4. When driven through the face of the board,
these nails have a pronounced head that can leave a larger hole in the installed flooring, requiring wood filler.
F. Finish nails 1. A slender nail with a
small globular head, used for finish work.
2. Strong attachment to the subfloor.
3. Nails normally are 15g-16g, and up to 2½” in length.
4. Most-commonly used against pull-up walls. 5. These nails normally are used with pneumatic
nailers. 6. These nails can leave a larger hole in the
installed flooring, requiring wood filler.
G. Brad nails 1. A thin brad of the
same thickness throughout, but tapering in width and having a slight projection at the top of one side instead of a head.
2. Brads often require supplemental elastomeric wood flooring adhesive to allow for adequate attachment to the subfloor.
3. Most commonly used against pull-up walls. 4. These nails are used with pneumatic nailers. 5. Brads are typically 18g, up to 2” in length
with a smaller head, requiring small amounts of filler.
H. Pin nails 1. A sewing needle-like
fastener that is used in fine carpentry to attach two items, often while adhesive is setting up.
2. Pin nails typically are 23g, up to 2” in length, headless pins, often requiring very little, if any, filler.
3. These nails are used with pneumatic nailers. 4. Pin nails are not acceptable fasteners for use
with wood flooring unless used in conjunction with an elastomeric wood flooring adhesive.

N A T I O N A L W O O D F L O O R I N G A S S O C I A T I O N T E C H N I C A L P U B L I C A T I O N
© 2019 NATIONAL WOOD FLOORING ASSOCIATION124
PART IIIFastener SchedulesDifferent types of wood floors require different flooring nailers, different fastener types, and different nailing schedules. Before beginning the installation, first identify the type of wood flooring being installed and then implement the appropriate, manufacturer- recommended flooring nailer and fastener type. Unless otherwise directed by the flooring manufacturer, the following guidelines should be followed:
A. Use a flooring nailer specifically designed and adjusted for the wood flooring being installed. Check with the flooring manufacturer for which fastener and nailer is required for the flooring being installed.
B. The flooring nailer should drive the fastener through the top of the tongue, into the nailing groove/pocket, along the length of the board, with the crown/head of the fastener seated flush, in a way that it is not over-driven or under-driven.
INCORRECT NAIL DEPTH | PROTRUDING
CORRECT NAIL DEPTH
INCORRECT NAIL DEPTH | TOO DEEP
APPROPRIATE WOODSUBFLOOR SYSTEMASSEMBLY
JOIST/TRUSS
WALL ASSEMBLY
12"
18g-20g CLEAT OR NARROWCROWNED (14") 18g STAPLE, NOTLESS THAN 1 14" LENGTH.
NOTES:FASTENER SPACING: 3"-4" INTERVALS ALONG LENGTH OF EACH BOARD.1"-2" FROM EACH END-JOINT OF EVERY BOARD.MINIMUM 2 FASTENERS PER BOARD.
ENGINEERED WOOD FLOORING (<58" THICK)
ALONG WALL-LINE USE AN ELASTOMERICWOOD FLOOR ADHESIVE OR FACE-NAIL
WITH A MINIMUM 18g FASTENER PLACEDEVERY 8-10"
CLASS II VAPOR RETARDER WHENNECESSARY.
WHEN NECESSARY, ADD AN ELASTOMERICWOOD FLOOR ADHESIVE TO ASSIST INTHE INSTALLATION.
SECTION:SCALE:
1ENGINEERED T&G WOOD FLOORING (< 5/8" THICK)
3"=1'-0"
111 CHESTERFIELDINDUSTRIAL BLVD.CHESTERFIELD, MO
63005
SHEET#
FLO
OR S
YSTE
MS:
REV. BY:
1
DATE:
2
- -
- -
DRAWN BY: DATE:HD 9-5-19
NWFA
4
THIC
K EN
GIN
EERED
T&G
WO
OD
FLO
ORIN
G (<
5/8
" THIC
K)BASE AND SHOE MO LDINGU
ENGINEERED T&G WOOD FLOORING (< 5/8” THICK)
C. Fasteners placed at intervals less than the required blind-nail spacing requirements are acceptable as long as the tongue and core material of the flooring is not compromised or split during installation.
Standard Fastener Schedules (unless otherwise recommended by the flooring manufacturer)
WOOD FLOORING TYPE FASTENER TYPE FASTENER SPACING
Engineered T&G wood flooring <5/8” thick
18g-20g cleat or narrow crowned (1/4”) 18g staple. Not less than 1¼” length.
3”-4” intervals along length of each board. 1”-2” from each end-joint of every board.
Minimum 2 fasteners per board.

N A T I O N A L W O O D F L O O R I N G A S S O C I A T I O N T E C H N I C A L P U B L I C A T I O N
© 2019 NATIONAL WOOD FLOORING ASSOCIATION 125
JOIST/TRUSS
WALL ASSEMBLY
BASE AND SHOE MOLDING
12"
15.5g,16g, OR 18g CLEAT ORSTAPLE, NOT LESS THAN 11
2" LENGTH.
NOTES:FASTENER SPACING: 6"-8" INTERVALS ALONG LENGTH OF EACH BOARD.1"-3" FROM EACH END-JOINT OF EVERY BOARD.MINIMUM 2 FASTENERS PER BOARD.
ENGINEERED WOOD FLOORING (≥58"THICK)
APPROPRIATE WOODSUBFLOOR SYSTEMASSEMBLY
ALONG WALL-LINE USE AN ELASTOMERICWOOD FLOOR ADHESIVE OR FACE-NAIL
WITH A MINIMUM 18g FASTENER PLACEDEVERY 8-10"
CLASS II VAPOR RETARDER WHENNECESSARY.
WHEN NECESSARY, ADD AN ELASTOMERICWOOD FLOOR ADHESIVE TO ASSIST INTHE INSTALLATION.
SECTION:SCALE:
1ENGINEERED T&G WOOD FLOORING (≥ 5/8" THICK)
3"=1'-0"
111 CHESTERFIELDINDUSTRIAL BLVD.CHESTERFIELD, MO
63005
SHEET#
FLO
OR S
YSTE
MS:
REV. BY:
1
DATE:
2
- -
- -
DRAWN BY: DATE:HD 9-5-19
NWFA
5
ENG
INEE
RED
T&G
WO
OD
FLO
ORIN
G (≥
5/8
" THIC
K)WALL ASSEMBLY
BASE AND SHOE MOLDING
34"
15.5g,16g, OR 18g CLEAT OR STAPLE,NOT LESS THAN 11
2" LENGTH.
NOTES:FASTENER SPACING: 6"-8" INTERVALS ALONG LENGTH OF EACH BOARD.1"-3" FROM EACH END-JOINT OF EVERY BOARD.MINIMUM 2 FASTENERS PER BOARD.
3/4" THICK, SOLID PLANK (≥3" WIDTH) WOOD FLOORING.
JOIST/TRUSS
APPROPRIATE WOODSUBFLOOR SYSTEMASSEMBLY
ALONG WALL-LINE USE AN ELASTOMERICWOOD FLOOR ADHESIVE OR FACE-NAIL
WITH A MINIMUM 18g FASTENER PLACEDEVERY 8-10"
CLASS II VAPOR RETARDER WHENNECESSARY.
WHEN NECESSARY, ADD AN ELASTOMERICWOOD FLOOR ADHESIVE TO ASSIST INTHE INSTALLATION.
SECTION:SCALE:
1SOLID PLANK T&G FLOORING 3/4" THICK (≥3" WIDTH)
3"=1'-0"
111 CHESTERFIELDINDUSTRIAL BLVD.CHESTERFIELD, MO
63005
SHEET#
FLO
OR S
YSTE
MS:
REV. BY:
1
DATE:
2
- -
- -
DRAWN BY: DATE:HD 9-5-19
NWFA
6
SO
LID
PLA
NK
T&G
FLO
ORIN
G 3
/4" T
HIC
K (≥
3" W
IDTH
)
ENGINEERED T&G WOOD FLOORING (≥ 5/8” THICK)
SOLID PLANK T&G FLOORING 3/4” THICK (≥3” WIDTH)
WOOD FLOORING TYPE FASTENER TYPE FASTENER SPACING
Engineered T&G wood flooring ≥5/8” thick
15.5g staple or 16g - 18g cleat. Not less than 1 ½” length.
6”-8” intervals along length of each board. 1”-3”from each end-joint of every board.
Minimum 2 fasteners per board.
WOOD FLOORING TYPE FASTENER TYPE FASTENER SPACING
Solid plank T&G wood flooring ¾” thick (≥3” widths)
15.5g staple or 16g - 18g cleat. Not less than 1 ½” length.
6”-8” intervals along length of each board. 1”-3”from each end-joint of every board.
Minimum 2 fasteners per board.
N A T I O N A L W O O D F L O O R I N G A S S O C I A T I O N T E C H N I C A L P U B L I C A T I O N
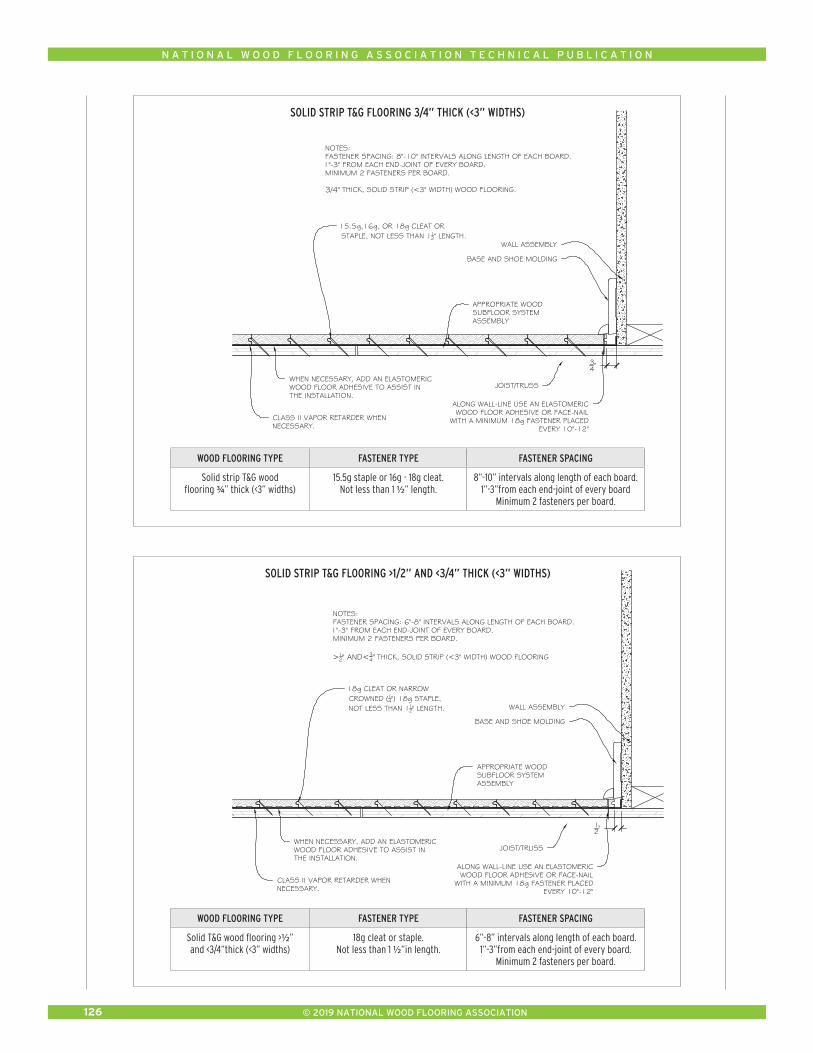
© 2019 NATIONAL WOOD FLOORING ASSOCIATION126
WALL ASSEMBLY
BASE AND SHOE MOLDING
34"
15.5g,16g, OR 18g CLEAT ORSTAPLE, NOT LESS THAN 11
2" LENGTH.
NOTES:FASTENER SPACING: 8"-10" INTERVALS ALONG LENGTH OF EACH BOARD.1"-3" FROM EACH END-JOINT OF EVERY BOARD.MINIMUM 2 FASTENERS PER BOARD.
3/4" THICK, SOLID STRIP (<3" WIDTH) WOOD FLOORING.
JOIST/TRUSS
APPROPRIATE WOODSUBFLOOR SYSTEMASSEMBLY
ALONG WALL-LINE USE AN ELASTOMERICWOOD FLOOR ADHESIVE OR FACE-NAIL
WITH A MINIMUM 18g FASTENER PLACEDEVERY 10"-12"
CLASS II VAPOR RETARDER WHENNECESSARY.
WHEN NECESSARY, ADD AN ELASTOMERICWOOD FLOOR ADHESIVE TO ASSIST INTHE INSTALLATION.
SECTION:SCALE:
1SOLID STRIP T&G FLOORING 3/4" THICK (<3" WIDTHS)
3"=1'-0"
111 CHESTERFIELDINDUSTRIAL BLVD.CHESTERFIELD, MO
63005
SHEET#
FLO
OR S
YSTE
MS:
REV. BY:
1
DATE:
2
- -
- -
DRAWN BY: DATE:HD 9-5-19
NWFA
7
SO
LID
STR
IP T
&G F
LOO
RIN
G 3
/4" T
HIC
K (<
3" W
IDTH
S)
WALL ASSEMBLY
BASE AND SHOE MOLDING
12"
18g CLEAT OR NARROWCROWNED (14") 18g STAPLE,NOT LESS THAN 11
2" LENGTH.
NOTES:FASTENER SPACING: 6"-8" INTERVALS ALONG LENGTH OF EACH BOARD.1"-3" FROM EACH END-JOINT OF EVERY BOARD.MINIMUM 2 FASTENERS PER BOARD.
>12" AND<3
4" THICK, SOLID STRIP (<3" WIDTH) WOOD FLOORING
ALONG WALL-LINE USE AN ELASTOMERICWOOD FLOOR ADHESIVE OR FACE-NAIL
WITH A MINIMUM 18g FASTENER PLACEDEVERY 10"-12"
CLASS II VAPOR RETARDER WHENNECESSARY.
WHEN NECESSARY, ADD AN ELASTOMERICWOOD FLOOR ADHESIVE TO ASSIST INTHE INSTALLATION.
JOIST/TRUSS
APPROPRIATE WOODSUBFLOOR SYSTEMASSEMBLY
SECTION:SCALE:
1SOLID STRIP T&G FLOORING >1/2" AND <3/4" THICK (<3" WIDTHS)
3"=1'-0"
111 CHESTERFIELDINDUSTRIAL BLVD.CHESTERFIELD, MO
63005
SHEET#
FLO
OR S
YSTE
MS:
REV. BY:
1
DATE:
2
- -
- -
DRAWN BY: DATE:HD 9-5-19
NWFA
8
SO
LID
STR
IP T
&G F
LOO
RIN
G >
1/2
" AND
<3
/4" T
HIC
K (<
3" W
IDTH
S)
SOLID STRIP T&G FLOORING 3/4” THICK (<3” WIDTHS)
SOLID STRIP T&G FLOORING >1/2” AND <3/4” THICK (<3” WIDTHS)
WOOD FLOORING TYPE FASTENER TYPE FASTENER SPACING
Solid strip T&G wood flooring ¾” thick (<3” widths)
15.5g staple or 16g - 18g cleat. Not less than 1 ½” length.
8”-10” intervals along length of each board. 1”-3”from each end-joint of every board
Minimum 2 fasteners per board.
WOOD FLOORING TYPE FASTENER TYPE FASTENER SPACING
Solid T&G wood flooring >½” and <3/4”thick (<3” widths)
18g cleat or staple. Not less than 1 ½”in length.
6”-8” intervals along length of each board. 1”-3”from each end-joint of every board.
Minimum 2 fasteners per board.

N A T I O N A L W O O D F L O O R I N G A S S O C I A T I O N T E C H N I C A L P U B L I C A T I O N
© 2019 NATIONAL WOOD FLOORING ASSOCIATION 127
NOTES:THE SECOND (TOP) LAYER SHOULD BE ORIENTED PERPENDICULAR TO THE FLOOR FRAMING AND OFFSET BY AMINIMUM 4" AND END JOINTS BY AT LEAST ONE JOIST SPACE. NO BASE LAYER SEAMS SHOULD ALIGN WITHTHE TOP LAYER SEAMS. PANELS MAY ALSO BE LAID ON DIAGONAL TO THE EXISTING SUBFLOORING.
THE SECOND LAYER (15/32" PANEL) SHOULD BE FASTENED WITH RING OR SCREW SHANKED NAILS,PROPRIETARY SCREWS, OR EQUIVALENT, WITH ATTACHMENT ONLY THROUGH THE ENTIRE SUBFLOOR PANEL,BUT NOT PENETRATING THROUGH TO THE FLOOR JOIST.
OPTIONAL: ELASTOMERIC WOOD FLOOR OR SUBFLOOR ADHESIVE
18"
EXISTING SUBFLOOR
JOIST/TRUSS
4" MIN.
MINIMUM 15/32" PLYWOODOR OSB
SOLID OR ENGINEEREDWOOD FLOORING
34"
ALONG WALL-LINE USE AN ELASTOMERICWOOD FLOOR ADHESIVE OR FACE-NAIL
WITH A MINIMUM 18g FASTENER PLACEDEVERY 8-10"
WHEN NECESSARY, ADD ANELASTOMERIC WOOD FLOORADHESIVE TO ASSIST IN THE
INSTALLATION.
WALL ASSEMBLY
12" O.C.
SECTION:SCALE:
1WOOD FLOOR INSTALLATION PARALLEL TO FLOOR JOISTS
3"=1'-0"
111 CHESTERFIELDINDUSTRIAL BLVD.CHESTERFIELD, MO
63005
SHEET#
FLO
OR S
YSTE
MS:
REV. BY:
1
DATE:
2
- -
- -
DRAWN BY: DATE:HD 9-5-19
NWFA
1
WO
OD
FLO
OR IN
STA
LLATI
ON P
ARALL
ELTO
FLO
OR J
OIS
TS
BASE AND SHOE MO LDINGU
WALL ASSEMBLY
12"
15g FLOORING BRADS. NOT LESS THAN 1" LENGTH
NOTES:FASTENER SPACING: 6 12"-7" INTERVALS, THROUGH THE FACE OF THEBOARD. ONE BRAD PER INCH-WIDTH OF THE FLOORING MATERIAL.
(EX. 2" WIDE BOARD GETS 2 BRADS EVERY 6 12"-7")
SOLID 5/16" THICK, TOP-NAIL WOOD FLOORING.
EXAMPLE: 2" WIDE FLOORING
CLASS II VAPOR RETARDER WHENNECESSARY.
JOIST/TRUSS
APPROPRIATE WOODSUBFLOOR SYSTEMASSEMBLY
SECTION:SCALE:
1SOLID STRIP FLOORING TOP-NAIL FLOORING 5/16" THICK
3"=1'-0"
111 CHESTERFIELDINDUSTRIAL BLVD.CHESTERFIELD, MO
63005
SHEET#
FLO
OR S
YSTE
MS:
REV. BY:
1
DATE:
2
- -
- -
DRAWN BY: DATE:HD 9-5-19
NWFA
10
SO
LID
STR
IP
FLO
ORIN
G T
OP-
NAIL
FLO
ORIN
G 5
/16
" THIC
K
BASE AND SHOE MO LDINGU
SOLID STRIP T&G FLOORING ≤1/2” THICK (<3” WIDTHS)
SOLID STRIP FLOORING TOP-NAIL FLOORING 5/16” THICK
WOOD FLOORING TYPE FASTENER TYPE FASTENER SPACING
Solid T&G wood flooring ≤1/2” thick (<3” widths)
18g-20g cleat or narrow crowned (1/4”) 18g staple.
Not less than 1 ¼” in length.
3”-4” intervals along length of each board. 1”-2”from each end-joint of every board.
Minimum 2 fasteners per board.
WOOD FLOORING TYPE FASTENER TYPE FASTENER SPACING
Solid square-edge top-nail wood flooring 5/16” thick
15g flooring brads. Not less than 1” in length.
6 ½”-7” intervals, through the face of the board. For every inch of flooring material width, 1 brad should be used (e.g., 2” wide board gets 2 brads every
6 ½”-7”). Any board width greater than even-inch increments should be rounded up (e.g., 1 ¼” board gets 2 brads every 6 ½”-7”). Note: For aesthetic
purposes, new top-nailed flooring matching up to existing top-nailed flooring should follow the same fastener schedule as currently exists.
WALL ASSEMBLY
BASE AND SHOE MOLDING
12"
18g-20g CLEAT OR NARROWCROWNED (14") 18g STAPLE,NOT LESS THAN 11
4" LENGTH.
NOTES:FASTENER SPACING: 3"-4" INTERVALS ALONG LENGTH OF EACH BOARD.1"-2" FROM EACH END-JOINT OF EVERY BOARD.MINIMUM 2 FASTENERS PER BOARD.
≤1/2" THICK, SOLID STRIP (<3" WIDTH) WOOD FLOORING.
ALONG WALL-LINE USE AN ELASTOMERICWOOD FLOOR ADHESIVE OR FACE-NAIL
WITH A MINIMUM 18g FASTENER PLACEDEVERY 10"-12"
CLASS II VAPOR RETARDER WHENNECESSARY.
WHEN NECESSARY, ADD AN ELASTOMERICWOOD FLOOR ADHESIVE TO ASSIST INTHE INSTALLATION.
JOIST/TRUSS
APPROPRIATE WOOD SUBFLOORSYSTEM ASSEMBLY
SECTION:SCALE:
1SOLID STRIP T&G FLOORING ≤1/2" THICK (<3" WIDTHS)
3"=1'-0"
111 CHESTERFIELDINDUSTRIAL BLVD.CHESTERFIELD, MO
63005
SHEET#
FLO
OR S
YSTE
MS:
REV. BY:
1
DATE:
2
- -
- -
DRAWN BY: DATE:HD 9-5-19
NWFA
9
SO
LID
STR
IP T
&G F
LOO
RIN
G≤
1/2
" TH
ICK
(<3" W
IDTH
S)
N A T I O N A L W O O D F L O O R I N G A S S O C I A T I O N T E C H N I C A L P U B L I C A T I O N
© 2019 NATIONAL WOOD FLOORING ASSOCIATION128
D. Face-nailing may occur where a flooring nailer or finish nailer cannot adequately drive a fastener into the tongue of the board.
1. When face-nailing along starter rows or pull-up rows, use a minimum 18g fastener.
a. For solid or engineered strip flooring (<3” widths), face-nails should be placed at 10”-12” intervals.
b. For solid or engineered plank flooring (≥3” widths), face-nails should be placed at 8”-10” intervals.
2. The type of fastener used will dictate the size of the hole left in the face of the board, the amount of necessary filler, and whether adhesive should also be used. To fill face-nail holes, use a wood-filler that matches the overall appearance of the finished wood floor. This is necessary anywhere face-nailing is required.
3. An elastomeric wood floor adhesive may be used as an alternative to, or in addition to, the use of face-nails on starting and pull-up walls.
a. Where flooring adhesive is used as an alternative to, or as an assistant to, the face nail, it may be applied to the subfloor or to the backside of the board itself in a variety of methods, such as the serpentine (sine-wave) pattern, parallel or lengthwise stripes, ends and grooves, or in a full-spread application. Regardless of the application method, the adhesive must cover the entire length and width of each board and be pressed down firmly to ensure the flooring is adhered adequately to the subfloor.
b. When using elastomeric wood flooring adhesive along pull-up walls as a primary fastening mechanism, use of an 18g or 23g pin-nail may be used to hold the flooring in place while the adhesive sets-up.
PART IVNail-Down Installation
A. Remove any existing base, shoe-mould, or doorway thresholds. These items can be replaced after installation.
B. Undercut door casings and jambs.
C. Snap a working line parallel to the starting wall (following wall-layout or center-layout methods), accounting for necessary expansion space.
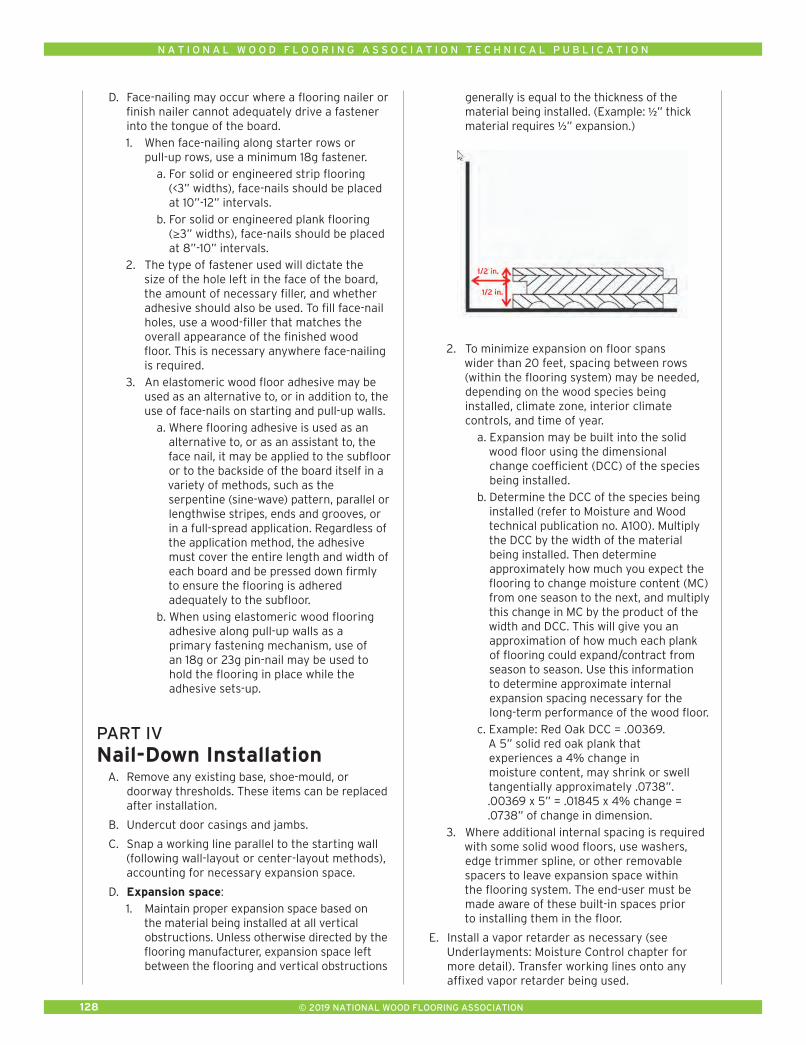
D. Expansion space: 1. Maintain proper expansion space based on
the material being installed at all vertical obstructions. Unless otherwise directed by the flooring manufacturer, expansion space left between the flooring and vertical obstructions
generally is equal to the thickness of the material being installed. (Example: ½” thick material requires ½” expansion.)
2. To minimize expansion on floor spans wider than 20 feet, spacing between rows (within the flooring system) may be needed, depending on the wood species being installed, climate zone, interior climate controls, and time of year.
a. Expansion may be built into the solid wood floor using the dimensional change coefficient (DCC) of the species being installed.
b. Determine the DCC of the species being installed (refer to Moisture and Wood technical publication no. A100). Multiply the DCC by the width of the material being installed. Then determine approximately how much you expect the flooring to change moisture content (MC) from one season to the next, and multiply this change in MC by the product of the width and DCC. This will give you an approximation of how much each plank of flooring could expand/contract from season to season. Use this information to determine approximate internal expansion spacing necessary for the long-term performance of the wood floor.
c. Example: Red Oak DCC = .00369. A 5” solid red oak plank that experiences a 4% change in moisture content, may shrink or swell tangentially approximately .0738”. .00369 x 5” = .01845 x 4% change = .0738” of change in dimension.
3. Where additional internal spacing is required with some solid wood floors, use washers, edge trimmer spline, or other removable spacers to leave expansion space within the flooring system. The end-user must be made aware of these built-in spaces prior to installing them in the floor.
E. Install a vapor retarder as necessary (see Underlayments: Moisture Control chapter for more detail). Transfer working lines onto any affixed vapor retarder being used.

N A T I O N A L W O O D F L O O R I N G A S S O C I A T I O N T E C H N I C A L P U B L I C A T I O N
© 2019 NATIONAL WOOD FLOORING ASSOCIATION 129
F. Racking: 1. With solid or engineered wood flooring
installed over a wood subfloor with a joist systems that meets or exceeds minimum requirements, properly staggered end joints are an appearance/aesthetic consideration only.
2. With ¾” strip or plank wood floors installed over bare joists, solid board subfloors, “perpendicular car decking,” screeds/sleepers, or panel-type subfloor/joist systems that do not meet minimum requirements, the layout of the entire floor, and end joint placement are not only an appearance/aesthetic consideration, but also add a structural element adding rigidity and stiffness to the finished installation.
3. When racking (or laying out the floor) prior to installation, be sure to work from multiple bundles or packages to ensure variation.
4. Flooring warranties typically do not cover materials with visible defects once they are installed. Installation is acceptance of product aesthetic quality.
5. Distribute lengths randomly and pull from multiple bundles.
6. Avoid “H” patterns when possible. 7. Avoid any discernible pattern in adjacent
runs such as blatant stair-steps or equal end-joint offsets in sequential rows. Cutting a variety of starter boards from full length boards will assist on “randomizing” joints in products of equal or limited lengths.
8. End joints of adjacent boards should not be installed in close proximity to each other. In general, end-joint staggering row-to-row should be a minimum of twice the width of the flooring being installed (e.g., 6” stagger for 3” wide material). Wider-width materials may be more-difficult to maintain these staggers due to the product length limitations.
G. Pre-cut, and lay out a starter row along the entire length of the working line.
H. Install and adequately secure this as your anchor row. This starter row should be secured to the subfloor to provide a stationary point to be pushed against so flooring doesn’t move during installation of the remaining floor. Face-nail only where necessary. Otherwise, blind-nail at the recommended schedule and glue with an elastomeric adhesive.
I. Runs of flooring generally should be installed straight. Unless otherwise required, the installed wood flooring should not deviate from a straight line more than 3/16” in 10’.
J. Flooring mallets, tapping blocks, and pull-bars may be used to drive flooring tight during installation. Be certain to only use tools that do not damage the flooring.
K. Set your compressor to the flooring nailer manufacturer recommended PSI setting for the wood being installed.
1. When the air pressure from the compressor is set too high for the species being nailed, staples have a tendency to drive the fastener below the nail pocket, potentially splitting the tongues of the flooring, resulting in a less-effective fastener.
2. When running multiple nailers from one compressor, individual regulators may help regulate the air to each tool.
L. Spline/Slip-Tongue: Spline or slip-tongue is used to maintain T&G within the entire flooring system. Use spline/slip-tongue to fit the specific flooring profile.
1. Use spline anytime the flooring direction changes, at all headers or flush transitions, and when reversing installation direction such as starting in the center of a layout or back-filling.
2. To install a spline/slip-tongue: a. Cut to length. b. Apply poly vinyl acetate (PVA)/
carpenters glue to the bottom side of the receiving groove.
c. Insert the slip-tongue. 3. Use the groove side of a piece of scrap
flooring to secure the slip-tongue while nailing the board into place using the proper nailing schedule for the flooring being installed.
N A T I O N A L W O O D F L O O R I N G A S S O C I A T I O N T E C H N I C A L P U B L I C A T I O N
© 2019 NATIONAL WOOD FLOORING ASSOCIATION130
PART VGlue-Assisted Nail-DownWhere the flooring manufacturer suggests glue-assisted installation or where the glue-assisted installation method is required, some key factors must be addressed:
A. Moisture
1. When using the glue-assist method, you will no longer be able to install a traditional sheet-good vapor retarder. When nailing down wood flooring over a conditioned space that is maintained at the same conditions as the living/interior space, no vapor retarder is necessary. Wood floors installed in these conditions may be nailed with a glue-assist directly to the subfloor without use of a vapor retarder.
2. Where wood flooring is being installed over unconditioned space, use of a liquid-applied, or similar Class II vapor retarder that is compatible with the flooring adhesive may be used to allow for a glue-assist directly to the subfloor.
3. IMPORTANT: Never install a wood floor over a known moisture condition. A known moisture condition is one that you are aware of, and could pose future damage to the flooring, the building, or the occupants. It is best practice to always test for moisture regardless of conditions so that any unknown conditions can become known conditions, which then can be handled appropriately.
B. Glue-Assisted Nail-Down Installation Method 1. Where mechanical fasteners on a nail-down
installation are the primary installation method, the nailing schedule should remain the same as normal installation for the flooring being installed. The addition of adhesive is not intended as a replacement fastener mechanism, rather supplemental to the mechanical fastener. Where the adhesive is applied using a full-spread application, the fastener schedule is not to be considered the primary fastening method.
2. Due to the reduction in the amount of fasteners used per square foot of flooring width, wide plank (>5” widths) solid and engineered wood flooring should be installed using the glue-assisted installation method, when site conditions allow, unless otherwise recommended by the flooring manufacturer.
3. The adhesive used should be a wood flooring adhesive with elastomeric qualities to allow for normal movement within the flooring system. The adhesive must also be compatible with the subflooring and any liquid-applied vapor retarder system used.
4. The wood subfloor must be thoroughly vacuumed, and free of any debris to ensure adhesion between the subfloor and the wood floor.
5. Test the adhesive to determine the most-effective application method, and for compatibility with the subfloor. The adhesive application method should add supplemental holding power to the installation.
6. The wood flooring adhesive may be applied to the subfloor or the backside of the board itself in a variety of methods to supplement the mechanical fastener.
a. With any of the following application methods, use a notch trowel, or apply a continuous, minimum ¼” wide, uniform bead of adhesive directly to the subfloor, or to the back of the board using a glue gun to dispense the adhesive.
b. The adhesive should be applied in a manner that covers the entire width and length of each plank, to within a minimum of 1” from the edges and ends of each board.

N A T I O N A L W O O D F L O O R I N G A S S O C I A T I O N T E C H N I C A L P U B L I C A T I O N
© 2019 NATIONAL WOOD FLOORING ASSOCIATION 131
i. Serpentine (sine-wave) pattern: The serpentine (sine-wave) pattern, where the full curve (peak-to-peak) is performed approximately twice the width of the board. The adhesive should cover the entire length and width of each board.
ii. Parallel stripes pattern: The parallel stripes may run perpendicular to, or on diagonal to, the length of each plank being installed. Each stripe should be placed at approximately 6”-8” intervals.
iii. Ends and grooves pattern: Adhesive is applied to the subfloor or to the underside of the board in the location within 1” from both ends of the board and along the full length of the back, groove-side of the board.
iv. Lengthwise parallel stripes pattern: Adhesive is applied to the subfloor or to the underside of the board in the location within 1” of each long side edge and down the middle of the board.
7. IMPORTANT: When using a trigger-activated flooring nailer with the glue-assisted installation method, the installer must either stand on the floor, or apply a downward pressure to the surface of each board as it is being nailed. This will ensure the flooring does not lift away from the subfloor causing unnecessary vertical movement or hollow noises.
C. Nail-Assisted Glue-Down Installation Method 1. Glue-down is the primary installation
method. The adhesive application should remain the same as normal installation for the flooring being installed (see Glue-Down Installation Methods chapter). The addition of mechanical fasteners is not intended as a replacement fastening mechanism, rather a supplemental method.
2. With full-spread installations over wood subfloors or screeds/sleepers, it is sometimes necessary or helpful to blind-nail the flooring periodically in order to hold the flooring in place while the adhesive sets-up.
a. This method may be appropriate where flooring needs to be driven tight during the installation.
b. There is no recommended nailing schedule for this method, as the fasteners are strictly used as a supplement to the glue-down method.
c. Listed are a few common methods and applications for each:
PARALLEL STRIPES PATTERN
SERPENTINE (SINE-WAVE) PATTERN
ENDS AND GROOVES PATTERN
LENGTHWISE PARALLEL STRIPES PATTERN
N A T I O N A L W O O D F L O O R I N G A S S O C I A T I O N T E C H N I C A L P U B L I C A T I O N
© 2019 NATIONAL WOOD FLOORING ASSOCIATION132
PART ISubstrate RequirementsWood flooring may be glued down over many substrates, as long as they meet the minimum requirements as detailed in the applicable chapter. Inspect the substrate to ensure it meets all requirements for the flooring being installed.
A. Wood Subfloors (refer to the Wood Subfloors chapter for more detailed information).
1. Inspect the wood subfloor to ensure it meets all flooring and adhesive manufacturer requirements.
2. Test the wood subfloor material for compatibility with the adhesive being used. (Some types of wood flooring adhesives do not adhere to some high-performance OSB panels.)
3. Check that the type and integrity of the wood subfloor is appropriate for the wood floor installation. This includes subfloor thickness and joist/floor truss spacing requirements, maximum vertical deflection requirements, and that it is sound and free from squeaks and noises.
4. Flatness: The standard for flatness with glue-down installation methods on a wood subfloor is 3/16” in 10’, or 1/8” in 6’.
5. When testing for moisture, both the wood flooring and the wood subfloor should be evaluated and documented (refer to the Moisture Testing Wood chapter for testing information).
a. IMPORTANT: Never install a wood floor over a known moisture condition. A known moisture condition is one that you are aware of, and could pose future damage to the flooring, the building, or the occupants. It is compulsory practice to always test for moisture regardless of conditions so that any unknown conditions can become known conditions, which then can be handled appropriately. If subfloor moisture becomes a problem after installation, pre-installation moisture testing and documentation will provide a moisture baseline at the time of installation.
6. All solid and engineered wood flooring being glued down over a wood subfloor should be installed perpendicular to, or on a diagonal to, the joist/floor truss direction for any single-layer subfloor.
INSTALLATION METHODS: Glue-Down
Many types of floors can be glued down in many different situations. No matter the specific job requirements, there are several items that need to be addressed and followed during each installation. When available, the flooring and adhesive manufacturer’s instructions should always be followed. Follow the adhesive manufacturer installation instructions specifically for substrate preparation and trowel selection. Where manufacturer instructions are unavailable, lack information, or they reference NWFA Guidelines, use the following information.

N A T I O N A L W O O D F L O O R I N G A S S O C I A T I O N T E C H N I C A L P U B L I C A T I O N
© 2019 NATIONAL WOOD FLOORING ASSOCIATION 133
APPROPRIATE WOOD SUBFLOORSYSTEM ASSEMBLY.
JOIST/TRUSS
WALL ASSEMBLY
ENGINEERED WOOD FLOORING
12"
FULL-SPREAD WOOD FLOORING ADHESIVE
NOTES:CONDITIONED SPACE BELOWTHE SUBFLOOR ASSEMBLY
111 CHESTERFIELDINDUSTRIAL BLVD.CHESTERFIELD, MO
63005
SHEET#
FLO
OR S
YSTE
MS:
REV. BY:
1
DATE:
2
- -
- -
DRAWN BY: DATE:HD 9-5-19
NWFA
3
FULL
-SPR
EAD
GLU
E-D
OW
N E
NG
INEE
RED
WO
OD
FLO
OR O
VER
WO
OD
SUBSTR
ATE
SECTION:SCALE:
13"=1'-0"
FULL-SPREAD GLUE-DOWN ENGINEERED WOODFLOOR OVER WOOD SUBSTRATE
BASE AND SHOE MO LDINGU
APPROPRIATE WOOD SUBFLOORSYSTEM ASSEMBLY.
JOIST/TRUSS
WOOD FLOORING
WALL ASSEMBLY
34"
FULL SPREAD FLOORING ADHESIVE
NOTES:CONDITIONED SPACE BELOWTHE SUBFLOOR ASSEMBLY
SECTION:SCALE:
1FULL-SPREAD GLUE-DOWN SOLID WOOD FLOORS OVER WOOD SUBSTRATE
3"=1'-0"
111 CHESTERFIELDINDUSTRIAL BLVD.CHESTERFIELD, MO
63005
SHEET#
FLO
OR S
YSTE
MS:
REV. BY:
1
DATE:
2
- -
- -
DRAWN BY: DATE:HD 9-5-19
NWFA
2
FULL
-SPR
EAD
GLU
E-D
OW
N S
OLI
DW
OO
D F
LOO
RS O
VER
WO
OD
SUBSTR
ATE
BASE AND SHOE MO LDINGU
FULL-SPREAD GLUE-DOWN SOLID WOOD FLOORS OVER WOOD SUBSTRATE
FULL-SPREAD GLUE-DOWN ENGINEERED WOOD FLOOR OVER WOOD SUBSTRATE
N A T I O N A L W O O D F L O O R I N G A S S O C I A T I O N T E C H N I C A L P U B L I C A T I O N
© 2019 NATIONAL WOOD FLOORING ASSOCIATION134
B. Concrete subfloors (refer to the Concrete Subfloors chapter for more-detailed information).
1. Inspect the concrete subfloor to ensure it meets all adhesive and flooring manufacturer requirements.
2. Address all construction joints on the jobsite. Wood flooring should not bridge these types of joints without allowing for a breaking point. Transitions and/or expansion space should be built into the wood flooring system to avoid potential wood floor damage at these locations in case of future movement.
3. If any subfloor toppings such as self-levelers, skim-coatings, patches, trowelable underlayments, or floor-fills exist, ensure any sealers or adhesive products are compatible with these toppings.
4. Removal of any contaminates that may interfere with the adhesive system is required.
5. Concrete surface profile (CSP): For concrete slabs, the concrete surface profile should be evaluated to ensure it meets the adhesive manufacturer requirements.
6. Porosity: Nonporous substrates may need to be prepared to an adequate CSP. Refer to the adhesive manufacturer for more detail. Porous substrates may require the use of densifiers/hardeners (compatible with the adhesive system being used).
7. Flatness: The standard for flatness for a concrete subfloor with glue-down installation methods is 3/16” in 10’ or 1/8” in 6’.
8. Moisture test the concrete subfloor in relation to the flooring being used. Refer to the Moisture Testing chapter for more information. When testing for moisture, both the wood flooring and the concrete subfloor should be evaluated.
a. Concrete slabs with a calcium chloride reading of greater than 3 lbs/1,000 sf/ 24 hr are strongly recommended to wait for further drying of the slab, or install/apply a minimum Class I impermeable vapor retarder over the slab according to the adhesive manufacturer’s instructions, prior to installation.
b. Concrete slabs with an in-situ RH reading of greater than 80% are strongly recommended to wait for further drying of the slab, or install/apply a Class I impermeable vapor retarder according to the adhesive manufacturer’s instructions, prior to installation.
c. Always follow the adhesive and the flooring manufacturer’s instructions for moisture test methods, limitations, and acceptable control of moisture. The results will help you decide which type of moisture control system will be necessary for the job.
C. Solid board subfloors (refer to the Wood Subfloors chapter for more detailed information).
1. Unless otherwise directed by the flooring and adhesive manufacturer, do not use the glue-down installation method as the only installation method over solid board subflooring.
2. Minimum 19/32” subfloor panels should be installed as an overlay to achieve a suitable substrate.
D. Screeds/sleepers (refer to the Screeds/Sleepers chapter for more detailed information).
1. Full-spread glue-down and nail-assisted glue-down installation methods are appropriate over properly prepared screeds/sleepers embedded in concrete, or when screeds/sleepers have been overlaid with the appropriate wood panel subfloor.
E. Radiant heat (refer to the Radiant Heat chapter for more detailed information).
1. Confirm the adhesive system being used is compatible with the radiant heating system.
2. Reduce or turn off heat during installation of the flooring to avoid loss of open/working time, premature drying, and skinning-over of the adhesive. Check with the adhesive manufacturer for minimum/maximum subfloor temperature limitations during the installation.

N A T I O N A L W O O D F L O O R I N G A S S O C I A T I O N T E C H N I C A L P U B L I C A T I O N
© 2019 NATIONAL WOOD FLOORING ASSOCIATION 135
PART IIAdhesivesAdhesive selection is an important step in a glue-down installation.
A. When applicable, follow the flooring manufacturer recommendations for which adhesives to use to install the flooring.
B. Follow the adhesive manufacturer’s instructions for proper use of the adhesive.
C. Characteristics of each adhesive, which affect application methods, include flash-time, working-time, and adjustability-time.
D. All wood flooring adhesives must be elastomeric, which means they remain flexible and maintain their bond when there is movement in the installed flooring system.
E. Allow the adhesive to reach room temperature before using, unless otherwise directed by the adhesive manufacturer.
F. There are several types of adhesives used to install wood floors.
1. Acrylic adhesives have great tack development, ease of clean-up, and are non-flammable. Acrylic adhesives contain water, which can cause some types of wood flooring to swell or become distorted. They also have limited resistance to alkalinity and slab moisture.
2. Solvent adhesives are easy-to-apply and easy-to-clean, but are highly flammable and are odorous. For this reason, it is important to extinguish all pilot lights before using solvent adhesives. Check local restrictions for potential constraints for shipping and storing solvent adhesives.
3. Urethane adhesives are commonly used for wood flooring installations today. They have minimal odor, and are nonflammable. This type of adhesive is moisture-resistant and alkali-resistant, but is more-difficult to clean off of the finished wood surface.
4. Modified polymers or silane-modified polymer adhesives are solvent-free and isocyanate-free adhesives. They are easy-to-clean and have low VOCs. These adhesives are typically capable of controlling moisture in concrete when applied in a specific, manufacturer-specified method.
5. Multi-functional adhesives: These products save time by eliminating multiple steps in the process, ultimately reducing overall costs. Each product has multiple functions, which may include crack bridging, moisture control, sound control, and mold/mildew resistance. These products are often marketed as two-in-ones, three-in-ones, four-in-ones, etc.
PART IIITrowel Selection
A. Trowel size dictates the square footage coverage of the adhesive.
B. The trowel selection is dictated by the adhesive manufacturer. Application method may include the angle at which the trowel is used to apply adhesive, or the pattern in which the adhesive is applied to the substrate.
C. It is typically required to occasionally pull boards to check for coverage and adequate adhesive transfer from the substrate to the back of the board. Unless otherwise suggested by the adhesive manufacturer, adhesive coverage should be as follows:
1. For moisture control, 100% substrate coverage and adhesive transfer is normally required for solid wood flooring product, >95% substrate coverage and adhesive transfer is required for all other wood flooring.
2. For bonding only, check coverage to ensure there is a minimum of 80% substrate coverage and adhesive transfer for engineered, and >95% for all solid wood flooring.
N A T I O N A L W O O D F L O O R I N G A S S O C I A T I O N T E C H N I C A L P U B L I C A T I O N
© 2019 NATIONAL WOOD FLOORING ASSOCIATION136
D. Do not use old or worn-down trowels, as the notches wear down with normal use, consequently decreasing the flow rate of the adhesive.
PART IVGlue-Down Installation
A. Solid and engineered strip, plank, parquet, or end-grain wood flooring may be glued down.
B. Where possible and practical, begin the installation at a point opposite of the point of egress in order to minimize walking across a newly glued-down installation. Wall-layout option is the most appropriate for glue-down installations. Refer to the Layout chapter for more-detailed information.
C. Undercut door casings and jambs. Remove any existing base, shoe-mold, or doorway thresholds. These items can be replaced after installation.
D. Snap a working line parallel to the starting wall, accounting for necessary expansion space.
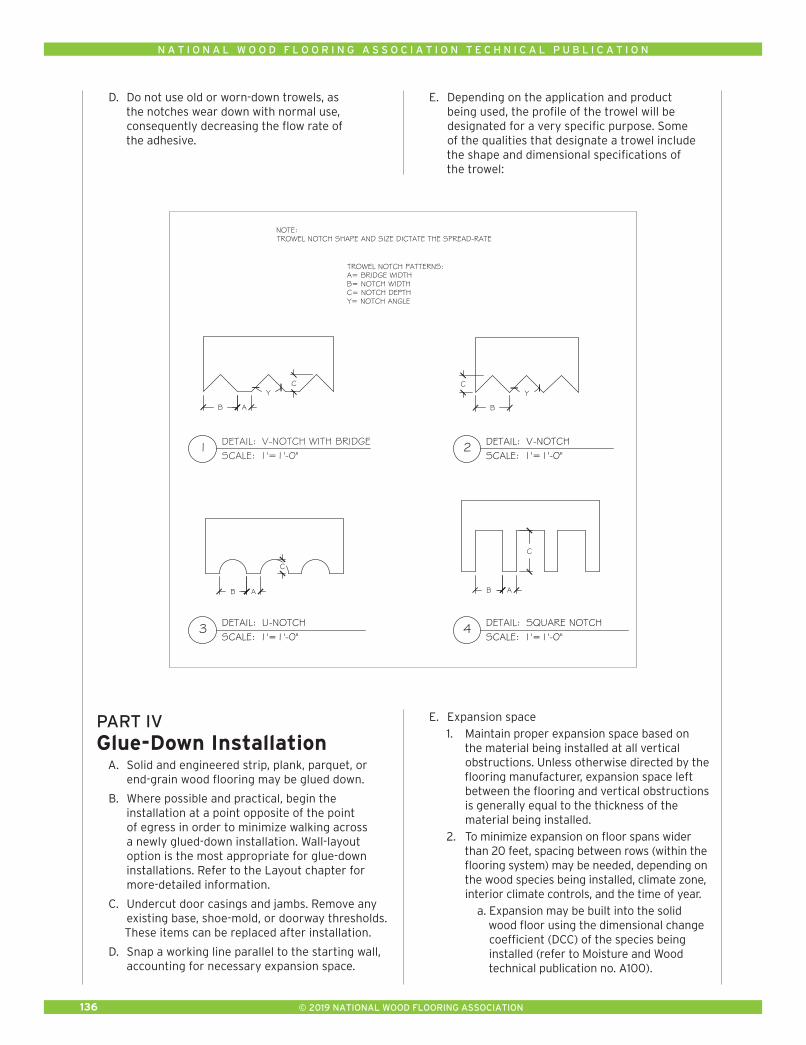
E. Depending on the application and product being used, the profile of the trowel will be designated for a very specific purpose. Some of the qualities that designate a trowel include the shape and dimensional specifications of the trowel:
E. Expansion space 1. Maintain proper expansion space based on
the material being installed at all vertical obstructions. Unless otherwise directed by the flooring manufacturer, expansion space left between the flooring and vertical obstructions is generally equal to the thickness of the material being installed.
2. To minimize expansion on floor spans wider than 20 feet, spacing between rows (within the flooring system) may be needed, depending on the wood species being installed, climate zone, interior climate controls, and the time of year.
a. Expansion may be built into the solid wood floor using the dimensional change coefficient (DCC) of the species being installed (refer to Moisture and Wood technical publication no. A100).
B A
YC
B
YC
B A
C
B A
C
DETAIL:SCALE:
V-NOTCH WITH BRIDGE1'=1'-0"
1
111 CHESTERFIELDINDUSTRIAL BLVD.CHESTERFIELD, MO
63005
SHEET#
FLO
OR S
YSTE
MS:
REV. BY:
1
DATE:
2
- -
- -
DRAWN BY: DATE:HD 9-3-19
NWFA
1TR
OW
EL N
OTC
H P
ATT
ERNS:
A=
BRID
GE
WID
THB=
NO
TCH W
IDTH
C=
NO
TCH D
EPTH
Y= N
OTC
H A
NG
LE
DETAIL:SCALE:
V-NOTCH1'=1'-0"
2
DETAIL:SCALE:
SQUARE NOTCH1'=1'-0"
4DETAIL:SCALE:
U-NOTCH1'=1'-0"
3
TROWEL NOTCH PATTERNS:A= BRIDGE WIDTHB= NOTCH WIDTHC= NOTCH DEPTHY= NOTCH ANGLE
NOTE:TROWEL NOTCH SHAPE AND SIZE DICTATE THE SPREAD-RATE

N A T I O N A L W O O D F L O O R I N G A S S O C I A T I O N T E C H N I C A L P U B L I C A T I O N
© 2019 NATIONAL WOOD FLOORING ASSOCIATION 137
b. Determine the DCC of the species being installed. Multiply the DCC by the width of the material being installed. Then determine approximately how much you expect the flooring to change moisture content (MC) from one season to the next, and multiply this change in MC by the product of the width and DCC. This will give you an approximation of how much each plank of flooring could shrink/swell from season to season. Use this information to determine approximate internal expansion spacing necessary for the long-term performance of the wood floor.
c. Example: Red Oak DCC = .00369. A 5” solid red oak plank that experiences a 4% change in moisture content, may shrink or swell tangentially approximately .0738”. .00369 x 5” = .01845 x 4% change = .0738” of change in dimension.
3. Where additional internal spacing is required with some solid wood floors, use washers, edge trimmer spline, or other removable spacers to leave expansion space within the flooring system. The end-user must be made aware of these built-in spaces prior to installing them into the floor.
F. Racking 1. With solid or engineered wood flooring
installed over concrete or a wood panel subfloor and joist systems that meets or exceeds minimum requirements, properly staggered end-joints are an appearance/aesthetic consideration only.
2. When racking (or laying out the floor) prior to installation, be sure to work from multiple bundles or packages to ensure color and length variation.
3. Flooring warranties do not typically cover materials with visible defects once they are installed. Installation is considered acceptance of the product aesthetic quality.
4. Distribute lengths randomly and pull from multiple bundles.
5. Avoid “H” patterns when possible. 6. Avoid any discernible pattern in adjacent runs
such as blatant stair-steps or equal end-joint offsets in sequential rows. Cutting a variety of starter boards from full length boards will assist in “randomizing” joints in products of equal or limited lengths.
7. End joints of adjacent boards should not be installed in close proximity to each other. In general, End-joint staggering, row-to-row should be a minimum of twice the width of the flooring being installed (e.g., 6” stagger for 3” wide material). Wider width materials may be more difficult to maintain these staggers due to the product length limitations.
G. Precut and lay out a starter row along the entire length of the working line.
H. An anchor row is sometimes beneficial to the installation.
1. An anchor row is one that may be set and secured to the substrate to provide a stationary point to be pushed against so flooring doesn’t move during installation of the remaining floor.
2. Creating an anchor row may include setting a section of flooring in the flooring adhesive the day prior to beginning the install or by setting a temporary starter row using a fastening mechanism, pressure sensitive tape, or temporary adhesive to create a backer for the flooring to be pulled against.
I. Many wood flooring adhesives are designed to be used in a wet-lay installation method, where you are able to spread the adhesive and begin to install the flooring immediately. Some adhesives may require flash-time prior to laying the flooring into the adhesive. Read the adhesive instructions prior to installation of any wood flooring.
J. Spread the adhesive with the appropriate trowel. Only apply as much adhesive as can be installed within the adhesive open-time period (see manufacture’s recommendations for open-time based on adhesive type). Avoid excessive adhesive thickness and inconsistent application by passing the trowel evenly through the adhesive as recommended by the manufacturer.
K. Lay the flooring into the adhesive, in accordance with the wood flooring and adhesive manufacturer’s instructions. Follow the flooring manufacturer’s instruction for tongue and groove (T&G) direction and placement.
L. Correctly position the flooring and press down firmly.
M. Tapping blocks, pull-bars, and straps may be used to drive flooring tight during installation. Be certain to only use tapping blocks, pull-bars, or straps that do not damage the flooring.
N. Runs of flooring should generally be installed straight. Unless otherwise required, the installed wood flooring should not deviate from a straight line more than 3/16” in 10’.
O. Periodically lift boards immediately after installation and at regular intervals to ensure proper slab coverage and adhesive transfer to the back of the flooring from subfloor is achieved.
P. Spline/slip-tongue: Spline or slip-tongue is used to maintain T&G within the entire flooring system. Use spline/slip-tongue to fit the specific flooring profile.
1. Use spline anytime the flooring direction changes, at all headers or flush transitions, and when reversing installation direction such as starting in the center of a layout or back-filling.

N A T I O N A L W O O D F L O O R I N G A S S O C I A T I O N T E C H N I C A L P U B L I C A T I O N
© 2019 NATIONAL WOOD FLOORING ASSOCIATION138
2. To install a spline/slip-tongue: a. Cut to length. b. Apply PVA glue or aliphatic resin
(carpenters glue) to the bottom side of the receiving groove.
c. Insert the slip-tongue.
Q. Use quick-release tape, straps, or tensioners to maintain a tight floor when necessary, and as suggested by the adhesive manufacturer.
R. Nail-assisted glue-down: 1. With full-spread installations over wood
subfloors or sleepers/screeds, it may be necessary or helpful to blind-nail the flooring into the wood subfloor periodically.
2. This method may be appropriate where flooring needs to be driven tight during the installation.
a. There is no recommended nailing schedule for this method, as the fasteners are strictly used as a supplement to the glue-down method.
S. If recommended by the adhesive manufacturer, roll the floor with the proper weight roller.
T. Clean all adhesive residue from the flooring surface using a proper adhesive remover as recommended by the adhesive and flooring manufacturer. Use the recommended cleaner to remove any residue that may have been left from the proper adhesive remover. Do not use a product or process that could damage the finished flooring.
U. Allow the floor to set for at least 24 hours, or as otherwise directed by the adhesive manufacturer, before allowing foot traffic.
V. Be sure the adhesive has had adequate time to dry and finish off-gassing before any topcoats of finish get applied to the floor.
PART VEnd-Grain Installation
A. Determine the layout before adhering end-grain blocks to the substrate.
B. Begin the installation at a point opposite of the main entrance in order to minimize walking across a newly glued-down installation. Wall-
layout option is the most appropriate for glue-down installations. Refer to the Layout chapter for more-detailed information.
C. Undercut door casings and jambs. Remove any existing base, shoe mold, or doorway thresholds. These items can be replaced after installation.
D. Snap a working line parallel to the starting wall, accounting for necessary expansion space.
E. Expansion space: 1. In facilities that do not have consistent
climate controls in place, shrink/swell should be accounted for within the installation.
2. End-grain flooring often requires expansion space to be added within the flooring system, based on the season of installation and the tangential shrink/swell value of the species being installed.
3. Many end-grain installations are installed with a slight gap between each block to allow for normal swelling. Depending on the size of the end-grain blocks, it is not uncommon to have 1/8”-1/4” (3-5 mm) expansion built into the system throughout the installation.
4. The typical rule of thumb for perimeter expansion is to maintain ¾” space at all vertical obstructions.
F. Racking: due to the varying wood grain patterns and other distinguishing characteristics that are prevalent in each individual end block, make sure to lay out the blocks in a random pattern.
G. An anchor row is sometimes beneficial to the installation.
1. This anchor row is one that may be set and secured to the subfloor to provide a stationary point to be pushed against so flooring doesn’t move during installation of the remaining floor. Creating an anchor row may include setting a section of flooring in the flooring adhesive the day prior to beginning the install.
2. Set a temporary starter row using a fastening mechanism, pressure-sensitive tape, or temporary adhesive to create a backer for the flooring to be pulled against.
H. Many wood flooring adhesives are designed to be used in a wet-lay installation method, where you are able to spread the adhesive and begin to install the flooring immediately. Some adhesives may require flash-time prior to laying the flooring into the adhesive. Read the adhesive instructions prior to installation of any wood flooring.
I. Spread the adhesive with the appropriate-size trowel. Only apply as much adhesive as can be installed within the adhesive open-time period (see manufactures recommendations for open-time based on adhesive type). Avoid excessive adhesive thickness and inconsistent application by passing the trowel evenly through the adhesive as recommended by the manufacturer.
N A T I O N A L W O O D F L O O R I N G A S S O C I A T I O N T E C H N I C A L P U B L I C A T I O N
© 2019 NATIONAL WOOD FLOORING ASSOCIATION 139
J. Lay the flooring into the adhesive, in accordance with the wood flooring and adhesive manufacturer’s written instructions. Correctly position the flooring and press down firmly.
K. During installation, use a white/non-marring flooring mallet on each end every block to ensure all are embedded properly into the adhesive. Tapping blocks and pull-bars also may be used to drive flooring tight during installation. Be certain to only use tapping blocks or pull-bars that do not damage the flooring.
L. Periodically lift the blocks immediately during installation and at regular intervals to ensure proper slab coverage and adhesive transfer to the back of the flooring from subfloor is achieved.
M. Use quick-release tape to maintain a tight floor when necessary, and as suggested by the adhesive manufacturer. Maintain adequate expansion on all four sides of each block when conditions are expected to fluctuate.
N. If recommended by the adhesive manufacturer, roll the floor with the proper weight roller.
O. Clean all adhesive residue from the flooring surface using a proper adhesive remover as recommended by the adhesive and flooring manufacturer. Be sure and use the recommended cleaner to remove any residue that may have been left from the proper adhesive remover. Do not use a product or process that could damage the finished flooring.
P. Allow the floor to set for at least 24 hours, or as otherwise directed by the adhesive manufacturer, before allowing foot traffic.
Q. Be sure the adhesive has had adequate time to dry and finish off-gassing before any topcoats of finish get applied to the floor.
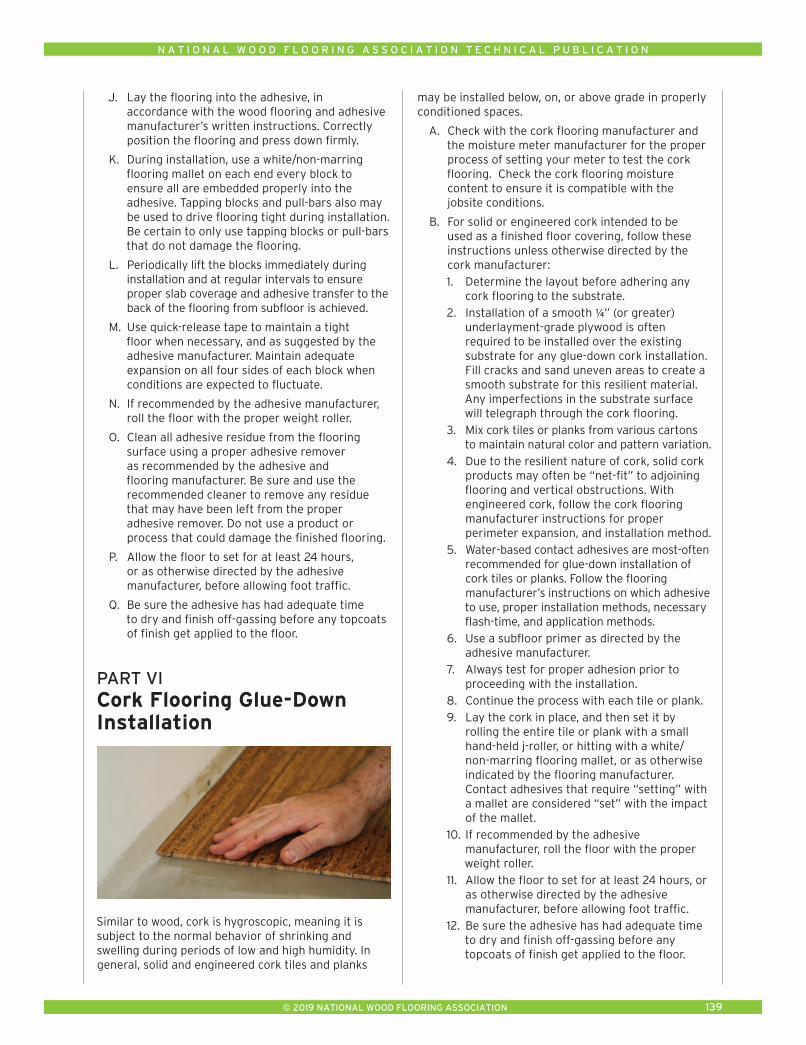
PART VICork Flooring Glue-Down Installation
Similar to wood, cork is hygroscopic, meaning it is subject to the normal behavior of shrinking and swelling during periods of low and high humidity. In general, solid and engineered cork tiles and planks
may be installed below, on, or above grade in properly conditioned spaces.
A. Check with the cork flooring manufacturer and the moisture meter manufacturer for the proper process of setting your meter to test the cork flooring. Check the cork flooring moisture content to ensure it is compatible with the jobsite conditions.
B. For solid or engineered cork intended to be used as a finished floor covering, follow these instructions unless otherwise directed by the cork manufacturer:
1. Determine the layout before adhering any cork flooring to the substrate.
2. Installation of a smooth ¼” (or greater) underlayment-grade plywood is often required to be installed over the existing substrate for any glue-down cork installation. Fill cracks and sand uneven areas to create a smooth substrate for this resilient material. Any imperfections in the substrate surface will telegraph through the cork flooring.
3. Mix cork tiles or planks from various cartons to maintain natural color and pattern variation.
4. Due to the resilient nature of cork, solid cork products may often be “net-fit” to adjoining flooring and vertical obstructions. With engineered cork, follow the cork flooring manufacturer instructions for proper perimeter expansion, and installation method.
5. Water-based contact adhesives are most-often recommended for glue-down installation of cork tiles or planks. Follow the flooring manufacturer’s instructions on which adhesive to use, proper installation methods, necessary flash-time, and application methods.
6. Use a subfloor primer as directed by the adhesive manufacturer.
7. Always test for proper adhesion prior to proceeding with the installation.
8. Continue the process with each tile or plank. 9. Lay the cork in place, and then set it by
rolling the entire tile or plank with a small hand-held j-roller, or hitting with a white/non-marring flooring mallet, or as otherwise indicated by the flooring manufacturer. Contact adhesives that require “setting” with a mallet are considered “set” with the impact of the mallet.
10. If recommended by the adhesive manufacturer, roll the floor with the proper weight roller.
11. Allow the floor to set for at least 24 hours, or as otherwise directed by the adhesive manufacturer, before allowing foot traffic.
12. Be sure the adhesive has had adequate time to dry and finish off-gassing before any topcoats of finish get applied to the floor.
N A T I O N A L W O O D F L O O R I N G A S S O C I A T I O N T E C H N I C A L P U B L I C A T I O N
© 2019 NATIONAL WOOD FLOORING ASSOCIATION140
PART IType of Flooring
A. With floating-floor installations, flooring panels are not attached to the substrate. Wood floors that can be floated either feature a tongue-and-groove construction, or edges with a locking mechanism.
B. When installing a floating-floor, engineered flooring is the only type of wood floor that can be used.
C. Solid wood flooring should never be installed using the floating-floor method unless otherwise recommended and warranted by the flooring manufacturer. In general, solid wood is not dimensionally stable enough, when exposed to seasonal changes, to withstand this installation method. Solid flooring includes solid strand woven flooring products.
PART IISubstrate Requirements
A. Engineered wood flooring may be floated over most subfloors, as long as it meets the minimum requirements as detailed in the applicable chapter.
B. Inspect the substrate to ensure it meets all requirements for the flooring being installed. This includes:
1. Integrity of the subfloor: all substrates must be sound.
2. Flatness a. For floating-floor installation methods,
all substrates should be flat to within minimum tolerance of 1/8” in 6’, or 3/16” in 10’, unless otherwise specified by the wood flooring manufacturer.
b. Wood flooring should not be floated on ramps or non-flat surfaces.
3. Moisture test the subfloor in relation to the flooring being used. Refer to the Moisture Testing Wood chapter for testing information.
a. When testing for moisture, both the wood flooring and the subfloor should be evaluated.
b. IMPORTANT: Never install a wood floor or underlayment over a known moisture condition. A known moisture condition is one that you are aware of, and could pose future damage to the flooring, the building, or the occupants. It is compulsory practice to always test for moisture regardless of conditions so that any unknown conditions can become known conditions, which then can be handled appropriately.
4. A wood subfloor must meet all joist/floor truss spacing & panel thickness requirements as detailed in the Wood Subfloors chapter.
5. Over 23/32” plywood or OSB, floating-floors may be installed in any direction in the room, regardless of joist direction. This is because the floor acts as an independent, monolithic unit.
INSTALLATION METHODS: Floating
No matter the specific job requirements, there are several items that need to be addressed and followed during any floating-floor installation. When available, the flooring manufacturer’s instructions should be followed. This includes all recommendations and requirements that give instruction on preparation, installation, or use of the wood floor. Where manufacturer instructions are unavailable, lack information, or they reference NWFA Guidelines, use the following information.

N A T I O N A L W O O D F L O O R I N G A S S O C I A T I O N T E C H N I C A L P U B L I C A T I O N
© 2019 NATIONAL WOOD FLOORING ASSOCIATION 141
PART IIIUnderlaymentsThere are many underlayment systems available for floating-floor installation methods when specifying the project. Refer to the Sound Control/Acoustical Underlayments chapter for more information.
A. Acoustical underlayment materials may include cork, recycled rubber or cork/rubber blends, foam pads, recycled cellulose fiber materials, and dimpled or peel-and-stick membranes. These materials may be attached to the flooring itself, floated over the subfloor, or adhered to the subfloor. Follow the underlayment manufacturer’s instructions for the proper application and installation of the underlayment.
B. Underlayments can impact wood flooring performance. When installing a floating-floor, the underlayment material functions may provide sound control and/or moisture control. Check with the flooring manufacturer or Homeowner Association’s Covenants, Conditions, and Restrictions (CC&Rs), for specific underlayment requirements. Refer to the Underlayments chapters for more information.
C. Over concrete substrates, when the acoustical underlayment material does not include a vapor retarder, installation of a separate Class I vapor retarder underneath the acoustical underlayment will be necessary.
D. Over wood substrates above unconditioned spaces, when the acoustical underlayment material does not include a vapor retarder, installation of a separate Class II vapor retarder underneath the acoustical underlayment may be necessary.
E. Any underlayment materials used below a floated wood floor should have a published compression resistance that meets all minimum requirements of the flooring being installed over it. Check with the flooring manufacturer for minimum compression resistance requirements.
F. Determine the IIC, Delta IIC, or STC requirements, then work with the builder, architect, and specifier to identify a flooring and underlayment combination that aligns with the facility requirements. Follow the flooring and underlayment manufacturer installation instructions and ensure the product used is a part of an entire sound control system.
G. The acoustical underlayment should have a published Delta IIC rating. The Delta IIC rating provides the flooring products contribution to the entire assembly in terms of isolating impact footfall noise. The Delta IIC rating can be used to compare the performance of different underlayment materials.
H. Pressure-sensitive peel-and-stick underlayments (engineered wood flooring only).
1. One-sided peel-and-stick underlayments with the sticky-side faced down, used as an acoustical underlayment or moisture retarding membrane, must be installed per underlayment manufacturer instructions.
2. One-sided peel-and-stick underlayments with the sticky-side faced up, are used as a method to mechanically adhere the flooring to the underlayment material, and must be installed per flooring and underlayment manufacturer instruction.
PART IVExpansion Space/ Transitions
A. Maintain proper expansion space at all vertical obstructions to allow for expansion/contraction of the monolithic flooring unit, based on the material being installed. Unless otherwise directed by the flooring manufacturer, expansion space left between the flooring and vertical obstructions are generally equal to the thickness of the material being installed. (Example: ½” thick material requires ½” expansion space.)
B. Transition pieces allowing for expansion space should be built into the floating-floor system at any doorways less than 4 feet in width, and within any flooring system that spans greater than 20 feet in width or greater than 40 feet in length (in comparison to flooring installation direction), unless otherwise directed by the flooring manufacturer.
C. Baseboard, base shoe, quarter round, and other trim pieces must not come into contact with the wood floor, allowing it to remain floating. Trim pieces should be held off of the floor a minimum of 1/16”, and should never be fastened to or through the flooring system.

N A T I O N A L W O O D F L O O R I N G A S S O C I A T I O N T E C H N I C A L P U B L I C A T I O N
© 2019 NATIONAL WOOD FLOORING ASSOCIATION142
D. Overlapping floor transition pieces (such as T-moulding and baby thresholds) must allow the flooring system to remain floating. Proper installation of transition pieces involves anchoring them only to the substrate and not directly to the flooring, allowing the flooring to remain completely independent.
E. Undercut all door casings 1/16” higher than the thickness of the flooring and underlayment material being installed. Place a scrap piece of plank and a sheet of underlayment against the door casing to act as a guide and cut the door casing with a hand saw or power jamb saw set to the correct height.
F. Areas that cannot receive baseboard or shoe moulding such as abutting floor coverings, stone fireplaces, staircase stringers, electrical outlets, or other fixed elements in the home, must allow for adequate expansion as well. This can be achieved by undercutting appropriate abutting material, or by using overlapping transitions.
G. Floating-floors should never be installed where future fixed cabinetry (such as kitchen islands) will lock the floor down, as these are considered “fixed vertical obstructions.”
H. Any heavy furniture or appliances such as pianos, pool tables, entertainment centers, or refrigerators can affect the ability of the floor to move as an independent monolithic unit, and may require additional expansion space built into the flooring system to accommodate. A point load on a single board of more than 600 lbs can keep the floor from floating. Check with the flooring manufacturer for specific point-load requirements, and advise the end-user of this condition prior to the product selection or installation.
PART VFloating-Floor Installation
A. Remove all doors and shoe mouldings.
B. Layout will determine the overall appearance of the floor. Plan the layout to avoid the final row being too narrow and for transition placement.
C. After determining the direction to run the flooring, measure the width of the room (the dimension perpendicular to the direction of the flooring), and divide by the width of the flooring planks. The last row of the flooring should be no less than 2” wide (unless otherwise dictated by the flooring manufacturer), unless the entire job layout doesn’t allow. Adjust the width of the starter row to avoid a narrow last row where possible.
D. Install the manufacturer-recommended underlayment material as required by the underlayment and flooring manufacturers.
E. Racking 1. When racking (or laying out the floor)
prior to installation, be sure to work from multiple bundles or packages to ensure variation. Distribute lengths randomly and pull from multiple bundles/packages.
2. Flooring warranties do not typically cover materials with visible defects once they are installed. Installation is acceptance of product aesthetic quality.
3. End joints of adjacent planks should not be installed in close proximity to each other. In general, end-joint staggering row-to-row should be a minimum of twice the width of the flooring planks being installed. For example, a 5” wide plank would require a 10” stagger row-to-row.
4. Avoid “H” patterns when possible and avoid any discernible pattern in adjacent runs such as equal end-joint offsets on sequential rows and blatant stair-steps, unless otherwise directed by the flooring manufacturer.
5. With some flooring materials, the installer is unable to follow the traditional racking guidelines due to available product lengths. Cutting a variety of starter planks from full length planks will assist in “randomizing” joints in products of equal or limited lengths.

N A T I O N A L W O O D F L O O R I N G A S S O C I A T I O N T E C H N I C A L P U B L I C A T I O N
© 2019 NATIONAL WOOD FLOORING ASSOCIATION 143
F. Edge-glued floating-floors 1. Apply the specified glue as recommended
by the flooring manufacturer. Amount, placement, and type of glue will vary from one wood flooring product to another. Poly vinyl acetate (PVA) glue generally is recommended for floating-floor installations.
2. Glue takes time to dry and will require additional time before foot traffic is allowed. Strapping the boards will help to avoid the installed flooring coming out of alignment before the glue completely dries.
3. Engage the tongue and groove snugly. Use of tapping blocks, straps, or a scrap piece of flooring may be necessary to get the flooring tight. Do not damage the edge, butt-end, tongue, or the groove while tapping the product into place.
4. At the end wall, use an end pry bar, if needed, to pull the ends of the planks tight.
5. Clean any excess glue from the surface of the planks as necessary.
G. Locking mechanism floating-floors 1. There are three basic types of locking
systems referred to by how the boards are attached to each other, along the length of the plank/and at the ends of the plank:
a. Angle/angle-locking systems: The plank must be angled upward to engage the locking mechanism along the length of the plank as well as the ends of the plank before lowering it to complete the connection. This must happen at the ends first (normally along the entire row), then along the length of the planks.
b. Angle/hook-locking systems: The plank must be angled upward to engage the locking mechanism along the length of the plank, but the ends of each plank have a hook lock connection. The ends are not locked in until the next row has been installed.
c. Angle/fold down-locking systems: Also called “single-action locking” as it locks the floor in one single motion often with an audible click sound. The plank must be angled upward to engage the locking mechanism along the length of the plank, but the ends are equipped with a mechanical locking function that actually locks the ends in place.
2. Ensure you lock the lengths and the ends of the flooring together correctly as per manufacturer recommendation of the particular locking mechanism being used.

N A T I O N A L W O O D F L O O R I N G A S S O C I A T I O N T E C H N I C A L P U B L I C A T I O N
© 2019 NATIONAL WOOD FLOORING ASSOCIATION144
H. Peel-and-stick installations 1. Follow the floating-floor installation instructions
for any engineered wood floor being placed over these underlayment materials.
2. With the underlayment material rolled out, peel and fold back the protective film no more than the width of each plank being installed, exposing the adhesive layer of the pad. Carefully lay each plank tightly into place, and then apply pressure to set it.
I. As with all hardwood flooring, the first row alignment is critical. Misaligned starter rows
can cause side and end gaps to appear in proceeding rows of flooring. Complete the first row. Make sure there are no gaps between the planks. Runs of flooring generally should be installed straight, measuring no more than 3/16”out of straight in a 10’ run.
J. Start each subsequent row with the cut-off end of the last board from the previous row whenever possible. Such cut off piece should be no less than 12” in length.
K. Continue to install the floor repeating the process until the completion of the floor.
WALL ASSEMBLY
PERIMETER ISOLATION BARRIER
ENGINEERED WOOD FLOORING
FLOATED ACOUSTICALUNDERLAYMENT
EXISTING WOOD OR CONCRETESUBFLOOR
12"
BASE BOARD.BASE BOARD HELD MINIMUM 1
16" OFF SURFACE OFFLOORING.
PERIMETER EXPANSION SPACE
SECTION:SCALE:
1FLOATED ACOUSTICAL UNDERLAYMENT
3"=1'-0"
111 CHESTERFIELDINDUSTRIAL BLVD.CHESTERFIELD, MO
63005
SHEET#
FLO
OR S
YSTE
MS:
REV. BY:
1
DATE:
2
- -
- -
DRAWN BY: DATE:HD 9-23-19
NWFA
.\NWFAcolor.jpg
1
FLO
ATE
D A
CO
USTI
CAL
UND
ERLA
YMEN
T
FLOATING FLOOR INSTALLATION

N A T I O N A L W O O D F L O O R I N G A S S O C I A T I O N T E C H N I C A L P U B L I C A T I O N
© 2019 NATIONAL WOOD FLOORING ASSOCIATION 145
PART IParquet Patterns
A. Parquet patterns often take their names from famous people or places. The Monticello pattern, for example, is based on floors in Thomas Jefferson’s home, and the Jeffersonian is a variation on that pattern. Others, such as Brittany, Bordeaux, and Canterbury, are named for places where they are thought to have originated.
B. There are also geometric patterns like herringbone, chevron, rhombus, and standard block- pattern parquet. Custom parquet patterns can also be created.
C. Parquet material thickness varies from 5/16” to 3/4” and may be solid or engineered. Parquet typically is made up of individual pieces, assembled into panels held together by wire, mesh, tape, or paperface (on the surface). Check with the manufacturer for specific installation instructions.
D. When ordering parquet, base your measurements on the actual dimension of the pattern. The quantity of parquet tiles, blocks, or pieces necessary will be dictated by the jobsite layout, and the repetition of the pattern itself.
PART IISubstrate RequirementsParquet wood flooring may be installed over many substrates, as long as they meet the minimum requirements as detailed in the applicable chapter. Inspect the substrate to ensure it meets all requirements for the flooring being installed, and the method in which it is being installed.
A. Wood subfloors (refer to the Wood Subfloors chapter for more detailed information).
1. Inspect the wood subfloor to ensure it meets all flooring and adhesive manufacturer requirements.
2. Test the wood subfloor material for compatibility with any wood flooring adhesive being used. (Some types of wood flooring adhesives do not adhere to some high-performance OSB panels.)
3. Check that the type and integrity of the wood subfloor is appropriate for the wood floor installation. This includes subfloor thickness and joist/floor truss spacing requirements, maximum vertical deflection requirements, and that it is sound and free from squeaks and noises.
INSTALLATION METHODS: Parquet
Parquet wood floors are a specific type of wood floor that has a geometric pattern.

N A T I O N A L W O O D F L O O R I N G A S S O C I A T I O N T E C H N I C A L P U B L I C A T I O N
© 2019 NATIONAL WOOD FLOORING ASSOCIATION146
4. Flatness: The standard for flatness with parquet installation methods on a wood subfloor is 3/16” in 10’, or 1/8” in 6’.
5. When testing for moisture, both the wood flooring and the wood subfloor should be evaluated and documented (refer to the Moisture Testing Wood chapter for testing information).
B. Concrete subfloors (refer to the Concrete Subfloors chapter for more-detailed information)
1. Inspect the concrete subfloor to ensure it meets all adhesive and flooring manufacturer requirements.
2. If any subfloor toppings such as self-levelers, skim-coatings, patches, trowelable underlayments, or floor-fills exist, ensure any sealers or adhesive products are compatible with these toppings.
3. Flatness: The standard for flatness for a concrete subfloor with parquet glue-down installation methods is 3/16” in 10’, or 1/8” in 6’.
4. Moisture test the concrete subfloor in relation to the flooring being used. Refer to the Moisture Testing chapter for more information. When testing for moisture, both the wood flooring and the concrete subfloor should be evaluated.
C. Solid board subfloors (refer to the Wood Subfloors chapter for more detailed information)
1. When gluing down parquet over solid board subfloors, installation of minimum 19/32 subfloor panels is required as an overlay to achieve a suitable substrate.
D. Screeds/sleepers (refer to the Screeds/Sleepers chapter for more detailed information)
1. Full-spread glue-down and nail-assisted glue-down installation methods are appropriate over properly prepared screeds/sleepers embedded in concrete, or when screeds/sleepers have been overlaid with the appropriate wood panel subfloor.
E. Radiant heat (refer to the Radiant Heat chapter for more detailed information)
1. When gluing parquet over any radiant heating system, refer to the Radiant Heat chapter for more information.
2. Confirm the adhesive system being used is compatible with the radiant heating system.
3. Reduce or turn off heat during installation of the flooring to avoid loss of open/working time, premature drying, and skinning-over of the adhesive. Check with the adhesive manufacturer for minimum/maximum subfloor temperature limitations during the installation.
PART IIIParquet Layout
A. In general, when a wood floor is laid out in a repetitive pattern, such as with parquet, the pattern should be balanced within the space. When the parquet pattern is installed wall-to-wall in a room that is not symmetrical, or when the pattern flows from one room to another, the floor pattern may not be balanced in all rooms.
B. With any parquet patterned floor, use the center-layout method to transfer and adjust your starting lines according to the most aesthetically or architecturally important elements in the rooms, taking into consideration doorways, fireplaces, cabinets, and transitions, as well as the dimensions of the pattern and the overall squareness of each room. (Refer to the Layout chapter for more-detailed information.)
C. In order to properly layout the parquet pattern within the given space, the dimensions of the pattern should be taken into account.
D. The layout includes finding the center of the pattern to help identify the best balance within the space. Base your working line measurements on these dimensions and the room characteristics where the flooring will be installed. Transfer lines as necessary to where the flooring installation will begin.
E. Use the dimensions of the parquet pattern to snap chalk lines across the subfloor indicating where each run will lie. This will allow you to know where to apply adhesive during the installation as well as to maintain straight lines during install.
F. Verify all measurements before proceeding with installation and application of adhesive.
PART IVParquet Tile Installation
A. Expansion space should be a minimum of ½” around the perimeter and all vertical obstructions, unless otherwise directed by the flooring manufacturer.
B. Parquet is often glued, but can also be blind-nailed (in a nail-assisted glue-down method) as long as the pattern continues to have an exposed side tongue for nailing.
1. Nail-assisted glue-down: a. With full-spread installations over wood
subfloors, it is sometimes necessary or helpful to blind-nail the flooring into the wood substrate periodically.
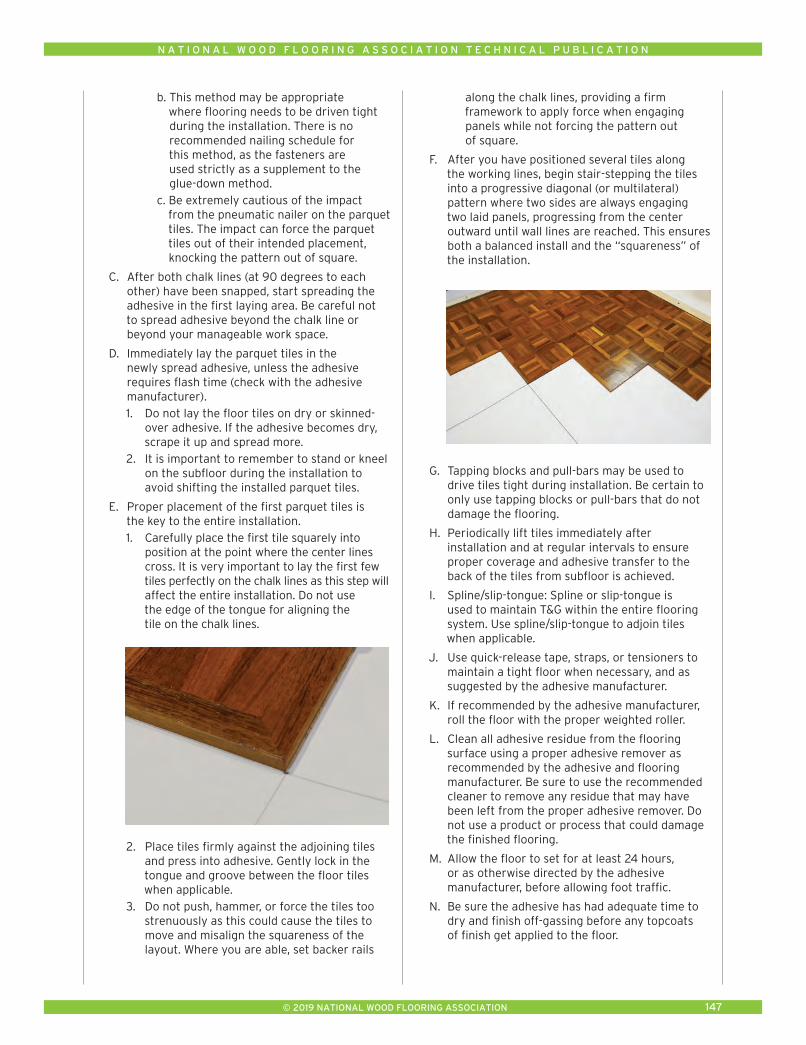
N A T I O N A L W O O D F L O O R I N G A S S O C I A T I O N T E C H N I C A L P U B L I C A T I O N
© 2019 NATIONAL WOOD FLOORING ASSOCIATION 147
b. This method may be appropriate where flooring needs to be driven tight during the installation. There is no recommended nailing schedule for this method, as the fasteners are used strictly as a supplement to the glue-down method.
c. Be extremely cautious of the impact from the pneumatic nailer on the parquet tiles. The impact can force the parquet tiles out of their intended placement, knocking the pattern out of square.
C. After both chalk lines (at 90 degrees to each other) have been snapped, start spreading the adhesive in the first laying area. Be careful not to spread adhesive beyond the chalk line or beyond your manageable work space.
D. Immediately lay the parquet tiles in the newly spread adhesive, unless the adhesive requires flash time (check with the adhesive manufacturer).
1. Do not lay the floor tiles on dry or skinned-over adhesive. If the adhesive becomes dry, scrape it up and spread more.
2. It is important to remember to stand or kneel on the subfloor during the installation to avoid shifting the installed parquet tiles.
E. Proper placement of the first parquet tiles is the key to the entire installation.
1. Carefully place the first tile squarely into position at the point where the center lines cross. It is very important to lay the first few tiles perfectly on the chalk lines as this step will affect the entire installation. Do not use the edge of the tongue for aligning the tile on the chalk lines.
2. Place tiles firmly against the adjoining tiles and press into adhesive. Gently lock in the tongue and groove between the floor tiles when applicable.
3. Do not push, hammer, or force the tiles too strenuously as this could cause the tiles to move and misalign the squareness of the layout. Where you are able, set backer rails
along the chalk lines, providing a firm framework to apply force when engaging panels while not forcing the pattern out of square.
F. After you have positioned several tiles along the working lines, begin stair-stepping the tiles into a progressive diagonal (or multilateral) pattern where two sides are always engaging two laid panels, progressing from the center outward until wall lines are reached. This ensures both a balanced install and the “squareness” of the installation.
G. Tapping blocks and pull-bars may be used to drive tiles tight during installation. Be certain to only use tapping blocks or pull-bars that do not damage the flooring.
H. Periodically lift tiles immediately after installation and at regular intervals to ensure proper coverage and adhesive transfer to the back of the tiles from subfloor is achieved.
I. Spline/slip-tongue: Spline or slip-tongue is used to maintain T&G within the entire flooring system. Use spline/slip-tongue to adjoin tiles when applicable.
J. Use quick-release tape, straps, or tensioners to maintain a tight floor when necessary, and as suggested by the adhesive manufacturer.
K. If recommended by the adhesive manufacturer, roll the floor with the proper weighted roller.
L. Clean all adhesive residue from the flooring surface using a proper adhesive remover as recommended by the adhesive and flooring manufacturer. Be sure to use the recommended cleaner to remove any residue that may have been left from the proper adhesive remover. Do not use a product or process that could damage the finished flooring.
M. Allow the floor to set for at least 24 hours, or as otherwise directed by the adhesive manufacturer, before allowing foot traffic.
N. Be sure the adhesive has had adequate time to dry and finish off-gassing before any topcoats of finish get applied to the floor.

N A T I O N A L W O O D F L O O R I N G A S S O C I A T I O N T E C H N I C A L P U B L I C A T I O N
© 2019 NATIONAL WOOD FLOORING ASSOCIATION148
PART VHerringbone/ Chevron Installation
A. Glue-down installation: Herringbone/chevron patterns are often glued down. Refer to the Glue-Down chapter for glue down information.
B. Nail-down installation: Nail herringbone or chevron patterns using the appropriate nailing schedule for the flooring being installed as long as the pattern continues to have an exposed side tongue for nailing. Refer to the Nail-Down Installation chapter for nailing schedule information, and glue-assisted installation methods. (Be extremely cautious of the impact from the pneumatic nailer on the herringbone/chevron planks. The impact can force the planks out of their intended placement, knocking the pattern out of square.)
C. Nail-assisted glue-down:
1. With full-spread installations over wood subfloors, it is sometimes necessary or helpful to blind-nail the flooring into the wood substrate periodically.
2. This method may be appropriate where flooring needs to be driven tight during the installation. There is no recommended nailing schedule for this method, as the fasteners are strictly used as a supplement to the glue-down method.
D. Herringbone direction should be installed in accordance with client preference. The distinct directional pattern may look best with the points in the direction of the longest dimension of the room, or toward a major focal point.
E. Herringbone-patterned floors can be ordered with ‘left’ and ‘right’ pieces because the pattern is directional. When looking at the face of the boards, they are a mirror image of each other. A universal form has grooves on both ends and slip-tongue or spline is used at each end connection.
F. When laying out the floor prior to installation, be sure to work from multiple bundles or packages to ensure variation.
G. Laying out a herringbone pattern:
1. Using the center-layout method, measure the room for center and strike the main control, perpendicular, and diagonal reference lines, as detailed in the Layout chapter.
2. Find true center on the pattern to establish the working lines.
a. To find center of a herringbone pattern: i. Divide the diagonal measurement by
four. This is the dimension used to establish the working lines A and B on both sides of the control line.
ii. This measurement will vary according to the width of the flooring.
b. To find center of a chevron pattern, measure the entire pattern width and divide by 2. The mitered point is center.
This measurement will vary according to the width of the flooring.
Measure

N A T I O N A L W O O D F L O O R I N G A S S O C I A T I O N T E C H N I C A L P U B L I C A T I O N
© 2019 NATIONAL WOOD FLOORING ASSOCIATION 149
3. Strike two working lines alongside the main control line. Working lines for herringbone should fall through the corners of each alternating slat. Working lines for chevron patterns should fall on the opposite mitered end of each picket.
4. Transfer the diagonal lines to the working lines.
5. Dry-lay a small section and measure to confirm a balanced layout.
6. The floor pattern is installed along working lines.
7. Once the working lines are established, the installation can begin.
8. To keep the installation square, cut a square piece of plywood the size of the herringbone pattern and anchor it at the intersection of the working lines and diagonal lines.
H. Installing a herringbone pattern: 1. The starting point must have working lines
and diagonal lines. 2. For direct glue, do not spread adhesive over
working lines. 3. Start with the tongue facing toward the build
direction. 4. Install pattern one row at a time. 5. Periodically check alignment and squareness
using a carpenters square at the head of the run as it progresses.
I. To continue the pattern: 1. Dry lay approximately eight boards 2. Lay a framing square from the points on the
working line to the outermost point. 3. Record measurement A; this becomes your
working line for the next course.
4. Once measurement A is established, the working lines can be repeated throughout the installation.