National Forest Inventory of Great BritainFILE/NFI... · National Forest Inventory Survey Manual...
336
National Forest Inventory of Great Britain Survey Manual
Transcript of National Forest Inventory of Great BritainFILE/NFI... · National Forest Inventory Survey Manual...

National Forest
Inventory of Great Britain
Survey Manual

2 Remember to Save your Edit Session Regularly, Validate the information and Backup the Data
NFI Survey Manual
National Forest Inventory Survey Manual
Introduction Great Britain’s trees, woodlands and forests are some of our countryside’s greatest assets. Trees provide a haven for wildlife and people, help to mitigate climate change, provide employment, timber and other useful products, and form an integral part of many of Britain’s most beautiful landscapes. The Forestry Commission is the Government Department responsible for Britain's woodlands, and our mission is “to protect and expand Britain's forests and woodlands and to increase their value to society and the environment”. In order to achieve this effectively, we need to have accurate scientific and statistical information about Britain's woodlands, and to keep it up to date. To do this we periodically carry out an extensive survey of woodlands and forests in England, Scotland and Wales, and the information gathered in the surveys contributes to the National Forest Inventory (NFI) of Great Britain. With the information from the field data collected, the Forestry Commission and other government organisations will be better equipped to draft policy and guidance for protecting and increasing the value of Britain’s woodlands and forests, and to plan future developments, investment and research. To achieve this, and in accordance with our responsibilities under the Forestry Act (1967), Forestry Commission surveyors intend to visit approximately 15,000 one-hectare (2.5-acre) sample squares randomly located across Britain to gather representative information about woodlands. The surveyors will gather a variety of information, such as tree species, heights and ages, and the woodland area. The FC will then use this information to assess the biodiversity value and general condition of Britain's woodland, as well as any potential it has for sustainable timber production. This will help the FC and other relevant government organisations and forest users to monitor a range of woodland issues, focus attention on what is important, and inform decisions about the future of forestry. The information will also help the United Kingdom meet international commitments, such as reporting for the Global Forest Resources Assessment and the Ministerial Conference on the Protection of Forests in Europe (MCPFE). It can also contribute to the process of estimating how much carbon is stored in Britain's forests.

3 Remember to Save your Edit Session Regularly, Validate the information and Backup the Data
NFI Survey Manual
All information gathered will be held in the strictest confidence, and it will not be used to police, regulate or directly affect management of individual woods in any way. In fact that would defeat the objective of the survey, which is to provide unbiased and impartial ‘snapshot’ of Britain’s woodlands. Information will only be published in a summary form that does not reveal information about individual woodlands. The main reporting units - Great Britain, country and regional - are shown in the map at Figure 0.1, and although "customised" reports might also be produced for some smaller areas, these, too, will not reveal any information about individual woodland holdings. Figure 0.1: National Forest Inventory main reporting units You can find out more about the Forestry Commission and the NFI at www.forestry.gov.uk/inventory.

4 Remember to Save your Edit Session Regularly, Validate the information and Backup the Data
NFI Survey Manual
PURPOSE OF THE FIELDWORK AND REQUIRED OUTPUTS
Purpose The purpose of the fieldwork is to collect a representative and unbiased sample picture of GB woodlands. The fieldwork will then be used in combination with the NFI GB woodland map to produce a series of woodland facts and figures. The sample squares have been devised to structure the fieldwork as to give as logical, representative and unbiased a picture of the physical nature of woodlands as possible. The sample squares are allocated without preference across all woodlands, whether they be conifer or broad-leaved, in public or private ownership, urban or rural, ancient or plantation etc. This sample squares represent about 0.6% of all woodlands and the picture gained here will then be extrapolated up to the total GB woodland area. This is derived from the NFI woodland map and the two together will be used for GB woodland monitoring. The 15,000 sample squares that make up the survey will be collected on a 5-year cycle to build a picture of the woodlands over that period. 66% of the sample squares are allocated on a systematic grid and 33% on a random basis. At the end of the 5-year cycle the data collected will be used to report on the state of the Nations forests. The outputs of the NFI include basic woodland area and composition, timber production forecast, carbon sequestration, bio mass availability and biodiversity factors such as woodland habitat condition. A full list of objectives and outputs can be found in the NFI strategy, which can be found on the FC website. To gain an accurate picture of change in these parameters over time the cycle will be repeated immediately afterwards, on a rolling basis, ad infinitum. The vast majority of the same squares will be revisited over the following 5-year cycle and after those 5 years the two surveys can be compared to detect the change in woodlands between the two.

5 Remember to Save your Edit Session Regularly, Validate the information and Backup the Data
NFI Survey Manual
Required Outputs In summary what the FC requires back from the surveyor, as their core output, is a completed NFI Forester Field Surveyor geodatabase for each sample square they are allocated. This will contain all the field data they collect plus any map changes. The detailed outputs required of the fieldwork will be delivered if the methodology is adhered to. In essence FC requires data to be collected at the following levels of the NFI data model:
1. Square 2. Section 3. Component Group 4. Component / sub component 5. Plot / point 6. Tree
Plus ancillary information such as Linear Features (e.g. rivers). Each level is subservient to the other and generally represents a smaller area. The six levels are linked and are used to build a physical picture of the woodland. The sample squares represent a 0.6% sample of all woodlands. This sample is to be extrapolated up to represent 100% of woodland area in GB, therefore it is vital to capture a representative, true, fair and unbiased picture of each sample square, as any errors, or biases, will be multiplied up to the total. To ensure this the FC will apply rigorous and strict Quality Assurance (QA) processes upon the fieldwork to ensure no bias and omission in the survey. However it is primarily the supplier’s responsibility to provide the main corpus of QA and FC is only checking if this is in place. If suppliers consistently do not adhere to the standards laid out and apply QA, they will be in breach of contract.

6 Remember to Save your Edit Session Regularly, Validate the information and Backup the Data
NFI Survey Manual
1.0 Getting Started
Purpose This document explains three main areas:
How to use the File Upload/Download website How to login to the Toughbook. How to load-in and use the NFI Square within Forester.
1.1 How to Use the File Upload/Download Website Use the File Upload/Download website to obtain blank NFI Squares and associated ownership information, and to submit completed NFI Squares.
Logging on to the website from your own personal computer 1. Navigate to the NFI upload site 2. Enter your unique username and password. 3. The website opens to the NFI File Upload System Menu, which has a Download File
and Upload File option.
How to download files 1. Select the Download File option. You will see a list of “Checkout” files per Bid Area,
which are periodically uploaded by FC admin. Each Checkout file contains: A batch of NFI Squares (ArcGIS personal geodatabase .mdb files). An ownership spreadsheet relating Square Grid reference to Square ID (e.g.
Bid1_Owners_Week1.xls, NB: the ‘1’ after Bid will vary by Bid Area as will the week number).
7 Remember to Save your Edit Session Regularly, Validate the information and Backup the Data
NFI Survey Manual
Owner reply questionnaires referenced by Square ID (.pdf files). A Points shapefile which can be loaded into ArcMap to show Square locations
(Bid1_Week1_Points.shp, NB: the ‘1’ after Bid will vary by Bid Area as will the week number). The shapefile will show all the squares that have been issued, BUT NOT RETURNED, up to the Week it relates to in its filename.
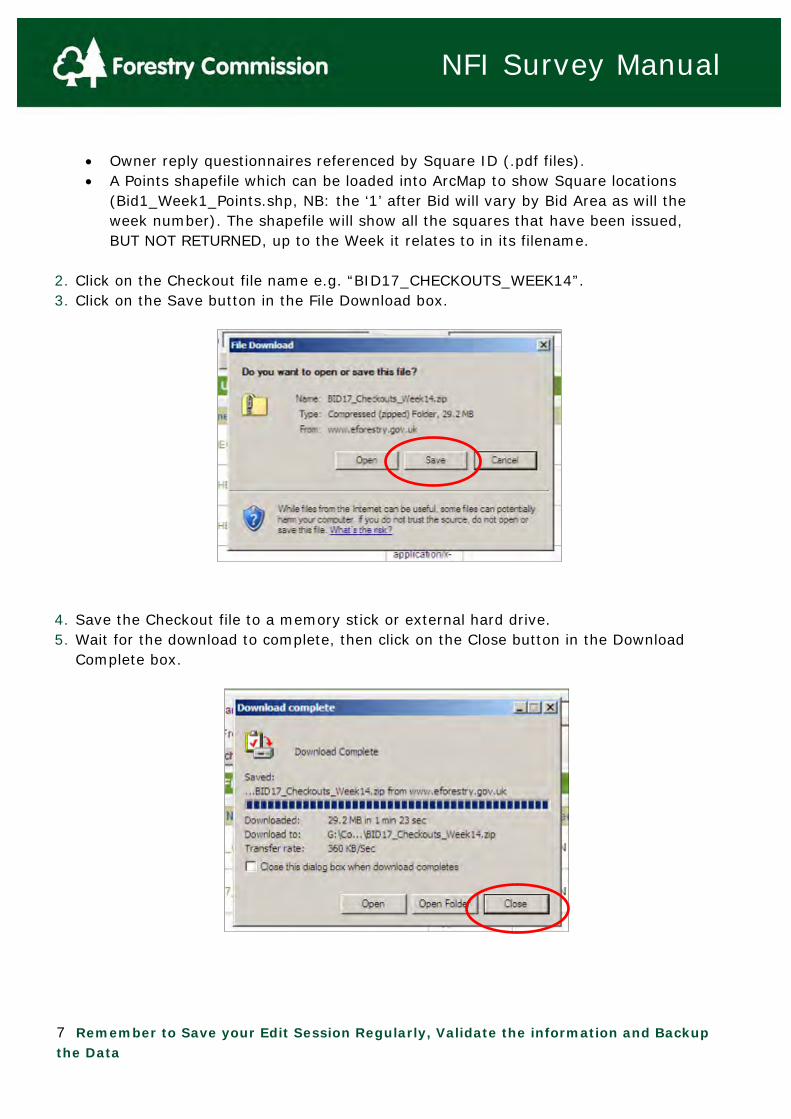
2. Click on the Checkout file name e.g. “BID17_CHECKOUTS_WEEK14”. 3. Click on the Save button in the File Download box. 4. Save the Checkout file to a memory stick or external hard drive. 5. Wait for the download to complete, then click on the Close button in the Download
Complete box.
8 Remember to Save your Edit Session Regularly, Validate the information and Backup the Data
NFI Survey Manual
6. Unzip the Checkout file saved to your memory stick. To do this right-click on the file, select “Extract all” and then follow the Extraction Wizard. If an error message pops up saying “No files to extract”, you will need to delete the Checkout file and then download it again (steps 2-5 above).
7. Transfer all the Square geodatabase (.mdb) files to the C:\NFI\Checkouts folder on your Toughbook. These are your working versions which you will edit in the field. It is very important not to have multiple copies of an edited Square so always keep your Squares to be edited in this folder and then copy them to your upload folder when completed.
When to upload files You can submit your completed NFI Squares to the FC at any time, but where possible you should stick to the fortnightly upload dates as per the “Data Upload Dates 2012/2013” spreadsheet. Contact Mark Lawrence if you’ve not already received this.
How to upload files 8. Transfer the completed Square geodatabases from your Toughbook to a memory stick
or external hard drive. Divide into batches of 5-10 Squares and place each batch in a separate “Checkin” folder, following the file naming conventions described on p.5 e.g. BID17_CHECKIN_040412_AG_1
9. Zip each Checkin folder. To do this right-click on the folder, select “Send To” and then select “Compressed (zipped) Folder”. A duplicate zipped folder will appear e.g. BID17_CHECKIN_040412_AG_1.ZIP.
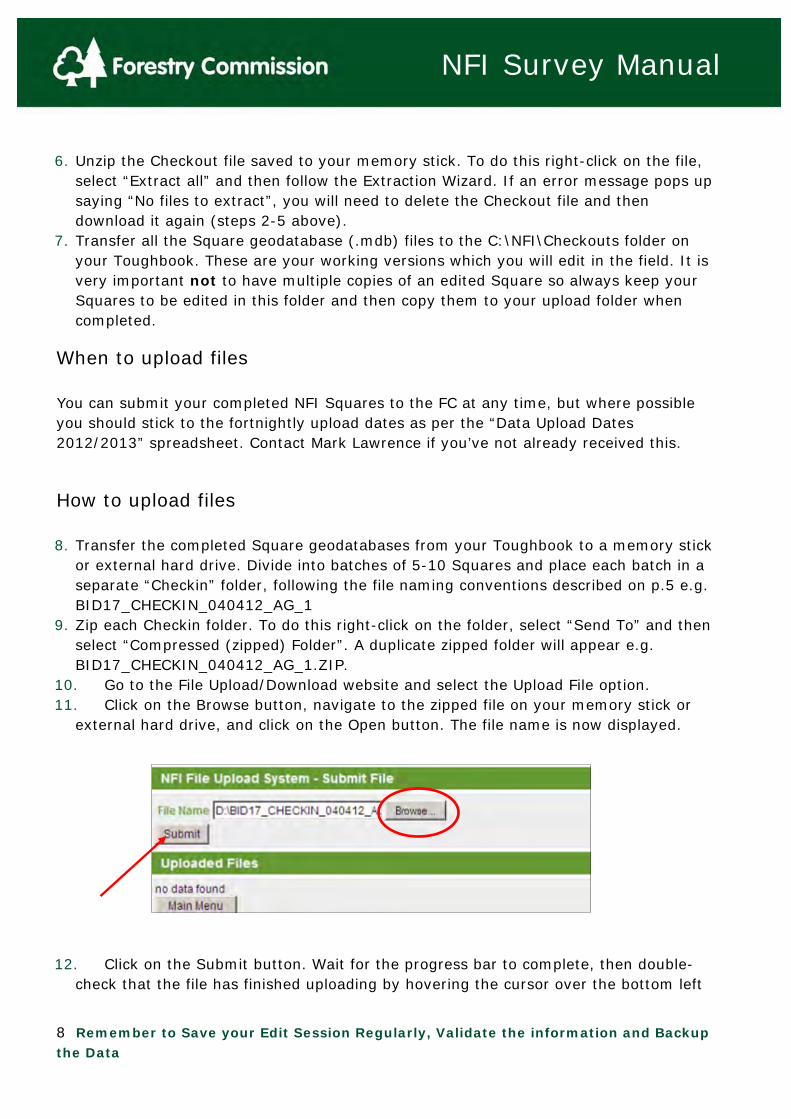
10. Go to the File Upload/Download website and select the Upload File option. 11. Click on the Browse button, navigate to the zipped file on your memory stick or
external hard drive, and click on the Open button. The file name is now displayed. 12. Click on the Submit button. Wait for the progress bar to complete, then double-
check that the file has finished uploading by hovering the cursor over the bottom left
9 Remember to Save your Edit Session Regularly, Validate the information and Backup the Data
NFI Survey Manual
corner of the screen: if the cursor changes from a pointer to an egg timer then the file is still being uploaded.
13. Wait to see the file appear in the Upload File list, then log off from the website. 14. E-mail Mark Lawrence to confirm that you’ve uploaded Squares.
Additional notes 15. It is important that if surveyors have multiple copies of a checked out Square,
that only the latest copy is kept to be surveyed. This can be achieved by storing all your checkout files on a separate hard drive and then extract them into one master checkout folder under NFI, which should avoid any duplication.
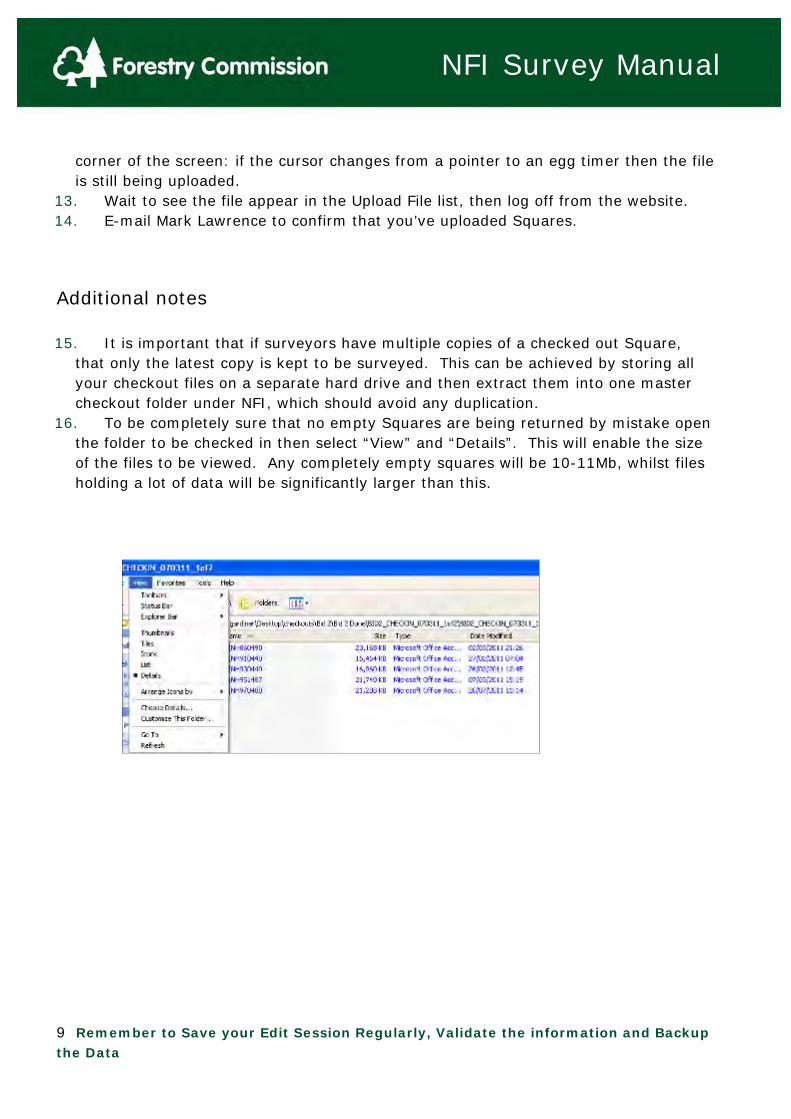
16. To be completely sure that no empty Squares are being returned by mistake open the folder to be checked in then select “View” and “Details”. This will enable the size of the files to be viewed. Any completely empty squares will be 10-11Mb, whilst files holding a lot of data will be significantly larger than this.

10 Remember to Save your Edit Session Regularly, Validate the information and Backup the Data
NFI Survey Manual
File naming conventions for the File Upload/Download website
Checked out Squares (from the FC to you)
BID19_CHECKOUTS_WEEK14.ZIP
Squares returned from fieldwork (i.e. completed squares from you to the FC)
BID19_CHECKIN_040312_RB_1.ZIP
Squares checked out for Quality Assurance (i.e. from the FC to QA staff)
QA_BID10_CHECKOUT_140510.ZIP
Week checked out Current state Bidding Area
Bidding Area
Current state Date returned via upload site
Surveyor’s initials
Batch number
Bidding Area Current state Date checked out to upload site for QA

11 Remember to Save your Edit Session Regularly, Validate the information and Backup the Data
NFI Survey Manual
Squares returned from QA (i.e. from QA staff to the FC)
QA_BID10_CHECKIN_120610.ZIP
Squares checked out for resurvey (i.e. from the FC to you)
BID10_RESURVEY_CHECKOUT_140510.ZIP
Squares resubmitted from surveyor (i.e. resubmitted by you to the FC)
BID10_RESUBMISSION_120610.ZIP
Date returned from QA via upload site
Bidding Area Current state
Bidding Area Current state Date checked out to upload site for resurvey
Bidding Area Current state Date returned from surveyor via upload site

12 Remember to Save your Edit Session Regularly, Validate the information and Backup the Data
NFI Survey Manual
1.2 Toughbook Login
Login The Toughbook has been configured to a Forestry Commission standard. The first screen you will see when you switch on is Log On to Windows. You will need to enter your username and password issued to you by the FC. Windows XP loads.
1.3 How to Load-in and Use the NFI Square within Forester There are seven steps:
Open ArcMap Log on to Forester and load in the Square geodatabase Open the NFI map schema to load in background data Start the Forester Data Editor session Validate edits Save edits and close the Forester Data Editor Session Log off from Forester
1.3.1 Open ArcMap Open ArcMap by double clicking on the GIS Editor icon on the Toughbook desktop. Opening the application may take a few seconds – be patient.

13 Remember to Save your Edit Session Regularly, Validate the information and Backup the Data
NFI Survey Manual
Customise the ArcMap toolbar Adding toolbars 17. Click on “Customize”, select “Toolbars” and scroll down to the bottom of the
toolbar list and click on “Customize”.
14 Remember to Save your Edit Session Regularly, Validate the information and Backup the Data
NFI Survey Manual
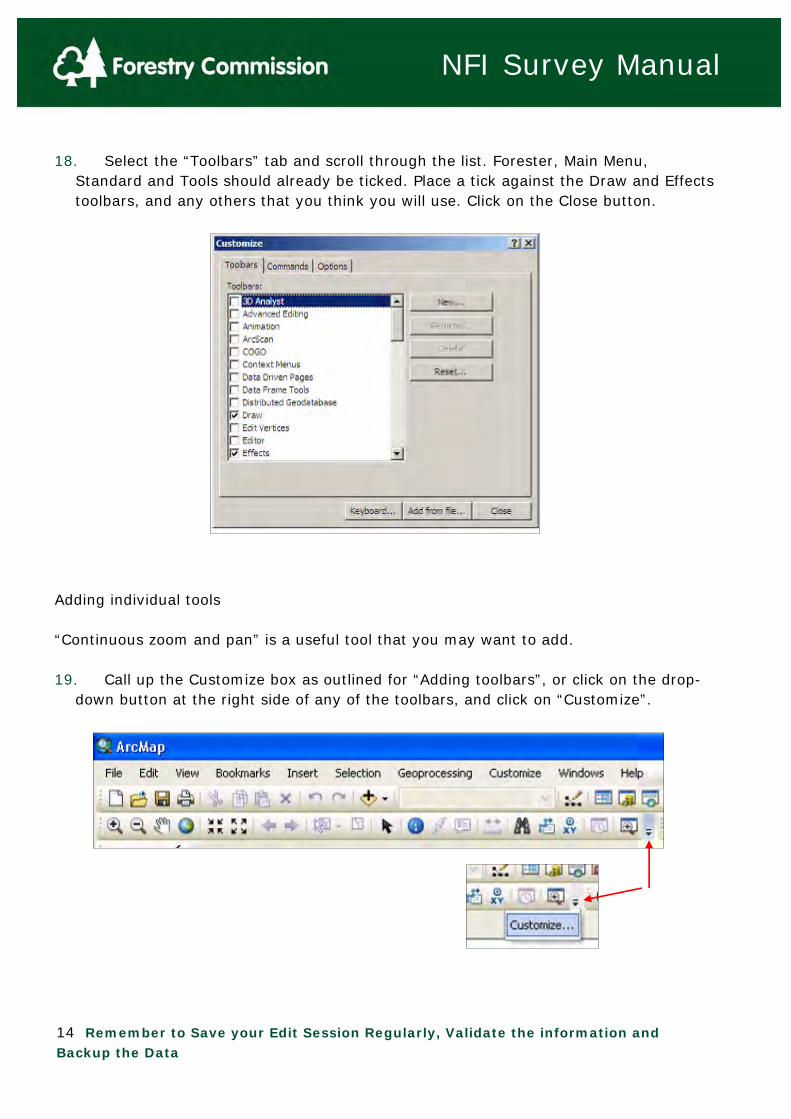
18. Select the “Toolbars” tab and scroll through the list. Forester, Main Menu, Standard and Tools should already be ticked. Place a tick against the Draw and Effects toolbars, and any others that you think you will use. Click on the Close button.
Adding individual tools “Continuous zoom and pan” is a useful tool that you may want to add. 19. Call up the Customize box as outlined for “Adding toolbars”, or click on the drop-
down button at the right side of any of the toolbars, and click on “Customize”.
15 Remember to Save your Edit Session Regularly, Validate the information and Backup the Data
NFI Survey Manual
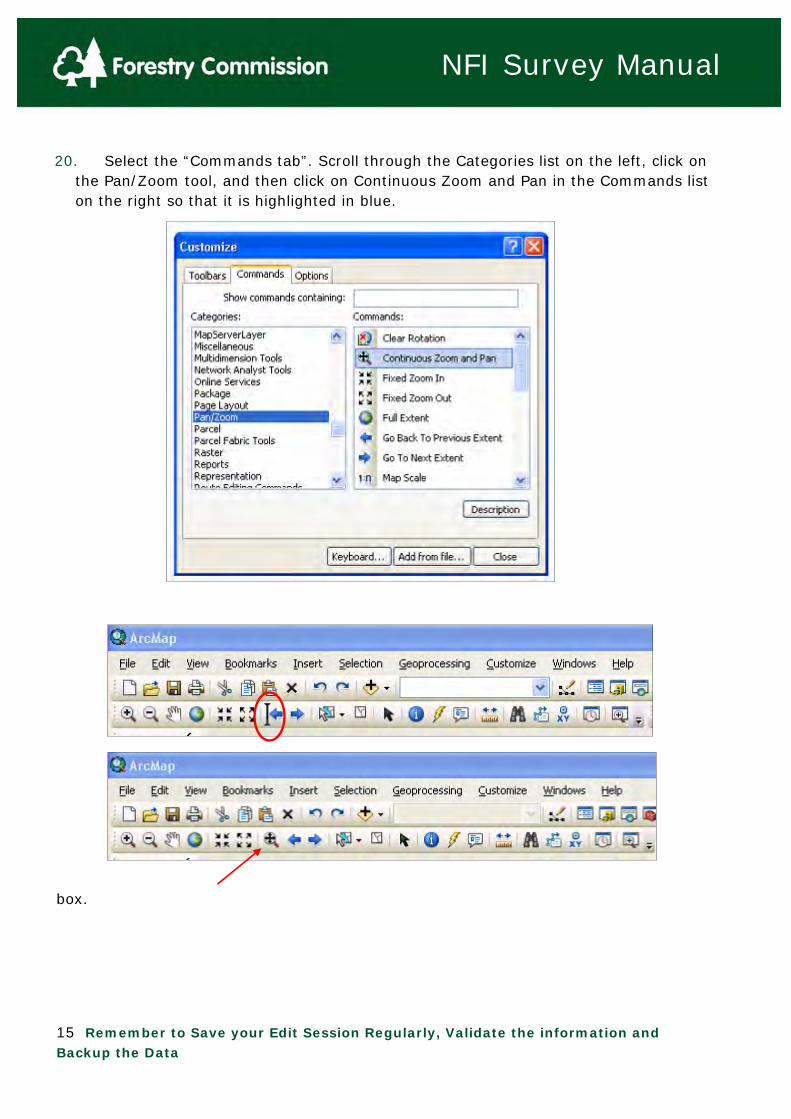
20. Select the “Commands tab”. Scroll through the Categories list on the left, click on the Pan/Zoom tool, and then click on Continuous Zoom and Pan in the Commands list on the right so that it is highlighted in blue.
box.

16 Remember to Save your Edit Session Regularly, Validate the information and Backup the Data
NFI Survey Manual
The “Measure distance and angle” tool has been installed. You can find it next to the Forester button. The “National Grid” tool that could be used to zoom to British National Grid coordinates within ArcGIS9 does not appear to be available within ArcGIS10. There is a “Go To XY” tool that can be used to zoom lat/long coordinates.

17 Remember to Save your Edit Session Regularly, Validate the information and Backup the Data
NFI Survey Manual
1.3.2 Log on to Forester and load in the Square geodatabase 21. Click on the Forester button, usually in the top left corner. 22. Click on the “Log on to Forester DB…..” button. 23. In the Forester log in box, click
on the Local tab.

18 Remember to Save your Edit Session Regularly, Validate the information and Backup the Data
NFI Survey Manual
24. Click on the yellow folder icon to select a local Forester geodatabase. 25. Navigate to C:\NFI\Checkouts and select the Square geodatabase (.mdb file) that
you want to log on to, then click on the Open button.
You may need to click on the “Connect To Folder” button if the pathway does not appear in the “Look in” drop-down list.
Note: all Squares for survey should be stored in this folder and pathway. 26. In the Forester Login box, enter your username and password. Then click on the
Open button and wait for the “Starting Forester” progress button to complete. Note: each bidding area is tied to one surveyor- if you are working outside your region please contact us for login details.

19 Remember to Save your Edit Session Regularly, Validate the information and Backup the Data
NFI Survey Manual
1.3.3 Open the NFI map schema to load in background data Click on the “Map Configuration Manager” button. In the Map Configuration Manager box, select the NFI map schema, right click and select Apply from the context menu, or double-click on the name. Then minimise the Map Configuration Manager box. The Ordnance Survey map and aerial photo image catalogues automatically load in, along with the NFI Woodland Maps (for Scotland, England and Wales) and other background data (e.g. SSSI, Ancient Woodland, Scheduled Ancient Monuments etc.). The background data is grouped under “Support info”- click on the + signs to expand.
20 Remember to Save your Edit Session Regularly, Validate the information and Backup the Data
NFI Survey Manual
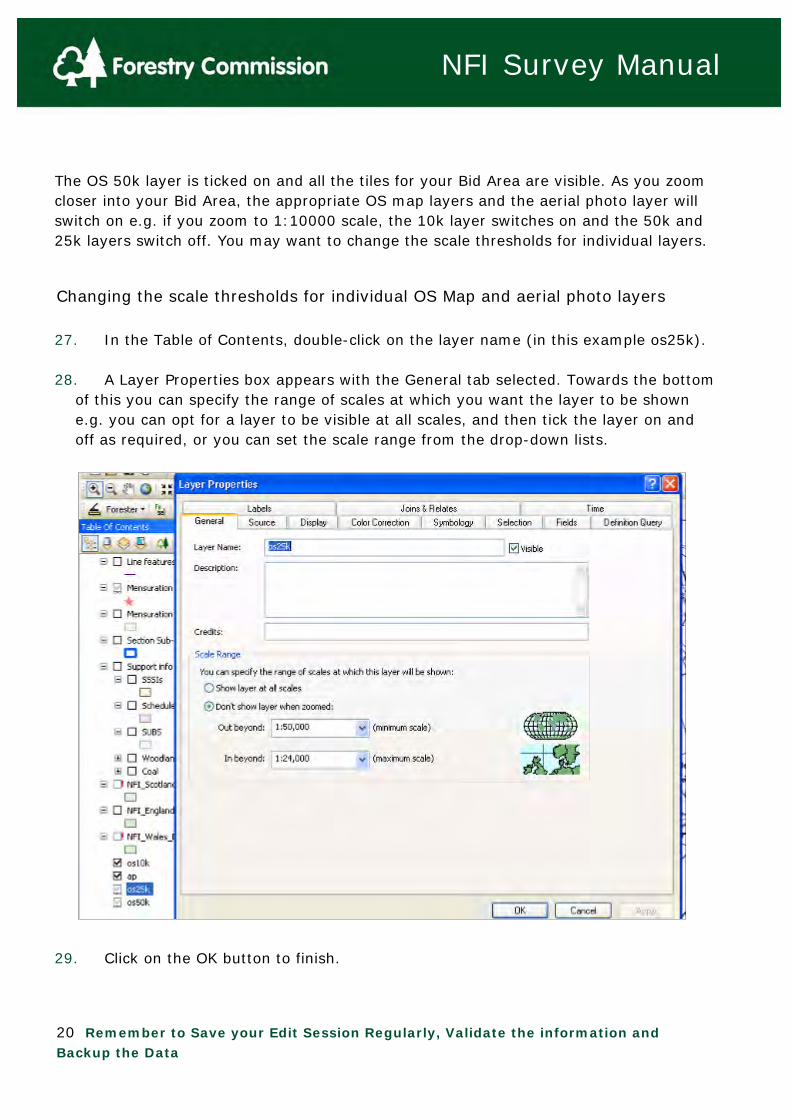
The OS 50k layer is ticked on and all the tiles for your Bid Area are visible. As you zoom closer into your Bid Area, the appropriate OS map layers and the aerial photo layer will switch on e.g. if you zoom to 1:10000 scale, the 10k layer switches on and the 50k and 25k layers switch off. You may want to change the scale thresholds for individual layers.
Changing the scale thresholds for individual OS Map and aerial photo layers 27. In the Table of Contents, double-click on the layer name (in this example os25k). 28. A Layer Properties box appears with the General tab selected. Towards the bottom
of this you can specify the range of scales at which you want the layer to be shown e.g. you can opt for a layer to be visible at all scales, and then tick the layer on and off as required, or you can set the scale range from the drop-down lists.
29. Click on the OK button to finish.

21 Remember to Save your Edit Session Regularly, Validate the information and Backup the Data
NFI Survey Manual
Background data folder structure Background data must be stored within the C:\NFI folder as shown below.
Only required if you work in more than one Bid Area (see “Swapping Bid Areas” overleaf).
This contains the background data that is grouped under “Support info” in the Table of Contents.
Do not alter the folder structure or the folder names. If you do, the map schema will not be able to find the data and a red exclamation mark will appear against the layer name in the Table of Contents (see below).
In this example the Sample Square is located within England and the map schema is able to find the NFI England Woodland Map, which is correctly stored within the Support Data folder. The NFI Wales and Scotland Woodland Maps are not relevant to this Square, so have not been supplied and are legitimately flagged up as missing.
22 Remember to Save your Edit Session Regularly, Validate the information and Backup the Data
NFI Survey Manual
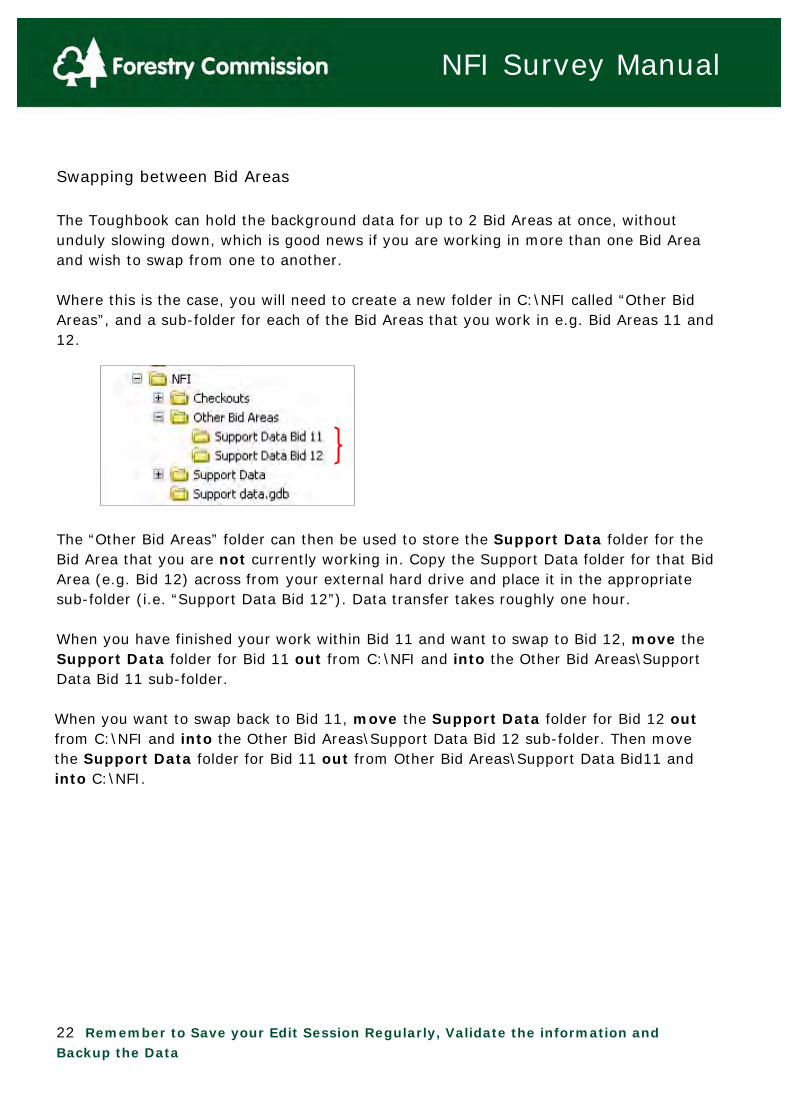
Swapping between Bid Areas The Toughbook can hold the background data for up to 2 Bid Areas at once, without unduly slowing down, which is good news if you are working in more than one Bid Area and wish to swap from one to another. Where this is the case, you will need to create a new folder in C:\NFI called “Other Bid Areas”, and a sub-folder for each of the Bid Areas that you work in e.g. Bid Areas 11 and 12. The “Other Bid Areas” folder can then be used to store the Support Data folder for the Bid Area that you are not currently working in. Copy the Support Data folder for that Bid Area (e.g. Bid 12) across from your external hard drive and place it in the appropriate sub-folder (i.e. “Support Data Bid 12”). Data transfer takes roughly one hour. When you have finished your work within Bid 11 and want to swap to Bid 12, move the Support Data folder for Bid 11 out from C:\NFI and into the Other Bid Areas\Support Data Bid 11 sub-folder. When you want to swap back to Bid 11, move the Support Data folder for Bid 12 out from C:\NFI and into the Other Bid Areas\Support Data Bid 12 sub-folder. Then move the Support Data folder for Bid 11 out from Other Bid Areas\Support Data Bid11 and into C:\NFI.
23 Remember to Save your Edit Session Regularly, Validate the information and Backup the Data
NFI Survey Manual
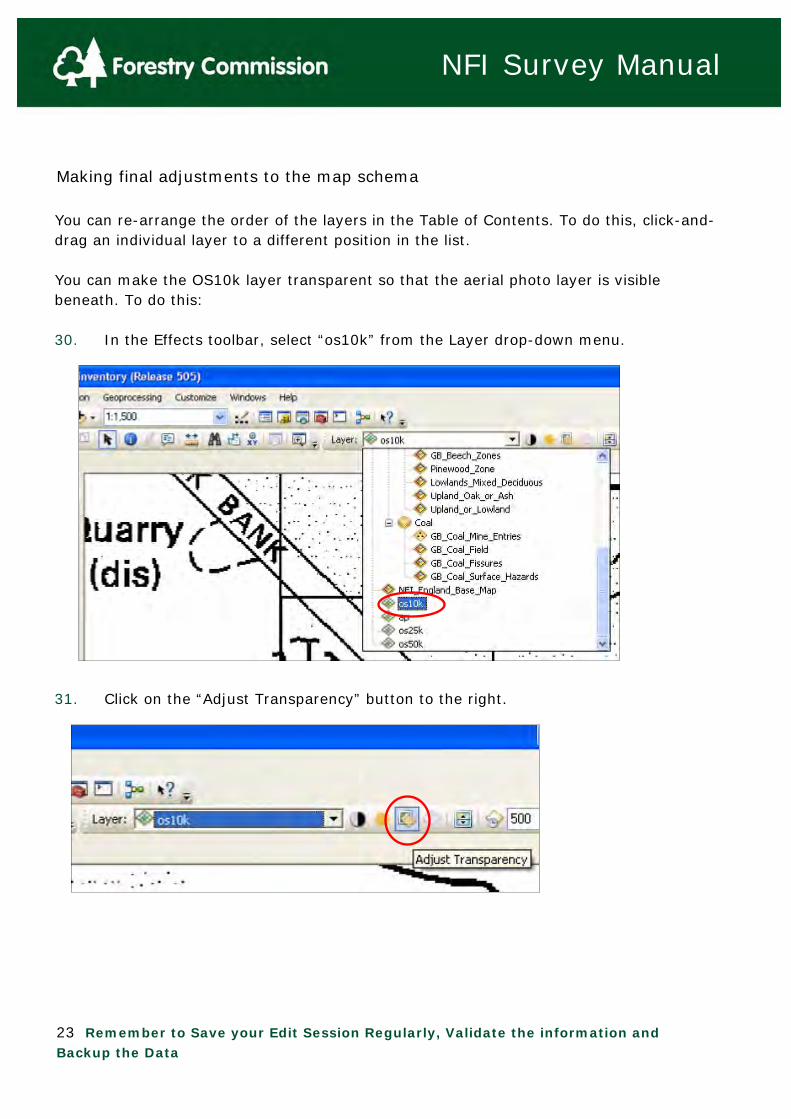
Making final adjustments to the map schema You can re-arrange the order of the layers in the Table of Contents. To do this, click-and-drag an individual layer to a different position in the list. You can make the OS10k layer transparent so that the aerial photo layer is visible beneath. To do this: 30. In the Effects toolbar, select “os10k” from the Layer drop-down menu. 31. Click on the “Adjust Transparency” button to the right.
24 Remember to Save your Edit Session Regularly, Validate the information and Backup the Data
NFI Survey Manual
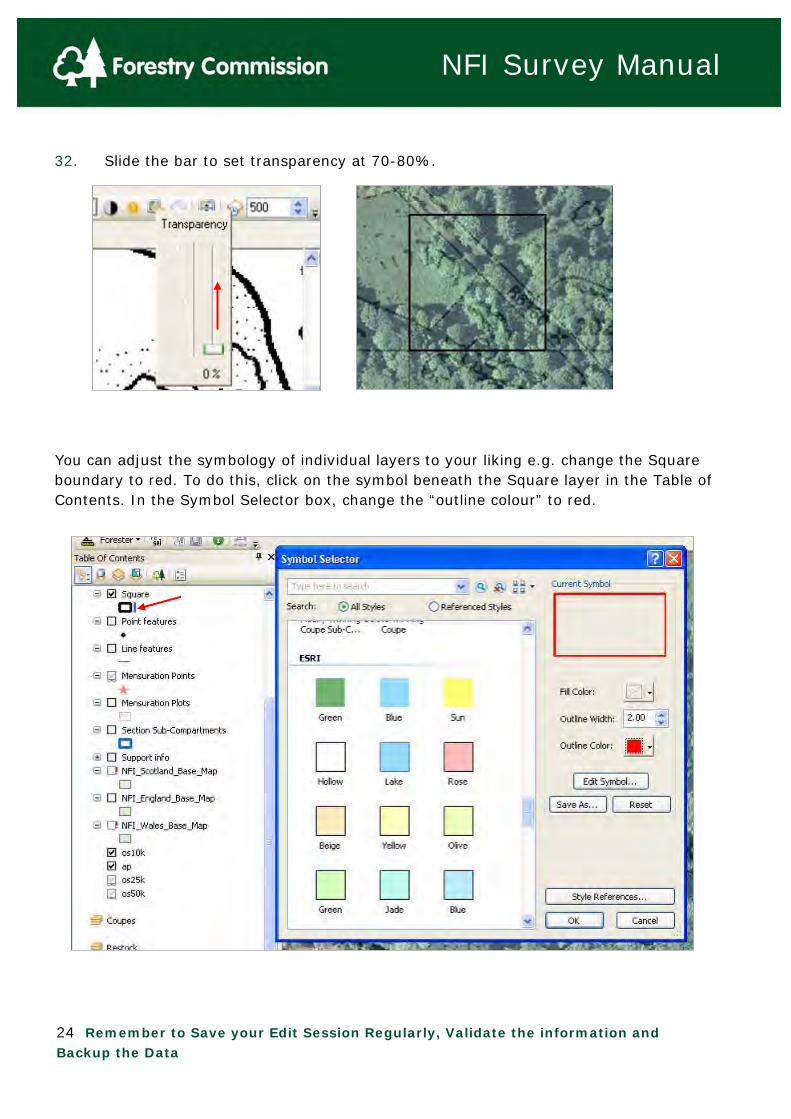
32. Slide the bar to set transparency at 70-80%. You can adjust the symbology of individual layers to your liking e.g. change the Square boundary to red. To do this, click on the symbol beneath the Square layer in the Table of Contents. In the Symbol Selector box, change the “outline colour” to red.
25 Remember to Save your Edit Session Regularly, Validate the information and Backup the Data
NFI Survey Manual
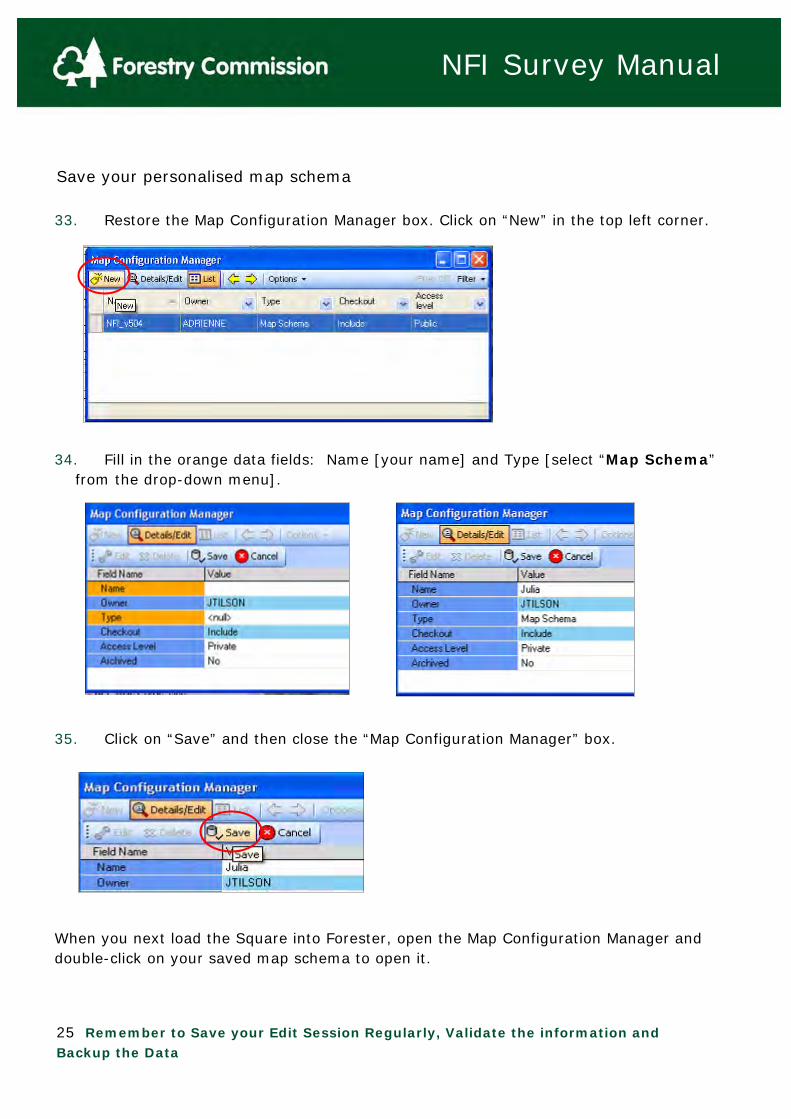
Save your personalised map schema 33. Restore the Map Configuration Manager box. Click on “New” in the top left corner. 34. Fill in the orange data fields: Name [your name] and Type [select “Map Schema”
from the drop-down menu]. 35. Click on “Save” and then close the “Map Configuration Manager” box. When you next load the Square into Forester, open the Map Configuration Manager and double-click on your saved map schema to open it.

26 Remember to Save your Edit Session Regularly, Validate the information and Backup the Data
NFI Survey Manual
1.3.4 Start the Forester Data Editor session 36. Click on the “Forester Data Editor” button. 37. The “Forester Data Editor” box opens with the “Session” tab automatically
selected. 38. Complete the orange “Assessment Date” data field. To do this, simply click in the
white Value field, and the software will automatically fill-in the current date.
27 Remember to Save your Edit Session Regularly, Validate the information and Backup the Data
NFI Survey Manual
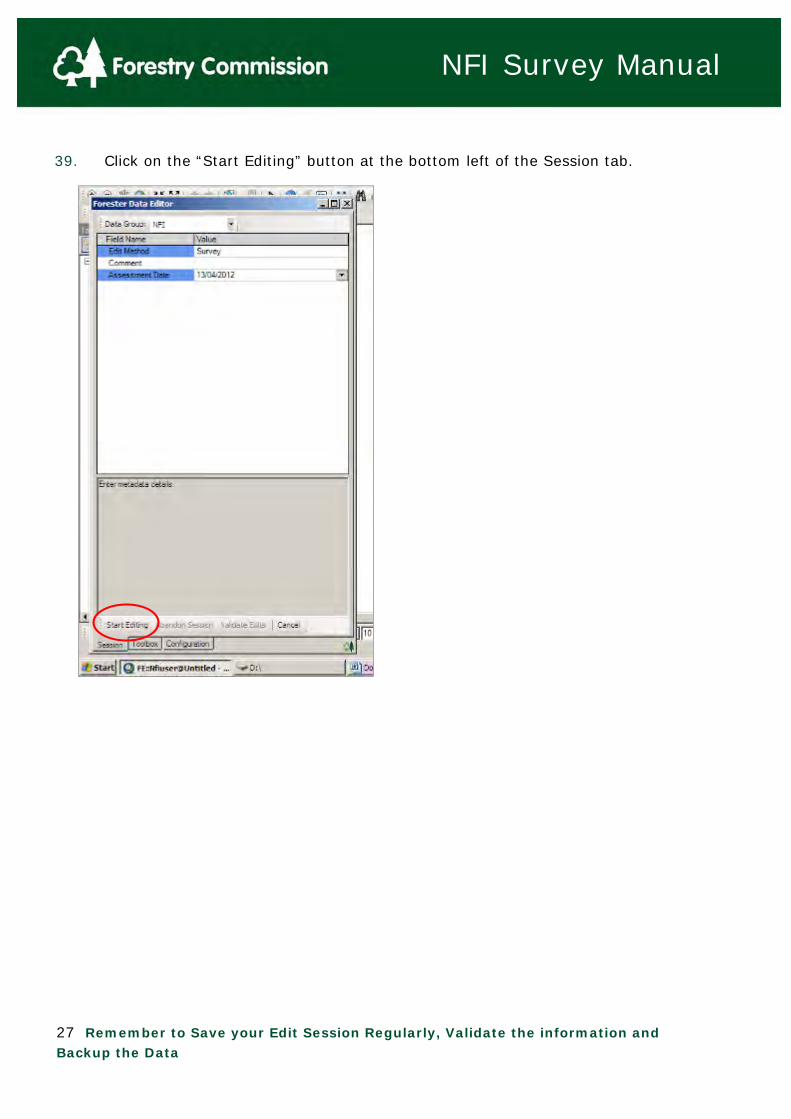
39. Click on the “Start Editing” button at the bottom left of the Session tab.
28 Remember to Save your Edit Session Regularly, Validate the information and Backup the Data
NFI Survey Manual
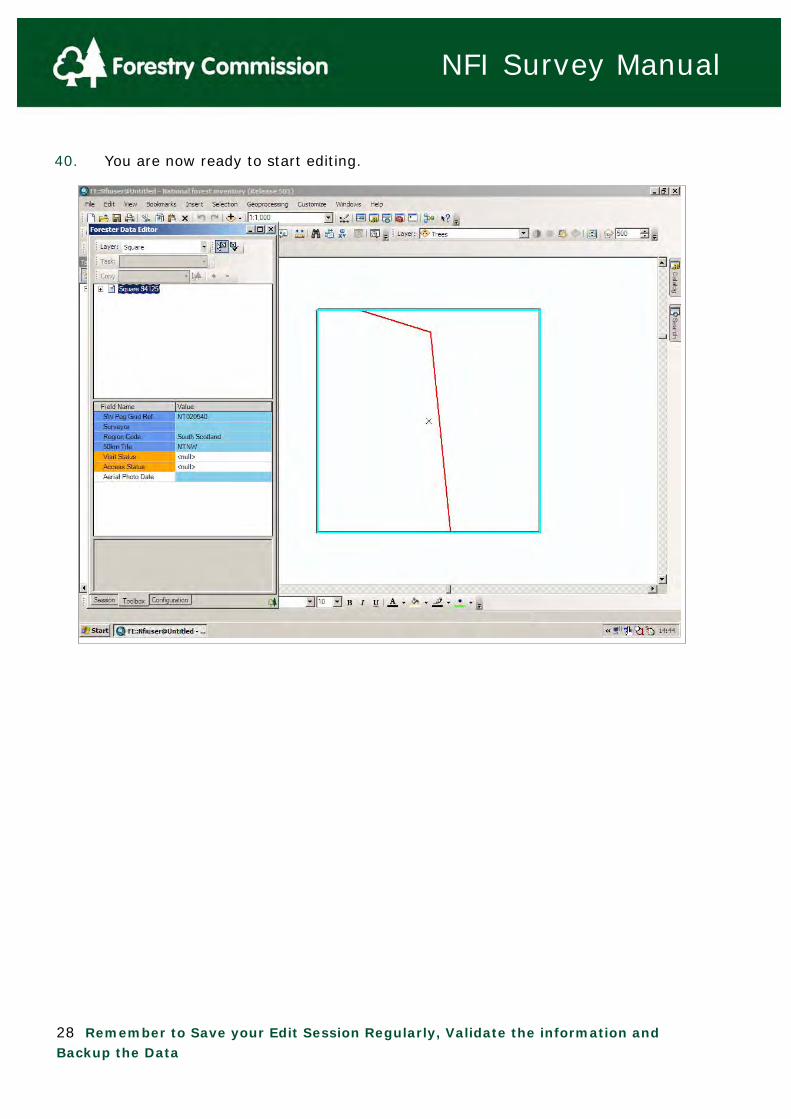
40. You are now ready to start editing.
29 Remember to Save your Edit Session Regularly, Validate the information and Backup the Data
NFI Survey Manual
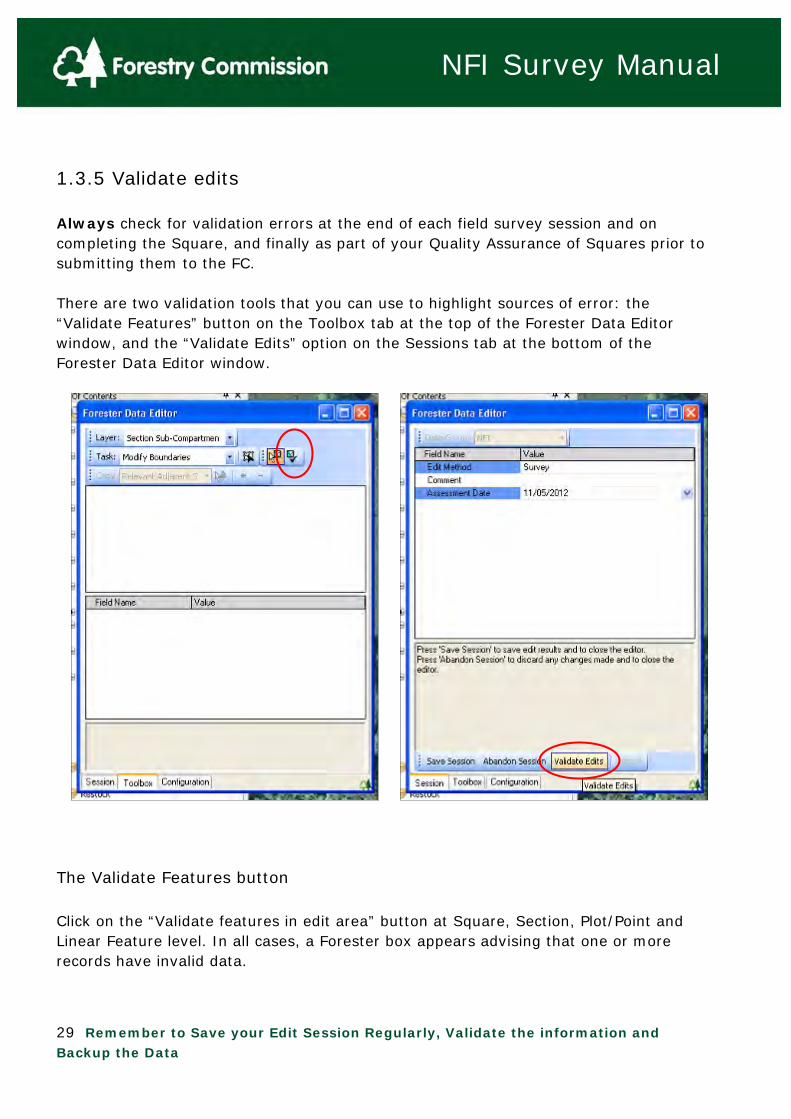
1.3.5 Validate edits Always check for validation errors at the end of each field survey session and on completing the Square, and finally as part of your Quality Assurance of Squares prior to submitting them to the FC. There are two validation tools that you can use to highlight sources of error: the “Validate Features” button on the Toolbox tab at the top of the Forester Data Editor window, and the “Validate Edits” option on the Sessions tab at the bottom of the Forester Data Editor window.
The Validate Features button Click on the “Validate features in edit area” button at Square, Section, Plot/Point and Linear Feature level. In all cases, a Forester box appears advising that one or more records have invalid data.

30 Remember to Save your Edit Session Regularly, Validate the information and Backup the Data
NFI Survey Manual
Investigate and correct each error in turn. Empty data fields are coloured in orange. Section, Component and Sub-Component folders are displayed in red font indicating that there are errors buried somewhere in the data. There may also be error messages in the grey area at the bottom of the Forester Data Editor window. Click on the “Validate features” button again after each correction.

31 Remember to Save your Edit Session Regularly, Validate the information and Backup the Data
NFI Survey Manual
Validate Edits option on the Sessions tab Click on the “Validate Edits” button just before saving the Forester Data Editor session. This lists the Sections, plots etc. where errors are located, but doesn’t say what the nature of the error is. You then need to go open up the Section, plot etc. and investigate further.
32 Remember to Save your Edit Session Regularly, Validate the information and Backup the Data
NFI Survey Manual
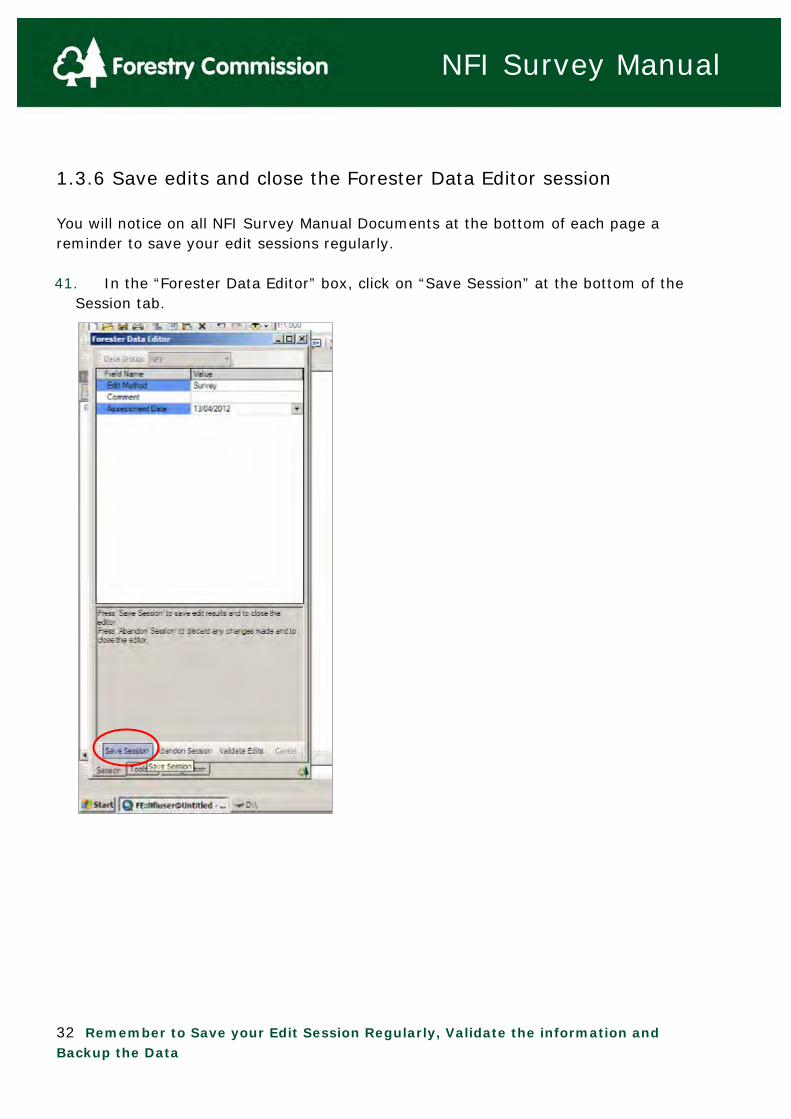
1.3.6 Save edits and close the Forester Data Editor session You will notice on all NFI Survey Manual Documents at the bottom of each page a reminder to save your edit sessions regularly. 41. In the “Forester Data Editor” box, click on “Save Session” at the bottom of the
Session tab.
33 Remember to Save your Edit Session Regularly, Validate the information and Backup the Data
NFI Survey Manual
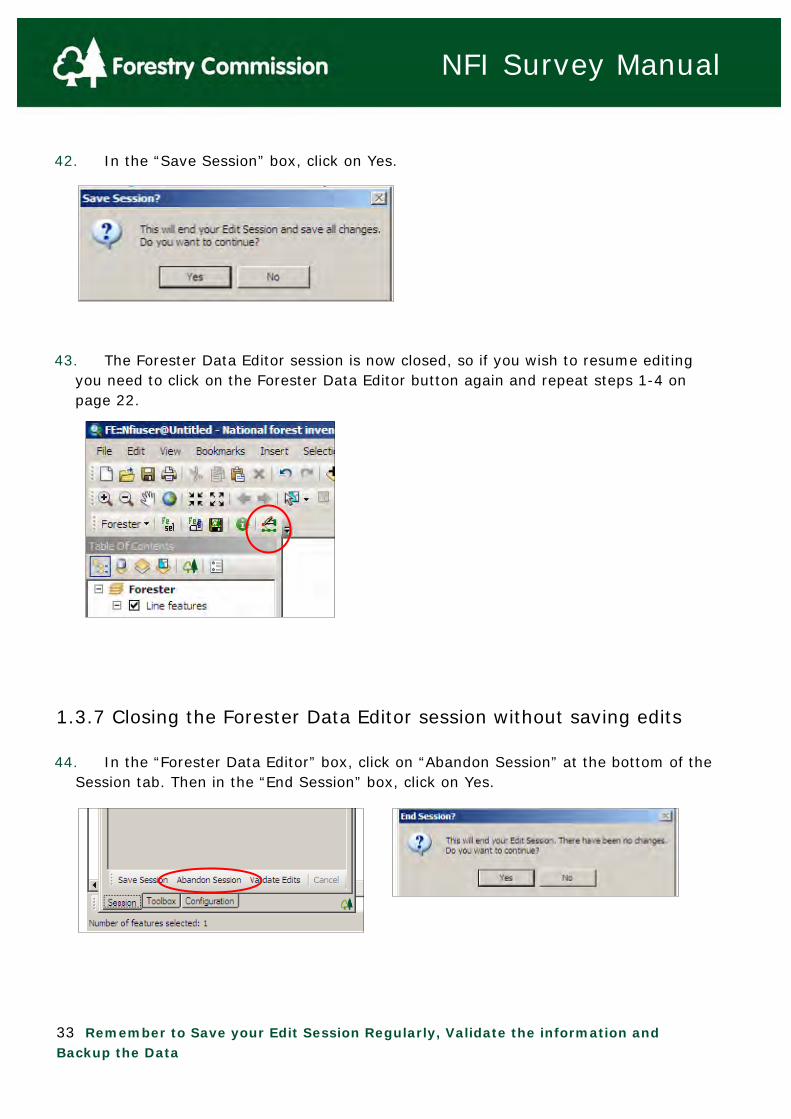
42. In the “Save Session” box, click on Yes. 43. The Forester Data Editor session is now closed, so if you wish to resume editing
you need to click on the Forester Data Editor button again and repeat steps 1-4 on page 22.
1.3.7 Closing the Forester Data Editor session without saving edits 44. In the “Forester Data Editor” box, click on “Abandon Session” at the bottom of the
Session tab. Then in the “End Session” box, click on Yes.

34 Remember to Save your Edit Session Regularly, Validate the information and Backup the Data
NFI Survey Manual
1.3.8 Logging off from Forester 45. Click on the “Forester” button, and then on “Log Off from Forester DB….”. 46. In the “Forester” box, click on Yes. 47. In the “ArcMap” box, click on No (i.e. do not save changes).

35 Remember to Save your Edit Session Regularly, Validate the information and Backup the Data
NFI Survey Manual
2.0 Square Data Accessing the Square Data Fields In the Forester Data Editor window, click on the Layer drop down menu
and choose Square:
36 Remember to Save your Edit Session Regularly, Validate the information and Backup the Data
NFI Survey Manual
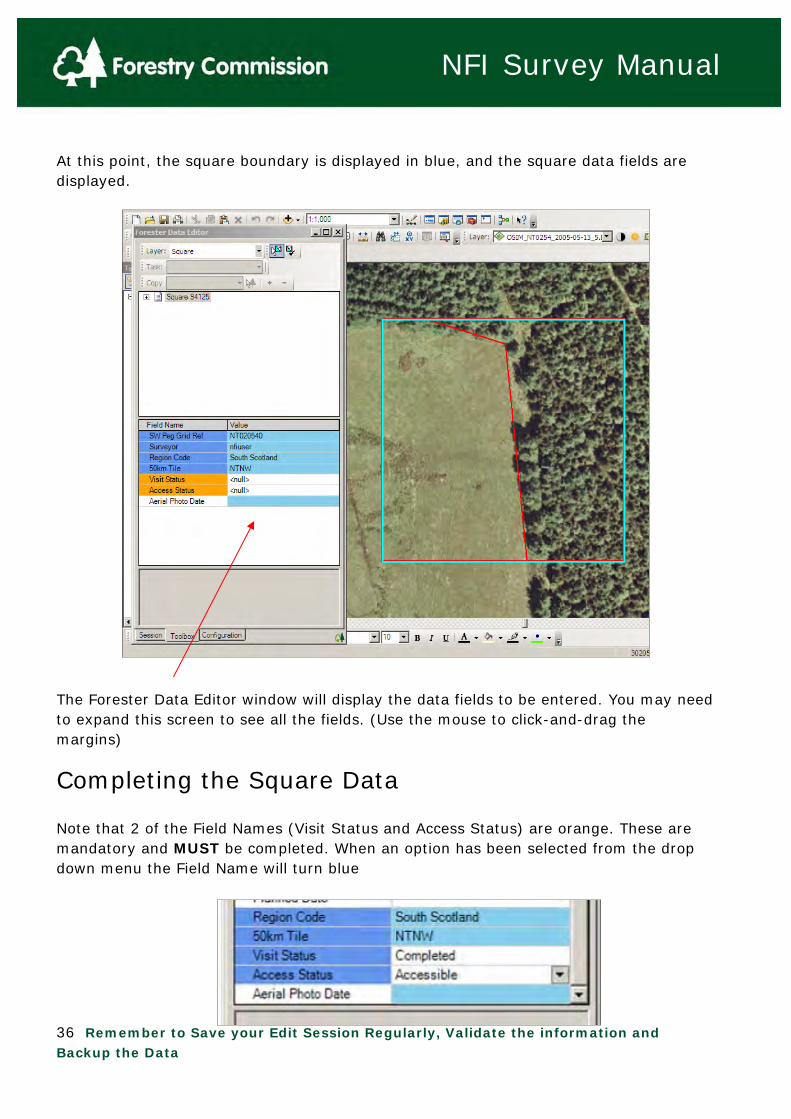
At this point, the square boundary is displayed in blue, and the square data fields are displayed. The Forester Data Editor window will display the data fields to be entered. You may need to expand this screen to see all the fields. (Use the mouse to click-and-drag the margins)
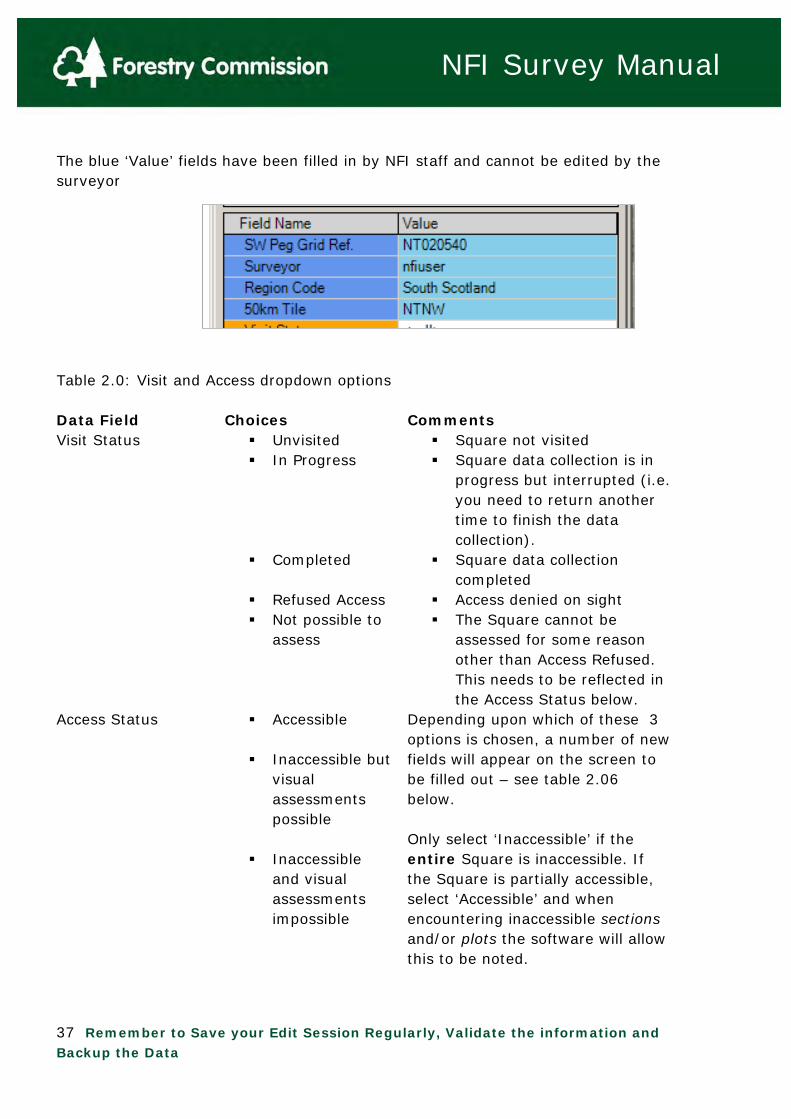
Completing the Square Data Note that 2 of the Field Names (Visit Status and Access Status) are orange. These are mandatory and MUST be completed. When an option has been selected from the drop down menu the Field Name will turn blue
37 Remember to Save your Edit Session Regularly, Validate the information and Backup the Data
NFI Survey Manual
The blue ‘Value’ fields have been filled in by NFI staff and cannot be edited by the surveyor Table 2.0: Visit and Access dropdown options Data Field Choices Comments Visit Status Unvisited
In Progress Completed Refused Access Not possible to
assess
Square not visited Square data collection is in
progress but interrupted (i.e. you need to return another time to finish the data collection).
Square data collection completed
Access denied on sight The Square cannot be
assessed for some reason other than Access Refused. This needs to be reflected in the Access Status below.
Access Status Accessible Inaccessible but
visual assessments possible
Inaccessible
and visual assessments impossible
Depending upon which of these 3 options is chosen, a number of new fields will appear on the screen to be filled out – see table 2.06 below. Only select ‘Inaccessible’ if the entire Square is inaccessible. If the Square is partially accessible, select ‘Accessible’ and when encountering inaccessible sections and/or plots the software will allow this to be noted.
38 Remember to Save your Edit Session Regularly, Validate the information and Backup the Data
NFI Survey Manual
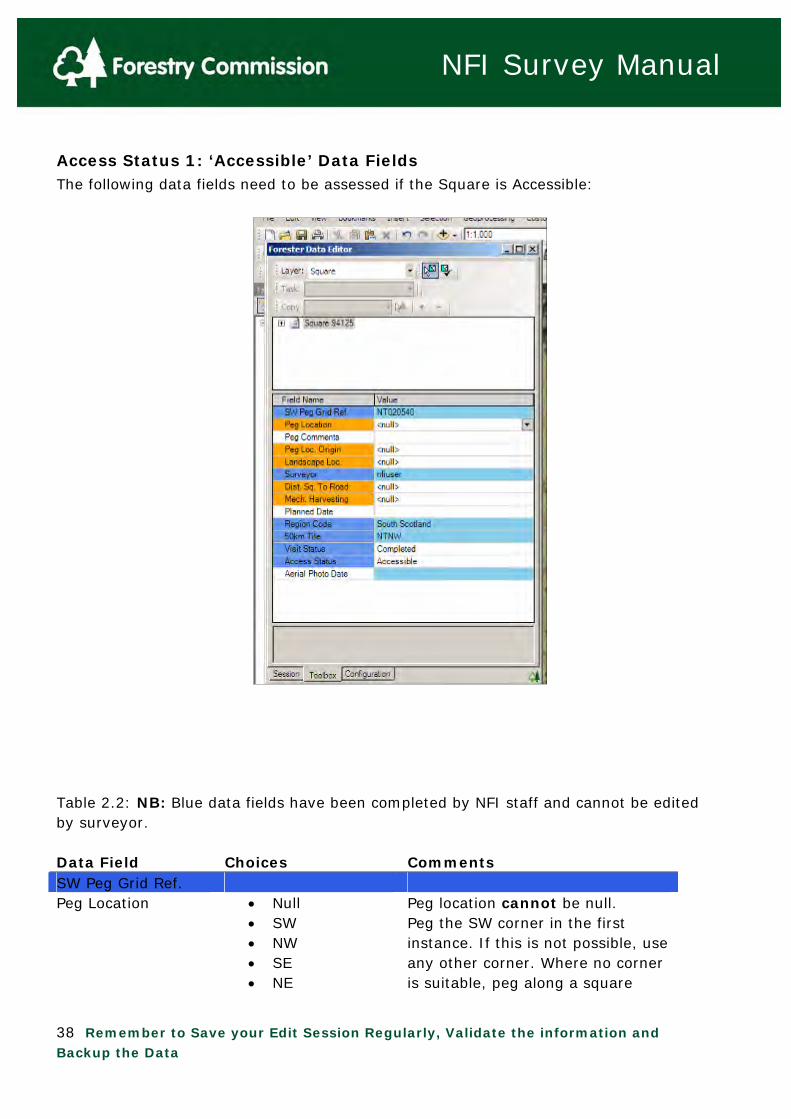
Access Status 1: ‘Accessible’ Data Fields The following data fields need to be assessed if the Square is Accessible: Table 2.2: NB: Blue data fields have been completed by NFI staff and cannot be edited by surveyor. Data Field Choices Comments SW Peg Grid Ref. Peg Location Null
SW NW SE NE
Peg location cannot be null. Peg the SW corner in the first instance. If this is not possible, use any other corner. Where no corner is suitable, peg along a square

39 Remember to Save your Edit Session Regularly, Validate the information and Backup the Data
NFI Survey Manual
No Peg Elsewhere
boundary and select the ‘Elsewhere’ option.
Peg Reason – this field appears if you have NOT chosen the SW corner for the peg.
No Landowner Permission
Health & Safety Legal
Restriction Public Access
Area Residential Garden Impenetrable
Surface Puddling
Ground Boggy Ground Inaccessible Multiple causes Terrain Ground
Vegetation Forest
Operations Other
Select the reason why you have not pegged the SW corner.
Peg GPS Loc. 12 characters starting with the OS 100km Square letters (e.g. NT) followed by 10 digits
Software will not allow invalid data entry here. Order of preference for identifying peg location is: Aerial photo, OS map, GPS. Enter the GPS reading not the ArcMap coordinates.
Peg Comments Free text Always fill in notes to help locate the peg in the future, e.g. 3m from path.
Peg Loc. Origin - Ordnance Survey
Aerial Photo GPS Survey Combination
OS map only used AP only used GPS only used Traditional survey methods Any combination of the
above Landscape Loc. Hilltop
A non-plateau area at the
top of a hill

40 Remember to Save your Edit Session Regularly, Validate the information and Backup the Data
NFI Survey Manual
Plateau
Upper Slopes
Middle Slopes
Lower Slopes Valley bottom
Plain
Flood plain
Riparian Frequently Flooded
Riparian Occasionally Flooded
An extensive flat area above a slope (on a hill)
The upper portion of any sloped area
The middle portion of any sloped area
The lower portion of any sloped area
A gently sloping basin at the foot of significant hill-slopes
An extensive flat area not above steep slopes
Areas subject to occasional flooding when rivers burst their banks, (must be at least once every 50 years).
Area related to the banks of a natural watercourse
Surveyor Dist. Sq. To Road <200m
200 – 400m 400 – 600m 600 – 800m 800 – 1000m > 1000m Not Possible to
Assess
This is the distance, as the crow flies, to the nearest category 1A road (able to take a 32 ton timber lorry) or better. You can carry this out as a map exercise.
Mech. Harvesting Wheeled vehicle on site possible
Wheeled vehicle on site impossible
Sky line site Mech.
Harvesting Impossible
Not Possible to Assess
Can a harvesting vehicle get on site? If not can a skyline be used or is it not possible to get any sort of mechanised harvesting on site? This is about the site conditions regardless of the tree cover.

41 Remember to Save your Edit Session Regularly, Validate the information and Backup the Data
NFI Survey Manual
Planned Date Calendar Planned date of Square survey – optional
Example screen with the data filled out. Note how the orange mandatory fields have turned blue after being filled in. Once the data fields have been filled in check the validation button to ensure there are no invalid data entries.

42 Remember to Save your Edit Session Regularly, Validate the information and Backup the Data
NFI Survey Manual
Access Status 2: ‘Inaccessible but visual assessment possible’ Data Fields. (Select this option if the approach to the square, or the square itself is inaccessible). NB: If any Section is Accessible then the square MUST be Accessible. The following data fields need to be assessed if the Square is Inaccessible but visual assessment possible: Fill in the following data fields: Table 2.3:
Data Field Choices Comments SW Peg Grid Ref.
Landscape Loc.
As for Accessible sites (see Table 2.2 above)
As for Accessible sites (see Table 2.2 above)
Surveyor Dist. Sq. To Road
As for Accessible sites (see Table 2.2 above)
As for Accessible sites (see Table 2.2 above)
Mech. Harvesting
As for Accessible sites (see Table 2.2 above)
As for Accessible sites (see Table 2.2 above)
Inaccessible reason
Inaccessible thicket
Inaccessible health & safety
Inaccessible slope
Inaccessible obstruction
Inaccessible wind blow
Inaccessible other
Thicket definition: ‘Stands of trees where the bases of
the live crowns of
the trees are below
1m height, and the
live crowns interlock
so tightly that
access is
impossible’.
Where vegetation (e.g. dense gorse) stops access use ‘Inaccessible other’.

43 Remember to Save your Edit Session Regularly, Validate the information and Backup the Data
NFI Survey Manual
Access Status 3: ‘Inaccessible & visual assessment impossible’ Data Fields (You only need to complete the ‘Inaccessible Reason’ data field) Software will not allow the collection of Section or tree data. Table 2.4: Data Field Choices Comments SW Peg Grid Ref.
Surveyor Inaccessible reason
Inaccessible thicket
Inaccessible health & safety
Inaccessible slope
Inaccessible obstruction
Inaccessible wind blow
Inaccessible other
Thicket definition: ‘Stands of trees where the bases of the live
crowns of the trees
are below 1m height,
and the live crowns
interlock so tightly
that access is
impossible’.
Where vegetation (e.g. dense gorse) stops access use ‘Inaccessible other’.

44 Remember to Save your Edit Session Regularly, Validate the information and Backup the Data
NFI Survey Manual
Adding a Square Photo Click on the next to the Square number in the Forester Data Editor window to get the Photo folder: Step1: take a photo showing the location of the square peg. Step2: Save the photo(s) to your Toughbook Step3: Add the photo into Forester Right click on either the folder or the word Photo to get the option to Add New Photo. You can add more than one Photo here but at least one needs to show the Square peg (usually in the SW corner) to help staff find the peg location in the future.
Completing the photo data fields. Photo Date - Add the date of the photo Comment – add in any comments about the
photo Include in Checkout – change to ‘Yes’
+

45 Remember to Save your Edit Session Regularly, Validate the information and Backup the Data
NFI Survey Manual
3.0 Creating Sections To help the FC report on the composition of our forests, we must break down the areas they occupy into classes or categories. Generally, we are looking to differentiate between homogenous, discrete and unique areas of land. We have done this at a national scale through production of the NFI GB Woodland Map, and its division into Interpreted Forest Types and Interpreted Open Areas (minimum size 0.5Ha). See Chapter 3.7.1 for a listing and description of the various categories. You are required to do this at a finer scale, breaking each 1Ha NFI Sample Square down into homogenous “Sections” (minimum size 0.05Ha). Sections are differentiated on the basis of: Forest or open area type Landuse Habitat Silvicultural system Tree/shrub species composition Age Height Tree storey structure Manual intervention (e.g. thinning, livestock grazing etc.). This is not an exhaustive list, and some judgement is required. Each Section needs to be as homogenous as possible within the area restrictions, and without unduly creating more sampling in the field.
Section types and the level of assessment required There are 4 types of Section for the purposes of assessment. NFI Treed Sections. These fall wholly within the NFI GB Woodland Map Boundary.
They require a full Section assessment and a mensuration assessment. Non-NFI Treed Sections. These fall wholly outwith the NFI GB Woodland Map
Boundary. They require a full Section assessment only (i.e. no mensuration assessment).
NFI Non-treed (Open) Sections. These fall wholly within the NFI GB Woodland Map Boundary and must be completely surrounded by NFI woodland (or nearly so). They require a brief Section assessment only.
Non-NFI Non-treed (Open) Sections. These fall wholly outwith the NFI GB Woodland Map Boundary. They require a brief Section assessment only.

46 Remember to Save your Edit Session Regularly, Validate the information and Backup the Data
NFI Survey Manual
NFI versus Non-NFI land The NFI GB Woodland Map is a digital map of all woodland areas in Britain at least 0.5Ha in extent and at least 20m wide. “Woodland” is defined as land having at least 20% tree canopy cover, or the potential to achieve this through maturation of the existing crop. The woodland polygons are referred to as “NFI Woodland” and their external boundaries are collectively referred to as the “NFI Map Boundary”. Everything within the NFI Map Boundary is classed as NFI land. Everything outwith the NFI Map Boundary is classed as Non-NFI land, including woodland areas <0.5Ha in extent and/or <20m wide- these are referred to as “Non-NFI Woodland”. The NFI GB Woodland Map is overlain by a grid of randomly and systematically generated 1Ha (100m x 100m) Sample Squares. Some fall wholly within the NFI Map Boundary and others only partly. In either case, the entire 1Ha Square is assessed.
Sections falling within the NFI Map Boundary are classed as NFI Sections falling outwith the NFI Map Boundary are classed as Non-NFI
An NFI Section must always be mapped separately to a Non-NFI Section, even where they are identical in character and composition. Always tick-on the appropriate NFI Woodland Map GIS layer and ground-truth the NFI Map Boundary before attempting to divide the Square into Sections. The NFI Woodland Map GIS layers for Scotland, England and Wales are stored in C:\NFI\Support Data on your Toughbook (e.g. the NFI England Woodland Map is named “NFI_England_Base_Map”). These layers automatically load-in when you log-on to Forester and open the NFI default Map Schema.
Ground-truthing the NFI Map Boundary The NFI Map Boundary is derived from desk-based aerial photograph interpretation, and follows Ordnance Survey Master Map (i.e. the boundary is “snapped” to pre-defined features on the Ordnance Survey Map). Sometimes, therefore, it may not exactly match the situation you see on the ground.
47 Remember to Save your Edit Session Regularly, Validate the information and Backup the Data
NFI Survey Manual
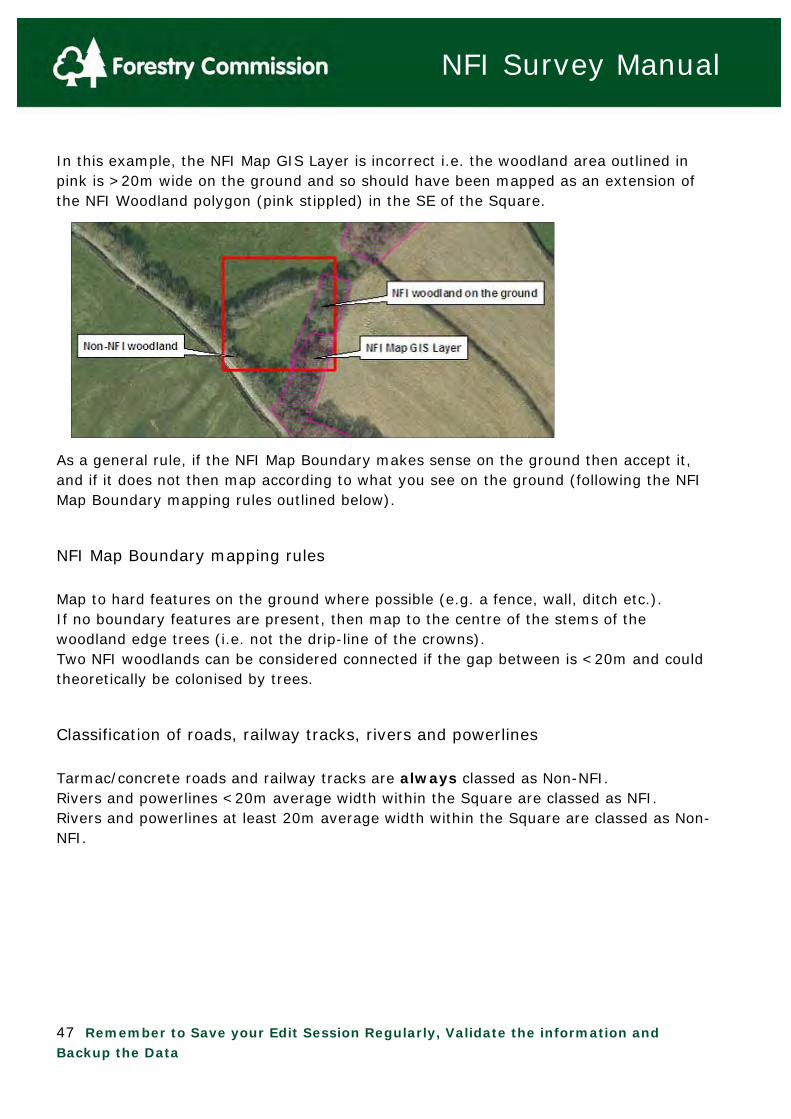
In this example, the NFI Map GIS Layer is incorrect i.e. the woodland area outlined in pink is >20m wide on the ground and so should have been mapped as an extension of the NFI Woodland polygon (pink stippled) in the SE of the Square. As a general rule, if the NFI Map Boundary makes sense on the ground then accept it, and if it does not then map according to what you see on the ground (following the NFI Map Boundary mapping rules outlined below).
NFI Map Boundary mapping rules Map to hard features on the ground where possible (e.g. a fence, wall, ditch etc.). If no boundary features are present, then map to the centre of the stems of the woodland edge trees (i.e. not the drip-line of the crowns). Two NFI woodlands can be considered connected if the gap between is <20m and could theoretically be colonised by trees.
Classification of roads, railway tracks, rivers and powerlines Tarmac/concrete roads and railway tracks are always classed as Non-NFI. Rivers and powerlines <20m average width within the Square are classed as NFI. Rivers and powerlines at least 20m average width within the Square are classed as Non-NFI.

48 Remember to Save your Edit Session Regularly, Validate the information and Backup the Data
NFI Survey Manual
Treed versus Non-treed (Open) land
Treed areas Land that has at least 20% tree canopy cover, or the potential to achieve this through maturation of the existing crop of trees, tree saplings and tree seedlings. Do not make assumptions about survival rates (e.g. losses to pests, diseases, mammal damage etc.) or future management interventions. Treed areas include temporarily unstocked areas, such as:
Clearfell cut <10 years ago Windblow pockets Failed crops: planted within the last 15 years and <20% of the appropriate
management table stocking. Burnt crops: high forest where >80% of trees have been killed by fire. Ground prepared for new planting
Treed areas also include:
Glades with a sufficient scattering of tree seedlings or saplings. Xmas tree crops Traditional orchards Wooded gardens with sufficient tree canopy cover
Treed areas do not include horticultural/arable crops, such as: Nursery crops Biofuel crops Intensively-managed commercial orchards
49 Remember to Save your Edit Session Regularly, Validate the information and Backup the Data
NFI Survey Manual
Non-treed (Open) areas Land that has <20% tree canopy cover, and no potential to achieve this through maturation of the existing crop of trees, tree saplings and tree seedlings. Non-treed areas include:
Clearfell which, after 10 years, has not achieved at least 20% stocking of tree species and/or shrubs acting as trees through planting or natural regen.
Glades with patchy or dense cover of shrub species, but <20% of the shrubs are “acting as trees”.
Heathland restoration sites where intended management has been confirmed by the landowner or manager.
Non-treed areas also include horticultural/arable crops, such as: Nursery crops Biofuel crops Intensively-managed commercial orchards
Permanent versus temporary open space For the purposes of the NFI, we differentiate between permanent open space (which you must record so that we can deduct it from the NFI GB Woodland total area) and temporary open space (which you must not record). See “Accounting for Open Space” (p.7) for a fuller explanation.

50 Remember to Save your Edit Session Regularly, Validate the information and Backup the Data
NFI Survey Manual
Minimum Section size A Section may be comprised of a single polygon at least 0.05Ha in extent, or it may be comprised of two or more separate but identical polygons (“multi-parts”), each at least 0.01Ha in extent and which sum to at least 0.05Ha. Sections and individual multi-parts must be at least 5m average width, although an exception is made for certain Non NFI Non-treed Sections (see “Mapping rules for open space associated with linear features”). Non-NFI land should always be mapped separately to NFI land where possible. To facilitate this, the minimum size for a Non-NFI Section may be lowered to 0.01Ha where the total extent of Non-NFI land within the Square is <0.05Ha. For example, if a Non-NFI tarmac road runs the entire length of the Square, but the road margin extends only 1m into the Square, and the remainder of the Square is NFI woodland, then the Non-NFI polygon should be mapped out as a separate Section, even though only 0.01Ha in extent and strictly too narrow. Normal rules apply to situations where the total extent of NFI land within the Square is <0.05Ha i.e. the NFI land must not be mapped out as a separate Section (but can instead be recorded as an NFI “Component Group” within the adjacent Non-NFI Section, as outlined below). Always double-check that each of your mapped Sections is at least 0.05Ha in extent (exceptionally 0.01Ha for certain Non-NFI Sections). The software will automatically calculate Section area but does not alert you when the area is <0.05Ha. Squares containing Sections less than the minimum permitted size will automatically fail our Quality Assurance Assessment and be returned to you for re-survey.
Component Groups Homogenous areas too small to map as discrete or multi-part Sections should be identified as “Component Groups” and attached to the most similar or largest adjacent Section. For example, a small stand of oak (0.03Ha) might be included as a Component Group within an adjacent Section of beech, or perhaps within an adjacent Section of spruce if that filled the remainder of the Square. See Chapter 3.7.4 for a fuller discussion of Component Groups.

51 Remember to Save your Edit Session Regularly, Validate the information and Backup the Data
NFI Survey Manual
Accounting for Open Space Accounting for Open Space associated with woodland is vital in estimating total woodland area, basal area of woodlands and woodland degradation.
Permanently open space Permanently open space is defined as land that will never, under the existing circumstances, become woodland. All permanently open space within the Sample Square must be accounted for to ‘net off’ from the gross NFI Woodland area. This can be achieved by either mapping it as a separate Section, or by recording it as a percentage of the Section area that it sits within (as an open space Component or Component Group). Easy determinations of permanent open space would be large areas of concrete, tarmac etc., recorded as urban and road etc. More difficult determinations would be, for example, grassed open space between trees and open space associated with linear features (roads, rides, rivers, powerlines etc.).
Grassed open space between trees Here we need to identify what area will never come under canopy once the existing trees have grown to maturity. This can be established by looking at the existing crop and predicting mature canopy closure. If any “gaps” remain, then these gaps would be classed as permanent open space and should be recorded as such. Areas that are open now but will sooner or later, in this rotation, become under canopy, are not recorded as open space. These temporary canopy gaps will be accounted for in the stocking density, DBH (stem diameter) and age assessments.
Open space associated with linear features We must ensure that we do not miss out or double-account for woodland area lost to roads, rides etc. Missing out the open space associated with a road would occur if the road was mapped “on top” of a woodland Section (as an NFI Linear Feature) but no thought was put to the area of woodland lost to the road.

52 Remember to Save your Edit Session Regularly, Validate the information and Backup the Data
NFI Survey Manual
Double accounting could occur where open space associated with a road (both underneath the road and adjacent to it) is mapped both as a separate Section and held as an open space Component in a woodland Section. We must also go a step further with linear features and draw the distinction between roads and tracks that are effectively permanently unable to grow trees (e.g. concreted, tarmac and heavily stoned roads) and those which could easily grow trees again (e.g. rides, extractions tracks, earth paths etc.), and so are considered temporary. For any woodland Section, you will need to make an assessment of the area of ‘non woodland’ lying ‘underneath’ linear features that are permanently unable to grow trees (e.g. tarmac/concrete/heavily-stoned roads, and rivers). You should then record this as a separate Component (landuse permanent open space associated with linear features) and assign it a percentage of the Section area. This should be done irrespective of whether or not the linear feature is under canopy cover, now or in the future. Temporary open space (associated with rides, tracks, footpaths etc.) that could easily grow trees again should be recorded as a separate Component, but you should assign one of the other open space landuse categories according to the type that it is (e.g. Open, Grass?). For temporary open space associated rides, tracks, paths etc. the usual canopy closure rules apply, and we would need to identify what area will never come under canopy once the existing trees have grown to maturity. This can be established by looking at the existing crop and predicting mature canopy closure. If any ‘gaps’ are left then these gaps would be permanent open space and should be recorded as such. If areas that are open now, but will sooner or later in this rotation be under the canopy then they are not recorded as open space.

53 Remember to Save your Edit Session Regularly, Validate the information and Backup the Data
NFI Survey Manual
Mapping rules for open space associated with linear features
Where the open space is classed as NFI land This refers to open space associated with linear features that fall within the NFI Map Boundary. Surveyors should not map out the open space associated with an NFI linear feature as a Section unless it is at least 0.05Ha in extent and at least 5m average width within the Square. These thresholds were chosen as:
Smaller ones would cost too much to capture. The cost of maintaining the data subsequently would be high. Staff would not be able to see these polygons on the scale 1:10,000 NFI
Woodland Map. 0.05Ha is the minimum permitted size for NFI Sections.
The 5-metre mean width rule applies to the following features:
Unsealed roads (i.e. non-tarmac/concrete) Forest rides Rights of Way Powerlines <20m wide Gas lines Walls Other boundary features that substantively occupy space and reduce the area that
trees can grow in. Rivers and canals <20m wide
Do not map out the open space associated with an NFI linear feature if it is <0.05Ha in extent and/or <5m average width within the Square. Do record it as a Component Group within an adjacent NFI Section if it is at least 0.01Ha in extent.

54 Remember to Save your Edit Session Regularly, Validate the information and Backup the Data
NFI Survey Manual
Where the open space is classed as Non-NFI land but it protrudes into an area of NFI land This refers to open space associated with linear features that fall outside the NFI Map Boundary, but cut through or protrude into NFI land. Examples include:
Sealed roads (tarmac/concrete) Railway tracks Powerlines at least 20m wide Rivers or canals at least 20m wide
Surveyors can map out the open space associated with a Non-NFI linear feature as a Section if it is at least 0.01Ha in extent.

55 Remember to Save your Edit Session Regularly, Validate the information and Backup the Data
NFI Survey Manual
Section boundaries
Boundary lines There are four methods, described in priority order, for determining where the boundary line should be drawn when creating Sections:
1. Where landuse changes, e.g. at the interface with non-woodland areas 2. Square boundary 3. The “drip line” (or the potential drip line when a young crop matures) 4. Sphere of Influence
1) Landuse changes: the interface with land that is non-woodland Where the tree canopy extends over an area that could not support trees (e.g. open water, a road, a quarry etc.), the boundary of that non-woodland area is taken as the Section boundary. This rule takes precedence over the drip line and it is generally a more objective boundary than interpreting the drip line boundary. It is not subject to change over time to the same extent as the drip line. The branches of the treed Section do not determine that the open water or road below it is a forest as it is not the PREDOMINANT landuse; the open water or road is the predominant landuse. Another example is where the tree canopy extends across a fence into agricultural land. This is a greyer area as the agricultural land could, if given the right conditions, support trees. But if the land is under active agricultural management, this is unlikely to occur within the NFI 5-year survey cycle, and therefore its predominant land use is agriculture
2) Square boundary This is an artificial boundary imposed by the sampling methodology and does not take into account any land features, only geographical location. In nearly all Sample Squares the Square boundary will divide Sections arbitrarily. When carrying out Mensuration plot work within a Section and a circular plot crosses the Square boundary line, all the area of the plot that would have been in the Section had the Square boundary not existed is assessed.

56 Remember to Save your Edit Session Regularly, Validate the information and Backup the Data
NFI Survey Manual
3) Drip line To establish a treed Section boundary in the vast majority of cases the drip line (of the uppermost storey) will be used. The drip line is the furthest tip of the widest branch in the crown; the last point from which the tree can drip if wet. If two treed sections have drip lines that cross over each other use the centre line of the cross over. An area of ambiguity is where to locate a drip line boundary for a young crop. In this instance the Section boundary is located where the surveyor thinks the drip line will be upon maturity of that crop. For example if a young crop is planted on ground prepared for planting it makes sense for the Section to contain the entire area prepared for planting rather than trying to map to the drip line of newly planted or young trees. Surveyors have to be careful not to mistake areas deliberately left unplanted and which would be classed as Open for areas the drip line may extend to. Using a planted area next to a road as an example, surveyors may find a 10m strip left open (no trees planted) between the planted site and the forest road. This strip may be to encourage greater biodiversity of flora and fauna and even when the crop matures it will be obvious that this is an open strip.
4) Sphere of influence This is probably the least likely method to create a Section boundary as it is the least likely situation to occur, especially in production forests. However, it holds greater importance in many respects as we wish to know about how tree storeys influence the land around them. It is more subjective than the other methods and harder to implement correctly. In some crops, seed tree stands for example; the upper storey is sparse but still exerts an influence over the storeys below it. See Figure 3.1.
57 Remember to Save your Edit Session Regularly, Validate the information and Backup the Data
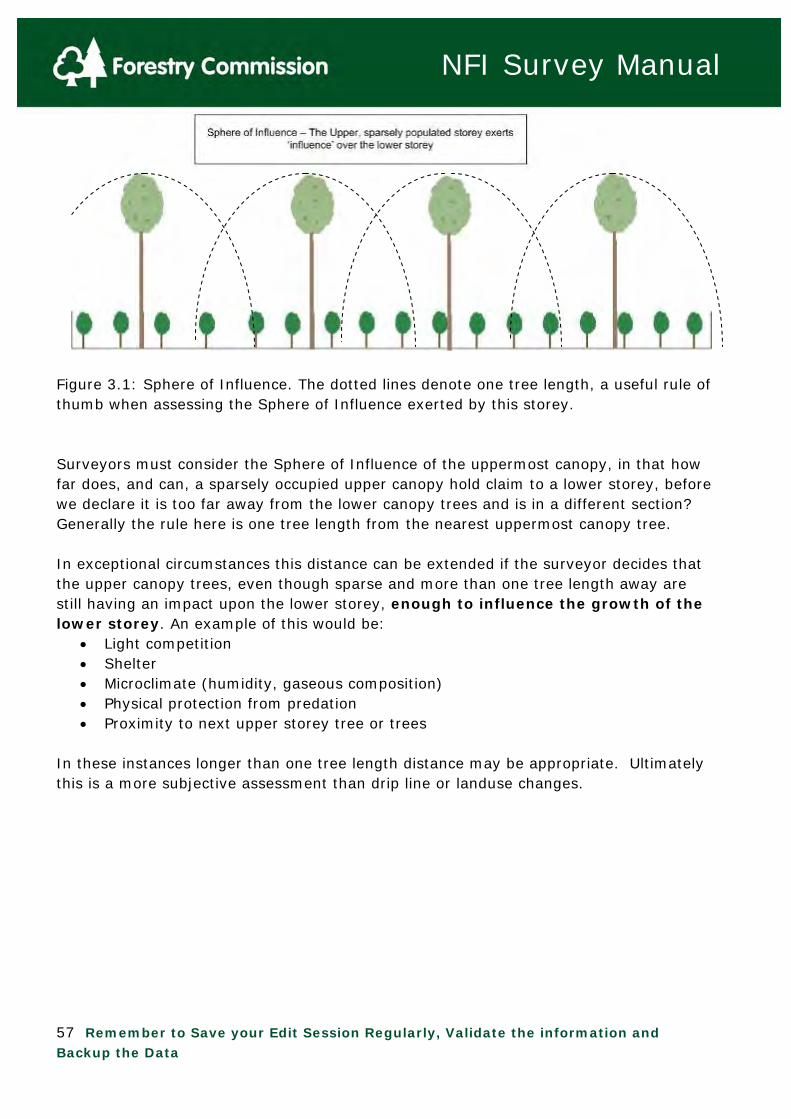
NFI Survey Manual
Figure 3.1: Sphere of Influence. The dotted lines denote one tree length, a useful rule of thumb when assessing the Sphere of Influence exerted by this storey. Surveyors must consider the Sphere of Influence of the uppermost canopy, in that how far does, and can, a sparsely occupied upper canopy hold claim to a lower storey, before we declare it is too far away from the lower canopy trees and is in a different section? Generally the rule here is one tree length from the nearest uppermost canopy tree. In exceptional circumstances this distance can be extended if the surveyor decides that the upper canopy trees, even though sparse and more than one tree length away are still having an impact upon the lower storey, enough to influence the growth of the lower storey. An example of this would be:
Light competition Shelter Microclimate (humidity, gaseous composition) Physical protection from predation Proximity to next upper storey tree or trees
In these instances longer than one tree length distance may be appropriate. Ultimately this is a more subjective assessment than drip line or landuse changes.
58 Remember to Save your Edit Session Regularly, Validate the information and Backup the Data
NFI Survey Manual
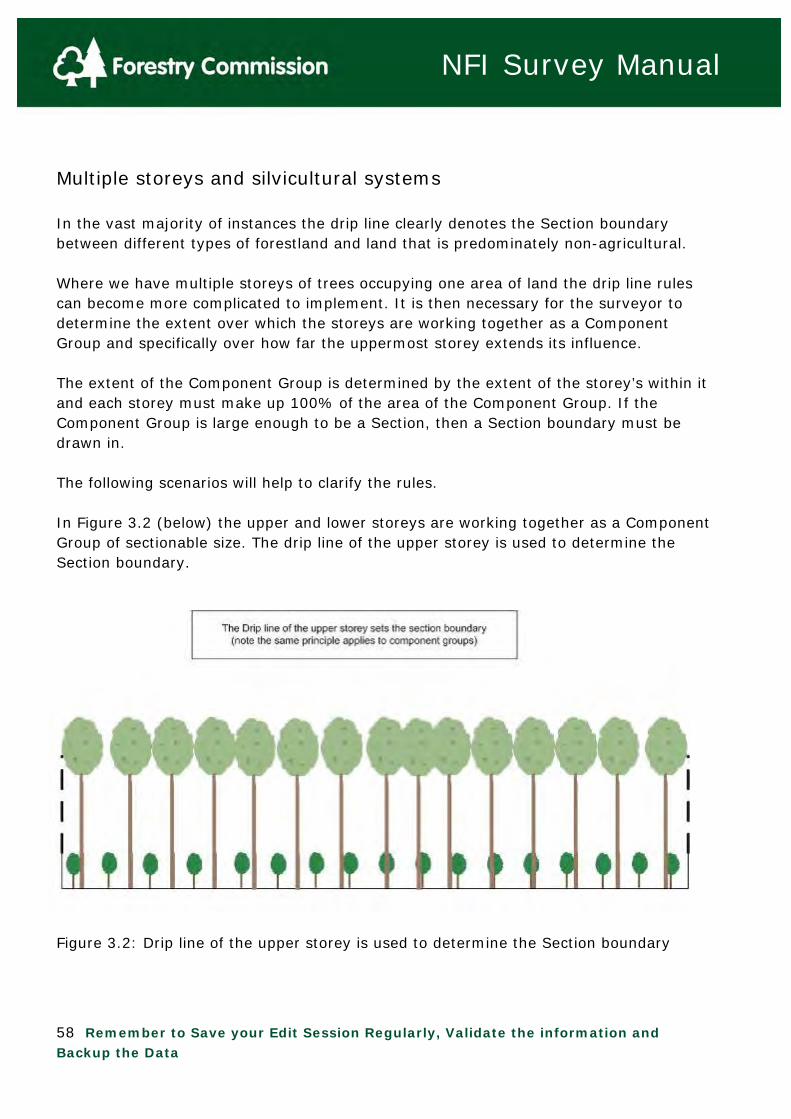
Multiple storeys and silvicultural systems In the vast majority of instances the drip line clearly denotes the Section boundary between different types of forestland and land that is predominately non-agricultural. Where we have multiple storeys of trees occupying one area of land the drip line rules can become more complicated to implement. It is then necessary for the surveyor to determine the extent over which the storeys are working together as a Component Group and specifically over how far the uppermost storey extends its influence. The extent of the Component Group is determined by the extent of the storey’s within it and each storey must make up 100% of the area of the Component Group. If the Component Group is large enough to be a Section, then a Section boundary must be drawn in. The following scenarios will help to clarify the rules. In Figure 3.2 (below) the upper and lower storeys are working together as a Component Group of sectionable size. The drip line of the upper storey is used to determine the Section boundary.
Figure 3.2: Drip line of the upper storey is used to determine the Section boundary

59 Remember to Save your Edit Session Regularly, Validate the information and Backup the Data
NFI Survey Manual
In Figure 3.1 the sparse upper storey is exerting an influence over the lower storey, such that the 2 storeys are working together as a Component Group, and this is of sectionable size. The drip line of the lower storey is used to determine the Section boundary. In Figure 3.3 (below) the clustered upper storey is exerting an influence over the lower storey, such that the 2 storeys are working together as a Component Group, and this is of sectionable size.
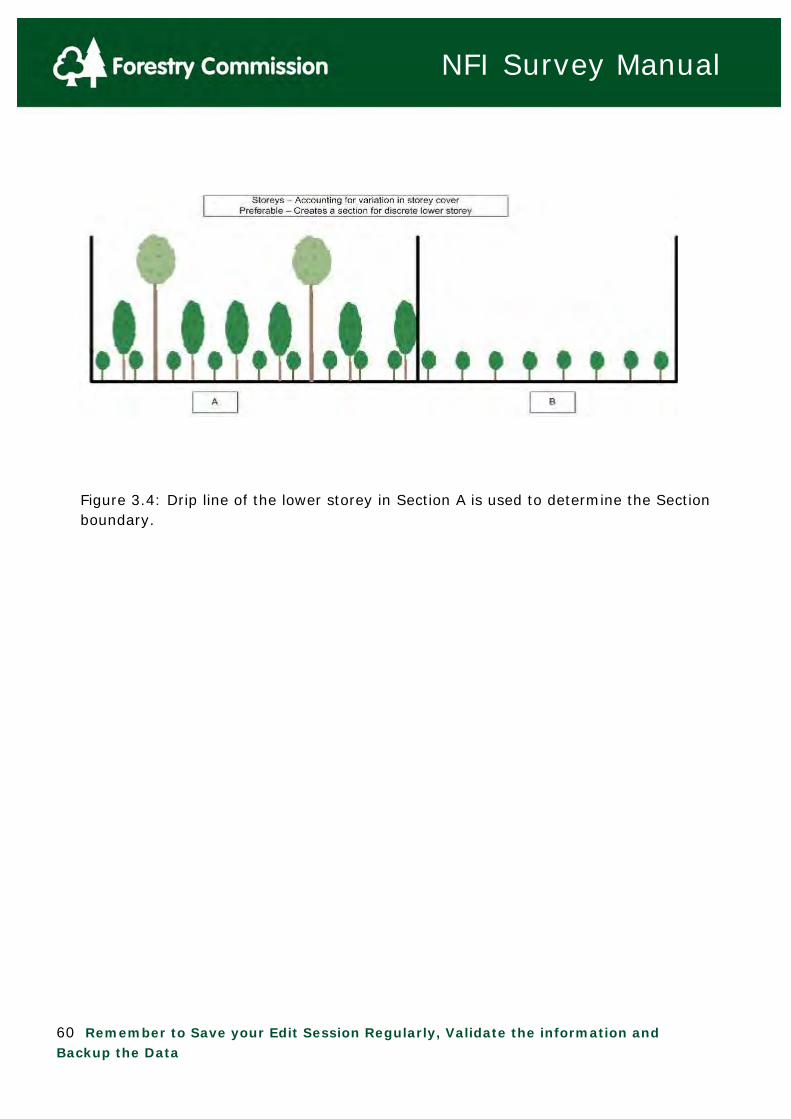
Figure 3.3: A single Component Group across the Section. The upper storey can be said to be extending its influence (the dotted curves) over the lower storey In Figure 3.4 (overleaf) the upper, middle and lower storeys are working together as a Component Group of sectionable size (A), and the single-storied area is also of sectionable size (B). The drip line of the lower storey in Section A is used to determine the Section boundary.
60 Remember to Save your Edit Session Regularly, Validate the information and Backup the Data
NFI Survey Manual
Figure 3.4: Drip line of the lower storey in Section A is used to determine the Section boundary.
61 Remember to Save your Edit Session Regularly, Validate the information and Backup the Data
NFI Survey Manual
Editing Section boundaries Some of the NFI Squares issued to you by the FC come with Section boundaries already mapped. The boundaries relate to the different Interpreted Forest Types and Interpreted Open Areas which collectively make up the NFI GB Woodland Map (see Chapter 3.7.1). The boundaries have been mapped-in through desk-based aerial photograph interpretation, at a coarser scale than we work at on the ground within the 1Ha sample Square, and so it is highly likely that you will need to modify them or map in new boundaries from scratch. Always ground-truth any pre-defined Section boundaries and carry out edits as necessary. Chapters 3.1-3.5 detail how to: Modify Sections by moving/adding/deleting individual vertices. Probably the most frequently used and easiest to explain. Merge Sections i.e. join two or more Sections together. Split Sections i.e. split a Section into two, smaller Sections. Reshape Section boundaries by drawing a new shape that the Section will then adopt as the boundary. Your newly drawn shape needs to cross the existing Section boundary twice to be accepted. Probably less used than 'Modify'. Slide boundary nodes i.e. adjust the node that sits at the intersection of two or more Sections; without this tool it would be fiddly and involve multiple reshape/modify operations. Not used very frequently. The tools all help facilitate editing of shared boundaries in such a way that the Section boundaries do not overlap and do not have any white space in-between them. There is no one tool that does everything, hence the need for several specialist tools to do the edits. It is very important that you get your Section boundaries correct before you start inputting mensuration plot or point data. If you change a Section boundary after entering plot/point data, the software will in some cases automatically delete your plots/points for all Sections sharing that boundary and your data will be lost.
62 Remember to Save your Edit Session Regularly, Validate the information and Backup the Data
NFI Survey Manual
3.1 Modify Section Boundaries
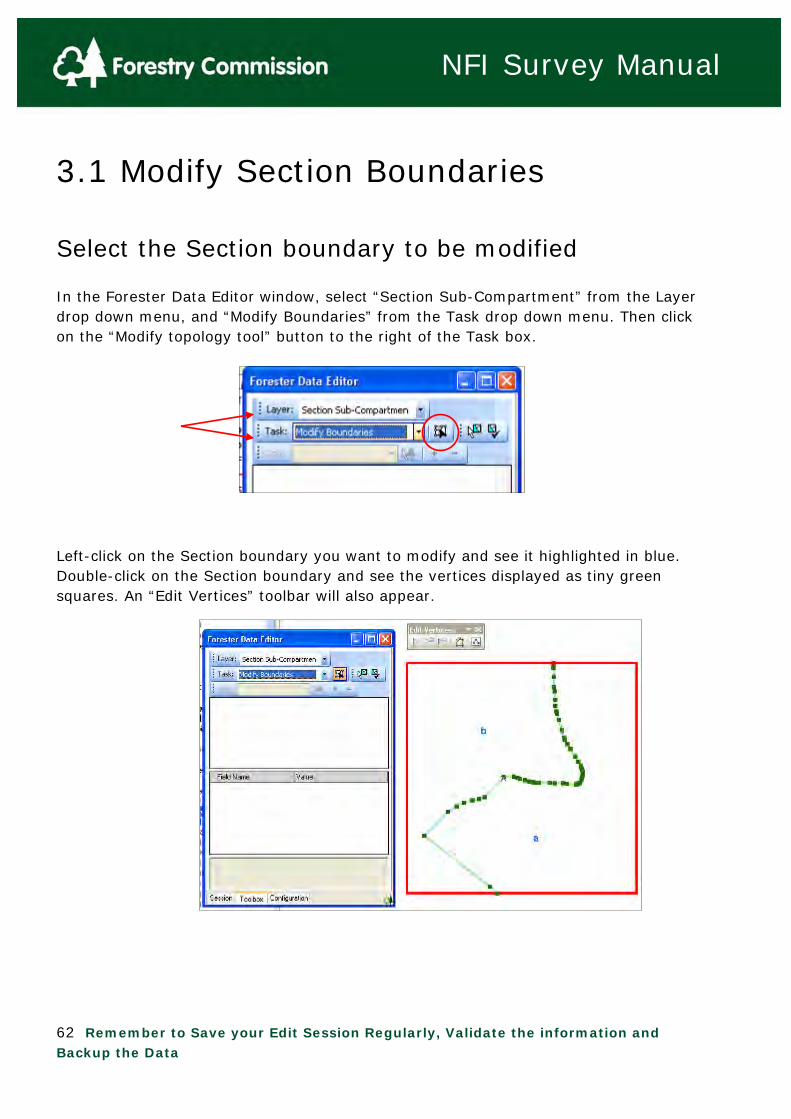
Select the Section boundary to be modified In the Forester Data Editor window, select “Section Sub-Compartment” from the Layer drop down menu, and “Modify Boundaries” from the Task drop down menu. Then click on the “Modify topology tool” button to the right of the Task box. Left-click on the Section boundary you want to modify and see it highlighted in blue. Double-click on the Section boundary and see the vertices displayed as tiny green squares. An “Edit Vertices” toolbar will also appear.

63 Remember to Save your Edit Session Regularly, Validate the information and Backup the Data
NFI Survey Manual
Move individual vertices Click-and-drag individual vertices to their new positions. You will see the modified Section boundary temporarily highlighted in yellow. Finish by clicking on the “Finish Sketch” button in the “Edit Vertices” toolbar, or by double-clicking away from the Section boundary. On the ArcMap toolbar, click on the “Clear Selected Features” button to get rid of the cross-hatching.

64 Remember to Save your Edit Session Regularly, Validate the information and Backup the Data
NFI Survey Manual
Moving nodes Nodes are the little red squares that occur where a Section boundary intersects another Section boundary, or the Square boundary. They cannot be moved using the Modify Tool (a message box pops up when you try and finish the operation). Nodes can be moved using the Slide Node Tool. See Chapter 3.5 “Slide Section Boundary Nodes” for instructions on how to do this.
Delete individual vertices Right-click on the vertex you wish to remove, then select “Delete Vertex” from the pop-up menu. Finish by clicking on the “Finish Sketch” button in the “Edit Vertices” toolbar, or by double-clicking away from the Section boundary.
Insert individual vertices Right-click on the Section boundary, at the point where you wish to add a vertex, then select “Insert Vertex” from the pop-up menu. Currently unavailable (greyed-out) in release 504 to be reinstated at a later date.

65 Remember to Save your Edit Session Regularly, Validate the information and Backup the Data
NFI Survey Manual
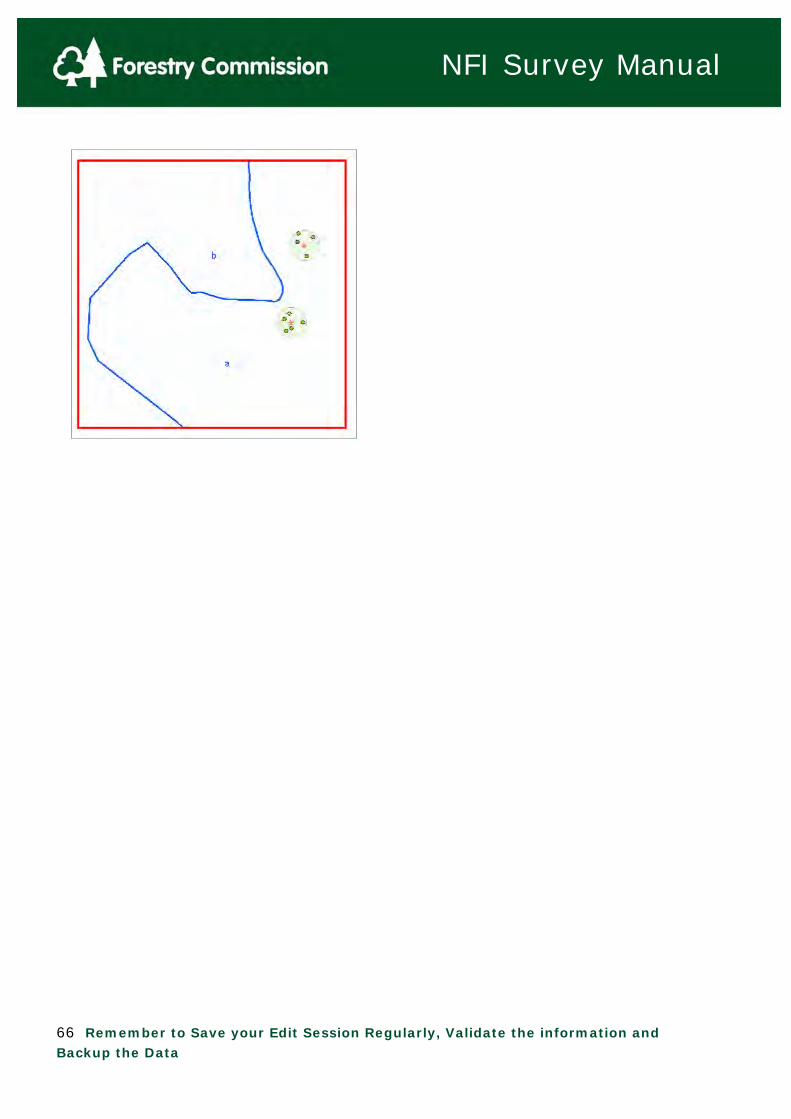
Modifying Section boundaries after mensuration plots/points have been generated Generally to be avoided, but you may want to do this where, for example, during the course of navigating to and between mensuration plots, you discover that your Section boundary mapping is significantly adrift. As long as the boundary modification does not result in any of the plots/points being transferred to a different Section, then the original set of plots/points is maintained, without loss of mensuration data already entered. Where the boundary modification would result in any of the plots/points being transferred to a different Section, a message box will appear warning that the original set of plots/points for the affected Section(s) will be deleted if you continue with the modification. If you decide to continue with the modification, you must then generate a new set of plots/points to replace those that have been deleted. See Chapter 5.0.1 “Generating Plots” for instructions on how to do this. In the example below, the original Section A plots are maintained because they are clear of the boundary modification, whereas the original Section B plots are deleted because at least one of the plot centres subsequently falls within Section A.
66 Remember to Save your Edit Session Regularly, Validate the information and Backup the Data
NFI Survey Manual

67 Remember to Save your Edit Session Regularly, Validate the information and Backup the Data
NFI Survey Manual
3.2 Merging Sections In the Forester Data Editor window, select “Section Sub-Compartment” from the Layer drop down menu, and “Merge” from the Task drop down menu. Click on the “Select Features” button to the right of the Task box, then left-click in the first of the Sections that you want to merge. The Section is now highlighted in blue hatching.
68 Remember to Save your Edit Session Regularly, Validate the information and Backup the Data
NFI Survey Manual
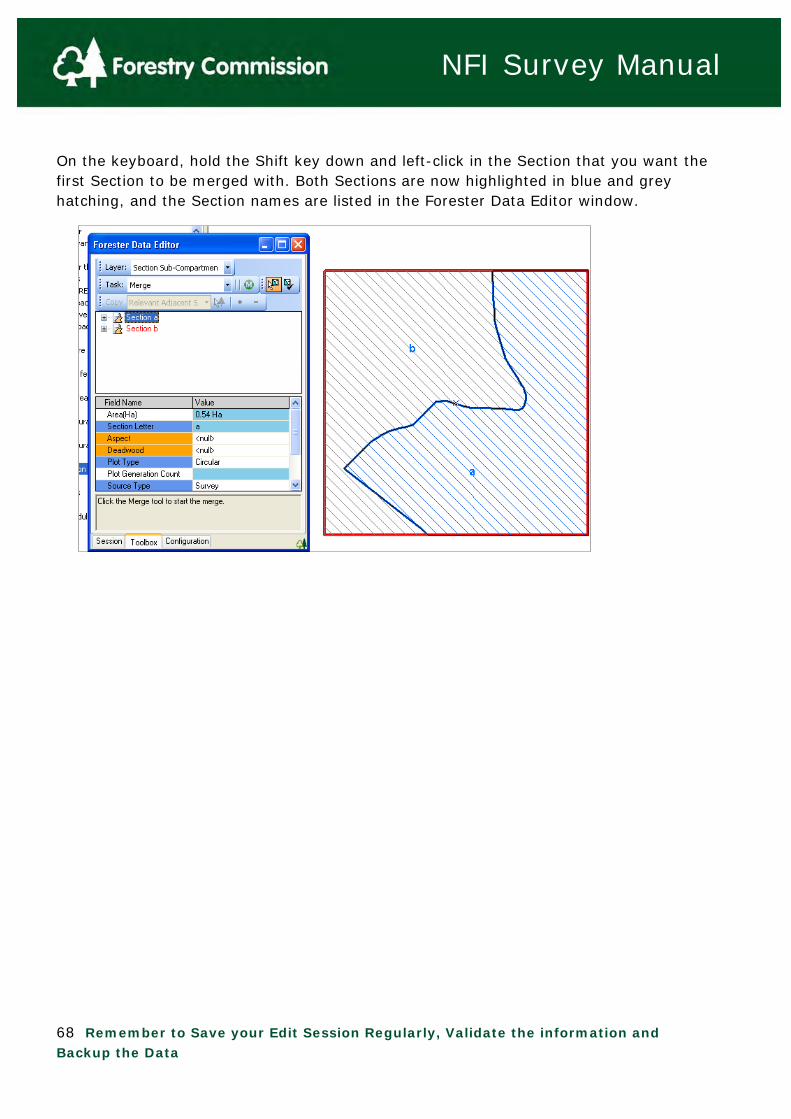
On the keyboard, hold the Shift key down and left-click in the Section that you want the first Section to be merged with. Both Sections are now highlighted in blue and grey hatching, and the Section names are listed in the Forester Data Editor window.

69 Remember to Save your Edit Session Regularly, Validate the information and Backup the Data
NFI Survey Manual
In the Forester Data Editor window, click on the green “Merge edit tool” button immediately to the right of the Task box. A “Merge Options” box appears.
In the “Merge Options” box, place a tick against the Section(s) you would like data to be copied across from (obviously this is only relevant where your Sections already contain some Component data). Then click on the “Merge” button.
70 Remember to Save your Edit Session Regularly, Validate the information and Backup the Data
NFI Survey Manual
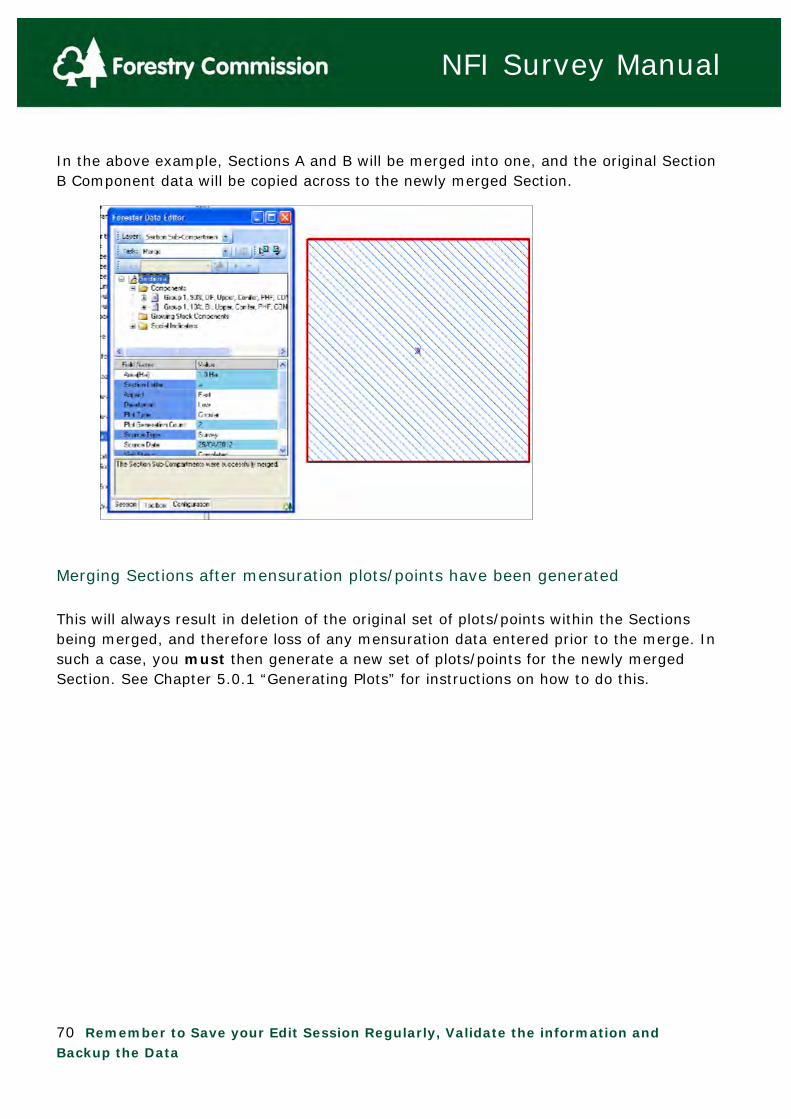
In the above example, Sections A and B will be merged into one, and the original Section B Component data will be copied across to the newly merged Section.
Merging Sections after mensuration plots/points have been generated This will always result in deletion of the original set of plots/points within the Sections being merged, and therefore loss of any mensuration data entered prior to the merge. In such a case, you must then generate a new set of plots/points for the newly merged Section. See Chapter 5.0.1 “Generating Plots” for instructions on how to do this.
71 Remember to Save your Edit Session Regularly, Validate the information and Backup the Data
NFI Survey Manual
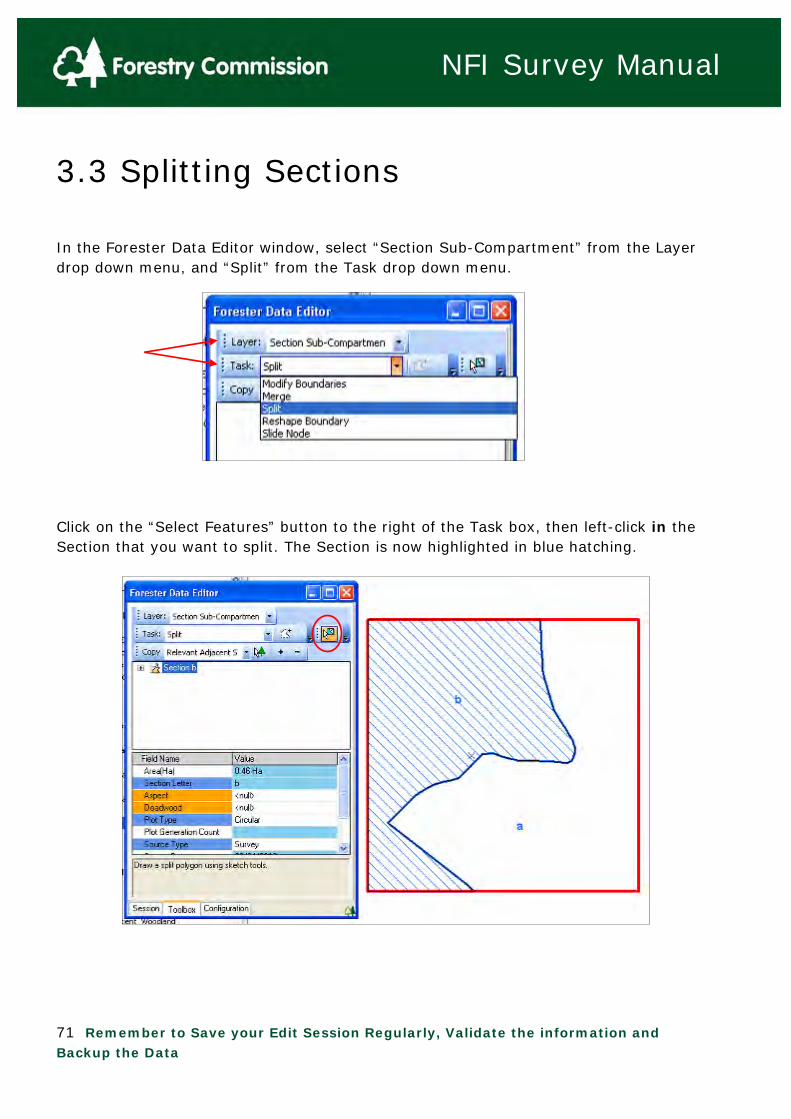
3.3 Splitting Sections In the Forester Data Editor window, select “Section Sub-Compartment” from the Layer drop down menu, and “Split” from the Task drop down menu. Click on the “Select Features” button to the right of the Task box, then left-click in the Section that you want to split. The Section is now highlighted in blue hatching.

72 Remember to Save your Edit Session Regularly, Validate the information and Backup the Data
NFI Survey Manual
In the Forester Data Editor window, click on the “Add to Polygon Edit Tool” button immediately to the right of the Task box. Click around the area to be split off, starting and finishing outside the Section. If you want to re-draw the split, click on the “Select Elements” button on the ArcMap toolbar and have another go. Double-click to finish the drawing. The new split-off Section is highlighted in red cross-hatching.
73 Remember to Save your Edit Session Regularly, Validate the information and Backup the Data
NFI Survey Manual
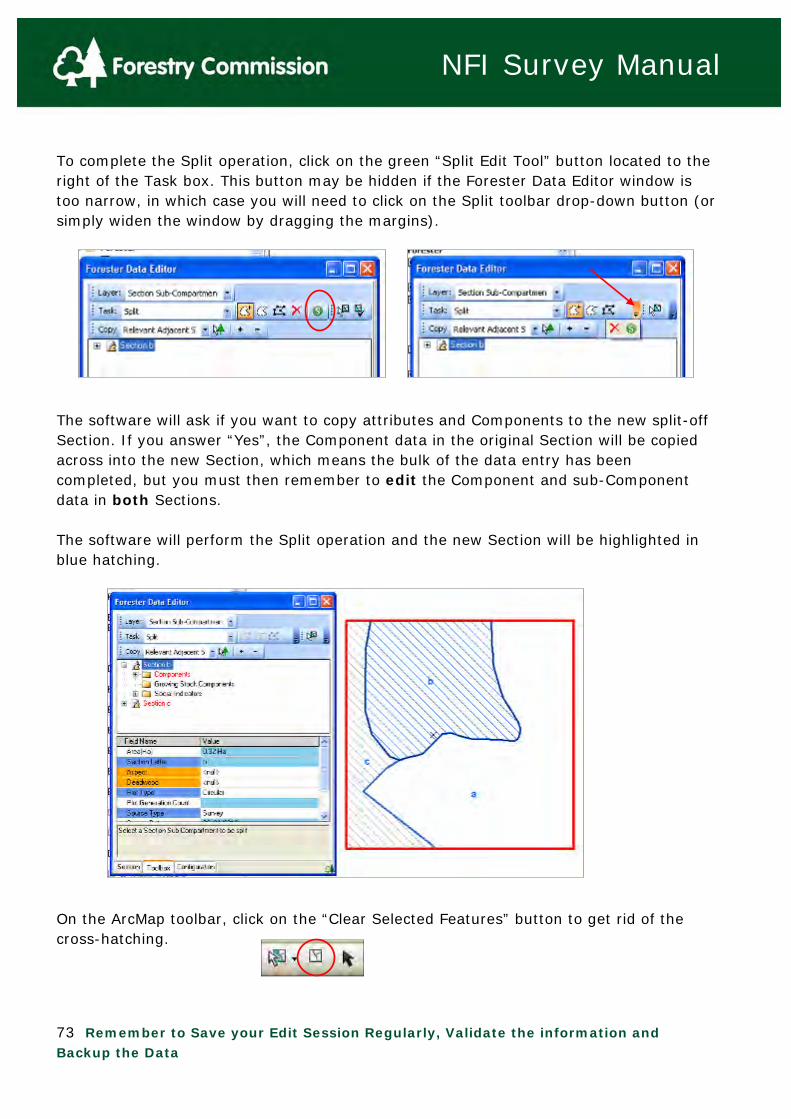
To complete the Split operation, click on the green “Split Edit Tool” button located to the right of the Task box. This button may be hidden if the Forester Data Editor window is too narrow, in which case you will need to click on the Split toolbar drop-down button (or simply widen the window by dragging the margins). The software will ask if you want to copy attributes and Components to the new split-off Section. If you answer “Yes”, the Component data in the original Section will be copied across into the new Section, which means the bulk of the data entry has been completed, but you must then remember to edit the Component and sub-Component data in both Sections. The software will perform the Split operation and the new Section will be highlighted in blue hatching. On the ArcMap toolbar, click on the “Clear Selected Features” button to get rid of the cross-hatching.
74 Remember to Save your Edit Session Regularly, Validate the information and Backup the Data
NFI Survey Manual
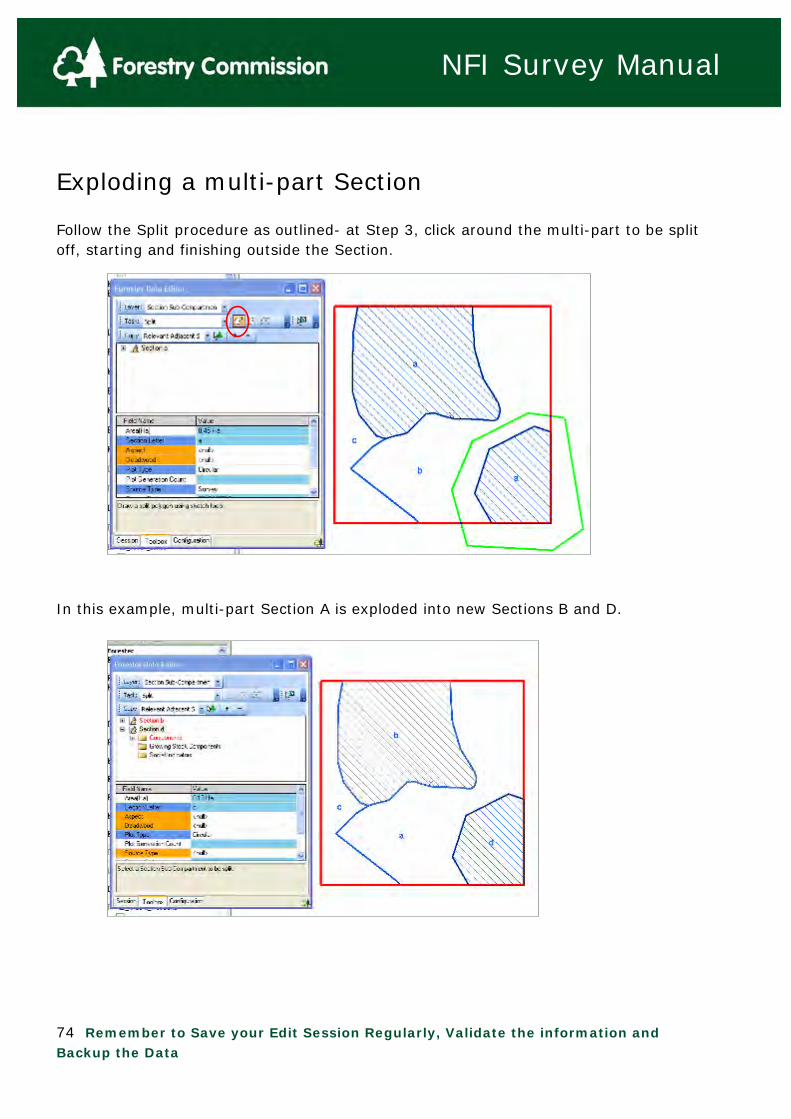
Exploding a multi-part Section Follow the Split procedure as outlined- at Step 3, click around the multi-part to be split off, starting and finishing outside the Section. In this example, multi-part Section A is exploded into new Sections B and D.

75 Remember to Save your Edit Session Regularly, Validate the information and Backup the Data
NFI Survey Manual
Splitting Sections after mensuration plots/points have been generated This will always result in deletion of the original set of plots/points within the Section being split, and therefore loss of any mensuration data entered prior to the split. In such a case, you must then generate a new set of plots/points for the two new Sections. See Chapter 5.0.1 “Generating Plots” for instructions on how to do this.

76 Remember to Save your Edit Session Regularly, Validate the information and Backup the Data
NFI Survey Manual
3.4 Reshape Section Boundaries
Reshaping Section boundaries In the Forester Data Editor window, select “Section Sub-Compartment” from the Layer drop down menu, and “Reshape Boundaries” from the Task drop down menu. Click on the “Select Shared Boundary” button to the right of the Task box, then left-click on the Section boundary you want to reshape and see it highlighted in blue. Click on the “Construct Edit Geometry” (pencil) button to the right of the Task box, and then click around the part of the boundary to be reshaped. A “Feature Construction” tool bar will appear and fade out as you draw.

77 Remember to Save your Edit Session Regularly, Validate the information and Backup the Data
NFI Survey Manual
If you want to amend the re-shape, press “Control and z” on the keyboard and this will undo the last vertex. Repeat until you are back at the start of the drawing. Double-click to finish the drawing, or press F2 on the keyboard. The software will re-shape the boundary. On the ArcMap toolbar, click on the “Clear Selected Features” button to get rid of the cross-hatching.

78 Remember to Save your Edit Session Regularly, Validate the information and Backup the Data
NFI Survey Manual
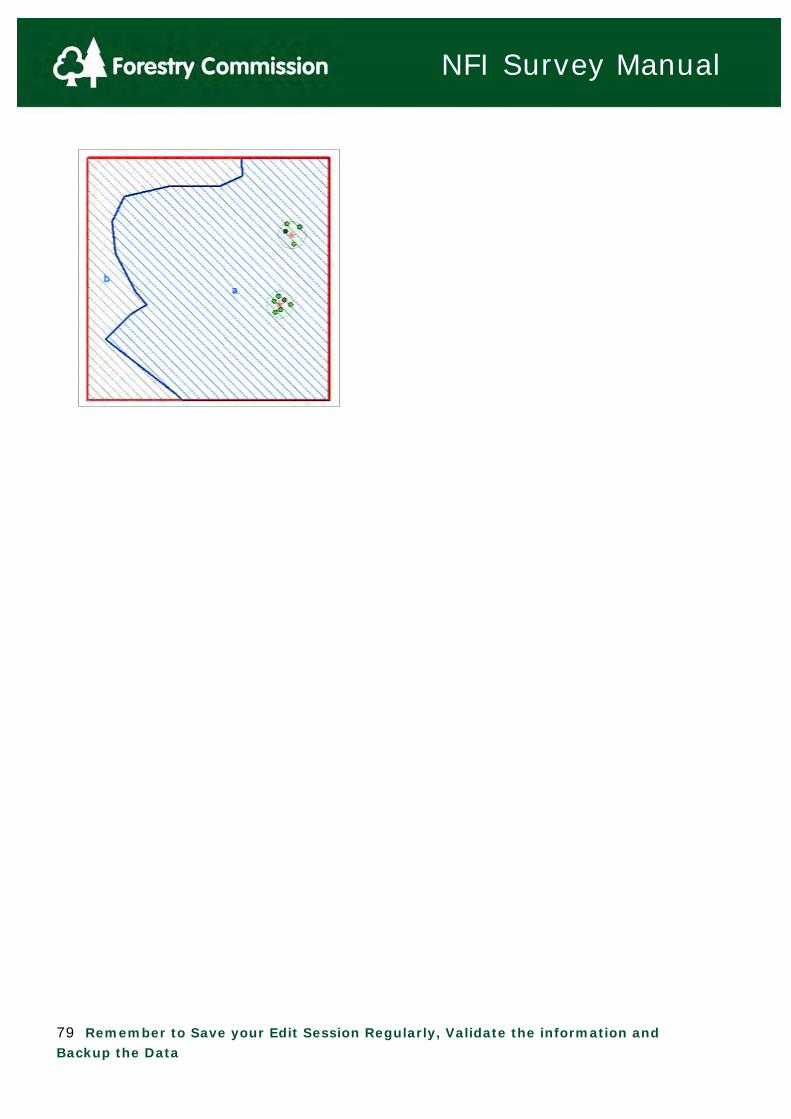
Re-shaping Section boundaries after mensuration plots/points have been generated Generally to be avoided, but you may want to do this where, for example, during the course of navigating to and between mensuration plots, you discover that your Section boundary mapping is significantly adrift. As long as the boundary re-shape does not result in any of the plots/points being transferred to a different Section, then the original set of plots/points is maintained, without loss of mensuration data already entered. Where the boundary re-shape would result in any of the plots/points being transferred to a different Section, a message box will appear warning that the original set of plots/points for the affected Section(s) will be deleted if you continue with the re-shape. If you decide to continue with the re-shape, you must then generate a new set of plots/points to replace those that have been deleted. See Chapter 5.0.1 “Generating Plots” for instructions on how to do this. In the example below, the original Section A plots are maintained because they are clear of the boundary modification, whereas the original Section B plots are deleted because at least one of the plot centres subsequently falls within Section A.
79 Remember to Save your Edit Session Regularly, Validate the information and Backup the Data
NFI Survey Manual

80 Remember to Save your Edit Session Regularly, Validate the information and Backup the Data
NFI Survey Manual
3.5 Slide Section Boundary Nodes
What are Section boundary nodes? Nodes mark the point where a Section boundary intersects another Section boundary or the Square boundary. If you are using the Modify Tool to amend a Section boundary, you will see the nodes displayed as little red squares (see Chapter 3.1 “Modifying Section Boundaries”).
Sliding boundary nodes You can move nodes by sliding them to another point along the Section or Square boundary, using the Slide Node Tool. 1. In the Forester Data Editor window, select “Section Sub-Compartment” from the Layer
drop down menu, and “Slide Node” from the Task drop down menu. 2. Click on the “Select Shared Boundary” button to the right of the Task box, and then
left-click on the Section boundary that contains the node you want to move. See the boundary highlighted in blue.
81 Remember to Save your Edit Session Regularly, Validate the information and Backup the Data
NFI Survey Manual
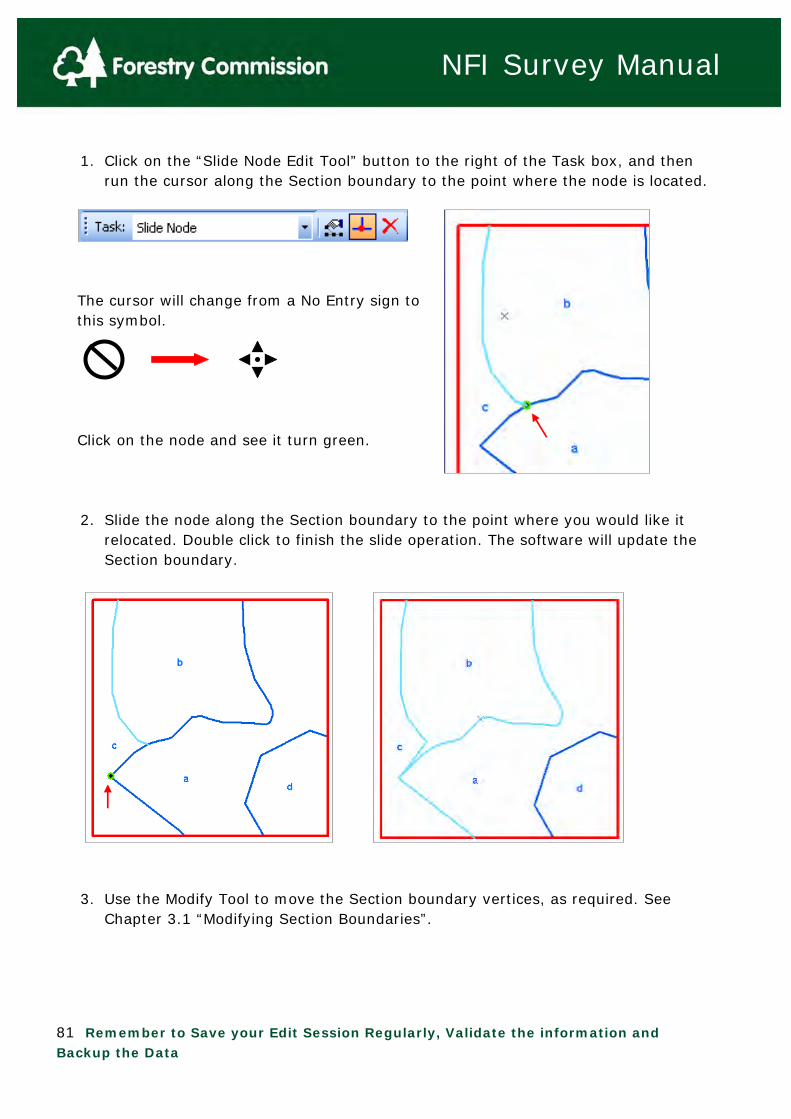
1. Click on the “Slide Node Edit Tool” button to the right of the Task box, and then run the cursor along the Section boundary to the point where the node is located.
The cursor will change from a No Entry sign to this symbol.
Click on the node and see it turn green.
2. Slide the node along the Section boundary to the point where you would like it relocated. Double click to finish the slide operation. The software will update the Section boundary.
3. Use the Modify Tool to move the Section boundary vertices, as required. See Chapter 3.1 “Modifying Section Boundaries”.
82 Remember to Save your Edit Session Regularly, Validate the information and Backup the Data
NFI Survey Manual
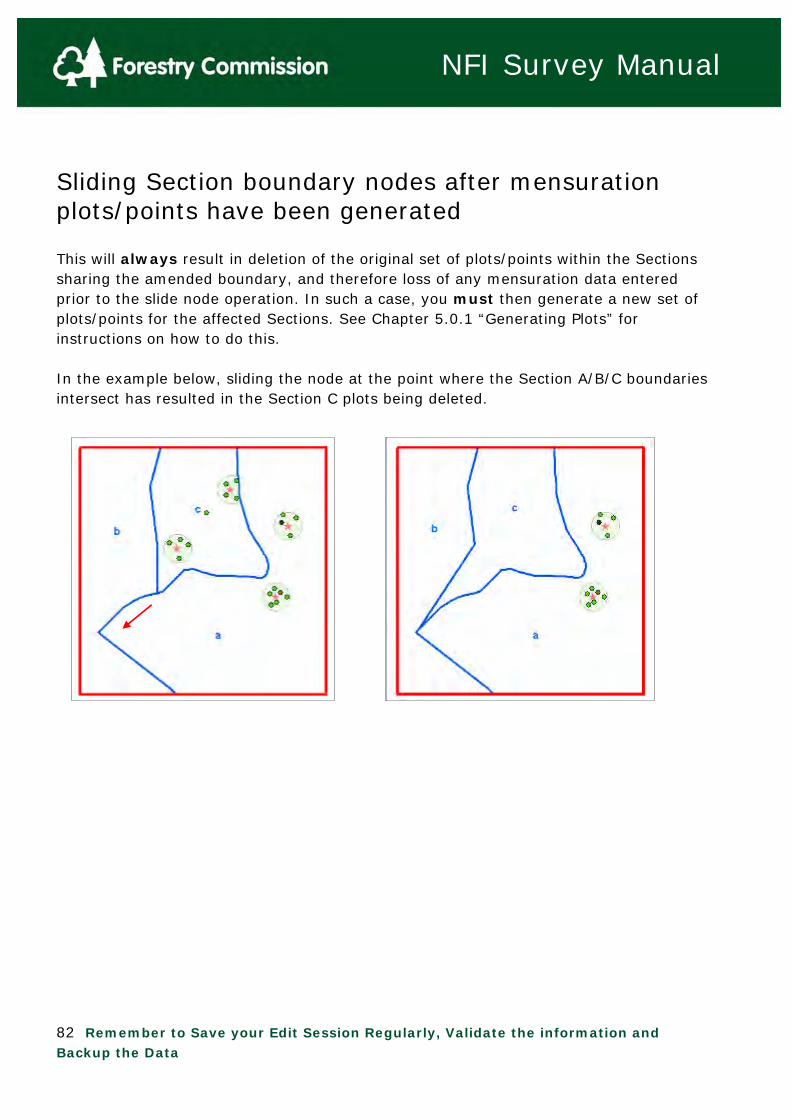
Sliding Section boundary nodes after mensuration plots/points have been generated This will always result in deletion of the original set of plots/points within the Sections sharing the amended boundary, and therefore loss of any mensuration data entered prior to the slide node operation. In such a case, you must then generate a new set of plots/points for the affected Sections. See Chapter 5.0.1 “Generating Plots” for instructions on how to do this. In the example below, sliding the node at the point where the Section A/B/C boundaries intersect has resulted in the Section C plots being deleted.

83 Remember to Save your Edit Session Regularly, Validate the information and Backup the Data
NFI Survey Manual
3.6 Section (aka Section Sub-Compartment) Level Data
Selecting a Section In the Forester Data Editor box use the Layer drop down box to choose Section Sub-Compartments.
Click on to the Select Features button and then click on the Section you wish to assess.
A list of data fields to enter data will appear in the lower half of the Forester Data Editor box.
Fill out the orange mandatory fields – see Table 3.1 below for details. Note that depending upon the Access Status selected at the Square level the data fields that can be entered here vary.

84 Remember to Save your Edit Session Regularly, Validate the information and Backup the Data
NFI Survey Manual
Data Entry Table 3.1: Data Field Choices Comments Area N/A Allocated by the software Section Letter N/A Allocated by the software Aspect North
Northeast Northwest East West South Southeast Southwest No slope
Choose the dominant aspect for the Section.
Deadwood Low Medium High None Not applicable
See 3.6.1 for details on this visual assessment. ‘Not applicable’ to be used in non treed Sections.
Plot Type Circular Whole Section
Sub-Compartment
Not applicable
Assign Plot Type as per section 4.0. ‘Not applicable’ to be used in non treed and non NFI Sections. Note that in some cases a valid Circular plot mat not be accessible for e.g. H&S reasons. This does not affect the Plot Type at this stage and Circular plots still need to be entered here.
Plot Generation Count
Generated by the software
Source Type Survey Remote Sensing FE change Grants & License Data Repair
You should have the Remote Sensing Field filled in already by IFOS staff. Change this to Survey to show that you have surveyed the site. In later years as the map data changes one of the lower three choices will be entered by IFOS to show where the new data comes from.
Source Date Generated by the FC Visit Status Unvisited
In progress Completed Refused Access
Fill in as appropriate. In progress can be used if surveyor needs to leave the site before completing data entry (e.g. it gets dark before completion).

85 Remember to Save your Edit Session Regularly, Validate the information and Backup the Data
NFI Survey Manual
Not possible to assess
Not possible to assess should ONLY be used if the Access Status is ‘Inaccessible and Visual Assessments impossible’
Access Status – se flow chart below
Accessible Inaccessible but
visual assessments possible
Inaccessible and visual assessments impossible
Choose the option most relevant for the Section. If ‘Inaccessible but visual assessments possible’ you will be requested for Est. Top Height and Est. Mean DBH for each Component If visual assessments are not possible the software does not allow sub-Section level data to be entered.
Inaccessible reason (this Field only appears if one of the two Inaccessible options above are chosen)
Inaccessible thicket
Inaccessible health & safety
Inaccessible slope
Inaccessible obstruction
Inaccessible wind blow
Inaccessible other
Enter the appropriate reason for inaccessibility. Thicket definition: ‘Stands of trees where the bases of the live crowns of the
trees are below 1m height, and the live
crowns interlock so tightly that access
is impossible’.
Where vegetation (e.g. dense Gorse) stops access use ‘Inaccessible other’.
Reason for Change
No change Real change
Error change
Spatial error 1st Assessment
Original
For use in the 2nd NFI For use in the 2nd NFI A change in the data due to an
error found from IFOS
As above but a Spatial error The normal Reason – your 1st
assessment of the site Unchanged data from IFOS
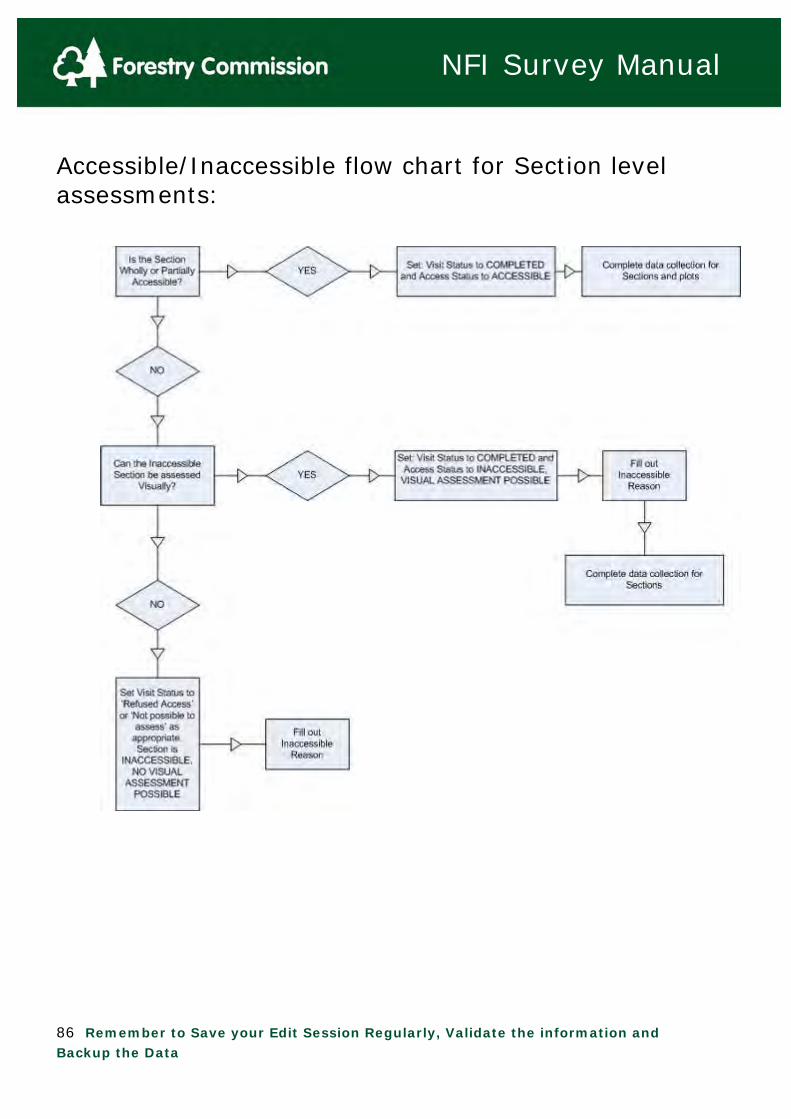
86 Remember to Save your Edit Session Regularly, Validate the information and Backup the Data
NFI Survey Manual
Accessible/Inaccessible flow chart for Section level assessments:

87 Remember to Save your Edit Session Regularly, Validate the information and Backup the Data
NFI Survey Manual
3.6.1 Visual Deadwood Estimation Deadwood: Visually estimate category of lying and standing deadwood (not stumps) into 1 of 3 classes for the Section based upon Table 3.2 (from Managing Deadwood in Forests and Woodlands). The deadwood MUST be from trees and not include material such as fence posts etc.
Low Medium High
Or
Not applicable – e.g. a car park None – no deadwood
Table 3.2: Deadwood value of Section Current value of site or wood Factor Low Medium High Current levels of deadwood on site
Low/little fallen deadwood and none/few dead standing stems. Few veteran trees and mature trees also scarce
Some fallen deadwood and/or dead standing stems. Average of 1-3 veteran trees per ha or majority of trees mature
A lot of fallen deadwood and/or dead standing stems. Average of more than 3 veteran trees per ha and some/many mature trees
Continuity of deadwood habitats over time
Known that there has been little continuity of habitat, and current resource of recent origin with reduced range of decay stages.
History of current resource and continuity not clear but some evidence of a range of different decay stages
Known or suspected high continuity of deadwood habitat; occurrence of large diameter deadwood and/or deadwood in a wide range of different decay stages

88 Remember to Save your Edit Session Regularly, Validate the information and Backup the Data
NFI Survey Manual
3.7 Components Components are the individual elements, or building blocks, of the forest that account for much of its nature and all of its recorded area. see 3.7.0.1: for further details Double click on the Section name (highlighted in the figure opposite) or single click on the + box next to the Section name. (Note if you have said the section was inaccessible with no visual assessments possible no sub-folders will be shown). In the upper box of the Forester Data Editor right click on Components to get the option to Add New Components.
Click on the Add New Components box to access the Component Data. Note that the word Component is
in red. This will turn black once all of the mandatory data fields have been correctly filled out. The number of Fields varies depending upon the combination of IFT\IOA and Landuse options that are chosen.
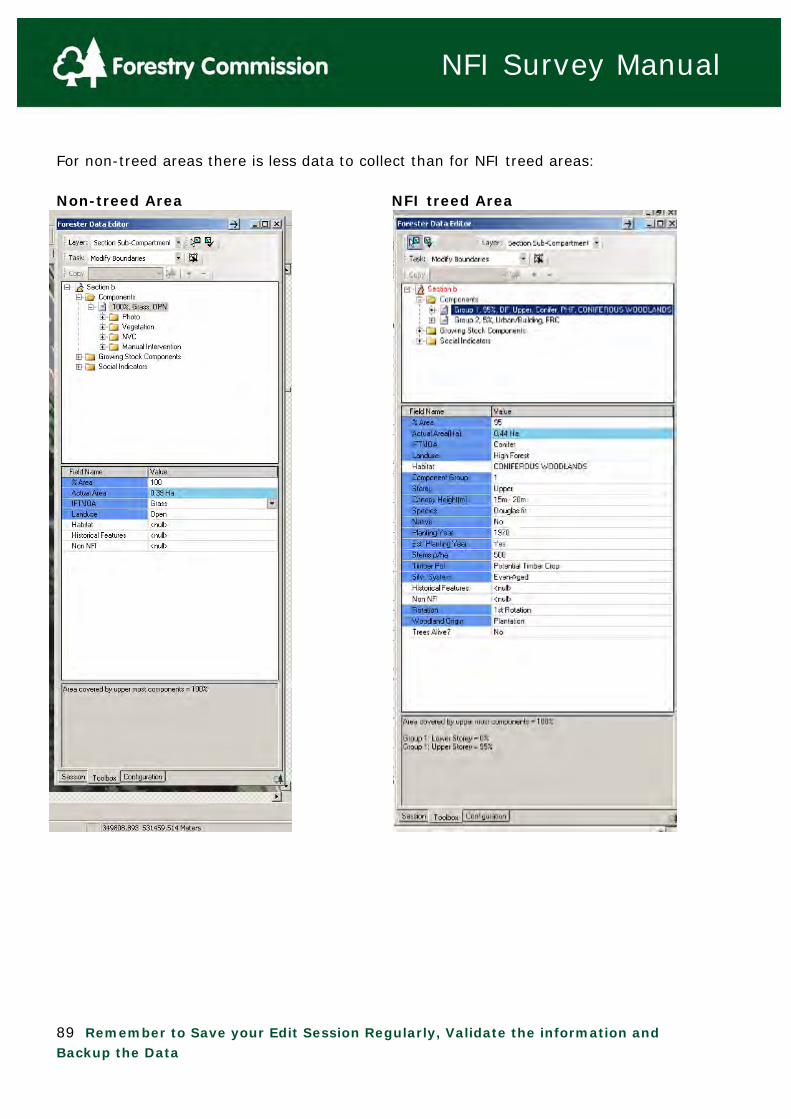
89 Remember to Save your Edit Session Regularly, Validate the information and Backup the Data
NFI Survey Manual
For non-treed areas there is less data to collect than for NFI treed areas: Non-treed Area NFI treed Area

90 Remember to Save your Edit Session Regularly, Validate the information and Backup the Data
NFI Survey Manual
Data Entry Table 3.3: Component Level Data entry Data Field Choices Comments %Area Free text Enter the % of the Section covered
by this Component. See Section 3.7.0.1 for more detail.
Actual Area None Calculated by the software IFT/IOA – choose the most appropriate IFT/IOA from the list opposite. The surveyor needs to assign the IFT/IOA based upon what is in the Section and as though the surveyor was looking down from above.
Conifer Broadleaved Mixed Predominately
Conifer Mixed Predominately
Broadleaved Coppice Coppice with Standards Shrub Land Young Trees Felled Woodland Ground prepared for new
planting Cloud or Shadow Uncertain Windblow Open Water Grass Agricultural land Urban/Building Forest Road, Track River Power line Quarry Bare Windfarm Other Vegetation
See 3.7.1 for definitions. Note that depending upon what you have chosen as the IFT/IOA for the site the remainder of the Fields left to complete varies. Open Sections have less data to enter, treed sections have more data. For Young Trees you must change this to one of the other IFT’s as you will be able to see what is actually on site. Note that once the site has been visited Cloud or Shadow and Uncertain cannot be chosen as these are from aerial interpretation.
Land Use The choice for Land Use depends upon the IFT/IOA you have chosen.
For example if you have chosen IFT = Coppice then six Land Use options are open to you. If you have chosen Conifers there are 11 Land Uses to choose from.
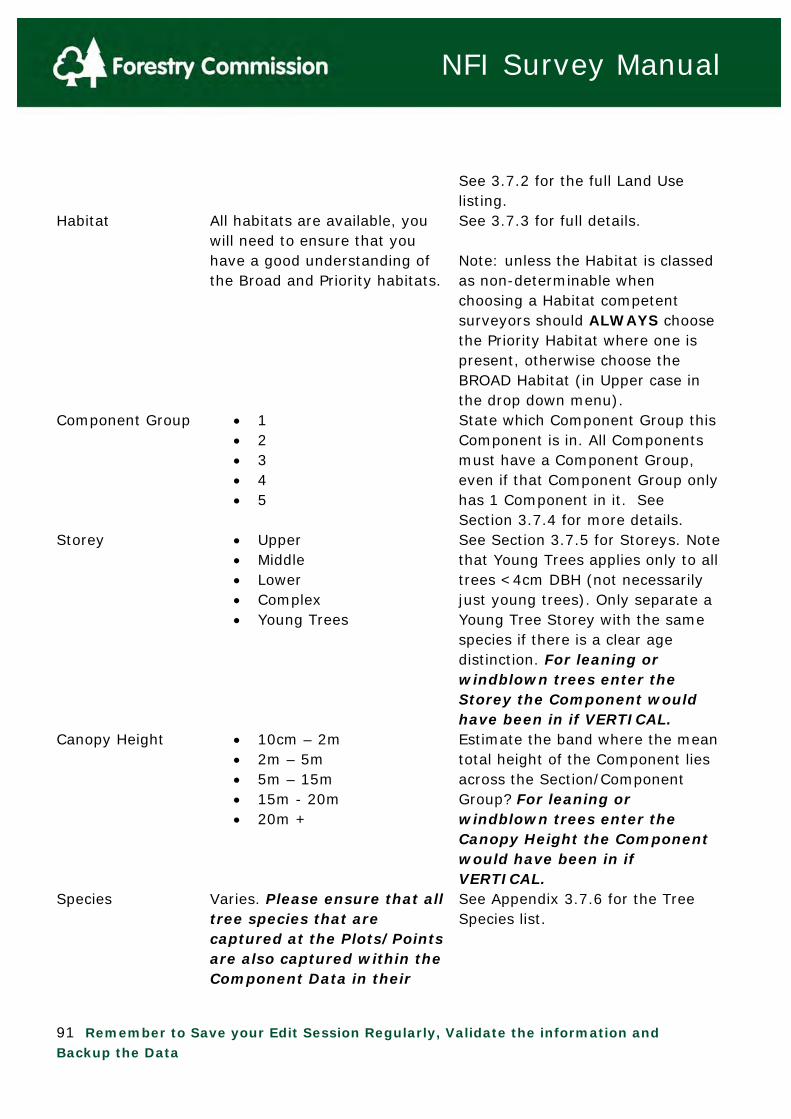
91 Remember to Save your Edit Session Regularly, Validate the information and Backup the Data
NFI Survey Manual
See 3.7.2 for the full Land Use listing.
Habitat All habitats are available, you will need to ensure that you have a good understanding of the Broad and Priority habitats.
See 3.7.3 for full details. Note: unless the Habitat is classed as non-determinable when choosing a Habitat competent surveyors should ALWAYS choose the Priority Habitat where one is present, otherwise choose the BROAD Habitat (in Upper case in the drop down menu).
Component Group 1 2 3 4 5
State which Component Group this Component is in. All Components must have a Component Group, even if that Component Group only has 1 Component in it. See Section 3.7.4 for more details.
Storey Upper Middle Lower Complex Young Trees
See Section 3.7.5 for Storeys. Note that Young Trees applies only to all trees <4cm DBH (not necessarily just young trees). Only separate a Young Tree Storey with the same species if there is a clear age distinction. For leaning or windblown trees enter the Storey the Component would have been in if VERTICAL.
Canopy Height 10cm – 2m 2m – 5m 5m – 15m 15m - 20m 20m +
Estimate the band where the mean total height of the Component lies across the Section/Component Group? For leaning or windblown trees enter the Canopy Height the Component would have been in if VERTICAL.
Species Varies. Please ensure that all tree species that are captured at the Plots/Points are also captured within the Component Data in their
See Appendix 3.7.6 for the Tree Species list.

92 Remember to Save your Edit Session Regularly, Validate the information and Backup the Data
NFI Survey Manual
appropriate Storeys. Native - is the stand Site native
Yes No Not applicable
Is the stand site native? – use support layers such as the pine zone and beech zone map layers to aid your decisions.
Planting Year Free text Estimate the Planting year of the component. Do this by estimating the Age of the Component and taking this figure away from the current year. See Section 3.7.7 for guidelines to estimating tree age.
Est. Planting Year No Yes
Have you estimated the planting year or do you know the planting year (from the landowner for example).
Stems p/ha Free text Estimate the stems per hectare of the component within its Component Group using the guide in 3.7.8. The minimum number of stems that can be entered is 2
Timber Pot. Fuelwood potential only Potential timber crop Short roundwood crop
Estimate the potential of this component for one of the 3 choices. Note that for broadleaves to be considered to have Timber Potential there needs to be an assessment of whether there are/will be/were enough good quality trees spaced at ≥500 stems per hectare at approximately 40-50 years of age.
Silvicultural System
Even-aged, i.e. Clear cutting
Seed tree (Uniform shelterwood)
Strip Shelterwood Group selection Single tree selection Coppice Coppice with standards Short Rotation Coppice Pollarding Group shelterwood Other
See OGB 7 in your Additional documents for guidance of some of these systems. A flowchart is located at the end of OGB 7 (page 56) for quick reference. Note that in some circumstances you will need to look outside of the Square to ensure you are capturing the correct Silvicultural System.
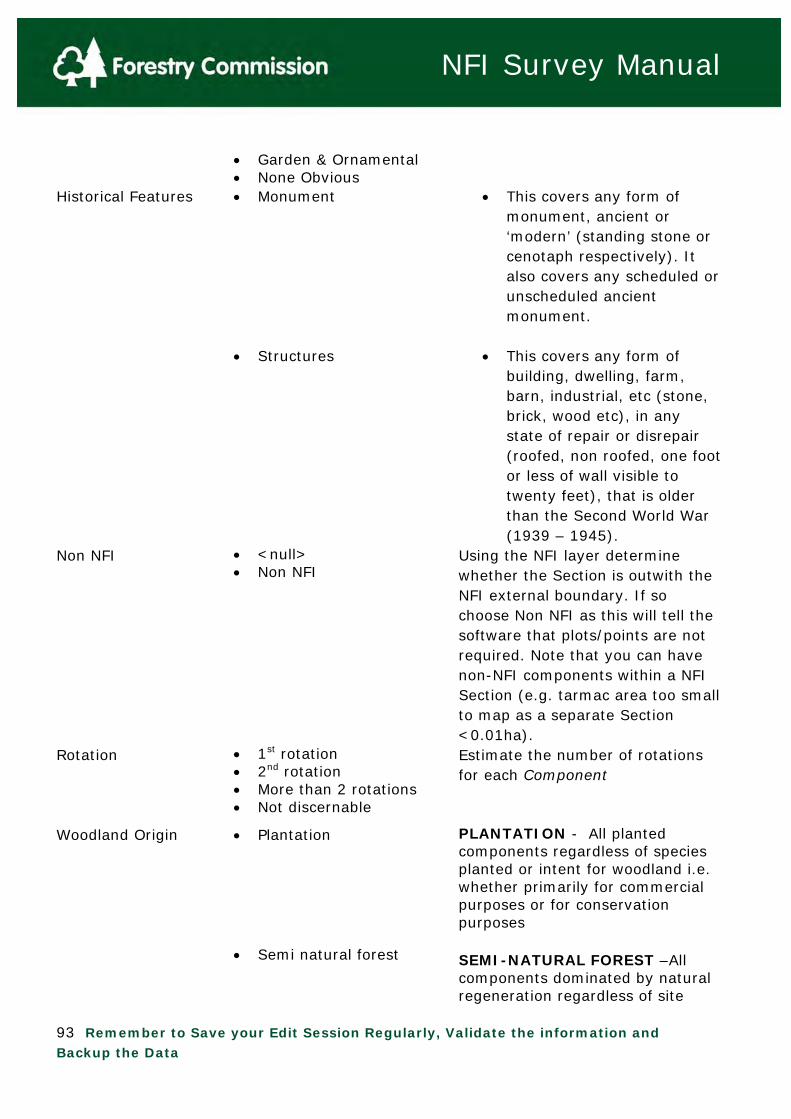
93 Remember to Save your Edit Session Regularly, Validate the information and Backup the Data
NFI Survey Manual
Garden & Ornamental None Obvious
Historical Features Monument
Structures
This covers any form of monument, ancient or ‘modern’ (standing stone or cenotaph respectively). It also covers any scheduled or unscheduled ancient monument.
This covers any form of
building, dwelling, farm, barn, industrial, etc (stone, brick, wood etc), in any state of repair or disrepair (roofed, non roofed, one foot or less of wall visible to twenty feet), that is older than the Second World War (1939 – 1945).
Non NFI <null> Non NFI
Using the NFI layer determine whether the Section is outwith the NFI external boundary. If so choose Non NFI as this will tell the software that plots/points are not required. Note that you can have non-NFI components within a NFI Section (e.g. tarmac area too small to map as a separate Section <0.01ha).
Rotation 1st rotation 2nd rotation More than 2 rotations Not discernable
Estimate the number of rotations for each Component
Woodland Origin
Plantation
Semi natural forest
PLANTATION - All planted components regardless of species planted or intent for woodland i.e. whether primarily for commercial purposes or for conservation purposes SEMI-NATURAL FOREST –All components dominated by natural regeneration regardless of site

94 Remember to Save your Edit Session Regularly, Validate the information and Backup the Data
NFI Survey Manual
Undisturbed by man
Recent natural expansion
Ancient forest
nativeness status i.e. it would include all species such as Sitka spruce UNDISTURBED BY MAN – This generally means pristine woodland that has not been influenced either directly or indirectly by human intervention (e.g. has not been grazed by domestic animals). It is generally not thought to occur in the UK. RECENT NATURAL EXPANSION – This generally means expansion onto areas not previously wooded e.g. agricultural land. However, it could be applied either to Section/Component Group or individual components. It could also be applied to all areas with 100% site native species or any proportion of site nativeness species down to 0%.
ANCIENT WOODLAND – This is a term generally used in the UK to refer to woodland that has existed continuously since 1600 or before in England & Wales or 1750 in Scotland. Before these dates it is thought that extensive planting of new woodland was uncommon so any woodland was likely to be mostly natural in origin. This could be any Section/ Component Group/Component for which the area is recognised on the Ancient Woodland Layer as Ancient Woodland regardless of current status, or only those areas that appear to be semi-natural sites on previous Ancient Woodland thus taking account of field observations rather than purely the AW Layer. Most surveys split Ancient
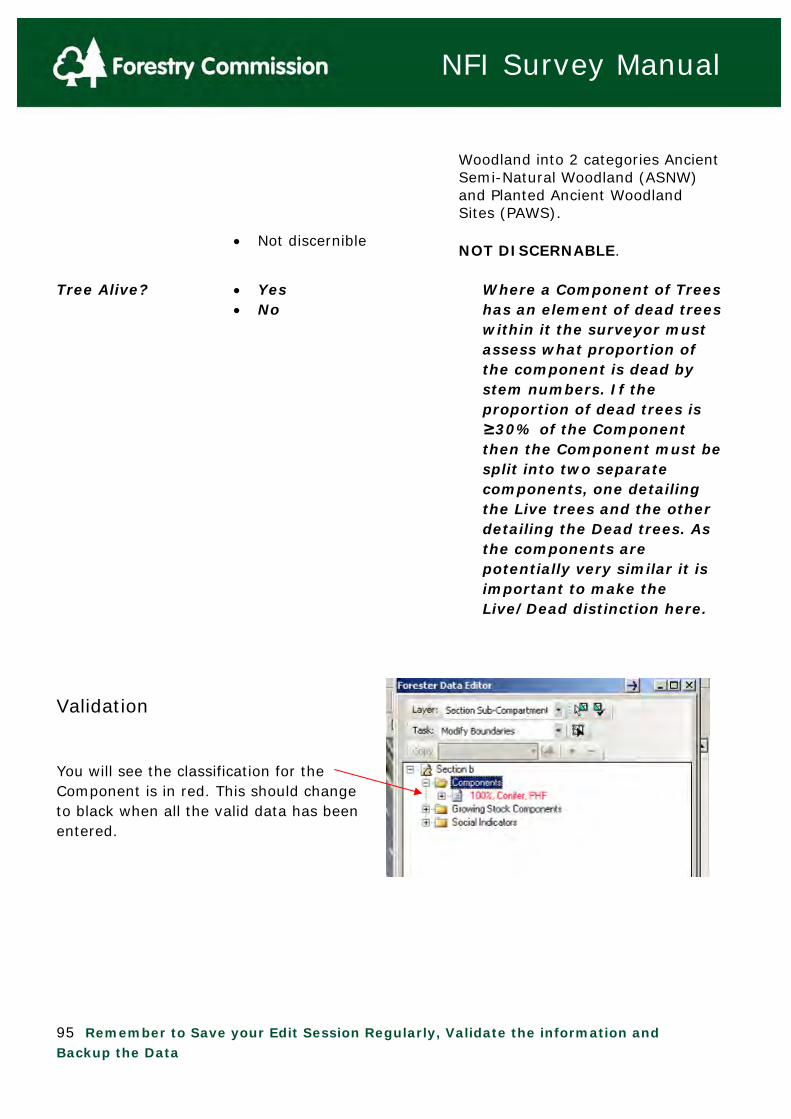
95 Remember to Save your Edit Session Regularly, Validate the information and Backup the Data
NFI Survey Manual
Not discernible
Woodland into 2 categories Ancient Semi-Natural Woodland (ASNW) and Planted Ancient Woodland Sites (PAWS).
NOT DISCERNABLE.
Tree Alive? Yes No
Where a Component of Trees has an element of dead trees within it the surveyor must assess what proportion of the component is dead by stem numbers. If the proportion of dead trees is ≥30% of the Component then the Component must be split into two separate components, one detailing the Live trees and the other detailing the Dead trees. As the components are potentially very similar it is important to make the Live/Dead distinction here.
Validation You will see the classification for the Component is in red. This should change to black when all the valid data has been entered.
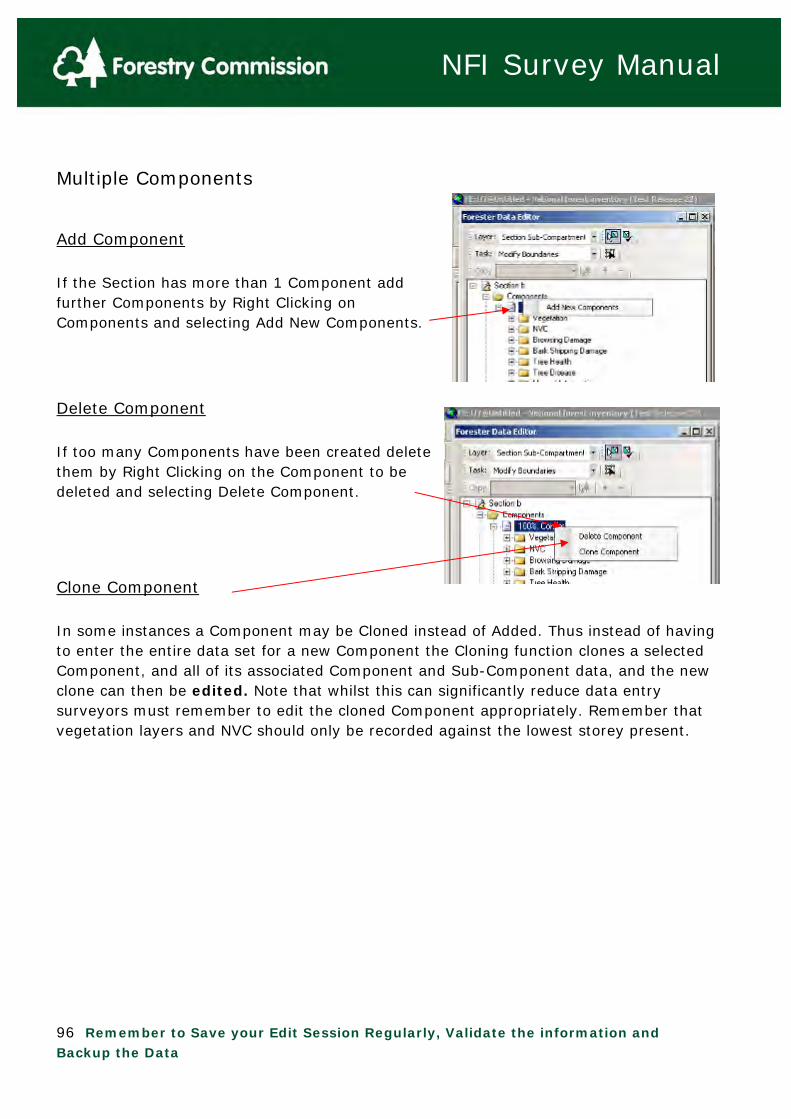
96 Remember to Save your Edit Session Regularly, Validate the information and Backup the Data
NFI Survey Manual
Multiple Components
Add Component If the Section has more than 1 Component add further Components by Right Clicking on Components and selecting Add New Components.
Delete Component If too many Components have been created delete them by Right Clicking on the Component to be deleted and selecting Delete Component.
Clone Component In some instances a Component may be Cloned instead of Added. Thus instead of having to enter the entire data set for a new Component the Cloning function clones a selected Component, and all of its associated Component and Sub-Component data, and the new clone can then be edited. Note that whilst this can significantly reduce data entry surveyors must remember to edit the cloned Component appropriately. Remember that vegetation layers and NVC should only be recorded against the lowest storey present.

97 Remember to Save your Edit Session Regularly, Validate the information and Backup the Data
NFI Survey Manual
Example of a young Scots pine plantation Component data A summary of the data entered will appear in the main Component data line. Orange Data Fields should be blue.
Validation issues and checks are located in the grey area at the bottom of the Forester Data Editor box. In this case it has correctly identified that the Uppermost storey = 100% of the Section.

98 Remember to Save your Edit Session Regularly, Validate the information and Backup the Data
NFI Survey Manual
Example of an open grass area
Note that fewer data Fields are required for a non-treed area.

99 Remember to Save your Edit Session Regularly, Validate the information and Backup the Data
NFI Survey Manual
Sub-Component Data: Treed areas Double click on the Component (highlighted in the figure opposite), or single click on the + box next to the Component, to add sub-component data. . Fill out the sub-components.
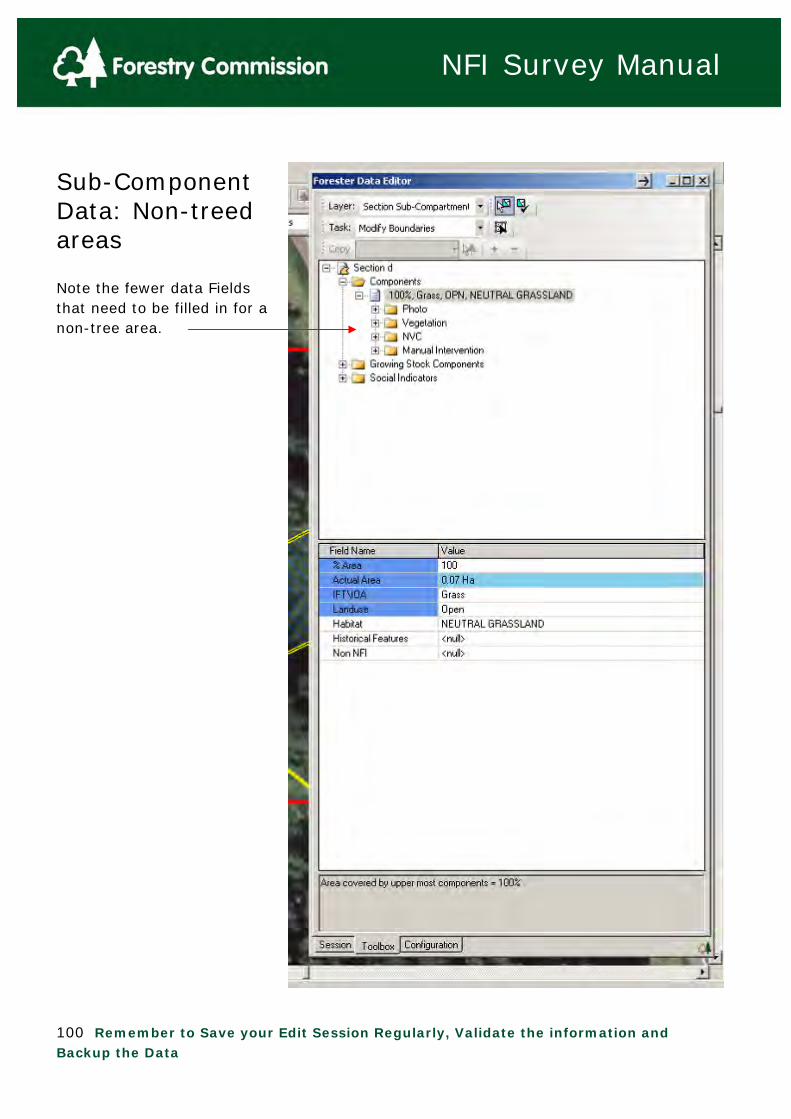
100 Remember to Save your Edit Session Regularly, Validate the information and Backup the Data
NFI Survey Manual
Sub-Component Data: Non-treed areas Note the fewer data Fields that need to be filled in for a non-tree area.
101 Remember to Save your Edit Session Regularly, Validate the information and Backup the Data
NFI Survey Manual
3.7.0.1 Recording Occupancy of Components This is the methodology for assessing the % cover, or share of the section area, of each Component within a Component Group. Note that all Components must belong to a Component Group within a Section. Definitions & Use: Section: A section is an area of land that has a relatively homogenous stand character or other land use, and is mappable within GIS. Mapping sections within GIS will automatically calculate their area, which can be used for analyses later. The minimum section size allowable within the square is NFI: 0.05ha, non-NFI: 0.01ha and the maximum can be 1 hectare; the whole square. The contiguous area defining the full extent of the section structure may be larger if its extension outside the square is taken into account (see Section 8 – Relevant Adjacent Areas), however only its area within the square is calculated. We need to identify and establish the area of elements within the section that are not as easily mapped, such as individual tree species and patches of open space. We refer to these elements as components and component groups. Components: Components are the individual elements, or building blocks, of the forest that account for much of its nature and all of its recorded area. Components can be used to identify an area of non-woodland, such as a house and garden, internal open space, a pond etc. Components also describe a particular element of a forested area. Stand components are identified by species, storey (vertical structure) and component group (plan structure) within the section (described below).

102 Remember to Save your Edit Session Regularly, Validate the information and Backup the Data
NFI Survey Manual
Because components cannot be easily mapped, components which occur within a section are recorded as a proportion (%) of that section. By applying this % to the section area, the component area can be subsequently derived. The minimum area for an individual component is zero (0%) of a section. Individual components, whether they are forest or non-forest components, will have attributes attached to them. Attributes: A range of attributes are recorded for each component. This is information specifically associated with the component such as associated plant communities, browsing damage, tree health and diseases, and manual intervention. One section can have one or many Component Group’s CG's and forested CG’s can have one or many forest components. A predominantly forested CG can also contain elements of non-forest that appear in the CG as non-forest components. Component Group (CG): Component groups are used to group spatial combinations of individual components within the section. Like a section CG’s are areas of relatively homogeneous land use or stand characteristics which are often too small or difficult to map yet are still important enough to identify separately. In effect they can sometimes be viewed as ‘sub-sections’, in that they often have similar characteristics to sections, but they are just not mapped. One section can have one or many CG’s. If the section is relatively homogenous, and there are no small areas within it that are discrete in their nature or land use, then the section will have one component group which will occupy the entire section. In this case all components in the section will be held within this single CG. This single CG may have one or more components (one or more tree species, storeys or land use types).

103 Remember to Save your Edit Session Regularly, Validate the information and Backup the Data
NFI Survey Manual
Two separate CG’s would be established in a section if the components in it fell into two identifiable spatial groupings. For example, a section may contain: Japanese larch, Sitka spruce, Norway spruce and sessile oak. They could be recorded as one section and one CG, with four components, implying an intimate mixture of all species. If, on closer observation, it was noticed that the larch and Sitka spruce were spatially grouped, forming one type of crop, and the oak and Norway spruce were separately grouped, forming another type of crop, they should be treated as separate entities (Component Groups). In this case the Section would have two CGs. One CG would record the Norway spruce and Oak, the other record the Sitka spruce and larch. Where differences in landuse or stand structure within the square, are sufficiently distinct, it is preferable to map these as sections with a minimum area of 0.05ha. Component groups can be used to further stratify sections into locally identifiable spatial features of areas less than 0.05ha. Component groups can also be used to ‘attach’ small areas of other stands or other land uses to a treed section. This is used when the feature itself, as it exists within the square, does not have a sufficient area (0.05ha) to form a section in its own right. In some circumstances CG’s might be used for operational convenience where larger areas that could have been mapped as separate sections are allowable. For example, a section has been created by the surveyor and the mensuration plots/points generated and assessed - then the surveyor notes an area within the section that should be really be a separate section. The surveyor now has a quandary, in that they really should re-section the square, with all the associated problems (losing the mensuration data associated with the plots/points assessed). In such circumstances it is allowable to define such an area as a CG of the previously defined section. However, at present QA will only pass a maximum size of CG of 0.2ha in wooded areas and 0.15ha in non-wooded areas. Storeys: Storeys are used to define and describe the vertical structure of treed component groups. Storeys will be classed as one of five types; upper, middle, lower, complex or Young Trees.

104 Remember to Save your Edit Session Regularly, Validate the information and Backup the Data
NFI Survey Manual
Once a section has been defined by the surveyor s/he must then make an assessment of vertical stand structure across the entire section identifying the presence of distinct storeys. Complex, Upper, Middle and Lower storeys must be separated by a minimum vertical distance of 4 metres between each others mid-canopy heights (see Section XX). The Young Tree Storey is for trees <4cm DBH regardless of where mid-canopy height is. Each treed component within a section will be associated to a storey. As will be seen in some of the examples below, this can lead to instances in which the highest storey within a component group is not labelled as an ‘upper’ storey. What needs to be borne in mind is that the storey labels refer to the storey structure across the whole section, and not only those present in a particular component group. A storey described within a component group is deemed to occupy 100% of its area, regardless of the composition of the component group. This is because the storey is an attribute of a component. However, since all storeys defined at the section level do not necessarily appear in all CG’s of a section, the occupancy of any storey within the section can be less than 100% of the section. (This is also true when the section contains non-forested component groups). In a single storey stand all components must add up to 100% of the section area. Component areas must be allocated in proportion relative to their share of the section. In multiple storey stands, the storey areas can ‘sit above’ one another and therefore occupy more than 100% of the planimetric area of the section. In either case 100% of the Section area must be accounted for. Examples of how the data should be recorded are overleaf:

105 Remember to Save your Edit Session Regularly, Validate the information and Backup the Data
NFI Survey Manual
1) One Storey, One Species A simple example to start with, this Section has a pure crop of Sitka spruce, all planted at the same time with the same storey. Section A CG1 (100% of Section) Records
Section Component Group (CG)
Component % Area of section
Storey Species Stems/ha
A 1 1 100 Upper Sitka 500
Within Section ‘A’ there is 1 Component Group (CG) and one component, note that all Treed Sections must have at least 1 CG. Within this CG there is a single storey – Upper. The occupancy of the Component (Sitka spruce) is 100% of the Upper Storey of the CG. Your data should look like this: Software validates the information at the Component level (you still need to fill in all the Sub-component and Social data for the Section level data to validate).
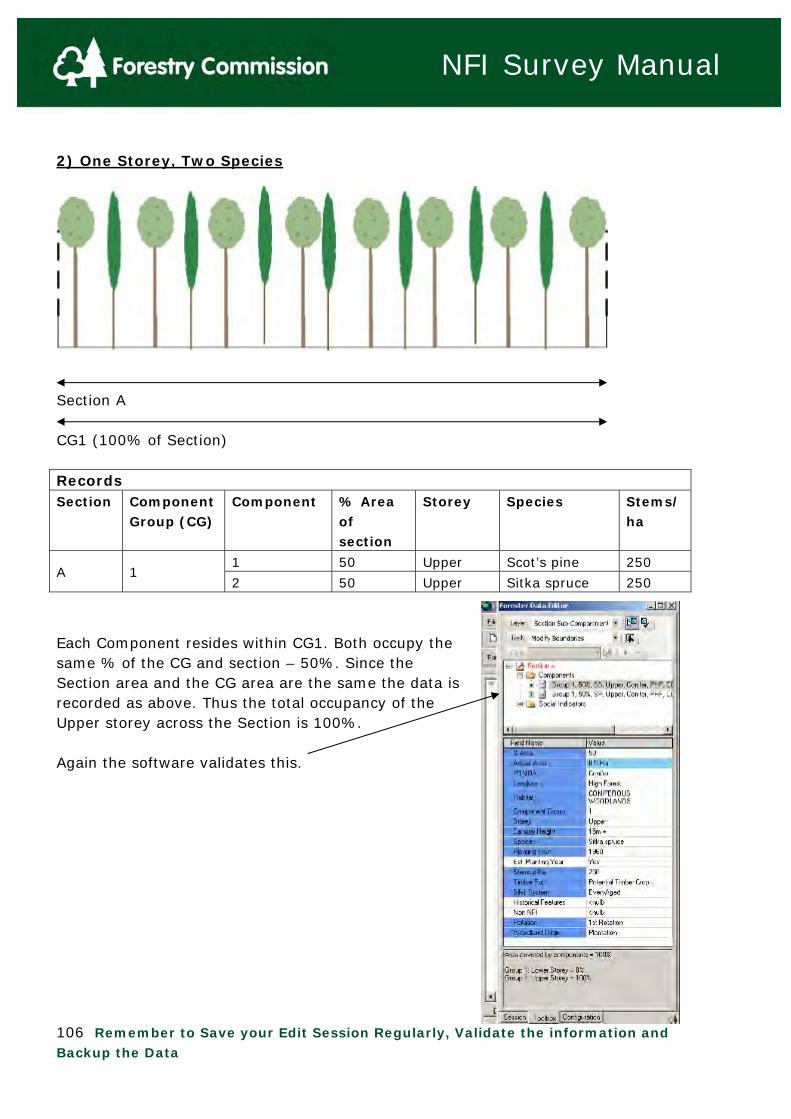
106 Remember to Save your Edit Session Regularly, Validate the information and Backup the Data
NFI Survey Manual
2) One Storey, Two Species
Section A CG1 (100% of Section) Records Section Component
Group (CG) Component % Area
of section
Storey Species Stems/ha
1 50 Upper Scot’s pine 250 A 1
2 50 Upper Sitka spruce 250
Each Component resides within CG1. Both occupy the same % of the CG and section – 50%. Since the Section area and the CG area are the same the data is recorded as above. Thus the total occupancy of the Upper storey across the Section is 100%. Again the software validates this.
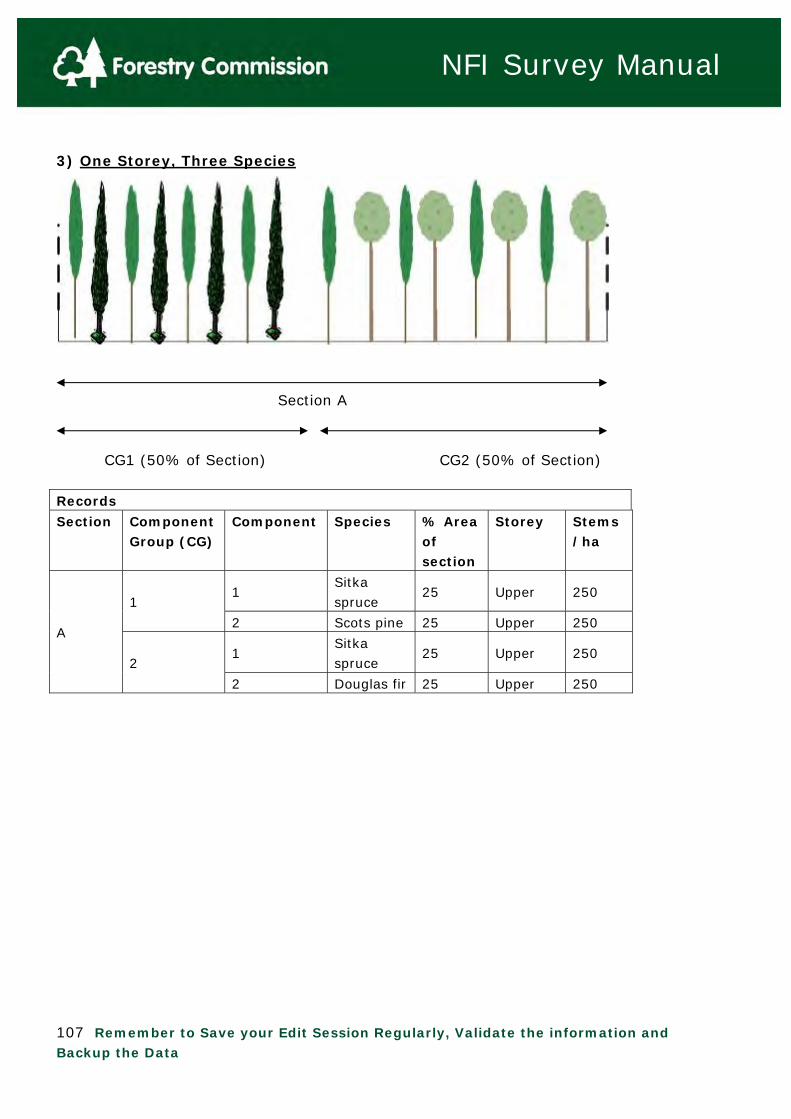
107 Remember to Save your Edit Session Regularly, Validate the information and Backup the Data
NFI Survey Manual
3) One Storey, Three Species
Section A CG1 (50% of Section) CG2 (50% of Section) Records
Section Component Group (CG)
Component Species % Area of section
Storey Stems/ha
1 Sitka spruce
25 Upper 250 1
2 Scots pine 25 Upper 250
1 Sitka spruce
25 Upper 250
A
2
2 Douglas fir 25 Upper 250

108 Remember to Save your Edit Session Regularly, Validate the information and Backup the Data
NFI Survey Manual
In this case whilst there is still a single storey across the Section there are now 2 distinct CG’s each occupying 50% of the Section. CG1: a single storey of Sitka spruce and Scots pine of equal occupancy. CG2: a single storey of Sitka spruce and Douglas fir of equal occupancy. If CG 1 occupies 50% of the Section and each Component occupies 50% of the CG Upper storey then each Component occupies 25% of the Section Upper storey. The same is true of CG2. Using the data entry shown above the software validates:

109 Remember to Save your Edit Session Regularly, Validate the information and Backup the Data
NFI Survey Manual
Therefore to calculate the %Area of any Component within a Section and CG you can use the following: (% Section occupancy of the CG) x (% of the storey containing the component that is occupied by the component within the CG) = %Area data to be input in the data screen. For the above example: For the Scots pine in CG1: 50% (% of Section occupancy of CG1) x 50% (Storey occupancy by the component; Scots pine within CG1) = 50% x 50% = 25% This can be repeated for each Component in the above example. If the Component %’s of the CG remain the same (50%) but the CG occupancy of the Section is changed to 70% for CG1 and 30% for CG 2 then the calculation for each Component would be: CG1 (70%): Sitka spruce %Area = 70% x 50% = 35% Scots pine %Area = 70% x 50% = 35% CG2 (30%): Sitka spruce %Area = 30% x 50% = 15% Douglas fir %Area = 30% x 50% = 15% Total occupancy across the Upper storey of the Section = 35% + 35% + 15% + 15% = 100%.

110 Remember to Save your Edit Session Regularly, Validate the information and Backup the Data
NFI Survey Manual
4) Sparse Upper storey It is important to note that the occupancy of a Component within a CG is not always the same as its coverage. For example you may have a CG with sparse coverage of an Upper storey of oak but the occupancy of that oak is 100% of the Upper storey within the CG as it is the only Component within that storey of the CG.
Section A CG1 (100% of Section) Records
Section Component Group (CG)
Component Species % Area of section
Storey Stems/ha
1 Scots pine
100 Upper 50 A 1
2 Western hemlock
100 Lower 1500
Here is an example of a sparse Scots pine Upper storey with Western hemlock regeneration coming in underneath. Whilst the Scots pine does not cover the entire CG it is the only occupant of the Upper storey and therefore for the calculations of % Area to be inputted the calculation is: (% of Section occupancy by CG) x (occupancy of storey by the component within the CG) = 100% x 100% = 100% The lower storey, populated by Western Hemlock, also occupies 100% of the section and the single CG within it. The occupancy of the Western Hemlock component is therefore

111 Remember to Save your Edit Session Regularly, Validate the information and Backup the Data
NFI Survey Manual
also 100% of the section and CG, but it occupies a different (lower) storey in the forest structure. 5) Two Storeys, Two Species, Two Component Groups This scenario assumes that the area with no Lower Storey is too small to be a Section, and therefore unmappable, so must be a Component Group. It is also legitimate to regard the whole section as a single forested stand with local variation with regard to the presence of the lower storey, so that the use of a single section with 2 component groups, as shown here, is correct.
Section A
CG 1 (70% of Section) CG 2 (30% of Section) Records
Section Component Group (CG)
Component Species % of section Area
Storey Stems/ha
1 Scots pine
70 Upper 500 1
2 Sitka spruce
70 Lower 800 A
2 1 Scots pine
30 Upper 500
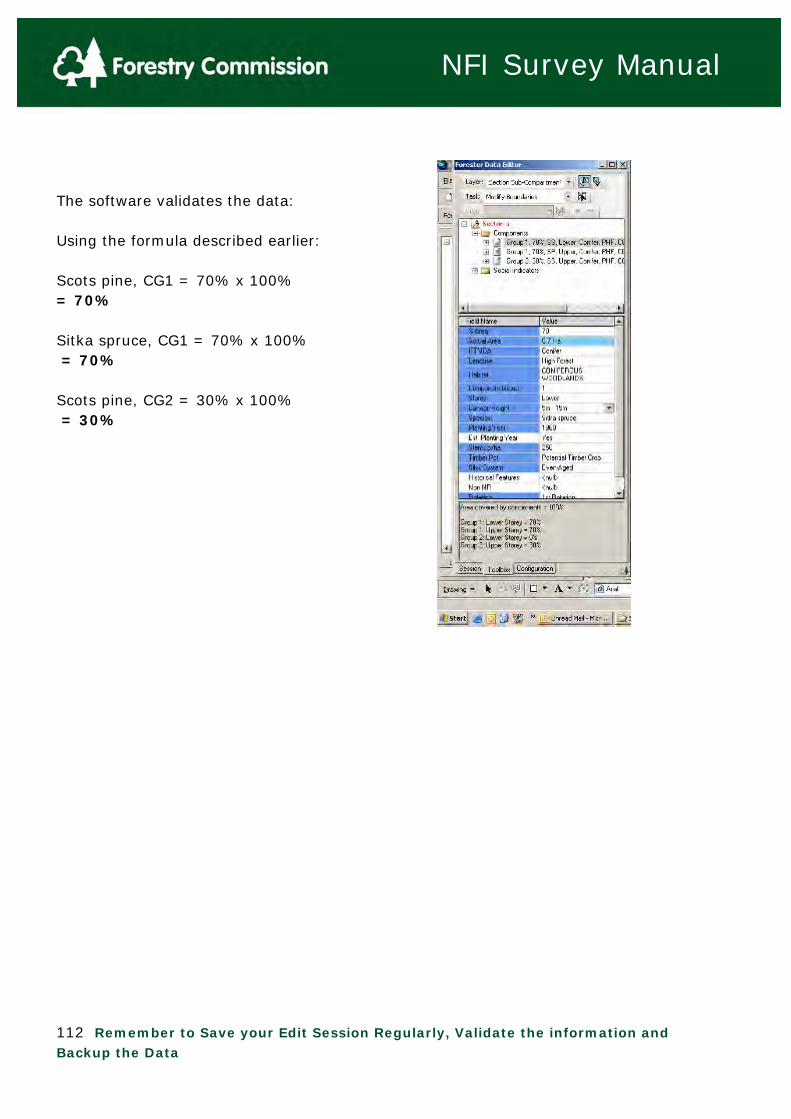
112 Remember to Save your Edit Session Regularly, Validate the information and Backup the Data
NFI Survey Manual
The software validates the data: Using the formula described earlier: Scots pine, CG1 = 70% x 100% = 70% Sitka spruce, CG1 = 70% x 100% = 70% Scots pine, CG2 = 30% x 100% = 30%
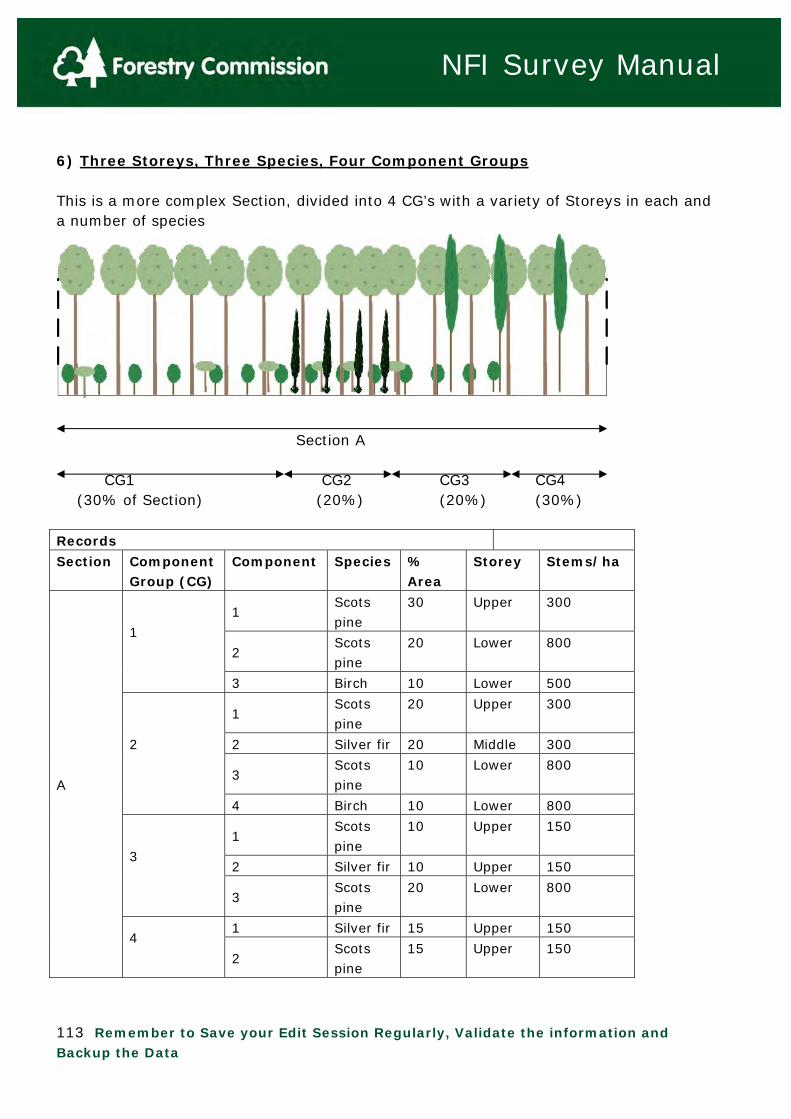
113 Remember to Save your Edit Session Regularly, Validate the information and Backup the Data
NFI Survey Manual
6) Three Storeys, Three Species, Four Component Groups This is a more complex Section, divided into 4 CG’s with a variety of Storeys in each and a number of species .
Section A CG1 CG2 CG3 CG4 (30% of Section) (20%) (20%) (30%) Records
Section Component Group (CG)
Component Species % Area
Storey Stems/ha
1 Scots pine
30 Upper 300
2 Scots pine
20 Lower 800 1
3 Birch 10 Lower 500
1 Scots pine
20 Upper 300
2 Silver fir 20 Middle 300
3 Scots pine
10 Lower 800
2
4 Birch 10 Lower 800
1 Scots pine
10 Upper 150
2 Silver fir 10 Upper 150 3
3 Scots pine
20 Lower 800
1 Silver fir 15 Upper 150
A
4 2
Scots pine
15 Upper 150
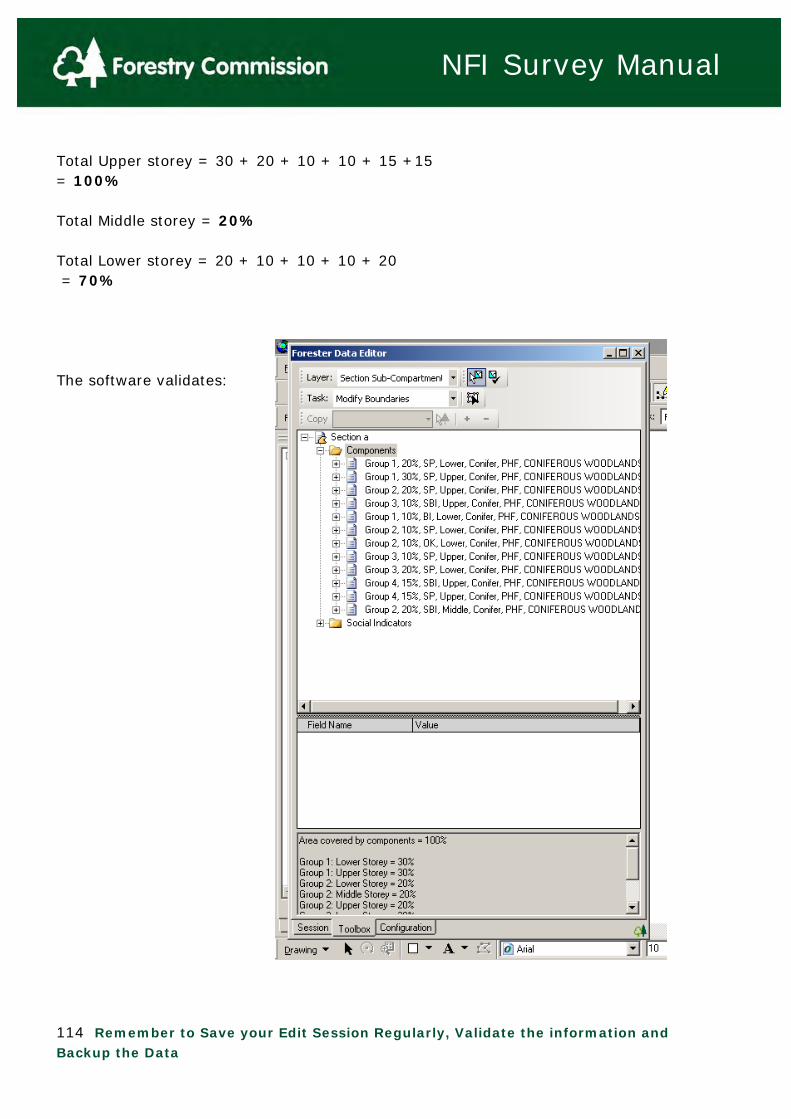
114 Remember to Save your Edit Session Regularly, Validate the information and Backup the Data
NFI Survey Manual
Total Upper storey = 30 + 20 + 10 + 10 + 15 +15 = 100% Total Middle storey = 20% Total Lower storey = 20 + 10 + 10 + 10 + 20 = 70% The software validates:
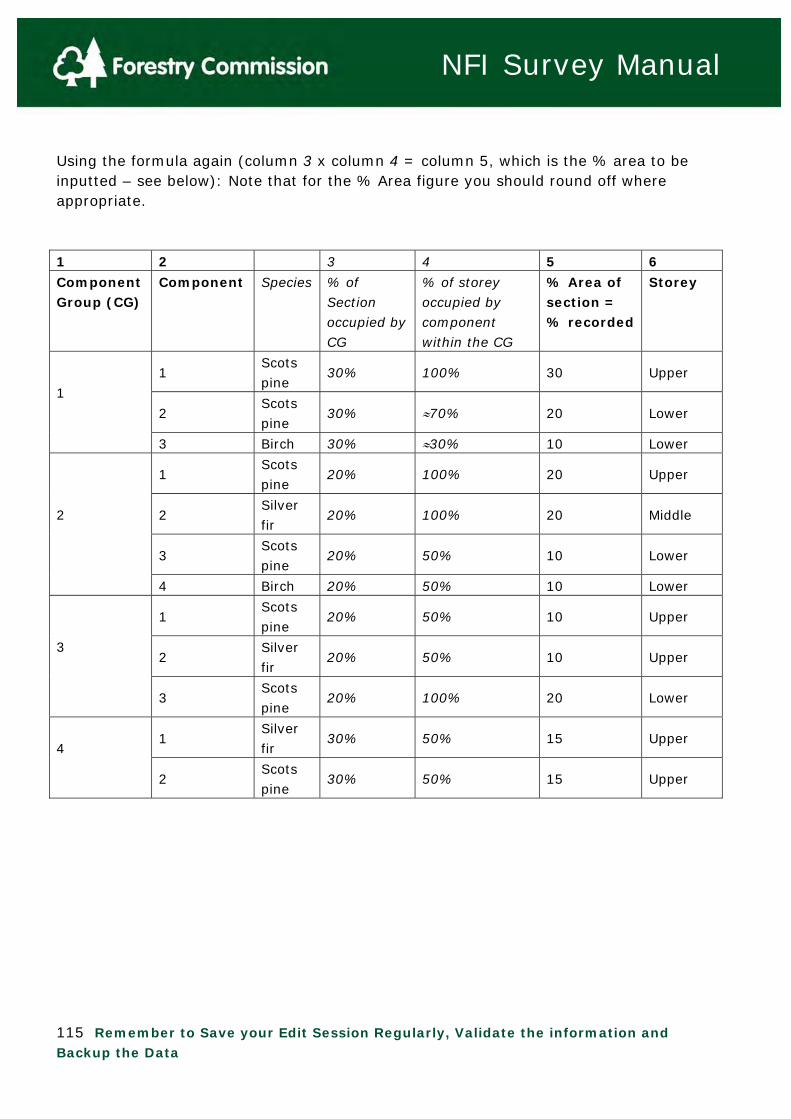
115 Remember to Save your Edit Session Regularly, Validate the information and Backup the Data
NFI Survey Manual
Using the formula again (column 3 x column 4 = column 5, which is the % area to be inputted – see below): Note that for the % Area figure you should round off where appropriate.
1 2 3 4 5 6
Component Group (CG)
Component Species % of Section occupied by CG
% of storey occupied by component within the CG
% Area of section = % recorded
Storey
1 Scots pine
30% 100% 30 Upper
2 Scots pine
30% 70% 20 Lower
1
3 Birch 30% 30% 10 Lower
1 Scots pine
20% 100% 20 Upper
2 Silver fir
20% 100% 20 Middle
3 Scots pine
20% 50% 10 Lower
2
4 Birch 20% 50% 10 Lower
1 Scots pine
20% 50% 10 Upper
2 Silver fir
20% 50% 10 Upper 3
3 Scots pine
20% 100% 20 Lower
1 Silver fir
30% 50% 15 Upper 4
2 Scots pine
30% 50% 15 Upper

116 Remember to Save your Edit Session Regularly, Validate the information and Backup the Data
NFI Survey Manual
Another way of viewing this structure is shown in the following table, in which component groups are shown as percentages of the whole section area, the storeys within component groups, where they exist, are shown in terms of % occupancy of the component group, and individual species components are expressed in terms of their occupancies of the storey within the component group. The second column on the left then shows the occupancy of the storeys within the section as a whole, and the percentage species make-up of those storeys.
Section A: Area = 0.65 ha.
System derived % of section
Component occupancy
CG1 CG2 CG3 CG4
% of section Area
30% 0.195ha
20% 0.13ha
20% 0.13ha
30% 0.195ha
Upper 100% SP 80% BI 20%
% of CG: 100 SP 100%
% of CG: 100 SP 100%
% of CG: 100 SP 75% BI 25%
% of CG: 100 SP 50% BI 50%
Middle 20% BI 100%
[Empty] % of CG: 100 BI 100%
[Empty] [Empty]
Lower
70% SP 72.8% BI 12.9% OK 14.3%
% of CG: 100 SP: 70% BI 30%
% of CG: 100 SP 50% OK 50%
% of CG: 100 SP 100%
[Empty]
The data in the second column (shown in grey) is derived from the CG areas & occupancy data of the individual components recorded by the surveyor. The presence of this column reflects the fully crossed structure between the (vertical) storeys and the (horizontal) CG’s. The surveyor would not need to enter this information, but considering this dimension in relation to what they have entered into the component group contents makes sense when looking at the section as a whole.

117 Remember to Save your Edit Session Regularly, Validate the information and Backup the Data
NFI Survey Manual
7) One Storey plus an Open Area (not big enough to section)
Section A CG1 (70% of Section) CG2 (30% of Section) Records
Section Land use
Component Group
Component Species % of section Area
Storey Stems/ha
High Forest
1 Scots pine
70 Upper 100
High Forest
1
2 Scots pine
70 Lower 800 A
Open Water
2 1 30 N/A N/A
Software validates:

118 Remember to Save your Edit Session Regularly, Validate the information and Backup the Data
NFI Survey Manual
8) Section with <100% Upper Storey
Section A CG1 (70% of Section) CG2 (30% of Section) Records
Section Component Group
Component Species % of section Area
Storey Stems/ha
1 Scots pine
70 Upper 100 1
2 Scots pine
70 Lower 500 A
2 1 Scots pine
30 Lower 2500
Software validates. Surveyor needs to ensure that the correct Canopy Height is entered. In this example it would be possible to construe, that the Scots pine in component group two is an upper canopy, because it has no over storey. However, for the purposes of the mensuration protocol, which requires the stratification of storeys at a section level, it is classed by its relative height band alongside the small Scots pine trees in CG 1 (assuming they are within 4m of the trees in CG2 (see Section 3.7.5 of the NFI Field Manual)). It is therefore classed as part of the lower storey at the section level.

119 Remember to Save your Edit Session Regularly, Validate the information and Backup the Data
NFI Survey Manual
So as in the previous example, the surveyor arrives at the section and undertakes the storey protocol across the whole section. Here they will note two distinct height bands of trees, in this case well over the 4m threshold apart. With such there are two storeys present in the section, one upper and one lower. Each storey is then allocated a percentage of the section area, within each CG accordingly. Linking plot data to each component group. For the purposes of linking or associating individual tree measures taken in mensuration plots to the component groups they fall within, the following must be undertaken:
1. Sectioning is undertaken 2. Component groups and components are assigned 3. Plot type is selected for high forest sections (circular or whole section) 4. Surveyor locates the plots/points 5. The surveyor should observe which component group each tree to be assessed for
mensuration measurements is in. 6. When the trees are recorded within the software they are to be allocated to the
CG they fall within. 7. Surveyor ensures that for each tree assessed for mensuration purposes there is
associated Component data Linking trees to component group. Within the software that records individual trees, there is a field called Component Group. This is where the link, from the individual tree to the component group it lies within, is made. If the tree is within CG1, then record ‘1’, against Component Group, if it is in CG2, record ‘2’ against the tree and so on. Ensure that tree storey equates to the relevant CG storey (or that storey is consistent to the section level storey assessments).

120 Remember to Save your Edit Session Regularly, Validate the information and Backup the Data
NFI Survey Manual
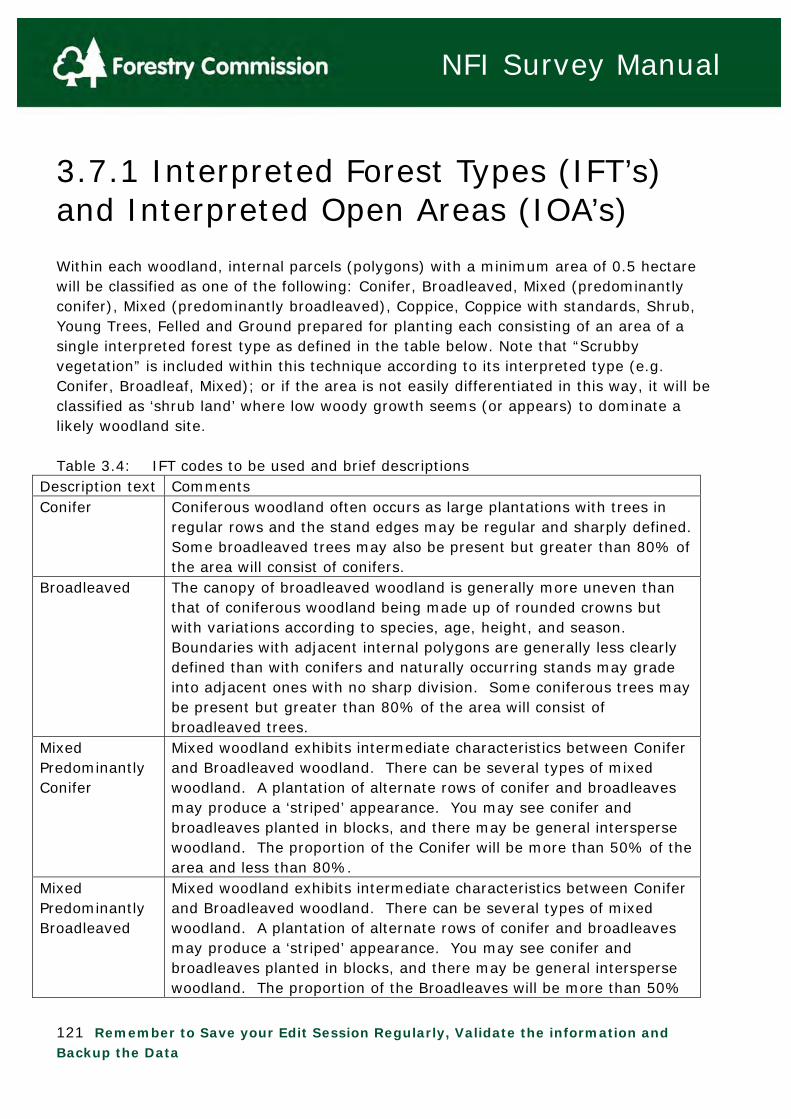
121 Remember to Save your Edit Session Regularly, Validate the information and Backup the Data
NFI Survey Manual
3.7.1 Interpreted Forest Types (IFT’s) and Interpreted Open Areas (IOA’s) Within each woodland, internal parcels (polygons) with a minimum area of 0.5 hectare will be classified as one of the following: Conifer, Broadleaved, Mixed (predominantly conifer), Mixed (predominantly broadleaved), Coppice, Coppice with standards, Shrub, Young Trees, Felled and Ground prepared for planting each consisting of an area of a single interpreted forest type as defined in the table below. Note that “Scrubby vegetation” is included within this technique according to its interpreted type (e.g. Conifer, Broadleaf, Mixed); or if the area is not easily differentiated in this way, it will be classified as ‘shrub land’ where low woody growth seems (or appears) to dominate a likely woodland site. Table 3.4: IFT codes to be used and brief descriptions
Description text Comments Conifer Coniferous woodland often occurs as large plantations with trees in
regular rows and the stand edges may be regular and sharply defined. Some broadleaved trees may also be present but greater than 80% of the area will consist of conifers.
Broadleaved The canopy of broadleaved woodland is generally more uneven than that of coniferous woodland being made up of rounded crowns but with variations according to species, age, height, and season. Boundaries with adjacent internal polygons are generally less clearly defined than with conifers and naturally occurring stands may grade into adjacent ones with no sharp division. Some coniferous trees may be present but greater than 80% of the area will consist of broadleaved trees.
Mixed Predominantly Conifer
Mixed woodland exhibits intermediate characteristics between Conifer and Broadleaved woodland. There can be several types of mixed woodland. A plantation of alternate rows of conifer and broadleaves may produce a ‘striped’ appearance. You may see conifer and broadleaves planted in blocks, and there may be general intersperse woodland. The proportion of the Conifer will be more than 50% of the area and less than 80%.
Mixed Predominantly Broadleaved
Mixed woodland exhibits intermediate characteristics between Conifer and Broadleaved woodland. There can be several types of mixed woodland. A plantation of alternate rows of conifer and broadleaves may produce a ‘striped’ appearance. You may see conifer and broadleaves planted in blocks, and there may be general intersperse woodland. The proportion of the Broadleaves will be more than 50%
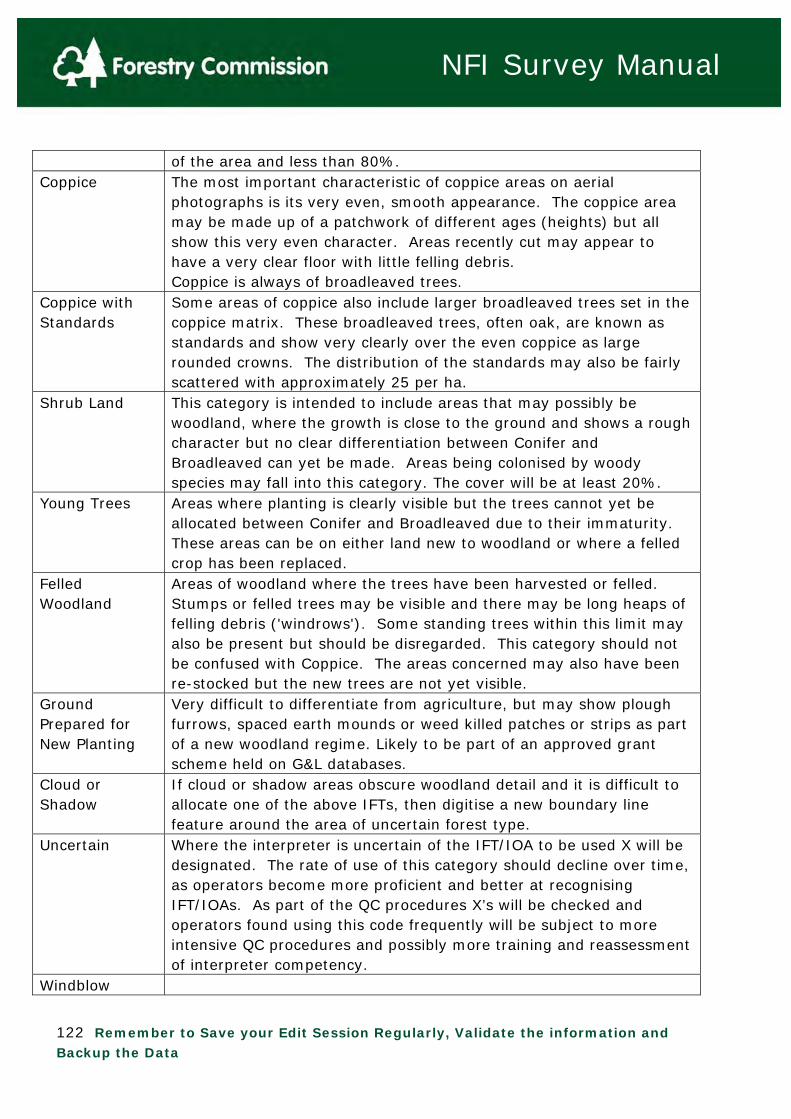
122 Remember to Save your Edit Session Regularly, Validate the information and Backup the Data
NFI Survey Manual
of the area and less than 80%. Coppice The most important characteristic of coppice areas on aerial
photographs is its very even, smooth appearance. The coppice area may be made up of a patchwork of different ages (heights) but all show this very even character. Areas recently cut may appear to have a very clear floor with little felling debris. Coppice is always of broadleaved trees.
Coppice with Standards
Some areas of coppice also include larger broadleaved trees set in the coppice matrix. These broadleaved trees, often oak, are known as standards and show very clearly over the even coppice as large rounded crowns. The distribution of the standards may also be fairly scattered with approximately 25 per ha.
Shrub Land
This category is intended to include areas that may possibly be woodland, where the growth is close to the ground and shows a rough character but no clear differentiation between Conifer and Broadleaved can yet be made. Areas being colonised by woody species may fall into this category. The cover will be at least 20%.
Young Trees
Areas where planting is clearly visible but the trees cannot yet be allocated between Conifer and Broadleaved due to their immaturity. These areas can be on either land new to woodland or where a felled crop has been replaced.
Felled Woodland
Areas of woodland where the trees have been harvested or felled. Stumps or felled trees may be visible and there may be long heaps of felling debris ('windrows'). Some standing trees within this limit may also be present but should be disregarded. This category should not be confused with Coppice. The areas concerned may also have been re-stocked but the new trees are not yet visible.
Ground Prepared for New Planting
Very difficult to differentiate from agriculture, but may show plough furrows, spaced earth mounds or weed killed patches or strips as part of a new woodland regime. Likely to be part of an approved grant scheme held on G&L databases.
Cloud or Shadow
If cloud or shadow areas obscure woodland detail and it is difficult to allocate one of the above IFTs, then digitise a new boundary line feature around the area of uncertain forest type.
Uncertain
Where the interpreter is uncertain of the IFT/IOA to be used X will be designated. The rate of use of this category should decline over time, as operators become more proficient and better at recognising IFT/IOAs. As part of the QC procedures X’s will be checked and operators found using this code frequently will be subject to more intensive QC procedures and possibly more training and reassessment of interpreter competency.
Windblow
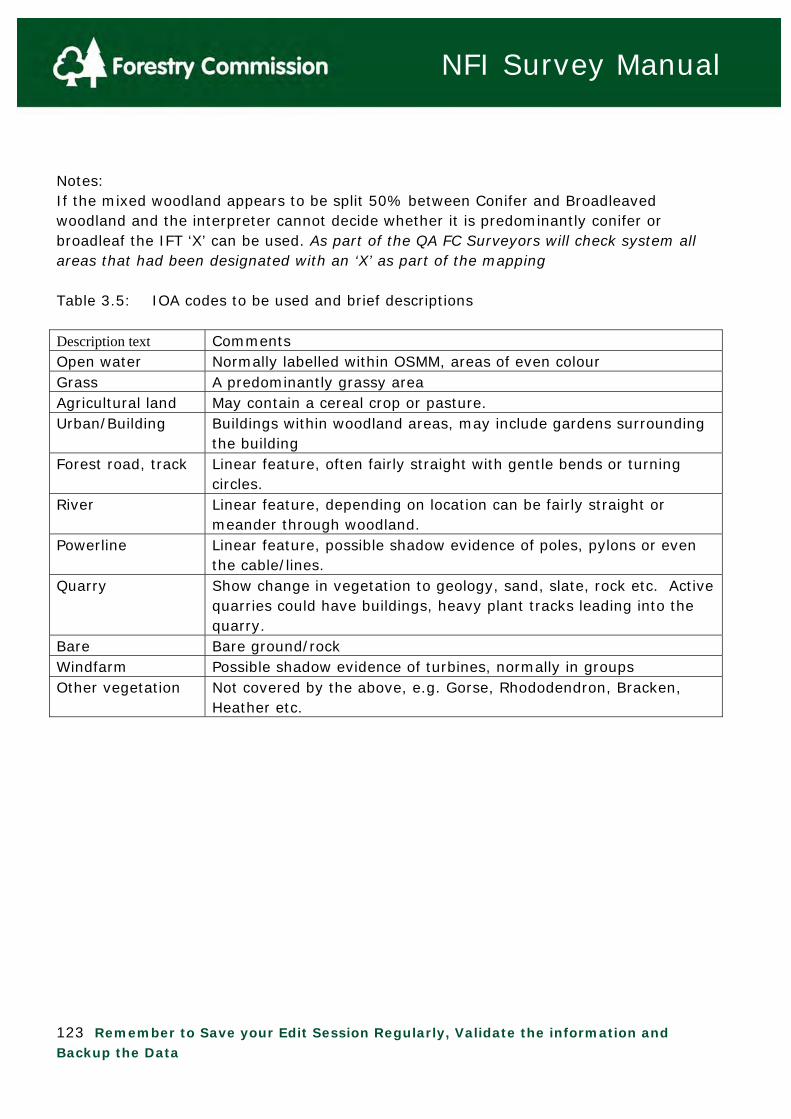
123 Remember to Save your Edit Session Regularly, Validate the information and Backup the Data
NFI Survey Manual
Notes: If the mixed woodland appears to be split 50% between Conifer and Broadleaved woodland and the interpreter cannot decide whether it is predominantly conifer or broadleaf the IFT ‘X’ can be used. As part of the QA FC Surveyors will check system all areas that had been designated with an ‘X’ as part of the mapping Table 3.5: IOA codes to be used and brief descriptions Description text Comments Open water Normally labelled within OSMM, areas of even colour Grass A predominantly grassy area Agricultural land May contain a cereal crop or pasture. Urban/Building Buildings within woodland areas, may include gardens surrounding
the building Forest road, track Linear feature, often fairly straight with gentle bends or turning
circles. River Linear feature, depending on location can be fairly straight or
meander through woodland. Powerline Linear feature, possible shadow evidence of poles, pylons or even
the cable/lines. Quarry Show change in vegetation to geology, sand, slate, rock etc. Active
quarries could have buildings, heavy plant tracks leading into the quarry.
Bare Bare ground/rock Windfarm Possible shadow evidence of turbines, normally in groups Other vegetation Not covered by the above, e.g. Gorse, Rhododendron, Bracken,
Heather etc.
124 Remember to Save your Edit Session Regularly, Validate the information and Backup the Data
NFI Survey Manual
3.7.2 Land Use (and Crop Type)
What Is Land Use? Land use helps to break down or describe the estate at its most basic level of land management and crop type and is a sub classification of IFT and IOA. It represents how we manage and use the land and is a FC categorisation of land developed to meet our business needs. Land use is used to monitor and measure the choices land managers have in allocating different parts of the estate to different objectives. It is descriptive information and in most cases you should be able to see Land Use on the ground. Exceptions to this would be uses like a Deer Glade. The physical nature of the land, its topography, lithology, habitat etc. may determine the Land Use or management regime we choose to operate on that land, but we have a choice in that management and that choice can change. That is why we store Land Use and Habitat separately. It is important to assign the Land Use code for a site correctly, as Land Use determines what other information we are required to store for that site in the NFI database (in a cascade or ‘waterfall’ effect). For example: If a component is given the IOA of Quarry, then only two Landuse options are available (Mineral Working or Quarries) i.e. you only have a limited number of options and amount of information to store against a given IFT/IOA. In the current release of Forester (i.e. v 501 Arc 10) all habitats are available but the intention will be to limit these in future updates, to those pertinent to each combination of IFT/IOA and Landuse.. When it comes to describing a site, we must remember that we start with the IFT, IOA and land use, as this determines the other information that we must enter to describe the site/component. It is also worth remembering that as a ‘rule of thumb’ a surveyor ought to be able to recognise the land use and not need to interpret our intention, separating physical description from management intents. An example is a three year old clearfell with some heather and grasses growing, but with lots of stumps and brash still visible. If it still looks like a clearfell site, it is one and it is not moorland yet. In such transition
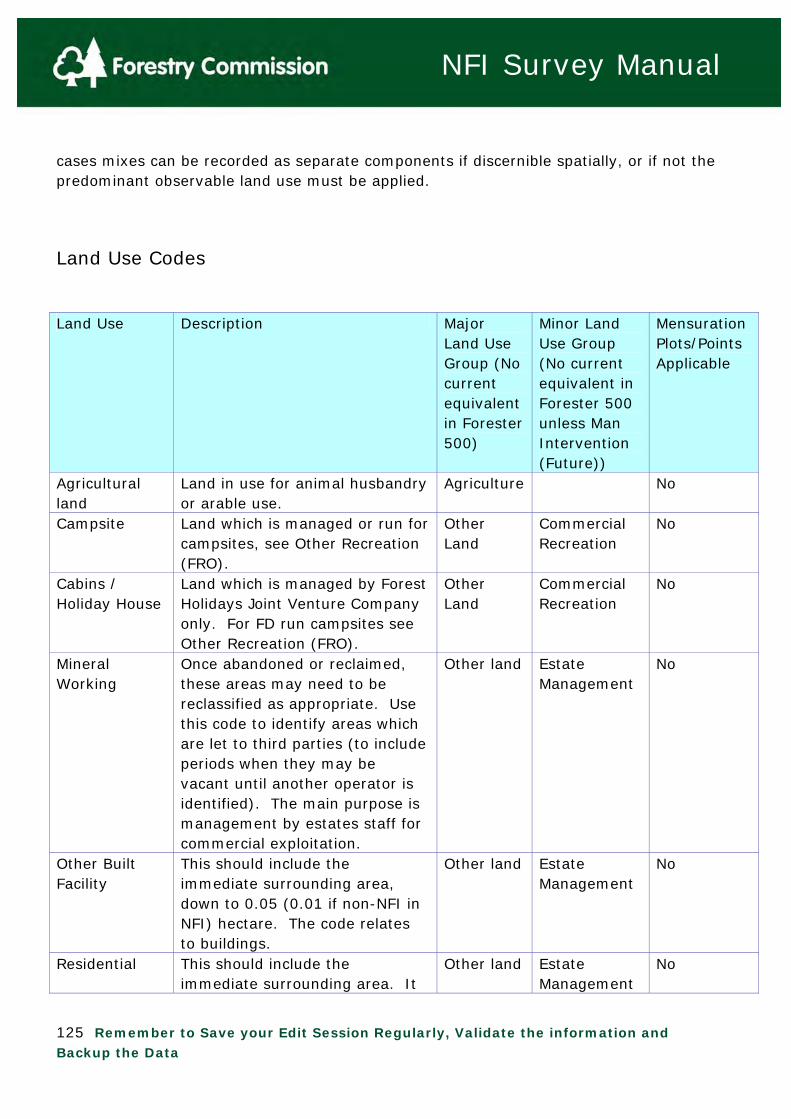
125 Remember to Save your Edit Session Regularly, Validate the information and Backup the Data
NFI Survey Manual
cases mixes can be recorded as separate components if discernible spatially, or if not the predominant observable land use must be applied.
Land Use Codes Land Use Description Major
Land Use Group (No current equivalent in Forester 500)
Minor Land Use Group (No current equivalent in Forester 500 unless Man Intervention (Future))
Mensuration Plots/Points Applicable
Agricultural land
Land in use for animal husbandry or arable use.
Agriculture No
Campsite Land which is managed or run for campsites, see Other Recreation (FRO).
Other Land
Commercial Recreation
No
Cabins / Holiday House
Land which is managed by Forest Holidays Joint Venture Company only. For FD run campsites see Other Recreation (FRO).
Other Land
Commercial Recreation
No
Mineral Working
Once abandoned or reclaimed, these areas may need to be reclassified as appropriate. Use this code to identify areas which are let to third parties (to include periods when they may be vacant until another operator is identified). The main purpose is management by estates staff for commercial exploitation.
Other land Estate Management
No
Other Built Facility
This should include the immediate surrounding area, down to 0.05 (0.01 if non-NFI in NFI) hectare. The code relates to buildings.
Other land Estate Management
No
Residential This should include the immediate surrounding area. It
Other land Estate Management
No

126 Remember to Save your Edit Session Regularly, Validate the information and Backup the Data
NFI Survey Manual
Land Use Description Major Land Use Group (No current equivalent in Forester 500)
Minor Land Use Group (No current equivalent in Forester 500 unless Man Intervention (Future))
Mensuration Plots/Points Applicable
is permissible to allocate them section status down to 0.05 (0.01 if non-NFI in NFI)hectare.
Christmas Trees
This should only be used when it represents the main land use (e.g. young trees under power lines would be recorded as Open: this was wayleaves but these are now Open).
Other Land
Forest Management
Yes
Deer glades Allocated to areas specifically used for deer management
Other Land
Forest Management
No
Nursery Defined in consultation with the appropriate managers. (Plant and Seed Supply Branch).
Other Land
Forest Management
No
Quarries Record both used and abandoned quarries. Quarries and other mineral sites (either reserves being actively worked by Forestry Civil Engineering, or worked out facilities) will be managed by the overall Forest District team, should be recorded using this code and not ‘mineral working’. Areas let to third parties for commercial exploitation should be assigned the ‘mineral working’ code.
Other Land
Forest Management
No
Non-plantation research
Defined in conjunction with the appropriate managers. (FR)
Other Land
Forest Management
Yes
Seed Orchard Defined in conjunction with the appropriate managers. (FR or Plant and Seed Supply Branch).
Other Land
Forest Management
Yes
Unplanted This category should reflect Other Forest No

127 Remember to Save your Edit Session Regularly, Validate the information and Backup the Data
NFI Survey Manual
Land Use Description Major Land Use Group (No current equivalent in Forester 500)
Minor Land Use Group (No current equivalent in Forester 500 unless Man Intervention (Future))
Mensuration Plots/Points Applicable
streamsides (non treed)
active management practices to maintain the unwooded state of water margins. Any planted or naturally occurring woodland too small to map as a sub-compartment should be separately recognised as a component (allocated to high forest etc.).
Land Management
Car Parks/Picnic Areas
Allocated at sub-compartment level if large enough, otherwise as a component with the surrounding crop. All woodland within car parks (i.e. islands) should be classified as FRC but surrounding woodland, despite any influence on its management because of its proximity to the site should be classified normally (e.g. high forest).
Other Land
Forest Recreation
No
Information Centre
Primarily applies to a building and its immediate surrounds such as lawns and car parks. May include areas with trees which primarily have an educational role but which are only a minor component of the site. Such sites can generally be recognised at the sub-compartment level.
Other Land
Forest Recreation
No
Other Recreation
Includes all other facilities provided specifically for public
Other Land
Forest Recreation
No

128 Remember to Save your Edit Session Regularly, Validate the information and Backup the Data
NFI Survey Manual
Land Use Description Major Land Use Group (No current equivalent in Forester 500)
Minor Land Use Group (No current equivalent in Forester 500 unless Man Intervention (Future))
Mensuration Plots/Points Applicable
enjoyment. This includes campsites and cabin sites managed by Forest Districts and NOT the Forest Holidays Joint Venture Company.
Plantable land Bare land immediately available for planting e.g. new land acquisitions. Should be recognised as a sub-compartment. FE land only. Should be held as open on private sector land.
Land In hand for new planting
No
Archaeological sites
This classification should take priority over all other land uses (including woodland) on or within the site in question.
Other land Miscellaneous No
Open Water Allocated to all land areas dominated by standing water for most of the year.
Other land Miscellaneous No
Ancient and Ornamental
The use of this coding is restricted to specifically identified woodland within the New Forest.
Woodland Non-plantation
Yes
Arboreta Allocated to all Arboreta whether officially recognised or not. Include the surrounding or associated woodland managed with it. Areas with trees which primarily have an educational role may be included in this category.
Woodland Non-plantation
Yes
Open
Including: Land lost to permanent roads and tracks wayleaves / rights of way;
No
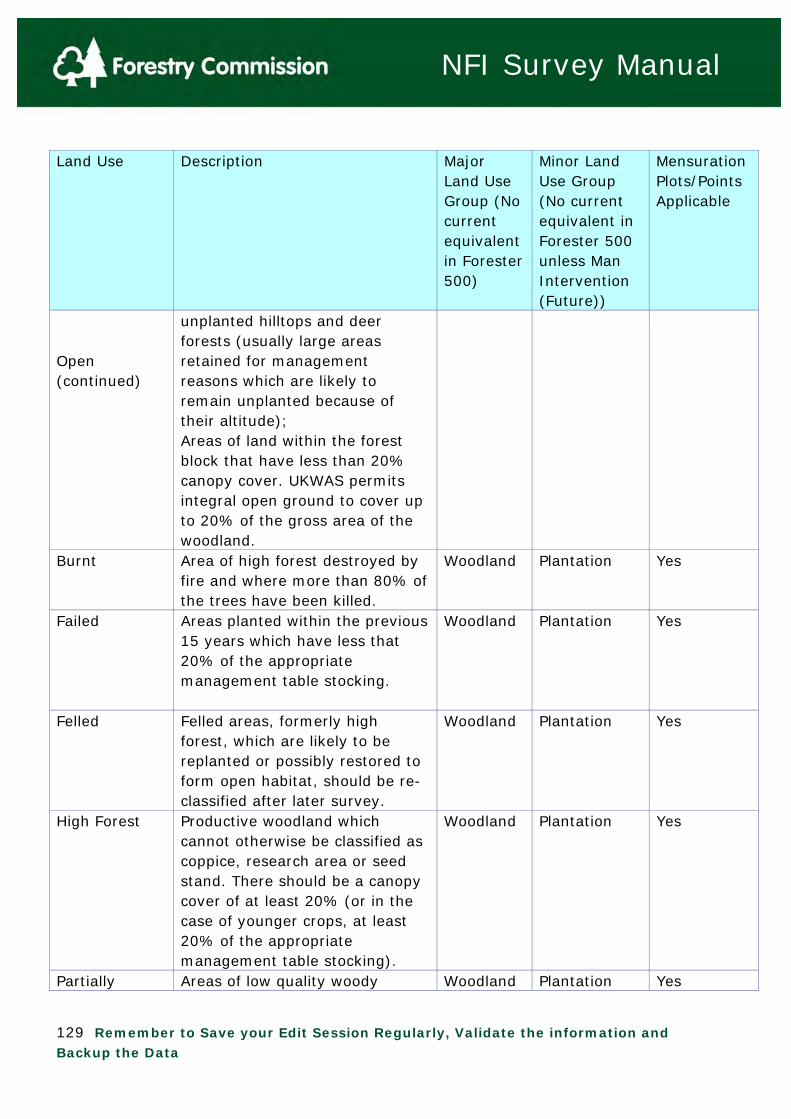
129 Remember to Save your Edit Session Regularly, Validate the information and Backup the Data
NFI Survey Manual
Land Use Description Major Land Use Group (No current equivalent in Forester 500)
Minor Land Use Group (No current equivalent in Forester 500 unless Man Intervention (Future))
Mensuration Plots/Points Applicable
Open (continued)
unplanted hilltops and deer forests (usually large areas retained for management reasons which are likely to remain unplanted because of their altitude); Areas of land within the forest block that have less than 20% canopy cover. UKWAS permits integral open ground to cover up to 20% of the gross area of the woodland.
Burnt Area of high forest destroyed by fire and where more than 80% of the trees have been killed.
Woodland Plantation Yes
Failed Areas planted within the previous 15 years which have less that 20% of the appropriate management table stocking.
Woodland Plantation Yes
Felled Felled areas, formerly high forest, which are likely to be replanted or possibly restored to form open habitat, should be re-classified after later survey.
Woodland Plantation Yes
High Forest Productive woodland which cannot otherwise be classified as coppice, research area or seed stand. There should be a canopy cover of at least 20% (or in the case of younger crops, at least 20% of the appropriate management table stocking).
Woodland Plantation Yes
Partially Areas of low quality woody Woodland Plantation Yes
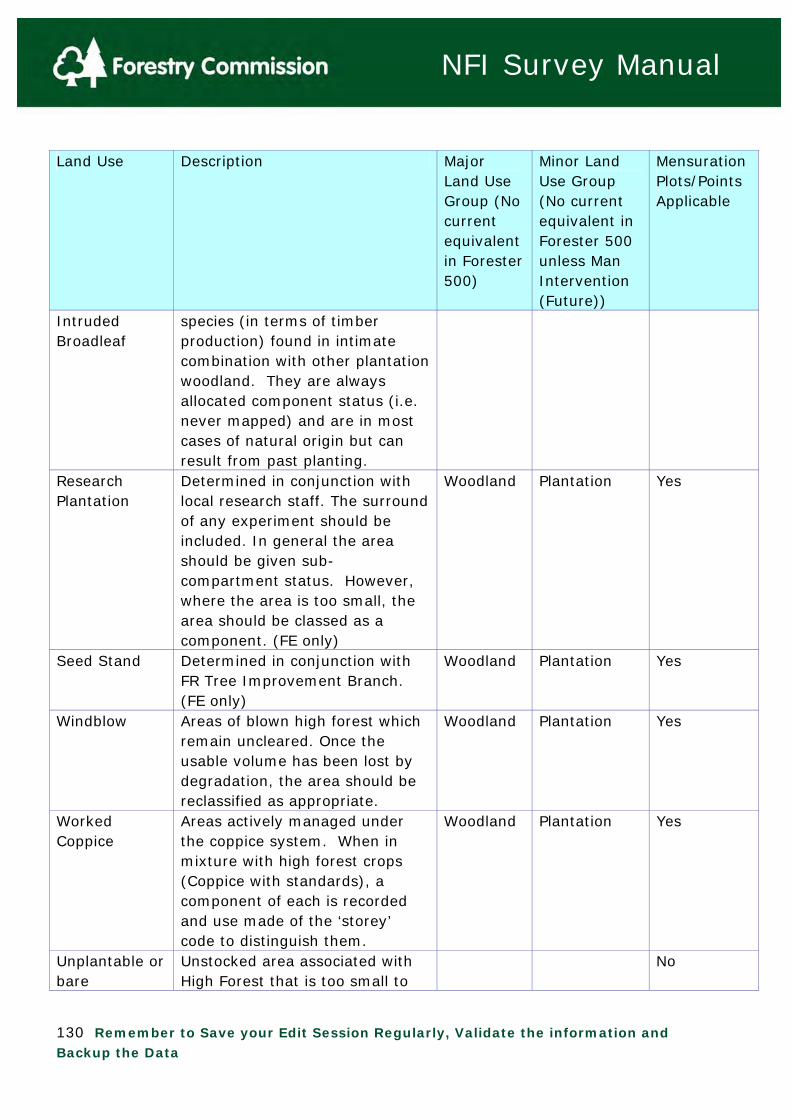
130 Remember to Save your Edit Session Regularly, Validate the information and Backup the Data
NFI Survey Manual
Land Use Description Major Land Use Group (No current equivalent in Forester 500)
Minor Land Use Group (No current equivalent in Forester 500 unless Man Intervention (Future))
Mensuration Plots/Points Applicable
Intruded Broadleaf
species (in terms of timber production) found in intimate combination with other plantation woodland. They are always allocated component status (i.e. never mapped) and are in most cases of natural origin but can result from past planting.
Research Plantation
Determined in conjunction with local research staff. The surround of any experiment should be included. In general the area should be given sub-compartment status. However, where the area is too small, the area should be classed as a component. (FE only)
Woodland Plantation Yes
Seed Stand Determined in conjunction with FR Tree Improvement Branch. (FE only)
Woodland Plantation Yes
Windblow
Areas of blown high forest which remain uncleared. Once the usable volume has been lost by degradation, the area should be reclassified as appropriate.
Woodland Plantation Yes
Worked Coppice
Areas actively managed under the coppice system. When in mixture with high forest crops (Coppice with standards), a component of each is recorded and use made of the ‘storey’ code to distinguish them.
Woodland Plantation Yes
Unplantable or bare
Unstocked area associated with High Forest that is too small to
No

131 Remember to Save your Edit Session Regularly, Validate the information and Backup the Data
NFI Survey Manual
Land Use Description Major Land Use Group (No current equivalent in Forester 500)
Minor Land Use Group (No current equivalent in Forester 500 unless Man Intervention (Future))
Mensuration Plots/Points Applicable
map is recorded as a component in the same sub-compartment as the high forest; (i.e. areas less than 0.5ha or several smaller areas the sum of which might add up to more than 0.5ha but which are scattered around the sub-compartment and therefore un-mappable).
How Do I Decide What Land Use To Enter? The following decision trees illustrate how to decide upon appropriate land use codes for use. Note: only cabin and campsites managed by Forest Holidays Joint Venture Company should be assigned ‘Cabins/Holiday Houses’ or ‘Campsite’. FD run campsites should be ‘Other Recreation’.
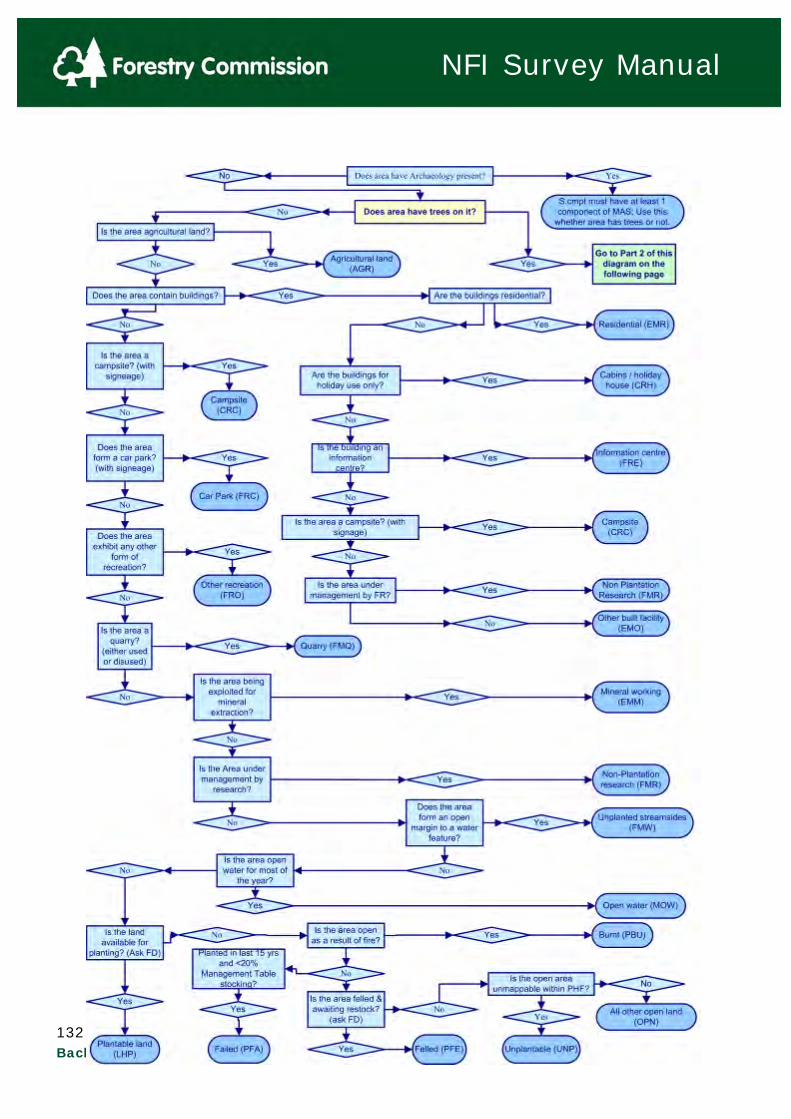
132 Remember to Save your Edit Session Regularly, Validate the information and Backup the Data
NFI Survey Manual

133 Remember to Save your Edit Session Regularly, Validate the information and Backup the Data
NFI Survey Manual
.
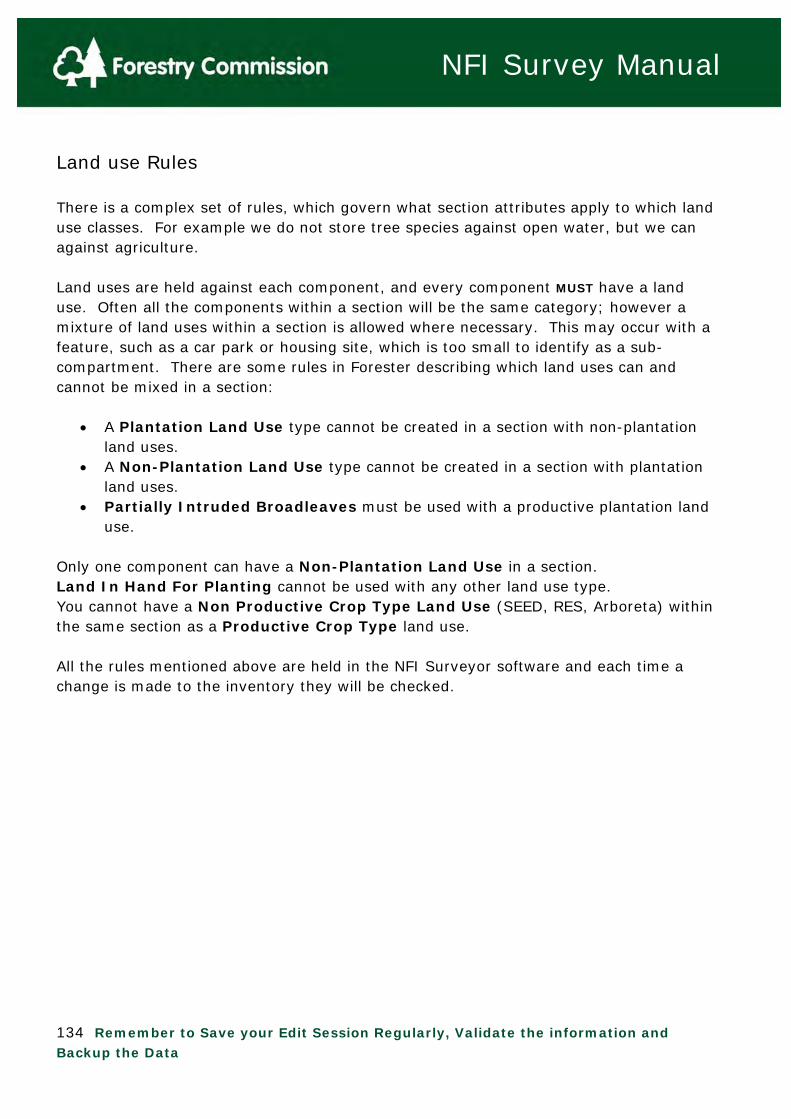
134 Remember to Save your Edit Session Regularly, Validate the information and Backup the Data
NFI Survey Manual
Land use Rules There is a complex set of rules, which govern what section attributes apply to which land use classes. For example we do not store tree species against open water, but we can against agriculture. Land uses are held against each component, and every component MUST have a land use. Often all the components within a section will be the same category; however a mixture of land uses within a section is allowed where necessary. This may occur with a feature, such as a car park or housing site, which is too small to identify as a sub-compartment. There are some rules in Forester describing which land uses can and cannot be mixed in a section:
A Plantation Land Use type cannot be created in a section with non-plantation land uses.
A Non-Plantation Land Use type cannot be created in a section with plantation land uses.
Partially Intruded Broadleaves must be used with a productive plantation land use.
Only one component can have a Non-Plantation Land Use in a section. Land In Hand For Planting cannot be used with any other land use type. You cannot have a Non Productive Crop Type Land Use (SEED, RES, Arboreta) within the same section as a Productive Crop Type land use. All the rules mentioned above are held in the NFI Surveyor software and each time a change is made to the inventory they will be checked.

135 Remember to Save your Edit Session Regularly, Validate the information and Backup the Data
NFI Survey Manual
3.7.3 Broad/Priority Habitat List All BROAD and Priority Habitats are now available regardless of the combination of IFT/IOA and Landuse. This means that ideally you should be familiar with all likely Habitats for your Bid Area. A spreadsheet with flow charts for groups of habitats (e.g. woodlands) and the appropriate Habitat depending on certain criteria are available in HAPS Flowchart. There is also a summary of these habitats in 3.7.3.1. NFI BROAD and Priority Habitats Summaries See ‘UK Biodiversity Action Plan – Priority Habitat Descriptions (2008)’ for more detailed description of individual Habitats. List of all NFI BROAD habitats BROAD Habitats ACID GRASSLAND ARABLE/HORTICULTURE BOGS BOUNDARY & LINEAR FEATURES BRACKEN BROADLEAVED;MIXED/YEW WOODLANDS
BUILT UP AREAS & GARDENS CALCAREOUS GRASSLAND CONIFEROUS WOODLANDS CONTINENTAL SHELF SLOPE DWARF SHRUB HEATH FEN; MARSH/SWAMP IMPROVED GRASSLAND INLAND ROCK INSHORE SUBLITTORAL ROCK INSHORE SUBLITTORAL SEDIMENT LITTORAL ROCK LITTORAL SEDIMENT MONTANE HABITATS NEUTRAL GRASSLAND OCEANIC SEAS OFFSHORE SHELF ROCK OFFSHORE SHELF SEDIMENT RIVERS & STREAMS STANDING OPEN WATER/CANALS SUPRALITTORAL ROCK SUPRALITTORAL SEDIMENT UNKNOWN URBAN

136 Remember to Save your Edit Session Regularly, Validate the information and Backup the Data
NFI Survey Manual
List of all NFI Priority Habitats: Priority Habitats Priority Habitats continued Aquifer fed naturally fluctuating water Mesotrophic lakes Arable Field margins Mountain Heaths & Willow Scrubs Blanket bog Mud habitats in deep water Blue Mussel Beds on Sediment Native Pine Woodlands Calaminarian grasslands Non-HAP Native Pine
Carbonate Mounds Not Surveyed Coastal & floodplain grazing marsh Oligotrophic and Dystrophic Lakes
Coastal saltmarsh Open Mosaic Habitats on Previously Developed Land
Coastal sand dunes Peat & Clay Exposures with Piddocks Coastal vegetated shingle Ponds Cold-water Coral Reefs Purple moor grass/rush pastures Deep Sea Sponge Communities Reedbeds Estuarine Rocky Habitats Rivers Eutrophic standing waters Sabellaria alveolata reefs File Shell Beds Sabellaria spinulosa reefs Fragile Sponge and Anthozoan Communities on Subtidal Rocky Habitats
Saline lagoons
Hedgerows Seagrass beds Horse Mussel Beds Seamount Communities Inland Rock Outcrop and Scree Habitats Serpulid reefs Intertidal Chalk Sheltered muddy gravels Intertidal Mudflats Sublittoral sands/gravels Intertidal Underboulder Communities Surveyed; Unknown Habitat Limestone pavements Tide Swept Channels Lowland Beech/Yew Woodlands Traditional Orchards Lowland calcareous grassland Upland Birchwoods
Lowland dry acid grassland Upland calcareous grassland Lowland Fens Upland Flushes, Fens & Swamps Lowland heathland Upland hay meadows Lowland meadows Upland heathland Lowland Mixed Deciduous Woodland Upland Mixed Ashwoods Lowland raised bog Upland Oakwoods
Machair Wet Woodland Maerl beds Woodpasture & Parkland
Maritime cliff/slopes

137 Remember to Save your Edit Session Regularly, Validate the information and Backup the Data
NFI Survey Manual
3.7.4 Component Groups
What is a Component Group? A Component Group is an area, within a Section, of homogenous structure and species. It can be composed of tree or non-tree components and/or many storeys. When dividing a Section into Component Groups, any Component Group 0.05ha should be split off as a separate Section unless there is a good reason not to do this. An example reason would be where a Section is 0.08ha and is split into 2 Component Groups, one is 0.06ha and the other 0.02ha which has been joined to the 0.06ha area as it is too small to be a Section by itself. ALL Components must be attached to a Component Group, even if that means that the Component Group is composed of only one Component.
Examples of Component Groups within a Section: Example 1: A single storey (e.g. Upper), single species (e.g. Scots pine) section. One component – Upper Storey, Scots pine in one Component Group (1) covering 100% of the Section.
Species Storey Component
Group Cover (%)
Scots pine Upper 1 100
Section X
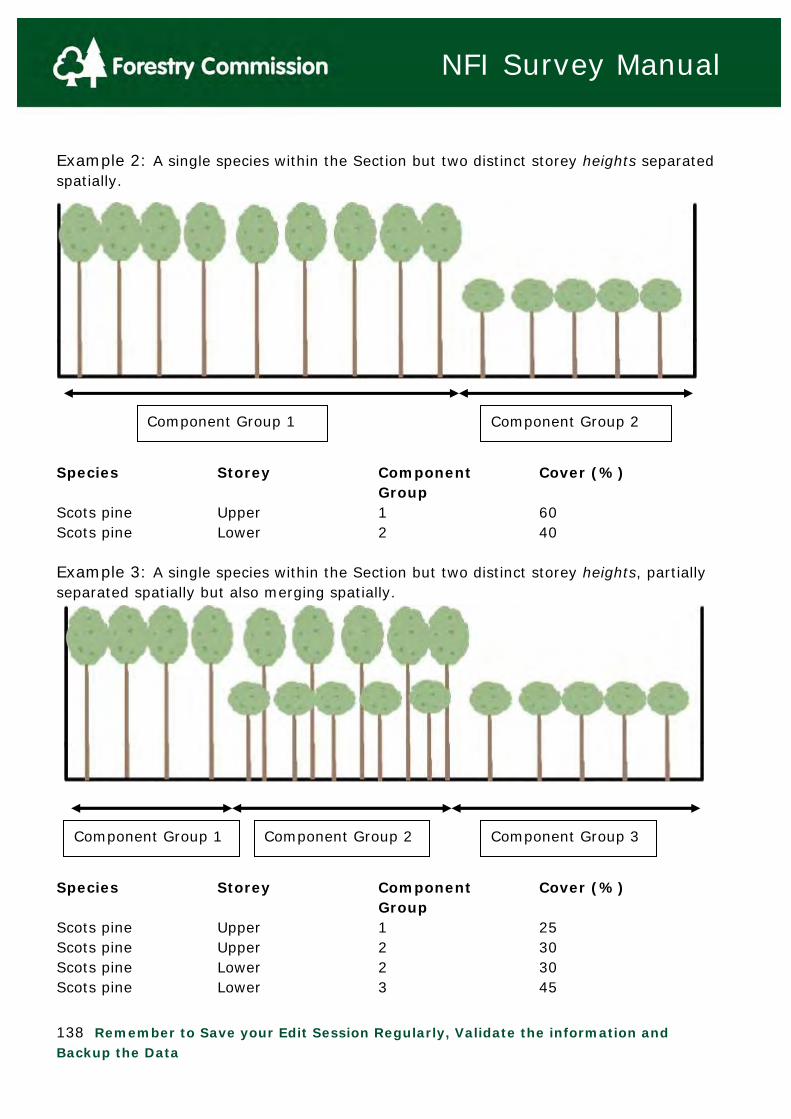
138 Remember to Save your Edit Session Regularly, Validate the information and Backup the Data
NFI Survey Manual
Example 2: A single species within the Section but two distinct storey heights separated spatially.
Species Storey Component
Group Cover (%)
Scots pine Upper 1 60 Scots pine Lower 2 40 Example 3: A single species within the Section but two distinct storey heights, partially separated spatially but also merging spatially.
Species Storey Component
Group Cover (%)
Scots pine Upper 1 25 Scots pine Upper 2 30 Scots pine Lower 2 30 Scots pine Lower 3 45
Component Group 1 Component Group 2
Component Group 1 Component Group 2 Component Group 3

139 Remember to Save your Edit Session Regularly, Validate the information and Backup the Data
NFI Survey Manual
Example 4: A two species, 3 storey, Section.
Species Storey Component
Group Cover (%)
Scots pine Upper 1 10 Scots pine Upper 2 10 Norway spruce Lower 2 10 Scots pine Upper 3 10 Scots pine Middle 3 10 Norway spruce Lower 3 10 Scots pine Upper 4 25 Scots pine Middle 4 25 Scots pine Middle 5 45
1 2 3 4 5

140 Remember to Save your Edit Session Regularly, Validate the information and Backup the Data
NFI Survey Manual
3.7.5 Storey Assessments Determining storeys within a section In assessing stand structure within a section for the presence of distinct storeys, it will often be the case that there is some variation in the heights of the trees but that it is difficult to determine from a simple visual assessment whether the trees of various sizes naturally group into different canopies and therefore into distinct identifiable storeys. This section describes a procedure for the assessment of a section which will help in the decision about whether different storeys are present in the stand and, if such separate storeys can be identified, the means of identifying the members of a storey. Due to the complexity of stand structure in many situations, there is still likely to be a certain amount of subjectivity and dependence on the skill of surveyors in the identification of storeys within a section. Note that for all subjective assessments the Quality Assurance team will judge whether the surveyor assessment is reasonable and understandable. If there are issues after the QA then this will be discussed with the surveyor. Following the procedures described here will help to ensure some degree of consistency in the definition of storeys across stands of differing structures and across surveyors. Before attempting to group trees into separate storeys according to their general vertical stature, it is first necessary to identify a definitive concept of the height of any particular tree for this purpose. Ultimately, a storey is defined by the similarity of the vertical positioning of the canopies of the trees belonging to that storey, and since tree canopies can vary considerably in general shape and form, the overall height of a tree will not always be the best representation of its vertical ‘presence’. A better representation of the general vertical positioning in the canopy of a tree would be the mid-point between the bottom and top of the crown, which is here named the ‘mid-crown’ height. The mid-crown height is then defined as the midway point between the lower crown height and the total height of the tree. The following diagrams illustrate three examples of the positioning of the lower crown, total and mid-crown heights of conifer and broadleaf species. This is a formal definition of the mid-crown height. In practice it represents the height which is ‘half way up’ the crown of a tree.

141 Remember to Save your Edit Session Regularly, Validate the information and Backup the Data
NFI Survey Manual
Note that Lower Crown height is slightly different for conifers and broadleaves: Conifers: The height of the lowest live branch (excluding epicormics and forks) insertion point that is connected to the crown, recorded to the nearest 0.1 m. Broadleaves: The height of the lowest level of foliage that is connected to the crown (excluding epicormics and forks), recorded to the nearest 0.1 m. In first deciding whether an identifiable multi-storey structure exists within a section, consideration is given to the vertical distribution of the mid-crown heights of trees within the section. The essential question to ask is whether these mid-crown heights cluster into two or more groups on the vertical scale across the Section? The convention to be used in answering this question is to visualize the mid-crown heights of the trees within the section and to decide, in the first instance, whether an upper storey exists in the section. This is the case if there is a distinguishable cluster of mid-crown heights in which the lowest member of that group is at least 4 metres higher than most of the rest of the trees within the section. This is described as ‘most’ rather than ‘all’ because there are likely to be situations in which there is a well-defined highest group and one or more lower groups but also an occasional tree whose height is spanning the vertical ‘gap’ between the highest group and the others. If these conditions exist in the section, the stand within the section can be considered to be a multi-storey stand and the trees in the identified tallest group (on the basis of mid-crown heights) form a stratum of the section which will be separately assessed and sampled. Any occasional trees that are less than 4 metres lower than the lowest in this
Upper Crown Height
Lower Crown Height
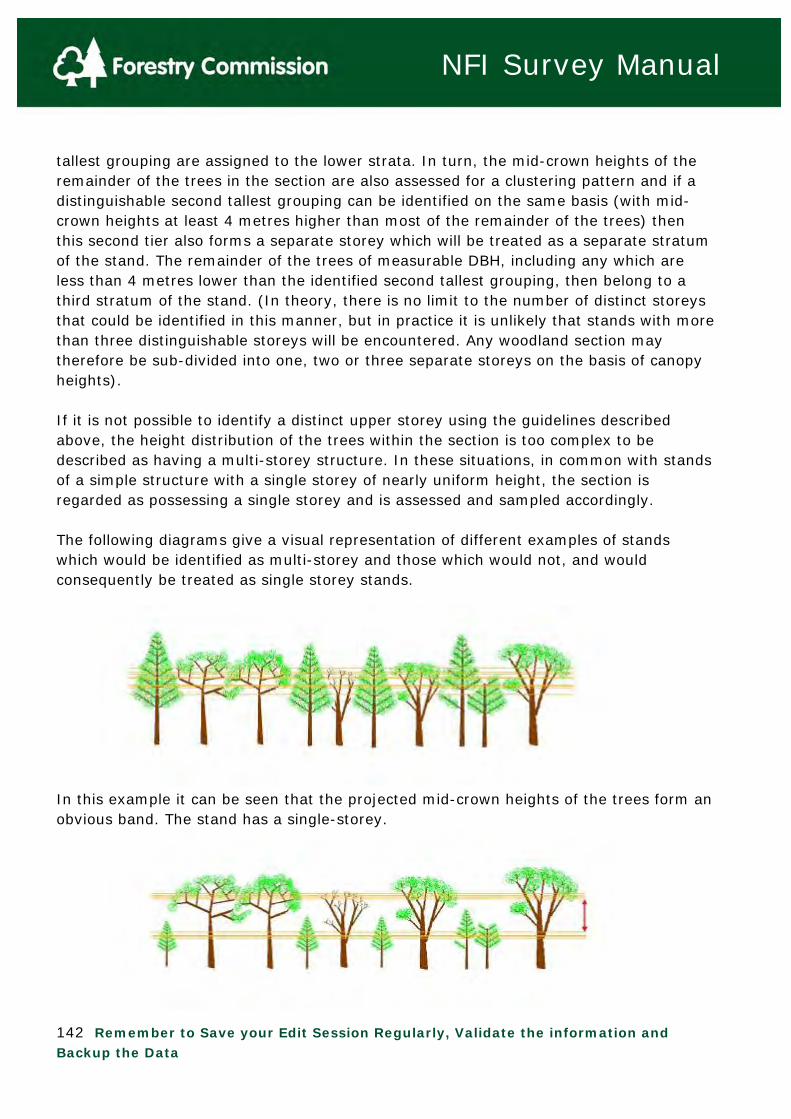
142 Remember to Save your Edit Session Regularly, Validate the information and Backup the Data
NFI Survey Manual
tallest grouping are assigned to the lower strata. In turn, the mid-crown heights of the remainder of the trees in the section are also assessed for a clustering pattern and if a distinguishable second tallest grouping can be identified on the same basis (with mid-crown heights at least 4 metres higher than most of the remainder of the trees) then this second tier also forms a separate storey which will be treated as a separate stratum of the stand. The remainder of the trees of measurable DBH, including any which are less than 4 metres lower than the identified second tallest grouping, then belong to a third stratum of the stand. (In theory, there is no limit to the number of distinct storeys that could be identified in this manner, but in practice it is unlikely that stands with more than three distinguishable storeys will be encountered. Any woodland section may therefore be sub-divided into one, two or three separate storeys on the basis of canopy heights). If it is not possible to identify a distinct upper storey using the guidelines described above, the height distribution of the trees within the section is too complex to be described as having a multi-storey structure. In these situations, in common with stands of a simple structure with a single storey of nearly uniform height, the section is regarded as possessing a single storey and is assessed and sampled accordingly. The following diagrams give a visual representation of different examples of stands which would be identified as multi-storey and those which would not, and would consequently be treated as single storey stands. In this example it can be seen that the projected mid-crown heights of the trees form an obvious band. The stand has a single-storey.
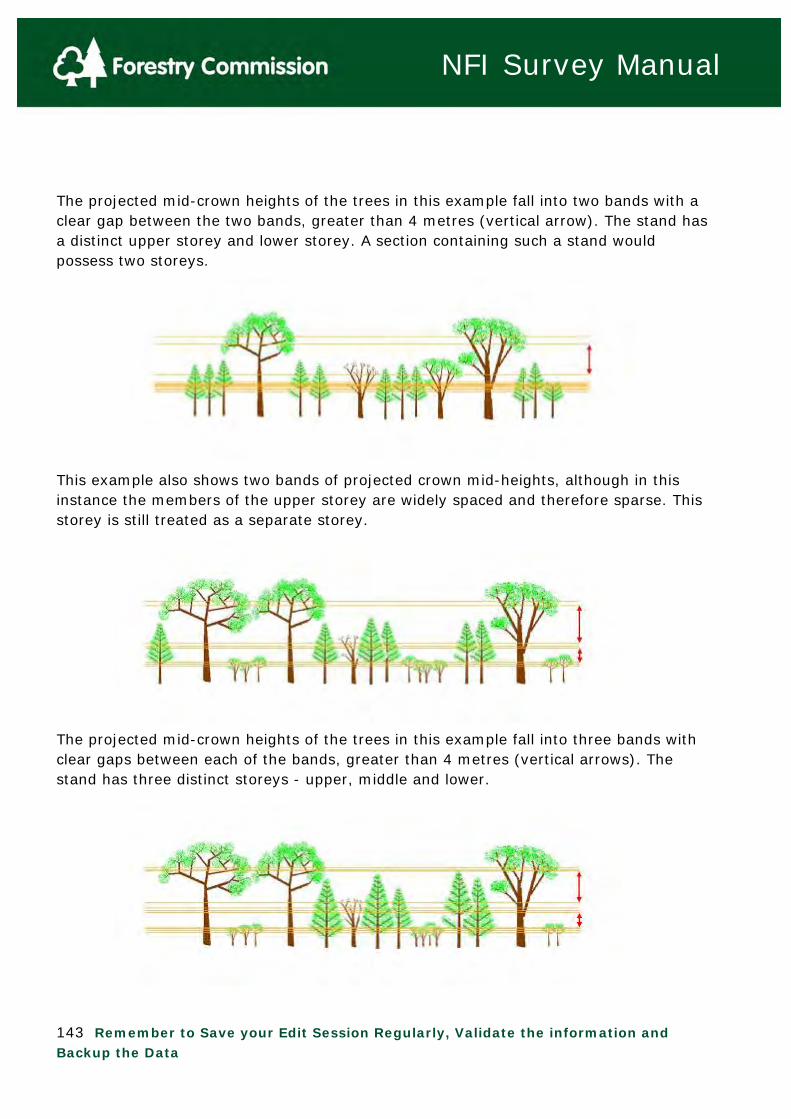
143 Remember to Save your Edit Session Regularly, Validate the information and Backup the Data
NFI Survey Manual
The projected mid-crown heights of the trees in this example fall into two bands with a clear gap between the two bands, greater than 4 metres (vertical arrow). The stand has a distinct upper storey and lower storey. A section containing such a stand would possess two storeys. This example also shows two bands of projected crown mid-heights, although in this instance the members of the upper storey are widely spaced and therefore sparse. This storey is still treated as a separate storey. The projected mid-crown heights of the trees in this example fall into three bands with clear gaps between each of the bands, greater than 4 metres (vertical arrows). The stand has three distinct storeys - upper, middle and lower.

144 Remember to Save your Edit Session Regularly, Validate the information and Backup the Data
NFI Survey Manual
In this example, there are conifer trees with total heights similar to the upper storey. However, the trees have long crowns and by looking at the projected mid-crown heights it is clear that these trees belong to a lower storey (vertical arrows). This is another example of a three-storey stand. The heights of the trees in this example are variable, but there is still a distinct upper storey. The band for the lower storey is wide, reflecting the complex structure, but there is a clear gap of greater than 4 m between the projected mid-crown heights for these trees and those forming the upper storey (vertical arrow). A section with a stand of this structure would therefore contain two storeys. In this example the heights of the trees are very variable, reflecting a complex stand structure. It is not possible to distinguish obvious storeys (i.e. no bands in the projected mid-crown heights of trees). The test for a difference in mid-crown height of 4 metres is based on groups of trees forming distinct bands, not individual trees. A section containing such a stand would therefore be considered to possess a single (complex) storey. It should be noted that storeys within a section may have very different lateral distributions. Some may be uniformly spread over the whole area of the section while others may occur in patches and do not cover the whole area of the section. Where such
145 Remember to Save your Edit Session Regularly, Validate the information and Backup the Data
NFI Survey Manual
patterns give rise to separately identifiable areas of sufficient size during the mapping stage of the sample square, these may be accommodated in the partitioning of the sample square into separately identified sections. This will often not be the case, however, and it is expected that individual storeys within a section may often occupy only parts of a section, or vary greatly in density in different areas of the section. It may sometimes be found that sample plots laid out in a section will capture little or no trees belonging to a particular storey being assessed, while others capture a dense part of the storey. This is to be expected, dependent upon the structure of the stand within a section, and adjustment or rejection of a sampling point should not be made on this basis.
Definitions
Upper Storey – The uppermost storey of measurable (≥4cm DBH) trees Middle Storey – A storey of measurable trees with a measurable tree storey
above it and below it Lower Storey – the lowest storey of measurable trees with 1-2 storeys above it Complex – a canopy structure with a range of heights from young trees to older,
taller trees where it is not possible to distinguish individual storeys. Young Trees – This is a storey of non-measurable trees regardless of age (<4cm
DBH) and is NOT counted towards whether a Section is Complex or not. Also the mid-crown height of this storey does not need to be ≥4m away from the next storey.

146 Remember to Save your Edit Session Regularly, Validate the information and Backup the Data
NFI Survey Manual
Defining and Recording Storeys within Sections with more than one Component Group
Summary of rules: 1. When assessing the Storey to which a Component is to be assigned, a Section level
assessment of the storey structure must first be undertaken. 2. If a Component is assigned as Upper storey then for any other Component within that
Section (whether in the same or a different Component Group) to also be assigned as Upper storey they must have a mid-crown height within ±4m of the lowest mid-crown of the Upper storey. The same rule applies for ‘Middle’ and ‘Lower’ storeys.
3. The Upper storey is the storey with the highest mid-canopy height within the Section
regardless of the actual area of the Section covered. 4. All storeys must cover 100% of the Component Group (not necessarily section) in
which they occur. Note that the % Area field refers to the Section area covered, not the Component Group area covered. So if it is decided that CG1 accounts for 60% of the section then you must ensure that each storey within CG1 is recorded as covering 60% of the Section.
5. If a storey is less than 100% across a Component Group this indicates that the
Component Group is too diverse and needs to be further subdivided. Example 1 below is a good illustration of this. If the entire Section was a single Component Group it would have an Upper Storey of 60% and a Lower Storey of 100%. This is not allowed as one of the Storeys does not cover 100% of the Component Group. Thus the Section is divided into two Component Groups.
6. The % Area field refers to the proportion of the storey occupied (by area cover, not
stems) by the Component within that Component Group across the Section and not its actual crown area coverage, i.e. in the field take the storey % set for the CG (60% in the point 4 above) and break it down to reflect the canopy share of the constituent species (e.g. 40% SP and 20% JL).
7. When all Components have been assessed the entire Section area must be accounted
for by one or more tree storeys plus any open areas.
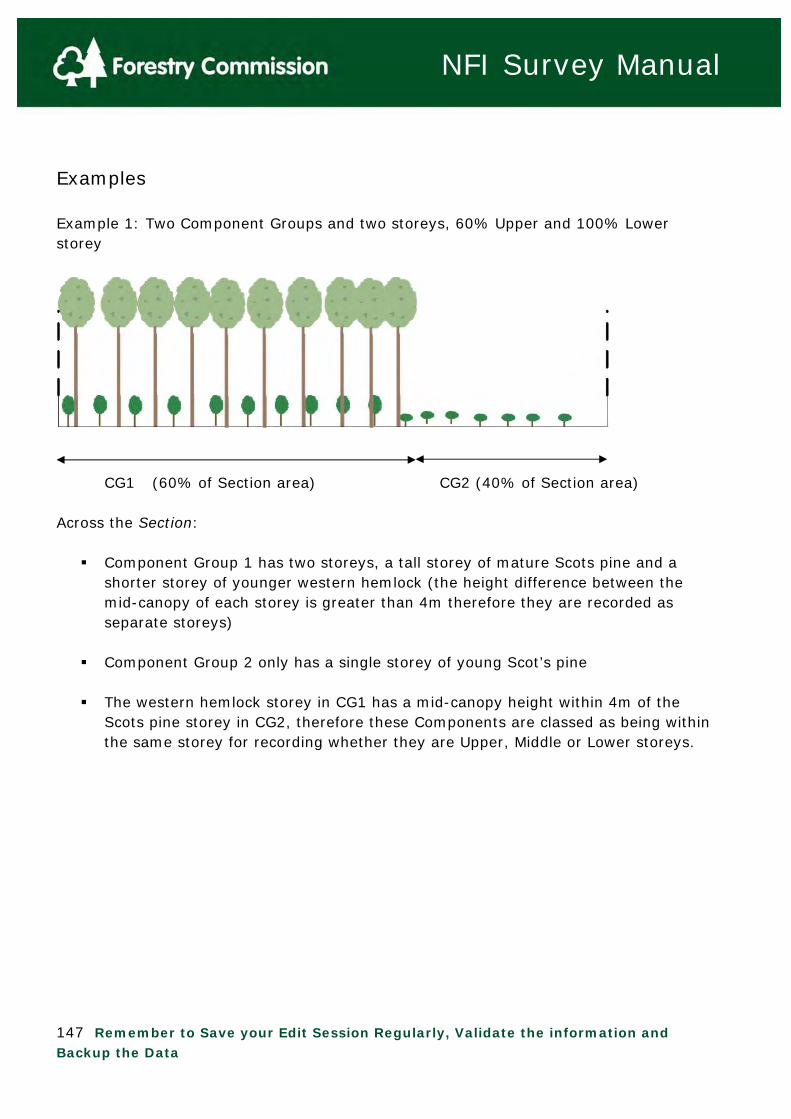
147 Remember to Save your Edit Session Regularly, Validate the information and Backup the Data
NFI Survey Manual
Examples Example 1: Two Component Groups and two storeys, 60% Upper and 100% Lower storey
CG1 (60% of Section area) CG2 (40% of Section area) Across the Section: Component Group 1 has two storeys, a tall storey of mature Scots pine and a
shorter storey of younger western hemlock (the height difference between the mid-canopy of each storey is greater than 4m therefore they are recorded as separate storeys)
Component Group 2 only has a single storey of young Scot’s pine
The western hemlock storey in CG1 has a mid-canopy height within 4m of the
Scots pine storey in CG2, therefore these Components are classed as being within the same storey for recording whether they are Upper, Middle or Lower storeys.
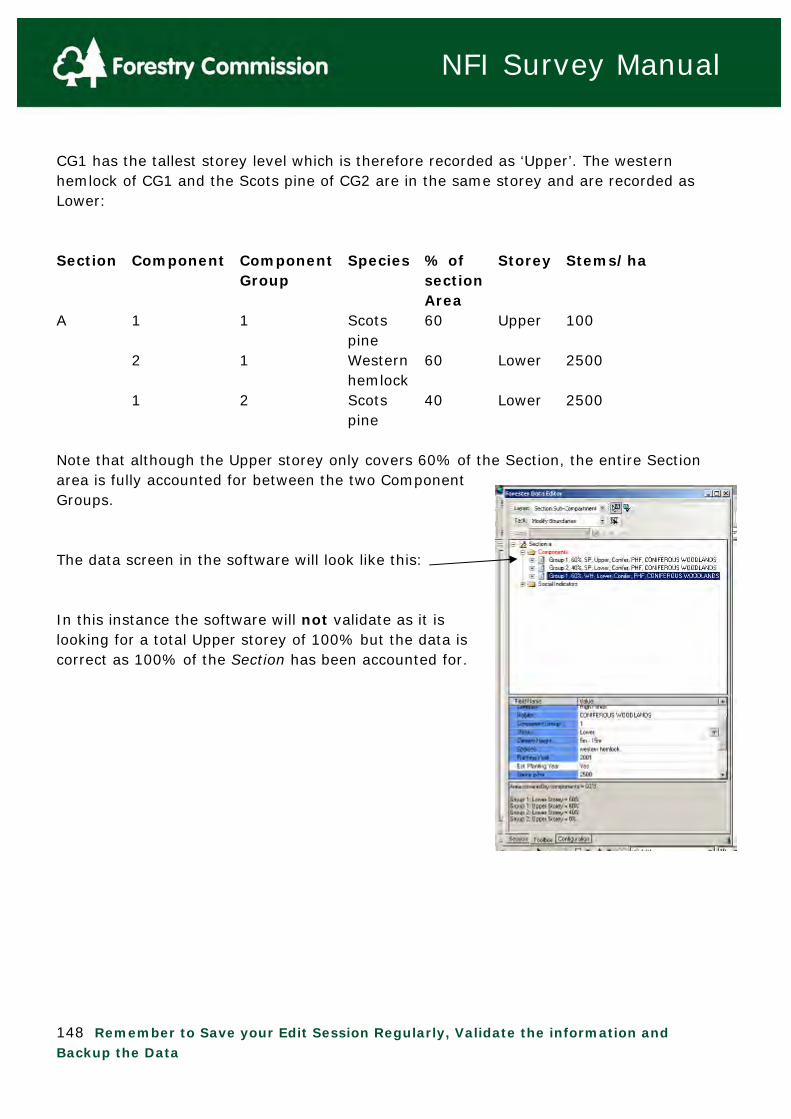
148 Remember to Save your Edit Session Regularly, Validate the information and Backup the Data
NFI Survey Manual
CG1 has the tallest storey level which is therefore recorded as ‘Upper’. The western hemlock of CG1 and the Scots pine of CG2 are in the same storey and are recorded as Lower: Section Component Component
Group Species % of
section Area
Storey Stems/ha
A 1 1 Scots pine
60 Upper 100
2 1 Western hemlock
60 Lower 2500
1 2 Scots pine
40 Lower 2500
Note that although the Upper storey only covers 60% of the Section, the entire Section area is fully accounted for between the two Component Groups. The data screen in the software will look like this: In this instance the software will not validate as it is looking for a total Upper storey of 100% but the data is correct as 100% of the Section has been accounted for.
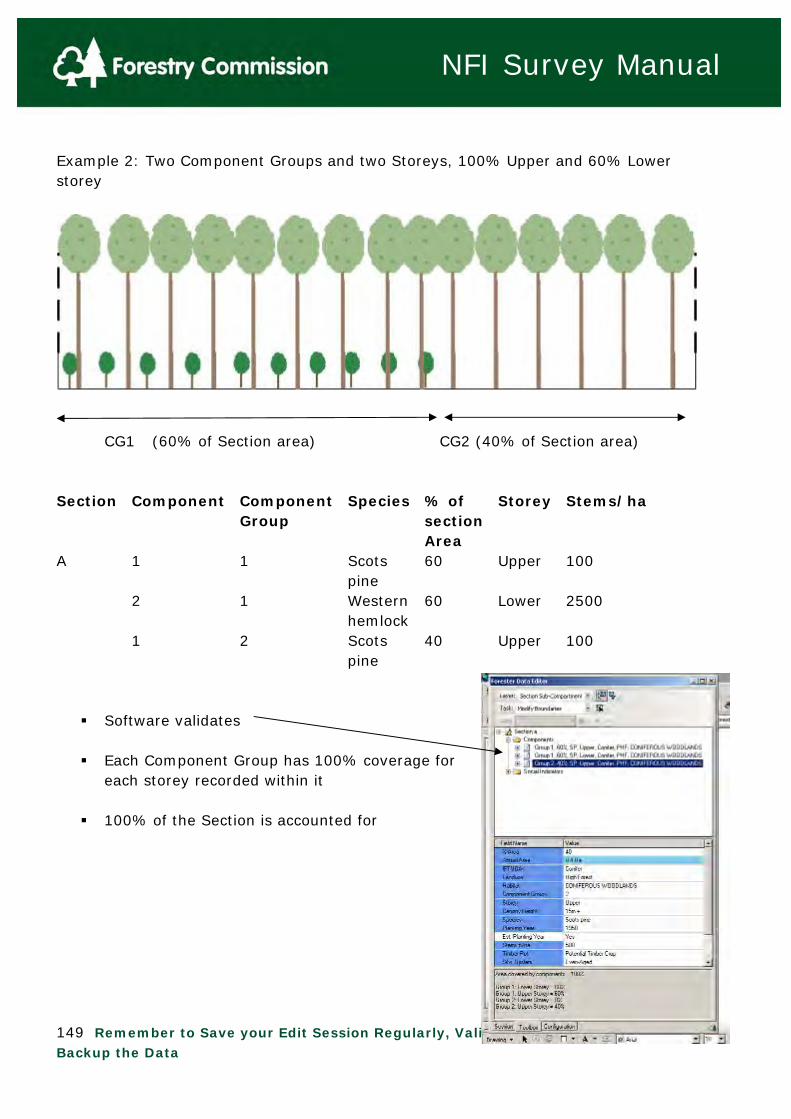
149 Remember to Save your Edit Session Regularly, Validate the information and Backup the Data
NFI Survey Manual
Example 2: Two Component Groups and two Storeys, 100% Upper and 60% Lower storey
CG1 (60% of Section area) CG2 (40% of Section area) Section Component Component
Group Species % of
section Area
Storey Stems/ha
A 1 1 Scots pine
60 Upper 100
2 1 Western hemlock
60 Lower 2500
1 2 Scots pine
40 Upper 100
Software validates Each Component Group has 100% coverage for
each storey recorded within it 100% of the Section is accounted for

150 Remember to Save your Edit Session Regularly, Validate the information and Backup the Data
NFI Survey Manual
Example 3: Four Component Groups and 3 Storeys
CG1 CG2 CG3 CG4 (30% of Section) (20%) (20%) (30%)
Records Section Component Component
Group Species %
Area Storey Stems/ha
A 1 1 Scots pine
30 Upper 300
2 1 Scots pine
20 Lower 800
3 1 Birch 10 Lower 500 1 2 Scots
pine 20 Upper 300
2 2 Silver birch
20 Middle 300
3 2 Scots pine
10 Lower 800
4 2 Oak 10 Lower 800 1 3 Scots
pine 10 Upper 150
2 3 Silver birch
10 Upper 150
3 3 Scots pine
20 Lower 800
1 4 Silver birch
15 Upper 150
2 4 Scots pine
15 Upper 150
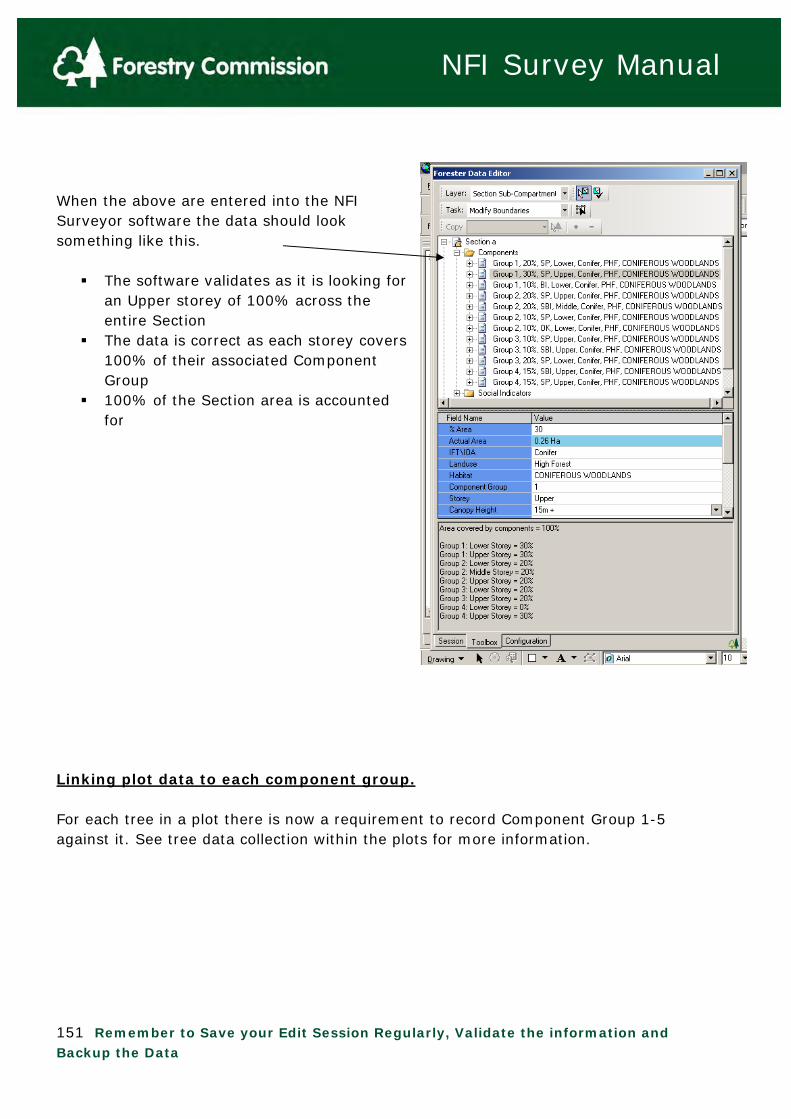
151 Remember to Save your Edit Session Regularly, Validate the information and Backup the Data
NFI Survey Manual
When the above are entered into the NFI Surveyor software the data should look something like this. The software validates as it is looking for
an Upper storey of 100% across the entire Section
The data is correct as each storey covers 100% of their associated Component Group
100% of the Section area is accounted for
Linking plot data to each component group. For each tree in a plot there is now a requirement to record Component Group 1-5 against it. See tree data collection within the plots for more information.

152 Remember to Save your Edit Session Regularly, Validate the information and Backup the Data
NFI Survey Manual
3.7.6 NFI Tree Species list There are only 3 native species of conifer in the UK, the Scot’s pine (Pinus sylvestris) (within the pine zone), yew (Taxus baccata) and juniper (Juniperus communis). Thus all other species of conifer have been introduced into the UK. In the list below species native to the UK are in bold text [Holly species is in blue bold to denote that whilst some holly species are native – primarily Ilex aquifolium, others are not], It is also important to note that not all native species are native to all parts of the UK. In addition not all native species will necessarily occur on all site types (i.e. are not necessarily site native). The tree species within the software are listed (mostly) in alphabetical order in the following sequence: Common Name Latin Name Alder Alnus spp Armand's pine Pinus armandii Ash Fraxinus excelsior Aspen Populus tremula Atlas cedar Cedrus atlantica Austrian pine Pinus nigra var nigra Beech Fagus sylvatica Bhutan pine Pinus wallichiana Big leaf maple Acer macrophyllum
Birch (downy/silver) Betula pubescens/pendula
Bird cherry Prunus padus Bishop pine Pinus muricata Black poplar Populus nigra Black walnut Juglans nigra Blackthorn Prunus spinosa Bornmullers fir Abies bornmuelleriana Box Buxus spp Calabrian pine Pinus brutia Cedar of Lebanon Cedrus libani Cider gum Eucalyptus gunnii Coast redwood Sequoia sempervirens Common alder Alnus gultinosa Common lime Tilia europaea Common walnut Juglans regia Corsican pine Pinus nigra var maritima Crab apple Malus sylvestris Crack willow Salix fragilis Douglas fir Pseudotsuga menziesii Downy birch Betula pubescens Downy oak Quercus pubescens Elm Ulmus spp
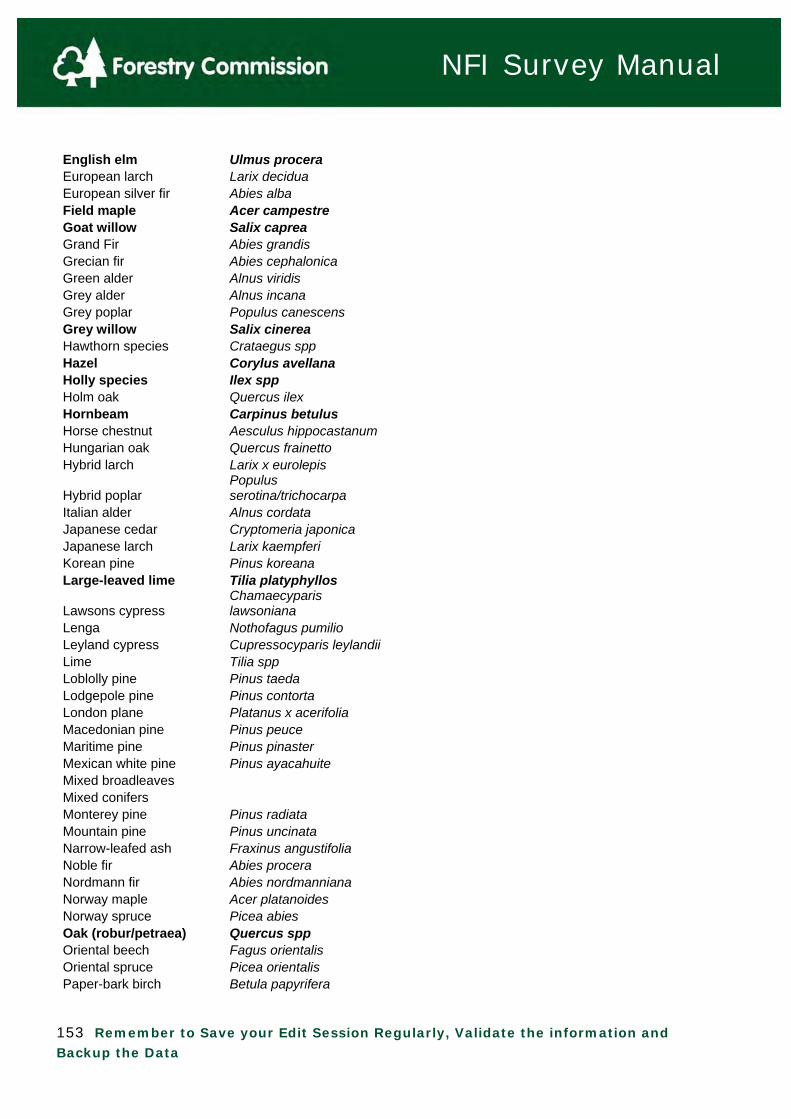
153 Remember to Save your Edit Session Regularly, Validate the information and Backup the Data
NFI Survey Manual
English elm Ulmus procera European larch Larix decidua European silver fir Abies alba Field maple Acer campestre Goat willow Salix caprea Grand Fir Abies grandis Grecian fir Abies cephalonica Green alder Alnus viridis Grey alder Alnus incana Grey poplar Populus canescens Grey willow Salix cinerea Hawthorn species Crataegus spp Hazel Corylus avellana Holly species Ilex spp Holm oak Quercus ilex Hornbeam Carpinus betulus Horse chestnut Aesculus hippocastanum Hungarian oak Quercus frainetto Hybrid larch Larix x eurolepis
Hybrid poplar Populus serotina/trichocarpa
Italian alder Alnus cordata Japanese cedar Cryptomeria japonica Japanese larch Larix kaempferi Korean pine Pinus koreana Large-leaved lime Tilia platyphyllos
Lawsons cypress Chamaecyparis lawsoniana
Lenga Nothofagus pumilio Leyland cypress Cupressocyparis leylandii Lime Tilia spp Loblolly pine Pinus taeda Lodgepole pine Pinus contorta London plane Platanus x acerifolia Macedonian pine Pinus peuce Maritime pine Pinus pinaster Mexican white pine Pinus ayacahuite Mixed broadleaves Mixed conifers Monterey pine Pinus radiata Mountain pine Pinus uncinata Narrow-leafed ash Fraxinus angustifolia Noble fir Abies procera Nordmann fir Abies nordmanniana Norway maple Acer platanoides Norway spruce Picea abies Oak (robur/petraea) Quercus spp Oriental beech Fagus orientalis Oriental spruce Picea orientalis Paper-bark birch Betula papyrifera
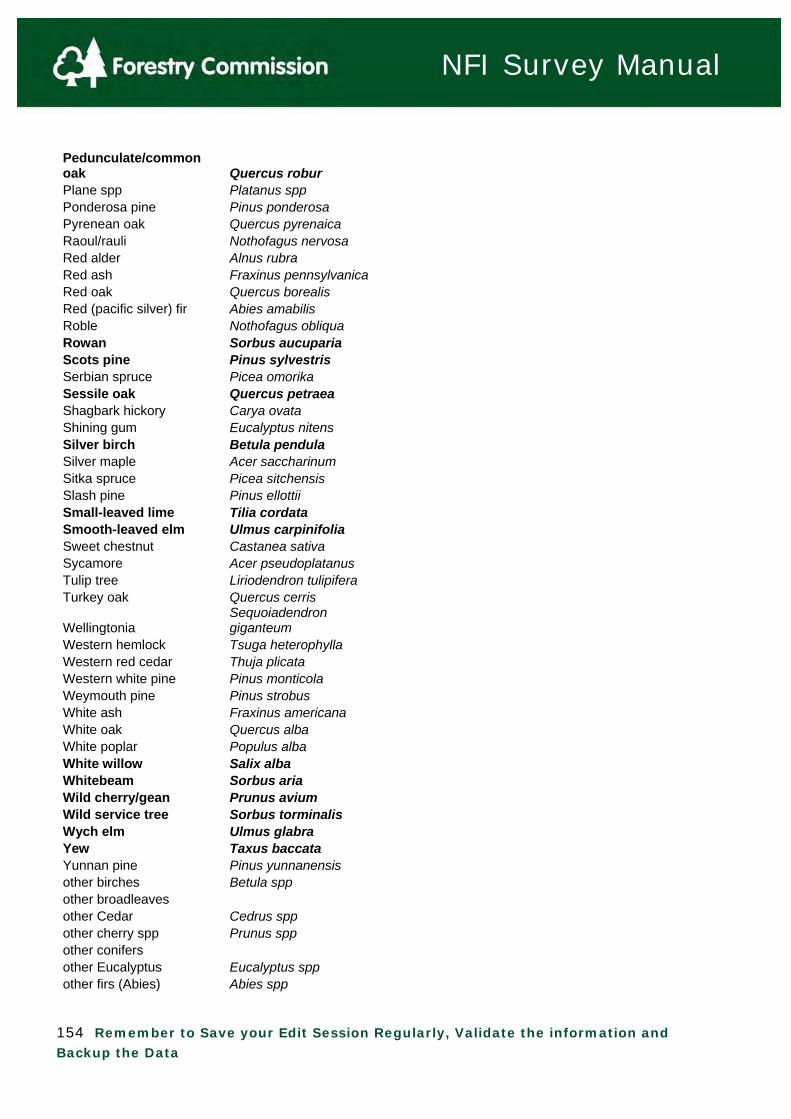
154 Remember to Save your Edit Session Regularly, Validate the information and Backup the Data
NFI Survey Manual
Pedunculate/common oak Quercus robur Plane spp Platanus spp Ponderosa pine Pinus ponderosa Pyrenean oak Quercus pyrenaica Raoul/rauli Nothofagus nervosa Red alder Alnus rubra Red ash Fraxinus pennsylvanica Red oak Quercus borealis Red (pacific silver) fir Abies amabilis Roble Nothofagus obliqua Rowan Sorbus aucuparia Scots pine Pinus sylvestris Serbian spruce Picea omorika Sessile oak Quercus petraea Shagbark hickory Carya ovata Shining gum Eucalyptus nitens Silver birch Betula pendula Silver maple Acer saccharinum Sitka spruce Picea sitchensis Slash pine Pinus ellottii Small-leaved lime Tilia cordata Smooth-leaved elm Ulmus carpinifolia Sweet chestnut Castanea sativa Sycamore Acer pseudoplatanus Tulip tree Liriodendron tulipifera Turkey oak Quercus cerris
Wellingtonia Sequoiadendron giganteum
Western hemlock Tsuga heterophylla Western red cedar Thuja plicata Western white pine Pinus monticola Weymouth pine Pinus strobus White ash Fraxinus americana White oak Quercus alba White poplar Populus alba White willow Salix alba Whitebeam Sorbus aria Wild cherry/gean Prunus avium Wild service tree Sorbus torminalis Wych elm Ulmus glabra Yew Taxus baccata Yunnan pine Pinus yunnanensis other birches Betula spp other broadleaves other Cedar Cedrus spp other cherry spp Prunus spp other conifers other Eucalyptus Eucalyptus spp other firs (Abies) Abies spp

155 Remember to Save your Edit Session Regularly, Validate the information and Backup the Data
NFI Survey Manual
other larches Larix spp other Nothofagus Nothofagus spp other oak spp Quercus spp other pines Pinus spp other poplar spp Populus spp other spruces Picea spp other walnut Juglans spp other willows Salix spp

156 Remember to Save your Edit Session Regularly, Validate the information and Backup the Data
NFI Survey Manual
3.7.7 Estimating Tree Age Background Tree age will be estimated for 3 main groups: young trees, measurable trees and veteran trees. Young trees will be further classified into naturally regenerated, planted or vegetatively regenerated trees (and whips and suckers at a later stage in the NFI): Young Trees (for the purposes of the NFI this is any stem <4 DBH regardless of age)
o Naturally regenerated young conifers and broadleaves Physiological age of naturally regenerated trees i.e. time since
germination (note for young tree transect age of regen. is no longer required).
o Planted young conifers and broadleaves Planting Year - time after planting
o Vegetatively regenerated young conifers and broadleaves Number of years growth of coppice shoots and tree suckers
Measurable Trees o Planting Year where appropriate of Physiological age of conifers and
broadleaves >4cm at dbh Veteran Trees
o Physiological age of veterans

157 Remember to Save your Edit Session Regularly, Validate the information and Backup the Data
NFI Survey Manual
Methods of Ageing Trees
There are several methods of ageing trees which, where appropriate, should be used in conjunction with each other to get as accurate an age as possible for each component. The estimate of the age of the tree should really be within 25% of the actual age when verified by data collected and analysed by FC staff (e.g. tree cores and comparison with accurate FC sub-compartment data base - FC SCDB layer). The following list is probably not complete and will be extended and amended in the future after further research has been undertaken. However, currently the recommended methods are:
1) Reliable information from 3rd parties e.g. owners or estate information with good records (NB - not a vague memory from owner or passing visitor!). This might also include for recently planted sites labels from planting bags etc.
2) For conifers– counting the whorls or marks of old whorls on trees (see Martin’s document for more info). This method is reliable for conifers up to the point when it is possible to get a good view of the whole tree, though care needs to be taken to count all whorls and not miss those close together due to the tree being held “in check” for example by poor site conditions such as waterlogging, frequent and persistent browsing, having roots compacted near to roads, tracks etc. One exception would be where the tree moves from smooth bark to one that develops a thick corky appearance often with deeper fissures. A good example of this is Douglas fir. Fortunately trees that have been ‘in check’ have their narrow growth in the lower part of the tree so it can be seen that growth in the early years was atypical.
3) In addition to counting the whorls in conifers if you can clearly see a lower main branch on conifers (but not an epicormic or partial/damaged branch) it is possible to count the number of branching patterns with a pair of opposite branches and a change in colour and texture of needles along the central spine and add this number to the number of whorls below the point of insertion of the branch to the main stem. The total should then give you the age of the tree. Yes, I’ve done this.
4) For broadleaves counting the number of growth scars (the terminal bud leaves a scar as a puckered ring on the stem) on the whole tree (if small enough to access) or the lowest main branch would be equivalent to that for conifers. Growth scars are generally also indicated by a change in the colour of the bark, and often a change in the direction of the growth (J. Gardiner). Unfortunately, for broadleaves branches are laid down somewhat erratically and thus this method will only give you the age of the branch (unless you can count from the tip of the tree. However, the age of the branch will at least give an indication of minimum age and rates of growth for mature to veteran broadleaves (see point 5 below). Further research will be undertaken on this method in the next year and if successful further information on accuracy for various species will be included at a latter date.

158 Remember to Save your Edit Session Regularly, Validate the information and Backup the Data
NFI Survey Manual
5) The branching pattern of the tree can also give indications of it’s age. Young, unhampered growth tend to be relatively long in relation to the size of a tree, though the extent of this varies by species. Trees of any age held “in check” tend to have relatively short yearly growth (at least for the period of time that they are subject to adverse conditions). Trees that have reached maturity will slow the rate of extension on each branch as the overall volume of branching gets extensive. Over mature to veteran trees (or trees held in severe check) have a complex of short growth spurts and look very tightly drawn in. A table which indicates the average age of maturity for each NFI species will be provided in the future. Knowledge of forestry practices and when they became widespread either across the country or an individual Bid Area can be used to help give a likely date of planting – though can not be used in isolation of other ageing techniques. To this end included in this document are the earliest known planting dates for conifers (and in a spreadsheet in the Additional documents folder, dates of widespread introduction etc), statistics on the Area of: Broadleaved and Coniferous Woodland by Planting Dates Classes in Great Britain, and periods of planting for various FC woodland grant schemes. However, these are for guidance and are not guarantees of planting dates.
6) Use the tree age calculator.xls in your Supporting documents folder. FC Information Note 12 (FCIN12) was converted into a spreadsheet and can be used to help guide tree age estimates. Three conifer species are detailed; their relationships between age, site and diameter can be used to guide tree age estimates for older trees
The other thing that you can do as a surveyor in the field is to look at stumps and count rings if you are content that they are the same planting as the trees still standing. The only uncertainty then is to estimate how many years since the thinning operation took place – how old is the stump? It should also be noted that it is easy to miss rings so the trees will be at least as old as stumps but may be considerably older. Similarly fallen trees might be used to help age the same component that is standing.
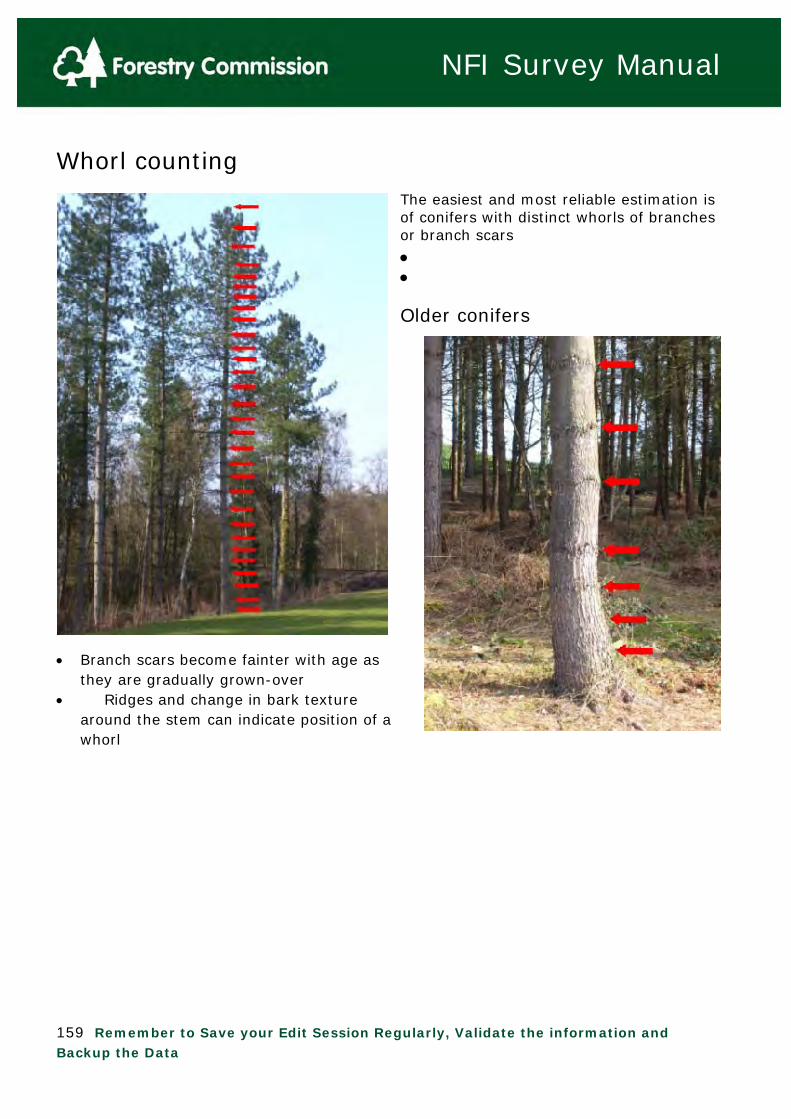
159 Remember to Save your Edit Session Regularly, Validate the information and Backup the Data
NFI Survey Manual
Whorl counting The easiest and most reliable estimation is of conifers with distinct whorls of branches or branch scars
Older conifers
Branch scars become fainter with age as they are gradually grown-over
Ridges and change in bark texture around the stem can indicate position of a whorl
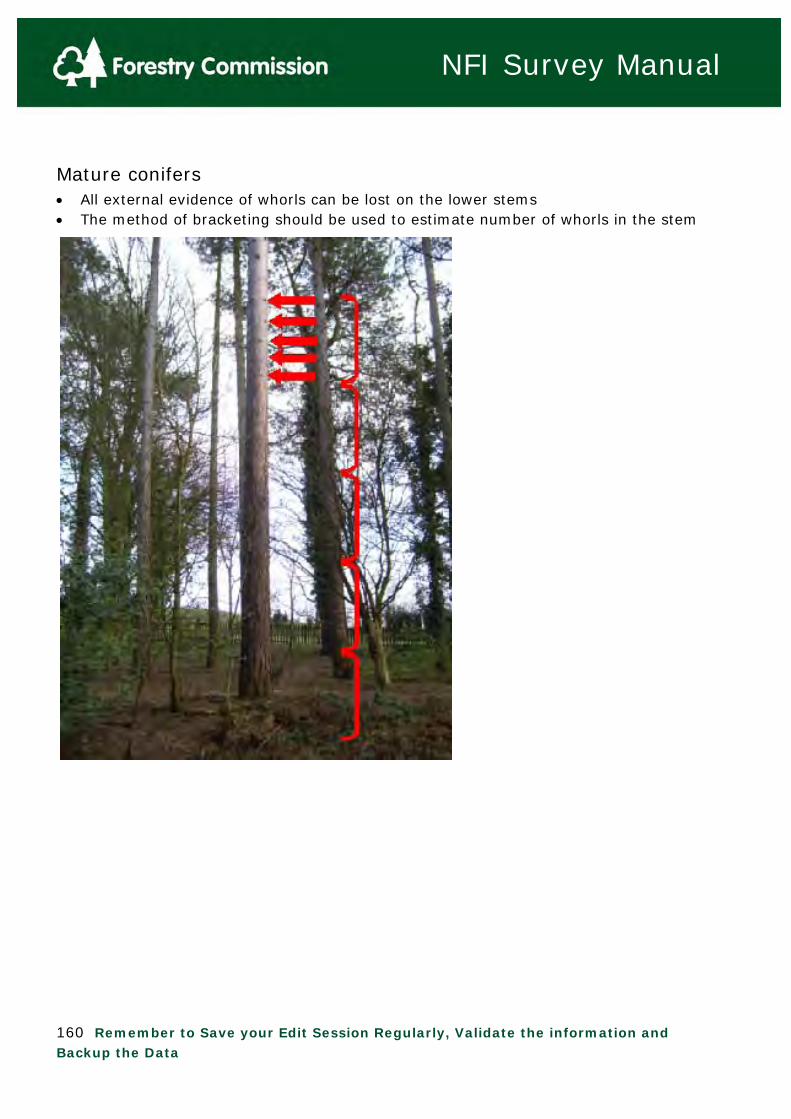
160 Remember to Save your Edit Session Regularly, Validate the information and Backup the Data
NFI Survey Manual
Mature conifers All external evidence of whorls can be lost on the lower stems The method of bracketing should be used to estimate number of whorls in the stem
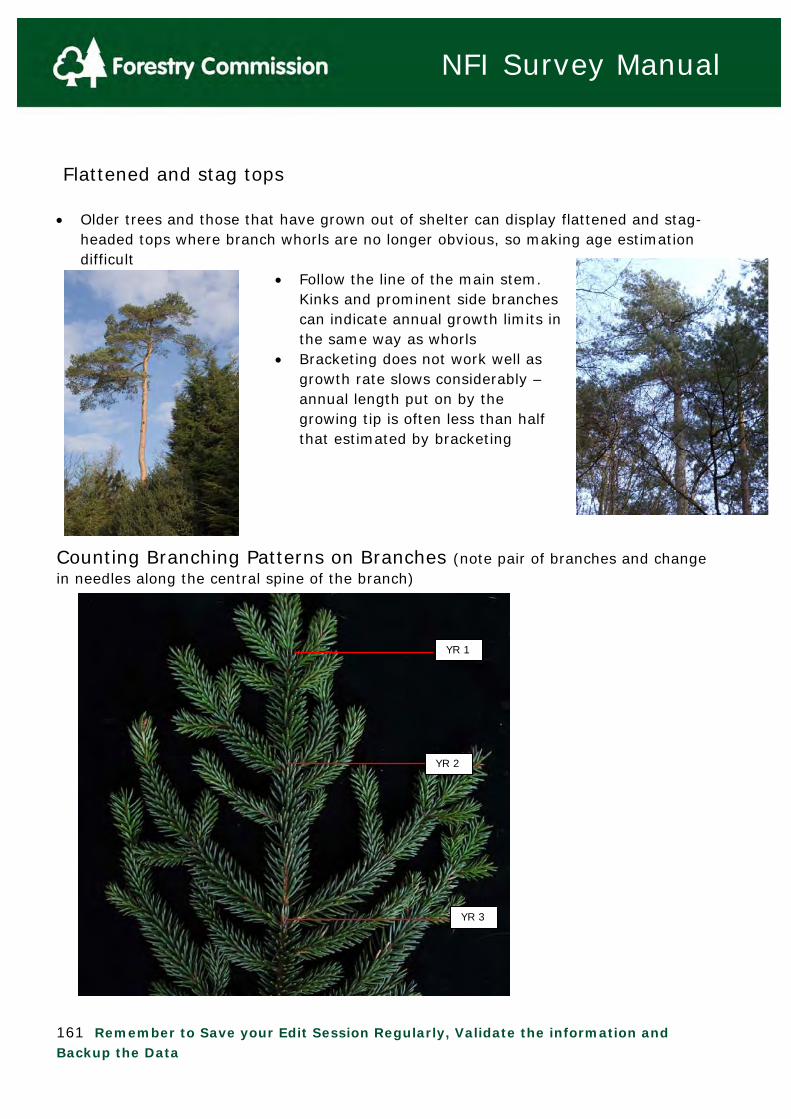
161 Remember to Save your Edit Session Regularly, Validate the information and Backup the Data
NFI Survey Manual
Flattened and stag tops Older trees and those that have grown out of shelter can display flattened and stag-
headed tops where branch whorls are no longer obvious, so making age estimation difficult
Follow the line of the main stem. Kinks and prominent side branches can indicate annual growth limits in the same way as whorls
Bracketing does not work well as growth rate slows considerably – annual length put on by the growing tip is often less than half that estimated by bracketing
Counting Branching Patterns on Branches (note pair of branches and change in needles along the central spine of the branch)
YR 2
YR 3
YR 1

162 Remember to Save your Edit Session Regularly, Validate the information and Backup the Data
NFI Survey Manual
Young Conifers Whorl counting should be used to estimate
seedling age e.g. emergents - current-years seedlings
and 1 year old have (though there is a change in colour in the fresh years growth) – no growth whorls
e.g. Sitka spruce natural regeneration – 4 years (to the left)
. 1u1 or 1+1 are physiologically 2
years old, C1+1½ is 2½ etc (below)

163 Remember to Save your Edit Session Regularly, Validate the information and Backup the Data
NFI Survey Manual
Young Broadleaves
An emergent less than 1 year old beech seedling
Annual growth scars can be used to age branches or if accessible the whole tree
Junction with parent branch indicates another years
Annual growth scar

164 Remember to Save your Edit Session Regularly, Validate the information and Backup the Data
NFI Survey Manual
Age of large and veteran trees FCIN12 (Estimating the Age of Large and Veteran Trees in Britain) has been
converted into a spreadsheet and can be used to help guide tree age estimates spreadsheet requires input of tree dbh, and selection of site type, tree species and
duration of senescence from drop–down menus dbh in centimetres the spreadsheet does not hold model data for all species in all site types and
will return a null value in those instances. Select the site type that is associated with data and best describes site
if it is felt that the tree is senescing i.e. crown die-back (loss of major limbs) and general decline, estimate the length of time this has been occurring e.g. time since large limbs were lost
if tree is not senescent, select zero in drop-down
Before loss of the major branches counting the leaf scar and branching patterns will give a minimum age for the branch and thus the tree.

165 Remember to Save your Edit Session Regularly, Validate the information and Backup the Data
NFI Survey Manual
Earliest Planting Dates for Conifers There are only 3 native species of conifer in the UK, the Scot’s pine (Pinus sylvestris) (within the pine zone), yew (Taxus baccata) and juniper (Juniperus communis). Thus all other species of conifer have been introduced into the UK. The earliest dates of introduction of many species are fairly well catalogued and known. A table listing major conifer species and introduction dates plus other age related data is attached, but further descriptions are provided below The European species were the first to be introduced with Norway Spruce (Picea abies) introduced and grown commercially as early as the 16th century, known to be prior 15481, with the first plantations dating to around 17502 European Larch (Larix decidua) was known to be introduced to the UK by 16291 with the two oldest living specimens by Dunkeld Cathedral planted in 1732. Having been promoted by the 2nd & 3rd Dukes of Atholl this species then became quite widespread from around 1774 both in plantations and as specimen trees. Corsican Pine (Pinus nigra var maritima) was introduced in 17593 and is planted in some parts of the country, whilst Austrian Pine (Pinus nigra var .nigra) was introduced in 18353 but was much less widely or extensively planted. Maritime Pine (Pinus maritima) was introduced prior to 1596 but is restricted in plantations to the New Forest & Wareham with some semi-naturalised pockets in west Surrey and Northamptonshire. It is otherwise infrequent to rare3. Other European species have been mostly ornamental specimens2. Specimens from the Americas started arriving in significant numbers after the explorer David Douglas (1799-1834) returned from his voyage around 1826/1827. Most common exotic conifers were introduced between 1826 and 1864. Douglas Fir (Pseudotsuga menziesii) was introduced in 1826/72. Sitka Spruce (Picea sitchensis), Grand Fir (Abies grandis), and Noble Fir (Abies procera) were all introduced in 18312. These species are all common to frequent in plantations. Japanese Cedar (Cryptomeria Coast redwood (Sequoia sempervirens) was introduced in 1846 but primarily as specimen trees. Western Hemlock (Tsuga heterophylla) was introduced in 1851 and is a frequent to common plantation species that can regenerate prolifically and is often present as regenerating crop when the parent crop has long since been cleared. Lodgepole Pine (Pinus contorta var latifolia), Western Red Cedar (Thuja plicata) and Wellingtonia (Sequoiadendron giganteum) were all introduced in 1853. Lodgepole Pine was quite uncommon but since the 1980s was planted fairly extensively on upland peat in Wales, Scotland & Ireland. Western Red Cedar is an occasional plantation species mostly planted with either hardwoods or larch, and Wellingtonia is a relatively common specimen tree.
166 Remember to Save your Edit Session Regularly, Validate the information and Backup the Data
NFI Survey Manual
Japanese Larch was introduced in 1861 and has been widely planted. A hybrid with European Larch arose around 1897 at Dunkeld, Perthshire and is also widely planted. Scots Pine (Pinus sylvestris), although a native species has also been extensively planted outside it’s native range. Naturally the plant can live for at least a couple of centuries, no one knows for sure the age of the oldest native pine but the oldest one ever scientifically dated was from Glen Loyne and was ~550 years old. Planting of this species as a commercial crop began at least 400 years ago and it is a common crop on heath, bog and other acid habitats. Juniper (Juniperus communis) and Yew (Taxus baccata) are not extensively planted as crops though specimen shrubs/trees are frequently found in gardens, arboreta, and for the latter grave yards.
Earliest Planting Dates for Broadleaves A full list of native broadleaved trees and shrubs that are required for the NFI survey is provided in the attached spreadsheet. The spreadsheet will eventually also contains data on the average life span, dates of widespread commercial planting, approximate ages at various life stages (>mature, mature, and peak growth), and general habitat. Some of the native species are also planted outside their site native habitat or are planted extensively as ornamental trees. For the purposes of this document such species are both native and exotic. Some broadleaved species were introduced6 to parts of the UK in pre-Roman times. These include non-native species of Whitebeam (Sorbus spp.), Crack willow (Salix fragilis), and Hornbeam (Carpinus betulus). Some species introduced by the Romans include the Tulip tree (Linodendron tulipifera) and the Turkey oak (Quercus cerris). Whilst others have been introduced over the centuries by various visitors including the Horse chestnut (Aesculus hippocastanum) circa 1500; Downy Oak (Quercus pubescens) circa 1600; Common Walnut (Juglans regia) pre 1656; Norway Maple (Acer platanoides) c 1685; Holm oak (Quercus ilex) in 1780; non-native Lime (Tilia spp.) in 1820; and Shining gum (Eucalyptus nitens) in 1902. Broadleaved trees have thus been introduced to the UK throughout the history or human habitation and they continue to be introduced to the UK or introduced outside their natural range.

167 Remember to Save your Edit Session Regularly, Validate the information and Backup the Data
NFI Survey Manual
Statistics on the Area of: Broadleaved and Coniferous Woodland by Planting Dates Classes in Great Britain. The following data was obtained from the FC’s Forestry Statistics 2011 - Woodland Areas and Planting, which in turn was derived from the National Inventory of Woodland & Trees, 1995-1999. Regional data for each country is provided in a separate spreadsheet in your Supporting documents folder (file: 3.7.7.1 Tree Ageing spreadsheet.xls). Two thirds of woodland area in GB consists of trees planted after 1950. Conifers tend to have a shorter rotation with 87% of conifers, but just 39% of broadleaves planted after 1950.
Table 1.8 Area of woodland in GB by planting year classes
Planting year England Wales Scotland GB
thousand hectares
Conifers
pre-1861 2 0 4 6
1861-1900 5 0 9 14
1901-1910 1 0 1 3
1911-1920 6 0 7 13
1921-1930 7 1 13 22
1931-1940 16 4 17 37
1941-1950 36 10 43 89
1951-1960 67 33 129 228
1961-1970 74 38 203 314
1971-1980 59 24 234 317
1981-1990 36 21 215 273
1991- 32 17 41 89
Total conifers 340 149 916 1 406
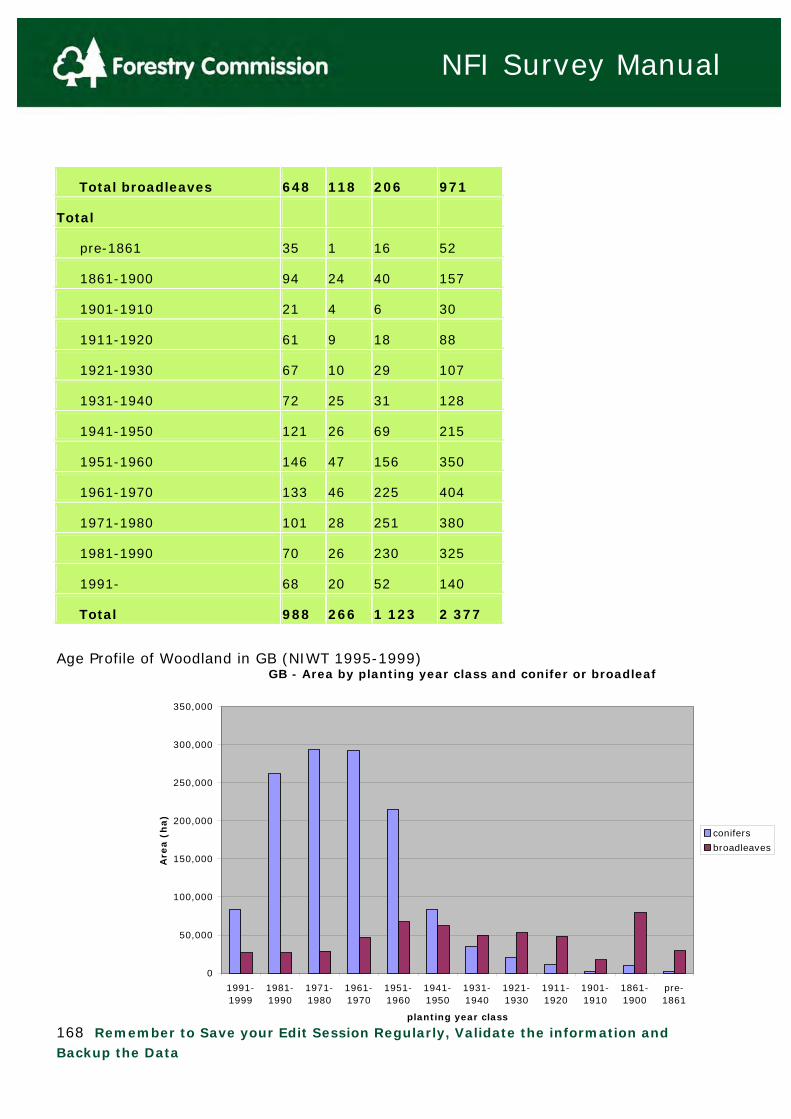
168 Remember to Save your Edit Session Regularly, Validate the information and Backup the Data
NFI Survey Manual
GB - Area by planting year class and conifer or broadleaf
0
50,000
100,000
150,000
200,000
250,000
300,000
350,000
1991-1999
1981-1990
1971-1980
1961-1970
1951-1960
1941-1950
1931-1940
1921-1930
1911-1920
1901-1910
1861-1900
pre-1861
planting year class
Are
a (
ha)
conifers
broadleaves
Total broadleaves 648 118 206 971
Total
pre-1861 35 1 16 52
1861-1900 94 24 40 157
1901-1910 21 4 6 30
1911-1920 61 9 18 88
1921-1930 67 10 29 107
1931-1940 72 25 31 128
1941-1950 121 26 69 215
1951-1960 146 47 156 350
1961-1970 133 46 225 404
1971-1980 101 28 251 380
1981-1990 70 26 230 325
1991- 68 20 52 140
Total 988 266 1 123 2 377
Age Profile of Woodland in GB (NIWT 1995-1999)

169 Remember to Save your Edit Session Regularly, Validate the information and Backup the Data
NFI Survey Manual
References:
1) MACDONALD, J., WOOD R.F., EDWARDS, M.V. and ALDHOUS, J.R. (1957)
Exotic Forest Trees in Great Britain. F.C. Bulletin No. 30, Paper Prepared for British Commonwealth Forestry Conference Australia and New Zealand 1957
2) TRADA (Timber Research and Development Association): Timber Species Database.
3) SAMUEL, C.J.A. (2003) The introduction, evaluation and use of non-native conifer species in Britain: Conifer Network Report, Fourth Meeting (2003) 4) MITCHELL, A. (1992) Trees of Britain & Northern Europe: Collins Field Guide 5) Branching patterns in forest shrubs and understorey trees in relation to habitat: Picket, STA & Kempf JS, JSTOR New Phytologist, Vol 86 No 2 (Oct 1980) pg 219-228
7) HART, C (1994), Practical Forestry for the Agent and Surveyor: 3rd Edition, Alan Sutton Publishing, Stroud, UK
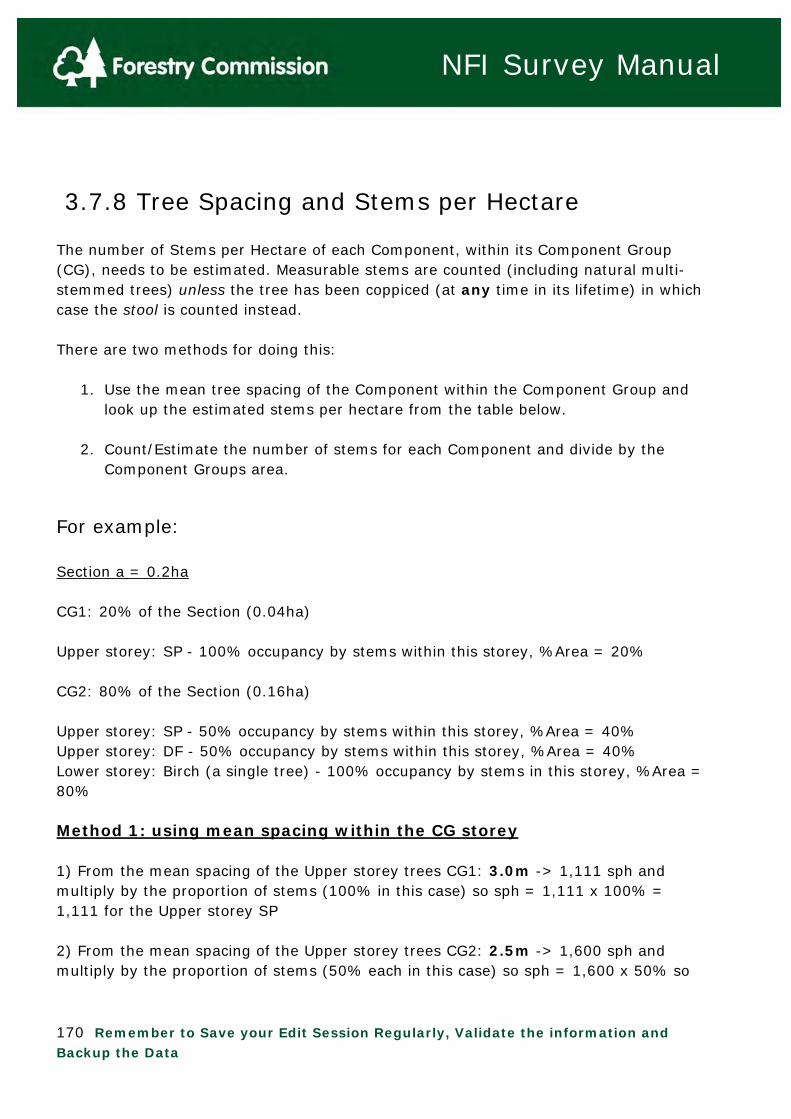
170 Remember to Save your Edit Session Regularly, Validate the information and Backup the Data
NFI Survey Manual
3.7.8 Tree Spacing and Stems per Hectare The number of Stems per Hectare of each Component, within its Component Group (CG), needs to be estimated. Measurable stems are counted (including natural multi-stemmed trees) unless the tree has been coppiced (at any time in its lifetime) in which case the stool is counted instead. There are two methods for doing this:
1. Use the mean tree spacing of the Component within the Component Group and look up the estimated stems per hectare from the table below.
2. Count/Estimate the number of stems for each Component and divide by the
Component Groups area.
For example: Section a = 0.2ha CG1: 20% of the Section (0.04ha) Upper storey: SP - 100% occupancy by stems within this storey, %Area = 20% CG2: 80% of the Section (0.16ha) Upper storey: SP - 50% occupancy by stems within this storey, %Area = 40% Upper storey: DF - 50% occupancy by stems within this storey, %Area = 40% Lower storey: Birch (a single tree) - 100% occupancy by stems in this storey, %Area = 80% Method 1: using mean spacing within the CG storey 1) From the mean spacing of the Upper storey trees CG1: 3.0m -> 1,111 sph and multiply by the proportion of stems (100% in this case) so sph = 1,111 x 100% = 1,111 for the Upper storey SP 2) From the mean spacing of the Upper storey trees CG2: 2.5m -> 1,600 sph and multiply by the proportion of stems (50% each in this case) so sph = 1,600 x 50% so

171 Remember to Save your Edit Session Regularly, Validate the information and Backup the Data
NFI SURVEY MANUAL
sph = 800 for both the Upper storey SP and DF 3) From the mean spacing of the Lower storey trees CG2: a single tree only across the CG so use no. trees/CG area = 1/0.16 = 6 sph (as deriving mean spacing for a single tree is not possible). Method 2: Count/Estimate the number of stems for each Component and divide by CG area So for the above example: CG1: (0.04ha) - Upper storey: SP - 100% occupancy within this storey, %Area = 20%: 45 trees counted within the 0.04ha CG -> 45/0.04 = 1100 sph CG2: (0.16ha) 1) Upper storey: SP - 50% occupancy by stems within this storey, %Area = 40%: 260 trees estimated within the 0.16ha CG -> 260/0.16 = 1625 sph 2) Upper storey: DF - 50% occupancy by stems within this storey, %Area = 40%: 260 trees estimated within the 0.16ha CG -> 260/0.16 = 1625 sph 3) Lower storey: Birch - 100% occupancy by stems in this storey, %Area = 80%: 1 tree counted within the 0.16ha CG -> 1/0.16 = 6 sph Note that a Component cannot have a Stems p/ha of 1. The reasoning behind this is that for there to be 1 stem per hectare the CG would need to be at least 0.67ha with only a single stem of that component present (remember: no. stems/CG area so 1 stem/0.67ha = 1.49sph or 1 when rounding conventions are used to a whole number) assuming normal rounding off of fractions. As it is easy to miss whether there is an extra stem of the component in question or not in a CG of that size it is sensible to assume that there are at least 2 trees per hectare of that component.

NFI Survey Manual
172 Remember to Save your Edit Session Regularly, Validate the information and Backup the Data
Table 3.7.8a: the approximate stems per hectare for given metric mean spacing between the trees.

NFI Survey Manual
173 Remember to Save your Edit Session Regularly, Validate the information and Backup the Data
3.8.0. Sub-Components & Photo Data Within each Component there are a number of Sub-components. Some sub-component fields need to be filled out for each Component whilst others only need to be filled out for certain Components. Photos can be very useful when the surveyor wishes to describe or highlight something. You can add a Photo of the Component if you wish. Right click on the Photo sub-component to Add New Photo.
You will then be asked to browse to the photo.
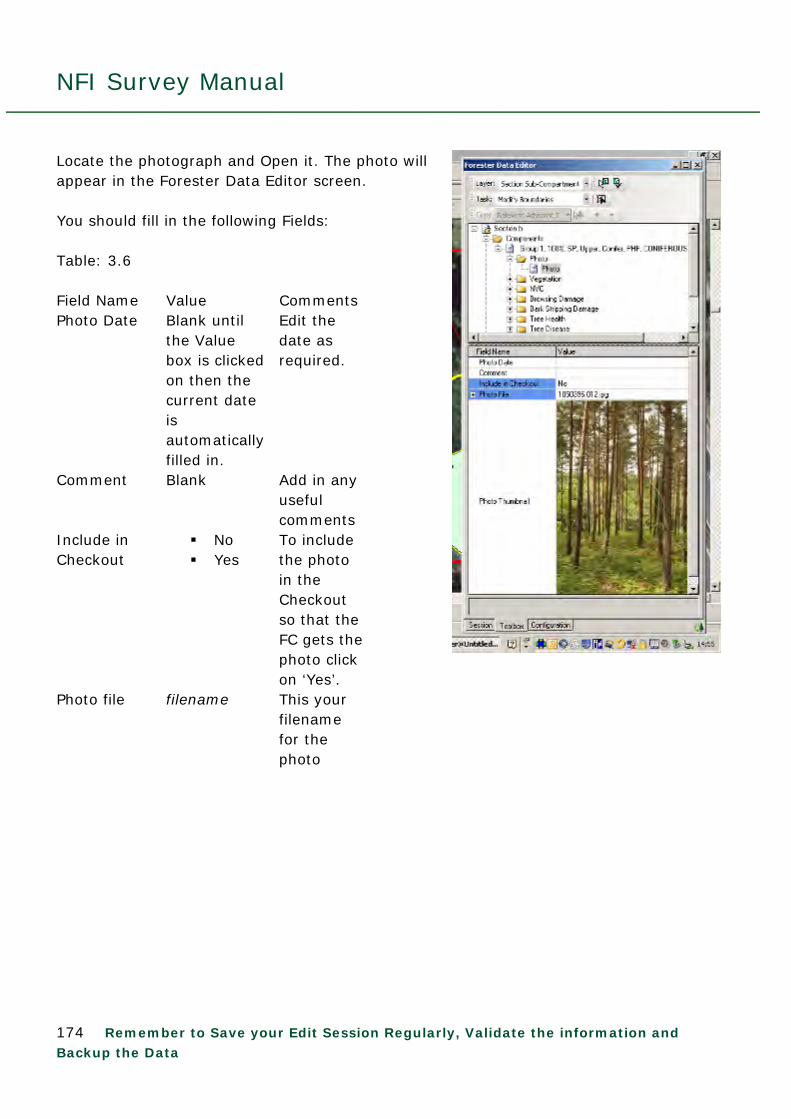
NFI Survey Manual
174 Remember to Save your Edit Session Regularly, Validate the information and Backup the Data
Locate the photograph and Open it. The photo will appear in the Forester Data Editor screen. You should fill in the following Fields: Table: 3.6 Field Name Value Comments Photo Date Blank until
the Value box is clicked on then the current date is automatically filled in.
Edit the date as required.
Comment Blank Add in any useful comments
Include in Checkout
No Yes
To include the photo in the Checkout so that the FC gets the photo click on ‘Yes’.
Photo file filename This your filename for the photo

NFI Survey Manual
175 Remember to Save your Edit Session Regularly, Validate the information and Backup the Data
Cloning Component Data Cloning Component Data can make adding extra Components potentially much easier than having to fill out each Component from scratch, especially where a lot of the information is repeated. It is vital to ensure that any cloned components are correctly, and fully, edited. An example of when cloning can be useful is if a Section has 3 Components within the Upper Storey and this is the only Storey on site. One Component can be created (including all the relevant sub-component data) and then cloned for the remaining Components. Thus only the differences between the Components needs to be edited and all the identical data (e.g. Storey: Upper, Vegetation data etc.) will already be place. To clone a Component right click on the Component to be cloned to get the option box: Choose clone Component and edit the cloned component as required.

NFI Survey Manual
176 Remember to Save your Edit Session Regularly, Validate the information and Backup the Data
3.8.1. Vegetation Data Vegetation data is nearly always recorded against all the Components within the lowest storey of the Component Group. If there is a Young Trees storey then it is recorded against all the components within this storey. If there is only an Upper storey then the vegetation is recorded against the Components in this Storey. The exception to this when vegetation can be attributed to a specific Component regardless of which Storey that Component is within. Double click on the Vegetation sub-component to get the red Vegetation field. Click on the red Vegetation field to get the Layer Data Field.
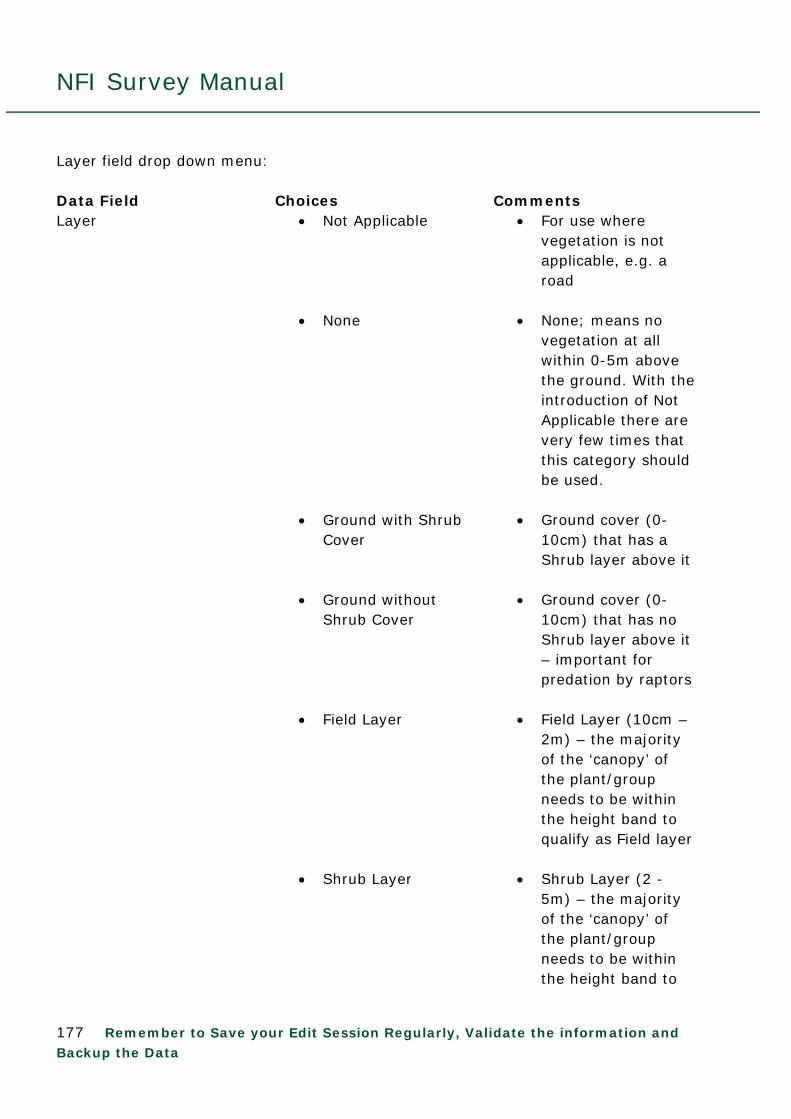
NFI Survey Manual
177 Remember to Save your Edit Session Regularly, Validate the information and Backup the Data
Layer field drop down menu: Data Field Choices Comments Layer Not Applicable
None Ground with Shrub
Cover
Ground without Shrub Cover
Field Layer
Shrub Layer
For use where vegetation is not applicable, e.g. a road
None; means no
vegetation at all within 0-5m above the ground. With the introduction of Not Applicable there are very few times that this category should be used.
Ground cover (0-
10cm) that has a Shrub layer above it
Ground cover (0-
10cm) that has no Shrub layer above it – important for predation by raptors
Field Layer (10cm –
2m) – the majority of the ‘canopy’ of the plant/group needs to be within the height band to qualify as Field layer
Shrub Layer (2 -
5m) – the majority of the ‘canopy’ of the plant/group needs to be within the height band to

NFI Survey Manual
178 Remember to Save your Edit Session Regularly, Validate the information and Backup the Data
qualify as Shrub layer. Note that it is not just Shrubs that are found within this Layer
See 3.8.1.1 for more details
Depending upon your choice you will get different Data Fields to enter:
Not Applicable & None – No other Data Fields to complete Ground with Shrub Cover – see table below Ground without Shrub Cover – see table below Field Layer – see table below Shrub Layer – see table below
Data Field Choices Comments Vegetation Name Varies depending upon
Layer Data Field choice See 3.8.1.1 for Ground, Field and Shrub Layer lists.
Shrubs acting as trees (NB: Only visible if you choose ‘Shrub Layer’ in the Layer data Field)
<null> Yes
Decide if the Shrub Layer vegetation chosen in the Vegetation Name is acting as a tree layer (see Appendix 3.8.1.2
% Cover Free text Enter % of Component area covered by this Sub component.
If Rhododendron is chosen in the Vegetation name the following Data Fields appear: Height Class Less than 1.3m
More than 1.3 m No Rhododendron
Management evidence No Yes
Is there evidence of management of the Rhododendron?

NFI Survey Manual
179 Remember to Save your Edit Session Regularly, Validate the information and Backup the Data
Adding, Deleting and Cloning Vegetation records If there is more than one vegetation layer or multiple species/species groups within vegetation layers you will need to either Add vegetation or Clone vegetation. By right clicking on Vegetation you can Add a new vegetation record. By right clicking on a vegetation layer you can Clone or Delete the vegetation record. Cloning is useful where the new record is similar to the new one you wish to enter and will save you time.
Validation The Vegetation Sub-Component lettering will turn from red to black if the % Cover Data Field is entered correctly. To do this you need to ensure the following:
The total of the 2 Ground Layer cover fields plus the Field layer cover, equals 100%.
No Field, individually, is >100% Note that if you choose Ground with Shrub Cover you will need to complete a Shrub Layer vegetation record, or records, that equal the total cover of the Ground with Shrub Cover Layer data.

NFI Survey Manual
180 Remember to Save your Edit Session Regularly, Validate the information and Backup the Data
3.8.1.1 Vegetation Layers The vegetation layers in the NFI come in 4 categories:
Ground Layer with Shrub cover – height range: 0-10cm Ground Layer without Shrub cover – height range: 0-10cm Field Layer – height range: 10cm – 2m Shrub Layer- height range: 2m – 5m
Ground Layer (<10cm high) To qualify as a layer a plant, or plant group, less than or equal to 10 cm high (middle of growing season) has to be present within the Component Group. Data on the dominant/obvious plants and plant groups must be collected along with data on any other plants/plant groups seen whilst surveying the site. This does not mean that the surveyor is expected to search every square centimetre of ground to ensure all plants have been accounted for. Plants/plant groups intimately mixed with a taller field layer do not qualify. The purpose of the two Ground Layers is to demonstrate wildlife habitat potential, and in the ground layer, the presence of open patches (Ground Layer without Shrub cover) forces mice and voles to traverse open ground and therefore become fairly easy prey. Assess presence and (Enter in % coverage 1-100%) of the following: Ground layer species:
Aquatic Plants Bare Soil Cotton-grass – other Fungi Grasses – Broadleaf Grasses – Fineleaf Hairs-tail cotton-grass Honeysuckle Ivy Leaf Litter Lichens

NFI Survey Manual
181 Remember to Save your Edit Session Regularly, Validate the information and Backup the Data
Mosses and Liverworts Other Plants Rock Tree Seedlings Tree Suckers Water
Field Layer (10cm – 2m high) Herbaceous vegetation, woody perennials and sapling trees, over 10 cm and under 2 m, including woody perennials such as honeysuckle, bramble, raspberry etc. It may also include tree seedlings, saplings and suckers and shrub species which do not exceed the surrounding vegetation by 50 cm in height. Assess presence and (Enter in % coverage 1-100%) of the following: Field layer species: Bilberry Blackthorn Box Bracken Bramble Broom
Buddleia Cotoneaster Cotton-grass – other Dogwood Elder Ferns Forbs Giant Hogweed Giant-rhubarb (Gunnera) Gorse - Common Gorse - Dwarf Gorse - Western Grasses - Broadleaf Grasses - Fineleaf Hairs-tail cotton-grass Heather (Calluna) Himalayan Balsam
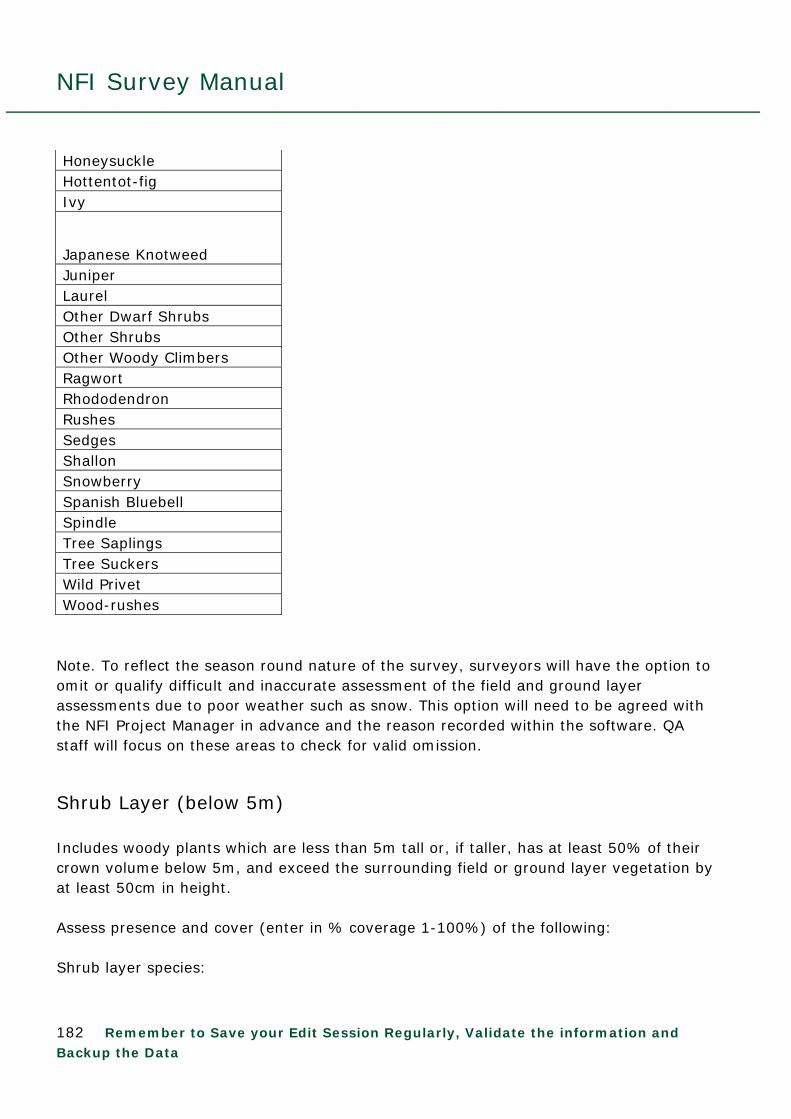
NFI Survey Manual
182 Remember to Save your Edit Session Regularly, Validate the information and Backup the Data
Honeysuckle Hottentot-fig Ivy
Japanese Knotweed Juniper Laurel Other Dwarf Shrubs Other Shrubs Other Woody Climbers Ragwort Rhododendron Rushes Sedges Shallon Snowberry Spanish Bluebell Spindle Tree Saplings Tree Suckers Wild Privet Wood-rushes
Note. To reflect the season round nature of the survey, surveyors will have the option to omit or qualify difficult and inaccurate assessment of the field and ground layer assessments due to poor weather such as snow. This option will need to be agreed with the NFI Project Manager in advance and the reason recorded within the software. QA staff will focus on these areas to check for valid omission.
Shrub Layer (below 5m) Includes woody plants which are less than 5m tall or, if taller, has at least 50% of their crown volume below 5m, and exceed the surrounding field or ground layer vegetation by at least 50cm in height. Assess presence and cover (enter in % coverage 1-100%) of the following: Shrub layer species:

NFI Survey Manual
183 Remember to Save your Edit Session Regularly, Validate the information and Backup the Data
Blackthorn Box Broom Buddleia Cotoneaster Cotton-grass, Other Dogwood
Elder Giant Hogweed Gorse - Common Gorse - Dwarf Gorse - Western Hairs-tail cotton-grass Honeysuckle Ivy Juniper Laurel Other Shrubs Other Woody Climbers Rhododendron Shallon Snowberry Spindle Tree Saplings Tree Suckers Wild Privet
Where shrubs express the morphology of trees (blackthorn etc), special rules are put in place to note and record this, as they can officially be classified as trees and will contribute to woodland area. See section 3.8.1.2 – Where Trees and Shrubs resemble each other.

NFI Survey Manual
184 Remember to Save your Edit Session Regularly, Validate the information and Backup the Data
3.8.1.2 Where Trees and Shrubs resemble each other
Shrubs There will be occasions where species normally recognised as shrubs express the morphology of trees. As a result of this they can form a woodland habitat, expressing all of the characteristics of a woodland habitat. In the last NIWT survey, the following areas of woodland ‘like’ shrubs were found.
blackthorn 842ha elder 891ha hawthorn 6901ha juniper 394ha laurel 113ha (cherry laurel)
Surveyors will be expected to assess the morphology of shrubs to assess if they are ‘treelike’:
Morphology Rules The ‘shrub’ must contain at least one clean bole of any straightness, of greater than 1.3m in height, with a diameter at breast height greater than 4cm.
Where a Shrub is Acting like a Tree then it has to be assessed as though it is a tree with all the respective Component and mensuration data.
Some trees resemble shrubs, due to genetic differences or biotic or abiotic factors. These are still classified as trees within the NFI and as such their area is defined as woodland, with the usual woodland and mensurational rules applying.

NFI Survey Manual
185 Remember to Save your Edit Session Regularly, Validate the information and Backup the Data
3.8.2 NVC Data NVC data should be added to the same Components as the Vegetation data. Open the NVC Sub-component in the usual way (see vegetation sub-component). For the Component Group fill in the following Data Fields: Data Field Choices Comments NVC Class Various
Not applicable – use for areas of non-woodland e.g. urban areas
See 3.8.2.1 for NVC descriptions. Use for:
1. Storeys above the lowest storey, e.g. if there is an Upper and Lower storey, then use for each component in the Upper storey at 100% cover)
2. Areas of non-
woodland e.g. urban areas
% Cover Free Text
You can Add, Delete and Clone NVC records in the normal manner.
You will need to ensure that the total NVC coverage equals 100%.
NVC is recorded for the lowest storey within the Component Group. Thus if the Component Group only contains an Upper storey then NVC is recorded against the components within this storey. If it contains an Upper and Lower storey then the NVC is recorded against the Lower storey.

NFI Survey Manual
186 Remember to Save your Edit Session Regularly, Validate the information and Backup the Data
3.8.2.1 NVC KEY NATIONAL VEGETATION CLASSIFICATION KEY FOR THE NATIONAL FOREST INVENTORY Derived from the JNCC key in NVC field guide to woodland by J.E. Hall, K.J. Kirby, and A.M. Whitbread, adapted by J. Gardiner with feedback from B. Averis: April 2010 TO DETERMINE WHICH PART OF THE KEY TO USE ANSWER WHICH IS THE MOST APPROPRIATE STATEMENT OF THE FOLLOWING TWO:
1) THE WOODLAND APPEARS TO BE MOSTLY NATURAL WITH SITE NATIVE SPECIES PREDOMINATING IN THE CANOPY
Go to NVC KEY FOR NATIVE WOODLANDS
2) THE WOODLAND APPEARS TO BE ARTIFICIAL AND EITHER MOSTLY NON-SITE
NATIVE OR PLANTED
Go to NVC KEY FOR PLANTATIONS

NFI Survey Manual
187 Remember to Save your Edit Session Regularly, Validate the information and Backup the Data
NVC KEY FOR NATIVE WOODLANDS 1) IS THE AREA DOMINATED BY ANY OF THE FOLLOWING SPECIES: hawthorn, blackthorn, willow or juniper. (NB gorse and broom are not considered as woodland sections for the NFI and should thus be ignored if they form the upper canopy) if YES go to 2 if NO go to 5 2) IS THE AREA DOMINATED BY WILLOW (sometimes with birch co-dominant but not solely dominant) IF YES go to 3 IF NO go to 4

NFI Survey Manual
188 Remember to Save your Edit Session Regularly, Validate the information and Backup the Data
3) AREA DOMINATED BY WILLOW with possibly some downy birch– select most appropriate NVC class from the five options below (3a-3e): 3a) Area dominated by DOWNY WILLOW possibly with some other willows (but in this community these will always be in the form of low sprawling bushes), confined to high altitude (630m – 900m) rocky slopes and ledges often with an understorey of dwarf shrub species such as: HEATHER, BILBERRY, COWBERRY. This community can overlap in altitudinal range with Juniper scrub community W19.
W20: DOWNY WILLOW – GREAT WOODRUSH scrub There are no sub-communities 3b) Area comprised of a mixture of GREY WILLOW, EARED WILLOW and BAY WILLOW, and possibly also some DOWNY BIRCH. Field layer swampy with five or more of the following species: CUCKOOFLOWER, MEADOWSWEET, COMMON MARSH-BEDSTRAW, MARSH-MARIGOLD, BOTTLE SEDGE, BOGBEAN, WATER HORSETAIL, ANGELICA, VALERIAN, WATER AVENS and MARSH HAWK’S BEARD. There is often an extensive moss carpet with amongst other species: Calliergon cuspidatum, Rhizomnium punctatum and Mnium hornum usually present.
W3: BAY WILLOW – BOTTLE SEDGE woodland There are no sub-communities 3c) GREY WILLOW/EARED WILLOW and DOWNY BIRCH and may share dominance. COMMON REED and SPHAGNUM MOSSES should be frequent and/or abundant. ALDER may be present and can share dominance with birch and willow.
W2: GREY WILLOW – DOWNY BIRCH – COMMON REED woodland There are two sub-communities:
a) ALDER can be dominant and COMMON REED is always present normally with MEADOWSWEET, Sphagnum palustre never present and Sphagnum generally low cover;
b) DOWNY BIRCH is always the dominant shrub and Sphagnum is dominant in the ground storey, although COMMON REED may still be abundant, ALDER is frequently absent.
3d) This community is dominated by GREY WILLOW, but usually with some DOWNY BIRCH (though never more than 50% canopy cover). There is often a carpet of mosses but never Sphagnum. Field layer is generally an open scatter

NFI Survey Manual
189 Remember to Save your Edit Session Regularly, Validate the information and Backup the Data
of herbs, with different species attaining local prominence (including WATER MINT, MEADOWSWEET, YORKSHIRE FOG, COMMON BENT, BRAMBLE and SOFT RUSH) however the commonest species is COMMON MARSH-BEDSTRAW. This community is usually found on wet mineral soils on the margins of standing or slow-moving water, and in moist hollows. It often forms a narrow fringe around ponds, and lakes particularly in the lowlands.
W1: GREY WILLOW – COMMON MARSH-BEDSTRAW woodland There are no sub-communities 3e) DOWNY BIRCH always present and generally dominant, often with abundant GREY WILLOW and occasionally ALDER. Generally PURPLE MOOR-GRASS is also abundant to dominant (although this species may be entirely absent). HEATHER and/or CROSS-LEAVED HEATH may be abundant (NB HEATHER species do not occur in any other wet woodland type i.e. W1-W3, W5-W7). Other features which distinguish this community from other wetland communities potentially dominated/co-dominated by DOWNY BIRCH are that: COMMON REED is never present; BOTTLE SEDGE is rarely present and is so is never more than 10% cover; EARED, GREY & GOAT WILLOW are the only willows generally present in W4 (although occasionally there may be a bit of BAY WILLOW); MARSH-MARIGOLD is never present; COTTONGRASSES may be present in W4 and are not found in any other wetland community. If this description appears accurate go to 9d W4 otherwise reconsider scrub types 4) Area dominated by one or more of the following: BLACKTHORN, HAWTHORN, OR JUNIPER – if so see which of the three options below best fits. 4a) Area dominated almost exclusively by BLACKTHORN (no HAWTHORN present), often with very little ground flora at all below, but BRAMBLE, COMMON NETTLE & CLEAVERS can be common.
W22: BLACKTHORN-BRAMBLE There are 3 sub-communities:
a) GORSE may be present, also IVY, RED CAMPION, HONEYSUCKLE, and BLUEBELL are often prominent in the ground layer together with COMMON CHICKWEED;
b) GORSE and HONEYSUCKLE are never present; c) Grasses are conspicuous including COCK’S-FOOT, also RIBWORT
PLANTAIN, YARROW and on sea-cliffs SEA CAMPION and THRIFT may occur.

NFI Survey Manual
190 Remember to Save your Edit Session Regularly, Validate the information and Backup the Data
4b) Stand dominated by HAWTHORN or a HAWTHORN/BLACKTHORN MIX, often (but not necessarily) with BRAMBLE and some DOGROSE. IVY is usually present among the ground flora sometimes with COMMON NETTLES and CLEAVERS.
W21: HAWTHORN-IVY SCRUB There are 4 sub-communities:
a) Field layer usually impoverished and sparse, BRAMBLE always present, JUNIPER never present;
b) DOG’S MERCURY usually present; also BLUEBELL, and WOOD ANEMONE may be present, JUNIPER never present;
c) JUNIPER often present as is SOFT-RUSH; and VIOLET may be abundant; d) Found on deeper soils, WAYFARING-TREE always present and often
abundant, as is the case with JUNIPER, but YORKSHIRE FOG, MALE FERN and BRACKEN never present.
4c) Area dominated by JUNIPER but there may be a few scattered DOWNY BIRCH or ROWAN trees. Ground flora usually a mixture of BENT grasses, WOOD SORREL, WOOD-RUSH, TORMENTIL and HARD FERN, but may just be a profusion of various mosses. Only found in Scotland, Northumberland, the Pennines and the Lake District.
W19: JUNIPER – WOOD SORREL woodland There are 2 sub-communities:
a) generally heathy, with WAVY HAIR-GRASS, BILBERRY and HEATH BEDSTRAW always present and usually abundant but DOG’S MERCURY never present;
b) generally grassy or bare/mossy, but VIOLET always present normally with WOOD ANEMONE, DOG’S MERCURY may be abundant and LADY’S BEDSTRAW, SHEEP’S SORREL and MEADOW BUTTERCUP may be present.
5) ALDER always present and generally dominant, sometimes with tall willows such as CRACK WILLOW, ALMOND WILLOW, PURPLE WILLOW, OSIER and/or ASH. -
Go to 6 ALDER not present –
Go to 7

NFI Survey Manual
191 Remember to Save your Edit Session Regularly, Validate the information and Backup the Data
6) Alder Woodland – choose the best option from the four listed below (6a – 6d): 6a) ALDER may be dominant or may share dominance with DOWNY BIRCH and/or GREY WILLOW. Frequently this community is found as the early stages of colonisation of fen/swamp. The canopy is uneven and individual trees are frequently rather precariously perched on tussocks of ground vegetation and regularly fall over, or remain as standing dead trees. The tussocks normally consist of at least some GREATER TUSSOCK-SEDGE. Some of the following may also be present: WOOD CLUB-RUSH, LESSER POND-SEDGE, MARSH THISTLE, BITTERSWEET, BROAD BUCKLER FERN, BUGLE, OPPOSITE-LEAVED GOLDEN SAXIFRAGE, MEADOWSWEET, COMMON MARSH-BEDSTRAW, WATER MINT, BRAMBLE, VALERIAN and COMMON REED.
W5: ALDER – GREATER TUSSOCK-SEDGE woodland There are three sub-communities:
a) BITTERSWEET and GREATER TUSSOCK-SEDGE are normally present and tall herbs are generally dominant, this is the most likely sub-community in Scotland
b) BRAMBLE, COMMON MARSH-BEDSTRAW and the moss Eurhynchium sp. are always present with YELLOW PIMPERNEL, BROAD BUCKLER FERN and GREATER TUSSOCK-SEDGE normally also present (this sub-community is mostly confined to Broadland);
c) BRAMBLE, GREATER TUSSOCK-SEDGE, OPPOSITE-LEAVED GOLDEN SAXIFRAGE, and the mosses Eurhynchium sp. and Brachythecium sp. are always present, COMMON MARSH-BEDSTRAW, CUCKOOFLOWER, BUGLE and MARSH THISTLE also normally present (this sub-community is uncommon).
6b) ALDER may be dominant or may share dominance with DOWNY BIRCH and/or GREY WILLOW, or various other willows named in the sub-community descriptions below. On drier stands SYCAMORE, OAK or ASH may be present at low frequency. SCOTS PINE may also invade or be planted. The field layer is species-poor with COMMON NETTLE generally dominant, frequently in association with CLEAVERS, or BRAMBLE. However, COMMON NETTLE may be entirely absent. COMMON REED and GREATER TUSSOCK-SEDGE are rarely present and if so are at low cover. Generally found as small isolated stands, or narrow fringes of slow moving rivers or pools.
W6: ALDER-COMMON NETTLE woodland There are 5 sub-communities:
NFI Survey Manual
192 Remember to Save your Edit Session Regularly, Validate the information and Backup the Data
a) ALDER is always the dominant tree species. COMMON NETTLE is always present and is normally abundant, CLEAVERS are also normally present and abundant. In patches where these two species are not prominent there can be CREEPING BUTTERCUP, GROUND IVY, HOGWEED and various grasses;
b) CRACK-WILLOW is always present and is normally the dominant tree species however there is normally a thick shrub layer consisting of scrubs and saplings. COMMON NETTLE is always present in the ground flora though rarely achieves more than 25% cover;
c) ALMOND WILLOW, PURPLE WILLOW and OSIER are the dominant tree species with the ground flora similar to sub-community (a);
d) BRAMBLE is always present and can form a thick layer, ALDER is normally the dominant tree with ELDER normally present in the shrub layer though generally at low cover. COMMON NETTLE is normally present and can be abundant, RAMSONS may be abundant, as can BUTTERBUR;
e) DOWNY BIRCH is always present and is often the dominant tree, there are frequently individual SCOTS PINE present, and the ground flora normally consists of BRAMBLE, HONEYSUCKLE and BROAD BUCKLER FERN.
6c) ALDER is often not as abundant as in the previous types. ASH and/or SILVER BIRCH are frequent with mixtures of GREY WILLOW, HAZEL, and HAWTHORN in the shrub layer. Ground flora includes MEADOWSWEET, YELLOW PIMPERNEL, CREEPING BUTTERCUP, LADY FERN, ROUGH MEADOW-GRASS, CREEPING SOFT-GRASS, TUFTED HAIR-GRASS and OPPOSITE-LEAVED GOLDEN SAXIFRAGE. PURPLE MOOR-GRASS is never present. Generally found on wet flushes, the bottom of slopes, or sometimes on periodically flooded alluvial flats.
W7: ALDER – ASH – YELLOW PIMPERNEL woodland There are 3 sub-communities:
a) ALDER is normally the dominant tree species and the ground flora normally has CREEPING BUTTERCUP, OPPOSITE-LEAVED GOLDEN SAXIFRAGE and COMMON NETTLE which are frequent to dominant;
b) ALDER is generally dominant but ASH and DOWNY BIRCH are quite frequent. MEADOWSWEET, YELLOW PIMPERNEL and CREEPING BUTTERCUP are normally present in the ground flora, whilst COMMON NETTLE is generally absent and is never greater than 10% cover;
c) ALDER commonly shares dominance with ASH also DOWNY BIRCH and sometimes OAK or other broadleaves. TUFTED HAIR-GRASS is likely to be both present and dominant. WOOD SORREL is frequent and can be abundant in the ground layer, VIOLET, WILD STRAWBERRY, MALE FERN, HEATH BEDSTRAW, BRACKEN, WOOD SAGE, PIGNUT and IVY are often present.

NFI Survey Manual
193 Remember to Save your Edit Session Regularly, Validate the information and Backup the Data
6d) ALDER may be dominant or may share dominance with DOWNY BIRCH and/or GREY WILLOW, or various other willows but never present are: COMMON NETTLES, GREATER TUSSOCK SEDGE, CLEAVERS, COMMON REED, BITTERSWEET, OPPOSITE-LEAVED GOLDEN SAXIFRAGE, WATER MINT, and YELLOW PIMPERNEL. Instead there may be an abundance of PURPLE MOOR GRASS (although this species may be entirely absent) and HEATHER, COTTONGRASS and/or CROSS-LEAVED HEATH may be abundant (NB HEATH and COTTONGRASS species do not occur in any other wet woodland type i.e. W1-W3, W5-W7). If this description appears accurate go to 9d W4 otherwise reconsider other types 7) Non-Alder Woodland Communities – choose one of the four options below: 7a) BEECH is frequent and usually abundant in the canopy. (N.B. There are complications with identifying BEECH stands under the following circumstances: i) OAK or ASH may be more common in gaps where regeneration is occurring; ii) in the south-west beech may be invading an oak wood; iii) old beech stands can occur beyond the recognised range of native beech, e.g. in northern England or Scotland. Under these circumstances the following rules should apply i) If within the beech zone key as beech woodland- if outside beech zone key using the plantations key; ii) treat invading beech stands according to the relative abundance of the beech, oak etc in terms of their contribution to the canopy; iii) stands beyond the native range should be assessed using the plantations key.
If this description appear accurate Go to 8 7b) YEW is frequent and abundant in the canopy with virtually no large emergent trees forming an over storey. (Some yew stands on the Downs may formerly have had a beech canopy, but where this has now been blown down and the yew forms the canopy, count as a yew stand). The shade of the yew is generally so dense that virtually nothing grows with it except in small gaps where DOG’s MERCURY, COMMON NETTLE, IVY and FALSE BROME may be found. Young ASH, COMMON WHITEBEAM, (in a few sites BOX), BEECH, ELDER may also occur. This community is most common on moderate-steep limestone or chalk slopes with thin soils (more rarely on moderate acid rocks in the Lake District). Most common in south-east England.
If this description appears accurate assign as W13: YEW woodland There are two sub-communities:

NFI Survey Manual
194 Remember to Save your Edit Session Regularly, Validate the information and Backup the Data
a) DOG’S MERCURY is virtually absent, COMMON WHITEBEAM is frequent in the canopy;
b) DOG’S MERCURY is always present and is normally abundant, ELDER if frequent in the canopy.
7c) SCOT’S PINE is frequent and abundant in the canopy over a heathy ground flora with some of HEATHER, BELL HEATHER, CROSS-LEAVED HEATH, BILBERRY, COWBERRY, WAVY HAIR-GRASS. Mosses (including Sphagnum) may be abundant. Strictly speaking this applies only to native pine stands, so it does not occur in England or Wales. Some mature pine stands that have invaded former bog should be assigned to W18 Bog Woodland
If this description appears accurate assign as W18: SCOT’S PINE- MOSS (Hylocomium splendens) woodland.
There are five sub-communities: a) this sub-community may include a few exotic conifers, CREEPING LADY’S
TRESSES are always present but this is the only sub-community where BILBERRY is absent;
b) BILBERRY and COWBERRY always present, usually with minimum cover of 10%, PURPLE MOOR GRASS may be present and abundant, this species is only found in (b&d);
c) JUNIPER may be present and fairly abundant, HAIRY WOOD-RUSH is always present though normally at a low level, this species is only found in (a&c);
d) Sphagnum is always present, PURPLE MOOR GRASS may also be present and abundant, however HEATH BEDSTRAW, WOOD SORREL, and TORMENTIL are always absent;
e) Birch can make up to 25% of canopy cover. Sphagnum and Dicranum majus are always present, Thuidium tamariscinum is generally present and abundant but Polytrichum sp. is generally of very low cover or absent.
7d) Woods not as above, commonly with OAK, BIRCH, ASH or ELM as the main species but also including stands of HORNBEAM, LIME, SWEET CHESTNUT, SYCAMORE etc., occurring a range of soil types from acid to base-rich, from sands to heavy clays.
Go to 9

NFI Survey Manual
195 Remember to Save your Edit Session Regularly, Validate the information and Backup the Data
8) Beech Woods – see three options below 8a) Beech stands on base-rich, often thin soils, e.g. over chalk. The ground flora as always under beech may be sparse, but DOG’S MERCURY, FALSE BROME, ENCHANTER’S NIGHTSHADE, LORDS-AND-LADIES, SANICLE or other species suggesting base-rich conditions are likely to be present. IVY is also often common. Associated trees and shrubs may include ASH, HAZEL, COMMON WHITEBEAM, YEW, HAWTHORN or SYCAMORE. Found on free-draining base-rich soils with a pH usually between 7 and 8. Largely in the south-east of Britain, often on the steep drift-free faces of chalk escarpments.
W12: BEECH-DOG’S MERCURY woodland There are three sub-communities:
a) usually found on deeper moister soils, DOG’S MERCURY and BRAMBLE are generally the dominant ground flora, but RAMSONS, WOOD ANEMONE, BROAD BUCKLER-FERN and LESSER CELANDINE may also be abundant.
b) usually on very shallow dry chalk or limestone soils, IVY is often the dominant vegetation along with DOG’S MERCURY AND BRAMBLE, but HOGWEED, COW PARSLEY, FALSE OAT-GRASS and BUGLE may be present at low cover;
c) found on steep rocky soil and is characterised by a dense yew understorey and is thus closely related to W13 (YEW woodland, section 8b). The ground flora is sparse.
8b) Beech stands on very acid “heathy” sites usually with some WAVY HAIR-GRASS, BILBERRY or HEATHER present at least near or under gaps. BRACKEN, BENT grasses and WOODRUSHES also often common. HOLLY, OAKS and BIRCHES are the commonest associated trees and shrubs. Found on very base-poor acid soils mainly in southern England but long-established plantations in the north have many of the same characteristics. Some stands were formerly treated as wood-pasture and contain large old pollards.
W15: BEECH-WAVY HAIR-GRASS woodland. There are four sub-communities largely reflect trends in the level of light below the canopy from virtually no ground flora in the densest shade to HEATHER under stands with a discontinuous canopy cover:
a) the vegetation is overwhelmingly dominated by BEECH almost to the total exclusion of all other plants;
b) OAK may be frequent in the canopy with WAVY HAIR-GRASS constant in the ground flora, YORKSHIRE FOG may be present at a low level and Hylocomium splendens may be present;

NFI Survey Manual
196 Remember to Save your Edit Session Regularly, Validate the information and Backup the Data
c) OAK is constant and may be as frequent in the canopy as BEECH, HOLLY is also common. BILBERRY, BRACKEN, WAVY HAIR-GRASS and Mnium hornum are constant in the ground flora;
d) HEATHER is a constant and normally dominant feature of the ground flora, BRACKEN is also constant.
8c) Beech stands often with a HOLLY understorey, and a ground flora showing neither indicators of very base-rich or of very acidic conditions. Frequently BRAMBLE or BRACKEN are common (depending on light levels), but other species such as IVY, WOOD-MELICK, WOOD-MILLET, BUTCHER’S-BROOM or TUFTED HAIR-GRASS are also frequent. Generally found on moderately acid brown earth soils, often with superficial deposits (e.g. clay-with-flints) over the southern chalk. Mainly in southern England but long-established plantations in the north and in the south-west may have these characteristics.
W14: BEECH-BRAMBLE woodland. There are no sub-communities. 9) Oak and Mixed Deciduous Woods – choose one of the four options (9a-d) below 9a) Woods found on very acidic soils usually with OAK or BIRCH as dominants (sometimes self-sown PINE on lowland heaths), HOLLY and ROWAN are common understorey species, but often there is little shrub layer at all. At least one of: BILBERRY, WAVY HAIR-GRASS or HEATHER present and prominent, but with few other species, often with some BRACKEN, and extensive moss carpets.
Go to 10 9b) Woods found on base-rich soils. ASH, usually present, often abundant, but a range of other species including ELM, LIME, SYCAMORE, or OAK (less often SWEET CHESTNUT, HORNBEAM) may be present. HAZEL is usually common in the understorey and in the south-east is often joined by FIELD MAPLE, WILD PRIVET, DOGWOOD, SPINDLE, and WAYFARING TREE. Ground flora includes at least some species characteristic of base-rich conditions such as DOG’s MERCURY, FALSE BROME, ENCHANTER’s NIGHTSHADE, COMMON NETTLE, HERB ROBERT, CLEAVERS, RAMSONS, ROUGH MEADOW GRASS or GROUND IVY.
Go to 11

NFI Survey Manual
197 Remember to Save your Edit Session Regularly, Validate the information and Backup the Data
9c) Woods on moderately acid soils, often brown earths. OAK and BIRCH tend to dominate, but locally SWEET CHESTNUT, LIME and HORNBEAM may occur (also plantations of a variety of species) HAZEL and HAWTHORN are the commonest shrub species where an understorey is present. The ground flora usually has abundant (BRAMBLE, BRACKEN, HONEYSUCKLE) or BLUEBELL or is dominated by grasses (SOFT GRASSES, BENTS, WAVY HAIR-GRASS, SWEET VERNAL-GRASS). Species characteristic of base-rich conditions (cf 9b) are absent (or very scarce).
Go to 12 9d) Wet birch wood, but can vary from very boggy peat to semi-dry peaty/gley with high water table. DOWNY BIRCH always present and usually dominant, although GREY WILLOW can share dominance. ALDER may be present and can be abundant; EARED WILLOW may also occur but never at greater than 10% cover. Ground flora usually dominated by PURPLE MOOR-GRASS, although this may be absent – but if so the ground flora will be dominated by either Sphagnum and/or Polytrichum spp. SOFT-RUSH and TUFTED HAIR-GRASS may dominate in some areas interspersed by one or more of the three main ground flora species listed above. On the driest stands SILVER BIRCH and OAK may occur but neither attain more than 10% cover, ROWAN may also be present with up to 33% cover. Here the field layer may consist of BRAMBLE, BROAD BUCKLER-FERN and HONEYSUCKLE.
W4: DOWNY BIRCH – PURPLE MOOR-GRASS woodland There are three sub-communities:
a) BRAMBLE and BROAD BUCKLER-FERN are generally both present, this sub-community tends to be found on drier soils;
b) SOFT-RUSH is always present and TORMENTIL, TUFTED HAIR-GRASS and CREEPING SOFT-GRASS are also often present, MARSH THISTLE, ANGELICA and VALERIAN are only found in this sub-community;
c) SPHAGNUM always present and generally carpets the ground, COTTONGRASSES HEATHER and CROSS-LEAVED HEATH may be present.
10) Acid Oak-Birch Woods – see two options below 10a) OAKS and/or BIRCHES predominate. [In one sub-community Juniper is present and can be abundant (W17d – Birch/Juniper wood)]. The ground flora is characterised by extensive and very diverse moss and liverwort cover on the ground, over rocks, tree bases etc. (In ungrazed stands the abundance of mosses & liverworts may be reduced but the diversity remains high). Key species are Dicranum majus, D. scoparium, Hylocomium splendens, Plagiothecium undulatum, Pleurozium scheberi, Polytrichum sp., Rhytidiadelphus loreus, and Thuidium tamariscinum, four or more of which are likely to be
NFI Survey Manual
198 Remember to Save your Edit Session Regularly, Validate the information and Backup the Data
present. BILBERRY, BRACKEN, WOOD SORREL, WAVY HAIR-GRASS and HARD FERN are the most commonly occurring ground flora species, but HEATHER, BELL HEATHER and HEATH BEDSTRAW are also frequent, particularly in the north. Found on very acid soils, that are often shallow and rocky, the community is found mainly in the cooler, wet north-west of Britain. W17 may possibly occur in fragmentary form in the gill woods of the south-east, but otherwise is absent from the lowlands where W16 replaces it.
W17: OAK-BIRCH-MOSS (Dicranum majus) woodland There are 4 sub-communities partly reflecting variations from “Atlantic” to more “Continental” conditions; there is also a grassy version related to W11 (see below):
a) the constants of this sub-community are OAK, and the mosses Rhytidiadelphus loreus, Polytrichum and Dicranum majus. Other species, which are almost always present, are WAVY HAIR-GRASS, and the mosses Hylocomium splendens, Pleurozium schreberi, Plagiothecium undulatum, Dicranum scoparium and Mnium hornum. Bryophytes are the dominant feature of this sub-community with a diverse array over boulders forming a thick mat;
b) similar to sub-community (a) but lacking the diversity of bryophytes; c) ericoids are generally infrequent and of low cover, with grasses the
dominant feature of this sub-community; d) JUNIPER may be present, OAK is generally absent from the canopy with
DOWNY BIRCH dominant. HEATHER is almost always present and BILBERRY is always present, otherwise there may be a mixture of ericoids, grasses and bryophytes.
10b) OAKS or BIRCHES are usually predominant (locally there may be some PINE on former heath). Understorey may not be well-developed but HOLLY, ROWAN or HAWTHORN are the most likely species to occur (JUNIPER does not occur). Ground flora species are often poor and BRACKEN may be dominated, but usually there will also be WAVY HAIR-GRASS or BILBERRY. Species such as BLUEBELL, and others found in part 11 of the key are generally absent. Mosses and liverworts may be common but there are generally relatively few species and Hylocomium splendens or Polytrichum sp. are lacking. This community is found on very acidic, often sandy very free draining, soils in the lowlands and upland fringes. W16 does however spread into the uplands, particularly in south-west England, south Wales, Yorkshire and Northumberland. Some long-established stands are former coppice or wood-pasture, but it is also typical of stands developed on lowland heath.
W16: OAK-WAVY HAIR-GRASS There are two sub-communities:
a) SILVER BIRCH is constant in the canopy and is normally dominant with BRACKEN and WAVY HAIR-GRASS dominating the field layer;

NFI Survey Manual
199 Remember to Save your Edit Session Regularly, Validate the information and Backup the Data
b) SESSILE OAK is the constant and usually dominant canopy species with BILBERRY often abundant in the field layer along with WAVY HAIR-GRASS, HEATHER (up to 90% cover compared with maximum of ~33% for sub-community a) and BRACKEN, bryophytes may also be frequent and diverse, including Plagiothecium undulatum, Lophocolea sp., Rhytidiadelphus loreus, R. triquetrus and Thuidium tamariscinum all of which are absent from (a).
11) Base-rich Woodland – see two options below 11a) ASH/OAK woodland sometimes with occasional LIME, HORNBEAM, SYCAMORE, and/or ELM. The understorey tends to have HAZEL and HAWTHORN with FIELD MAPLE, DOGWOOD or SPINDLE, WILD PRIVET or WAYFARING TREE also present. Ground flora often dominated by DOG’s MERCURY, WOOD ANEMONE, TUFTED HAIR-GRASS, IVY, RAMSONS and/or BLUEBELL. Other base-rich indicators may be common for example FALSE BROME, ENCHANTER’s NIGHTSHADE, LORDS-AND-LADIES, COMMON NETTLES, CLEAVERS, WOOD AVENS, HERB ROBERT, and GROUND IVY. HONEYSUCKLE may also be present. This woodland is typically found on calcareous mull soils, generally in warmer low rainfall areas, though it does extend into the NW uplands.
W8: ASH-FIELD MAPLE-DOG'S MERCURY woodland There are seven sub-communities, which show a well defined geographical division:
a) found in the south-east, particularly east Midlands, East Anglia and the Weald. HAZEL is constant with ASH, OAK and FIELD MAPLE normally present, whilst in the ground layer the prominent features are GROUND IVY, BUGLE and PRIMROSE;
b) found mostly in the south-east, but with patchy distribution in the north-west including Scotland, on heavier soils. Characteristics are similar to (a) with differences mostly in the field layer with WOOD ANEMONE (constant) and LESSER CELANDINE generally more abundant than DOG’S MERCURY and BLUEBELL;
c) found mostly in the south-east, but with patchy distribution in the north-west, on heavier soils. HAZEL and ASH are constant in the canopy but otherwise the woody cover varies widely. The constants in the field layer are TUFTED HAIR-GRASS and BRAMBLE both of which are normally abundant.
d) found in the oceanic south-west. The canopy layer is generally species poor compared to other sub-communities, with the ground layer dominated by IVY, DOG’S MERCURY and BRAMBLE;
e) this is characteristic of the north-west, particularly Yorkshire, Derbyshire and the Welsh Marches, it is the only sub-community to occur with any frequency in Scotland. ASH can be the overwhelming dominant in the

NFI Survey Manual
200 Remember to Save your Edit Session Regularly, Validate the information and Backup the Data
canopy but is frequently joined by SYCAMORE and ELM. The ground flora is characterised by the predominance of COMMON NETTLE, CLEAVERS, and HERB ROBERT amongst the DOG’S MERCURY and BRAMBLE;
f) this is characteristic of the north-west, particularly Yorkshire, Derbyshire and the Welsh Marches, but on deeper soils than sub-community (e). The canopy structure is similar to (e) but the ground layer is distinguished by the prominence of RAMSONS a constant and normally dominant species;
g) this is also characteristic of the north-west but is quite rare having been recorded only in parts of the Wye Valley, Derbyshire and fragmented stands in the Yorkshire Dales. The tree canopy is more diverse than the other north-west sub-communities as is the field layer with the only constants being DOG’S MERCURY and WOOD SAGE but usually at low cover intermixed with a species rich ground flora.
11b) ASH and ELM woods, found mainly in the uplands or upland fringe; ROWAN usually present but shrubs such as FIELD MAPLE, DOGWOOD, SPINDLE, WILD PRIVET etc. absent or very rare. WOOD SORREL is generally frequent (it is much less common in W8), some LORDS-AND-LADIES may be present, but GROUND IVY and HONEYSUCKLE are not present. The field layer species tend to form complex mosaics on irregular topography. DOG’s MERCURY and BLUEBELL are sometimes dominant, ENCHANTER’s NIGHTSHADE, WOOD AVENS, HERB ROBERT and FALSE-BROME frequent. Ferns are very prominent and grasses may be frequent though not dominant. Mosses often form an abundant and diverse patchy mat however in terms of species present (rather than abundance and diversity of mosses generally) it is difficult to distinguish between W8 and W9 unless Hylocomium splendens, Hylocomium brevirostre, Dicranum scoparium, or Isothecium myosuroides are present in which case defer to W9: or if Dicranella heteromalla is present defer to W8. There are a few other definitive mosses but these require good ID skills to distinguish between the individual species in a Genus. The community occurs on permanently moist brown soils derived from calcareous bedrock and superficial deposits in the sub-montane climate of north and west Britain.
W9: ASH-ROWAN-DOG’s MERCURY woodland There are two sub-communities:
a) often diverse canopy cover which may include both OAKS, SILVER BIRCH, BEECH, SCOT’S PINE, HOLLY and ELDER, the ground layer is also diverse but almost always contains MALE FERN and the moss Eurhynchium. There may also be present CLEAVERS, COMMON NETTLE, BRAMBLE, RED CAMPION, IVY, LORD’S AND LADIES and COW PARSLEY none of which occur in sub-community (b);
b) less diverse canopy cover containing none of the above trees, but may contain GREY WILLOW and POPLAR, which are not found in (a). The
NFI Survey Manual
201 Remember to Save your Edit Session Regularly, Validate the information and Backup the Data
ground flora generally contains MEADOWSWEET, PIGNUT, and MARSH HAWK’S-BEARD along with the constant WOOD SORREL.
12. Mesotrophic Soil Woodlands – see two options below 12a) BIRCH and OAK stands often with HAZEL and ROWAN. BRACKEN and BRAMBLE do occur (cf W10) but also with several of the following: WOOD SORREL, SWEET VERNAL-GRASS, WAVY HAIR-GRASS, CREEPING SOFT-GRASS, BENT grasses, TORMENTIL, and HEATH BEDSTRAW. Mosses are more abundant than in W10, and include Hylocomium splendens, Pleurozium schreberi, Dicranum majus, Rhytidiadelphus loreus, and Rhytidiadelphus squarrosus (none of which are found in W10). The type occurs on free-draining moderately acid, base-poor brown earths in the cooler wetter parts of Britain, mainly the uplands and upland fringes
W11: OAK-BIRCH-WOOD SORREL woodland There are four sub-communities covering Atlantic to more Continental conditions, but all tend to have a very grassy appearance. :
a) SESSILE OAK is a constant and often a dominant canopy species, BROAD BUCKLER-FERN and/or MALE FERN are usually present in the ground layer and may be dominant. Carpets of bluebells are often found in spring/ early summer (this is the only sub-community where cover is greater than 25%). In Wales this is the sub-community most likely to be encountered;
b) DOWNY BIRCH tends to be the dominant tree species with ROWAN almost always present, constants in the field layer are SWEET VERNAL GRASS, WOOD SORREL, TORMENTIL, HARD FERN, and the mosses Thuidium tamariscinum and Dicranum majus;
c) OAK or DOWNY BIRCH may be dominant but ASH or HAWTHORN are never present, constants in the ground layer are SWEET VERNAL GRASS, WAVY HAIR-GRASS, HEATH BEDSTRAW, VIOLET, and the mosses Thuidium tamariscinum and Hylocomium splendens. BILBERRY, may be found and is unique to this sub-community;
d) the tree canopy is similar to sub-community (c) and the ground flora may be similar to (c) but the following species are never present BRAMBLE, BROAD BUCKLER-FERN, HEATHER, BELL HEATHER and the mosses Pleurozium schreberi, Dicranum majus, and Atrichum undulatum.
12b) OAK/BIRCH stands, sometimes with small amounts of CHESTNUT, LIME, and HORNBEAM. BEECH, ASH or SYCAMORE occur only rarely. HAZEL and HAWTHORN common in understorey. Ground flora of BRAMBLE, BRACKEN, HONEYSUCKLE with WOOD ANEMONE or BLUEBELL sometimes dominant, but lacking species typical of either very base rich or acidic conditions.

NFI Survey Manual
202 Remember to Save your Edit Session Regularly, Validate the information and Backup the Data
Found mainly on base-poor brown earths in the lowlands of Britain. In the upland fringes ASH and SYCAMORE may occur (they are usually absent) over stands with CREEPING SOFT GRASS, FERNS and WOOD SORREL (closely related to W11 above).
W10: OAK-BRACKEN-BRAMBLE woodland There are 5 sub-communities:
a) PEDUNCULATE OAK and SILVER BIRCH may share dominance together with a diverse array of other woody associates, the ground flora may also contains most of the species found in the other sub-communities, but the diversity for an individual community may be low, and the species composition unremarkable;
b) PEDUNCULATE OAK is generally the dominant canopy species but SESSILE OAK is always absent, as are RHODODENDRON, ROWAN, CRAB APPLE, BLACKTHORN, and FIELD MAPLE which are commonly found in other sub-communities. WOOD ANEMONE, BRAMBLE, HONEYSUCKLE and BLUEBELL are normally present but other common plants of this NVC type are absent such as BENT grasses, SWEET VERNAL GRASS, FALSE BROME, WAVY HAIR-GRASS, FOXGLOVE, HEATH BEDSTRAW, SOFT RUSH, BILBERRY, RASPBERRY, DOG ROSE, and BROOM;
c) Often dominated by PEDUNCULATE OAK with an under storey of HAZEL, but SESSILE OAK may also be present, the ground flora always contains BRAMBLE, and HONEYSUCKLE with IVY almost always present and often abundant;
d) PEDUNCULATE OAK and SILVER BIRCH may share dominance, BRACKEN is always present and may be dominant in the field layer together with BRAMBLE, and YORKSHIRE FOG the latter of which is almost always present (a distinctive feature of this sub-community). Exotic conifers are frequently planted in this sub-community;
e) there may be no real dominant canopy species, the ground flora is characterised by the dominance of WOOD SORREL and CREEPING SOFT-GRASS, with LEMON SCENTED-FERN often present and exclusive to this sub-community. In contrast species frequently associated with all other sub-communities are absent including HOGWEED, GROUND IVY, HARD FERN, GORSE, SELF-HEAL, and COMMON COW-WHEAT.

203 Remember to Save your Edit Session Regularly, Validate the information and Backup the Data
NFI Survey Manual
Plantation and Non-Site Native Woods Assess which of the following three statements is most appropriate: The soil is more or less permanently wet as a result of a high water table with Sphagnum including Sphagnum palustre present and a prominent feature
Go to 4 The soil is more or less permanently wet as a result of a high water table but with Sphagnum absent
- Go to 5 The soil is generally dry soils (with any wet patches infrequent and small in size)
- Go to 6

NFI Survey Manual
204 Remember to Save your Edit Session Regularly, Validate the information and Backup the Data
4) Wet soils with Sphagnum prominent – choose the best option from the four below 4a) Base rich and nutrient rich soils, generally found on wet flushes, the bottom of slopes, or sometimes on periodically flooded alluvial flats. Ground flora includes MEADOWSWEET, YELLOW PIMPERNEL, CREEPING BUTTERCUP, LADY FERN, ROUGH MEADOW-GRASS, CREEPING SOFT-GRASS, TUFTED HAIR-GRASS and OPPOSITE-LEAVED GOLDEN SAXIFRAGE. PURPLE MOOR-GRASS is never present. There may be individuals trees/shrubs or seedlings of the following species ALDER, ASH, SILVER BIRCH, GREY WILLOW, HAZEL, and HAWTHORN. (HEATHER, WAVY HAIR-GRASS and PURPLE MOOR-GRASS are never present).
W7: ALDER – ASH – YELLOW PIMPERNEL woodland There are 2 sub-communities in which Sphagnum occurs:
a) MEADOWSWEET, YELLOW PIMPERNEL and CREEPING BUTTERCUP are normally present in the ground flora, whilst COMMON NETTLE is generally absent and is never greater than 10% cover;
b) WOOD SORREL is frequent and can be abundant in the ground layer, VIOLET, WILD STRAWBERRY, MALE FERN, HEATH BEDSTRAW, BRACKEN, WOOD SAGE, PIGNUT and IVY are often present.
4b) Very boggy peat to semi-dry peaty/gley with high water table. Ground flora usually dominated by PURPLE MOOR-GRASS, although SOFT-RUSH and TUFTED HAIR-GRASS may dominate in some areas. DOWNY BIRCH will almost always be present and can form a major component as an understorey. Also present at low frequency may be GREY WILLOW, EARED WILLOW, and on the drier stands SILVER BIRCH, OAK and ROWAN with a field layer consisting of BRAMBLE, BROAD BUCKLER-FERN and HONEYSUCKLE.
W4: DOWNY BIRCH – PURPLE MOOR-GRASS woodland There are three sub-communities:
a) community tends to be found on drier soils; b) SOFT-RUSH is always present and TORMENTIL, TUFTED HAIR-GRASS and
CREEPING SOFT-GRASS are also often present, MARSH THISTLE, ANGELICA and VALERIAN are only found in this sub-community;
c) BRAMBLE and BROAD BUCKLER-FERN are generally both present, this sub-SPHAGNUM always present and generally carpets the ground, COTTONGRASSES and HEATHER may be present.

NFI Survey Manual
205 Remember to Save your Edit Session Regularly, Validate the information and Backup the Data
4c) Predominantly heathy ground flora with some of HEATHER, BELL HEATHER, CROSS-LEAVED HEATH, BILBERRY, COWBERRY and WAVY HAIR-GRASS. This may include planted stands of Scots Pine as well as exotic conifers.
W18: SCOT’S PINE- MOSS (Hylocomium splendens) woodland. There are two sub-communities that exist in wet conditions:
a) Sphagnum is always present, PURPLE MOOR GRASS may also be present and abundant, however HEATH BEDSTRAW, WOOD SORREL, and TORMENTIL are always absent;
b) Sphagnum and Dicranum majus are always present, Thuidium tamariscinum is generally present and abundant but Polytrichum sp. is generally of very low cover or absent. PURPLE MOOR GRASS is not present.
4d) The ground flora is characterised by extensive and very diverse moss and liverwort cover on the ground, over rocks, tree bases etc. (In ungrazed stands the abundance may be reduced but the diversity remains). Key species are Dicranum majus, D. scoparium, Hylocomium splendens, Plagiothecium undulatum, Pleurozium schreberi, Polytrichum sp., Rhytidiadelphus loreus, and Thuidium tamariscinum, four or more of which are likely to be present. BILBERRY, BRACKEN, WOOD SORREL, WAVY HAIR-GRASS and HARD FERN are the most commonly occurring ground flora species, but HEATHER, BELL HEATHER and HEATH BEDSTRAW are also frequent, particularly in the north. Found on very acid soils, that are often shallow and rocky, the community is found mainly in the cooler, wet north-west of Britain. W17 may possibly occur in fragmentary form in the gill woods in the south-east but otherwise is absent from the lowlands where W16 replaces it.
W17: OAK-BIRCH-MOSS (Dicranum majus) woodland There are 4 sub-communities partly reflecting variations from “Atlantic” to more “Continental” conditions; there is also a grassy version related to W11 (see below): a) the constants of this sub-community are the mosses Rhytidiadelphus loreus,
Polytrichum and Dicranum majus. Other species, which are almost always present, are WAVY HAIR-GRASS, and the mosses Hylocomium splendens, Pleurozium schreberi, Plagiothecium undulatum, Dicranum scoparium and Mnium hornum. Bryophytes are the dominant feature of this sub-community with a diverse array over boulders forming a thick mat;
b) similar to sub-community (a) but lacking the diversity of bryophytes; c) ericoids are generally infrequent and of low cover, with grasses the dominant
feature of this sub-community; d) JUNIPER may be present. HEATHER is almost always present and BILBERRY is
always present, otherwise there may be a mixture of ericoids, grasses and bryophytes.

NFI Survey Manual
206 Remember to Save your Edit Session Regularly, Validate the information and Backup the Data
5) Wet soils but with Sphagnum always absent – see two options below 5a) ALDER may be dominant or may share dominance with DOWNY BIRCH and/or GREY WILLOW. On drier stands SYCAMORE, OAK or ASH may be present at low frequency. SCOTS PINE may also invade or be planted. The field layer is species-poor with COMMON NETTLE generally dominant frequently in association with CLEAVERS, or BRAMBLE. COMMON REED and GREATER TUSSOCK-SEDGE are rarely present and if so are at low cover. Generally found as small isolated stands, or narrow fringes of slow moving rivers or pools.
W6: ALDER-COMMON NETTLE woodland There are 5 sub-communities:
a) COMMON NETTLE is always present and is normally abundant; CLEAVERS are also normally present and abundant. In patches where these two species are not prominent there can be CREEPING BUTTERCUP, GROUND IVY, HOGWEED and various grasses;
b) CRACK-WILLOW is always present and is normally the dominant tree species however there is normally a thick shrub layer consisting of scrubs and saplings. COMMON NETTLE is always present in the ground flora though rarely achieves more than 25% cover;
c) ALMOND WILLOW, PURPLE WILLOW and OSIER are the dominant tree species with the ground flora similar to sub-community (a);
d) BRAMBLE is always present and can form a thick under scrub, ALDER is normally the dominant tree with ELDER normally present in the shrub layer though generally at low cover, COMMON NETTLE is normally present and can be abundant;
e) DOWNY BIRCH is always present and is often the dominant tree, there are frequently individual SCOTS PINE present, and the ground flora normally consists of BRAMBLE, HONEYSUCKLE and BROAD BUCKLER FERN.
5b) Base rich and nutrient rich soils, generally found on wet flushes, the bottom of slopes, or sometimes on periodically flooded alluvial flats. Ground flora includes MEADOWSWEET, YELLOW PIMPERNEL, CREEPING BUTTERCUP, LADY FERN, ROUGH MEADOW-GRASS, CREEPING SOFT-GRASS, TUFTED HAIR-GRASS and OPPOSITE-LEAVED GOLDEN SAXIFRAGE. There may be individuals trees/shrubs or seedlings of the following species ALDER, ASH, SILVER BIRCH, GREY WILLOW, HAZEL, and HAWTHORN. (HEATHER, WAVY HAIR-GRASS and PURPLE MOOR-GRASS never present).
W7: ALDER – ASH – YELLOW PIMPERNEL woodland There is one sub-community, where Sphagnum is not a prominent feature:
NFI Survey Manual
207 Remember to Save your Edit Session Regularly, Validate the information and Backup the Data
a) The ground flora normally has CREEPING BUTTERCUP, OPPOSITE-LEAVED GOLDEN SAXIFRAGE and COMMON NETTLE that are frequent to dominant.
6) Generally dry soils, Sphagnum normally absent – see three options below 6a) Woods on very acidic soils. One or all of BILBERRY, WAVY HAIR-GRASS or HEATHER present, but with few other species, often with some BRACKEN, or extensive moss carpets. Native tree/ shrub species remaining may include OAK, BIRCH, self-sown PINE, HOLLY and ROWAN.
Go to 7 6b) Woods on base-rich soils. Ground flora includes at least some species characteristic of base-rich conditions such as DOG’s MERCURY, FALSE BROME, ENCHANTER’s NIGHTSHADE, COMMON NETTLE, HERB ROBERT, CLEAVERS, RAMSONS, ROUGH MEADOW GRASS or GROUND IVY. Native tree/ shrub species remaining may include ASH, ELM, LIME, SYCAMORE, OAK, SWEET CHESTNUT, HORNBEAM, HAZEL, FIELD MAPLE, WILD PRIVET, DOGWOOD, SPINDLE, and WAYFARING TREE.
Go to 8 6c) Woods on moderately nutrient rich soils (mesotrophic). The ground flora usually has abundant (BRAMBLE, BRACKEN, HONEYSUCKLE) or BLUEBELL or is dominated by grasses (SOFT GRASSES, BENTS, WAVY HAIR-GRASS, SWEET VERNAL-GRASS). Species characteristic of base-rich conditions (see section 7) are absent (or very scarce). Native tree/ shrub species remaining may include OAK, BIRCH, SWEET CHESTNUT, LIME, HORNBEAM, HAZEL and HAWTHORN.
Go to 9

NFI Survey Manual
208 Remember to Save your Edit Session Regularly, Validate the information and Backup the Data
7) Woods on very acidic soils - see five options (7a-e) below 7a) Found only in Scotland on nutrient poor soils. Heathy ground flora with some of HEATHER, BELL HEATHER, CROSS-LEAVED HEATH, BILBERRY, COWBERRY WAVY HAIR-GRASS. Mosses may be abundant.
W18: SCOT’S PINE- MOSS (Hylocomium splendens) woodland. There are three remaining sub-communities:
b) this sub-community may include a few exotic conifers, CREEPING LADY’S TRESSES are always present but this is the only sub-community where BILBERRY is absent;
c) BILBERRY and COWBERRY always present, usually with minimum cover of 10%, PURPLE MOOR GRASS may be present and abundant, this species is only found in (b&d);
d) JUNIPER may be present and fairly abundant, HAIRY WOOD-RUSH is always present though normally at a low level, this species is only found in (a&c);
7b) Very acid “heathy” sites found on very base-poor soils in the South of England, usually with some WAVY HAIR-GRASS, BILBERRY or HEATHER present at least near or under gaps. BRACKEN, BENT grasses and WOODRUSHES also often common. BEECH, HOLLY, OAKS and BIRCHES are the commonest associated trees and shrubs.
W15: BEECH-WAVY HAIR-GRASS woodland. There are four sub-communities largely reflect trends in the level of light below the canopy from virtually no ground flora in the densest shade to HEATHER under stands with a discontinuous canopy cover:
a) the vegetation is overwhelmingly dominated by BEECH almost to the total exclusion of all other plants;
b) OAK may be frequent in the canopy with WAVY HAIR-GRASS constant in the ground flora, YORKSHIRE FOG may be present at a low level and Hylocomium splendens may be present;
c) OAK is constant and may be as frequent in the canopy as BEECH, HOLLY is also common. BILBERRY, BRACKEN, WAVY HAIR-GRASS and Mnium hornum are constant in the ground flora;
d) HEATHER is a constant and normally dominant feature of the ground flora, BRACKEN is also constant.
7c) Juniper may be present and can be abundant. The ground flora is characterised by extensive and very diverse moss and liverwort cover on the ground, over rocks, tree bases etc. (In ungrazed stands the abundance may be reduced but the diversity remains). Key species are Dicranum majus, D. scoparium, Hylocomium splendens,

NFI Survey Manual
209 Remember to Save your Edit Session Regularly, Validate the information and Backup the Data
Plagiothecium undulatum, Pleurozium schreberi, Polytrichum sp., Rhytidiadelphus loreus, and Thuidium tamariscinum, four or more of which are likely to be present. BILBERRY, BRACKEN, WOOD SORREL, WAVY HAIR-GRASS and HARD FERN are the most commonly occurring ground flora species, but HEATHER, BELL HEATHER and HEATH BEDSTRAW are also frequent, particularly in the north. Found on very acid soils, that are often shallow and rocky, the community is found mainly in the cooler, wet north-west of Britain. W17 may possibly occur in fragmentary form in the gill woods in the south-east but otherwise is absent from the lowlands where W16 replaces it.
W17: OAK-BIRCH-MOSS (Dicranum majus) woodland There are 4 sub-communities partly reflecting variations from “Atlantic” to more “Continental” conditions; there is also a grassy version related to W11 (see below):
a) the constants of this sub-community are the mosses Rhytidiadelphus loreus, Polytrichum and Dicranum majus. Other species, which are almost always present, are WAVY HAIR-GRASS, and the mosses Hylocomium splendens, Pleurozium schreberi, Plagiothecium undulatum, Dicranum scoparium and Mnium hornum. Bryophytes are the dominant feature of this sub-community with a diverse array over boulders forming a thick mat;
b) similar to sub-community (a) but lacking the diversity of bryophytes; c) ericoids are generally infrequent and of low cover, with grasses the dominant
feature of this sub-community; d) JUNIPER may be present, OAK is generally absent from the canopy with DOWNY
BIRCH dominant. HEATHER is almost always present and BILBERRY is always present, otherwise there may be a mixture of ericoids, grasses and bryophytes.
7d) Understorey may not be well-developed but HOLLY, ROWAN or HAWTHORN are the most likely species to occur (JUNIPER does not occur). Ground flora species poor often BRACKEN dominated, but usually with WAVY HAIR-GRASS or BILBERRY and lacking species such as BLUEBELL, and others characteristic of base-rich soils. Mosses and liverworts may be common but there are generally relatively few species and Hylocomium splendens or Polytrichum sp. are lacking. This community is found on very acidic, often sandy very free draining, soils in the lowlands and upland fringes. W16 does however spread into the uplands, particularly in south-west England, south Wales, Yorkshire and Northumberland.
W16: OAK-WAVY HAIR-GRASS There are two sub-communities:
a) SILVER BIRCH may be present with BRACKEN and WAVY HAIR-GRASS dominating the field layer;
b) SESSILE OAK may be present with BILBERRY often abundant in the field layer along with WAVY HAIR-GRASS and BRACKEN, bryophytes are also frequent and

NFI Survey Manual
210 Remember to Save your Edit Session Regularly, Validate the information and Backup the Data
diverse, including Plagiothecium undulatum, Lophocolea sp., Rhytidiadelphus loreus, R. triquetrus and Thuidium tamariscinum all of which are absent from (a).
7e) Stand dominated by Ground flora usually a mixture of BENT grasses, WOOD SORREL, WOOD-RUSH, TORMENTIL and HARD FERN. Only found in Scotland, Northumberland, the Pennines and the Lake District. JUNIPER may remain as an understorey in the plantation.
W19: JUNIPER – WOOD SORREL woodland There are 2 sub-communities:
a) generally heathy, with WAVY HAIR-GRASS, BILBERRY and HEATH BEDSTRAW always present and usually abundant but DOG’S MERCURY never present;
b) generally grassy or bare, but VIOLET always present normally with WOOD ANEMONE, DOG’S MERCURY may be abundant and LADY’S BEDSTRAW, SHEEP’S SORREL and MEADOW BUTTERCUP may be present.
8) Woods on base-rich soils – choose the best from the four options (8a-d) below 8a) The ground flora is dominated by DOG’s MERCURY, COMMON NETTLE, IVY, and FALSE BROME. However the typical base-rich species SANICLE and ENCHANTER’S NIGHTSHADE are never present. Under the planted conifers YEW, young ASH, COMMON WHITEBEAM, (in a few sites BOX), BEECH, and ELDER may occur. This community is most common on moderate-steep limestone or chalk slopes with thin soils (more rarely on moderate acid rocks in the Lake District). Most common in south-east England.
W13: YEW woodland There are two sub-communities:
a) DOG’S MERCURY is virtually absent; b) DOG’S MERCURY is always present and is normally abundant.
8b) Former beech stands on base-rich, often thin soils, e.g. over chalk. The ground flora may be sparse but DOG’S MERCURY, FALSE BROME, ENCHANTER’S NIGHTSHADE, LORDS-AND-LADIES, SANICLE or other species suggesting base-rich conditions are likely to be present. IVY is also often common. Associated trees and shrubs may include BEECH, ASH, HAZEL, COMMON WHITEBEAM, YEW, HAWTHORN or SYCAMORE. Found on free-draining base-rich soils with a pH usually between 7 and 8. Largely in the south-east of Britain, often on the steep drift-free faces of chalk escarpments.
W12: BEECH-DOG’S MERCURY woodland There are three sub-communities:

NFI Survey Manual
211 Remember to Save your Edit Session Regularly, Validate the information and Backup the Data
a) usually found on deeper moister soils, DOG’S MERCURY and BRAMBLE are generally the dominant ground flora, but RAMSONS, WOOD ANEMONE, BROAD BUCKLER-FERN and LESSER CELANDINE may also be abundant.
b) usually on very shallow dry chalk or limestone soils, IVY is often the dominant vegetation along with DOG’S MERCURY AND BRAMBLE, but HOGWEED, COW PARSLEY, FALSE OAT-GRASS and BUGLE may be present at low cover;
c) found on steep rocky soil and is characterised by a dense yew understorey and is thus closely related to W13 (YEW woodland, section 8b). The ground flora is sparse.
8c) Ground flora often dominated by DOG’s MERCURY, WOOD ANEMONE, TUFTED HAIR-GRASS, IVY, RAMSONS and/or BLUEBELL. Other base-rich indicators may be common for example FALSE BROME, ENCHANTER’s NIGHTSHADE, LORDS-AND-LADIES, COMMON NETTLES, CLEAVERS, and GROUND IVY. WOOD SORREL is generally of low cover. Native tree\ shrub species that may occur are OAK, ASH, LIME, ELM, HORNBEAM, HAZEL, HAWTHORN, FIELD MAPLE, DOGWOOD, SPINDLE, WILD PRIVET or WAYFARING TREE also present. This woodland is typically found on calcareous mull soils, generally in warmer low rainfall areas, though it does extend into the NW uplands.
W8: ASH-FIELD MAPLE-DOG'S MERCURY woodland There are seven sub-communities, which show a well defined geographical division:
a) found in the south-east, particularly east Midlands, East Anglia and the Weald. In the ground layer the prominent features are GROUND IVY, BUGLE and PRIMROSE;
b) found mostly in the south-east, but with patchy distribution in the north-west including Scotland, on heavier soils. Characteristics are similar to (a) with differences mostly in the field layer with WOOD ANEMONE (constant) and LESSER CELANDINE generally more abundant than DOG’S MERCURY and BLUEBELL;
c) found mostly in the south-east, but with patchy distribution in the north-west, on heavier soils. The constants in the field layer are TUFTED HAIR-GRASS and BRAMBLE both of which are normally abundant.
d) found in the oceanic south-west. The canopy layer is generally species poor compared to other sub-communities, with the ground layer dominated by IVY, DOG’S MERCURY and BRAMBLE;
e) this is characteristic of the north-west, particularly Yorkshire, Derbyshire and the Welsh Marches, it is the only sub-community to occur with any frequency in Scotland. ASH can be the overwhelming dominant in the canopy but is frequently joined by SYCAMORE and ELM. The ground flora is characterised by the predominance of COMMON NETTLE, CLEAVERS, and HERB ROBERT amongst the DOG’S MERCURY and BRAMBLE;

NFI Survey Manual
212 Remember to Save your Edit Session Regularly, Validate the information and Backup the Data
f) this is characteristic of the north-west, particularly Yorkshire, Derbyshire and the Welsh Marches, but on deeper soils than sub-community (e). The canopy structure is similar to (e) but the ground layer is distinguished by the prominence of RAMSONS a constant and normally dominant species;
g) this is also characteristic of the north-west but is quite rare having been recorded only in parts of the Wye Valley, Derbyshire and fragmented stands in the Yorkshire Dales. The tree canopy is more diverse than the other north-west sub-communities as is the field layer with the only constants being DOG’S MERCURY and WOOD SAGE but usually at low cover intermixed with a species rich ground flora.
8d) WOOD SORREL is generally a prominent feature, some LORDS-AND-LADIES are often present. The field layer species tend to form complex mosaics on irregular topography. DOG’s MERCURY and BLUEBELL are sometimes dominant, ENCHANTER’s NIGHTSHADE, WOOD AVENS, HERB ROBERT and FALSE-BROME frequent. Ferns are very prominent and grasses may be frequent though not dominant. Native tree/shrub species that may remain include ROWAN, ASH, OAK, ELM, FIELD MAPLE, DOGWOOD, SPINDLE, and WILD PRIVET The community occurs on permanently moist brown soils derived from calcareous bedrock and superficial deposits in the sub-montane climate of north and west Britain in the uplands or upland fringe.
W9: ASH-ROWAN-DOG’s MERCURY woodland There are two sub-communities:
a) often diverse canopy cover which may include both OAKS, SILVER BIRCH, BEECH, SCOT’S PINE, HOLLY and ELDER, the ground layer is also diverse but almost always contains MALE FERN and the moss Eurhynchium. There may also be present CLEAVERS, COMMON NETTLE, BRAMBLE, RED CAMPION, IVY, LORD’S AND LADIES and COW PARSLEY none of which occur in sub-community (b);
b) less diverse canopy cover containing none of the above trees, but may contain GREY WILLOW and POPLAR, which are not found in (a). The ground flora generally contains MEADOWSWEET, PIGNUT, and MARSH HAWK’S-BEARD along with the constant WOOD SORREL.

NFI Survey Manual
213 Remember to Save your Edit Session Regularly, Validate the information and Backup the Data
9) Woods on moderately nutrient rich soils (mesotrophic) - see three options (9a-c) below 9a) Ground flora showing neither indicators of very base-rich or of very acidic conditions. Frequently BRAMBLE or BRACKEN are common (depending on light levels), but other species such as IVY, WOOD-MELICK, WOOD-MILLET, BUTCHER’S-BROOM or TUFTED HAIR-GRASS are also frequent. Generally found on moderately acid brown earth soils, often with superficial deposits (e.g. clay-with-flints) over the southern chalk of England. BEECH and HOLLY may be present as remnant species.
W14: BEECH-BRAMBLE woodland. There are no sub-communities. 9b) BRACKEN and BRAMBLE do occur (cf W10) but also with several of the following: WOOD SORREL, SWEET VERNAL-GRASS, WAVY HAIR-GRASS, CREEPING SOFT-GRASS, BENT grasses, TORMENTIL, and HEATH BEDSTRAW. Mosses are more abundant than in W10, and include Hylocomium splendens, Pleurozium schreberi, Dicranum majus, Rhytidiadelphus loreus, and Rhytidiadelphus squarrosus (none of which are found in W10). Native tree/ shrub species remaining may include BIRCH, OAK, HAZEL and ROWAN. The type occurs on free-draining moderately acid, base-poor brown earths in the cooler wetter parts of Britain, mainly the uplands and upland fringes
W11: OAK-BIRCH-WOOD SORREL woodland There are four sub-communities covering Atlantic to more Continental conditions, but all tend to have a very grassy appearance. :
a) BROAD BUCKLER-FERN and/or MALE FERN are usually present in the ground layer and may be dominant. Bluebells may carpet the ground with up to 100% cover (in all other sub-communities they do not exceed 25% cover). This is the sub-community most likely to be encountered in Wales;
b) constants in the field layer are SWEET VERNAL GRASS, WOOD SORREL, TORMENTIL, HARD FERN, and the mosses Thuidium tamariscinum and Dicranum majus;
c) constants in the ground layer are SWEET VERNAL GRASS, WAVY HAIR-GRASS, HEATH BEDSTRAW, VIOLET, and the mosses Thuidium tamariscinum and Hylocomium splendens. BILBERRY, may be found and is unique to this sub-community;
d) the ground flora may be similar to (c) but the following species are never present BRAMBLE, BROAD BUCKLER-FERN, HEATHER, BELL HEATHER and the mosses Pleurozium schreberi, Dicranum majus, and Atrichum undulatum.
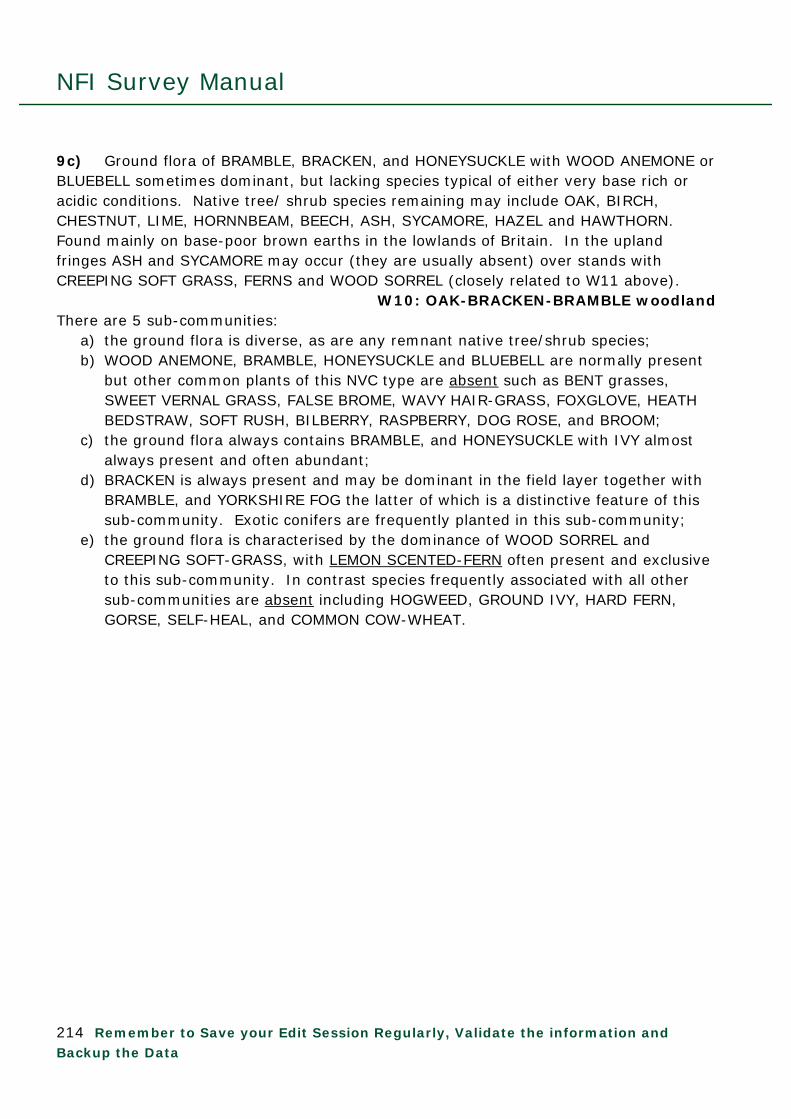
NFI Survey Manual
214 Remember to Save your Edit Session Regularly, Validate the information and Backup the Data
9c) Ground flora of BRAMBLE, BRACKEN, and HONEYSUCKLE with WOOD ANEMONE or BLUEBELL sometimes dominant, but lacking species typical of either very base rich or acidic conditions. Native tree/ shrub species remaining may include OAK, BIRCH, CHESTNUT, LIME, HORNNBEAM, BEECH, ASH, SYCAMORE, HAZEL and HAWTHORN. Found mainly on base-poor brown earths in the lowlands of Britain. In the upland fringes ASH and SYCAMORE may occur (they are usually absent) over stands with CREEPING SOFT GRASS, FERNS and WOOD SORREL (closely related to W11 above).
W10: OAK-BRACKEN-BRAMBLE woodland There are 5 sub-communities:
a) the ground flora is diverse, as are any remnant native tree/shrub species; b) WOOD ANEMONE, BRAMBLE, HONEYSUCKLE and BLUEBELL are normally present
but other common plants of this NVC type are absent such as BENT grasses, SWEET VERNAL GRASS, FALSE BROME, WAVY HAIR-GRASS, FOXGLOVE, HEATH BEDSTRAW, SOFT RUSH, BILBERRY, RASPBERRY, DOG ROSE, and BROOM;
c) the ground flora always contains BRAMBLE, and HONEYSUCKLE with IVY almost always present and often abundant;
d) BRACKEN is always present and may be dominant in the field layer together with BRAMBLE, and YORKSHIRE FOG the latter of which is a distinctive feature of this sub-community. Exotic conifers are frequently planted in this sub-community;
e) the ground flora is characterised by the dominance of WOOD SORREL and CREEPING SOFT-GRASS, with LEMON SCENTED-FERN often present and exclusive to this sub-community. In contrast species frequently associated with all other sub-communities are absent including HOGWEED, GROUND IVY, HARD FERN, GORSE, SELF-HEAL, and COMMON COW-WHEAT.
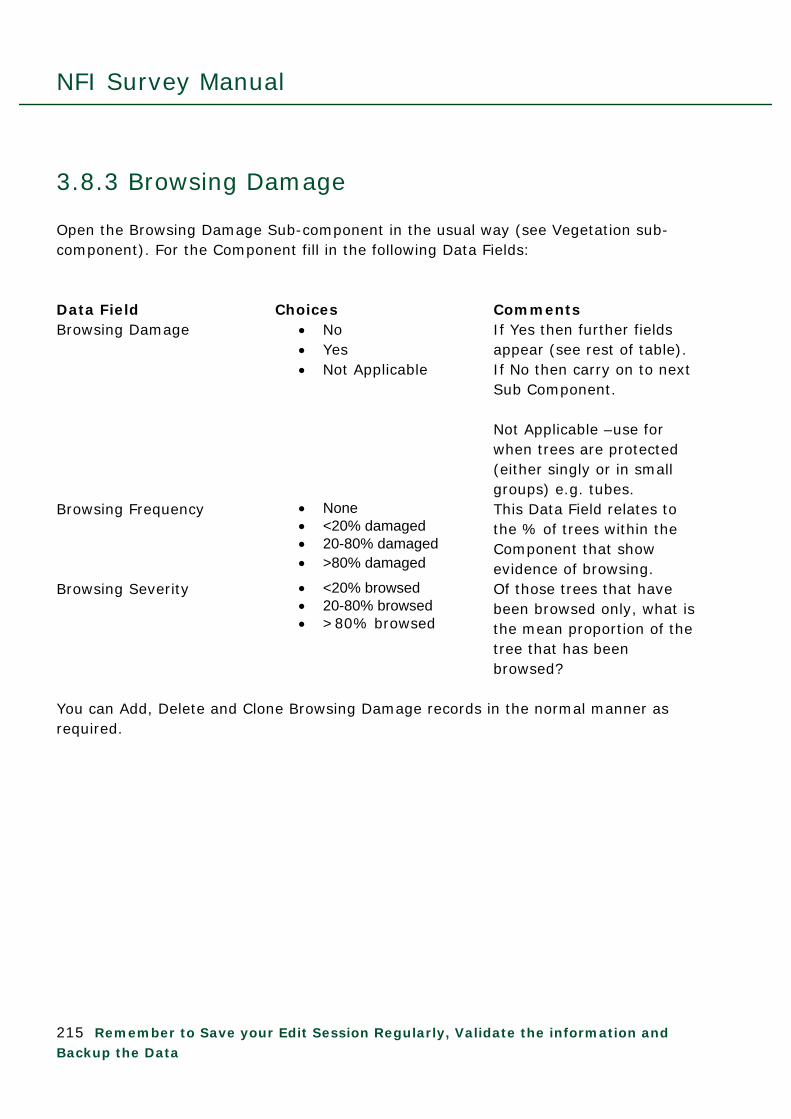
NFI Survey Manual
215 Remember to Save your Edit Session Regularly, Validate the information and Backup the Data
3.8.3 Browsing Damage Open the Browsing Damage Sub-component in the usual way (see Vegetation sub-component). For the Component fill in the following Data Fields: Data Field Choices Comments Browsing Damage No
Yes Not Applicable
If Yes then further fields appear (see rest of table). If No then carry on to next Sub Component. Not Applicable –use for when trees are protected (either singly or in small groups) e.g. tubes.
Browsing Frequency None <20% damaged 20-80% damaged >80% damaged
This Data Field relates to the % of trees within the Component that show evidence of browsing.
Browsing Severity <20% browsed 20-80% browsed >80% browsed
Of those trees that have been browsed only, what is the mean proportion of the tree that has been browsed?
You can Add, Delete and Clone Browsing Damage records in the normal manner as required.
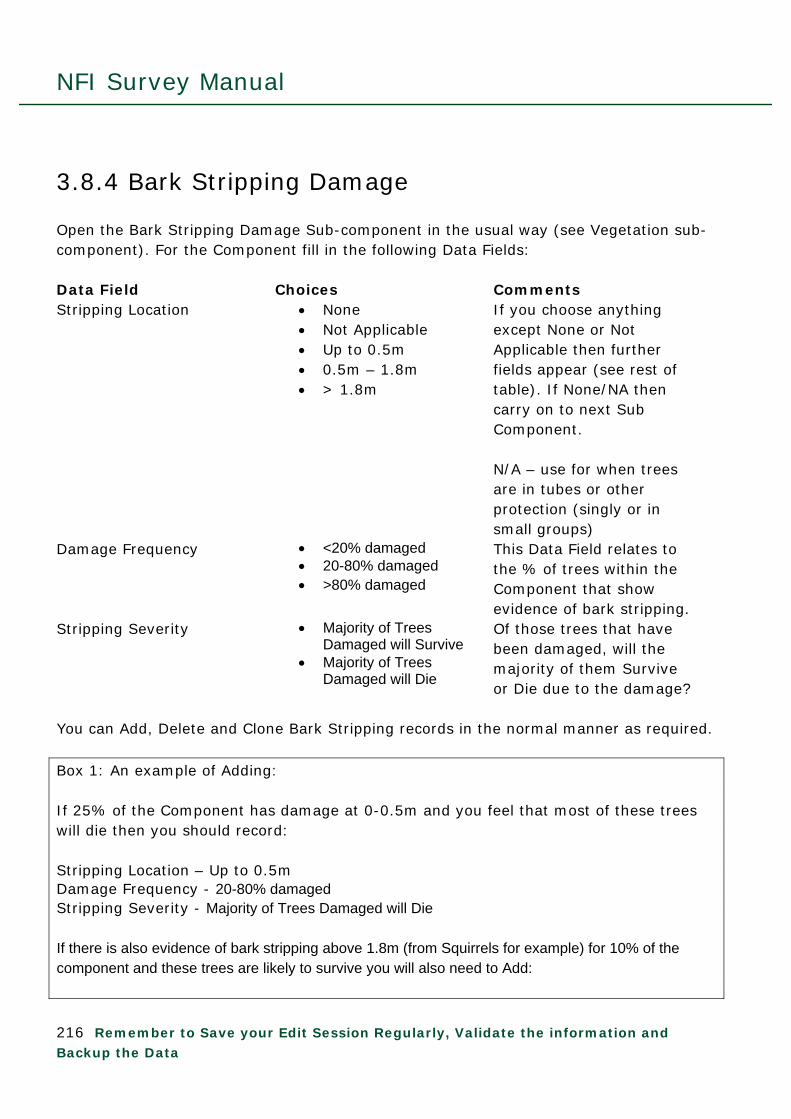
NFI Survey Manual
216 Remember to Save your Edit Session Regularly, Validate the information and Backup the Data
3.8.4 Bark Stripping Damage Open the Bark Stripping Damage Sub-component in the usual way (see Vegetation sub-component). For the Component fill in the following Data Fields: Data Field Choices Comments Stripping Location None
Not Applicable Up to 0.5m 0.5m – 1.8m > 1.8m
If you choose anything except None or Not Applicable then further fields appear (see rest of table). If None/NA then carry on to next Sub Component. N/A – use for when trees are in tubes or other protection (singly or in small groups)
Damage Frequency <20% damaged 20-80% damaged >80% damaged
This Data Field relates to the % of trees within the Component that show evidence of bark stripping.
Stripping Severity Majority of Trees Damaged will Survive
Majority of Trees Damaged will Die
Of those trees that have been damaged, will the majority of them Survive or Die due to the damage?
You can Add, Delete and Clone Bark Stripping records in the normal manner as required. Box 1: An example of Adding: If 25% of the Component has damage at 0-0.5m and you feel that most of these trees will die then you should record: Stripping Location – Up to 0.5m Damage Frequency - 20-80% damaged Stripping Severity - Majority of Trees Damaged will Die If there is also evidence of bark stripping above 1.8m (from Squirrels for example) for 10% of the component and these trees are likely to survive you will also need to Add:

NFI Survey Manual
217 Remember to Save your Edit Session Regularly, Validate the information and Backup the Data
Stripping Location – Above 1.8m Damage Frequency - <20% damaged Stripping Severity - Majority of Trees Damaged will Survive.
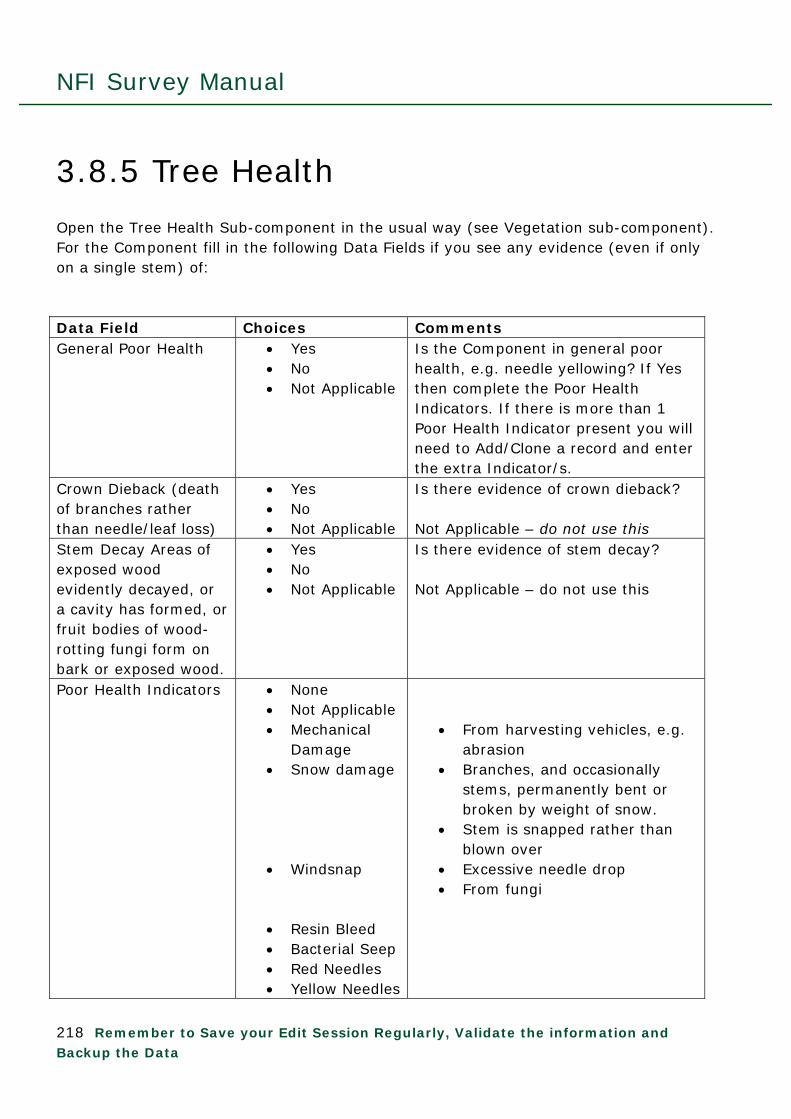
NFI Survey Manual
218 Remember to Save your Edit Session Regularly, Validate the information and Backup the Data
3.8.5 Tree Health Open the Tree Health Sub-component in the usual way (see Vegetation sub-component). For the Component fill in the following Data Fields if you see any evidence (even if only on a single stem) of: Data Field Choices Comments General Poor Health Yes
No Not Applicable
Is the Component in general poor health, e.g. needle yellowing? If Yes then complete the Poor Health Indicators. If there is more than 1 Poor Health Indicator present you will need to Add/Clone a record and enter the extra Indicator/s.
Crown Dieback (death of branches rather than needle/leaf loss)
Yes No Not Applicable
Is there evidence of crown dieback? Not Applicable – do not use this
Stem Decay Areas of exposed wood evidently decayed, or a cavity has formed, or fruit bodies of wood-rotting fungi form on bark or exposed wood.
Yes No Not Applicable
Is there evidence of stem decay? Not Applicable – do not use this
Poor Health Indicators None Not Applicable Mechanical
Damage Snow damage
Windsnap
Resin Bleed Bacterial Seep Red Needles Yellow Needles
From harvesting vehicles, e.g.
abrasion Branches, and occasionally
stems, permanently bent or broken by weight of snow.
Stem is snapped rather than blown over
Excessive needle drop From fungi

NFI Survey Manual
219 Remember to Save your Edit Session Regularly, Validate the information and Backup the Data
Needle Drop Fruiting Bodies
You can Add, Delete and Clone Tree Health records in the normal manner as required. Additional records will be required where there are >1 Poor Health Indicators. For sites with significant levels of damage or where identification is required, submit photographs and descriptions of the damage and location as a separate report.

NFI Survey Manual
220 Remember to Save your Edit Session Regularly, Validate the information and Backup the Data
3.8.6. Tree Pest/Disease Open the Tree Disease Sub-component in the usual way (see Vegetation sub-component). For the Component, fill in the following Data Fields for any evidence of the pest/disease seen. If there is no evidence of a Tree Pest/Disease within the Component, choose None, otherwise choose the appropriate disease. If there is more than 1 Tree Pest/Disease present you will need to Add/Clone a record and enter the extra Diseases. See 3.8.6.1 for more detail of tree diseases. Within the Component is there evidence of: Data Field Choices Alternative Name General Poor Health Not Applicable
None Anoplophora chinensis Anoplophora glabripennis Canker Cryphonectria parasitica Dendroctinus micans Gibberella circinata Horse Chestnut Bleeding
Canker Ips amitinus Ips duplicatus Ips typographus Oak Processionary Moth Phytophthora kernoviae Phytophthora ramorum Red band needle blight Tomicus piniperda Weevils Asian Longhorn beetle
Citrus Longhorn beetle Asian Longhorn beetle Chestnut blight Great spruce bark beetle Pine Pitch canker Pseudomonus syringae } } 8-Toothed spruce bark } beetle Thaumetopoea processionea Sudden oak death Dothistroma needle blight Pine Shoot beetle Hylobius/Hylastes/Pissodes Anoplophora glabripennis
You can Add, Delete and Clone Tree Pest/Disease records in the normal manner as required. Additional records will be required where there are >1 Tree Pest/Disease present. NB: remember to refer to the Phytophthora shapefile in your support data.

NFI Survey Manual
221 Remember to Save your Edit Session Regularly, Validate the information and Backup the Data
3.8.7 Manual Intervention Open the Manual Intervention Sub-component in the usual way (see Vegetation sub-component). Note that the Management Data Field is not generally required for non-treed Sections unless there is clear indication of management such as fencing. For the Component fill in the following Data Fields: Data Field Choices Comments Management Less than 3 years
old Greater than 3 years
old Future None
From the evidence on site if there has been Manual Intervention what is the Dominant Intervention and when did/will it occur?
Depending upon the answer chosen a selection of the following Data Fields will appear in the data editor Box.
Category (for Less than 3 years old and Greater than 3 years old)
Brashing
Cleaning
Coppicing
Draining
Removal of the lower dead branches, up to about two metres, of trees in a stand.
The removal of
unwanted broadleaves and woody usually before canopy closure
Trees that are cut near
ground level causing them to produce many small shoots.
The site has open drains
dug to drain water
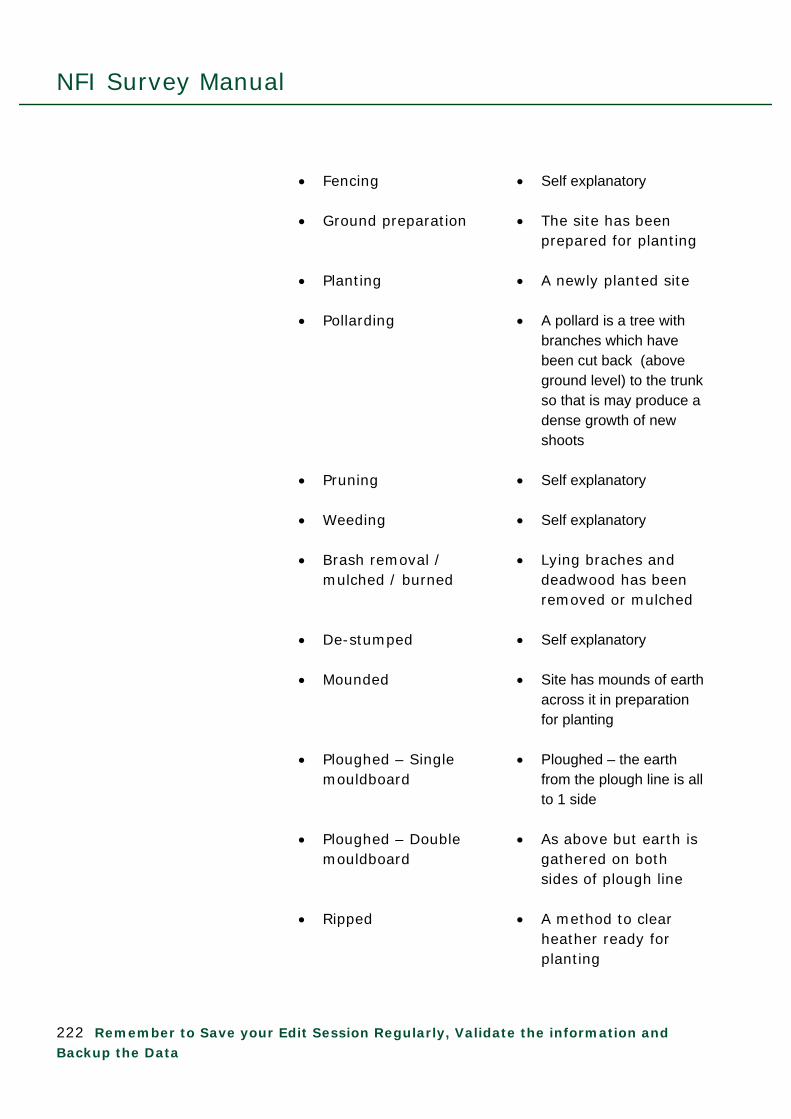
NFI Survey Manual
222 Remember to Save your Edit Session Regularly, Validate the information and Backup the Data
Fencing Ground preparation
Planting Pollarding
Pruning
Weeding
Brash removal / mulched / burned
De-stumped Mounded
Ploughed – Single mouldboard
Ploughed – Double mouldboard
Ripped
Self explanatory
The site has been
prepared for planting
A newly planted site
A pollard is a tree with branches which have been cut back (above ground level) to the trunk so that is may produce a dense growth of new shoots
Self explanatory
Self explanatory
Lying braches and
deadwood has been removed or mulched
Self explanatory
Site has mounds of earth
across it in preparation for planting
Ploughed – the earth
from the plough line is all to 1 side
As above but earth is
gathered on both sides of plough line
A method to clear
heather ready for planting

NFI Survey Manual
223 Remember to Save your Edit Session Regularly, Validate the information and Backup the Data
Scarified
Windrowed
Other Thinning Once Thinning more than
once
A method for clearing plating lines by clearing brash and vegetation and leaving the soil bare
Timber which is
pushed into lines for burning during a clearing operation
Thinning – only record
the timing of the latest thinning event – whether <3yrs old or ≥3 years old. There is no need to record thinning twice.
Category (for Future) Agroforestry
Conservation
Game Birds
Grazing
Ornamental
Agroforestry is an integrated approach of using the interactive benefits from combining trees and shrubs with crops and/or livestock. It combines agriculture and forestry.
The land is being used
for conservation purposes, e.g. for fritillary butterflies
There is evidence that
the land is used for game birds, e.g. feeders are present
Self explanatory
Self explanatory

NFI Survey Manual
224 Remember to Save your Edit Session Regularly, Validate the information and Backup the Data
Public Recreation
Screening/Shelter
Timber Production
Personal recreation
Self explanatory
Self explanatory
Self explanatory
Self explanatory
Prescription derivation Guess from Surveyor
Known from owner Where did the information come from for the Future manual intervention answer you gave? If known from any source (e.g. a map layer) use ‘Known from Owner’.
Planned Fell Year Free text This is optional so do not use unless for actual planned felling.
You can Add, Delete and Clone records in the normal manner as required.

NFI Survey Manual
225 Remember to Save your Edit Session Regularly, Validate the information and Backup the Data
3.9 Growing Stock Components This is a computer generated analyses of the tree data collected within the mensuration plots (circular and whole section). It can be used as a useful check of the data collected as part of your QA of the data collected. Growing Stock Components can be accessed from the Forester button. When clicked you are given the options:
Log off from Forester DB… NFI
Highlight NFI and further options are given. Click in NFI Growing Stock Calculation. The computer will calculate the Growing Stock elements for Components that are found within the mensuration plots.
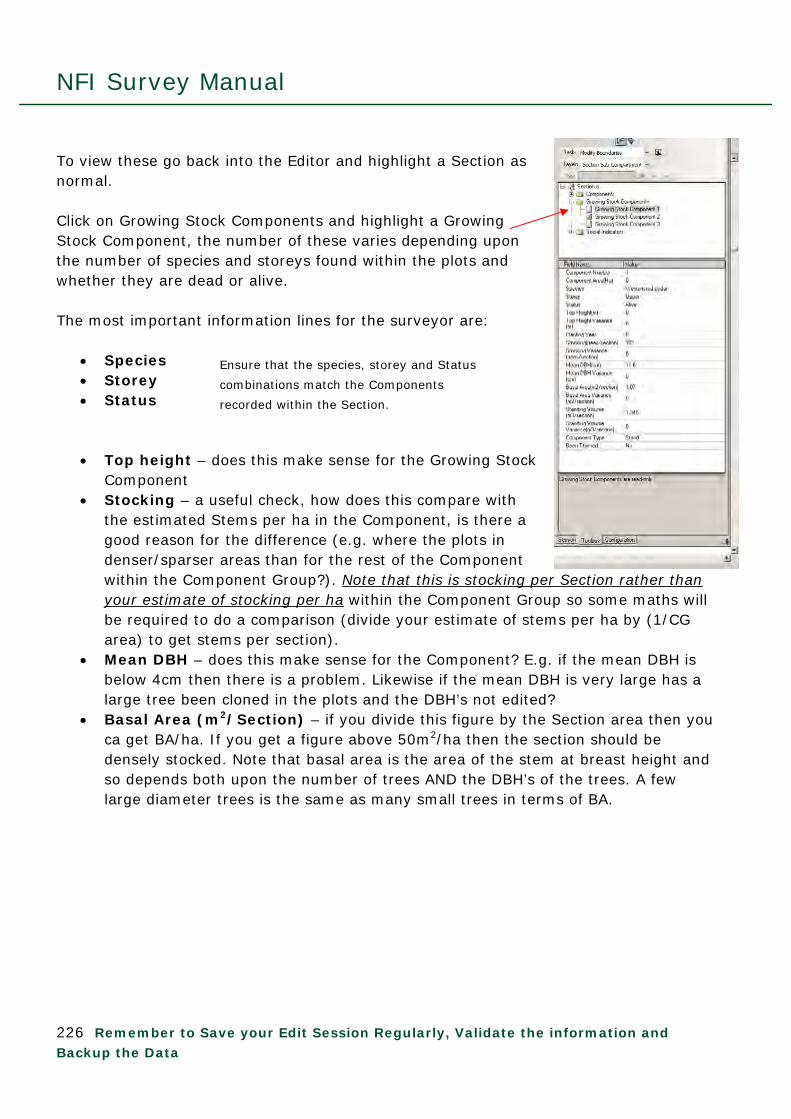
NFI Survey Manual
226 Remember to Save your Edit Session Regularly, Validate the information and Backup the Data
To view these go back into the Editor and highlight a Section as normal. Click on Growing Stock Components and highlight a Growing Stock Component, the number of these varies depending upon the number of species and storeys found within the plots and whether they are dead or alive. The most important information lines for the surveyor are:
Species Storey Status
Top height – does this make sense for the Growing Stock Component
Stocking – a useful check, how does this compare with the estimated Stems per ha in the Component, is there a good reason for the difference (e.g. where the plots in denser/sparser areas than for the rest of the Component within the Component Group?). Note that this is stocking per Section rather than your estimate of stocking per ha within the Component Group so some maths will be required to do a comparison (divide your estimate of stems per ha by (1/CG area) to get stems per section).
Mean DBH – does this make sense for the Component? E.g. if the mean DBH is below 4cm then there is a problem. Likewise if the mean DBH is very large has a large tree been cloned in the plots and the DBH’s not edited?
Basal Area (m2/Section) – if you divide this figure by the Section area then you ca get BA/ha. If you get a figure above 50m2/ha then the section should be densely stocked. Note that basal area is the area of the stem at breast height and so depends both upon the number of trees AND the DBH’s of the trees. A few large diameter trees is the same as many small trees in terms of BA.
Ensure that the species, storey and Status
combinations match the Components
recorded within the Section.

NFI Survey Manual
227 Remember to Save your Edit Session Regularly, Validate the information and Backup the Data
3.10 Social Indicators Open the Social Indicators section data in the usual way (see Vegetation sub-component). For the Section fill in the following Data Fields: Data Field Choices Comments Social indicator Type Recreation
Amenity Management Abuse Fire None
Enter the Social Indicators noted within the Section. Depending upon the data entered different Data Fields will appear.
Social Indicator Subtype (Recreation)
Informal path (made through cumulative usage)
Formal path Outdoor Education Activity Off-road motorcycle tracks Informal gathering /
camping Equestrian Use Mountain bike use Dog Walking Able/encouraged to roam
from paths
For historical transport routes such as old drove roads, Roman roads etc. use either informal or formal path depending upon whether signage is present or on the OS maps.
Social Indicator Subtype (Amenity Management)
Vegetation management Furniture Signage
Social Indicator Subtype (Abuse)
Litter Fly tipping Dog fouling Vandalism
Social Indicator Subtype (Fire)
Fire
Value (Recreation) None Present More than One
Value (Abuse) None Some A lot
Percentage (Fire) Free text Enter the % of the Section affected by the fire/s
You can Add, Delete and Clone records in the normal manner as required.

NFI Survey Manual
228 Remember to Save your Edit Session Regularly, Validate the information and Backup the Data
4.0 Mensuration Plots (Circular) or Mensuration Points (Whole Section)? For each treed Section within the NFI boundary the surveyor will need to carry out a number of assessments based around Mensuration Plots or Mensuration Points. These assessments are:
Mensuration – at all Mensuration Plots/ Mensuration Points Lying deadwood – the first Mensuration Plots or first Mensuration Point only Young Trees - the first Mensuration Plots or first Mensuration Point only [Canopy occupancy – at all Mensuration Plots/ Mensuration Points] – not required
in current survey but still available in software if required at a later date Stumps – at all Mensuration Plots/ within the entire Whole Section plot
Circular mensuration Plots are used for the assessments where:
There are 40 or more standing, measurable stems (i.e. stems ≥4cm DBH, dead AND alive) within the Section AND any Relevant Adjacent Area associated with the Section up to 21m away from the Square boundary
AND The Plot can physically fit within the Section according to the NFI rules – the NFI
Surveyor software calculates this for you. See Flowchart 4.1 overleaf.

NFI Survey Manual
229 Remember to Save your Edit Session Regularly, Validate the information and Backup the Data
PLOTS/POINTS DECISION TREE
Flowchart 4.1: Decision tree for selecting plot-based assessment procedures

NFI Survey Manual
230 Remember to Save your Edit Session Regularly, Validate the information and Backup the Data
5.0 Circular Plot Level Data
5.0.1 Generating plots Select the section you wish to generate plots in and right click on the Section in the Data Editor window. Note that for Section ≥0.6ha three plots will be generated other wise only two plots are generated. From the drop down menu choose Regenerate Plots. You will be asked if you want to include RAS (Relevant Adjacent Stand) in the selection. If you choose ‘No’ your plots will be restricted to the Section boundaries. If you choose ‘Yes’ then up to 21m into the RAS from the Square boundary can be included in the plot location selection. Note that in this case it is possible that all the plots are in the RAS, or none. Plots within the RAS will have their plot centres no greater than 15m from the Square boundary. Any mapping of the RAS should extend to at least 21m beyond the square boundary, where applicable, to incorporate the plots. Only say ‘Yes’ where the section would change from a Whole Section plot into circular plots if the trees within the RAS (up to 21m from the Square boundary) are also counted towards the 40+ stems for circular plots. Note that if the RAS is a solid colour then you will need to change the RAS layer to hollow in order to see any plots within the RAS. See Chapter 8.0 for more details on RAS.
In this image the plots have been randomly located within both the Section and its adjoining RAS.

NFI Survey Manual
231 Remember to Save your Edit Session Regularly, Validate the information and Backup the Data
Square boundary
Section boundary
Tree locations
5.0.2 Plots crossing Square boundaries This plot spans the Square boundary. Because the Square boundary is based upon geographical coordinates and not ground conditions it is often the case that the Section carries on outside the Square boundary. If this is the case the entire plot area is assessed, even those parts that land outwith the Square.

NFI Survey Manual
232 Remember to Save your Edit Session Regularly, Validate the information and Backup the Data
Section boundary
5.0.3 Plots crossing Section boundaries/Partial plots In this situation the mensuration plot crosses a Section boundary. Because a Section boundary relates to what is happening on the ground the software automatically accounts for this by creating a partial plot. In this case all Normal trees and stumps must be located within the plot. Height sample trees can be located outside the plot (except Dominant Height trees) but must still be located within the Section. Care needs to be exercised when mapping the location of trees and it is advisable to zoom in to the plot on screen to map trees accurately.
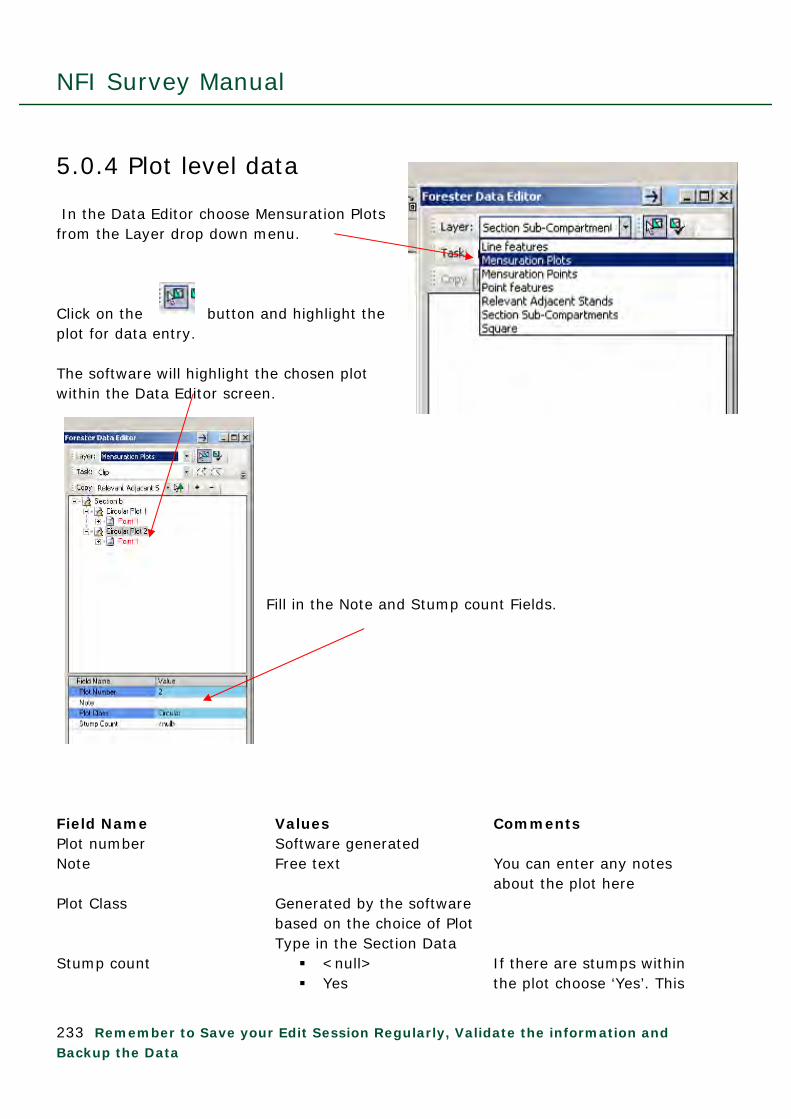
NFI Survey Manual
233 Remember to Save your Edit Session Regularly, Validate the information and Backup the Data
5.0.4 Plot level data In the Data Editor choose Mensuration Plots from the Layer drop down menu. Click on the button and highlight the plot for data entry. The software will highlight the chosen plot within the Data Editor screen.
Fill in the Note and Stump count Fields.
Field Name Values Comments Plot number Software generated Note Free text You can enter any notes
about the plot here Plot Class Generated by the software
based on the choice of Plot Type in the Section Data
Stump count <null> Yes
If there are stumps within the plot choose ‘Yes’. This

NFI Survey Manual
234 Remember to Save your Edit Session Regularly, Validate the information and Backup the Data
will open the stump count Field Names shown below:
Count the number of stumps within each class (e.g. 7-14cm) in the plot by assessing the diameter of each stump visually along the North/South axis. Note that one stump will need to be physically
measured and the location mapped – see Section 5.1.2 for more details. Ensure that the mapped and measured stump is included in the visual stump count.
Where there are no stumps within a size class a 0 (zero) needs to be input to ensure the Field validates (turns from orange to blue).
Field Name Values Comments 4-6cm 7-14cm 15-40cm 41+cm
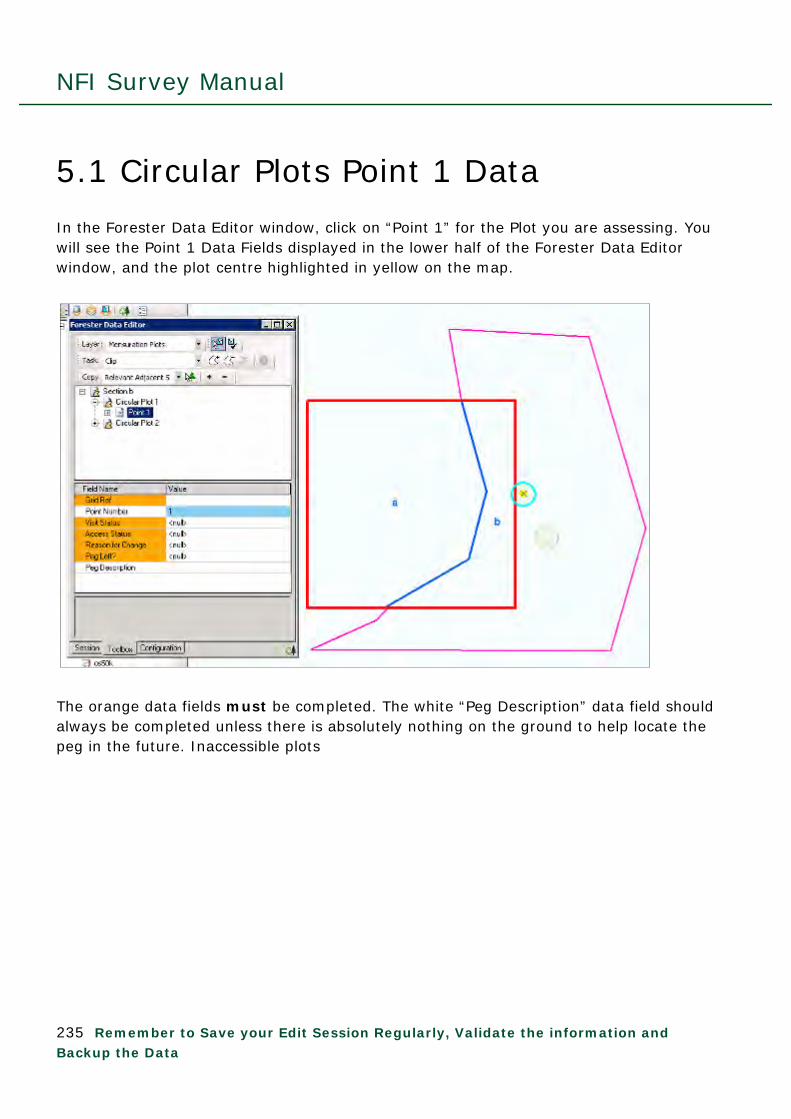
NFI Survey Manual
235 Remember to Save your Edit Session Regularly, Validate the information and Backup the Data
5.1 Circular Plots Point 1 Data In the Forester Data Editor window, click on “Point 1” for the Plot you are assessing. You will see the Point 1 Data Fields displayed in the lower half of the Forester Data Editor window, and the plot centre highlighted in yellow on the map. The orange data fields must be completed. The white “Peg Description” data field should always be completed unless there is absolutely nothing on the ground to help locate the peg in the future. Inaccessible plots

NFI Survey Manual
236 Remember to Save your Edit Session Regularly, Validate the information and Backup the Data
Data Field Choices Comments
Grid Ref. Free text Enter the field GPS reading for the plot centre, using the “2 letter-10 digit format” e.g. TQ0901012008.
Point Number Software generated
Visit Status Unvisited
In progress
Completed
Refused Access
Not possible to assess
In progress can be used if the surveyor needs to leave the site before completing data entry (e.g. it gets dark before completion). Completed should be used if the plot can be assessed, either physically or visually.
Access Status Accessible
Inaccessible, visual assessment possible
Inaccessible, NO visual assessment
If either of the inaccessible options is selected, an “Inaccessible Reason” data field will appear (see table overleaf).
Reason for Change No Change
Real Change
Error Change
Spatial Error
1st Assessment
Original
For use in the 2nd NFI.
For use in the 2nd NFI.
A change in the data due to an error found by NFI office staff.
A change in the data due to a spatial error found by NFI office staff.
The normal Reason – your 1st assessment of the site.
Unchanged data.
Peg Left? No Yes
If “No” then the “Peg not Left Reason” data field will appear.
Peg not Left Reason No Landowner

NFI Survey Manual
237 Remember to Save your Edit Session Regularly, Validate the information and Backup the Data
Permission
Health & Safety
Legal Restriction
Public Access Area
Residential
Garden
Impenetrable surface
Puddling Ground
Boggy Ground
Inaccessible
Multiple Causes
Terrain
Ground cover vegetation
Forest operations
Other
E.g. the site is a Scheduled Ancient Monument and ground disturbance is forbidden.
E.g. livestock-grazed woodland.
Peg Description Free text Record anything to help us relocate the peg for Quality Assurance purposes and for the return visit in 5 years time.

NFI Survey Manual
238 Remember to Save your Edit Session Regularly, Validate the information and Backup the Data
Inaccessible plots When either of the Inaccessible options is selected under “Access Status”, an “Inaccessible Reason” data field appears. Select the most appropriate reason.
Inaccessible Reason
Inaccessible thicket
Inaccessible health and safety
Inaccessible slope
Inaccessible obstruction
Inaccessible wind blow
Inaccessible other
Thicket definition: “Stands of trees where the bases of the live crowns of the trees are below 1m in height, and the live crowns interlock so tightly that access is impossible”.
E.g. dense gorse preventing access.
Depending upon the Inaccessible reason you choose for Inaccessible plots where visual assessment is possible you may see the following fields requested:
Height (m) Free text Estimate the mean total height of all the trees within the plot.
Tree count Free text Estimate the number of trees within the plot.
Est. Mean DBH (cm)
Free text Estimate the average DBH of all the trees within the plot.
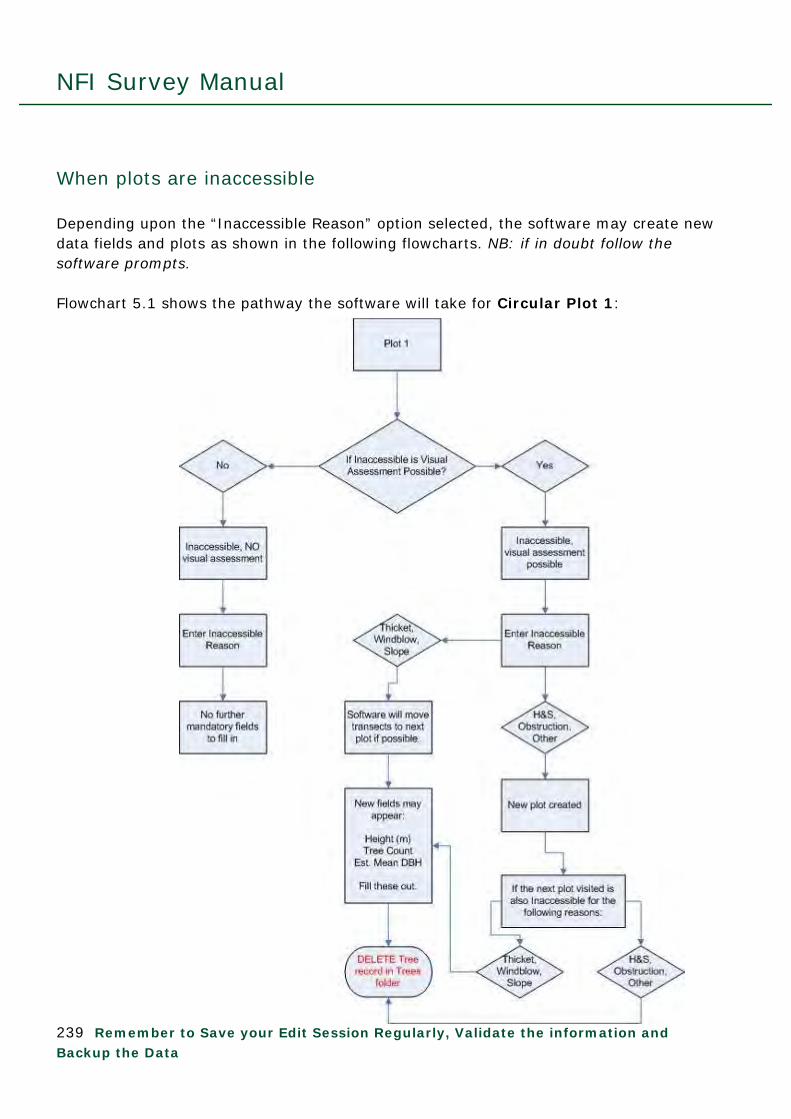
NFI Survey Manual
239 Remember to Save your Edit Session Regularly, Validate the information and Backup the Data
When plots are inaccessible Depending upon the “Inaccessible Reason” option selected, the software may create new data fields and plots as shown in the following flowcharts. NB: if in doubt follow the software prompts. Flowchart 5.1 shows the pathway the software will take for Circular Plot 1:

NFI Survey Manual
240 Remember to Save your Edit Session Regularly, Validate the information and Backup the Data
Inaccessible plot validation issues Due to the complexity of the various combinations of Inaccessible Reasons for multiple plots it is possible that the software will ask for data you cannot collect. Fill out the data where possible and delete data fields or folders as appropriate to allow the software to validate (e.g. delete the empty Normal tree record in the Trees folder). If you have filled in as much data as possible and cannot fill in more (e.g. species where the plot is not visually assessable) please make a note in the Checkpoint report. These anomalies will then be collated ready for future software updates.

NFI Survey Manual
241 Remember to Save your Edit Session Regularly, Validate the information and Backup the Data
5.1.0 Photo Add Photo in the same way as described in Section 2.0 page.
5.1.1 Trees Click on Trees and then Normal to see the Data Fields to be entered for each tree. The word Normal in this context simply refers to a tree which is not a height sample tree. By right clicking on Trees the following options become available:
See overleaf for explanations of the options.
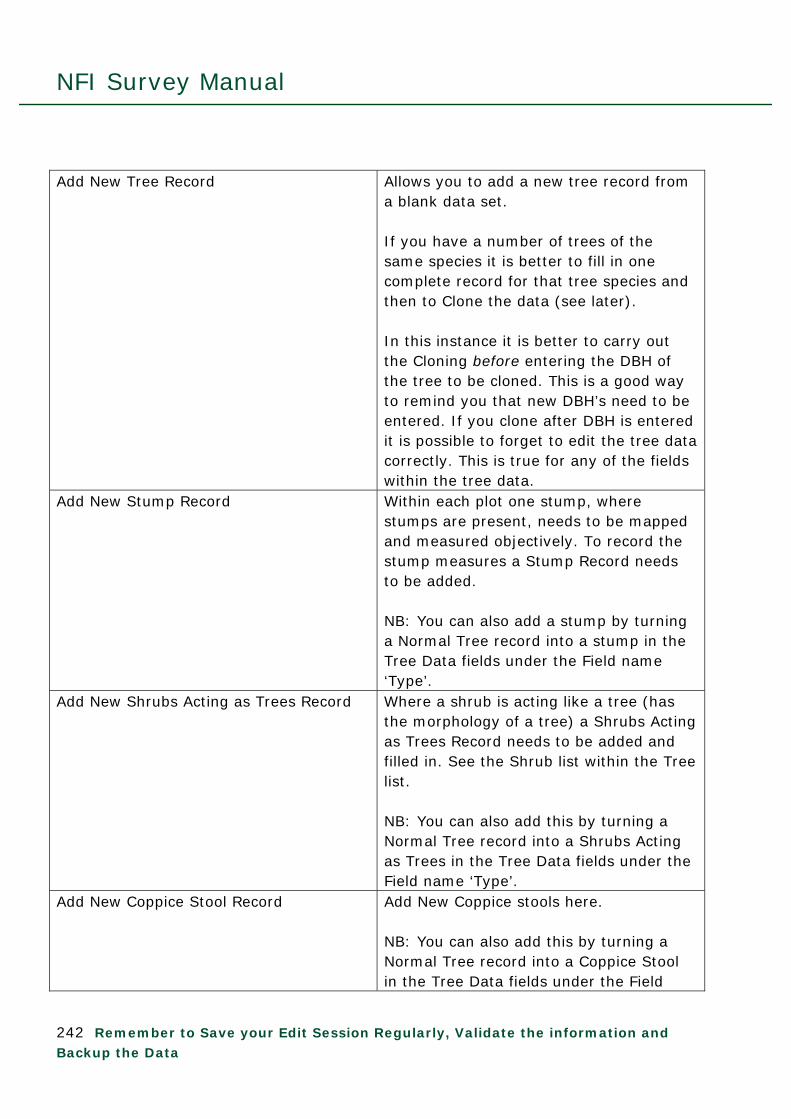
NFI Survey Manual
242 Remember to Save your Edit Session Regularly, Validate the information and Backup the Data
Add New Tree Record Allows you to add a new tree record from
a blank data set. If you have a number of trees of the same species it is better to fill in one complete record for that tree species and then to Clone the data (see later). In this instance it is better to carry out the Cloning before entering the DBH of the tree to be cloned. This is a good way to remind you that new DBH’s need to be entered. If you clone after DBH is entered it is possible to forget to edit the tree data correctly. This is true for any of the fields within the tree data.
Add New Stump Record Within each plot one stump, where stumps are present, needs to be mapped and measured objectively. To record the stump measures a Stump Record needs to be added. NB: You can also add a stump by turning a Normal Tree record into a stump in the Tree Data fields under the Field name ‘Type’.
Add New Shrubs Acting as Trees Record Where a shrub is acting like a tree (has the morphology of a tree) a Shrubs Acting as Trees Record needs to be added and filled in. See the Shrub list within the Tree list. NB: You can also add this by turning a Normal Tree record into a Shrubs Acting as Trees in the Tree Data fields under the Field name ‘Type’.
Add New Coppice Stool Record Add New Coppice stools here. NB: You can also add this by turning a Normal Tree record into a Coppice Stool in the Tree Data fields under the Field
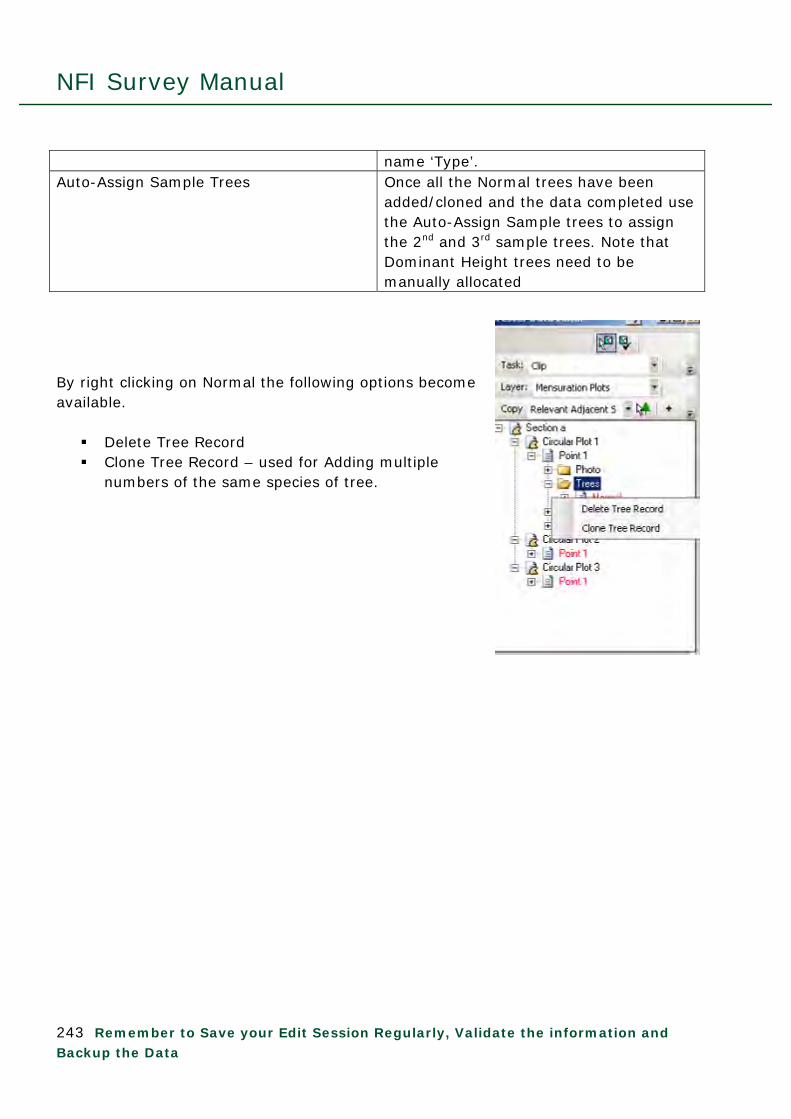
NFI Survey Manual
243 Remember to Save your Edit Session Regularly, Validate the information and Backup the Data
name ‘Type’. Auto-Assign Sample Trees Once all the Normal trees have been
added/cloned and the data completed use the Auto-Assign Sample trees to assign the 2nd and 3rd sample trees. Note that Dominant Height trees need to be manually allocated
By right clicking on Normal the following options become available. Delete Tree Record Clone Tree Record – used for Adding multiple
numbers of the same species of tree.
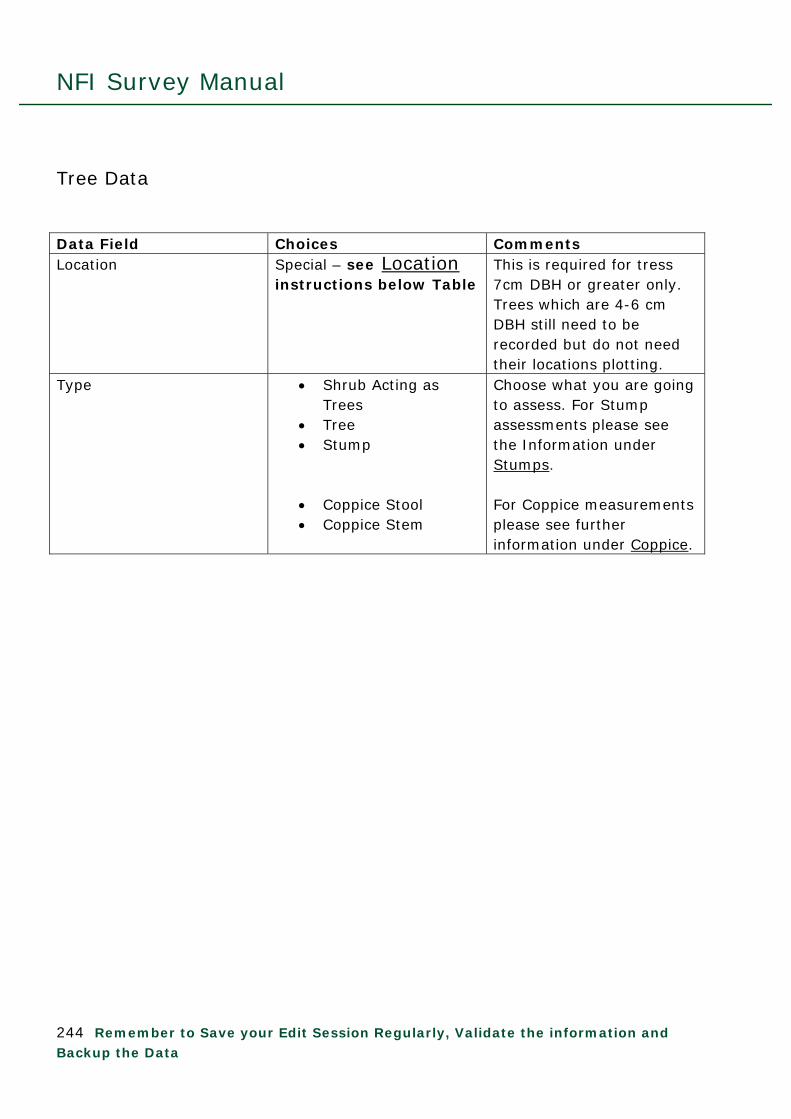
NFI Survey Manual
244 Remember to Save your Edit Session Regularly, Validate the information and Backup the Data
Tree Data Data Field Choices Comments Location Special – see Location
instructions below Table This is required for tress 7cm DBH or greater only. Trees which are 4-6 cm DBH still need to be recorded but do not need their locations plotting.
Type Shrub Acting as Trees
Tree Stump Coppice Stool Coppice Stem
Choose what you are going to assess. For Stump assessments please see the Information under Stumps. For Coppice measurements please see further information under Coppice.

NFI Survey Manual
245 Remember to Save your Edit Session Regularly, Validate the information and Backup the Data
Location In the example below Plot 2 is being assessed (the centre of the plot is yellow). Before selecting the location of the tree/stump it is best to zoom in to the plot using the zoom tool.
Click on the white space next to the Location Data Field and you will see a small grey box with the word ‘Set’ in it. Click on this and then click on the tree/stump/stool location within the Plot.

NFI Survey Manual
246 Remember to Save your Edit Session Regularly, Validate the information and Backup the Data
Click on the plot area to locate the tree/stump: Repeat the assessments for all trees ≥4cm DBH within the plot. When Locating 2nd and 3rd Sample Trees your location can be anywhere within the Section/RAS. You may need to zoom out from the plot to be able to locate its position on the map.
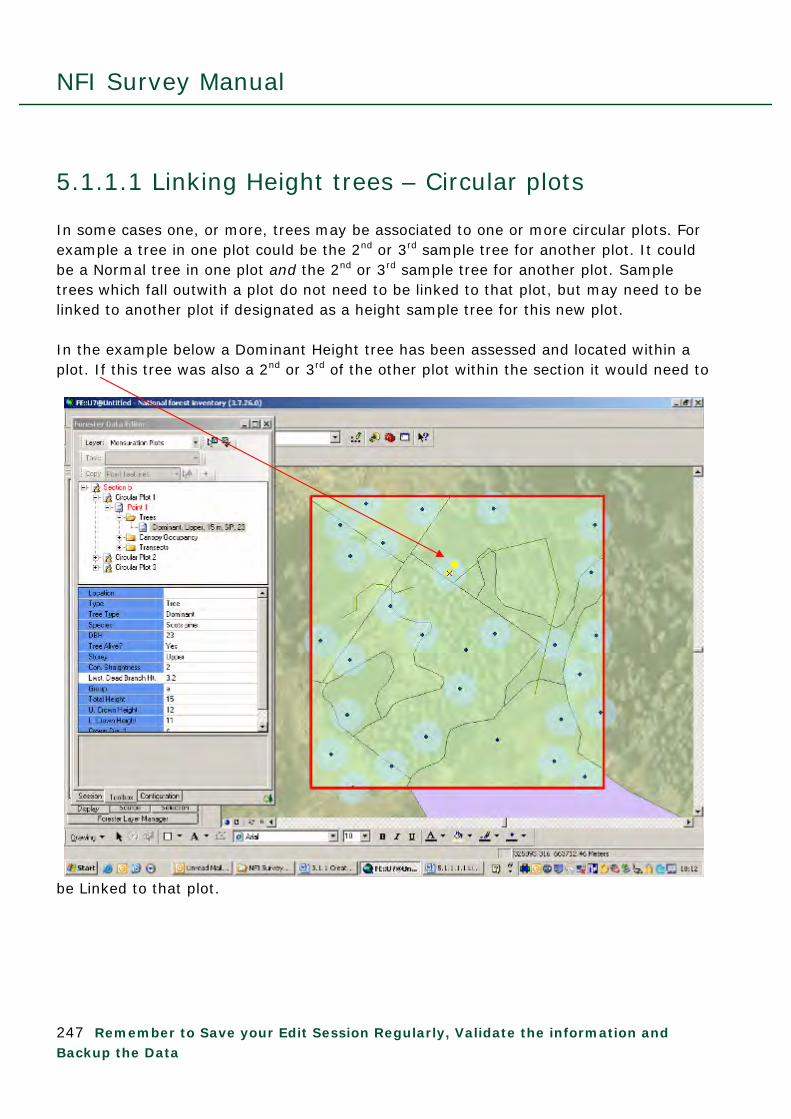
NFI Survey Manual
247 Remember to Save your Edit Session Regularly, Validate the information and Backup the Data
5.1.1.1 Linking Height trees – Circular plots In some cases one, or more, trees may be associated to one or more circular plots. For example a tree in one plot could be the 2nd or 3rd sample tree for another plot. It could be a Normal tree in one plot and the 2nd or 3rd sample tree for another plot. Sample trees which fall outwith a plot do not need to be linked to that plot, but may need to be linked to another plot if designated as a height sample tree for this new plot. In the example below a Dominant Height tree has been assessed and located within a plot. If this tree was also a 2nd or 3rd of the other plot within the section it would need to
be Linked to that plot.

NFI Survey Manual
248 Remember to Save your Edit Session Regularly, Validate the information and Backup the Data
The tree now needs to be linked to that plot. Right click on the tree record you want to link and choose the ‘Link Tree to a Mensuration Point’ Choose which Point you want to link it to:
Also choose what relation it has with the other point, e.g. 3rd Sample tree.

NFI Survey Manual
249 Remember to Save your Edit Session Regularly, Validate the information and Backup the Data
5.1.1.2 Diameter Assessments from Roberts & Mackie (2006) Forest Mensuration, A handbook for Practitioners, FC, Edinburgh.
Tree and log diameters are conventionally measured overbark by a girthing tape, rounding down to the nearest whole centimetre. Rounding down is achieved automatically with the tapes of the type shown in Figure 1. (The zero point on these tapes is the extreme edge of the brass rectangle or the point of the hook, according to the fitment, as shown in Figure 1. When measuring trees, in cases where the zero point is found to fall on the dividing line between two diameter classes, the higher diameter class should be used.) The girthing tape must always be taut and at right-angles to the stem or log. Calipers are an alternative instrument for measurement of diameter and many modern examples include facilities for automatic recording of assessments. Examples of these are Haglöf and Masser. These instruments are supplied with computer software and full instructions which are not reproduced here.
Figure 1: Examples of girthing tapes — the dotted line shows the zero point.
Measuring diameter at breast height on standing trees It is important to ensure that trees are girthed at a point on the tree 1.3 m above ground level, which is the diameter at breast height (dbh) point (see Figure 2a–i). The minimum dbh of a tree for the NFI is 4 cm. As such the dbh of any tree measuring less than 4 cm is not usually recorded. It is recommended that a stick accurately measured to 1.3 m is used to locate the dbh point. Alternatively, a pin can be attached to the operator’s clothing at this height.

NFI Survey Manual
250 Remember to Save your Edit Session Regularly, Validate the information and Backup the Data
Always locate the breast height point on a tree from ground level and not from the top of a tree root. The only exception to this convention would be when measuring trees with extreme buttressing; such trees are rare in Britain.
Locating the correct dbh point. a) On sloping ground, measure the diameter at 1.3 m from ground level on the upper side of the tree. b) On uneven or ploughed ground, measure the diameter at 1.3 m from the ground level at the base of the tree.

NFI Survey Manual
251 Remember to Save your Edit Session Regularly, Validate the information and Backup the Data
c) Where a swelling occurs at 1.3 m above ground level, measure the diameter below the swelling at the point where the diameter is smallest. On trees that fork below 1.3m, treat each limb as a separate tree and measure the diameter of both trees. d) and e) On leaning trees, measure the diameter at 1.3 m from ground level on the underside of the tree, at right angles to the axis of the stem.
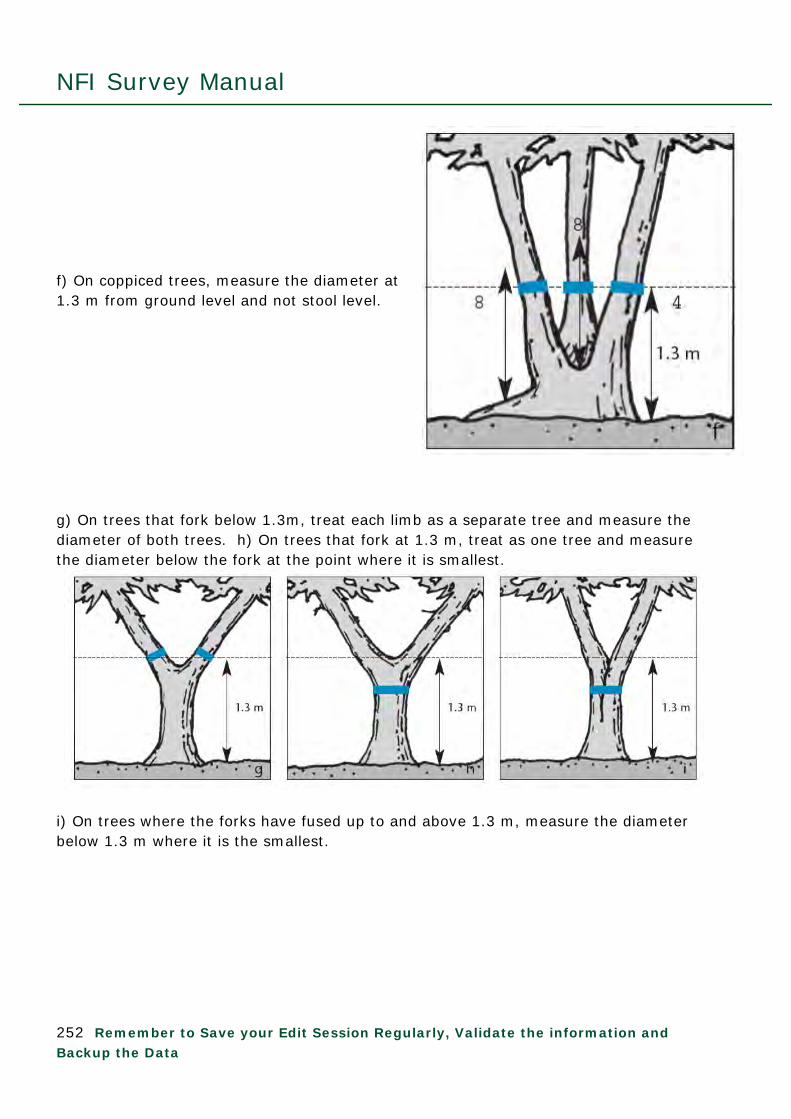
NFI Survey Manual
252 Remember to Save your Edit Session Regularly, Validate the information and Backup the Data
f) On coppiced trees, measure the diameter at 1.3 m from ground level and not stool level. g) On trees that fork below 1.3m, treat each limb as a separate tree and measure the diameter of both trees. h) On trees that fork at 1.3 m, treat as one tree and measure the diameter below the fork at the point where it is smallest.
i) On trees where the forks have fused up to and above 1.3 m, measure the diameter below 1.3 m where it is the smallest.

NFI Survey Manual
253 Remember to Save your Edit Session Regularly, Validate the information and Backup the Data
5.1.1.3 Decay Classes Using the decay classes (below) from Malcolm Hunter’s Wildlife, Forests, And Forestry (1990), Prentice Hall, New Jersey, surveyors are required to enter decay classes for lying deadwood in transects and for standing deadwood within plots.
Standing deadwood During the assessments of Mensuration Plots (Circular or Whole Section) all dead stems 4cm DBH are recorded. Using the diagram overleaf choose which decay class (top row of diagrams) the standing stem relates to (3 – 7).
Lying deadwood During the Lying Deadwood assessments all dead stems 7cm diameter where they cross the transect line are recorded. Using the diagram overleaf choose which decay class (Log Decomposition, 2nd row of diagrams) the lying deadwood relates to (1 - 5).
Stumps When assessing the stump nearest the plot centre/point assess the decay class from the top diagram below using classes 1-5 as per the Lying deadwood above.

NFI Survey Manual
254 Remember to Save your Edit Session Regularly, Validate the information and Backup the Data
Figure 1: Decay classes in Standing and Lying deadwood (from Hunter (1990)).

NFI Survey Manual
255 Remember to Save your Edit Session Regularly, Validate the information and Backup the Data
5.1.1.4 Height (Height assessment methodologies from Roberts & Mackie (2006) Forest Mensuration, A handbook for Practitioners, FC, Edinburgh). Height is assessed for the following trees:
Dominant Height tree (Circular plots only)
o This is the largest diameter tree within each Storey in the plot.
1st Stand Height Tree (Whole Section points only)
o This is the nearest tree to each of the three Points within the Section.
2nd Sample Tree (for Circular and Whole Section Plots)
o This is usually assigned using the auto-assign option in the software. If assigned manually it should be the 3rd nearest tree to the 1st Stand Height or Dominant Height tree within the same storey. Note that for counting between trees only live trees are to be counted. Also coppice stools/multi-stem trees are counted as a single entity (e.g. count the stool) and not counted for each individual stem. The tree must be within the Section boundary but can be outside the Square where the Section extends outside the Square.
3rd Sample Tree (for Circular and Whole Section Plots)
o This is usually assigned using the auto-assign option in the software. If
assigned manually it is the 3rd nearest tree to the 2nd Sample Tree within the same storey. Note that for counting between trees only live trees are to be counted. Also coppice stools/multi-stem trees are counted as a single entity (e.g. count the stool) and not counted for each individual stem. The tree must be within the Section boundary but can be outside the Square where the Section extends outside the Square.
Mapping the location of the Dominant, 1st Stand Height and 2nd & 3rd Sample trees is important to allow the QA staff to relocate them.
NB: Only live, unsnapped trees which are not excessively leaning (≥20) can be assessed for height. Components of dead trees are assessed for estimated height and diameter at the Component level.

NFI Survey Manual
256 Remember to Save your Edit Session Regularly, Validate the information and Backup the Data
Total Height For the National Forest Inventory (NFI) the Total height of the trees is required. Total height is the vertical distance from the base of the tree to the uppermost point (tip) for live trees.
Figure 1: Total height points on conifers (a) and broadleaves (b). During the NFI all tree heights are to be assessed either directly with tapes or indirectly using a Vertex hypsometer. When assessing windblown trees the stem length is assessed to give an indication of total height as if the tree was standing.

NFI Survey Manual
257 Remember to Save your Edit Session Regularly, Validate the information and Backup the Data
Height Measurement Conventions
Distance from the Tree The distance between the observation point and the tree should be in the region of 1 to 1.5 times the height of the tree. Errors can prove to be sizeable where the observer is closer than this. The main difficulty in achieving the ideal position is being able to view the tops of trees in dense stands. The height of the tree is always the vertical distance between the top and the base. The precision of the measurement is inevitably related to Figure 2 Measuring tree height. the capability of the instrument used. Take care to find the true total height point and do not sight on a side branch. This can be especially difficult when measuring broadleaved trees.
Figure 3: Measuring Tree Heights

NFI Survey Manual
258 Remember to Save your Edit Session Regularly, Validate the information and Backup the Data
Assessing Tree Heights on a Slope On sloping ground it is necessary to correct the measured distance to the tree to obtain this (Figure 4). The Vertex hypsometer will do this automatically if used correctly. Figure 4 Measuring tree height on sloping ground.
Assessing Leaning Trees Trees should be checked for lean and direction of lean. If the tree is leaning the measurement should be taken at right angles to the direction of lean (Figure 5). Height should be measured as the vertical distance from the tip of the tree to the ground. Strictly the distance from the observer to the tree should also be measured from a point on the ground vertically below the tip. However, it may be expedient to measure this distance from the base of the tree. Trees with excessive lean (≥20) are unsuitable for the assessment of height unless the Storey is leaning excessively.
Figure 5: Measuring tree height on
leaning trees.

NFI Survey Manual
259 Remember to Save your Edit Session Regularly, Validate the information and Backup the Data
5.1.1.5 Crown heights and diameter
Crown Heights
Upper Crown Height: Conifers: The height on the main stem (insertion point) where the lowest complete live whorl of branches occurs, recorded to the nearest 0.1 m. Broadleaves: The height on the main stem where the lowest complete live circle of foliage occurs, recorded to the nearest 0.1 m.
Lower Crown Height: Conifers: The height of the lowest live branch (excluding epicormics and forks) insertion point that is connected to the crown, recorded to the nearest 0.1 m. Broadleaves: The height of the lowest level of foliage that is connected to the crown (excluding epicormics and forks), recorded to the nearest 0.1 m. ADD IMAGES
Upper Crown Height
Lower Crown Height

NFI Survey Manual
260 Remember to Save your Edit Session Regularly, Validate the information and Backup the Data
Crown Diameter The diameter of the crown should be measured along a North – South bearing first and then along an East – West bearing, from drip line to drip line. Measure to the actual drip line along these axes and do not tree to take the average of the crown at that point. Measure across the visual centre of the crown (tip: put the vertex pole under the crown centre) rather than across the base of the stem. In some cases the crown does not sit above the stem base.
PLAN VIEW
Tree crown
Diameter point 1: N/S
Diameter point 2: E/W
Measurement of diameter
90
Plan area of the crown does not sit over the base of the stem

NFI Survey Manual
261 Remember to Save your Edit Session Regularly, Validate the information and Backup the Data
5.1.2 Stumps Stumps are assessed using two different methodologies. The nearest stump to each plot centre/point is measured and mapped. The remaining stumps are visually assessed and tallied into size classes only at the Circular plot/Section Plot level. DO NOT clone/add extra stump records (over and above the stump nearest to the plot centre/point) at the Tree level data. You will see the following Data Fields in the Trees folder: Data Field Choices Comments Location Map the location of the Stump
within the plot. Type Tree
Stump Choose Stump
Stumps Present No Yes
Choose Yes if Stumps present. If no Stumps are present in the plot choose ‘No’. Your ‘Trees’ category may not validate if you do not do this when stumps are not present.
If you choose ‘Yes’ for ‘Stumps Present’ you will need to fill in the following Species Group Spruce
Pine Broadleaved Other Conifer
Choose the class you think the stump fits into.
Stump height(cm) Free text to 1 decimal place
See 5.1.2.1
Diameter 1 Free text to 1 decimal place
See 5.1.2.1 for more details
Diameter 2 Free text to 1 decimal place
See 5.1.2.1 for more details
Decay Class 8 9
Fresh stump, still fairly solid
Older, partially or almost fully rotted stump.
See 5.1.1.3 for more details Coppice Stool No
Yes Is this a coppice stool?

NFI Survey Manual
262 Remember to Save your Edit Session Regularly, Validate the information and Backup the Data
5.1.2.1 Stump Assessments A stump is defined as a part of a tree stem that still has roots attached to the ground and is less than 1.3m in height and has no visible live shoots. Within each Mensuration plot (or in a 5.64m radius circle around each Mensuration Point in the Whole Section Mensuration plot) carry out the following deadwood stump assessments for the stump whose centre is nearest to the plot centre/point using measuring tapes where applicable:
Height – this is the mean height of the stump in cm. On a slope assess mid-way up the slope.
Diameter 1 – assessed North to South. You may have to estimate if the stump is covered in mosses (do not disturb the vegetation on the stump)
Diameter 2 - assessed East to West Map location within the software Decay classification – see Decay classes.
For all other stumps assess the above data visually (QA tolerances will reflect this). Where there is some ambiguity over whether a stump is still a stump or not (e.g. a moss covered mound) surveyor discretion is allowed. Coppice stools – assess the stool and not individual stems connected to it. Assess to the outside of the stool. Minimum diameter of the stool/stump is 4cm.
NFI Survey Manual
263 Remember to Save your Edit Session Regularly, Validate the information and Backup the Data
5.1.3 Canopy Occupancy – NOT CURRENTLY IN USE IN THE NFI Choose Canopy Occupancy in the normal manner.
Total canopy occupancy in each section
a) A spherical crown densiometer is used for this assessment.
b) Stand at the centre of the plot. The centre should be temporarily marked to allow the assessor to move around the section and return easily.
c) Ensure there are no branches from understorey trees directly above which may
overestimate the canopy occupancy from the densiometer. Move position to the nearest unobscured location to the plot centre if this is the case.
d) Use a compass to point North and orient your body to face this direction. Count all
of the unmasked dots on the face of the concave densiometer (indicated as blue stars in Figure 2) which are covered by a reflected image of the canopy. Record the count on the laptop.
e) Carry out the same assessment three more times facing East, South and West.
Record the counts on the laptop.
Canopy occupancy in partial plots
a) Carry out steps a-c for the total canopy occupancy procedure.
b) Use a compass to point North and orient your body to face this direction. If the boundary of the section intersects the plot at any point within 45º to the left or right of North use the compass to orient your body to the next compass point in the sequence (East then South then West).
c) At each cardinal direction, if the plot edge for the 90º arc is not intersected by the
section boundary, Count all of the unmasked dots on the face of the concave densiometer (indicated as blue stars in Figure 2) which are covered by a reflected
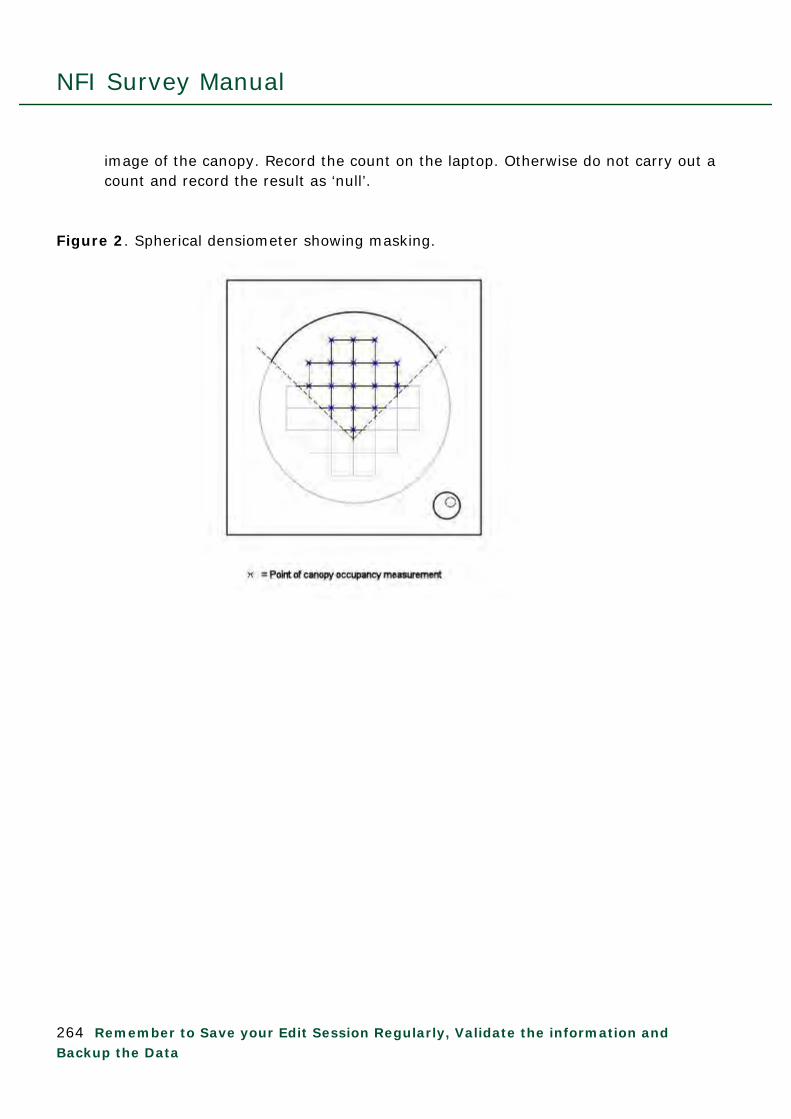
NFI Survey Manual
264 Remember to Save your Edit Session Regularly, Validate the information and Backup the Data
image of the canopy. Record the count on the laptop. Otherwise do not carry out a count and record the result as ‘null’.
Figure 2. Spherical densiometer showing masking.
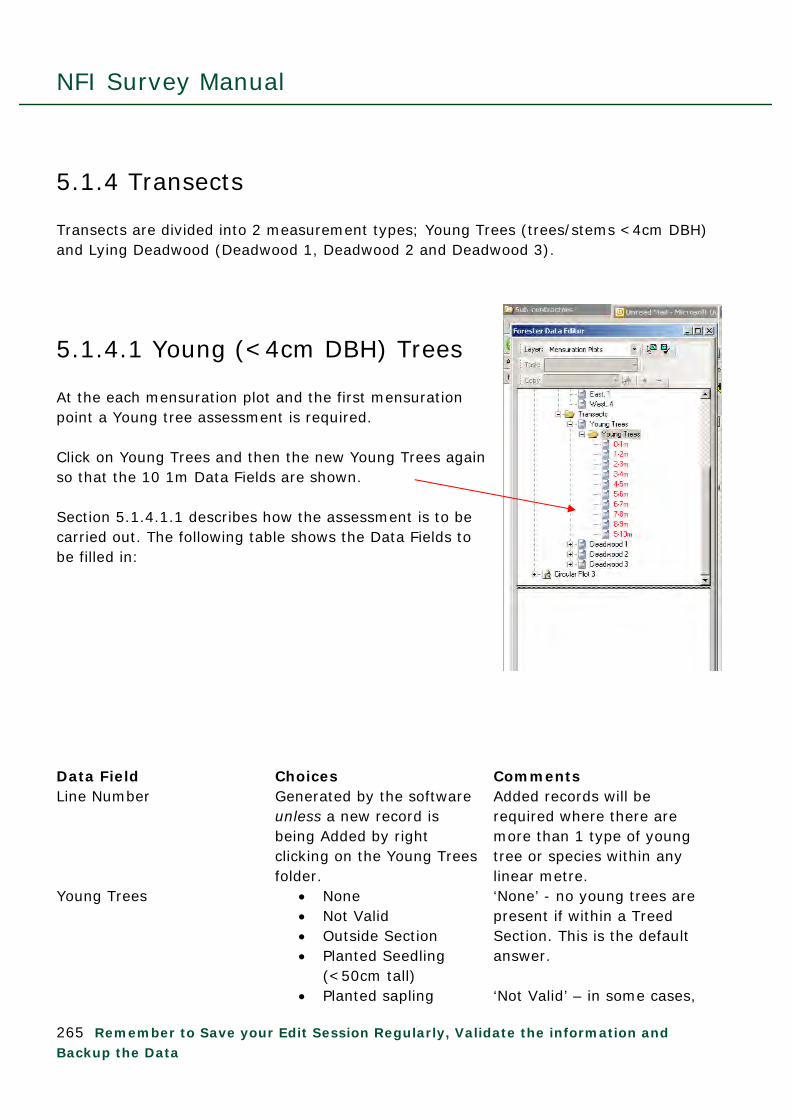
NFI Survey Manual
265 Remember to Save your Edit Session Regularly, Validate the information and Backup the Data
5.1.4 Transects Transects are divided into 2 measurement types; Young Trees (trees/stems <4cm DBH) and Lying Deadwood (Deadwood 1, Deadwood 2 and Deadwood 3).
5.1.4.1 Young (<4cm DBH) Trees At the each mensuration plot and the first mensuration point a Young tree assessment is required. Click on Young Trees and then the new Young Trees again so that the 10 1m Data Fields are shown. Section 5.1.4.1.1 describes how the assessment is to be carried out. The following table shows the Data Fields to be filled in: Data Field Choices Comments Line Number Generated by the software
unless a new record is being Added by right clicking on the Young Trees folder.
Added records will be required where there are more than 1 type of young tree or species within any linear metre.
Young Trees None Not Valid Outside Section Planted Seedling
(<50cm tall) Planted sapling
‘None’ - no young trees are present if within a Treed Section. This is the default answer. ‘Not Valid’ – in some cases,

NFI Survey Manual
266 Remember to Save your Edit Session Regularly, Validate the information and Backup the Data
(≥50cm tall and <4cm DBH)
Regen Seedling (<50cm tall)
Regen sapling (≥50cm tall and <4cm DBH)
e.g. a metalled road within a Section, the presence of young trees is not valid. Where a plot is partially outwith the Section, it is possible that the Young Trees transects could also be outwith the Section. NB: an answer is required for each linear meter.
Where a sapling or Seedling has been indicated the following Data Fields will appear: Planting Year (ONLY for Planted trees)
Free text
Species Various See Species list 3.7.6 Species Quantity 1
2 3 4 5 >5
Enter the number of that species and young tree type within that linear metre.
Browse Class None >50% Outer Shoots
Browsed 10-50% Outer
Shoots Browsed <10% Outer Shoots
Browsed
Recently Frayed No Yes

NFI Survey Manual
267 Remember to Save your Edit Session Regularly, Validate the information and Backup the Data
Repeat the assessment for each linear metre. Where there are more than 1 species or Young Tree Type within a linear metre new records will need to be Added. For example if, during the assessment, it was found that within the Linear metre category of 3-4m there were Western hemlock seedlings and saplings and some Sitka spruce seedlings then 3 records would be required within that Linear meter category: 1) Western hemlock saplings 2) Sitka spruce seedling 3) Western hemlock seedlings Where there is a mixture of potential ages for planted seedlings and saplings for the same species it is acceptable to band them into approximate 5 year bands to reduce the recording burden whilst still giving good data.
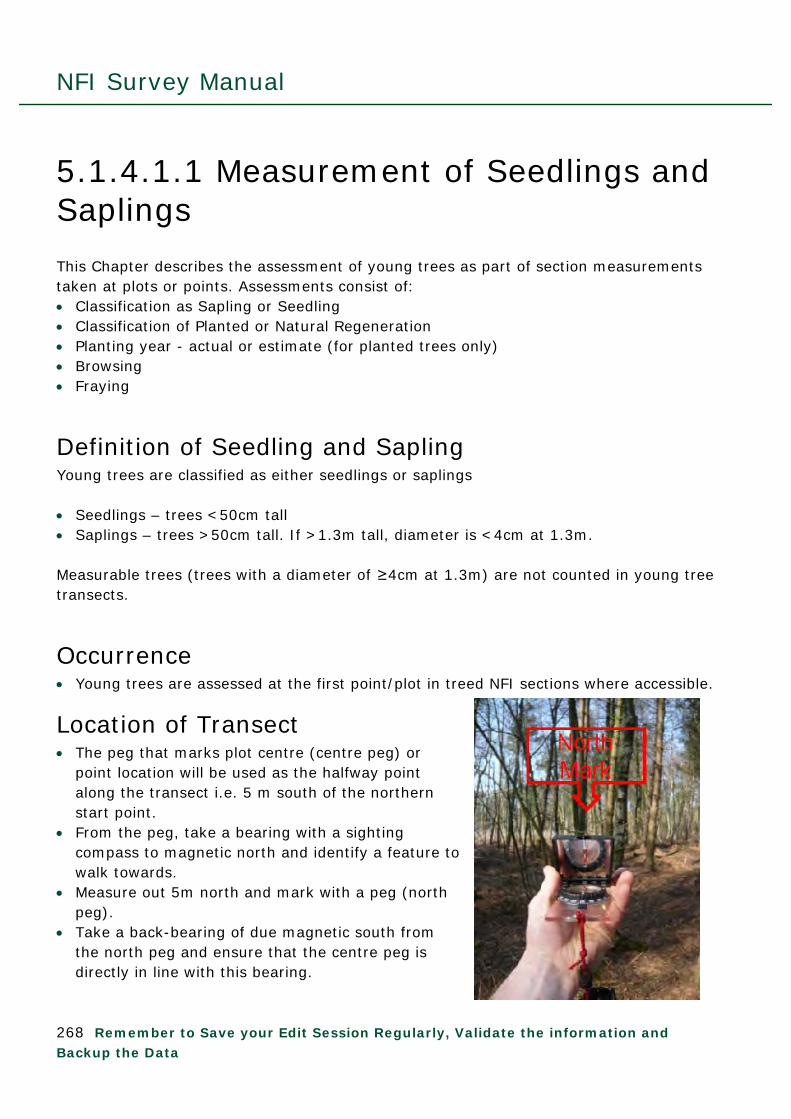
NFI Survey Manual
268 Remember to Save your Edit Session Regularly, Validate the information and Backup the Data
5.1.4.1.1 Measurement of Seedlings and Saplings This Chapter describes the assessment of young trees as part of section measurements taken at plots or points. Assessments consist of: Classification as Sapling or Seedling Classification of Planted or Natural Regeneration Planting year - actual or estimate (for planted trees only) Browsing Fraying
Definition of Seedling and Sapling Young trees are classified as either seedlings or saplings Seedlings – trees <50cm tall Saplings – trees >50cm tall. If >1.3m tall, diameter is <4cm at 1.3m. Measurable trees (trees with a diameter of ≥4cm at 1.3m) are not counted in young tree transects.
Occurrence Young trees are assessed at the first point/plot in treed NFI sections where accessible.
Location of Transect The peg that marks plot centre (centre peg) or
point location will be used as the halfway point along the transect i.e. 5 m south of the northern start point.
From the peg, take a bearing with a sighting compass to magnetic north and identify a feature to walk towards.
Measure out 5m north and mark with a peg (north peg).
Take a back-bearing of due magnetic south from the north peg and ensure that the centre peg is directly in line with this bearing.
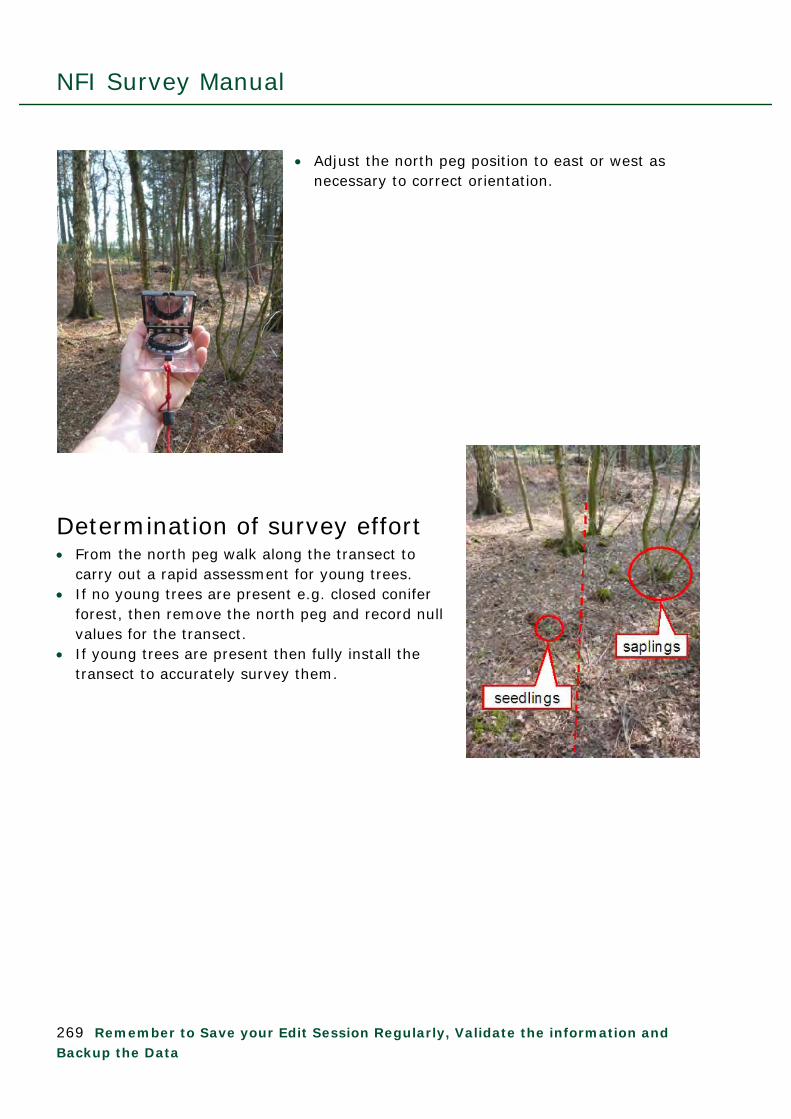
NFI Survey Manual
269 Remember to Save your Edit Session Regularly, Validate the information and Backup the Data
Adjust the north peg position to east or west as necessary to correct orientation.
Determination of survey effort From the north peg walk along the transect to
carry out a rapid assessment for young trees. If no young trees are present e.g. closed conifer
forest, then remove the north peg and record null values for the transect.
If young trees are present then fully install the transect to accurately survey them.

NFI Survey Manual
270 Remember to Save your Edit Session Regularly, Validate the information and Backup the Data
Installing Transect Line (flat ground) Clip loggers tape into the centre peg and walk
out to north peg. Whilst maintaining north-south line, move north
peg to 5m from centre peg. Attach end of linear tape to north peg and walk
back to centre peg.
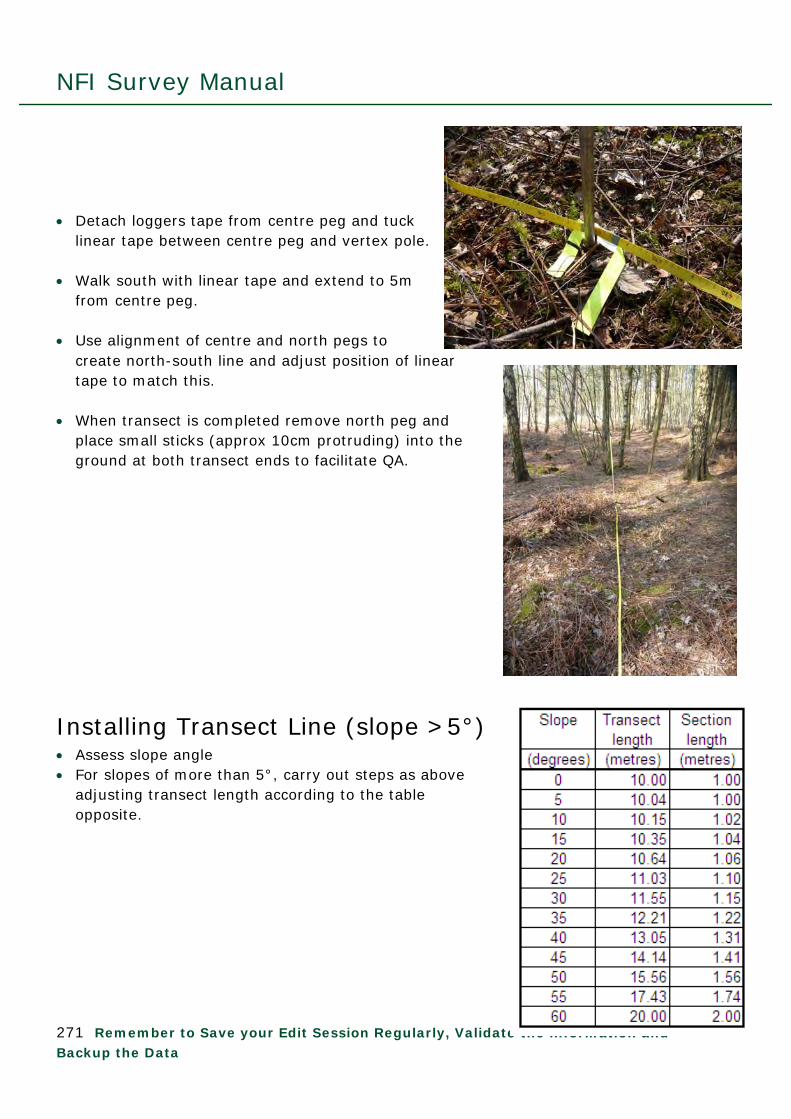
NFI Survey Manual
271 Remember to Save your Edit Session Regularly, Validate the information and Backup the Data
Detach loggers tape from centre peg and tuck
linear tape between centre peg and vertex pole. Walk south with linear tape and extend to 5m
from centre peg. Use alignment of centre and north pegs to
create north-south line and adjust position of linear tape to match this.
When transect is completed remove north peg and
place small sticks (approx 10cm protruding) into the ground at both transect ends to facilitate QA.
Installing Transect Line (slope >5°) Assess slope angle For slopes of more than 5°, carry out steps as above
adjusting transect length according to the table opposite.

NFI Survey Manual
272 Remember to Save your Edit Session Regularly, Validate the information and Backup the Data
Survey of Transect Survey and recording of the transect is from north to south. For each linear metre assess:
o Seedlings or saplings & planted or natural regeneration o Planting year o Species o Number (1, 2, 3, 4, 5 or >5) o Browse class
Browsed (B): >50% of outer shoots browsed Intermediate (I): 10% to 50% of outer shoots browsed Unbrowsed/ungrazed (U): <10% of outer shoots browsed.
o Fraying Add “F” after B, I or U where seedling/sapling has recent fraying
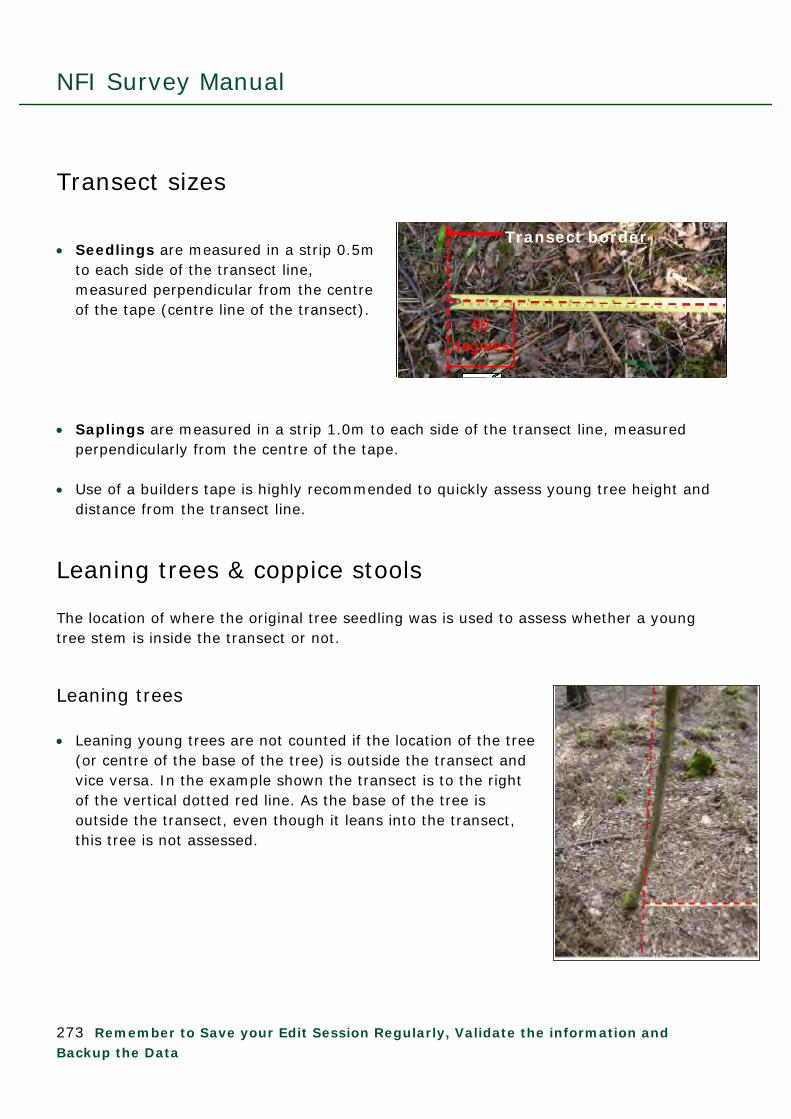
NFI Survey Manual
273 Remember to Save your Edit Session Regularly, Validate the information and Backup the Data
Transect sizes Seedlings are measured in a strip 0.5m
to each side of the transect line, measured perpendicular from the centre of the tape (centre line of the transect).
Saplings are measured in a strip 1.0m to each side of the transect line, measured
perpendicularly from the centre of the tape. Use of a builders tape is highly recommended to quickly assess young tree height and
distance from the transect line.
Leaning trees & coppice stools The location of where the original tree seedling was is used to assess whether a young tree stem is inside the transect or not.
Leaning trees Leaning young trees are not counted if the location of the tree
(or centre of the base of the tree) is outside the transect and vice versa. In the example shown the transect is to the right of the vertical dotted red line. As the base of the tree is outside the transect, even though it leans into the transect, this tree is not assessed.
Transect border

NFI Survey Manual
274 Remember to Save your Edit Session Regularly, Validate the information and Backup the Data
Centre of coppice stool
Transect boundary
Coppice trees For coppice stems to be assessed the centre of the
coppice stool, where the original seedling was deemed to be, must be within the transect.
o If the centre of the stool is inside the
transect then all stems on the stool are deemed to be within the transect and need to be assessed (shown opposite).
o If the centre of the stool is outside the transect then all stems on the stool are deemed to be outside the transect and do not require assessment.
Coppice stems are assessed individually and
are counted if the root collar junction lies within the transect strip.
Side branches on coppice stool stems are not
counted as young trees. Low side branches on maiden-form trees stems are
also not counted as young trees.

NFI Survey Manual
275 Remember to Save your Edit Session Regularly, Validate the information and Backup the Data
5.1.4.2 Deadwood (Lying Deadwood Transects) Definition: Lying Deadwood is dead, woody material from trees that has not been processed e.g. branches or stem-wood. Fencing posts etc. are NOT counted as lying deadwood.
At the first mensuration plot/point three lying deadwood transects need to be assessed. Chapter 5.1.4.2.1 details the assessment required. Select Transects as shown.
Points for Whole section plots Circular plots Click on the Deadwood 1 (or 2 or 3) folder as normal to highlight the Data Fields.
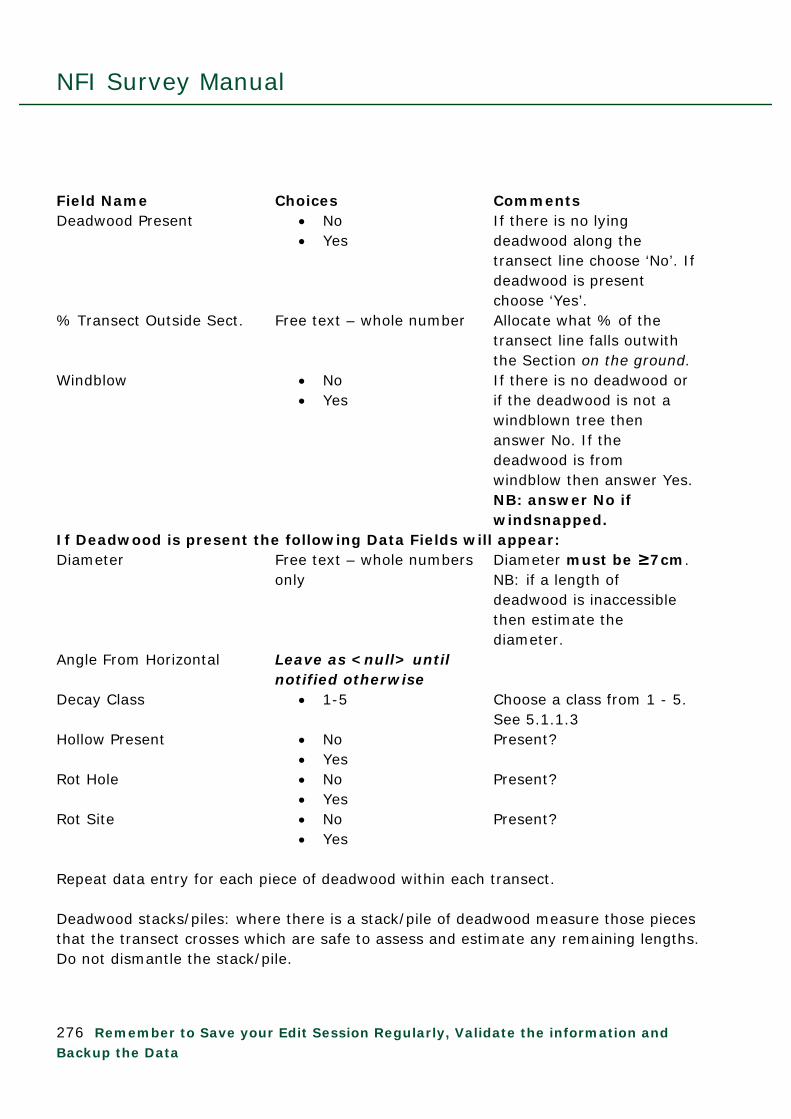
NFI Survey Manual
276 Remember to Save your Edit Session Regularly, Validate the information and Backup the Data
Field Name Choices Comments Deadwood Present No
Yes If there is no lying deadwood along the transect line choose ‘No’. If deadwood is present choose ‘Yes’.
% Transect Outside Sect. Free text – whole number Allocate what % of the transect line falls outwith the Section on the ground.
Windblow No Yes
If there is no deadwood or if the deadwood is not a windblown tree then answer No. If the deadwood is from windblow then answer Yes. NB: answer No if windsnapped.
If Deadwood is present the following Data Fields will appear: Diameter Free text – whole numbers
only Diameter must be ≥7cm. NB: if a length of deadwood is inaccessible then estimate the diameter.
Angle From Horizontal Leave as <null> until notified otherwise
Decay Class 1-5 Choose a class from 1 - 5. See 5.1.1.3
Hollow Present No Yes
Present?
Rot Hole No Yes
Present?
Rot Site No Yes
Present?
Repeat data entry for each piece of deadwood within each transect. Deadwood stacks/piles: where there is a stack/pile of deadwood measure those pieces that the transect crosses which are safe to assess and estimate any remaining lengths. Do not dismantle the stack/pile.

NFI Survey Manual
277 Remember to Save your Edit Session Regularly, Validate the information and Backup the Data
Where a transect line runs along a length of deadwood assess the diameter mid-way along that part of the transect that coincides with the deadwood length.
5.1.4.2.1 Lying Deadwood Three 10m (horizontal distance) transects at 120o to each other are laid out as shown below. Lines should start 2m from the plot centre, using magnetic north as shown on the compass. Starting at the centre and working outwards move along each transect and measure the diameter, perpendicular to the axis of the deadwood, of all Coarse Woody Debris (CWD) – 7cm diameter where the wood intersects the transect.
Plot
Circular Plot centre or Mensuration Point
Transect
N

NFI Survey Manual
278 Remember to Save your Edit Session Regularly, Validate the information and Backup the Data
Where forked CWD intersects the transect line at more than 1 point, measure all diameters where they intersect the transect line: Note the decay class (1-5) of each piece of CWD
Where: 1 = Bark intact 2 = Bark loose or sloughing off, no sapwood degradation 3 = No bark, some sapwood degradation 4 = No bark, considerable sapwood degradation 5 = Sapwood and heartwood degradation For each piece note the presence of: Hollow – is the deadwood hollow? Rot hole – is there a rot hole ≥5cm mean diameter Rot site – must be ≥300cm2 in size Windblow – is the lying deadwood a result of windblow?
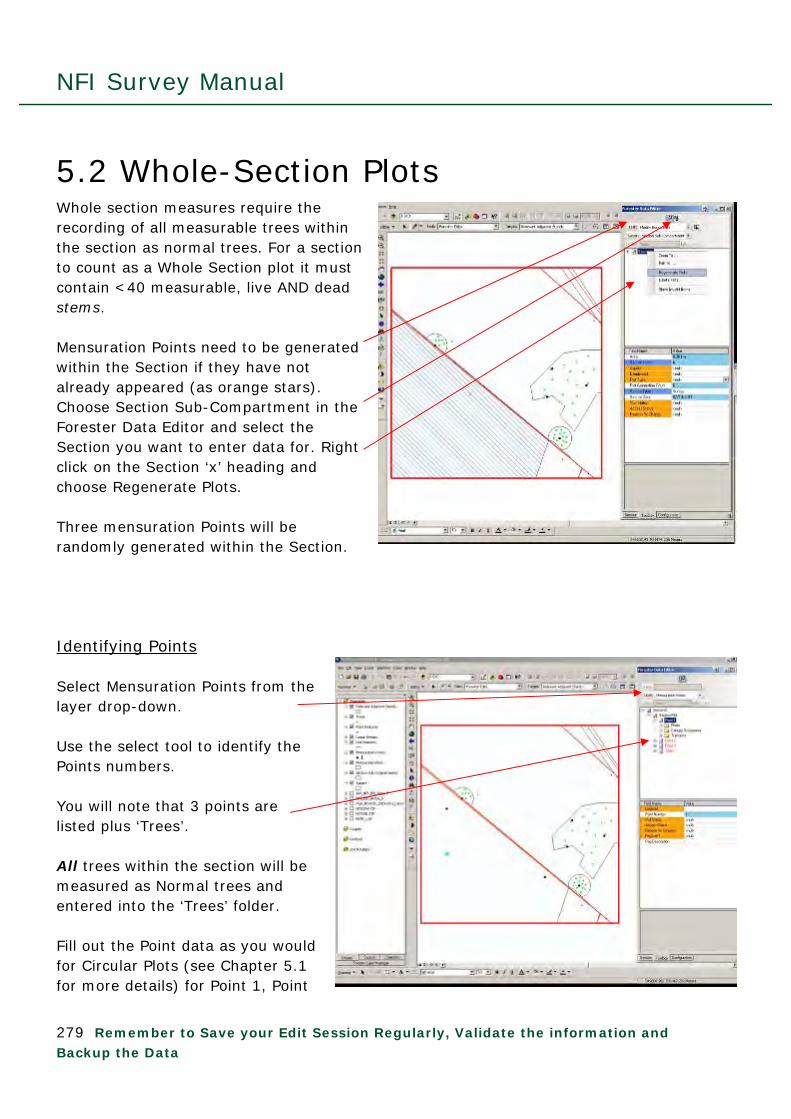
NFI Survey Manual
279 Remember to Save your Edit Session Regularly, Validate the information and Backup the Data
5.2 Whole-Section Plots Whole section measures require the recording of all measurable trees within the section as normal trees. For a section to count as a Whole Section plot it must contain <40 measurable, live AND dead stems. Mensuration Points need to be generated within the Section if they have not already appeared (as orange stars). Choose Section Sub-Compartment in the Forester Data Editor and select the Section you want to enter data for. Right click on the Section ‘x’ heading and choose Regenerate Plots. Three mensuration Points will be randomly generated within the Section. Identifying Points Select Mensuration Points from the layer drop-down. Use the select tool to identify the Points numbers. You will note that 3 points are listed plus ‘Trees’. All trees within the section will be measured as Normal trees and entered into the ‘Trees’ folder. Fill out the Point data as you would for Circular Plots (see Chapter 5.1 for more details) for Point 1, Point
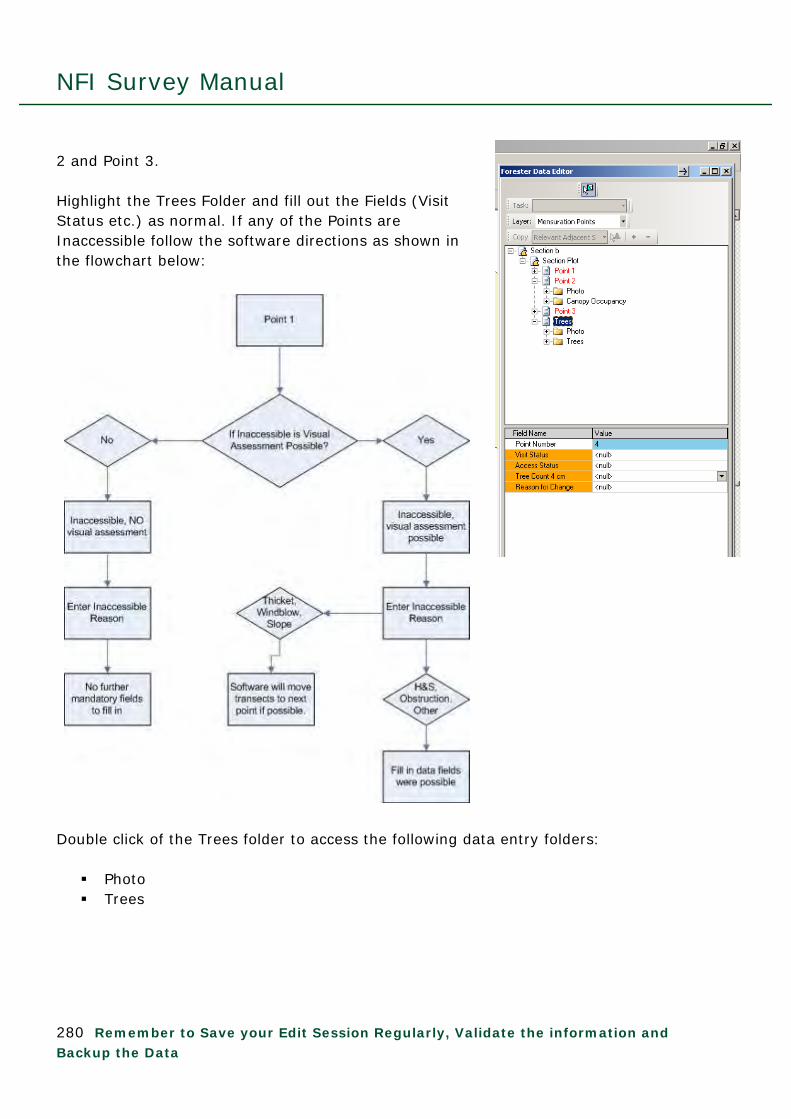
NFI Survey Manual
280 Remember to Save your Edit Session Regularly, Validate the information and Backup the Data
2 and Point 3. Highlight the Trees Folder and fill out the Fields (Visit Status etc.) as normal. If any of the Points are Inaccessible follow the software directions as shown in the flowchart below:
Double click of the Trees folder to access the following data entry folders: Photo Trees
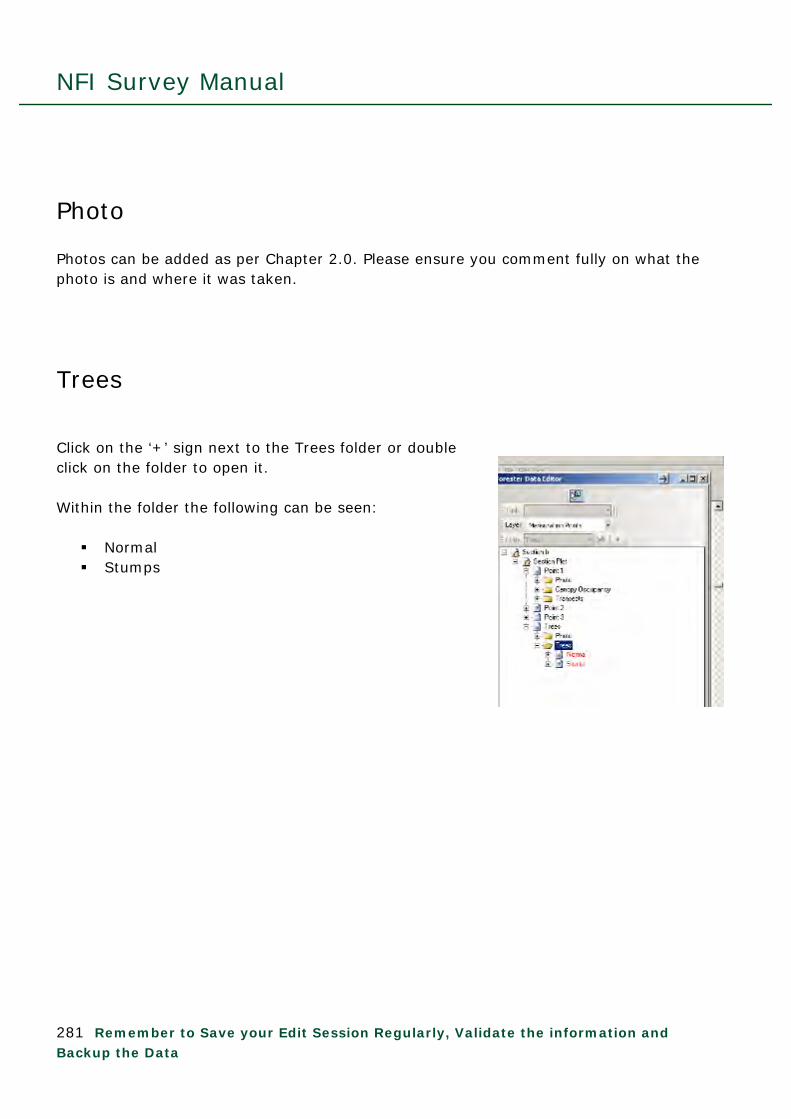
NFI Survey Manual
281 Remember to Save your Edit Session Regularly, Validate the information and Backup the Data
Photo Photos can be added as per Chapter 2.0. Please ensure you comment fully on what the photo is and where it was taken.
Trees Click on the ‘+’ sign next to the Trees folder or double click on the folder to open it. Within the folder the following can be seen: Normal Stumps
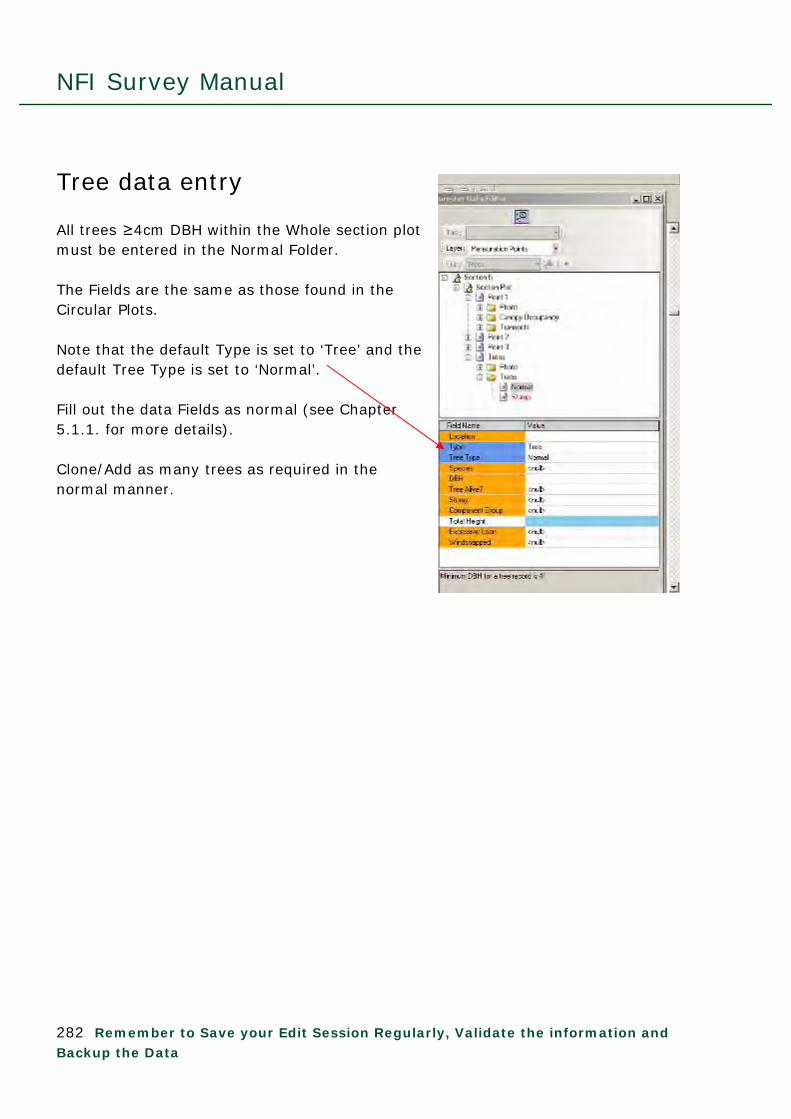
NFI Survey Manual
282 Remember to Save your Edit Session Regularly, Validate the information and Backup the Data
Tree data entry All trees ≥4cm DBH within the Whole section plot must be entered in the Normal Folder. The Fields are the same as those found in the Circular Plots. Note that the default Type is set to ‘Tree’ and the default Tree Type is set to ‘Normal’. Fill out the data Fields as normal (see Chapter 5.1.1. for more details). Clone/Add as many trees as required in the normal manner.
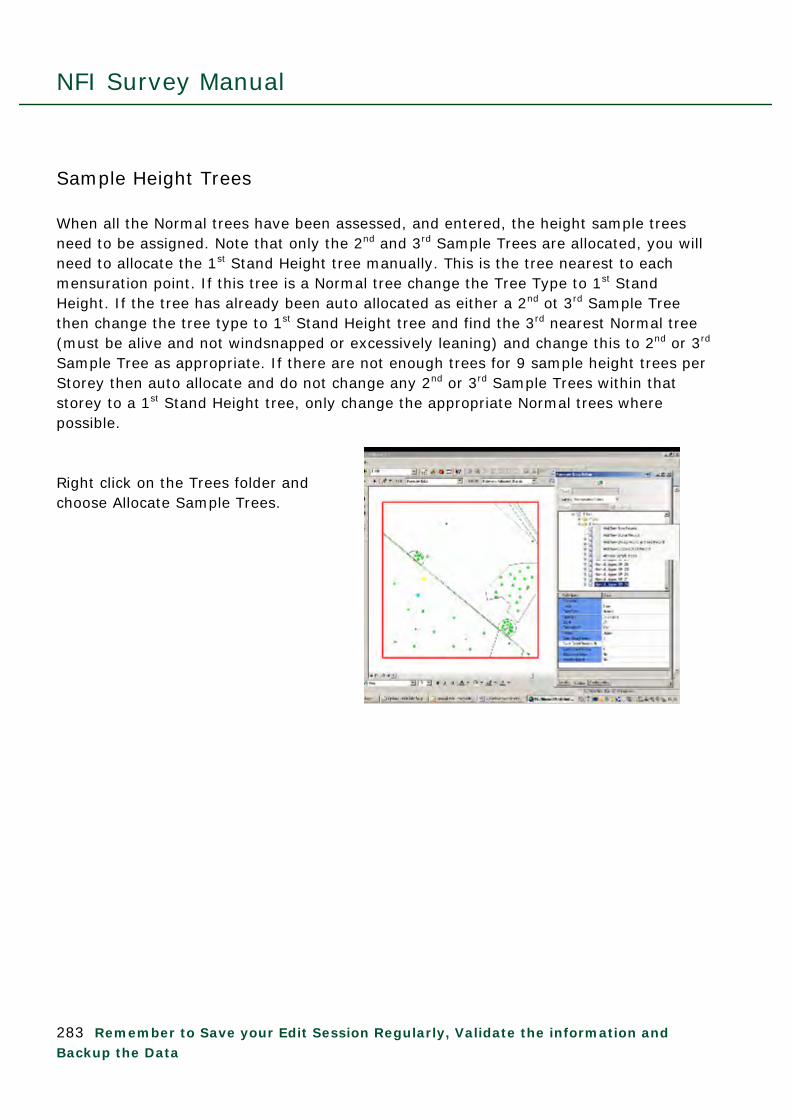
NFI Survey Manual
283 Remember to Save your Edit Session Regularly, Validate the information and Backup the Data
Sample Height Trees When all the Normal trees have been assessed, and entered, the height sample trees need to be assigned. Note that only the 2nd and 3rd Sample Trees are allocated, you will need to allocate the 1st Stand Height tree manually. This is the tree nearest to each mensuration point. If this tree is a Normal tree change the Tree Type to 1st Stand Height. If the tree has already been auto allocated as either a 2nd ot 3rd Sample Tree then change the tree type to 1st Stand Height tree and find the 3rd nearest Normal tree (must be alive and not windsnapped or excessively leaning) and change this to 2nd or 3rd Sample Tree as appropriate. If there are not enough trees for 9 sample height trees per Storey then auto allocate and do not change any 2nd or 3rd Sample Trees within that storey to a 1st Stand Height tree, only change the appropriate Normal trees where possible. Right click on the Trees folder and choose Allocate Sample Trees.

NFI Survey Manual
284 Remember to Save your Edit Session Regularly, Validate the information and Backup the Data
6.0 Linear Features Linear Features are drawn to highlight the spatial location of Cultural Boundaries, Woodland Edges, Transport links, Recreation features, Hazards and Water Features.
6.1 Create Linear Features In the Data Editor choose Line Features from the Layer drop down menu and then Create from the Task menu. Select the button and click on the screen to highlight the location of the line. Ignore the Feature Construction pop-up box.
Double click to complete the line. Within the Data Editor window Data Fields will appear.
A Linear Feature can denote a single or multiple Themes along a line. By changing the ‘From’ and ‘To’ Data Fields along the length of the Linear Feature different Themes can be allocated to a single line along different parts of the length. For example, a wall and a fence may share the same line in parallel or first one half and then the other.

NFI Survey Manual
285 Remember to Save your Edit Session Regularly, Validate the information and Backup the Data
Linear Features can be Added, Deleted, Zoomed To and Panned To by right clicking on the Feature length in the Data Editor window. Delete, Zoom To and Pan To can also be accessed by right clicking on the Linear Feature information. Data Field Choices Comments Theme Unsurveyed/Missing
Cultural Boundaries Woodland Edge Transport Recreation Hazards Water Feature
You have recorded the line, e.g. from map data, but not surveyed and added the Theme
The next 3 Data Fields relate to where, on the Linear Feature, a Theme is. From (metres) Set by the software initially
but can be changed by surveyor
Change the value either using the Set buttons, the pen or by free text.
To (metres) Set by the software initially but can be changed by surveyor
Change the value either using the Set buttons, the pen or by free text.
Length (metres) Calculated by software Do not change this value Visit Status Unvisited
In progress Completed Refused Access Not possible to
assess
Fill in as appropriate. In progress can be used if surveyor needs to leave the site before completing data entry (e.g. it gets dark before completion). Not possible to assess should ONLY be used if the Access Status is ‘Inaccessible and Visual Assessments impossible’.

NFI Survey Manual
286 Remember to Save your Edit Session Regularly, Validate the information and Backup the Data
If a Theme other than Unsurveyed/missing is chosen the following data Fields appear: Data Field Choices Comments Event Category Dependant upon Theme
Water Feat. Width (for Water Features only)
Estimated Mean Width along length of feature. Drop down list of 1m widths:
0-1 1-2 etc.
Water Feat. Depth (for Water Features only)
Estimated Mean Depth along length of feature, as assessed on the day of the survey. Drop down list of 1m depths:
0-1 1-2 2-3 3-4 4-5 5+ Dry
See appropriate Theme later in this Chapter:
Cultural Boundaries Woodland Edge Transport Recreation Hazards Water Feature
Visit Status Unvisited
In progress Completed Refused Access Inaccessible
The line has been drawn from map data but not visited yet
In progress can be used if surveyor needs to leave the site before completing data entry (e.g. it gets dark before completion)
Reason for Change No change Real change
Error change
Spatial error
For use in the 2nd NFI
For use in the 2nd NFI
A change in the data due to an error found from IFOS
As above but a Spatial error

NFI Survey Manual
287 Remember to Save your Edit Session Regularly, Validate the information and Backup the Data
1st Assessment
Original
The normal Reason – your 1st assessment of the site
Unchanged data from IFOS
Cultural Boundaries Data Field Choices Comments Event Category Fence (internal or
external)
Wall
Hedge
Avenue
Any type of fence unbroken along its length but can be in good to very poor repair. If fence is broken map separate lengths.
NB: Electric and Barbed wire fences also come under Hazards and should be assessed as both. As above but any
type of wall
A hedge or hedgerow is a line of closely spaced shrubs and tree species, planted and trained in such a way as to form a barrier or to mark the boundary of an area.
Traditionally, an

NFI Survey Manual
288 Remember to Save your Edit Session Regularly, Validate the information and Backup the Data
Ditch
Woodbank
Earthworks
Historic (old) Pollarding
avenue is a straight road with a line of trees or large shrubs running along each side
A ditch is usually
defined as a small to moderate depression created to channel water.
A feature often
associated with a ditch that in the past had a wall or hedge on top to keep grazing animals out.
In archaeology,
earthworks are artificial changes in land level often known as 'lumps and bumps'.
Evidence of old
pollarding. Pollarding is a pruning system in which the tree is cut back (tree stem or minor branches removed) above the browse line as part of management. This pruning encourages lateral branches and is normally done two or three metres above ground level.

NFI Survey Manual
289 Remember to Save your Edit Session Regularly, Validate the information and Backup the Data
Woodland Edge Data Field Choices Comments Event Category Abrupt Edge
Tapered By Height Variable Density
Ecozone
See 6.1.1 for details
Transport Data Field Choices Comments Event Category Public Road
Railway
Public greenway
Forest Road sealed surface
Forest Road unsealed surface
A road over which the public has the right of access. Also includes Private roads.
A railway track of
any gauge
A greenway is a historical right of way for any persons or vehicles usually denoted by a lack of surface, often used for recreation and pedestrian and bicycle traffic
A road through the
forest for use by the owner and workers – tarmacked
As above but
metalled not tarmacked

NFI Survey Manual
290 Remember to Save your Edit Session Regularly, Validate the information and Backup the Data
Ride sealed surface
Ride unsurfaced
Extraction rack – Dozed
Extraction rack
Soil damaged and compacted through Ops.
Rides are often
vegetated, un-metalled or un-surfaced corridors often giving access to or through a forest. They also include de-classified CAT 1A roads that are no longer maintained but still surfaced.
Rides are vegetated,
un-metalled or un-surfaced corridors often giving access to or through a forest.
A dozed path
through the forest that is used to extract timber (assign Linear Feature to the main Rack only)
A path through the
forest that is used to extract timber (assign Linear Feature to the main Rack only)
Soil that has been
obviously damaged (e.g. deep ruts) and/or compacted by forestry vehicles

NFI Survey Manual
291 Remember to Save your Edit Session Regularly, Validate the information and Backup the Data
Recreation Data Field Choices Comments Event Category Public Right of Way
Informal Path
Formal path Outdoor education
activity
Off-road motorcycle tracks
Bridleway
Cycle way
Path with Way markers
Footpaths, bridleways and byways which give members of the public the right to travel across land.
A path made
through cumulative use
A planned and
created pathway
Any linear outdoor education facility
Tracks for off-road
motorcycles
A track along which the public have a right to walk or ride horses.
Segregated cycle
facilities are roads, tracks, paths or marked lanes designated for use by cyclists from which motorised traffic is generally excluded
A path with markers to
guide users along routes.

NFI Survey Manual
292 Remember to Save your Edit Session Regularly, Validate the information and Backup the Data
Hazards Data Field Choices Comments Event Category Powerlines overhead
Powerlines underground
Gas lines underground
Telephone lines overhead
Cliff Steep ground Other Hazard
Scheduled
Monument Mine area No Go Area Working quarry Abandoned quarry Dangerous
scree/boulders Electric fence Barbed wire fence
Self explanatory Self explanatory
Self explanatory
Self explanatory
Self explanatory A slope of ≥33%
(≥18) Any other hazard
Self explanatory
Self explanatory Self explanatory Self explanatory Self explanatory Self explanatory
Self explanatory Self explanatory
Comments (if Other Hazard chosen in Event Category)
Free text Make a note on what the hazard is.
Water Feature Data Field Choices Comments Event Category Ditch/Drain
Stream
The Main Ditch/Drains in a Section
A stream is a body
of water with a current, confined within a bed and

NFI Survey Manual
293 Remember to Save your Edit Session Regularly, Validate the information and Backup the Data
River
Canal
stream banks. For the NFI the mean width of the stream along its mapped length must be <5m.
A river is a natural
watercourse, usually freshwater, normally flowing toward an ocean, a lake, or another river. For the NFI the mean width of the river along its mapped length must be ≥5m.
Canals are human-
made channels for water. There are two types of canal:
Aqueduct (or water conveyance) canals that are used for the conveyance and delivery of fresh water, for human consumption, agriculture, etc.
Waterway canals that are navigable transportation canals used for carrying ships and boats loaded with goods and people, often connected to existing lakes, rivers, or oceans
Water Feat. Width 0-1m 1-2m
Estimate the MEAN width of the Water Feature over

NFI Survey Manual
294 Remember to Save your Edit Session Regularly, Validate the information and Backup the Data
2-3m 3-4m 4-5m 5-6m 6-7m 7-8m 8-9m 9-10m 10-11m 11-12m 12-13m 13-14m 14-15m 15-16m 16-17m 17-18m 18-19m 19-20m 20m+
its mapped length.
Water Feat. Depth 0-1m 1-2m 2-3m 3-4m 4-5m 5m+ Dry
Estimate the MEAN depth of the Water Feature over its mapped length on the day of the assessment.
For Streams, Rivers and Canals the following also have to be completed Contaminants None
Woody harvesting and fallen tree debris
No list A, possibly min. list B litter pres
Traces of list A and/or occas. List B
List A widespread & / or occas. or widespread List B
Self explanatory See 6.1.2 for LIST A and B contaminants
Tree Shading % Free text (numerical) What proportion of the feature is shaded by trees.

NFI Survey Manual
295 Remember to Save your Edit Session Regularly, Validate the information and Backup the Data
6.1.1 Woodland Edge
Software Location Linear Features, Data Field ‘Theme’ = Woodland Edge
Woodland Edge Where a Treed Section is adjacent to an Open Section (whether within or without the NFI external map boundary) which has a minimum mean width of 20m (including going outside the Square boundary) then a description of the woodland edge between the two Sections is required.
Abrupt Edge An Abrupt Edge is defined by an abrupt change from Treed to non-treed. Ideal examples of this are a treed section next to an agricultural field or a treed section adjacent to a public highway.
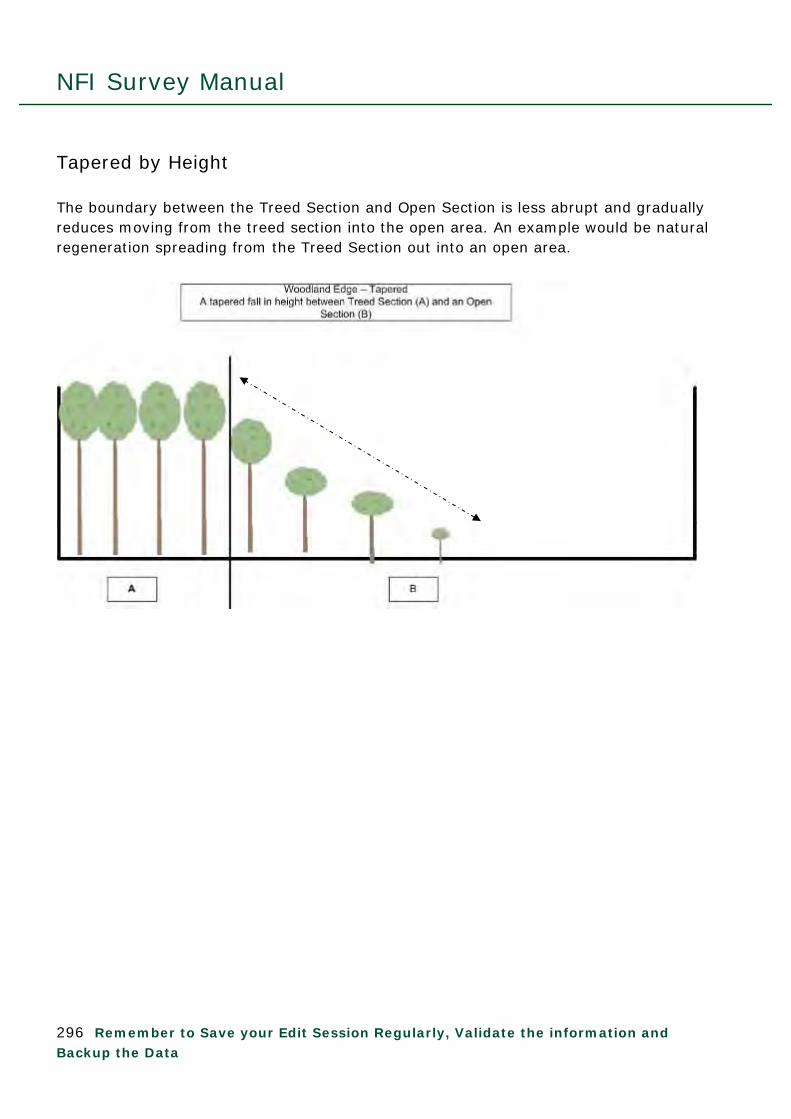
NFI Survey Manual
296 Remember to Save your Edit Session Regularly, Validate the information and Backup the Data
Tapered by Height The boundary between the Treed Section and Open Section is less abrupt and gradually reduces moving from the treed section into the open area. An example would be natural regeneration spreading from the Treed Section out into an open area.
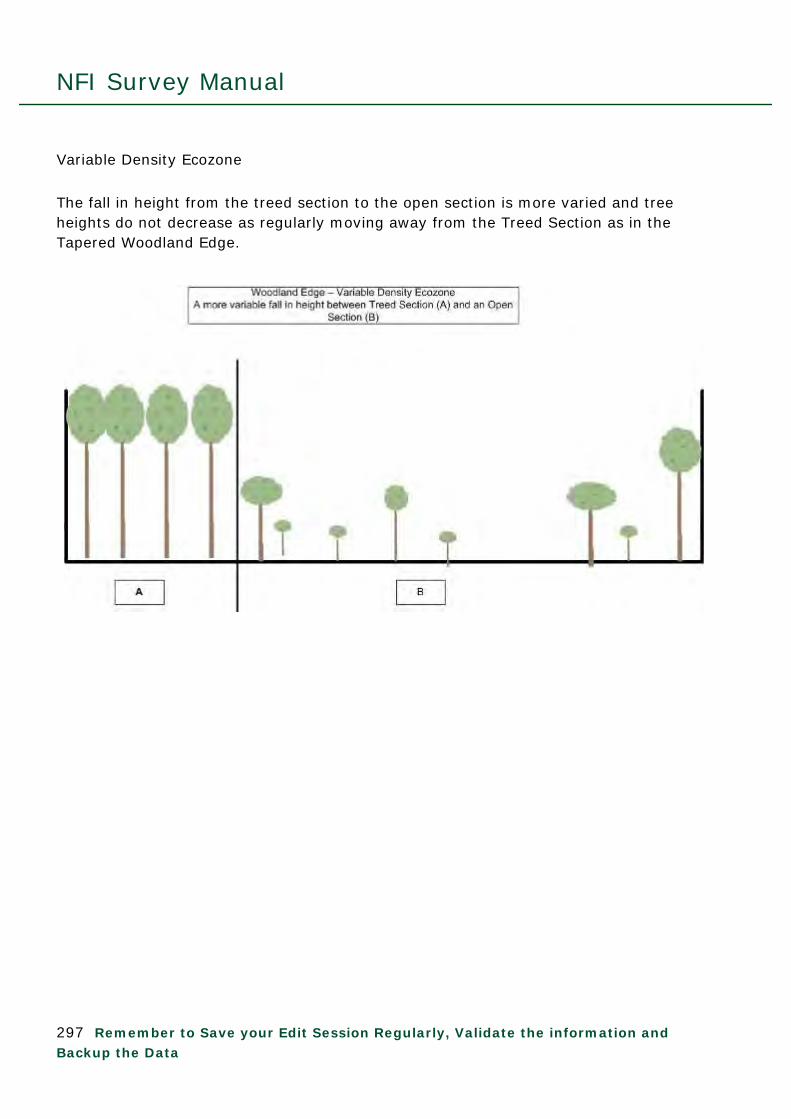
NFI Survey Manual
297 Remember to Save your Edit Session Regularly, Validate the information and Backup the Data
Variable Density Ecozone
The fall in height from the treed section to the open section is more varied and tree heights do not decrease as regularly moving away from the Treed Section as in the Tapered Woodland Edge.

NFI Survey Manual
298 Remember to Save your Edit Session Regularly, Validate the information and Backup the Data
6.1.2 Water Contaminants List List A contaminants List B contaminants Sewage derived litter and solids, including - faeces - toilet paper - contraceptives - sanitary towels - tampons - cotton buds Oils Non natural foam, scum or colour Sewage fungus Sewage or oily smells
General non sewage derived litter Builders waste Gross litter, including - shopping trolleys - furniture - motor vehicles - road cones - bicycles/prams

NFI Survey Manual
299 Remember to Save your Edit Session Regularly, Validate the information and Backup the Data
6.2 Modify Linear Features In the Data Editor choose Line Features from the Layer drop down menu and then Modify from the Task menu. Select the button and highlight the Linear Feature to be modified.
Any of the Nodes (the black and red square boxes along the Linear Feature) can be dragged into a new position.
Double click (or press F2 – this is a safer option) to finish the modification.
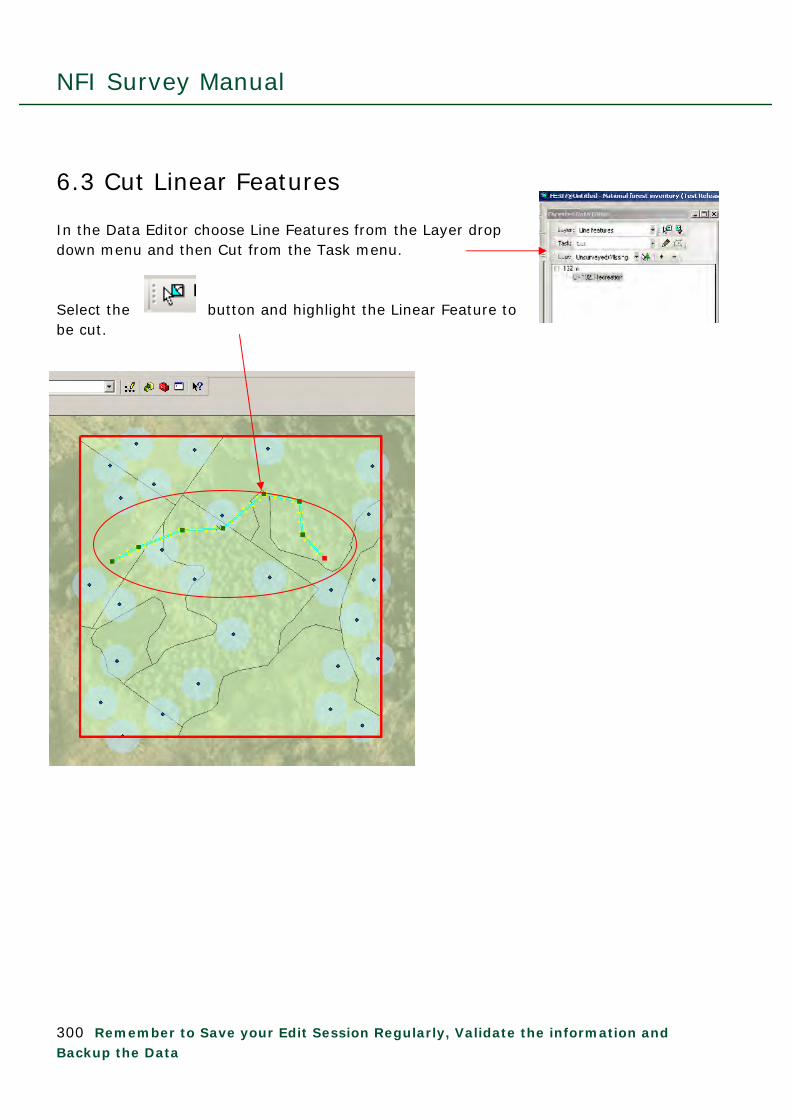
NFI Survey Manual
300 Remember to Save your Edit Session Regularly, Validate the information and Backup the Data
6.3 Cut Linear Features In the Data Editor choose Line Features from the Layer drop down menu and then Cut from the Task menu. Select the button and highlight the Linear Feature to be cut.

NFI Survey Manual
301 Remember to Save your Edit Session Regularly, Validate the information and Backup the Data
Select the Construct Edit Geometry button and create a polygon crossing the Linear Feature at the points where it is to be cut. Double click to finish the modification. The Linear Feature has been cut into two distinct Linear Features, both of which have kept the data for the original Linear Feature. Editing may be required.

NFI Survey Manual
302 Remember to Save your Edit Session Regularly, Validate the information and Backup the Data
6.4 Reshape Linear Features In the Data Editor choose Line Features from the Layer drop down menu and then Reshape from the Task menu. Select the button and highlight the Linear Feature to be reshaped.
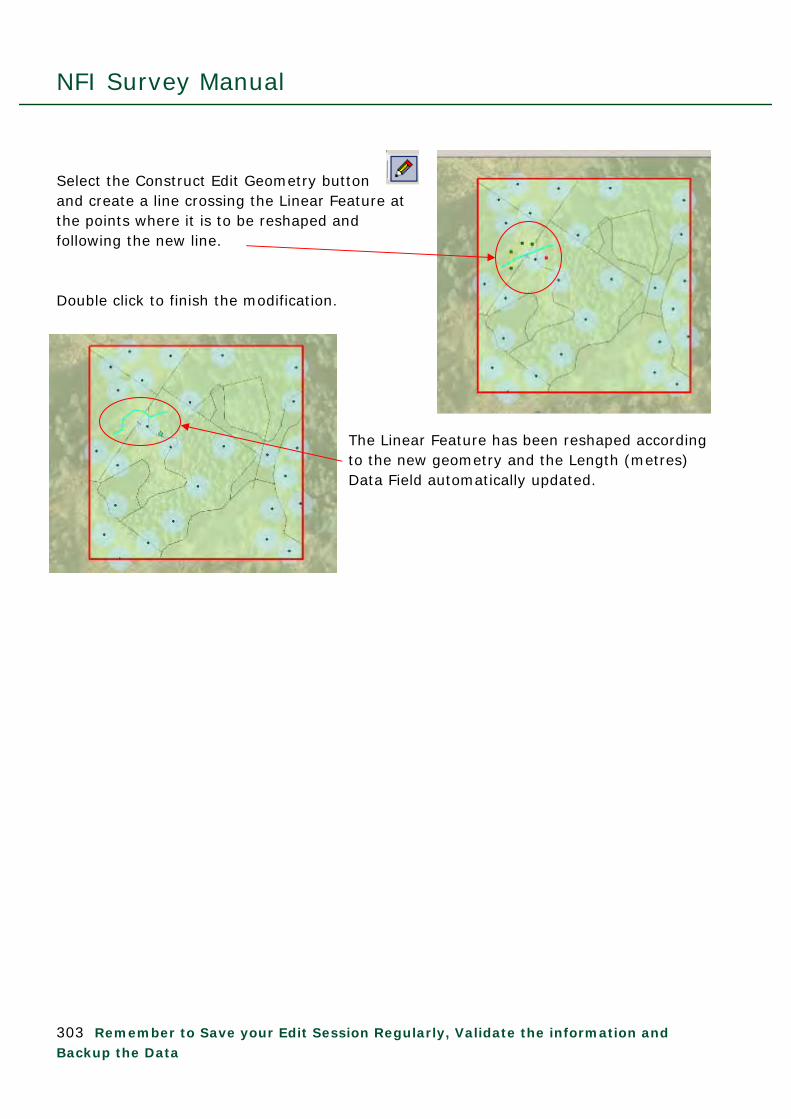
NFI Survey Manual
303 Remember to Save your Edit Session Regularly, Validate the information and Backup the Data
Select the Construct Edit Geometry button and create a line crossing the Linear Feature at the points where it is to be reshaped and following the new line. Double click to finish the modification.
The Linear Feature has been reshaped according to the new geometry and the Length (metres) Data Field automatically updated.

NFI Survey Manual
304 Remember to Save your Edit Session Regularly, Validate the information and Backup the Data
7 Point Features Point features are created when an area, or item is represents, becomes too small to map. In the NFI this is <0.01ha. Only certain items can be recorded as points e.g. veteran trees, mineshafts…
7.1 Create Point Features In the Data Editor choose Point Features from the Layer drop down menu and then Create new point from the Task menu.
Select the
button and click
on the screen to highlight the location of the Point. Double click to complete the Point. Within the Data Editor box Data Fields will appear. Fill these out in the normal manner (see table below). Right click on the word point to Add or Delete a Point Component:

NFI Survey Manual
305 Remember to Save your Edit Session Regularly, Validate the information and Backup the Data
Visit Status Unvisited
In progress Completed Refused Access Not possible to
assess
In progress can be used if surveyor needs to leave the site before completing data entry (e.g. it gets dark before completion)
Reason for Change No change Real change
Error change
Spatial error 1st Assessment
Original
For use in the 2nd NFI
For use in the 2nd NFI
A change in the data due to an error found from IFOS
As above but a Spatial error
The normal Reason – your 1st assessment of the site
Unchanged data from IFOS
When Adding a new Component you will be asked to fill in the Theme of the Point: Field Name Value Theme Water Feature
Veteran Trees Hazard
Water Features - Type Type Additional Data required Data entry
Pond Area (sq metres) Estimate of area – Free text
Pond
Water Feat. Depth Choose from: 0-1m 1-2m 2-3m 3-4m 4-5m

NFI Survey Manual
306 Remember to Save your Edit Session Regularly, Validate the information and Backup the Data
5+m Dry
Tree Shading % Estimate % of pond overshadowed by trees from a plan view (i.e. from above)
Contaminants None Woody harvesting
& fallen tree debris No list A, possibly
min. list B litter (see Chapter 6.1.2 for lists)
Traces of list A and/or occas. List B
List A widespread &/or occas. or widespread List B
Outflow Is there an outflow visible? Yes No
Inflow Is there an Inflow visible? Yes No
Pond Origin Natural Man made
Pond Age <10 years >10 years (10
years or greater) Spring None

NFI Survey Manual
307 Remember to Save your Edit Session Regularly, Validate the information and Backup the Data
Veteran Trees Veteran trees are defined by either DBH for a given species, and/or a total of three or more features and attributes combined:
DBH
Species
100cm +
Alder
100cm +
Ash
150cm +
Beech
75cm + Birch 75cm + Cherry 150cm +
Elm
75cm + Field Maple 75cm + Holly 75cm + Hornbeam 150cm +
Horse Chestnut
150cm +
Lime
150cm +
Oak (lowland)
100cm +
Oak (upland)
150cm +
Other Exotics
150cm +
Other pine
75cm + Other small tree species
150cm +
Poplar
75cm + Rowan 100cm +
Scot's pine
150cm +
Sweet Chestnut
150cm +
Sycamore
75cm + Willow - Goat 75cm + Willow - Grey 150cm +
Willow - other
75cm + Yew
Field Name Value Species See Species list above DBH Free text – whole number Height(m) Free text – total height to one
decimal place
Tree Form Maiden Form Multi-stemmed Coppice Pollard Layering
Heritage Tree <null> Yes

NFI Field Manual
308 Remember to Save your Edit Session Regularly, Validate the information and Backup the Data
Veteran Tree Form Diagrams from Fay, N. & de Berker, N. (1997) The Specialist Survey Method, http://www.treeworks.co.uk/press_releases_publications.php.
Multi-stemmed – trunk naturally
divided into multiple stems
Maiden Tree - free grown
with natural crown
Coppice – cutting of stems creating
a multi-stem tree, cutting carried
out near the ground
Pollard – similar to coppice but stems
start much higher from the ground (e.g.
to prevent grazing of new stems)
Layering – tree with main
stem on the ground and new
stems arising from it.

NFI Field Manual
309 Remember to Save your Edit Session Regularly, Validate the information and Backup the Data
Left click on the word Component to bring up the Veteran Tree Features and Veteran tree Attributes data entry fields. Right click on Veteran Tree Features to note the presence of any of the following features. Note that more than 1 feature can be noted by Right clicking on Veteran Tree Features as usual.
Right click on Veteran Tree Attribute to note the presence and number (free text, whole numbers only) of any of the following features. Note that more than 1 attribute can be noted by Right clicking on Veteran Tree Attribute as usual.
Field Name Value Foliose lichens Bryophytes Ferns Mistletoe Vascular plants Other trees
Feature
Suckers
Field Name Value Comment Rot Holes Must be ≥ 5cm diameter Rot Sites Must be ≥300cm2 Dead Wood in Crown Must be ≥1m in length and
≥25cm circumference Hollowing of Trunk/Major Limbs Water pockets Bark Fluxes Liquid from inside the tree
leaking through the bark. Fluxes may emerge from wounds, cracks or fissures without obvious signs of decay.
Tears, Scars or Lightening Strikes Bird Nests Use 1 to denote the presence of
bird nests, do not count them all.
Woodpecker Holes As for Birds Nests Bat Roosts As for Birds Nests
Attribute
Other Animal Activity As for Birds Nests
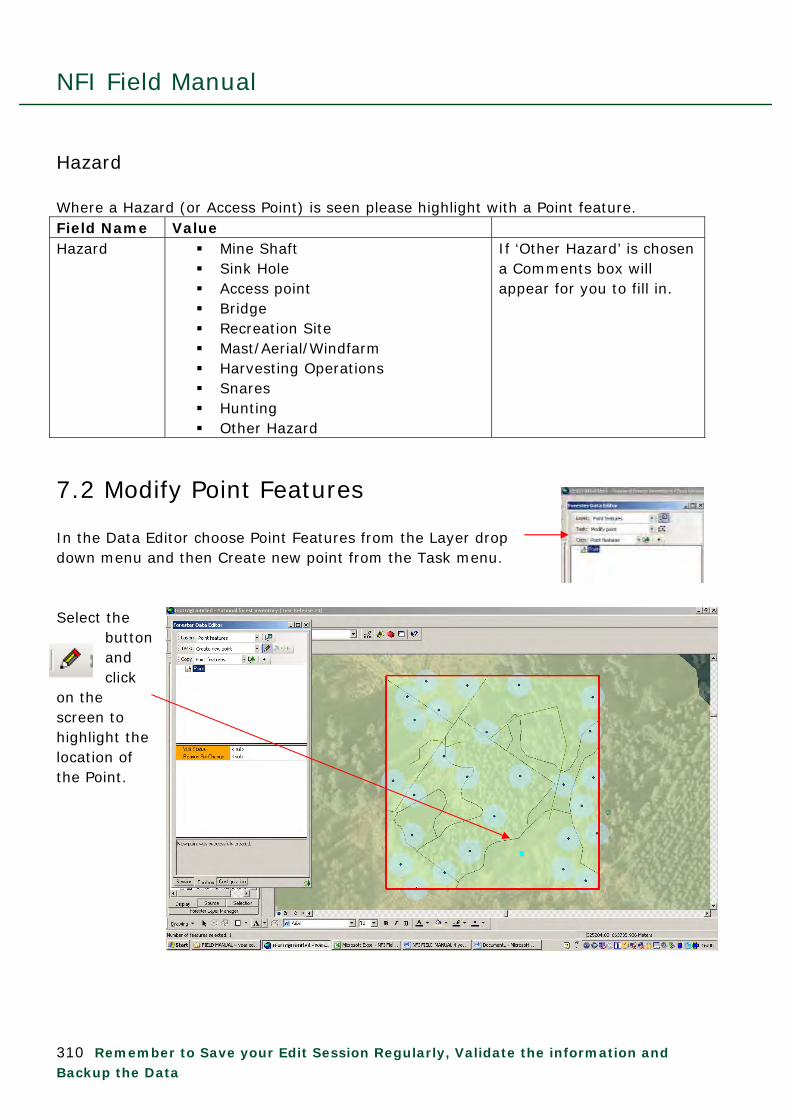
NFI Field Manual
310 Remember to Save your Edit Session Regularly, Validate the information and Backup the Data
Hazard Where a Hazard (or Access Point) is seen please highlight with a Point feature. Field Name Value Hazard Mine Shaft
Sink Hole Access point Bridge Recreation Site Mast/Aerial/Windfarm Harvesting Operations Snares Hunting Other Hazard
If ‘Other Hazard’ is chosen a Comments box will appear for you to fill in.
7.2 Modify Point Features In the Data Editor choose Point Features from the Layer drop down menu and then Create new point from the Task menu. Select the
button and click
on the screen to highlight the location of the Point.

NFI Field Manual
311 Remember to Save your Edit Session Regularly, Validate the information and Backup the Data
8.0 Relevant Adjacent Stands (RAS) Relevant Adjacent Stands (RAS) are essentially a continuation of the Section boundary where the Section has been cut by the Square boundary and should be generated for the following reasons:
1) The Section within the square is a native section (as per the normal rules) – so map a RAS for all native sections that cut across the Square boundary regardless of tree numbers.
2) If a Section (native or non-native) is likely to be Whole Section Plot (i.e. there are
< 40 measurable trees in it) then if it continues across the Square boundary a RAS can be mapped and the trees within the RAS are then counted for the purpose of assessing whether the Section has <40 measurable trees in it. This will result in fewer Whole Section plots overall.
a. If counting the trees within a RAS to assess whether the site is a Whole
Section plot or not (<40 measurable trees) only count trees up to 21m from the square boundary as only trees within 21m of the Square boundary can be sampled by circular plots – the software will not allocate plot centres further than 15m from the square boundary.
When mapping the RAS, map to at least 21m from the Square boundary if possible/applicable.
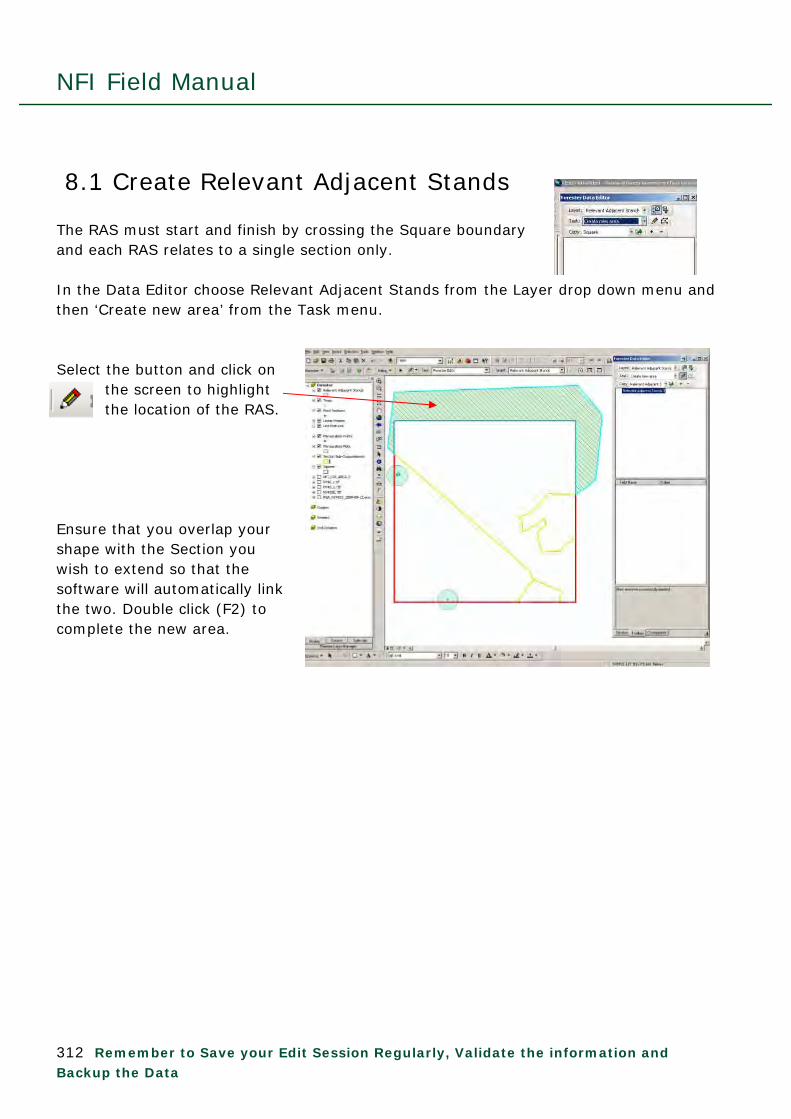
NFI Field Manual
312 Remember to Save your Edit Session Regularly, Validate the information and Backup the Data
8.1 Create Relevant Adjacent Stands The RAS must start and finish by crossing the Square boundary and each RAS relates to a single section only. In the Data Editor choose Relevant Adjacent Stands from the Layer drop down menu and then ‘Create new area’ from the Task menu. Select the button and click on
the screen to highlight the location of the RAS.
Ensure that you overlap your shape with the Section you wish to extend so that the software will automatically link the two. Double click (F2) to complete the new area.
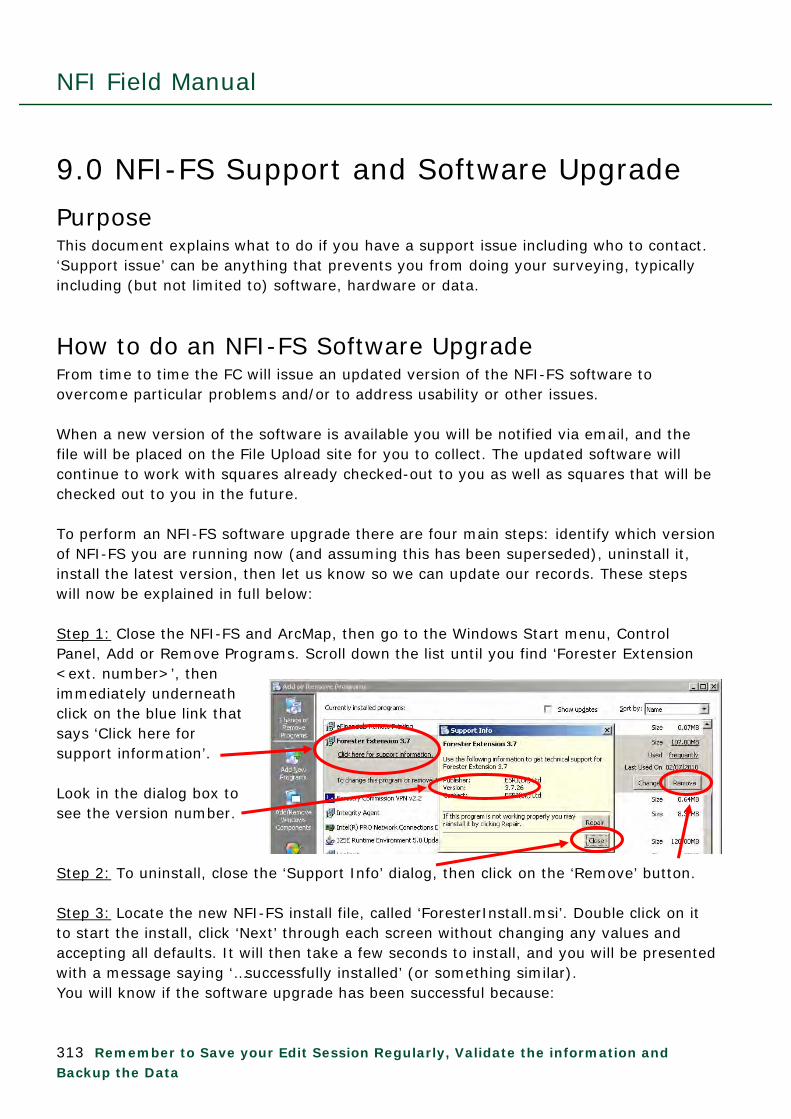
NFI Field Manual
313 Remember to Save your Edit Session Regularly, Validate the information and Backup the Data
9.0 NFI-FS Support and Software Upgrade
Purpose This document explains what to do if you have a support issue including who to contact. ‘Support issue’ can be anything that prevents you from doing your surveying, typically including (but not limited to) software, hardware or data.
How to do an NFI-FS Software Upgrade From time to time the FC will issue an updated version of the NFI-FS software to overcome particular problems and/or to address usability or other issues. When a new version of the software is available you will be notified via email, and the file will be placed on the File Upload site for you to collect. The updated software will continue to work with squares already checked-out to you as well as squares that will be checked out to you in the future. To perform an NFI-FS software upgrade there are four main steps: identify which version of NFI-FS you are running now (and assuming this has been superseded), uninstall it, install the latest version, then let us know so we can update our records. These steps will now be explained in full below: Step 1: Close the NFI-FS and ArcMap, then go to the Windows Start menu, Control Panel, Add or Remove Programs. Scroll down the list until you find ‘Forester Extension <ext. number>’, then immediately underneath click on the blue link that says ‘Click here for support information’. Look in the dialog box to see the version number. Step 2: To uninstall, close the ‘Support Info’ dialog, then click on the ‘Remove’ button. Step 3: Locate the new NFI-FS install file, called ‘ForesterInstall.msi’. Double click on it to start the install, click ‘Next’ through each screen without changing any values and accepting all defaults. It will then take a few seconds to install, and you will be presented with a message saying ‘…successfully installed’ (or something similar). You will know if the software upgrade has been successful because:

NFI Field Manual
314 Remember to Save your Edit Session Regularly, Validate the information and Backup the Data
a) There will be no error messages during the install, and b) You can open a square and work on it as normal; it should work on any of your
squares (pre-survey, mid-survey or post-survey). Step 4: Email or phone the FC to let us know which version of NFI-FS is now on your Toughbook; we need this to keep our records up to date. If you have any problems please get in touch with us.
How to resolve and/or log a support issue 1. Check your training and standard operating procedure (SOP) documentation to see if
this explains the issue. Check also the Frequently Asked Questions (FAQs) document on the File Upload/Download site.
2. For items that do not ‘validate’ within the NFI-FS software (i.e. they remain red in the folder tree within the data editor and/or they fail when using the validate button) you may also want to check the Business Rules within the relevant chapters of the ‘Forester_NFI_Elaborated_Usecase_Descriptions.pdf’ document to see if this explains what you need to do.
3. Try asking a colleague or QA staff member. 4. Take detailed notes that explain exactly what you were doing to get the support issue
in the first place. Ideally this is a repeatable set of steps that an independent third party with no prior knowledge of the issue can do to reproduce the issue on their machine. Screen shots of error messages will help. Use the Alt-PrtSc (Print Screen) buttons on the Toughbooks to capture the message/problem, then paste into a Word doc, save to file then email to us from your own PC.
5. If you are sending back your Toughbook please remember to include your password if it’s been changed! Also clean the computer especially of any debris in the ports.
6. Contact the following people in this order, sending supporting notes if applicable:
First Line of support: Bidding Areas 1-10 & 13: Julie Gardiner, [email protected], Tel: 07901-008675 Bidding Areas 11, 12 14-19: Julia Tilson, [email protected], Tel: 07901-008676 (Map of the Bidding Areas shown on the next page)
Second Line of support: Vera Correia, [email protected], Tel: 0131-445-2176, then Adam Ward, [email protected], Tel: 0131-445-2176
Third Line of support: Mark Lawrence, [email protected], Tel: 0131-445-6991/07785-702207

NFI Field Manual
315 Remember to Save your Edit Session Regularly, Validate the information and Backup the Data
NFI Bid Areas:
Bid Area 1
Bid Area 2
Bid Area 3
Bid Area 4
Bid Area 5
Bid Area 6
Bid Area 7
Bid Area 8
Bid Area 9
Bid Area 10
Bid Area 11
Bid Area 12
Bid Area 13
Bid Area 14
Bid Area 15
Bid Area 16
Bid Area 17
Bid Area 18
Bid Area 19

NFI Field Manual
316 Remember to Save your Edit Session Regularly, Validate the information and Backup the Data
10.0 Use of protractor and sighting compasses for field navigation and the assessment of aspect Scope This chapter covers the use of both protractor and sighting compasses. Prior competence with map reading is needed. The assessment of aspect is also covered. In order to accurately calculate angle of declination, the most recently published Ordnance Survey 1:50,000-scale map will be required. The effect that ferrous metal has on any compass must be considered during use.
Background Several operations and assessments within the NFI protocol require the field surveyor to use a compass. Whilst GPS provides an alternative method of field navigation, a compass remains an invaluable piece of equipment that can be employed when GPS is unable to operate. The latest generation of hand-held GPS receivers (equipped with quad helix aerials) now give accurate positioning under relatively dense tree canopy. Problems can be encountered with steep slopes and rocky landscapes however. A compass will give effective results under all conditions. Compasses are relatively cheap to buy, robust, long lasting and do not require batteries. Compasses are also essential for providing the accuracy needed for installing transects, GPS compasses being unsuitable. Compasses can be broadly split into 2 groups; protractor types and sighting compasses. Sighting compasses are usually more expensive than the protractor type, but due to their ability to provide very accurate results are recommended as the principal choice for surveyors. The requirement for high accuracy is demonstrated by young tree transects. An offset of 1 degree translates to the transect end moving 17 cm. The effect that ferrous metal has on any compass must be considered during use, and the compass moved away from the likely source of any magnetic interference. Likely candidates in a woodland environment would include, watches, spectacle frames, tools (e.g. transponder unit, tapes), portable computers, vehicles, metal in wooden posts, fences, overhead power cables, metal gates, GPS receivers, iron based geology etc. A compass needle points to magnetic north, rather than to true or grid north. This will mean that a small calculation is required to convert from a magnetic bearing to a grid bearing if this is needed.

NFI Field Manual
317 Remember to Save your Edit Session Regularly, Validate the information and Backup the Data
The angle between magnetic north and either grid or true north is known as the angle of declination. This angle changes with time and also by locality.
Protractor type compass Basic compass lacking in ability to accurately sight. No declination function.
Sighting compass – (e.g. Ranger 15TDCL) Accurate compass with the ability to sight. Has ability to automatically adjust for declination if required.

NFI Field Manual
318 Remember to Save your Edit Session Regularly, Validate the information and Backup the Data
Sighting compass – (e.g. Suunto KB- 14/360 R) Very accurate sighting compass with ability precision of 0.5 degrees easily attainable. Limited in use with map and no declination function.
Method
Declination - converting a grid bearing to a magnetic bearing The current angle of declination for the area you are in can be found by consulting the Ordnance Survey 1:50 000 scale Landranger map. For accuracy the most recent published map edition must be used. Instructions are included within the map legend under ‘Technical Information’ North Points. The angle and yearly change is also shown in blue at the top (Northern) edge of the map To convert a bearing taken from a map to a compass bearing, it is necessary to add the angle of declination to the grid bearing to give a working bearing. The magnetic declination (or variation) of the UK is to the West of true North, and as such, the variation must then be added to the grid bearing to give a working bearing.
Example With in the Technical Information section of the 1:50000 Landranger 78 map it states that at the centre of the map magnetic north is 3 degrees 51 minutes west of grid north for July 2001. The annual change is about 13 minutes east. If the map is being used in July 2008 the correction factor to be added would be 3 degrees 51 minutes minus 7 years x 13 minutes = 91minutes = 1 degree 31minutes.
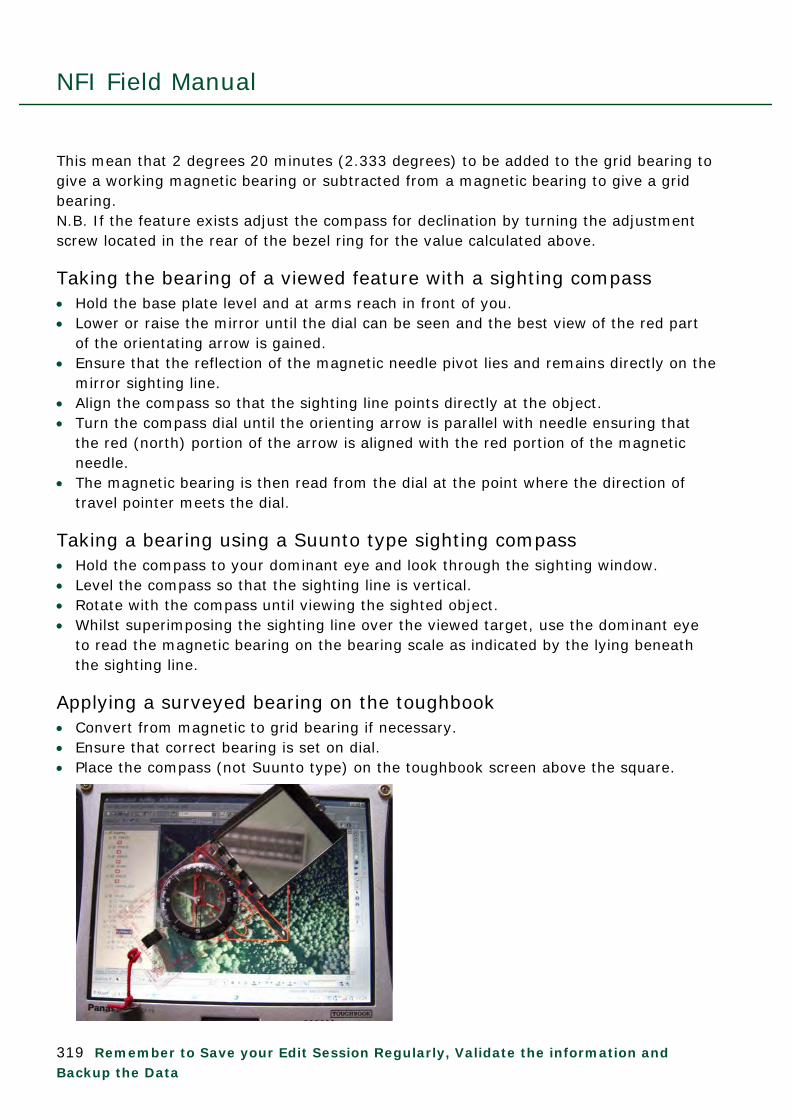
NFI Field Manual
319 Remember to Save your Edit Session Regularly, Validate the information and Backup the Data
This mean that 2 degrees 20 minutes (2.333 degrees) to be added to the grid bearing to give a working magnetic bearing or subtracted from a magnetic bearing to give a grid bearing. N.B. If the feature exists adjust the compass for declination by turning the adjustment screw located in the rear of the bezel ring for the value calculated above.
Taking the bearing of a viewed feature with a sighting compass Hold the base plate level and at arms reach in front of you. Lower or raise the mirror until the dial can be seen and the best view of the red part
of the orientating arrow is gained. Ensure that the reflection of the magnetic needle pivot lies and remains directly on the
mirror sighting line. Align the compass so that the sighting line points directly at the object. Turn the compass dial until the orienting arrow is parallel with needle ensuring that
the red (north) portion of the arrow is aligned with the red portion of the magnetic needle.
The magnetic bearing is then read from the dial at the point where the direction of travel pointer meets the dial.
Taking a bearing using a Suunto type sighting compass Hold the compass to your dominant eye and look through the sighting window. Level the compass so that the sighting line is vertical. Rotate with the compass until viewing the sighted object. Whilst superimposing the sighting line over the viewed target, use the dominant eye
to read the magnetic bearing on the bearing scale as indicated by the lying beneath the sighting line.
Applying a surveyed bearing on the toughbook Convert from magnetic to grid bearing if necessary. Ensure that correct bearing is set on dial. Place the compass (not Suunto type) on the toughbook screen above the square.

NFI Field Manual
320 Remember to Save your Edit Session Regularly, Validate the information and Backup the Data
With the side edge of the compass over your known position, rotate the compass (not the dial) until the orientating arrow points to the top of the screen (north) and the orientating lines are parallel with the side of the square.
The side of the compass will lie along the surveyed bearing.
Taking a bearing from the toughbook Place the compass on the map with the side edge of the compass connecting your
known position with your desired destination. Turn the compass dial until the orienting lines run parallel with the North / South grid
lines printed on the map, and the North marked on the dial is pointing to the top of the (North) of the map. The grid bearing is then read from the dial at the point where the direction of travel pointer meets the dial.
Convert to magnetic bearing.
Travelling on a bearing using a protractor compass Set the compass dial to the desired bearing. Hold the compass horizontally in front of you so that the needle can move freely. Turn yourself around so that the red end of the needle is pointing to the North on the
dial and is parallel with the orienting lines in the base of the dial. The direction of travel arrow is now pointing to your destination. Sight along this
arrow to an object along your direction of travel.
Travelling on a bearing using a mirror sighting compass Set the compass dial to the desired bearing. Hold the base plate level and at arms reach in front of you. Lower or raise the mirror until the dial can be seen and the best view of the red part
of the orientating arrow is gained. Ensure that the reflection of the magnetic needle pivot lies and remains directly on the
mirror sighting line. Rotate with compass until the red end of the magnetic needle lines up with the red
part of the orientating arrow. When the needle sides are entirely parallel with those of the orientating arrow and the
tip in line with the arrow tip, use the sighting line to identify direction of travel.
Travelling on a bearing using a Suunto type sighting compass Hold the compass to your dominant eye and look through the sighting window. Level the compass so that the sighting line is vertical. Rotate with the compass until the desired bearing appears in the sighting window. Whilst holding the sighting lines over the bearing mark desired, superimpose the
sighting line over the view of the non-dominant eye to identify direction of travel.

NFI Field Manual
321 Remember to Save your Edit Session Regularly, Validate the information and Backup the Data
Correct positioning of a mirror sighting compass (left), Bearing of 191.5° on Suunto type sighting compass (right).
ASSESSING ASPECT
Slopes of <5º If on flat land, record the area as having no aspect.
Slopes of >5º If the area is on a slope Face downhill, perpendicular to the contour and take a bearing in this direction Aspect is recorded as being one of the eight cardinal points of the compass (or zero as
already described). The cardinal points are; North, North East, East, South East, South, South West, West, and North West.
Choose the nearest cardinal point to the recorded bearing as your aspect.

NFI Field Manual
322 Remember to Save your Edit Session Regularly, Validate the information and Backup the Data
Maintenance Although reasonably robust, compasses must be treated and stored with care if it is to remain accurate. Any compass must not be stored close to any other metal object (including other compasses), or close to electrical circuits, loudspeakers etc. It is also important to maintain smooth operation of the compass dial and a clear view through the frame. Compasses should be cleaned following use, especially after exposure to tree resin. Compasses must be periodically checked for accuracy against a new, unused one.

NFI Field Manual
323 Remember to Save your Edit Session Regularly, Validate the information and Backup the Data
11.0 Square Navigation
Background In order to complete survey work, the surveyor must be able to navigate both to the square and within it. Navigation requires the surveyor to be competent in the use of map reading, aerial photo interpretation, and compass and GPS use. The Geo-DataBase (GDB) supplied for each square will automatically load the Aerial Photos (AP) and Ordnance Survey (OS) files for the area around the square. These images and the ability of the GIS software to provide grid references should be used by the surveyor to navigate.
Method
Grid References from ArcMap
Cursor Location The location of the cursor can always be found in the bottom-right part of the screen. The 12 figure XY (easting & northing) can be seen displayed with 3 decimal places.
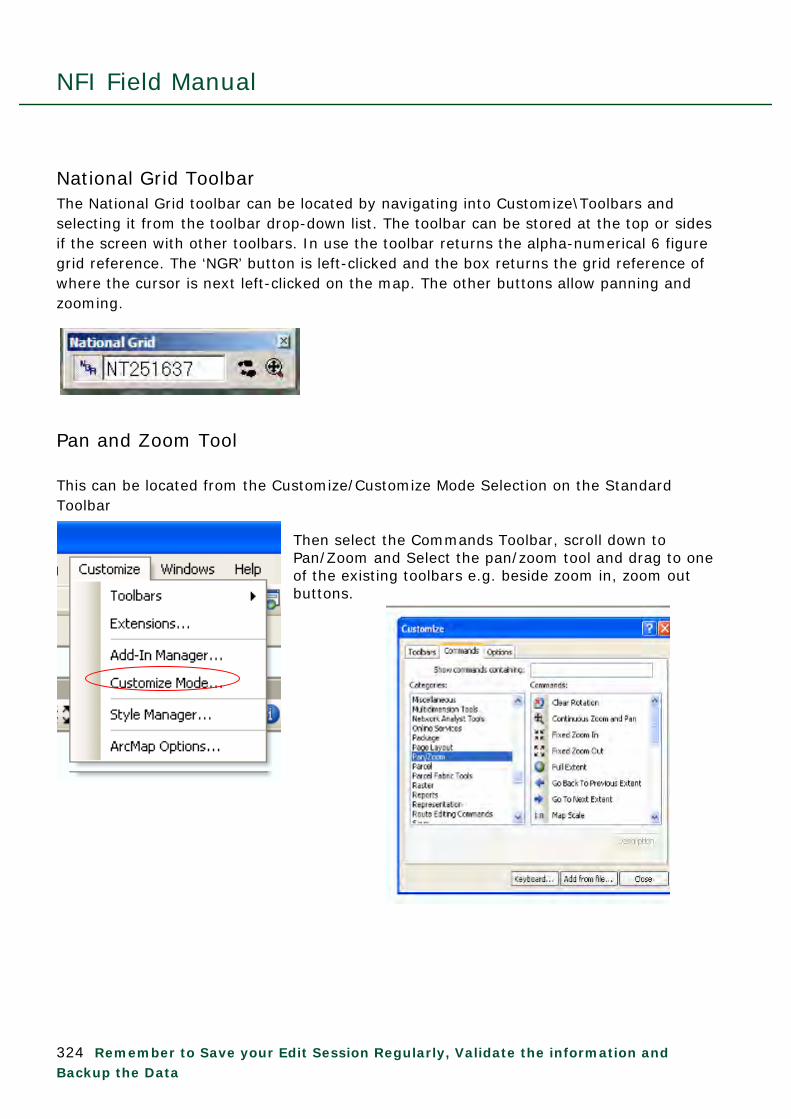
NFI Field Manual
324 Remember to Save your Edit Session Regularly, Validate the information and Backup the Data
National Grid Toolbar The National Grid toolbar can be located by navigating into Customize\Toolbars and selecting it from the toolbar drop-down list. The toolbar can be stored at the top or sides if the screen with other toolbars. In use the toolbar returns the alpha-numerical 6 figure grid reference. The ‘NGR’ button is left-clicked and the box returns the grid reference of where the cursor is next left-clicked on the map. The other buttons allow panning and zooming.
Pan and Zoom Tool This can be located from the Customize/Customize Mode Selection on the Standard Toolbar
Then select the Commands Toolbar, scroll down to Pan/Zoom and Select the pan/zoom tool and drag to one of the existing toolbars e.g. beside zoom in, zoom out buttons.
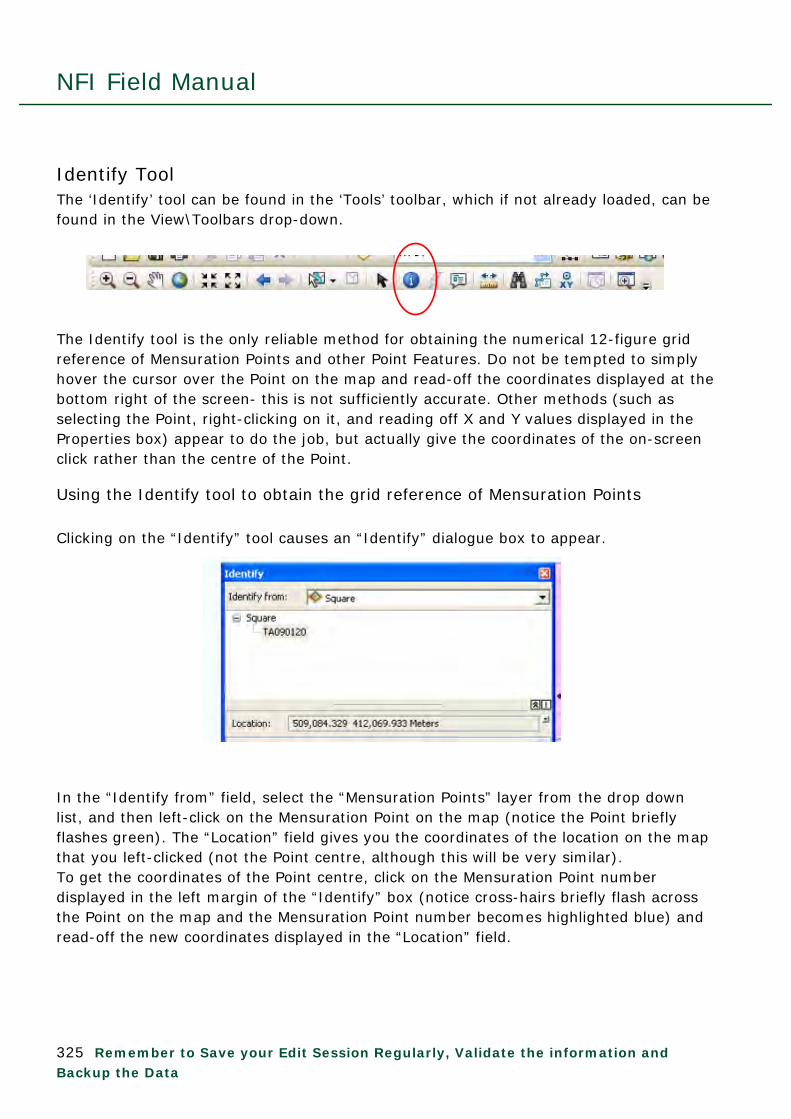
NFI Field Manual
325 Remember to Save your Edit Session Regularly, Validate the information and Backup the Data
Identify Tool The ‘Identify’ tool can be found in the ‘Tools’ toolbar, which if not already loaded, can be found in the View\Toolbars drop-down. The Identify tool is the only reliable method for obtaining the numerical 12-figure grid reference of Mensuration Points and other Point Features. Do not be tempted to simply hover the cursor over the Point on the map and read-off the coordinates displayed at the bottom right of the screen- this is not sufficiently accurate. Other methods (such as selecting the Point, right-clicking on it, and reading off X and Y values displayed in the Properties box) appear to do the job, but actually give the coordinates of the on-screen click rather than the centre of the Point.
Using the Identify tool to obtain the grid reference of Mensuration Points Clicking on the “Identify” tool causes an “Identify” dialogue box to appear. In the “Identify from” field, select the “Mensuration Points” layer from the drop down list, and then left-click on the Mensuration Point on the map (notice the Point briefly flashes green). The “Location” field gives you the coordinates of the location on the map that you left-clicked (not the Point centre, although this will be very similar). To get the coordinates of the Point centre, click on the Mensuration Point number displayed in the left margin of the “Identify” box (notice cross-hairs briefly flash across the Point on the map and the Mensuration Point number becomes highlighted blue) and read-off the new coordinates displayed in the “Location” field.
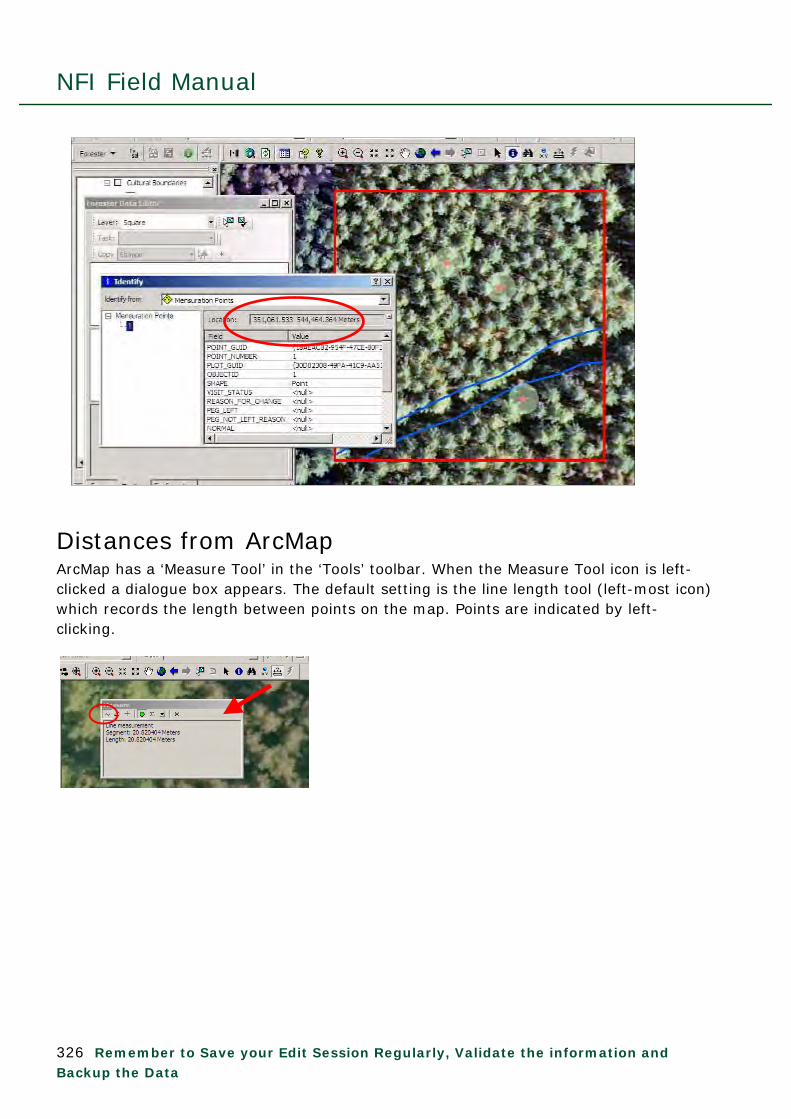
NFI Field Manual
326 Remember to Save your Edit Session Regularly, Validate the information and Backup the Data
Distances from ArcMap ArcMap has a ‘Measure Tool’ in the ‘Tools’ toolbar. When the Measure Tool icon is left-clicked a dialogue box appears. The default setting is the line length tool (left-most icon) which records the length between points on the map. Points are indicated by left-clicking.

NFI Field Manual
327 Remember to Save your Edit Session Regularly, Validate the information and Backup the Data
Locating the square To plan the visit to the square the surveyor must locate it within their region. When the GDB is opened, the GIS software will display the AP and OS layers relevant to the square. In order to locate the square on larger-scale maps, atlases or sat-navs, zoom out to larger scales (e.g. 1:25,000 or 50,000) and use prominent roads and map features as orientation. Inspection of the map at smaller scales will help indicate likely car parking and access routes or confirm them after discussion with woodland owners.
nearest townor village
closest A road
closest motorwayjunction
OS MapsNy44ne.tif-10k
NY44_C.TIF-25kNY44_C.tif-50k
Squarelocation
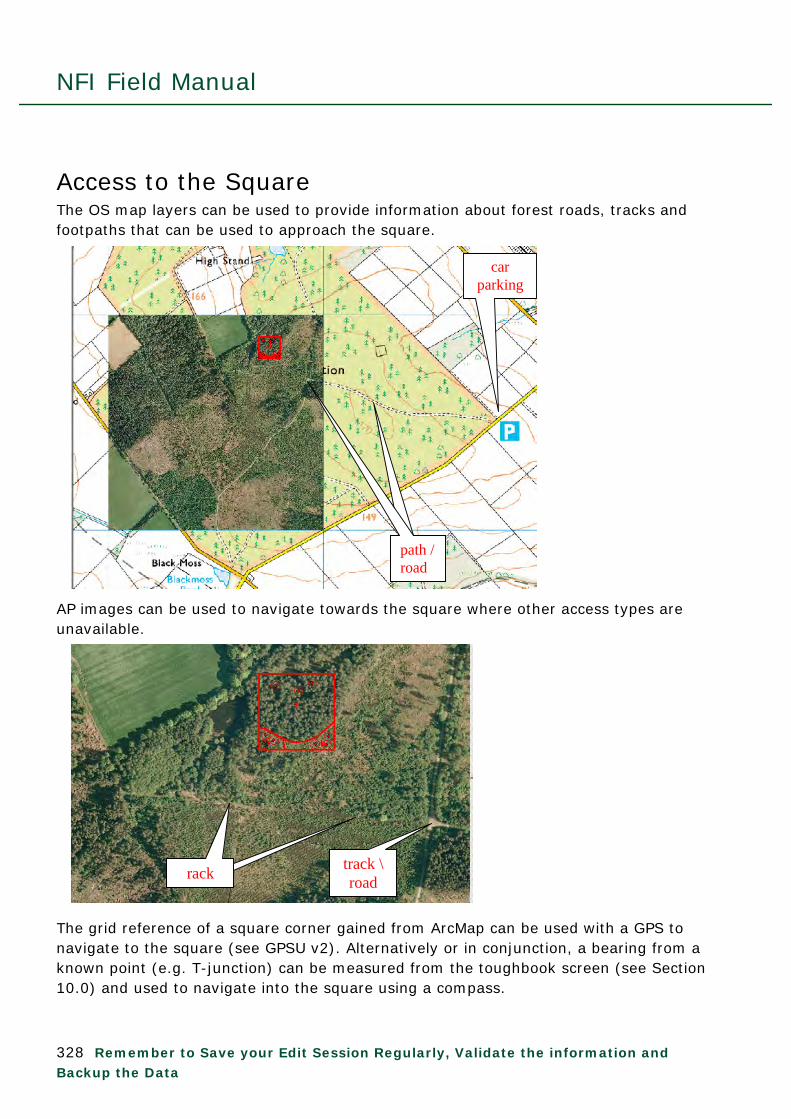
NFI Field Manual
328 Remember to Save your Edit Session Regularly, Validate the information and Backup the Data
Access to the Square The OS map layers can be used to provide information about forest roads, tracks and footpaths that can be used to approach the square. AP images can be used to navigate towards the square where other access types are unavailable. The grid reference of a square corner gained from ArcMap can be used with a GPS to navigate to the square (see GPSU v2). Alternatively or in conjunction, a bearing from a known point (e.g. T-junction) can be measured from the toughbook screen (see Section 10.0) and used to navigate into the square using a compass.
carparking
path /roadpath /road
rackracktrack \road
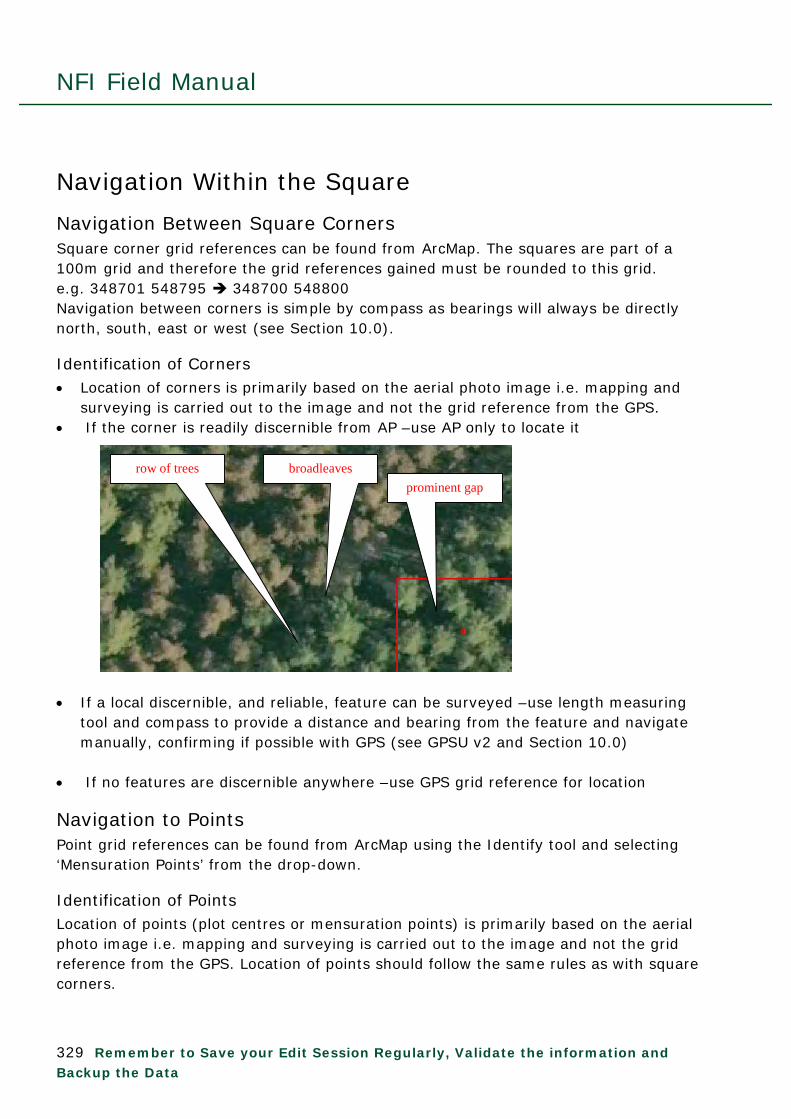
NFI Field Manual
329 Remember to Save your Edit Session Regularly, Validate the information and Backup the Data
Navigation Within the Square
Navigation Between Square Corners Square corner grid references can be found from ArcMap. The squares are part of a 100m grid and therefore the grid references gained must be rounded to this grid. e.g. 348701 548795 348700 548800 Navigation between corners is simple by compass as bearings will always be directly north, south, east or west (see Section 10.0).
Identification of Corners Location of corners is primarily based on the aerial photo image i.e. mapping and
surveying is carried out to the image and not the grid reference from the GPS. If the corner is readily discernible from AP –use AP only to locate it
If a local discernible, and reliable, feature can be surveyed –use length measuring
tool and compass to provide a distance and bearing from the feature and navigate manually, confirming if possible with GPS (see GPSU v2 and Section 10.0)
If no features are discernible anywhere –use GPS grid reference for location
Navigation to Points Point grid references can be found from ArcMap using the Identify tool and selecting ‘Mensuration Points’ from the drop-down.
Identification of Points Location of points (plot centres or mensuration points) is primarily based on the aerial photo image i.e. mapping and surveying is carried out to the image and not the grid reference from the GPS. Location of points should follow the same rules as with square corners.
prominent gap
row of trees broadleaves

NFI Field Manual
330 Remember to Save your Edit Session Regularly, Validate the information and Backup the Data
12.0 Improving the Accuracy of GPS Ensure that your GPS is switched on well before you get to your square, particularly if this is in a different region to where you last used the GPS. If you have moved a significant distance (>50 miles) from the last time you used your GPS it is worth recalibrating the GPS to improve efficiency. You should certainly undertake this procedure if the GPS is indicating a different grid reference to the one which you know
you are at. To undertake recalibration complete the following instructions: On the Satellite page press the MENU button, then go up to “Use with GPS off” – (select using ENTR button), the screen will go to one labelled “GPS is Off” - then press the menu button again, and the “New Location” option will be enabled, select this (using the ENTR key) – you will then get a box with two options: Automatic and Use Map. Unless you are absolutely certain that you know where you are to within an accuracy of 5m use the Automatic option (select and press ENTR). The GPS will then spend a few minutes locating satellites. It is also worth recalibrating the compass. On the compass page press MENU button, then select “Calibrate Compass” follow the on screen instructions and on completion press OK.
In areas of poor reception wait in an open area, or an adjacent area of good reception to get a strong signal, then either walk on from this point to your square/corner/plot centre – or if the GPS still seems unreliable navigate using compass bearing and pacing to a nearby place (<20m away).
Remember to always use the aerial photograph as the main reference point for determining feature and corner/plot locations. If your aerial and GPS disagree by more than 20m you may well be in the wrong place. Check that for example the ride that you think you are on, or the junction that you think you are at, is actually where you are. Remember that not all rides will be apparent on aerials as they may be hidden by canopy, and/or may have been widened since the aerial was taken. If more than one or two features seem out of place you are in the wrong area, pause and rethink, go to the area indicated by your GPS and see if that makes more sense.
NFI Field Manual
331 Remember to Save your Edit Session Regularly, Validate the information and Backup the Data
GPS Utility & How to Use It
What is GPS Utility GPS Utility is a piece of software that allows easy downloading and uploading of waypoints, tracks etc from/to various GPS units. It also allows for saving this data in various formats including text files (*.txt) and shapefiles with associated database. The shapefiles can then be readily imported into GIS Editor and can be used as a layer in the Forester software. Thus the edges of a polygon or a line feature can be marked/waymarked using the GPS and the file downloaded from the GPS using GPS Utility and saved as a shapefile. This shapefile can then be loaded into Forester and used as a layer to create section polygons or line features etc. This shapefile can then be added to the layers and used as a base to create a new polygon, or accurately determine a line feature/boundary etc. It is most useful when there have been changes since the aerial photo or where the aerial is otherwise unreliable.
How to Use GPS Utility There should be a GPS Utility icon on your desktop. It looks like a turquoise and green GPS. Double click on this to open the facility. When the software is successfully installed the key elements to allow easy transfer of files is to ensure;
1) That the interface set-up is for the correct GPS machine (see instructions below) 2) That both the GPS and GPSU are using the same Coordinate format (this is
recommended as British Grid – see instructions below Should any difficulties arise at any point there is an instructive help guide sent with the registration documents, or contact [email protected], or if all else fails contact Julie Gardiner at: [email protected] or phone 0790 1008675.
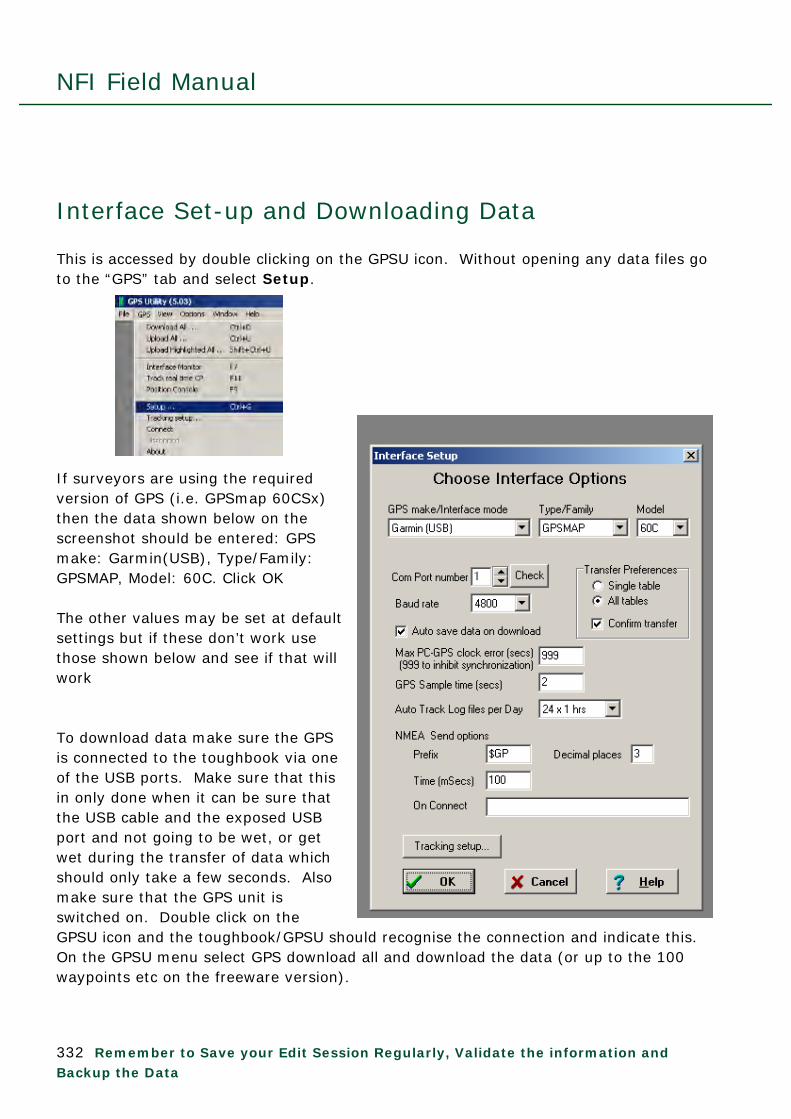
NFI Field Manual
332 Remember to Save your Edit Session Regularly, Validate the information and Backup the Data
Interface Set-up and Downloading Data This is accessed by double clicking on the GPSU icon. Without opening any data files go to the “GPS” tab and select Setup. If surveyors are using the required version of GPS (i.e. GPSmap 60CSx) then the data shown below on the screenshot should be entered: GPS make: Garmin(USB), Type/Family: GPSMAP, Model: 60C. Click OK The other values may be set at default settings but if these don’t work use those shown below and see if that will work To download data make sure the GPS is connected to the toughbook via one of the USB ports. Make sure that this in only done when it can be sure that the USB cable and the exposed USB port and not going to be wet, or get wet during the transfer of data which should only take a few seconds. Also make sure that the GPS unit is switched on. Double click on the GPSU icon and the toughbook/GPSU should recognise the connection and indicate this. On the GPSU menu select GPS download all and download the data (or up to the 100 waypoints etc on the freeware version).
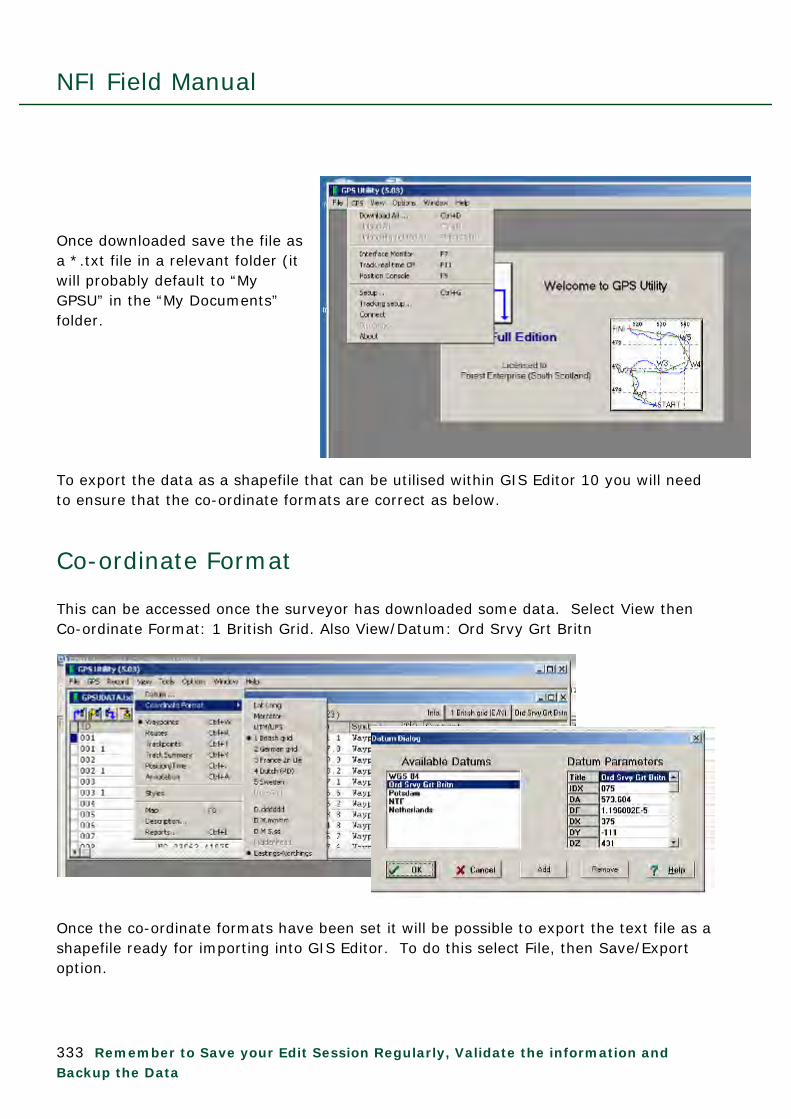
NFI Field Manual
333 Remember to Save your Edit Session Regularly, Validate the information and Backup the Data
Once downloaded save the file as a *.txt file in a relevant folder (it will probably default to “My GPSU” in the “My Documents” folder. To export the data as a shapefile that can be utilised within GIS Editor 10 you will need to ensure that the co-ordinate formats are correct as below.
Co-ordinate Format This can be accessed once the surveyor has downloaded some data. Select View then Co-ordinate Format: 1 British Grid. Also View/Datum: Ord Srvy Grt Britn
Once the co-ordinate formats have been set it will be possible to export the text file as a shapefile ready for importing into GIS Editor. To do this select File, then Save/Export option.

NFI Field Manual
334 Remember to Save your Edit Session Regularly, Validate the information and Backup the Data
Then click in the “Export As..” box and select DBF waypoint fileset (dbf+shp, shx)
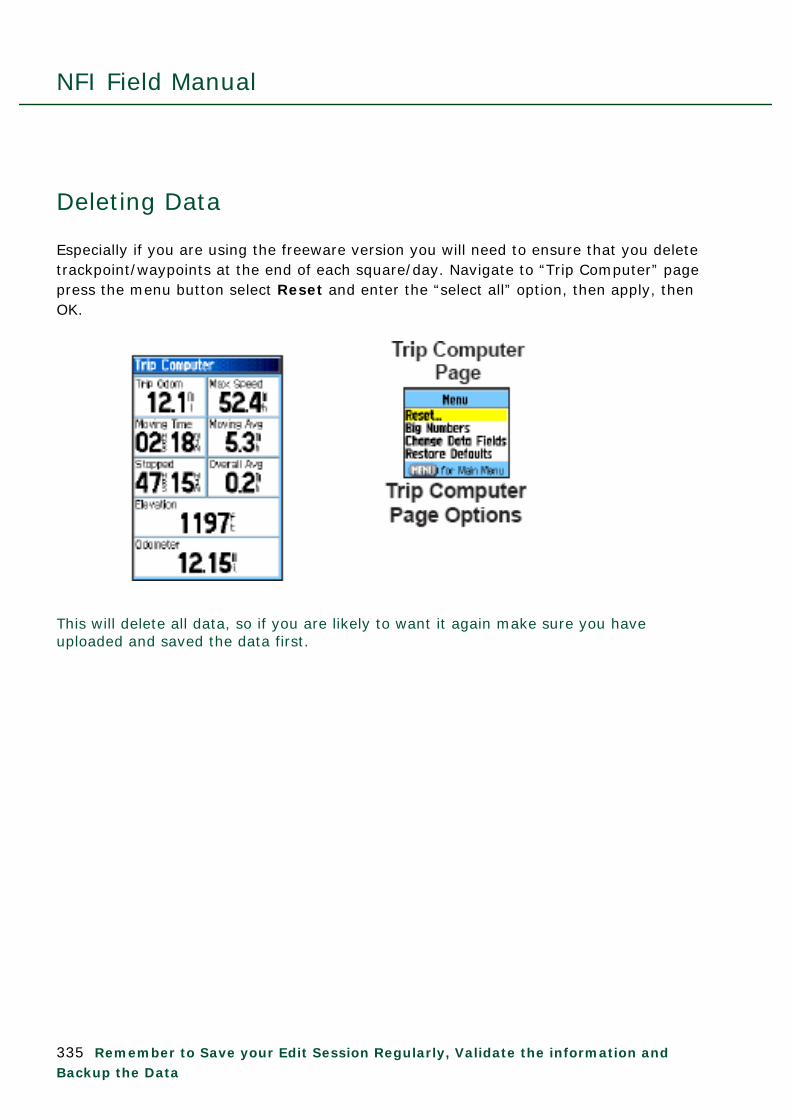
NFI Field Manual
335 Remember to Save your Edit Session Regularly, Validate the information and Backup the Data
Deleting Data Especially if you are using the freeware version you will need to ensure that you delete trackpoint/waypoints at the end of each square/day. Navigate to “Trip Computer” page press the menu button select Reset and enter the “select all” option, then apply, then OK.
This will delete all data, so if you are likely to want it again make sure you have uploaded and saved the data first.

NFI Field Manual
336 Remember to Save your Edit Session Regularly, Validate the information and Backup the Data
Inputting Data by Hand Waypoints can also be entered onto GPSU and uploaded to your GPS. This can be achieved by selecting: “File”, then “new”, double clicking inside the empty row that appears, and then entering data into the pop-up box.
Once you have entered one point if you use the OK and NEW option then the eastings and northings can be readily changed. Keep doing this until you have entered all your points then press OK. If you press OK by mistake before you have finished entering all your points just restart the process again from where you left off. (You need to enter an ID number as well as easting and northing). The data doesn’t appear until you press OK.