Nak Sul – The Art of Falling - The Martial Artist Foundation€¦ · Nak Sul means falling...
13
Nak Sul – The Art of Falling Introduction Nak Sul means falling techniques in Korean. It is taken from hapkido, which got most of the techniques from Ukemi. Ukemi is literally translated from the Japanese as “receiving body or self”. In the simplest terms possible, the “bat gi” part of nak sul means “the one who is thrown” and is a person who is on the receiving end of the throw. Simple logic testifies that one should master nak sul before throwing a partner. Judo is unique among sports and martial arts in the way it incorporates a scientific approach to the methods of falling. The history of Judo spans some one hundred twenty years, but Judo techniques which derived from jujitsu are much older than that. The Judo techniques that are practiced today are at least one thousand years of accumulation of knowledge and experience, and over the centuries have evolved into a science. The principle of “mutual welfare and benefit” requires that we learn to fall as well as throw. In addition to the safety and confidence this practice imparts, it is an essential part of understanding the more advanced techniques of Judo. Unless one understands the correct positioning of bat gi (the one receiving the throw) it is difficult to fully master the action of jap gi (the thrower). In classes around the world this is typically the first thing Judo teachers focus on with students that are new. It is not possible to excel in throwing, or to defend against an attack successfully, without a thorough understanding of falling. In aikido and judo training for instance, many classes begin with ukemi training as conditioning. Fear The most universal and basic of all fears, across all cultures, is the fear of falling. Over time people do develop other fears. Many can become critical problems that disable
Transcript of Nak Sul – The Art of Falling - The Martial Artist Foundation€¦ · Nak Sul means falling...

Nak Sul – The Art of Falling
IntroductionNak Sul means falling techniques in Korean. It is taken from hapkido, which got most of the techniques from Ukemi. Ukemi is literally translated from the Japanese as “receiving body or self”. In the simplest terms possible, the “bat gi” part of nak sul means “the one who is thrown” and is a person who is on the receiving end of the throw. Simple logic testifies that one should master nak sul before throwing a partner. Judo is unique among sports and martial arts in the way it incorporates a scientific approach to the methods of falling. The history of Judo spans some one hundred twenty years, but Judo techniques which derived from jujitsu are much older than that. The Judo techniques that are practiced today are at least one thousand years of accumulation of knowledge and experience, and over the centuries have evolved into a science.
The principle of “mutual welfare and benefit” requires that we learn to fall as well as throw. In addition to the safety and confidence this practice imparts, it is an essential part of understanding the more advanced techniques of Judo. Unless one understands the correct positioning of bat gi (the one receiving the throw) it is difficult to fully master the action of jap gi (the thrower).
In classes around the world this is typically the first thing Judo teachers focus on with students that are new. It is not possible to excel in throwing, or to defend against an attack successfully, without a thorough understanding of falling. In aikido and judo training for instance, many classes begin with ukemi training as conditioning.
FearThe most universal and basic of all fears, across all cultures, is the fear of falling. Over time people do develop other fears. Many can become critical problems that disable

normal functioning. On the other hand, most people can also overcome their fears and learn to cope with them. Learning to deal with the fear of falling can establish an important sense of confidence that often will translate into the ability to deal with other fears.
The earliest and most primal fear we experience is falling, but most people have many opportunities to fall and realize at a young age that they can survive. Recreation and sports activities can accelerate that level of acceptance. Activities as diverse as gymnastics, football, hiking, and skateboarding provide plenty of opportunities, but no activity deals with the fear of falling so directly and positively as Judo.
The common human response to falling is the most dangerous. Although most people instinctively protect their heads, they will reach out to catch themselves and break an arm or wrist. Apprehension causes them to tense their body when makes it more susceptible to injury and causes the forces of the fall to travel through the body to the brain causing dizziness or even unconsciousness.
From a fall, injuries can range from a bruise or sprain to a concussion or even possible death. In a fall during a self-defense situation, one must prevent injury from the fall and protect oneself from further attack by regaining a defensive position as quickly as possible after the fall. Therefore, the ability to fall safely is an essential practice for anyone interested in learning any type of self-defense.
Early endeavors at nak sul will most likely create many mental barriers as your desire to perform nak sul conflicts with a primal instinct to avoid falling. The result will be a high level of anxiety that will disrupt your ability to fall smoothly and confidently. Given a committed, disciplined effort, you will eventually conquer the fear of falling and reveal a whole new level of ability.
It hurts to hit the ground. It hurts whether you perform nak sul or not. The difference is that nak sul allows you to maintain intensity and martial awareness.
BreathingBreathing is very important in nak sul. If you hold your breath, your body won’t be soft and limber and you’ll wear yourself out. If your nak sul seems difficult, use your breathe to help take the fall. Your body should relax until the point of contact with the ground, at which time you expel the air from the diaphragm and tense the appropriate muscles to direct the force of the blow throughout the body and then relax again.
While performing nak sul, you must tighten different muscles depending on the type of fall. For back falls, it is very important to tighten the neck and front torso muscles so that your chin is pulled into the chest. This keeps the back of your head from hitting the ground. Likewise in a front fall, we tighten the neck and trapezius (upper back/neck) muscles to prevent our head from dropping forward and hitting the ground.
In rolling, we will not have one absolute point of contact with the ground but rather many points of brief contact. Therefore we keep our muscles more relaxed to facilitate a fluid completion of the roll. We do, however, continue to keep some tightness in our abdominal muscles.

Always be ActiveLet’s take a simple hip throw (large hip throw) has an example. You give a clear attack in the form of a grab to your partner’s jacket. As he performs the throw, your body is bent and your energy is directed to the ground. You could be simply slammed to the ground or you can be active. To be active is to lower yourself to the ground intentionally and accept the ground. At each point you want to be in balance. Your partner is continually taking your balance and by performing active nak sul, you are continually reestablishing your balance. This dance goes on all the way to the ground.
The tactical reason for this method of practice is that if your partner provides an opening, you are in a position (that is, in control) to move through that opening. You may be able to reverse a technique on your partner if you are in balance and control of your own falling.
The method of active nak sul is very simple. Once you feel your balance going, don’t resist. Take a step or two to recover your balance and then lower yourself, whether to the mat or to a position to reverse a technique. Your speed will have to match your partner’s speed.
To get a feel for what this is like, imagine you are bat gi. You strike at jap gi (the thrower) and imagine that he is performing a technique on you. Go through the movements of “his” takedown on you in slow motion. If you are performing the movements under your own control, you’ll be able to stop and reverse the movement at any time (this will take practice). You want to have this feeling (control, reversibility) when someone is really throwing you.
As you advance in nak sul, you will be able to move in an unexpected direction (that is, not the place where jap gi expects you to fall) after losing your balance. This may upset jap gi’s balance and suddenly jap gi is taking nak sul!.
Integrating Nak Sul into TrainingFor Nak Sul to be completely effective, it must be practiced to the point where it is executed instinctively by the Bat Gi. The best way to accomplish this is to incorporate Nak Sul into all aspects of a training regimen and to practice Nak Sul early and often.
The traditional order of training is to move from the simple to the more difficult. Each person will progress at their own speed but the basic steps are as follows:
1. At first, practice falling from a low position, and gradually move higher.
2. Learn one direction and style of falling, then learn to fall in other directions.
3. First fall in place, then add movement.
4. In the beginning, move slowly and carefully, then increase speed.
5. First fall by yourself, then have a partner throw you. When someone is throwing you, repeat the learning steps 1 through 4.

The damaging force of a throw is generated by the collision between the body and the ground. The potential for greater damage is realized when the velocity is high and the contact area is small.
In order to eliminate or reduce the level of damage, the practitioner’s nak sul would seek to reduce the velocity of the fall by rolling into or slapping the ground with their arm like a coil. In addition the practitioner would strive to increase the surface area in which the force could be absorbed.
The three basic directions are forwards, backwards, and sideways. To begin, practice nak sul from a laying down or sitting or kneeling posture, squatting posture, and finally a standing posture. Once simple break-falling from different heights and positions has been mastered, other applications such as changing your direction, being pushed, and break-falling from a throw may be attempted.
Key points to remember when practicing nak sul:
• Start from a low position and gradually work up to a standing position • Maintain the proper angle of the slapping arm(s) to the body. • Strike the mat hard with one of both arms - straight arm slap - palm down • Timing of hand slaps must coincide with main mass of your body striking the
ground. • Curve your back • Roll when ever possible. • Keep hips off the ground • Tuck your chin to your chest so that your head does not hit the mat and tense neck
on impact • Do not try to catch yourself by reaching out with your arms, but to take the impact
of the fall on the meaty portions of the body. • Do not fall onto your elbows or knees (Keep unprotected bones from hitting the
ground) • Stay relaxed to prevent injury. • Breath out on impact • Tense stomach on impact
TrainingPractice the left side more.
Seventy five percent of the world’s population is right-handed and will tend to use the right-handed throwing techniques, which require the Bat Gi to execute left side break falls.
Turn the head while facing the ground on any exercise
Practice turning the head on any exercise where the face would naturally face the ground such as with push-ups and stretches. Do this consistently and your head will naturally turn when doing forward break falls.
Keep the head off the mat during exercise.

Work on strengthening the neck muscles by keeping the head up and off the mat during exercises.
Break fall when going to the floor for exercises
Use a break fall when going to the mat for any exercise. For example, start from a standing position and have the class drop to the floor for sit-ups. The class should get to the floor by doing a back break fall.
Descriptions of Nak Sul techniquesThe following are simple descriptions of nak sul techniques; however, one must not forget that the basics of learning nak sul require one to practice executing all types of nak sul with a flexible body, a sharp mind, and an accurate judgment of the situation.
1. Hoobang Nakbup - Back Breakfall
Back fall is most common type of fall. Back fall is used when being tripped and pushed backward. If a strong horizontal force is also used, such as being forcibly shoved backward, then the back-rolling fall should be used.
Sitting• Start learning the back fall by sitting on the ground with the legs together, knees
bent, and feet flat on the ground with the arms in a guarding position, then: • Cross the arms in front of the chest with tight fists in a guarding position and tuck
the chin down to the chest. • Curl the back into a half circle and roll the body backward. • As the upper back touches the mat, slap the mat with open palms with the arms at
a 45-degree angle from the body and kihap. The palms of the hand should hit the ground a split second before the upper back hits the ground. Do not reach backward with the arms (may break the wrists). Do not keep arms to close to the body (ineffective). Do not extend arms too far out to the sides (ineffective and may sprain the shoulders).
• Immediately snap the arms back in front of the chest in a guarding position to protect you from further attack.
• Return to the sitting position. • Repeat until the movements become smooth and powerful.
Squatting• Now practice the same technique by falling backward from a squatting position.
Begin by assuming a deep squat position with the arms in a guarding position, then:
• Cross the arms at the chest with tight fists and roll backward with a kihap. • Follow the same steps as explained in the sitting position description. • Do not let the legs fly back over the head. • Return to the squatting position. • Repeat until the movements become smooth and powerful.
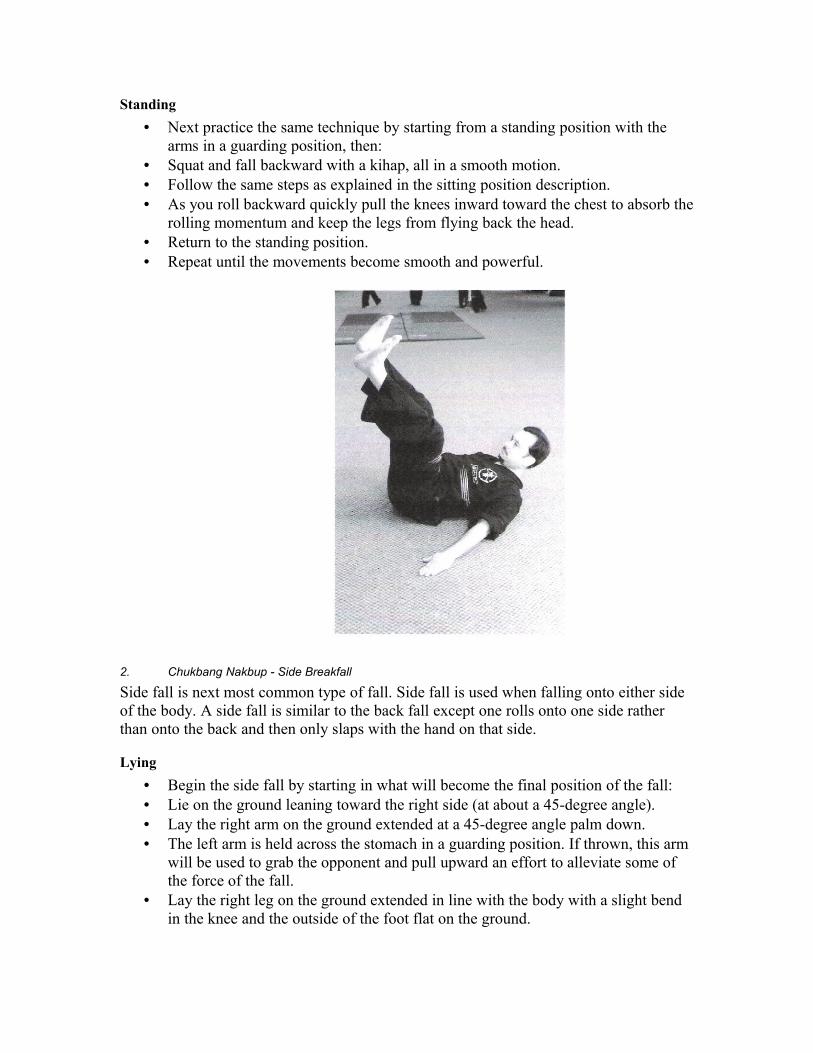
Standing• Next practice the same technique by starting from a standing position with the
arms in a guarding position, then: • Squat and fall backward with a kihap, all in a smooth motion. • Follow the same steps as explained in the sitting position description. • As you roll backward quickly pull the knees inward toward the chest to absorb the
rolling momentum and keep the legs from flying back the head. • Return to the standing position. • Repeat until the movements become smooth and powerful.
2. Chukbang Nakbup - Side Breakfall
Side fall is next most common type of fall. Side fall is used when falling onto either side of the body. A side fall is similar to the back fall except one rolls onto one side rather than onto the back and then only slaps with the hand on that side.
Lying• Begin the side fall by starting in what will become the final position of the fall: • Lie on the ground leaning toward the right side (at about a 45-degree angle). • Lay the right arm on the ground extended at a 45-degree angle palm down. • The left arm is held across the stomach in a guarding position. If thrown, this arm
will be used to grab the opponent and pull upward an effort to alleviate some of the force of the fall.
• Lay the right leg on the ground extended in line with the body with a slight bend in the knee and the outside of the foot flat on the ground.

• Bend the left knee so the sole of the foot is flat on the ground near the mid-calf of the right leg.
• Hold the head up and slightly turned toward the left shoulder. • This is the final landing position for the side fall. Now practice the slapping
motion: • Lift the right and left legs about 12-inches while maintaining their position. • Simultaneously pull the right arm to the left shoulder with a tight fist. • Slap the legs back to the ground to their original position. • Simultaneously slap the right arm back down to its original position at a 45-
degree angle to the side of the body palm down with a kihap. The slapping arm and the legs should strike the ground simultaneously.
• Now practice getting into position and slapping while leaning to the left side. Everything is performed the same as on the right except everything is opposite.
• Repeat movement on each side until they become smooth and powerful.
Squatting• Now practice the same technique by falling to the side from a squatting position.
Begin from a deep squatting position with the arms in a guarding position, then: • Cross the arms crossed at the chest with tight fists with the right arm on top. • Extend the right leg and roll and drop to the right side while slapping the right
arm and leg into the final side fall position with a kihap. • Rise back to the squatting position and repeat the fall to the other side. • Repeat the falls on each side until the movements become smooth and powerful.
Standing• Next practice the same technique by starting from a standing position with the
arms in a guarding position, then: • Squat and fall to the side with a kihap, all in a smooth motion. • Follow the same steps as explained in the squatting position description. • Return to the standing position. • Repeat until the movements become smooth and powerful.

3. Junbang Nakbup - Front Breakfall
Front fall is used when falling forward with no forward momentum. Being able to instinctively bring the hands up and turn the head may protect one from chipped teeth, broken nose, or bruised ribs.
Kneeling• Begin by kneeling on the ground with the heels under the buttocks, toes curled
upward, and weight resting on the knees and the balls of the feet with the arms in a guarding position, then:
• Raise the arms with the forearms perpendicular to the upper arms, hands held flat, and palms facing forward.
• Turn the head to the side, slightly raise the head, and tense the neck muscles. • Fall straight forward with the upper body and slap the ground with the palms with
a kihap. Do not reach forward with the arms so the elbows hit the ground (may injure elbows) or let the arms drop so they land in a push-up position (may injure wrists or shoulders). The hands should hit the ground on a horizontal line with the head. When the hands initially hit the ground, the elbows should be at a 45-degree angle to the hands (about 9 to 12 inches off the ground).
• After the hands slap, the arm and shoulder muscles are used to absorb the forces of the fall and slowly lower the elbows to the ground.
• Return to the kneeling position. • Repeat until the movements become smooth and powerful.
Squatting• Begin from a squatting position, then: • Raise the arms with the forearms perpendicular to the upper arms, hands held flat,
and palms facing forward. • Turn the head to the side, slightly raise the head, and tense the neck muscles. • Fall straight forward, extend the body forward by straightening the legs and slap
the ground with the palms with a kihap. Do not reach forward with the arms so

the elbows hit the ground or let the arms drop so they land in a push-up position. The hands should hit the ground on a horizontal line with the head. When the hands initially hit the ground, the elbows should be at a 45-degree angle to the hands (about 9 to 12 inches off the ground).
• After the hands slap, the arm and shoulder muscles are used to absorb the forces of the fall and slowly lower the elbows to the ground.
• Simultaneously with the hand slap, the body is extended supported by the feet that are resting on the balls of the feet.
• Tense the entire body so it is rigid and supported above the ground. The body is supported above the ground so it will not impact the ground or a piercing object on the ground. Many vital areas are located on the front of the body.
• Return to the squatting position. • Repeat until the movements become smooth and powerful.
Standing• Begin from a standing position with feet together, then: • Bend at the waist and touch the toes with the fingertips of both arms. • Turn the head to the side, slightly raise the head, and tense the neck muscles. • Suddenly thrust the body forward and the legs backward while dropping straight
down. In the final position, the waist will be just above the point where the feet were at originally.
• Slap the ground with the palms with a kihap. Do not reach forward with the arms so the elbows hit the ground or let the arms drop so they land in a push-up position. The hands should hit the ground on a horizontal line with the head. When the hands initially hit the ground, the elbows should be at a 45-degree angle to the hands (about 9 to 12 inches off the ground).
• After the hands slap, the arm and shoulder muscles are used to absorb the forces of the fall and slowly lower the elbows to the ground.
• Simultaneously with the hand slap, the body is extended supported by the feet that are about 2-feet apart and resting on the balls of the feet.
• Tense the entire body so it is rigid and supported above the ground. The body is supported above the ground so it will not impact the ground or a piercing object on the ground. Many vital areas are located on the front of the body.
• Return to the standing position. • Repeat until the movements become smooth and powerful.
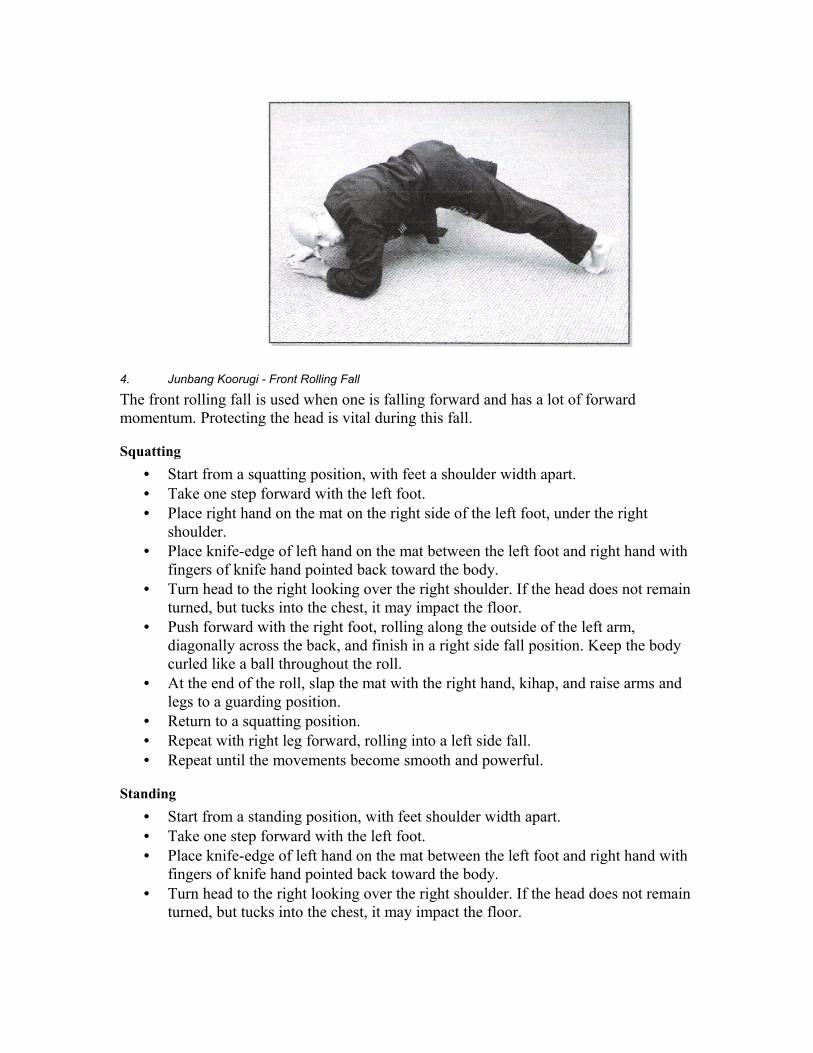
4. Junbang Koorugi - Front Rolling Fall
The front rolling fall is used when one is falling forward and has a lot of forward momentum. Protecting the head is vital during this fall.
Squatting• Start from a squatting position, with feet a shoulder width apart. • Take one step forward with the left foot. • Place right hand on the mat on the right side of the left foot, under the right
shoulder. • Place knife-edge of left hand on the mat between the left foot and right hand with
fingers of knife hand pointed back toward the body. • Turn head to the right looking over the right shoulder. If the head does not remain
turned, but tucks into the chest, it may impact the floor. • Push forward with the right foot, rolling along the outside of the left arm,
diagonally across the back, and finish in a right side fall position. Keep the body curled like a ball throughout the roll.
• At the end of the roll, slap the mat with the right hand, kihap, and raise arms and legs to a guarding position.
• Return to a squatting position. • Repeat with right leg forward, rolling into a left side fall. • Repeat until the movements become smooth and powerful.
Standing• Start from a standing position, with feet shoulder width apart. • Take one step forward with the left foot. • Place knife-edge of left hand on the mat between the left foot and right hand with
fingers of knife hand pointed back toward the body. • Turn head to the right looking over the right shoulder. If the head does not remain
turned, but tucks into the chest, it may impact the floor.

• Push forward with the right foot, rolling along the outside of the left arm, diagonally across the back, and finish in a right side fall position. Keep the body curled like a ball throughout the roll.
• At the end of the roll, slap the mat with the right hand, kihap, and raise arms and legs to a guarding position.
• Return to a standing position. • Repeat with right leg forward, rolling into a left side fall. • Repeat until the movements become smooth and powerful.
Beginners usually throw themselves forward, landing heavily on the shoulder instead of rolling gently along an unbroken arc. They have not learned to maintain a sense of “center” around which the sphere of their body will roll. They leap forward with their upper body with the rest of the body trailing along. In a correct forward roll, the entire body moves at once as it revolves around the center of gravity like a wheel.

To avoid injury, contact must be maintained with the ground throughout the movement. Pain results from the impact of body surfaces with the ground. The greater the distance between a body’s surface and the ground, the greater the impact and the greater the pain. If there is no distance between them, there will be not impact and no pain. Your body must roll along, not “fall” onto the floor. Contact should be smoothly transferred from the shoulder to the back, the hip, thigh, and finally to the feet. There should be no interruption of the flow.
Nak Sul DrillsThis section describes Nak Sul drills that can be used to improve technique while breaking up the monotony of straight technique drills.
• Backstroke – Students line up on one end of the Dojo. This can be single file, multiple line, or simply in a classic line-up. Students crawl on their backs staying up on their shoulders and feet. This drill is designed to increase Nak Sul strength and also improves left/right coordination.
• Bowling Lanes – In this drill, mats are assembled long-ways in a line. Students form a line and take turns stepping onto the mat and performing the designated Nak Sul fall. After each fall the student takes a step down the mat and does the fall again. This continues until the student reaches the end. The next student in line begins their journey down the mats as soon as the previous student has moved along the mats far enough to make room.
• Yin Yang Rolls – Students form two single-file lines on opposite sides of the mat. The first student in line A rolls forward onto the mat then strikes a pose in forward fall directly in front of the first student in line B. The first student in line B rolls over the student from line A and strikes a pose in forward fall directly in front of line A. The first student from line A rises quickly and goes to the back of line B.
• Obstacle Course – One or More students form an obstacle course either on hands and knees or bending over at the waist with hands on knees. Students form a line and proceed down the course by rolling on and over the “obstacle” students.
• Chaos Circle – Students sit in a circle around a small set of mats. Students randomly spring up on the mat and do whatever break fall they chose. Once a student starts, they must keep going. The goal is to perform in chaos while being aware of your surroundings enough so that nobody bumps into each other. All students must participate. The instructor should call people by name out who hold back.
Japanese Terminology
the uke (受け ?) (IPA: [ɯkɛ]) is the person who “receives” a technique.

nage or tori (投げ ”thrower”?),
action of uke is called “taking ukemi (受け身 ?).” Literally translated as “receiving body”
Korean TerminologyBat Gi is the one who is thrown.
Jap Gi is the one who throws
Too Sul or Yu Sul is throwing techniques
Nak Sul is falling techniques
Nak Bop is break fall
Koorugi is rolling fall
Junbang Nakbup is forward breakfall
Hoobang Nakbup is backward breakfall
Chukbang Nakbup is side breakfall
Konjoong Hoejun is aero fall
Woljang is high jump fall
Molli Koorugi is distance jump fall
BibliographyWikipedia. “http://en.wikipedia.org/wiki/Uke_(martial_arts)”
Ohlenkamp, Neil. “The Study of Falling”
DiFilippo, Anthony R. “Ukemi” March 28, 2005 for USA Dojo
Bornstein, Howard. “Aikido from the Inside Out”
Kanai, Mitsunari. “Technical Aikido”
Tedeschi, Marc. “Hapkido: Traditions, Philosophy, Technique “


![[Presenticcon Pilot] Rang Mudo Nak Singkarak](https://static.fdocuments.in/doc/165x107/55b1d3a6bb61eb6a368b46cf/presenticcon-pilot-rang-mudo-nak-singkarak.jpg)