n User Environment Manager 9 - VMware Docs Home · VMware User Environment Manager 9.2. ... 6...
50
Installing and Configuring VMware User Environment Manager VMware User Environment Manager 9.2
Transcript of n User Environment Manager 9 - VMware Docs Home · VMware User Environment Manager 9.2. ... 6...

Installing and Configuring VMwareUser Environment Manager
VMware User Environment Manager 9.2
Installing and Configuring VMware User Environment Manager
2 VMware, Inc.
You can find the most up-to-date technical documentation on the VMware Web site at:
https://docs.vmware.com/
The VMware Web site also provides the latest product updates.
If you have comments about this documentation, submit your feedback to:
Copyright © 2017 VMware, Inc. All rights reserved. Copyright and trademark information.
VMware, Inc.3401 Hillview Ave.Palo Alto, CA 94304www.vmware.com

Contents
About Installing and Configuring VMware User Environment Manager™ 5
1 Introduction to User Environment Manager 7
Application Configuration Management 7User Environment Settings 7Personalization of Application and Windows Settings 8Migration of Application Settings 8Dynamic Configuration of the Desktop 9
2 User Environment Manager Scenario Considerations 11
Using User Environment Manager with Mandatory Profiles 11Using User Environment Manager with Roaming Profiles 12Using User Environment Manager with Local Profiles 13
3 Installation and Deployment Prerequisites 15
User Environment Manager Infrastructure and Terminology 15Overview of the User Environment Manager Deployment 16Infrastructure Requirements 17
User Environment Manager Configuration Share 17Profile Archives Share 18
Software Requirements 19Registry Access Requirements 20Licensing Requirements 20
4 Installing User Environment Manager 21
Overview of the User Environment Manager Deployment 21Install User Environment Manager Manually 22Unattended Installation of User Environment Manager 23Upgrade User Environment Manager 23
Upgrade FlexEngine on all Windows Desktops and Terminal Servers 24Upgrade the User Environment Manager Management Console 24Upgrade the ADMX Templates 25
5 Configuring User Environment Manager 27
Configuring the FlexEngine Group Policy Object 27Create a User Environment Manager Group Policy Object 28Configure the User Environment Manager Group Policy Object 29
Open the User Environment Manager Group Policy Object 30Configure the Flex Configuration Files Setting 31Configure FlexEngine to Run as Group Policy Extension Setting 31Configure FlexEngine Logging Setting 32
VMware, Inc. 3

Configure Profile Archives Setting 32Configure Profile Archive Backups Setting 33Configure Application Blocking Logging to the Windows Event Log Setting 33Configure Privilege Elevation Logging to the Windows Event Log Setting 33Configure Certificate Support for Mandatory Profiles Setting 34Configure DirectFlex - Advanced Settings 34Configure FlexEngine Logging to the Windows Event Log Setting 34Configure Paths Unavailable at Logon Setting 35Configure FlexEngine Refresh Settings 36Configure Access to VMware UEM Self-Support for End Users 36Configure User Environment Manager Logon and Logoff Progress Information 36Configure Silo-Specific Flex Configuration Files Settings 36
Configuring FlexEngine to Run from Logon and Logoff Scripts 37Configure FlexEngine to Run from a Logon Script 37Configure FlexEngine to Run From a Logoff Script 38
Configuring the User Environment Manager Management Console 38
6 Installing and Configuring User Environment Manager in NoAD Mode 39
Install User Environment Manager in NoAD Mode 39Configuring User Environment Manager with the NoAD Mode 39
Configuring FlexEngine Logging Settings 40Configuring Profile Archives Settings 40Configuring Profile Archive Backups Settings 41Configuring Application Blocking Logging to the Windows Event Log Setting 41Configuring Privilege Elevation Logging to the Windows Event Log Setting 41Enable Certificate Support for Mandatory Profiles Setting 41Configure DirectFlex – Advanced Settings 42Configure FlexEngine Logging to the Windows Event Log Setting 42Configure Paths Unavailable at Logon Setting 43Prevent Access to User Environment Manager Self-Support to End Users 43Disable the NoAD Mode for Certain Users 43Remove Registry Settings for the NoAD Mode 44Sample NoAD.xml File 44
7 FlexEngine Command-Line Arguments 45
FlexEngine Operations and Arguments 45Operation Modes 46Overriding Group Policy Settings 47Applying Horizon Smart Policies in Multiple Sessions 47Additional FlexEngine Operations 47
Index 49
Installing and Configuring VMware User Environment Manager
4 VMware, Inc.

About Installing and Configuring VMwareUser Environment Manager™
The Installing and Configuring VMware User Environment Manager guide provides information about installingand configuring VMware User Environment Manager™ on Terminal Services or Windows desktopenvironments.
Intended AudienceThis information is intended for experienced Windows administrators who want to deployUser Environment Manager in their Terminal Services or Windows desktop environments to providedynamic management of desktop, user, and application settings.
VMware, Inc. 5

Installing and Configuring VMware User Environment Manager
6 VMware, Inc.

Introduction toUser Environment Manager 1
User Environment Manager provides end users with a personalized and dynamic Windows desktop.Through User Environment Manager, you can customize the desktop by providing access to IT resourcesbased on the role, device, and location of the user. In this way, you can create a desktop that adapts to thespecific needs of the user.
User Environment Manager manages user and Windows settings and dynamically configures the desktop.For example, it can create drive and printer mappings, file type associations, and shortcuts.User Environment Manager can also manage and provide shortcuts to applications such as ThinApp tousers.
This chapter includes the following topics:
n “Application Configuration Management,” on page 7
n “User Environment Settings,” on page 7
n “Personalization of Application and Windows Settings,” on page 8
n “Migration of Application Settings,” on page 8
n “Dynamic Configuration of the Desktop,” on page 9
Application Configuration ManagementWith User Environment Manager, you can configure the initial settings of an application without having torely on the defaults of the application. You can define the application settings that the user can personalizeand the settings that always remain unchanged each time the user opens the application. In this way, youcan combine policy-enforced settings and user personalization.
You can also use User Environment Manager to manage certain user environment settings when anapplication starts. For example, you can configure drive and printer mappings, apply custom settings forfiles and folders, and registry, and run custom tasks. You can also define settings and configurations for allusers to guarantee compliance and provide a consistent environment.
You can use the User Environment Manager Application Profiler to capture predefined settings for anapplication. You can run the application on a reference system that Application Profiler monitors andconfigure the settings that you want.
User Environment SettingsYou can use User Environment Manager to centrally manage user settings that users require to perform theirdaily tasks. The settings are applied when a user logs in or starts a certain application.
For example, a multinational corporation has end users from multiple countries. The company can centrallymanage the different display languages, wallpapers, keyboard configurations, and other regional settings.
VMware, Inc. 7

By using User Environment Manager, you can manage the following settings:
n ADMX-based settings
n Application blocking
n Application shortcuts and file type associations
n Display language
n Drive and printer mappings
n Environment variables
n Files, folders, and registry settings
n Folder redirection
n Hide drives
n Horizon Smart Policies
n Logon and logoff tasks
n Privilege Elevation
n Triggered tasks
Personalization of Application and Windows SettingsUser Environment Manager is a profile management capability that enables users to roam their personaldesktop and application settings. Personalization separates user-specific desktop and application settingsfrom the Windows operating system. This way, the settings are available across OS versions, devices, andapplication instances.
Personalization works independent from the Windows user profile management and facilitates themanagement of virtualization technologies and application delivery mechanisms.User Environment Manager personalization integrates seamlessly with natively installed and virtualizedapplications, providing a consistent user experience across Windows platforms that are physical or virtual,local, or remote.
User Environment Manager personalization lets users create their own personal settings. For example,developers might want to configure Eclipse according to their own habits and apply that configurationacross multiple environments. Quality engineers might want to set the bug tracking Web site as the homepage of all browsers.
Migration of Application SettingsUser Environment Manager can transfer personal application settings of users from one OS to another, forexample from Windows 7 to Windows 10. This is default behavior of User Environment Manager, the onlyrequirement is that the application must store its configuration at the same registry and AppData locationsin the user profile.
User Environment Manager also provides an XML-based mechanism for settings migration betweenapplication versions. In this way, you can avoid situations where personalized data is lost during applicationupgrade, because it is stored at different location after the upgrade.
The User Environment Manager download package contains XML migration file samples for migratingbetween different versions of Microsoft Office.
Installing and Configuring VMware User Environment Manager
8 VMware, Inc.

Dynamic Configuration of the DesktopBy using User Environment Manager, you can provide dynamic adaptation of the content and appearanceof the end-user desktop by using conditions. User Environment Manager includes ready-to-use conditionsthat you can combine for the user, location, and device characteristics.
For example, by using conditions you can provide access to a network printer that is based on the currentphysical location of the user, or create an application shortcut on the desktop that is based on the user'sidentity.
You can re-evaluate conditions when users unlock their workstation or reconnect to a remote session. Youcan manage conditions from the User Environment Manager console and apply them to all configurableitems within User Environment Manager.
Chapter 1 Introduction to User Environment Manager
VMware, Inc. 9

Installing and Configuring VMware User Environment Manager
10 VMware, Inc.

User Environment Manager ScenarioConsiderations 2
You can use User Environment Manager to optimize the experience of Windows users with all types of userprofiles: mandatory, roaming, and local.
This chapter includes the following topics:
n “Using User Environment Manager with Mandatory Profiles,” on page 11
n “Using User Environment Manager with Roaming Profiles,” on page 12
n “Using User Environment Manager with Local Profiles,” on page 13
Using User Environment Manager with Mandatory ProfilesMandatory profiles are mostly used in Terminal Services environments, although you can use them withWindows desktops as well. With mandatory profiles, personalization changes of the desktop are effectiveonly during a Windows session. When the user logs out, all changes are deleted. WithUser Environment Manager, you can eliminate the need of customizing mandatory profiles, manage thesettings that are available for personalization, and customize the user environment settings.
The following are the advantages and disadvantages of mandatory profiles:
Advantages n Short login and logout times.
n Consistent user experience, no matter what the user changes.
n Minimal troubleshooting on user profiles.
Disadvantages n None of the personalization changes made by users are saved.
n Creating a usable and customized mandatory profile requires a highlevel of skill.
n Scripting is often necessary to create shortcuts, drive mappings, and soon.
When using User Environment Manager with mandatory profiles, you can address the disadvantages in thefollowing ways:
n Select the settings that users are allowed to personalize within their environment. Settings that you donot manage with User Environment Manager are discarded when the user logs out.
n Configure specific settings for applications or Windows settings by using the Predefined Settingsfeature of User Environment Manager. By using predefined settings, you do not need to customize amandatory profile. A mandatory profile that is based on the Default User profile is sufficient.
n Customize the user environment by creating shortcuts, drive mappings, and so on.
VMware, Inc. 11

Using User Environment Manager with Roaming ProfilesRoaming profiles are mostly used in a managed desktop environment. With roaming profiles, allpersonalization changes that users make during a Windows session are stored in the central roaming profilewhen users log out. When a user logs in to a Windows session, the roaming profile is copied again from thecentral location. With User Environment Manager, you can manage the size of roaming profiles, reducelogin times, and achieve greater flexibility in managing application and Windows settings for roamingprofiles.
You should avoid using roaming profiles with User Environment Manager for a longer period of time.Typically, User Environment Manager only runs with roaming profiles when you start migrating from theroaming profile to either local or mandatory profiles being managed by User Environment Manager. TheUser Environment Manager best practice is to use either local or mandatory profiles.
Advantages n No specific administration necessary besides enabling the roamingprofiles.
n Personalized settings roam with the user across different machines thatare running the same operating system.
Disadvantages n Limited control over the settings that the users can change. Everything issaved by default.
n Large roaming profiles might get corrupted and cause the individualroaming profile to reset completely. As a result, users might spend a lotof time getting all personalized settings back.
n Troubleshooting an application defect might cause the individualroaming profile to reset completely because all application andWindows settings are stored in a single container.
n Roaming profiles do not roam across different operating systems. Thisresults in multiple roaming profiles per user in a mixed environment,like desktops and Terminal Services.
n Potential for unnecessary growth of roaming profile, causing long logintimes.
n Application shortcuts and file type associations get retained in roamingprofiles and often cause confusion when users roam to devices wherethe applications might not be installed.
You can address many of the disadvantages of roaming profiles by using User Environment Manager.
n You can use the Profile Cleanup feature to clean up unimportant or obsolete parts of each user profile atlogout.
n Create a mandatory set of settings for business-critical applications by using the Predefined Settingsfeature. You can also use Predefined Settings to disallow personalized settings for certain applications.
n Decouple and segment personalized application and Windows settings from the roaming profile byusing the Import / Export and the Profile Cleanup features.
n Compress all settings that User Environment Manager manages including files and folders to provideshorter login times.
n Save all settings for roaming profiles in a central place that makes the settings available after a totalreset.
n Reset certain application or Windows settings without performing a complete reset of the roaming userprofile.
Installing and Configuring VMware User Environment Manager
12 VMware, Inc.
n Provide roaming for personalized application and Windows settings across different operating systemsfor a consistent user experience.
n Provide different application and Windows settings depending on a user's business case by usingCondition Sets.
Using User Environment Manager with Local ProfilesWith local profiles, personalized changes that users make during a Windows session are stored on the localdisk. When a user logs in to the same desktop again, the user environment is the same as in the previoussession of the user. When a user logs in to another desktop, none of the settings are the same, as a new localprofile is created and stored locally on that desktop.
Advantages n No specific administration is needed.
n No network storage is required.
Disadvantages n Personalized settings are not roamed across different machines.
n Each desktop a user logs on to is polluted with a local profile for thatspecific user.
n If local disk failure or corruption occurs, all user settings are lost.
With User Environment Manager, you can eliminate the disadvantages of local profiles.
n Introduce roaming functionality for application and Windows settings that User Environment Managermanages.
n Create redundancy for application and Windows settings by managing these settings withUser Environment Manager when local disk failure or corruption occurs.
Chapter 2 User Environment Manager Scenario Considerations
VMware, Inc. 13

Installing and Configuring VMware User Environment Manager
14 VMware, Inc.
Installation and DeploymentPrerequisites 3
To install and deploy User Environment Manager, your environment must meet certain infrastructure,system, access, and licensing requirements. You must also get familiar with the User Environment Managerterminology.
This chapter includes the following topics:
n “User Environment Manager Infrastructure and Terminology,” on page 15
n “Overview of the User Environment Manager Deployment,” on page 16
n “Infrastructure Requirements,” on page 17
n “Software Requirements,” on page 19
n “Registry Access Requirements,” on page 20
n “Licensing Requirements,” on page 20
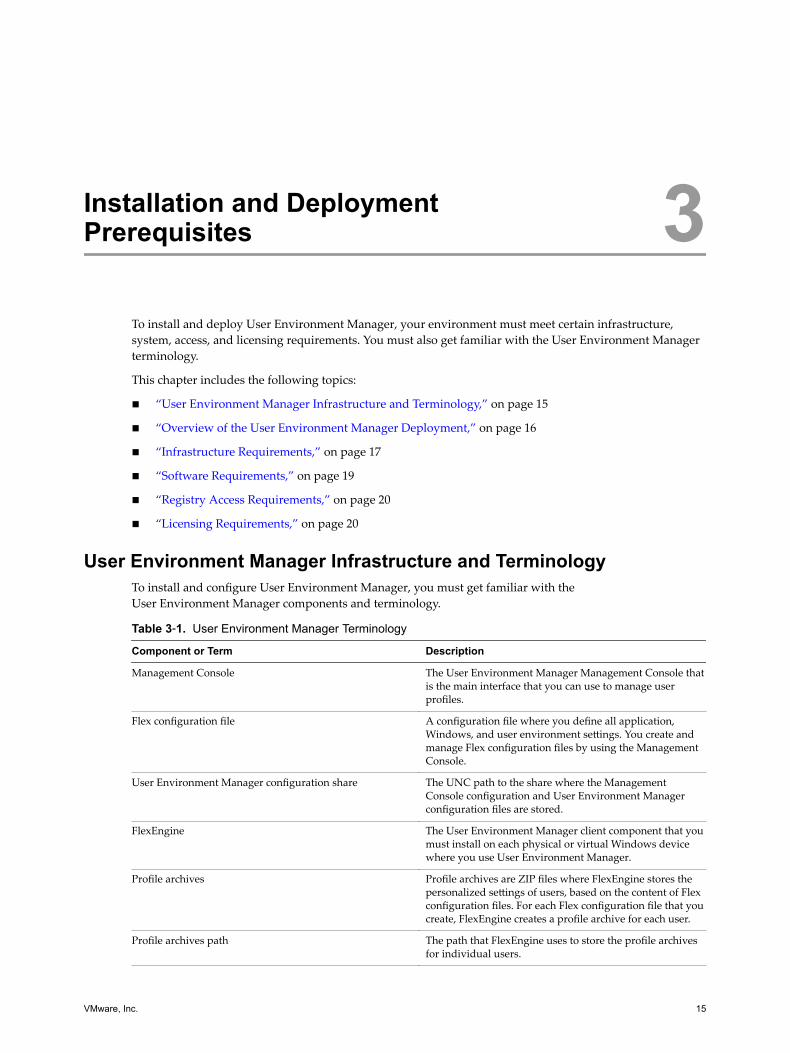
User Environment Manager Infrastructure and TerminologyTo install and configure User Environment Manager, you must get familiar with theUser Environment Manager components and terminology.
Table 3‑1. User Environment Manager Terminology
Component or Term Description
Management Console The User Environment Manager Management Console thatis the main interface that you can use to manage userprofiles.
Flex configuration file A configuration file where you define all application,Windows, and user environment settings. You create andmanage Flex configuration files by using the ManagementConsole.
User Environment Manager configuration share The UNC path to the share where the ManagementConsole configuration and User Environment Managerconfiguration files are stored.
FlexEngine The User Environment Manager client component that youmust install on each physical or virtual Windows devicewhere you use User Environment Manager.
Profile archives Profile archives are ZIP files where FlexEngine stores thepersonalized settings of users, based on the content of Flexconfiguration files. For each Flex configuration file that youcreate, FlexEngine creates a profile archive for each user.
Profile archives path The path that FlexEngine uses to store the profile archivesfor individual users.
VMware, Inc. 15
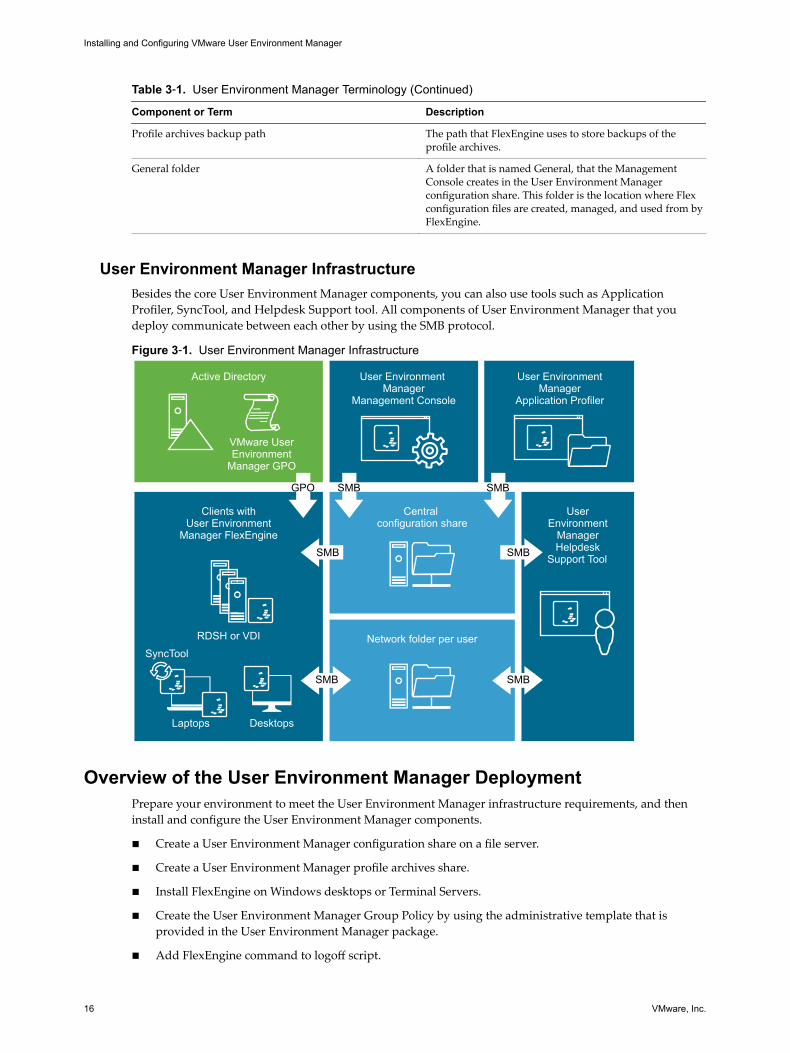
Table 3‑1. User Environment Manager Terminology (Continued)
Component or Term Description
Profile archives backup path The path that FlexEngine uses to store backups of theprofile archives.
General folder A folder that is named General, that the ManagementConsole creates in the User Environment Managerconfiguration share. This folder is the location where Flexconfiguration files are created, managed, and used from byFlexEngine.
User Environment Manager InfrastructureBesides the core User Environment Manager components, you can also use tools such as ApplicationProfiler, SyncTool, and Helpdesk Support tool. All components of User Environment Manager that youdeploy communicate between each other by using the SMB protocol.
Figure 3‑1. User Environment Manager Infrastructure
Active Directory
GPO SMB SMB
SMBSMB
SMBSMB
Clients withUser Environment
Manager FlexEngine
UserEnvironment
ManagerHelpdesk
Support Tool
RDSH or VDISyncTool
Laptops Desktops
User Environment Manager
Management Console
Central configuration share
Network folder per user
User EnvironmentManager
Application Profiler
VMware UserEnvironment
Manager GPO
Overview of the User Environment Manager DeploymentPrepare your environment to meet the User Environment Manager infrastructure requirements, and theninstall and configure the User Environment Manager components.
n Create a User Environment Manager configuration share on a file server.
n Create a User Environment Manager profile archives share.
n Install FlexEngine on Windows desktops or Terminal Servers.
n Create the User Environment Manager Group Policy by using the administrative template that isprovided in the User Environment Manager package.
n Add FlexEngine command to logoff script.
Installing and Configuring VMware User Environment Manager
16 VMware, Inc.
n Install the Management Console on the administrator's machine.
n Perform initial configuration of the Management Console.
After you install and configure the User Environment Manager components, you can start managingpersonalization and application management settings by creating Flex configuration files. You can use theUser Environment Manager Application Profiler to capture application settings in Flex configuration files.
Note The User Environment Manager MSI file has a digital signature, which the Windows Installerinfrastructure validates when the installation starts. The installation process includes a certificate revocationcheck for which the system requires Internet access. If the Internet connectivity is not sufficient, theinstallation continues, but only after several timeouts. During the process, the installer seems to hangwithout providing any feedback.
Infrastructure RequirementsTo deploy User Environment Manager, your environment must meet certain infrastructure requirements.
Requirement Description
Active Directory Active Directory is required for Group Policy configurationof FlexEngine. You configure FlexEngine by creating anActive Directory Group Policy Object (GPO). See “Configure the User Environment Manager Group PolicyObject,” on page 29. You can configure FlexEnginewithout Group Policy, but it requires command-linearguments. For more information, see Chapter 7,“FlexEngine Command-Line Arguments,” on page 45.
User Environment Manager configuration share A central share on a file server, which can be a replicatedshare for multiple sites. In such a case, you can usemultiple Active Directory GPOs to configure the path tothe share for all client devices, based on the location. Thisshare uses the Server Message Block (SMB) protocol forcommunication. For more information about theconfiguration share requirements, see “User EnvironmentManager Configuration Share,” on page 17.
Profile archives share You must consider a location to store the profile archiveZIP files for the user settings and the profile backups. Theprofile archives share also uses SMB. For details about theprofile archives share, see “Profile Archives Share,” onpage 18.
User Environment Manager Configuration ShareThe User Environment Manager configuration share is a central share on a file server. It contains all theconfiguration files for personalization and application configuration management ofUser Environment Manager. FlexEngine reads configuration data from the User Environment Managerconfiguration share when a user logs in or logs out of the environment, or when the user opens or closesapplications that are configured with DirectFlex.
Folder StructureThe User Environment Manager configuration share has a predefined structure. The first time when youstart the Management Console, the General folder is automatically created in the configuration share. TheGeneral folder contains the Flex configuration files that you use to define settings for personalization andapplication configuration management.
Chapter 3 Installation and Deployment Prerequisites
VMware, Inc. 17

The General folder also contains the mandatory FlexRepository folder. The Management Console createsthe FlexRepository folder the first time you configure a user environment setting, such as a printermapping. The FlexRepository folder contains all the configuration files for the user environment settingsand condition sets.
Requirements
Requirement Description
Networking To optimize login times, the computer where the user logsin should have a 1-Gbps connection to the configurationshare.
Storage Storage requirements might vary based on the specificdeployment. A general guideline is to have at least 200 kBper application with a starting minimum size of 1 GB.
NTFS security permission n Administrators must have Full Control permissions.n End users must have Read and Execute permissions.Caution For security reasons, non-administrators mustnot have write permissions on theUser Environment Manager configuration share.
Profile Archives ShareThe profile archives share stores the personal settings for users as FlexEngine creates a subfolder for eachuser. The share contains User Environment Manager profile archives, which are ZIP files. FlexEngine readspersonal user settings from the profile archives share when a user logs in to the environment or launches aDirectFlex-enabled application. FlexEngine writes the modified settings when the user logs out, or closes aDirectFlex-enabled application.
In a typical deployment, profile archive backups and log files are stored on the same share, but you canconfigure different locations in the FlexEngine GPO.
You should use a share that is dedicated to the profile archives. A dedicated share improves performance,simplifies configuring the User Environment Manager SyncTool, and makes it easier to configurepermissions for the Helpdesk Support Tool.
Note Do not use the Home drive share. Using this share can cause synchronization conflicts betweenOffline Files and the User Environment Manager SyncTool, and lets users delete their profile archives.
Folder StructureThe profile archives share has a one-on-one relation to the naming and folder structure of theUser Environment Manager configuration share and the Management Console.
Installing and Configuring VMware User Environment Manager
18 VMware, Inc.

Requirements
Requirement Description
Networking requirements For best performance and to optimize login times, thecomputer where the end user logs in should have a 1-Gbpsconnection to the profile archives share. If an end user haslimited bandwidth or has a laptop that is often offline, usethe SyncTool. This tool improves connectivity to the profilearchives share under these conditions.
Storage Storage requirements might vary based on the specificdeployment. A general guideline is to have at least 100 MBper user.
NTFS security permissions Setting the following NTFS security permissions on theprofile archives share automatically creates a folder foreach user on first login and limits the user to their ownfolder.n For User Environment Manager administrators and
help desk: Full control, applied to this folder, subfolders, and files.
n For End users: Create folders and append data, appliedto this folder only.
n For Creator owner: Full control, applied to sub foldersand files only.
The minimum share permissions for all users should beChange and Read.
Software RequirementsThe system on which you plan to install User Environment Manager must meet certain softwarerequirements.
Supported Windows Versionsn Windows 7 Professional, Enterprise, and Ultimate x86 and x64 SP1
n Windows Server 2008 R2 Standard and Enterprise x64 SP1
n Windows Server 2012 Standard and Datacenter x64
n Windows 8.1 Professional and Enterprise x86 and x64 with Update
n Windows Server 2012 R2 Standard and Datacenter x64 with Update
n Windows 10 Version 1703 (Creators Update) Professional and Enterprise x86 and x64
n Windows Server 2016 Standard and Datacenter x64
Supported Application Virtualization Products and Versionsn App-V 4.6 Service Pack 3
n App-V 5.0 Service Pack 3
n App-V 5.1
n ThinApp 5.2
n SWV 7.5
n SWV 7.6
Chapter 3 Installation and Deployment Prerequisites
VMware, Inc. 19

Registry Access RequirementsAccess to Regedit.exe or Reg.exe must not be disabled through Group Policy. FlexEngine uses Regedit.exeto add user-specific settings to the registry. Depending on the User Account Control (UAC) settings onWindows 7 or later, FlexEngine might use Reg.exe.
User Environment Manager might not work properly on some Windows versions if access to Regedit.exe isdisabled through Group Policy, unless the option Disable regedit from running silently? is set to No.However, this setting is insufficient for Reg.exe. This means that if Regedit.exe cannot run due to UAC, thispolicy must remain unset.
If users are not allowed to run Regedit.exe silently, an error message might appear when they log in. Anerror message is also written to the FlexEngine log file.
Licensing RequirementsFlexEngine requires a valid license file. To switch from an evaluation license file to a production license file,reinstallation of any User Environment Manager component is not required. You must only replace the oldlicense file with the new license file, retaining both license filename and location in the file system.
Note A license file is not required on Horizon 7 for installation. A license file is required only when youinstall User Environment Manager as a standalone installation.
Installing and Configuring VMware User Environment Manager
20 VMware, Inc.

Installing User Environment Manager 4You must install User Environment Manager on your environment to manage personalization andapplication configuration settings. The User Environment Manager MSI consists of several installationfeatures that you can install on your environment.
Table 4‑1. User Environment Manager Installation Features
Installation Feature Description
VMware UEM FlexEngine Client component that you must install on each desktop or Terminal Server that you wantto manage by using User Environment Manager.If you are deploying FlexEngine to physical machines, you can use any softwaredeployment tool to perform batch deployment or use Active Directory Group Policysoftware deployment.If you deploy FlexEngine in a VDI or RDSH environment, such as VMware Horizon, youcan manually install FlexEngine in the template or parent virtual machines and thendeploy pools and farms of VMware Horizon® View™ desktops and RDSH servers basedon these templates.
VMware UEM ManagementConsole
Administration console that you can install on any desktop or Terminal Server where youwant to manage User Environment Manager.
Application Migration Optional. You can install Application Migration on desktops or Terminal Servers if youwant to migrate application settings across application versions. This feature depends onFlexEngine and cannot work standalone.
Self-Support Optional. You can install the Self-Support tool on desktops or Terminal Servers where youwant users to support their application settings by themselves, without administratorintervention. This feature depends on FlexEngine and cannot work standalone.
This chapter includes the following topics:
n “Overview of the User Environment Manager Deployment,” on page 21
n “Install User Environment Manager Manually,” on page 22
n “Unattended Installation of User Environment Manager,” on page 23
n “Upgrade User Environment Manager,” on page 23
Overview of the User Environment Manager DeploymentPrepare your environment to meet the User Environment Manager infrastructure requirements, and theninstall and configure the User Environment Manager components.
n Create a User Environment Manager configuration share on a file server.
n Create a User Environment Manager profile archives share.
n Install FlexEngine on Windows desktops or Terminal Servers.
VMware, Inc. 21
n Create the User Environment Manager Group Policy by using the administrative template that isprovided in the User Environment Manager package.
n Add FlexEngine command to logoff script.
n Install the Management Console on the administrator's machine.
n Perform initial configuration of the Management Console.
After you install and configure the User Environment Manager components, you can start managingpersonalization and application management settings by creating Flex configuration files. You can use theUser Environment Manager Application Profiler to capture application settings in Flex configuration files.
Note The User Environment Manager MSI file has a digital signature, which the Windows Installerinfrastructure validates when the installation starts. The installation process includes a certificate revocationcheck for which the system requires Internet access. If the Internet connectivity is not sufficient, theinstallation continues, but only after several timeouts. During the process, the installer seems to hangwithout providing any feedback.
Install User Environment Manager ManuallyYou install User Environment Manager by running VMware User Environment Manager 9.2 x86.msi orVMware User Environment Manager 9.2 x64.msi based on your operating system. This launches a setupwizard which guides you through the installation.
Prerequisites
n Verify that you have a valid license file. If you install on VMware Horizon® 7, you do not need aseparate license file.
n Verify that you have administrative privileges on the account where you will run the MSI file.
n Download and extract the MSI file package for your operating system.
Procedure
1 Run the MSI that corresponds to your OS architecture, and click Next.
2 Read and accept the End User License Agreement and click Next.
3 Select the destination folder where you want to install the application and click Next.
VMware recommends you install User Environment Manager in the default folder.
4 Select an installation option for User Environment Manager.
Option Description
Typical Install the User Environment Manager FlexEngine, Application Migration,and Self-Support tool.
Custom Manually select components to install.
Complete Install User Environment Manager FlexEngine, Application Migration,Self-Support tool, and Management Console.
5 Select the license file and click Next.
6 Click Install, and after the installation is complete, click Finish.
What to do next
n Create the User Environment Manager Group Policy by using the administrative template that isprovided in the User Environment Manager package. See “Configuring the FlexEngine Group PolicyObject,” on page 27.
Installing and Configuring VMware User Environment Manager
22 VMware, Inc.

n Add FlexEngine command to logoff script. See “Configure FlexEngine to Run From a Logoff Script,” onpage 38.
n Configure the Management Console. See “Configuring the User Environment Manager ManagementConsole,” on page 38.
Unattended Installation of User Environment ManagerThe User Environment Manager MSI supports unattended installations by using MSI properties to specifyinstallation parameters. To perform an unattended installation, run the misiexec utility from the commandline with the following properties.
Property Description
INSTALLDIR The absolute path to the installation directory. The default value is %ProgramFiles%\Immidio\Flex Profiles
ADDLOCAL The features that you want to install. The default values are FlexEngine, FlexMigrate, andFlexProfilesSelfSupport.The following values are supported:n ALL.n FlexEngine. Installs FlexEngine.n FlexMigrate. Installs Application Migration and FlexEngine.n FlexProfilesSelfSupport. Installs the Self-Support tool and FlexEngine.n FlexManagementConsole. Installs the Management Console.To install multiple features, separate the values with commas, without any spaces. Forexample, to select FlexMigrate and FlexProfilesSelfSupport:ADDLOCAL="FlexMigrate,FlexProfilesSelfSupport"
Note The property values are case-sensitive.
LICENSEFILE The path to the location of the User Environment Manager license file. The installer copiesthat license to the installation folder.Note If LICENSEFILE only contains the name of the license file, the installer looks for thatfile in the folder where the MSI resides.
The following is an example for a custom unattended installation command:
msiexec.exe /i "VMware User Environment Manager 9.2 x64.msi" /qn INSTALLDIR="D:\Apps\VMware UEM"
ADDLOCAL="FlexProfilesSelfSupport" LICENSEFILE="\\filesrv1\share\VMware UEM.lic" /l*
InstallUEM.log
The following is an example of a typical unattended installation that installs FlexEngine, ApplicationMigration, and Self-Support in the default installation directory:
msiexec.exe /i "VMware User Environment Manager 9.2 x64.msi" /qn
LICENSEFILE="\\filesrv1\share\VMware UEM.lic" /l* InstallUEM.log
Upgrade User Environment ManagerYou can upgrade to the latest version of User Environment Manager from Immidio Flex+ 8.x or from earlierversions of User Environment Manager.
To upgrade User Environment Manager, you must upgrade FlexEngine, the Management Console, and theADMX templates in the given order.
Chapter 4 Installing User Environment Manager
VMware, Inc. 23

Upgrade FlexEngine on all Windows Desktops and Terminal ServersTo upgrade User Environment Manager, you must first upgrade FlexEngine on all Windows desktops andTerminal Servers.
Prerequisites
Verify that you have an appropriate license file. If you install on VMware Horizon 7, you do not need aseparate license file.
Procedure
1 As an administrator, run VMware User Environment Manager 9.2 x86.msi or VMware User EnvironmentManager 9.2 x64.msi.
2 Read and accept the End User License Agreement and click Next.
3 Select the destination folder where you want to install the application and click Next.
Install User Environment Manager in the default folder.
4 Select only FlexEngine and its subfeatures to upgrade and click Next.
5 Choose the license file and click Next.
6 Click Upgrade.
What to do next
“Upgrade the User Environment Manager Management Console,” on page 24.
Upgrade the User Environment Manager Management ConsoleAfter you upgrade FlexEngine, you must upgrade the Management Console on the Windows desktop orTerminal Server it is installed on.
Prerequisites
Upgrade FlexEngine.
Procedure
1 As an administrator, run VMware User Environment Manager 9.2 x86.msi or VMware User EnvironmentManager 9.2 x64.msi.
2 Read and accept the End User License Agreement and click Next.
3 Select the destination folder where User Environment Manager is installed and click Next.
4 Select only the Management Console feature to upgrade and click Next.
5 Choose the license file and click Next.
6 Click Upgrade.
7 Select all Flex configuration files that contain Application Templates or Windows Common Settings tohave them automatically updated to the new definitions. If an updated template is available, you areprompted for your approval of the update.
What to do next
“Upgrade the ADMX Templates,” on page 25.
Installing and Configuring VMware User Environment Manager
24 VMware, Inc.
Upgrade the ADMX TemplatesInstall the ADMX templates from the VMware User Environment Manager download package to completethe upgrade process.
Prerequisites
n Upgrade FlexEngine.
n Upgrade the Management Console.
Procedure
1 Remove the previous User Environment Manager ADMX templates from the Central Store on theWindows domain controller.
2 Open the User Environment Manager download package.
3 Copy the new ADMX templates from the download package to the Central Store on the Windowsdomain controller.
You successfully upgraded User Environment Manager.
Chapter 4 Installing User Environment Manager
VMware, Inc. 25

Installing and Configuring VMware User Environment Manager
26 VMware, Inc.
ConfiguringUser Environment Manager 5
After you install User Environment Manager on Windows desktops or Terminal Services, you mustconfigure FlexEngine and the Management Console.
To have User Environment Manager running correctly, you must configure FlexEngine.
n Create and configure an Active Directory GPO for User Environment Manager. You must configureGroup Policies to enable FlexEngine to run when the users log on to their Windows machines, and setup the locations of the configuration and profile archives shares. The rest of theUser Environment Manager Group Policies are optional.
n Configure a logoff script to enable FlexEngine to run at Windows logoff process.
If you do not use a GPO to configure FlexEngine, you can configure it by using command-line arguments.See Chapter 7, “FlexEngine Command-Line Arguments,” on page 45. Or, you can use the NoAD mode. See Chapter 6, “Installing and Configuring User Environment Manager in NoAD Mode,” on page 39.
This chapter includes the following topics:
n “Configuring the FlexEngine Group Policy Object,” on page 27
n “Create a User Environment Manager Group Policy Object,” on page 28
n “Configure the User Environment Manager Group Policy Object,” on page 29
n “Configuring FlexEngine to Run from Logon and Logoff Scripts,” on page 37
n “Configuring the User Environment Manager Management Console,” on page 38
Configuring the FlexEngine Group Policy ObjectYou configure FlexEngine by creating an Active Directory Group Policy Object (GPO). You use theUser Environment Manager administrative templates that are provided in the download package.
If you want to provide different FlexEngine configurations, you can use multiple GPOs. For example, youcan manage multiple User Environment Manager environments such as test and production.
GPO Mandatory SettingsAfter you deploy FlexEngine to the client devices, you must configure FlexEngine to run during theWindows logon and logoff processes.
FlexEngine runs during Windows logon to get all the settings for the client device and apply them as soon asthe user logs in.
You can configure FlexEngine in the following ways to run during Windows logon process:
n By setting Group Policy Run FlexEngine as Group Policy Extension. See “Configure FlexEngine toRun as Group Policy Extension Setting,” on page 31.
VMware, Inc. 27
n By configuring a logon script in Group Policy. Use this method if you prefer to write a logon script. See “Configure FlexEngine to Run from a Logon Script,” on page 37.
FlexEngine runs again during Windows logoff to save all the settings for the client device to the profilearchives share. To run FlexEngine during Windows logoff, configure a logoff script in Group Policy. See “Configure FlexEngine to Run From a Logoff Script,” on page 38.
You must also configure the path to the configuration share and the profile archives share in the GPO. See “Configure the Flex Configuration Files Setting,” on page 31 and “Configure Profile Archives Setting,” onpage 32.
GPO Optional SettingsThe two most common optional GPO settings for User Environment Manager are as follows:
n Use the Profile Archives Backups setting to configure the location and number of backups. Users canrestore their settings from a backup using the Self-Support Tool or help desk personnel can do this byusing the Helpdesk Support tool.
n Use the FlexEngine Logging setting to configure the location and filename of the log file, the level of logdetail, and the maximum file size. The log file helps with troubleshooting.
For more information on all FlexEngine GPO settings, see “Configure the User Environment ManagerGroup Policy Object,” on page 29 for details.
Create a User Environment Manager Group Policy ObjectTo configure FlexEngine, you must create a GPO for User Environment Manager by using the administrativetemplates that are provided in the download package.
You can create a new GPO for User Environment Manager or use an existing one that is applied to the usersfor which you want to configure FlexEngine.
Procedure
1 Copy the User Environment Manager ADMX files and their corresponding ADML files from thedownload package to the correct PolicyDefinitions folder on your Windows Domain Controller.
The User Environment Manager ADMX files are located in the Administrative Templates (ADMX)folder in the download package, and their corresponding ADML files are located in the AdministrativeTemplates (ADMX)\en-US folder. For more information about the location of the PolicyDefinitionsfolder, go to the Microsoft Web site.
2 Open the Group Policy Management Console.
3 Create a new GPO.
What to do next
n Configure the appropriate User Environment Manager Group Policy settings. See “Configure the UserEnvironment Manager Group Policy Object,” on page 29.
n Configure FlexEngine to run during logout by configuring a logoff script. See “Configure FlexEngine toRun From a Logoff Script,” on page 38.
Installing and Configuring VMware User Environment Manager
28 VMware, Inc.

Configure the User Environment Manager Group Policy ObjectAfter you create a User Environment Manager GPO, you must configure its settings. These settings arerequired to configure the location of the User Environment Manager configuration and profile archivesshares, and configure FlexEngine to start automatically during login.
Prerequisites
You must at least configure the following settings:
n Flex configuration files.
n Profile archives.
n Run FlexEngine as Group Policy Extension.
If you do not configure Run FlexEngine as Group Policy Extension, you must configure FlexEngine to runusing a logon script. See “Configure FlexEngine to Run from a Logon Script,” on page 37.
The rest of the User Environment Manager GPO settings are optional and enabling them depends on yourinfrastructure and requirements.
Note Many of the FlexEngine settings that you configure through a GPO can be overridden by command-line arguments. Command-line arguments have higher priority than GPO settings. See Chapter 7,“FlexEngine Command-Line Arguments,” on page 45.
Procedure
1 Open the User Environment Manager Group Policy Object on page 30To configure User Environment Manager, you must edit the settings of theUser Environment Manager GPO that you created. Open the settings of the GPO from the GroupPolicy Management Editor. The User Environment Manager GPO configures FlexEngine with thecorrect User Environment Manager share locations and is therefore a required step.
2 Configure the Flex Configuration Files Setting on page 31You configure the location of the central share that stores the Flex configuration files in the Flex configfiles setting. Flex configuration files contain User Environment Manager data that FlexEngine uses toread and store user settings. FlexEngine runs with the user's credentials, and processes each Flexconfiguration file for which the user has NTFS read access.
3 Configure FlexEngine to Run as Group Policy Extension Setting on page 31You can enable FlexEngine to run automatically during logon by running as a Group Policy client-sideextension.
4 Configure FlexEngine Logging Setting on page 32You can configure the location and file name of the FlexEngine log file, the level of logging detail, andthe maximum size of the log file.
5 Configure Profile Archives Setting on page 32Configure the location of the profile archives share from where FlexEngine reads and stores userprofile archives and other settings that are related to the profile archives.
6 Configure Profile Archive Backups Setting on page 33Use the Profile Archive Backups setting to configure the location where FlexEngine stores the backupsof profile archives.
7 Configure Application Blocking Logging to the Windows Event Log Setting on page 33You can enable Application blocking logging to the Windows event log to have the details onblocked application launches logged to the Windows event log.
Chapter 5 Configuring User Environment Manager
VMware, Inc. 29

8 Configure Privilege Elevation Logging to the Windows Event Log Setting on page 33You can enable Privilege elevation logging to the Windows event log to have the details on elevatedapplication launches logged to the Windows event log.
9 Configure Certificate Support for Mandatory Profiles Setting on page 34You can enable the use of personal certificates in a mandatory profile. In addition to enabling thissupport, you also must create a Flex configuration file with the Personal Certificates WindowsCommon Setting.
10 Configure DirectFlex - Advanced Settings on page 34You can configure advanced DirectFlex settings for more fine-grained control over DirectFlex exportsettings and visual feedback.
11 Configure FlexEngine Logging to the Windows Event Log Setting on page 34Use FlexEngine logging to the Windows Event Log to configure the events that FlexEngine logs to theWindows event log. When this setting is enabled, FlexEngine logs informational messages to the eventlog indicating the start and finish of path-based import and export actions.
12 Configure Paths Unavailable at Logon Setting on page 35You can configure Paths Unavailable at Logon to determine the behavior if the Flex configuration filespath or profile archives path is unavailable at login.
13 Configure FlexEngine Refresh Settings on page 36Use FlexEngine Refresh Settings when you run FlexEngine from a logon script. When you runFlexEngine as Group Policy extension, this setting is ignored.
14 Configure Access to VMware UEM Self-Support for End Users on page 36You can control whether users have access to VMware User Environment Manager Self-Support.
15 Configure User Environment Manager Logon and Logoff Progress Information on page 36You can configure Show VMware UEM logon and logoff progress information to show a splashscreen with progress bar when FlexEngine runs.
16 Configure Silo-Specific Flex Configuration Files Settings on page 36Use the Silo-Specific Flex Config Files setting to specify an additional, silo-specific path with Flexconfiguration files that is processed in addition to the ones configured through the Flex config filessetting.
Open the User Environment Manager Group Policy ObjectTo configure User Environment Manager, you must edit the settings of the User Environment Manager GPOthat you created. Open the settings of the GPO from the Group Policy Management Editor. TheUser Environment Manager GPO configures FlexEngine with the correct User Environment Manager sharelocations and is therefore a required step.
Prerequisites
Create a GPO for FlexEngine. See “Create a User Environment Manager Group Policy Object,” on page 28.
Procedure
1 Open the Group Policy Management console.
2 Right-click the User Environment Manager GPO that you created and select Edit.
The Group Policy Management Editor opens.
3 To access the User Environment Manager administrative templates, navigate to User configuration >Policies > Administrative Templates > VMware UEM > FlexEngine.
Installing and Configuring VMware User Environment Manager
30 VMware, Inc.
What to do next
Configure the following FlexEngine mandatory settings:
n Flex configuration files.
n Profile archives.
n Run FlexEngine as Group Policy Extension. Either enable this setting or configure FlexEngine to runfrom a logon script. See “Configure FlexEngine to Run from a Logon Script,” on page 37.
n Configure FlexEngine to run from a logoff script. See “Configure FlexEngine to Run From a LogoffScript,” on page 38.
Configure the Flex Configuration Files SettingYou configure the location of the central share that stores the Flex configuration files in the Flex config filessetting. Flex configuration files contain User Environment Manager data that FlexEngine uses to read andstore user settings. FlexEngine runs with the user's credentials, and processes each Flex configuration file forwhich the user has NTFS read access.
Procedure
1 In the Group Policy Management Editor, double-click the Flex config files setting.
2 Select Enabled.
3 In the Central location of Flex config files text box, enter the location of the central configuration share.
Use a UNC path for this setting. Typically, this path points to the General folder created by theManagement Console in the User Environment Manager configuration share.
For example: \\Filesrv\UemConfig$\General
4 Select Process folder recursively to also enable processing Flex configuration files that are located insubfolders of the specified path.
Configure FlexEngine to Run as Group Policy Extension SettingYou can enable FlexEngine to run automatically during logon by running as a Group Policy client-sideextension.
By running FlexEngine as Group Policy Extension, settings that User Environment Manager manages areapplied earlier during the logon phase rather than when running FlexEngine from a logon script. This way,the range of settings that can be managed by User Environment Manager is extended, such as the WindowsMultilanguage User Interface or slideshow backgrounds.
Prerequisites
n Enable the Always wait for the network at computer startup and logon Computer Group Policysetting to ensure that the FlexEngine Group Policy client-side extension runs during each logon. Applythis setting to an OU in Active Directory where all the Windows clients are located.
n Configure a logon script through Group Policy to run FlexEngine with the -OfflineImport argument.This is needed to ensure that FlexEngine still runs at logon when a computer is offline and a user logson with cached credentials, because Group Policy client-side extensions do not run in such a scenario.See “Additional FlexEngine Operations,” on page 47.
n Configure FlexEngine logout commands through a Group Policy logoff script as described in “Configure FlexEngine to Run From a Logoff Script,” on page 38. FlexEngine Group Policy client-sideextension runs only during logon.
Chapter 5 Configuring User Environment Manager
VMware, Inc. 31

Procedure
1 In the Group Policy Management Editor, double-click the Run FlexEngine as Group Policy Extensionsetting.
2 Select Enabled.
Configure FlexEngine Logging SettingYou can configure the location and file name of the FlexEngine log file, the level of logging detail, and themaximum size of the log file.
Procedure
1 In the Group Policy Management Editor, double-click the FlexEngine Logging setting.
2 Select Enabled.
3 Enter the settings for FlexEngine logging.
Option Description
Path and name of log file Enter a location that is unique for each user, for example:\\Filesrv\Users$\%username%\Logs\FlexEngine.log
If you enter a subdirectory that does not exist, FlexEngine automaticallycreates it when a user logs in.
Log level Set the amount of detail that is logged. Do not use Debug or Info inproduction environments, because the amount of logging informationmight slow down the logon and logoff process.
Maximum log file size in kB Set the maximum size of the log file. If you set a maximum log file size, thelog file is created again after that size is reached. If you set the maximumsize to 0, the log file grows indefinitely.
Log total size of profile archive andprofile archive backups folders
FlexEngine logs the number of profile archives and profile archivesbackups, and their file sizes at the end of a path-based export.
Note You should avoid using Debug log level in production, but it is extremely helpful whentroubleshooting issues.
Configure Profile Archives SettingConfigure the location of the profile archives share from where FlexEngine reads and stores user profilearchives and other settings that are related to the profile archives.
Procedure
1 In the Group Policy Management Editor, double-click the Profile Archives setting.
2 Select Enabled.
3 Configure the settings for storing the profile archives.
Option Description
Location for storing user profilearchives
Enter the location of the profile archives share. Use a location that isunique for each user, for example:\\Filesrv\UemUsers$\%username%\Archives
Hide profile archives folder Mark the specified profile archives folder as hidden after FlexEngineperforms a path-based export.
Installing and Configuring VMware User Environment Manager
32 VMware, Inc.

Option Description
Compress profile archives Enable ZIP compression for the user profile archives.
Retain file modification dates Restore last modified dates when FlexEngine imports profile archives. Thissetting is required if you want to use the Do not export files older than ...days function.
Configure Profile Archive Backups SettingUse the Profile Archive Backups setting to configure the location where FlexEngine stores the backups ofprofile archives.
Procedure
1 In the Group Policy Management Editor, double-click the Profile Archive Backups setting.
2 Select Enabled.
3 Enter the settings for storing profile archives backups.
Option Description
Location for storing user profilearchive backups
Provide a unique location to store the profile archives backups for everyuser. For example:\\Filesrv\UemUsers$\%username%\Backups
If you enter a subdirectory that does not exist, FlexEngine automaticallycreates a subdirectory when a user creates a backup for the first time.
Hide backup folder Mark the specified profile archives backup folder as hidden after a path-based export.
Number of backups per profilearchive
Specify the number of backups you want to create for each profile archivefor each user.Note You can override this setting in the Flex configuration files bysetting a different value on the Backups tab in the Management Console.
Create single backup per day Treat the number of backups as the number of days for which to keepbackups. This prevents DirectFlex from overwriting backups from theprevious day or older days.
Configure Application Blocking Logging to the Windows Event Log SettingYou can enable Application blocking logging to the Windows event log to have the details on blockedapplication launches logged to the Windows event log.
Procedure
1 In the Group Policy Management Editor, double-click Application blocking logging to the Windowsevent log.
2 Select Enabled.
Configure Privilege Elevation Logging to the Windows Event Log SettingYou can enable Privilege elevation logging to the Windows event log to have the details on elevatedapplication launches logged to the Windows event log.
Procedure
1 In the Group Policy Management Editor, double-click Privilege elevation logging to the Windowsevent log.
2 Select Enabled.
Chapter 5 Configuring User Environment Manager
VMware, Inc. 33
Configure Certificate Support for Mandatory Profiles SettingYou can enable the use of personal certificates in a mandatory profile. In addition to enabling this support,you also must create a Flex configuration file with the Personal Certificates Windows Common Setting.
Note Do not enable this setting when you are using roaming or local profiles.
Procedure
1 In the Group Policy Management Editor, double-click Certificate Support for Mandatory Profiles.
2 Select Enabled.
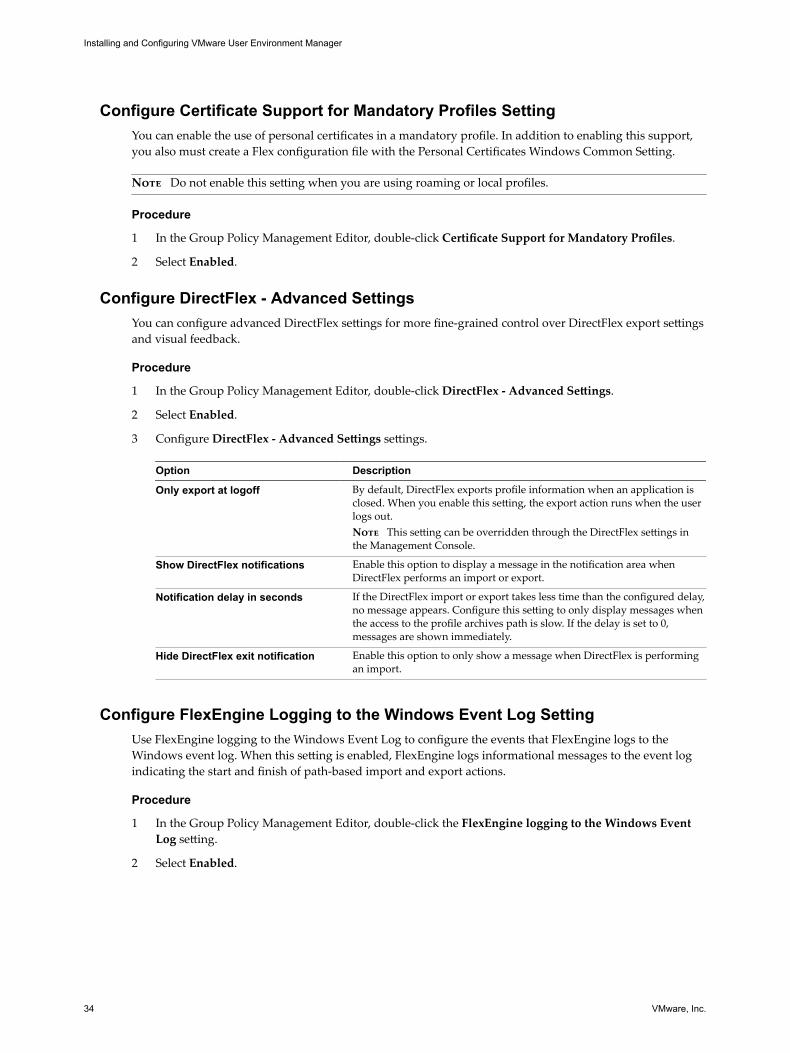
Configure DirectFlex - Advanced SettingsYou can configure advanced DirectFlex settings for more fine-grained control over DirectFlex export settingsand visual feedback.
Procedure
1 In the Group Policy Management Editor, double-click DirectFlex - Advanced Settings.
2 Select Enabled.
3 Configure DirectFlex - Advanced Settings settings.
Option Description
Only export at logoff By default, DirectFlex exports profile information when an application isclosed. When you enable this setting, the export action runs when the userlogs out.Note This setting can be overridden through the DirectFlex settings inthe Management Console.
Show DirectFlex notifications Enable this option to display a message in the notification area whenDirectFlex performs an import or export.
Notification delay in seconds If the DirectFlex import or export takes less time than the configured delay,no message appears. Configure this setting to only display messages whenthe access to the profile archives path is slow. If the delay is set to 0,messages are shown immediately.
Hide DirectFlex exit notification Enable this option to only show a message when DirectFlex is performingan import.
Configure FlexEngine Logging to the Windows Event Log SettingUse FlexEngine logging to the Windows Event Log to configure the events that FlexEngine logs to theWindows event log. When this setting is enabled, FlexEngine logs informational messages to the event logindicating the start and finish of path-based import and export actions.
Procedure
1 In the Group Policy Management Editor, double-click the FlexEngine logging to the Windows EventLog setting.
2 Select Enabled.
Installing and Configuring VMware User Environment Manager
34 VMware, Inc.

3 (Optional) Configure settings for additional settings.
Option Description
Asynchronous UEM actionsDirectFlex refreshUEM refresh
Enable these options to instruct FlexEngine to log start and finish eventsfor these features.
Warn if size of single profile archiveexceeds this size in kB
If you set a size other than 0, FlexEngine logs an event whenever a profilearchive that is exported is larger than the specified size in kB. This appliesboth to DirectFlex exports and path-based exports.
Warn if size of profile archive folderexceeds this size in kB
If you set a size other than 0, FlexEngine logs an event whenever the totalsize of profile archives in the profile archives folder is larger than thespecified size in kB. This size check only takes place after a path-basedexport.
Include profile archive backupfolder when determining folder size
When set, the size of profile archives backups in the backup folder is takeninto account when computing the size of the profile archives folder.
Configure Paths Unavailable at Logon SettingYou can configure Paths Unavailable at Logon to determine the behavior if the Flex configuration files pathor profile archives path is unavailable at login.
Procedure
1 In the Group Policy Management Editor, double-click the Paths Unavailable at Logon setting.
2 Select Enabled.
3 Configure the Paths Unavailable at Logon options.
Option Description
If Flex config files path is notavailable
Select one of the following options when the Flex configuration files path isnot available at login.n Skip import. Allows the user to log in. The user profile archives are
not imported and the user environment settings are not applied.n Logoff. Automatically logs off the user.
If profile archive path is notavailable
Select one of the following options when the profile archives path is notavailable at login.n Skip import. Allows the user to log in. The user profile archives are
not imported and the user environment settings are not applied.n Apply user environment settings. Applies the user environment
settings. The user profile archives are not imported.n Logoff. Automatically logs off the user.
Optional message to display Use this setting to display a message in case the path is missing. You canconfigure this setting separately for the Flex configuration files path, ifSkip import is selected, and for the profile archives path, if Skip import orApply user environment settings is selected.
Timeout after which to dismissmessage
Use this setting to configure how long the message remains displayed. Theuser can dismiss the message manually at any time.
Note If the Flex configuration files path is not available, the user is immediately logged out by default.If the profile archives path is not available, only the user environment settings are applied by defaultand no user profile archives are imported.
Chapter 5 Configuring User Environment Manager
VMware, Inc. 35

Configure FlexEngine Refresh SettingsUse FlexEngine Refresh Settings when you run FlexEngine from a logon script. When you run FlexEngineas Group Policy extension, this setting is ignored.
Procedure
1 In the Group Policy Management Editor, double-click FlexEngine Refresh Settings.
2 Select Enabled.
3 Configure the options for FlexEngine Refresh Settings.
Option Description
Refresh Windows appearance Refresh Windows appearance-related settings at logon, such as the desktopwallpaper. In addition, you must create a Flex configuration file from theManagement Console that contains the appropriate information to beprocessed by FlexEngine.
Refresh mouse settings Refresh mouse-related settings at logon. In addition, you must create a Flexconfiguration file that contains the Mouse Windows Common Setting.
Refresh keyboard settings Refresh keyboard-related settings at logon. In addition, you must create aFlex configuration file that contains the Keyboard Windows CommonSetting.
Configure Access to VMware UEM Self-Support for End UsersYou can control whether users have access to VMware User Environment Manager Self-Support.
Procedure
1 In the Group Policy Management Editor, double-click Prevent access to VMware UEM Self-Support.
2 Select Enabled.
Configure User Environment Manager Logon and Logoff Progress InformationYou can configure Show VMware UEM logon and logoff progress information to show a splash screenwith progress bar when FlexEngine runs.
Procedure
1 In the Group Policy Management Editor, double-click Show VMware UEM logon and logoff progressinformation.
2 Select Enabled.
Configure Silo-Specific Flex Configuration Files SettingsUse the Silo-Specific Flex Config Files setting to specify an additional, silo-specific path with Flexconfiguration files that is processed in addition to the ones configured through the Flex config files setting.
Procedure
1 In the Group Policy Management Editor, double-click Silo-Specific Flex Config Files .
2 Select Enabled.
Installing and Configuring VMware User Environment Manager
36 VMware, Inc.

3 Configure the silo-specific settings.
Option Description
Central location of silo-specific Flexconfig files
Use a UNC path for this setting. Typically this points to a silo subfolder ofthe Silos folder created by the Management Console in the UEMconfiguration share, for example:\\Filesrv\UemConfig$\Silos\ts-1
Silo-specific suffix To distinguish profile archives corresponding to Flex configuration files inthe configured silo-specific folder, this suffix is used as a subfolder in theconfigured profile archives and backup paths. If you do not set a suffix, thelast component of the silo-specific Flex configuration files path is used,ts-1 in the example above.
Configuring FlexEngine to Run from Logon and Logoff ScriptsFor the User Environment Manager to run correctly, FlexEngine must run during the logon and logoffprocess. To run FlexEngine at logoff, you must run the FlexEngine logoff command from a logoff script. Torun FlexEngine at logon, you can either configure Flex Engine as Group Policy client-side extension, or runthe FlexEngine logon command from a logon script.
For information about how to run FlexEngine as Group Policy client-side extension, see “ConfigureFlexEngine to Run as Group Policy Extension Setting,” on page 31.
Configure FlexEngine to Run from a Logon ScriptIf you do not configure FlexEngine to run as a Group Policy client-side extension, you must configureFlexEngine to run from a logon script.
If you configure FlexEngine to run as a Group Policy client-side extension, you do not need to configureFlexEngine to run from a logon script. See “Configure FlexEngine to Run as Group Policy ExtensionSetting,” on page 31.
However, in case a computer is offline and a user logs in with cached credentials, Group Policy client-sideextensions do not run. If FlexEngine is configured to run as a Group Policy extension, no import takes place.Therefore, configure a logon script with the -OfflineImport argument to enable importing of user settings atlogin even when the user's computer is offline.
You can add the FlexEngine logon command to an existing logon script or call it directly as a logon script.For this purpose, use User Configuration\Windows Settings\Scripts.
Configure the following command that runs during logon:
C:\Program Files\Immidio\Flex Profiles\FlexEngine.exe -r
This command reads the settings that are configured through the User Environment Manager Group PolicyObject and performs the path-based import accordingly.
User Environment Manager manages profile information that often must be imported before the Windowsshell is initialized. To make sure that the shell initialization waits until the logon script has completed,enable the Run logon scripts synchronously Windows Group Policy setting. This setting is located at UserConfiguration\Policies\Administrative Templates\System\Scripts.
Note On Windows 7 and Windows Server 2008 R2, the Microsoft Windows GPO ignores the Run logonscripts synchronously policy setting when using mandatory profiles. When using local or roaming profiles,the policy setting is ignored the first time a user logs in. Microsoft hotfix 2550944 addresses this issue.
Chapter 5 Configuring User Environment Manager
VMware, Inc. 37

Configure FlexEngine to Run From a Logoff ScriptYou must always configure the FlexEngine logoff command to run from a logoff script. You can add theFlexEngine logoff command to an existing logoff script or call it directly as if it were a logoff script. Use UserConfiguration\Windows Settings\Scripts for this purpose.
Configure the following logoff command that will run during the logoff process:
C:\Program Files\Immidio\Flex Profiles\FlexEngine.exe -s
This command reads the settings configured through the User Environment Manager Group Policy Objectand performs the path-based export accordingly.
Configuring the User Environment Manager Management ConsoleAfter you install and configure User Environment Manager, you can start the User Environment ManagerManagement Console. The Management Console requires initial configuration and you can also configurewhich features you want to manage through the console.
Initial ConfigurationWhen you start the Management Console for the first time, you must specify the location of theconfiguration share. With the configuration share set, you can start using the Management Console.
Management Console searches for the Immidio Flex Profiles Configuration.xml configuration file at thespecified location. If the file exists, this central file is read and used as configuration for the ManagementConsole. Otherwise, a new configuration file, with default values, and a General folder is created.
Note Management Console configuration is stored in the central configuration share. Any changes thatyou make to the configuration affect all Management Console installations that are configured to use thisshare.
Further ConfigurationYou can control which features you want to manage through the Management Console by configuring theManagement Console settings. You can display the settings by clicking Configure in the ManagementConsole.
n Personalization features. Each check box from the Personalization features corresponds to a tab in theManagement Console, except the Silo support check box. Silo support lets you use ManagementConsole to manage both General configuration files and silo-specific ones. When enabled, a Silos folderis created in the User Environment Manager configuration share. Within the Silos folder, you can createsubfolders for each silo, and within these subfolders you can create and manage silo-specific Flexconfiguration files.
n App-V and SWV configuration. The App-V and SWV tabs contain settings for application virtualizationsupport. For Symantec Workspace Virtualization 7.5 there is only a single setting, which enables ordisables support. For more information, see the VMware User Environment Manager Administration Guide.
Installing and Configuring VMware User Environment Manager
38 VMware, Inc.

Installing and ConfiguringUser Environment Manager in NoADMode 6
The NoAD mode is an alternative to configuring User Environment Manager with Active Directory GroupPolicy. You do not need to create a GPO, logon and logoff scripts, or configure Windows Group Policysettings.
In NoAD mode, all User Environment Manager GPO settings are ignored. If settings from a previous GPO-based deployment are encountered, no actions are performed and a message is logged to the FlexEngine logfile.
This chapter includes the following topics:
n “Install User Environment Manager in NoAD Mode,” on page 39
n “Configuring User Environment Manager with the NoAD Mode,” on page 39
Install User Environment Manager in NoAD ModeYou install User Environment Manager in NoAD mode by performing unattended installation through acommand-line interface.
Procedure
u To install User Environment Manager in NoAD mode, specify the path to the Flex configuration filesthrough the NOADCONFIGFILEPATH MSI property at the time of installation.
msiexec.exe /i "VMware User Environment Manager 9.2 x64.msi" /qn
LICENSEFILE="\\filesrv1\share\VMware UEM.lic" /l* InstallUEM.log
NOADCONFIGFILEPATH=\\Filesrv\UemConfig$\General
This command inserts the basic NoAD configuration in the HKLM registry hive and enables the NoADmode.
Note To disable the NoAD mode, uninstall User Environment Manager, and reinstall without theNOADCONFIGFILEPATH MSI property.
Configuring User Environment Manager with the NoAD ModeYou can provide the settings for configuring User Environment Manager with the NoAD mode through anXML file on the central configuration share. When a user logs in, FlexEngine reads the settings from theXML file and applies them to the registry.
The XML file is called NoAD.xml and must reside in the …\General\FlexRepository\NoAD subfolder.
VMware, Inc. 39

The NoAD.xml is a UTF-8-encoded XML file with an explicit UTF-8 BOM. You can create this file by usingNotepad and selecting the UTF-8 encoding when saving. The file must have the following basic structure:
<?xml version="1.0" encoding="utf-8"?>
<userEnvironmentSettings>
<setting type="noAD" additionalSetting="…" otherSetting="…" … />
</userEnvironmentSettings>
Configuring FlexEngine Logging SettingsYou can configure the location and filename of the FlexEngine log file, the level of logging details, and themaximum size of the log file.
Setting Value
LogFileName Set a location that is unique for each user, for example:\\Filesrv\Users$\%username%\Logs\FlexEngine.log
If you enter a subdirectory that does not exist, FlexEngine creates it when a user logsin.
LogLevel Configure the amount of details to log by setting this property to one of the followingvalues:n 0 (DEBUG)
n 1 (INFO)
n 2 (WARN)
n 3 (ERROR)
n 4 (FATAL)
Note Do not use 0 (DEBUG) or 1 (INFO) in production environments, because theamount of logging information might slow down the logon and logoff process.
MaximumLogFileSize Set the maximum size of the log file in kB. If you set a maximum log file size, the logfile is created again after that size limit is reached. If you set the maximum size to 0,the log file expands indefinitely.
LogProfileArchiveFolderSize
To enable this setting, set the value to 1. If enabled, FlexEngine logs the number ofprofile archives and profile archives backups, and their sizes, at the end of a path-based export.
Configuring Profile Archives SettingsConfigure the location of the profile archives share from where the FlexEngine reads and stores user profilearchives and other settings related to profile archives.
Setting Value
ProfileArchivePath Set the location of the profile archives share. Use a location that is unique for eachuser. For example:\\Filesrv\UemUsers$\%username%\Archives
HideProfileArchiveFolder To enable this setting, set the value to 1. This setting marks the specified profilearchives folder hidden after FlexEngine performs a path-based export.
RestoreLastModified To enable this setting, set the value to 1. If enabled, FlexEngine restores last modifieddates when it imports profile archives. This setting is required if you want to use theDo not export files older than ... days option.
Installing and Configuring VMware User Environment Manager
40 VMware, Inc.

Configuring Profile Archive Backups SettingsUse this setting to configure the location where FlexEngine stores the backups of profile archives.
Setting Value
BackupPath Set a unique location to store the profile archives backups for every user. For example:\\Filesrv\UemUsers$\%username%\Backups
If you enter a subdirectory that does not exist, FlexEngine creates a subdirectorywhen a user creates a backup for the first time.
HideBackupFolder To enable this setting, set the value to 1. Marks the specified profile archives backupfolder as hidden after a path-based export.
BackupCount Set the number of backups that you want to create for each profile archive for eachuser.Note You can override this setting in the Flex configuration files by setting adifferent value on the Backups tab in the Management Console.
BackupDaily To enable this setting, set the value to 1. Treats the number of backups as the numberof days for which to retain backups. This prevents DirectFlex from overwritingbackups from the previous day or recent days.
Configuring Application Blocking Logging to the Windows Event Log SettingAs an option, you can enable this setting to log the details of the blocked application launches to theWindows event log.
Setting Value
AppBlockingEventLog To enable this setting, set the value to 1.
Configuring Privilege Elevation Logging to the Windows Event Log SettingAs an option, you can enable this setting to log the details of the privilege elevation launches to theWindows event log.
Setting Value
PrivilegeElevationEventLog To enable this setting, set the value to 1.
Enable Certificate Support for Mandatory Profiles SettingAs an option, you can enable the use of personal certificates in a mandatory profile.
Setting Value
CertificateSupport To enable this setting, set the value to 1.
Note Do not enable this setting when you are using roaming or local profiles.
Chapter 6 Installing and Configuring User Environment Manager in NoAD Mode
VMware, Inc. 41
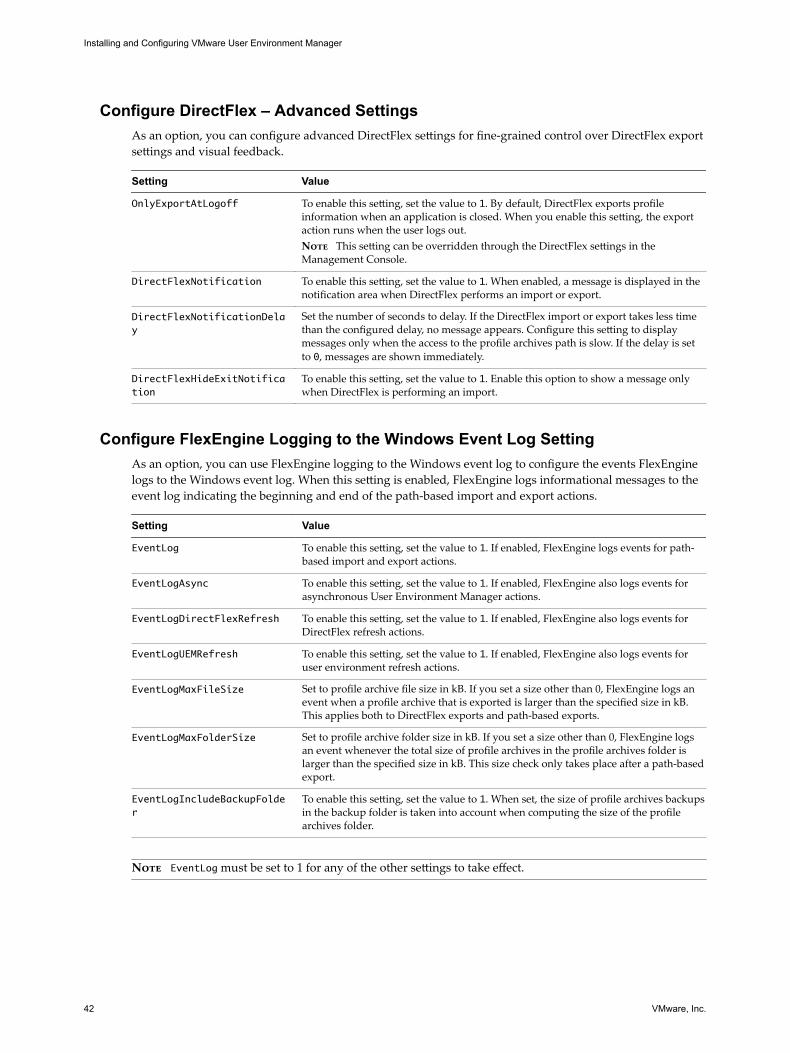
Configure DirectFlex – Advanced SettingsAs an option, you can configure advanced DirectFlex settings for fine-grained control over DirectFlex exportsettings and visual feedback.
Setting Value
OnlyExportAtLogoff To enable this setting, set the value to 1. By default, DirectFlex exports profileinformation when an application is closed. When you enable this setting, the exportaction runs when the user logs out.Note This setting can be overridden through the DirectFlex settings in theManagement Console.
DirectFlexNotification To enable this setting, set the value to 1. When enabled, a message is displayed in thenotification area when DirectFlex performs an import or export.
DirectFlexNotificationDelay
Set the number of seconds to delay. If the DirectFlex import or export takes less timethan the configured delay, no message appears. Configure this setting to displaymessages only when the access to the profile archives path is slow. If the delay is setto 0, messages are shown immediately.
DirectFlexHideExitNotification
To enable this setting, set the value to 1. Enable this option to show a message onlywhen DirectFlex is performing an import.
Configure FlexEngine Logging to the Windows Event Log SettingAs an option, you can use FlexEngine logging to the Windows event log to configure the events FlexEnginelogs to the Windows event log. When this setting is enabled, FlexEngine logs informational messages to theevent log indicating the beginning and end of the path-based import and export actions.
Setting Value
EventLog To enable this setting, set the value to 1. If enabled, FlexEngine logs events for path-based import and export actions.
EventLogAsync To enable this setting, set the value to 1. If enabled, FlexEngine also logs events forasynchronous User Environment Manager actions.
EventLogDirectFlexRefresh To enable this setting, set the value to 1. If enabled, FlexEngine also logs events forDirectFlex refresh actions.
EventLogUEMRefresh To enable this setting, set the value to 1. If enabled, FlexEngine also logs events foruser environment refresh actions.
EventLogMaxFileSize Set to profile archive file size in kB. If you set a size other than 0, FlexEngine logs anevent when a profile archive that is exported is larger than the specified size in kB.This applies both to DirectFlex exports and path-based exports.
EventLogMaxFolderSize Set to profile archive folder size in kB. If you set a size other than 0, FlexEngine logsan event whenever the total size of profile archives in the profile archives folder islarger than the specified size in kB. This size check only takes place after a path-basedexport.
EventLogIncludeBackupFolder
To enable this setting, set the value to 1. When set, the size of profile archives backupsin the backup folder is taken into account when computing the size of the profilearchives folder.
Note EventLog must be set to 1 for any of the other settings to take effect.
Installing and Configuring VMware User Environment Manager
42 VMware, Inc.
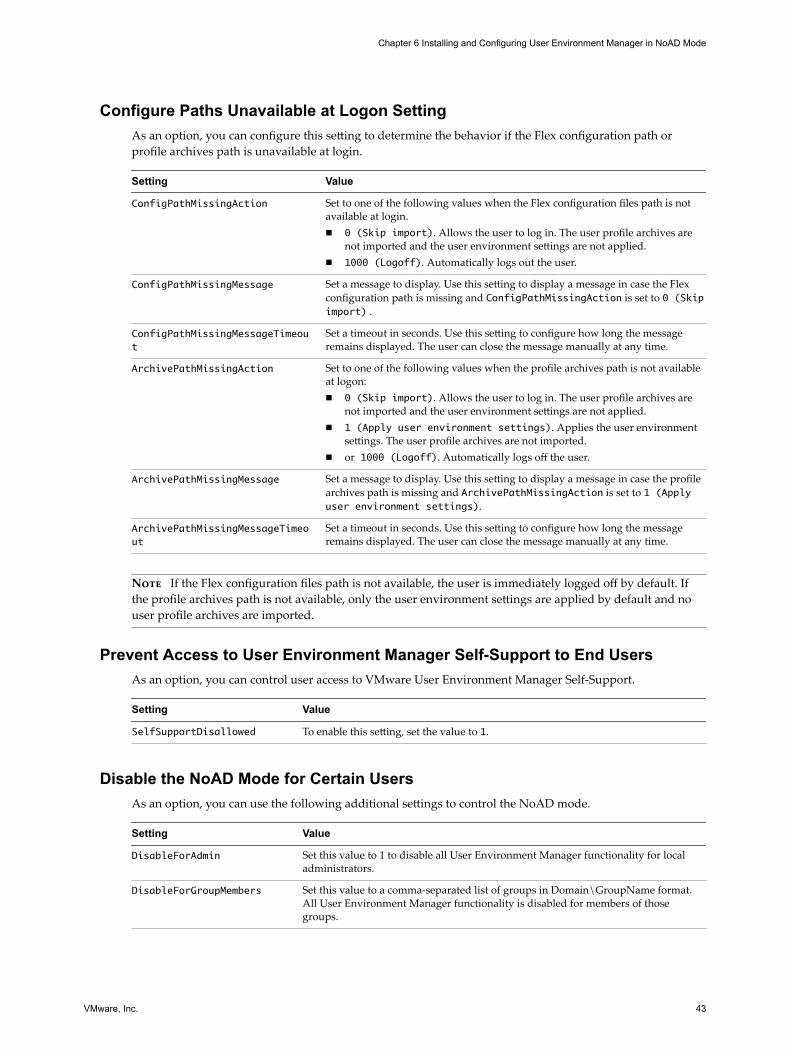
Configure Paths Unavailable at Logon SettingAs an option, you can configure this setting to determine the behavior if the Flex configuration path orprofile archives path is unavailable at login.
Setting Value
ConfigPathMissingAction Set to one of the following values when the Flex configuration files path is notavailable at login.n 0 (Skip import). Allows the user to log in. The user profile archives are
not imported and the user environment settings are not applied.n 1000 (Logoff). Automatically logs out the user.
ConfigPathMissingMessage Set a message to display. Use this setting to display a message in case the Flexconfiguration path is missing and ConfigPathMissingAction is set to 0 (Skipimport) .
ConfigPathMissingMessageTimeout
Set a timeout in seconds. Use this setting to configure how long the messageremains displayed. The user can close the message manually at any time.
ArchivePathMissingAction Set to one of the following values when the profile archives path is not availableat logon:n 0 (Skip import). Allows the user to log in. The user profile archives are
not imported and the user environment settings are not applied.n 1 (Apply user environment settings). Applies the user environment
settings. The user profile archives are not imported.n or 1000 (Logoff). Automatically logs off the user.
ArchivePathMissingMessage Set a message to display. Use this setting to display a message in case the profilearchives path is missing and ArchivePathMissingAction is set to 1 (Applyuser environment settings).
ArchivePathMissingMessageTimeout
Set a timeout in seconds. Use this setting to configure how long the messageremains displayed. The user can close the message manually at any time.
Note If the Flex configuration files path is not available, the user is immediately logged off by default. Ifthe profile archives path is not available, only the user environment settings are applied by default and nouser profile archives are imported.
Prevent Access to User Environment Manager Self-Support to End UsersAs an option, you can control user access to VMware User Environment Manager Self-Support.
Setting Value
SelfSupportDisallowed To enable this setting, set the value to 1.
Disable the NoAD Mode for Certain UsersAs an option, you can use the following additional settings to control the NoAD mode.
Setting Value
DisableForAdmin Set this value to 1 to disable all User Environment Manager functionality for localadministrators.
DisableForGroupMembers Set this value to a comma-separated list of groups in Domain\GroupName format.All User Environment Manager functionality is disabled for members of thosegroups.
Chapter 6 Installing and Configuring User Environment Manager in NoAD Mode
VMware, Inc. 43
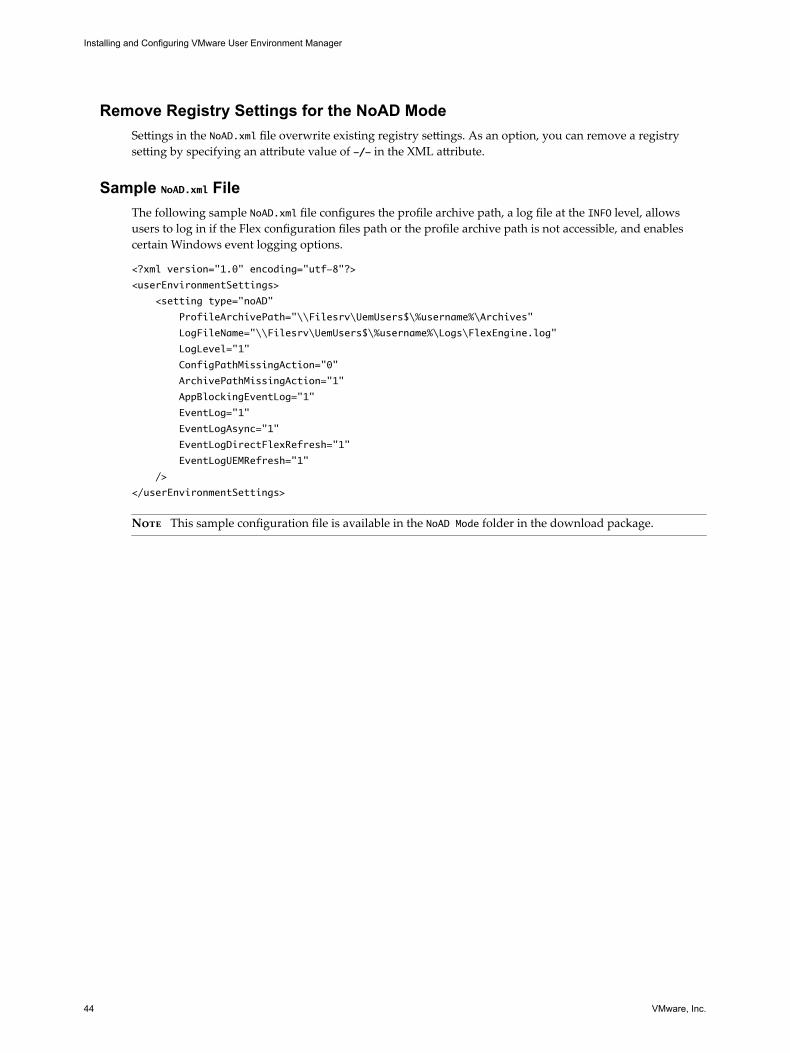
Remove Registry Settings for the NoAD ModeSettings in the NoAD.xml file overwrite existing registry settings. As an option, you can remove a registrysetting by specifying an attribute value of -/- in the XML attribute.
Sample NoAD.xml FileThe following sample NoAD.xml file configures the profile archive path, a log file at the INFO level, allowsusers to log in if the Flex configuration files path or the profile archive path is not accessible, and enablescertain Windows event logging options.
<?xml version="1.0" encoding="utf-8"?>
<userEnvironmentSettings>
<setting type="noAD"
ProfileArchivePath="\\Filesrv\UemUsers$\%username%\Archives"
LogFileName="\\Filesrv\UemUsers$\%username%\Logs\FlexEngine.log"
LogLevel="1"
ConfigPathMissingAction="0"
ArchivePathMissingAction="1"
AppBlockingEventLog="1"
EventLog="1"
EventLogAsync="1"
EventLogDirectFlexRefresh="1"
EventLogUEMRefresh="1"
/>
</userEnvironmentSettings>
Note This sample configuration file is available in the NoAD Mode folder in the download package.
Installing and Configuring VMware User Environment Manager
44 VMware, Inc.
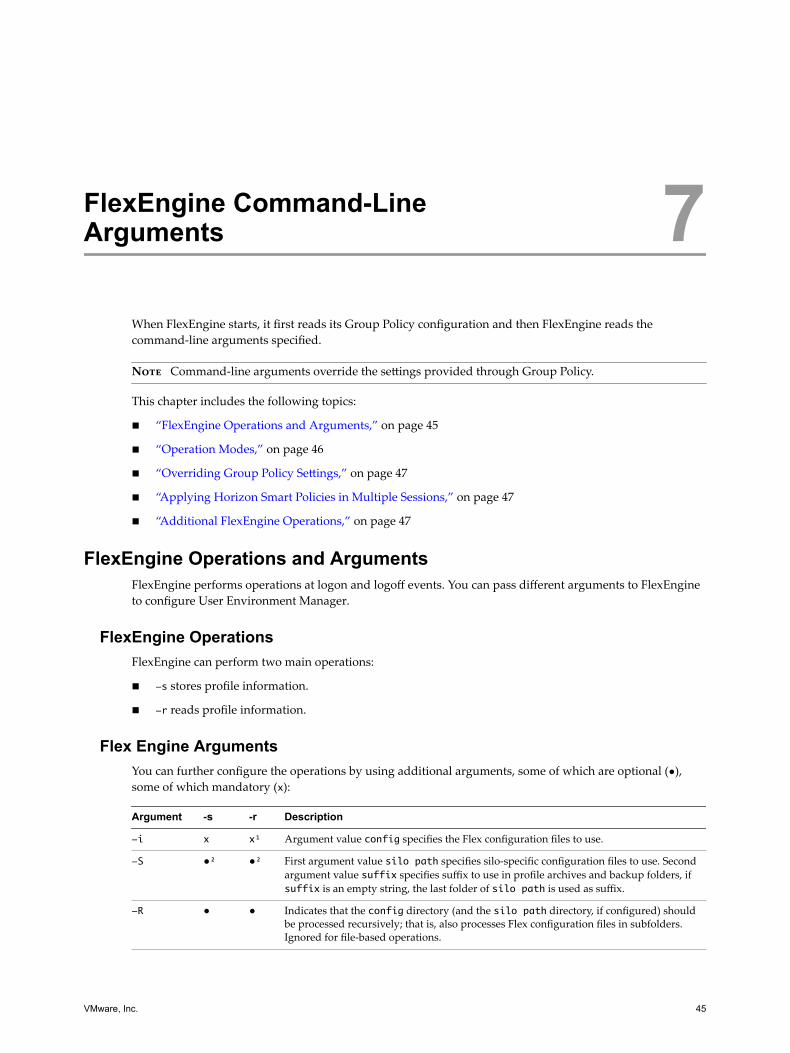
FlexEngine Command-LineArguments 7
When FlexEngine starts, it first reads its Group Policy configuration and then FlexEngine reads thecommand-line arguments specified.
Note Command-line arguments override the settings provided through Group Policy.
This chapter includes the following topics:
n “FlexEngine Operations and Arguments,” on page 45
n “Operation Modes,” on page 46
n “Overriding Group Policy Settings,” on page 47
n “Applying Horizon Smart Policies in Multiple Sessions,” on page 47
n “Additional FlexEngine Operations,” on page 47
FlexEngine Operations and ArgumentsFlexEngine performs operations at logon and logoff events. You can pass different arguments to FlexEngineto configure User Environment Manager.
FlexEngine OperationsFlexEngine can perform two main operations:
n -s stores profile information.
n -r reads profile information.
Flex Engine ArgumentsYou can further configure the operations by using additional arguments, some of which are optional (●),some of which mandatory (x):
Argument -s -r Description
-i x x¹ Argument value config specifies the Flex configuration files to use.
-S ●² ●² First argument value silo path specifies silo-specific configuration files to use. Secondargument value suffix specifies suffix to use in profile archives and backup folders, ifsuffix is an empty string, the last folder of silo path is used as suffix.
-R ● ● Indicates that the config directory (and the silo path directory, if configured) shouldbe processed recursively; that is, also processes Flex configuration files in subfolders.Ignored for file-based operations.
VMware, Inc. 45
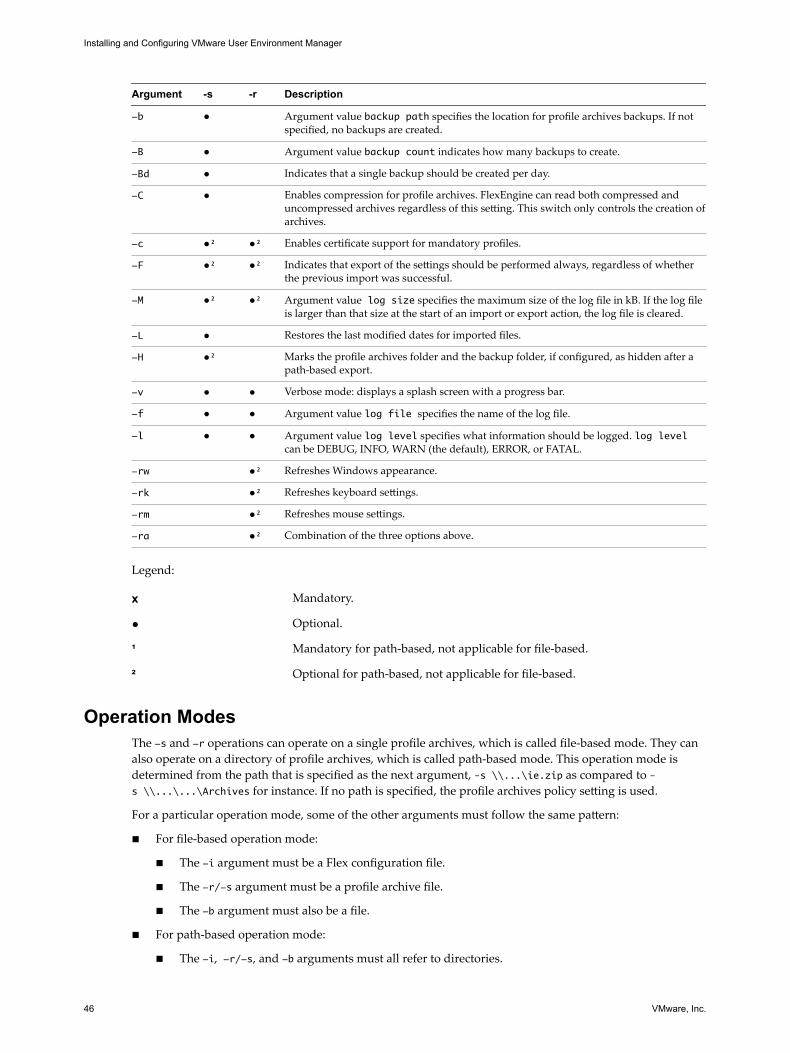
Argument -s -r Description
-b ● Argument value backup path specifies the location for profile archives backups. If notspecified, no backups are created.
-B ● Argument value backup count indicates how many backups to create.
-Bd ● Indicates that a single backup should be created per day.
-C ● Enables compression for profile archives. FlexEngine can read both compressed anduncompressed archives regardless of this setting. This switch only controls the creation ofarchives.
-c ●² ●² Enables certificate support for mandatory profiles.
-F ●² ●² Indicates that export of the settings should be performed always, regardless of whetherthe previous import was successful.
-M ●² ●² Argument value log size specifies the maximum size of the log file in kB. If the log fileis larger than that size at the start of an import or export action, the log file is cleared.
-L ● Restores the last modified dates for imported files.
-H ●² Marks the profile archives folder and the backup folder, if configured, as hidden after apath-based export.
-v ● ● Verbose mode: displays a splash screen with a progress bar.
-f ● ● Argument value log file specifies the name of the log file.
-l ● ● Argument value log level specifies what information should be logged. log levelcan be DEBUG, INFO, WARN (the default), ERROR, or FATAL.
-rw ●² Refreshes Windows appearance.
-rk ●² Refreshes keyboard settings.
-rm ●² Refreshes mouse settings.
-ra ●² Combination of the three options above.
Legend:
x Mandatory.
● Optional.
¹ Mandatory for path-based, not applicable for file-based.
² Optional for path-based, not applicable for file-based.
Operation ModesThe -s and -r operations can operate on a single profile archives, which is called file-based mode. They canalso operate on a directory of profile archives, which is called path-based mode. This operation mode isdetermined from the path that is specified as the next argument, –s \\...\ie.zip as compared to –s \\...\...\Archives for instance. If no path is specified, the profile archives policy setting is used.
For a particular operation mode, some of the other arguments must follow the same pattern:
n For file-based operation mode:
n The -i argument must be a Flex configuration file.
n The -r/-s argument must be a profile archive file.
n The -b argument must also be a file.
n For path-based operation mode:
n The -i, -r/-s, and -b arguments must all refer to directories.
Installing and Configuring VMware User Environment Manager
46 VMware, Inc.

Overriding Group Policy SettingsCommand-line arguments for FlexEngine take precedence over settings configured through Group Policy.For instance, if you set the log level to ERROR through policy, but specify -l DEBUG on the command-line, thelatter is used.
You can also reset an argument that is configured through policy, in effect making it unconfigured, byappending a hyphen (-) to the command-line argument. For instance, if you have configured a backup paththrough policy, but want to run an export without creating backups, you can specify -b-.
You can reset the following arguments: -S, -R, -b, -B, -Bd, -C, -c, -F, -M, -L, -H, -v, -f, -l, -rw, -rk, -rm, and-ra.
Applying Horizon Smart Policies in Multiple SessionsWhen using a Horizon Remote Desktop with Horizon Remote Applications, the same user can havemultiple sessions on the same computer.
To correctly apply Horizon Smart Policies in such a situation, configure logon and logoff scripts with anextra command-line argument.
n For the logon script, specify the following arguments: -HorizonMultiSession -r
n For the logoff script, specify the following arguments: -HorizonMultiSession -s
Note -HorizonMultiSession must be the first argument.
Additional FlexEngine OperationsIn addition to -r and -s, FlexEngine supports three other modes of operation.
-OfflineImportWhen a computer is offline and a user logs in with cached credentials, Group Policy client-side extensionsdo not run. If FlexEngine is configured to run as a Group Policy extension, no import takes place in such asituation.
As a fallback approach (where a user logs on when the computer is offline), configure a logon script butinstead of the -r script parameter, specify -OfflineImport. For information about configuring a logon scriptsee “Configure FlexEngine to Run from a Logon Script,” on page 37.
If FlexEngine runs with this argument, it checks whether an import already took place. If so, it exits quietly.If not, a path-based import is performed by using the configuration from the User Environment ManagerGroup Policy.
-DirectFlexRefreshDirectFlex configuration is processed during logon. If you add Flex configuration files with DirectFlexenabled, or modify DirectFlex-related settings of existing files while a user is logged on, these changes arenot automatically picked up during the session.
This might not be a problem, but you can force an update by running the following command in the user'ssession:
"C:\Program Files\Immidio\Flex Profiles\FlexEngine.exe" -DirectFlexRefresh
Chapter 7 FlexEngine Command-Line Arguments
VMware, Inc. 47

-UemRefreshUser environment settings are applied at logon. For certain types of settings, you can perform a refreshwhile the user is logged in.
Table 7‑1. Refresh Operations
Operation Description
-UemRefresh Refresh the User Environment Manager file type associations, shortcuts, andprinter mappings.
-UemRefreshFtas Refresh the User Environment Manager file type associations.
-UemRefreshShortcuts Refresh the User Environment Manager shortcuts.
-UemRefreshPrinters Refresh the User Environment Manager printer mappings.
-UemRefreshADMX Refresh the User Environment Manager ADMX-based settings.
-UemRefreshDrives Refresh the User Environment Manager drive mappings.
-UemRefreshEnvVars Refresh the User Environment Manager environment variables.
-UemRefreshApplicationBlocking Refresh the User Environment Manager application blocking settings.
-UemRefreshHorizonPolicy Refresh the User Environment Manager Horizon Smart Policies.Note You can refresh Horizon Smart Policies at any time. However, theHorizon remote desktop experience components determine if the changesactually take effect at that time.
-UemRefreshTriggeredTasks Refresh the User Environment Manager triggered tasks.
-UemRefreshPrivilegeElevation Refresh the User Environment Manager privilege elevation settings.
Installing and Configuring VMware User Environment Manager
48 VMware, Inc.
Index
Ccentral share 17Command-Line Arguments 45configuration share 17configure FlexEngine 27configure GPO
access administrative templates 30access ADMX templates 30application blocking 33certificate support for Mandatory Profiles 34Direct-Flex advanced settings 34Flex Config Files 31FlexEngine Logging 32FlexEngine Refresh 36FlexEngine to the Windows Event Log 34Paths Unavailable at Logon 35privilege elevation 33Profile Archive Backups 33profile archives 32Run FlexEngine as Group Policy
Extension 31show logon and logoff information 36User Environment Manager administrative
templates 30configure group policy object 29configure logoff script 38configure logon script 37configure Management Console 38configure User Environment Manager GPO 29configuring FlexEngine 27configuring user environment manager 27configuring User Environment Manager 27create GPO 28create Group Policy Object 28create User Environmenet Manager GPO 28
Ddeploy Use Environment Manager 16, 21deployment overview 16, 21
FFlexEngien logon script 37FlexEngine
Additional FlexEngine 47additional command line operations 47
apply Horizon Smart policies 47arguments 45command line 45Horizon multiple sessions 47Horizon Smart policies 47operation modes 46operations 45override GPO 47override GPO settings 47override Group Policy 47
FlexEngine GPO 27FlexEngine logoff script 37, 38FlexEngine logon script 37FlexEngine logon and logoff scripts 37
Gglossary 5GPO 29GPO configuration, silo-specific settings 36Group Policy configuration 27Group Policy Object 29
Iinstall
Application Migration 21FlexEngine 21Management Console 21Self-Support tool 21
install and configure without Actvie Directory 39install User Environment Manager
silent installation 23unattended installation 23
install User Environment Manager in NoADmode 39
installing User Environment Manager 21intended audience 5introduction to User Environment Manager 7
MManagement Console 38manual installation 22
NNoAD
Application Blocking Logging settings 41
VMware, Inc. 49

certificate support for mandatory profilessettings 41
configure 39configure paths unavailable at logon
settings 43configuring 39DirectFlex advanced settings 42disable the NoAD mode for users 43FlexEngine logging settings 40FlexEngine Logging to the Windows Event Log
Settings 42prevent access to self-support to end
users 43privilege elevation logging settings 41profile archive backups settings 41profile archives settings 40remove registry settings 44sample XML 44
NoAD Modeinstall 39installing 39
PPrevent Access to VMware UEM Self-
Support 36
Rrequirements
configuration share 17group policy object 17infrastructure 17profile archives share 17
run FlexEngine from a logoff script 38run FlexEngine from a logon script 37
Ssample NoAD XML 44
Uupgrade FlexEngine 24upgrade Management Console 24upgrade the ADMX templates 25upgrade User Environment Manager 23User Environment Manager GPO 29User Environment Manager
application management 7application configuration management 7components 15conditions 9configuration share 15dynamic configuration 9environment settings 7Flex config files 15
Flex configuration files 15FlexEngine 15General folder 15infrastructure 15infrastructure requirements 15licensing 20licensing requirements 15, 20local profiles 13Management Console 15mandatory profiles 11migrate application settings 8migration of application settings 8personalization settings 8personalized application settings 8Profile archives 15Profile archive backup path 15Profile archives path 15profile archives share 18registry access requirements 15, 20roaming profiles 12scenario considerations 11–13scenario consideration 11system requirements 15, 19terminology 15upgrade 23upgrading 23user profiles 11Windows settings 8
User Environment Manager configuration 27User Environment Manager configuration
share 17User Environment Manager deployment 16, 21User Environment Manager overview,
introduction 7User Environment Manager Management
Console 38User Environment Manager manual
installation 22User Environment Manager profile archives
share 18
Installing and Configuring VMware User Environment Manager
50 VMware, Inc.