
n the Zend Framework n - amu-it.eu · The Zend Framework developers also place special emphasis on...
6
DZone, Inc. | www.dzone.com By W. Jason Gilmore INTRODUCING THE ZEND FRAMEWORK Getting Started with the Zend Framework www.dzone.com Get More Refcardz! Visit refcardz.com #89 Getting Started with the Zend Framework CONTENTS INCLUDE: n Introducing The Zend Framework n Introducing The MVC Design Pattern n Framework Prerequisites n Installing The Zend Framework n Creating Your First Project n Sending Variables to the View and more... The Zend Framework (http://framework.zend.com) is an open source object-oriented Web framework which significantly reduces the barriers typically encountered when creating powerful Web applications. It does so by providing developers with an array of tools which facilitate many of the most commonplace yet tedious tasks, such as data validation, database access and manipulation, sending e-mail, user account management, search engine optimization, and internationalization. The Zend Framework developers also place special emphasis on “the latest Web 2.0 features”, offering simple solutions for AJAX integration, content syndication, and communication with popular APIs such as those offered by Amazon.com, Google, and Yahoo!. Get over 85 DZone Refcardz FREE from Refcardz.com! INTRODUCING THE MVC DESIGN PATTERN Like most mainstream Web frameworks, the Zend Framework embraces the MVC design pattern, which encourages the separation of an application’s data, business logic, and presentation. Doing so facilitates the creation of more maintainable, reusable, and testable code. Figure 1: The MVC pattern isolates application components Zend Framework applications typically consist of a series of models, controllers, and views, each of which are managed within a separate file. But the end user does not access these files directly! Instead, all requests are routed through the front controller. See the later section “The Application Structure” for more information about these files. FRAMEWORK PREREQUISITES The Zend Framework uses object-oriented features only available within PHP 5, with the latest release supporting PHP 5.2.4 and newer. To take advantage of features such as custom routing you’ll need to implement Apache’s mod_rewrite module. Finally, you may need to enable specific PHP extensions in order to take advantage of specific Zend Framework components. Consult the Zend Framework documentation for a list of extension dependencies. INSTALLING THE ZEND FRAMEWORK You can download the Zend Framework from the following location: http://framework.zend.com/download/latest On this page you’ll find several packages, with accompanying descriptions of the package contents. Unless you have special requirements I suggest downloading the minimal package. The Zend Framework can be installed simply by opening the download file and moving the library directory to a location accessible by the PHP installation. You can do this by modifying the php.ini file’s include_path directive to include the location of your Zend Framework files. For instance you could place the library directory within a directory named includes found within the PHP directory on your server, and then set the include_path directive like so: include_path = ".:/php/includes" If you’re unable to modify the php.ini file, then you can set the include_path directive within an .htaccess file like this: php_value include_path ".:/php/includes"
Transcript of n the Zend Framework n - amu-it.eu · The Zend Framework developers also place special emphasis on...
DZone, Inc. | www.dzone.com
By W. Jason Gilmore
INTRODUCING THE ZEND FRAMEWORK
Ge
ttin
g S
tart
ed
wit
h t
he
Ze
nd
Fra
me
wo
rk
w
ww
.dzo
ne.
com
Ge
t M
ore
Re
fcar
dz!
Vis
it r
efca
rdz.
com
#89
Getting Started with the Zend Framework
CONTENTS INCLUDE:n Introducing The Zend Frameworkn Introducing The MVC Design Patternn Framework Prerequisitesn Installing The Zend Frameworkn Creating Your First Projectn Sending Variables to the View and more...
The Zend Framework (http://framework.zend.com) is an open source object-oriented Web framework which significantly reduces the barriers typically encountered when creating powerful Web applications. It does so by providing developers with an array of tools which facilitate many of the most commonplace yet tedious tasks, such as data validation, database access and manipulation, sending e-mail, user account management, search engine optimization, and internationalization.
The Zend Framework developers also place special emphasis on “the latest Web 2.0 features”, offering simple solutions for AJAX integration, content syndication, and communication with popular APIs such as those offered by Amazon.com, Google, and Yahoo!.
Get over 85 DZone Refcardz FREE from Refcardz.com!
INTRODUCING THE MVC DESIGN PATTERN
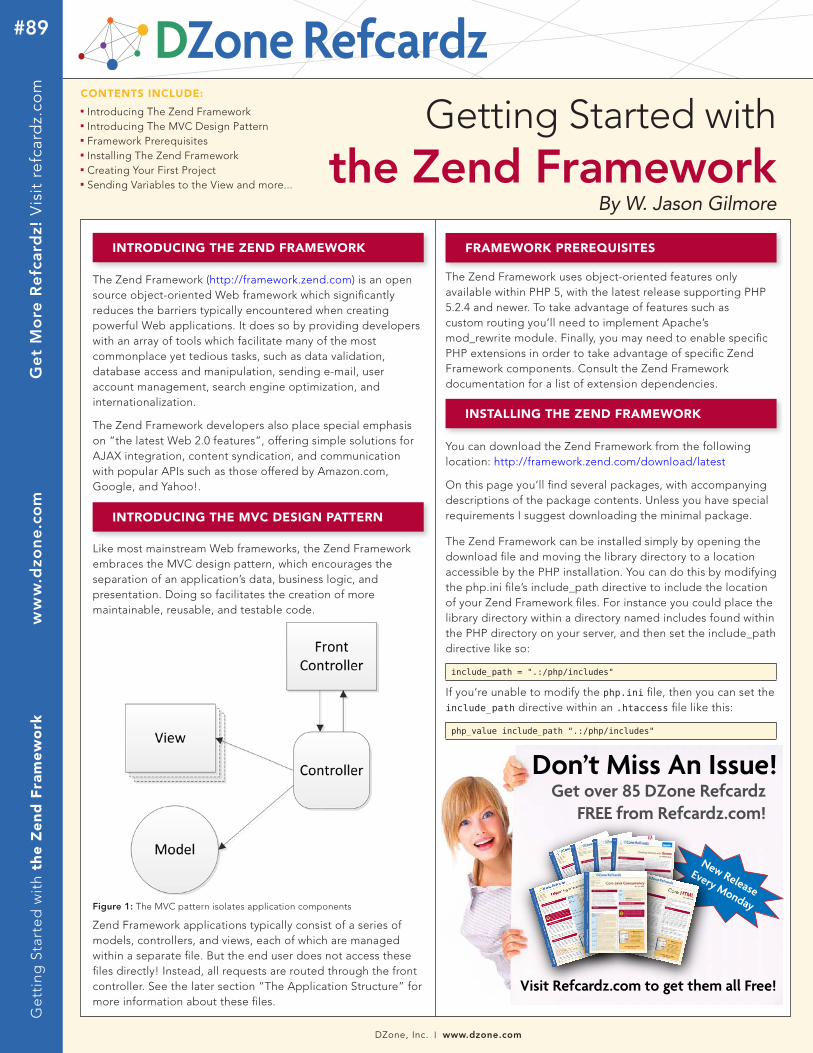
Like most mainstream Web frameworks, the Zend Framework embraces the MVC design pattern, which encourages the separation of an application’s data, business logic, and presentation. Doing so facilitates the creation of more maintainable, reusable, and testable code.
Figure 1: The MVC pattern isolates application components
Zend Framework applications typically consist of a series of models, controllers, and views, each of which are managed within a separate file. But the end user does not access these files directly! Instead, all requests are routed through the front controller. See the later section “The Application Structure” for more information about these files.
FRAMEWORK PREREQUISITES
The Zend Framework uses object-oriented features only available within PHP 5, with the latest release supporting PHP 5.2.4 and newer. To take advantage of features such as custom routing you’ll need to implement Apache’s mod_rewrite module. Finally, you may need to enable specific PHP extensions in order to take advantage of specific Zend Framework components. Consult the Zend Framework documentation for a list of extension dependencies.
INSTALLING THE ZEND FRAMEWORK
You can download the Zend Framework from the following location: http://framework.zend.com/download/latest On this page you’ll find several packages, with accompanying descriptions of the package contents. Unless you have special requirements I suggest downloading the minimal package.
The Zend Framework can be installed simply by opening the download file and moving the library directory to a location accessible by the PHP installation. You can do this by modifying the php.ini file’s include_path directive to include the location of your Zend Framework files. For instance you could place the library directory within a directory named includes found within the PHP directory on your server, and then set the include_path directive like so:
include_path = ".:/php/includes"
If you’re unable to modify the php.ini file, then you can set the include_path directive within an .htaccess file like this:
php_value include_path ".:/php/includes"

DZone, Inc. | www.dzone.com
2Getting Started with the Zend Framework
Configuring Zend_ToolThe Zend Framework includes a component named Zend_Tool which greatly reduces the amount of time and effort otherwise required to manage your Zend Framework projects. The Zend Framework is bundled with a command-line interface to this tool, but in order to use it you’ll need to make the interface accessible from anywhere on your operating system, done by adding the script location to your system path. The script extension is operating system-dependent, so be sure to refer to the zf.sh script on Unix-based servers, and zf.bat on Windows.
The script is located within the downloaded package’s bin directory. Copy the appropriate operating system-specific file along with the zf.php file (also found in the bin directory) into a directory recognized by your system path. It’s common practice to copy these files into the same directory as your PHP binary. Next, create the environment variable ZEND_TOOL_INCLUDE_PATH_PREPEND, assigning it the path pointing to the location of your Zend Framework library directory.
CREATING YOUR FIRST PROJECT
With Zend_Tool installed, you can create your first Zend Framework-powered project in mere seconds. To create a project, open a command prompt and navigate to the location where you’d like the project directory to reside. Then execute the following command, replacing PROJECT_NAME with the name of your particular project:
%>zf create project PROJECT_NAME
In addition to creating the directory structure and files necessary to power a Zend Framework-driven Website, this command will also create an index controller and corresponding view which will represent the home page. You can confirm that the project was created successfully by navigating to the site’s home page from within your browser, but first you’ll need to set your Web server’s document root to the project’s public directory (this directory is found in the project’s root directory, and is autogenerated by Zend_Tool). This is because all requests are funneled through the project’s front controller, which is responsible for processing the request and returning the response. You don’t have to create the front controller, it’s automatically created when you create a new project using Zend_Tool. Once the document root is set, restart your Web server and navigate to the site’s home page, and you’ll see the welcome message displayed in Figure 2.
Figure 2: The default home page
Creating a ControllerZend_Tool also supports the ability to create controllers from the command-line using the following syntax:
%>zf create controller NAME
Creating ActionsControllers are simply PHP classes which typically consist of a series of public methods, known as actions. Each action is responsible for processing the logic associated with a corresponding page. For instance, an action named contact found in the About controller would by default be associated with the url:
www.example.com/about/contact
Zend_Tool supports the ability to create an action using the following syntax:
%>zf create action NAME CONTROLLER-NAME
Be sure to replace NAME with the name of your action, and CONTROLLER-NAME with the name of the controller where you’d like this action to be placed.
Creating a ViewEach action is accompanied by a view, which contains the HTML used to render the page associated with the action. For instance, the view associated with the About controller’s contact action would be named contact.phtml, and would reside in the following directory:
application/views/scripts/about/
Zend_Tool does not support the creation of view skeletons, likely because it’s probably more efficient to simply create them using an IDE in the first place. However if you’ve already used Zend_Tool to create the corresponding action, then the default behavior is to create an associated view. See the Zend_Tool documentation for more information.
Creating a TemplateBy default any rendered view will comprise the whole of the Web page displayed within the browser. Because you’ll probably want to wrap a template around the views which contains elements such as a header and footer. Configure your application to recognize the template by opening the application/configs/application.ini file and adding the following lines:
; Configure the layout templateresources.layout.layout = "layout"resources.layout.layoutPath = APPLICATION_PATH "/views/layouts"
The application.ini configuration file is introduced in the later section “The Configuration File”.
Next, create a file named layout.phtml and place it within application/views/layouts. You’ll need to first create the layouts directory.
The Application StructureBased on the tasks we’ve carried out so far, the project’s directory structure will look like this:

DZone, Inc. | www.dzone.com
3Getting Started with the Zend Framework
application/ configs/ application.ini controllers/ ErrorController.php IndexController.php models/ views/ helpers/ layouts/ layout.phtml scripts/ error/ error.phtml index/ index.phtml Bootstrap.phplibrary/public/ .htaccess index.phptests/
Let’s take a moment to examine those directories and files which haven’t already been introduced.
The configs directory contains the application’s configuration file, application.ini. This file is introduced in the later section “The Configuration File”.
The ErrorController.php file is automatically created when creating a project using Zend_Tool. It handles any errors of codes such as 404 and 500 which are generated when using the application.
The views/helpers directory contains the application’s view helpers. This feature is introduced in the later section “View Helpers.”
The Bootstrap.php file is responsible for initializing the resources used by your application.
The public directory contains files which are directly accessible by the user, such as the application’s images, javascript files, and CSS. You’re free to organize these files within the public directory as you see fit, however I prefer to simply place them within directories named images, javascript, and css, respectively. The public directory also contains an .htaccess file, which is responsible for rewriting all incoming requests (save for anything stored in the public directory) to the index.php file, which is the application’s front controller.
The tests directory contains any PHPUnit tests you’ve created to test your application
SENDING VARIABLES TO THE VIEW
Because much of the data found in the application views will likely be dynamically generated, you’ll need to regularly pass variables from actions to views. Known as instance properties, these variables are assigned within the action like this, where NAME is the name of your variable:
$this->view->NAME Within the view, you’ll be able to access this variable like this:
$this->NAME
VIEW HELPERS
Within your views you’ll often need to repeatedly manipulate data in a specific way. For instance, if you were creating a weight loss application, then you’ll regularly want to refer to a user according to gender, such as:
He has lost 4.25 lbs this week. Because the user could be male or female, you’ll need a way to dynamically change the string to use He or She, accordingly. Such decision making will likely occur throughout your application, therefore rather than repeatedly use if or ternary statements, you can create a view helper and use it like this:
<?= $this->Gender($user); ?> has lost 4.25 lbs. this week. This Gender view helper is defined next:
class My_View_Helper_Gender extends Zend_View_Helper_Abstract{ public function Gender($user) { return $user->Gender == "m" ? "he" : "she"; } }
Save this helper to a file named Gender.php and store it within the application/views/helpers directory.
THE CONFIGURATION FILE
The Zend Framework makes it easy to centrally manage your application’s configuration data such as database connection parameters, Web service API keys, and e-mail addresses. Although it’s possible to manage this information from data sources such as a database, the most commonplace solution is via the default application.ini file, located within the application’s configs directory. The file is organized using the common INI format used by many applications, with each configuration variable assignment performed like this:
email.support = "[email protected]"
Recognizing the need to often adjust configuration data based on the phase of development (development, testing, staging, and production are commonplace phase monikers), this file is broken into four sections, with each representing a phase, like so:
[production]phpSettings.display_startup_errors = 0email.support = "[email protected]"
[staging : production]phpSettings.display_startup_errors = 1
[testing : production]phpSettings.display_startup_errors = 1
[development : production]email.support = "[email protected]"phpSettings.display_startup_errors = 1
Setting the Application PhaseTo switch an application from one phase to another, open up the project’s .htaccess file and set the APPLICATION_ENV variable to the desired phase. By default APPLICATION_ENV is set to development, as shown here:

DZone, Inc. | www.dzone.comDZone, Inc. | www.dzone.com
4Getting Started with the Zend Framework
CUSTOM ROUTING
Although the Zend Framework’s default routing behavior is to deconstruct the URL path, identifying the controller and action by the order of URL segments (for instance /about/contact/ maps to the About controller’s contact method, you’ll inevitably want to override this default behavior and create your own custom routes. To do this you’ll invoke the Zend_Controller_Router_Route() class, passing along the URL pattern, and destination controller and action. These custom routes are defined within a method typically named _initRouter() (I say typically because this particular name is optional although usual) found in the Bootstrap.php file. For instance to override the destination of the /about/contact URL path, instead invoking the Help controller’s support method, you would add the following method to your Bootstrap.php file:
FORMS PROCESSING
In the previous section you learned how to access URL parameters using the $this->_request->getParam() method. Accessing data passed via a Web form is similarly trivial using the $this->_request->getPost() method. For instance, if a
USING THE init() METHOD
Because your actions will often call upon the same code to carry out certain tasks, such as accessing the configuration file as demonstrated in the previous example, it makes sense to consolidate that code within a single location. You can do this using a special init() method, typically placed at the top of a controller class. Within this method you can place for instance the code used to retrieve the configuration data:
public function init(){ $bootstrap = $this->getInvokeArg('bootstrap'); $configArray = $bootstrap->getOptions(); $this->config = new Zend_Config($configArray);}
Notice the subtle difference between the snippet used to retrieve the configuration variables and the previous snippet shown in the previous section. When creating variables which will be accessed throughout the controller, you’ll need to make them instance properties via $this.
SetEnv APPLICATION_ENV development
Accessing Configuration DataTo access your configuration data within a controller, define the following lines within the action:
$bootstrap = $this->getInvokeArg('bootstrap');$configArray = $bootstrap->getOptions();$config = new Zend_Config($configArray);
All of the configuration variables will be made available as attributes via the $config object. For instance, you would access a configuration variable named email.support like this:
$config->email->support
If you’re managing user-facing data such as corporate e-mail addresses within the configuration file, then all you need to do is assign the e-mail address to an instance property as demonstrated in the section “Sending Variables to the View”:
$this->view->email->support = $this->config->email->support;
protected function _initRouter(){ $frontController = Zend_Controller_Front::getInstance(); $router = $frontController->getRouter();
// Product view route $route = new Zend_Controller_Router_Route( '/about/contact', array( 'controller' => 'help', 'action' => 'support' ) ); $router->addRoute('contactus', $route);}
You can add as many other custom routes as you pleae to this method, just be sure to define the route and then assign the route a unique name using the addRoute() method, as demonstrated above.
Passing Variables to the ActionIt’s common practice to build pages dynamically based on the values of parameters passed via the URL. You can perform this task right out of the box using the Zend Framework simply by stringing parameter names and their corresponding values together following the controller and action, like this:
/account/confirm/key/7dugpl97812fjkl You can then access the key parameter from within the confirm action like this:
$key = $this->_request->getParam('key');
But what if you wanted to construct a URL which flouted this convention? For instance, you might want to string together parameters sans their keys in order to create a more compact URL which looks like this:
/tutorials/php/zend_framework/
You can perform such tasks easily using custom routes. For instance, to retrieve the php and zend framework parameters, passing them to the tutorials controller’s index action, define the following custom route:
$route = new Zend_Controller_Router_Route( '/tutorials/:parent_category/:child_category', array( 'controller' => 'tutorials', 'action' => 'categories' ));$router->addRoute('confirm-account', $route);
You can then access the values represented by the :parent_category and :child_category placeholders using the following syntax:
$parent = $this->_request->getParam('parent_category');$child = $this->_request->getParam('child_category');

DZone, Inc. | www.dzone.comDZone, Inc. | www.dzone.com
5Getting Started with the Zend Framework
The Zend_Db component provides developers with an object-oriented interface which makes it trivially easy to retrieve and manipulate database data. Supporting all of the major database solutions, among them MySQL, Oracle, and SQLite, you can begin taking advantage of Zend_Db with minimal configuration, and gradually extend its capabilities to fit even the most complex databasing requirements.
Connecting to the DatabaseTo use Zend_Db you’ll need to configure your database connection within the application.ini file using the following variables:
resources.db.adapter = PDO_MYSQLresources.db.params.dbname = "easyphpwebsites"resources.db.params.username = "webuser"resources.db.params.password = "secret"resources.db.params.hostname = "www.easyphpwebsites.com"resources.db.isDefaultTableAdapter = true
The purpose of each variable should be apparent save for resources.db.adapter, which defines the specific supported database adapter which you’ll be using, and resources.db.isDefaultTableAdapter, which makes it possible to directly call the adapter from within your application.
Remember that one of the great features of the application.ini file is your ability to override parameters, so feel free to define these parameters within each phase section in order to easily connect to multiple databases.
Using Zend_Db_Table as a Concrete ClassThe easiest way to use the Zend_Db component is by instantiating the Zend_Db_Table class directly (this feature is available as of version 1.9). This example will retrieve the name of the country associated with the primary key 233:
$country = new Zend_Db_Table('countries');echo $country->find(233)->current()->title;
Using Zend_Db_Table in this fashion is useful when you’re only interested in carrying out the most straightforward database operations, such as data retrieval, insertion, modification, and deletion. For instance, to delete the row associated with the primary key 233, you can call the update() method like this:
$country = new Zend_Db_Table('country');
$data = array ( 'title' => "United States of America");
$where = $country->getDefaultAdapter()->quoteInto('id = ?', 233); $country->update($data, $where);
Creating a ModelWith the database connection established, you can next create a model which will serve as an object-oriented interface to a specific table. For instance, to connect to a table named country which contains information about the world’s countries, you can define a class named Default_Model_Country which
TALKING TO THE DATABASEform’s text field is assigned the name email, then this value can be accessed via the form’s action destination in the following fashion:
$email = $this->_request->getPost('email');
Of course, you’ll want to thoroughly validate any user-supplied data before carrying out further actions. The Zend_Validate component greatly reduces the time and code required to perform these validations.
Validating Data with Zend_ValidateThe Zend_Validate component contains more than two dozen validation classes capable of vetting a wide variety of data, including e-mail and IP addresses, URLs, credit cards, and barcodes, in addition to determining whether a value falls within a certain range, is of a certain length, or whether two values are identical.
Further, it’s possible to chain validators together, allowing you to conveniently consider multiple aspects of a particular value, such as whether it’s both of a certain length and consisting of alphanumeric characters. While these validators can be used anywhere within your application controllers, you’ll most often seen them used in conjunction with validating user input. Consult the Zend_Validate documentation for a complete list of available classes and capabilities.
Validating an E-mail AddressValidating an e-mail address is a notoriously difficult task, accomplished using a fairly complex regular expression. Thanks to Zend_Validate’s EmailAddress validator, carrying out this task is trivial:
$email = "[email protected]";$validator = new Zend_Validate_Email_Address();if ($validator->isValid($email)) { echo "Valid e-mail address!"} else { echo "Invalid e-mail address!";}
It’s possible to take the e-mail validation process one step further by attempting to verify whether the address actually exists. See the documentation to learn how both the domain and MX records can be verified for existence.
Chaining Validators TogetherSuppose you wanted to determine whether a username consists of not only at least five characters, but also of only alphanumeric characters (letters and numbers). You could use Zend_Validate’s StringLength and Alnum validators separately to examine both attributes, however Zend_Validate also supports a concept known as validator chaining which streamlines the code:
$username = "45!";$validatorChain = new Zend_Validate();$validatorChain->addValidator(new Zend_Validate_Alnum()) ->addValidator(new Zend_Validate_StringLength(6);if ($validatorChain->isValid($username)) { echo "Valid username!");}
It’s possible to take the e-mail validation process one step further by attempting to verify whether the address actually exists. See the documentation to learn how both the domain and MX records can be verified for existence.

By Paul M. Duvall
ABOUT CONTINUOUS INTEGRATION
G
et
Mo
re R
efc
ard
z! V
isit
ref
card
z.co
m
#84
Continuous Integration:
Patterns and Anti-Patterns
CONTENTS INCLUDE:
■ About Continuous Integration
■ Build Software at Every Change
■ Patterns and Anti-patterns
■ Version Control
■ Build Management
■ Build Practices and more...
Continuous Integration (CI) is the process of building softwar
with every change committed to a project’s version contr
repository.
CI can be explained via patterns (i.e., a solution to a pr
in a particular context) and anti-patterns (i.e., inef
approaches sometimes used to “fi x” the particular problem)
associated with the process. Anti-patterns are solutions that
appear to be benefi cial, but, in the end, they tend to produce
adverse effects. They are not necessarily bad practices, but can
produce unintended results when compared to implementing
he pattern.tion he term Continuous Integration
le this Refcars
Aldon ®
Change. Collaborate. Comply.
Pattern
Description
Private WorkspaceDevelop software in a Private Workspace to isolate changes
Commit all fi les to a version-control repository
Develop on a mainline to minimize merging and to manage
e within a system that utilizes multiple
ce code changes by task-oriented units of work
and submit changes as a Task Level Commit
Label the build with unique name
Automate all activities to build software from source without
guration
e-installed tool dependencies to the bare minimum
For each tagged deployment, use the same deployment
package (e.g. WAR or EAR) in each target environment
Centralize all dependent libraries
eate a single template fi le that all target environment
operties are based on
emote builds into different target environments
Perform a Private Build before committing changes to the
Repository
Perform an Integration Build periodically, continually, etc.
tomated feedback from CI server to development team
hey occurd based on
brought to you by...
By Andy Harris
HTML BASICS
om
Ge
t M
ore
Re
fcar
dz!
Vis
it r
efca
rdz.
com
#64
Core HTMLHTML and XHTML are the foundation of all web development.
HTML is used as the graphical user interface in client-side
programs written in JavaScript. Server-side languages like PHP
and Java also receive data from web pages and use HTML
as the output mechanism. The emerging Ajax technologies
likewise use HTML and XHTML as their visual engine. HTML
was once a very loosely-defi ned language with very little
standardization, but as it has become more important, the
need for standards has become more apparent. Regardless of
whether you choose to write HTML or XHTML, understanding
the current standards will help you provide a solid foundation
that will simplify all your other web coding. Fortunately HTML
and XHTML are actually simpler than they used to be, because
much of the functionality has moved to CSS.
common elementsEvery page (HTML or XHTML shares
common.) All are essentiextension H
CONTENTS INCLUDE:■ HTML Basics■ HTML vs XHTML
■ Validation■ Useful Open Source Tools
■ Page Structure Elements■ Key Structural Elements and more...
The src attribute describes where the image fi le can be found,
and the alt attribute describes alternate text that is displayed if
the image is unavailable.Nested tagsTags can be (and frequently are) nested inside each other. Tags
cannot overlap, so <a><b></a></b> is not legal, but <a><b></
b></a> is fi ne.
HTML VS XHTMLHTML has been around for some time. While it has done its
job admirably, that job has expanded far more than anyb d
expected. Early HTML had very limited layo
Browser manufacturers added
web developers cresult
By Daniel Rubio
ABOUT CLOUD COMPUTING
ww
w.d
zon
e.co
m
Ge
t M
ore
Re
fcar
dz!
Vis
it r
efca
rdz.
com
#82
Getting Started with Cloud Computing
CONTENTS INCLUDE:■ About Cloud Computing■ Usage Scenarios■ Underlying Concepts ■ Cost■ Data Tier Technologies■ Platform Management and more...
Web applications have always been deployed on servers connected to what is now deemed the ‘cloud’.
However, the demands and technology used on such servers has changed substantially in recent years, especially with the entrance of service providers like Amazon, Google and Microsoft.
These companies have long deployed web applications that adapt and scale to large user bases, making them knowledgeable in many aspects related to cloud computing.
This Refcard will introduce to you to cloud computing, with an emphasis on these providers, so you can better understand what it is a cloud computing platform can offer your web applications.
USAGE SCENARIOS
Pay only what you consumeWeb application deployment until a few years ago was similar to most phone services: plans with alloted resources, with an incurred cost whether such resources were consumed or not.
Cloud computing as it’s known today has changed this. The various resources consumed by web applications (e.g. bandwidth, memory, CPU) are tallied on a per-unit basis (starting from zero) by all major cloud computing platforms.
also minimizes the need to make design changes to support one time events.
Automated growth & scalable technologiesHaving the capability to support one time events, cloud computing platforms also facilitate the gradual growth curves faced by web applications.
Large scale growth scenarios involving specialized equipment (e.g. load balancers and clusters) are all but abstracted away by relying on a cloud computing platform’s technology.
In addition, several cloud computing platforms support data tier technologies that exceed the precedent set by Relational Database Systems (RDBMS): Map Reduce, web service APIs, etc. Some platforms support large scale RDBMS deployments.
CLOUD COMPUTING PLATFORMS AND UNDERLYING CONCEPTS
Amazon EC2: Industry standard software and virtualizationAmazon’s cloud computing platform is heavily based on industry standard software and virtualization technology.
Virtualization allows a physical piece of hardware to be utilized by multiple operating systems. This allows resources (e.g. bandwidth, memory, CPU) to be allocated exclusively to individual operating system instances.
As a user of Amazon’s EC2 cloud computing platform, you are
Browse our collection of over 85 Free Cheat SheetsUpcoming RefcardzJava GUI DevelopmentAdobe CatalystFlash Builder 4Maven 3
DZone, Inc.140 Preston Executive Dr.Suite 100Cary, NC 27513
888.678.0399919.678.0300
Refcardz Feedback [email protected]
Sponsorship Opportunities [email protected]
Copyright © 2010 DZone, Inc. All rights reserved. No part of this publication may be reproduced, stored in a retrieval system, or transmitted, in any form or by means electronic, mechanical, photocopying, or otherwise, without prior written permission of the publisher.
Version 1.0
$7.9
5
DZone communities deliver over 6 million pages each month to
more than 3.3 million software developers, architects and decision
makers. DZone offers something for everyone, including news,
tutorials, cheat sheets, blogs, feature articles, source code and more.
“DZone is a developer’s dream,” says PC Magazine.
6Getting Started with the Zend Framework
RECOMMENDED BOOKABOUT THE AUTHOR
ISBN-13: 978-1-934238-84-4ISBN-10: 1-934238-84-8
9 781934 238844
50795
extends the framework’s Zend_Db_Table_Abstract class in order to be endowed with Zend_Db’s special features:
class Model_Country extends Zend_Db_Table_Abstract { protected $_name = 'country';}
The $_name attribute can be used to override Zend_Db’s presumption that the model and corresponding table name are identical. For instance if the table name is actually countries but you preferred to use singular form for model names, then $_name can be used to rectify this discrepancy.
With the model defined, you’re free to add methods capable of abstracting the data query and management processes pertinent to the associated table in any way you please.
Creating Table RelationsBecause your table data will likely be interrelated, Zend_Db offers a great way to formally define these relations, and use convenience methods to query for interrelated data. Suppose you created a member table which includes a foreign key named country_id. This key maps to the primary key of a table named country. Because you’ll not only want to know what country a member lives in, but also what members live
in a particular country, you’ll need to define the relationship within both models. Within the member name you’ll define the dependency like this:
protected $_referenceMap = array ( 'Country' => array ( 'columns' => array('country_id'), 'refTableClass' => 'Model_Country' ) );
Within the country model you’ll define the associated relationship like this:
protected $_dependentTables = array('Model_Member');
With these relationships formalized, you’re able to easily retrieve the member’s country using the findParentRow() method. Likewise, you can retrieve an array containing all members belonging to a specific country using the findDependentRowset() method.
Zend_Db has grown into a quite complex and capable component, perhaps worthy of its own RefCard at some point in the future. What is introduced here is but a taste of its capabilities. Be sure to consult the Zend Framework documentation for a complete overview.
Easy PHP Websites with the Zend Framework shows you how to build websites fast using PHP and MySQL, two of the world’s most popular Web development technologies. What’s more, you’ll learn how to supercharge these technologies by taking advantage of a powerful, free web development solution known as the Zend Framework, which helps developers build
websites with amazing speed and efficiency.
W. Jason Gilmore is founder of a W.J. Gilmore, LLC, a publishing and consulting firm based out of Columbus, Ohio. He’s the author of several books, including the best-selling “Beginning PHP and MySQL: From Novice to Professional”, “Easy PHP Websites with the Zend Framework”, and “Easy PayPal with PHP”. Jason is cofounder of theCodeMash Conference, has over 100 articles to
his credit within prominent publications such as PHPBuilder.com, Developer.com, and Linux Magazine.
BUY NOWbooks.dzone.com/books/zendframework


