MyNetball - Amazon S3 · PDF fileweb browser when working with MyNetball. ii | P a g e...
95
PLEASE NOTE: We recommend using Google Chrome as your web browser when working with MyNetball. MyNetball Training Manual PLEASE NOTE: We recommend using Google Chrome as your web browser when working with MyNetball.
Transcript of MyNetball - Amazon S3 · PDF fileweb browser when working with MyNetball. ii | P a g e...
PLEASE NOTE: We recommend using Google Chrome as your web browser when working with MyNetball.
MyNetball Training Manual
PLEASE NOTE: We recommend using Google Chrome as your web browser when working with MyNetball.
ii | P a g e Version: 0.14A
TABLE OF CONTENTS
MyNetball Information .................................................................................................................. 1
How to Use Manual 1
Menu Modes Explained 1
User Roles Explained 1
Person Roles & Sub Roles Explained 2
Glossary of Common Terms in MyNetball 3
Help Options 4
Quick Launch 4
Logging On 4
Netball Setup – Association .......................................................................................................... 5
Adding a New User 6
User Maintenance 6
Checking Organisation Details 6
Creating Contact Lists for your Affiliated Clubs 7
Netball Victoria Registrations - Online ........................................................................................ 9
MyNetball Online Registration Set Up 9
Create your Payment Gateway 9
Creating Products 10
Description of Product Fields 11
Setting up the Online Signup Form 12
Description of Online Form Fields 13
Accessing your Signup Form web link 14
Reporting 15
Transaction Report 15
Payment Gateway Report 16
Registration Product Report 17
Person Contact Details 18
Participant Login Management 19
Finding Player Registrations 20
Glossary 21
Netball Victoria Registrations - Registration Manager ............................................................ 22
Adding New Members 23
Checking a Players Registration Date 24
iii | P a g e Version: 0.14A
Registering a Player on behalf of a Club 24
Merging Records 25
Participant Login Management 25
Transfers and Clearances 27
Clearing a Player from one organisation to another 28
Granting and Denying Clearances 28
Enabling Settings for Clearances within an organisation 29
Adding a Role to an existing Record 29
Checking Umpire/Coach Accreditations 30
Creating a Custom Field 30
Adding a Disclaimer 30
E Communications ....................................................................................................................... 31
Email Communications 31
SMS Communications 31
Purchase Credits 32
Sending SMS 32
Email Team Contacts and Members 33
Newsletter Manager 33
Newsletter Portal Setup 34
Create a Sender Address 34
Create a Recipient List 35
Creating Marketing Email 36
Basic/Design Templates 37
Drag and Drop Function 38
MyNetball Competition Module - full instructions .................................................................. 40
Setting up Draw 40
Set Up Wizard 40
Organisation Details 40
Review Competition Settings 40
Competition Settings 41
Set/Rollover Season 41
Setting Current Season 41
Adding New Season 41
Season Settings 42
Copying Data from Season to Season 42
Adding your Venues 43

iv | P a g e Version: 0.14A
Editing an Existing Venue 43
Deleting a Venue 43
Creating Ladder Point Setup 44
Creating Ladder Display Schemes 44
Entering Match Start Times 45
Add Non Playing Dates 46
Managing Grade Setup 47
Add a New Grade 47
Adding Teams to Grades 48
Team Settings 49
Season Settings and Fixture Slots 50
Allocating ladders to Grades 51
Grade Divisions 51
Creating a Draw 52
Round Settings 53
Round Dates 53
Venue Selection 54
Editing the Fixture 55
Editing Teams, Days, Times and Courts 55
Venue Calendar 55
Bulk Changes to Days, Times or Venues 56
Venue Clash Report 58
Creating a Single Day Tournament Draw [Tips] 58
Before Beginning 58
Configuring Fixture Slots for Tournament Mode 58
Creating the Draw 58
Tournament Mode Settings 58
Publish Draw 59
Setting Default Score Sheets 60
Selecting Different Score Sheets for Different Grades 60
Match Manager 61
Printing Score Sheets 62
Entering Results 62
Player Stats 63
Borrowed Player 63
Ladders 64
Calculating Ladders 64
Viewing Ladders - Basic Ladders 64

v | P a g e Version: 0.14A
Ladders by Round 65
Ladder Adjustments 65
Activating Finals 67
Creating Finals if NO FINALS was Initially Selected 67
Regrading 68
Moving a Team from one Grade to Another Grade 68
Swapping Two Teams 68
Regrading Report 68
Setting Up Awards 69
Entering Votes 70
MyNetball Websites .................................................................................................................... 71
Sample Web Page 71
Setting up the Layout 71
Changing Home Page Layout 72
Changing the Banner 73
Resizing an Image 73
Editing Website Styles and Colours 74
Changing Menu Items 75
Editing Menu 75
Uploading Files and Images 76
Using Drop Box to Increase Website Data 76
Adding News Items 78
Adding Extra Pages 78
Adding Events 80
Slideshow Galleries 80
Adverts 80
Creating the Advert - Maintenance and Placement 81
Creating the Advert - HTML Method 82
Adding Social Media Feeds 85
Renew a Website 85
Linking MyNetball from External Websites 86
Public Portal 87
Public Portal Report 87
Match Report 87
Team Grade Report 87
Fixtures and Results 88

MyNetball Information
How to use this manual
This manual is a detailed document created to support and guide you through all modules of the MyNetball system in Victoria. While in MyNetball there are different menu modes, headings & items, these will be referred to throughout the manual, as below.
Competition Management Competition Participation Website (SportzVault)
Registrations Competition Menu Management
Menu Modes Explained
Depending on your level of access, you will be able to see different menu modes. Although some tasks can be completed in more than one place, mode or menu and the options will vary.
Competition Management - functions relating to the setup and management of a competition and player registration. Competition Participation – functions relating to participation in a competition Website (SportzVault) - relating to managing the setup and content of the website
Typically, Associations will have access to all modules and clubs will have access to Competition Participation and Website.
User Roles Explained
SYSTEM ADMIN Access to high level system administration.
SITE MANAGER Higher level website and competition related maintenance which is typically related to ‘setup’ or ‘configuration’ tasks.
USER MANAGER Access to create and maintain other users. Warning – any user who has this role can effectively grant themselves any other role.
CONTENT MANAGER Website content related maintenance (Eg. Create & maintain Html content, home page, news, events, slideshow galleries).
RESULTS MANAGER Competition results related maintenance (Eg. Clubs: results & scores update, associations: match confirmation, exception reports etc.).
ADMINISTER CHILD A user within an organization which manages competitions between your ‘child’ organizations can administer directly without requiring a separate login to that club.
EMAIL SENDER Sending of email messages.
SMS SENDER Sending of SMS messages & ordering SMS credits.
FINANCIAL MANAGER Access to tasks relating to financial information (Eg. Payments/subscriptions made by players or other people in the system.
UMPIRE MANAGER Umpire related tasks
PERSON MANAGER Creation and editing person records

2 | P a g e Version: 0.14A
Person roles and sub roles explained
Each person that exists in the system is added as a certain role depending on the relationship they have with netball i.e. a coach would have a coach role, a player would have a player role, and an office bearer member would have an office bearer role. Each role also has a sub role i.e. senior coach, junior coach, president, secretary etc.
*ROLES AND REGISTRATION TYPES ARE NOT RELATED!* Roles are important when allocating players to teams, creating your office bearer list, allocating coaches and managers to teams and allocating umpires to games. If the person does not have the relevant role they will not appear on the list to be selected.
Role Sub role
Player Senior Junior NetSetGo AA
Contact Administrator Supporter Parent Other
Umpire
(association only)
Senior Junior
Team Official Senior coach Junior coach Team manager Scorer Other
Office Bearer President Secretary Treasurer Ground contact Other
Subscriber Media reports

3 | P a g e Version: 0.14A
Glossary of common terms in MyNetball
Term Definition
Child organisation An organisation which sits below another e.g. a club is a child organisation of an association
Categories Provisional grades created for teams to be nominated into
Clearance The act of moving a participant’s details from one organisation to another (e.g. a move from one club to another club, one association to another association or one club to another association)
Fixture slot Available slots for games to be played created through a combination of venue and allocations vs time allocations
Forms Age groups/groups created for the categories to be grouped into
Grade divisions A collection of grades created to improve the usability of the system to group grades together e.g. U13, U14
Grades The final grades where competitions and/ draws are created
Parent organisation An organisation above another e.g. Netball Victoria is a parent organisation of associations within Victoria
Person Participant Anyone who is created in the system
Principal User An administrative user with access to all modules in MyNetball. There can only be one Principal User for an organisation at any one time
Public Portal A public website (http://my.netball.com.au/) - anyone can access a website to view detailed competition information for all organisations using MyNetball to manage competitions
Registration period The period during which individuals participants can be registered. This is set by your State body
Registration Type The types of memberships e.g. Senior, Junior, NetSetGO
ResultsVault Another name for MyNetball Interact Sport’s product name for the module to manage participants and competitions
Role The involvement a person has in netball e.g. office bearer, umpire, player
Season The period during which competitions are scheduled
SportzVault The public portal website Interact Sport’s product name for the module to manage websites
Template A spread sheet downloaded from the system which may or may not be populated with information, depending on the filter and criteria defined
Transfer The act of copying a participant’s details to another organisation. This is primarily done so that the participant can register at a Registering for a secondary association while maintaining registration at a primary organisation
Venue The court a game is played on
Help Options
There are a number of online help methods if you get stuck:
A ‘Help on this Topic’ function at the top of each page within MyNetball is available & considered to be most helpful.

4 | P a g e Version: 0.14A
Within the Organisation mode, there is a help menu with a link directing you to the support system or go to http://helpdesk.interactsport.com/ and submit a ticket, enter as much information as possible and leave your name and contact details. This option is ideal for Users to track your request or issue. Manuals and Quick Reference Guides are available at http://thecentre.netball.com.au/
Quick Launch
As well as menu modes, match manger the quick launch menu allows for quick execution of certain tasks. Before using this ensure that the season setting is correct each time!
Logging On
You should have received an email from ‘ResultsVault Administration’ with your Login ID and Password as well as a link to the MyNetball Home page http://admin-netball.resultsvault.com
If this is the first time your organisation has logged into MyNetball you will be prompted to complete the set up wizard. Once you have completed the Set Up Wizard you are ready to begin using MyNetball.
5 | P a g e Version: 0.14A
Netball Setup – Association Creating Login for Administrative Users
System Administrators are able to add new users to their own organisation and their child organisations. i.e. associations and leagues will be responsible to add new users to their clubs.
Note:
Netball Victoria take the security of members’ details that have been recorded in the MyNetball database seriously! MyNetball Users from Associations/Leagues/Clubs must have their own authorised logins, [i.e. User ID & Password], if a user shares their login details with anyone else, it will be considered as a breach of the User Agreement by Netball Victoria and penalties may apply.
To download the User Agreement forms for associations/leagues/clubs go to -
www. http://nvclubhouse.com.au
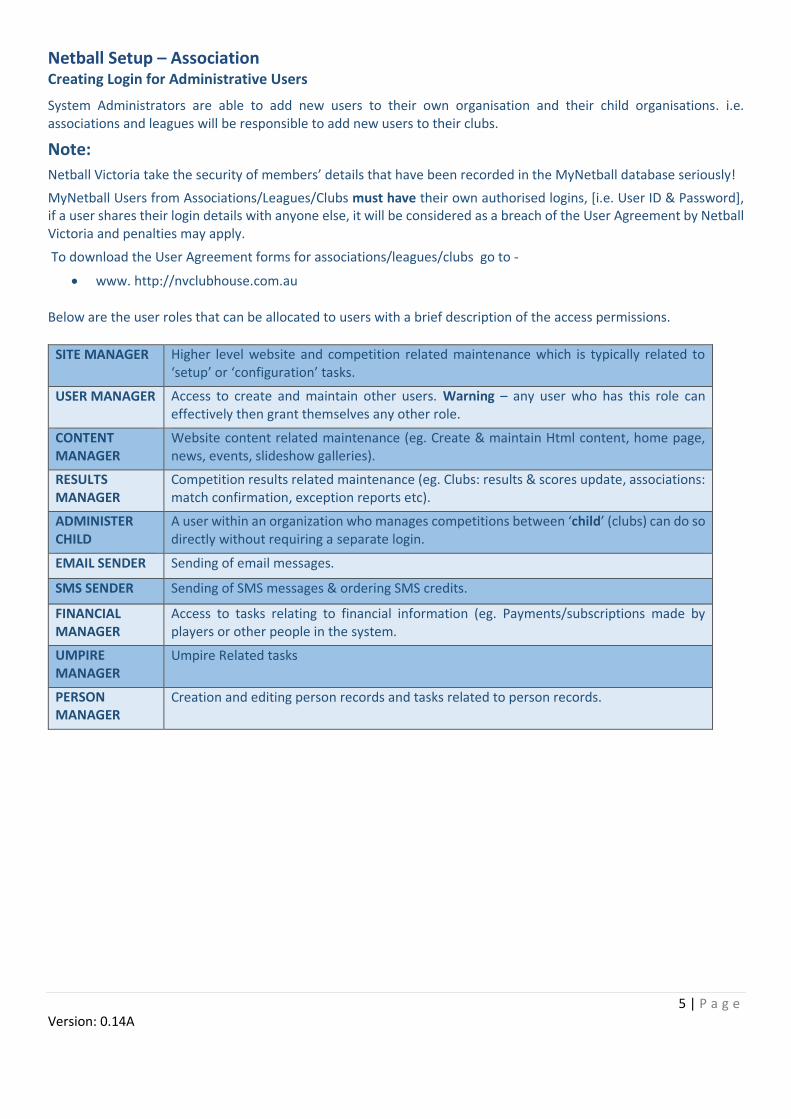
Below are the user roles that can be allocated to users with a brief description of the access permissions.
SITE MANAGER Higher level website and competition related maintenance which is typically related to ‘setup’ or ‘configuration’ tasks.
USER MANAGER Access to create and maintain other users. Warning – any user who has this role can effectively then grant themselves any other role.
CONTENT MANAGER
Website content related maintenance (eg. Create & maintain Html content, home page, news, events, slideshow galleries).
RESULTS MANAGER
Competition results related maintenance (eg. Clubs: results & scores update, associations: match confirmation, exception reports etc).
ADMINISTER CHILD
A user within an organization who manages competitions between ‘child’ (clubs) can do so directly without requiring a separate login.
EMAIL SENDER Sending of email messages.
SMS SENDER Sending of SMS messages & ordering SMS credits.
FINANCIAL MANAGER
Access to tasks relating to financial information (eg. Payments/subscriptions made by players or other people in the system.
UMPIRE MANAGER
Umpire Related tasks
PERSON MANAGER
Creation and editing person records and tasks related to person records.

6 | P a g e Version: 0.14A
Adding a New User –
Please note that if you are creating a user for a club, you will need to administer as the club to create the login.
Go to your home page, click on the drop down key [next to your association/league/club name at top right hand corner]. Click on the drop down key
Click on User List under the heading Users Organisation
Organisation Details Office Bearers Honour Board Contacts for Parent Organisations Notification Subscribers List
Users
User List Login Failures Report Login Ageing Report
You are now in the User Maintenance page, click on + Add New User
User Maintenance
Create login ID (i.e. club name username (person’s name) Add in email address (The user’s Login ID and password for MyNetball will be sent to this email address) Add phone number (will be used for SMS) Select the relevant ‘User Roles’ Select ‘Grade Access’ and ‘Role Access’ restrictions if required Click update. An automated email will be sent to the user with their username and login details.
NOTE : *Denotes a mandatory field.
The Grade and Person Role access options allow you to create users who can only see and update the grades and person records that are relevant to them. Please see Help for more information.
Do not forget to hit the update button below Update
Checking Organisation details
Go to your home page, click on the drop down key [next to your association/league/club name at top right hand
corner].
Click on Organisation Details
Organisation
Organisation Details Office Bearers Honour Board Contacts for Parent Organisations Notification Subscribers List
Check the details are correct and once changes have been made or not you still need to click ‘Update’
7 | P a g e Version: 0.14A
NOTE : This page provides a list of the child organisations [clubs] affiliated to your organisation [associations / leagues]. You are able to access clubs to maintain and control some of the information relating to those clubs. However, to add or remove an organisation from the list, please contact Netball Victoria Member Services. [email protected].
Links available from this page are :
Email – access to the page to enable sending of email to all child organisation on the list.
Logos – if a logo has been uploaded for the club it is displayed here. Logos can be uploaded via the Entity Details page accessible via the actions dropdown – edit details.
Contacts – primary contact nominated by each club. This list of contacts can be used to email, sending SMS, and may optionally be listed in the PDF fixture/handbook. While each individual club should have the responsibility of updating this information, associations/leagues can also do this by clicking the Edit link. By default, the number of contacts only is displayed, but the names can be displayed by checking the List Contact Names checkbox.
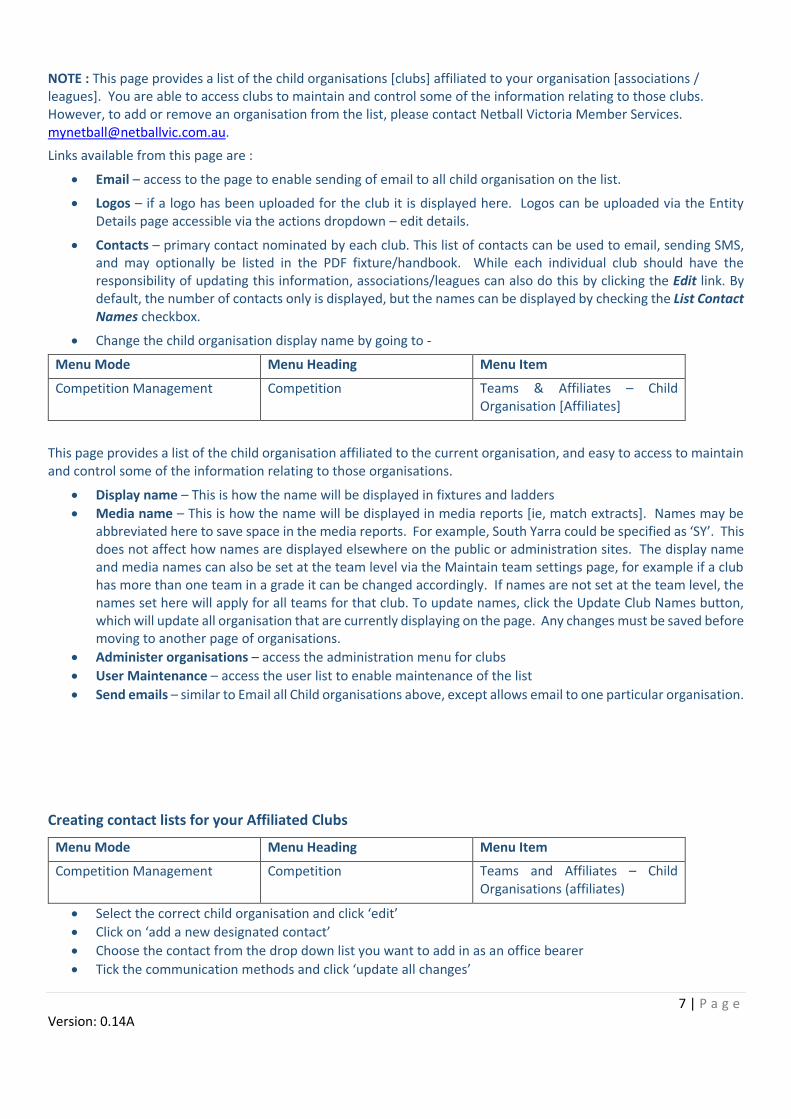
Change the child organisation display name by going to -
Menu Mode Menu Heading Menu Item
Competition Management Competition Teams & Affiliates – Child Organisation [Affiliates]
This page provides a list of the child organisation affiliated to the current organisation, and easy to access to maintain and control some of the information relating to those organisations.
Display name – This is how the name will be displayed in fixtures and ladders
Media name – This is how the name will be displayed in media reports [ie, match extracts]. Names may be abbreviated here to save space in the media reports. For example, South Yarra could be specified as ‘SY’. This does not affect how names are displayed elsewhere on the public or administration sites. The display name and media names can also be set at the team level via the Maintain team settings page, for example if a club has more than one team in a grade it can be changed accordingly. If names are not set at the team level, the names set here will apply for all teams for that club. To update names, click the Update Club Names button, which will update all organisation that are currently displaying on the page. Any changes must be saved before moving to another page of organisations.
Administer organisations – access the administration menu for clubs
User Maintenance – access the user list to enable maintenance of the list
Send emails – similar to Email all Child organisations above, except allows email to one particular organisation.
Creating contact lists for your Affiliated Clubs
Menu Mode Menu Heading Menu Item
Competition Management Competition Teams and Affiliates – Child Organisations (affiliates)
Select the correct child organisation and click ‘edit’
Click on ‘add a new designated contact’
Choose the contact from the drop down list you want to add in as an office bearer
Tick the communication methods and click ‘update all changes’
8 | P a g e Version: 0.14A
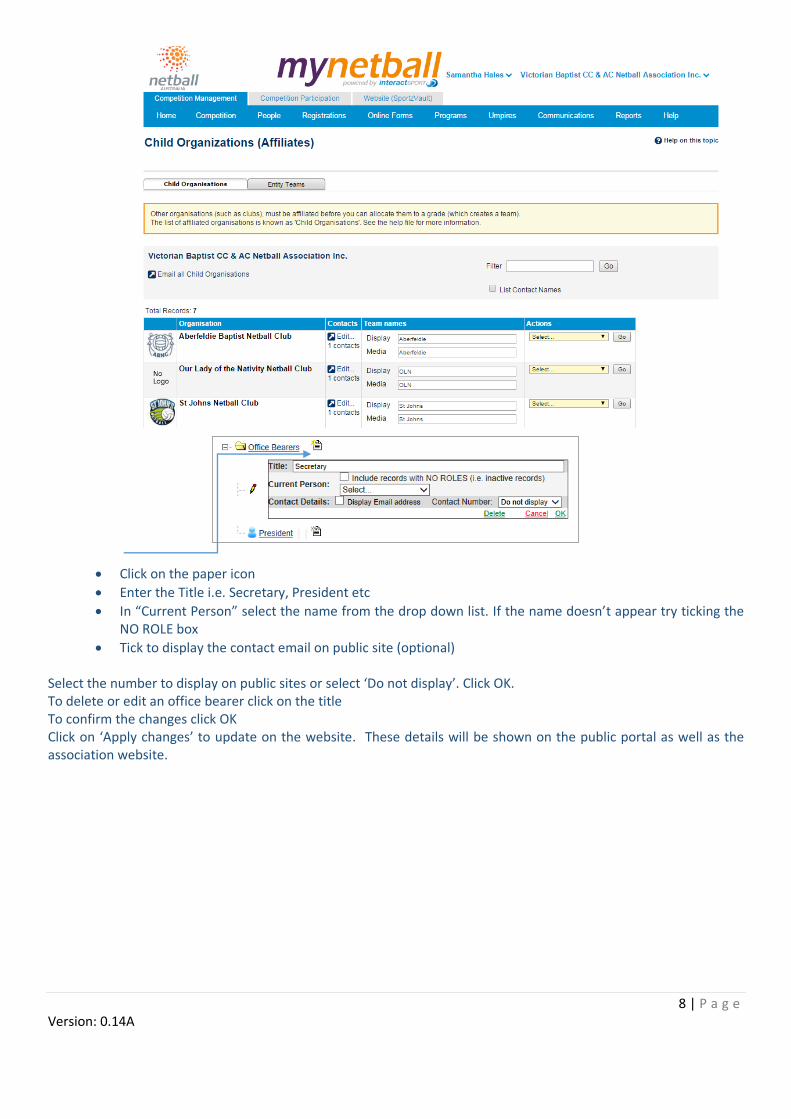
Click on the paper icon
Enter the Title i.e. Secretary, President etc
In “Current Person” select the name from the drop down list. If the name doesn’t appear try ticking the NO ROLE box
Tick to display the contact email on public site (optional)
Select the number to display on public sites or select ‘Do not display’. Click OK. To delete or edit an office bearer click on the title To confirm the changes click OK Click on ‘Apply changes’ to update on the website. These details will be shown on the public portal as well as the association website.

9 | P a g e Version: 0.14A
Netball Victoria Registrations
MyNetball Online Registration Set Up
Online registration is the preferred option for all Associations / Leagues and Clubs to use, with the improved processes that are now available. Once set up, online registrations will reduce the workload of volunteers and administrators.
Create Your Payment Gateway
A payment gateway allows a direct connection of finances between an online payment and a nominated bank account. Payments made online through your form are deposited straight into a nominated bank account.
Key features of the service: - Easy to get connected - No setup fee - No ongoing monthly fees - Standard transaction fee across all transactions 1.75% plus 30 cents, as at the 17th of December 2015 - Integration to the MyNetball system - Money automatically transferred to nominated bank account - Settlements are processed 5 days from transaction (to allow for disputes)
To access and create your Payment Gateway, enter the website address below and complete the form -
http://thecentre.netball.com.au/mynetball-payment-service/
Once the form has been submitted please allow up to 10 working days to be processed.
Once active you should see the MyNetball payment service listed as a payment option in your sign up forms.
Terms & Conditions
Please read the terms & conditions located on the link below – http://netball.com.au/mynetball-payment-service/

10 | P a g e Version: 0.14A
CREATING PRODUCTS
Products can be created through the below steps:
Add a Member Subscription Product
NOTE : A separate product for each registration type must be created, i.e. Senior, Junior, Off the Court, All Abilities
Set up a product for each member category i.e. Junior, Senior, etc. The below screen will appear. Enter the relevant details into each field. Please see Page 6 for further details on each field.
NOTE: You can create your own form to use for umpire and coaching course registrations
Competition Management
Online Forms
Configuration > Products

11 | P a g e Version: 0.14A
Description of Product Fields
The below table outlines additional notes for each field:
NAME Mandatory
i.e. Senior, Junior, Off the Court, All Abilities
CATEGORY For the purposes of online registration the category is Membership
DESCRIPTION Enter in the age restrictions for the membership type:
2016 Senior – Born on or before 31/12/1998
2016 Junior – Born between 01/01/1999 – 31/12/2005
PRICE Mandatory
Price according to the NV membership categories. Please select Simple and enter the total cost for that product.
CLASS Mandatory
Set as “Membership Subscription/Registration”, otherwise it will not register members in MyNetball for their registration
NUMBER AVAILABLE If your association/league/club can only take a certain amount of players you can cap it here
AVAILABLE FROM/TO Restrict the period in which members can use the form
ACTIVE If you would like the product available to be selected on the form be sure to tick the Active box
SORT ORDER The order in which the product will display on the Signup Form
i.e. By enter 1 the product will display first on the Signup Form
START/END DATE Length of registration
i.e. Start Date – 01/01/2016; Finish Date – 31/12/2016
PERSON ROLE Mandatory
When the person registers what role will be added to their profile?
i.e. Player: Senior, Umpire: Senior, Umpire: Junior, etc
AUTOMATICALLY REGISTER PARTICIPANT TO
Mandatory
This is the organisation the player will be automatically registered to when they register.
i.e. Whitehorse Netball Association or Camberwell Netball Club
REGISTRATION TYPE Mandatory
The registration type the member will be registered as. i.e. Senior, Junior, Off the Court or All Abilities
REGISTRATION PERIOD Mandatory
What year the registration will apply to. i.e. 2015, 2016

12 | P a g e Version: 0.14A
Setting up the Online Signup Form
Add a “New Online Registration Form”
Select the NA – Membership Signup Template Click Refresh The below screen will appear
Once all fields are filled in appropriately click “Update” to complete the form When the form submits successfully a green tick will appear
Competition Management
Online Forms
Configuration > Sign Up Forms

13 | P a g e Version: 0.14A
Description of Online Form Fields
The below table outlines additional notes for the relevant fields:
TITLE Mandatory
i.e. Whitehorse Netball Association Registration Form
TOP DESCRIPTION Defaults with a prompt to find the correct MyNetball ID and password for already existing members. We suggest leaving this prompt there however you may wish to add additional information.
STATUS Mandatory
Leave the form as INACTIVE when setting it up before the registration date open.
The status can be changed to ACTIVE at a later date when your association/league/club opens up registrations.
SORT ORDER The order in which the form will display on your website. It is not necessary to update.
CONTACT NAME/EMAIL Mandatory
The IT User that is logged in when setting up the form will automatically have their details entered into these fields. Please edit as required.
PAYMENT GATEWAY Mandatory
Please select your own Payment Gateway (not the simulated Payment Gateway)
ALLOW OFFLINE PAYMENT
Un-tick Allow offline payment if you are having an online payment. Leave ticked if you are allowing offline payments.
AUTOMATICALLY ADD PROCESSING FEE
Mandatory
Select Apply to online payments and enter the Variable Charge of 1.78%* and Fixed Charge as $0.31 to cover any processing fee costs incurred. This is the processing fee recommended by Netball Australia and PinPayments.
DEFAULT/ADDITIONAL FIELDS
The Default fields are those that will automatically appear on the form. If your association/league/club would like to add additional fields select Additional Fields, and select from the Available fields.
SELECT REGISTRATION TYPE/PRODUCT
Mandatory
Select the products (i.e. member types) you would like available on the form and add them across to the right under the Selected Registration Type/Products column.
ADVANCED SETTINGS Please leave Create logins for new registrants as ticked.
If you don’t wish to show the fee breakdown please leave Display payment split information if possible unticked.
If you would like the registration to a particular location please tick the relevant option.
NOTE : the processing fee is set by Pin Payments and is unavoidable for online payments.

14 | P a g e Version: 0.14A
Accessing your Signup Form web link
By accessing your Signup Form web link this will enable you to distribute to your members so they can easily access your form. It will also enable you to add onto your website, social media pages or send via email.
To access your Signup Form web link please follow the steps below:
Once the form has been successfully set up it will appear under the Signup Form Manager as displayed below
Click on Edit for the applicable form The below screen will appear with a specific web link to the online form

15 | P a g e Version: 0.14A
Reporting
There are three main types of reports that you can produce to tack online registrations:
Transaction Report Payment Gateway Report Registration Product Report
Transaction Report
Assists with tracking who has registered; Shows payment method (i.e. online or offline) and the status of the payment Helps to reconcile offline payments
To find the Transaction Report please follow the steps below:
The below screen will appear:
Adjust the Registration Form and Date Range as required Click Go To extract the data generated click Download Data
Competition Management
Online Forms
Reports
Transaction Report
16 | P a g e Version: 0.14A
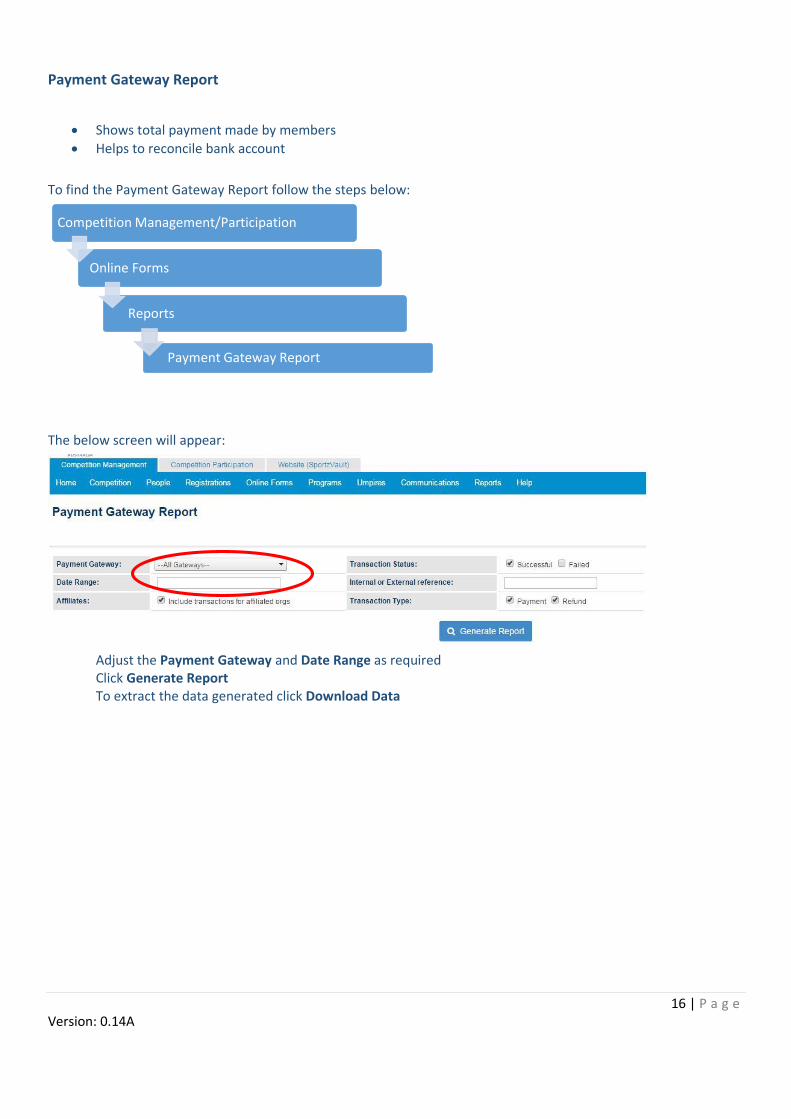
Payment Gateway Report
Shows total payment made by members
Helps to reconcile bank account
To find the Payment Gateway Report follow the steps below:
The below screen will appear:
Adjust the Payment Gateway and Date Range as required Click Generate Report To extract the data generated click Download Data
Competition Management/Participation
Online Forms
Reports
Payment Gateway Report

17 | P a g e Version: 0.14A
Registration Product Report
Shows the actual product bought by members
Helps to fulfil any product or merchandise orders
To find the Registration Report follow the steps below:
The below screen will appear:
Adjust the Registration Form and Date Range as required
Click Go To extract the data generated click Download Data
Competition Management/Participation
Online Forms
Reports
Registration Product Report

18 | P a g e Version: 0.14A
Person Contact Details
To easily edit or add person contact details follow the steps below:
The below screen will appear:
Filter by Role and click Search Select the orange pencil next to the relevant record Update details as required To save the changes click on green tick next to the record.
Competition Management/Participation
People
Person Contact Details

19 | P a g e Version: 0.14A
Participant Login Management
The Participant Login Management page will allow you to see the account status for each of your members. It will also display the current email recorded under the member’s record.
To access Participant Login Management please follow the steps below:
The screen below will appear:
To send all “Active Members” their login details:
Select the relevant Person Role Select Active from the Account Status drop down list Click on Search Persons – only those with an Active account will appear on your screen In the Actions drop down list select Create Logins or Resend if created. Tick Select All or individually select the relevant records Click Perform Action Click Ok when the “Are you sure you want to create accounts or resend the welcome message for the selected participants?” box appears
Competition Management/Participation
People
Participant Logins

20 | P a g e Version: 0.14A
To send all members with “No Account” their login details:
Select the relevant Person Role Select No Account from the Account Status drop down List Click on Search Persons – only those with a No Account status will appear on your screen In the Actions drop down list select Create Logins Tick Select All or individually select the relevant records Click on Perform Action Click Ok when the “Are you sure you want to create accounts for the selected participants?” box appears
Finding Player Registrations
If a player has gone through another Association, Leagues or clubs registration for the best way to verify this registration is through Add New Person. Please see details below:
Add New Person
Individually search for each player by entering their name or ID number Find the relevant record and reference the Reg. Type and Reg. Period
NOTE: If a player creates a new record when registering then their current registration will not show under their previous ID number. In this case it is better to search by full name or name variations.
NOTE: The search function in MyNetball is extremely sensitive so be vigilant when searching for a member’s record.

21 | P a g e Version: 0.14A
Glossary
PAYMENT GATEWAY A payment gateway allows members to pay online using their credit cards. The payment gateway is link to the selected account and the selected registration fees will be sent directly to the selected gateway account.
PRODUCT A product is the ‘thing’ being sold i.e. Senior registration
ONLINE SIGNUP FORM The online registration form is the ‘thing’ participants complete online (replaces paper registration form)
REGISTRATION PERIOD The period during which individuals participants can be registered.
REGISTRATION TYPE The types of memberships available e.g. Senior, Junior
ROLE The involvement a person has in netball e.g. office bearer, umpire, player, COACH.
SEASON The period during which competitions are scheduled.
ALL ABILITIES Individuals who identify as having a disability.
OFF THE COURT Committee members, administrators, volunteers, spectators, parents and others who do not coach, umpire or play.
22 | P a g e Version: 0.14A
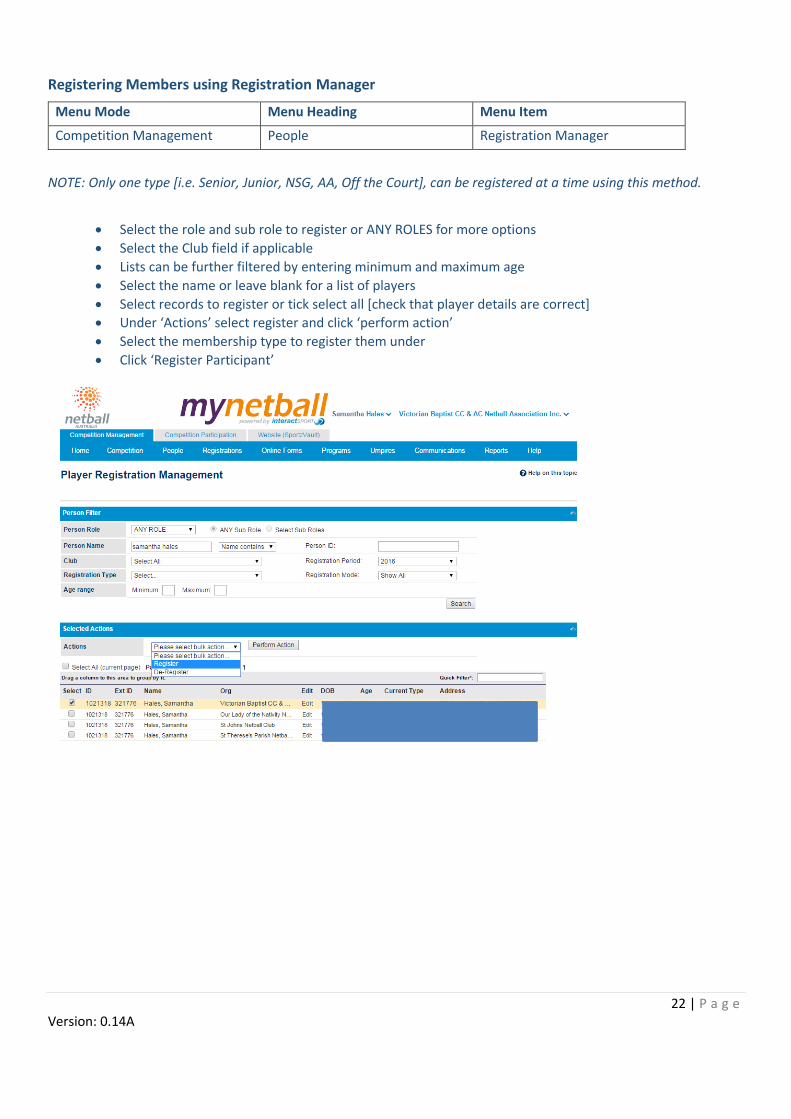
Registering Members using Registration Manager
Menu Mode Menu Heading Menu Item
Competition Management People Registration Manager
NOTE: Only one type [i.e. Senior, Junior, NSG, AA, Off the Court], can be registered at a time using this method.
Select the role and sub role to register or ANY ROLES for more options
Select the Club field if applicable
Lists can be further filtered by entering minimum and maximum age
Select the name or leave blank for a list of players
Select records to register or tick select all [check that player details are correct]
Under ‘Actions’ select register and click ‘perform action’
Select the membership type to register them under
Click ‘Register Participant’

23 | P a g e Version: 0.14A
To complete registrations you must first ensure the new members are on your list of players.
Members not on your list
Menu Mode Menu Heading Menu Item
Competition Management People Add a new person
Search for the name
If it doesn’t appear click the ‘CREATE NEW PERSON’ button
Complete the details required with * identifying mandatory fields and click ‘add’
Once the record is added you will have the option to add another role and populate any additional custom fields
To add a second role select the Roles tab and select a role and sub role then click ‘add’

24 | P a g e Version: 0.14A
Checking a players last registration date
Menu Mode Menu Heading Menu Item
Competition Management People Person Search
Once you have brought up the person record, click on the player tab and then Registration
Registering a player on a clubs behalf
Menu Mode Menu Heading Menu Item
Competition Management Competitions Registration Manager
If you are registering members to a club ensure you change the club filter to the selected club prior to registering members.
25 | P a g e Version: 0.14A
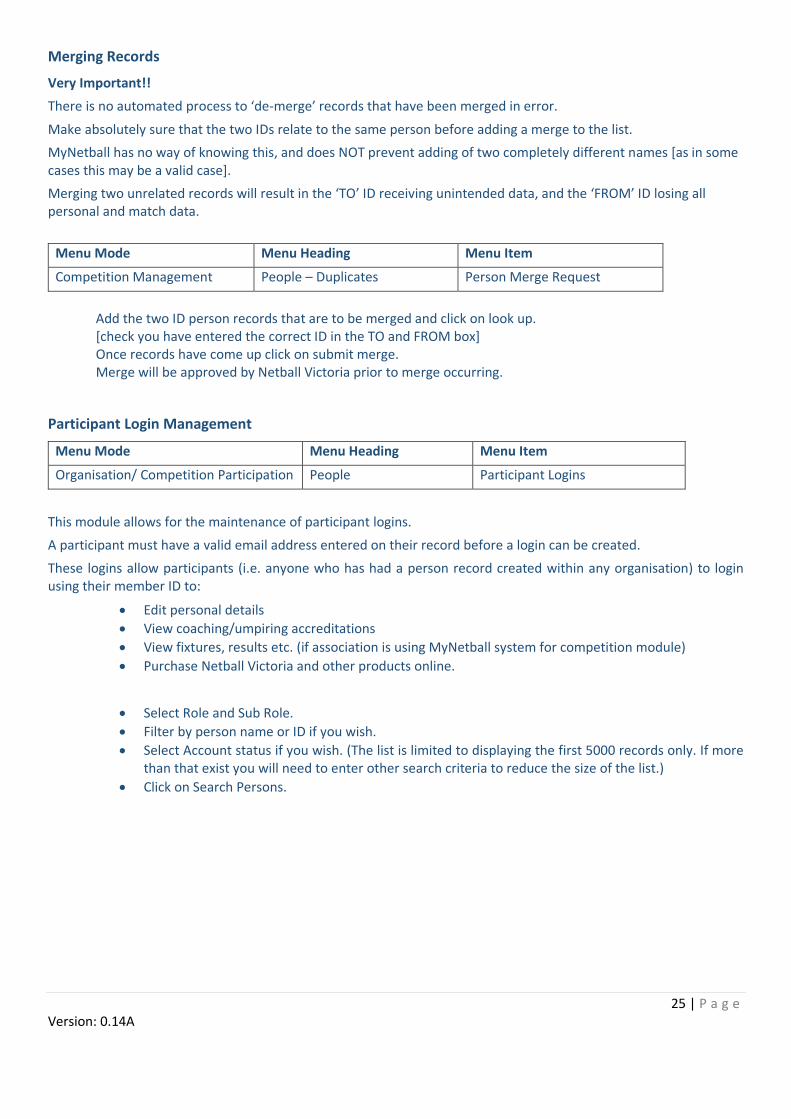
Merging Records
Very Important!!
There is no automated process to ‘de-merge’ records that have been merged in error.
Make absolutely sure that the two IDs relate to the same person before adding a merge to the list.
MyNetball has no way of knowing this, and does NOT prevent adding of two completely different names [as in some cases this may be a valid case].
Merging two unrelated records will result in the ‘TO’ ID receiving unintended data, and the ‘FROM’ ID losing all personal and match data.
Menu Mode Menu Heading Menu Item
Competition Management People – Duplicates Person Merge Request
Add the two ID person records that are to be merged and click on look up. [check you have entered the correct ID in the TO and FROM box] Once records have come up click on submit merge. Merge will be approved by Netball Victoria prior to merge occurring.
Participant Login Management
Menu Mode Menu Heading Menu Item
Organisation/ Competition Participation People Participant Logins
This module allows for the maintenance of participant logins.
A participant must have a valid email address entered on their record before a login can be created.
These logins allow participants (i.e. anyone who has had a person record created within any organisation) to login using their member ID to:
Edit personal details
View coaching/umpiring accreditations
View fixtures, results etc. (if association is using MyNetball system for competition module)
Purchase Netball Victoria and other products online.
Select Role and Sub Role.
Filter by person name or ID if you wish.
Select Account status if you wish. (The list is limited to displaying the first 5000 records only. If more than that exist you will need to enter other search criteria to reduce the size of the list.)
Click on Search Persons.

26 | P a g e Version: 0.14A
The participant login account can have the following status:
NO ACCOUNT No account exists for this participant (an account can be created)
INVALID EMAIL No account exists for this participant but their email address is missing or invalid (no account can be created until this is rectified)
ACTIVE Participant has an account which is active
LOCKED Participant has an account which is locked (perhaps they have entered the wrong password too many times)
DELETED Participant has an account which has been marked Deleted
A list of valid actions that can be performed against this login account. NOTE : If you choose an action that is not valid the action will not be performed for this participant.
Create Logins A login account is created for the participant and an email (the welcome email) containing their details is emailed to the participant.
Create Logins or Resend if created
As above but if the participant already has a login account the "welcome email" is resent
Reset Passwords This will change the password to a random password, unlock a locked account, and send a password reset email to the participant.
Unlock Accounts Unlock the account for a participant. The login will lock after a certain number of consecutive unsuccessful login attempts.
To send login details to those participants that have a valid email address: Select participant you would like the action to apply to. At Actions select required action. Click Perform action.
Where a login already exists for the person concerned, that row will have a light green background, otherwise there will be no background.
Where a login account has been locked or deleted the text will be displayed as orange or red accordingly.

27 | P a g e Version: 0.14A
Transfers and clearances
Transfers - a player can be registered under many associations, this is called a transfer in MyNetball and the second association, becomes the secondary registration, this does not need authorisation.
For Privacy reasons, you cannot edit this record for 5 days, however you are able to register the player and select them on a team.
Clearances – moving a player from one association to another OR moving from one club to another OR one club to another association, does need authorisation, and is referred to in MyNetball as a clearance.
Transferring an existing record to your association
If your member is on list but is not linked to your association or club you will need to click on the transfer button.
Select the transfer option to an association or directly to a club
Click Transfer.
28 | P a g e Version: 0.14A
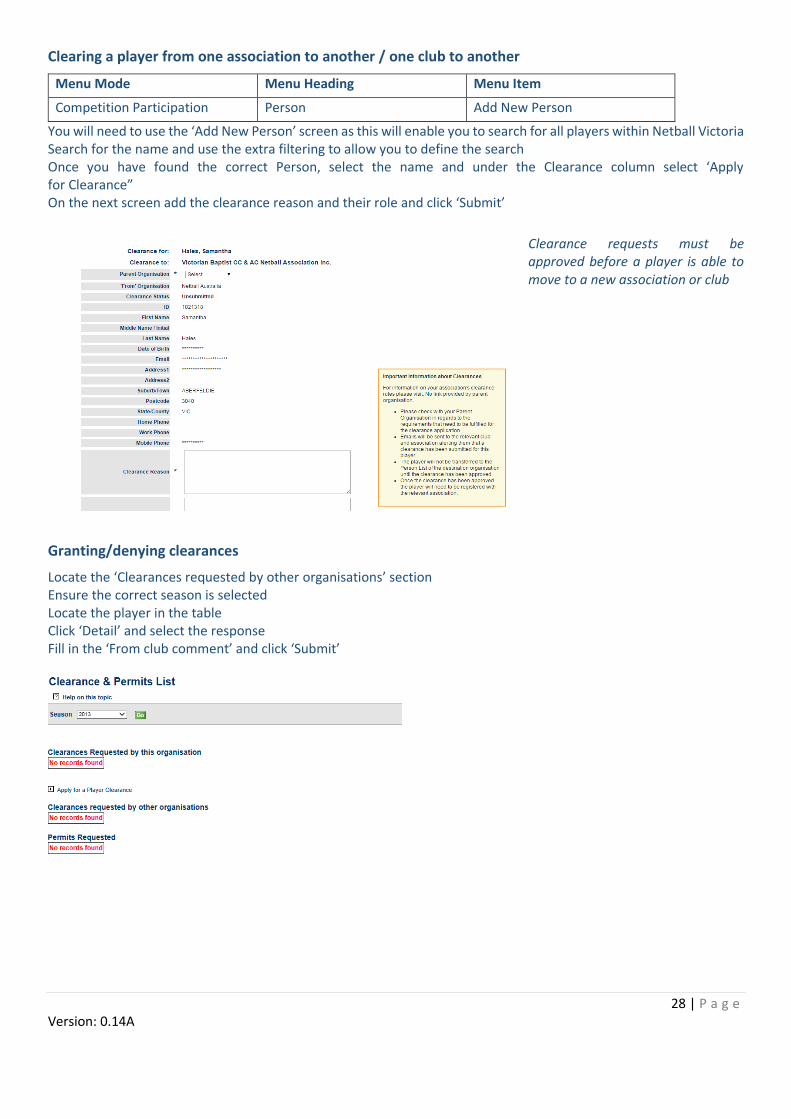
Clearing a player from one association to another / one club to another
Menu Mode Menu Heading Menu Item
Competition Participation Person Add New Person
You will need to use the ‘Add New Person’ screen as this will enable you to search for all players within Netball Victoria Search for the name and use the extra filtering to allow you to define the search Once you have found the correct Person, select the name and under the Clearance column select ‘Apply for Clearance” On the next screen add the clearance reason and their role and click ‘Submit’
Clearance requests must be approved before a player is able to move to a new association or club
Granting/denying clearances
Locate the ‘Clearances requested by other organisations’ section Ensure the correct season is selected Locate the player in the table Click ‘Detail’ and select the response Fill in the ‘From club comment’ and click ‘Submit’
29 | P a g e Version: 0.14A
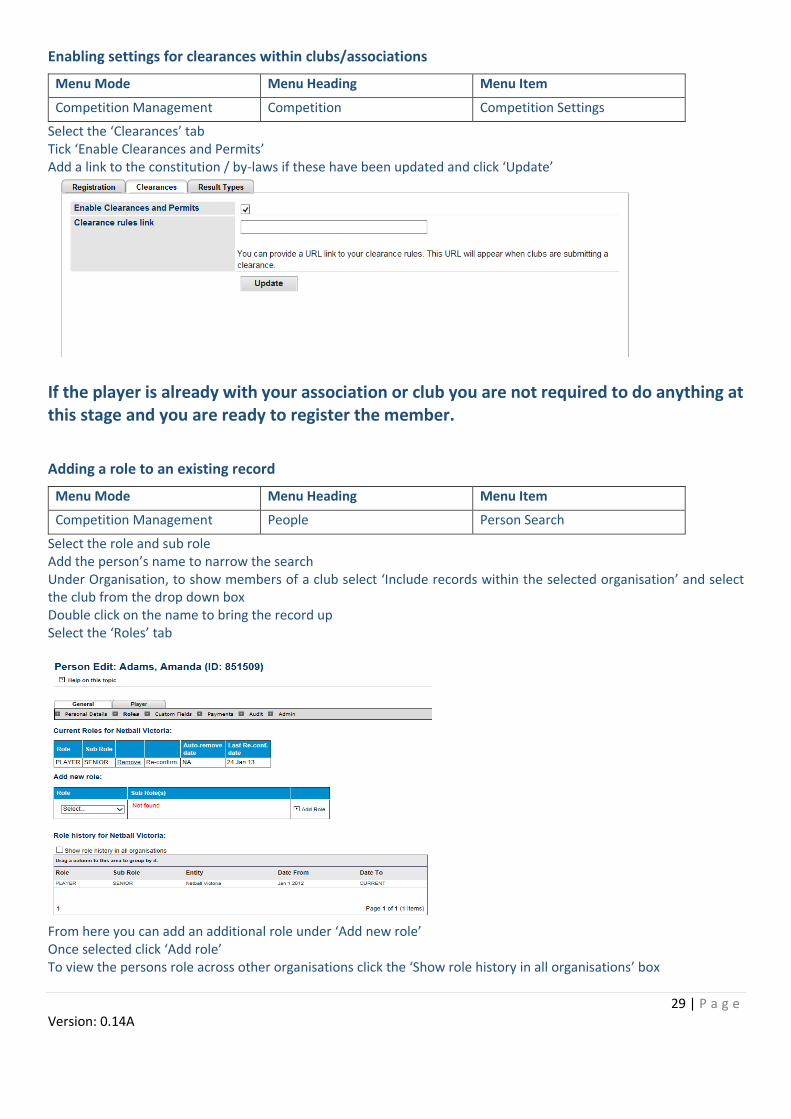
Enabling settings for clearances within clubs/associations
Menu Mode Menu Heading Menu Item
Competition Management Competition Competition Settings
Select the ‘Clearances’ tab Tick ‘Enable Clearances and Permits’ Add a link to the constitution / by-laws if these have been updated and click ‘Update’
If the player is already with your association or club you are not required to do anything at this stage and you are ready to register the member.
Adding a role to an existing record
Menu Mode Menu Heading Menu Item
Competition Management People Person Search
Select the role and sub role Add the person’s name to narrow the search Under Organisation, to show members of a club select ‘Include records within the selected organisation’ and select the club from the drop down box
Double click on the name to bring the record up Select the ‘Roles’ tab
From here you can add an additional role under ‘Add new role’ Once selected click ‘Add role’ To view the persons role across other organisations click the ‘Show role history in all organisations’ box

30 | P a g e Version: 0.14A
Checking Umpire/Coach Accreditations
Menu Mode Menu Heading Menu Item
Competition Management People Person Search
Once you have brought up the person record, click on the Accreditation tab Select Coach or Umpire Accreditation tab to view particular accreditation.
Creating a custom field
Menu Mode Menu Heading Menu Item
Competition Participation People Custom Person Fields
Click on ‘Add New Custom Field’ Under ‘Field Details’ column add a short name and description
Under the heading Field Type, from the drop down menu ‘Type’ select the type of data entry you required i.e. Check Box List AND ‘Options’ if required i.e. yes, no Under Display options select both options to prohibit editing Tick ‘Child Orgs’ to make these visible to clubs Select the roles this field will apply to Tick ‘active’ Select a sort order (this is the order it will be presented on the screen) Click ‘update’
Adding a Disclaimer
Menu Mode Menu Heading Menu Item
Competition Management Online Forms Configuration/ Disclaimers
Click on ‘Add New Disclaimer’
Add the title and fill in the main text body or insert a link to the registration rules, by laws or constitution.
Click ‘Update’

31 | P a g e Version: 0.14A
E Communications Email Communications
This module allows you to communicate with your members through email directly from the system this is a text based email system.
Menu Mode Menu Heading Menu Item
Competition Management/ Participation
Communications Email> Email People
Select a Person Filter and Role Filter Filter by Advanced Search Criteria if applicable Click on Display Recipients
Unselect any recipients you wish not to send email to and add any extra recipients below Click Send Email to send the email.
SMS Communications
Add Subject and content in Message section Attach files is applicable To use this function you are required to purchase credits from Interact Sport.
32 | P a g e Version: 0.14A
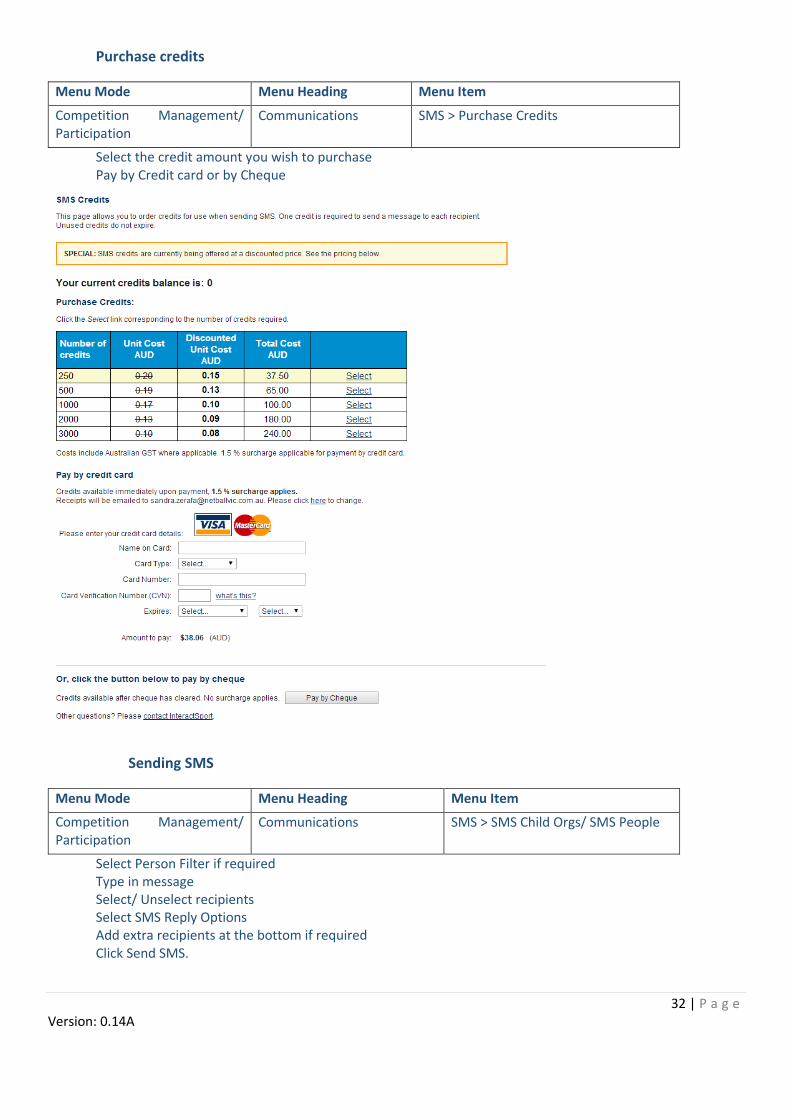
Purchase credits
Menu Mode Menu Heading Menu Item
Competition Management/ Participation
Communications SMS > Purchase Credits
Select the credit amount you wish to purchase Pay by Credit card or by Cheque
Sending SMS
Menu Mode Menu Heading Menu Item
Competition Management/ Participation
Communications SMS > SMS Child Orgs/ SMS People
Select Person Filter if required Type in message Select/ Unselect recipients Select SMS Reply Options Add extra recipients at the bottom if required Click Send SMS.

33 | P a g e Version: 0.14A
Email team contacts & members
In this section you are also able to ‘email players in a particular team’ & select team lists.
Menu Mode Menu Heading Menu Item
Competition Management Competition Teams & Affiliates>Team contacts report
Select Season, Grade division, Grade & Type. Select the teams you wish to contact Select the action you would like to perform Click ‘Perform Action’ This will take you to the email / SMS communications page
Newsletter Manager
Menu Mode Menu Heading Menu Item
Competition Participation Communications Newsletter Manager > Newsletter Portal
The Newsletter Manager is a sophisticated Newsletter creation system and operates on a purchased credit basis. The newsletter is delivered through SendGrid.
This HTML based system allows you to attach images and track and manage subscribers.
You are able to purchase Newsletter credits by contacting Interact Sports.

34 | P a g e Version: 0.14A
Newsletter Portal Setup
Click on Account Overview On the right hand side click Profile Settings and ensure information is correct.
Create a sender address
Click on Marketing Dashboard Click on Create a Sender Address Enter details and click Save.

35 | P a g e Version: 0.14A
Create a Recipient List
Click on Recipient Lists Click on ‘Create A Recipient List’ Add a List Name. Click Step 2 – Add Recipients
Add recipients to the list using one of the options and click Step 3 – Verify and Save

36 | P a g e Version: 0.14A
Creating marketing email
In Newsletter Portal select ‘Marketing Emails’
Select ‘Create marketing email’ Add the marketing email title Select the sender address (if you have more than one stored) Create a category to group your emails if you are sending multiple emails relating to the same topic areas e.g. umpiring, events Select the applicable Marketing Email type (most clubs and associations will not require Split Testing) and Click STEP 2 – Select Recipients Select an existing recipient list from your person filters or create a new list and click Step 3 - Design
Select your template choices:
BASIC/DESIGN TEMPLATES

37 | P a g e Version: 0.14A
38 | P a g e Version: 0.14A
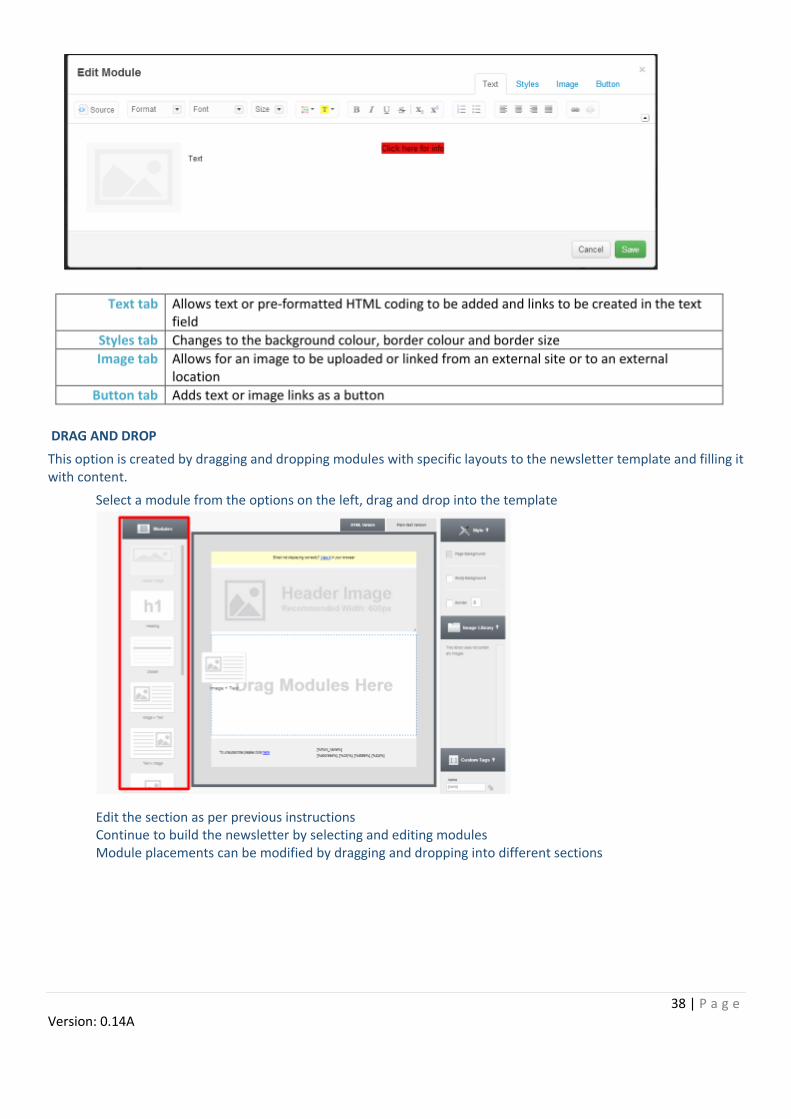
DRAG AND DROP
This option is created by dragging and dropping modules with specific layouts to the newsletter template and filling it with content.
Select a module from the options on the left, drag and drop into the template
Edit the section as per previous instructions Continue to build the newsletter by selecting and editing modules Module placements can be modified by dragging and dropping into different sections
39 | P a g e Version: 0.14A
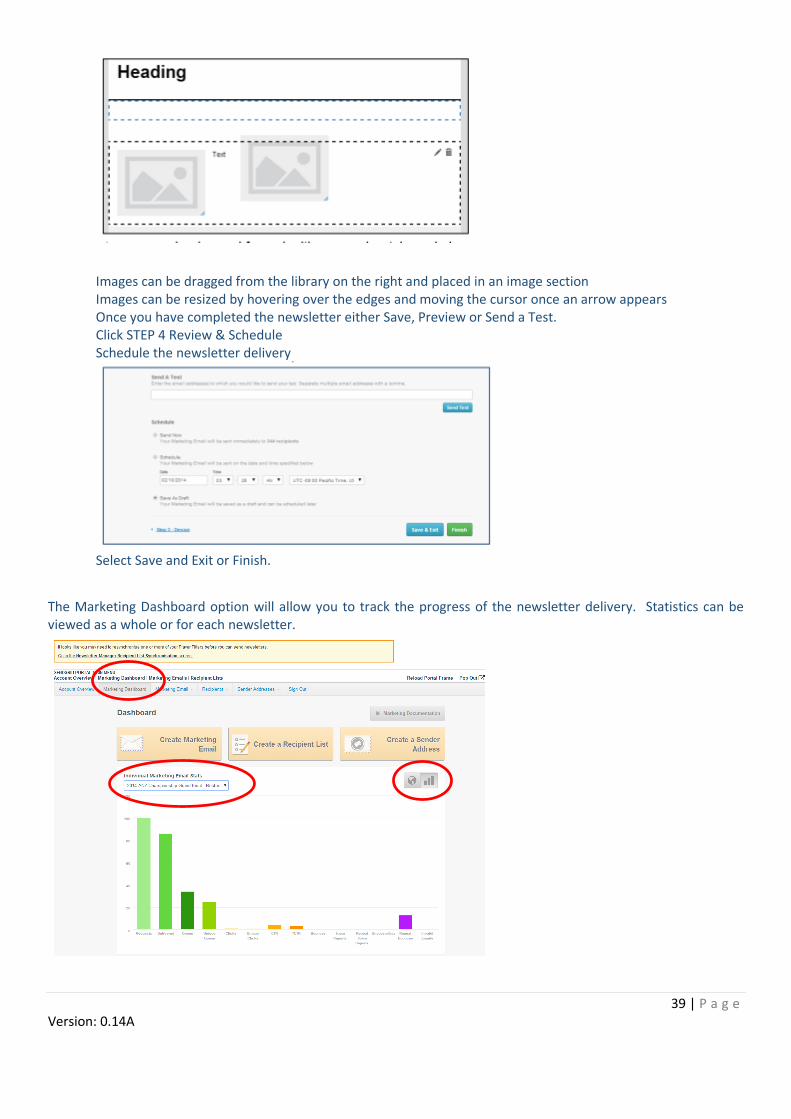
Images can be dragged from the library on the right and placed in an image section Images can be resized by hovering over the edges and moving the cursor once an arrow appears Once you have completed the newsletter either Save, Preview or Send a Test. Click STEP 4 Review & Schedule Schedule the newsletter delivery
Select Save and Exit or Finish.
The Marketing Dashboard option will allow you to track the progress of the newsletter delivery. Statistics can be viewed as a whole or for each newsletter.

40 | P a g e Version: 0.14A
MyNetball Competition Module – full instructions
Setting up draw detail
To create your draw you can follow the Setup Wizard steps, set up each section individually or use a combination of both. We recommend the set up wizard if this is your first time
Setup wizard
Menu Mode Menu Heading Menu Item
Competition Management Competition Setup Wizard
Select the Set Up Mode – ‘Simple’ or ‘Advanced’ depending on how much information you want to input
Select the Team Mode – ‘Teams Managed By Clubs’ or ‘Teams Managed By This Organisation’
Organisation Details, refer page 6
Review Competition Settings
At the top of the page there are 3 tabs, ‘Registration’, ‘Clearances’ and ‘Result Types’
In the ‘Registration’ tab ensure ‘Enable Registration’ is ticked to be able to register for the current competition, select update Once this is completed, you will have 3 options to choose from, ‘Require reg and report exceptions’, ‘Require reg and prevent selection’ and ‘Don’t Require reg’.
In the ‘Clearances’ tab ensure ‘Enable Clearances and Permits’ is ticked, to ensure players can be transferred from other clubs / associations, click update. You can provide a link to your constitution / by laws if these include clearance by laws

41 | P a g e Version: 0.14A
In the ‘Results Types’ tab, choose the match types that relate to your competitions, click update.
Set/Rollover Season
Menu Mode Menu Heading Menu Item
Competition Management Competition Season Settings
Setting current season
In the ‘Settings’ tab under ‘Set to new season’ select the season. This will set the season for your Association only Under ‘Current season for affiliates’ click ‘Set current’ to set this for your child organisations. (clubs)
Adding a New Season
Under ‘Season list’ click ‘Add season’ Select the season and suffix if applicable. Click ‘Add’ Note: A newly added season that could potentially be set as the current season will not appear in the Current Season list until the page is refreshed (by visiting another tab and returning to this page).
42 | P a g e Version: 0.14A
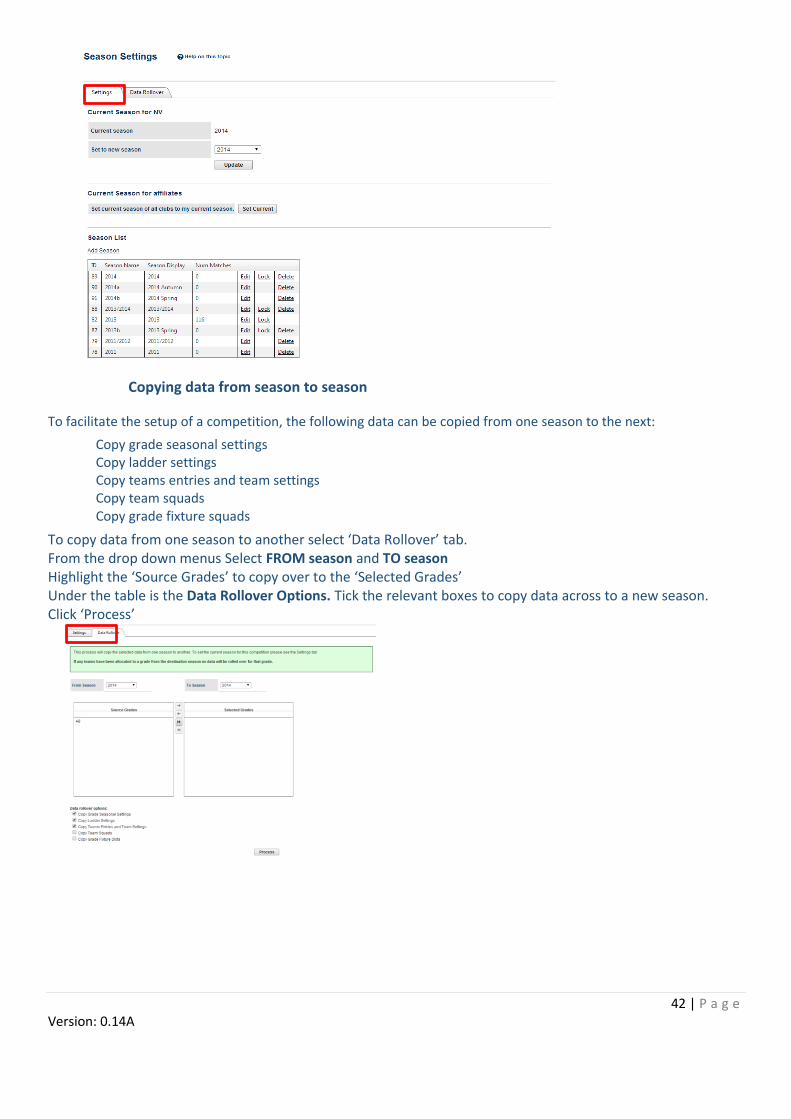
Copying data from season to season
To facilitate the setup of a competition, the following data can be copied from one season to the next:
Copy grade seasonal settings Copy ladder settings Copy teams entries and team settings Copy team squads Copy grade fixture squads
To copy data from one season to another select ‘Data Rollover’ tab. From the drop down menus Select FROM season and TO season Highlight the ‘Source Grades’ to copy over to the ‘Selected Grades’ Under the table is the Data Rollover Options. Tick the relevant boxes to copy data across to a new season. Click ‘Process’
43 | P a g e Version: 0.14A
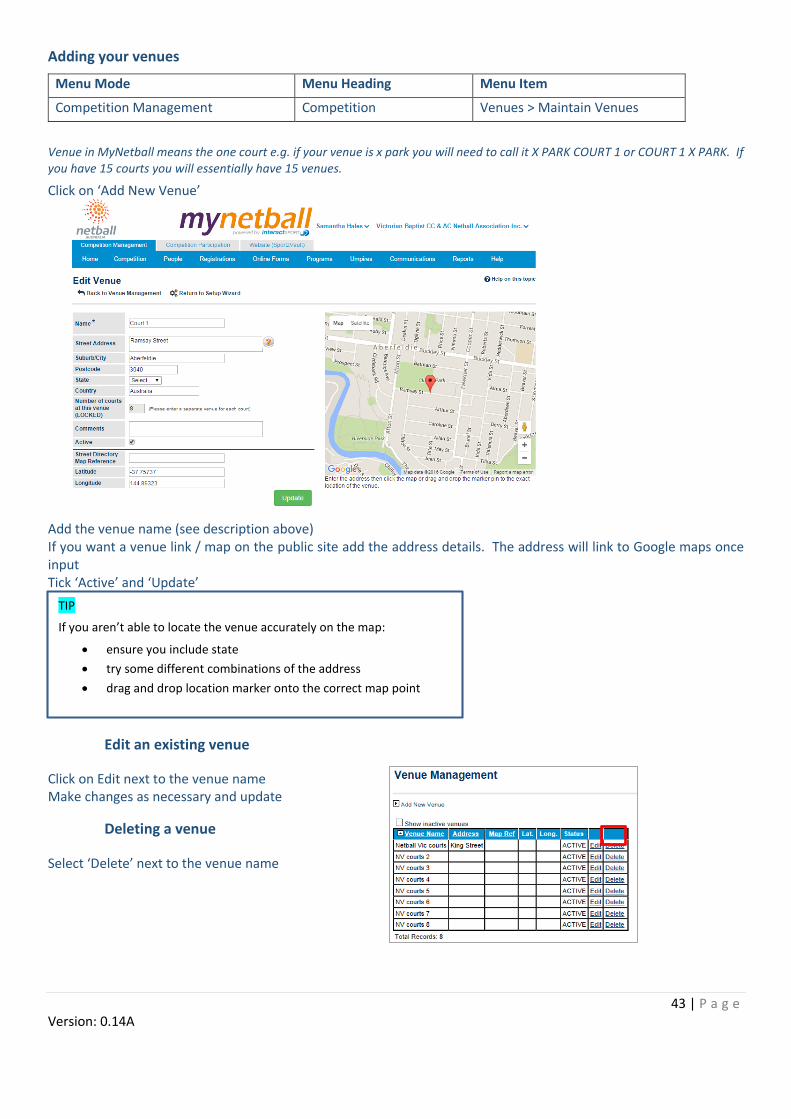
Adding your venues
Menu Mode Menu Heading Menu Item
Competition Management Competition Venues > Maintain Venues
Venue in MyNetball means the one court e.g. if your venue is x park you will need to call it X PARK COURT 1 or COURT 1 X PARK. If you have 15 courts you will essentially have 15 venues.
Click on ‘Add New Venue’
Add the venue name (see description above) If you want a venue link / map on the public site add the address details. The address will link to Google maps once input Tick ‘Active’ and ‘Update’
Edit an existing venue
Click on Edit next to the venue name Make changes as necessary and update
Deleting a venue
Select ‘Delete’ next to the venue name
TIP
If you aren’t able to locate the venue accurately on the map:
ensure you include state
try some different combinations of the address
drag and drop location marker onto the correct map point

44 | P a g e Version: 0.14A
Creating ladder points setup
Menu Mode Menu Heading Menu Item
Competition Management Competition Ladders > Ladder Points Schemes
Click on ‘Add New Ladder Points Scheme’ Add a name for the ladder Ensure bonus points tick box is ticked if your association uses bonus points Tick ‘Default points scheme’ if this is the main ladder you will use Add your points settings for each match outcome (this will be different for each association) Click ‘Update’ to save NOTE: Areas highlighted yellow will not display as result types to be selected. To change refer to 4.4
Creating ladder display schemes
Menu Mode Menu Heading Menu Item
Competition Management Competition Ladders > Ladder Display Schemes
There are 2 options with ladder display schemes; simple and advanced
SIMPLE Shows a basic ladder and you have no control over which columns appear
ADVANCED Can be customised, calculated on column order and any number of columns selected to be displayed
Click on ‘Add New Ladder Display Scheme’

45 | P a g e Version: 0.14A
Under Simple Mode tab:
Select the transfer option to an association or directly to a club Click Transfer. Add the scheme name Add number of finals teams Tick ‘Show Team Logos in Ladder’ if you want to display the team logo Tick Default display scheme if you want to make it the default scheme Tick ‘Show Ladder Summary Fields’ Select the correct Points Ratio Display Select the correct Percentage Calculation Method Click ‘Update’
Under Advanced Mode tab:
Edit Ladder Sort Order if required. Under Ladder Columns to Display add columns if you require. You can also move columns up and down and delete as required. Click ‘Update’
Entering match start times
Menu Mode Menu Heading Menu Item
Competition Management Competition Draw > Configure Start Times
Click on ‘Add New Match Start Time’
Select the day and time
Column order can be changed by dragging to relevant order

46 | P a g e Version: 0.14A
Add a sort order (the sort order determines the ordering of the start time with lower values at the top and higher values at the bottom) Click ‘Save’ To edit previous start times click on ‘Edit’
Add non playing dates
Menu Mode Menu Heading Menu Item
Competition Management Competition Draws > Non Playing Dates
Under ‘Add non playing date grouping’ add a new group name
Add a description – optional Click ‘Save’ To add the specific dates under ‘Existing groupings’, ‘Actions’ click ‘Edit’
In the ‘Add new date’ box select the date range (It is recommended that if this is a range you specify the day after the last match up to the day before the next match)
In ‘Add public holidays section’ click on ‘Include dates’ – optional

47 | P a g e Version: 0.14A
Managing grade setup
Menu Mode Menu Heading Menu Item
Competition Management Competition Grades > Maintain Grades, Teams & Ladders
Add a New Grade
Select ‘Add New Grade’
Add in the Grade Name and tick ‘active’ to display Add in a ‘Grade Sort Order’ number (optional) - this affects the order in which the grades are in a list Select the grade type from the drop down menu Add in ‘Age Range’ (optional) Add a ‘Default Start Time’ (optional and not needed if fixture slots are created) ‘Umpire Allocation Organisation’ – optional at this point ‘Club Championship Weighing Factor’ – not applicable ‘Automatically Make Match Official When Confirmed’ – i.e. once results are confirmed. Tick if you want this setting to be enforced Select ‘Fixture Sort Order’ by round Select your preferred Match Result Entry Settings Select your preferred Player Score Entry Settings Click ‘Update’

48 | P a g e Version: 0.14A
Adding teams to grades
There are two options to select teams into grades:
Child Organisation (club teams) Entity Teams (teams not linked to a club, standalone teams)
OPTION 1 – Child Organisations
Select the ‘Allocate Teams’ tab In ‘Populate Available List From’ select ‘Child Organisations’ from the drop down menu In the available teams box select the clubs who are nominating teams into the grade. If a club has entered more than one team, move the club to the right box x number of times i.e. if a club has 2 teams, select the club name once then again. When all clubs are in the Teams in this Grade box select ‘Update’ OPTION 2 - Entity Teams
In ‘Populate Available List From’ select ‘Teams with Current Organisation’ (entity teams) from the drop down menu Click on ‘Add New Team’ Insert the team name and allocate players to the team. Click ‘Update’
OR Copy data from a previous grade or season
Tick the box below with info you want to copy over Select the season and grade and click GO – This will override any existing setups carried out for this grade
49 | P a g e Version: 0.14A
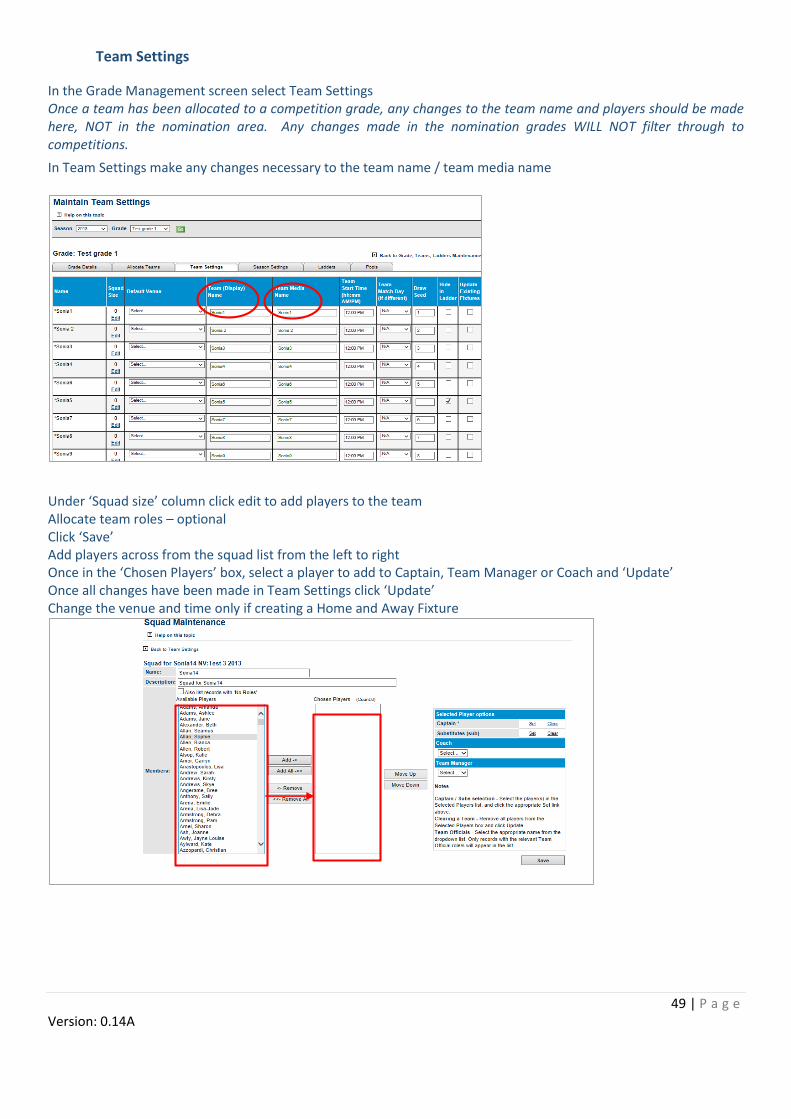
Team Settings
In the Grade Management screen select Team Settings Once a team has been allocated to a competition grade, any changes to the team name and players should be made here, NOT in the nomination area. Any changes made in the nomination grades WILL NOT filter through to competitions.
In Team Settings make any changes necessary to the team name / team media name
Under ‘Squad size’ column click edit to add players to the team Allocate team roles – optional Click ‘Save’ Add players across from the squad list from the left to right Once in the ‘Chosen Players’ box, select a player to add to Captain, Team Manager or Coach and ‘Update’ Once all changes have been made in Team Settings click ‘Update’ Change the venue and time only if creating a Home and Away Fixture

50 | P a g e Version: 0.14A
Season settings and fixture slots
Fixture slots are a way of adding venues to grades, made up of court allocations versus time allocations
Under the ‘Season Settings’ tab tick the boxes relevant to your association Ensure ‘Ladders and fixtures are published for this grade’ is ticked Select the relevant match type from the drop down menu (this is your match playing time and must be less than or equal to your fixture slot allocated) Click on ‘Add New Fixture Slot’ Select the ‘Start Time’ and ‘Venue’ If relevant edit the Weighting and Priority (The weighing will determine the order in which matches are allocated to this slot. Higher weighting means higher selection chance. Priority is used to determine the allocation order between fixture slots with the weighting. Lower = higher priority.

51 | P a g e Version: 0.14A
Allocating ladders to grades
Select the ‘Ladders’ tab and ‘Add New Ladder’ Select the Ladder Points Scheme and Ladder Display Scheme to allocate to the grade Set the ladder calculation mode to ‘Auto’ Ensure the ‘Visible on public sites’ is ticked
Grade divisions
Menu Mode Menu Heading Menu Item
Competition Management Competition Grades > Grade Divisions
Grade divisions are ways of sorting grades into groupings to make it easier to filter. The divisions will also sort the grouping of the grades on public websites
Click on ‘Add New Division’
Add the Division name e.g. Seniors Enter a sort order, the lower the number the higher the sort list Click ‘Update’ Select ‘Edit Members’
Select the grades to add to this division and ‘add’ to selected grades list Click ‘Save’
52 | P a g e Version: 0.14A
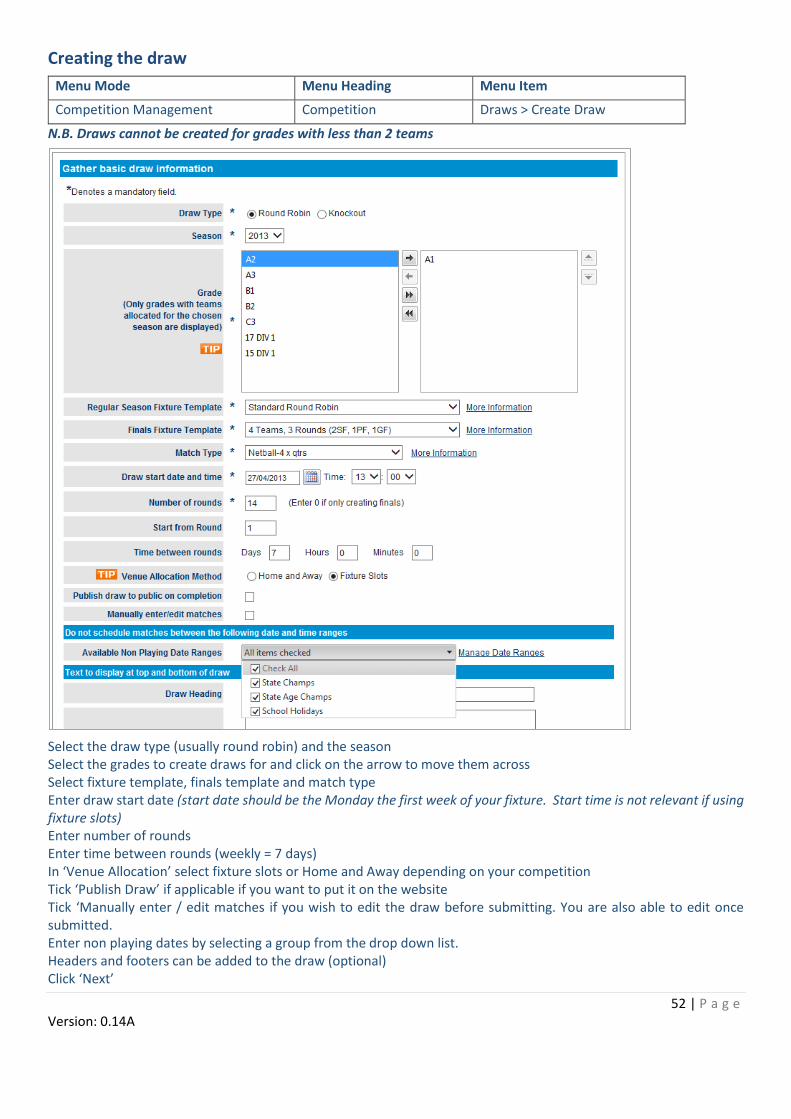
Creating the draw
Menu Mode Menu Heading Menu Item
Competition Management Competition Draws > Create Draw
N.B. Draws cannot be created for grades with less than 2 teams
Select the draw type (usually round robin) and the season Select the grades to create draws for and click on the arrow to move them across Select fixture template, finals template and match type Enter draw start date (start date should be the Monday the first week of your fixture. Start time is not relevant if using fixture slots) Enter number of rounds Enter time between rounds (weekly = 7 days) In ‘Venue Allocation’ select fixture slots or Home and Away depending on your competition Tick ‘Publish Draw’ if applicable if you want to put it on the website Tick ‘Manually enter / edit matches if you wish to edit the draw before submitting. You are also able to edit once submitted. Enter non playing dates by selecting a group from the drop down list. Headers and footers can be added to the draw (optional) Click ‘Next’

53 | P a g e Version: 0.14A
Round Settings
Confirm the match types for each round
Round Dates
Starting date and times will be populated by the fixture slots created. If fixture slots have been assigned you can skip this step

54 | P a g e Version: 0.14A
Venue Selection
If fixture slots have been assigned you can skip this step
Allocate venues to start times or if ‘Any Venue/Court’ is selected matches will be allocated to any venues specified in the Default venues list.
Seeding - optional
Seeding relates to the fixtures template which can be found in the create draw Start page – Regular Season Fixture Template more information
Review/Submit
Check the generated fixture to ensure it meets your requirement. Once you are happy click ‘Submit’ to save

55 | P a g e Version: 0.14A
Editing the fixture
There are a number of methods that can be used to edit the draw once submitted. Below are a few choices.
Editing teams, days, times and courts
Menu Mode Menu Heading Menu Item
Competition Management Competition Draws > Draw Management or Edit Draw
Select the grade to make changes to and in the Edit Draw column click ‘Edit’ Select the round games to display Make the relevant changes and click ‘Update’ and then ‘Update’ again at the bottom.
OR
Venue calendar
Menu Mode Menu Heading Menu Item
Competition Management Competition Venues > Venue Scheduler
In this view once the draw has been created matches can be moved to different start times and venues using drag and drop (maximum 10 venues visible each time)
Select the match you want to move and drag it into the venue and time slot OR Right click on the match Select ‘Edit’

56 | P a g e Version: 0.14A
Change the details in the pop up screen and select ‘Update’
Be aware once this has been done it is automatically saved so do not move matches unless you are 100% sure!
OR
Bulk changes to days, times or venues
Menu Mode Menu Heading Menu Item
Competition Management Competition Matches > Match Manager
Select the grade to display Select the date range or round for the games to display Click on ‘search matches’ Tick all the relevant matches the change will apply to In the bulk actions box select ‘Change match dates/times’ or ‘Change match type’ or ‘Change match venue’ Click ‘Perform action’. This will perform the bulk changes for you. You will need to print an updated fixture list
Changing / replacing teams in a draw
Menu Mode Menu Heading Menu Item
Competition Management Competition Draws > Replace Team in Draw
This can be used for a last minute replacement of a team.
Once you have added in the extra team in Maintain Grades, Teams and Ladders section, select the relevant grade Locate the team to be replaced In the drop down options select the team to replace them Update If a round has already been played and scores input, the change will need to be made manually for each round using Edit Draw following instructions below:
Menu Mode Menu Heading Menu Item
Competition Management Competition Draws > Edit Draw
Select the grade and round you would like to implement the changes for Next to the relevant match click ‘Delete’ You will receive the message below

57 | P a g e Version: 0.14A
Click OK A small C will appear next to the match Click Update at the bottom – this will clear the score for the game Click edit next to the same game Make the necessary team changes Click update next to the game and at the bottom of the screen You will now need to re input the scores in match manager and recalculate the ladder
58 | P a g e Version: 0.14A
Venue Clash Report
Once you have completed all your changes run a venue clash report to ensure there are no clashes in your fixtures.
Menu Mode Menu Heading Menu Item
Competition Management Competition Venues > Venue Clashes
1. Filter the season and grade and click Go. All clashes will appear on the list.
Creating a single day tournament draw – TIPS
Before beginning
Check that the Current Season is set refer to section 6.5 Create Match Start Times (One for each day and time) refer to section 6.9 Create venues (One for each court) refer to section 6.6 Create Grades (Create al the grades you will be fixturing) refer to section 6.11.1 Allocate Teams to Grades (Populate the grades with teams) refer to section 6.11.2
Configuring Fixture Slots for tournament mode
Fixture slots for a tournament must be configured on the season settings page for the grades involved. Competition > Grades > Maintain Grades, Teams and Ladders…Season Settings Every fixture slot that a match from a grade can potentially occupy in the tournament should be added The priority field of the fixture slot will be used to determine the order of allocation. Low values have a high priority (ie: 1 is the Highest priority). It is recommended that the priority of a fixture slot should correspond to the round in which that fixture slot will be used (eg: Priority 1 slots will be used in round 1) If a set of fixture slots are going to be shared by multiple grades then all of the fixture slots need to be allocated to each grade.
Creating the Draw
Creating the draw follows the same process as usual. Competition > Draws >Create Draw refer to section 7
At ‘Frequency’ setting select ‘Tournament’ will make a few new settings available.
Tournament mode settings
Rounds per day – The number of tournament rounds that will take place each day. Time between rounds – The time between the beginnings of 2 consecutive rounds in the tournament on any given day. Venue Allocation Method – The method that will be used to allocate venues. (This will always be set to fixture slots).
Notes: At the venue allocation step of the draw creator the ‘Process in Grade Sort order’ option can be checked giving the user some control over the order in which matches are allocated.
59 | P a g e Version: 0.14A
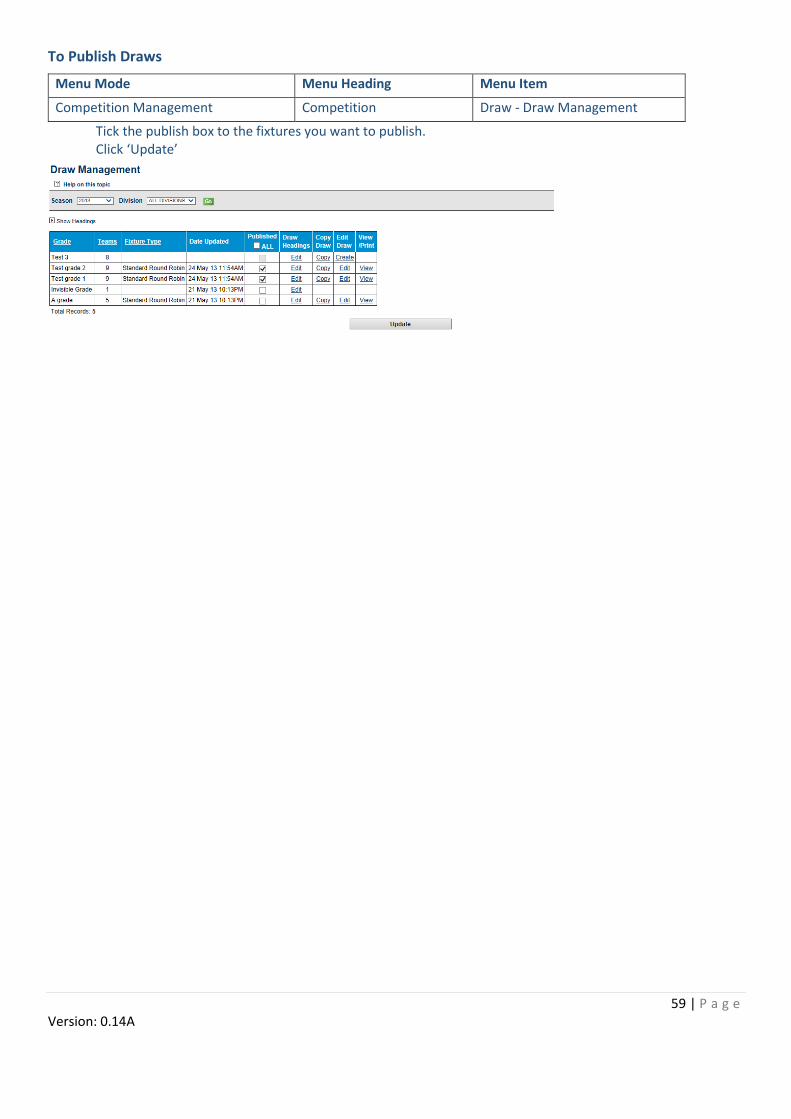
To Publish Draws
Menu Mode Menu Heading Menu Item
Competition Management Competition Draw - Draw Management
Tick the publish box to the fixtures you want to publish. Click ‘Update’

60 | P a g e Version: 0.14A
Setting default score sheets
Menu Mode Menu Heading Menu Item
Competition Management Competition Grades > Advanced Grade Settings
In the ‘Match scorecards’ tab, you can either set one default to be used for all grades of different score sheets for different divisions. In default settings choose the default score sheet you want to use. Add any text you want at the top and the bottom (selecting scorecard preview screen will show which ones can be edited) Add the organisation logo and sponsor logos (these files will need to be uploaded to the website file manager before they can be selected)
Selecting different score sheets for different grades
To set different score sheets for specific grades, under Grade Settings tick the grade(s) you want Click on ‘Update selected grades’
Choose the template In the pop up window add in the text you want for these grades (e.g. junior score sheet instructions and senior instructions) Click Update
61 | P a g e Version: 0.14A
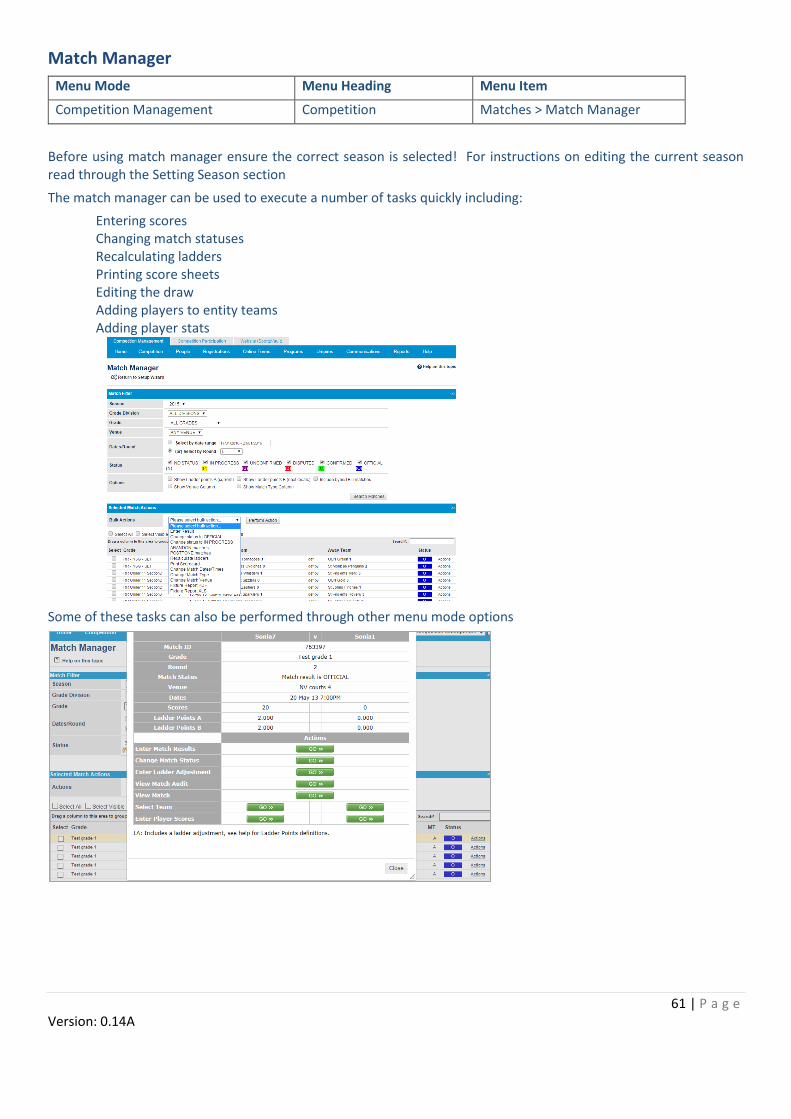
Match Manager
Menu Mode Menu Heading Menu Item
Competition Management Competition Matches > Match Manager
Before using match manager ensure the correct season is selected! For instructions on editing the current season read through the Setting Season section
The match manager can be used to execute a number of tasks quickly including:
Entering scores Changing match statuses Recalculating ladders Printing score sheets Editing the draw Adding players to entity teams Adding player stats
Some of these tasks can also be performed through other menu mode options

62 | P a g e Version: 0.14A
Printing Score Sheets
Menu Mode Menu Heading Menu Item
Competition Management Competition Matches > Match Manager
Select the grade division or grade and date range or round to display Tick the grade you need or tick select all in the grade list
In ‘Actions’ drop down menu select ‘Print scorecard’ Score cards will open in a PDF file for you to print
Entering Results
Menu Mode Menu Heading Menu Item
Competition Management Competition Matches > Match Manager
Select the relevant Grade Division and Grade or ‘All grade divisions’ and ‘All grades’ to show a list Select the date range to show matches or round Click ‘Search matches’ In the match list tick the matches to enter results for or tick ‘Select all’ In Actions choose ‘Enter result’ from the drop down menu Add your scores and result in and click ‘Update
’

63 | P a g e Version: 0.14A
Player Stats
Menu Mode Menu Heading Menu Item
Competition Management Competition Matches > Match Manager
Once the results have been added go to the previous match manager screen In the matches list next to the relevant match select Actions
Under ‘Enter player scores’ select
Complete player stats – Untick ‘played’ for players who have not taken the court or add in periods played and positions for more detailed stats Click ‘Update’
Borrowed Players
In the player result list above, click the ‘Add player’ box at the bottom Search for the player and add them to the game Click ‘Update’

64 | P a g e Version: 0.14A
Ladders
Calculating Ladders
Menu Mode Menu Heading Menu Item
Competition Management Competition Ladders > Maintain Grades, Teams, Ladders
If you have set the ladder to calculate automatically this will be recalculated overnight. If you need to see the ladder update straight away follows the steps below
Click on ‘Ladders’ in the ladder column Under ‘Recalculate auto ladder’ select ‘Recalc’ You should now be able to see an updated ladder
Viewing Ladders
Basic Ladders
Menu Mode Menu Heading Menu Item
Competition Management Reports Public Portal Reports > Ladders - Basic

65 | P a g e Version: 0.14A
Ladders by round
Menu Mode Menu Heading Menu Item
Competition Management Reports Public Portal Reports > Ladders – By Round
Ladder Adjustments
Menu Mode Menu Heading Menu Item
Competition Management Competition Ladders > Ladder Adjustments
Click on add a new adjustment Select round and Grade and click Go
Select the match the adjustment applied to Select the team the adjustment applies to Adjust the points Add comments Click ‘Add’
The adjustment and comments will display on PUBLIC PORTAL REPORTS > LADDERS > BY ROUND by an A

66 | P a g e Version: 0.14A
Clicking on the A will display the reason for the adjustment:
67 | P a g e Version: 0.14A
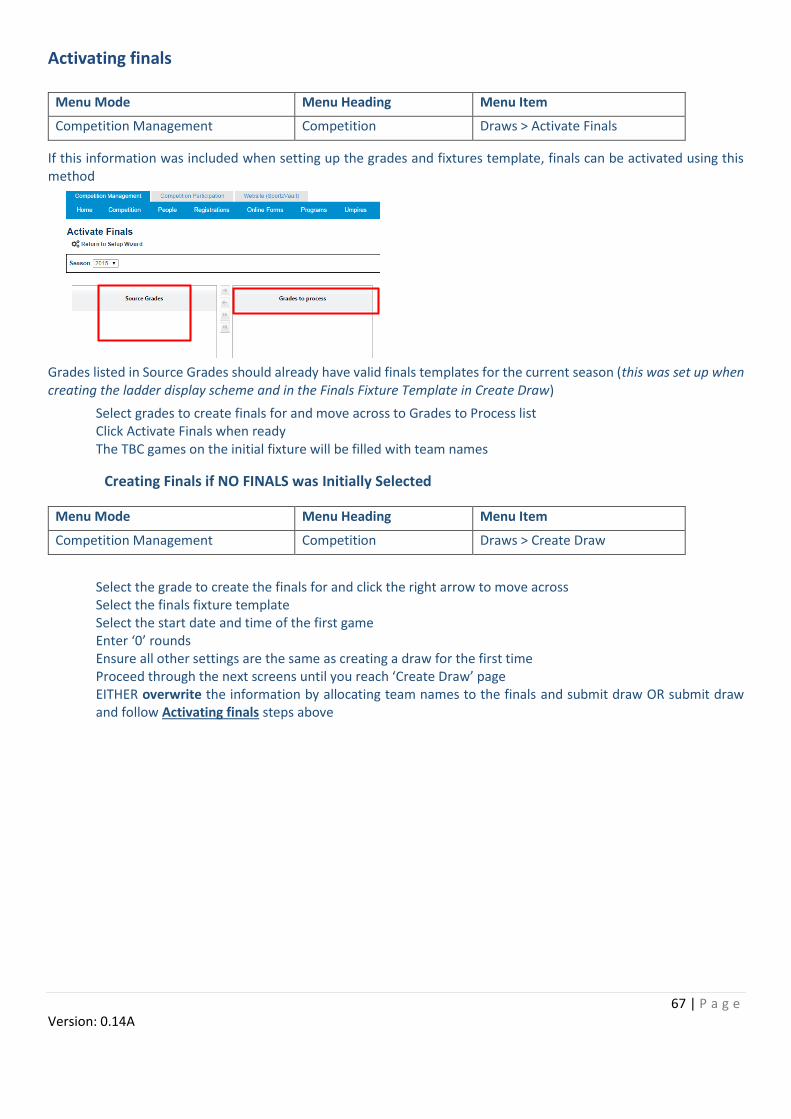
Activating finals
Menu Mode Menu Heading Menu Item
Competition Management Competition Draws > Activate Finals
If this information was included when setting up the grades and fixtures template, finals can be activated using this method
Grades listed in Source Grades should already have valid finals templates for the current season (this was set up when creating the ladder display scheme and in the Finals Fixture Template in Create Draw)
Select grades to create finals for and move across to Grades to Process list Click Activate Finals when ready The TBC games on the initial fixture will be filled with team names
Creating Finals if NO FINALS was Initially Selected
Menu Mode Menu Heading Menu Item
Competition Management Competition Draws > Create Draw
Select the grade to create the finals for and click the right arrow to move across Select the finals fixture template Select the start date and time of the first game Enter ‘0’ rounds Ensure all other settings are the same as creating a draw for the first time Proceed through the next screens until you reach ‘Create Draw’ page EITHER overwrite the information by allocating team names to the finals and submit draw OR submit draw and follow Activating finals steps above

68 | P a g e Version: 0.14A
Regrading
Menu Mode Menu Heading Menu Item
Competition Management Competition Grades > Re grade Team
Select the source grade being moved from Select the ‘Team to re grade’ Select the destination grade
Moving a Team from One Grade to Another Grade
Follow the steps above Select ‘Create as a new team’ Optional – select ‘Replace future byes in the destination grade with migrated team’ if applicable Tick ‘Copy played matches and ladder points’ if applicable or leave unticked to start from 0 Tick ‘Replace migrated team with BYE in the source grade’ if applicable Click ‘Submit’
Swapping Two Teams
Follow the steps above Click ‘Submit’ Repeat the steps above for the other team
Re-grade Report
Click on ‘Re-grade report’ on the right to show a re-grading history.
NOTE: If you find that the team that has been regraded is not displaying on the ladder or fixture, check whether they have been hidden at Maintain Grades, Teams and Ladders Page

69 | P a g e Version: 0.14A
Setting up awards
Menu Mode Menu Heading Menu Item
Competition Management Competition Matches> Voted Awards > Voted Awards Management
Click on ‘Add new award’ Add the award name Add details into the notes Select the season it applies to Select the Public Report Display Status: Principal User Only – Will not get displayed on any public pages Unrestricted – Will display on public sites such as the public portal In ‘Vote entry access’ select the people you want to have access to enter votes
Select the grades the vote applies to and click ‘Add’ to move it to Selected Grades box
Select the applicable grade behaviour Choose the correct validation notes: Number of voters - The number of separate 'Vote Entries' for a given match. For example, if this is set to 1, only one voter can enter votes in a match for this award (for one or more players - see below). Any user accessing the Enter Votes screen for the same award and match will not be able to enter an extra set of votes, but depending on their access, they may be able to edit the existing votes. Sum of votes in match - For a single 'Vote Entry', determines the maximum and minimum range for the tally of votes across all players. Votes given to an individual player - For a single 'Vote Entry', determines the maximum and minimum range for the votes given to any one player. Players not receiving votes are left blank. Number of players that must be given votes - For a single 'Vote Entry', determines the maximum and minimum number of players that receive votes.
Add in optional notes and click ‘Update’ to confirm

70 | P a g e Version: 0.14A
Entering Votes
Either select Enter Votes in the Voted Awards Management page or use the menu mode below
Menu Mode Menu Heading Menu Item
Competition Management Competition Matches> Voted Awards > Enter Votes
Select the Round, Award and Grade and click GO In the Actions box click on Enter Votes
Add the votes in

71 | P a g e Version: 0.14A
Websites
Sample Web Page
Setting up the Layout
Menu Mode Menu Heading Menu Item
Website (SportzVault) Site Design Layout Manager
There are 3 parts that make up a site layout:
Home Page Template – controls the home page layout
Non Home Page Template – controls page layout other than homepage. You will need to set these up separately to view them in the menu selections
Styles Manager – controls colours, font style and sizing and other design areas
A template is divided into three main sections which span the width of the page - header, main content and footer. The main content section is made up of 2 column areas. The templates are made up of widgets and rows.
A widget is something to add to the layout to display items or information (see below)
Types of widgets:
This is an example of a website layout. You will be able to move certain sections around to meet your needs.
72 | P a g e Version: 0.14A
Banner Inserts an image that displays as the banner of the website
Menu Standard and additional menu items (recommended limit 10-12)
Image Inserts an image
HTML Adds page information
Advert Inserts an advert
YouTube Video Inserts a YouTube video
Events Displays event information from the event manager
Twitter Inserts Twitter feeds
Facebook Inserts Facebook feeds
Score Board Add in match and ladder data (option to be compact or detailed)
News Rotator Displays news items in a rotating setting
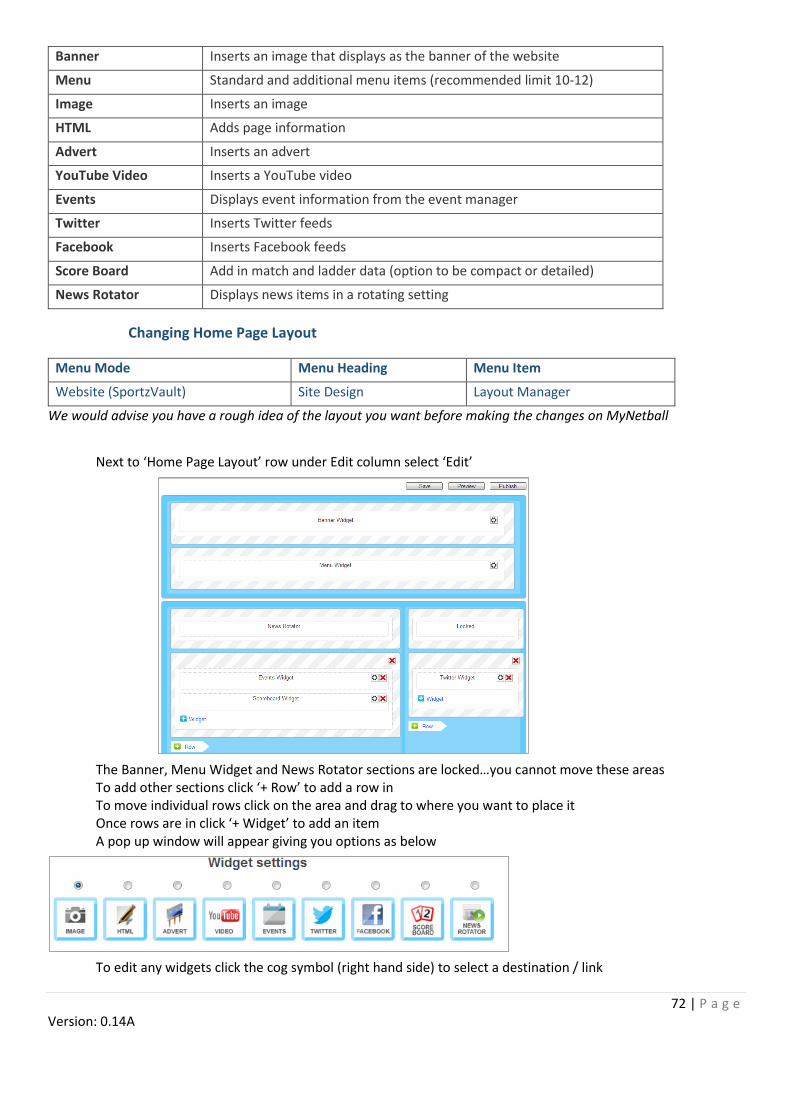
Changing Home Page Layout
Menu Mode Menu Heading Menu Item
Website (SportzVault) Site Design Layout Manager
We would advise you have a rough idea of the layout you want before making the changes on MyNetball
Next to ‘Home Page Layout’ row under Edit column select ‘Edit’
The Banner, Menu Widget and News Rotator sections are locked…you cannot move these areas To add other sections click ‘+ Row’ to add a row in To move individual rows click on the area and drag to where you want to place it Once rows are in click ‘+ Widget’ to add an item A pop up window will appear giving you options as below
To edit any widgets click the cog symbol (right hand side) to select a destination / link

73 | P a g e Version: 0.14A
SAVE when you make changes Changes can be viewed before making them live by selecting PREVIEW
When you’re happy with the changes select PUBLISH to make public To delete click X in the relevant row or whole section
Changing the Banner
Menu Mode Menu Heading Menu Item
Website (SportzVault) Site Design Layout Manager
Next to ‘Home Page Layout’ row under Edit column select ‘Edit’ In the Banner Widget select the cog symbol (right hand side) Choose the image from File Source drop down menu or add text to just add the association name as the banner. Add a link if applicable Click OK
Resizing an Image
There are numerous ways to resize an image and searching Google can give you some ideas. Using Paint is a quick method to do this
In your documents right click the image, go to ‘Open with’ and select Microsoft Office or Windows Live Photo Gallery
Locate the Edit / Resize option, add in your dimensions and save
The banner image needs to be 1000x150 PXL

74 | P a g e Version: 0.14A
Editing Website Styles and Colours
Menu Mode Menu Heading Menu Item
Website (SportzVault) Site Design Layout Manager
Click ‘Edit’ under Site Styles
Site Colours Primary colour Sets the banner, menu and widget header background colours
Secondary colour Sets the banner, menu, widget header text colour and menu hover colour
Background Background colour
Sets the background colour
Background image Sets an image in the background – Background image size is
1920 x 1200 PXL
Background repeat
Formats the background image
Menu Item padding This is the space between the menu text and the border for each menu item (for more items set a smaller padding size)
Text size The menu text font size
Text Font family The font style used throughout the website

75 | P a g e Version: 0.14A
Changing Menu Items
Menu Mode Menu Heading Menu Item
Website (SportzVault) Menu Management Menu Preferences
You can override or hide existing set menu items if you choose
Next to the relevant menu item select:
Default Label – will keep the existing name Custom Label – you can rename Hide – will not show as a menu option
Editing Menu
Menu Mode Menu Heading Menu Item
Website (SportzVault) Menu Management Menu Editor
Select whether you want to set up a Simple or Advanced menu
Simple – the simple mode retains certain menu items as a basic starting point and allows you to build from these. In the menu preferences you can choose to override the name or hide the menu item.
Advanced – No menu items to start with, needs to be built from the beginning and is not covered by Menu Preferences option.
Under ‘Menu items’ section click on the Create Child icon
Add your new menu item name
To add as a new menu item select Target Type as ‘Built in’ You can also link to any of the other options Depending on the choice you make, it’ll open up different options in the Directory and Select Page sections. Click ‘Update

76 | P a g e Version: 0.14A
Repeat steps above to build your menu items and pages (see image above)
Select ‘Child’ under root to build the main home page menu options. All others will be sub pages
Uploading Files and Images
Menu Mode Menu Heading Menu Item
Website (SportzVault) Content File Manager
You will need to upload all files and images you wish to use into these folders Select ‘Files’ or ‘Images’ folder depending on what you’re uploading
Select In the pop up window choose whether to replace existing files with the same name by ticking the box Click ‘Select Files’ and select a file/image and click ‘Upload’ or ‘Open’ (options depend on your browser) Repeat these steps for each item.
It is recommended that you crop images before uploading them, however it is possible to crop after by clicking on the
symbol
Using Drop box to Increase your Website Data
You can increase your website data by using an online storage program. This program will store your forms and images and allow you to share the link via your website. This will not affect your data capacity.
Step 1 – Create Account
Visit www.dropbox.com Click the Sign In tab at top of screen and create a new account Complete your details

77 | P a g e Version: 0.14A
Step 2 – Upload Files
Go to the Drop box home page (click on the Drop box logo in the top left corner) Click on the folder type Public for data files or Photos for images
Once in this folder click on the upload icon at the top of the page to upload your file
Choose the file you want to upload and click open The file will begin to upload automatically Once it has completed uploading, click done Highlight the file you want and click copy to public link and then copy to clipboard
You are then ready to use your uploaded file in MyNetball
Step 3 – Add to MyNetball
Sign in to MyNetball Click on the website menu mode on the top right Build your menu by selecting Edit Menu When you are ready to attach the document to the correct menu item, click on ‘Create Child’ paper icon Add the title and choose ‘external link’ from the drop down options Paste the relevant public link created from Drop box in the URL section (make sure you remove http://) Click update
Step 4 - Add a HTML Page to Website
You can choose to create HTML pages with document links instead of menu items. This is useful when dedicating a page to a particular area. You can insert a link with the public link into the document to refer to the drop box stored document.

78 | P a g e Version: 0.14A
Adding News Items
Menu Mode Menu Heading Menu Item
Website (SportzVault) Content News
Select ‘Add new news item’
Add a title Add a date and expiry date Tick ‘Show in news rotator’ to show on the front page rotator To add an image in the ‘Floating image’ section search the directory and filename and add a caption (optional) Add the news content Select ‘Validate’ if you are formatting through HTML or/and ‘Update
Adding Extra Pages
Menu Mode Menu Heading Menu Item
Website (SportzVault) Content HTML Pages > General Pages or Templates
The following website may be useful in learning more www.webreference.com/html
Click ‘GO’ next to Add new page…blank page OR ‘Add new template’ if in templates menu
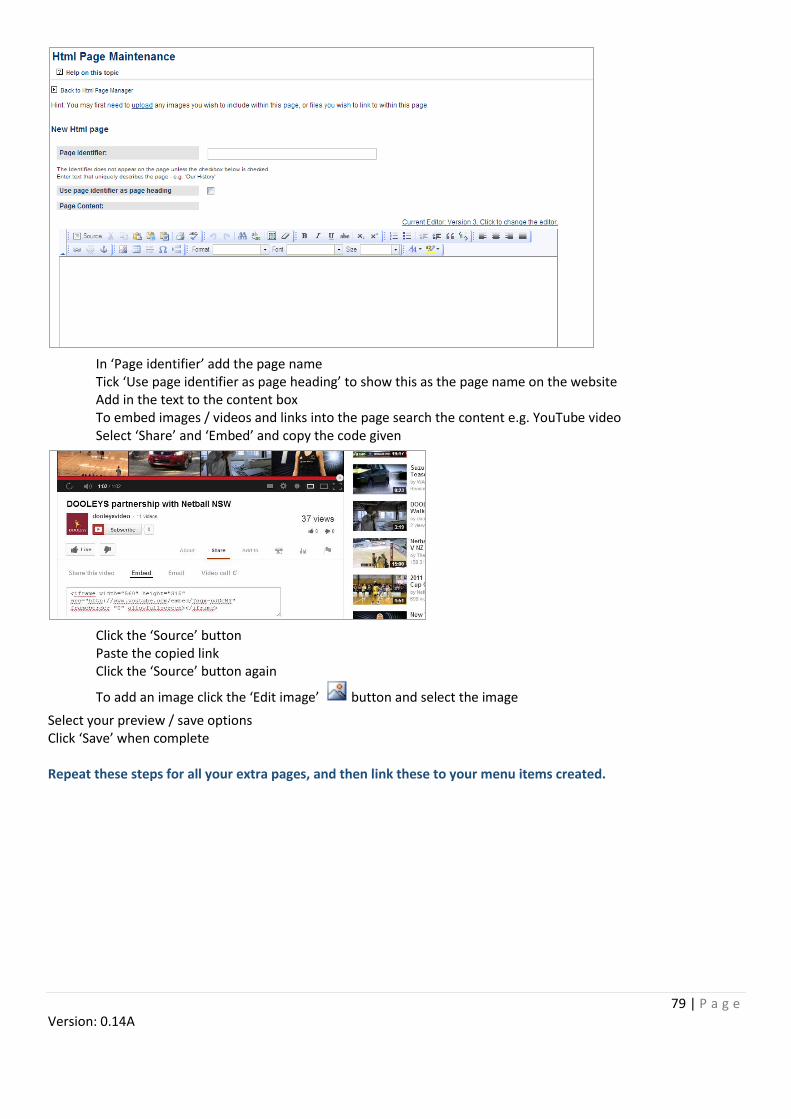
79 | P a g e Version: 0.14A
In ‘Page identifier’ add the page name Tick ‘Use page identifier as page heading’ to show this as the page name on the website Add in the text to the content box To embed images / videos and links into the page search the content e.g. YouTube video Select ‘Share’ and ‘Embed’ and copy the code given
Click the ‘Source’ button Paste the copied link Click the ‘Source’ button again
To add an image click the ‘Edit image’ button and select the image
Select your preview / save options Click ‘Save’ when complete Repeat these steps for all your extra pages, and then link these to your menu items created.

80 | P a g e Version: 0.14A
Adding Events
Menu Mode Menu Heading Menu Item
Website (SportzVault) Content Events
List all your upcoming events here. This will then filter through to the events widget
Click ‘Add new event’ Add the date and expiry date Click ‘Show in news rotator’ if you want it to be part of the news section Add an image in the ‘Floating image’ section’ Add the content if applicable Validate if applicable and ‘Update’ to confirm
Repeat the above steps for all events
Slideshow Galleries
Menu Mode Menu Heading Menu Item
Website (SportzVault) Content Photo Gallery
Click ‘Add new slideshow gallery’ Add a gallery name Add a description (optional) Select your preferred gallery type Select the images to add to the gallery group When finished click ‘Update Gallery’ Add Slideshow / Image Gallery menu item (see menu item section) Add gallery to this item Click ‘Publish to website’ to make public
13.1 Adverts
The website package you have will dictate which of the methods below you are able to access i.e. if you have the free starter package you will not be able to place your ad through the Advert section.
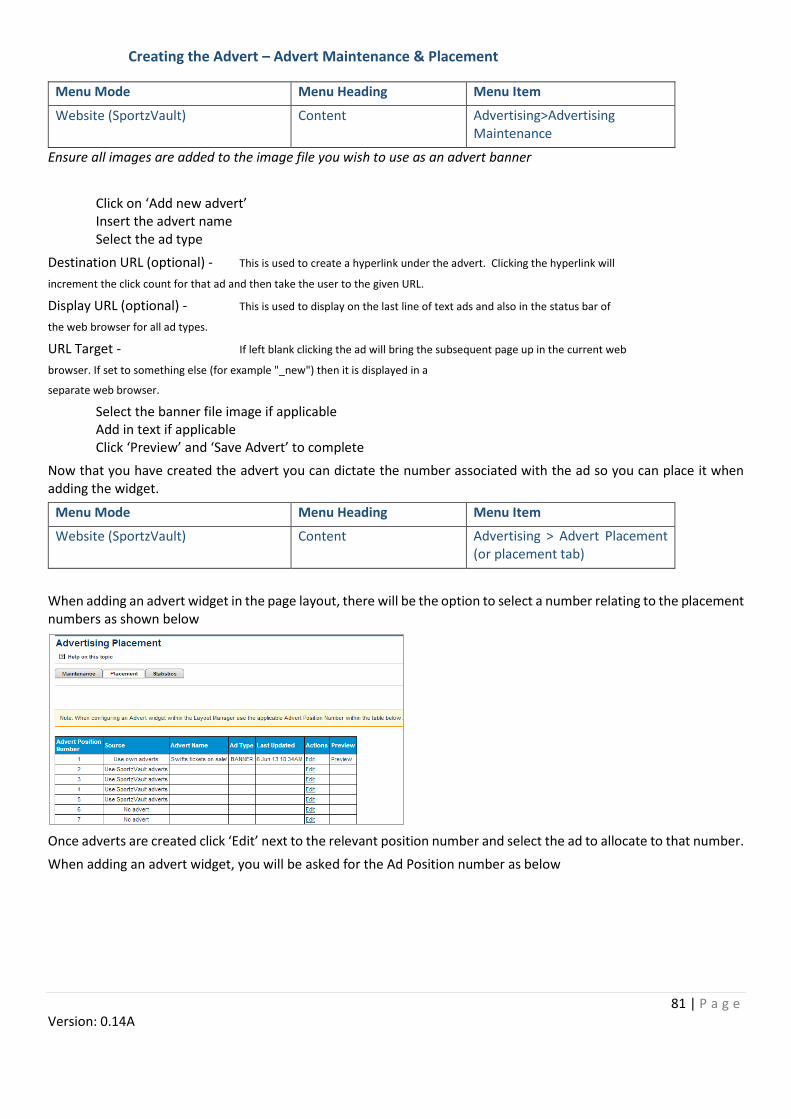
81 | P a g e Version: 0.14A
Creating the Advert – Advert Maintenance & Placement
Menu Mode Menu Heading Menu Item
Website (SportzVault) Content Advertising>Advertising Maintenance
Ensure all images are added to the image file you wish to use as an advert banner
Click on ‘Add new advert’ Insert the advert name Select the ad type
Destination URL (optional) - This is used to create a hyperlink under the advert. Clicking the hyperlink will
increment the click count for that ad and then take the user to the given URL.
Display URL (optional) - This is used to display on the last line of text ads and also in the status bar of
the web browser for all ad types.
URL Target - If left blank clicking the ad will bring the subsequent page up in the current web
browser. If set to something else (for example "_new") then it is displayed in a
separate web browser.
Select the banner file image if applicable Add in text if applicable Click ‘Preview’ and ‘Save Advert’ to complete
Now that you have created the advert you can dictate the number associated with the ad so you can place it when adding the widget.
Menu Mode Menu Heading Menu Item
Website (SportzVault) Content Advertising > Advert Placement (or placement tab)
When adding an advert widget in the page layout, there will be the option to select a number relating to the placement numbers as shown below
Once adverts are created click ‘Edit’ next to the relevant position number and select the ad to allocate to that number.
When adding an advert widget, you will be asked for the Ad Position number as below

82 | P a g e Version: 0.14A
Creating the Advert – HTML Method
Menu Mode Menu Heading Menu Item
Website (SportzVault) Content HTML Pages > General Pages
Click ‘Add New Page’ – Blank Page and click on GO Add a Page Identifier (name) which will appear in a drop down selection list. The name will only display on public sites if the ‘Use page identifier as page heading’ box is ticked Click the Insert/Edit table icon to add a table to define the ad layout
4. Choose your table layout option from the pop up box
E.g. if you want to display 2 logos one under another with headings above each one, you would create a 4X row by 1X column table.

83 | P a g e Version: 0.14A
To add a title to the section add this in the Caption area as above ‘MAJOR SPONSORS’
Select the width and height based on the image width and height that will be inserted into the table cell (the table area will need to be larger)
Select how you want it to be aligned in the alignment box.
Click ok and the table will appear as below
Click on a table cell and add text or photo as you want it to be shown
To add text type it in and format as necessary
To add an image select the image icon, choose the file from the file manager list created and select an image from the uploaded images
Click save when ready
If you want to use the same sponsor images on all pages on the websites you can save as a template to create your extra pages from. Give the template a name and re-save
To preview how it looks on the site in the HTML Page Manager click ‘Preview’
You can add more rows and columns by right clicking on the table to show the options and insert row or column

84 | P a g e Version: 0.14A
Once you are happy with the layout, go to page layout and add a HTML widget
Select the name of the general page created
Add a display header if you want a header in the section, set the height to include the total table height and click ok
Save in the layout and Preview to have a look

85 | P a g e Version: 0.14A
Adding Social Media Feeds
Select which social feed you want when adding in a widget in the layout
Add the link (see table below)
Add the settings and confirm
You Tube Twitter Facebook
To obtain your playlist ID:
View your YouTube Playlist Click Share Copy the URL Extract everything after the letters: "list=PL"
To set a Twitter account you will need to enter your Twitter handle:
Go to your Twitter page (e.g. https://twitter.com/interactsport) Your handle is the text at the end of the string (interactsport in the above example)
To set a Facebook account do the following:
Log into your Facebook page Click ‘Edit page’ Select ‘Update page info’ In Page Address click on edit Add a short Facebook name e.g.NetballNSW Check this is available and save Copy the URL to the Facebook widget
Renew a Website
When an organisation’s website is up for renewal, a notification will be provided on the home page when they login to MyNetball. Websites can be renewed within 1 month of their expiry. There is no fee involved to the organisation in renewing a website.
Menu Mode Menu Heading Menu Item
Website (SportzVault) Accounts Account > Account Details & Renewal

86 | P a g e Version: 0.14A
Click the ‘Renew Account’ button
Linking to MyNetball from External Websites
MyNetball help contains detailed information on how to display competition information on MyNetball on external websites not set up through NMAS or MyNetball. For info follow this link http://admin-netball.resultsvault.com/pages/admin/help/linkingtorv.aspx or go to Organisation > Help > Help Topics > Linking to ResultsVault from External Websites.

87 | P a g e Version: 0.14A
Public Portal The public portal is a public website accessed through the following link http://my.netball.com.au which anyone can view detailed competition information for all organisations using MyNetball to manage competitions. Organisations will not need to make any changes to this website, all the information is uploaded from the data entered into MyNetball.
The public portal displays:
Association details Office bearers Upcoming match information Game results Ladders Player statistics Links to the association / club website
Public portal report
Match Report
Matches > Upcoming Matches
The full fixture can be downloaded to PDF for fixture only details or Excel to include umpire allocations
Team Grade Report
Matches > Team Index
Shows a list of teams and the grades they have been allocated. This will also link to the relevant fixture and ladder

88 | P a g e Version: 0.14A
Fixtures and Results
Matches > Fixtures & Results
This will show a full fixture list and results for all games the association / club manages and participates in.
Clicking on the venue will show a venue map if this information has been put into MyNetball and will list all upcoming games to take place on the court.
Full results will show the below information
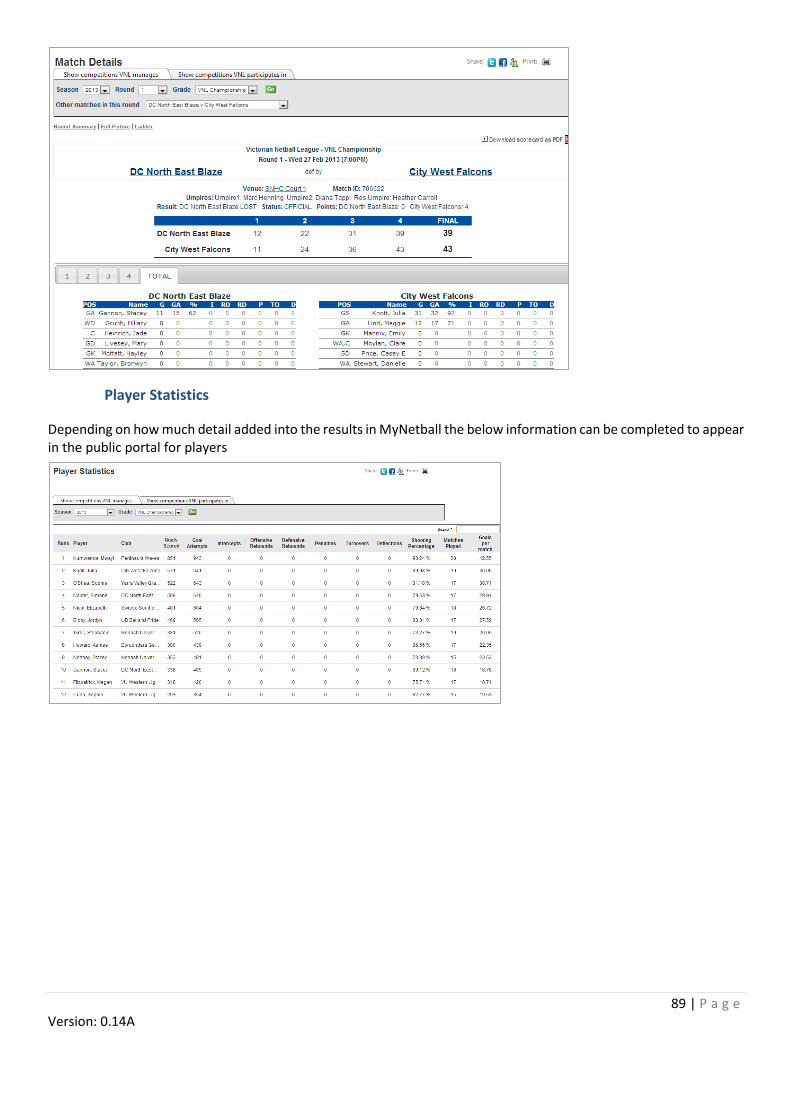
89 | P a g e Version: 0.14A
Player Statistics
Depending on how much detail added into the results in MyNetball the below information can be completed to appear in the public portal for players

90 | P a g e Version: 0.14A
APPENDIX
Association Individual User Agreement Club Individual User Agreement