My Housing Streamline
20
Philadelphia Housing Authority My Housing Streamline Philadelphia Housing Authority Resident Manual
Transcript of My Housing Streamline

Philadelphia Housing Authority
My Housing Streamline Philadelphia Housing Authority Resident Manual

Contents Getting Started .............................................................................................................................................. 1
Language Selection ....................................................................................................................................... 1
Registration ................................................................................................................................................... 2
Logging In .................................................................................................................................................. 4
Forgot Password?...................................................................................................................................... 4
Dashboard ................................................................................................................................................. 4
Recertification Portal .................................................................................................................................... 5
Help Link .................................................................................................................................................... 5
Let’s Begin ..................................................................................................................................................... 6
Welcome ................................................................................................................................................... 6
Your Family ............................................................................................................................................... 6
Your Income .............................................................................................................................................. 8
Your Assets ................................................................................................................................................ 9
Your Expenses ......................................................................................................................................... 10
Your Attachments ................................................................................................................................... 11
Attachment Type Examples…….. ......................................................................................................... 13
Additional Questions............................................................................................................................... 15
Summary ................................................................................................................................................. 16

Page 1 of 18
Getting Started Welcome to PHA’s Online Recertification Portal, My Housing, which is designed to automate the process of recertifying with PHA’s Housing Choice Voucher (HCV) program!
Why should I complete my recertification online? It's Faster, Easier and Secure. Completing your required recertification online instead of paper is fast, easy, secure and will save time for both you and your PHA representative. What are the benefits of completing your recertification online?
You can complete your recertification on your mobile device (smartphone or tablet) or on a computer
Secure submission of your personal information Future certifications will require less time; Access and view status and recertification information 24/7 It's faster, easier, and secure. Completing your required recertification online instead
of paper is fast, easy, and secure and will save time for both you and your PHA representative
Fewer questions to answer Easier forms to complete and only requires one signature (online) per adult
household member; How long does the Online Recertification take to complete? Depending on the size of your family or income or assets you need to report it may take 20 to 30 minutes to complete your online recertification. What do I need to complete the Online Recertification? You will need to upload all verification documents including your household income to complete your recertification with HCV.
Language Selection The recertification portal provides the ability to change the default English language used for displaying labels and instructions. Spanish, Russian and Chinese are offered as alternative languages. You change the default English language by completing the following steps;
1. Click , located in the upper right-hand corner of the log in screen. 2. Select your preferred language from the drop down list.

Page 2 of 18
Registration The head of the household must complete registration to use the recertification portal. If you previously registered yourself and have a username and password, you can skip this task and proceed to Logging In. Only the head of household can register use of the recertification portal. You must provide your personal information to validate entry and access to your recertification. To register, complete the following steps;
1. Click Register.
2. Enter the first initial of your first name (ONLY the first initial of your first name), and your full last name. Your Date of Birth should be entered in the following format: MM/DD/YYYY. For example, if your date of birth is January 1, 1980, you would enter 01/01/1980. Your Social Security number must be entered without dashes in the format (example: 999999999).
3. Click Continue.

Page 3 of 18
4. Enter your Entity ID number. This is your personal identification number for the Housing Choice Voucher program. Your Entity ID number can be found at the top of your recertification letter.
5. Click Continue.
6. Copy and store your Username. It is required to log in to your account. 7. Next, provide your email address and create a password. Also, at this step you can identify
your preferred language for the portal label and instruction display.

Page 4 of 18
8. Your registration is now complete. You can proceed to log into your account by clicking “Click here to login and get started!”
Logging In You will log in to the portal using your username and password. Remember, your username is the name assigned to you by the portal. It is comprised of your first name first initial and your last name. An example of the name Jane Doe would be represented as jdoe for a username. The password is the secret word or phrase you created for your account.
Forgot Password? Use the Forgot Password link to reset your portal password. It is accessible from the portal main page.
1. You will be required to enter the email address associated to your portal account. 2. Click the Email Link button. You will receive an email with a link to reset your account. 3. Click the link and create a new password that you will remember. 4. Log in to your account using your username and new password.
Dashboard This is the main area that your will be directed to after logging in. Within this area of the portal, you are provided with access to notifications, upcoming appointments, messages, appointments, .

Page 5 of 18
Notifications. Under this section is a list of recent activity. Clicking the notice will take you to the section where you can view the details of the information. Upcoming Appointments. This section advertises the scheduled appointments you have with your caseworker.
Messaging. This feature allows you to send messages to your caseworker. Appointments. This feature provides you a list of appointments you have with your caseworker. If available, you can request an appointment with your caseworker to go over your recertification. Documents You May Need. This feature provides you with a list of downloadable documents that you may need to complete your certification. The documents are; Family Notification of Lead Based Paint Name Change Form Emergency Contact Transfer Request Self-Certification of Zero Income Financial Hardship Declaration of Citizenship Authorization of Release of Information
Your Account. Use this section to manage access to your account. This feature allows you to update your email account, change your password and set a preferred language for you use of the portal.
Recertification Portal
Help Link

Page 6 of 18
If at any time you are unsure of how to answer a question or complete a task in any of the sections, you can click the Need Help? link at the bottom of the page. There are also links to forms you may need to complete, and links to explanations of some questions in order to complete your certification.
Let’s Begin
Welcome
1. Read the directions and information displayed on the Welcome page 2. Click the Get Started button to begin your recertification.
Your Family The portal will first display a summary of your family members reported from your last certification. You will click Next to review each individual family member’s information, and make changes if necessary.

Page 7 of 18
There is a Tell Us About This Family Member section for each household member of your family. If there is no change in any of this information you may hit the Next button.
If you need to remove a family member. Click Remove the Family Member button on the upper right. Keep in mind that if you choose to remove a family member, you will be required to provide documentation to verify that they no longer reside in your household, like a utility bill sent to their new address or copy of their new lease
If you need to add a family member. Use the Add Family Members section to add a new household member. This section is available after reviewing all current household members. When adding a Family Member you must complete all fields. If you fail to complete all fields you will not be able to move forward in adding the family member.
Select the Add button, and then click Next when complete.

Page 8 of 18
Your Income Like the Your Family page, you will also review what you reported as income at your last certification. Each household member on the family composition has their own, What we know about your family’s income, section based on what your family reported at the last certification action.
If you need to remove a source of Income. Click the Remove this Income button on the upper right. Keep in mind that if you choose to remove an income source, you will be required to provide documentation to verify that this income source is no longer received.

Page 9 of 18
If you need to add a source of Income. To add new or previously unreported income source click Add an Additional Income at the bottom of the page. You must ensure you report all income sources for all household members.
Click Next when done.
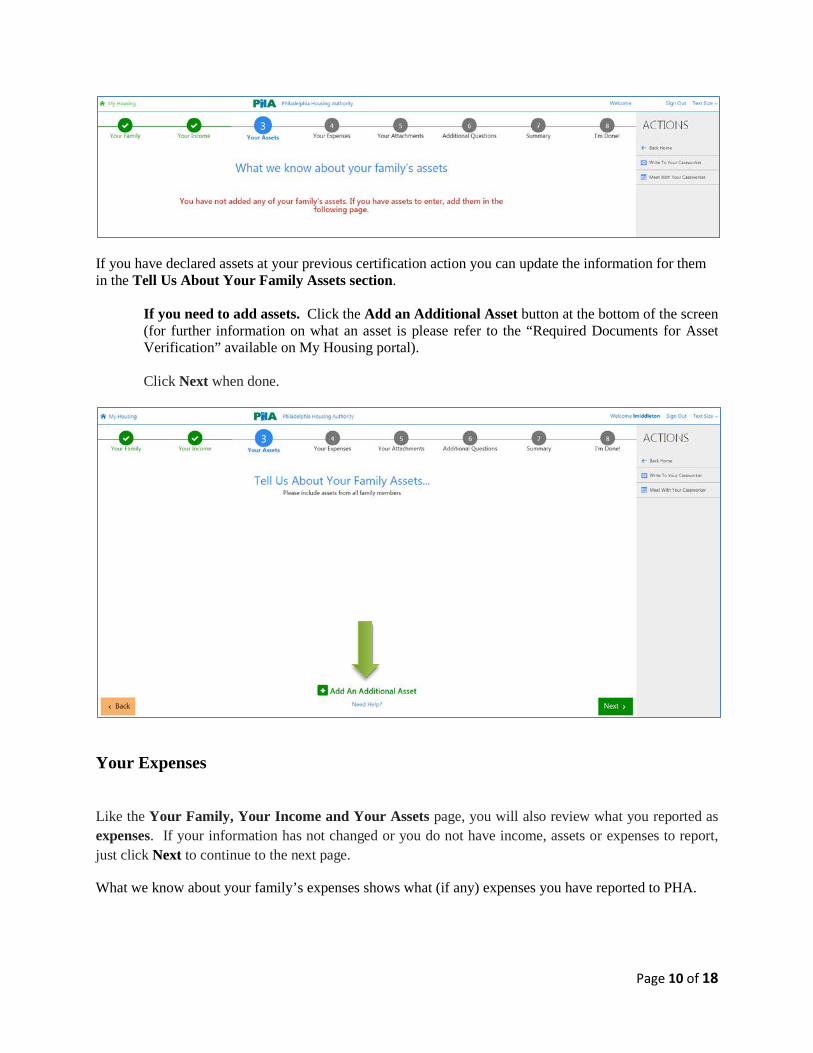
Your Assets Like the Your Family and Income page, you will also review what you reported as assets If your information has not changed or you do not have income, assets or expenses to report, just click Next to continue to the next page. What we know about your family’s assets shows what (if any) assets you have reported to PHA.
Page 10 of 18
If you have declared assets at your previous certification action you can update the information for them in the Tell Us About Your Family Assets section.
If you need to add assets. Click the Add an Additional Asset button at the bottom of the screen (for further information on what an asset is please refer to the “Required Documents for Asset Verification” available on My Housing portal).
Click Next when done.
Your Expenses
Like the Your Family, Your Income and Your Assets page, you will also review what you reported as expenses. If your information has not changed or you do not have income, assets or expenses to report, just click Next to continue to the next page.
What we know about your family’s expenses shows what (if any) expenses you have reported to PHA.

Page 11 of 18
If you have reported expenses you can update the information for them in the Tell Us About Your Expenses section.
If you need to report expenses. Click the “Add an Additional Expense” button at the bottom of the screen (for further information on what an allowalbe expense is please refer to the “Required Documents for Asset Verification” available on My Housing portal).
Click Next when done.
Your Attachments

Page 12 of 18
You must upload document(s) that verify each of your income, assets, and/or expenses. If you have added or removed a family member, you must also upload a document to verify the change. If you have new income or have removed income, you must also upload a document to verify that change. To upload supporting documentation click Add Attachment.
After you click Add Attachment the below screen will appear. There are three drop down box menus that you will need to complete. They are;
1. What area in the certification do you want to link to this attachment to….. a. Select Family Member if the document is for verifying a household member’s personal
information. (Examples; social security card, birth certificate , driver’s license) b. Select Incomes if the document is for verifying a household member’s source of income. c. Select Assets if the document is for verifying a household member’s asset. d. Select Expenses if the document if for verifying a household member’s expense.
2. Attachment Type
a. Select Family Member Verification if the document if for verifying an individual household member information. Or select Family Form if the document is for the entire household.
b. Select Verification of Income if the document if for verifying an individual household member information. Or select Income Form if the document is for the entire household.
c. Select Expense Verification if the document if for verifying an individual household member information. Or select Expense Form if the document is for the entire household.
d. Select Asset Verification if the document if for verifying an individual household member information. Or select Asset Form if the document is for the entire household.
3. What the attachment is for….
Select the household member that the document is associated to. When uploading documents the “What area in the certification do you want to link this attachment to…” must correspond with the correct “Attachment Type” and “What the attachment is for…”.

Page 13 of 18
Attachment Type Examples…….. Example #1. If you are uploading a document for “Family Members”,
1. The attachment type will be Family Member Verification (Proof of date of birth, social security number, etc.) or Family Forms (e.g. Declaration of Citizenship, Authorization of Release of Information, etc.)
2. Then select “What the attachment is for….”

Page 14 of 18
Finally, complete the drop down fields you must attach your document. Select the folder icon to browse for the document you would like to upload, and then click the Upload button.
When the document is successfully uploaded, the document name will appear in blue.
Example #2. If you are uploading a document for income in the What area in the recertification do you want to link this attachment to…. you select Incomes.
1. The “Attachment Type” will be “Verification of Income” or “Income Forms”.
2. Then select What the attachment is for…. which is who the document is for and the income type.
Finally, complete the drop down fields you must attach your document. Select the folder icon to browse for the document you would like to upload, and then click the Upload button.
When the document is successfully uploaded, the document name will appear in blue.

Page 15 of 18
Additional Questions Click the Next button.

Page 16 of 18
Summary The portal will display a summary of all your information. Review each item listed carefully.

Page 17 of 18
If any item is incomplete, it will appear in red. To review and complete any incomplete item, click it to return to that page of your recertification.
Once you have verified that your information is correct, you must read the Authorization for the Release of Information statement then click the checkbox below it that states “I agree and verify that all the information I provided is correct”
You will then add your signature to the signature box and click Save Signature which will appear in green once you have signed. The Next button at the bottom right will become green.
Your recertification has been successfully submitted to PHA when you see the page below. Your case worker will now review what you have submitted.
You can print a confirmation of your submitted recertification by clicking the Print/Save button at the bottom of the screen. You can print or save this document for your personal records.
You will also receive an email indicating you have a successfully submitted your recertification.

Page 18 of 18
Once your representative has reviewed and approved (or denied) your submitted recertification you will receive another email indicating you have a message in your message box in the recertification portal.
You will receive a letter confirming when your new rent will become effective, your rent amount and utility allowance. Please note: your rent amount may not change as a result of your recertification.
If your PHA Representative needs more information from you, you will receive a message in your My Housing message account and a letter listing the documents you will need to provide. You can submit your documents by logging in to the portal and uploading them.
![1728EX+ : Programming Guide - safe-tech · 02 ... Streamline section Streamline Streamline section Streamline section ... 1728EX+ : Programming Guide Keywords [English] Created Date:](https://static.fdocuments.in/doc/165x107/5b84d6a77f8b9aec488d14a4/1728ex-programming-guide-safe-02-streamline-section-streamline-streamline.jpg)