MXIE Zultys End User Training 2010 11/14/2013End User Training1.
71
MXIE Zultys End User Training 2010 02/07/22 End User Training 1
-
Upload
natalie-little -
Category
Documents
-
view
224 -
download
1
Transcript of MXIE Zultys End User Training 2010 11/14/2013End User Training1.

MXIEZultys End User Training
2010
04/10/23 End User Training 1

MXIEMXIE
MMedia Eedia Exxchange change IInterfacenterfacefor for EEnd Usersnd Users
04/10/23 End User Training 2
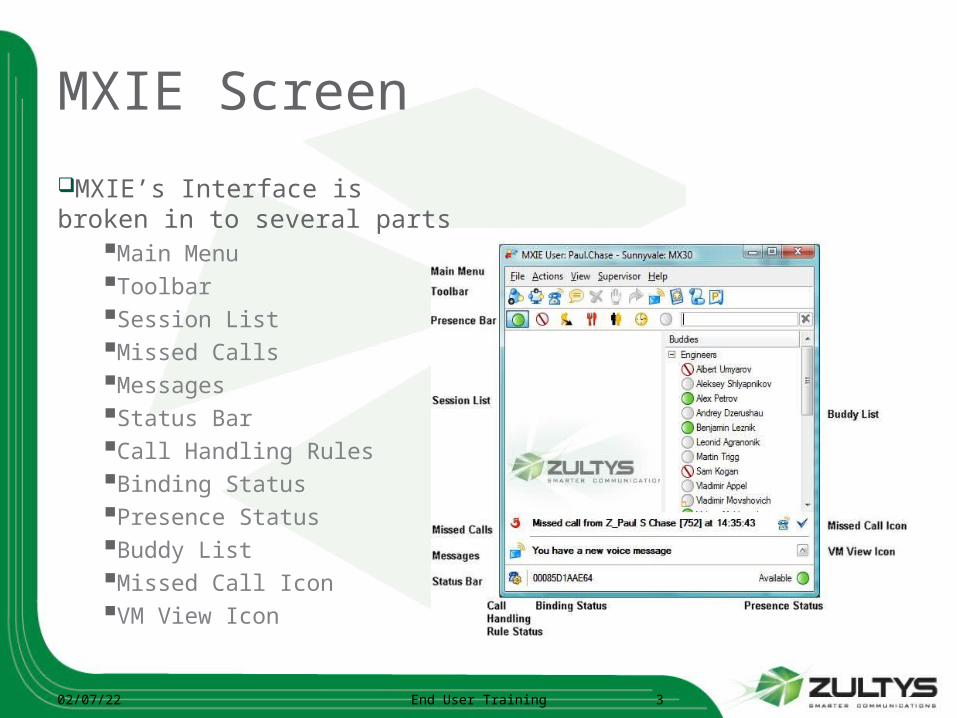
MXIE Screen
MXIE’s Interface is broken in to several parts
Main MenuToolbarSession ListMissed CallsMessagesStatus BarCall Handling RulesBinding StatusPresence StatusBuddy ListMissed Call IconVM View Icon
04/10/23 End User Training 3
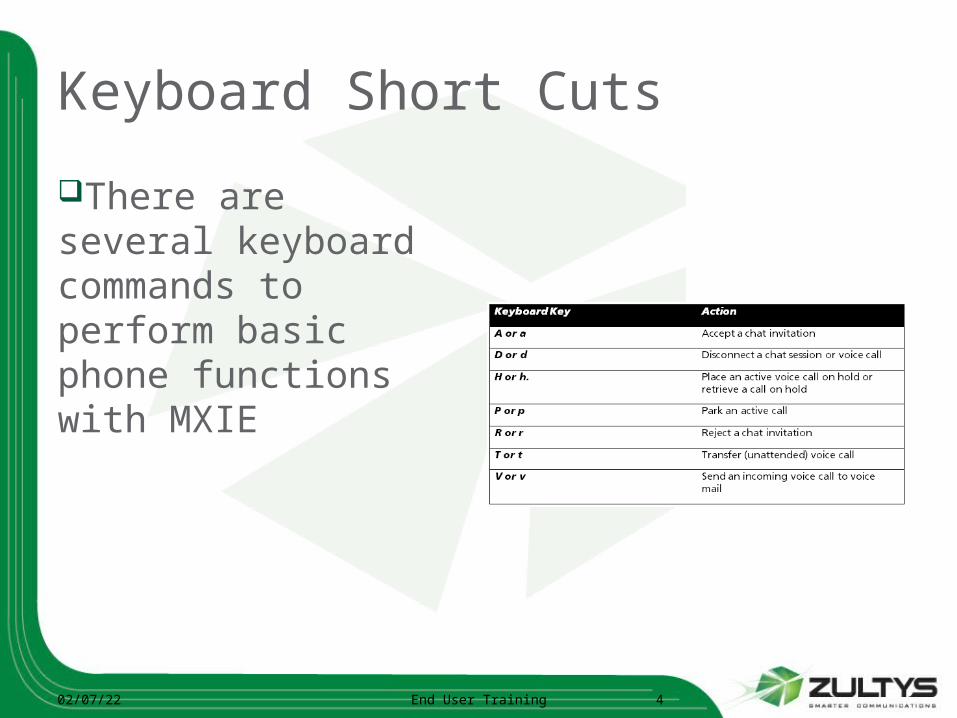
Keyboard Short Cuts
There are several keyboard commands to perform basic phone functions with MXIE
04/10/23 End User Training 4
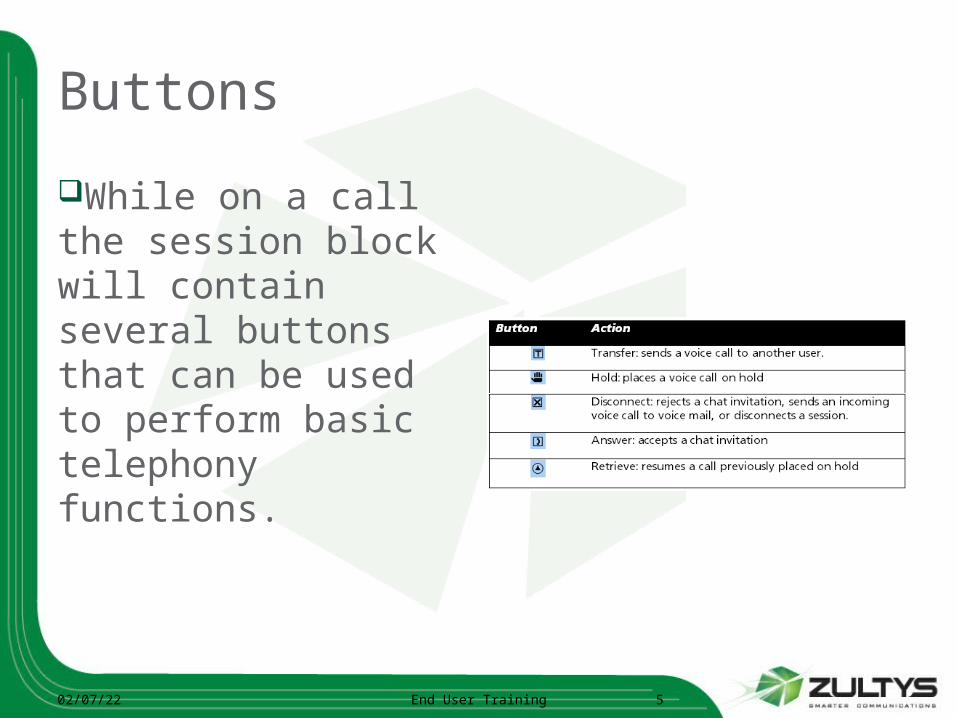
Buttons
While on a call the session block will contain several buttons that can be used to perform basic telephony functions.
04/10/23 End User Training 5
Buddy List
The Buddy List displays MX users with whom you are in regular contact. You can quickly initiate instant messages, chats, and voice calls with Buddy List members. The Buddy List displays the presence state for all buddies that permit others to view their presence and provides tools to send voice mail to your buddies. You can also organize your Buddy List into Buddy groups.To add a user to the buddy list, open the address book and display the contact list. Highlight the name of the person that you wish to add, press the right mouse button, and select Buddy. You cannot modify the buddy list for operator and agent roles.To add a buddy group to the list, point at the buddy list, click the right mouse button, and select Create a Group.To initiate communication sessions with buddy list members, point at a buddy and click the right mouse button.To perform Buddy Group operations, right click on your buddy list and select the desired operation. You can drag and drop buddy list members into any group. Users can belong to more than one buddy group.
04/10/23 End User Training 6
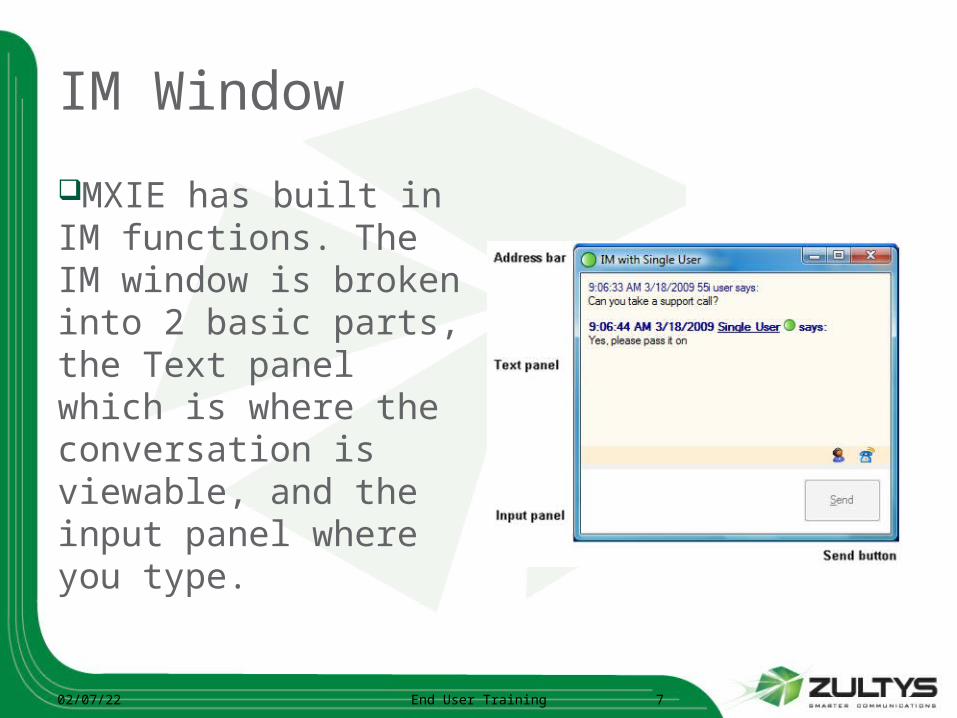
IM Window
MXIE has built in IM functions. The IM window is broken into 2 basic parts, the Text panel which is where the conversation is viewable, and the input panel where you type.
04/10/23 End User Training 7
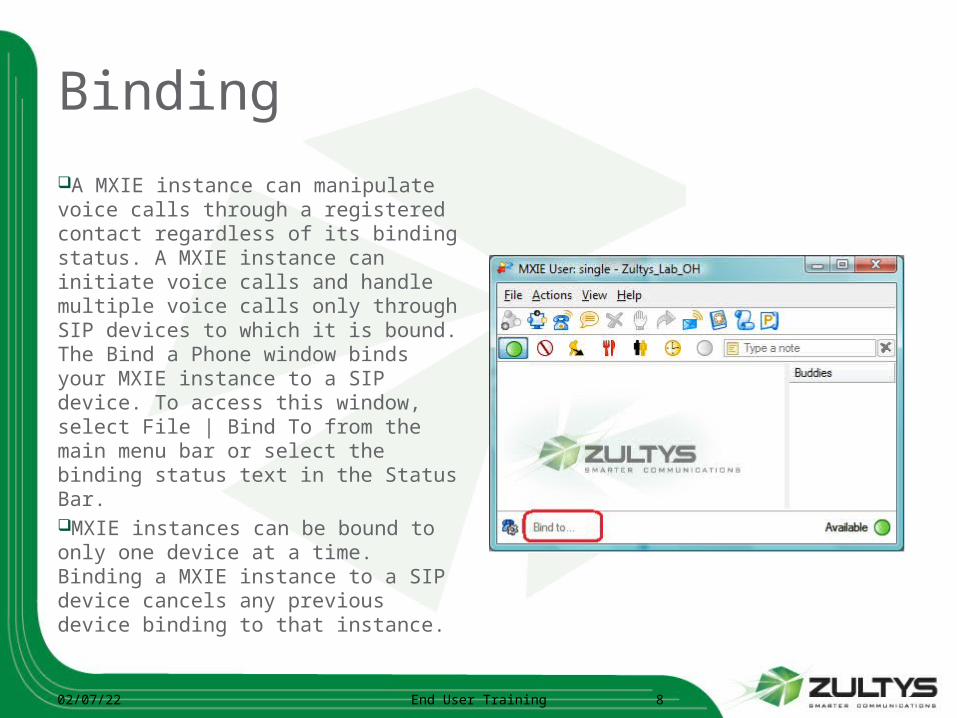
Binding
A MXIE instance can manipulate voice calls through a registered contact regardless of its binding status. A MXIE instance can initiate voice calls and handle multiple voice calls only through SIP devices to which it is bound. The Bind a Phone window binds your MXIE instance to a SIP device. To access this window, select File | Bind To from the main menu bar or select the binding status text in the Status Bar.MXIE instances can be bound to only one device at a time. Binding a MXIE instance to a SIP device cancels any previous device binding to that instance.
04/10/23 End User Training 8
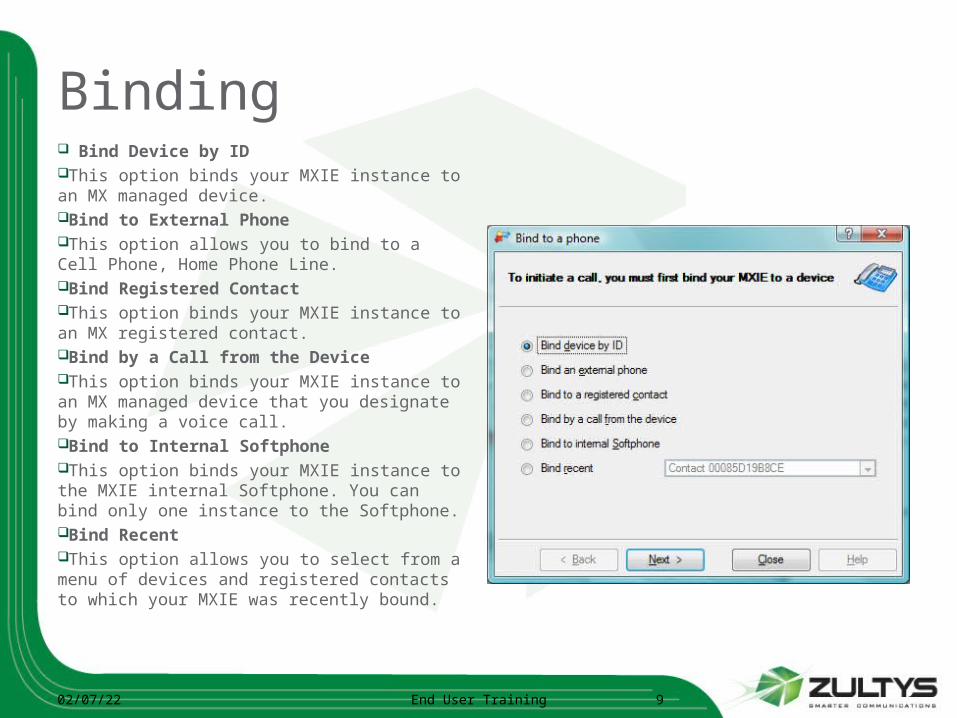
Binding Bind Device by IDThis option binds your MXIE instance to an MX managed device.Bind to External Phone This option allows you to bind to a Cell Phone, Home Phone Line.Bind Registered ContactThis option binds your MXIE instance to an MX registered contact. Bind by a Call from the DeviceThis option binds your MXIE instance to an MX managed device that you designate by making a voice call. Bind to Internal SoftphoneThis option binds your MXIE instance to the MXIE internal Softphone. You can bind only one instance to the Softphone. Bind RecentThis option allows you to select from a menu of devices and registered contacts to which your MXIE was recently bound.
04/10/23 End User Training 9
Softphone
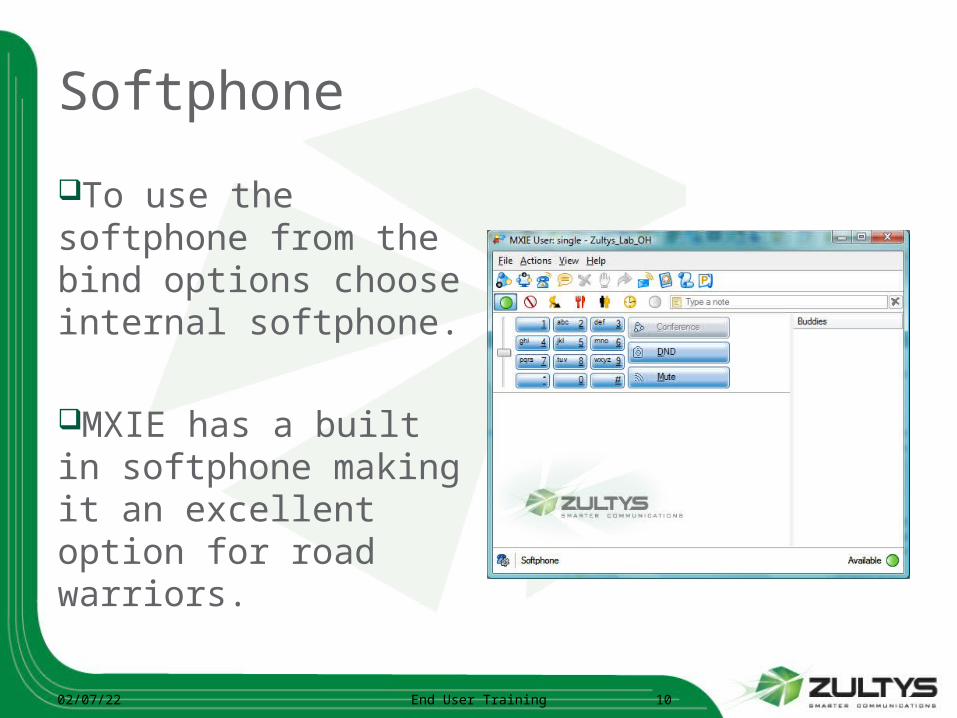
To use the softphone from the bind options choose internal softphone.
MXIE has a built in softphone making it an excellent option for road warriors.
04/10/23 End User Training 10
Placing a Call
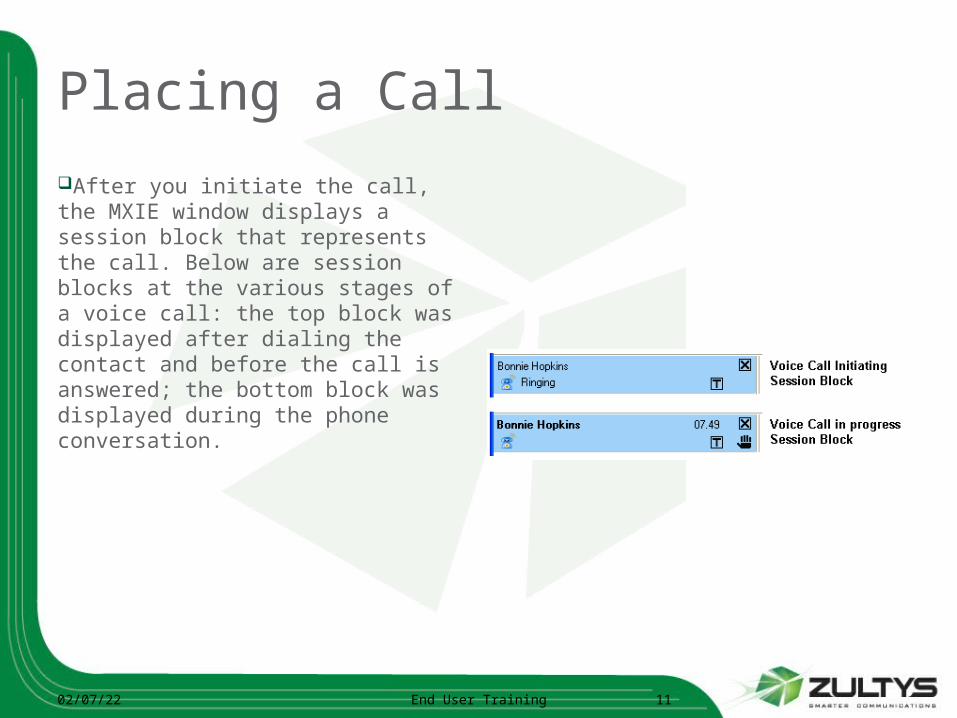
After you initiate the call, the MXIE window displays a session block that represents the call. Below are session blocks at the various stages of a voice call: the top block was displayed after dialing the contact and before the call is answered; the bottom block was displayed during the phone conversation.
04/10/23 End User Training 11
Recording a Call
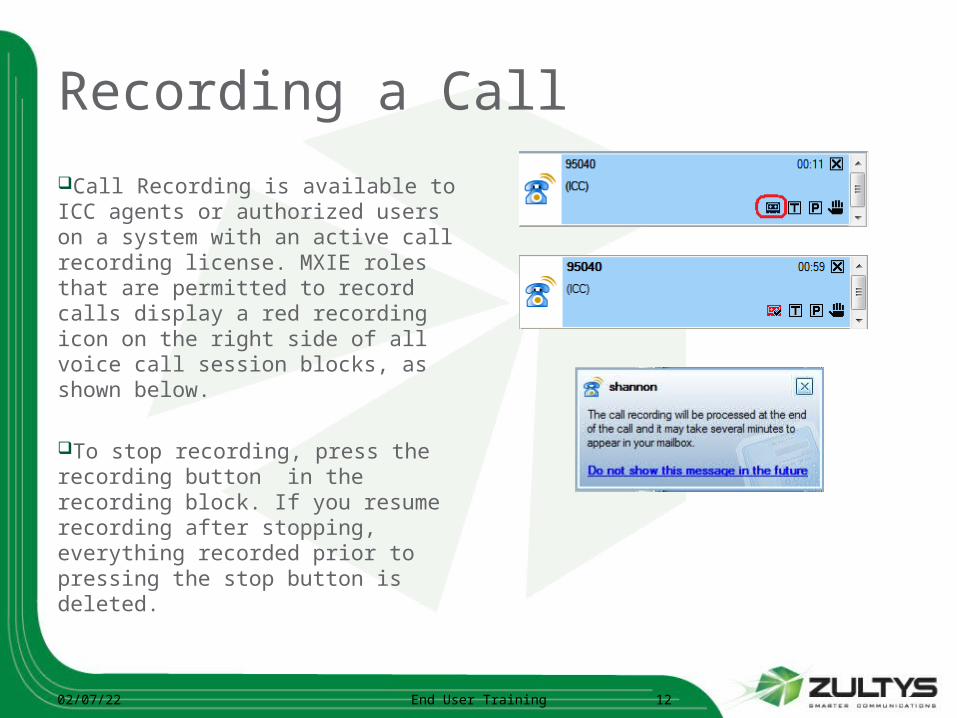
Call Recording is available to ICC agents or authorized users on a system with an active call recording license. MXIE roles that are permitted to record calls display a red recording icon on the right side of all voice call session blocks, as shown below.
To stop recording, press the recording button in the recording block. If you resume recording after stopping, everything recorded prior to pressing the stop button is deleted.
04/10/23 End User Training 12
Presence StatesEach user is assigned a presence state based on online status and communication availability. Users logged into MXIE as an operator or an ACD agent are assigned an additional presence state for that role. Presence states are represented by icons. Select the icon style that MXIE uses to display your presence from the Toolbar Preferences panel.User presence states include AvailableNot AvailableBusyAt LunchIn a MeetingBe Right BackAppear OfflineOn the Phone
Operator presence states include AvailableNot AvailableOn the PhoneLogged Off
ACD group agent presence states include AvailableNot AvailableActive, Wrap UpLogged Off
04/10/23 End User Training 13
Presence Notes
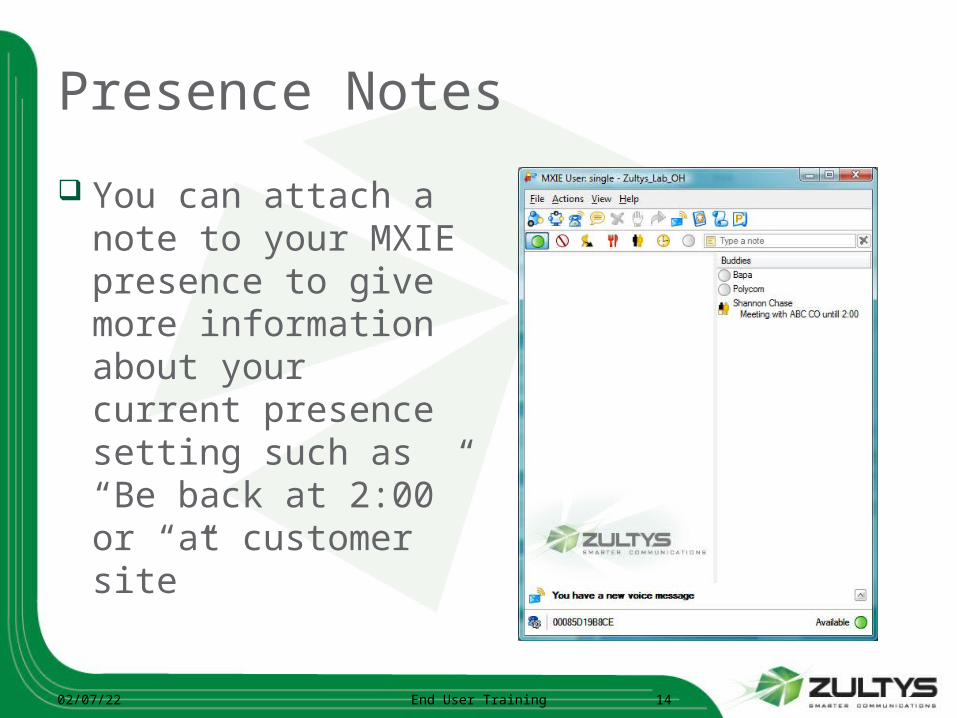
You can attach a note to your MXIE presence to give more information about your current presence setting such as “Be back at 2:00” or “at customer site”
04/10/23 End User Training 14
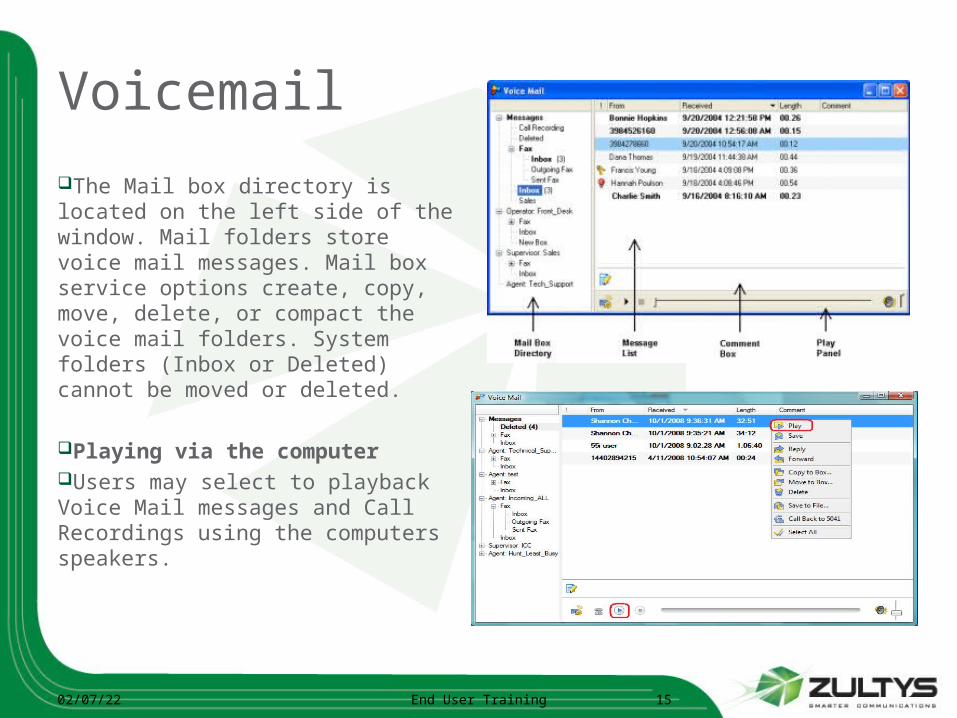
Voicemail
The Mail box directory is located on the left side of the window. Mail folders store voice mail messages. Mail box service options create, copy, move, delete, or compact the voice mail folders. System folders (Inbox or Deleted) cannot be moved or deleted.
Playing via the computerUsers may select to playback Voice Mail messages and Call Recordings using the computers speakers.
04/10/23 End User Training 15
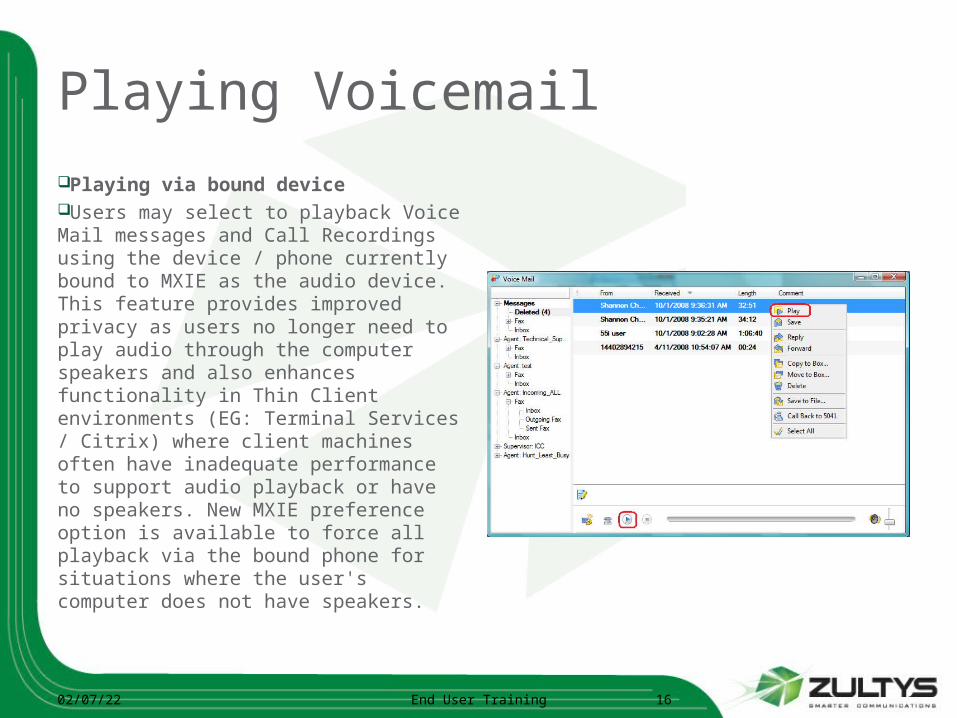
Playing Voicemail
Playing via bound deviceUsers may select to playback Voice Mail messages and Call Recordings using the device / phone currently bound to MXIE as the audio device. This feature provides improved privacy as users no longer need to play audio through the computer speakers and also enhances functionality in Thin Client environments (EG: Terminal Services / Citrix) where client machines often have inadequate performance to support audio playback or have no speakers. New MXIE preference option is available to force all playback via the bound phone for situations where the user's computer does not have speakers.
04/10/23 End User Training 16
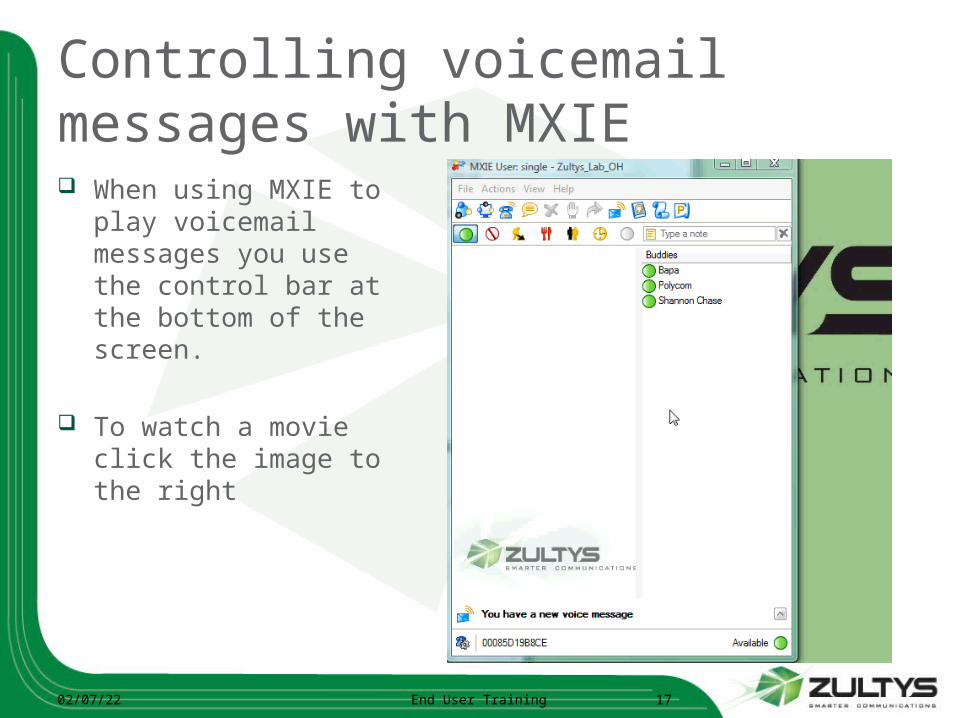
Controlling voicemail messages with MXIE When using MXIE to
play voicemail messages you use the control bar at the bottom of the screen.
To watch a movie click the image to the right
04/10/23 End User Training 17
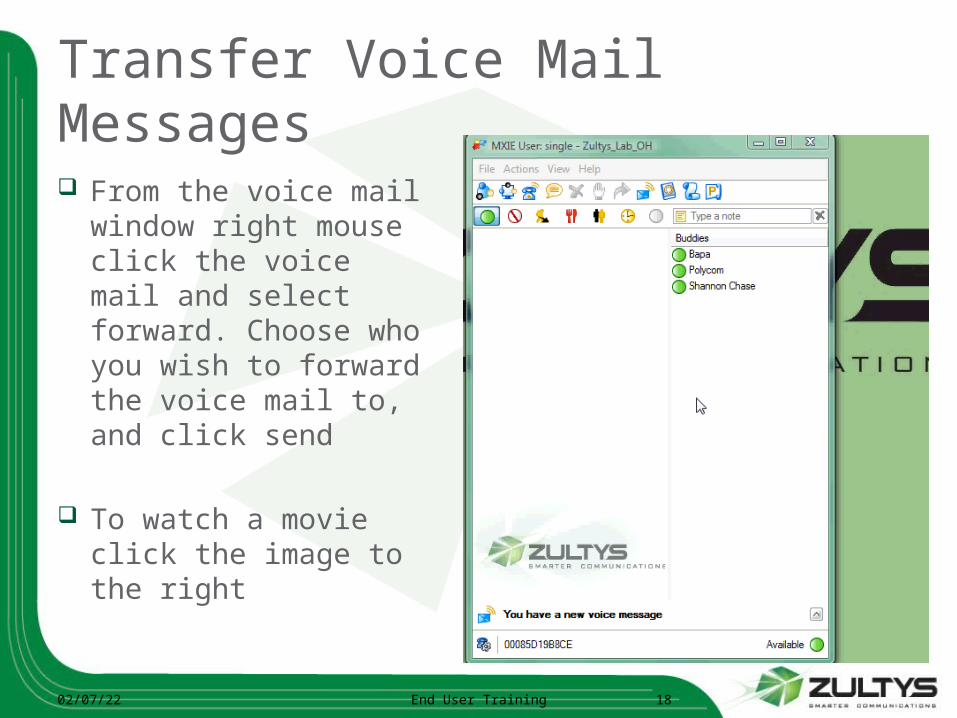
Transfer Voice Mail Messages
From the voice mail window right mouse click the voice mail and select forward. Choose who you wish to forward the voice mail to, and click send
To watch a movie click the image to the right
04/10/23 End User Training 18
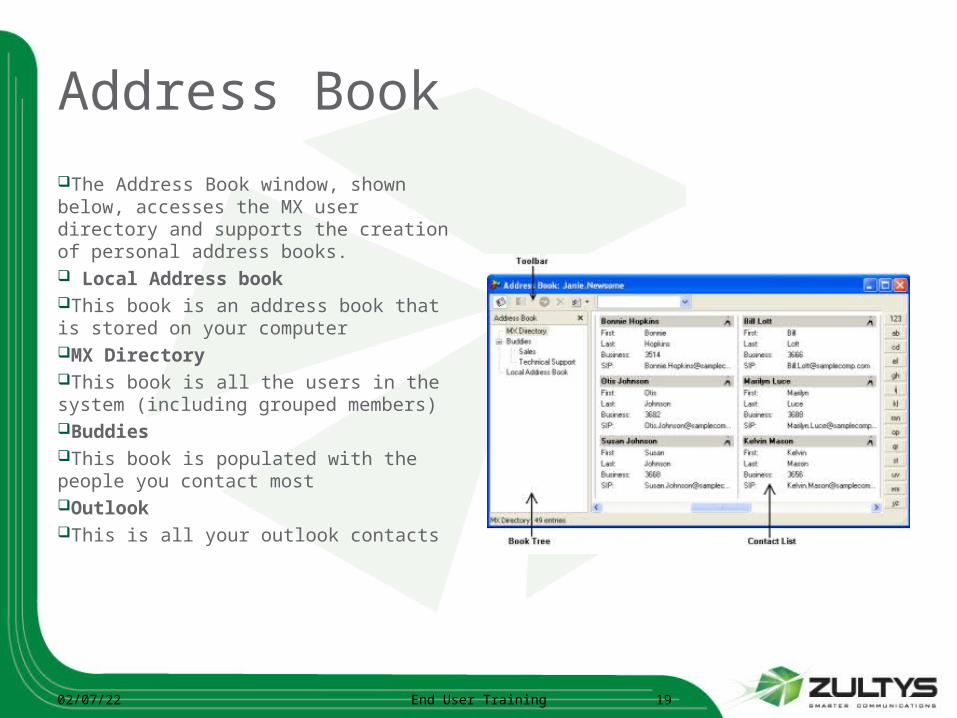
Address BookThe Address Book window, shown below, accesses the MX user directory and supports the creation of personal address books. Local Address bookThis book is an address book that is stored on your computerMX DirectoryThis book is all the users in the system (including grouped members)BuddiesThis book is populated with the people you contact mostOutlookThis is all your outlook contacts
04/10/23 End User Training 19
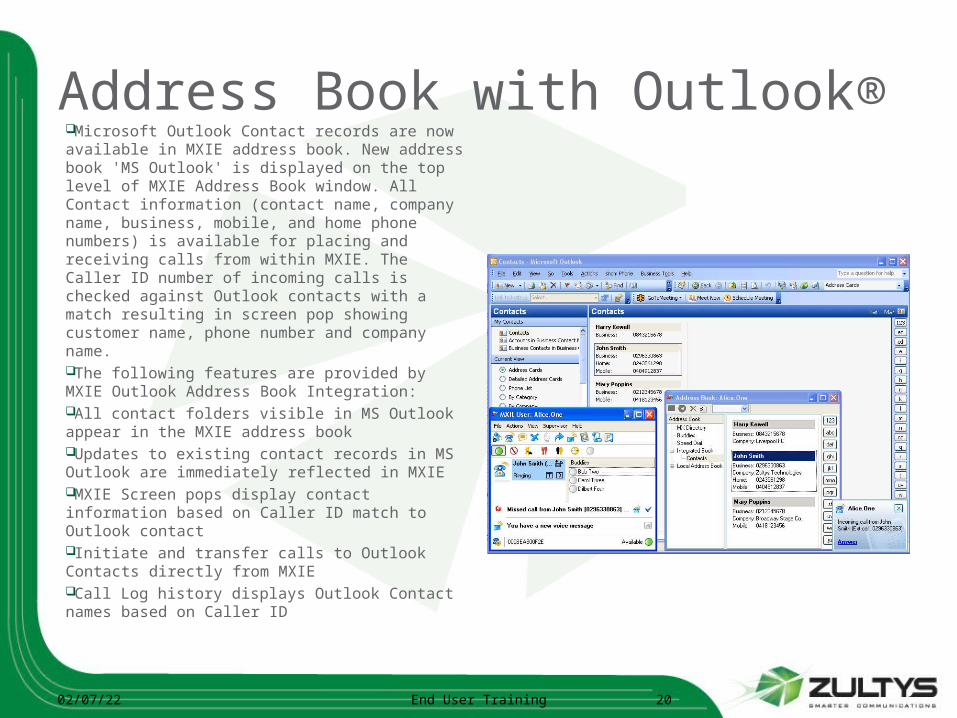
Address Book with Outlook®Microsoft Outlook Contact records are now available in MXIE address book. New address book 'MS Outlook' is displayed on the top level of MXIE Address Book window. All Contact information (contact name, company name, business, mobile, and home phone numbers) is available for placing and receiving calls from within MXIE. The Caller ID number of incoming calls is checked against Outlook contacts with a match resulting in screen pop showing customer name, phone number and company name.The following features are provided by MXIE Outlook Address Book Integration:All contact folders visible in MS Outlook appear in the MXIE address bookUpdates to existing contact records in MS Outlook are immediately reflected in MXIEMXIE Screen pops display contact information based on Caller ID match to Outlook contactInitiate and transfer calls to Outlook Contacts directly from MXIECall Log history displays Outlook Contact names based on Caller ID
04/10/23 End User Training 20
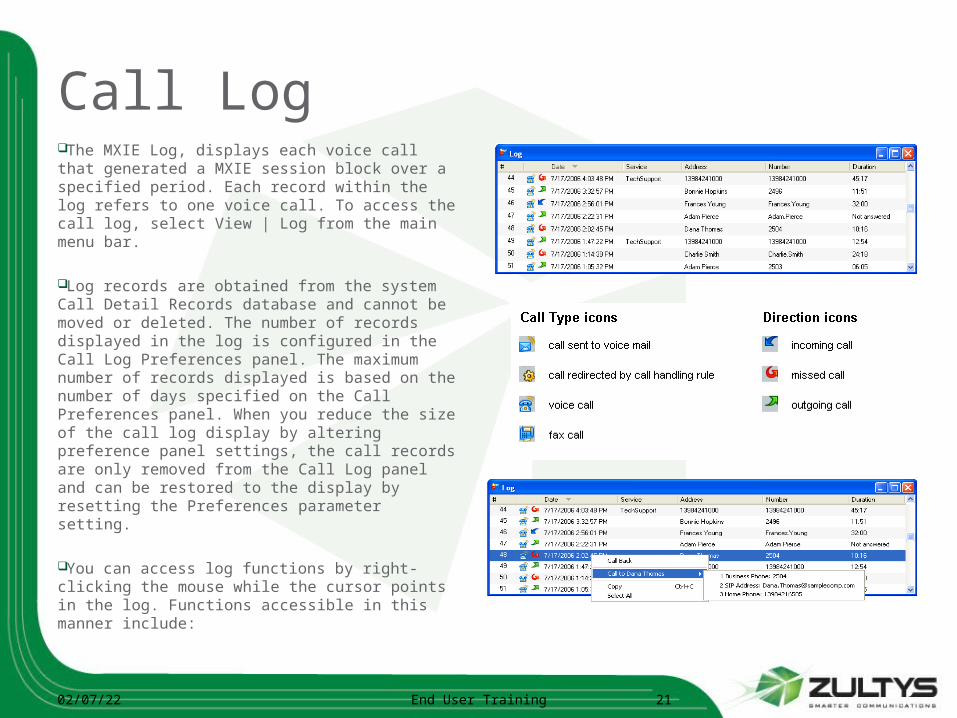
Call LogThe MXIE Log, displays each voice call that generated a MXIE session block over a specified period. Each record within the log refers to one voice call. To access the call log, select View | Log from the main menu bar.
Log records are obtained from the system Call Detail Records database and cannot be moved or deleted. The number of records displayed in the log is configured in the Call Log Preferences panel. The maximum number of records displayed is based on the number of days specified on the Call Preferences panel. When you reduce the size of the call log display by altering preference panel settings, the call records are only removed from the Call Log panel and can be restored to the display by resetting the Preferences parameter setting.
You can access log functions by right-clicking the mouse while the cursor points in the log. Functions accessible in this manner include:
04/10/23 End User Training 21
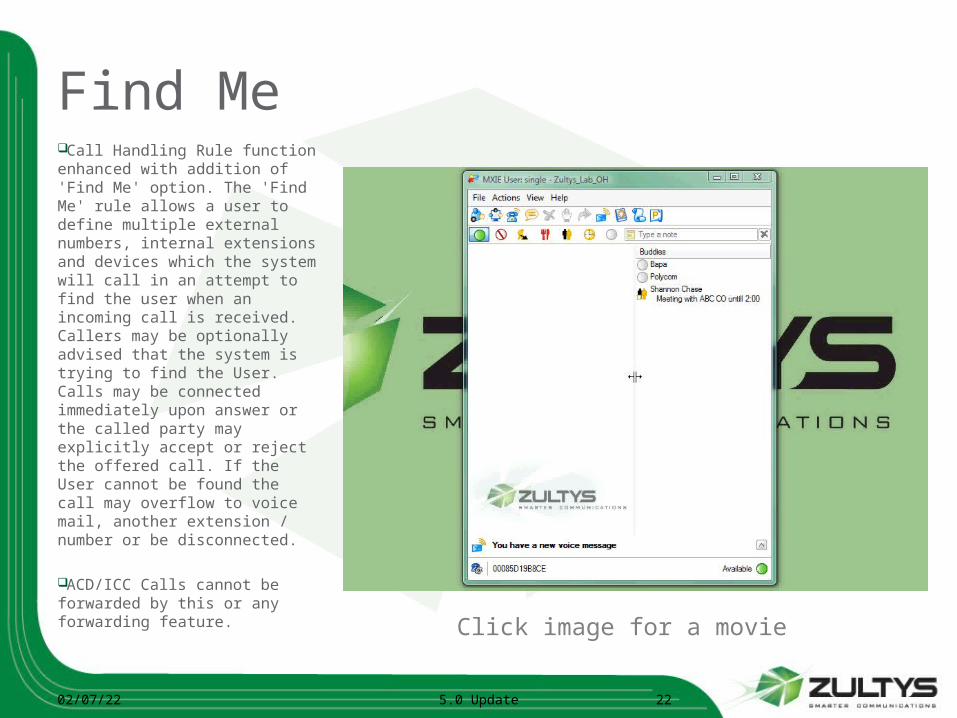
Find MeCall Handling Rule function enhanced with addition of 'Find Me' option. The 'Find Me' rule allows a user to define multiple external numbers, internal extensions and devices which the system will call in an attempt to find the user when an incoming call is received. Callers may be optionally advised that the system is trying to find the User. Calls may be connected immediately upon answer or the called party may explicitly accept or reject the offered call. If the User cannot be found the call may overflow to voice mail, another extension / number or be disconnected.
ACD/ICC Calls cannot be forwarded by this or any forwarding feature.
04/10/23 5.0 Update 22
Click image for a movie
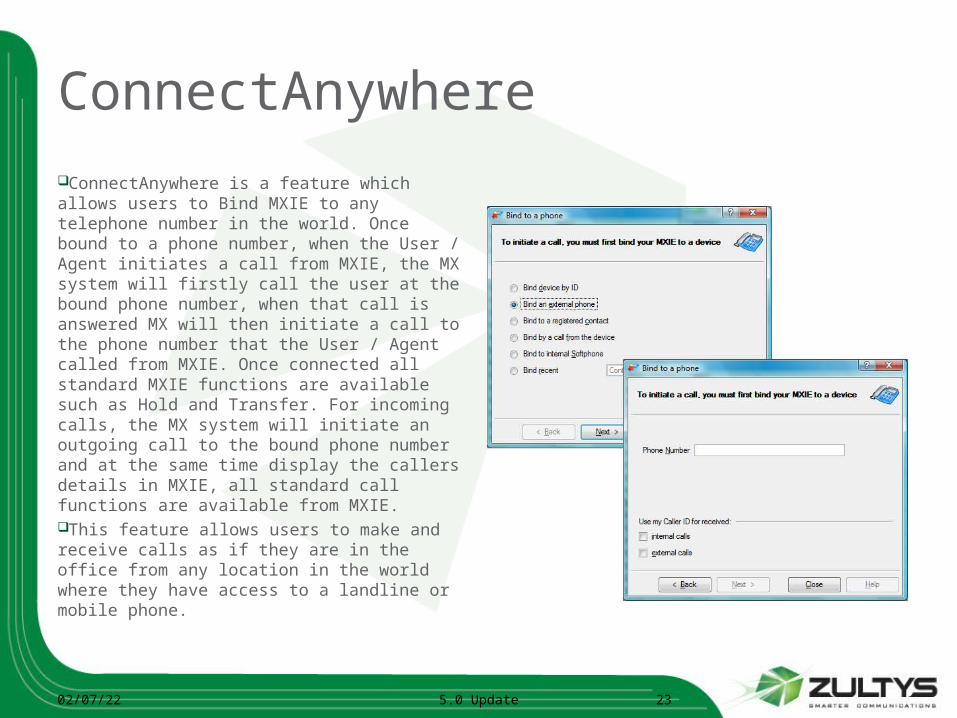
ConnectAnywhereConnectAnywhere is a feature which allows users to Bind MXIE to any telephone number in the world. Once bound to a phone number, when the User / Agent initiates a call from MXIE, the MX system will firstly call the user at the bound phone number, when that call is answered MX will then initiate a call to the phone number that the User / Agent called from MXIE. Once connected all standard MXIE functions are available such as Hold and Transfer. For incoming calls, the MX system will initiate an outgoing call to the bound phone number and at the same time display the callers details in MXIE, all standard call functions are available from MXIE.This feature allows users to make and receive calls as if they are in the office from any location in the world where they have access to a landline or mobile phone.
04/10/23 5.0 Update 23

Set up VoicemailSet up Voicemail
04/10/23 End User Training 24
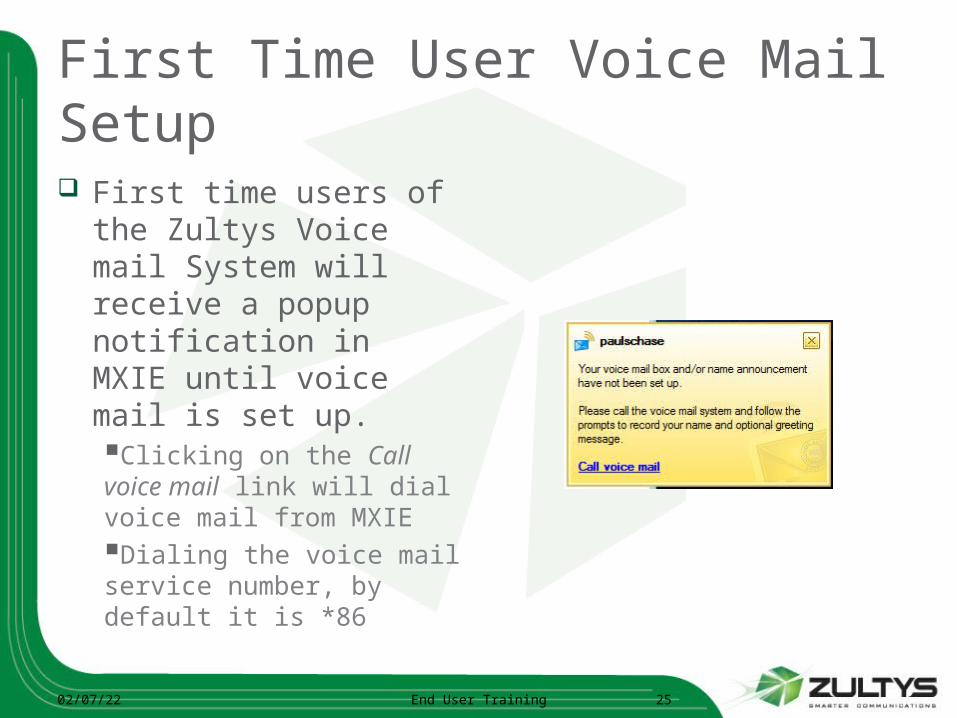
First Time User Voice Mail Setup First time users of the
Zultys Voice mail System will receive a popup notification in MXIE until voice mail is set up.Clicking on the Call voice mail link will dial voice mail from MXIEDialing the voice mail service number, by default it is *86
04/10/23 End User Training 25
Set Up Voice Mail
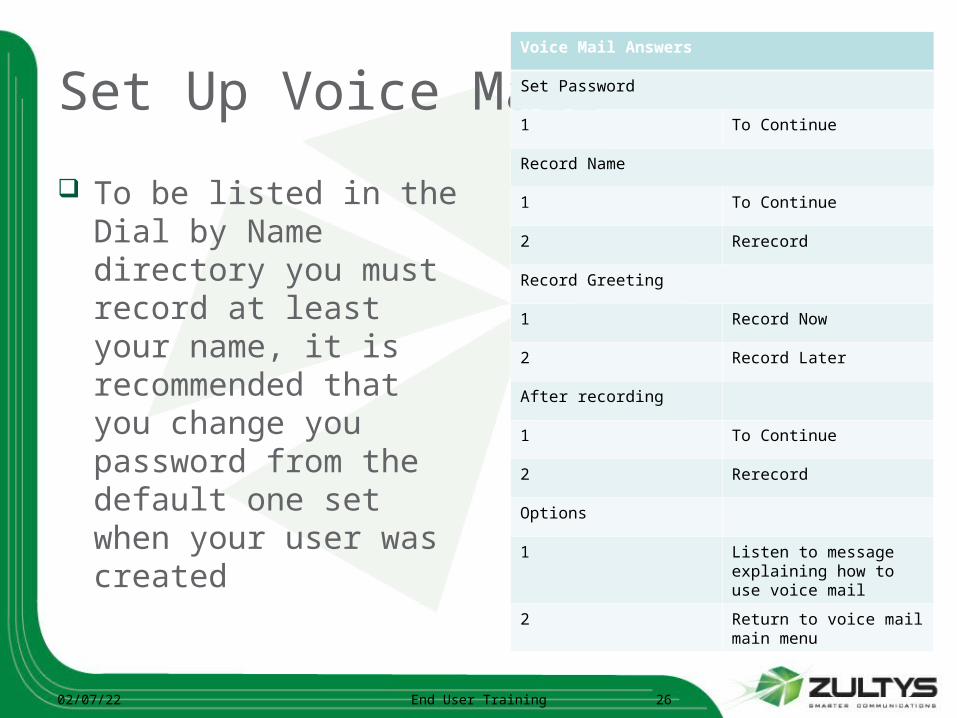
To be listed in the Dial by Name directory you must record at least your name, it is recommended that you change you password from the default one set when your user was created
04/10/23 End User Training 26
Voice Mail Answers
Set Password
1 To Continue
Record Name
1 To Continue
2 Rerecord
Record Greeting
1 Record Now
2 Record Later
After recording
1 To Continue
2 Rerecord
Options
1 Listen to message explaining how to use voice mail
2 Return to voice mail main menu
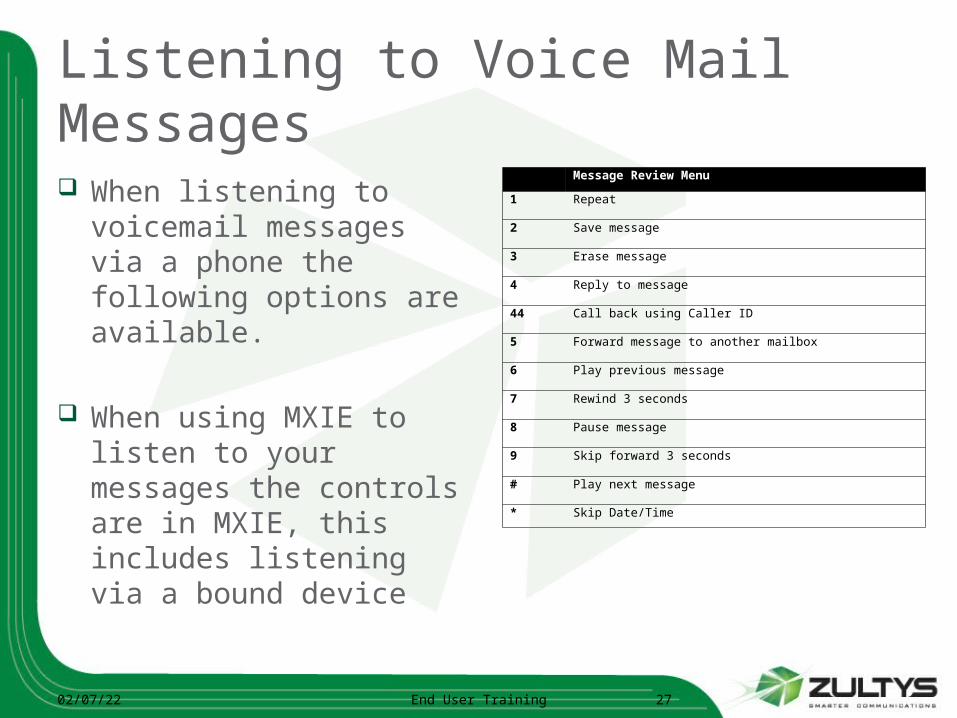
Listening to Voice Mail Messages
Message Review Menu
1 Repeat
2 Save message
3 Erase message
4 Reply to message
44 Call back using Caller ID
5 Forward message to another mailbox
6 Play previous message
7 Rewind 3 seconds
8 Pause message
9 Skip forward 3 seconds
# Play next message
* Skip Date/Time
04/10/23 End User Training 27
When listening to voicemail messages via a phone the following options are available.
When using MXIE to listen to your messages the controls are in MXIE, this includes listening via a bound device
MXIEMXIE
Call Handling Using MXIECall Handling Using MXIE
04/10/23 End User Training 28
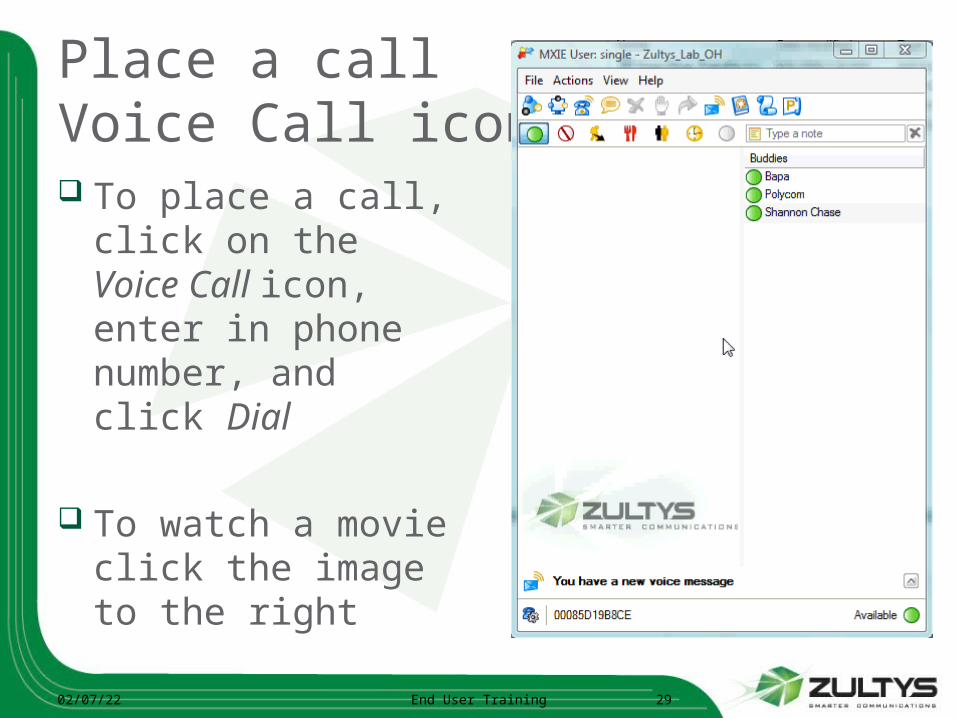
Place a callVoice Call icon To place a call,
click on the Voice Call icon, enter in phone number, and click Dial
To watch a movie click the image to the right
04/10/23 End User Training 29
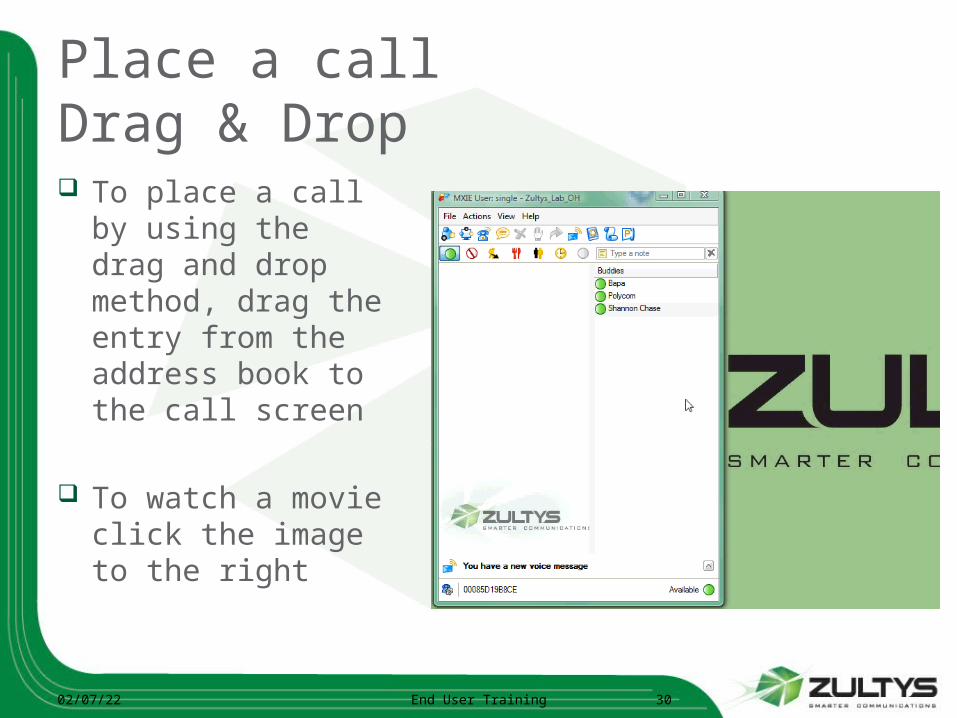
Place a callDrag & Drop To place a call by
using the drag and drop method, drag the entry from the address book to the call screen
To watch a movie click the image to the right
04/10/23 End User Training 30
Answer
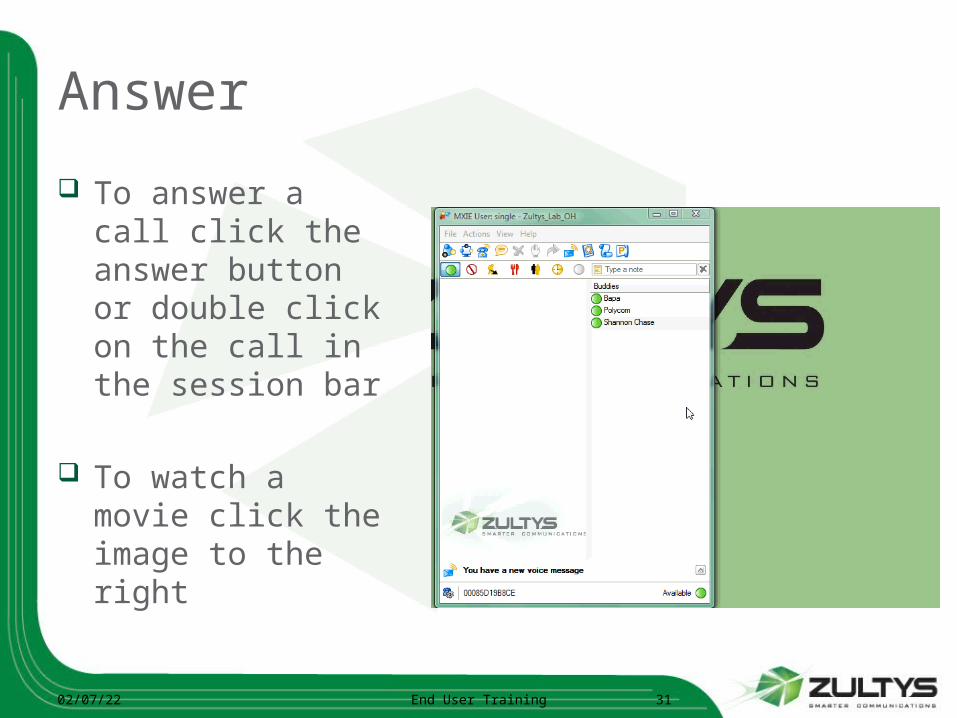
To answer a call click the answer button or double click on the call in the session bar
To watch a movie click the image to the right
04/10/23 End User Training 31
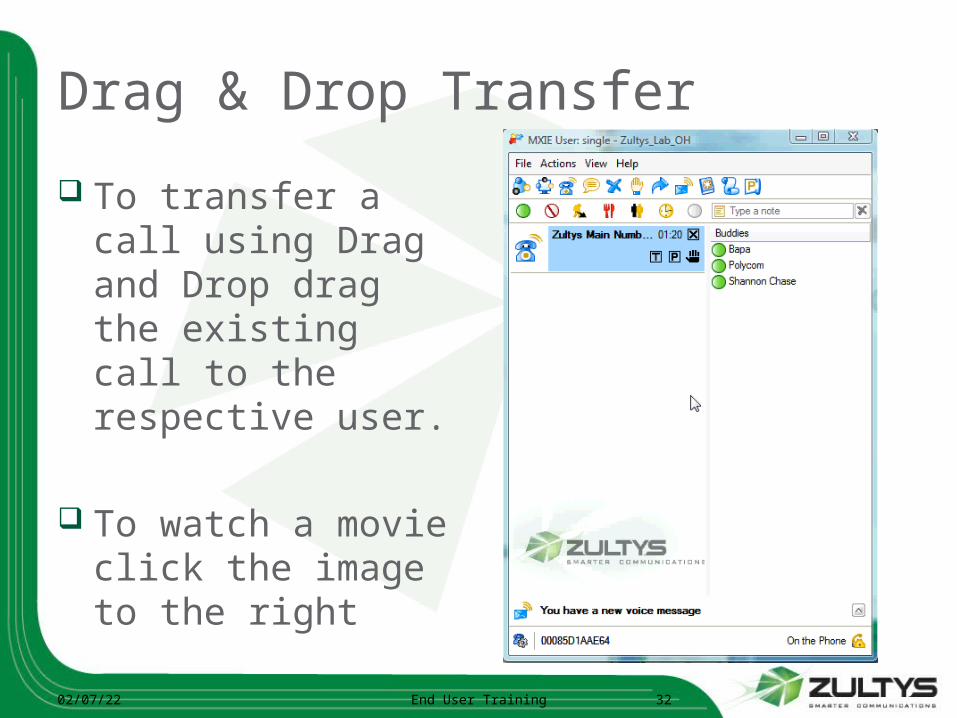
Drag & Drop Transfer
To transfer a call using Drag and Drop drag the existing call to the respective user.
To watch a movie click the image to the right
04/10/23 End User Training 32
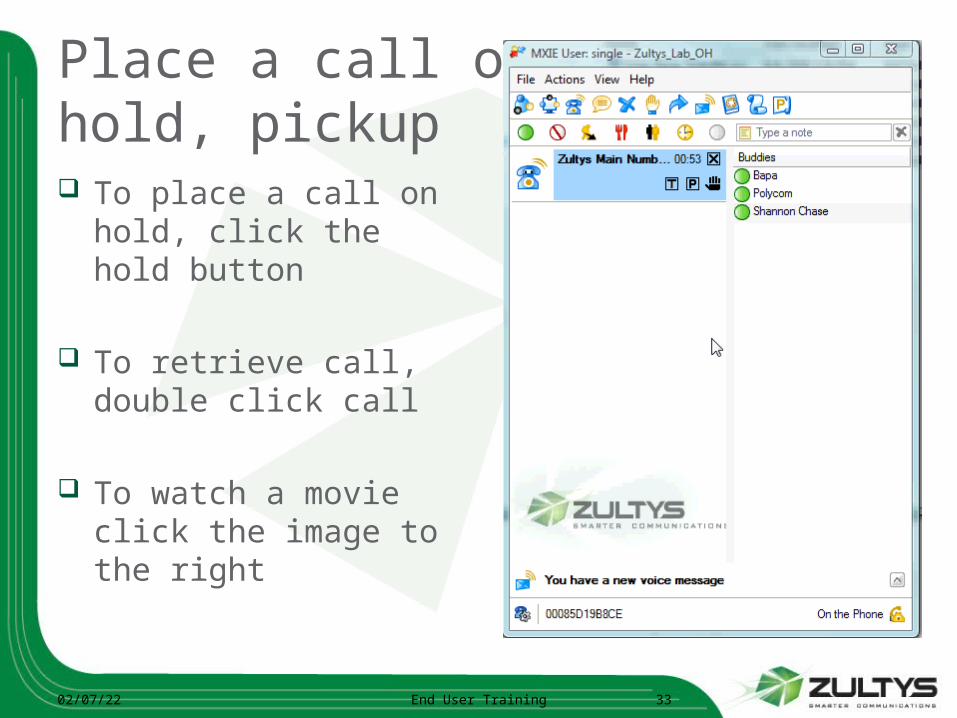
Place a call on hold, pickup To place a call on
hold, click the hold button
To retrieve call, double click call
To watch a movie click the image to the right
04/10/23 End User Training 33
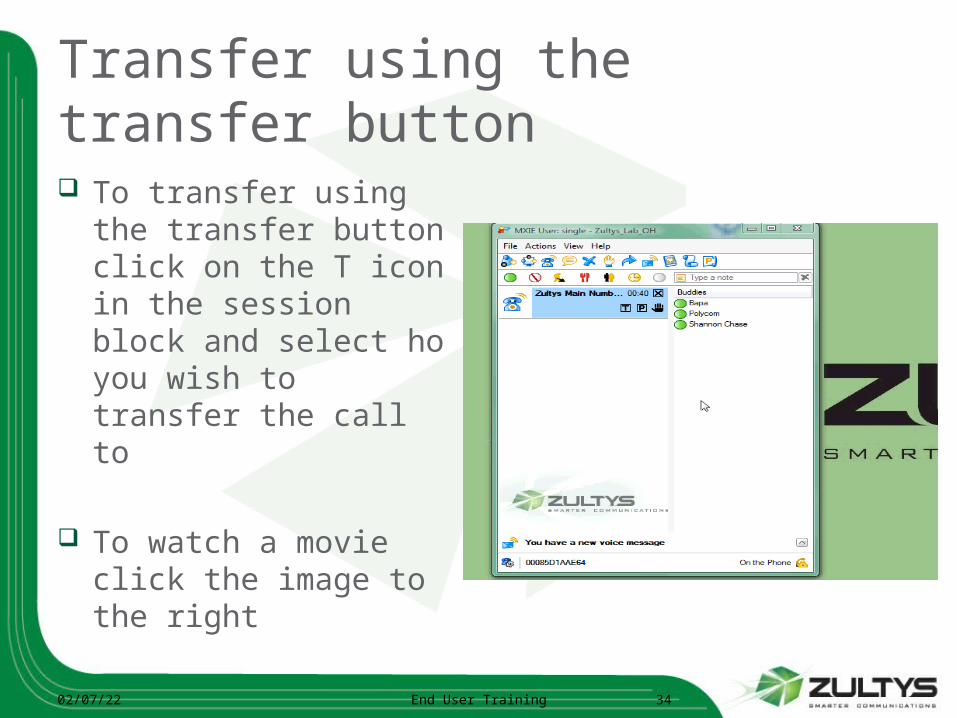
Transfer using the transfer button To transfer using the
transfer button click on the T icon in the session block and select ho you wish to transfer the call to
To watch a movie click the image to the right
04/10/23 End User Training 34
Attended Transfer
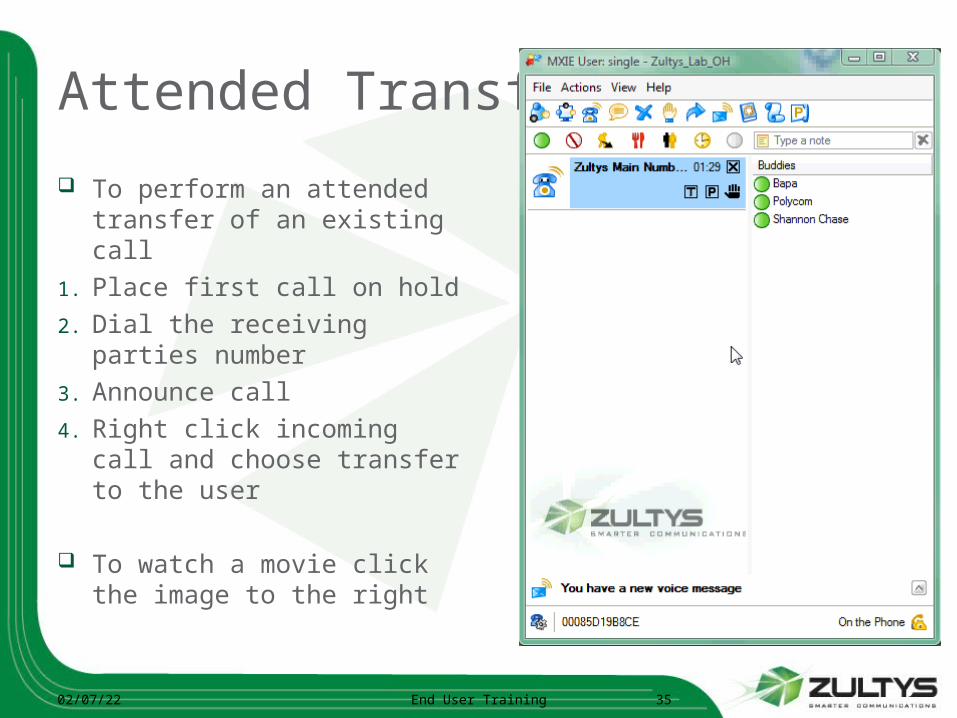
To perform an attended transfer of an existing call
1. Place first call on hold2. Dial the receiving parties
number3. Announce call4. Right click incoming call
and choose transfer to the user
To watch a movie click the image to the right
04/10/23 End User Training 35

Transfer to users voicemail Right click on the
active call, choose send to user voicemail
Select which user you wish to transfer the call to their voicemail
To watch a movie click the image to the right
04/10/23 End User Training 36
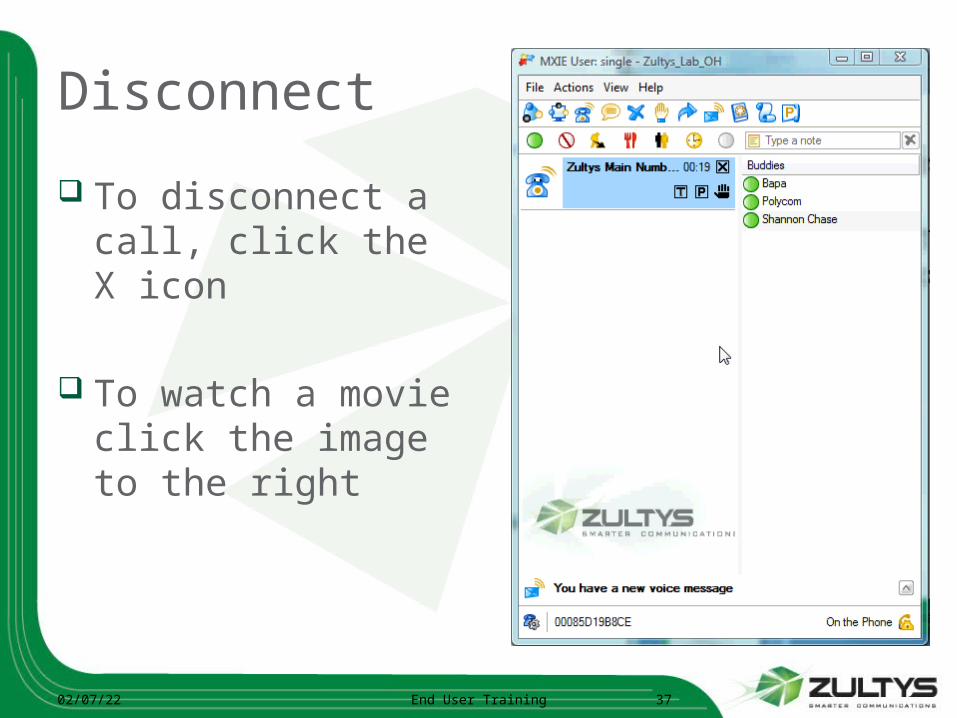
Disconnect
To disconnect a call, click the X icon
To watch a movie click the image to the right
04/10/23 End User Training 37
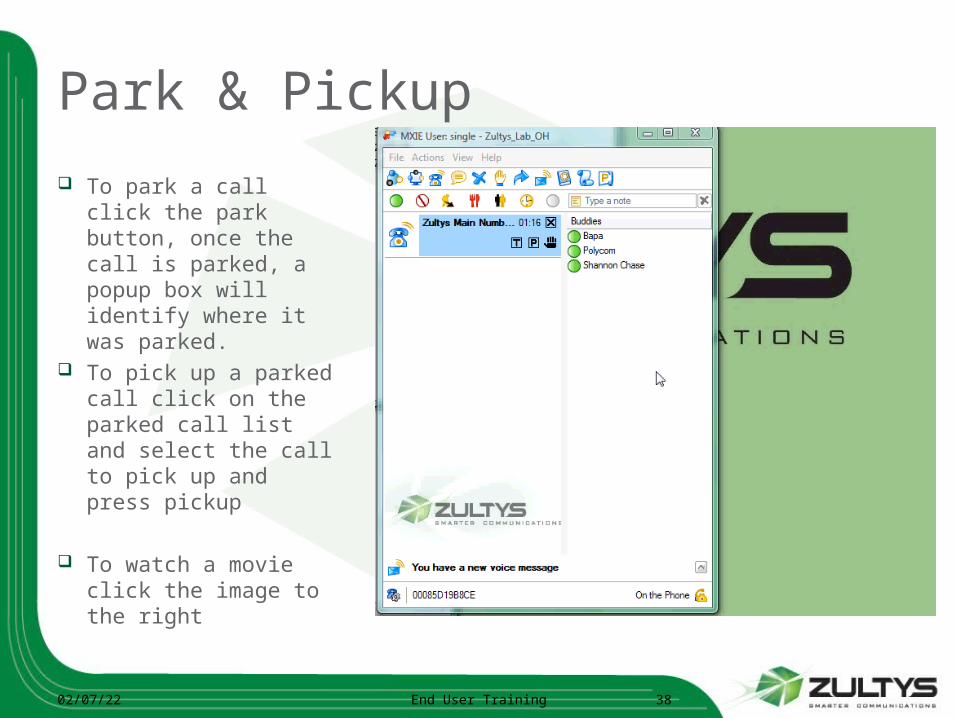
Park & Pickup
To park a call click the park button, once the call is parked, a popup box will identify where it was parked.
To pick up a parked call click on the parked call list and select the call to pick up and press pickup
To watch a movie click the image to the right
04/10/23 End User Training 38
Call HandlingCall Handling
Via the ZIP5xiVia the ZIP5xi
04/10/23 End User Training 39
Call Control using the ZIP5xi Phone To Place a call: Lift your handset and dial. When receiving a call: Either lift your handset or press your speaker button to
speak hands free. To Transfer a call: Press XFER in your display, dial the extension, press XFER
in your display and hang up. To Transfer user to a person’s voicemail: Press XFER + *86 + [extension number] + XFER and hang
up.
04/10/23 End User Training 40
Call Control using the ZIP5xi Phone
To place a call on hold: Press the HOLD button, to release press the LINE with the flashing
green LED or PICKUP in your display. To retrieve voicemail: Either with your handset off-hook or not, press the voicemail
button then enter your password and follow prompts. To park a call Press the park key in your display, enter in the Park ID and then
press DIAL in your display To pick up a parked call Dial the park server followed by the Park ID
04/10/23 End User Training 41
Call Control using the ZIP5xi Phone To change your volume: For Handset: lift the handset and adjust the volume using the
volume buttons . For Headset: press the SPEAKER/HEADSET button and adjust the
volume using the volume buttons . For Speakerphone: press the SPEAKER/HEADSET button and
adjust the volume using the volume buttons . For Ringing: press the volume buttons and adjust the volume
WHILE the phone is ringing. For Paging: press and adjust the volume using the volume
buttons WHILE someone is paging.
04/10/23 End User Training 42
MXIEMXIE
FaxingFaxing
04/10/23 End User Training 43
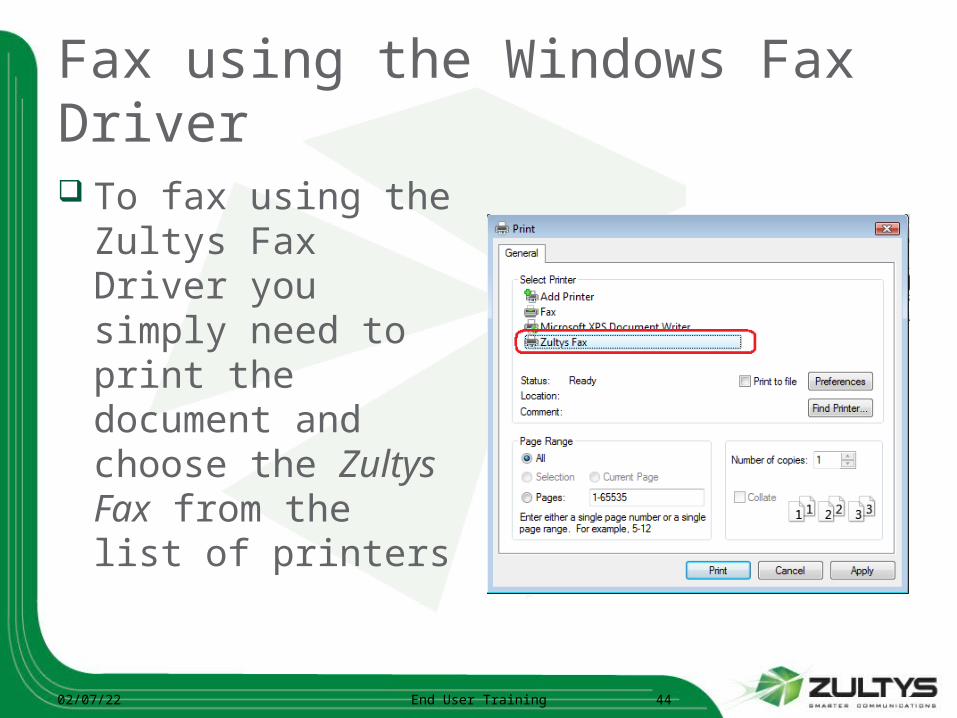
Fax using the Windows Fax Driver To fax using the
Zultys Fax Driver you simply need to print the document and choose the Zultys Fax from the list of printers
04/10/23 End User Training 44
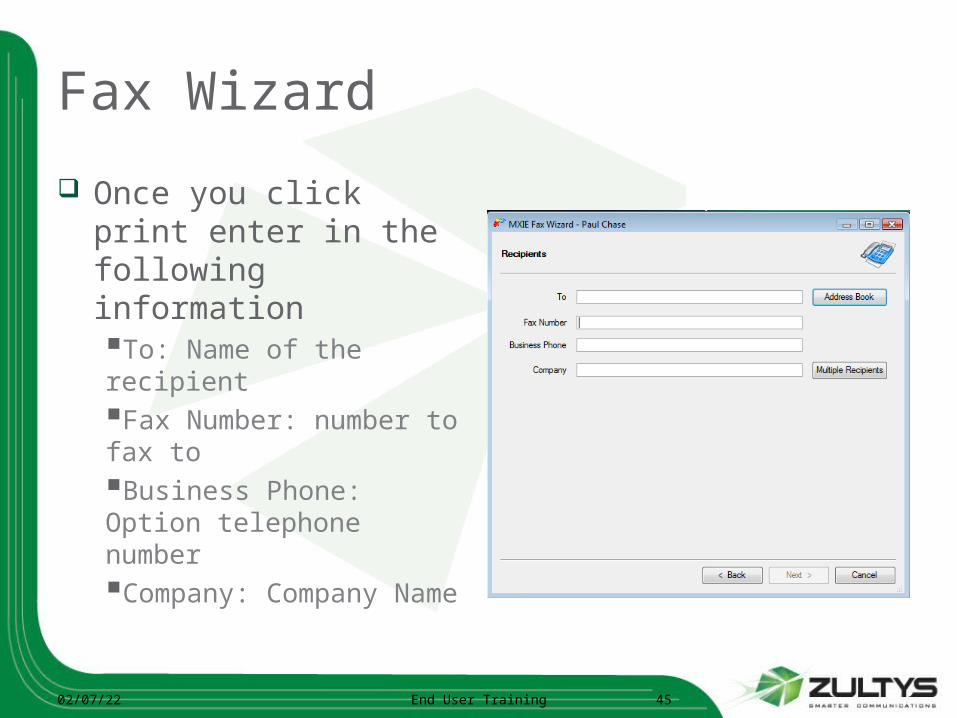
Fax Wizard
Once you click print enter in the following informationTo: Name of the recipientFax Number: number to fax toBusiness Phone: Option telephone numberCompany: Company Name
04/10/23 End User Training 45
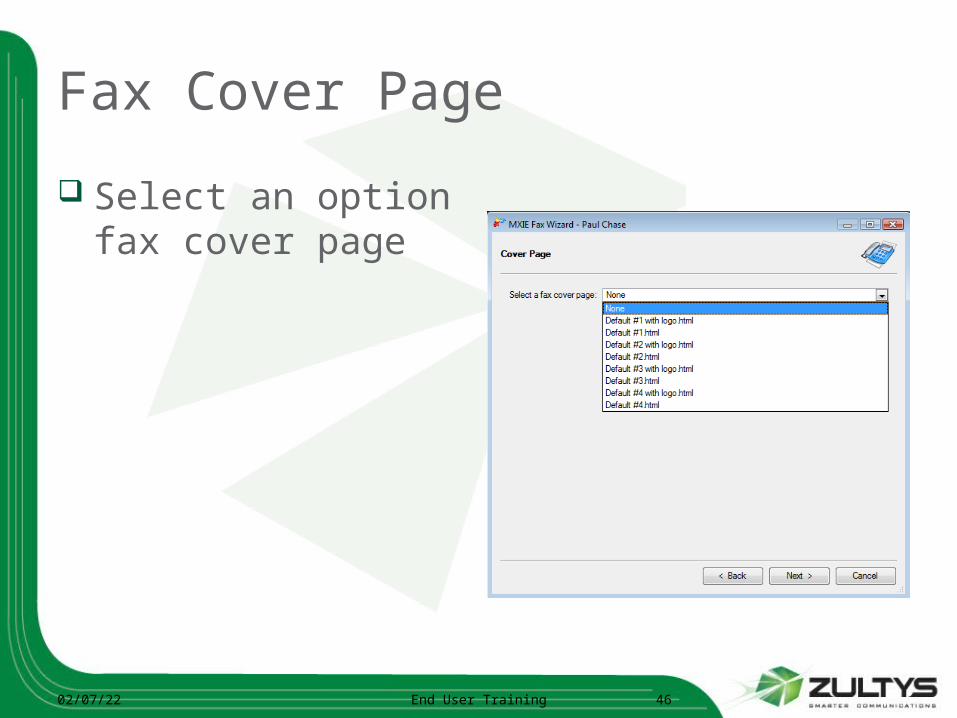
Fax Cover Page
Select an option fax cover page
04/10/23 End User Training 46
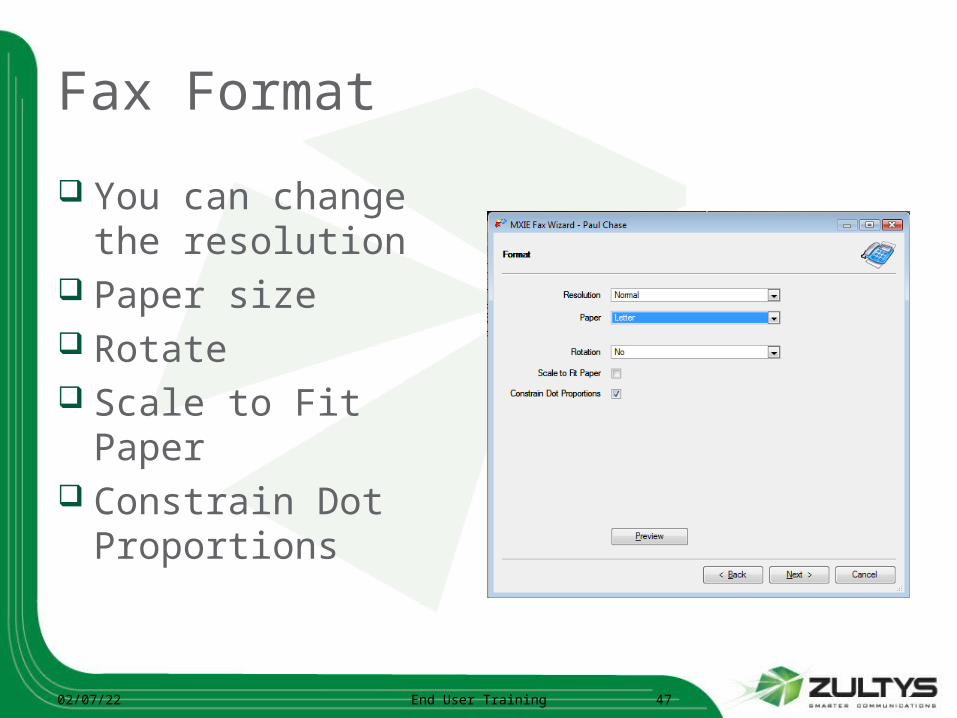
Fax Format
You can change the resolution
Paper size Rotate Scale to Fit Paper Constrain Dot
Proportions
04/10/23 End User Training 47
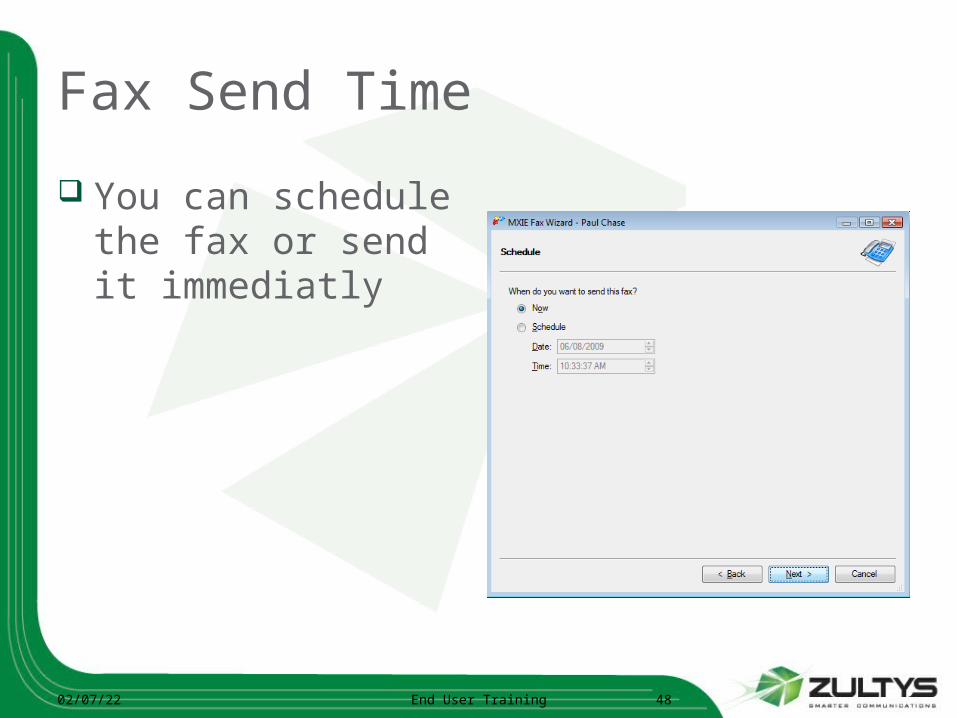
Fax Send Time
You can schedule the fax or send it immediatly
04/10/23 End User Training 48
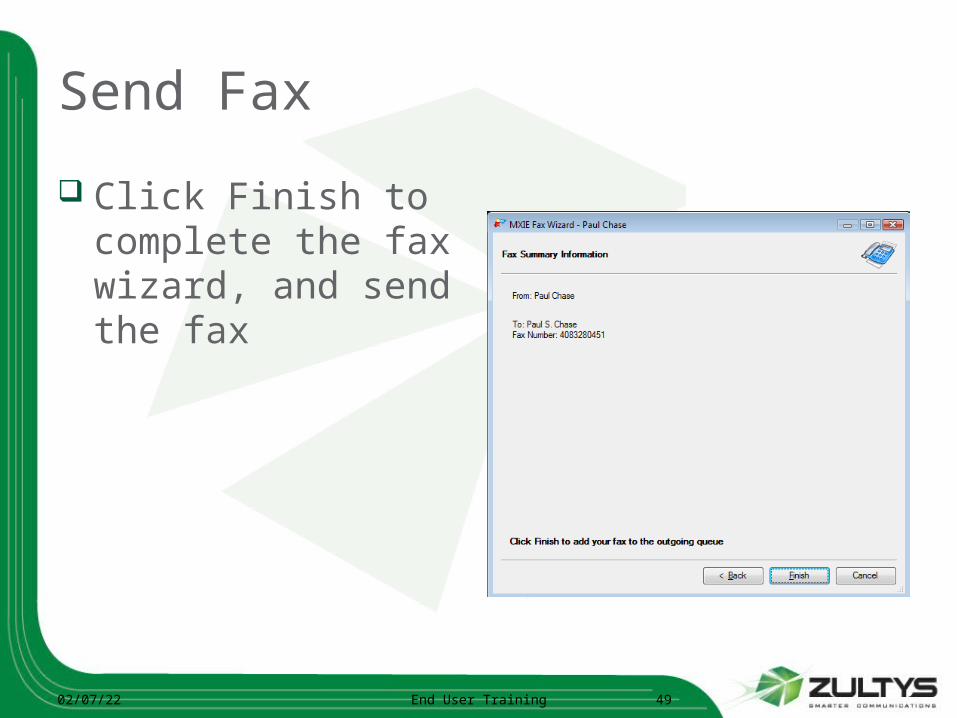
Send Fax
Click Finish to complete the fax wizard, and send the fax
04/10/23 End User Training 49

MXIEMXIE
CCall all HHandling andling RRulesules
04/10/23 End User Training 50
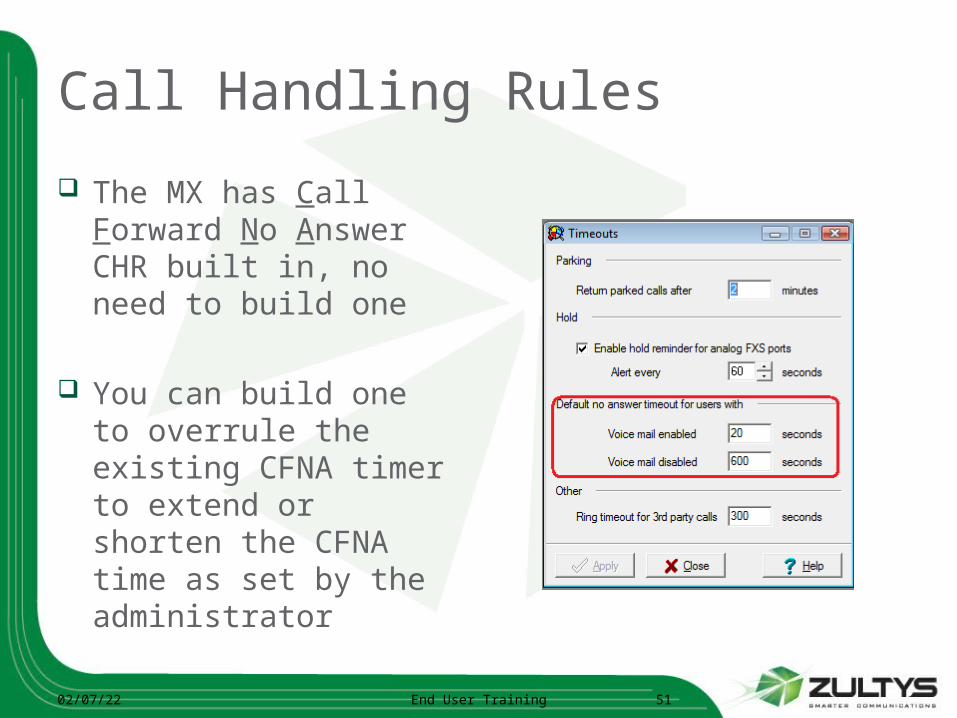
Call Handling Rules
The MX has Call Forward No Answer CHR built in, no need to build one
You can build one to overrule the existing CFNA timer to extend or shorten the CFNA time as set by the administrator
04/10/23 End User Training 51
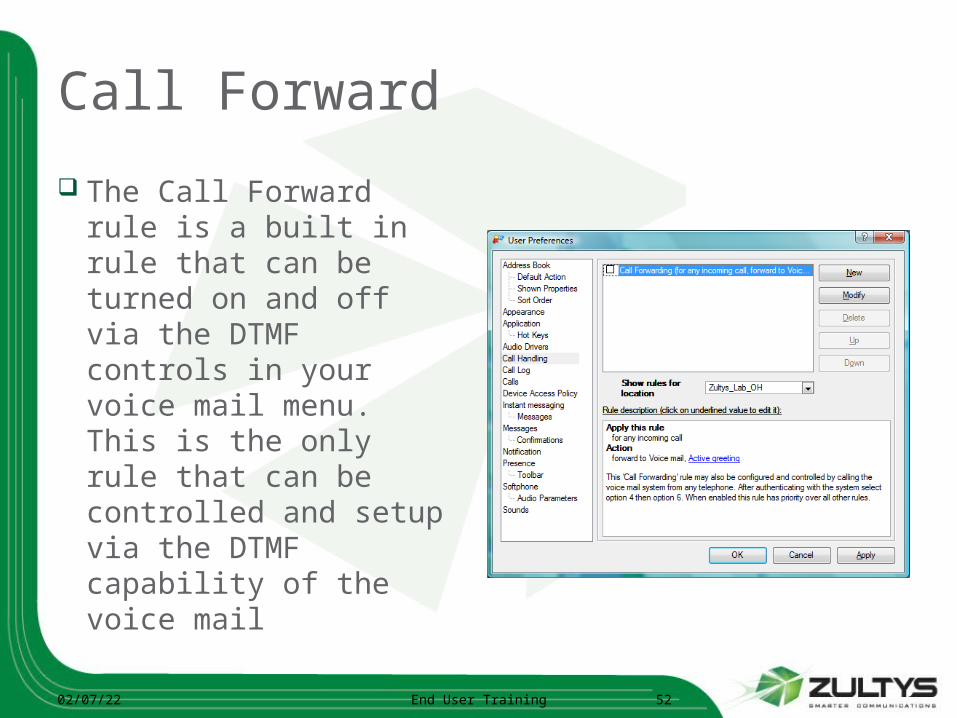
Call Forward
The Call Forward rule is a built in rule that can be turned on and off via the DTMF controls in your voice mail menu. This is the only rule that can be controlled and setup via the DTMF capability of the voice mail
04/10/23 End User Training 52
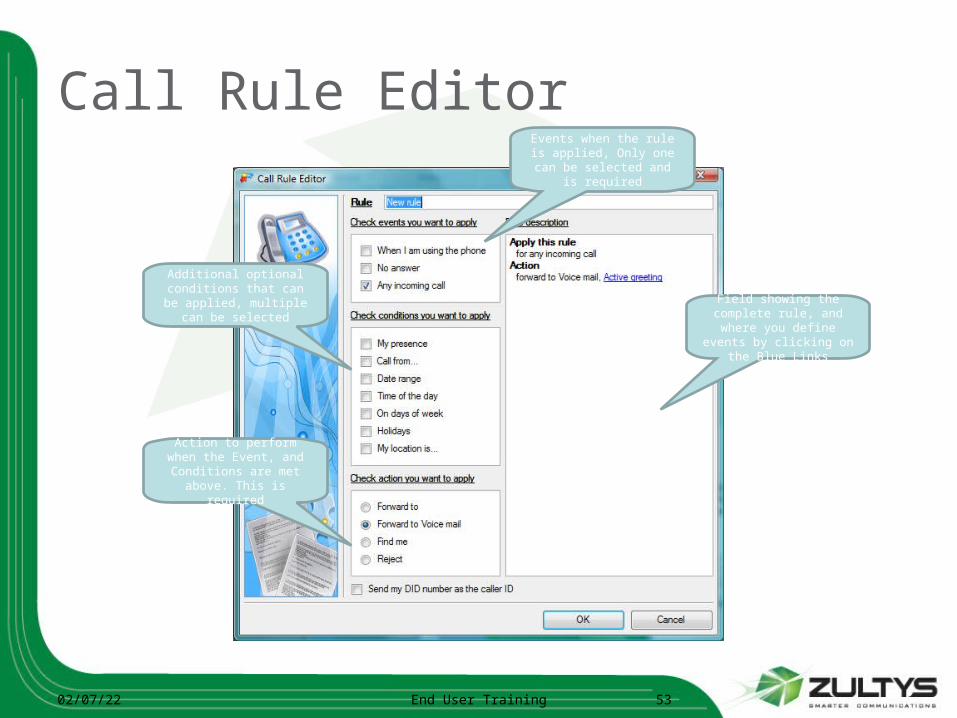
Call Rule Editor
04/10/23 End User Training 53
Additional optional conditions that can be
applied, multiple can be selected
Events when the rule is applied, Only one can be selected and is required
Action to perform when the Event, and
Conditions are met above. This is required
Field showing the complete rule, and
where you define events by clicking on the Blue
Links
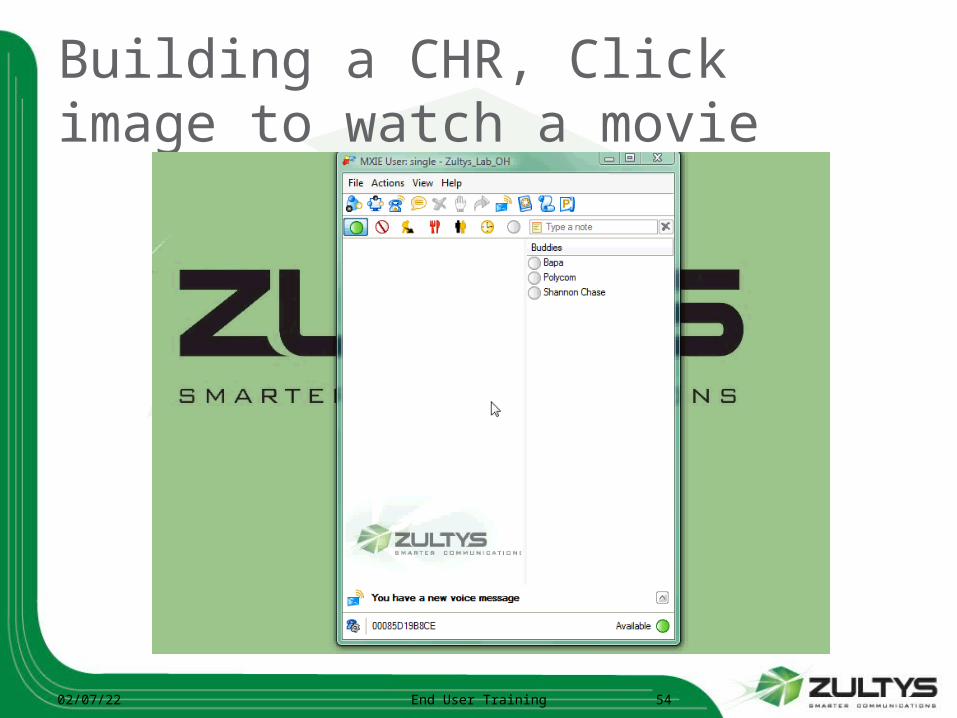
Building a CHR, Click image to watch a movie
04/10/23 End User Training 54
MXIEMXIE
ICC Supervisor OptionsICC Supervisor OptionsICC ReportingICC Reporting
04/10/23 End User Training 55
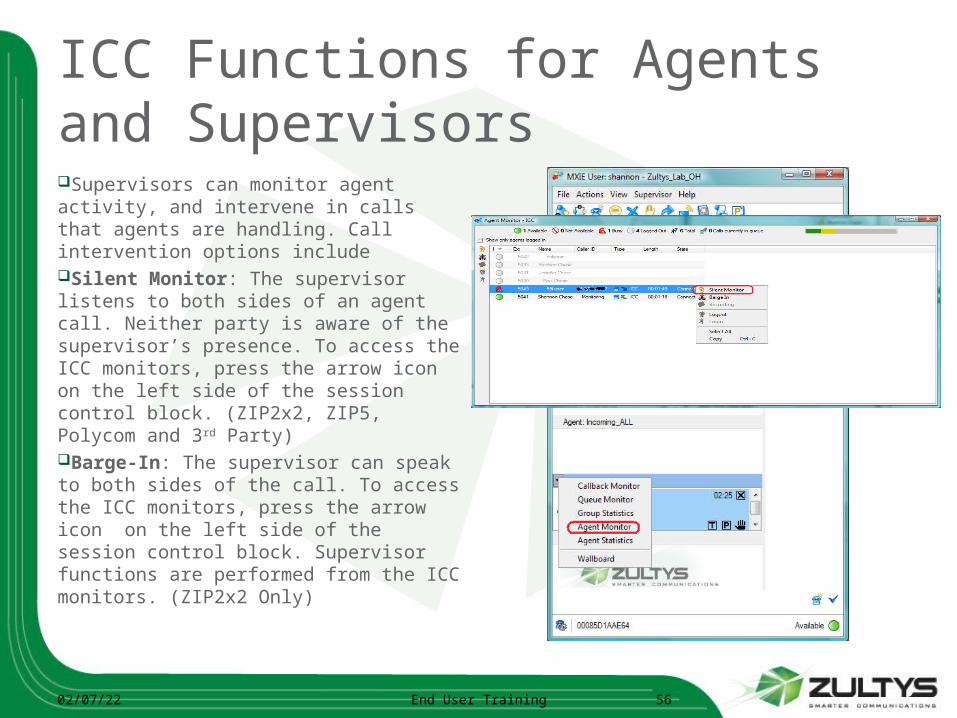
ICC Functions for Agents and SupervisorsSupervisors can monitor agent activity, and intervene in calls that agents are handling. Call intervention options includeSilent Monitor: The supervisor listens to both sides of an agent call. Neither party is aware of the supervisor’s presence. To access the ICC monitors, press the arrow icon on the left side of the session control block. (ZIP2x2, ZIP5, Polycom and 3rd Party)Barge-In: The supervisor can speak to both sides of the call. To access the ICC monitors, press the arrow icon on the left side of the session control block. Supervisor functions are performed from the ICC monitors. (ZIP2x2 Only)
04/10/23 End User Training 56
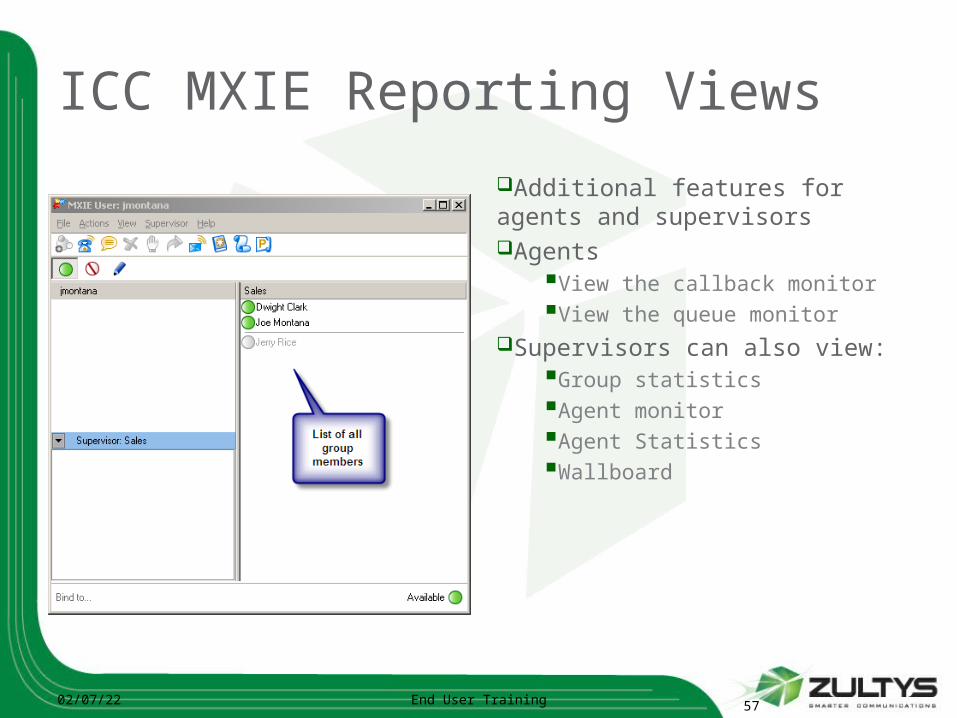
ICC MXIE Reporting Views
Additional features for agents and supervisorsAgents
View the callback monitorView the queue monitor
Supervisors can also view:Group statisticsAgent monitorAgent StatisticsWallboard
04/10/23 End User Training 57
ICC MXIE View
From the agents and supervisors standpoint, additional features are available on MXIE when logged in to an ICC group.
For agents, view of the callback monitor and the queue monitor are available. The callback monitor consists of a list of callers who requested callback and left their callback numbers. The queue monitors shows real-time queue information such as the number of callers in queue, status of other agents, and more.
04/10/23 End User Training 58
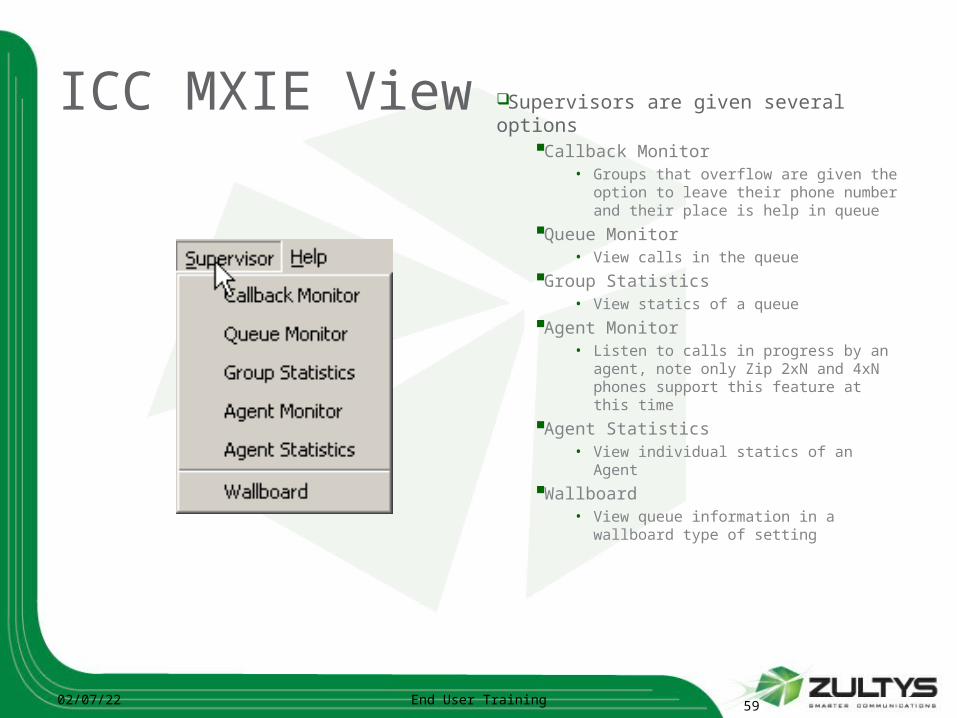
ICC MXIE View Supervisors are given several options
Callback Monitor• Groups that overflow are given the
option to leave their phone number and their place is help in queue
Queue Monitor• View calls in the queue
Group Statistics• View statics of a queue
Agent Monitor• Listen to calls in progress by an
agent, note only Zip 2xN and 4xN phones support this feature at this time
Agent Statistics• View individual statics of an Agent
Wallboard • View queue information in a
wallboard type of setting
04/10/23 End User Training 59
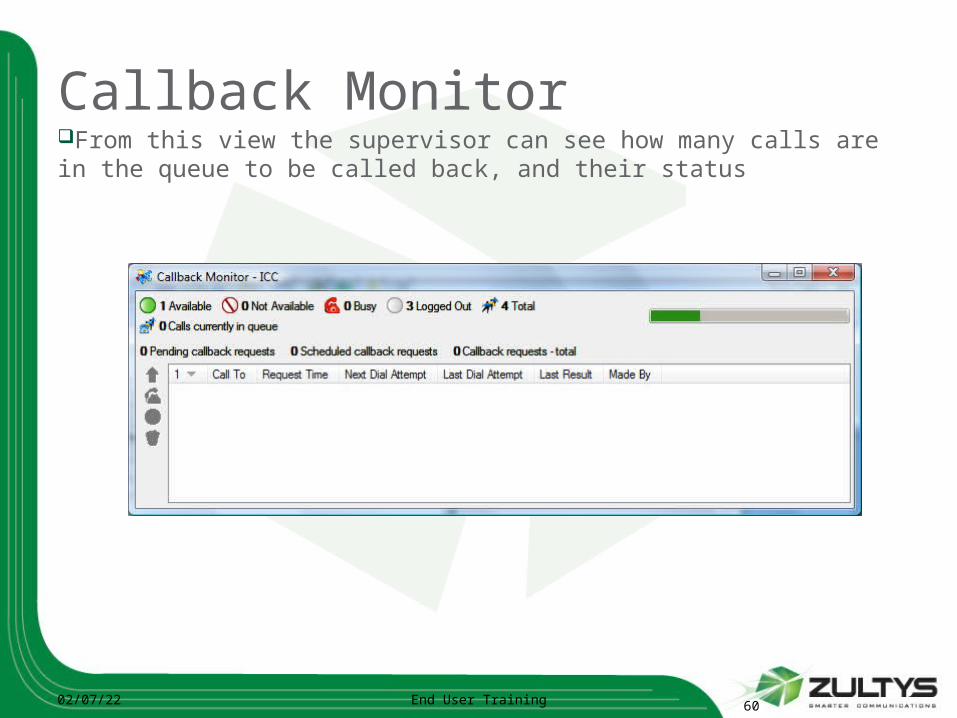
Callback MonitorFrom this view the supervisor can see how many calls are in the queue to be called back, and their status
04/10/23 End User Training 60
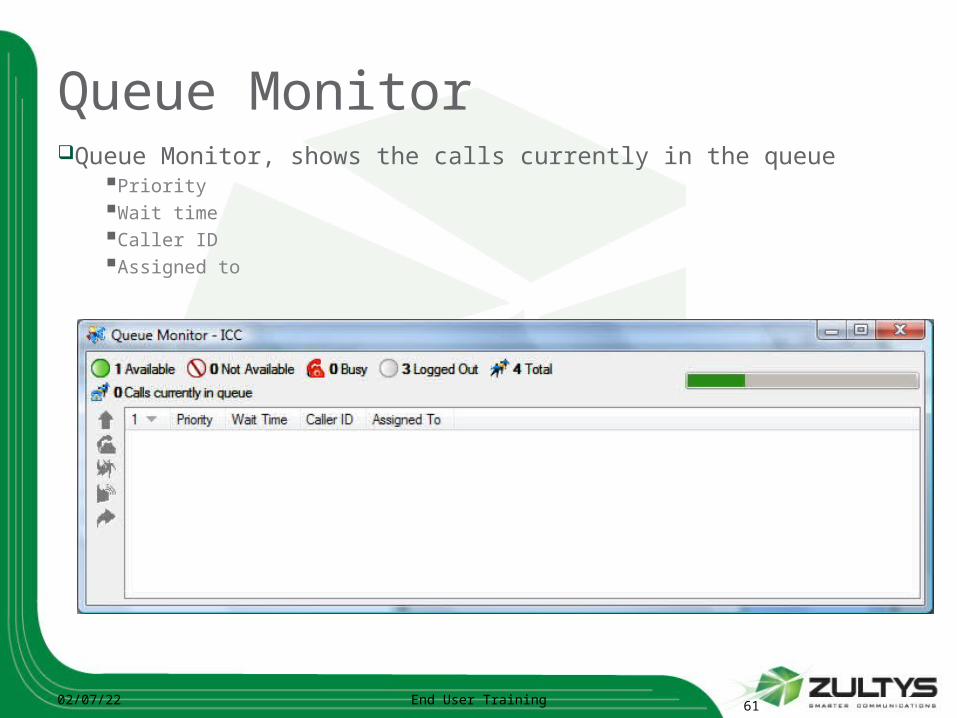
Queue MonitorQueue Monitor, shows the calls currently in the queue
PriorityWait timeCaller IDAssigned to
04/10/23 End User Training 61
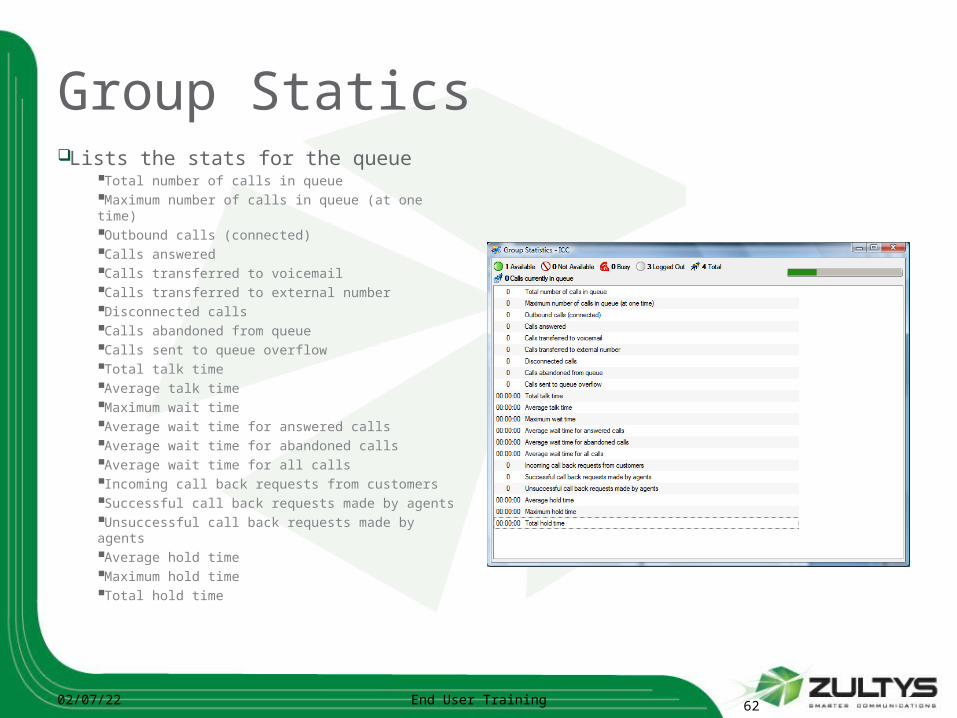
Group StaticsLists the stats for the queue
Total number of calls in queueMaximum number of calls in queue (at one time)Outbound calls (connected)Calls answeredCalls transferred to voicemailCalls transferred to external numberDisconnected callsCalls abandoned from queueCalls sent to queue overflowTotal talk timeAverage talk timeMaximum wait timeAverage wait time for answered callsAverage wait time for abandoned callsAverage wait time for all callsIncoming call back requests from customersSuccessful call back requests made by agentsUnsuccessful call back requests made by agentsAverage hold timeMaximum hold timeTotal hold time
04/10/23 End User Training 62
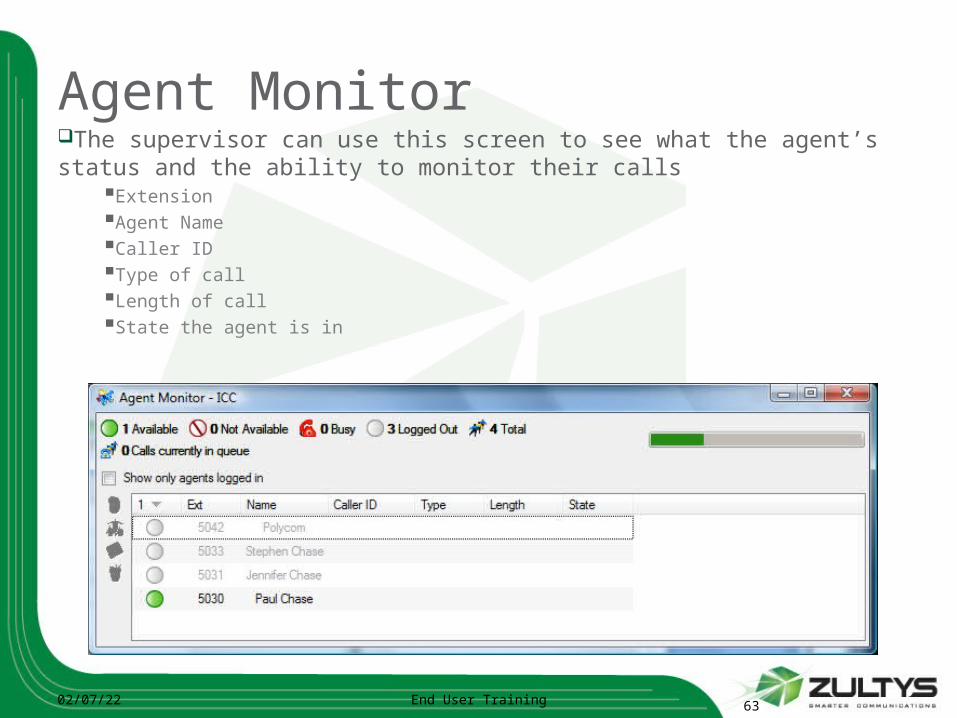
Agent MonitorThe supervisor can use this screen to see what the agent’s status and the ability to monitor their calls
ExtensionAgent NameCaller IDType of callLength of callState the agent is in
04/10/23 End User Training 63
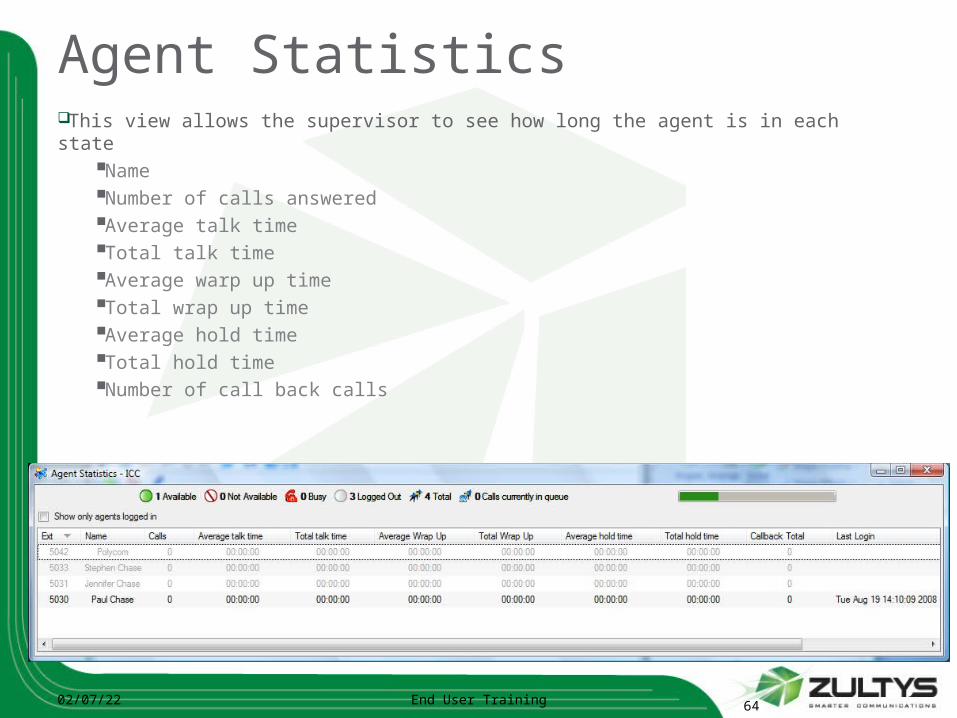
Agent StatisticsThis view allows the supervisor to see how long the agent is in each state
NameNumber of calls answeredAverage talk timeTotal talk timeAverage warp up timeTotal wrap up timeAverage hold timeTotal hold timeNumber of call back calls
04/10/23 End User Training 64
Wallboard Reporting ParametersTotal number of calls in queue. This parameter displays the total number of calls sent to the queue since the daily reset.Maximum number of calls in queue (at one time). This parameter displays the largest number of callers that were waiting in the group queue at one time.Outbound calls (connected). This parameter displays the total number of calls that were initiated by ACD agents since the daily reset.Calls answered. This parameter displays the total number of calls that have been answered by ACD agents since the daily reset.Calls transferred to voice mail. This parameter displays the number of calls that have been transferred to voice mail since the daily reset.Total call back requests. This parameter list the number of callers that have requested callbacks since the daily reset.Calls abandoned from queue. This parameter list the number of callers that have abandoned their calls while waiting in the queue since the daily reset.Calls sent to queue overflow. This parameter list the number of calls that have been sent to group queue since the daily reset.Total talk time. This parameter lists the cumulative talk time of all ACD agents since the daily reset.
04/10/23 End User Training 65
Wallboard Reporting ParametersAverage talk time. This parameter list the average time per call since the daily reset.Maximum wait time. This parameter list the maximum wait time that a caller waited to talk to an ACD agent before the call was either answered by the agent or terminated by the caller.Average wait time for answered calls. This parameter list the average time, for calls answered by an ACD agent, that a caller had to wait before talking to an agent.Average wait time for abandoned calls. This parameter list the average time, for all abandoned calls, that a caller waited for an agent before terminating the call.Average wait time for all calls. This parameter list the average time, for all abandoned calls and calls answered by the ACD agent.Available. This parameter list the number of ACD agents that have a presence state of available.Not available. This parameter list the number ACD agents that have a presence state of not available.Busy. This parameter lists the number of ACD agents that have a presence state of busy.Logged out. This parameter list the number of ACD agents that have a presence state of logged out.Total. This parameter list the total number of ACD agents that are part of the ACD group.Calls currently in queue. This parameter list the total number of calls that are currently in queue.
04/10/23 End User Training 66
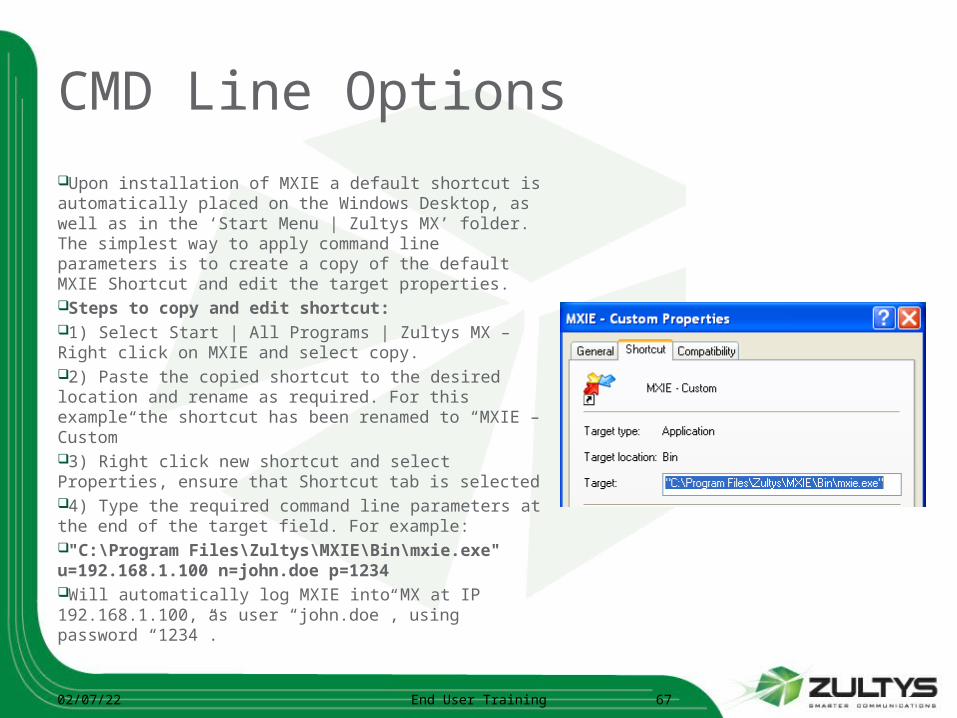
CMD Line OptionsUpon installation of MXIE a default shortcut is automatically placed on the Windows Desktop, as well as in the ‘Start Menu | Zultys MX’ folder. The simplest way to apply command line parameters is to create a copy of the default MXIE Shortcut and edit the target properties.Steps to copy and edit shortcut:1) Select Start | All Programs | Zultys MX – Right click on MXIE and select copy.2) Paste the copied shortcut to the desired location and rename as required. For this example the shortcut has been renamed to “MXIE – Custom”3) Right click new shortcut and select Properties, ensure that Shortcut tab is selected4) Type the required command line parameters at the end of the target field. For example:"C:\Program Files\Zultys\MXIE\Bin\mxie.exe" u=192.168.1.100 n=john.doe p=1234Will automatically log MXIE into MX at IP 192.168.1.100, as user “john.doe”, using password “1234”.
04/10/23 End User Training 67
CMD Line Options
04/10/23 End User Training 68

MXIE DemosMXIE Demos
MMedia Eedia Exxchange change IInterfacenterfacefor for EEnd Usersnd Users
04/10/23 End User Training 69
MXIE Demo
04/10/23 End User Training 70
Softphone Demo
04/10/23 End User Training 71