MW-C WALL MOUNT - B&H Photo · 2015-04-28 · MW-C WALL MOUNT ADAPTER For MD-ASL15W and MD-BSL15W...
10
MW-C WALL MOUNT ADAPTER For MD-ASL15W and MD-BSL15W Monitor Mounts User Manual
Transcript of MW-C WALL MOUNT - B&H Photo · 2015-04-28 · MW-C WALL MOUNT ADAPTER For MD-ASL15W and MD-BSL15W...
MW-C
WALL MOUNTADAPTERFor MD-ASL15W and MD-BSL15W Monitor Mounts
User Manual
WWW.MADEBYGABOR.COM
FORWARD YOUR PROOFSto [email protected]
FOR APPROVALBEFORE FINAL PRODUCTION
DO NOT BEGIN PRODUCTIONWITHOUT PRIOR APPROVAL OF PROOFS
Manual for Wall Mount AdapterMatte Printing
FoldingInstructions
DO NOT EDIT OR REVISE ARTWORKWe will not approve any artwork which has been altered by the vendor
Thank you for choosing Gabor.The Gabor MW-C is a dedicated wall mount for the MD-ASL15W (single display) and MD-BSL15W (dual display) monitor mounts, replacing the center column and desk clamp to offer an alternative mounting option. It’s perfect for cramped spaces or desk edges that are too thick to accommodate a desk clamp. The MW-C frees up valuable desk space and enables personalized monitor placement for improved safety and comfort over conventional monitor stands.
Customer Support
ONE-YEAR LIMITED WARRANTY
This GABOR product is warranted to the original purchaser to be free from defects in materials and workmanship under normal consumer use for a period of one (1) year from the original purchase date or thirty (30) days after replacement, whichever occurs later. The warranty provider’s responsibility with respect to this limited warranty shall be limited solely to repair or replacement, at the provider’s discretion, of any product that fails during normal use of this product in its intended manner and in its intended environment. Inoperability of the product or part(s) shall be determined by the warranty provider. If the product has been discontinued, the warranty provider reserves the right to replace it with a model of equivalent quality and function.
This warranty does not cover damage or defect caused by misuse, neglect, accident, alteration, abuse, improper installation or maintenance. EXCEPT AS PROVIDED HEREIN, THE WARRANTY PROVIDER MAKES NEITHER ANY EXPRESS WARRANTIES NOR ANY IMPLIED WARRANTIES, INCLUDING BUT NOT LIMITED TO ANY IMPLIED WARRANTY OF MERCHANTABILITY OR FITNESS FOR A PARTICULAR PURPOSE. This warranty provides you with specific legal rights, and you may also have additional rights that vary from state to state.
To obtain warranty coverage, contact the Gabor Customer Service Department to obtain a return merchandise authorization (“RMA”) number, and return the defective product to Gabor along with the RMA number and proof of purchase. Shipment of the defective product is at the purchaser’s own risk and expense.
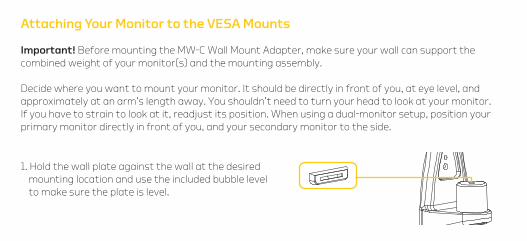
Attaching Your Monitor to the VESA Mounts
Important! Before mounting the MW-C Wall Mount Adapter, make sure your wall can support the combined weight of your monitor(s) and the mounting assembly.
Decide where you want to mount your monitor. It should be directly in front of you, at eye level, and approximately at an arm’s length away. You shouldn’t need to turn your head to look at your monitor. If you have to strain to look at it, readjust its position. When using a dual-monitor setup, position your primary monitor directly in front of you, and your secondary monitor to the side.
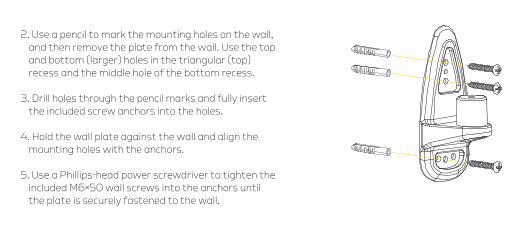
1. Hold the wall plate against the wall at the desired mounting location and use the included bubble level to make sure the plate is level.
2. Use a pencil to mark the mounting holes on the wall, and then remove the plate from the wall. Use the top and bottom (larger) holes in the triangular (top) recess and the middle hole of the bottom recess.
3. Drill holes through the pencil marks and fully insert the included screw anchors into the holes.
4. Hold the wall plate against the wall and align the mounting holes with the anchors.
5. Use a Phillips-head power screwdriver to tighten the included M6×50 wall screws into the anchors until the plate is securely fastened to the wall.
KOPULA Gradus Group Brand
TM
KOPULA Gradus Group Brand
TM
For more information or to arrange service, visit www.madebygabor.com or call Customer Service at 212-594-2353.
Product warranty is provided by the Gradus Group. www.gradusgroup.com
Gabor is a registered trademark of the Gradus Group. © 2014 Gradus Group LLC. All Rights Reserved.
GG1
Safety Warnings
Please read and follow these instructions and keep this manual in a safe place.
Clean this product with only a soft, dry cloth.
Keep this product away from children.
Use only parts provided by the manufacturer.
Make sure everything is secure before proceeding.
Do not exceed the maximum load capacity.
Make sure your wall can support the combined weight of your monitor and the mounting assembly.
Mounting surfaces should be sturdy and flat. Do not install this product on a weak, uneven surface.
1 6
All photos are for illustrative purposes only.9
27
83
4
5
M6 M8 Caps Bubble Level
A x3 C x3
B x1 E x1
D x1 set F x8
A (3) M6 × 50 wall screws B (1) M6 × 25 screw C (3) M8 × 40 screw anchors
E Mounting peg capF Bubble level G User manual
D (2) Protective caps (1 set)
Also IncludedWall plate
Product Specifications
Compatibility: Gabor MD-ASL15W and MD-BSL15W Monitor Mounts
Maximum load capacity: 17.6 lb. (8 kg)
Dimensions (H × W × D): 6.6″ × 2.7″ × 2.6″ (16.8 × 6.9 × 6.6 cm) Weight: 8.8 oz. (249 g)
6. Insert the included protective caps into the plate with the triangular cap attaching to the middle hole of the top recess and the other cap fitting into the holes at each end of the bottom recess.
Attaching Your Gabor Monitor Mount
1. Mount your compatible Gabor monitor mount onto the MW-C’s mounting peg.
2. Insert your monitor cable(s) into the cable guides on the underside of the mounting arm(s). If you are using the MD-BSL15W Dual-Display Mount, you have completed the mounting instructions and can stop here. If you are using the MD-ASL15W single-arm mount, continue below.
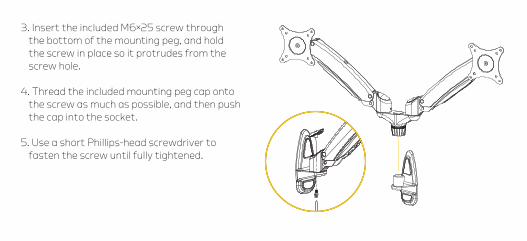
3. Insert the included M6×25 screw through the bottom of the mounting peg, and hold the screw in place so it protrudes from the screw hole.
4. Thread the included mounting peg cap onto the screw as much as possible, and then push the cap into the socket.
5. Use a short Phillips-head screwdriver to fasten the screw until fully tightened.

MW-C
WALL MOUNTADAPTERFor MD-ASL15W and MD-BSL15W Monitor Mounts
User Manual
WWW.MADEBYGABOR.COM
FORWARD YOUR PROOFSto [email protected]
FOR APPROVALBEFORE FINAL PRODUCTION
DO NOT BEGIN PRODUCTIONWITHOUT PRIOR APPROVAL OF PROOFS
Manual for Wall Mount AdapterMatte Printing
FoldingInstructions
DO NOT EDIT OR REVISE ARTWORKWe will not approve any artwork which has been altered by the vendor
Thank you for choosing Gabor.The Gabor MW-C is a dedicated wall mount for the MD-ASL15W (single display) and MD-BSL15W (dual display) monitor mounts, replacing the center column and desk clamp to offer an alternative mounting option. It’s perfect for cramped spaces or desk edges that are too thick to accommodate a desk clamp. The MW-C frees up valuable desk space and enables personalized monitor placement for improved safety and comfort over conventional monitor stands.
Customer Support
ONE-YEAR LIMITED WARRANTY
This GABOR product is warranted to the original purchaser to be free from defects in materials and workmanship under normal consumer use for a period of one (1) year from the original purchase date or thirty (30) days after replacement, whichever occurs later. The warranty provider’s responsibility with respect to this limited warranty shall be limited solely to repair or replacement, at the provider’s discretion, of any product that fails during normal use of this product in its intended manner and in its intended environment. Inoperability of the product or part(s) shall be determined by the warranty provider. If the product has been discontinued, the warranty provider reserves the right to replace it with a model of equivalent quality and function.
This warranty does not cover damage or defect caused by misuse, neglect, accident, alteration, abuse, improper installation or maintenance. EXCEPT AS PROVIDED HEREIN, THE WARRANTY PROVIDER MAKES NEITHER ANY EXPRESS WARRANTIES NOR ANY IMPLIED WARRANTIES, INCLUDING BUT NOT LIMITED TO ANY IMPLIED WARRANTY OF MERCHANTABILITY OR FITNESS FOR A PARTICULAR PURPOSE. This warranty provides you with specific legal rights, and you may also have additional rights that vary from state to state.
To obtain warranty coverage, contact the Gabor Customer Service Department to obtain a return merchandise authorization (“RMA”) number, and return the defective product to Gabor along with the RMA number and proof of purchase. Shipment of the defective product is at the purchaser’s own risk and expense.
Attaching Your Monitor to the VESA Mounts
Important! Before mounting the MW-C Wall Mount Adapter, make sure your wall can support the combined weight of your monitor(s) and the mounting assembly.
Decide where you want to mount your monitor. It should be directly in front of you, at eye level, and approximately at an arm’s length away. You shouldn’t need to turn your head to look at your monitor. If you have to strain to look at it, readjust its position. When using a dual-monitor setup, position your primary monitor directly in front of you, and your secondary monitor to the side.
1. Hold the wall plate against the wall at the desired mounting location and use the included bubble level to make sure the plate is level.
2. Use a pencil to mark the mounting holes on the wall, and then remove the plate from the wall. Use the top and bottom (larger) holes in the triangular (top) recess and the middle hole of the bottom recess.
3. Drill holes through the pencil marks and fully insert the included screw anchors into the holes.
4. Hold the wall plate against the wall and align the mounting holes with the anchors.
5. Use a Phillips-head power screwdriver to tighten the included M6×50 wall screws into the anchors until the plate is securely fastened to the wall.
KOPULA Gradus Group Brand
TM
KOPULA Gradus Group Brand
TM
For more information or to arrange service, visit www.madebygabor.com or call Customer Service at 212-594-2353.
Product warranty is provided by the Gradus Group. www.gradusgroup.com
Gabor is a registered trademark of the Gradus Group. © 2014 Gradus Group LLC. All Rights Reserved.
GG1
Safety Warnings
Please read and follow these instructions and keep this manual in a safe place.
Clean this product with only a soft, dry cloth.
Keep this product away from children.
Use only parts provided by the manufacturer.
Make sure everything is secure before proceeding.
Do not exceed the maximum load capacity.
Make sure your wall can support the combined weight of your monitor and the mounting assembly.
Mounting surfaces should be sturdy and flat. Do not install this product on a weak, uneven surface.
1 6
All photos are for illustrative purposes only.9
27
83
4
5
M6 M8 Caps Bubble Level
A x3 C x3
B x1 E x1
D x1 set F x8
A (3) M6 × 50 wall screws B (1) M6 × 25 screw C (3) M8 × 40 screw anchors
E Mounting peg capF Bubble level G User manual
D (2) Protective caps (1 set)
Also IncludedWall plate
Product Specifications
Compatibility: Gabor MD-ASL15W and MD-BSL15W Monitor Mounts
Maximum load capacity: 17.6 lb. (8 kg)
Dimensions (H × W × D): 6.6″ × 2.7″ × 2.6″ (16.8 × 6.9 × 6.6 cm) Weight: 8.8 oz. (249 g)
6. Insert the included protective caps into the plate with the triangular cap attaching to the middle hole of the top recess and the other cap fitting into the holes at each end of the bottom recess.
Attaching Your Gabor Monitor Mount
1. Mount your compatible Gabor monitor mount onto the MW-C’s mounting peg.
2. Insert your monitor cable(s) into the cable guides on the underside of the mounting arm(s). If you are using the MD-BSL15W Dual-Display Mount, you have completed the mounting instructions and can stop here. If you are using the MD-ASL15W single-arm mount, continue below.
3. Insert the included M6×25 screw through the bottom of the mounting peg, and hold the screw in place so it protrudes from the screw hole.
4. Thread the included mounting peg cap onto the screw as much as possible, and then push the cap into the socket.
5. Use a short Phillips-head screwdriver to fasten the screw until fully tightened.

MW-C
WALL MOUNTADAPTERFor MD-ASL15W and MD-BSL15W Monitor Mounts
User Manual
WWW.MADEBYGABOR.COM
FORWARD YOUR PROOFSto [email protected]
FOR APPROVALBEFORE FINAL PRODUCTION
DO NOT BEGIN PRODUCTIONWITHOUT PRIOR APPROVAL OF PROOFS
Manual for Wall Mount AdapterMatte Printing
FoldingInstructions
DO NOT EDIT OR REVISE ARTWORK We will not approve any artwork which has been altered by the vendor
Thank you for choosing Gabor.The Gabor MW-C is a dedicated wall mount for the MD-ASL15W (single display) and MD-BSL15W (dual display) monitor mounts, replacing the center column and desk clamp to offer an alternative mounting option. It’s perfect for cramped spaces or desk edges that are too thick to accommodate a desk clamp. The MW-C frees up valuable desk space and enables personalized monitor placement for improved safety and comfort over conventional monitor stands.
Customer Support
ONE-YEAR LIMITED WARRANTY
This GABOR product is warranted to the original purchaser to be free from defects in materials and workmanship under normal consumer use for a period of one (1) year from the original purchase date or thirty (30) days after replacement, whichever occurs later. The warranty provider’s responsibility with respect to this limited warranty shall be limited solely to repair or replacement, at the provider’s discretion, of any product that fails during normal use of this product in its intended manner and in its intended environment. Inoperability of the product or part(s) shall be determined by the warranty provider. If the product has been discontinued, the warranty provider reserves the right to replace it with a model of equivalent quality and function.
This warranty does not cover damage or defect caused by misuse, neglect, accident, alteration, abuse, improper installation or maintenance. EXCEPT AS PROVIDED HEREIN, THE WARRANTY PROVIDER MAKES NEITHER ANY EXPRESS WARRANTIES NOR ANY IMPLIED WARRANTIES, INCLUDING BUT NOT LIMITED TO ANY IMPLIED WARRANTY OF MERCHANTABILITY OR FITNESS FOR A PARTICULAR PURPOSE. This warranty provides you with specific legal rights, and you may also have additional rights that vary from state to state.
To obtain warranty coverage, contact the Gabor Customer Service Department to obtain a return merchandise authorization (“RMA”) number, and return the defective product to Gabor along with the RMA number and proof of purchase. Shipment of the defective product is at the purchaser’s own risk and expense.
Attaching Your Monitor to the VESA Mounts
Important! Before mounting the MW-C Wall Mount Adapter, make sure your wall can support the combined weight of your monitor(s) and the mounting assembly.
Decide where you want to mount your monitor. It should be directly in front of you, at eye level, and approximately at an arm’s length away. You shouldn’t need to turn your head to look at your monitor. If you have to strain to look at it, readjust its position. When using a dual-monitor setup, position your primary monitor directly in front of you, and your secondary monitor to the side.
1. Hold the wall plate against the wall at the desired mounting location and use the included bubble level to make sure the plate is level.
2. Use a pencil to mark the mounting holes on the wall, and then remove the plate from the wall. Use the top and bottom (larger) holes in the triangular (top) recess and the middle hole of the bottom recess.
3. Drill holes through the pencil marks and fully insert the included screw anchors into the holes.
4. Hold the wall plate against the wall and align the mounting holes with the anchors.
5. Use a Phillips-head power screwdriver to tighten the included M6×50 wall screws into the anchors until the plate is securely fastened to the wall.
KOPULA Gradus Group Brand
TM
KOPULA Gradus Group Brand
TM
For more information or to arrange service, visit www.madebygabor.com or call Customer Service at 212-594-2353.
Product warranty is provided by the Gradus Group. www.gradusgroup.com
Gabor is a registered trademark of the Gradus Group. © 2014 Gradus Group LLC. All Rights Reserved.
GG1
Safety Warnings
Please read and follow these instructions and keep this manual in a safe place.
Clean this product with only a soft, dry cloth.
Keep this product away from children.
Use only parts provided by the manufacturer.
Make sure everything is secure before proceeding.
Do not exceed the maximum load capacity.
Make sure your wall can support the combined weight of your monitor and the mounting assembly.
Mounting surfaces should be sturdy and flat. Do not install this product on a weak, uneven surface.
16
All photos are for illustrative purposes only. 9
27
83
4
5
M6M8CapsBubble Level
Ax3Cx3
Bx1Ex1
Dx1 setFx8
A (3) M6 × 50 wall screws B (1) M6 × 25 screw C (3) M8 × 40 screw anchors
E Mounting peg capF Bubble level G User manual
D (2) Protective caps (1 set)
Also Included Wall plate
Product Specifications
Compatibility: Gabor MD-ASL15W and MD-BSL15W Monitor Mounts
Maximum load capacity: 17.6 lb. (8 kg)
Dimensions (H × W × D): 6.6″ × 2.7″ × 2.6″ (16.8 × 6.9 × 6.6 cm) Weight: 8.8 oz. (249 g)
6. Insert the included protective caps into the plate with the triangular cap attaching to the middle hole of the top recess and the other cap fitting into the holes at each end of the bottom recess.
Attaching Your Gabor Monitor Mount
1. Mount your compatible Gabor monitor mount onto the MW-C’s mounting peg.
2. Insert your monitor cable(s) into the cable guides on the underside of the mounting arm(s). If you are using the MD-BSL15W Dual-Display Mount, you have completed the mounting instructions and can stop here. If you are using the MD-ASL15W single-arm mount, continue below.
3. Insert the included M6×25 screw through the bottom of the mounting peg, and hold the screw in place so it protrudes from the screw hole.
4. Thread the included mounting peg cap onto the screw as much as possible, and then push the cap into the socket.
5. Use a short Phillips-head screwdriver to fasten the screw until fully tightened.