An approach to automatic music playlist generation using iTunes and behavioral data
Music Tag User Manual
http://www.wideanglesoftware.com/
Welcome Welcome to the Music Tag User Manual. This document will guide you through the steps to using Music
Tag.
Table of Contents
Introduction Learn about Music Tag, the application that helps you retrieve Tag data for those Untitled Music Files on
your Library.
Requirements Find out the system requirements to run Music Tag.
Quick Start Guide A quick guide on how to use Music Tag, and some of its features.
Downloading Tags Learn how to download the missing track data for your music, and how to navigate Music Tag's
interface.
Modifying Tags Learn how to manually edit the tag data from your files, and give them that personal touch.
Cover Art Learn how to download artwork separately, as well as to revert any unwanted changes, or even to
remove your existing artwork!
File List Learn how to use the file list: how do add files, remove them, and how to restore files to default.
iTunes Learn how to retrieve your music files from iTunes, for full control over the data contained inside.
2
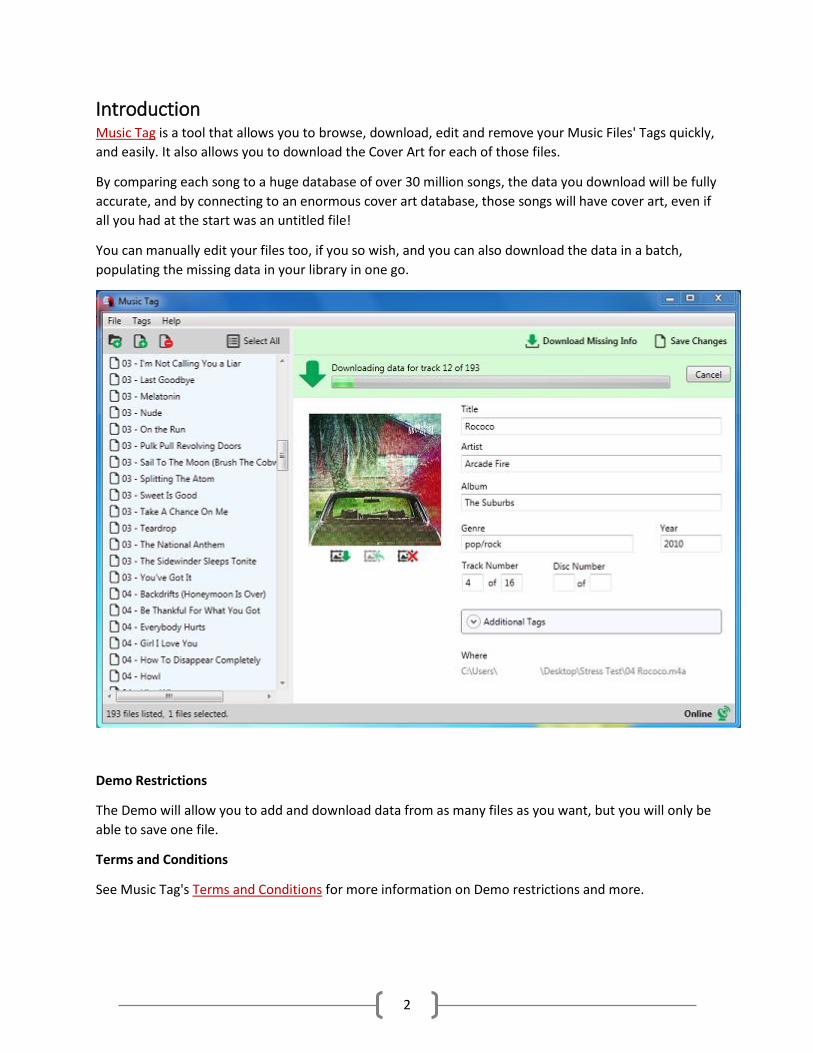
Introduction Music Tag is a tool that allows you to browse, download, edit and remove your Music Files' Tags quickly,
and easily. It also allows you to download the Cover Art for each of those files.
By comparing each song to a huge database of over 30 million songs, the data you download will be fully
accurate, and by connecting to an enormous cover art database, those songs will have cover art, even if
all you had at the start was an untitled file!
You can manually edit your files too, if you so wish, and you can also download the data in a batch,
populating the missing data in your library in one go.
Demo Restrictions
The Demo will allow you to add and download data from as many files as you want, but you will only be
able to save one file.
Terms and Conditions
See Music Tag's Terms and Conditions for more information on Demo restrictions and more.

3
Requirements Windows Requirements
The program requires Microsoft .Net 4.0, and can run on Windows Vista, Windows 7, Windows 8/8.1
and Windows 10.
To download data, the program requires an available internet connection.
Supported Files
The program currently supports MP3, M4A (iTunes files) and WMA.
Quick Start Guide 1. Download and Install Music Tag.
2. Start Music Tag by double-clicking the Music Tag icon on your desktop.
Add Files to the program:
When the program launches, you will be greeted by this window.
4
At the bottom right, you can see the progress of the connectivity test. Until this test is complete, you
will not be able to use the online functionality of the program.
If the test was successful, a green connected sign will be displayed.
If the connectivity test failed, the offline sign will be shown. You will not be able to use the online
functionality of the program.
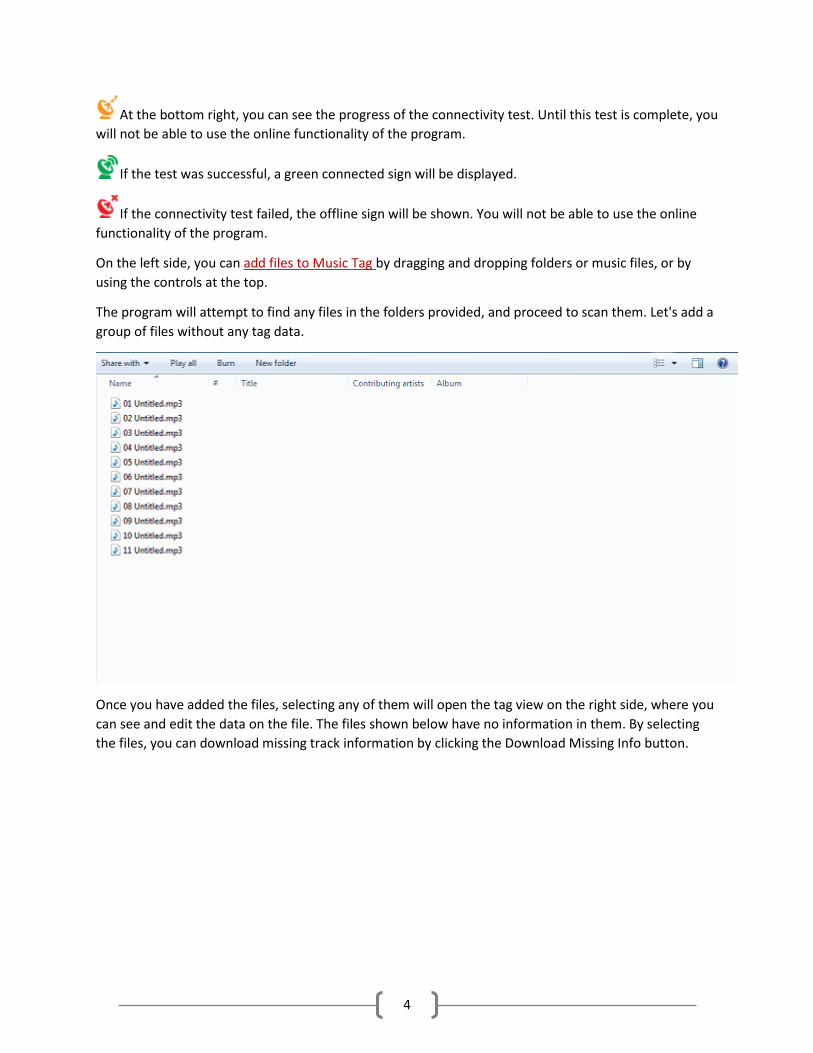
On the left side, you can add files to Music Tag by dragging and dropping folders or music files, or by
using the controls at the top.
The program will attempt to find any files in the folders provided, and proceed to scan them. Let's add a
group of files without any tag data.
Once you have added the files, selecting any of them will open the tag view on the right side, where you
can see and edit the data on the file. The files shown below have no information in them. By selecting
the files, you can download missing track information by clicking the Download Missing Info button.

5
As each file's data is retrieved, you can browse the data, while the download continues in the
background. At any point you can stop the download, or revert the downloaded data, should you prefer
to keep the original. Often, files will have multiple hits.
You can navigate through these by using the left and right arrows.
6
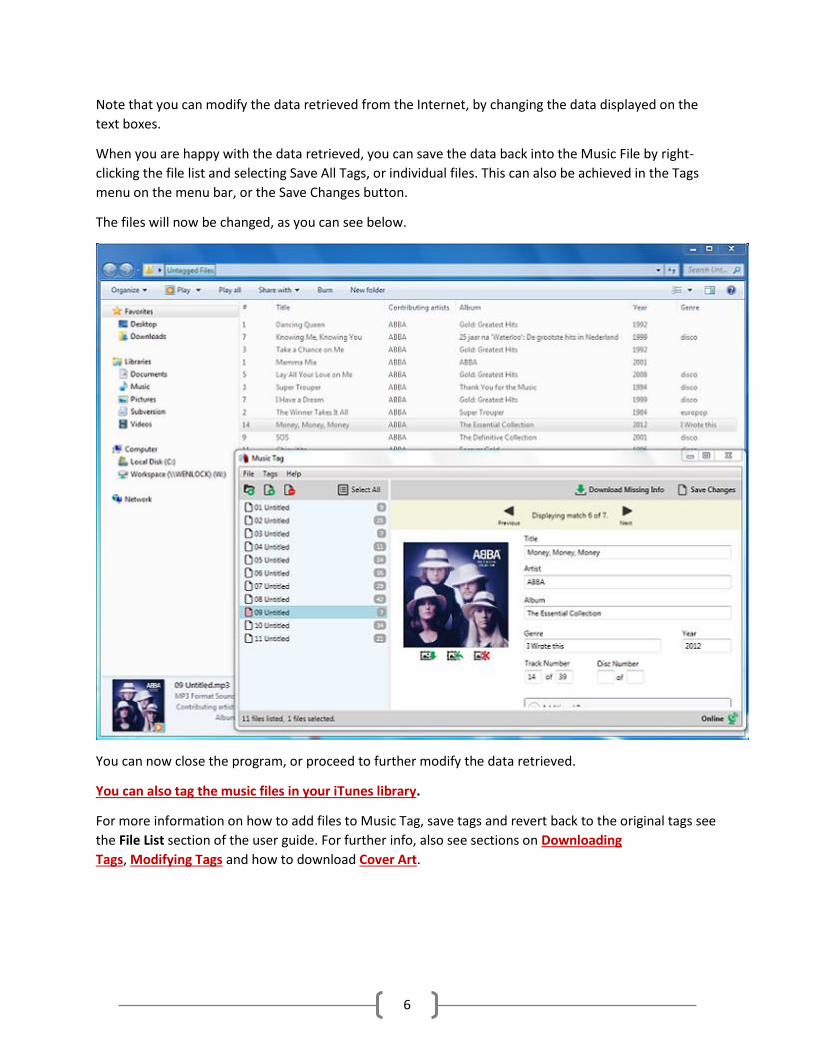
Note that you can modify the data retrieved from the Internet, by changing the data displayed on the
text boxes.
When you are happy with the data retrieved, you can save the data back into the Music File by right-
clicking the file list and selecting Save All Tags, or individual files. This can also be achieved in the Tags
menu on the menu bar, or the Save Changes button.
The files will now be changed, as you can see below.
You can now close the program, or proceed to further modify the data retrieved.
You can also tag the music files in your iTunes library.
For more information on how to add files to Music Tag, save tags and revert back to the original tags see
the File List section of the user guide. For further info, also see sections on Downloading
Tags, Modifying Tags and how to download Cover Art.

7
Downloading Tags First, add files to the File List (refer to File List and Quick Start).
Keep in mind you won't be able to use this functionality until the connectivity test result returns as a
success, with this green connected sign being displayed.
You can then select a group of files from which you want to download missing tag data and press the
download button. The download progress will be shown over the Tag data, as seen below. This button is
available both on top of the Tag Data View, and in the context menu on the list, by right-clicking, and
selecting the "Download Missing Tags" Option.
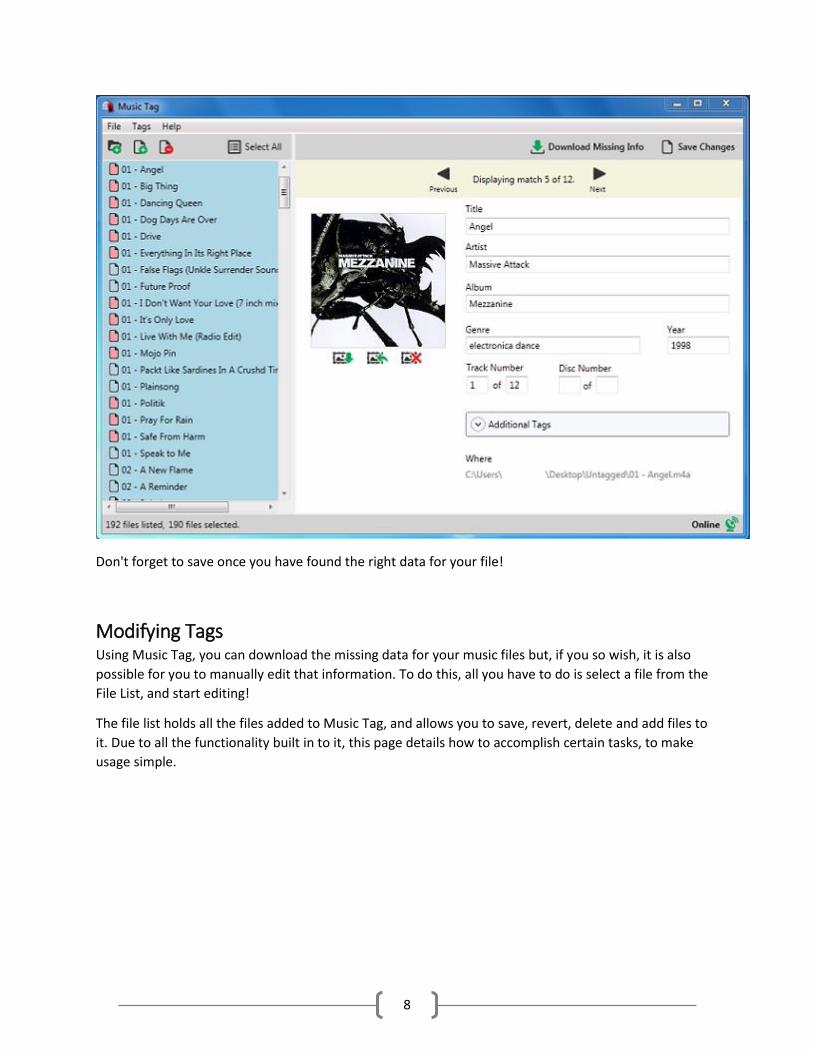
Often, the data returned will include multiple recordings, and the first option, though sorted,
might not be your preferred option. If this is the case, use the navigation arrows to cycle between
recordings.
8
Don't forget to save once you have found the right data for your file!
Modifying Tags Using Music Tag, you can download the missing data for your music files but, if you so wish, it is also
possible for you to manually edit that information. To do this, all you have to do is select a file from the
File List, and start editing!
The file list holds all the files added to Music Tag, and allows you to save, revert, delete and add files to
it. Due to all the functionality built in to it, this page details how to accomplish certain tasks, to make
usage simple.

9
Say you want to change the album, or you have no data and want to fill it in yourself, or you want to
leave a comment so you can remember something about the song. By filling it in on the Tag Data View,
you can save it back to the tags, and keep those changes.

10
Notice that the file you modified has been marked red. This means a change has been made, and in
order to keep it, you need to save the file.
Cover Art As well as allowing you to download tag data directly from the database, and allowing you to edit
existing tags on the file, Music Tag also allows you to use the data present on the tags to download,
restore and remove artwork based on the data on display, which you can edit.
Should you wish to retrieve cover art for a file that already contains tag data, or if you wish to add
the tag data yourself, then you can click the Download Artwork button underneath the Artwork Display
box, and Music Tag will attempt to download the Artwork for the specified Artist, Song Title and Album.
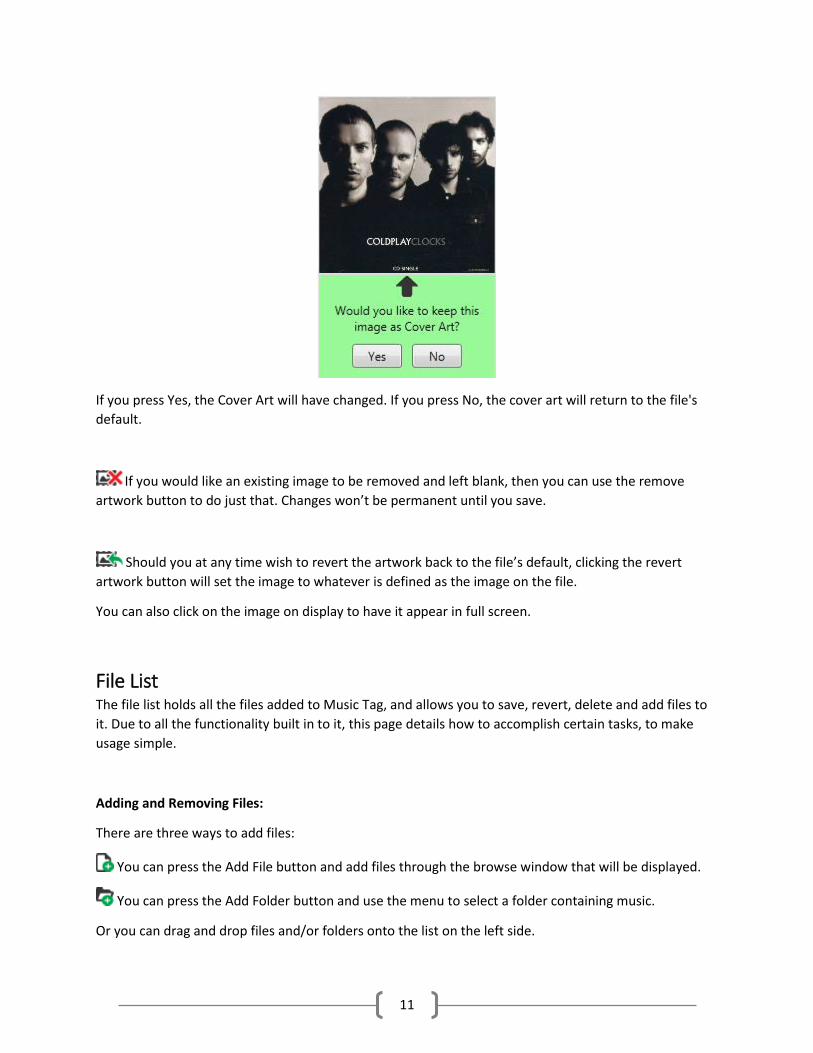
The program will then prompt you once it has retrieved the data.
11
If you press Yes, the Cover Art will have changed. If you press No, the cover art will return to the file's
default.
If you would like an existing image to be removed and left blank, then you can use the remove
artwork button to do just that. Changes won’t be permanent until you save.
Should you at any time wish to revert the artwork back to the file’s default, clicking the revert
artwork button will set the image to whatever is defined as the image on the file.
You can also click on the image on display to have it appear in full screen.
File List The file list holds all the files added to Music Tag, and allows you to save, revert, delete and add files to
it. Due to all the functionality built in to it, this page details how to accomplish certain tasks, to make
usage simple.
Adding and Removing Files:
There are three ways to add files:
You can press the Add File button and add files through the browse window that will be displayed.
You can press the Add Folder button and use the menu to select a folder containing music.
Or you can drag and drop files and/or folders onto the list on the left side.

12
This will add them to the list, and make them available for use in the program.
You can press the Remove File button to remove the files from the list. This will not save any
changes, so please make sure you've saved any changes you want to keep.
All these functions can also be accessed in the context menu on the list, by right-clicking, and on the
menu, under "File".
Saving, Reverting and Removing Tags:
By clicking revert changes, all the selected files’ data will be brought back to the file’s default at the
time of the program’s opening, allowing you to revert any unwanted changes that might’ve occurred.
If you click on the remove all tags button, all of the file’s tags will be removed. Be advised, this
change is permanent, so to avoid losing your data, please be careful when using this button.
By clicking on save changes, all the modified data will be added back into each selected file, putting
said changes into effect.
All these functions can also be accessed in the context menu on the list, by right-clicking, and on the
menu, under "Tags".
Modified Files:
When you Download data, remove or replace the artwork, or manually insert tag data, the file icon
will change to indicate that the data for this particular file has changed. In order to keep these changes,
it needs to be saved.
When you save, remove all tags, undo changes or add a new file, the file icon will be white, indicating
that no changes have been made.
Selecting All:
If you wish to select all the entries on the list, you can do so by pressing the Select All button.
Download Button:
As well as the button on the right side, it is also possible to initiate the download process by
accessing the context menu on the list, by right-clicking, and selecting the "Download Missing Tags"
Option.

13
iTunes First, start Music Tag and iTunes. Then, search for the files you want to bring from iTunes to Music Tag,
and drag and drop them from iTunes to the files list on the left in Music Tag.
The files will now be added to the list, and you can proceed to download, modify and remove tags and
cover art at your leisure.
Any modifications you might have made will be saved when you save changes on Music Tag.
Sometimes, iTunes fails to register these changes, and in order to force it to recognize them, select all
the files that have been changed, Right-Click, and click on "Get Info". This should update the iTunes
Library. You can now close the window that popped up.
You have now modified your iTunes files!