Murrumbeja dooligahcmag-and-hp.s3.amazonaws.com/cmag/assets/14/2238… · · 2015-10-21How do you...
12
Matilda House Murrumbeja dooligah 1996 Lithograph
Transcript of Murrumbeja dooligahcmag-and-hp.s3.amazonaws.com/cmag/assets/14/2238… · · 2015-10-21How do you...

Mat
ilda
Ho
use
Mur
rum
bej
a d
oo
ligah
1996
Lith
og
rap
h

Matilda House
Born 1945
Murrumbeja dooligah1996Lithograph31 x 38.5cm (image)50 x 57cm (sheet)Printed by Jan Hogan and Theo Tremblay
Matilda House is a senior Ngambri/Wolgarlo woman and a traditional custodian of the Canberra Region.
This work of art is a lithograph which is a type of print that involves drawing or painting with an oil-based medium onto a porous stone. The image is then printed using a special printing press.
The title of this work of art is Murrumbeja dooligah. Murumbeeja refers to Matilda’s country identified as the Murrumbidgee River and Murrumbidgee Ranges near Angle Crossing which she depicts in this image with strong curvaceous lines; dooligah are the star spirits of the constellations visible in this region, which she represents with a smattering of glittering white stars just beyond the ranges.
The colours she has chosen are glowing violets and deep velvety blues that both contrast and in some areas melt into the strong dark lines of her country. The image tells the story of this special place cloaked in twilight, as she passes on her culture to future generations.
DISCUSSION QUESTIONS
What time of day does this image suggest?
How can you tell?
Can you find any clues to help you?
Can you find where the mountains meet the sky in Matilda’s country?
That is called the horizon. Trace your finger along this line. How would you describe it?
How do the colours in this image make you feel?
Are they warm or cool colours? Can you think of any other warm or cool colours?
What kind of materials do you think the artist used to make this image?
Matilda House has made her artwork about her country, a place in Australia that is very special to her. Think of a place that is special to you.
How do you feel when you are there?
What makes it special to you?
ACTIvITy - MONOprINTINg
Monoprinting involves transferring an image from an inked surface onto paper to produce a one-off print that is the reverse of the original. It is a wonderfully playful and spontaneous way to create works of art.
Create a series of monoprints inspired by a place that is special to you. Use positive and negative printing techniques and explore colours that reflect varying times of night and day.
MATErIALS
Block printing ink
Rollers
Perspex sheets (30cm x 40cm or smaller)
Palette knife
Drawing implements
A variety of papers the same size or larger than the perspex sheets
NEgATIvE MONOprINTS
• Roll a thick layer of block printing ink onto a flat surface such as a sheet of perspex.
• Draw directly into the ink with a blunt object such as the end of a paintbrush. Experiment by using other implements such as sticks, plastic forks, pieces of thick card and rags to see what kinds of interesting marks and textures you can make.
• Lay the paper on top, smooth out and then peel back gently to reveal the finished print.
pOSITIvE MONOprINTS
• Roll out a thin layer of block printing ink onto a flat surface.
• Place a sheet of paper over the ink. Draw directly onto the back of the page using the end of a paintbrush or a pencil. You could also use a pre-drawn image, laying it down in the same way and then tracing over the lines.
• When the paper is carefully removed, the drawn image will appear in reverse, on the underside of the paper.
OThEr IDEAS
• Use your monoprints to create a concertina artist’s book.
• Add a layer of drawing over the first monoprint.
• Create a paper collage and use it to make a positive mono print. Experiment with printing on a range of different papers such as newspaper, handmade papers or rice paper.
• Create a series of mini monoprints and design a box in which to keep them.
• Lay down a piece of plastic food wrap onto your printing surface, moving it around to create texture. Roll out the ink over the plastic and then make a print.
rESOUrCES
Monoprinting, Jackie Newell and Dee Whittington, A & C Black Publishers, London, 2006
Print Pattern and Colour, Ruth Issett, Batsford Publishing, London, 2007
The Printmaking Handbook, Louise Woods, Search Press Ltd, UK, 2008
Tales From Ngambri History early childhood readers, 2003:
Book 1: Onyong and Noolup: Ngambri and Ngurmal Warriors, Arnold Williams, Robert Williams, Publishing Services ACT Government, ACT 2003
Book 2: Ngoobra the Ngambri Cleverman, Paul House, Reuben House, George House, Publishing Services ACT Government, ACT 2003
Book 3: Ngoobra and the Hairy Man at Yankee Hat, Paul House, Reuben House, George House, Publishing Services ACT Government, ACT 2003
Book 4: Kymin and Kangaroo: a Ngambri love story, Matilda House, Leah House, Ruby House, Publishing Services ACT Government, ACT 2003
Book 5: Kywun and the Gunji, Darren Williams, Dylan Williams, Travis Williams and Jacinta Williams, Publishing Services ACT Government, ACT 2003
Photography & Design Rob Little RLDI
Canberra Museum and Gallery is part of the Cultural Facilities Corporation which is an ACT Government Agency.

Law
renc
e D
aws
The
Land
scap
e o
f th
e C
entr
al B
asin
: Can
ber
ra A
CT
1960
Oil
on
canv
as

Lawrence DawsBorn 1927
The Landscape of the Central Basin: Canberra ACT 1960Oil on canvas 110.5 x 216.5cm
Australian artist Lawrence Daws was commissioned by the National Capital Development Commission to produce a number of panorama paintings and sketches for illustration in their reports, documents and public exhibitions between 1960 and 1967.
Daws’ oil painting The Landscape of the Central Basin: Canberra ACT presents a panoramic view of Mount Ainslie and the War Memorial on the north side of the lake from an aerial viewpoint on the south side. It depicts the Commonwealth Bridge on the left of the painting and Kings Bridge on the right.
This image was intended to portray a convincing, technically correct and to scale panoramic view of the basin on the northern side of Lake Burley Griffin as it would look after the commission’s planning was complete. The image is painted in a traditional style presenting to the viewer a sweeping vista, with its dramatic sky and calm waters projecting a future vision of a city in the light of a new day.
DISCUSSION QUESTIONS
What time of day does this painting suggest? How can you tell? Can you find any clues to help you?
Where in Canberra could you stand to get a view of the city similar to this?
The artist has painted this image in a traditional style that appears realistic. How has he captured the light radiating from the clouds? What colours has he used? How does he make the lake appear to reflect light?
Some objects in the painting appear closer and others further away. How has the artist created this illusion?
How does the painting make you feel when you look at it? How would the painting make you feel if it depicted a dark and stormy sky?
Think of a place in your city or environment that makes you feel hopeful about the future.
What is it about that place that makes you feel positive and hopeful?
What sorts of things do you hope for when you are there?
ACTIvITy - CITy SkyLINE
Lawrence Daws was commissioned to paint a future vision of the city of Canberra.
Create a work of art inspired by the city you live in or one you have visited.
MATErIALS
A3 cartridge paper (white or neutral)
Scissors
2B pencils
Rulers (optional)
Poster paints or watercolour paint
Construction paper in a variety of colours including metallic, recycled paper or cardboard
Glue
Black markers
rEfLECTION Of A CITy SkyLINE
• Fold an A3 piece of cartridge paper in half with the short sides together, and flatten out again and orientate to portrait.
• Decide whether your city will be depicted by day or by night. For night, glue a black piece of construction paper over the top half of the page to create a night sky which could be spattered with white paint to create a starry effect. For day, use a grey or blue sheet of construction paper with some cloud prints created by dipping a sponge in white poster paint and dabbing onto the surface.
• Using another piece of construction paper, cut out a range of shapes to represent individual skyscrapers, landmarks and special buildings in your chosen city. Create your buildings using simple shapes. Aim for a variety of building heights and shapes to create visual interest.
• Arrange the buildings across the surface of the sky, making sure they sit one centimetre above the base of the sky, leaving a strip below the buildings still visible. Ensure the sides of the buildings are touching each other. When you are happy with the composition, glue them down. Now add details to the buildings such as doors and windows. Create some smaller buildings and glue them over the top of the previous buildings to create visual depth.
• Using a pencil draw the mirror-image of all the buildings you have just constructed onto the lower, blank half of the paper.
• Add colour using watercolour or thinned poster paint. Base your colours on those chosen for your constructed buildings, to create the effect of buildings reflected in the water.
rECyCLED pApEr pANOrAMA
• Using recycled paper such as newspaper, telephone books, postage envelopes, brown paper or packaging, create a series of buildings by tearing the shapes rather than by using scissors.
• Arrange the buildings across a piece of A3 recycled cardboard, for example cut from a large packing box.
• Attach using PVA glue when you are happy with the composition. Create another layer of slightly smaller buildings and glue them over the top if desired.
• Using contrasting pieces of recycled or metallic paper cut small squares and rectangles to create windows. Glue them onto some of the buildings.
• Once dry, use a black marker to draw in the architectural details of each building over the top of the torn paper shapes.
• Create a city skyline panorama across the classroom wall by displaying the finished works of art horizontally with their short edges touching.
OThEr IDEAS
• Create a city skyline drawing using simple one-point perspective, then collage or paint.
• Create a local city skyline mural with your class. Roll out cartridge paper from a 150 cm wide roll and attach to the wall. Create person-sized line drawings of buildings using black crayon or thick marker. Add colour using paint and/or collage.
• Find a place from which you can see a city skyline or a row of buildings. Make some drawings on clipboards from that spot. Back in the classroom add colour and detail.
• Create a drawing of an imaginary city.
Project inspired by www.artroom104.blogspot.com.auPhotography & Design Rob Little RLDI
Canberra Museum and Gallery is part of the Cultural Facilities Corporation which is an ACT Government Agency.

George Ingham
Bush Cabinet1994 -98
Timber: corduroy tamarind, saffron heart,
tulip oak, silky oak, MDF, brass.
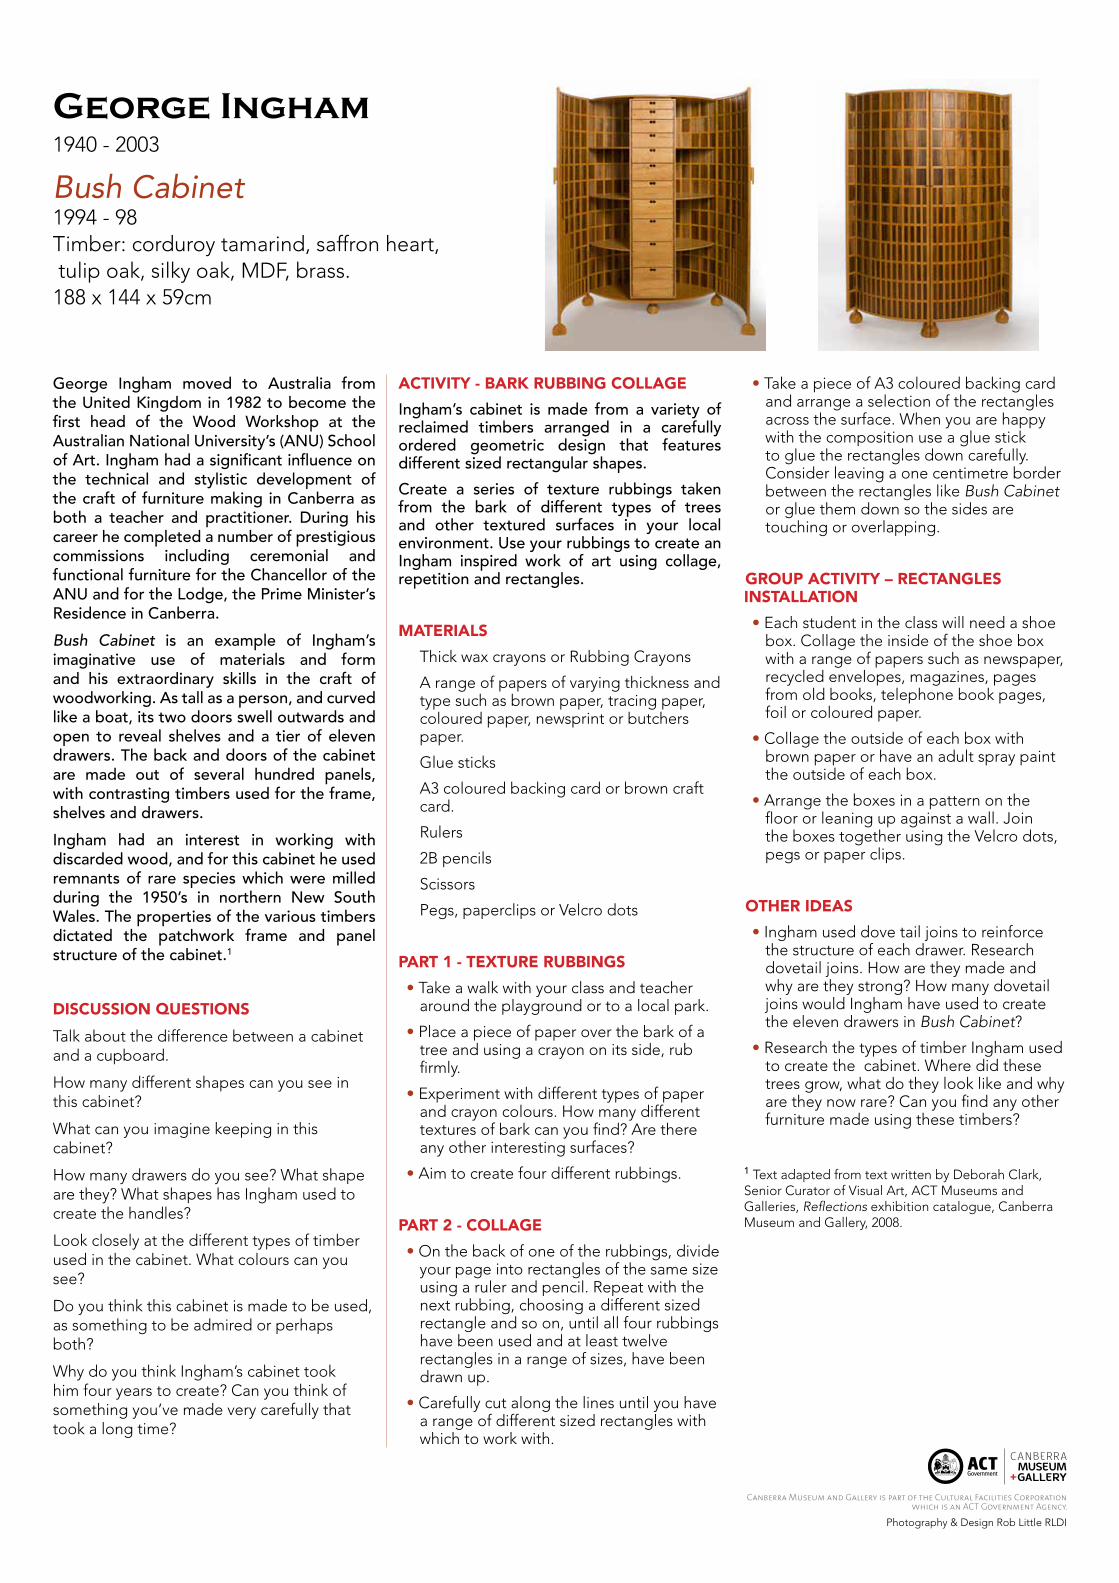
George Ingham1940 - 2003
Bush Cabinet 1994 - 98 Timber: corduroy tamarind, saffron heart, tulip oak, silky oak, MDF, brass.188 x 144 x 59cm
George Ingham moved to Australia from the United Kingdom in 1982 to become the first head of the Wood Workshop at the Australian National University’s (ANU) School of Art. Ingham had a significant influence on the technical and stylistic development of the craft of furniture making in Canberra as both a teacher and practitioner. During his career he completed a number of prestigious commissions including ceremonial and functional furniture for the Chancellor of the ANU and for the Lodge, the Prime Minister’s Residence in Canberra.
Bush Cabinet is an example of Ingham’s imaginative use of materials and form and his extraordinary skills in the craft of woodworking. As tall as a person, and curved like a boat, its two doors swell outwards and open to reveal shelves and a tier of eleven drawers. The back and doors of the cabinet are made out of several hundred panels, with contrasting timbers used for the frame, shelves and drawers.
Ingham had an interest in working with discarded wood, and for this cabinet he used remnants of rare species which were milled during the 1950’s in northern New South Wales. The properties of the various timbers dictated the patchwork frame and panel structure of the cabinet.1
DISCUSSION QUESTIONS
Talk about the difference between a cabinet and a cupboard.
How many different shapes can you see in this cabinet?
What can you imagine keeping in this cabinet?
How many drawers do you see? What shape are they? What shapes has Ingham used to create the handles?
Look closely at the different types of timber used in the cabinet. What colours can you see?
Do you think this cabinet is made to be used, as something to be admired or perhaps both?
Why do you think Ingham’s cabinet took him four years to create? Can you think of something you’ve made very carefully that took a long time?
ACTIvITy - BArk rUBBINg COLLAgE
Ingham’s cabinet is made from a variety of reclaimed timbers arranged in a carefully ordered geometric design that features different sized rectangular shapes.
Create a series of texture rubbings taken from the bark of different types of trees and other textured surfaces in your local environment. Use your rubbings to create an Ingham inspired work of art using collage, repetition and rectangles.
MATErIALS
Thick wax crayons or Rubbing Crayons
A range of papers of varying thickness and type such as brown paper, tracing paper, coloured paper, newsprint or butchers paper.
Glue sticks
A3 coloured backing card or brown craft card.
Rulers
2B pencils
Scissors
Pegs, paperclips or Velcro dots
pArT 1 - TExTUrE rUBBINgS
• Take a walk with your class and teacher around the playground or to a local park.
• Place a piece of paper over the bark of a tree and using a crayon on its side, rub firmly.
• Experiment with different types of paper and crayon colours. How many different textures of bark can you find? Are there any other interesting surfaces?
• Aim to create four different rubbings.
pArT 2 - COLLAgE
• On the back of one of the rubbings, divide your page into rectangles of the same size using a ruler and pencil. Repeat with the next rubbing, choosing a different sized rectangle and so on, until all four rubbings have been used and at least twelve rectangles in a range of sizes, have been drawn up.
• Carefully cut along the lines until you have a range of different sized rectangles with which to work with.
• Take a piece of A3 coloured backing card and arrange a selection of the rectangles across the surface. When you are happy with the composition use a glue stick to glue the rectangles down carefully. Consider leaving a one centimetre border between the rectangles like Bush Cabinet or glue them down so the sides are touching or overlapping.
grOUp ACTIvITy – rECTANgLES INSTALLATION
• Each student in the class will need a shoe box. Collage the inside of the shoe box with a range of papers such as newspaper, recycled envelopes, magazines, pages from old books, telephone book pages, foil or coloured paper.
• Collage the outside of each box with brown paper or have an adult spray paint the outside of each box.
• Arrange the boxes in a pattern on the floor or leaning up against a wall. Join the boxes together using the Velcro dots, pegs or paper clips.
OThEr IDEAS
• Ingham used dove tail joins to reinforce the structure of each drawer. Research dovetail joins. How are they made and why are they strong? How many dovetail joins would Ingham have used to create the eleven drawers in Bush Cabinet?
• Research the types of timber Ingham used to create the cabinet. Where did these trees grow, what do they look like and why are they now rare? Can you find any other furniture made using these timbers?
1 Text adapted from text written by Deborah Clark, Senior Curator of Visual Art, ACT Museums and Galleries, Reflections exhibition catalogue, Canberra Museum and Gallery, 2008.
Photography & Design Rob Little RLDI
Canberra Museum and Gallery is part of the Cultural Facilities Corporation which is an ACT Government Agency.

Mitchell Brooks and Dan Lorrimer
Griffin Blueprint Dish2013
Stainless steel
Colours: blue, yellow

Mitchell Brooks and Dan Lorrimer
Griffin Blueprint Dish2013Stainless steel25.5 x 45.5 x 4cmColours: blue, yellow
Mitchell Brooks and Dan Lorrimer are emerging Canberra designers. They were finalists in Centenary of Canberra - a legacy of good design which was a competition to design unique, high quality objects to be produced and sold as memorabilia for the city’s centenary in 2013.1
“We entered the Centenary of Canberra – a legacy of good design competition to collaborate, test our skills and realise ambitions in a new and exciting way. We are aiming to use this experience as a beginning to what we hope will develop into a sustainable design and manufacturing business.”2
The collaborative duo’s stainless steel dish titled The Griffin Blueprint Dish, has a gently concaved form suggestive of Canberra’s location within a natural amphitheatre created by the surrounding hills and mountains. The underside of the dish is either blue or yellow, in striking contrast to the silver-grey surface of the upper surface. A design inspired by the Griffin’s early blueprints for Canberra’s streets and boulevards is etched into the surface of the stainless steel preserving the story of how Canberra was designed for the next century and generations beyond, while celebrating the beauty of Canberra and the Griffin’s achievement.3
DISCUSSION QUESTIONS
Talk about the form of the dish: What does the curved or concave shape of this dish remind you of? Why do you think it has been designed to have rounded edges rather than corners?
Talk about the function of the dish: What do you imagine this dish might hold successfully, i.e. liquid or solid? Why?
Why do you think the designers have chosen to produce the dishes in blue and yellow? What might these colours represent? Which colours would you have chosen?
What kind of materials do you think the designers used to make this dish? How do you think it has been made?
Mitchell Brooks and Dan Lorrimer design objects together. Can you think of a time when you’ve created something with someone else? What did you make? What did you learn while working together?
ACTIvITy - DESIgN A CONTAINEr
Designers ask themselves a lot of important questions when coming up with designs for new objects. What will the object be used for and what is its function? What will it look like and what form will it take? How does the object’s function influence its form? What materials will it be made of and why? How is the object different to those that perform a similar function? Who will buy it?
Work with a partner to design, produce and evaluate an innovative container to hold an object of your choice, using the questions above to help during the design process.
MATErIALS
Find a small interesting object approximately 15 x 15cm
A3 cartridge
Drawing materials such as charcoal, crayons, markers and pencils
A selection of construction and joining materials (see suggestions below)
DESIgN
• Find an object that is interesting to you both.
• Make some observational drawings of the object from different angles using pencil, charcoal or markers on A3 cartridge paper. Make some notes on the page about the object’s main characteristics.
• Take an A3 sheet of cartridge each and fold it into four sections and then flatten out again. Imagine four different design ideas for a container to hold the object you chose to drawn in the previous step. Draw one idea in each section of the four sections. The questions above will help you think about the container’s form and function. Write some notes on the page to further explain each design idea and list possible materials.
• Discuss the designs with your partner and decide on one that you will produce together. It could be a good idea to show your designs to others in your class because their feedback might be helpful also.
• Now make a final drawing on A3 cartridge paper of your container design. Make the size of the drawing as close to life size as possible. Now add detail using markers, pastels, watercolour or collage to show the colour and materials you
have decided on, and any surface design. Write some notes on the page to further explain the containers special features.
prODUCTION
• Construct your container using the materials and construction techniques you’ve decided on. Some suggested construction techniques are balsa wood construction, paper scoring and folding, slits and tabs, modelling, weaving, stitching, sewing, knitting, wire-work and cable tying. Some suggested materials are: heavy card, recycled materials, modelling clay, fabrics such as hessian, canvas and old clothes, cable ties, masking tape, eyelets, rivets, masking or gaffa tape, and organic materials such as sticks, leaves and raffia.
EvALUATION
• How successfully does your container function? Does it do what you intended it to?
• What was it like working with the materials you chose? Did you have any problems or difficulties? Did you find solutions to these?
• How does the intended function of your container influence its form?
• Which part of the design process did you enjoy the most? What would you do differently next time? What would you do in the same way?
• What did you learn about working in a design partnership?
1 Centenary of Canberra - a legacy of good design is a Centenary of Canberra project, presented by the ACT Government, with support from Business and Industry Development and administered by Craft ACT: Craft and Design Centre.
2 Mitchell Brooks and Dan Lorrimer 2012
3 Text adapted from Centenary of Canberra - a legacy of good design: www.craftact.org.au
Photography by Art Atelier Photography Design Rob Little RLDI

Megan Jackson
The Marion Scarf2013
Silk and cotton blend
Colours: red, blue, green

Megan Jackson
The Marion Scarf2013Silk and cotton blend54 x 170cmColours: red, blue, green
Megan Jackson is a textile designer who graduated from the Australian National University (ANU) School of Art in 2008 and has since established an independent textile business. She was a finalist in Centenary of Canberra - a legacy of good design, a competition to design unique, high quality objects to be produced and sold as memorabilia for the city’s centenary in 2013.1
“I entered the Centenary of Canberra - a legacy of good design competition for the opportunity to develop an exciting new product which communicated the unique and often unnoticed character of Canberra. Being selected is a real opportunity to work with small Australian manufacturers to develop a product and expand my textile design practice.”2
Jackson’s cotton and silk blend, printed Marion Scarf comes in three colours: red, blue and green and features a hand drawn design that includes depictions of local buildings such as the ANU School of Art and the Melbourne Building, intermingled with cyclists and hot air balloons reflecting local life and the experiences of the city. The scarves capture the unique qualities and character of Canberra as a city. 3
DISCUSSION QUESTIONS
Which other iconic or special buildings do you think of when you think of Canberra?
What other daily activities do people do in cities?
Why do you think Megan Jackson gave her scarf the title, The Marion Scarf?
Jackson designs wearable items and home furnishings. What type of wearable item would you design if you had the choice?
Have you ever made something for your home?
What did you make and why?
The material the designer has used to create her scarves is a silk/cotton blend. Find out about silk and how is it processed to become a wearable fabric.
ACTIvITy - fOAM prINTED CALICO BAgS
Jackson’s Marion Scarf is inspired by daily life in the city of Canberra. Create a hand-printed calico bag inspired by the city and take it with you on your next city adventure. Think about what you like to do in the city, what you have seen or perhaps buildings you have visited.
MATErIALS
Calico bags
Non toxic fabric paint
Printing Foam cut into A6 sized rectangles
A6 piece of drawing paper
Ballpoint pens
Foam rollers
Butchers paper
Paper plates, palettes or plastic lids
Paper towel
Masking tape
Fabric markers (optional)
pArT 1 – DESIgN yOUr prINTINg pLATE
• Make a line drawing of your city-inspired subject on an A6 piece of drawing paper, keeping the design as simple as possible.
• Place the drawing over a piece of Printing Foam, and use two pieces of masking tape to secure the drawing to the Printing Foam at each long edge. Now trace over the drawing firmly with a ballpoint pen to transfer the image into the foam.
• Remove the paper and use the ballpoint pen to go over the lines directly onto the Printing Foam. This will incise the surface.
pArT 2 - fABrIC prINTINg
• Place a folded sheet of butchers paper inside a calico bag.
• Coat the Printing Foam with an even layer of fabric paint using the foam roller.
• Position the newly inked Printing Foam onto the surface of the calico bag, starting at the bottom left corner. Press down firmly and with even pressure.
• Peel off the Printing Foam to reveal the print.
• Clean the fabric paint off the Printing Foam using paper towel. Repeat this process using another colour, and by placing the newly inked Printing Foam on a clean area of the bag. Repeat until the surface of the bag is covered.
• Additional features or words can be added using fabric markers if desired.
• Allow the finished bag to air dry and then get an adult to heat set with an iron or clothes dryer on a hot setting. This will make it machine washable.
OThEr IDEAS
• Explore using hand-cut potato stamps to print geometric designs onto cotton, hemmed, available from art and textile suppliers.
• Use found objects to stamp interesting designs onto t-shirts.
• Print with fallen leaves collected from your local area onto lengths of cotton or taffeta.
rESOUrCES
Hand Printing from Nature: Create Unique Prints for Fabric, Paper, and Surfaces Using Natural and Found Materials, Laura Donnelly Bethmann, Storey Publishing, UK 2011
All about Fabric Printing, Todd Oldham, Ammo Books, USA 2012
1 Centenary of Canberra - a legacy of good design is a Centenary of Canberra project, presented by the ACT Government, with support from Business and Industry Development and administered by Craft ACT: Craft and Design Centre.
2 Megan Jackson 2012
3 Text adapted from Centenary of Canberra - a legacy of good design: www.craftact.org.au
Photography by Art Atelier PhotographyDesign Rob Little RLDI

Fernando Octavio Pino
#29 model 2013Acrylic, plywood, reclaimed hardwood
(brush box and river red gum), black japan

Fernando Octavio PinoBorn 1974
#29 model 2013Acrylic, plywood, reclaimed hardwood (brush box and river red gum), black japan138cm x 137cm
Fernando Octavio Pino is an architecture graduate, artist and designer interested in the practice of making through art, architecture, design and fabrication. #29 model 2013 is a response to Walter Burley Griffin and Marion Mahony’s drawings, particularly Mahony’s drawing onto silk, which formed their entry to the international competition held by the Australian Government in April 1911, to produce a design for its new capital city.
This work of art is produced by cutting and arranging two types of timber, Brush Box and River Red Gum, to create a three dimensional interpretation of the of the city plan as designed by the Griffins. Pino’s selection of the timbers is important because the grain follows the direction and movement of Mahony’s hand as she made the final drawing onto silk. The next stage is the carving which is also a hand movement, that this time draws the topography of the city plan into timber. The variation in colour between the two types of timber used provides an interesting contrast between the roads and the land, while reflecting Mahony’s use of colour in the original drawing.
This ‘drawing in wood’ looks back to the past and the ‘plan’ which imagined a future city, a new nation, a modern city. A design of a city expressed through the craft of drawing... looking at not only the lines and circles but also the colours, tectonics and techniques used. Just as her drawing draws on the environment, the making of this model looks to her drawings as an environment. 1
DISCUSSION QUESTIONS
Research and find images of Marion Mahony and Walter Burley Griffin’s entry to the competition to design Canberra. Describe the features that make Mahony’s drawings unique.
Find the meaning of the words tectonic and topography.
Discover other artists that use traditional wood working techniques to create works of art.
Fernando Octavio Pino has made a ‘drawing in wood’ that is a creative response to the Griffin’s original drawings. Can you find a drawing that could inspire you to make a three dimensional work of art?
Talk with your class about a time when you have created a city, town or streetscape using blocks or lego.
ACTIvITy - BUILD A BOx CITy 2
Imagine if you could design your own city. Who would live there? How would it accommodate the communities that live in it? What would be its character and special qualities? Where in the landscape would it be situated and how would it be powered?
Design and build a Box City with your class keeping all of these considerations in mind.
MATErIALS
Sketchbooks and cameras.
Enough shoe boxes (or similar) for one per child, and a collection of recycled boxes in all sizes.
Clear, thin, recycled plastic or foil.
Coloured card and recycled paper.
Glue sticks and PVA glue.
Masking or electrical tape.
pArT 1 – DESIgN yOUr prINTINg pLATE
• Go on a walking tour with your class to observe, document and discuss the built and natural environments that make up your local community. Take cameras and sketchbooks. Make drawings and diagrams, record width, depth and height measurements of the following; a car, an average sized doorway, a window and a street sign. Measure larger features such as the width and depth of an average house block, shop front, and local playground. Estimate the height of a one story building and some common trees and shrubs. Safely investigate the width of roads, footpaths and roundabouts.
pArT 2 – BUILDINg & CONSTrUCTION
• Using a shoe box as the base unit of measure for one house, begin constructing some shop-fronts and houses. For example, if an average house is the size of one shoe box, then a shop-front might be the size of two shoe boxes and a football field might be the size of four shoe boxes, and so on. Use glue and tape and recycled cardboard to create rooves, garages, patios or other architectural details. Create colour and texture on the outside of your buildings by attaching coloured card, foil or recycled plastic packaging for windows.
• As a class make a list of larger buildings you would like to include such as cinemas,
museums, schools, and theme parks. Using your houses and shop fronts as a unit of comparison estimate how big these buildings would be and construct them using the extra cardboard and boxes, adding colour and detail in the same way as the previous step.
• Now make a list of other outdoor and natural features that would make your city an enjoyable place to live such as parks, skate parks, community gardens, ovals, creeks, rivers, lakes, bike and walking paths. Construct these as above remembering to use your houses and shop fronts as a unit of comparison.
• Create other features such as modes of transport, street signage, trees and shrubs, public amenities and street sculpture.
pArT 3 - pLANNINg ThE CITy LAyOUT
• In a large, clear, area such as a school gym, hall or cleared space in the classroom, use masking and electrical tape to mark out a plan for the Box City, particularly streets, roads, residential areas, rivers and parkland.
• Set up the city, thinking carefully about what makes a good city layout. Who will live in the city? What is the geography and climate of the site? What type of landscapes, buildings and community spaces will the people need? What other features would give the city a special sense of place?
OThEr IDEAS
• Create citizens for your Box City. Give each citizen a name, occupations, hairstyle etc.
• Evaluate the strengths, weaknesses and potential improvements that could be made to the city.
• Write stories or newspaper articles about events that happen in the Box City, draw pictures and take photos to document it.
• Utilise the Box City for maths activities such as mapping, measuring and graphing.
1 Fernando Pino 2013
2 Project inspired by the Box City Community Building Project - Learning By Design in Massachusetts www.lbdma.org
Photography Sandie Little - Design Rob Little RLDI
Canberra Museum and Gallery is part of the Cultural Facilities Corporation which is an ACT Government Agency.