Multiplex Trio
12
Aquaticausa.com Aquaticabath.ca E: [email protected] Multiplex Trio Shower Control Installation & Care Manual INTERNATIONAL Function : Form : Fashion Function : Form : Fashion
Transcript of Multiplex Trio

Function : Form : Fashion
Aquaticausa.com Aquaticabath.caE: [email protected]
Multiplex Trio Shower Control
Installation & Care ManualINTERNATIONAL
Function : Form : Fashion
Function : Form : Fashion
Aquaticausa.com Aquaticabath.caE: [email protected]
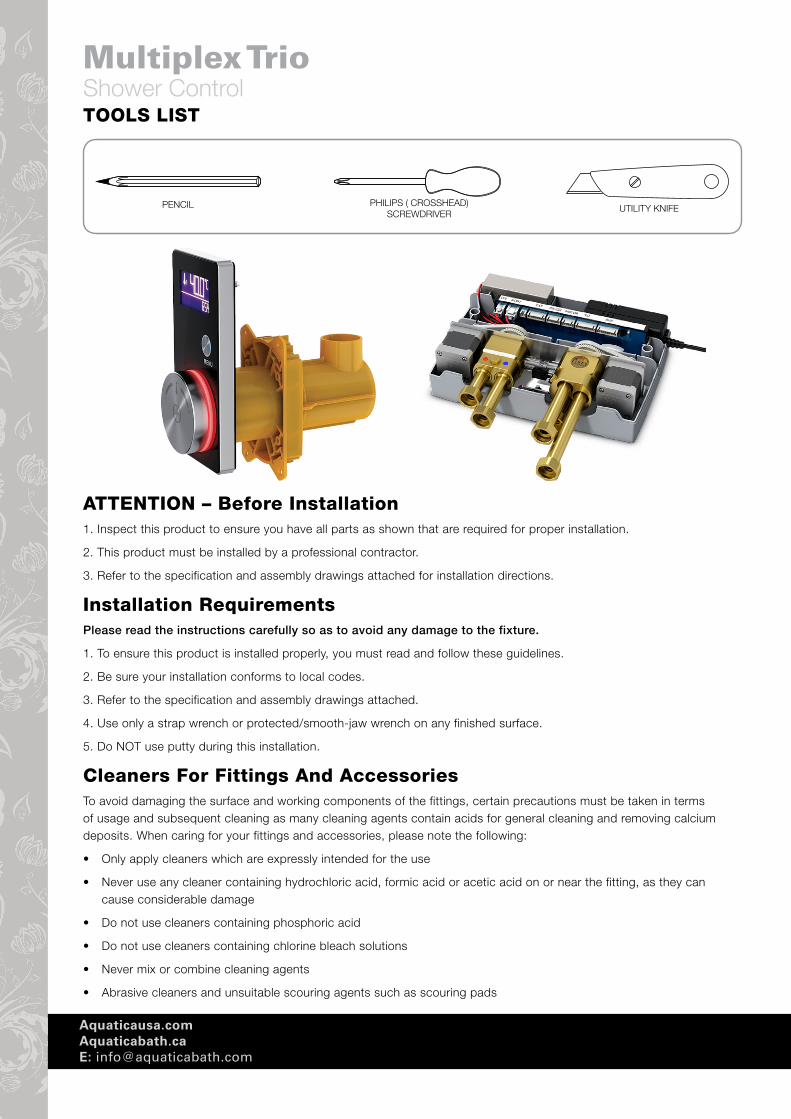
Multiplex Trio Shower ControlTOOLS LIST
PENCIL UTILITY KNIFEPHILIPS ( CROSSHEAD)
SCREWDRIVER
ATTENTION – Before Installation1. Inspect this product to ensure you have all parts as shown that are required for proper installation.
2. This product must be installed by a professional contractor.
3. Refer to the specification and assembly drawings attached for installation directions.
Installation RequirementsPlease read the instructions carefully so as to avoid any damage to the fixture.
1. To ensure this product is installed properly, you must read and follow these guidelines.
2. Be sure your installation conforms to local codes.
3. Refer to the specification and assembly drawings attached.
4. Use only a strap wrench or protected/smooth-jaw wrench on any finished surface.
5. Do NOT use putty during this installation.
Cleaners For Fittings And AccessoriesTo avoid damaging the surface and working components of the fittings, certain precautions must be taken in terms of usage and subsequent cleaning as many cleaning agents contain acids for general cleaning and removing calcium deposits. When caring for your fittings and accessories, please note the following:
• Only apply cleaners which are expressly intended for the use
• Never use any cleaner containing hydrochloric acid, formic acid or acetic acid on or near the fitting, as they can cause considerable damage
• Do not use cleaners containing phosphoric acid
• Do not use cleaners containing chlorine bleach solutions
• Never mix or combine cleaning agents
• Abrasive cleaners and unsuitable scouring agents such as scouring pads
Function : Form : Fashion
Function : Form : Fashion
1
2
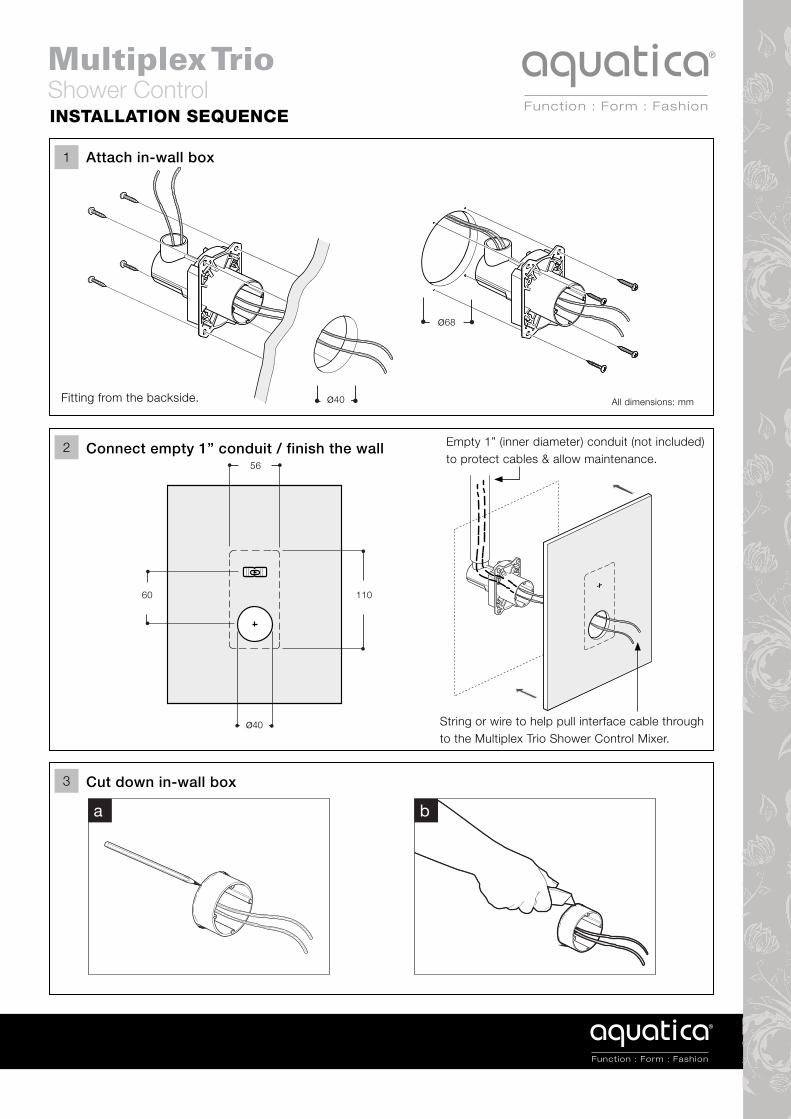
Multiplex Trio Shower ControlINSTALLATION SEQUENCE
Fitting from the backside.
Attach in-wall box
Connect empty 1” conduit / finish the wall Empty 1” (inner diameter) conduit (not included) to protect cables & allow maintenance.
String or wire to help pull interface cable through to the Multiplex Trio Shower Control Mixer.
3 Cut down in-wall box
ba
ø68
ø40
11060
56
ø40
All dimensions: mm

Aquaticausa.com Aquaticabath.caE: [email protected]
4
6
Multiplex Trio Shower ControlINSTALLATION SEQUENCE continued
Attach fixing clip 5 Feed both cables through to the controller
Clear rubber seal
Position display and lock by screws
1
2
3
7 Position controller unit into the display and lock by turning clockwise, then push the control wheel into place
1
2
4
8 Preset temperature & flow selection
5.0
60
Function : Form : Fashion
Function : Form : Fashion
Multiplex Trio Shower ControlINSTALLATION SEQUENCE continued
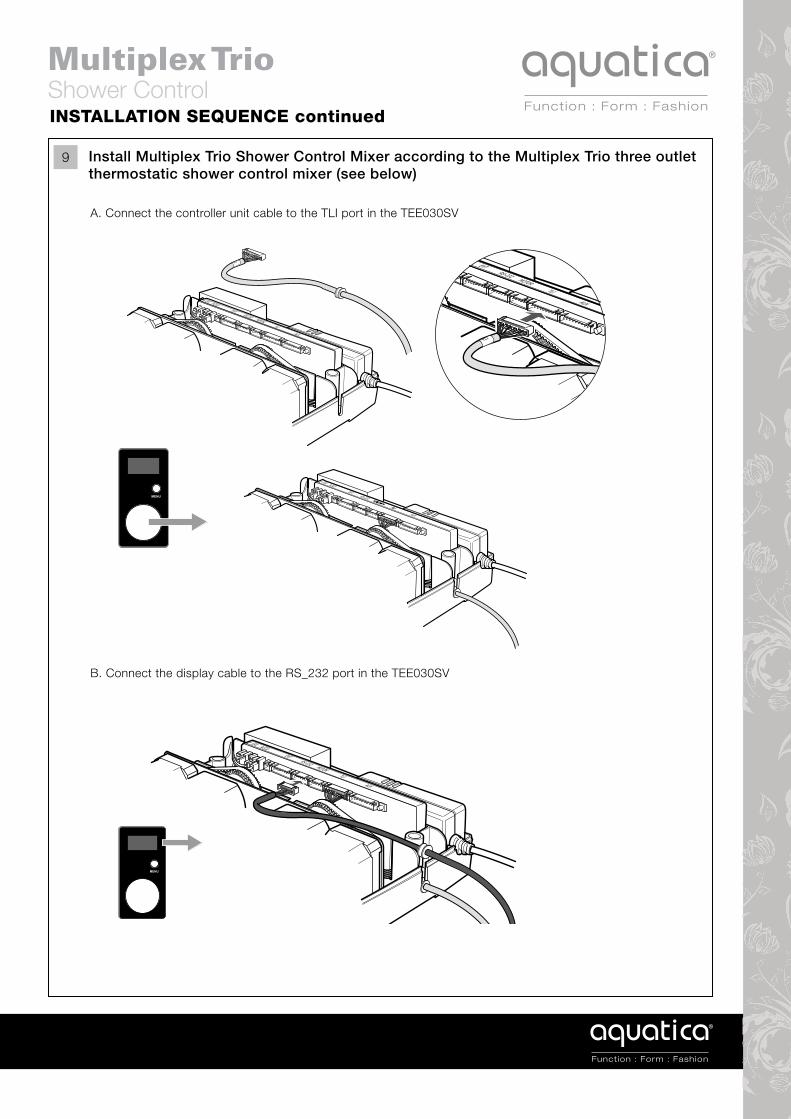
9 Install Multiplex Trio Shower Control Mixer according to the Multiplex Trio three outletthermostatic shower control mixer (see below)
A. Connect the controller unit cable to the TLI port in the TEE030SV
15V ACCU EXT RS-232 MOTOR TLI AUX 15V ACCU EXT RS-232 MOTOR TLI AUX
15V ACCU EXT RS-232 MOTOR TLI AUX
12
B. Connect the display cable to the RS_232 port in the TEE030SV
15V ACCU EXT RS-232 MOTOR TLI AUX

Aquaticausa.com Aquaticabath.caE: [email protected]
Multiplex Trio Shower ControlMultiplex Trio Three Outlet Thermostatic Control Mixer INSTALLATION SEQUENCE
1
2
Remove the control mixer cover.Important: The control mixer must be installed in a dry area that is accessible for future maintenance
Connecting the control mixer for shower installation
Connect empty 1” conduit / finish the wall
Outlet #1 is the default outlet for hand shower, when turned on, water will flow through this outlet first. Outlet #2 for shower head. Outlet #3 for body sprays.
15VB attery
WLANValveC ontrollerD ual Wheel
15V ACCU TLI AUX
Fixing holes
Cover retaining holes
Battery compartment Power supply
Connector block
Hot ColdInlets Outlets
2 1
3
!

Function : Form : Fashion
15VB attery
WLANValveC ontrollerD ual Wheel
Display
Outlet #1 is the default outlet for hand shower, when turned on, water will flow through this outlet first. Outlet #2 for shower head. Outlet #3 for body sprays.
3
If required, use the supplied template (provided inthe install guide) to mark the position of the controlmixer fixing holes in the selected location.
Multiplex Trio Shower ControlMultiplex Trio Three Outlet Thermostatic Control Mixer INSTALLATION SEQUENCE continued
Function : Form : Fashion
4
Fix the control box in position using thescrew kit supplied.
5 6
15VB attery
WLANValveC ontrollerD ual Wheel
Display
7
8
15V Battery
WLANValve Contro
Dis
Hot
Cold
not supplied
15VB attery
WLANValveC ontrollerD ual Wheel
Display
Remove the inlet connectors’ retaining bolt.
Fully insert the inlet connectors into theinlet valves (one long and one short connector).
15VB attery
WLANValveC ontroller
Display
Re-insert the inlet connectors retaining bolt.
• Important: Flush through the pipework before connection.• Filter screen for inlet is highly recommended.
Attach the NPT adaptors to the hot & cold water supply connections.

15VB attery
WLANValve Controller Dual Wheel
Display
9
Remove the outlet connectors’ retaining bolt.
Multiplex Trio Shower ControlMultiplex Trio Three Outlet Thermostatic Control Mixer INSTALLATION SEQUENCE continued
10
15VB attery
WLANValveC ontrollerD ual Wheel
Display
23 1
15VB attery
WLANValveC ontrollerD ual Wheel
Display
11 1215V Battery
WLANValve Controller Dual Wheel
Display
15V Battery
WLANValve Controller Dual Wheel
Display13
Re-insert the outlet connectors retaining bolt.
Attach the supplied NPT adaptorpipework to the outlet connectors.Make a note of which pipe goes to which outlet.
Note: Make sure that the pipework is perpendicular tothe control box so that there is no strain on the fittings,use pipe clips as required.
Run a pipe from the mixed water outlet on the controlbox through the wall to the proposed position of theshower hose outlet etc.
Connect the data cable from the on-off control to the ‘TLI’ port in the control box.
Fully insert the outlet connectors into the outlet valves (one long and one short connector).
Note: Outlet #1 is the default outlet. When turned on, water will flow through this outlet first. Which is the hand shower icon on the electronicaVision Wheel TEE300.
WLANValve ControllerD ual Wheel
Display

Function : Form : Fashion
14
Connect the data cable from the Vision Wheel interfaceconnection in the “RS-232” port in the control box.
Multiplex Trio Shower ControlMultiplex Trio Three Outlet Thermostatic Control Mixer INSTALLATION SEQUENCE continued
Function : Form : Fashion
15
Connect Vision Wheel interface control data cable
AUX
�5V Battery
�5V Battery
�LA�Va��e C��tr���er ��a� ��ee�
�����ay
�5V Battery
�LA�Va��e C��tr���er ��a� ��ee�
�����ay
AUX
�5V Battery
�5V Battery
�LA�Va��e C��tr���er ��a� ��ee�
�����ay
�5V Battery
�LA�Va��e C��tr���er ��a� ��ee�
�����ay
AUX
�5V Battery
�5V Battery
�LA�Va��e C��tr���er ��a� ��ee�
�����ay
�5V Battery
�LA�Va��e C��tr���er ��a� ��ee�
�����ay
AUX
�5V Battery
�5V Battery
�LA�Va��e C��tr���er ��a� ��ee�
�����ay
�5V Battery
�LA�Va��e C��tr���er ��a� ��ee�
�����ay
Connect the battery cable to the “Battery for battery back-up” connection and place the battery in the compartment.
Connect the back-up battery

Display
15V Battery
WLANValve Controller Dual Wheel
16
Refit the control box cover.
Multiplex Trio Shower ControlMultiplex Trio Three Outlet Thermostatic Control Mixer INSTALLATION SEQUENCE continued
17
Note: • The electrical installation and testing must be
carried out by a qualified electrician• Electrical connections and the minimum
distances between water and electricity connections must be installed or laid out in accordance with the valid national regulations.
• Equipment for protection against faulty currents must be installed (residual current circuit breaker), N=30mA
• All work on the electronic components must be only carried out under absence of voltage
Connect an all-pole mains switch in theelectrical installation in accordance withthe current wiring regulations.

Function : Form : Fashion
Multiplex Trio Shower ControlMultiplex Trio Three Outlet Thermostatic Control Mixer INSTALLATION SEQUENCE continued
Function : Form : Fashion
Ø8
x 55Ø
8 x 55
this side up
this side up
235mm
/ 9.2inch
Note: Diagram is to scale. Ensure when printing that image size is at 100%.

Aquaticausa.com Aquaticabath.caE: [email protected] Function : Form : Fashion
Funct ion : Form : Fashion