Multi Theft Auto: San Andreas Manual -...
12
Multi Theft Auto: San Andreas Manual Multi Theft Auto: San Andreas is the latest in a series of fan-created multiplayer modifications for the Grand Theft Auto games (PC versions only). For the GTA3 and Vice City versions that run on the old core, visit http://www.multitheftauto.com . This mod is not endorsed by Rockstar Games or Take 2 Interactive. Please note that MTA:SA is a beta, which means it could crash or cause unexpected results. Before you start Before you install Multi Theft Auto: San Andreas, first make sure that there are no modifications to GTA:SA installed. These will conflict with MTA. If you would like to keep your single player mods, you can create two installations by reinstalling San Andreas to a second folder on your hard drive. Also make sure that you are running Windows XP, Windows 2000 or Windows Server 2003 and that your machine is capable of running the game in single player. Note that if you are running single player on the absolute minimum requirements, you will experience slowdowns in MTA as it takes up extra processing power. Note: MTA:SA will only work on GTA:SA v1.0. This means that if you have applied the “no more hot coffee” patch, you will need to reinstall GTA in order to play MTA. The patched versions will be supported in a later release.
-
Upload
vuonghuong -
Category
Documents
-
view
241 -
download
0
Transcript of Multi Theft Auto: San Andreas Manual -...
Multi Theft Auto: San Andreas Manual
Multi Theft Auto: San Andreas is the latest in a series of fan-created multiplayer modifications for the Grand Theft Auto games (PC versions only). For the GTA3 and Vice City versions that run on the old
core, visit http://www.multitheftauto.com. This mod is not endorsed by Rockstar Games or Take 2
Interactive.
Please note that MTA:SA is a beta, which means it could crash or cause unexpected results.
Before you start
Before you install Multi Theft Auto: San Andreas, first make sure that there are no modifications to GTA:SA installed. These will conflict with MTA. If you would like to keep your single player mods, you
can create two installations by reinstalling San Andreas to a second folder on your hard drive.
Also make sure that you are running Windows XP, Windows 2000 or Windows Server 2003 and
that your machine is capable of running the game in single player. Note that if you are running single player on the absolute minimum requirements, you will experience slowdowns in MTA as it takes up
extra processing power.
Note: MTA:SA will only work on GTA:SA v1.0. This means that if you have applied the “no more
hot coffee” patch, you will need to reinstall GTA in order to play MTA. The patched versions will be supported in a later release.
Installing the game
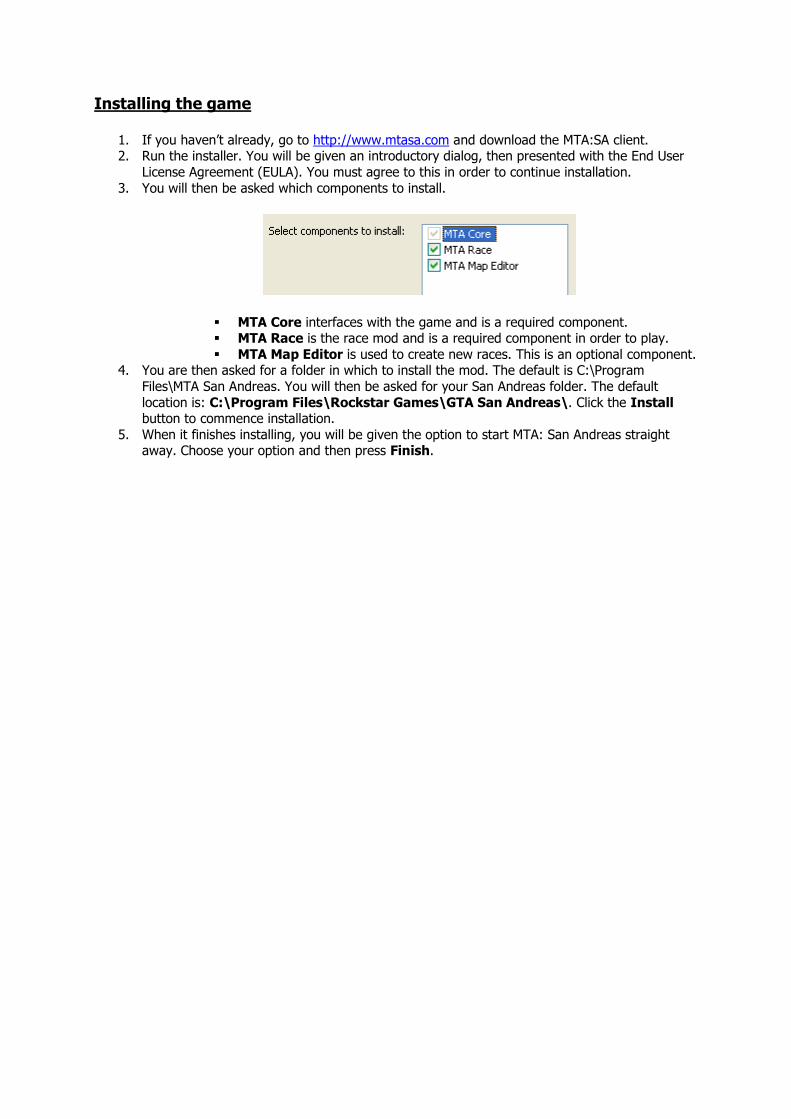
1. If you haven’t already, go to http://www.mtasa.com and download the MTA:SA client. 2. Run the installer. You will be given an introductory dialog, then presented with the End User
License Agreement (EULA). You must agree to this in order to continue installation.
3. You will then be asked which components to install.
� MTA Core interfaces with the game and is a required component. � MTA Race is the race mod and is a required component in order to play.
� MTA Map Editor is used to create new races. This is an optional component. 4. You are then asked for a folder in which to install the mod. The default is C:\Program
Files\MTA San Andreas. You will then be asked for your San Andreas folder. The default
location is: C:\Program Files\Rockstar Games\GTA San Andreas\. Click the Install button to commence installation.
5. When it finishes installing, you will be given the option to start MTA: San Andreas straight away. Choose your option and then press Finish.
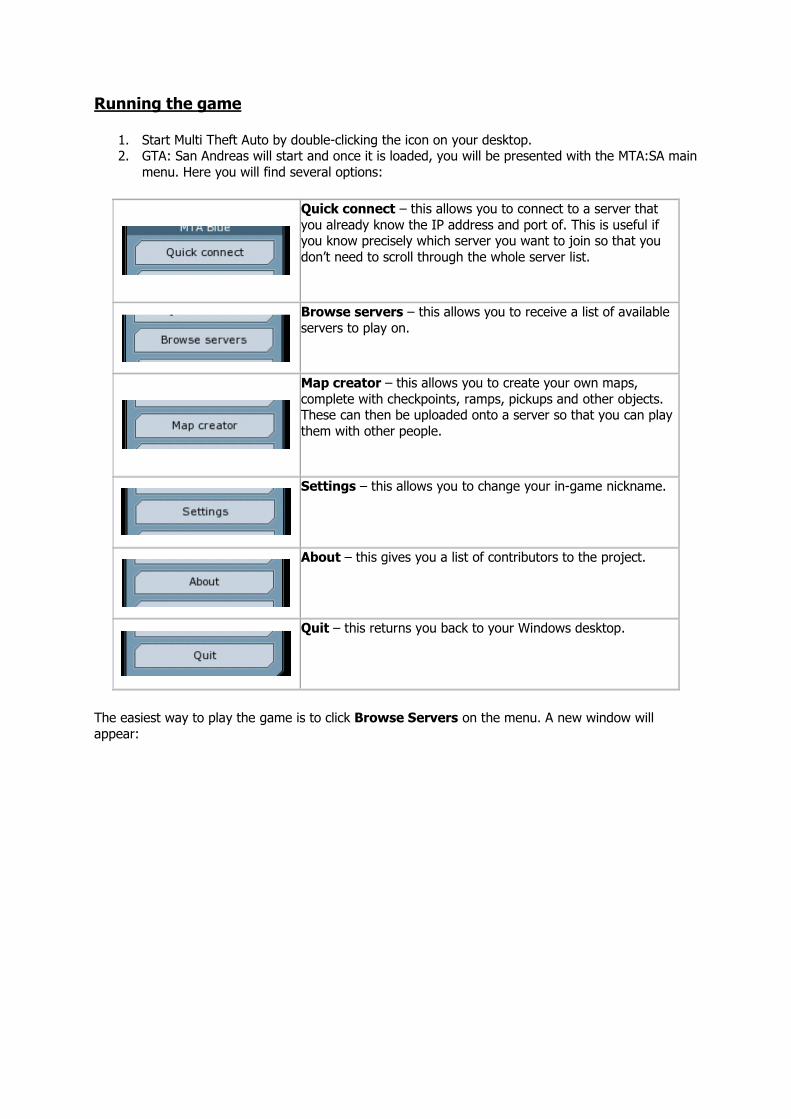
Running the game
1. Start Multi Theft Auto by double-clicking the icon on your desktop. 2. GTA: San Andreas will start and once it is loaded, you will be presented with the MTA:SA main
menu. Here you will find several options:
Quick connect – this allows you to connect to a server that
you already know the IP address and port of. This is useful if you know precisely which server you want to join so that you
don’t need to scroll through the whole server list.
Browse servers – this allows you to receive a list of available
servers to play on.
Map creator – this allows you to create your own maps,
complete with checkpoints, ramps, pickups and other objects. These can then be uploaded onto a server so that you can play
them with other people.
Settings – this allows you to change your in-game nickname.
About – this gives you a list of contributors to the project.
Quit – this returns you back to your Windows desktop.
The easiest way to play the game is to click Browse Servers on the menu. A new window will
appear:
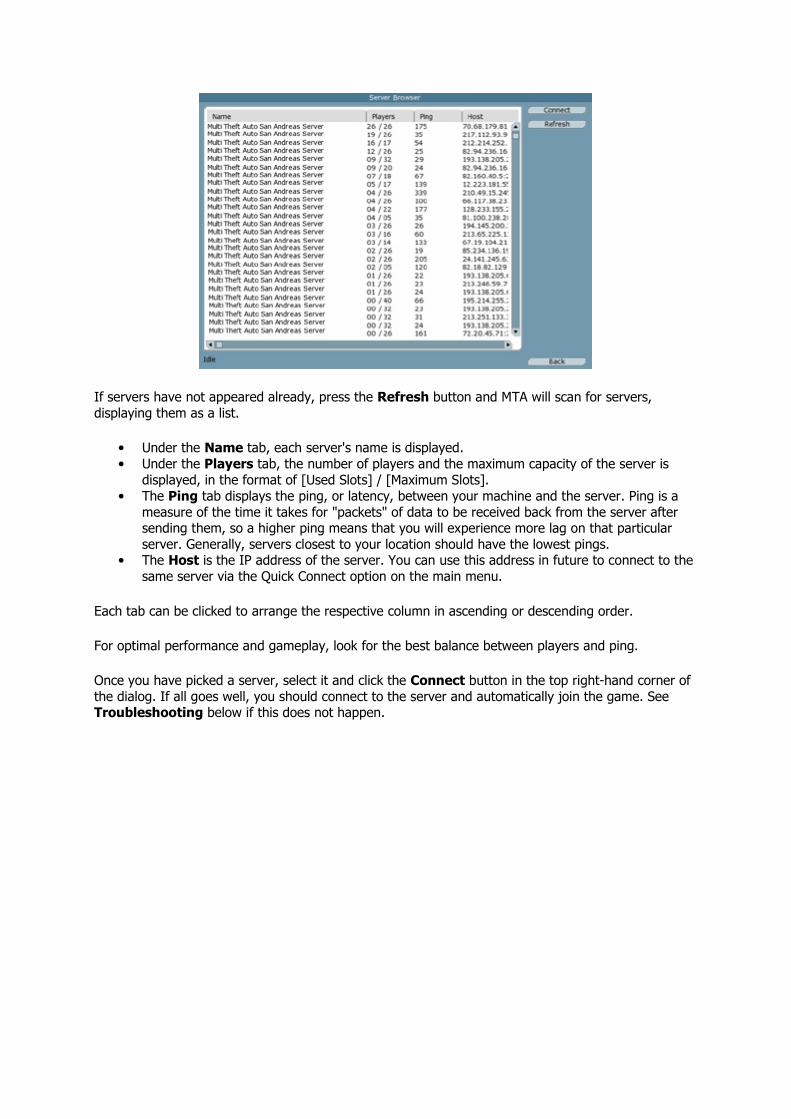
If servers have not appeared already, press the Refresh button and MTA will scan for servers,
displaying them as a list.
• Under the Name tab, each server's name is displayed.
• Under the Players tab, the number of players and the maximum capacity of the server is
displayed, in the format of [Used Slots] / [Maximum Slots].
• The Ping tab displays the ping, or latency, between your machine and the server. Ping is a
measure of the time it takes for "packets" of data to be received back from the server after sending them, so a higher ping means that you will experience more lag on that particular
server. Generally, servers closest to your location should have the lowest pings. • The Host is the IP address of the server. You can use this address in future to connect to the
same server via the Quick Connect option on the main menu.
Each tab can be clicked to arrange the respective column in ascending or descending order.
For optimal performance and gameplay, look for the best balance between players and ping.
Once you have picked a server, select it and click the Connect button in the top right-hand corner of
the dialog. If all goes well, you should connect to the server and automatically join the game. See Troubleshooting below if this does not happen.
How to Play
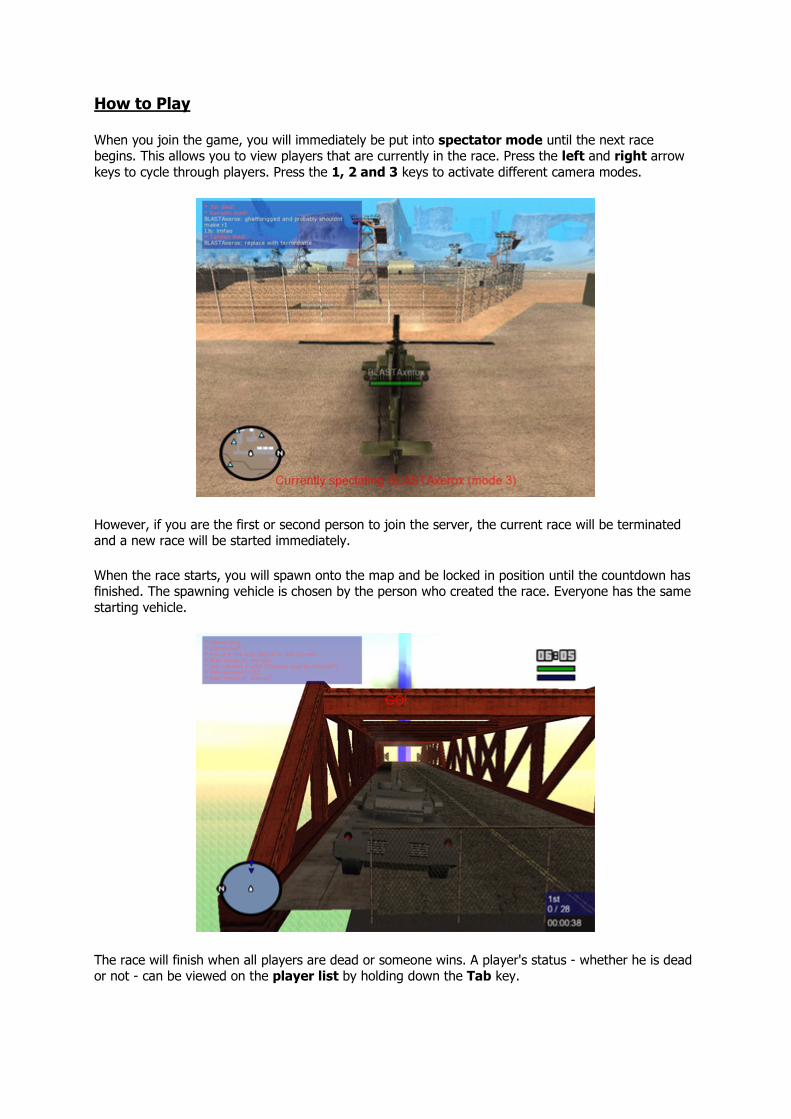
When you join the game, you will immediately be put into spectator mode until the next race begins. This allows you to view players that are currently in the race. Press the left and right arrow
keys to cycle through players. Press the 1, 2 and 3 keys to activate different camera modes.
However, if you are the first or second person to join the server, the current race will be terminated and a new race will be started immediately.
When the race starts, you will spawn onto the map and be locked in position until the countdown has finished. The spawning vehicle is chosen by the person who created the race. Everyone has the same
starting vehicle.
The race will finish when all players are dead or someone wins. A player's status - whether he is dead or not - can be viewed on the player list by holding down the Tab key.
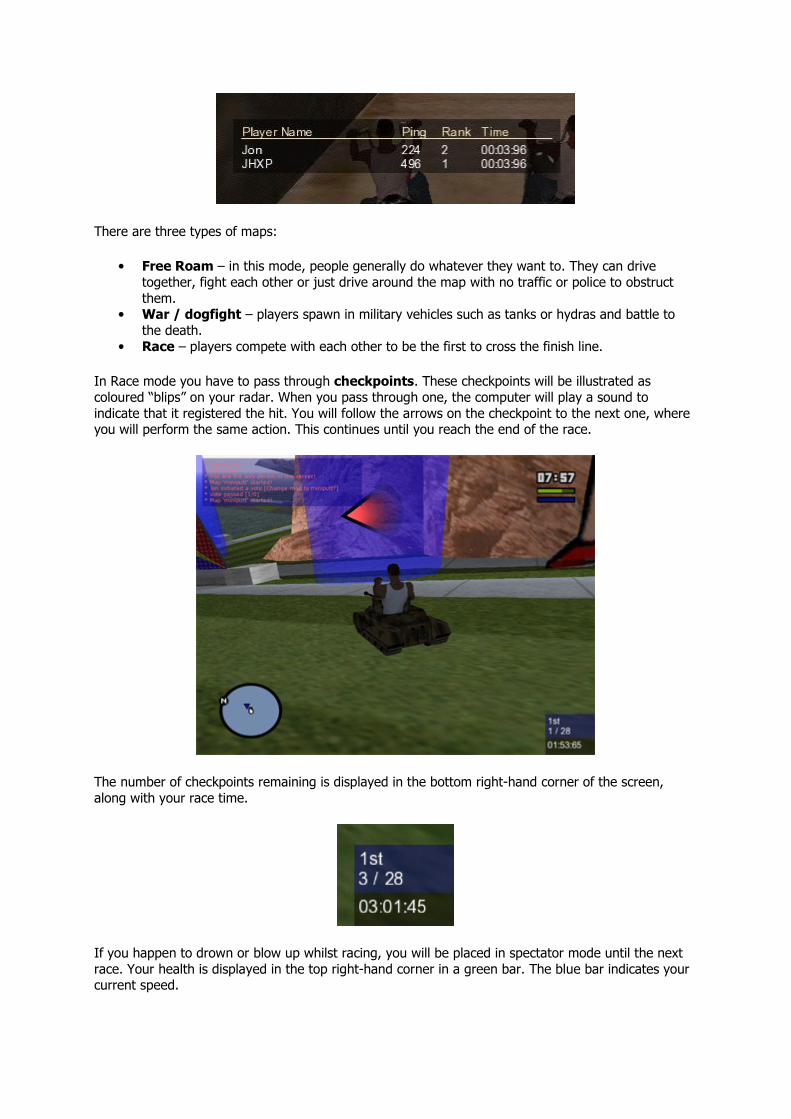
There are three types of maps:
• Free Roam – in this mode, people generally do whatever they want to. They can drive
together, fight each other or just drive around the map with no traffic or police to obstruct
them. • War / dogfight – players spawn in military vehicles such as tanks or hydras and battle to
the death.
• Race – players compete with each other to be the first to cross the finish line.
In Race mode you have to pass through checkpoints. These checkpoints will be illustrated as
coloured “blips” on your radar. When you pass through one, the computer will play a sound to
indicate that it registered the hit. You will follow the arrows on the checkpoint to the next one, where you will perform the same action. This continues until you reach the end of the race.
The number of checkpoints remaining is displayed in the bottom right-hand corner of the screen,
along with your race time.
If you happen to drown or blow up whilst racing, you will be placed in spectator mode until the next
race. Your health is displayed in the top right-hand corner in a green bar. The blue bar indicates your current speed.
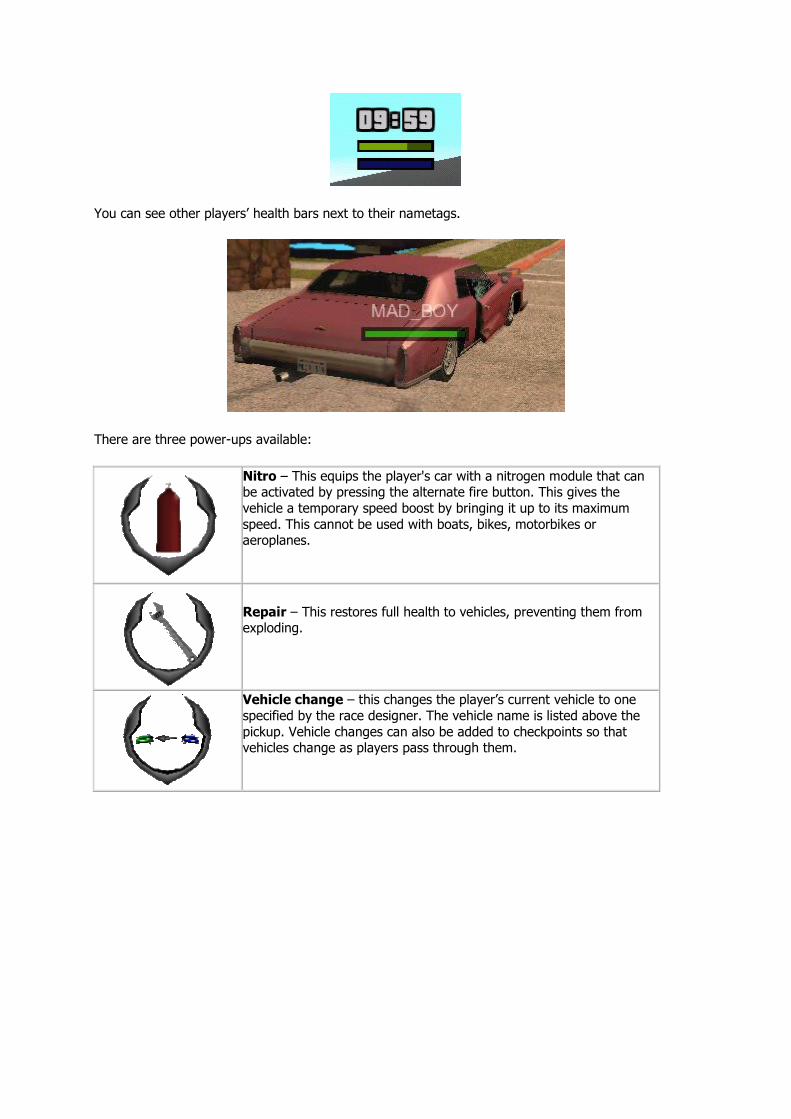
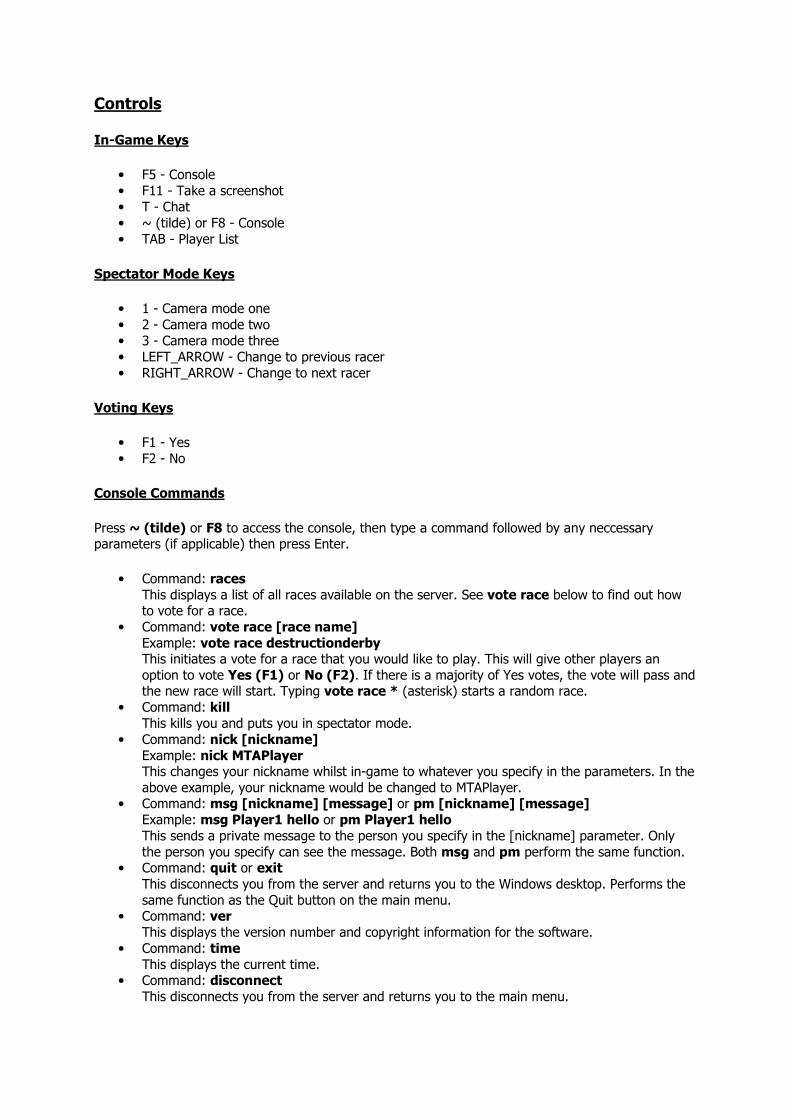
You can see other players’ health bars next to their nametags.
There are three power-ups available:
Nitro – This equips the player's car with a nitrogen module that can be activated by pressing the alternate fire button. This gives the
vehicle a temporary speed boost by bringing it up to its maximum
speed. This cannot be used with boats, bikes, motorbikes or aeroplanes.
Repair – This restores full health to vehicles, preventing them from exploding.
Vehicle change – this changes the player’s current vehicle to one
specified by the race designer. The vehicle name is listed above the
pickup. Vehicle changes can also be added to checkpoints so that vehicles change as players pass through them.
Controls
In-Game Keys
• F5 - Console
• F11 - Take a screenshot
• T - Chat
• ~ (tilde) or F8 - Console
• TAB - Player List
Spectator Mode Keys
• 1 - Camera mode one
• 2 - Camera mode two
• 3 - Camera mode three
• LEFT_ARROW - Change to previous racer
• RIGHT_ARROW - Change to next racer
Voting Keys
• F1 - Yes
• F2 - No
Console Commands
Press ~ (tilde) or F8 to access the console, then type a command followed by any neccessary parameters (if applicable) then press Enter.
• Command: races
This displays a list of all races available on the server. See vote race below to find out how to vote for a race.
• Command: vote race [race name]
Example: vote race destructionderby This initiates a vote for a race that you would like to play. This will give other players an
option to vote Yes (F1) or No (F2). If there is a majority of Yes votes, the vote will pass and the new race will start. Typing vote race * (asterisk) starts a random race.
• Command: kill
This kills you and puts you in spectator mode.
• Command: nick [nickname]
Example: nick MTAPlayer This changes your nickname whilst in-game to whatever you specify in the parameters. In the
above example, your nickname would be changed to MTAPlayer. • Command: msg [nickname] [message] or pm [nickname] [message]
Example: msg Player1 hello or pm Player1 hello
This sends a private message to the person you specify in the [nickname] parameter. Only
the person you specify can see the message. Both msg and pm perform the same function. • Command: quit or exit
This disconnects you from the server and returns you to the Windows desktop. Performs the
same function as the Quit button on the main menu. • Command: ver
This displays the version number and copyright information for the software.
• Command: time
This displays the current time. • Command: disconnect
This disconnects you from the server and returns you to the main menu.
• Command: say [text]
Example: say hello
This enables you to continue talking to people in the chat box whilst the console is open.
• Command: slap [nickname]
Example: slap Player1 This is an old IRC command. When you type the above example into the chat box, it will say
"Player2 slapped Player1 around a bit with an old trout". It can be useful for attracting someone's attention.
• Command: me [text]
Example: me runs This is another old IRC command. This outputs your nickname in front of the text you typed.
In the example above, if your name was Player, it would output "Player runs".
• Command: ignore [nickname]
Example: ignore Player2 This will not display any text typed by the player you wish to ignore. To stop ignoring a
player, type ignore [nickname] again. • Command: rcon_login [password]
Example: rcon_login password
This allows a player to log in as an administrator in order to access to administrative functions
such as kicking and banning players whilst in-game. This requires the server to be configured for RCON access.
• Command: rcon [command] [arguments]
Example: rcon kick Player1 This allows an admin who is logged into RCON (see rcon_login) to perform administrative
functions within the server. These include kicking, banning and freezing players.
Tip: You can use these commands in the chatbox by putting a / (forward slash) in front of them.
A list of console commands can be seen by typing help into the console and pressing Enter.
Troubleshooting
You get a timeout error when trying to connect or whilst in-game.
This is either a problem with the server or your connection. If the timeout occurs whilst playing, check
that your internet service provider hasn’t disconnected you. If not, the server may have been reset or else may be experiencing difficulties. Try connecting a few minutes later. If this does not work, try
connecting to a different server.
If this happens whilst trying to connect, firstly check that the server is currently up and running (or try
connecting to a different server). If the problem persists, make sure that there are no problems with your internet connection and that any firewalls or routers that you may have are not blocking MTA
from accessing the internet. For more information on doing this, visit www.portforward.com.
You experience lag whilst playing.
This could be due to poor PC performance or a slow connection to the server. The way to experience
the least amount of lag possible is to lower the graphical settings as low as you can bear them, close all other applications that may be taking up precious memory and bandwidth, and play on servers
near to your location that only have a few players. If lag problems still persist, you should consider
upgrading your PC and/or internet connection, depending on which factor is causing the problem.
The game crashes.
MTA is beta software so crashes may still occur. If the game does crash whilst you are playing,
please report it to us and we will fix it as soon as possible. It is helpful if you include as much information as possible about your system and what you were doing at the time of the crash.
Keyboard controls are lagging
Microsoft has implemented a feature into DirectX that allows your graphics card to render a few frames ahead in order to make everything smoother. The cost of this, however, is a loss in
performance. Remember that MTA is a lot heavier on resource usage than San Andreas alone. This
can cause keyboard input lag on slower machines because you can render frames ahead, but you can’t render keyboard input ahead.
Nvidia gives you an option in their driver dialog to disable this (right-click the desktop, go to
Properties and click the Advanced button in the Settings tab). ATI unfortunately doesn’t offer this
option.
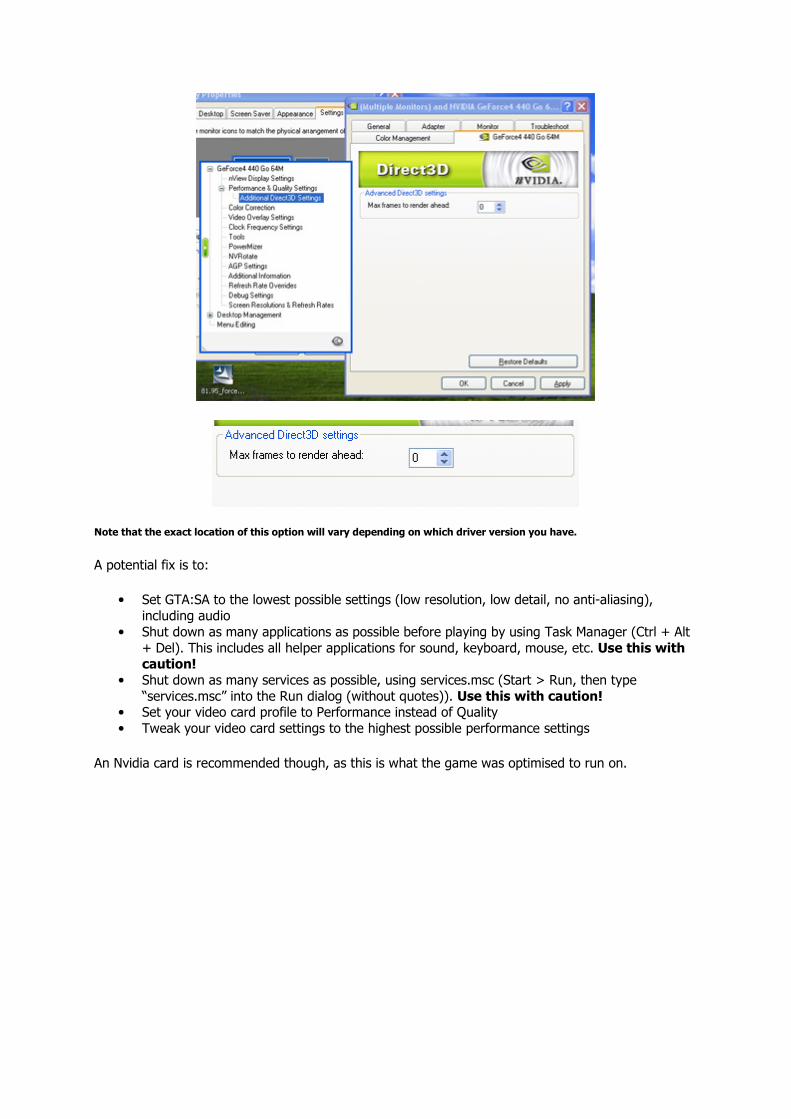
Note that the exact location of this option will vary depending on which driver version you have.
A potential fix is to:
• Set GTA:SA to the lowest possible settings (low resolution, low detail, no anti-aliasing),
including audio
• Shut down as many applications as possible before playing by using Task Manager (Ctrl + Alt
+ Del). This includes all helper applications for sound, keyboard, mouse, etc. Use this with caution!
• Shut down as many services as possible, using services.msc (Start > Run, then type
“services.msc” into the Run dialog (without quotes)). Use this with caution! • Set your video card profile to Performance instead of Quality
• Tweak your video card settings to the highest possible performance settings
An Nvidia card is recommended though, as this is what the game was optimised to run on.
Final Words For starters : Have fun
We would like to thank:
Rockstar Games and Take 2 Interactive
Wojjie Networks The QA Team and all other testers
The community
The MTA Team:
AJH
Blokker_1999 Bloodymess_13
ChrML
Cray eAi
IJs Kent747
Oli
RISO Slush
Trix


![MTA - Unopomp · TM01 8522 0300 MTA 3 MTA 4 L[mm] 35 45 TM01 8657 0600 TM01 8658 0600 TM01 9076 1000 10 L 10 125 45 Min. 20 mm General data MTA. 6 Technical data MTA 3 MTA 4 ... 105](https://static.fdocuments.in/doc/165x107/5be789d309d3f246788ca2ff/mta-tm01-8522-0300-mta-3-mta-4-lmm-35-45-tm01-8657-0600-tm01-8658-0600-tm01.jpg)