Multi-room Installation guide - Cambridge...
26
Multi-room Installation guide
Transcript of Multi-room Installation guide - Cambridge...

Multi-room
Installation guide

2 Incognito multi-room
Introduction...................................................................................3
Safety precautions ........................................................................4
Audio connections .........................................................................6
Video connections .........................................................................7
Source connections ......................................................................8
Sub-zones ......................................................................................9
Advanced system options ............................................................10
Local source connections ........................................................10
AS10 active speakers...............................................................11
Connecting an external amplifier / active subwoofer
to your system ..........................................................................12
CCT V .......................................................................................12
Larger systems ............................................................................13
Planning your system...................................................................14
Pre-installation notes...................................................................16
System specifications..................................................................19
FAQs ............................................................................................22
Limited warranty ..........................................................................23
System details .............................................................................24
Installer details ............................................................................25
CONTENTS

Incognito Multi-Room
Incognito multi-room 3
Incognito multi-room
The Incognito multi-room system is a whole-house entertainmentsystem capable of distributing audio and video* throughout a home.
The system consists of KP10 keypads with built-in amplifiersconnected to a central AH10 audio hub unit by Cat-5/5e cable.
Source components (CD players, DVD players etc) from almost anymanufacturer can be used and are connected to the AH10 hub unitby standard stereo RCA/phono leads. Sources connected to thecentral hub are distributed to the remote rooms (throughout theguide referred to as main and sub-zones), so that different roomsmay listen to different things at the same time.
The KP10 keypads are mounted in-the-wall in standard back-boxesand connected to in-wall, in-ceiling or conventional speakers withstandard speaker cable. The keypads do not require local power andare powered via the cable from the hub.
The AH10 hub and KP10 keypad utilize A-BUSTM technology, and canbe switched between Incognito A-BUS or standard A-BUS mode(switches located on the underside of the AH10 and rear of KP10respectively). A-BUS is a standard which provides compatibilitybetween systems from various manufacturers. When using IncognitoA-BUS mode and our own keypads, some extra features are possiblesuch as changing sources from the keypad itself and the fitment oflocal input modules. When used with other A-BUS keypads it shouldbe set to standard A-BUS mode or they will not work.
If video distribution is required a VH10 video switcher can be addedwhich sends video over RG6/CT100 co-axial cable to each roomrequired. Again, different rooms can watch different things at thesame time.
One AH10 hub supports four main-zones and four sub-zones (eightrooms in total). Each sub-zone output is tied to a main zone outputand always receives the same source as its main zone. Sub-zonesare used for instances such as en-suite bathrooms (the bedroombeing a main zone) where it is desired to to have an area thatautomatically follows the same source as another but can beindependently turned on and off, has individual bass and treble etc.
Up to four AH10 (and VH10 where fitted) can be chained for asystem maximum of 16 main zones plus 16 sub-zones.
Enjoy !
Matthew BrambleTechnical Director
* requires VH10 video switcher
Incognito is a trademark of Cambridge Audio Ltd. All rights reserved.
A-BUS is a registered trademark of LeisureTech Electronics Pty Ltd Australia
INTRODUCTION

4 Incognito multi-room
Before laying cable or installing an Incognito system it is importantthat you check and comply with all building regulations or buildingcode applicable to your country, state or area. If you are in anydoubt contact your local building regulations/code officer and/orseek professional advice from a suitably qualified person.
Read instructions – All the safety and operating instructions shouldbe read before the product is operated.
Retain instructions – The safety and operating instructions shouldbe retained for future reference.
Heed warnings – All warnings on the product and the operatinginstructions should be adhered to.
Follow instructions – All operating and use instructions should be followed.
Cleaning – Unplug all system components from the wall outletbefore cleaning any part of the system. Do not use liquid cleaners oraerosol cleaners. Use a damp cloth for cleaning.
Attachments – Do not use attachments which are not recom-mended by the manufacturer as they may cause hazards.
Water and moisture – Do not install the AH10/PS10 near water –for example, near a bath tub, wash bowl or kitchen sink; in a wetbasement, or near a swimming pool etc.
Wall or ceiling mounted loudspeakers – should be mounted to awall or ceiling only as recommended by the manufacturer. Installer'sshould also ensure that all building regulations are strictly adheredto as cutting a hole for a loudspeaker may affect the fire rating of aceiling or wall.
SAFETY PRECAUTIONS
Accessories – Do not install any part of the system on an unstablesurface, stand, bracket or table. The product may fall, causingserious injury to child or adult, and serious damage to the product.Use only a surface, stand bracket or table recommended by themanufacturer, or sold with the product. Any mounting of the productshould follow the manufacturer's instructions, and should use amounting accessory recommended by the manufacturer.
A product and stand combination should be moved with care. Quickstops, excessive force, and uneven surfaces may cause the combi-nation to overturn.
Ventilation – Slots and openings in the cabinets/enclosures areprovided for ventilation and to ensure reliable operation of theproduct and to protect them from overheating. These openings mustnot be blocked or covered. The openings should never be blocked byplacing the product on a soft surface. The AH10 should not beplaced in a built-in installation such as a bookcase or rack unlessproper ventilation is provided and the manufacturer’s instructionshave been adhered to. For all components, the manufacturersinstructions on ventilation must be adhered to.
Power sources – The PS10 should be operated only from the type ofpower source indicated on the marking label. If you are not sure ofthe type of power supply to your home, consult your product dealeror local power company.
Grounding or polarization – In some countries the PS10 may beequipped with a polarized alternating-current line plug (a plughaving one pin wider than the other). This plug will fit into the poweroutlet only one way. This is a safety feature. If you are unable toinsert the plug into the outlet, try reversing the plug. If the plug still

Incognito Multi-Room
Incognito multi-room 5
Incognito multi-room
does not fit, contact your electrician to replace your obsolete outlet.Do not defeat the safety purpose of the polarized plug.
Power-cord protection – Power supply cords should be routed sothat they are not likely to be walked on or pinched by items placedupon or against them, paying particular attention to cords at plugs,mains sockets/outlets, and the point where they exit from theproduct.
Protective attachment plug – In some countries product may beequipped with a plug having overload protection (fuse). This is asafety feature. If replacement of the plug is required, be sure theservice technician has used a replacement plug specified by the manufacturer that has the same overload protection as theoriginal plug.
Lightning – For added protection for this product during a lightningstorm, or when it is left unattended and unused for long periods oftime, unplug it from the wall outlet. This will prevent damage to theproduct due to lightning and power-line surges.
Overloading – Do not overload wall outlets, extension cords, orintegral mains sockets/outlets as this can result in a risk of fire orelectric shock.
Object and liquid entry – Never push objects of any kind into thisproduct through openings as they may touch dangerous voltagepoints or short-out parts that could result in a fire or electric shock.Never spill liquid of any kind on the product.
Servicing – Do not attempt to service this product yourself asopening or removing covers may expose you to dangerous voltage orother hazards. Refer all servicing to an authorised service agent.
Damage requiring service – Refer any part of this system requiringrepair to an authorised Incognito service agent only.
Heat – The product should be situated away from heat sources suchas radiators, heat registers, stoves, or other products (includingamplifiers) that produce heat.

6 Incognito multi-room
PS10
SS10
Cat5
KP10
Cat5
SS10
AUDIO CONNECTIONS
PS10 power supply to AH10
For each AH10 with up to four main zones connected (and no sub-zones) one PS10 is required.
Sub-zones require a separate PS10 power supply.
For each AH10 (with both main and sub-zones connected) two xPS10 power supplies are required.
AH10 to KP10
Using a single Cat-5e cable, connect each KP10 to the AH10 via anRJ45 plug using the EIA/TIA 568A wiring standard (see below) at theAH10, and an eight-way colour-coded connection at the keypad.
The Cat-5 connection from AH10 to KP10 should not exceed 30m/ 100 ft.
Sub-zones connections are made in the same way as main zoneconnections but from the sub-zone sockets (see illustration on page 9).
KP10 to SS10 or other loudspeakers
Connect the KP10 to a pair of speakers with two runs of standardhigh-quality speaker cable.
Connections for one AH10 with two main zones attached
4 – blue
5 – white/blue
6 – orange
7 – white/brown
8 – brown
3 – white/orange
2 – green
1 – white/green
Speaker cableSpeaker cable

Incognito multi-room 7
Where a VH10 video switcher has been specified
The VH10 is linked to the AH10 via a Cat-5e patch cable (suppliedwith the VH10), connected to the expansion sockets on both units.This provides power, and input switching commands direct from thesystem remote control or KP10.
Main video displays are connected to the VH10 at the ‘main zone’sockets via high quality RG6/CT100 co-axial cable terminated atthe VH10 by a phono/RCA plug. No external power is required by theVH10 it is powered by the AH10.
Sub-zone video displays are connected in the same way, but to thefour sub-zone sockets on the VH10.
SS10SS10
PS10
Connections between AH10 and VH10 with two main zones and a sub-zone attached
VIDEO CONNECTIONS
Incognito multi-room
SUB-ZONE
MAIN ZONE
Cat5
Cat5
Coax cableCoax cable

8 Incognito multi-room
SOURCE CONNECTIONS
Audio source connections
It is possible to connect a total of six audio source components tothe AH10. The connections are made from a line level output on thesource equipment to one of the six inputs on the AH10 usingRCA/phono to RCA/phono cables.
Video source connections
When using a VH10 each of the six sources can also supply video.
The connections are made from a composite video output on thesource equipment to one of the six inputs on the VH10 using goodquality 75ohm RCA/phono to RCA/phono video cables.
Remote control of source equipment through the KP10
For remote control of the source equipment, six routed IR outputsare provided. Individual IR emitters are plugged into the appropriateIR output (corresponding to the respective audio input) the otherend is stuck to the IR receiving window of the source equipment(see below).
AudioOutput
AudioOutput
L
R
Audio Inputs from Sources
Audio Inputs from Sources
Source 6 Source 5 Source 4 Source 3 Source 2 Source 1
Source 6 Source 5 Source 4 Source 3 Source 2 Source 1
L
R
L
R
FM 75Ω
AM 300Ω
Control Bus
Control Bus
In
Out
In
Out
Scart Out (Composite / RGB)CompositeVideo
Cb/Pb YCr/Pr
Component
S-VideoOpticalCoaxial
Front Surround CentreL
Video Out
Video Inputs From Sources
Video Inputs From Sources4
456
56
123
123
IR10
AH10 Source equipment eg CD player
Detail of audio connections between a tuner and AH10
Stereo RCA/phono leads
Side 1 connections of AH10
Detail of video connections between a DVD player and VH10
75ohm video RCA/phono cable
Side 1 connections of VH10
Incognito multi-room
Incognito multi-room 9
SUB-ZONES
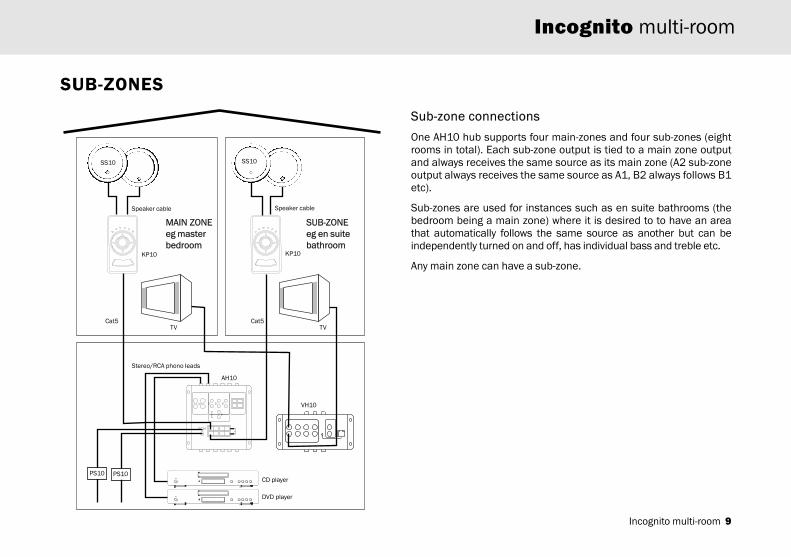
Sub-zone connections
One AH10 hub supports four main-zones and four sub-zones (eightrooms in total). Each sub-zone output is tied to a main zone outputand always receives the same source as its main zone (A2 sub-zoneoutput always receives the same source as A1, B2 always follows B1etc).
Sub-zones are used for instances such as en suite bathrooms (thebedroom being a main zone) where it is desired to to have an areathat automatically follows the same source as another but can beindependently turned on and off, has individual bass and treble etc.
Any main zone can have a sub-zone.
PS10 PS10
MAIN ZONEeg masterbedroom
SUB-ZONEeg en suitebathroom
KP10
TV
SS10
Speaker cable
KP10
Cat5Cat5TV
SS10
Speaker cable
CD player
AH10
VH10
DVD player
Stereo/RCA phono leads

10 Incognito multi-room
SS10 SS10
Cat5
Cat5
Cat5
KP10
LM10
AudioOutput
FM 75Ω
FM 75Ω
AM 300Ω
AM 300Ω
Control Bus
Control Bus
AudioOutput
L
R
L
R
In
Out
In
Out
PS10
Local source connections
The LM10 Local Input Module (LIM) is an optional in-wall modulethat allows the user to add additional local sources to thosedistributed by the AH10. The local source may only be heard in theroom where it is connected and the corresponding sub-zone (ifconnected) and is not distributed to other rooms. LM10s can befitted in as many rooms as are desired. The LM10 connects betweenthe audio hub and a KP10 amplified control module using Cat-5/5ewiring.
Each main zone can support two LM10s, giving you the option oflistening to one or two local sources (eg. Playstation, MP3 player).Each local source can be controlled through the Incognito remoteand/or keypad.
Full details of installation, connection, operation and specialfeatures can be found in the guide that accompanies the LM10module.Note: The AH10 and KP10s must be in Incognito A-BUS mode inorder to use an LM10.
ADVANCED SYSTEM OPTIONS
Speaker cable Speaker cable
Stereo/RCAphono leads
IR10 connects to IRwindow on front ofsource input

Incognito multi-room
Incognito multi-room 11
PS10
AS10-A AS10-P
Cat5LR10
AH10
ADVANCED SYSTEM OPTIONS
AS10 Active Speakers
The AS10 active speakers can be used where it is not desired tohave a keypad fitted in the wall. The AS10 active speakers featurean IR receiver and amplifier in one of the speakers and like theKP10 keypad do not require mains power.
1. Using a single Cat-5e cable, connect the AS10-A to theAH10/VH10 via an RJ45 plug at the AH10, and the eight-waycolour-coded punch down connection at the AS10-A.
The RJ45 hub connection should be wired to EIA/TIA568Astandard as shown in the wiring guide on page 6.
The Cat-5 connection from AH10 to the AS10-A should notexceed 30m/100 ft.
2. The AS10-A is then connected to the AS10-P using either Cat-5ecable terminated at eight-way colour-coded punch down connec-tions (all eight cores must be connected) or using a run ofstandard speaker cable.
Only one method of connection between the active and passivespeaker is necessary.
Full details of installation, connection, operation and special featurescan be found in the guide that accompanies the AS10 speakers.
Speaker cable

12 Incognito multi-room
Connecting an external amplifier/active subwoofer toyour system
Should extra amplification power, or, an active subwoofer be required,a line level pre-amp output is provided on the back of the KP10.
Using high-quality audio interconnect cable, an external poweramplifier may be connected to the KP10 pre-amp output screwterminals.
A fader function on the KP10 can be used to adjust the levelbetween the speakers connected to the KP10 and the externalamplifier/active subwoofer, so that the balance between the twocan be adjusted.
CCTV
A CCTV system may be connected to the Incognito Multi-Room system.
Connect the monitor/TV video signal output to the VH10 at theCCTV IN socket located on the top surface of the unit allowing thelive video feed to be viewed in all connected zones.
If sound is also required, the audio signal output of the CCTVsystem may be connected to the EXT/CCTV inputs on the AH10.
If the CCTV system is to be remote controlled connect an IR-1 infra-red emitter to the ALL COMMANDS output on the AH10 and stickthe emitter over the IR receiver of the CCTV system. This will allowthe user to control the CCTV system from any room in the house.
ADVANCED SYSTEM OPTIONS
Active subwoofer or external amplifier
Twin screenedcable
Outlet with twoPhono/RCA sockets
CCTV hub
Video
Cat5Audio (if available)
IR10
SS10

Incognito multi-room 13
Linking Units
For large installations which require more than four main zones andfour sub-zones, an AH10 ‘linking’ facility is provided. Units are linkedvia a Cat-5e patch cable to the ‘Hub Link’ in and out sockets on thetop right hand corner of each AH10.
In order to share audio input sources with the first AH10, the secondmay be joined using Incognito CK10 audio couplers (see diagram).These double-ended phono plugs simply connect the ‘Loop out’sockets of the first AH10, to the ‘Audio input’ sockets of the second,allowing both to access the same sources and distribute them to allavailable zones.
Up to four AH10s may be linked together in this way, providing audiofor a maximum of 16 main zones for the AH10, or 16 main zonesand 16 sub-zones for the AH10.
VH10 Linking
Should video also be required in more than the four main zones and foursub-zones provided by the VH10, then these units may also be linked.Each VH10 must be connected to a corresponding AH10 via the Cat-5epatch cable, in order to provide power and switching commands.
Video input sources may then be shared between both VH10 unitsby using Incognito CK10 couplers (See diagram). These double-ended phono plugs simply connect the ‘Loop out’ sockets of the firstVH10 to the ‘Video input’ sockets of the second, allowing both toaccess the same sources and distribute them to all available zones.
Up to four VH10s may be linked together with the correspondingfour AH10s in this way, providing video for a maximum of 16 mainzones for the AH10.
Connections between AH10 and VH10 to allow eight main zones and eightsub-zones
LARGER SYSTEMS
CK10couplers
CK10couplers
Cat-5 patch cable
Cat-5 patch cable
Incognito multi-room

14 Incognito multi-room
PLANNING YOUR SYSTEM
When installing your Incognito multi-room entertainment system,consideration should be given to detailed advance planning. Westrongly suggest you read this entire manual before commencingany work.
AH10 A-BUS audio hub
The AH10 is located alongside source components which meansyou have two AH10 location options:
1. Locate AH10 and source components in any convenient discreetlocation with adequate ventilation within the home (such as anunder-stair cupboard, service room or cabinet), or...
2. If it is desired to use the same sources for the Incognito system asare being used by a conventional stereo or surround sound systemit is possible to route source equipment through the AH10 for output through existing hi-fi or home cinema amplifiers whilst alsodistributing them to the rest of your home via the Incognito system.
Should this be required, your existing audio source equipment would be first connected to the AH10 and then routed from the sixloop out sockets on the AH10 to the amplifier/receiver in yoursystem via high quality audio interconnect cable terminated at eachend by phono/RCA plugs.
Similarly video source equipment may be connected to the VH10and then routed from the six loop out sockets on the VH10 to the AVreceiver in a home cinema setup using phono/RCA cables designedfor video use.
For this configuration the AH10 should be located behind yourexisting system.
It is suggested that you locate keypads:• 138cm height from the floor finish (to centre
of keypad) or taking into account light switchlocations etc
• 25-35cm away from the outer edge of anydoor frame or wall edge
• Away from direct, bright sunlight which mayaffect infra-red performance
AH10 location is criticalSee opposite for details
In a bedroom it is suggested that you locatespeakers above or close to bed location foroptimal stereo reproduction
Locate speakers in all rooms taking into accountlocation of furnishings foroptimal stereo reproduction

Incognito multi-room
Incognito multi-room 15
The AH10 is compact and can be mounted either horizontally, orvertically, such as on a wall, and is powered by a dedicated powersupply (Incognito PS10).
Try to ensure that the AH10 and it’s source components arepowered from the same set of mains outlets.
VH10 video hub
The VH10 video hub works in conjunction with the AH10 to providevideo signals to all connected zones, via RG6/CT100 co-axialcabling. Up to six video input sources and a CCTV input may beconnected and distributed, with their corresponding audio signalsrouted through the AH10 as one of its dedicated six inputs.
The VH10 may be mounted either horizontally or vertically in thesame manner as the AH10, and power is provided by the AH10 via aCat-5e patch cable, so no extra power supply or mains socket is required.
When deciding upon a location for the AH10 and VH10 units consid-eration should be given to space constraints, and power points forthe source equipment and AH10, as well as integration into anyexisting setups.
KP10 A-BUS keypad
Simple and intuitive control is provided by the KP10 A-BUS keypad.
Housed in a stylishly designed casing, the KP10 fits into any wall andis available with different finishes to compliment various decorativeschemes. Control of your source equipment, volume, bass, treble andother functions can be performed by the KP10.
Each KP10 may be used as a main zone or sub-zone controller, withthe only difference being that the sub-zone must listen to/watch thesame source as the main zone.
Should extra amplification power, or an active subwoofer berequired (to provide more bass), a line level pre-amp output isprovided on the back of the KP10.
AS10/SS10 speakers
When placing the ceiling-mounted speakers, thought should begiven to positions which give the best desired sound coveragethroughout a room, while not interfering with existing or plannedlight fittings or joists.
It is advisable to plan all aspects of installation in advance of workbeginning, preferably with the house/flat building schematics if available.
CCTV system connection
It is possible to connect a CCTV camera to your multi-room system.Refer to the section on ‘Advanced system options’ for details.Please note that extra cabling will be required in addition to thatexplained in the installation notes.
16 Incognito multi-room
Cambridge Audio Enhanced A-BUS
Standard A-BUS
Mode SwitchSee User Guide for details
AUDIO INPUTS FROM SOURCES
AUDIO LOOP OUTPUT - CONNECT SOURCES OTHER END
Cambridge Audio Enhanced A-BUS
Standard A-BUS
Mode SwitchSee User Guide for details
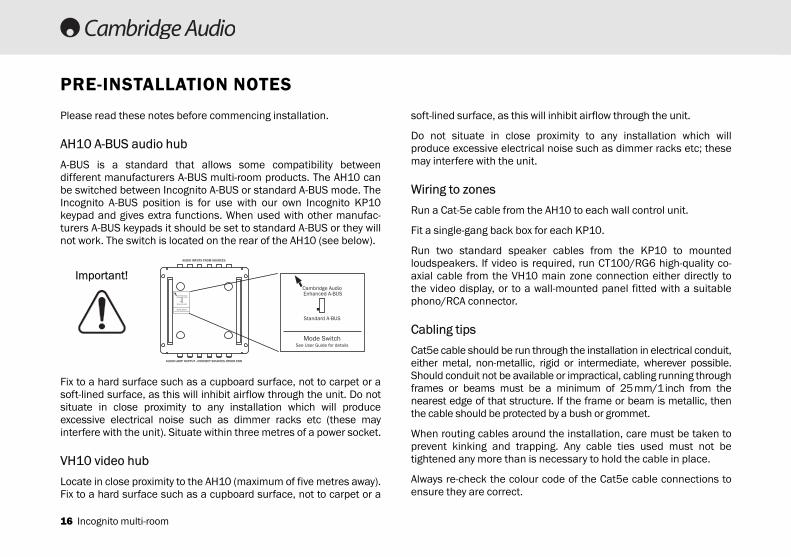
Please read these notes before commencing installation.
AH10 A-BUS audio hub
A-BUS is a standard that allows some compatibility betweendifferent manufacturers A-BUS multi-room products. The AH10 canbe switched between Incognito A-BUS or standard A-BUS mode. TheIncognito A-BUS position is for use with our own Incognito KP10keypad and gives extra functions. When used with other manufac-turers A-BUS keypads it should be set to standard A-BUS or they willnot work. The switch is located on the rear of the AH10 (see below).
Fix to a hard surface such as a cupboard surface, not to carpet or asoft-lined surface, as this will inhibit airflow through the unit. Do notsituate in close proximity to any installation which will produceexcessive electrical noise such as dimmer racks etc (these mayinterfere with the unit). Situate within three metres of a power socket.
VH10 video hub
Locate in close proximity to the AH10 (maximum of five metres away).Fix to a hard surface such as a cupboard surface, not to carpet or a
soft-lined surface, as this will inhibit airflow through the unit.
Do not situate in close proximity to any installation which willproduce excessive electrical noise such as dimmer racks etc; thesemay interfere with the unit.
Wiring to zones
Run a Cat-5e cable from the AH10 to each wall control unit.
Fit a single-gang back box for each KP10.
Run two standard speaker cables from the KP10 to mountedloudspeakers. If video is required, run CT100/RG6 high-quality co-axial cable from the VH10 main zone connection either directly tothe video display, or to a wall-mounted panel fitted with a suitablephono/RCA connector.
Cabling tips
Cat5e cable should be run through the installation in electrical conduit,either metal, non-metallic, rigid or intermediate, wherever possible.Should conduit not be available or impractical, cabling running throughframes or beams must be a minimum of 25mm/1inch from thenearest edge of that structure. If the frame or beam is metallic, thenthe cable should be protected by a bush or grommet.
When routing cables around the installation, care must be taken toprevent kinking and trapping. Any cable ties used must not betightened any more than is necessary to hold the cable in place.
Always re-check the colour code of the Cat5e cable connections toensure they are correct.
PRE-INSTALLATION NOTES
Important!

Incognito multi-room 17
Incognito multi-room
KP10 A-BUS keypad
The KP10 EU version should be fitted into a standard single UK(square) 47mm deep back-box (the stainless steel/silver KP10 EUshould be fitted into a 50–60mm deep back-box/pattress).
The KP10 CU version should be fitted into a standard single US J-box.
The Cat5 cable running from the AH10 is terminated at the 8-waycolour-coded punch down connection on the rear face of the KP10.
Speaker cable is connected via screw terminals on the rear of the KP10.
The KP10 should be positioned at a height of 138cm from the floorfinish (to centre of keypad) or taking into account light switchlocations etc.
It should also be placed 25-35cm away from the outer edge of anydoor frame or wall edge.
Locate away from direct, bright sunlight which may affect infra-redperformance.
Full instructions for installing your KP10 are supplied with thekeypad.
Cat-5 cable Cat-5 cable
Speaker cable Speaker cable
KP10 CU version KP10 EU version

18 Incognito multi-room
AS10 / SS10 in-ceiling speakers
Standard installation would specify AS10/SS10 ceiling mountedspeakers which are matched to the Incognito system for optimumaudio performance. However, virtually any customer-specifiedspeaker units may be used.
Where ceiling or wall-mounted speakers are used, care should betaken to ensure that all building regulations are followed.
When mounting speakers flush to a ceiling or wall, ensure thatenough depth/clearance is available in the respective cavity. Aclearance of at least 80mm is necessary when mounting pairs ofAS10/SS10 speakers.
When deciding upon a ceiling or wall placement, care should betaken to avoid joists, load bearing beams etc.
Before cutting ceiling loudspeaker holes it is suggested that thearea is tested for clearance by making an L-shaped probe fromstrong wire (eg a coat hanger), drilling a small hole in the target area,inserting the probe and slowly turning. Any obstructions will beimmediately obvious, so that the target area can be moved to amore suitable position.
Also, locate loudspeakers taking into account location of furnishingsfor optimal stereo reproduction.
Full details of installation, connection, operation and specialfeatures can be found in the guide that accompanies the speakers.
L-shaped probe used to check available void
space before cuttingspeaker holes
AS10/SS10
207mm diametermounting hole

Incognito multi-room
Incognito multi-room 19
SYSTEM SPECIFICATIONS
AH10
No. of source inputs : 6
No of loop outputs : 6
No. of external inputs/loop outputs/CCTV: 1
No. of zones per hub : 4 main + 4 sub
System zone maximum (4 chained AH10s) : 16 main + 16 sub
Frequency response : 20kHz–20kHz
Trigger output : 12V @ 100mA
Required power input : 24V dc (via supplied PS10)
Note: second PS10 required for sub-low power
Dimensions (W x D x H) : 165 x 172 x 48
Weight (net) : 1.14kg / 2.5 lbs
VH10
No. of source inputs : 6
No. of loop outputs : 6
Source input specification : 75 ohm, composite video
Video bandwidth : 10MHz
Maximum cable run to zone : 50m/150 ft
Recommended cable type to zone : RG6/CT100 75 ohm co-axial
Required power input : Powered by AH10
Dimensions (W x D x H ): 165 x 74 x 44mm
Weight (net): 0.6kg
Cambridge Audio’s policy is one of continuous improvement. Design andspecifications are therefore subject to change without prior notice.

20 Incognito multi-room
SYSTEM SPECIFICATIONS
KP10 EU version KP10 CU version
Frequency response : 20Hz–20Hz
Volume control range : - 80dB 32 steps
Bass control range : +/- 16dB 2dB steps
Treble control range : +/- 16dB 2dB steps
Balance control range : +/- 40dB 9 steps both ways
IR pass-through : 34–40 kHz and 54–58 kHz modulation
Required power input : powered from AH10 via Cat5 cable
AS10
Frequency Response: 60Hz - 20kHz (+/- 2dB)
THD: <0.25% @ 5W, 1kHz
Signal/Noise ratio: > 80dB
Input impedance (local input): 33K Ohms
Volume control range: 0 to -78dB in 31 steps
Pre-amp output: Variable, following volume setting
IR passthrough: 34-40kHz and 54-58kHz frequencies supported
Speaker impedance: 4Ohms
Power requirement: +24V DC @ 1A max from hub
Weight (AS10-A): 1.4kg / 3.1lbs
Weight (AS10-P): 1.1kg / 2.4lbs
Dimensions: 240 x 75 mm, 9.4 x 3 inches

Incognito multi-room
Incognito multi-room 21
SYSTEM SPECIFICATIONS
LR10
Battery : 4 AAA/LR03 alkaline batteries
Dimensions (W x H x D ) : 65 x 25 x 190mm (approx)
Weight : 200g (inc batteries)
PS10
Input : 100-240V AC 50/60Hz
Output : 24V DC @ 2.5A
Efficiency : 80%, Line/load regulation : 5%
Approvals : UL, CE, T Mark, TUV, FCC Class B, EN 55022B,
EN 5008-1: 1997, EN 61000-4-2/3/4/5/6, Level 2, EN 61000-4-11
CK10
Unit length : coupler - 39mm
SS10
Frequency response : 58Hz–20Hz +/- 3dB
Sensitivity : 90dB SPL @ 1 watt/1 metre
Nominal impedance : 4 ohms
Power handling : 15–80 watts
Enclosure type : In-ceiling infinite baffle
Drive components : 1 x 1.3cm tweeter, 1 x 16.5cm woofer
Crossover frequency : 4.5kHz
Mounting depth required (min) : 75mm
Cutout dimensions : 207mm
Recommended back air or volume: 22 litres
Weight : 1.5kg

22 Incognito multi-room
FAQs
1. What entertainment equipment can I connect ?
The Incognito system is compatible with almost any type of hi-fi or video separate that uses 34–40kHz or 54–58kHz IR system(nearly all).
2. What is the difference between a main zone and a sub-zone ?
A sub-zone can only listen to the same audio source as is beinglistened to in the main zone. The sub-zone has independent power,volume and tone controls from the main zone.
3. How many rooms can a system serve ?
Each AH10 supports four main and four sub-zones. Four AH10s canbe chained together supporting up to a maximum of 16 main zonesand 16 sub-zones. If a larger system is required it is possible to havetwo or more separate systems running independently givingunlimited expandability.
4. Do I have to use Incognito speakers ?
No, but it is highly recommended as the Incognito speakers areoptimised and impedance matched to the keypad amplifiers.
5. How many remote controls can the system have ?
There is no limit to the amount of remotes you can have. If requiredyou can have a remote in each room.
6. What advice can you give for keypad location ?
When locating a keypad you should avoid putting in direct sunlightor in close proximity to plasma screens. Care should also be takenlocating it near to devices that produce electrical noise such asmechanical dimmers. See planning section on page 17.
7. Is there a maximum cable run from AH10 to each KP10 ?
Yes, the maximum cable run is 30 metres / 100 feet.

Incognito multi-room
Incognito multi-room 23
LIMITED WARRANTY
Cambridge Audio warrants this product to be free from defects inmaterials and workmanship (subject to the terms set forth below).Cambridge Audio will repair or replace (at Cambridge Audio’s option)this product or any defective parts in this product. Warranty periodsmay vary from country to country. If in doubt consult your dealer andensure that you retain proof of purchase.
To obtain warranty service, please contact the Cambridge Audioauthorised dealer from which you purchased this product. If yourdealer is not equipped to perform the repair of your CambridgeAudio product, it can be returned by your dealer to Cambridge Audioor an authorised Cambridge Audio service agent. You will need toship this product in either its original packaging or packagingaffording an equal degree of protection.
Proof of purchase in the form of a bill of sale or receipted invoice,which is evidence that this product is within the warranty period,must be presented to obtain warranty service.
This warranty is invalid if (a) the factory-applied serial number hasbeen altered or removed from this product or (b) this product wasnot purchased from a Cambridge Audio authorised dealer. You maycall Cambridge Audio or your local country Cambridge Audiodistributor to confirm that you have an unaltered serial numberand/or you purchased from a Cambridge Audio authorised dealer.
This warranty does not cover cosmetic damage or damage due toacts of God, accident, misuse, abuse, negligence, commercial use,or modification of, or to any part of, the product. This warranty doesnot cover damage due to improper operation, maintenance orinstallation, or attempted repair by anyone other than Cambridge
Audio or a Cambridge Audio dealer, or authorised service agentwhich is authorised to do Cambridge Audio warranty work. Anyunauthorised repairs will void this warranty. This warranty does notcover products sold AS IS or WITH ALL FAULTS.
REPAIRS OR REPLACEMENTS AS PROVIDED UNDER THISWARRANTY ARE THE EXCLUSIVE REMEDY OF THE CONSUMER.CAMBRIDGE AUDIO SHALL NOT BE LIABLE FOR ANY INCIDENTALOR CONSEQUENTIAL DAMAGES FOR BREACH OF ANY EXPRESSOR IMPLIED WARRANTY IN THIS PRODUCT. EXCEPT TO THEEXTENT PROHIBITED BY LAW, THIS WARRANTY IS EXCLUSIVEAND IN LIEU OF ALL OTHER EXPRESS AND IMPLIED WARRANTIESWHATSOEVER INCLUDING, BUT NOT LIMITED TO, THE WARRANTY OFMERCHANTABILITY AND FITNESS FOR A PRACTICAL PURPOSE.
Some countries and US states do not allow the exclusion orlimitation of incidental or consequential damages or impliedwarranties so the above exclusions may not apply to you. Thiswarranty gives you specific legal rights, and you may have otherstatutory rights, which vary from state to state or country to country.

24 Incognito multi-room
SYSTEM DETAILS
Hub 1 – A1 main zone keypad . . . . . . . . . . . . . . . . . . . . . . . . . . . . . . . . . . . . .
Hub 1 – B1 main zone keypad . . . . . . . . . . . . . . . . . . . . . . . . . . . . . . . . . . . . .
Hub 1 – C1 main zone keypad . . . . . . . . . . . . . . . . . . . . . . . . . . . . . . . . . . . . .
Hub 1 – D1 main zone keypad . . . . . . . . . . . . . . . . . . . . . . . . . . . . . . . . . . . . .
Hub 2 – A1 main zone keypad . . . . . . . . . . . . . . . . . . . . . . . . . . . . . . . . . . . . .
Hub 2 – B1 main zone keypad . . . . . . . . . . . . . . . . . . . . . . . . . . . . . . . . . . . . .
Hub 2 – C1 main zone keypad . . . . . . . . . . . . . . . . . . . . . . . . . . . . . . . . . . . . .
Hub 2 – D1 main zone keypad . . . . . . . . . . . . . . . . . . . . . . . . . . . . . . . . . . . . .
Hub 3 – A1 main zone keypad . . . . . . . . . . . . . . . . . . . . . . . . . . . . . . . . . . . . .
Hub 3 – B1 main zone keypad . . . . . . . . . . . . . . . . . . . . . . . . . . . . . . . . . . . . .
Hub 3 – C1 main zone keypad . . . . . . . . . . . . . . . . . . . . . . . . . . . . . . . . . . . . .
Hub 3 – D1 main zone keypad . . . . . . . . . . . . . . . . . . . . . . . . . . . . . . . . . . . . .
Hub 4– A1 main zone keypad . . . . . . . . . . . . . . . . . . . . . . . . . . . . . . . . . . . . .
Hub 4 – B1 main zone keypad . . . . . . . . . . . . . . . . . . . . . . . . . . . . . . . . . . . . .
Hub 4 – C1 main zone keypad . . . . . . . . . . . . . . . . . . . . . . . . . . . . . . . . . . . . .
Hub 4 – D1 main zone keypad . . . . . . . . . . . . . . . . . . . . . . . . . . . . . . . . . . . . .
Hub 1 – A2 sub-zone keypad . . . . . . . . . . . . . . . . . . . . . . . . . . . . . . . . . . .
Hub 1 – B2 sub-zone keypad . . . . . . . . . . . . . . . . . . . . . . . . . . . . . . . . . . .
Hub 1 – C2 sub-zone keypad . . . . . . . . . . . . . . . . . . . . . . . . . . . . . . . . . . .
Hub 1 – D2 sub-zone keypad . . . . . . . . . . . . . . . . . . . . . . . . . . . . . . . . . . .
Hub 2 – A2 sub-zone keypad . . . . . . . . . . . . . . . . . . . . . . . . . . . . . . . . . . .
Hub 2 – B2 sub-zone keypad . . . . . . . . . . . . . . . . . . . . . . . . . . . . . . . . . . .
Hub 2 – C2 sub-zone keypad . . . . . . . . . . . . . . . . . . . . . . . . . . . . . . . . . . .
Hub 2 – D2 sub-zone keypad . . . . . . . . . . . . . . . . . . . . . . . . . . . . . . . . . . .
Hub 3 – A2 sub-zone keypad . . . . . . . . . . . . . . . . . . . . . . . . . . . . . . . . . . .
Hub 3 – B2 sub-zone keypad . . . . . . . . . . . . . . . . . . . . . . . . . . . . . . . . . . .
Hub 3 – C2 sub-zone keypad . . . . . . . . . . . . . . . . . . . . . . . . . . . . . . . . . . .
Hub 3 – D2 sub-zone keypad . . . . . . . . . . . . . . . . . . . . . . . . . . . . . . . . . . .
Hub 4 – A2 sub-zone keypad . . . . . . . . . . . . . . . . . . . . . . . . . . . . . . . . . . .
Hub 4 – B2 sub-zone keypad . . . . . . . . . . . . . . . . . . . . . . . . . . . . . . . . . . .
Hub 4 – C2 sub-zone keypad . . . . . . . . . . . . . . . . . . . . . . . . . . . . . . . . . . .
Hub 4 – D2 sub-zone keypad . . . . . . . . . . . . . . . . . . . . . . . . . . . . . . . . . . .
Zone/room details Sub-zones/room

Incognito multi-room
Incognito multi-room 25
INSTALLER DETAILS
Name . . . . . . . . . . . . . . . . . . . . . . . . . . . . . . . . . . . . . . . . . . . . . . . . . .
. . . . . . . . . . . . . . . . . . . . . . . . . . . . . . . . . . . . . . . . . . . . . . . . . . . . . . . .
Address . . . . . . . . . . . . . . . . . . . . . . . . . . . . . . . . . . . . . . . . . . . . . . . . .
. . . . . . . . . . . . . . . . . . . . . . . . . . . . . . . . . . . . . . . . . . . . . . . . . . . . . . . .
. . . . . . . . . . . . . . . . . . . . . . . . . . . . . . . . . . . . . . . . . . . . . . . . . . . . . . . .
. . . . . . . . . . . . . . . . . . . . . . . . . . . . . . . . . . . . . . . . . . . . . . . . . . . . . . . .
. . . . . . . . . . . . . . . . . . . . . . . . . . . . . . . . . . . . . . . . . . . . . . . . . . . . . . . .
. . . . . . . . . . . . . . . . . . . . . . . . . . . . . . . . . . . . . . . . . . . . . . . . . . . . . . . .
Contact name . . . . . . . . . . . . . . . . . . . . . . . . . . . . . . . . . . . . . . . . . . . .
. . . . . . . . . . . . . . . . . . . . . . . . . . . . . . . . . . . . . . . . . . . . . . . . . . . . . . . .
Email . . . . . . . . . . . . . . . . . . . . . . . . . . . . . . . . . . . . . . . . . . . . . . . . . . .
. . . . . . . . . . . . . . . . . . . . . . . . . . . . . . . . . . . . . . . . . . . . . . . . . . . . . . . .
Telephone number . . . . . . . . . . . . . . . . . . . . . . . . . . . . . . . . . . . . . . . .
AH10 Serial No/s . . . . . . . . . . . . . . . . . . . . . . . . . . . . . . . . . . . . . . . . . . . . .
. . . . . . . . . . . . . . . . . . . . . . . . . . . . . . . . . . . . . . . . . . . . . . . . . . . . . . . . . . .
. . . . . . . . . . . . . . . . . . . . . . . . . . . . . . . . . . . . . . . . . . . . . . . . . . . . . . . . . . .
. . . . . . . . . . . . . . . . . . . . . . . . . . . . . . . . . . . . . . . . . . . . . . . . . . . . . . . . . . .
Source equipment details
Source (1) . . . . . . . . . . . . . . . . . . . . . . . . . . . . . . . . . . . . . . . . . . . . . . .
Source (2) . . . . . . . . . . . . . . . . . . . . . . . . . . . . . . . . . . . . . . . . . . . . . . .
Source (3) . . . . . . . . . . . . . . . . . . . . . . . . . . . . . . . . . . . . . . . . . . . . . . .
Source (4) . . . . . . . . . . . . . . . . . . . . . . . . . . . . . . . . . . . . . . . . . . . . . . .
Source (5) . . . . . . . . . . . . . . . . . . . . . . . . . . . . . . . . . . . . . . . . . . . . . . .
Source (6) . . . . . . . . . . . . . . . . . . . . . . . . . . . . . . . . . . . . . . . . . . . . . . .

Incognito multi-room
Part No. AP18274/2
www.cambridge-audio.com