MULTI-DECK Cases with Glass Doors - Hussmann Documents/0524790_E... · MULTI-DECK Cases with Glass...
14
EcoShine II Vertical LEDs MULTI-DECK Cases with Glass Doors Upgrade Installation Manual P/N 0524790_E June 2017 Spanish 0527936 French 0531194 MANUAL- KIT INSTALLATION ECOSHINE II VERTICAL LED UPGRADE
Transcript of MULTI-DECK Cases with Glass Doors - Hussmann Documents/0524790_E... · MULTI-DECK Cases with Glass...
EcoShine II Vertical LEDsMULTI-DECK Cases with Glass Doors
UpgradeInstallation Manual
P/N 0524790_EJune 2017
Spanish 0527936French 0531194
MANUAL- KIT INSTALLATION ECOSHINE II VERTICAL LED UPGRADE
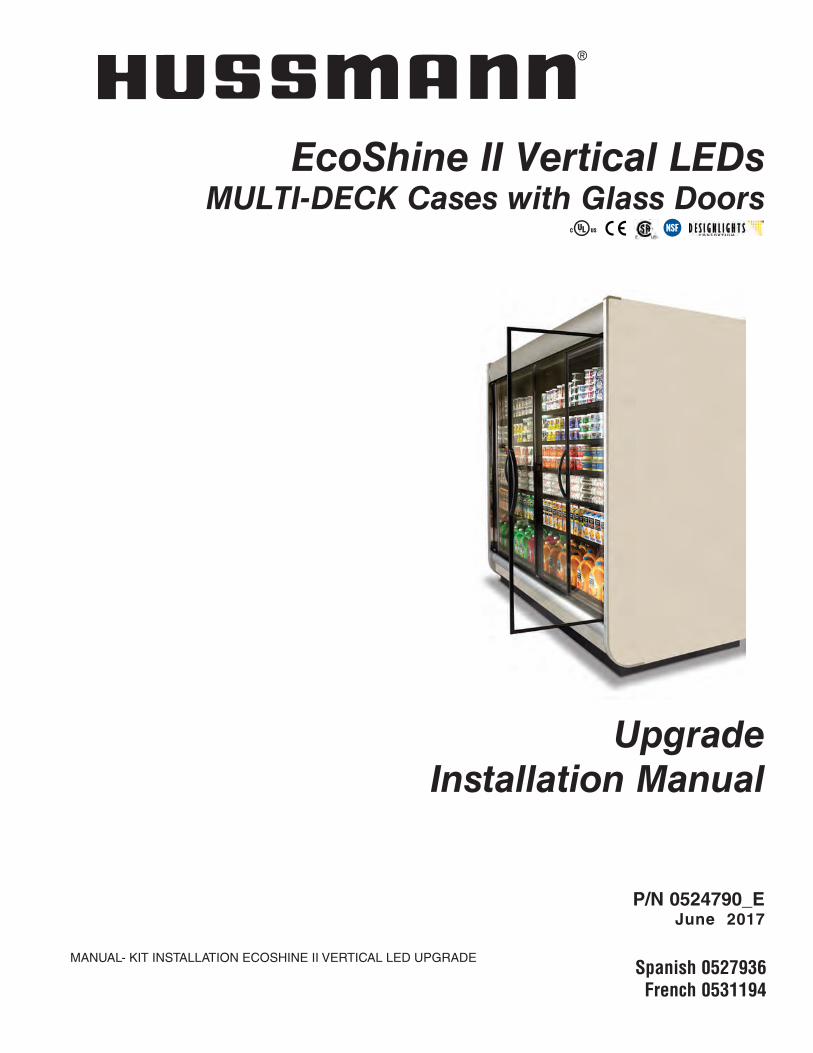
BEFORE YOU BEGINRead these instructions completely and carefully.
RISK OF FIRE OR ELECTRICAL SHOCK. LUMINAIRE WIRING AND ELECTRICAL PARTS
MAY BE DAMAGED WHEN DRILLING FOR INSTALLATION OF LED RETROFIT KIT. CHECK FOR ENCLOSED WIRING AND COMPONENTS.
RISK OF FIRE OR ELECTRIC SHOCK. LED RETRO-FIT KIT INSTALLATION REQUIRES KNOWLEDGE
OF LUMINAIRES’ ELECTRICAL SYSTEMS. IF NOT QUALIFIED, DO NOT ATTEMPT INSTALLATION.
CONTACT A QUALIFIED ELECTRICIAN.
RISK OF FIRE OR ELECTRICAL SHOCK. INSTALL THIS KIT ONLY IN THE LUMINAIRES THAT HAVE THAT HAVE THE CONSTRUCTION
FEATURES AND DIMENSIONS SHOWN IN THE PHOTOGRAPHS AND / OR DRAWINGS.
TO PREVENT WIRING DAMAGE OR ABRASION, DO NOT EXPOSE WIRING TO EDGES OF SHEET
METAL OR OTHER SHARP OBJECTS.
TO PREVENT WIRING DAMAGE OR ABRASION, DO NOT EXPOSE WIRING TO EDGES OF SHEET
METAL OR OTHER SHARP OBJECTS.
ONLY THOSE OPEN HOLES INDICATED IN THE PHOTOGRAPHS AND / OR DRAWINGS MAY
BE MADE OR ALTERED AS A RESULT OF KIT INSTALLATION. DO NOT LEAVE ANY OTHER
OPEN HOLES IN AN ENCLOSURE OF WIRING OR ELETRICAL COMPONENTS.

Hussmann Corporation • Bridgeton, Missouri 63044-2483 U.S.A.
Vertical LEDs for Medium Temperature Doors P/N 0524790_E
3
REVISION HISTORY
REVISION E — Switched to latest generation light
REVISION D — Removed LED part numbers, updated
brackets and power supply parts
REVISION C — Added caution boxes on Page 2.
Updated Lighting Chart, Page 9; change reference from
EcoShine II to EcoShine II Plus throughout document;
Updated wiring Diagrams, Page 14.
REVISION B — Bold note, Page 6; Diagram page
updated, Page, 12; Note, page 15 canopy lights;
REVISION A — Original Issue
There are two main hazard areas that service technicians may encounter on a day-to-day basis. They are: working within close proximity to the public and personal safety. Before starting work, review these hazards by completing the following checklist:
* * * * * * * * * * * * * * * * * * * * * * * * * *
ANSI Z535.5 DEFINITIONS
• DANGER – Indicate[s] a hazardous sit-uation which, if not avoided, will result in death or serious injury.
• WARNING – Indicate[s] a hazardous situation which, if not avoided, could result in death or serious injury.
• CAUTION – Indicate[s] a hazardous situation which, if not avoided, could result in minor or moderate injury.
• NOTICE – Not related to personal injury – Indicates[s] situations, which if not avoided, could result in damage to equipment.
IMPORTANTKEEP IN STORE FOR FUTURE REFERENCE
Quality that sets industry standards!
12999 St. Charles Rock Road • Bridgeton, MO 63044-2483
U.S. & Canada 1-800-922-1919 • Mexico 01-800-890-2900
www.hussmann.com© 2017 Hussmann Corporation
U.S. & Canada 1-800-922-1919 • Mexico 01-800-890-2900 • WWW.HUSSMANN.COM
P/N 0524790_E
4
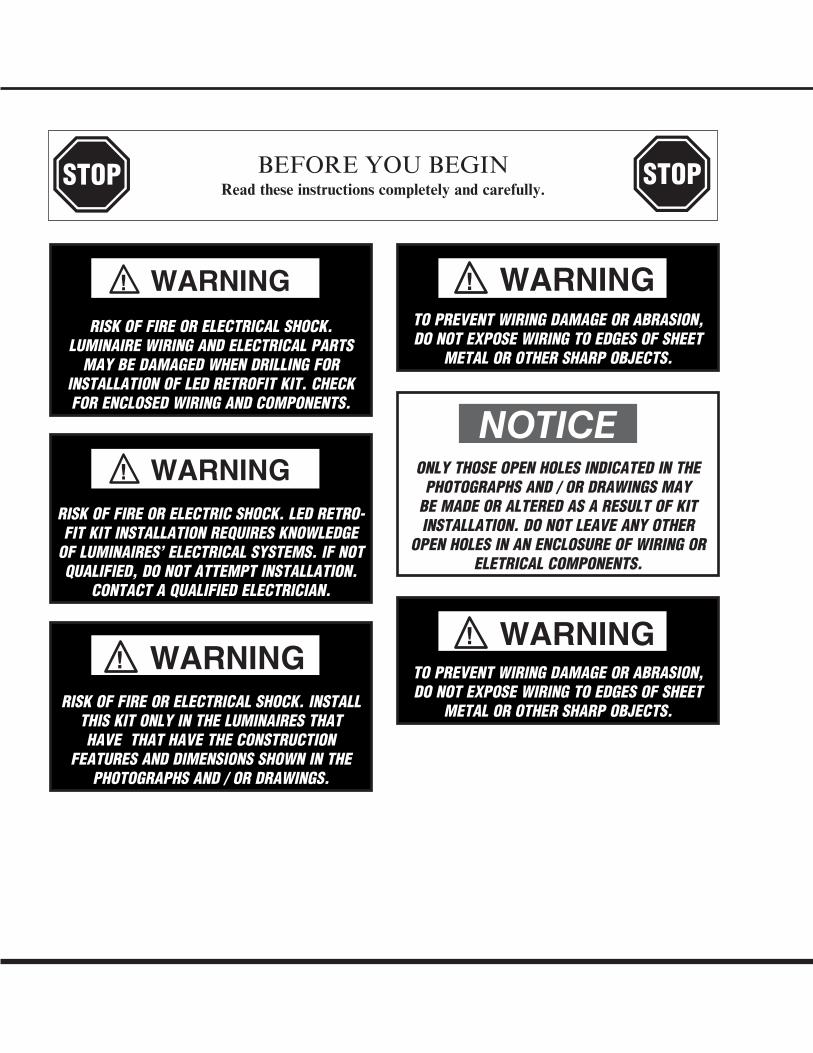
Working near the Public
Keeping the public out:The following techniques reduce the risk of injury to third parties (shoppers, store employees, etc.): Cordon off all work areas with cones, caution tape, warning signs and/or barricades. Maintain a work area of at least five feet from the public. Is a second person required to prevent the public from entering the work area when the work area cannot be adequately cordoned off?
hazardous materials
Can the public be exposed to any chem-icals, refrigerants or fumes? If yes, can steps be taken to eliminate or reduce the risk of exposure? to guard against accidental release of refrigerants, make sure the work area is ade-quately cordoned off (instead of posting a wet floor sign, use caution tape to prevent the public from entering the area). Are wet floors going to create a slip hazard for pedestrians? If yes, be sure to post wet floor signs and establish a schedule for clean up as soon as the work is complete.
electrical hazards
Are all live electrical hazards protected from public access; i.e., de-energized/locked out or cordoned off? Is proper signage in place? Do fixtures need to be replaced: If yes, will high work be conducted from a ladder or a scissor lift? Make sure the work area is cordoned off as shown below.
SAFETY
Fluorescent lamps contain mercury vapor. Mercury exposure at high levels can harm the brain, heart, kidneys, lungs, and immune system of people of all ages. Do not break or puncture fluorescent lamps. Dispose of, or store, all fluorescent lamps in accordance with Federal (40 CFR 273), State, and local hazardous waste requirements. Refer to http://www.epa.gov/mercury/about.htm
Hussmann Corporation • Bridgeton, Missouri 63044-2483 U.S.A.
Vertical LEDs for Medium Temperature Doors P/N 0524790_E
5
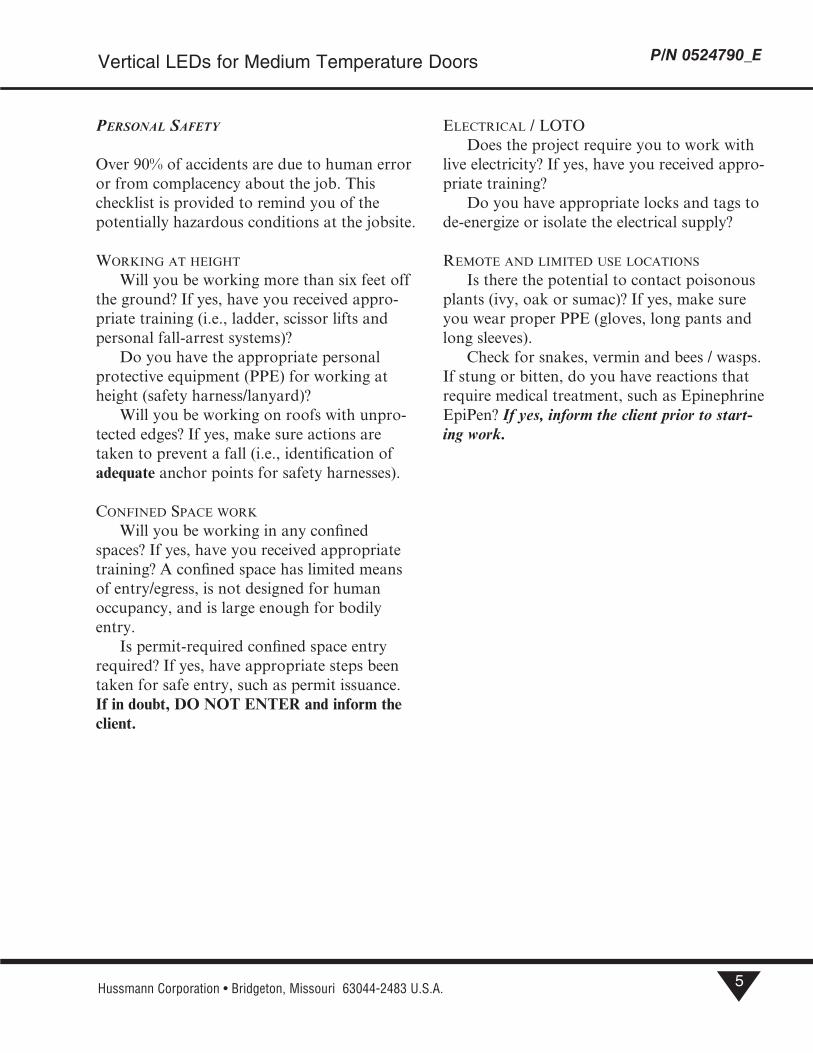
Personal safety
Over 90% of accidents are due to human error or from complacency about the job. This checklist is provided to remind you of the potentially hazardous conditions at the jobsite.
WorKing at height
Will you be working more than six feet off the ground? If yes, have you received appro-priate training (i.e., ladder, scissor lifts and personal fall-arrest systems)? Do you have the appropriate personal protective equipment (PPE) for working at height (safety harness/lanyard)? Will you be working on roofs with unpro-tected edges? If yes, make sure actions are taken to prevent a fall (i.e., identification of adequate anchor points for safety harnesses).
confined space WorK
Will you be working in any confined spaces? If yes, have you received appropriate training? A confined space has limited means of entry/egress, is not designed for human occupancy, and is large enough for bodily entry. Is permit-required confined space entry required? If yes, have appropriate steps been taken for safe entry, such as permit issuance. If in doubt, DO NOT ENTER and inform the client.
electrical / loto Does the project require you to work with live electricity? If yes, have you received appro-priate training? Do you have appropriate locks and tags to de-energize or isolate the electrical supply?
remote and limited use locations
Is there the potential to contact poisonous plants (ivy, oak or sumac)? If yes, make sure you wear proper PPE (gloves, long pants and long sleeves). Check for snakes, vermin and bees / wasps.If stung or bitten, do you have reactions that require medical treatment, such as Epinephrine EpiPen? If yes, inform the client prior to start-ing work.
U.S. & Canada 1-800-922-1919 • Mexico 01-800-890-2900 • WWW.HUSSMANN.COM
P/N 0524790_E
6
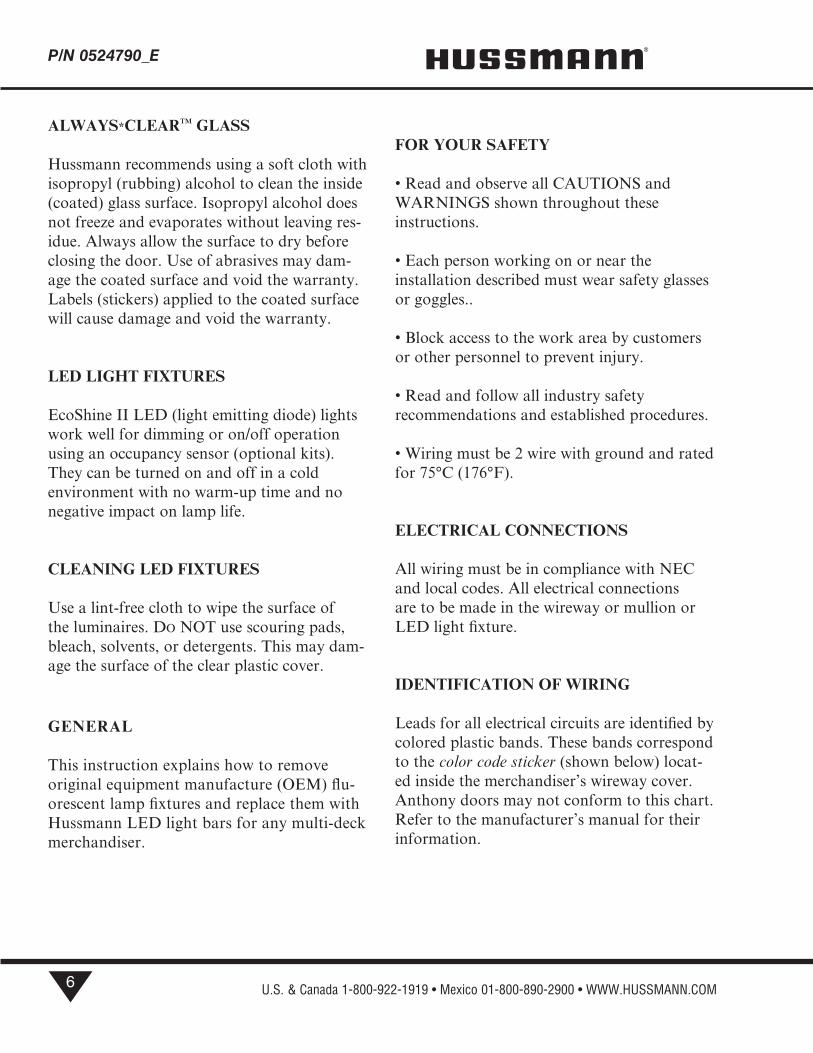
ALWAYS*CLEAR™ GLASS
Hussmann recommends using a soft cloth with isopropyl (rubbing) alcohol to clean the inside (coated) glass surface. Isopropyl alcohol does not freeze and evaporates without leaving res-idue. Always allow the surface to dry before closing the door. Use of abrasives may dam-age the coated surface and void the warranty. Labels (stickers) applied to the coated surface will cause damage and void the warranty.
LED LIGHT FIXTURES
EcoShine II LED (light emitting diode) lights work well for dimming or on/off operation using an occupancy sensor (optional kits). They can be turned on and off in a cold environment with no warm-up time and no negative impact on lamp life.
CLEANING LED FIXTURES
Use a lint-free cloth to wipe the surface of the luminaires. do not use scouring pads, bleach, solvents, or detergents. This may dam-age the surface of the clear plastic cover.
GENERAL
This instruction explains how to remove original equipment manufacture (OEM) flu-orescent lamp fixtures and replace them with Hussmann LED light bars for any multi-deck merchandiser.
FOR YOUR SAFETY
• Read and observe all CAUTIONS and WARNINGS shown throughout these instructions.
• Each person working on or near the installation described must wear safety glasses or goggles..
• Block access to the work area by customers or other personnel to prevent injury.
• Read and follow all industry safety recommendations and established procedures.
• Wiring must be 2 wire with ground and rated for 75°C (176°F).
ELECTRICAL CONNECTIONS
All wiring must be in compliance with NEC and local codes. All electrical connections are to be made in the wireway or mullion or LED light fixture.
IDENTIFICATION OF WIRING
Leads for all electrical circuits are identified by colored plastic bands. These bands correspond to the color code sticker (shown below) locat-ed inside the merchandiser’s wireway cover. Anthony doors may not conform to this chart. Refer to the manufacturer’s manual for their information.
Hussmann Corporation • Bridgeton, Missouri 63044-2483 U.S.A.
Vertical LEDs for Medium Temperature Doors P/N 0524790_E
7
SHIPPING DAMAGE
All equipment should be thoroughly examined for shipping damage before and during unloading.
This equipment has been carefully inspected at our factory. Any claim for loss or damage must be made to the carrier. The carrier will provide any necessary inspection reports and/or claim forms.
Apparent Loss Or DamageIf there is an obvious loss or damage, it must be noted on the freight bill or express receipt and signed by the carrier’s agent; otherwise, carrier may refuse claim.
Concealed Loss Or DamageWhen loss or damage is not apparent until after equipment is uncrated, retain all packing mate-rials and submit a written request to the carrier for inspection, within 15 days.
Missing PartsEvery effort is made to ship all parts for the kit. The Hussmann Service Center can be reached by calling
• from U.S. & Canada 1-800-922-1919 • from Mexico 01-800-890-2900 •
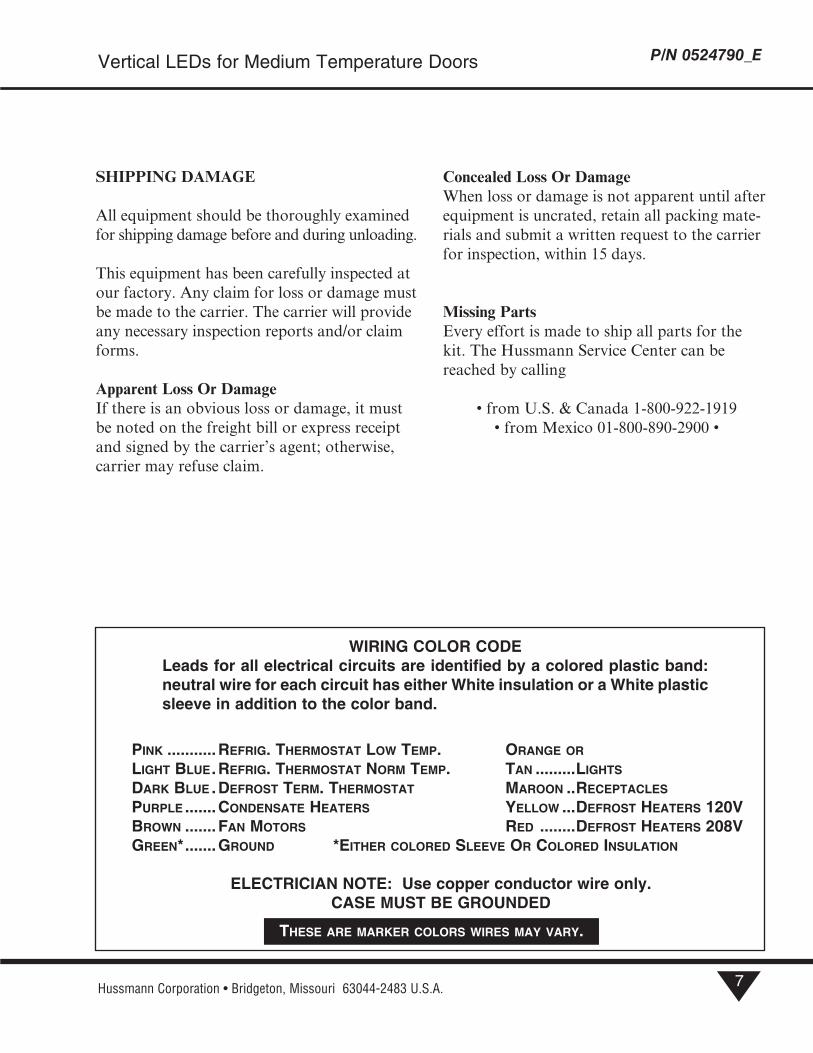
WIRING COLOR CODELeads for all electrical circuits are identified by a colored plastic band: neutral wire for each circuit has either White insulation or a White plastic sleeve in addition to the color band.
Pink ...........RefRig. TheRmosTaT Low TemP. oRange oR
LighT BLue .RefRig. TheRmosTaT noRm TemP. Tan .........LighTs
DaRk BLue .DefRosT TeRm. TheRmosTaT maRoon ..RecePTacLes
PuRPLe .......conDensaTe heaTeRs YeLLow ...DefRosT heaTeRs 120VBRown ....... fan moToRs ReD ........DefRosT heaTeRs 208VgReen* .......gRounD *eiTheR coLoReD sLeeVe oR coLoReD insuLaTion
ELECTRICIAN NOTE: Use copper conductor wire only. CASE MUST BE GROUNDED
These aRe maRkeR coLoRs wiRes maY VaRY.
U.S. & Canada 1-800-922-1919 • Mexico 01-800-890-2900 • WWW.HUSSMANN.COM
P/N 0524790_E
8
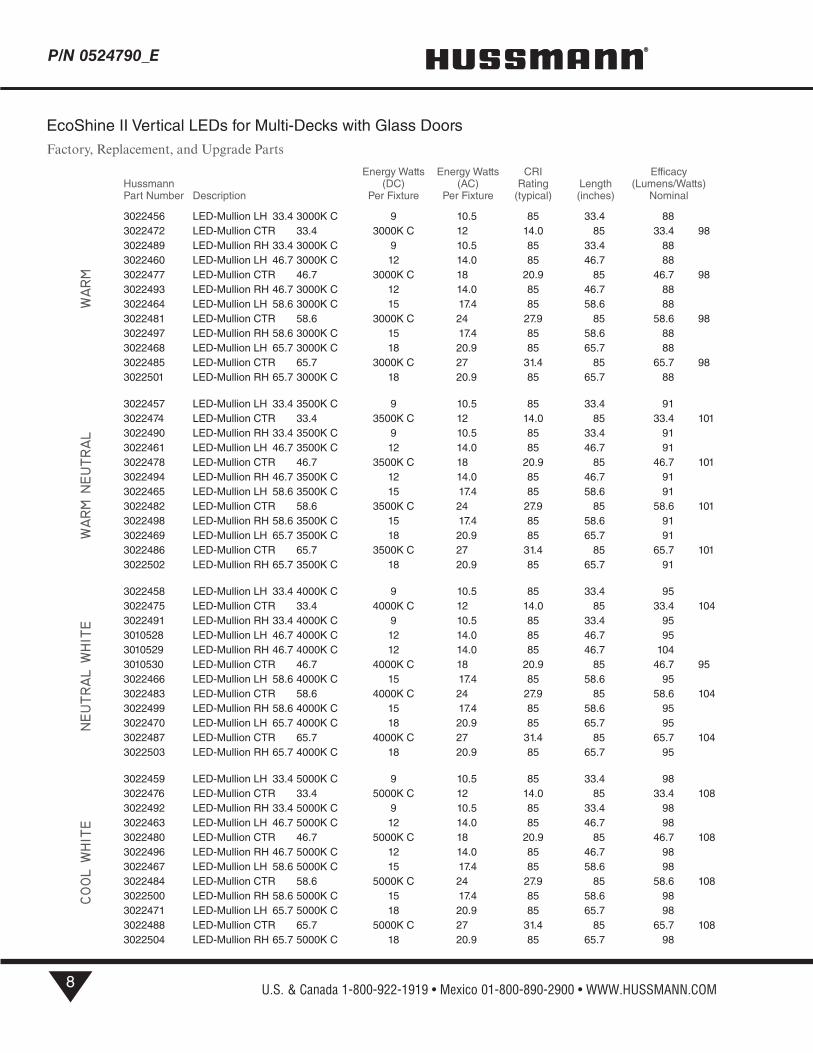
Energy Watts Energy Watts CRI EfficacyHussmann (DC) (AC) Rating Length (Lumens/Watts)Part Number Description Per Fixture Per Fixture (typical) (inches) Nominal
3022456 LED-Mullion LH 33.4 3000K C 9 10.5 85 33.4 883022472 LED-Mullion CTR 33.4 3000K C 12 14.0 85 33.4 983022489 LED-Mullion RH 33.4 3000K C 9 10.5 85 33.4 883022460 LED-Mullion LH 46.7 3000K C 12 14.0 85 46.7 883022477 LED-Mullion CTR 46.7 3000K C 18 20.9 85 46.7 983022493 LED-Mullion RH 46.7 3000K C 12 14.0 85 46.7 883022464 LED-Mullion LH 58.6 3000K C 15 17.4 85 58.6 883022481 LED-Mullion CTR 58.6 3000K C 24 27.9 85 58.6 983022497 LED-Mullion RH 58.6 3000K C 15 17.4 85 58.6 883022468 LED-Mullion LH 65.7 3000K C 18 20.9 85 65.7 883022485 LED-Mullion CTR 65.7 3000K C 27 31.4 85 65.7 983022501 LED-Mullion RH 65.7 3000K C 18 20.9 85 65.7 88
3022457 LED-Mullion LH 33.4 3500K C 9 10.5 85 33.4 913022474 LED-Mullion CTR 33.4 3500K C 12 14.0 85 33.4 1013022490 LED-Mullion RH 33.4 3500K C 9 10.5 85 33.4 913022461 LED-Mullion LH 46.7 3500K C 12 14.0 85 46.7 913022478 LED-Mullion CTR 46.7 3500K C 18 20.9 85 46.7 1013022494 LED-Mullion RH 46.7 3500K C 12 14.0 85 46.7 913022465 LED-Mullion LH 58.6 3500K C 15 17.4 85 58.6 913022482 LED-Mullion CTR 58.6 3500K C 24 27.9 85 58.6 1013022498 LED-Mullion RH 58.6 3500K C 15 17.4 85 58.6 913022469 LED-Mullion LH 65.7 3500K C 18 20.9 85 65.7 913022486 LED-Mullion CTR 65.7 3500K C 27 31.4 85 65.7 1013022502 LED-Mullion RH 65.7 3500K C 18 20.9 85 65.7 91
3022458 LED-Mullion LH 33.4 4000K C 9 10.5 85 33.4 953022475 LED-Mullion CTR 33.4 4000K C 12 14.0 85 33.4 1043022491 LED-Mullion RH 33.4 4000K C 9 10.5 85 33.4 953010528 LED-Mullion LH 46.7 4000K C 12 14.0 85 46.7 953010529 LED-Mullion RH 46.7 4000K C 12 14.0 85 46.7 1043010530 LED-Mullion CTR 46.7 4000K C 18 20.9 85 46.7 953022466 LED-Mullion LH 58.6 4000K C 15 17.4 85 58.6 953022483 LED-Mullion CTR 58.6 4000K C 24 27.9 85 58.6 1043022499 LED-Mullion RH 58.6 4000K C 15 17.4 85 58.6 953022470 LED-Mullion LH 65.7 4000K C 18 20.9 85 65.7 953022487 LED-Mullion CTR 65.7 4000K C 27 31.4 85 65.7 1043022503 LED-Mullion RH 65.7 4000K C 18 20.9 85 65.7 95
3022459 LED-Mullion LH 33.4 5000K C 9 10.5 85 33.4 983022476 LED-Mullion CTR 33.4 5000K C 12 14.0 85 33.4 1083022492 LED-Mullion RH 33.4 5000K C 9 10.5 85 33.4 983022463 LED-Mullion LH 46.7 5000K C 12 14.0 85 46.7 983022480 LED-Mullion CTR 46.7 5000K C 18 20.9 85 46.7 1083022496 LED-Mullion RH 46.7 5000K C 12 14.0 85 46.7 983022467 LED-Mullion LH 58.6 5000K C 15 17.4 85 58.6 983022484 LED-Mullion CTR 58.6 5000K C 24 27.9 85 58.6 1083022500 LED-Mullion RH 58.6 5000K C 15 17.4 85 58.6 983022471 LED-Mullion LH 65.7 5000K C 18 20.9 85 65.7 983022488 LED-Mullion CTR 65.7 5000K C 27 31.4 85 65.7 1083022504 LED-Mullion RH 65.7 5000K C 18 20.9 85 65.7 98
WARM
WARM N
EUTRAL
NEUTRAL W
HIT
ECOOL W
HIT
E
EcoShine II Vertical LEDs for Multi-Decks with Glass DoorsFactory, Replacement, and Upgrade Parts
Hussmann Corporation • Bridgeton, Missouri 63044-2483 U.S.A.
Vertical LEDs for Medium Temperature Doors P/N 0524790_E
9
REMOVE EXISTING FLUORESCENT LIGHTING (if previously installed)
a. Remove product from the merchandiser and store at appropriate product temperature.
b. Turn the light switch to off. The switch is located inside the case on the door mullion.
c. Lock out and tag out the circuit breaker for the lighting circuit of the case where the LED light fixtures are being installed.
d. If fluorescent lighting is present in the cano-py or mullions; it should be removed.
e. Remove and discard the lenses covering the fluorescent tubes.
f. Remove the fluorescent tubes.
Fluorescent Lamp Disposal: The United States Environmental Protection Agency has information regarding environmentally-safe fluorescent lamp waste management programs. On the Net: EPA Web site:http://www.epa.gov/osw/hazard/wastetypes/ universal/lamps/recycle.htm
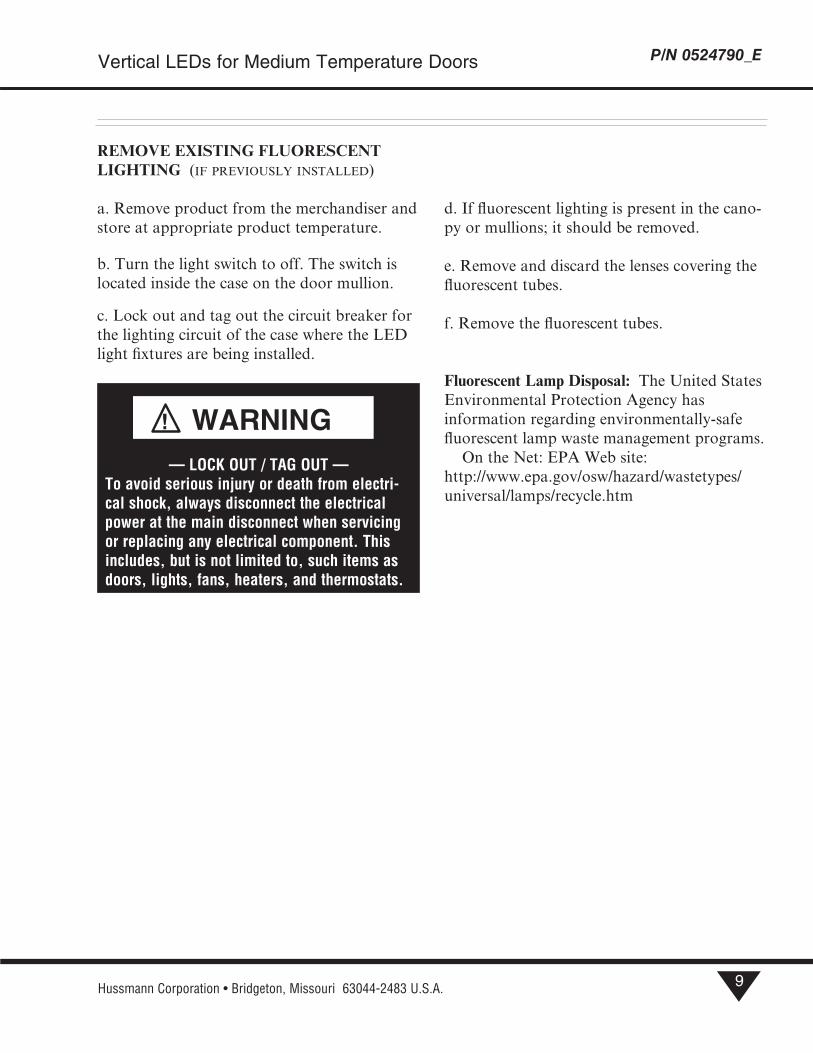
— LOCK OUT / TAG OUT —To avoid serious injury or death from electri-cal shock, always disconnect the electrical power at the main disconnect when servicing or replacing any electrical component. This includes, but is not limited to, such items as doors, lights, fans, heaters, and thermostats.

U.S. & Canada 1-800-922-1919 • Mexico 01-800-890-2900 • WWW.HUSSMANN.COM
P/N 0524790_E
10
PARTS IDENTIFICATION CHART
RECOMMENDED TOOLS anD SUPPLIES
Battery-powered
Drill
Diagonal Pliers
DMM Digital Multimeter
Gloves
Wire Nuts
Tape Measure
Phillips and Flat BladeScrewdriversHeat Shrink
Butt Terminals
Safety Eye-wear
Wire
Wire Stripper9/64 Drill Bit
7/64 Drill Bit
Bit Depth Collar
One power supply is used for each five-door merchandiser.
EcoShine II LED Mullion Light Fixture 24VDC Class 2 100W Power Supply Standard Part Number: 3013744
Slimline Part Number: 4483262
Hussmann Corporation • Bridgeton, Missouri 63044-2483 U.S.A.
Vertical LEDs for Medium Temperature Doors P/N 0524790_E
11
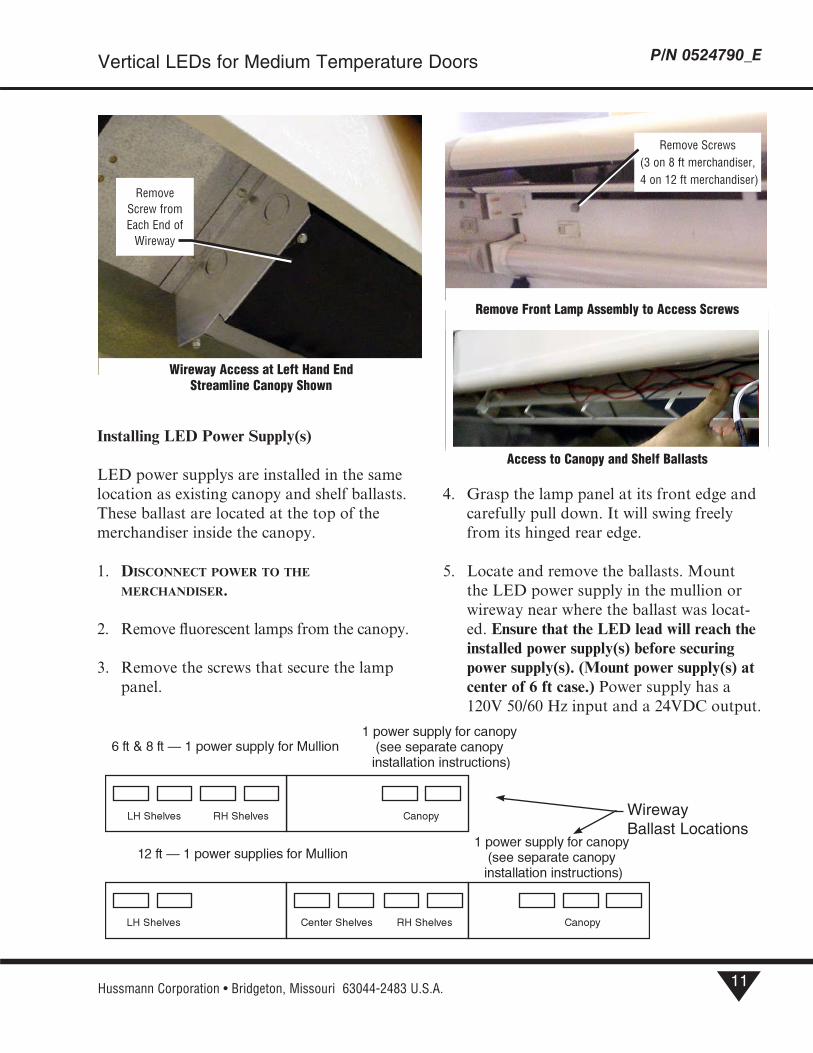
Installing LED Power Supply(s)
LED power supplys are installed in the same location as existing canopy and shelf ballasts.These ballast are located at the top of the merchandiser inside the canopy.
1. Disconnect power to the merchanDiser.
2. Remove fluorescent lamps from the canopy.
3. Remove the screws that secure the lamp panel.
4. Grasp the lamp panel at its front edge and carefully pull down. It will swing freely from its hinged rear edge.
5. Locate and remove the ballasts. Mount the LED power supply in the mullion or wireway near where the ballast was locat-ed. Ensure that the LED lead will reach the installed power supply(s) before securing power supply(s). (Mount power supply(s) at center of 6 ft case.) Power supply has a 120V 50/60 Hz input and a 24VDC output.
Ballast Locations
RemoveScrew from Each End of
Wireway
Wireway Access at Left Hand EndStreamline Canopy Shown
Access to Canopy and Shelf Ballasts
Remove Screws (3 on 8 ft merchandiser,
4 on 12 ft merchandiser)
Remove Front Lamp Assembly to Access Screws
WirewayBallast Locations
U.S. & Canada 1-800-922-1919 • Mexico 01-800-890-2900 • WWW.HUSSMANN.COM
P/N 0524790_E
12
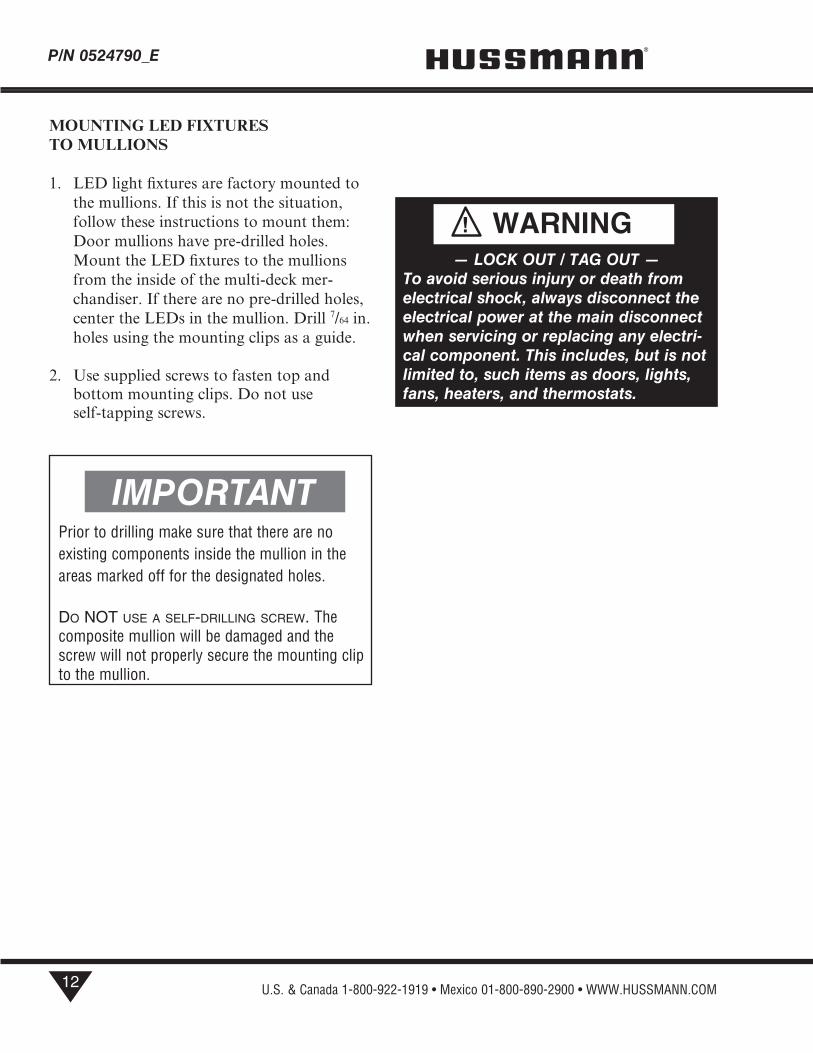
— LOCK OUT / TAG OUT —To avoid serious injury or death from electrical shock, always disconnect the electrical power at the main disconnect when servicing or replacing any electri-cal component. This includes, but is not limited to, such items as doors, lights, fans, heaters, and thermostats.
MOUNTING LED FIXTURES TO MULLIONS
1. LED light fixtures are factory mounted to the mullions. If this is not the situation, follow these instructions to mount them: Door mullions have pre-drilled holes. Mount the LED fixtures to the mullions from the inside of the multi-deck mer-chandiser. If there are no pre-drilled holes, center the LEDs in the mullion. Drill 7/64 in. holes using the mounting clips as a guide.
2. Use supplied screws to fasten top and bottom mounting clips. Do not use self-tapping screws.
Prior to drilling make sure that there are no existing components inside the mullion in the areas marked off for the designated holes.
Do NoT use a self-DrilliNg screw. The composite mullion will be damaged and the screw will not properly secure the mounting clip to the mullion.
Hussmann Corporation • Bridgeton, Missouri 63044-2483 U.S.A.
Vertical LEDs for Medium Temperature Doors P/N 0524790_E
13
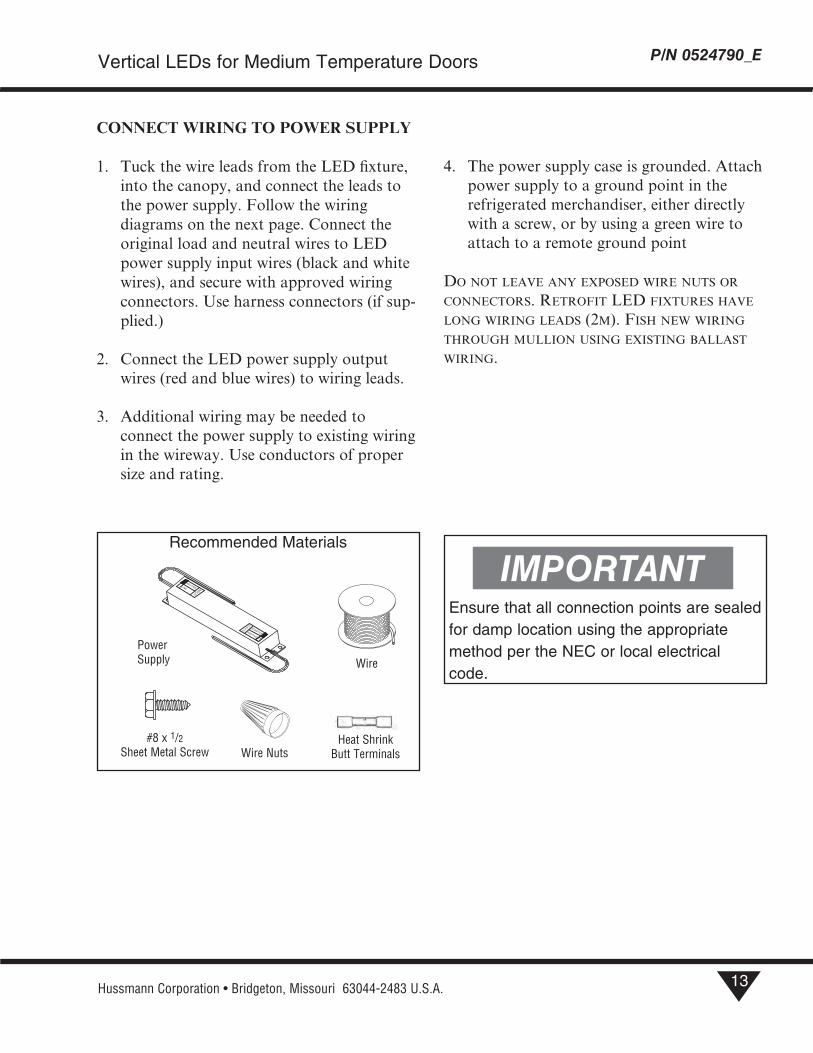
Recommended Materials
#8 x 1/2Sheet Metal Screw Wire Nuts
Wire
Heat ShrinkButt Terminals
PowerSupply
Ensure that all connection points are sealed for damp location using the appropriate method per the NEC or local electrical code.
CONNECT WIRING TO POWER SUPPLY
1. Tuck the wire leads from the LED fixture, into the canopy, and connect the leads to the power supply. Follow the wiring diagrams on the next page. Connect the original load and neutral wires to LED power supply input wires (black and white wires), and secure with approved wiring connectors. Use harness connectors (if sup-plied.)
2. Connect the LED power supply output wires (red and blue wires) to wiring leads.
3. Additional wiring may be needed to connect the power supply to existing wiring in the wireway. Use conductors of proper size and rating.
4. The power supply case is grounded. Attach power supply to a ground point in the refrigerated merchandiser, either directly with a screw, or by using a green wire to attach to a remote ground point
Do not leave any exposed Wire nuts or connectors. retrofit led fixtures have long Wiring leads (2m). fish neW Wiring through mullion using existing ballast Wiring.
U.S. & Canada 1-800-922-1919 • Mexico 01-800-890-2900 • WWW.HUSSMANN.COM
P/N 0524790_E
14
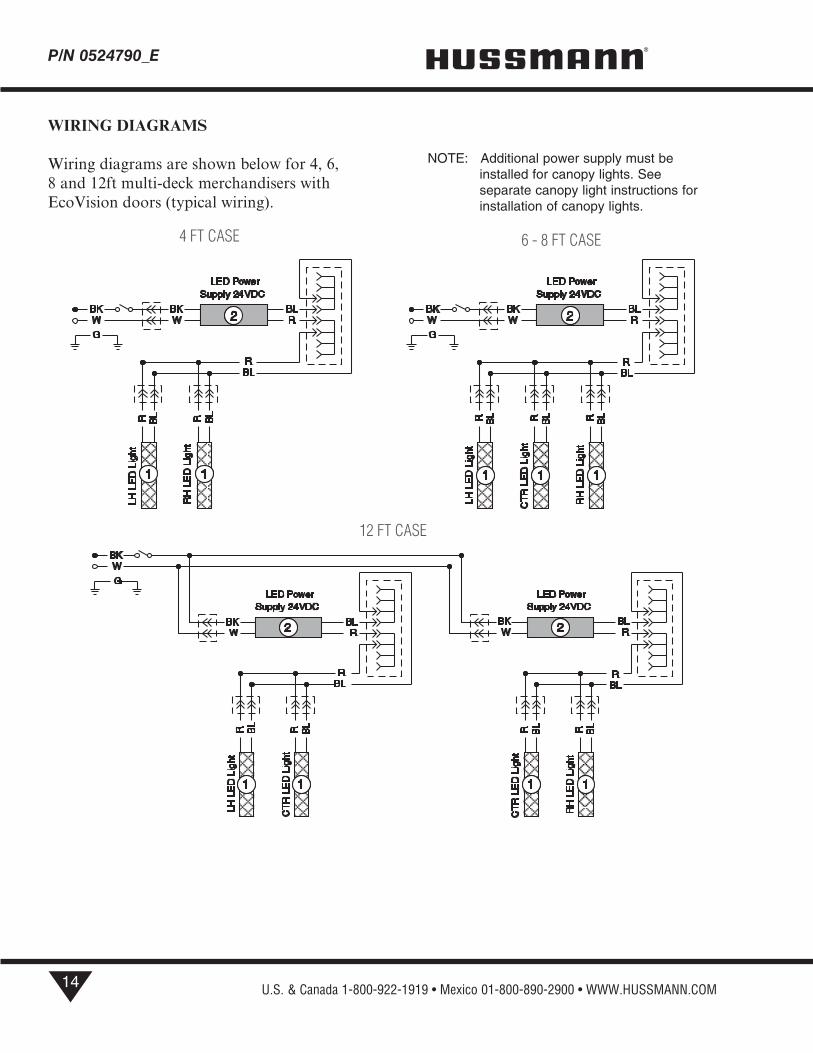
WIRING DIAGRAMS
Wiring diagrams are shown below for 4, 6, 8 and 12ft multi-deck merchandisers with EcoVision doors (typical wiring).
NOTE: Additional power supply must be installed for canopy lights. See separate canopy light instructions for installation of canopy lights.
R = Red Y = Yellow G = Green BL = Blue BK = Black W = White
= 120V POWER = 120V NEUTRAL = FIELD GROUND = CASE GROUND
WARNING All components must have mechanical ground, and the merchandiser must be grounded
This product is not for use with wet or damp applications.
1 = LED Fixture 2 = Power Supply
LED MULLION LIGHTING
4 FT. CASE 6 OR 8 FT. CASE
12 FT. CASE
4 FT CASE 6 - 8 FT CASE
R = Red Y = Yellow G = Green BL = Blue BK = Black W = White
= 120V POWER = 120V NEUTRAL = FIELD GROUND = CASE GROUND
WARNING All components must have mechanical ground, and the merchandiser must be grounded
This product is not for use with wet or damp applications.
1 = LED Fixture 2 = Power Supply
LED MULLION LIGHTING
4 FT. CASE 6 OR 8 FT. CASE
12 FT. CASE12 FT CASE