
MU N-B00070 Bauanleitung - DM-Toys
8
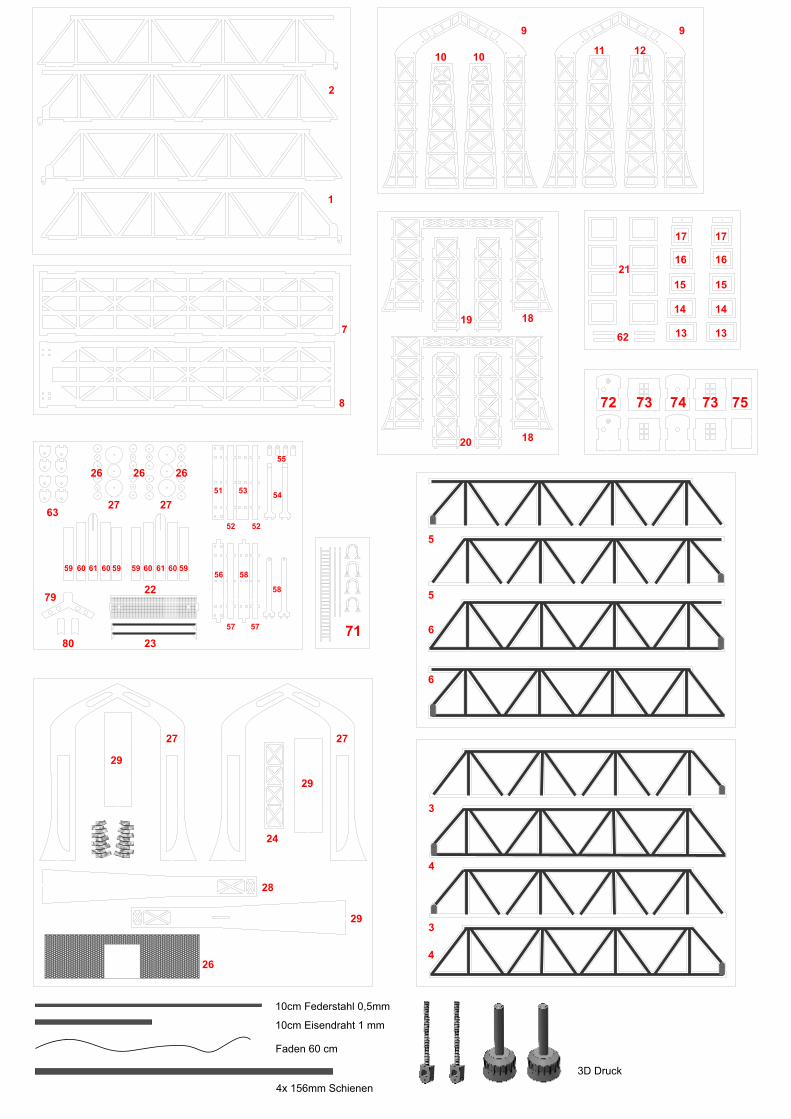
1 2 3 4 4 3 5 7 8 9 9 10 11 10 12 13 14 15 16 17 13 14 15 16 17 18 18 19 20 21 22 23 24 26 26 27 27 26 26 27 27 28 29 29 29 51 52 52 53 54 55 56 58 57 57 58 59 60 61 60 59 59 60 61 60 59 62 5 6 6 63 71 72 73 74 75 73 79 80 10cm Federstahl 0,5mm 10cm Eisendraht 1 mm Faden 60 cm 4x 156mm Schienen 3D Druck
Transcript of MU N-B00070 Bauanleitung - DM-Toys
1
2
3
4
4
3
5
7
8
9 9
1011
1012
13
14
15
16
17
13
14
15
16
17
18
18
19
20
21
22
23
24
26
26
27 27
26 26
27 27
28
29
29
29
51
52 52
5354
55
56 58
57 57
58
59 60 61 60 59 59 60 61 60 59
62
5
6
6
63
71
72 73 74 7573
79
80
10cm Federstahl 0,5mm
10cm Eisendraht 1 mm
Faden 60 cm
4x 156mm Schienen
3D Druck
25
2x
2x
30
31 32
31 32
33 33
34
35
36 37
38 39
40
4142 42 43 43
44
45
48 48
46
47
49
50
64
64
65
66
67
6869
70
7677
78
81
82
81
81
82
81
84
83
46b
12
3
4
5
6
1
12
534
6
2x2x
2
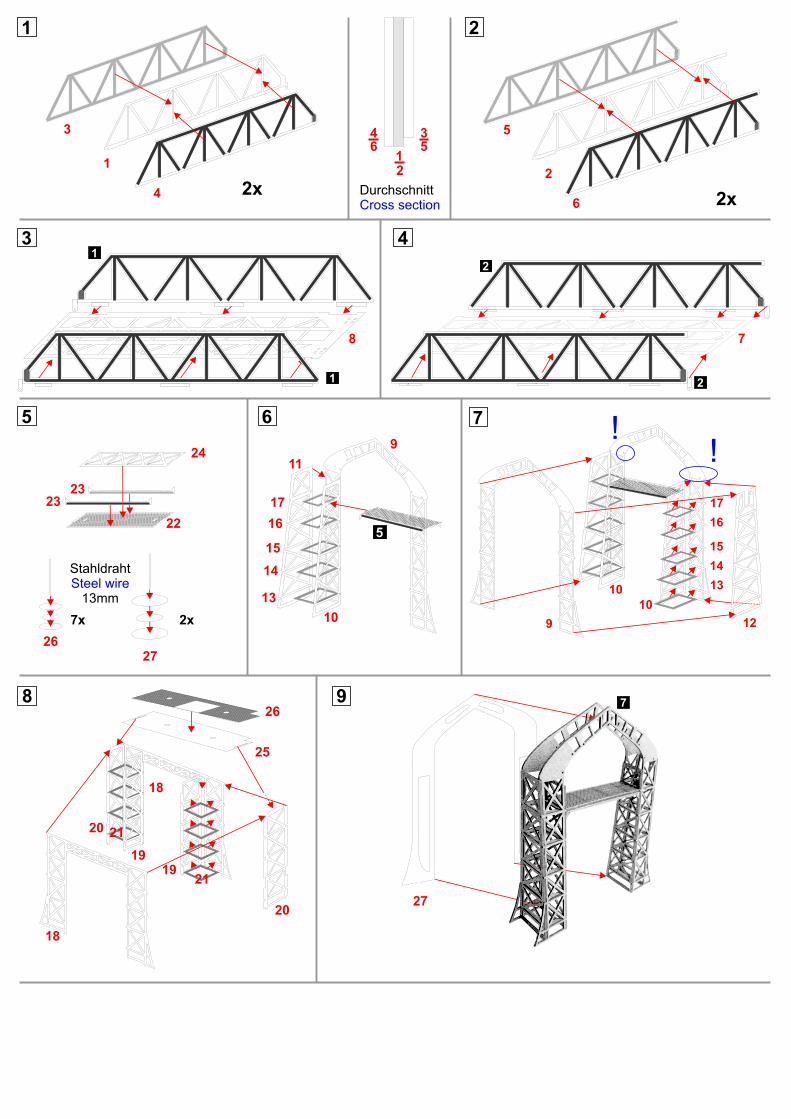
DurchschnittCross section
78
3 4
5
21
1 2
18
19
8
19
18
20
20 21
21
6
22
23
24
23
9
10
11
13
14
15
16
17
5
7
9
10
12
13
14
15
16
17
10
25
269
2627
7x 2x
StahldrahtSteel wire
13mm
!!
27
7
10
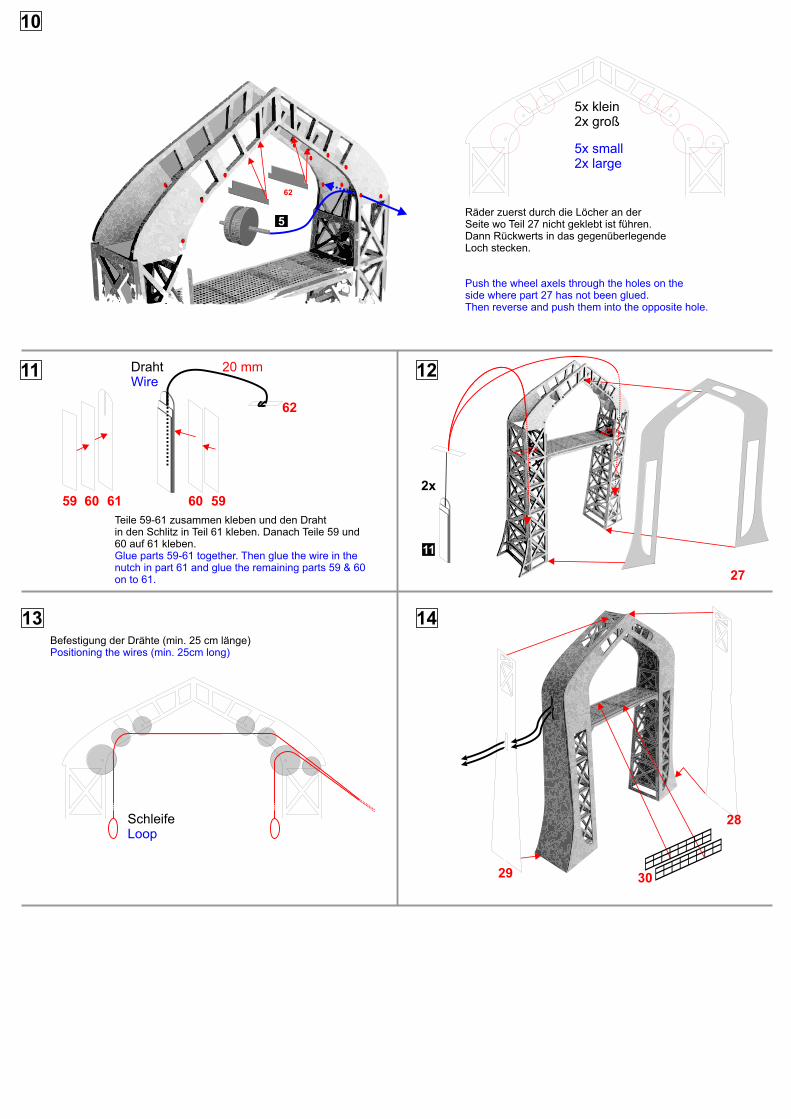
Räder zuerst durch die Löcher an derSeite wo Teil 27 nicht geklebt ist führen.Dann Rückwerts in das gegenüberlegendeLoch stecken.
Push the wheel axels through the holes on the side where part 27 has not been glued.Then reverse and push them into the opposite hole.
5
5x klein2x groß
5x small2x large
11
SchleifeLoop
Befestigung der Drähte (min. 25 cm länge)Positioning the wires (min. 25cm long)
12
27
13
28
29
14
30
59 60 61 60 59
62
Teile 59-61 zusammen kleben und den Drahtin den Schlitz in Teil 61 kleben. Danach Teile 59 und60 auf 61 kleben.Glue parts 59-61 together. Then glue the wire in thenutch in part 61 and glue the remaining parts 59 & 60on to 61.
DrahtWire
20 mm
11
2x
62
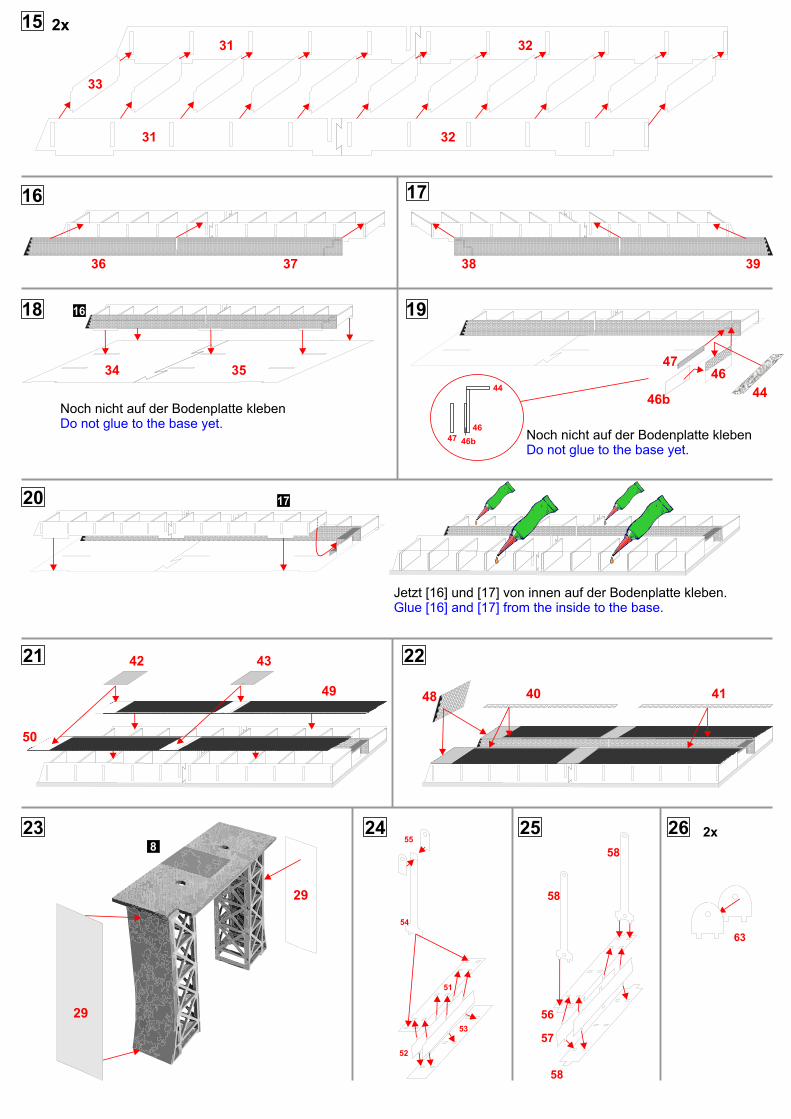
15
44
31 32
36 37 38 39
4734 35
33
2x
31 32
16 17
1618 19
47
46
44
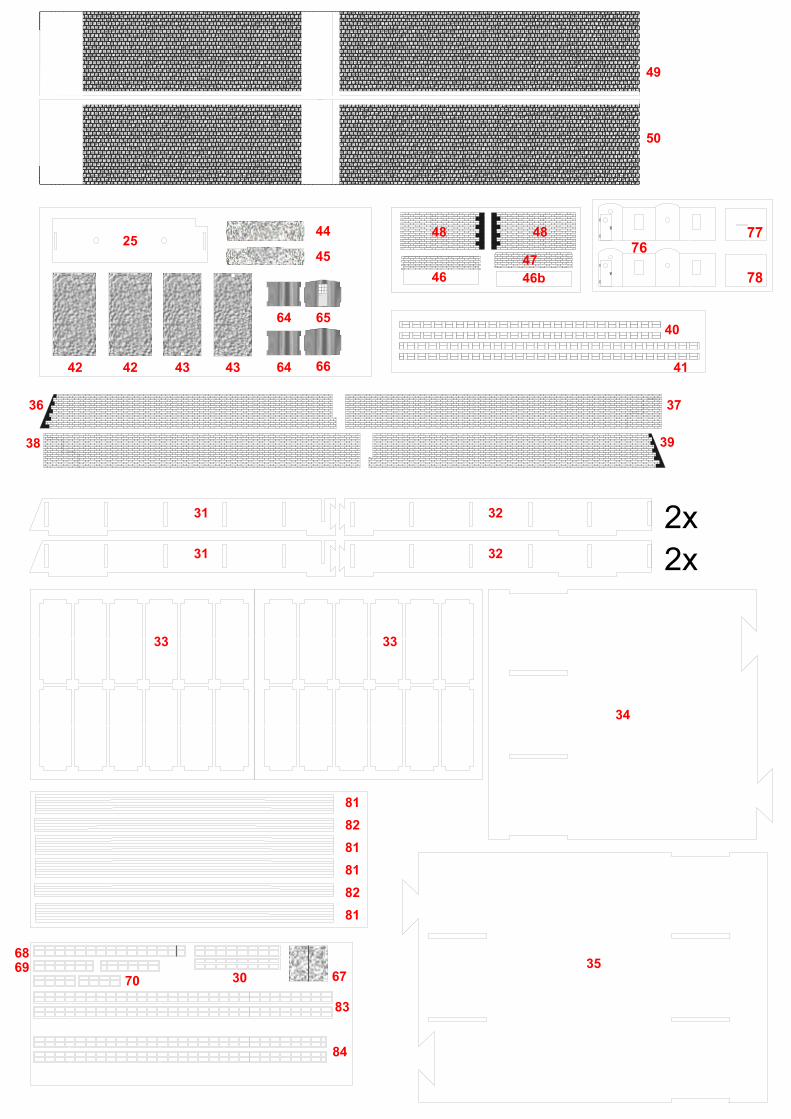
Noch nicht auf der Bodenplatte klebenDo not glue to the base yet.
20
Noch nicht auf der Bodenplatte klebenDo not glue to the base yet.
17
Jetzt [16] und [17] von innen auf der Bodenplatte kleben.Glue [16] and [17] from the inside to the base.
21
49
50
42 43 22
40 4148
23
51
52
53
55
56
58
57
58
24
54
25
58
26
63
2x8
29
29
46
46b
46b
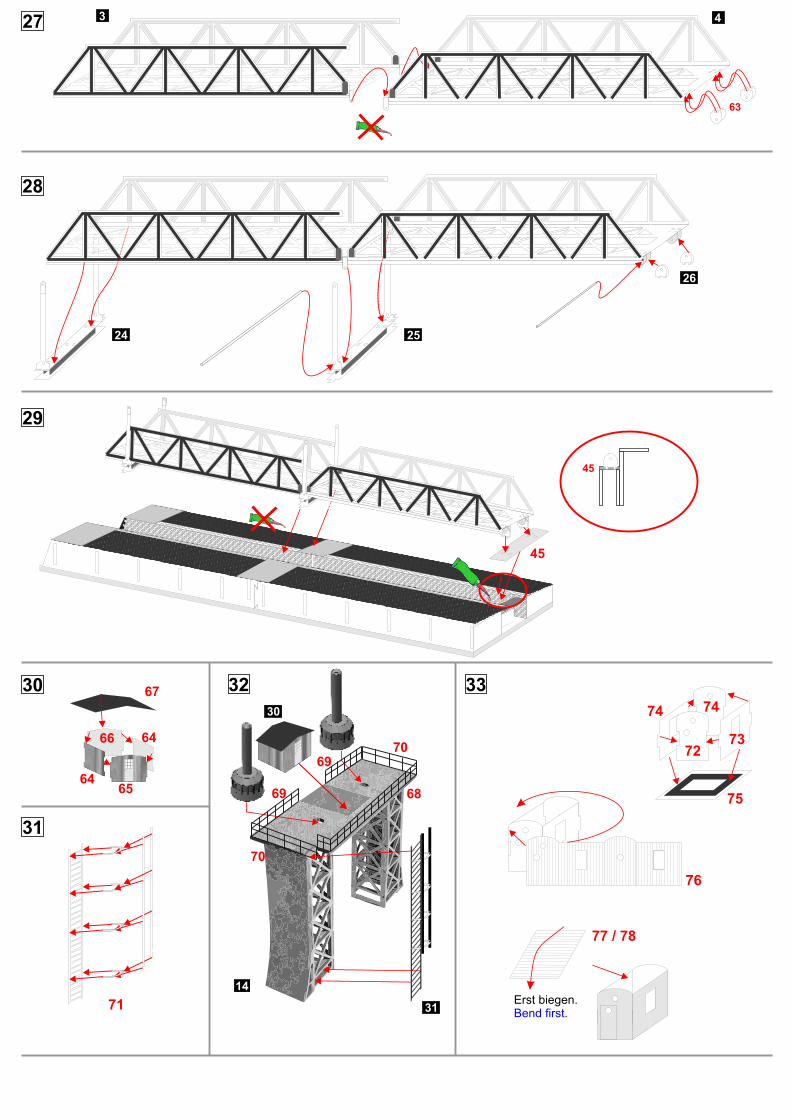
3 427
63
28
25
26
29
45
24
30
64
64
65
66
67
31
68
70
14
70
69
69
32
71 31
30
33
Erst biegen.Bend first.
7273
74
75
74
76
77 / 78
45
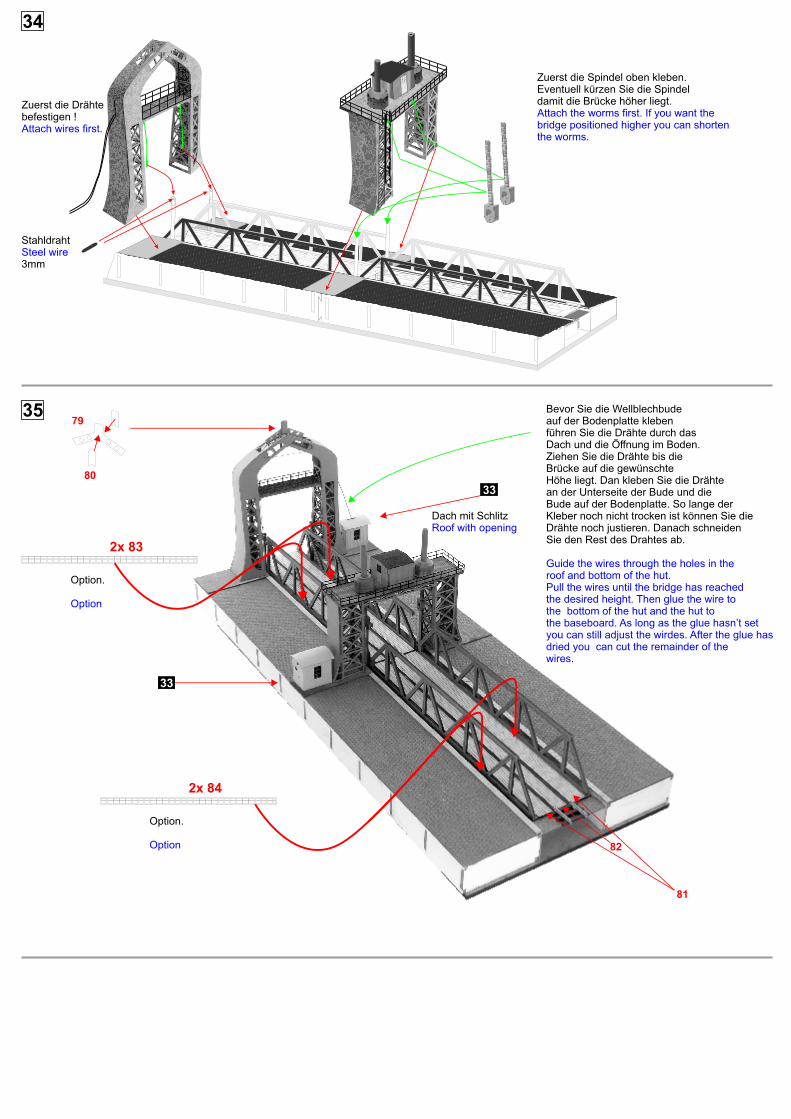
34
StahldrahtSteel wire3mm
Zuerst die Drähtebefestigen !Attach wires first.
Zuerst die Spindel oben kleben. Eventuell kürzen Sie die Spindeldamit die Brücke höher liegt.Attach the worms first. If you want thebridge positioned higher you can shortenthe worms.
3579
80
33
33
Dach mit SchlitzRoof with opening
Bevor Sie die Wellblechbudeauf der Bodenplatte klebenführen Sie die Drähte durch dasDach und die Öffnung im Boden.Ziehen Sie die Drähte bis dieBrücke auf die gewünschte Höhe liegt. Dan kleben Sie die Drähtean der Unterseite der Bude und dieBude auf der Bodenplatte. So lange derKleber noch nicht trocken ist können Sie dieDrähte noch justieren. Danach schneidenSie den Rest des Drahtes ab.
Guide the wires through the holes in theroof and bottom of the hut.Pull the wires until the bridge has reachedthe desired height. Then glue the wire tothe bottom of the hut and the hut tothe baseboard. As long as the glue hasn’t setyou can still adjust the wirdes. After the glue hasdried you can cut the remainder of thewires.
81
82
2x 84
Option.
Option
2x 83
Option.
Option


![SummaryMap ward2 [Converted] · 2019-10-01 · MU-2 MU-6 MU-16 MU-14 MU-6 MU-2 MU-20 MU-9 MU-4 MU-13 MU-15 MU-13 MU-16 MU-18 MU-22 MU-19 MU-16 MU-27 MU-4 MU-3A MU-17 MU-13 MU-4 ...](https://static.fdocuments.in/doc/165x107/5f5e4f591750d150e9633369/summarymap-ward2-converted-2019-10-01-mu-2-mu-6-mu-16-mu-14-mu-6-mu-2-mu-20.jpg)