
MTS and DCOM setup - Portrait Softwaresupport.portraitsoftware.com/documentation/Portrait... ·...
26
MTS and DCOM setup Release 6.1
Transcript of MTS and DCOM setup - Portrait Softwaresupport.portraitsoftware.com/documentation/Portrait... ·...

MTS and DCOM setup
Release 6.1

Copyright Release 6.1
MTS and DCOM setup 2
© 2015 Pitney Bowes Software Inc. All rights reserved.
This document may contain confidential and proprietary information belonging to Pitney Bowes Inc. and/or its subsidiaries and associated companies.
Portrait Software, the Portrait Software logo, Portrait, and Portrait Software’s Portrait brand are the trademarks of Portrait Software International Limited and may not be used or exploited in any way without the prior express written authorization of Portrait Software International Limited.
Acknowledgement of trademarks
Other product names, company names, marks, logos and symbols referenced herein may be the trademarks or registered trademarks of their registered owners.
Portrait Software Support
If you need help with something that’s not covered by this documentation, try the Knowledge Base on our web site. http://support.portraitsoftware.com and follow the links to your product.
You can also download other Portrait Software documentation from the site. If you don’t have a username and password—or you’ve forgotten them—please contact us through one of the channels below.
If you find a problem with the use, installation, or documentation of this product, please contact us using any of the following methods:
Email: [email protected]
Phone
• USA/Canada 1-800-335-3860 (toll-free)
• Rest of world +44 800 840 0001
When you report a problem, it helps if you can tell us:
• The name of the software application
• The circumstances in which the problem arose
• What error messages you saw (if any);
• The version of the software that you were using.
Pitney Bowes Software Inc.
January 9, 2015

Copyright Release 6.1
MTS and DCOM setup 3
Contents
Introduction ....................................................................................................................... 5
Related documents ........................................................................................................ 5
Software release ............................................................................................................ 5
Configure the Application server (Dialogue Server) .................................................... 6
Creating users and user groups .................................................................................... 6
Running with local users and groups .......................................................6
Running with domain users and groups ...................................................6
Configure Windows 2008 server ................................................................................... 7
Network COM+ access ..........................................................................7
Network DTC access .............................................................................8
Transaction timeout ............................................................................ 10
User and user group access ................................................................. 10
Server Components ............................................................................ 11
Configure Windows 2012 server ................................................................................. 12
Network COM+ access ........................................................................ 12
Network DTC access ........................................................................... 13
Transaction timeout ............................................................................ 15
User and user group access ................................................................. 15
Server Components ............................................................................ 16
Configure database access on application server ...................................................... 17
Dialogue Server and Database server on same physical server ................. 17
Dialogue Server and Database server on separate physical servers ........... 18
Connecting clients to Dialogue Server ........................................................................ 19
Clients and Dialogue Server on same windows domain ............................................. 19
Clients and Dialogue Server on different windows domains ....................................... 19
Scenario 1 – Client is member of a domain, Dialogue Server is not ........... 19
Scenario 2 – Dialogue Server is member of a domain, client is not ........... 19
Scenario 3 – Client and Dialogue Server is members of different domains . 20
Scenarios requiring special configuration .................................................................. 21
Configuring DTC to Work Through a Firewall ............................................................. 21
General ............................................................................................. 21
Setup of DTC ..................................................................................... 21
Setup of firewall ................................................................................. 22
Configuring DTC to work across non-domain environments ...................................... 22
Enable Network DTC Access on both servers .......................................... 22
Install the SQL Server Client Tools on both servers ................................. 22
Enable NETBIOS across all machines ..................................................... 22
Disable RPC Security for MSDTC Service on both servers ......................... 23

Copyright Release 6.1
MTS and DCOM setup 4
Configure DTC on a Windows Server cluster ............................................................. 24
Cloning Windows DTC Servers ................................................................................... 24
Essential test Utilities .................................................................................................... 25
Introduction Release 6.1
MTS and DCOM setup 5
Introduction
This document is written to lead a team through the steps of configuring com+ for servers and clients running Portrait Dialogue. The audiences for this guide are business application specialists, IT specialists, and infrastructure specialists who are deploying a solution based on Portrait Dialogue application server.
Related documents
Portrait Dialogue 6.1 release notes, available on the installation CD.
Software release
Portrait Dialogue 6.1
Configure the Application server (Dialogue Server) Release 6.1
MTS and DCOM setup 6
Configure the Application server (Dialogue Server)
Before you install and configure Dialogue Server, you must configure the required software. This includes creating users and user groups with special permissions, configuring and enables network COM+ access and network DTC access, and finally configure database access to support transactions.
Creating users and user groups
o Create system user for COM+ components and services.
Network COM+ access
o Allow the Dialogue Server to be used to host COM+ components for distributed applications.
Network DTC access
o Allow DTC process to participate in network transactions.
Database support for transactions
o Allow Dialogue Server and DBMS to communicate using transactions.
Creating users and user groups
Before deploying you should create a service and system user, and a user group for ease of administrating access to the Applications from clients.
Running with local users and groups
This scenario is most common for test and demonstration purposes.
1. Create one local user account with administrator rights. Ex: MhSystemUser
2. Create one local user group. Ex: MhUsers
Running with domain users and groups
This scenario is most common for production purposes.
1. Create one domain user account with local administrator rights. Ex: YourDomain\MhSystemUser.
2. Create one domain user group. Ex: YourDomain\MhUsers

Configure the Application server (Dialogue Server) Release 6.1
MTS and DCOM setup 7
Configure Windows 2008 server
Enabling network COM+ access and network DTC access on a windows 2008 server
Network COM+ access
By default, Microsoft Network COM+ access is disabled in the Windows Server 2008. You can only use COM+ locally on these products.
Open “Server Manager” from “Administrative Tools”, click on the “Application Server” node and make sure the “COM+ Network Access” role service is installed.
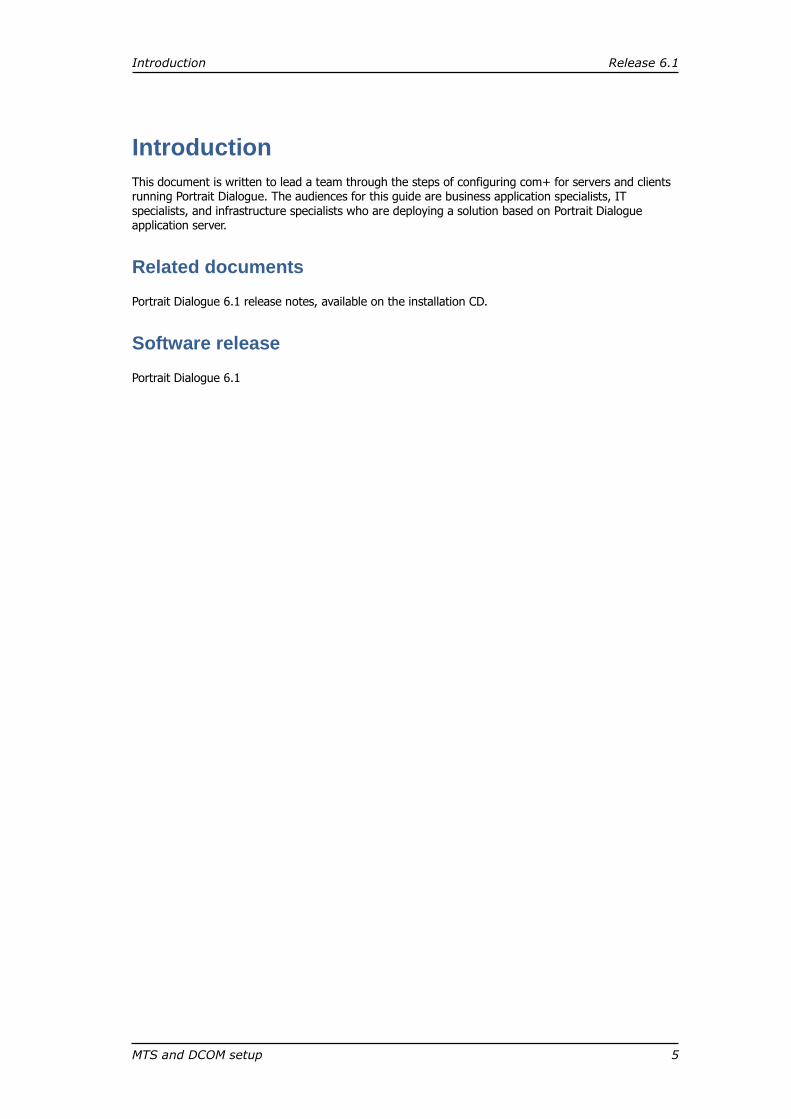
Open “Component services” from “Administrative tools” and right click on the “My Computer” node and choose “Properties” in the Tree.
On the Default Properties flip: Make sure the “Enable Distributed COM on this computer” is enabled
Configure the Application server (Dialogue Server) Release 6.1
MTS and DCOM setup 8
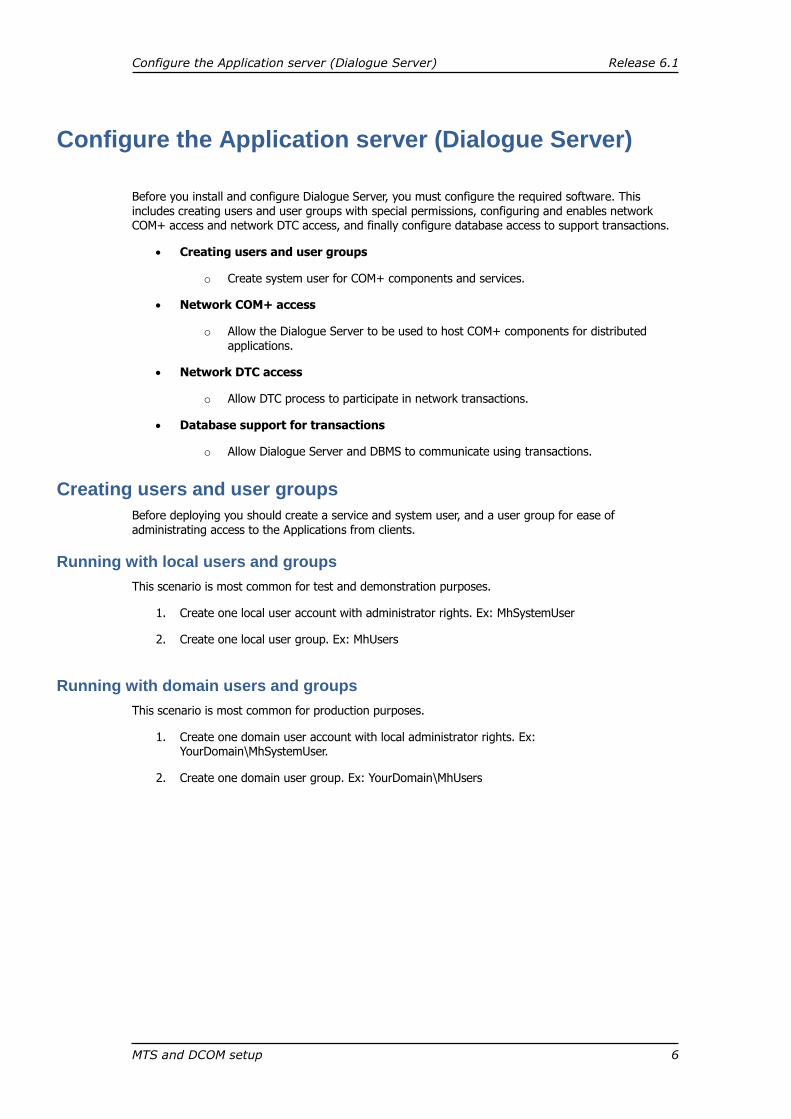
On the MSDTC flip make sure “Use local coordinator” is enabled
Network DTC access
By default, network DTC access is disabled on the Windows Server 2008. When you do not enable network DTC access on the server, applications can only use transactions that stay on the local computer. For example, transactions cannot flow from a local computer to a database that runs on a separate computer if network DTC access is disabled.

Configure the Application server (Dialogue Server) Release 6.1
MTS and DCOM setup 9
Open “Server Manager” from “Administrative Tools”, click on “Application Server” and make sure the “Distributed Transactions” role service is installed.
To enable, open “Component services” from “Administrative tools”, open the “My Computer” node, then the “Distibuted Transaction Coordinator” node and right click on the “Local DTC” node. Then choose “Properties” in the Tree.
On the MSDTC flip click on the Security Configuration button: Make sure the “Network DTC Access” is enabled. Also check that “Allow Inbound” and “Allow Outbound” is enabled. (Authentication choices are discussed later in this document.)

Configure the Application server (Dialogue Server) Release 6.1
MTS and DCOM setup 10
Transaction timeout
By default, transaction timeout is set to 60 second on the Windows Server 2008. Since Portrait Dialogue transactions often run for a longer time, this value should be changed to 0 which means transactions will never time out.
To set the transaction timeout value, open “Component services” from “Administrative tools” and right click on “My Computer” node and choose “Properties” in the Tree.
On the Options flip set Transction timeout to 0.
User and user group access
Make sure to add the user group you created in chapter 0 to the local user group “Distributed COM Users”

Configure the Application server (Dialogue Server) Release 6.1
MTS and DCOM setup 11
Server Components
After you have installed Dialogue Server successfully a com+ application named “MH Dialog Server” is installed under Com+ applications in Component services. To verify the installation please check the following:
Verify that the com+ components appear in the left window as shown below
Right click on the node “MH Dialog Server” and choose “Properties”.
On the Security tab make sure the “Enforce access checks for this application” is NOT checked
Configure the Application server (Dialogue Server) Release 6.1
MTS and DCOM setup 12
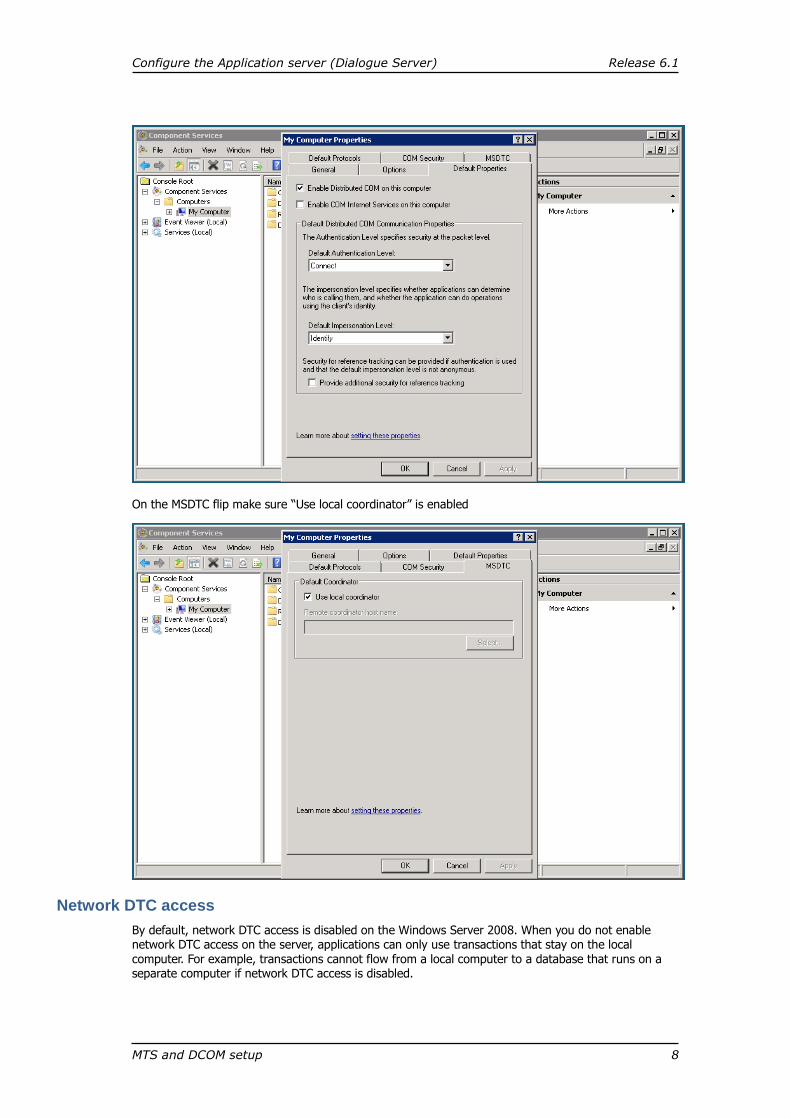
On the Identity tab make sure the account for the application is the user account you created in chapter 0
Configure Windows 2012 server
Enabling network COM+ access and network DTC access on a windows 2012 server
Network COM+ access
By default, Microsoft Network COM+ access is disabled in the Windows Server 2012. You can only use COM+ locally on these products.
Open “Server Manager”, select “Local Server” node, scroll down to “Roles and features” and make sure the “COM+ Network Access” role service is installed.

Configure the Application server (Dialogue Server) Release 6.1
MTS and DCOM setup 13
Open “Component Services”, right click on the “My Computer” node and choose “Properties” in the Tree.
On the Default Properties flip: Make sure the “Enable Distributed COM on this computer” is enabled
On the MSDTC flip make sure “Use local coordinator” is enabled
Network DTC access
By default, network DTC access is disabled on the Windows Server 2012. When you do not enable network DTC access on the server, applications can only use transactions that stay on the local computer. For example, transactions cannot flow from a local computer to a database that runs on a separate computer if network DTC access is disabled.

Configure the Application server (Dialogue Server) Release 6.1
MTS and DCOM setup 14
Open “Server Manager”, select “Local Server” node, scroll down to “Roles and features” and make sure the “Distributed Transactions” role service is installed.
To enable, open “Component Services”, open the “My Computer” node, then the “Distibuted Transaction Coordinator” node and right click on the “Local DTC” node. Then choose “Properties” in the Tree.
On the MSDTC flip click on the Security Configuration button: Make sure the “Network DTC Access” is enabled. Also check that “Allow Inbound” and “Allow Outbound” is enabled. (Authentication choices are discussed later in this document)

Configure the Application server (Dialogue Server) Release 6.1
MTS and DCOM setup 15
Transaction timeout
By default, transaction timeout is set to 60 second on the Windows Server 2012. Since Portrait Dialogue transactions often run for a longer time, this value should be changed to 0 which means transactions will never time out.
To set the transaction timeout value, open “Component services” and right click on “My Computer” node and choose “Properties” in the Tree.
On the Options flip set Transction timeout to 0.
User and user group access
Make sure to add the user group you created in chapter 0 to the local user group “Distributed COM Users”

Configure the Application server (Dialogue Server) Release 6.1
MTS and DCOM setup 16
Server Components
After you have installed Dialogue Server successfully a com+ application named “MH Dialog Server” is installed under Com+ applications in Component Services. To verify the installation please check the following:
Verify that the com+ components appear in the left window as shown below
Right click on the node “MH Dialog Server” and choose “Properties”.
On the Security tab make sure the “Enforce access checks for this application” is NOT checked
On the Identity tab make sure the account for the application is the user account you created in chapter 0

Configure the Application server (Dialogue Server) Release 6.1
MTS and DCOM setup 17
Configure database access on application server
Portrait Dialogue support running on multiple DBMS systems. Currently supported DBMS systems are:
Microsoft SQL Server
Oracle DBMS system
The Dialogue Server connects to the DBMS system using the system standard OLEDB driver. In addition this communication must support distributed transactions. The support for transactions is
handled different on MS and Oracle systems.
The Dialogue Server and the database server can be set up on the same physical server, also referred to as a “stand alone system” or on two separate servers both setups require support for transactions to be able to communicate successfully.
Dialogue Server and Database server on same physical server
Checkpoints when running a “stand alone system”
Microsoft SQL Server:
Make sure you have installed the client tools. This is normally done during a standard setup of the database server. As long as you have configured the server as described in in this document. no more configuration is required.
Oracle DBMS system:
Make sure you have installed the following.
Oracle Provider for OLE DB driver.
Oracle Services for Microsoft Transaction Server.
Both of these packages are part of the client setup. Also make sure you apply the latest patches for these components.
To verify that these components are installed you can run the “Oracle universal installer” and press the “Installed products” button.

Configure the Application server (Dialogue Server) Release 6.1
MTS and DCOM setup 18
Dialogue Server and Database server on separate physical servers
Checkpoints when running Dialogue and Database Servers on two different servers.
If the servers are separated with a firewall or is located on different domains special setup is required. This is explained in detail in chapter 3 of this document.
Microsoft SQL Server:
Make sure you have installed the client tools on the application server, and have configured the application server as described in chapter 0.
Also make sure that you have enabled “network COM+ access” and “network DTC access” on the database server.
Oracle DBMS system:
Make sure you have installed oracle client on the application server including the following
components.
1. Oracle Provider for OLE DB driver.
2. Oracle Services for Microsoft Transaction Server.
Both of these packages are part of the client setup. Also make sure you apply the latest patches for these components.
To verify that these components are installed you can run the “Oracle universal installer” and press the “Installed products” button.
No special configuration is required for the database server.

Connecting clients to Dialogue Server Release 6.1
MTS and DCOM setup 19
Connecting clients to Dialogue Server
The Win32 clients Visual Dialogue, Dialogue Admin and Process monitor communicate with the Dialogue Server through DCOM. This communication requires special user permissions on the Dialogue Server.
Make sure the Dialogue Server is working correctly before attempting to connect with remote clients. You can test your server by running Dialogue Admin locally on the server.
If the clients and the Dialogue Server are separated with a firewall special setup is required. This is explained in detail later in this document.
DTC uses Remote Procedure Call (RPC) dynamic port allocation. By default, RPC dynamic port allocation randomly selects port numbers above 1024 and port 135 (the RPC endpoint mapper port).
Clients and Dialogue Server on same windows domain
This is the most common setup and require minimal configuration. Simply add the windows users to the domain group “YourDomain\MhUsers” created in chapter 0.
Please note that special settings for Global Policy, firewalls etc. in your domain can prevent you form
connecting successfully. If you cannot connect after giving your windows user account the rights described here, verify that your domain policies are not preventing DCOM communication between your computer and the Dialogue Server.
Clients and Dialogue Server on different windows domains
This setup requires more configurations on client and server. If you “google” this topic you find thousands of newsgroup articled about this problem. It is possible to configure this by change security settings on your machines, but these changes will have impact on overall security, and is therefore not recommended. We recommend creating local users on application server to get this to work.
Three different scenarios are described below.
Scenario 1 – Client is member of a domain, Dialogue Server is not
Create a local windows user account on the Dialogue Server with the same username and password as the client domain users. Add this user to the group “MhUsers” on the Dialogue Server created in chapter 0.
Scenario 2 – Dialogue Server is member of a domain, client is not
Create a local windows user account on the Dialogue Server with the same username and password as the client local users. Add this user to the domain group “YourDomain\MhUsers” on the Dialogue Server created in chapter 0.

Connecting clients to Dialogue Server Release 6.1
MTS and DCOM setup 20
Scenario 3 – Client and Dialogue Server is members of different domains
In this scenario you have two options:
1. Create a local windows user account on the Dialogue Server with the same username and password as the client domain users (from the other domain). Add this user to the domain group “YourDomain\MhUsers” on the Dialogue Server created in chapter 0.
2. Establish a trusted relationship between the domains and add users to the domain group “YourDomain\MhUsers” on the Dialogue Server created in chapter 0.

Scenarios requiring special configuration Release 6.1
MTS and DCOM setup 21
Scenarios requiring special configuration
Configuring DTC to Work Through a Firewall
This scenario applies to both client – Dialogue Server, and Dialogue Server – database server communication. The server – database server communication is only applicable when you use Microsoft SQL Server, and NOT when you use Oracle DBMS.
You can configure DTC to communicate through firewalls, including network address translation firewalls.
DTC uses Remote Procedure Call (RPC) dynamic port allocation. By default, RPC dynamic port allocation randomly selects port numbers above 1024. By modifying DTS setup, you can control which ports RPC dynamically allocates for incoming communication. You can then configure your firewall to confine incoming external communication to only those ports and port 135 (the RPC Endpoint Mapper
port).
You must provide one incoming dynamic port for DTC. You may need to provide additional incoming dynamic ports for other subsystems that rely on RPC.
General
DTC requires that you are able to resolve computer names by way of NetBIOS or DNS. You can test whether or not NetBIOS can resolve the names by using ping and the server name. The client computer must be able to resolve the name of the server, and the server must be able to resolve the name of the client. If NetBIOS cannot resolve the names, you can add entries to the LMHOSTS files on the computers.
To configure client – server communication you only need to change DTC settings on the Application server. For Application server – database server communication you need to change DTC settings on both servers.
Setup of DTC
To control RPC dynamic port allocation open “Component services”. Right click on “My Computer” choose “Properties”. On the “Default Protocols” tab make sure the TCP/IP protocol is in top of the list. Click on this and add the port range as shown below:

Scenarios requiring special configuration Release 6.1
MTS and DCOM setup 22
Microsoft recommends that you open up ports from 5000 and up, and that you open a minimum of 15 to 20 ports.
You must reboot the server for applying these settings.
Setup of firewall
The firewall must be open in both directions for the specified ports (tcp/ip) and for port 135 (UDP).
Configuring DTC to work across non-domain environments
This chapter applies to scenarios like:
The Application server (Dialogue Server) is member of a domain, but the SQL server is not.
Both the Application server and database server are none member of a domain.
The servers are member of different domains with no trust relationship established.
Enable Network DTC Access on both servers
Please see chapter 1 on how to do this.
Install the SQL Server Client Tools on both servers
The SQL Client Tools can be found on the SQL Server CD. During Setup, ensure that the MSDTC option is checked.
Enable NETBIOS across all machines
Alternatively, you can add entries in the HOSTS file (c:\windows\system32\drivers\etc) so that the machines can be pinged by server name. See the comments in the HOSTS file for more information on how to accomplish this.
DTC requires that you are able to resolve computer names by way of NetBIOS or DNS. You can test whether or not NetBIOS can resolve the names by using ping and the server name. The client computer must be able to resolve the name of the server, and the server must be able to resolve the

Scenarios requiring special configuration Release 6.1
MTS and DCOM setup 23
name of the client. If NetBIOS cannot resolve the names, you can add entries to the LMHOSTS files on the computers.
Disable RPC Security for MSDTC Service on both servers
Select the “No Authentication Required” in Security Configuration.
“No Authentication Required” explained by Microsoft:
You can use No Authentication Required to resolve a situation where the Distributed Transaction Coordinator services are running on computers that are in domains that do not have a trust relationship established. Additionally, you can use No Authentication Required to resolve a situation where the Distributed Transaction Coordinator services are running on computers that are members of
a workgroup.
“No Authentication Required” affects the following registry entries:
HKEY_LOCAL_MACHINE\SOFTWARE\Microsoft\MSDTC
Value name: AllowOnlySecureRpcCalls Value type: REG_DWORD Value data: 0
Value name: FallbackToUnsecureRPCIfNecessary Value type: REG_DWORD Value data: 0
Value name: TurnOffRpcSecurity Value type: REG_DWORD Value data: 1
Note On a server cluster, these registry entries are located in the shared cluster registry.
You must reboot the server for applying these settings.

Scenarios requiring special configuration Release 6.1
MTS and DCOM setup 24
Configure DTC on a Windows Server cluster
If your application server and / or database server is installed on a cluster special setup is required for Microsoft Distributed Transaction Coordinator.
Please read the following MS articles thoroughly:
http://technet.microsoft.com/en-us/library/cc755269.aspx
http://msdn.microsoft.com/en-us/library/dd897479.aspx
Cloning Windows DTC Servers
Often IT departments use cloning tools to roll out new servers. If you clone a server you should always make sure the machines have unique identities. If they have the same identity the DTC services are unable to communicate. You will get the following error in the event log:
The local MS DTC detected that the MS DTC on “CLONED SERVER” has the same unique identity as the local MS DTC. This means that the two MS DTC will not be able to communicate with each other. This problem typically occurs if one of the systems were cloned using unsupported cloning tools. MS DTC requires that the systems be cloned using supported cloning tools such as SYSPREP. Running 'msdtc -uninstall', do a reboot and then 'msdtc -install' from the command prompt will fix the problem. Note: Running 'msdtc -uninstall' will result in the system losing all MS DTC configuration information. Note: On Windows 2008 Server with UAC enabled, the commands must be run as administrator.

Essential test Utilities Release 6.1
MTS and DCOM setup 25
Essential test Utilities
Microsoft support tends to use three core utilities for debugging MSDTC transactions and associated errors:
1. DTCPing - download from and documented at http://support.microsoft.com/kb/306843/en-us
Use the DTCPing tool to verify distributed transaction support across firewalls or against networks. The DTCPing tool must be installed on both the client and server computer and is a good alternative to the DTCTester utility when SQL Server is not installed on either computer.
2. DTCTester - download from and documented at http://support.microsoft.com/kb/293799/en-us
Use the DTCTester tool to verify distributed transaction support across firewalls or against networks. The DTCTester utility uses ODBC to verify transaction support against a SQL Server database and therefore requires that SQL Server is installed on one of the computers being tested.
3. NetMon - found on Windows setup disks or resource kit

Essential test Utilities Release 6.1
MTS and DCOM setup 26


![[MS-DCOM]: Distributed Component Object Model (DCOM ......Release: July 14, 2016 [MS-DCOM]: Distributed Component Object Model (DCOM) Remote Protocol Intellectual Property Rights Notice](https://static.fdocuments.in/doc/165x107/6116faf7d13bec40547d2870/ms-dcom-distributed-component-object-model-dcom-release-july-14-2016.jpg)


