
MS Excel Basics - SCSCC for Creating Formulas With Functions ..... 23 Referencing Adjacent Cells In...
31
EXCEL 2010 BASICS
Transcript of MS Excel Basics - SCSCC for Creating Formulas With Functions ..... 23 Referencing Adjacent Cells In...

EXCEL 2010 BASICS

ii Microsoft Excel I
Microsoft Excel I
OFFICE TAB .................................................................................................................................. 1
RIBBONS & GROUPS................................................................................................................... 2
OTHER SCREEN PARTS ............................................................................................................. 4
APPLICATION SPECIFICATIONS ........................................................................................... 5
THE BASICS ................................................................................................................................... 6
The Mouse .............................................................................................................................. 6
What Are Worksheets? ........................................................................................................... 6
What is a Workbook? ............................................................................................................. 6
THE FORMULA BAR ................................................................................................................... 7
name box ................................................................................................................................. 7
functions box ........................................................................................................................... 7
MOVING AROUND THE SPREADSHEET ............................................................................... 8
The Name Box ........................................................................................................................ 8
The Scroll Bar or Scroll Wheel (Mouse) ................................................................................ 8
The Keyboard ......................................................................................................................... 8
moving to different sheets ....................................................................................................... 8
KEYSTROKE SHORTCUTS ....................................................................................................... 9
DIFFERENT INFORMATION THAT CAN BE ENTERED IN EXCEL .............................. 10
Text ....................................................................................................................................... 10
Date ....................................................................................................................................... 11
Time ...................................................................................................................................... 11
NUMBERS..................................................................................................................................... 12
FORMATTING A CELL AS YOU TYPE ................................................................................. 13
EDITING THE CONTENTS OF A CELL ................................................................................ 14
While Entering The Data ...................................................................................................... 14
After Entering the Data ......................................................................................................... 14
STATUS MODE............................................................................................................................ 15
SELECTING CELLS ................................................................................................................... 16
Selecting One Cell ................................................................................................................ 16
Selecting a Group of Adjacent Cells ..................................................................................... 16
Selecting a Group of Non-Adjacent Cells ............................................................................ 17

Selecting The Entire Spreadsheet ......................................................................................... 17
Selecting A Row ................................................................................................................... 17
Selecting a Column ............................................................................................................... 17
MOVING TEXT ........................................................................................................................... 18
Moving Using the clipboard group on the home ribbon ....................................................... 18
Moving with the Mouse ........................................................................................................ 18
COPYING & PASTING TEXT ................................................................................................... 19
Copying Using the clipboard group on the home ribbon...................................................... 19
Copying with the Mouse ....................................................................................................... 19
THE AUTO CALCULATE FEATURE ..................................................................................... 20
SIMPLE FORMULAS ................................................................................................................. 21
Rules For Creating Formulas ................................................................................................ 21
OPERATORS IN FORMULAS .................................................................................................. 22
Order of Operation ................................................................................................................ 22
USING EXCEL FUNCTIONS..................................................................................................... 23
Rules for Creating Formulas With Functions ....................................................................... 23
Referencing Adjacent Cells In A Formula ........................................................................... 24
Referencing Non-Adjacent Cells In A Formula ................................................................... 25
MOST COMMONLY USED FUNCTIONS .............................................................................. 26
AUTOSUM .............................................................................................................................. 27

iv Microsoft Excel I

OFFICE TAB 1
OFFICE TAB
The features to manage your Excel files are found on the Office Tab:

2 Microsoft Excel I
RIBBONS & GROUPS
HOME RIBBON
GROUPS: Clipboard, Font, Alignment, Number, Styles, Cells, Editing
INSERT RIBBON
GROUPS: Tables, Illustrations, Charts, Sparklines, Filter, Links, Text, Symbols
PAGE LAYOUT RIBBON
GROUPS: Themes, Page Setup, Scale to Fit, Sheet Options, Arrange
FORMULAS RIBBON
GROUPS: Function Library, Defined Names, Formula Auditing, Calculation

RIBBONS & GROUPS 3
DATA RIBBON
GROUPS: Get External Data, Connections, Sort & Filter, Data Tools, Outline
REVIEW RIBBON
GROUPS: Proofing, Language, Comments, Changes, Ink
VIEW RIBBON
GROUPS: Workbook Views, Show, Zoom, Window, Macros

4 Microsoft Excel I
OTHER SCREEN PARTS
Name Box Gives you the cell address of the active cell. Can also be used to
move quickly to a range or to a specific cell address. It also can
be used to name ranges in the workbook.
Formula Bar Displays the text or formulas that are in the active cell. Can also
be used to edit the contents of a cell.
Status Bar Lets you know the status of your worksheet – Ready, Edit or
Enter Mode. Also contains Auto Calculate Features (Average,
Count, Sum) that can be performed without entering a formula in
a cell.
Sheet Tabs Are just like other sheets of paper that you can use in your
workbook. By default every workbook starts with 3 sheets.

APPLICATION SPECIFICATIONS 5
APPLICATION SPECIFICATIONS
The following are the maximums that Excel allows:
Feature Maximum Limit
Open Workbooks Limited by available memory and system
resources
Worksheet Size 1,048,576 rows by 16,384 columns
Column Width 255 characters
Row Height 409 points
Total number of characters that a cell can
contain
32,767 characters
Characters in a header/footer 255
Sheets in a single workbook Limited by available memory
(default is 3 sheets)
Number of characters for naming a sheet 31 characters

6 Microsoft Excel I
THE BASICS
THE MOUSE
Your mouse pointer will take on a different shape depending where you are in the spreadsheet.
Selection Face – used to select one cell or a range of cells.
Used to Move or Copy text using the Drag & Drop Feature.
AutoFill Handle – used to copy cell contents or formulas to adjoining cells.
I-Beam – shows you when the contents of a cell is being edited.
WHAT ARE WORKSHEETS?
A worksheet is also called a spreadsheet. A worksheet is just like a piece of paper, but can
contain more information than can be printed on one sheet of paper. The worksheet is the
primary document you use in Microsoft Excel to store and manipulate data. A worksheet
consists of cells organized into columns and rows and is always part of the workbook.
WHAT IS A WORKBOOK?
A workbook is what we called the file in Excel. A workbook is made up of a combination of
worksheets. You can add as many additional worksheets as your computer’s memory can
handle. When you open a new workbook in Excel you are given 3 worksheets by default.

THE FORMULA BAR 7
THE FORMULA BAR
NAME BOX
FUNCTIONS BOX
Name Box Displays the Cell Address of the active cell.
Functions Box When you type an equal sign (=) in a cell, the
Name Box becomes the Functions Box which
gives you a list of all of EXCEL’s functions.
You can select the one you want from the list or
you can type it in manually.
Cancel Button Allows you to cancel the information before
you have entered it in your workbook.
Enter Button Allows you to enter the information in you
workbook without changing the cell address.
Insert Function Button Calls up the Function Wizard and allows you to
select a function from the list.
The Open Area Displays the formula that is in the active cell.

8 Microsoft Excel I
MOVING AROUND THE SPREADSHEET
There are many ways to move around a spreadsheet.
THE NAME BOX
The Name Box is the easiest way to have Excel move you to a specific cell address.
Click into the Name Box.
Type the cell address or cell name.
Press Enter.
THE SCROLL BAR OR SCROLL WHEEL (MOUSE)
You can click on the arrows on the scroll bar or
you can physically drag the vertical scroll bar
up or down or the horizontal scroll bar left or
right.
You can also use the Scroll Wheel on your mouse to scroll through the worksheet.
THE KEYBOARD
You can use the arrow keys on your keyboard or on the Number Pad (if you turn the Number
Lock off). There are several common keystroke shortcuts that are listed on the next page.
MOVING TO DIFFERENT SHEETS
With the Mouse Just click the mouse on the Sheet Tab you want to move to.
With the Keyboard To move to the next sheet – CTRL + Page Down
To move to the previous sheet – CTRL + Page Up

KEYSTROKE SHORTCUTS 9
KEYSTROKE SHORTCUTS
TO MOVE TO KEYSTROKE
ONE CELL TO THE RIGHT TAB
ONE CELL TO THE LEFT SHIFT + TAB
CELL A1 CTRL + HOME
FIRST CELL IN CURRENT ROW HOME
MOVES DOWN ONE WINDOW BY ROWS PAGE DOWN KEY
MOVES UP ONE WINDOW BY ROWS PAGE UP KEY
MOVES RIGHT ONE WINDOW BY
COLUMNS
ALT + PAGE DOWN
MOVES TO THE NEXT SHEET IN
WORKBOOK
CTRL + PAGE UP
GO TO COMMAND F5 KEY
CTRL + G
EDIT – GO TO (FROM MENU BAR)
USING THE END KEY
MOVES TO THE LAST CELL OF DATA IN
THE WORKSHEET
CTRL + END
MOVES TO THE LAST CELL OF DATA IN
THE COLUMN
END +
MOVES TO THE LAST COLUMN OF
DATA IN THE CURRENT ROW
END +

10 Microsoft Excel I
DIFFERENT INFORMATION THAT CAN BE ENTERED IN EXCEL
TEXT
Text can be entered into EXCEL. EXCEL considers any cell containing any text, even if it
contains both text and numbers as “Text”. You can enter up to 32,000 characters in a cell and
text is left-aligned.
Examples of Text:
Firm Name
123 Main Street
Las Vegas, NV 89111
(702) 555-1234
or
702-555-1234
or
702/555/1234
If you type a number as any of these number formats above, EXCEL will consider it as text not a
number.

DIFFERENT INFORMATION THAT CAN BE ENTERED IN EXCEL 11
DATE
Excel recognizes several different ways of inserting a date:
October 2, 2005
10/2/05
Oct-02
Oct-2005
02-10-05
Excel gives you many options to format a date.
The current data can be inserted by pressing CTRL + ; at the same time.
TIME
Excel also recognizes several different ways of inserting the time.
13:30
10:21AM
20:00 (You can also use military time.)
Excel gives you many options to format time.
The current time can be inserted by pressing CTRL + SHIFT + ; at the same time.

12 Microsoft Excel I
NUMBERS
You can enter numbers with many different formats in EXCEL.
General Number 99
Comma 5,400
Percent 20%
Decimal 3.12345
Currency $34,000.00
Exponent 1.2E+08
When first entering a number, type it in with no formatting. You can then format numbers by
selecting an entire column(s) or row(s).
If a column is too small for Excel to display an entire number, Excel will either turn the number
into an exponent or will display it as pound signs (#######).
The easiest way to size a column is to double-click on the border after the column.

FORMATTING A CELL AS YOU TYPE 13
FORMATTING A CELL AS YOU TYPE
If you enter a number or text with specific formatting in a cell, the cell retains the same
formatting even if you delete the data.
To clear the format from a cell, from the Home Ribbon, click the Clear option:
Clear All – will delete the contents and the formatting from the cell.
Clear Format – will leave the contents and clear the formatting.
Clear Contents – will delete the contents, but leave the formatting. (Same as using the
DELETE key.)
Clear Comments – if the cell contains a comment, the comment will be deleted.

14 Microsoft Excel I
EDITING THE CONTENTS OF A CELL
WHILE ENTERING THE DATA
When you are in the middle of typing data into a cell you can edit it by either:
Using the Backspace or Delete keys.
Pressing the ESC key or the Cancel button to completely delete what you have
began to enter.
Use your arrow keys on the keyboard to move to the text you want to edit and make
your changes.
Click into the formula bar to edit the contents.
AFTER ENTERING THE DATA
Once you have entered the information you need to decide if you want to delete the contents of
the cell or you just want to edit the contents.
To replace the entire contents of the cell, click into the cell you want to change and type
in the new data.
To edit the contents of a cell you need to make the cell active for editing. (Status Bar will
indicate EDIT.) There are several ways to do this:
Double-click into the cell you want to edit.
Click into the cell and press the F2 key.
Click into the Formula Bar and edit the data there.

STATUS MODE 15
STATUS MODE
There are different modes of operation in EXCEL that are indicated in the Status Bar as defined
below:
READY EXCEL is ready for you to begin entering
data in a cell. You can also access the
Menu Bar or select another cell in this
mode.
EDIT Anyone of the methods describe when
editing text on the page before will put you
in the EDIT mode.
When you are in the EDIT mode you
cannot access the Menu Bar or select
another cell. To return to the READY
mode press the ENTER key when you are
finished editing.
ENTER This indicates that EXCEL is waiting for
you to enter data in a cell.
Like the EDIT mode you cannot access the
Menu Bar or select another cell until you
return to the READY mode.

16 Microsoft Excel I
SELECTING CELLS
There are many different ways to select cells.
SELECTING ONE CELL
To select one cell, click into it to make it the Active Cell. Your active cell is the one with the
border around and it is going to be affected by the next set of actions you perform.
SELECTING A GROUP OF ADJACENT CELLS
With the mouse:
Click the first cell in the group of cells you want to select.
Place the Selection Face on top of the Active Cell and hold down the mouse
while moving over the area you want to select, then release the mouse as shown below:
With the keyboard:
Click on the first cell in the group of cells you want to select.
Then hold down the SHIFT key while using your Arrow keys.
SELECTING CELLS 17
SELECTING A GROUP OF NON-ADJACENT CELLS
Click on the cell.
Hold down the CTRL key.
Continue to click on cells you want to select.
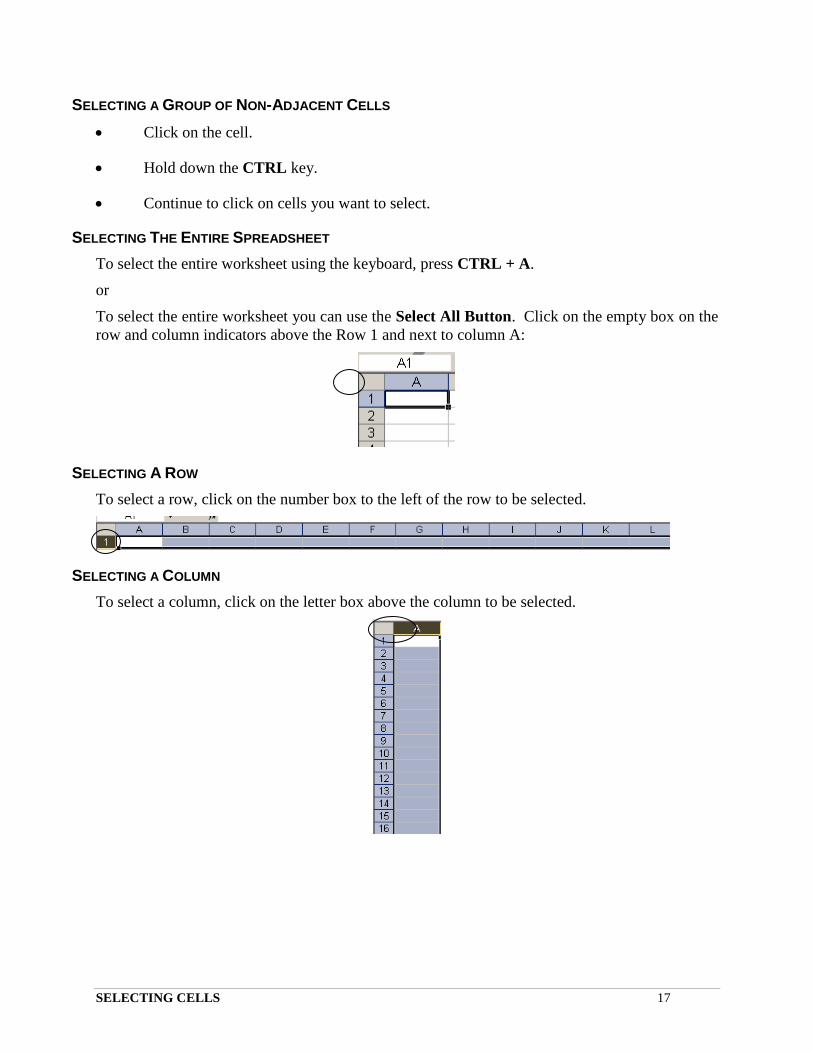
SELECTING THE ENTIRE SPREADSHEET
To select the entire worksheet using the keyboard, press CTRL + A.
or
To select the entire worksheet you can use the Select All Button. Click on the empty box on the
row and column indicators above the Row 1 and next to column A:
SELECTING A ROW
To select a row, click on the number box to the left of the row to be selected.
SELECTING A COLUMN
To select a column, click on the letter box above the column to be selected.

18 Microsoft Excel I
MOVING TEXT
MOVING USING THE CLIPBOARD GROUP ON THE HOME RIBBON
If you are moving cells far away or to other worksheets or workbooks you probably will use the
commands on the Clipboard Group on the Home Ribbon as shown below:
Select the cells you want to move.
From the Home Ribbon, click the Cut command .
If you want to move the cells to another sheet or workbook, switch to it.
Put you mouse in the upper-left cell of the paste area.
From Click on the Paste command .
EXCEL will replace any existing data in the paste area.
When you cut cell contents, a “marquis” will appear around the cell. Once the contents is pasted
the “marquis” will disappear.
MOVING WITH THE MOUSE
Moving cells a short distance within a window is quick and easy if you move the information by
dragging and dropping.
Select the cells you want to move.
Point to the bottom border of the selection. (Your mouse pointer will look like an arrow.)
Drag the selection where you want to paste it.

COPYING & PASTING TEXT 19
COPYING & PASTING TEXT
COPYING USING THE CLIPBOARD GROUP ON THE HOME RIBBON
If you are copying cells far away or to other worksheets or workbooks you will want to use the
commands on the Clipboard Group on the Home Ribbon as shown below:
Select the cells you want to copy.
Then click the Copy command .
If you want to copy the cells to another sheet or workbook, switch to it.
Put you mouse in the upper-left cell of the paste area.
Click on the Paste command .
EXCEL will replace any existing data in the paste area.
When you copy cell contents, a “marquis” will appear around the cell. As long as the marquis is
still active, you can continue to paste the cell content. To turn off the “marquis” after pasting,
press the ESC key.
COPYING WITH THE MOUSE
Copying cells a short distance within a window is quick and easy if you copy the information by
dragging and dropping.
Select the cells you want to copy.
Point to the bottom border of the selection. (Your mouse pointer will look like an arrow.)
Hold down the CTRL key while dragging the selection. (You will see a plus sign next to
the arrow.)
Drag the selection to where you want to paste it, release the mouse first and then release
the CTRL key.

20 Microsoft Excel I
THE AUTO CALCULATE FEATURE
You can quickly get a sum, count or average of a range of numbers without entering a formula
with the Auto Calculate Feature.
Select the range of numbers you want to calculate.
In the lower-right corner of the Status Bar the Average, Count and Sum of the numbers
will be displayed.
Right click on the area where the sum appears and a short-cut menu will appear with
other calculations you can select to automatically appear in the Status Bar:
CALCULATIONS PERFORMED WITH AUTOCALCULATE
Average Gives you the average of a range of numbers.
Count Counts the number of cells in a range
Numeric Count Counts the number of cells that contain numbers in the range.
Maximum Returns the maximum value in the range.
Minimum Returns the minimum value in the range.
Sum Gives you the sum of the range.

SIMPLE FORMULAS 21
SIMPLE FORMULAS
RULES FOR CREATING FORMULAS
Every formula must begin with an equal sign (=).
No spaces are to appear in the formula.
Numbers or cell addresses can be referenced.
Numbers can be used in formulas as follows:
=Sum(45+67+123+567)
Formulas can use cell addresses as follows:
=sum(D5+D6+D7+D8)
The cell addresses can be typed in capital or lowercase.
Formulas can contain both numbers and cell addresses.
=sum(D9+6+D10+8)

22 Microsoft Excel I
OPERATORS IN FORMULAS
ARITHMETIC OPERATORS
Operator Formula Type of Operation
+ =2+2 or =A1+A2 Addition
- =10-3 or =A1-A2 Subtraction
* =4*4 or =A1*A2 Multiplication
/ =20/5 or =A1/A2 Division
% =10% Percent
^ =5^2 or =A1^A2 Exponentiation (to
the power of)
COMPARATIVE OPERATORS
Operator Type of Operation
= Equal to
< Less than
<= Less than or equal to
> Greater than
>= Greater than or equal to
<> Not equal to
ORDER OF OPERATION
The following is the order of operation: Parentheses, Exponents Multiplication, Division,
Addition and Subtraction.
i.e. =2+2*5 12
You can use parentheses to change the order of operation:
i.e. =(2+2)*5 20

USING EXCEL FUNCTIONS 23
USING EXCEL FUNCTIONS
The built-in functions in EXCEL perform standard worksheet calculations. The values on which
a function performs operations are called arguments. The values that the functions return are
called results. You use functions by entering them into formulas on the worksheet. The
sequence of characters used in a function is called the syntax. The syntax of a formula begins
with an equal sign (=) and is followed by a combination of values and operators.
Parentheses tell EXCEL where arguments begin and end. You must include both parentheses,
with no spaces before the argument and after. Arguments can be numbers, text, logical values,
arrays, error values or cell references. The argument you designate must produce a valid value
for that argument. Arguments can also be constants or formulas, and the formulas can contain
other functions. When an argument to a function is itself a function, it is said to be nested. In
EXCEL, you can nest up to seven levels of functions in a formula.
RULES FOR CREATING FORMULAS WITH FUNCTIONS
All formulas must start with an equal sign (=), followed by the function name.
The arguments must be in parentheses.
AND NO SPACES are to appear.
=SUM(2,4,5,B6,C15,D21)
NOTE: By default EXCEL always displays the results of the formula in the cell of the
worksheet. If you want to see the actual formulas in the worksheet, press CTRL
+ ~ (tilda).

24 Microsoft Excel I
REFERENCING ADJACENT CELLS IN A FORMULA
Instead of typing the cell addresses in a formula, you can reference the cells by selecting them
with your mouse.
Click into the cell where you want to enter the formula.
Type an equal sign (=)
Type the function name (SUM) and the open parentheses (.
Click on the first cell you want to reference in the formula and select the additional
adjacent cells either dragging down or dragging across over the cells.
EXCEL will display the range of cells with a colon (:). The range specifies the first cell
address through the last cell address.
Press the ENTER key.
EXCEL will add the closing parentheses.

USING EXCEL FUNCTIONS 25
REFERENCING NON-ADJACENT CELLS IN A FORMULA
Working with functions for non-adjacent cells follows the same principle as adjacent cells. The
main difference is that each cell address is separated with a comma (,).
Click into the cell where you want to enter the formula.
Type an equal sign (=)
Type the function name (SUM) and the open parentheses (.
Click on the first cell you want to reference in the formula.
Hold down the CTRL key and continue to click on the non-adjacent cells you want to
reference in the formula.
EXCEL will display the list of cells, each one separated by a comma (,).
Press the ENTER key.
EXCEL will add the closing parentheses.
NOTE: You can combine ranges, non-adjacent cells and constant numbers in a formula, each
separated by a comma (,) as follows:
=SUM(A1:A5,C6,D12,8,5,8)

26 Microsoft Excel I
MOST COMMONLY USED FUNCTIONS
=SUM Adds all the numbers in a range of cells.
=MAX Returns the largest number in a set of values.
=MIN Returns the smallest number in a set of values.
=AVERAGE Returns the average of an argument. An argument can contain
numbers, ranges or individual cells.

AUTOSUM 27
AUTOSUM
AutoSum is a shortcut to using the =SUM function. AutoSum will automatically insert the
formula for you. All you have to do is reference the cell addresses or sometimes EXCEL will
assume the range of the cells as shown below:
Click into the empty cell below the range of values. This is where the formula will
automatically appear.
Click on the AutoSum button on the Home Ribbon in the Editing Group:
.
EXCEL will automatically select the range of the cells above.
Press the ENTER key.
NOTE: The AutoSum feature will not work if there are blank cells above and may or may
not work when referencing cells to the left of the formula.