
MQClusterSetup
8
file:///C:/Documents%20and%20Settings/Administrator/My... 1 of 7 3/5/2007 12:58 PM WebSphere MQ V6.0 Setting up a queue manager cluster via WebSphere MQ Explorer This tutorial des cribes steps req uired to configure and veri fy the setup of a queue manager cluster on Windows . The use of queue manager clusters is primarily to minimize the definition of queues and channels during the setup of distributed queuing between 2 or more queue managers. In addition to that, workload management and failover can be achieved through the use of queue manager clusters. Introduction The “WebSphere MQ Explorer” is an eclipse based user interface that can run on multiple platfo rms. It comes bundled with WebSphere MQ V6.0 (hereafter known as WMQ V6.0) and can be installed through the “WebSphere MQ Launchpad”. Do note that the WebSphere MQ Explorer (hereafter known as WMQ Explorer) utilizes the WebSphere Eclipse Platform 3.0.1 and cannot be install ed on any other version of eclipse. Before proceeding with this tutorial, please ensure that th e following pre-requis ites are met: 1) WMQ 6 server and WMQ Explorer are installed. 2) 2 Queue Managers i.e. KLQM & MELBQM have been created with default values. 3) Queue manager “KLQM” should have a TCP listener defined to listen at port “ 1417” and queue manager “MELBQM” should have a TCP listener defined to listen at the default port “1414”. Both listeners should be configured to start when the queue manager is started. 4) A local queue i.e. store.queue should be defined with default values on both queue managers. 5) A default queue manager should be configured. Create the queue manager cluster 1) Launch WMQ Explorer (as depicted below) via the following start menu link “ Start > Programs > IBM WebSphere MQ > WebSphere MQ Explorer ”. Figure 1 – WebSphere MQ Explorer
-
Upload
chirutha84 -
Category
Documents
-
view
219 -
download
0
Transcript of MQClusterSetup

8/8/2019 MQClusterSetup
http://slidepdf.com/reader/full/mqclustersetup 1/7
file:///C:/Documents%20and%20Settings/Administrator/My..
of 7 3/5/2007 12:58 PM
WebSphere MQ V6.0 Setting up a queue manager cluster via
WebSphere MQ Explorer
This tutorial describes steps required to configure and verify the setup of a queue manager cluster on Windows. The use
of queue manager clusters is primarily to minimize the definition of queues and channels during the setup of distributedqueuing between 2 or more queue managers. In addition to that, workload management and failover can be achieved
through the use of queue manager clusters.
Introduction
The “WebSphere MQ Explorer” is an eclipse based user interface that can run on multiple platforms. It comes bundled
with WebSphere MQ V6.0 (hereafter known as WMQ V6.0) and can be installed through the “WebSphere MQ
Launchpad”. Do note that the WebSphere MQ Explorer (hereafter known as WMQ Explorer) utilizes the WebSphereEclipse Platform 3.0.1 and cannot be installed on any other version of eclipse. Before proceeding with this tutorial, please
ensure that the following pre-requisites are met:
1) WMQ 6 server and WMQ Explorer are installed.
2) 2 Queue Managers i.e. KLQM & MELBQM have been created with default values.
3) Queue manager “KLQM” should have a TCP listener defined to listen at port “1417” and queue manager
“MELBQM” should have a TCP listener defined to listen at the default port “1414”. Both listeners should beconfigured to start when the queue manager is started.
4) A local queue i.e. store.queue should be defined with default values on both queue managers.
5) A default queue manager should be configured.
Create the queue manager cluster
1) Launch WMQ Explorer (as depicted below) via the following start menu link “ Start > Programs > IBM
WebSphere MQ > WebSphere MQ Explorer”.
Figure 1 – WebSphere MQ Explorer

8/8/2019 MQClusterSetup
http://slidepdf.com/reader/full/mqclustersetup 2/7
file:///C:/Documents%20and%20Settings/Administrator/My..
of 7 3/5/2007 12:58 PM
2) Right-click on “Queue Manager Clusters” in the navigation pane and select “New > Queue manager
cluster…” from the context menu to initiate the cluster creation wizard (as depicted below):
Figure 2 – Create new queue manager cluster
3) In the first dialog of the wizard, key in a cluster name i.e. QMCLUSTER and click "Next" to proceed.
Figure 3 – Key in a cluster name
4) Next up, select the Queue Manager which will act as the first full repository (if and when new queue managersare added into the cluster, all that is required to be defined on the new queue manager are cluster receiver
and sender channels to the full repository)
Figure 4 – Select the first full repository
5) You’ll then be prompted to select a second queue manager full repository (as depicted below):
Figure 5 – Select a second full repository

8/8/2019 MQClusterSetup
http://slidepdf.com/reader/full/mqclustersetup 3/7
file:///C:/Documents%20and%20Settings/Administrator/My..
of 7 3/5/2007 12:58 PM
6) The next dialog displays a summary of the cluster receiver channels which needs to be defined in the latter
screens. Click “Next” to proceed.
Figure 6 – Define cluster channels
7) In the following dialog, key in a cluster receiver name i.e. TO.KLQM.CLUSRCVR and the connection name i.e.
localhost(1417). This defines a cluster receiver channel to enable the first full repository to receive clusterinformation from other full repositories.
Figure 7 – Define cluster receiver channel for first full repository
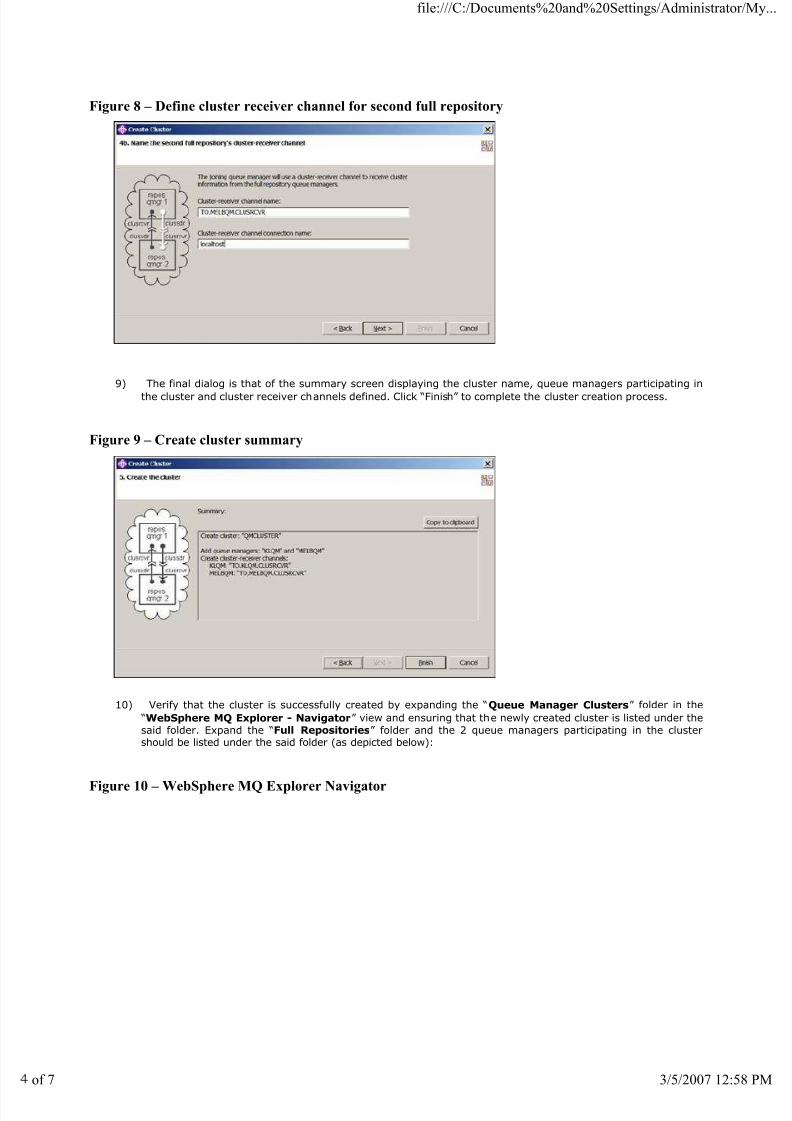
8) Next up, key in the cluster receiver name i.e. TO.MELBQM.CLUSRCVR and the connection name i.e.
localhost for the second full repository. This defines a cluster receiver channel to enable the second fullrepository to receive information from other full repositories.
8/8/2019 MQClusterSetup
http://slidepdf.com/reader/full/mqclustersetup 4/7
file:///C:/Documents%20and%20Settings/Administrator/My..
of 7 3/5/2007 12:58 PM
Figure 8 – Define cluster receiver channel for second full repository
9) The final dialog is that of the summary screen displaying the cluster name, queue managers participating in
the cluster and cluster receiver channels defined. Click “Finish” to complete the cluster creation process.
Figure 9 – Create cluster summary
10) Verify that the cluster is successfully created by expanding the “Queue Manager Clusters” folder in the
“WebSphere MQ Explorer - Navigator” view and ensuring that the newly created cluster is listed under the
said folder. Expand the “Full Repositories” folder and the 2 queue managers participating in the clustershould be listed under the said folder (as depicted below):
Figure 10 – WebSphere MQ Explorer Navigator

8/8/2019 MQClusterSetup
http://slidepdf.com/reader/full/mqclustersetup 5/7
file:///C:/Documents%20and%20Settings/Administrator/My..
of 7 3/5/2007 12:58 PM
Configure a cluster queue on each queue manager
11) Select the “Queues” folder under the queue manager name i.e. KLQM or MELBQM, after which right-click on
the local queue i.e. store.queue listed in the “WebSphere MQ – Content” view and select properties fromthe context menu to launch the properties dialog. In the properties dialog, select “Cluster” in the left pane,
after which check the “Shared in cluster” radio button and key in “QMCLUSTER ” in the text field (as
depicted below). Click OK to persist the changes.
(Note: This step has to be performed on both the queue managers)
Figure 11 – Local queue properties
8/8/2019 MQClusterSetup
http://slidepdf.com/reader/full/mqclustersetup 6/7
file:///C:/Documents%20and%20Settings/Administrator/My..
of 7 3/5/2007 12:58 PM
Configure workload management on each queue manager
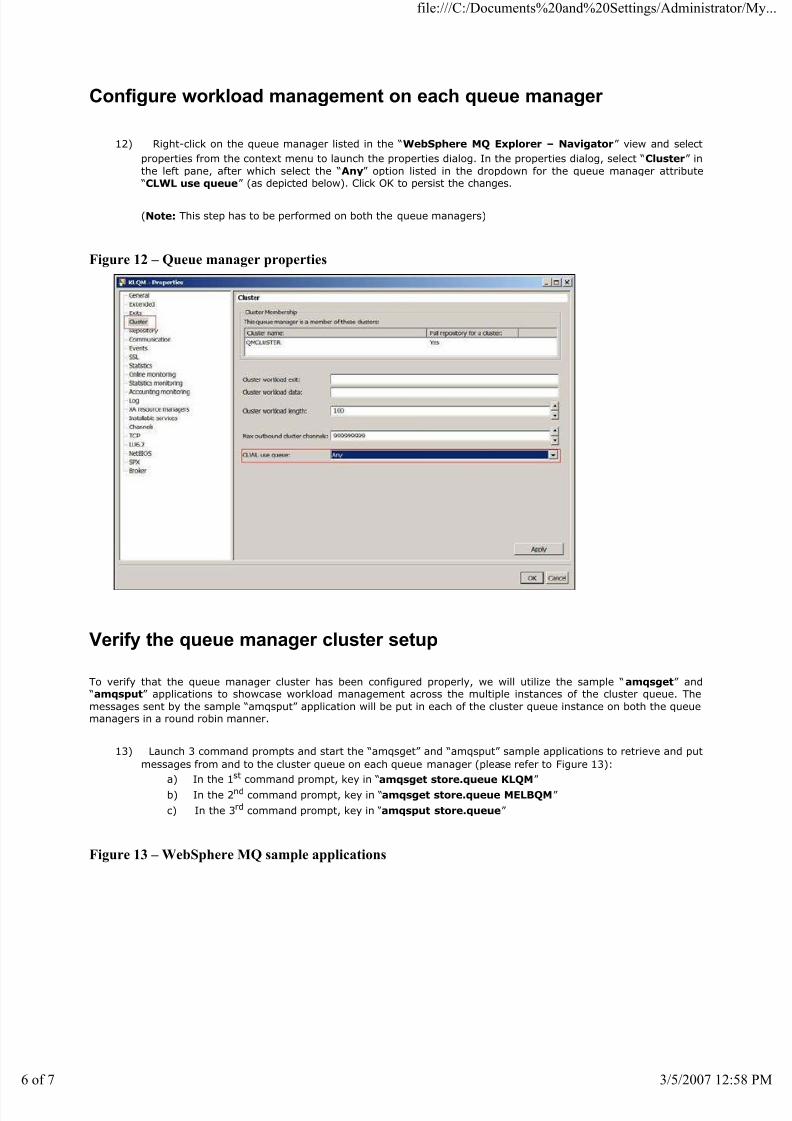
12) Right-click on the queue manager listed in the “WebSphere MQ Explorer – Navigator” view and select
properties from the context menu to launch the properties dialog. In the properties dialog, select “Cluster” in
the left pane, after which select the “Any” option listed in the dropdown for the queue manager attribute
“CLWL use queue” (as depicted below). Click OK to persist the changes.
(Note: This step has to be performed on both the queue managers)
Figure 12 – Queue manager properties
Verify the queue manager cluster setup
To verify that the queue manager cluster has been configured properly, we will utilize the sample “ amqsget” and “amqsput” applications to showcase workload management across the multiple instances of the cluster queue. The
messages sent by the sample “amqsput” application will be put in each of the cluster queue instance on both the queuemanagers in a round robin manner.
13) Launch 3 command prompts and start the “amqsget” and “amqsput” sample applications to retrieve and put
messages from and to the cluster queue on each queue manager (please refer to Figure 13):
a) In the 1st command prompt, key in “amqsget store.queue KLQM”
b) In the 2nd command prompt, key in “amqsget store.queue MELBQM”
c) In the 3rd command prompt, key in “amqsput store.queue”
Figure 13 – WebSphere MQ sample applications

8/8/2019 MQClusterSetup
http://slidepdf.com/reader/full/mqclustersetup 7/7
file:///C:/Documents%20and%20Settings/Administrator/My..
14) Enter sample messages e.g. message 1, message 2, message 3, etc. as input to the “amqsput” application in
the 3rd command prompt. You’ll notice that the first message will be placed in the cluster queue hosted by
queue manager “KLQM”, the second message in the cluster queue hosted by “MELBQM” and the third messagereturns to the cluster queue hosted by “KLQM”. This verifies that workload management is achieved in a round
robin manner (as depicted below):
Figure 14 – Workload management in a round robin manner
15) Congratulations! You have successfully created a queue manager cluster with 2 full repository queue
managers and 2 instances of a cluster queue. In addition, you have verified using the sample “amqsget” and “amqsput” applications that workload management is achieved in a round robin manner.


