MPR FT-US-ISS1
21
1 MPR FT Users Handbook This handbook refers to all MPR FT models Model shown is the MPR FT with rubber butt pad and optional scope.. WARNING! - UNAUTHORISED DISASSEMBLY OF THIS RIFLE WILL INVALIDATE THE MANUFACTURERS WARRANTY. **** SAFETY CODE **** 1 ALWAYS TREAT AN AIR RIFLE AS IF LOADED. 2 ALWAYS POINT THE RIFLE IN A SAFE DIRECTION, NEVER POINT A GUN AT ANYONE, EVEN IF UNLOADED. 3 NEVER LEAVE A RIFLE UNATTENDED WHEN COCKED OR LOADED. 4 ALWAYS BE SURE OF WHAT LIES BEYOND YOUR TARGET. 5 ALWAYS CONDUCT YOURSELF IN A SPORTSMAN LIKE MANNER. 6. ALWAYS KEEP YOUR FINGER OFF THE TRIGGER UNTIL YOU ARE READY TO FIRE. ALWAYS BE AWARE THAT YOUR ACTIONS WILL BE UNDER THE SCRUTINY OF OTHER MEMBERS OF THE PUBLIC WHO MAY NOT SHARE YOUR ENTHUSIASM FOR AIR GUNS. BAD PRACTICES PROMOTE BAD PUBLICITY. DO NOT JEOPARDISE OUR FUTURE ENJOYMENT BY MISUSING THIS GUN. Issue 1PYR PLEASE READ THIS MANUAL BEFORE USING YOUR MPR FOR THE FIRST TIME. IT CONTAINS IMPORTANT SAFETY INFORMATION AND INSTRUCTION ON USE, ADJUSTMENT AND MAINTENANCE.
Transcript of MPR FT-US-ISS1

1
MPR FT
Users HandbookThis handbook refers to all MPR FT models
Model shown is the MPR FT with rubber butt pad and optional scope..
WARNING! - UNAUTHORISED DISASSEMBLY OF THIS RIFLE WILL INVALIDATE THEMANUFACTURERS WARRANTY.
**** SAFETY CODE ****
1 ALWAYS TREAT AN AIR RIFLE AS IF LOADED.2 ALWAYS POINT THE RIFLE IN A SAFE DIRECTION, NEVER POINT A GUN AT ANYONE, EVEN IF UNLOADED.3 NEVER LEAVE A RIFLE UNATTENDED WHEN COCKED OR LOADED.4 ALWAYS BE SURE OF WHAT LIES BEYOND YOUR TARGET.5 ALWAYS CONDUCT YOURSELF IN A SPORTSMAN LIKE MANNER.6. ALWAYS KEEP YOUR FINGER OFF THE TRIGGER UNTIL YOU ARE READY TO FIRE.
ALWAYS BE AWARE THAT YOUR ACTIONS WILL BE UNDER THE SCRUTINY OF OTHER MEMBERS OF THE PUBLIC WHOMAY NOT SHARE YOUR ENTHUSIASM FOR AIR GUNS. BAD PRACTICES PROMOTE BAD PUBLICITY. DO NOT JEOPARDISEOUR FUTURE ENJOYMENT BY MISUSING THIS GUN.
Issue 1PYR
PLEASE READ THIS MANUAL BEFORE USING YOUR MPR FOR THE FIRST TIME. ITCONTAINS IMPORTANT SAFETY INFORMATION AND INSTRUCTION ON USE,
ADJUSTMENT AND MAINTENANCE.

2
Not a toy. Adult supervision required. Misuse or careless use maycause serious injury or death. May be dangerous up to 1,000 yards.
WARNING!
THIS AIRGUN IS INTENDED FOR USE BY THOSE 18 YEARS OF AGE OR OLDER.
Do not inhale dust from lead pellets or put lead pellets in the mouth.Wash hands after handling lead. Lead pellets contain lead, a chemicalknown to the State of California to cause cancer and birth defects (orother reproductive harm).
WARNING!
Keep the air rifle in the ON SAFE position until you’re ready toshoot, then push the safety to the OFF SAFE position.
WARNING!
Keep your finger off the trigger while cocking the air rifle or with thebarrel in the downward position. Failure to do so may permanentlydamage your air rifle. Do not shoot without a pellet in the chamber(dry fire). This may permanently damage your air rifle.
WARNING!
Use the correct pellet size according to your Air Arms rifle model.Never reuse pellets. The use of any other kind of ammunition cancause injury to you or damage to the air rifle.
WARNING!
Do not assume that the gun is unloaded if it fails to fire properly!
WARNING!
Never leave your gun loaded. Do not store it loaded.
WARNING!

3
Contents of box.
1 x MPR rifle.1 x Tool kit consisting of. 1 x 1.5mm Allen key.
1 x 2mm Allen key.1 x 2.5mm Allen key.1 x 3mm Allen key.1 x 4mm Allen key.1 x 5mm Allen key.1 x 6mm Allen key.1 x Filling adaptor.
1 x Manual.
Contents.
Important information. Page 4.Assembly. Page 6.Filling instructions. Page 7.Cocking. Page 10.Loading. Page 11.Trigger adjustment. Page 12.Stock adjustment. Page 14.Maintenance. Page 16.
IMPORTANT INFORMATION, PLEASE READ
Before leaving the factory this rifle was quality inspected and test fired using Air Arms PELLETSto check operation and final adjustment.
It was dispatched in a sealed purpose designed box with a contents label on the lid. Air Arms maynot be responsible for any damage to the contents or missing items if the box is not original, if it isdamaged or the seals are not intact.
Air Arms cannot be held responsible for damage or missing items due to transit damage, mishan-dling or being tampered with after leaving the factory.
If this rifle is not received in the original box with the seals intact, please examine carefully forany damage, missing tools or documentation.
In the first instance any problems or complaints regarding this product should be referred to thesupplier.
The air cylinder is a highly pressurized unit that must not be modified in any way. Serious per-sonal injury may result if this, and the advice below is not followed.
Do not pressurize the cylinder if there are any surface abrasions or dents. Contact Air Arms foradvice.
Do not store the rifle in places with, or near sources of high temperature such as fires or boilers.Do not attempt to dismantle when pressurized.Do not pressurize beyond the stated filling pressure (see filling instruction section). Damage
caused by such action is not covered by the manufacturers warranty.
4
Important Information continued.
Only use clean, filtered and dry compressed air. Never use any other gas, particularly industrialor welding gases such as oxygen, carbon dioxide, acetylene, hydrogen, argon, etc.
If compressed air is being used other than from a diving shop, the inside of the cylinder should beinspected for corrosion at least annually.
In any event the cylinder should be inspected every two to three years depending upon usage.Air Arms can provide this service at a reasonable cost.
To maintain this rifle in good working order it should be serviced annually by a competent gun-smith, your supplier may be able to provide this service or you should contact Air Arms.
A reasonable amount of advice will be provided to enable the end user to service their own rifle,however this is at the discretion of Air Arms and advice may not be given in all cases.
Due to the nature of hand pumps and their relative inefficiency in removing moisture from the aircompressed air, the chances of corrosion damage to the cylinder and other internal components areincreased. The rifle should be regularly serviced and/or checked for any signs of damage by a compe-tent gunsmith.
Air Arms recommend using a dry pack filter kit on any hand pump used to fill our air rifles.Air Arms cannot be held responsible for the loss of performance when accessories used that are
not manufactured by Air Arms. Contact your supplier or Air Arms for any advice on this matter.Do not store the rifle in a damp place such as a garden shed or garage.Do not store this rifle in a plastic or PVC gun bag without first applying a surfaces corrosion
inhibitor.Always ensure the loading bolt is fully closed before firing.
***** LIMITED LIABILITY WARRANTY *****UK Customers only.
This product is warranted to the retail customer for 12 months from the date of purchase against defects inmaterials and workmanship and is transferable to any subsequent owner.
Proof of purchase is required to receive warranty repairs, retain your purchase invoice and return thewarranty registration card as soon as possible after purchase. The warranty card must show the dealer/supplier name and address and date of purchase.
What is covered.Replacement parts & labour on a ‘back to base’ basis, return transportation to the
consumer (mainland UK only).What is not covered.
Transportation from the consumer to Air Arms.Damage caused by misuse, abuse, lack of routine maintenance, transit damage be-
tween the dealer/supplier and the consumer.Unauthorised disassembly.Parts subject to normal wear and tear.Any other consequential cost incurred by the consumer.Return transportation to consumers outside the mainland UK.
No warranty is implied as to the fitness for any particular purpose.
AIR ARMS RESERVE THE RIGHT TO ALTER THE CONSTRUCTION, APPEARANCE ORPERFORMANCE OF ANY PRODUCT WITHOUT PRIOR NOTIFICATION. ALL ILLUSTRA-TIONS ARE FOR INFORMATION PURPOSES ONLY AND DO NOT NECESSARILY SHOW THEEXACT MODEL THAT WAS PURCHASED.
5
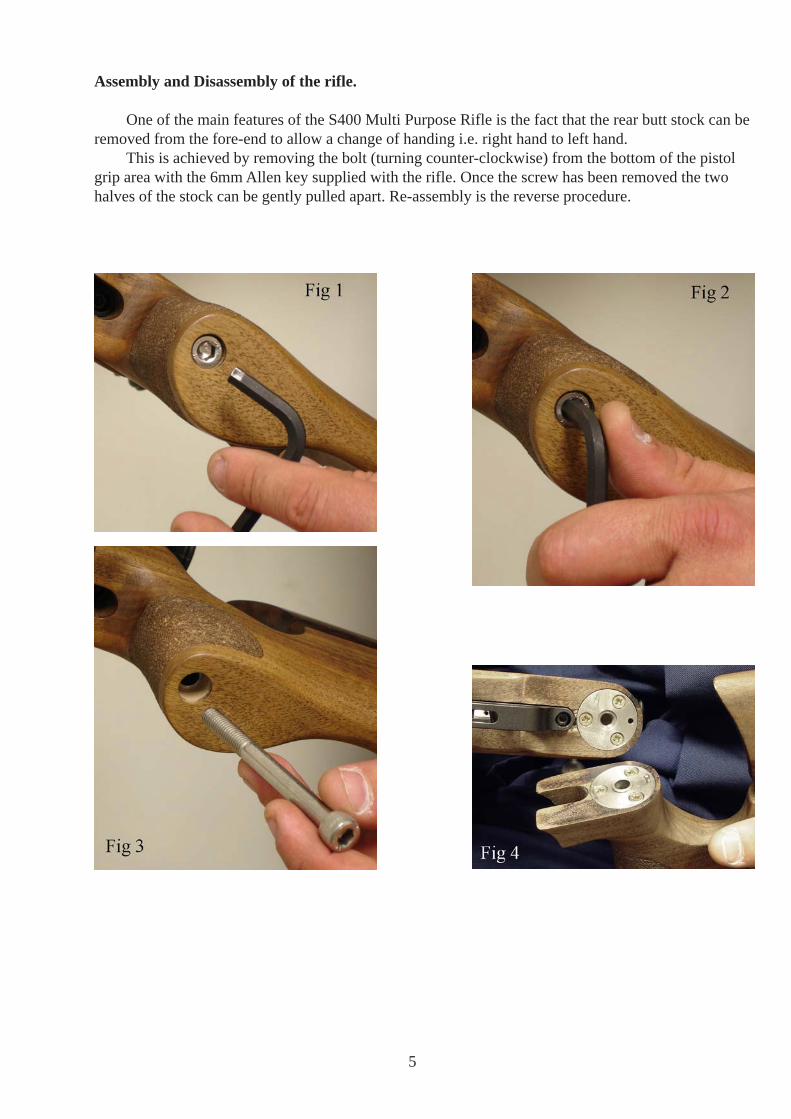
Assembly and Disassembly of the rifle.
One of the main features of the S400 Multi Purpose Rifle is the fact that the rear butt stock can beremoved from the fore-end to allow a change of handing i.e. right hand to left hand.
This is achieved by removing the bolt (turning counter-clockwise) from the bottom of the pistolgrip area with the 6mm Allen key supplied with the rifle. Once the screw has been removed the twohalves of the stock can be gently pulled apart. Re-assembly is the reverse procedure.

6
FILLING INSTRUCTIONS
NOTE ! ONLY USE CLEAN, DRY AND FILTERED COMPRESSED AIR, PREFERABLY FROMA DIVING SHOP. OVER PRESSURISATION MAY DAMAGE THE CYLINDER BEYOND REPAIR.
First the female part of the filling kit (this was supplied with the rifle) must be fitted to your filling equip-ment. The female part (S475) has a 1/8th BSP male thread that screws directly into the hose of your pump orbottle.
Next remove the dust cover from the end of your rifle.
This is achieved by unscrewing the cover in an anti-clockwisedirection.
Once the connector is exposed the female part of the filling kit can be place on the male and press all theway on making sure that the ‘O’ rings on the male part are covered. Once the female part is pushed on to themale, twist it to lock it into place.
Using hand pumps.
The procedure for using hand pumps is the same as for bottle. It is more important to turn the female onthe gun to lock it in place.
When using the pump it must be remembered that the first few pump are filling the hose and NOT thegun. When the pressure in the hose equalises to that in the gun, the gun will start to fill.
It can take some effort to fill the gun using a pump and we reccomend using the pump to top up insteadof filling from empty.

7
The MPR FT range of rifles are fiited with a pressure indicator mounted on the underside of the rifle justin front of the stock screw. This provides the user with a visual check on the amount of air remaining in thecylinder this indicator should not be used during the filling process as the needle reaction speed has beenslowed to prevent damage whilst filling. After filling the needle can take several seconds to synchronise withthe air in the cylinder. The picture below shows a rifle with just over 150 bar of pressure. Although every gunis slightly different the recommended refill pressure for the MPR FT is between 100 and 110 bar.
With the female in place the gun can now be filled.If the rifle is empty the mechanism will need to be cocked to allow the firing valve to close. If the rifle is
not cocked when the bottle is opened or the pump used, the air will past the valve and exhaust through thebarrel.
Check that the bleed valve on the filling equipment is closed (turn clockwise to close) then slowly openthe main valve on bottle or start using the pump. The pressure in the hose will equalise and then the rifle willstart to fill.
If you are filling your rifle from empty there may be some air exhausted through the barrel until the airpressure is sufficient to over come the firing valve spring (S306) this will happen at approximately 50 bar(750psi).
The filling pressure of the MPR FT is 190 bar (2755psi). Filling to a higher pressure will not increaseeither power or number of shots. Over filling will lower the power and may cause irreparable damage to thecylinder.
Once the filling pressure has been reached, close the valve on the bottle or stop pumping, open the bleedvalve on the filling kit (to vent the hose, if you do not vent the hose you will not be able to remove the femalefrom the rifle). Now the female connector can be removed from the rifle and end cap (S483) can be replacedover the male connector ensuring not to overtighten.
NOTE: On the front of the cylinder is an engraved warning reading....
READ MANUAL. MFP 200bar. MSP 200bar. DOM **/**/** **. INSPECTANNUALLY.
MFP = Maximum Filling Pressure. The pressure is stated.MSP = Maximum Safe Pressure. The pressure is stated.DOM = Date of Manufacture. The date is stated.

8
WARNING NOTE CONCERNING 300 BAR BOTTLES.
WITH THE ADVENT OF THE 300 BAR BOTTLE IT SHOULD BE NOTED THAT CARE HAS TO BE TAKEN WHENFILLING YOUR RIFLE.
THE FILLING PROCEDURE DESCRIBED IN THIS MANUAL MUST BE FOLLOWED TO AVOIDED DAMAGE TOTHE RIFLE, PARTICULARLY THE SLOW OPENING OF THE VALVE ON THE BOTTLE. OPENING THE VALVE QUICKLYWILL ALLOW UP TO 300 BAR OF PRESSURE INTO THE CYLINDER AT ONCE, THIS COULD CAUSE SERIOUSPERSONAL INJURY OR IRREPARABLE DAMAGE TO THE CYLINDER.

9
Cocking and Loading the rifle.
To cock the S400 Multi Purpose Rifle hold the gun firmly in one hand and with the other hold thebolt as shown in Fig 16. Lift the bolt up and pull straight backwards until you hear a click, this is thesear engaging the striker (In the pictures below, the sights have been removed for demonstration pur-poses).
If the bolt is held with 2 fingers on one side of the bolt and the thumb on the other side, as in Fig17, the cocking action is smoother and less effort.
10
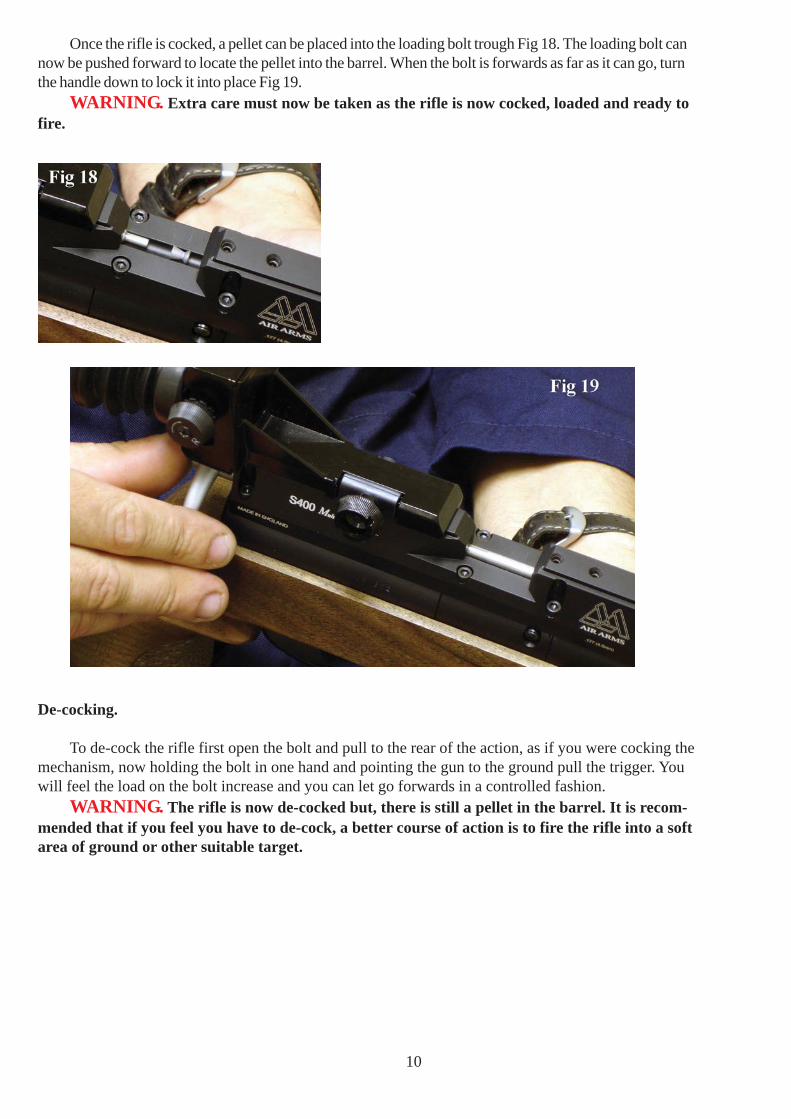
Once the rifle is cocked, a pellet can be placed into the loading bolt trough Fig 18. The loading bolt cannow be pushed forward to locate the pellet into the barrel. When the bolt is forwards as far as it can go, turnthe handle down to lock it into place Fig 19.
WARNING. Extra care must now be taken as the rifle is now cocked, loaded and ready tofire.
De-cocking.
To de-cock the rifle first open the bolt and pull to the rear of the action, as if you were cocking themechanism, now holding the bolt in one hand and pointing the gun to the ground pull the trigger. Youwill feel the load on the bolt increase and you can let go forwards in a controlled fashion.
WARNING. The rifle is now de-cocked but, there is still a pellet in the barrel. It is recom-mended that if you feel you have to de-cock, a better course of action is to fire the rifle into a softarea of ground or other suitable target.

11
Trigger adjustment.
The Multi Purpose Rifle has a two stage trigger. This means that as the trigger is pulled the bot-tom sear gradually disengages with the top sear until the two disengage completely and the rifle fires. Ifthe pressure on the trigger is released before firing, the sears return to their first fully engaged position.This type of trigger allows a very fine but safe operation because it is the release of the second stagethat actually fires the gun. This arrangement is vastly superior to single stage trigger, however it mustbe stated that adjustment of a two stage unit is more difficult than the adjustment of a single stagetrigger.
Trigger positioning.
The trigger on the Multi Purpose Rifle can be adjusted in a variety of ways to make the trigger asefficient as possible. First, the trigger blade can be rotated around the trigger pillar, this allows thefinger to sit perfectly on the trigger.
The blade can be raised or lower on the pillar to make sure that it is in line with the shootersfinger.
The whole trigger blade and pillar assembly can also slide forwards and backwards along thetrigger bar to increase or decrease the length of pull.
These adjustments will allow the gun to be tailored the individual shooter.
Fig 20.
A - Pillar screw.B - Blade screw.C - Second stage adjuster.D - First stage adjuster.E - Weight of pull adjuster.F - Trigger bar.G - Trigger blade.H - Trigger pillar.
Rotating, raising and lowering the blade.
The trigger blade can be rotated andmoved up and down on the trigger pillarby loosening the screw in the blade ‘B’(use the 2mm Allen key supplied.)Fig 21.
Once in position the screw can bere-tightened.
WARNING. Over tighteningscrews or bolts mounted into plasticmay cause damage.

12
Moving the pillar on the trigger bar.
Loosening screw ‘A’ with the1.5mm Allen key (supplied) will allowthe trigger pillar to be moved forwardsand backwards along the trigger bar. (Fig22).
Trigger adjustment.
The operation of the trigger is con-trolled by 3 screws C, D & E (fig 23).
The weight of pull adjustment iscontrolled by screw ‘E’, and is located infront of the trigger, housed in the triggerguard (fig 20).
Clockwise rotation will increase thepull weight and counter-clockwise willdecrease the weight. If the screw is over adjusted in the clockwise direction the spring will becomecoil-bound and may prevent operation of the trigger.
The first stage adjuster ‘D’ is thefirst screw in the trigger bar looking fromthe front of the gun (fig 23). This screwdetermines the length of first stage travelbefore the second stage engages. Clock-wise adjustment reduces the first stagetravel.
The second stage adjuster ‘C’ islocated next to the first stage screw (fig23). This screw determines the exactpull-off point of the trigger.
WARNING. Adjustment of a two-stage trigger can be difficult and should be left to experi-enced and trained technicians. Adjustment to any one of the screws will have a direct effect onthe other two screws and could make the gun unsafe.
If you have no experience of adjusting a two-stage trigger it is highly recommended that youseek guidance or leave the trigger on the factory settings.
Tip.
When adjusting the trigger write down on a piece of paper the number of turns and direction ofeach adjuster screw. This will make it easier to recover the original settings if required.

13
Adjusting the Cheek Piece and Butt Pad.
The cheek piece can be adjusted in two planes first it can be raised and lowered by looseningscrew ‘J’ (fig 25). The cheek piece can also be adjusted a small amount from side to side as in (fig 25),by loosening screws ‘I’.

14
Adjusting butt pad.
The butt pad on the MPR can be adjusting in the vertical plane by loosening screw ‘K’, andsliding the pad into position then re-tightening screw ‘K’. Fig 28.
Spacers can be added in between the butt pad assembly and the butt stock to lengthen the stock.This can be achieved by moving the rubber pad up or down to expose screw ‘L’, Fig 29 at the top andbottom of the butt pad assembly.
Loosening these screw will allow a spacer (available from Air Arms) to be place into the assem-bly.

15
MAINTENANCE
FIXINGSRegularly check the tightness of all fixings. However do not be tempted to over tighten as
some parts are made from aluminium and stripped threads may result. Stripped threads are notcovered by the manufacturers warranty.
BARRELFor ultimate accuracy, clean and re-lube the barrel frequently. It is difficult to advise how often
is best for every circumstance, but every 250 shots is not too often if the desire is to keep the barrelin the best possible condition.
The correct materials are very important. Air arms only uses products made by napier. Listedbelow is the napier product and a more generally available alternative. If possible use napier for thebest results.
As a rule cleaners and oils intended for shotguns and small/fullbore weapons are not suitable.
1> Cut a piece of line three times the length of your barrel, fold in half and tie endstogether. Remove silencer if fitted. Open loading bolt.
2> Feed un-knotted end down barrel from the muzzle end until folded end protrudes about50mm.
3> Cut a 100mm length of ‘rifle clean’ or 100x50mm piece of cloth and pass it between theprotruding loop. Spray the pad with ‘gun cleaner’ or white spirit, turn the rifle upsidedown and pull the line back through the barrel slowly.
4> Repeat steps 2&3 until the pad is clean.5> Repeat steps 2&3 once more without any cleaner on the pad to dry the barrel.6> Repeat steps 2&3 once more with the pad sprayed with ‘gun oil’ or 3 in 1 oil.
IMPORTANT : THE REASON FOR TURNING THE RIFLE UPSIDE DOWN IS TO PREVENT EXCESS CLEANER/OILFROM PASSING DOWN THE TRANSFER PORT INTO THE FIRING VALVE CHAMBER.
LUBRICATION
Lubrication of the internal mechanism is not covered in this handbook. This is best performedby a competent gunsmith or the factory and in any case should not be required until the annualservice.
Apply a small dab of grease on the loading bolt and work-in by moving the bolt forwards andbackwards. Wipe off excessive grease. Preferred grease is ‘napier g95 gun grease’
On return from every shooting session, wipe all over the exterior with an oily rag to preservethe surface finish during storage.
CLEANER : ‘NAPIER GUN CLEANER’, ALTERNATIVELY WHITE SPIRIT.OIL : ‘NAPIER GUN OIL’, ALTERNATIVELY ‘3 IN 1’ OIL.PULL-THROUGH PAD: ‘NAPIER RIFLE CLEAN’, ALTERNATIVELY SOFT COTTON CLOTH.PULL-THROUGH LINE: ‘NAPIER PULL THROUGH KIT’, ALTERNATIVELY 20lb FISHING LINE.

16
17
SAFETY
You and others with you should always wear shooting glasses to protect your eyes.
Always aim your air rifle in a SAFE DIRECTION. When you are sure of your target and backstop and thearea around the target is clear, take the air rifle OFF SAFE and squeeze the trigger to fire.
Do not shoot at hard surfaces or at the surface of water. The pellet may bounce off or ricochet and hitsomeone or something you had not intended to hit.
Always choose your target carefully. It is best to shoot at paper bullseye targets attached to a safebackstop. Your backstop should be checked for wear before and after each use. Replace yourbackstop if the surface is worn or damaged or if a ricochet occurs.
Your rifle is suited for indoor and outdoor use. Always remember to place your target carefully. THINKabout what you will hit if you miss the target.
Do not attempt to disassemble or tamper with your air rifle. Contact Air Venturi at 216-292-2570 forrepair.
Do not put the air rifle away while it is loaded or cocked.
REPAIR SERVICEIf your rifle needs to be repaired,
contact Air Venturi at 216-292-2570.

18
19

20
DO NOT TRY TO DISASSEMBLE THE GUN. Your rifle needsspecial tools and Air Arms parts in order to be repaired. If you disas-semble it, you may not be able to properly reassemble it. Air Armsdoes not assume any warranty liability under such circumstances.
WARNING!
WARRANTY
Limited One-Year Warranty
This product is warranted to the retail consumer for one year from date of retail purchase against defects inmaterial and workmanship and is transferable.
What is covered:Replacement parts and labor. Transportation charges to consumer for repaired product.
What is NOT covered:Transportation charges to Air Venturi for defective products. Damages caused by abuse or failure toperform normal maintenance. Any other expense. CONSEQUENTIAL DAMAGES, INCIDENTALDAMAGES OR INCIDENTAL EXPENSES INCLUDING DAMAGE TO PROPERTY. SOMESTATES DO NOT ALLOW THE EXCLUSION OR LIMITATION OF INCIDENTAL OR CONSE-QUENTIAL DAMAGES, SO THE ABOVE LIMITATION OR EXCLUSION MAY NOT APPLY TOYOU.
Warranty claims:Warranty claims for U.S. and Canadian Customers:Please return product to Air Venturi. Call Air Venturi at 216-292-2570 before returning any product.
Implied warranties:ANY IMPLIED WARRANTIES, INCLUDING THE IMPLIED WARRANTIES OFMERCHANTABILITY AND FITNESS FOR A PARTICULAR PURPOSE, ARE LIMITED IN DU-RATION TO ONE YEAR FROM DATE OF RETAIL PURCHASE. SOME STATES DO NOT AL-LOW LIMITATIONS ON HOW LONG AN IMPLIED WARRANTY LASTS, SO THE ABOVELIMITATION MAY NOT APPLY TO YOU.
To the extent any provision of this warranty is prohibited by federal, state or municipal law which cannot bepreempted, it shall not be applicable. This warranty gives you specific legal rights, and you may also haveother rights which vary from state to state and country to country.
Air VenturiAirVenturi.com • 216-292-2570

21
Notes.