Developing for the Epson Moverio + App Challenge Announcement

MOVERIO BT-300
Developer’s Guide
SEIKO EPSON CORPORATION
MOVERIO BT-300 Developer's Guide (Rev.1.1)
Revision history
Revision Item Revised contents
R1.0 - -
R1.1 1.2 Added precaution for creating App for BT-300
2.5.1 Deleted description of unnecessary setting items for gradle
3.4.2 Added 「Comparison with mute knock function」
5.1 Added frame rate and precaution for camera release process
MOVERIO BT-300 Developer's Guide (Rev.1.1)
Note the following points when using this guide.
The content of this guide may change without prior notice. 1. Reprinting part or all of this guide without prior permission from Seiko Epson, or reprinting for any other purposes is strictly
prohibited. 2. Programs and usage instructions used in this guide are for reference only, Seiko Epson cannot be held responsible for any
infringements (including industrial property rights) or damage caused to third parties. Furthermore, this guide does not imply consent to licensing for third parties or industrial property rights for Seiko Epson.
3. This document does not relate to products that require a high level of reliability, such as life support equipment. Epson accepts no responsibility if this product is used for such circumstances.
Trademarks The product names, brand names, and company names mentioned in this guide are the trademarks or registered trademarks of their respective companies.
microSD and microSDHC are the trademarks or registered trademarks of the SD Card Association.
Wi-Fi®, Wi-Fi Direct ™, and Miracast ™ are the trademarks or registered trademarks of the Wi-Fi Alliance. The Bluetooth® word mark and logos are registered trademarks owned by Bluetooth SIG, Inc., and any use of such marks by the Seiko Epson Corporation is under license. Google, Google Play, and Android are the trademarks of Google Inc. Windows is the trademark or registered trademark of the Microsoft Corporation in the USA, Japan, and other countries. Mac and Mac OS are the trademarks of Apple Inc. Intel, Cherry trail, and Atom are the trademarks of the Intel Corporation in the USA and other countries.
Other product names used herein are also for identification purposes only and may be trademarks of their respective owners. Epson disclaims any and all rights in those marks.
©SEIKO EPSON CORAPORATION 2016, All right reserved.

MOVERIO BT-300 Developer's Guide (Rev.1.1)
― Contents ―
1. Introduction _______________________________________________ 1
1.1. Summary __________________________________________________________________________2
1.2. Main System Specifications __________________________________________________________3
1.3. Functions of SDK ___________________________________________________________________5
2. Developing Apps __________________________________________ 6
2.1. Summary of Developing Apps ________________________________________________________7
2.2. Introduction to the Android SDK _____________________________________________________8
2.3. USB driver settings ________________________________________________________________ 11
2.4. Connecting the BT-300 to a computer _______________________________________________ 12
2.5. Including the SDK provided by Epson ______________________________________________ 13
3. Display Control ___________________________________________ 14
3.1. Display control summary __________________________________________________________ 15
3.2. Full screen display function ________________________________________________________ 16
3.3. Switch between 2D/3D display _____________________________________________________ 17
3.4. Mute function _____________________________________________________________________ 19
3.5. Creating images for the see-through function _______________________________________ 21
4. UI Control ________________________________________________ 22
4.1. UI control summary _______________________________________________________________ 23
5. Camera Control __________________________________________ 25
5.1. Camera control summary __________________________________________________________ 26
6. Sensor Control ___________________________________________ 27
6.1. Sensor control summary __________________________________________________________ 28
6.2. Using the sensors ________________________________________________________________ 30
6.3. Sample Code _____________________________________________________________________ 32
7. Bluetooth ________________________________________________ 33
7.1. Bluetooth summary _______________________________________________________________ 34

MOVERIO BT-300 Developer's Guide (Rev.1.1)
1
1. Introduction
MOVERIO BT-300 Developer's Guide (Rev.1.1)
2
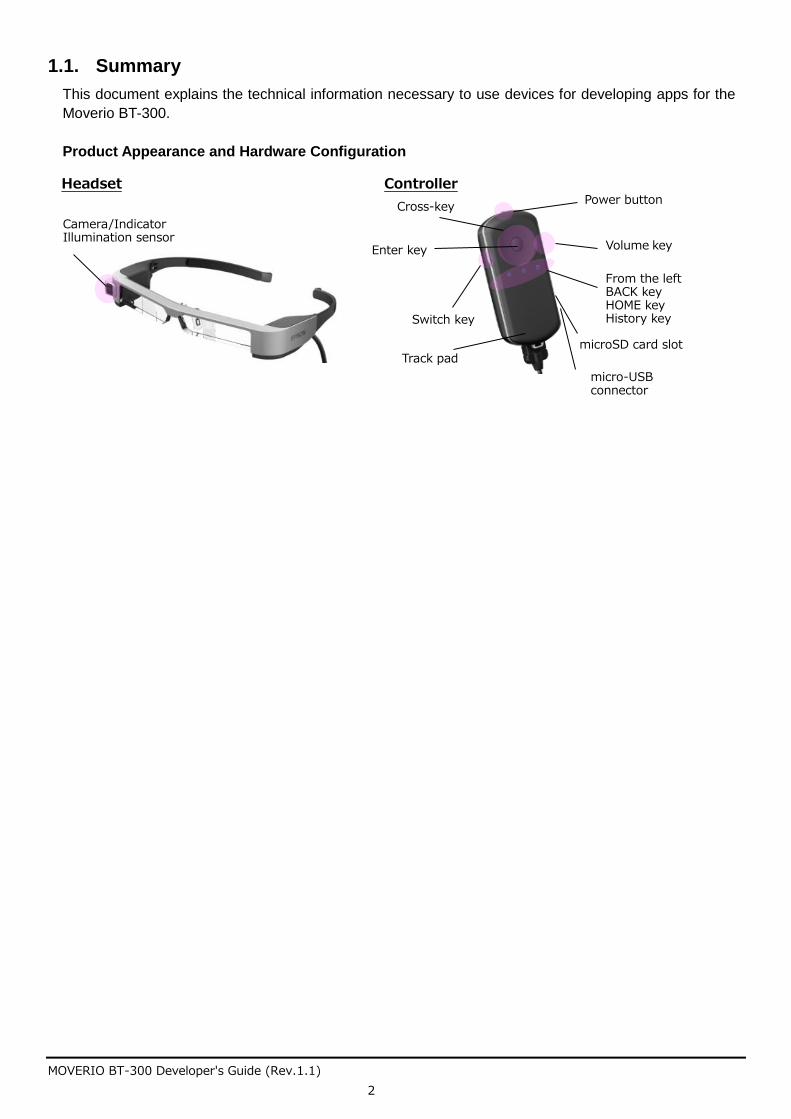
1.1. Summary
This document explains the technical information necessary to use devices for developing apps for the
Moverio BT-300.
Product Appearance and Hardware Configuration
Volume key
Power button Cross-key
Track pad
Camera/Indicator Illumination sensor
micro-USB connector
Switch key
Enter key
From the left BACK key HOME key History key
Headset Controller
microSD card slot
MOVERIO BT-300 Developer's Guide (Rev.1.1)
3
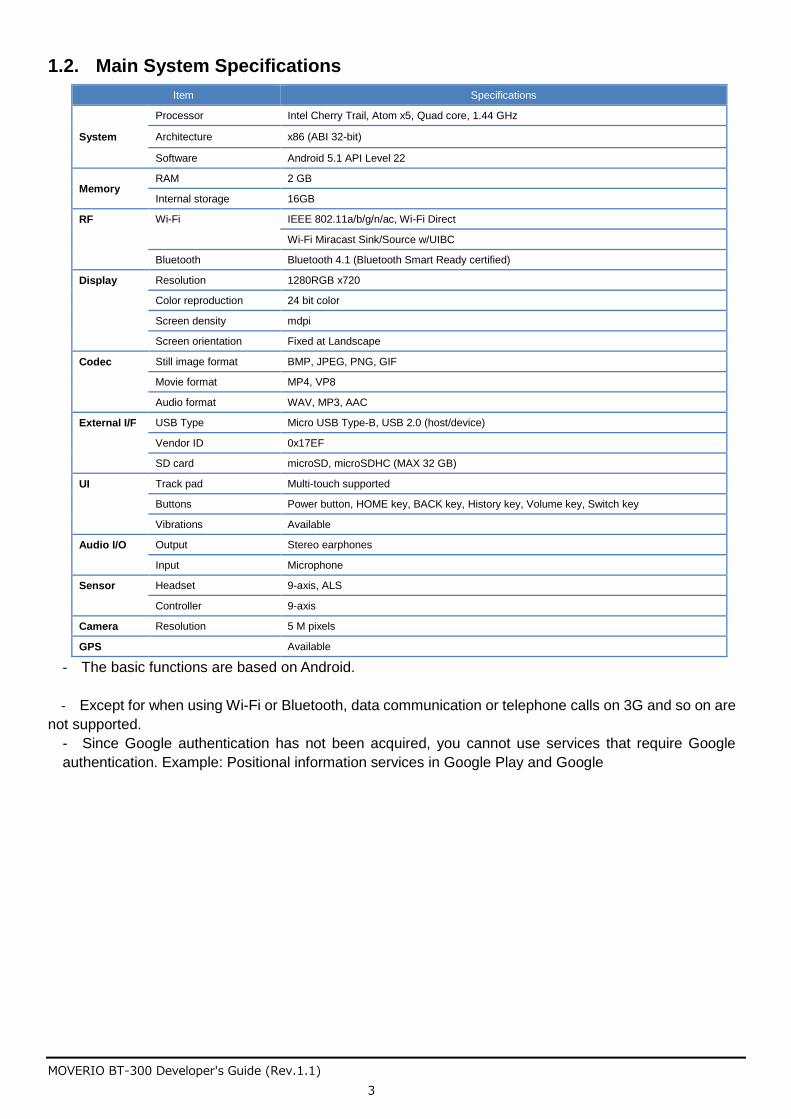
1.2. Main System Specifications
Item Specifications
System
Processor Intel Cherry Trail, Atom x5, Quad core, 1.44 GHz
Architecture x86 (ABI 32-bit)
Software Android 5.1 API Level 22
Memory RAM 2 GB
Internal storage 16GB
RF Wi-Fi IEEE 802.11a/b/g/n/ac, Wi-Fi Direct
Wi-Fi Miracast Sink/Source w/UIBC
Bluetooth Bluetooth 4.1 (Bluetooth Smart Ready certified)
Display Resolution 1280RGB x720
Color reproduction 24 bit color
Screen density mdpi
Screen orientation Fixed at Landscape
Codec Still image format BMP, JPEG, PNG, GIF
Movie format MP4, VP8
Audio format WAV, MP3, AAC
External I/F USB Type Micro USB Type-B, USB 2.0 (host/device)
Vendor ID 0x17EF
SD card microSD, microSDHC (MAX 32 GB)
UI Track pad Multi-touch supported
Buttons Power button, HOME key, BACK key, History key, Volume key, Switch key
Vibrations Available
Audio I/O Output Stereo earphones
Input Microphone
Sensor Headset 9-axis, ALS
Controller 9-axis
Camera Resolution 5 M pixels
GPS Available
- The basic functions are based on Android.
- Except for when using Wi-Fi or Bluetooth, data communication or telephone calls on 3G and so on are
not supported.
- Since Google authentication has not been acquired, you cannot use services that require Google
authentication. Example: Positional information services in Google Play and Google

MOVERIO BT-300 Developer's Guide (Rev.1.1)
4
- Model specification information
The following shows the main information items that you can acquire that are specific to the model.
Depending on the model, you can use this information to distinguish between models.
Table 1-1 Main Items for Android.os.Build
Item Contents
MANUFACTURER EPSON
MODEL EMBT3C
PRODUCT embt3c
BRAND MOVERIO
- Precaution for creating App for BT-300
This product uses a Si-OLED(Organic EL Pane)for display panel. Due to the general characteristic
of the Si-OLED, you may notice burn-in or decreasing luminance on the panel. To reduce the burn-in,
please note the following points to create Apps.
- Have screen transition that the same screen does not display for long time
- Avoid using high brightness color scheme for character display, marker display and object display
that always display at same position
- Countermeasure using sleep function or implementing screen saver process into the App to avoid
no operation state for long time

MOVERIO BT-300 Developer's Guide (Rev.1.1)
5
1.3. Functions of SDK
By using the Epson original APIs as well as the standard Android APIs, the BT-300 can use specific
functions that are not built-in to the standard Android system. Table 1-2 Table of each function and which API to use
Function Contents Android Standard
API
Epson Original
API
3. Display Control Start/end 3D display in side-by-side, adjust the display brightness, full screen display, display mute
✔
4. UI Control Key code and track pad control ✔
5. Camera Control Take still images/movies ✔
6. Sensor Control Acquire values for the controller's built-in sensor, and the BT-300 original sensor
✔ ✔
7. Bluetooth Bluetooth profile support ✔
The following chapters explain how to use these functions from the app.

MOVERIO BT-300 Developer's Guide (Rev.1.1)
6
2. Developing Apps

MOVERIO BT-300 Developer's Guide (Rev.1.1)
7
2.1. Summary of Developing Apps
The BT-300 has adopted Android as the system software. Therefore, you can develop apps for the
BT-300 in the same environment as developing apps for Android smartphones. However, when
connecting the BT-300 with the app development computer, or when using functions unique to the BT-300,
you need to adjust the computer settings so that they are compatible with the BT-300.
This chapter explains the following procedures necessary to develop apps for the BT-300.
- Introduction to the Android SDK
- USB driver settings
- Connecting the BT-300 to a computer
- Including the SDK provided by Epson

MOVERIO BT-300 Developer's Guide (Rev.1.1)
8
2.2. Introduction to the Android SDK
The introduction to the Android SDK assumes the following steps will be performed in a Windows 7
environment.
2.2.1. Acquiring Android Studio
Download Android Studio from the following Website.
https://developer.android.com/studio/index.html
2.2.2. Acquiring and installing JDK
Download the JDK (7 or later) from the following Website, and then install.
http://www.oracle.com/technetwork/java/javase/downloads/jdk8-downloads-2133151.html
2.2.3. Installing Android Studio
Follow the directions provided by the installer to install Android Studio.
Example) C:\Users\User name\AppData\Local\Android\sdk
* From here on, instructions assume Android Studio is installed in the folder above.

MOVERIO BT-300 Developer's Guide (Rev.1.1)
9
2.2.4. Platform-tools and SDK Platform
Execute “C:\Users\User name\AppData\Local\Android\sdk\SDK Manager.exe”.
* When you start SDK Manager, the dialog "No packages found" may be displayed.
This occurs when the proxy is not set correctly, and information cannot be updated.
Close all dialogs except for "Android SDK Manager", and then set the proxy in [Tools] -[Options].
If you do not know the Proxy settings, contact your network administrator for details on “Connecting
method to external network using Proxy”.
MOVERIO BT-300 Developer's Guide (Rev.1.1)
10
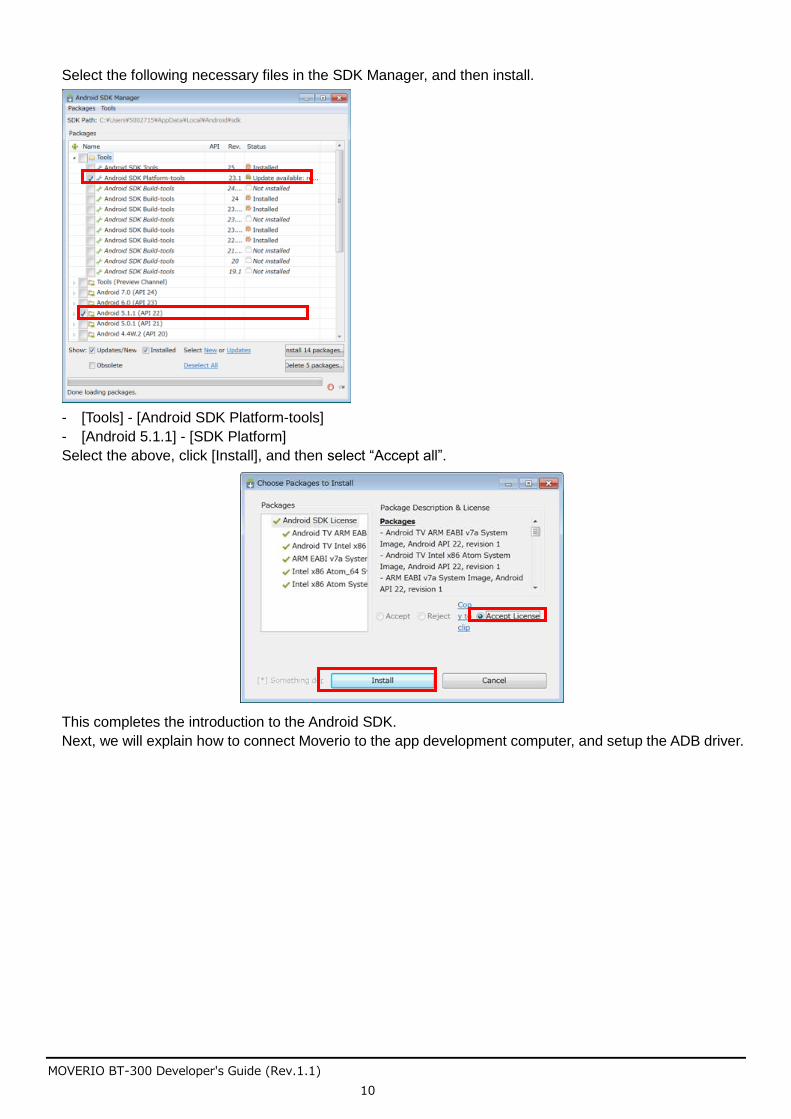
Select the following necessary files in the SDK Manager, and then install.
- [Tools] - [Android SDK Platform-tools]
- [Android 5.1.1] - [SDK Platform]
Select the above, click [Install], and then select “Accept all”.
This completes the introduction to the Android SDK.
Next, we will explain how to connect Moverio to the app development computer, and setup the ADB driver.
MOVERIO BT-300 Developer's Guide (Rev.1.1)
11
2.3. USB driver settings
2.3.1. When Using Windows
Connect Moverio to the app development computer, and setup the USB driver.
Install the USB driver from the following site.
https://software.intel.com/en-us/android/articles/installation-instructions-for-intel-android-usb-driver
2.3.2. When Using Mac OS/Linux
You do not need to install the USB driver.

MOVERIO BT-300 Developer's Guide (Rev.1.1)
12
2.4. Connecting the BT-300 to a computer
This section explains how to connect the BT-300 to a computer after the ADB settings are complete.
2.4.1. BT-300 settings
- Follow the steps below to enable USB debugging.
1) Tap "Settings" - "About Device" to open the screen.
2) "Developer options" is displayed when you tap "Build number" seven times.
3) Open "Settings" - "Developer options", and then select "USB debugging".
2.4.2. Checking the connection
You can check if the computer and the BT-300 are connected by using the ADB check command.
Start the command prompt, run "cd C:\Users\<User name>\AppData\Local\Android\sdk\platform-tools",
and move the folder. * It is useful to maintain the environment variable path mentioned above.
When you execute "adb devices" and the device name is displayed in the list, ADB connection is
complete.
* If this is not displayed, reconnect the BT-300 to the USB port, and rerun the "adb devices" command.

MOVERIO BT-300 Developer's Guide (Rev.1.1)
13
2.5. Including the SDK provided by Epson
2.5.1. How to use the SDK provided by Epson
The following procedures assume app development in Android Studios.
1) Display the Project View in Android Studio, and then create a “libs” folder from
[File]-[New]-[Directory].
2) C:\Users\<user name>\AndroidStudioProjects\<application name>\app\libs is created; put
BT300Ctrl.jar in this folder.
(When the created project folder is C:\Users\<user name>\AndroidStudioProjects)
*Explanations from now on are based on the assumption that the project is at C:\Users\<user
name>\AndroidStudioProjects\<application name>.
3) Press the Sync Project with Gradle Files button above Android Studio to apply the Gradle change
to the project.

MOVERIO BT-300 Developer's Guide (Rev.1.1)
14
3. Display Control

MOVERIO BT-300 Developer's Guide (Rev.1.1)
15
3.1. Display control summary
The BT-300 is smart glass that features an optical see-through system. You can overlay information on
the display using an optical technique that provides clear images, without disturbing the view of the
user's surroundings. It is also possible to project more information since the device uses a see-through
system allowing images to be projected for both eyes, as opposed to the single image monocular type.
<Summary of functions>
- Full screen display
- Switch between 2D/3D display
- Display brightness control
- Mute control
MOVERIO BT-300 Developer's Guide (Rev.1.1)
16
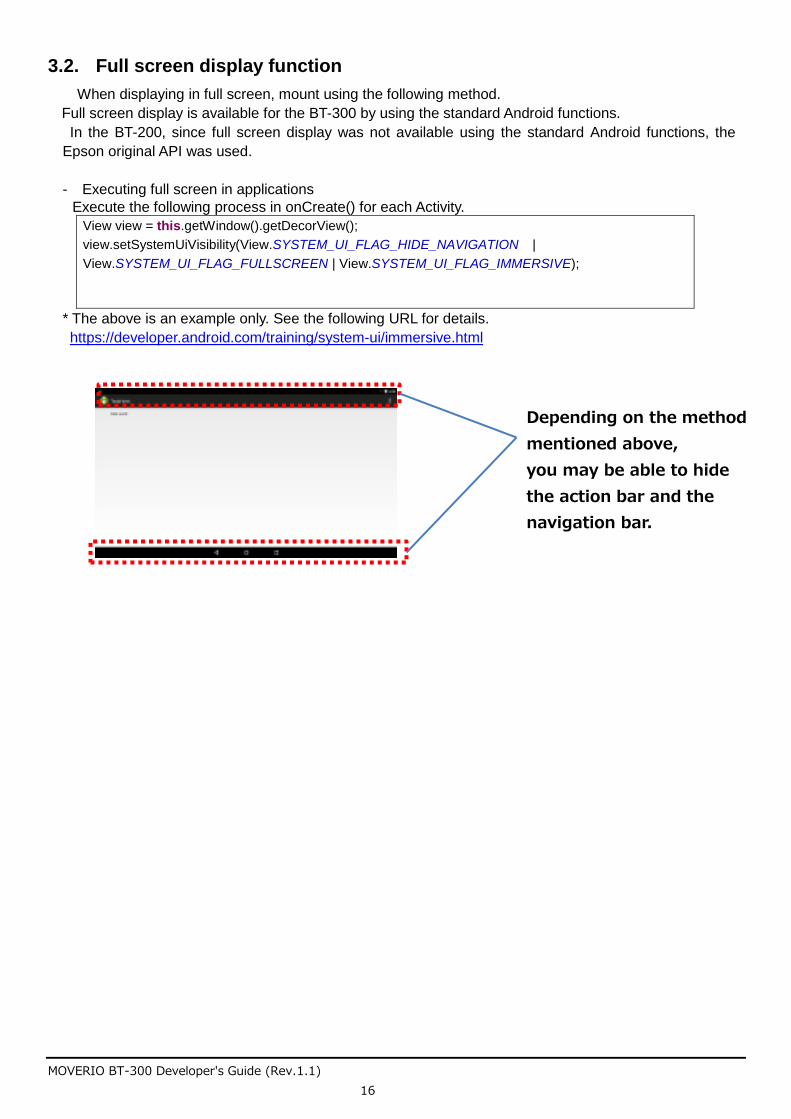
3.2. Full screen display function
When displaying in full screen, mount using the following method.
Full screen display is available for the BT-300 by using the standard Android functions.
In the BT-200, since full screen display was not available using the standard Android functions, the
Epson original API was used.
- Executing full screen in applications
Execute the following process in onCreate() for each Activity.
View view = this.getWindow().getDecorView();
view.setSystemUiVisibility(View.SYSTEM_UI_FLAG_HIDE_NAVIGATION |
View.SYSTEM_UI_FLAG_FULLSCREEN | View.SYSTEM_UI_FLAG_IMMERSIVE);
* The above is an example only. See the following URL for details.
https://developer.android.com/training/system-ui/immersive.html
Depending on the method
mentioned above,
you may be able to hide
the action bar and the
navigation bar.
MOVERIO BT-300 Developer's Guide (Rev.1.1)
17
3.3. Switch between 2D/3D display
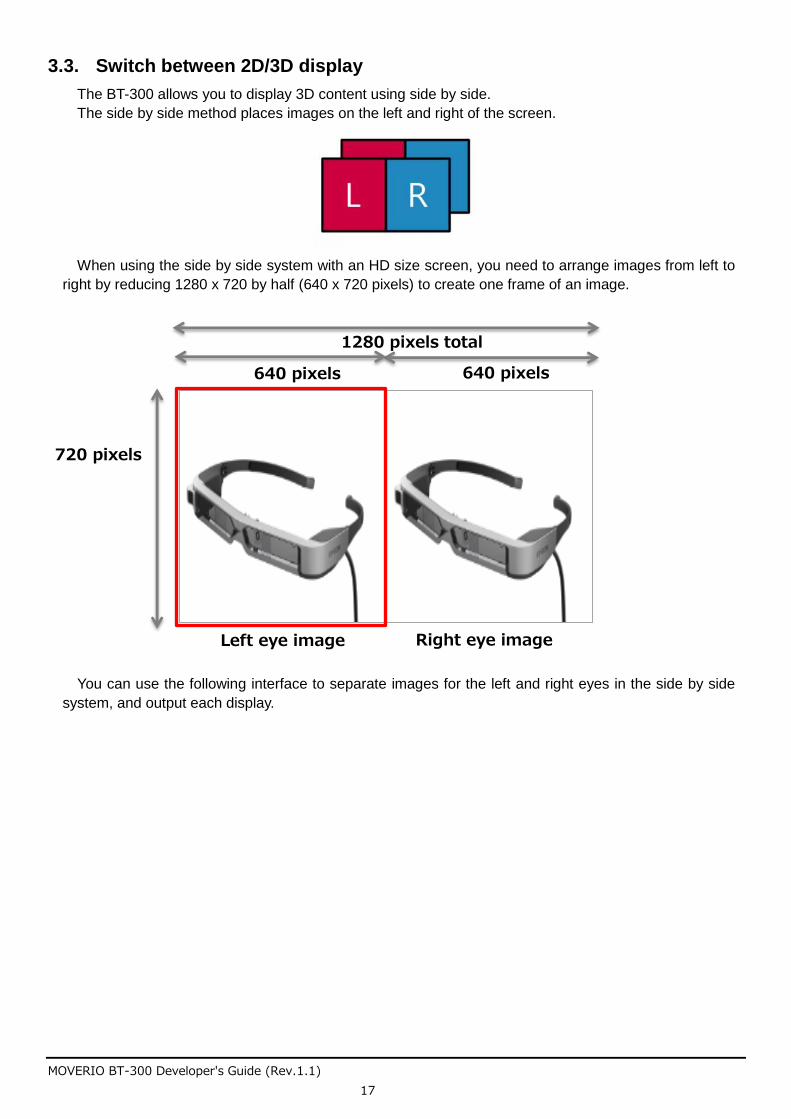
The BT-300 allows you to display 3D content using side by side.
The side by side method places images on the left and right of the screen.
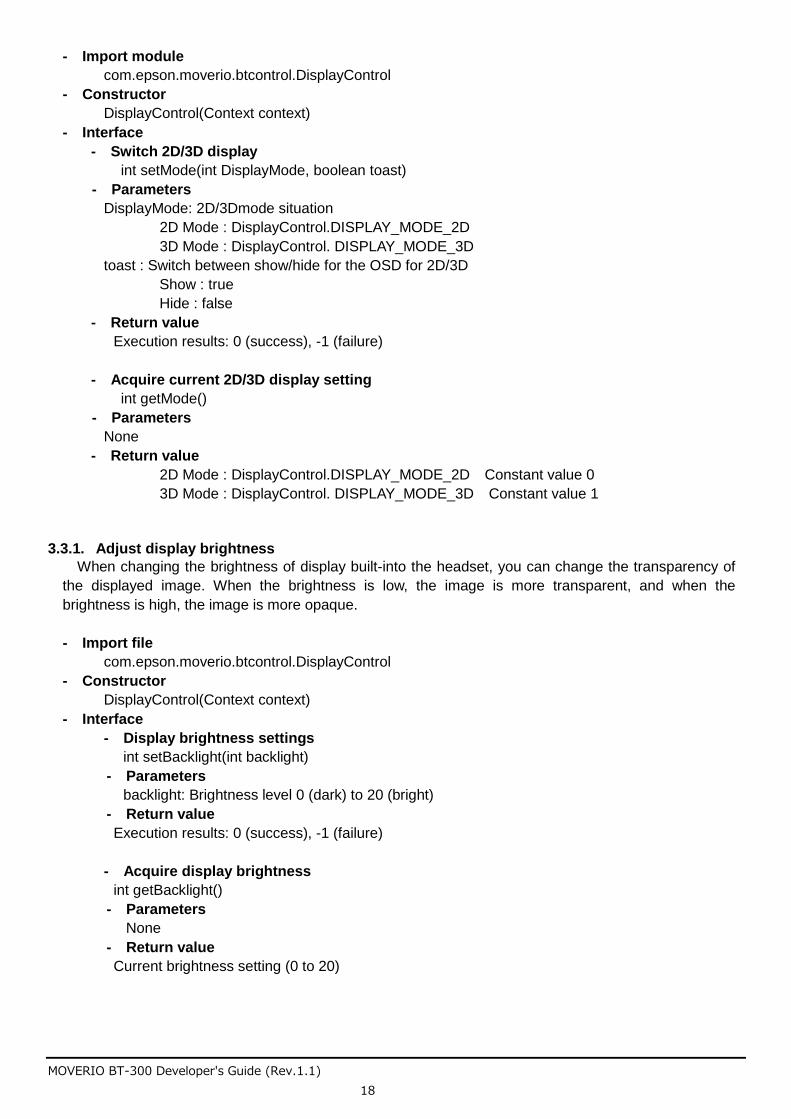
When using the side by side system with an HD size screen, you need to arrange images from left to
right by reducing 1280 x 720 by half (640 x 720 pixels) to create one frame of an image.
You can use the following interface to separate images for the left and right eyes in the side by side
system, and output each display.
Left eye image Right eye image
1280 pixels total
640 pixels 640 pixels
720 pixels
MOVERIO BT-300 Developer's Guide (Rev.1.1)
18
- Import module
com.epson.moverio.btcontrol.DisplayControl
- Constructor
DisplayControl(Context context)
- Interface
- Switch 2D/3D display
int setMode(int DisplayMode, boolean toast)
- Parameters
DisplayMode: 2D/3Dmode situation
2D Mode : DisplayControl.DISPLAY_MODE_2D
3D Mode : DisplayControl. DISPLAY_MODE_3D
toast : Switch between show/hide for the OSD for 2D/3D
Show : true
Hide : false
- Return value
Execution results: 0 (success), -1 (failure)
- Acquire current 2D/3D display setting
int getMode()
- Parameters
None
- Return value
2D Mode : DisplayControl.DISPLAY_MODE_2D Constant value 0
3D Mode : DisplayControl. DISPLAY_MODE_3D Constant value 1
3.3.1. Adjust display brightness
When changing the brightness of display built-into the headset, you can change the transparency of
the displayed image. When the brightness is low, the image is more transparent, and when the
brightness is high, the image is more opaque.
- Import file
com.epson.moverio.btcontrol.DisplayControl
- Constructor
DisplayControl(Context context)
- Interface
- Display brightness settings
int setBacklight(int backlight)
- Parameters
backlight: Brightness level 0 (dark) to 20 (bright)
- Return value
Execution results: 0 (success), -1 (failure)
- Acquire display brightness
int getBacklight()
- Parameters
None
- Return value
Current brightness setting (0 to 20)
MOVERIO BT-300 Developer's Guide (Rev.1.1)
19
3.4. Mute function
3.4.1. Display mute
You can use the mute function to temporarily stop displaying images. For example, you can use this to
clear your view if you feel there is any possibility of danger in your immediate surroundings.
Use the following interface to activate and then deactivate mute.
- Import file
com.epson.moverio.btcontrol.DisplayControl
- Constructor
DisplayControl(Context context)
- Interface
- Set mute status
int setMute(boolean mute)
- Parameters
Mute: Mute ON (true)/ OFF (false)
- Return value
Execution results: 0 (normal value), Others (error)
- Acquire the mute status
boolean getMute()
- Parameters
None
- Return value
Execution results: true (mute ON), false (mute OFF)

MOVERIO BT-300 Developer's Guide (Rev.1.1)
20
3.4.2. Comparison of mute knock function
For similar function, there is a system standard function of BT-300 called mute knock to temporary stop
video and sound. Comparisons to display mute using API are shown as below.
Item Display mute API Mute knock
How to use Call DisplayControl#setMute()
By turning “Tap mute” in setting App ON, tap
headset twice lightly. To return, perform the following operation
Tap headset twice lightly Press either function key, volume key or power button
*When auto sleep operate during mute, sleep function have priority and will be in sleep mode. After returning from sleep mode, mute will be cancelled.
Video motion
When mute
Display turns off Display turns off(Same as left column)
KEYCODE_MEDIA_PAUSE will be issued from system to AudioManager to pause video play
When return
Display turns on Display turns on(Same as left column) KEYCODE_MEDIA_PLAY will be issued from system to AudioManager to restart video play
Sound motion
When mute
No Change KEYCODE_MEDIA_PAUSE will be issued from system to AudioManager to pause music play
When return
- KEYCODE_MEDIA_PLAY will be issued from system to AudioManager to restart music play
Remarks To know current mute situation, call DisplayControl#getMute()
No notification to App for mute knock ON and OFF

MOVERIO BT-300 Developer's Guide (Rev.1.1)
21
3.5. Creating images for the see-through function
MOVERIO is a device that uses projection technology. This system provides the user with an image
projected onto a half-mirror via a light-guided panel, creating a half-mirror version (whereby not all the
pixels are needed) allowing images to be arranged over a real-life scene giving a sense of transparency,
and creating a more vivid augmented reality experience.
To create this transparent background effect, so visual elements (text, graphics...) stand out vividly, the
background will need to be set to black when drawing on the projection, so you display the target section
overlapping with the actual images.
The following steps allow you to create images making use of the see-through function.
1) Execute full screen display.
To reduce the feeling of being in a screen, remove everything except for the necessary image (status
bar and so on).
2) Make the background black.
Make everything black except for the object you want to display ([R,G,B] = [0,0,0]).
In theory, the black section should keep out external light.
Object you want to display Displayed scene Scene placed over MOVERIO

MOVERIO BT-300 Developer's Guide (Rev.1.1)
22
4. UI Control

MOVERIO BT-300 Developer's Guide (Rev.1.1)
23
4.1. UI control summary
4.1.1. Hardware button types and functions
The BT-300 comes with the hardware buttons shown in the following figure. The key event for each key is
shown in Table 4-1 Key Code List.
Table 4-1 Key Code List
Name Key code* Device type
Power button (KEYCODE_POWER) Physical switch
HOME key (KEYCODE_HOME) Touch Sensor
BACK key KEYCODE_BACK Touch Sensor
History key (Recent key)
(KEYCODE_RECENT) Touch Sensor
Switch key (KEYCODE_MULTIFUNCTION) Physical switch
Volume Up KEYCODE_VOLUME_UP Physical switch
Volume Down KEYCODE_VOLUME_DOWN Physical switch
Up KEYCODE_DPAD_UP Touch Sensor
Down KEYCODE_DPAD_DOWN Touch Sensor
Left KEYCODE_DPAD_LEFT Touch Sensor
Right KEYCODE_DPAD_RIGHT Touch Sensor
Enter key KEYCODE_DPAD_CENTER Physical switch
*When there are parenthesis, events are not notified in the app.
Switch key
Enter key
Volume Up Volume Down
Power button
BACK key HOME key History key
Up Down Left Right
MOVERIO BT-300 Developer's Guide (Rev.1.1)
24
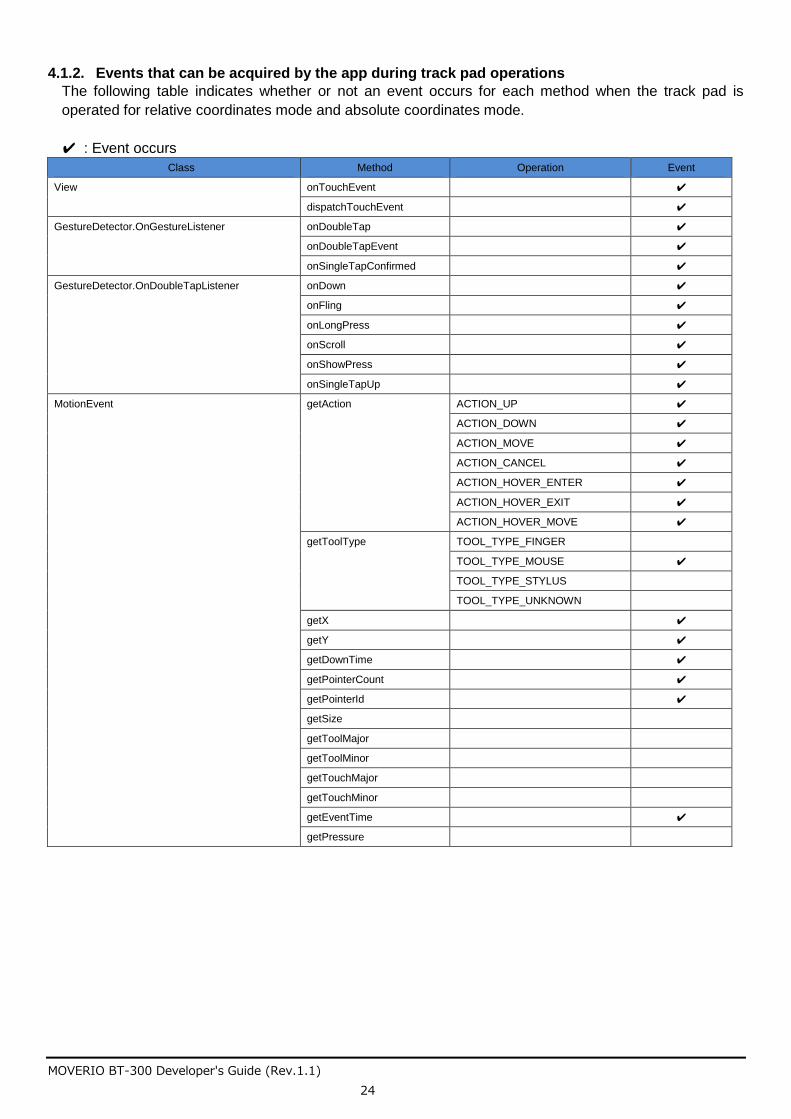
4.1.2. Events that can be acquired by the app during track pad operations
The following table indicates whether or not an event occurs for each method when the track pad is
operated for relative coordinates mode and absolute coordinates mode.
✔ : Event occurs
Class Method Operation Event
View onTouchEvent
✔
dispatchTouchEvent
✔
GestureDetector.OnGestureListener onDoubleTap
✔
onDoubleTapEvent
✔
onSingleTapConfirmed
✔
GestureDetector.OnDoubleTapListener onDown
✔
onFling
✔
onLongPress
✔
onScroll
✔
onShowPress
✔
onSingleTapUp
✔
MotionEvent getAction ACTION_UP ✔
ACTION_DOWN ✔
ACTION_MOVE ✔
ACTION_CANCEL ✔
ACTION_HOVER_ENTER ✔
ACTION_HOVER_EXIT ✔
ACTION_HOVER_MOVE ✔
getToolType TOOL_TYPE_FINGER
TOOL_TYPE_MOUSE ✔
TOOL_TYPE_STYLUS
TOOL_TYPE_UNKNOWN
getX
✔
getY
✔
getDownTime
✔
getPointerCount
✔
getPointerId
✔
getSize
getToolMajor
getToolMinor
getTouchMajor
getTouchMinor
getEventTime
✔
getPressure

MOVERIO BT-300 Developer's Guide (Rev.1.1)
25
5. Camera Control

MOVERIO BT-300 Developer's Guide (Rev.1.1)
26
5.1. Camera control summary
The BT-300 has a camera built into the headset. As well as standard photography, you can also use it to
recognize markers.
5.1.1. Main specifications of the built-in camera
Table 5-1 Main specifications of the built-in camera
Item Contents
Resolution Picture size 2560x1920/ 1920x1080/ 1280x720/ 640x480/
Preview size 1920x1080/ 1280x720/ 640x480/
Video size 1920x1080/ 1280x720/ 640x480/
Exposure compensation
Maximum, minimum
max: +5, min: -5
White balance auto/ incandescent/ fluorescent/ warm-fluorescent/ daylight/ cloudy-daylight/ shade/ twilight
Scene mode auto/ action/ portrait/ night/ / barcode
5.1.2. Externally connected camera
- The BT-300 allows you to connect a UVC 1.0 supported camera to the micro-USB connector.
- The image resolution and frame rate for shooting images depends on the camera being used.
- Note that we cannot guarantee operation for all UVC supported cameras.
5.1.3. Precaution for camera releae process
When camera is open and user press HOME key, App will evacuate to background. Please be sure to do
the camera release process in that situation. In details, please write camera release process in onPause
method. Especially for external camera, while in the situation of not doing release process, be careful it
may not be in right connected situation when detaching.
MOVERIO BT-300 Developer's Guide (Rev.1.1)
27
6. Sensor Control

MOVERIO BT-300 Developer's Guide (Rev.1.1)
28
6.1. Sensor control summary This section provides a list of the sensors available in the BT-300. You can acquire the values for each
sensor in the same way as for a general sensor by using the standard Android API. When you can not use sensor type, you can also specify the value of sensor ID column directly.
6.1.1. Sensor list Table 6-1 Sensor list
Sensor type Sensor ID
(Hex) Contents Built-in location
Android Standard
TYPE_ACCELEROMETER 0x00000001 Accelerometer Headset ✔
TYPE_MAGNETIC_FIELD 0x00000002 Geomagnetic sensor Headset ✔
TYPE_ORIENTATION 0x00000003 Azimuth detection Headset ✔
TYPE_GYROSCOPE 0x00000004 Gyroscope sensor Headset ✔
TYPE_LIGHT 0x00000005 Illumination sensor Headset ✔
TYPE_TEMPERATURE 0x00000007 Temperature sensor Headset ✔
TYPE_GRAVITY 0x00000009 Gravity sensor Headset ✔
TYPE_LINEAR_ACCELERATION 0x0000000a Linear acceleration sensor
Headset ✔
TYPE_ROTATION_VECTOR 0x0000000b Rotation vector sensor
Headset ✔
TYPE_MAGNETIC_FIELD_UNCALIBRATED 0x0000000e Geomagnetic sensor Headset ✔
TYPE_HEADSET_TAP 0x00002001 Tap detector Headset
TYPE_CONTROLLER_ACCELEROMETER 0x00100001 Accelerometer Controller
TYPE_CONTROLLER_MAGNETIC_FIELD 0x00100002 Geomagnetic sensor Controller
TYPE_CONTROLLER_GYROSCOPE 0x00100004 Gyroscope sensor Controller
TYPE_CONTROLLER_ROTATION_VECTOR 0x0010000b Rotation vector sensor
Controller
* You can use the sensors in the headset and the controller at the same time. There is no real limit to the
number of sensors that can be used at the same time, but we recommend that the listener only registers necessary sensors to prevent a decline in performance.

MOVERIO BT-300 Developer's Guide (Rev.1.1)
29
6.1.2. Coordinations axis for each sensor From the sensors built into the headset and controller, a sensor value is output for each sensor with an X, Y, Z axis according to the coordinate axis shown in the following figure.
Headset Controller
Sensor position
+X
+Y
+Z +X
+Y
+Z
MOVERIO BT-300 Developer's Guide (Rev.1.1)
30
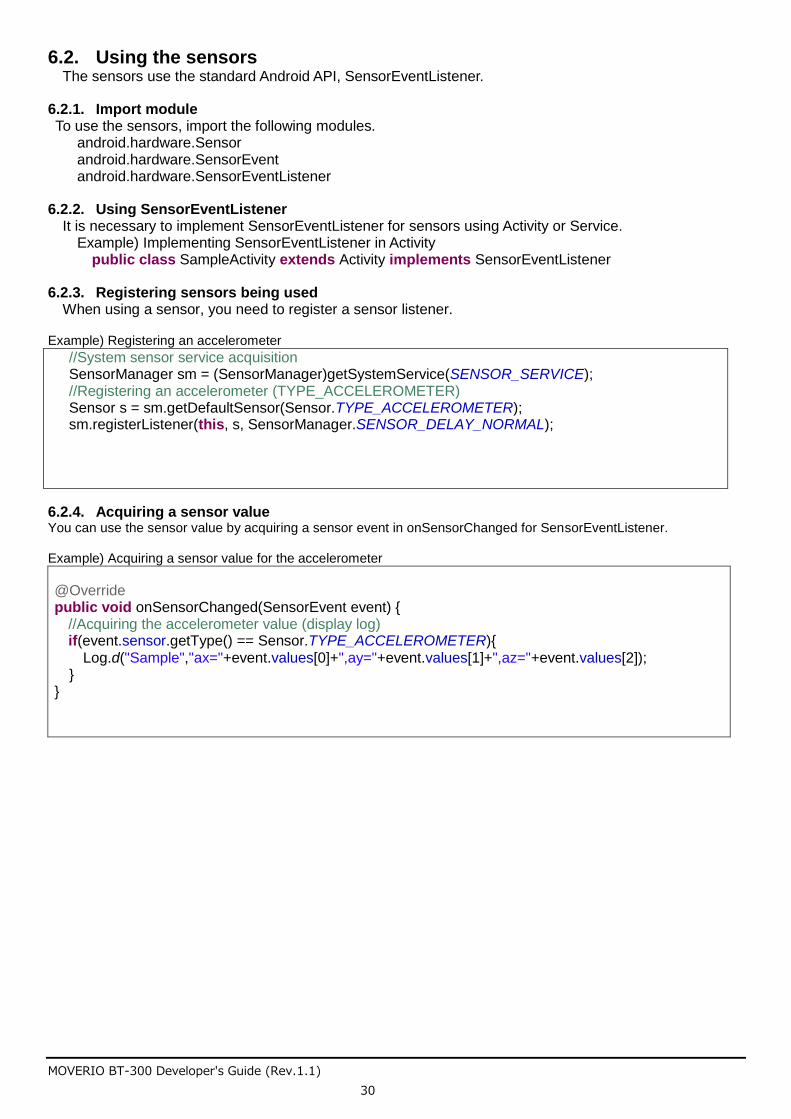
6.2. Using the sensors The sensors use the standard Android API, SensorEventListener.
6.2.1. Import module To use the sensors, import the following modules.
android.hardware.Sensor android.hardware.SensorEvent android.hardware.SensorEventListener
6.2.2. Using SensorEventListener It is necessary to implement SensorEventListener for sensors using Activity or Service.
Example) Implementing SensorEventListener in Activity public class SampleActivity extends Activity implements SensorEventListener
6.2.3. Registering sensors being used
When using a sensor, you need to register a sensor listener. Example) Registering an accelerometer
//System sensor service acquisition SensorManager sm = (SensorManager)getSystemService(SENSOR_SERVICE); //Registering an accelerometer (TYPE_ACCELEROMETER) Sensor s = sm.getDefaultSensor(Sensor.TYPE_ACCELEROMETER); sm.registerListener(this, s, SensorManager.SENSOR_DELAY_NORMAL);
6.2.4. Acquiring a sensor value You can use the sensor value by acquiring a sensor event in onSensorChanged for SensorEventListener. Example) Acquiring a sensor value for the accelerometer
@Override public void onSensorChanged(SensorEvent event) {
//Acquiring the accelerometer value (display log) if(event.sensor.getType() == Sensor.TYPE_ACCELEROMETER){
Log.d("Sample","ax="+event.values[0]+",ay="+event.values[1]+",az="+event.values[2]); }
}
MOVERIO BT-300 Developer's Guide (Rev.1.1)
31
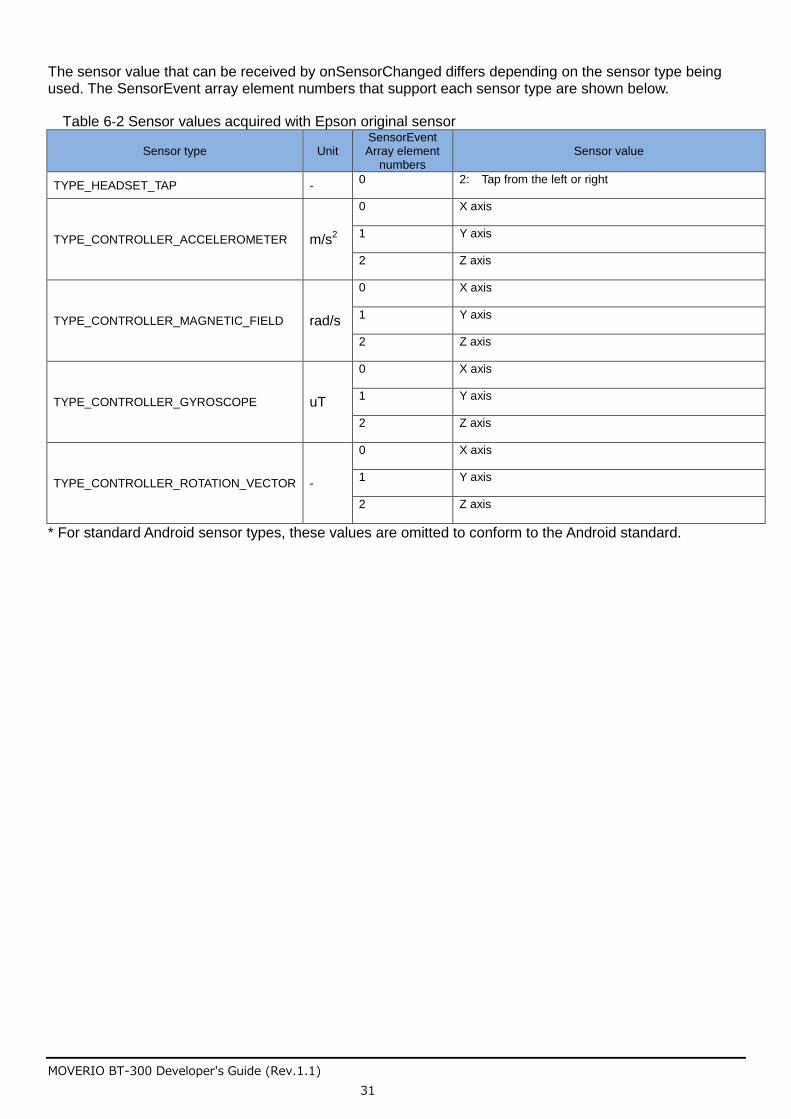
The sensor value that can be received by onSensorChanged differs depending on the sensor type being used. The SensorEvent array element numbers that support each sensor type are shown below.
Table 6-2 Sensor values acquired with Epson original sensor
Sensor type Unit SensorEvent Array element
numbers Sensor value
TYPE_HEADSET_TAP - 0 2: Tap from the left or right
TYPE_CONTROLLER_ACCELEROMETER m/s2
0 X axis
1 Y axis
2 Z axis
TYPE_CONTROLLER_MAGNETIC_FIELD rad/s
0 X axis
1 Y axis
2 Z axis
TYPE_CONTROLLER_GYROSCOPE uT
0 X axis
1 Y axis
2 Z axis
TYPE_CONTROLLER_ROTATION_VECTOR -
0 X axis
1 Y axis
2 Z axis
* For standard Android sensor types, these values are omitted to conform to the Android standard.
MOVERIO BT-300 Developer's Guide (Rev.1.1)
32
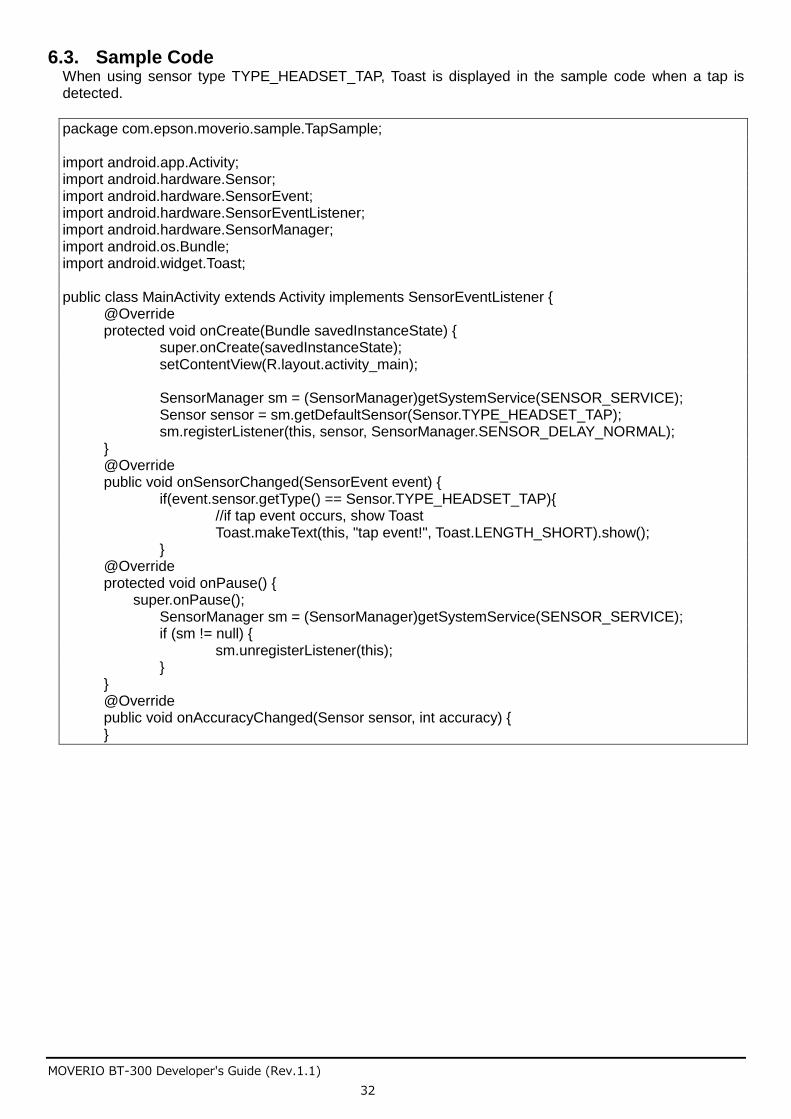
6.3. Sample Code When using sensor type TYPE_HEADSET_TAP, Toast is displayed in the sample code when a tap is detected.
package com.epson.moverio.sample.TapSample; import android.app.Activity; import android.hardware.Sensor; import android.hardware.SensorEvent; import android.hardware.SensorEventListener; import android.hardware.SensorManager; import android.os.Bundle; import android.widget.Toast; public class MainActivity extends Activity implements SensorEventListener { @Override protected void onCreate(Bundle savedInstanceState) { super.onCreate(savedInstanceState); setContentView(R.layout.activity_main); SensorManager sm = (SensorManager)getSystemService(SENSOR_SERVICE); Sensor sensor = sm.getDefaultSensor(Sensor.TYPE_HEADSET_TAP); sm.registerListener(this, sensor, SensorManager.SENSOR_DELAY_NORMAL); } @Override public void onSensorChanged(SensorEvent event) { if(event.sensor.getType() == Sensor.TYPE_HEADSET_TAP){ //if tap event occurs, show Toast Toast.makeText(this, "tap event!", Toast.LENGTH_SHORT).show(); } @Override protected void onPause() { super.onPause(); SensorManager sm = (SensorManager)getSystemService(SENSOR_SERVICE); if (sm != null) { sm.unregisterListener(this); } } @Override public void onAccuracyChanged(Sensor sensor, int accuracy) { }
MOVERIO BT-300 Developer's Guide (Rev.1.1)
33
7. Bluetooth

MOVERIO BT-300 Developer's Guide (Rev.1.1)
34
7.1. Bluetooth summary
7.1.1. Supported specifications This describes the Bluetooth specifications for the BT-300. Table 7-1 Bluetooth profile support
Profile Role
Headset Profile (HSP) Audio Gateway
Advanced Audio Distribution Profile (A2DP) Source
Audio/Video Remote Control Profile (AVRCP) Target
Human Interface Device (HID) Host
Object Push Profile (OPP) Client/Server
Personal Area Network (PAN) NAP/PANU