
MONSIEUR TRICOT Hanging lamps - tribu.com
48
MONSIEUR TRICOT Hanging lamps User manual English Version 1.0 issued on 11-06-2019
Transcript of MONSIEUR TRICOT Hanging lamps - tribu.com

MONSIEUR TRICOT Hanging lamps
User manual English
Version 1.0 issued on 11-06-2019


3Monsieur Tricot collection • User manual
CONTENT
Preface 4
The story of Monsieur Tricot 4Product description 4Intended use 6
Safety instructions 6
Product overview 7Parts list 7Specifications 8
Installation 9Check the content of the package 9Installation of the lamp 9
Maintenance 12Replacing the light source 12Cleaning the cover 14
Disclaimer 18
Disposal 18

4
PREFACE
Congratulations on the purchase of your Monsieur Tricot lamp. Its warm glow and hand-crocheted or knitted fabric will cast beautiful shadows as a magical backdrop for long, cosy summer nights. The Monsieur Tricot hanging and standing objects form a complete family of lights – you can read their story below.
This user manual contains all the necessary information for a correct, efficient and safe use of your lamp. We invite you to read this information carefully before installing or using the product.
One variant of the Monsieur Tricot collection has been used as an example to explain the instructions. It may be possible that your lamp looks slightly different.
THE STORY OF MONSIEUR TRICOT
Designer Ilia Eckardt grew up immersed in the Belgian fashion scene, his mother Hilde Frunt knitting prototypes for Belgian fashion designers such as Raf Simons, Ann Demeulemeester and Dries Van Noten. Fascinated by their world, Ilia worked on several knitting projects of his own, experimenting with innovative knitting techniques and materials.
Monsieur Tricot is his first creation, a family of in- and outdoor lighting objects, knitted or hand-crocheted with an innovative, weatherproof yarn. The sphere shaped lights give a warm glow and the different patterns cast beautiful shadows. The knitting and crocheting is done in Belgium by a network of artisans and every item is checked by Ilia and his mother.
As family is very important to the designer, he created his light objects as a family. Meet the handsome Monsieur Lebonnet, the graceful Madame Latoque, the chic Madame Cachet and their nephew Monsieur Ellipse.

5Monsieur Tricot collection • User manual
COLLECTION OVERVIEW
Wireless Switch08010
dia 30cm080130S
dia 30cm080130H
dia 40cm080140S
dia 40cm080140H
dia 60cm080160S
dia60cm080160H
dia 30cm080230S
dia 30cm080230H
dia 40cm080240S
dia 40cm080240H
dia 30cm080330S
dia 30cm080330H
dia 40cm080340H
dia 50cm080350H
dia 40cm080340S
dia 50cm080350S
dia40cm080440H
10-Linen00-White
60-Brick 30-Moss
Monsieur Lebonnet
Monsieur Lebonnet
Madame Cachet
Madame Cachet Monsieur Ellipse
HA
NG
ING
CO
LOR
S
AC
CES
SOR
IES
STA
ND
ING
Madame Latoque
Madame Latoque
89-Wengé

6
INTENDED USE
The product is only intended as in- or outdoor led lighting. Any change to the product can have consequences for safety, warranty and correct operation.
SAFETY INSTRUCTIONS
6 Only use the product as described in this manual. 6 Do not use a damaged product. 6 Do not drop the product and avoid bumping. 6 Do not use the product if a part is damaged or defective.
Replace a damaged or defective part immediately. 6 Always switch off the power before starting installation or maintenance
work. 6 Do not tumble dry the removable cover. 6 Installation must be done by an electrical technician. 6 Any changes made to the product can have consequences for safety,
correct operation and warranty procedures.

7Monsieur Tricot collection • User manual
PRODUCT OVERVIEW
PARTS LIST
A Removable coverB SphereC LED lightD FittingE Lamp holder
F Cable glandG BaseH Splicing connectorI Strain reliefJ 4-wire cable, 5 meter
A B C D E F G H I J

8
SPECIFICATIONS
Light source Dimmable LED filament bulb included
Colour temperature 2200 K
Socket E27
Voltage 100-240V
Wattage 3.5W
Average lifetime 200.000 hrs
Cycles on/off 100.000
Lumen flux 200 Lumen
Colour rendering index Ra. 90
Energy class A+
Battery No
Installing 5 meter cable, strain relief and wire connector clamps included
Control Have a local professional install a switch
Dimmable Yes

9Monsieur Tricot collection • User manual
INSTALLATION
CHECK THE CONTENT OF THE PACKAGE
Check if all parts from the parts list are present and that no damage is visible on the parts. In case parts are missing or damaged, please contact your local Tribù dealer.
INSTALLATION OF THE LAMP
6 Always switch off the power before starting installation or maintenance work.
6 Installation must be done by an electrical technician. 2 Make sure to install the lamp with two people.
To hang the lamp at the desired height, use the strain relief.
1. Remove the wires from the splicing connectors.2. Route the cable through the strain relief.3. Hang the strain relief on the hook of the outlet box.

10
4. Cut the cable.5. Strip the wires with a length of 10 mm.
6. Connect the wires of the outlet box with the splicing connectors.
10 mm
11Monsieur Tricot collection • User manual
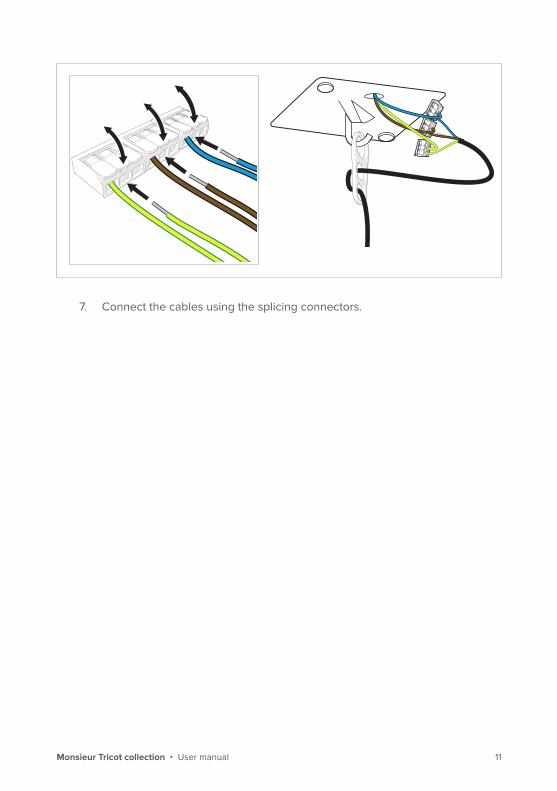
7. Connect the cables using the splicing connectors.

12
MAINTENANCE
REPLACING THE LIGHT SOURCE
6 Always switch off the power before starting installation or maintenance work.
1. Turn the sphere clockwise until it is free of the bayonet catch.2. Remove the sphere.
3. Turn the LED light clockwise.4. Remove the LED light.
1
2
3
4

13Monsieur Tricot collection • User manual
5. Place the new LED light in the socket.6. Turn the LED light counter clockwise.7. Place the sphere in the bayonet catch. 8. Turn the sphere counter clockwise until it is fastened.9. Switch on the power and test whether the lamp is functioning properly.
CLEANING THE COVER
5
6
7
8

14
6 Always switch off the power before starting installation or maintenance work.
1. Turn the sphere clockwise until it is free of the bayonet catch.2. Remove the sphere.
3. Loosen the elastic band of the removable cover.
1
2
3

15Monsieur Tricot collection • User manual
4. Pull the removable cover off the sphere.5. Wash the removable cover at 40 degrees with a ph neutral washing agent. 6 Do not tumble dry the removable cover.
6. Use a clean, microfibre cloth, lukewarm/hot water and a ph neutral washing agent to clean the sphere.
7. Pull the removable cover over the sphere.
4
7

16
8. Tighten the elastic band of the removable cover.
9. Twist and pull the elastic band over the rim of the sphere.
8
9

17Monsieur Tricot collection • User manual
10. Place the sphere in the bayonet catch.11. Turn the sphere counter clockwise until it is fastened.12. Switch on the power and test whether the lamp is functioning properly.
10
11

18
DISCLAIMER
Designs and specifications are subject to change without notice. All logos, brands and product names are trademarks or registered trademarks of their respective owners and are hereby recognized as such.
DISPOSAL
Our products are packaged in environmentally friendly materials that can be recycled, disposed of or destroyed without endangering the environment.
This symbol indicates that this product should not be thrown away with other household waste throughout the EU. To prevent possible harm to the environment or human health by uncontrolled waste disposal, you are responsible for recycling in order to promote the sustainable reuse of raw materials.


Produced by:
TRIBÙ Oude Heidestraat 72 3740 Bilzen Belgium
www.tribu.com

MONSIEUR TRICOT Standing lamps
User manual English
Version 1.0 issued on 11-06-2019


3Monsieur Tricot User manual
CONTENT
Preface 5
The story of Monsieur Tricot 5Collection overview 6Intended use 7
Safety instructions 7
Product overview 8Parts list 8Specifications 9Adapter specifications 9Accessories 9
Installation 10Check the content of the package 10Charging the led light 10Installation of the Casambi app 10Making connection with the lamp(s) 11
Use 12Change the lamp profile 12Create a group 12Switching the lamp(s) on and off 12Dimming lamp(s) and groups 13Gallery 13Create a scene 14Set a timer 14
Wireless remote 15Product overview 15Installation 15Adding scenes 16
Maintenance 17Replacing the light source 17Cleaning the cover 22
Troubleshooting 26
Disclaimer 26
Disposal 26


5Monsieur Tricot User manual
PREFACE
Congratulations on the purchase of your Monsieur Tricot lamp. Its warm glow and hand-crocheted or knitted fabric will cast beautiful shadows as a magical backdrop for long, cosy summer nights. The Monsieur Tricot hanging and standing objects form a complete family of lights – you can read their story below.
This user manual contains all the necessary information for a correct, efficient and safe use of your lamp. We invite you to read this information carefully before installing or using the product.
One variant of the Monsieur Tricot collection has been used as an example to explain the instructions. It may be possible that your lamp looks slightly different.
THE STORY OF MONSIEUR TRICOT
Designer Ilia Eckardt grew up immersed in the Belgian fashion scene, his mother Hilde Frunt knitting prototypes for Belgian fashion designers such as Raf Simons, Ann Demeulemeester and Dries Van Noten. Fascinated by their world, Ilia worked on several knitting projects of his own, experimenting with innovative knitting techniques and materials.
Monsieur Tricot is his first creation, a family of in- and outdoor lighting objects, knitted or hand-crocheted with an innovative, weatherproof yarn. The sphere shaped lights give a warm glow and the different patterns cast beautiful shadows. The knitting and crocheting is done in Belgium by a network of artisans and every item is checked by Ilia and his mother.
As family is very important to the designer, he created his light objects as a family. Meet the handsome Monsieur Lebonnet, the graceful Madame Latoque, the chic Madame Cachet and their nephew Monsieur Ellipse.

6
COLLECTION OVERVIEW
Wireless Switch08010
dia 30cm080130S
dia 30cm080130H
dia 40cm080140S
dia 40cm080140H
dia 60cm080160S
dia60cm080160H
dia 30cm080230S
dia 30cm080230H
dia 40cm080240S
dia 40cm080240H
dia 30cm080330S
dia 30cm080330H
dia 40cm080340H
dia 50cm080350H
dia 40cm080340S
dia 50cm080350S
dia40cm080440H
10-Linen00-White
60-Brick 30-Moss
Monsieur Lebonnet
Monsieur Lebonnet
Madame Cachet
Madame Cachet Monsieur Ellipse
HA
NG
ING
CO
LOR
S
AC
CES
SOR
IES
STA
ND
ING
Madame Latoque
Madame Latoque
89-Wengé

7Monsieur Tricot User manual
INTENDED USE
The product is only intended as in- or outdoor led lighting. Any change to the product can have consequences for safety, warranty and correct operation.
SAFETY INSTRUCTIONS
6 Only use the product as described in this manual. 6 Do not use a damaged product. 6 Do not drop the product and avoid bumping. 6 Do not use the product if a part is damaged or defective.
Replace a damaged or defective part immediately. 6 Do not tumble dry the removable cover. 6 Do not expose the battery to a heat source. 6 Do not puncture or drill through the battery. 6 Any changes made to the product can have consequences for safety,
correct operation and warranty procedures.

8
PRODUCT OVERVIEW
PARTS LIST
A BaseB Strain reliefC Allen screwD Lamp holderE Countersunk head screw
F Lamp lidG Charging portH LED lightI SphereJ Removable cover
A B C D E F G H I J

9Monsieur Tricot User manual
SPECIFICATIONS
Power 25W
Light source Dimmable LED included
Voltage 12V
Wattage 3.5W (+15.6W when charging)
Average lifetime ≥ 5000 hrs
Cycles on/off ≥ 45000
Starting time Within 1 sec
Warm-up time to 60% of the full light output
Immediately full light output
Light source dimensions 178 x 85 mm
Luminous flux 235 Lumen
Luminous efficacy 72 Lumen/Watt
Lumen maintenance L70
Colour rendering index Ra.82
Energy class A+
Battery Rechargeable battery, up to 12 hrs operational at 100%
Charging Power adaptor and cable included, 5 hrs of charging time
Control Via Bluetooth connection or a wireless remote (art.nr 08010)
Dimming Can be dimmed via Bluetooth connection
ADAPTER SPECIFICATIONS
IP code IP44
Supply voltage 230V : 24V
Power 21W
ACCESSORIES
Wireless remote Art. nr. 08010

10
INSTALLATION
CHECK THE CONTENT OF THE PACKAGE
Check if all parts from the parts list are present and that no damage is visible on the parts. In case parts are missing or damaged, please contact your local Tribù dealer.
CHARGING THE LED LIGHT
1. Plug in the adapter. Make sure the white stripe on the end of the cable is facing up.
2. Charge the battery for at least 5 hours. 2 The battery is fully charged when the LED light next to the LED filaments is
off.
INSTALLATION OF THE CASAMBI APP
1. Download the Casambi app for Android or iOS on your phone via Google Play or the Apple App Store.
2. Switch on the lamp(s) by connecting the adapter.3. Activate Bluetooth on your phone.4. Open the Casambi app on your phone.

11Monsieur Tricot User manual
MAKING CONNECTION WITH THE LAMP(S)
1. Tap ‘Nearby devices’. All light sources supported by the Casambi app are shown.
2. Select a lamp. 2 Tap ‘Identify lamp’ to check which lamp is activated. The lamp will start blink-
ing.3. Tap ‘Add to…’. The existing networks are shown. 2 When you use the Casambi app for the first time it will automatically create
a network that can only be accessed with the device that has created this network.
4. Select the automatically created network. The lamp is now connected to the network.
2 Repeat step 1 – 4, if you want to add another lamp to the network.

12
USE
CHANGE THE LAMP PROFILE
1. In the ‘Lamps’ tab, double tap a lamp.2. Under ‘Information’ you can change the name of the lamp and give it an
icon.3. Under ‘Start status for activation’ you can select the ‘Standard mode’ and
‘Last status’. 2 In the ‘Standard mode’ the lamp will be switched on at 100%. In ‘Last status’
the lamp is switched on in the settings as when it was last switched off.
CREATE A GROUP
If you have several lamps, it is practical to group them together so that you can operate them as a group at the same time.
1. Go to the ‘Lamps’ tab.2. Tap ‘Edit’ in the top right corner.3. Touch and hold any lamp on the screen. Drag the lamp onto another lamp to
create a group. 2 You can drag other lamps into the group by repeating these steps.
4. Double tap the group to change the name of the group.5. Tap ‘Done’ at the top right corner of the screen.
SWITCHING THE LAMP(S) ON AND OFF
1. Go to the ‘Lamps’ tab.2. Tap a lamp or group to switch it on.3. Tap again to switch off the lamp or group. 2 Tap ‘All lamps’ to switch on all lamps. Tap again to switch off all lamps.

13Monsieur Tricot User manual
DIMMING LAMP(S) AND GROUPS
1. Go to the ‘Lamps’ tab.2. Touch and hold any lamp or group on the screen and move your finger to
the left or right to determine the dimming percentage. 2 Open a group by double tapping it. This way you can dim a lamp which is
part of a group. 2 Tap and hold any lamp on the screen for three seconds to open the dim bar.
GALLERY
The ‘Gallery’ tab gives you a good overview of all lamps in the room and allows you to easily operate them.
1. Tap the ‘Gallery’ tab.2. Tap ‘Edit’ in the top right corner.3. Tap the plus icon in the top left corner.4. Tap ‘Take photo’ to take a photo or ‘Choose existing’ to choose an existing
photo.5. Tap the plus icon in the top left corner and select a lamp. 6. Tap ‘Done’ in the top right corner. The circle visualizes the lamp.7. Scale the circle until it is equal to the size of the lamp on the photo.8. Place the circle on top of the lamp and tap ‘Done’ in the top right corner. 2 Repeat steps 5 – 8, if you want to add another lamp in the photo. 2 Operate the lamps from the ‘Gallery’ tab by tapping a circle on the screen.
Tap and hold a circle on the screen for three seconds to open the dim bar.

14
CREATE A SCENE
The ‘Scenes” tab allows you to save different scenes.
1. Set up your lamps to the desired intensity.2. Tap the ‘Scenes’ tab.3. Tap ‘Edit’ in the top right corner.4. Tap the plus icon in the top left corner.5. Enter a scene name. 6. Tap ‘Add scene’ and select the lamps that you want to add to the scene.7. Tap ‘Done’ in the top right corner. 2 Repeat these steps, if you want to save another scene.
SET A TIMER
By setting a timer you can switch lamp(s) on or off at set times or switch scenes automatically.
2 You must first save different scenes before you can assign them to a timer.1. Tap the ‘More’ tab.2. Tap ‘Timers’.3. Tap ‘Edit’ in the top right corner.4. Tap the plus icon in the top left corner.5. Tap ‘Switches ON’ to indicate on which days, time or moment the scene
should be activated. 6. Tap ‘Done’ in the top right corner.7. Tap ‘Switches OFF’ to indicate on which days, time or moment the scene
should be deactivated. 8. Tap ‘Add scene’ and select one of the saved scenes.9. Tap ‘Done’ twice in the top right corner. 2 If you have selected multiple scenes, make sure to set the end time of the
first scene as the start time of the next scene.

15Monsieur Tricot User manual
K L M
Q P O
NR
WIRELESS REMOTE
PRODUCT OVERVIEW
The wireless remote is a wall control button that you can use to easily control your lamp(s).
K Preset button 1L Multi-purpose button 1M Preset button 2N Dim up
O Preset button 3P Multi-purpose button 2Q Preset button 4R Dim down
INSTALLATION
1. Open the Casambi app on your phone.2. Tap ‘Nearby devices’ and select the Casambi Express. 2 Make sure that the Casambi Express is active by pressing two buttons
simultaneously.3. Tap ‘Add to…’. The existing networks are shown.4. Select the desired network. The Casambi Express is connected to the
network.

16
ADDING SCENES
1. Select one of the four options.2. Select the desired scene. The scene has been added to the option.

17Monsieur Tricot User manual
1
2
3
4
MAINTENANCE
REPLACING THE LIGHT SOURCE
1. Turn the sphere counter clockwise until it is free of the bayonet catch.2. Remove the sphere.
3. Loosen the countersunk head screws of the lamp holder.4. Remove the lamp holder.

18
5. Loosen the Allen screws of the strain relief.
6. Turn the lamp lid counter clockwise to remove the lamp holder.7. Replace the LED light with a new LED light.
6
5

19Monsieur Tricot User manual
8
10
9
8. Fasten the lamp holder by turning the lamp lid on to the LED light.
9
9. Place the charging port on the strain relief. 2 Make sure to point the white marking on the charging port upwards.
10. Fasten the Allen screws of the strain relief.

20
11. Place the lamp holder. 2 Make sure to place the lamp holder correctly by using the bayonet catch.
12. Fasten the countersunk head screws of the lamp holder.
11
12

21Monsieur Tricot User manual
13. Place the sphere in the bayonet catch.14. Turn the sphere clockwise until it is fastened.15. Test whether the lamp is functioning properly.
14
13

22
CLEANING THE COVER
1. Turn the sphere counter clockwise until it is free of the bayonet catch.2. Remove the sphere.
3. Loosen the elastic band of the removable cover.
1
3
2

23Monsieur Tricot User manual
4. Pull the removable cover off the sphere.5. Wash the removable cover at 40 degrees with a ph neutral washing agent. 6 Do not tumble dry the removable cover.
6. Use a clean, microfibre cloth, lukewarm/hot water and a ph neutral washing agent to clean the sphere.
7. Pull the removable cover over the sphere.
8
4
7

24
8. Tighten the elastic band of the removable cover.
9. Twist and pull the elastic band over the rim of the sphere.
9

25Monsieur Tricot User manual
10. Place the sphere in the bayonet catch. 11. Turn the sphere clockwise until it is fastened.
10
11

26
TROUBLESHOOTING
1. Unable to find the lamp in the Casambi app.Before connecting with the lamp in the Casambi app, charge the lamp with the adapter (cf. Installation).
2. Unable to dim the lamp.Double tap on the lamp in the Casambi app. Set a minimum and maximum dimvalue.
DISCLAIMER
Designs and specifications are subject to change without notice. All logos, brands and product names are trademarks or registered trademarks of their respective owners and are hereby recognized as such.
DISPOSAL
Our products are packaged in environmentally friendly materials that can be recycled, disposed of or destroyed without endangering the environment.
This symbol indicates that this product should not be thrown away with other household waste throughout the EU. To prevent possible harm to the environment or human health by uncontrolled waste disposal, you are responsible for recycling in order to promote the sustainable reuse of raw materials.


Produced by:
TRIBÙ Oude Heidestraat 72 3740 Bilzen Belgium
www.tribu.com