MONOPRICE · INTRODUCTION Thank you for purchasing this 22" IPS FHD Graphic Pen Display! This...
29
MONOPRICE MP 22" IPS FHD Graphic Pen Display P/N 21825 User's Manual
Transcript of MONOPRICE · INTRODUCTION Thank you for purchasing this 22" IPS FHD Graphic Pen Display! This...

MONOPRICE MP 22" IPS FHD Graphic Pen Display
P/N 21825
User's Manual

2
CONTENTS SAFETY WARNINGS AND GUIDELINES ................................................................................................................................................................................... 3
INTRODUCTION .......................................................................................................................................................................................................................................... 4
FEATURES ........................................................................................................................................................................................................................................................ 4
CUSTOMER SERVICE .............................................................................................................................................................................................................................. 4
PACKAGE CONTENTS ............................................................................................................................................................................................................................. 5
SYSTEM REQUIREMENTS .................................................................................................................................................................................................................... 5
PRODUCT OVERVIEW ............................................................................................................................................................................................................................6
Controls ......................................................................................................................................................................................................................................................6
Rear Panel ................................................................................................................................................................................................................................................. 7
SOFTWARE INSTALLATION ............................................................................................................................................................................................................... 7
Windows ................................................................................................................................................................................................................................................... 7
Mac OS X ................................................................................................................................................................................................................................................. 12
HARDWARE INSTALLATION ...........................................................................................................................................................................................................14
PEN CONFIGURATION ......................................................................................................................................................................................................................... 15
Windows® ............................................................................................................................................................................................................................................... 15
Mac® OS X®............................................................................................................................................................................................................................................ 18
PEN CHARGING ......................................................................................................................................................................................................................................... 21
CHANGING THE PEN TIP .................................................................................................................................................................................................................... 21
OSD MENU ................................................................................................................................................................................................................................................... 22
Brightness Menu .............................................................................................................................................................................................................................. 22
Color Temp Menu ...........................................................................................................................................................................................................................24
OSD Menu ............................................................................................................................................................................................................................................. 25
Reset Menu .......................................................................................................................................................................................................................................... 26
Misc Menu ............................................................................................................................................................................................................................................. 27
SPECIFICATIONS ......................................................................................................................................................................................................................................28
REGULATORY COMPLIANCE ......................................................................................................................................................................................................... 29
Notice for FCC ................................................................................................................................................................................................................................... 29
Notice for Industry Canada .................................................................................................................................................................................................... 29

3
SAFETY WARNINGS AND GUIDELINES Please read this entire manual before using this device, paying extra attention to these safety warnings and guidelines. Please keep this manual in a safe place for future reference.
This device is intended for indoor use only.
Do not expose this device to water or moisture of any kind. Do not place drinks or other containers with moisture on or near the device. If moisture does get in or on the device, immediately unplug it from the power outlet and allow it to fully dry before reapplying power.
Do not touch the device, the power cord, or any other connected cables with wet hands.
Do not expose this device to excessively high temperatures. Do not place it in, on, or near heat sources, such as a fireplace, stove, radiator, etc. Do not leave it in direct sunlight.
Prior to operation, check the unit and power cord for physical damage. Do not use if physical damage has occurred.
Unplug this device from the power source when not in use.
Take care to prevent damage to the power cord. Do not allow it to become crimped, pinched, walked on, or become tangled with other cords. Ensure that the power cord does not present a tripping hazard.
Never unplug the unit by pulling on the power cord. Always grasp the connector head or adapter body.
Ensure that power is turned off and disconnected before making any electrical connections.
Clean using a soft, dry cloth only. Do not use chemical cleaners, solvents, or detergents. For stubborn deposits, moisten the cloth with warm water.
This monitor has no user serviceable parts. Do not open the case or otherwise attempt to modify this monitor.

4
INTRODUCTION Thank you for purchasing this 22" IPS FHD Graphic Pen Display! This display features VGA, HDMI®, and DVI input options and a maximum resolution of 1980 x 1080p. The recharagable pen has a 5080 lines-per-inch resolution, 2048 levels of pressure sensitivity, and a 233 rps report rate. It is compatible with Windows® XP and later and with Mac® OS X® 10.4.11 and later. The included adjustable display bracket allows it to be angled from 10 ~ 80°.
FEATURES 1920 x 1080p maximum display resolution
VGA, HDMI®, and DVI input options
5080 lines-per-inch resolution
2048 levels of pressure sensivity
233 reports-per-second report rate
178° horizontal and vertical viewing angles
Rechargeable pen stylus
CUSTOMER SERVICE The Monoprice Customer Service department is dedicated to ensuring that your ordering, purchasing, and delivery experience is second to none. If you have any problem with your order, please give us an opportunity to make it right. You can contact a Monoprice Customer Service representative through the Live Chat link on our website www.monoprice.com during normal business hours (Mon-Fri: 5am-7pm PT, Sat-Sun: 9am-6pm PT) or via email at [email protected]

5
PACKAGE CONTENTS Please take an inventory of the package contents to ensure you have all the items listed below. If anything is missing or damaged, please contact Monoprice Customer Service for a replacement.
1x 22" Graphic pen display
1x Rechargeable pen stylus
1x AC power adapter
1x AC power cord (NEMA 5-15 to IEC 60320 C13)
1x Adjustable stand
4x Screws
1x VGA video cable
1x HDMI® video cable
1x USB cable
1x Pen charging cable
1x Pen holder (with 8x spare pen tips and 1x tip removal clip inside)
1x Driver disc
1x User's manual
SYSTEM REQUIREMENTS Computer running Windows® XP or later or Max® OS X® 10.4.11 or later
Available USB port
VGA. DVI, or HDMI® video output
Optical disc drive or internet connection for driver installation

6
PRODUCT OVERVIEW Controls
AUTO: If using the VGA input and the OSD menu is not display, press the AUTO button to automatically adjust the display for optimum performance. If the OSD menu is display, press the AUTO button to go back to the previous menu screen. If at the main menu screen, pressing the AUTO button will exit the OSD menu.
-: When the OSD menu is displayed, press the - button to move the highlight down or to the left. When an OSD menu entry is being edited, press the - button to decrease the edited value.
+: When the OSD menu is displayed, press the + button to move the highlight up or to the right. When an OSD menu entry is being edited, press the + button to increase the edited value.
MENU: If the OSD menu is not displayed, press the MENU button to display the OSD menu. When the OSD menu is displayed, press the MENU button to select the highlighted entry. If an entry is being edited, press the MENU button to accept the edited value.
POWER: Press the POWER button to turn the monitor on or to put it into standby.

7
Rear Panel
SOFTWARE INSTALLATION IMPORTANT! You must install the driver package before physically connecting the display to your Windows® or Mac® PC.
Windows Perform the following steps to install the driver software to your Windows® PC.
1. Insert the driver CD into your optical disc drive. If you have autorun enabled, the setup screen will appear. If not, navigate the CD file structure and double-click the setup.exe file. If you receive a Security Warning, click the Run button.

8
2. Click the WINDOWS DRIVER button. The launcher will open a file browser with the WinDriver directory opened. Double-click the Monoprice21825.exe file to launch the installer. If you receive a Security Warning, click the Run button.
3. Whether you have painting software package running or not, you will be prompted to close all painting software programs. Close any that are open, then click the Yes button to continue.
4. The Setup Wizard will launch. Click the Next button to continue.
9
5. The Wizard will prompt you for the installation directory. You can click the Browse... button to open the file browser and select an installation directory or accept the default directory. Click the Next button to continue.
6. You will next be prompted to select the menu folder for the software shortcuts.
You can click the Browse... button to open a browser and select a menu folder or you can accept the default folder. Click the Next button to continue.

10
7. If you want to have a desktop icon installed, leave the box checked, otherwise, uncheck the box. Click the Next button to continue.
8. Take a moment to review your installation choices. Click the Install button to begin
the installation process.
11
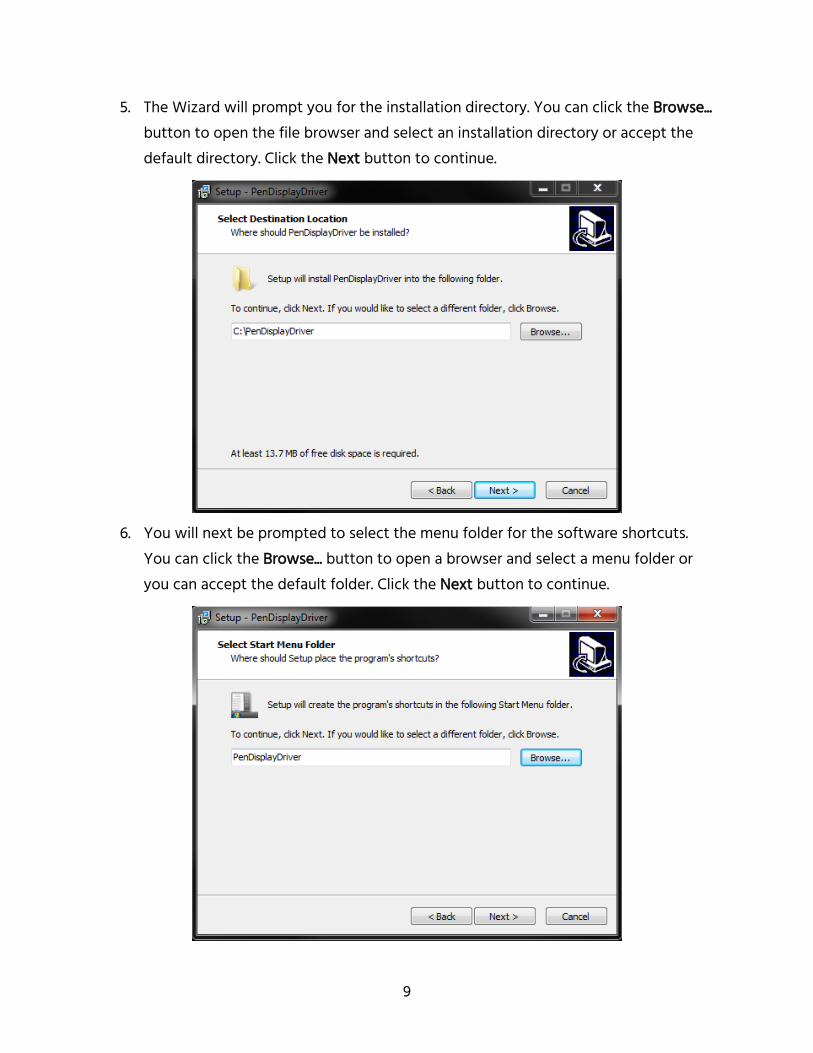
9. Once the files have been installed, click the box to remove the check mark, then click the Finish button to close the Setup Wizard. Restart your computer.

12
Mac OS X Perform the following steps to install the driver software to your Mac® computer.
1. Insert the driver CD into your optical disc drive. Open a Finder window and navigate to the MacDriver folder on the disc, then double-click the PenDisplay.pkg file to launch the installer.
2. Click the Continue button to proceed.
13
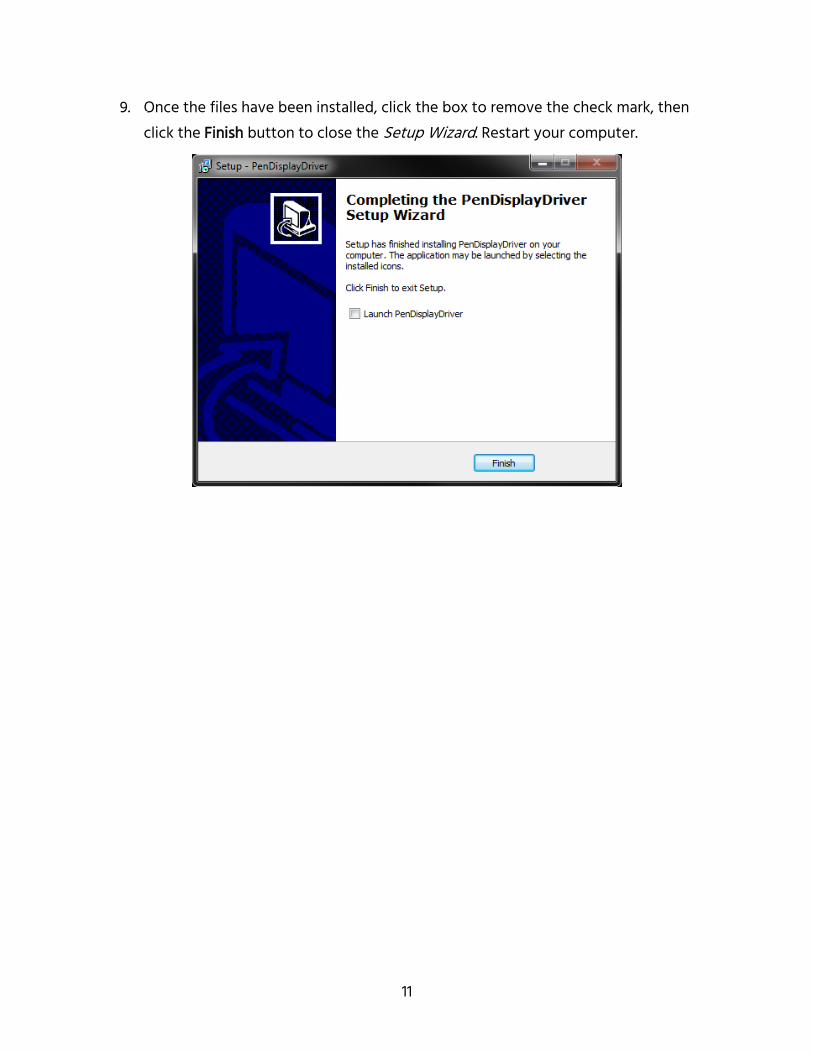
3. Click the Install button.
4. Input your Name and Password, then click the Install Software button to begin the
driver installation.

14
5. Once the driver is installed, the Driver Configuration window will open. Close the window, then click the Close button on the installer. Restart your Mac®.
HARDWARE INSTALLATION Important! If you have not already done so, install the driver software by following the Windows® or Mac® OS X® installation instructions in the SOFTWARE INSTALLATION section above.
1. Carefully remove the monitor, stand, and accessories box from the packaging. Place a blanket or towel on a flat surface, then place the monitor face down on the blanket or towel.
2. Use the four screws to secure the stand to the back of the monitor. You may need to adjust the position of the stand to access the screw heads.
3. Place the monitor in its intended location and adjust the angle as desired.
4. Using the included VGA cable, the included HDMI® cable, or a DVI cable (not included), plug one end into the VGA, HDMI, or DVI connector on the monitor, then plug the other end into the appropriate video output on your computer.
5. Using the included USB cable, plug one end into the USB port on the monitor, then plug the other end into an available USB port on your computer.
15
6. Plug the DC barrel connector on the included AC power adapter into the DC IN port on the monitor.
7. Plug the included AC power cord into the AC power adapter, then plug the other end into a nearby AC power outlet.
8. Press the POWER button on the monitor to turn it on.
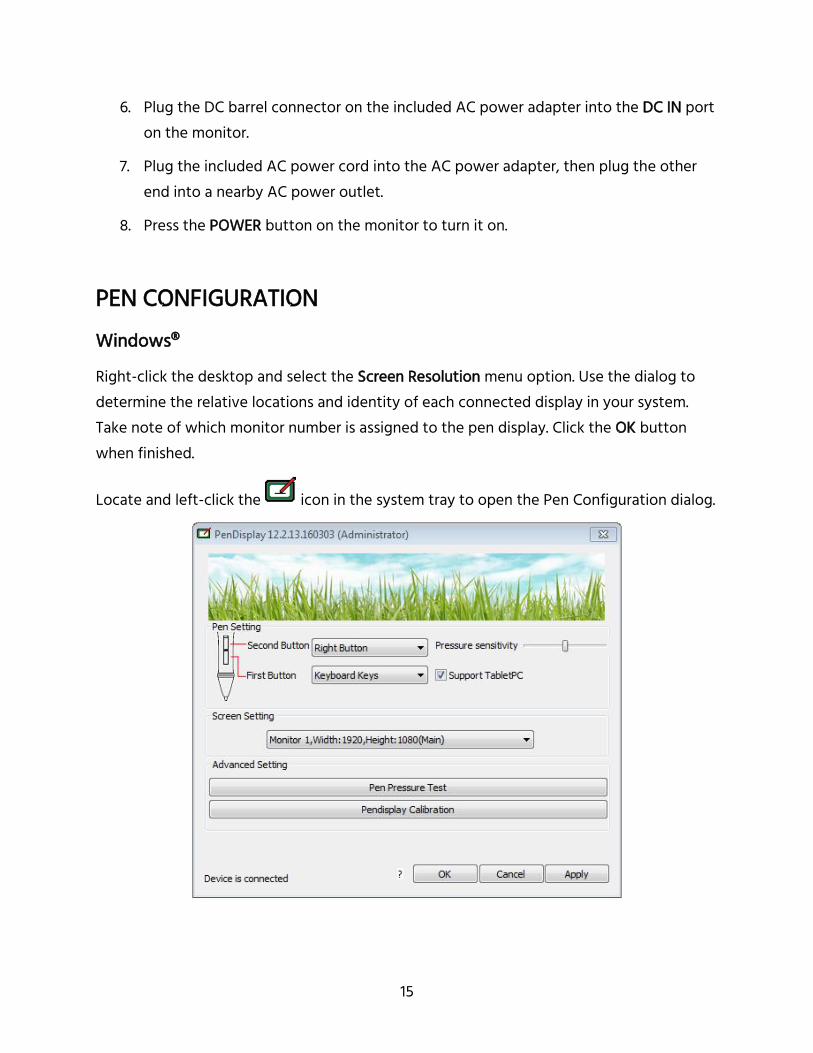
PEN CONFIGURATION Windows® Right-click the desktop and select the Screen Resolution menu option. Use the dialog to determine the relative locations and identity of each connected display in your system. Take note of which monitor number is assigned to the pen display. Click the OK button when finished.
Locate and left-click the icon in the system tray to open the Pen Configuration dialog.

16
Use the pull-down list box in the Screen Setting section to select the monitor number for the pen display, then click the Apply button to save the setting.
Use the First Button and Second Button pull-down list boxes to select the function for each button on the pen. Note that the pen tip simulates the left mouse button.
If you select the Keyboard Keys option, you will be presented with a second dialog that prompts you to select which keyboard key is simulated when the button is pressed. Click the Apply button when finished.
Click the Pen Pressure Test button to open the PenPressure Test dialog. Drag it to the pen display if it opens on the wrong monitor. Use the pen to test the pressure range. Drag the Pressure sensitivity slider to the left or right as needed to decrease or increase the sensitivity. Click the radio buttons to the left of the colors to change the active color. Click the brush icon to clear the test area. Close the dialog when finished.

17
Click the Pendisplay Calibration button to display the calibration screen on the pen display monitor. Use the pen to click the red dots to perform the calibration.
The Support TabletPC option enables native Windows® tablet support operations in Control Panel. If problems are encountered, try enabling or disabling the Support TabletPC option.

18
Mac® OS X®
Click the icon in the left corner of the screen and select the System Preferences... option. Double-click the Displays icon to open the display configuration dialog. Click the Arrangement tab, then drag the pen display monitor to the desired location in relation to the main display. Next, drag the white menu bar from the original display to the pen display, making it the primary display. Close the dialog when finished.
Open Finder and navigate to the Applications > PenInput folder.
19
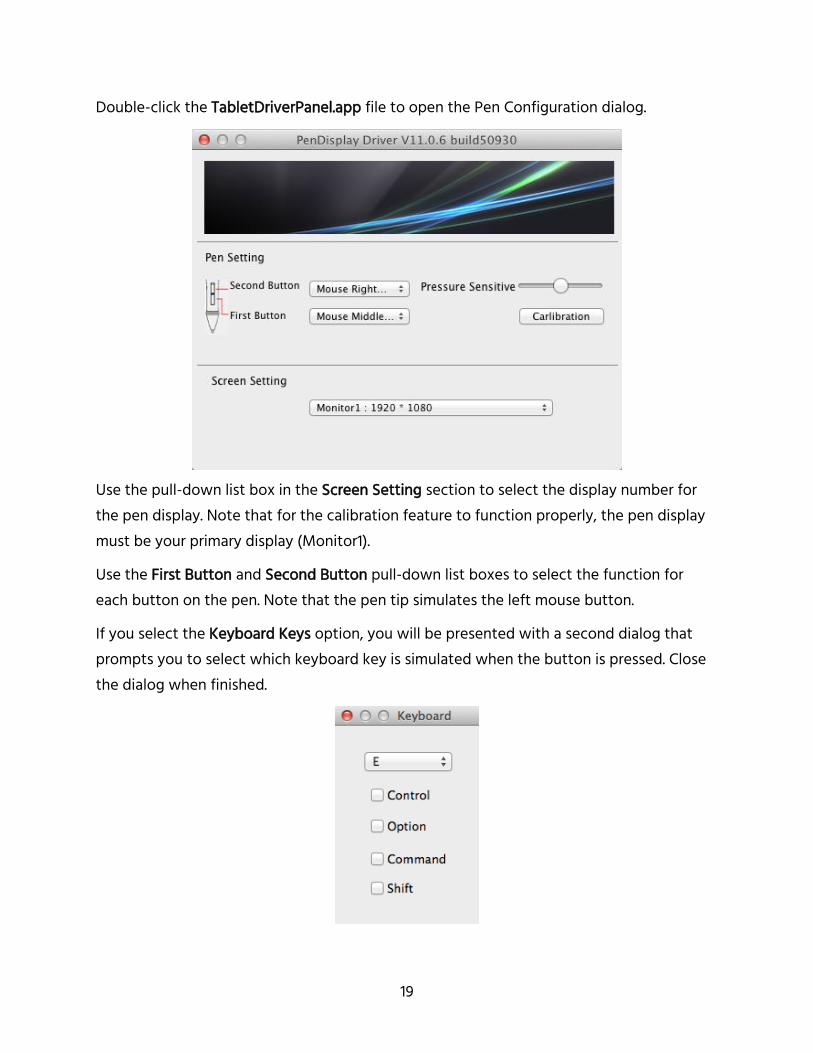
Double-click the TabletDriverPanel.app file to open the Pen Configuration dialog.
Use the pull-down list box in the Screen Setting section to select the display number for the pen display. Note that for the calibration feature to function properly, the pen display must be your primary display (Monitor1).
Use the First Button and Second Button pull-down list boxes to select the function for each button on the pen. Note that the pen tip simulates the left mouse button.
If you select the Keyboard Keys option, you will be presented with a second dialog that prompts you to select which keyboard key is simulated when the button is pressed. Close the dialog when finished.

20
Click the Calibrate button to display the calibration screen. Use the pen to click the red dots to perform the calibration.
Double-click the PenPressureTest.app file in the Applications > PenInput folder to test the pen pressure. Click the radio buttons to the left of the colors to change the active color. Click the brush icon to clear the test area. Drag the Pressure Sensitive slider in the TabletDriverPanel app to adjust the pen pressure level to the left or right as needed to decrease or increase the sensitivity. Close the dialog when finished.

21
PEN CHARGING The pen stylus features a built-in rechargeable battery. To charge the pen, plug the included charging cable into the top of the pen, then plug the other end into a USB power source, such as your computer's USB port, a wall charger, etc. The LED on the pen blinks while charging is in progress. The pen takes about 1 hour to fully charge.
CHANGING THE PEN TIP Perform the following steps to replace the pen tip.
1. Unscrew the base of the pen tip holder to reveal the spare pen tips and the pen clip. Remove one tip and the pen clip.
2. Position the pen clip of the tip, then squeeze it to grip the tip. Pull gently to remove the old tip, then insert the new tip.

22
OSD MENU Brightness Menu
BRIGHTNESS: Adjusts the overall screen brightness.
CONTRAST: Adjusts the amount of difference between the dark and bright portions of the image.
ECO: Selects one of four preset brightness and contrast settings. The available options are STANDARD, TEXT, GAME, and MOVIE.
DCR: Enables or disables the Dynamic Contrast Ratio. When enabled, the monitor uses the backlighting to artificially increase the overall contrast ratio. DCR is not well suited to fast moving images found in action movies and video games.

23
Image Menu
H. POSITION: Adjust the horizontal positioning of the image on the screen. This option is
only available when using a VGA input.
V. POSITION: Adjust the vertical positioning of the image on the screen. This option is only available when using a VGA input.
CLOCK: Adjusts the vertical clock rate of the image on screen. This option is only available when using a VGA input.
PHASE: Adjusts the horizontal phase of the image on screen. This option is only available when using a VGA input.
ASPECT: Selects one of two aspect ratios for the image on screen. You can choose between WIDE and 4:3.

24
Color Temp Menu
COLOR TEMP.: Allows selection of one of two color temperature presets, WARM and
COOL, or the USER setting, which allows direct manipulation of the individual color elements.
RED: Adjusts the amount of red in the image. This option is only available when the COLOR TEMP option is set to USER.
GREEN: Adjusts the amount of green in the image. This option is only available when the COLOR TEMP option is set to USER.
BLUE: Adjusts the amount of blue in the image. This option is only available when the COLOR TEMP option is set to USER.

25
OSD Menu
LANGUAGE: Allows selection of the language used in the OSD menu system. You can
select English, French, German, Chinese, Italian, Spanish, Portuguese, Turkish, Polish, Dutch, Russian, and Korean.
OSD H. POS.: Sets the horizontal position of the OSD menu.
OSD V. POS.: Sets the vertical position of the OSD menu.
OSD TIMER: Sets the amount of time the OSD menu will remain on screen without any button input. The adjustment range is 5 to 60 seconds in 5 second intervals.
TRANSPARENCY: Sets the level of transparency for the OSD menu. The adjustment range is 0 to 100% in 25% increments.

26
Reset Menu
IMAGE AUTO ADJUST: Automatically adjusts the screen position, clock, and phase. This
option is only available when using a VGA input.
COLOR AUTO ADJUST: Automatically adjusts the color balance of the image. This option is only available when using a VGA input.
RESET: Resets all settings to the factory default values.

27
Misc Menu
SIGNAL SOURCE: Allows selection of the input source. The screen also displays the current
resolution and refresh rate.

28
SPECIFICATIONS Model 21825
Maximum Resolution 1920 x 1080p
Inputs VGA, HDMI®, DVI
Display Area 476.64 x 268.11 mm
Dot Pitch 0.24825 x 0.24825 mm
Viewing Angles 178° horizontal, 178° vertical
Stand Angle Range 10 ~ 80°
Input Resolution 5080 lines per inch
Pressure Levels 2048
Accuracy ±0.5mm (center)
Report Rate 233 rps
Input Power 12 VDC, 3A
AC Adapter Input Power 100 ~ 240 VAC, 50/60 Hz
Maximum Power Consumption 36 watts
Operating Temperature +41 ~ +104°F (+5 ~ +40°C)
Storage Temperature -4 ~ +140°F (-20 ~ +60°C)
Operating Humidity 20 ~ 80% RH, non-condensing
Storage Humidity 5 ~ 95% RH, non-condensing
Weight 8.2 lbs. (3.7 kg)
Compatible Operating Systems Microsoft Windows® XP and later Apple Mac® OS X® 10.4.11 and later

29
REGULATORY COMPLIANCE Notice for FCC
Modifying the equipment without Monoprice's authorization may result in the equipment no longer complying with FCC requirements for Class B digital devices. In that event, your right to use the equipment may be limited by FCC regulations, and you may be required to correct any interference to radio or television communications at your own expense.
This equipment has been tested and found to comply with the limits for a Class B digital device, pursuant to Part 15 of the FCC Rules. These limits are designed to provide reasonable protection against harmful interference in a residential installation. This equipment generates, uses and can radiate radio frequency energy and, if not installed and used in accordance with the instructions, may cause harmful interference to radio communications. However, there is no guarantee that interference will not occur in a particular installation. If this equipment does cause harmful interference to radio or television reception, which can be determined by turning the equipment off and on, the user is encouraged to try to correct the interference by one or more of the following measures:
Reorient or relocate the receiving antenna.
Increase the separation between the equipment and receiver.
Connect the equipment into an outlet on a circuit different from that to which the receiver is connected.
Consult the dealer or an experienced radio/TV technician for help.
Notice for Industry Canada This Class B digital apparatus complies with Canadian ICES-003.
Cet appareil numérique de la classe B est conforme à la norme NMB-003 du Canada.
HDMI, the HDMI Logo, and High-Definition Multimedia Interface are trademarks or registered trademarks of HDMI Licensing LLC in the United States and other countries.
Microsoft and Windows are either registered trademarks or trademarks of Microsoft Corporation in the United States and/or other countries.
Apple, Mac, and OS X are trademarks of Apple Inc., registered in the U.S. and other countries.