MODx Web Development - Packt Publishing | … · For More Information: In this package, you will...
25
MODx Web Development Antano Solar John Chapter No. 5 "Authentication and Authorization"
-
Upload
nguyenkhanh -
Category
Documents
-
view
219 -
download
0
Transcript of MODx Web Development - Packt Publishing | … · For More Information: In this package, you will...

MODx Web Development
Antano Solar John
Chapter No. 5 "Authentication and Authorization"
For More Information: http://www.packtpub.com/modx-web-development/book
In this package, you will find: A Biography of the author of the book
A preview chapter from the book, Chapter No. 5 "Authentication and Authorization"
A synopsis of the book’s content
Information on where to buy this book
About the Author Antano Solar is a techie to the core—a tech evangelist who is passionate about using technology to revolutionize the learning experience!
Antano has contributed to the open source community in terms of documentation, code, and support, with a variety of platforms based on languages such as PHP, Perl, Lisp, Python, and Ruby.
He loves to share his tech excitement with fellow techies and non-techies, and does so through publishing papers, books, and delivering seminars at colleges, universities such as the IIT, and corporate tech events.
He has published a paper on enhancing wireless networks in an IEEE Journal. His paper on an engine helping machines understand objectives by meta-modelling, using Neuro Linguistic Programming principles and Deep Structure, is considered a landmark.
An avid hacker, Antano has won two Yahoo hack day awards. He recently won the award for developing a Hybrid Search Engine from scratch in 24 hours that uses Machine Intelligence and Social Intelligence to identify, search, and present the information in the required format.

For More Information: http://www.packtpub.com/modx-web-development/book
Professionally, Antano, until recently, has been a Consultant and a Trainer providing IT solutions and sessions on VoIP, Networks and Software Plaforms, and Languages. He is currently the Chief Technology Officer at NuVeda Learning. In his current role, he is responsible for the development and deployment of Learning Management Systems that are being used by large MNCs globally. He also plays the role of a Chief Architect in the research and development of technologies related to the understanding and measuring of Learning. He is excited by the challenges of using complex technologies such as Artificial Intelligence and Natural Language Processing.
Occasionally, when Antano needs to take a "Tech" break, he likes to train and tell stories!
To those who prepared me: My Mom and Dad—for all the hope, faith, love, and wise counsel. And to those who made it happen: The Packt team—especially Leena and Sarah—the reviewers, and the MODx community for an awesome open source development platform.

For More Information: http://www.packtpub.com/modx-web-development/book
MODx Web Development This book teaches you how to use MODx for creating powerful dynamic web sites, even without the knowledge of a programming language as a prerequisite. It leads the reader step by step in a logical pattern to build a complete web site. Each chapter covers certain concepts with simple examples. All the examples if you follow along, aggregate to a self-created web site. Towards the end, it has a chapter dedicated to the serious programmers who would like to extend what they can do with MODx.
This book can also be used as a reference or to relearn the particular concepts that have been discussed in each chapter. It has illustrative examples, wherever necessary, to make sure it is friendly. It has a mix of simple demonstrations and in-depth concepts that will interest both the casual and the serious reader.
What This Book Covers Chapter 1: In this chapter, you will learn the general concepts of web development, and also learn why MODx as a tool is a good choice to develop your web site.
Chapter 2: In this chapter, you will learn how to set up a working platform for developing web sites with MODx, which includes the installation and configuration of the prerequisites such as Apache, PHP, and MySQL.
Chapter 3: In this chapter, you will learn about documents and containers, and how every page that is displayed gets its content from a document. You will also learn to create, edit, and manipulate documents, and manage their configurations, and we will explain the TinyMCE editor.
Chapter 4: In this chapter, you will learn how to create/add templates. We will also take a look at template variables and document-specific variables, and briefly discuss snippets and chunks.
Chapter 5: In this chapter, you will learn how to modify the site to have a signup form and login form. We will also learn how to enable blogs to be posted only by friends.

For More Information: http://www.packtpub.com/modx-web-development/book
Chapter 6: In this chapter, you will learn one very useful snippet called Ditto. You will see how to create aggregation and feeds, and how to create feeds for separate categories. You will also learn about tagging, and how to tag documents and use them in MODx.
Chapter 7: In this chapter, you will learn how to use the snippet [[WayFinder]] to create lists of documents. We will also see the usage of parameters in WayFinder to make list creation flexible.
Chapter 8: In this chapter, you will learn how to use the hundreds of snippets available in detail. You will also learn how to search for the snippets that don't come packaged with MODx and how to use them.
Chapter 9: In this chapter, you will learn how to format the values in template variables. You will also learn how to make conditions based on the values of template variables, and accordingly present a different output either from the HTML in the expression or from a chunk or snippet.
Chapter 10: In this chapter, we will use what we have already learned, to study how certain commonly required functionalities can be implemented. We will learn how to integrate a forum, an image gallery, or forms that can send a mail, create web user profiles, and identify similar posts for blogs.
Chapter 11: In this chapter, you will learn how to create snippets, the different ways of displaying their output, and how to implement them. You will also learn to use the available MODx APIs and why you should use them.
Chapter 12: In this chapter, we will discuss how to make the site optimized for search engines. We will also discuss clean URLs, meta tags, sitemaps, and other tweaks.
Chapter 13: Finally, in this chapter, you will learn about plug-ins and modules including the ones that we will use in our application. The chapter will also cover events and plug-in configuration.

For More Information: http://www.packtpub.com/modx-web-development/book
Authentication and Authorization
Authentication is the process of verifying that users are who they claim to be. Authorization is the process of granting access to the authenticated users—based on their role—to perform operations such as view, edit, or delete on resources. In this chapter, you will learn how MODx facilitates authentication and authorization. You will build your site to include user registrations, logins, user types, and set rules on who can do what.
As you read this chapter, it is important that you keep in mind that MODx has two user types.
Web Users—users who use the web siteManager Users—users who are allowed to log in to the Manager interface
It is vital to keep this distinction in mind to be able to understand the complexities explained in this chapter.
You will also learn in this chapter how MODx allows grouping of documents, users, and permissions.
Create web usersLet us start by creating a web user. Web users are users who can access restricted document groups in the web site frontend; they do not have Manager access.
•
•

For More Information: http://www.packtpub.com/modx-web-development/book
Authentication and Authorization
[ 80 ]
Web users can identify themselves at login by using login forms. They are allowed to log in from the user page, but they cannot log in using the Manager interface. To create a web user, perform the following steps:
1. Click on the Web Users menu item in the Security menu.2. Click on New Web User.3. Fillinthefieldswiththefollowinginformation:
Field Name ValueUsername samiraPassword samira123Email Address [email protected]
4. Click on the Save button.
For More Information: http://www.packtpub.com/modx-web-development/book
Chapter 5
[ 81 ]
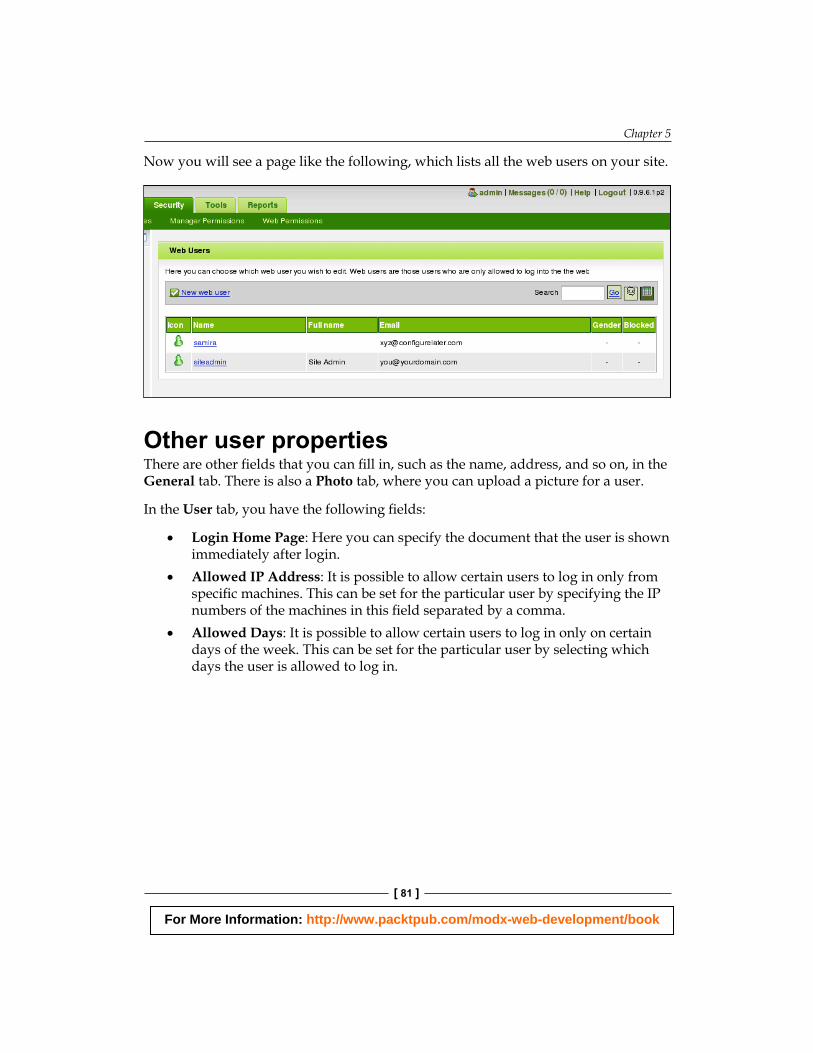
Now you will see a page like the following, which lists all the web users on your site.
Other user propertiesThereareotherfieldsthatyoucanfillin,suchasthename,address,andsoon,intheGeneral tab. There is also a Photo tab, where you can upload a picture for a user.
In the Usertab,youhavethefollowingfields:
Login Home Page: Here you can specify the document that the user is shown immediately after login.Allowed IP Address: It is possible to allow certain users to log in only from specificmachines.ThiscanbesetfortheparticularuserbyspecifyingtheIPnumbersofthemachinesinthisfieldseparatedbyacomma.Allowed Days: It is possible to allow certain users to log in only on certain days of the week. This can be set for the particular user by selecting which days the user is allowed to log in.
•
•
•

For More Information: http://www.packtpub.com/modx-web-development/book
Authentication and Authorization
[ 82 ]
When you click on any user on the web users' page, a page opens that allows you to edit the existing information and also shows simple statistics, such as when the user last logged in. It is also possible to block or unblock the particular user from this page. You can also set Blocked Until or Blocked After to block a user for a certain period and to schedule such a block. When a user is blocked, MODx does not allow that user to log in.
Add the login snippetNow that we have created a user, let us add a login form that allows the user to log in to the site.
This process is very simple. All that you have to do is call the WebLogin snippet in the template where you want the login page to be shown. We are going to change the template HTML with the following HTML for the Learning MODx default template:
<!DOCTYPE html PUBLIC "-//W3C//DTD XHTML 1.1//EN" "http://www.w3.org/TR/xhtml11/DTD/xhtml11.dtd"> <html xmlns="http://www.w3.org/1999/xhtml" xml:lang="en"> <head> <base href="[(site_url)]"></base> <title>Learning MODx</title> <meta http-equiv="Content-Type" content="text/html; charset=iso- 8859-1" />

For More Information: http://www.packtpub.com/modx-web-development/book
Chapter 5
[ 83 ]
<link rel="stylesheet" type="text/css" href="style.css" /> </head> <body> <div id="banner"> <h1>Learning MODx</h1> </div> <div id="wrapper"> <div id="container"> <div id="content"> <div id="col-1">
<h1>[*pagetitle*]</h1>
<br/>
[*#content*]
</div>
<div id="col-2" >
<div > [!WebLogin!] </div>
</div>
</div> </div> <div class="clearing"> </div> </div> <!-- end of wrapper div --> <div id="footer">It is fun and exciting to build websites with MODx</div></body></html>
Notice that the only addition is the call to the [!WebLogin!] snippet besides the change in the HTML layout, which now has two divs id=col-1 and id=col-2 within the div with id=content to make the content area into two panes.
Also, since we have made changes to the layout, we will have to change the style.cssfiletospecifythewidthofcol-1 and col-2. The new style.css should be changed to:
* { padding:2; margin:0; border:1; }body { margin:0 20px; background:#8CEC81; }#banner { background: #2BB81B; border-top:5px solid #8CEC81; border- bottom:5px solid #8CEC81; }#banner h1 { padding:10px; }#wrapper { background: #8CEC81; }#container { width: 100%; background: #2BB81B; float: left; }#content { background: #ffffff; height:600px; padding:0 10px 10px 10px; clear:both; }#footer { background: #2BB81B; border-top:5px solid #8CEC81; border- bottom:5px solid #8CEC81; }.clearing { clear:both; height:0; }
For More Information: http://www.packtpub.com/modx-web-development/book
Authentication and Authorization
[ 84 ]
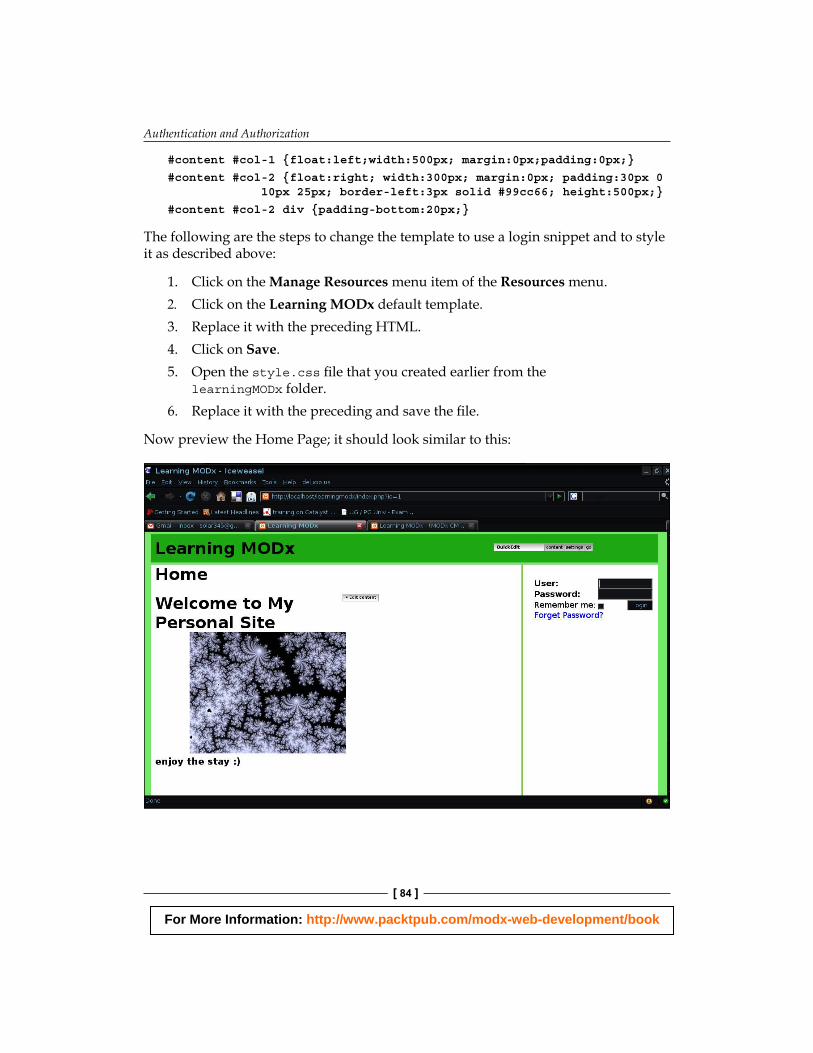
#content #col-1 {float:left;width:500px; margin:0px;padding:0px;}
#content #col-2 {float:right; width:300px; margin:0px; padding:30px 0 10px 25px; border-left:3px solid #99cc66; height:500px;}
#content #col-2 div {padding-bottom:20px;}
The following are the steps to change the template to use a login snippet and to style it as described above:
1. Click on the Manage Resources menu item of the Resources menu.2. Click on the Learning MODx default template.3. Replace it with the preceding HTML.4. Click on Save.5. Open the style.cssfilethatyoucreatedearlierfromthe
learningMODx folder.6. Replaceitwiththeprecedingandsavethefile.
Now preview the Home Page; it should look similar to this:
For More Information: http://www.packtpub.com/modx-web-development/book
Chapter 5
[ 85 ]
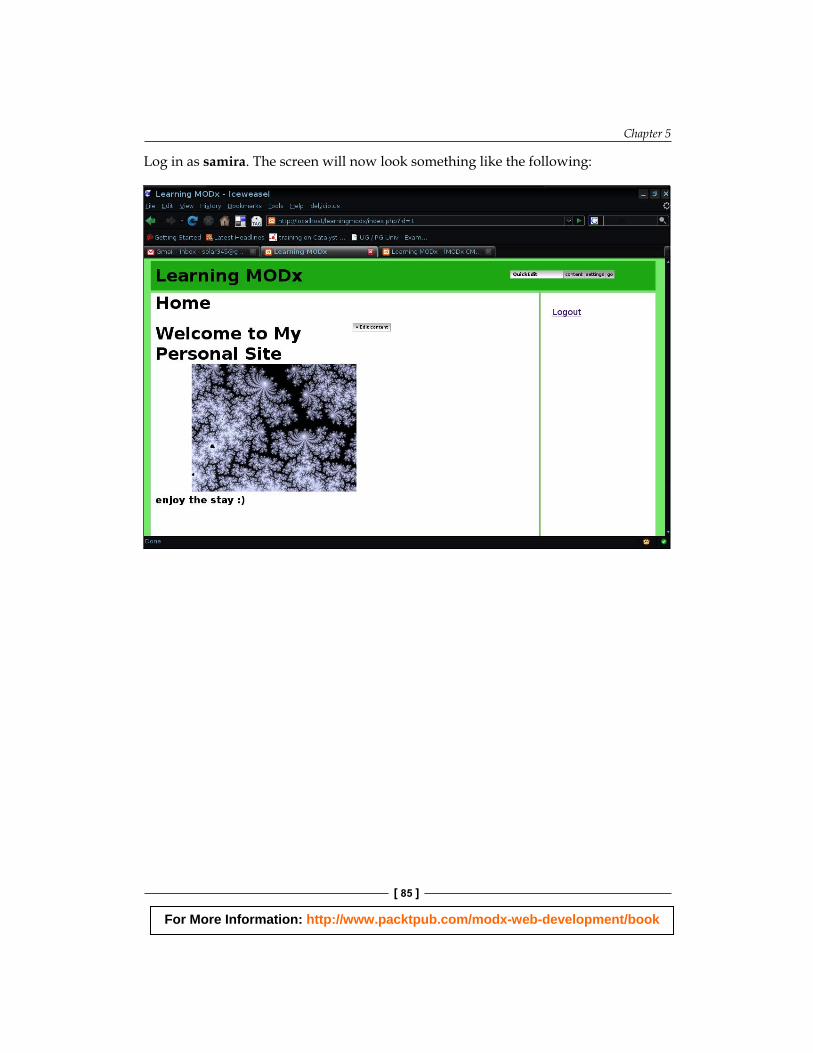
Log in as samira. The screen will now look something like the following:

For More Information: http://www.packtpub.com/modx-web-development/book
Authentication and Authorization
[ 86 ]
Notice that the QuickEdit bar is dependent on whom you log in as from the Manager interface and not on whom you log in as from the Web interface. You can check this out by clicking on the Logout link in the Manager page and refreshing the Home Page. The QuickEdit bar does not appear.
Documentscanbeassignedtodocumentgroupsandpermissionscanbedefinedon document groups. In our site, we want only our friends to post a blog, though anyone can write a comment. So we will create a user group called Friends and assign all the friends that we will allow to blog to this group.
Perform the following steps to create the Friends user group:
1. Click on the Web Permissions menu item on the Security menu.2. Click on the Web User groups tab if it is not the default selected tab.3. In the Create a new user group box, type Friends.4. Click on Submit.

For More Information: http://www.packtpub.com/modx-web-development/book
Chapter 5
[ 87 ]
Document group for friendsNow that we have a user group called Friends, we need to specify which, otherwise not accessible, documents are accessible by this group. We can group all those documents into a document group. The following are the steps to create a document group:
1. Click on the Web Permissions menu item on the Security menu.2. Click on the Document groups tab if it is not the default selected tab.3. In the Create a new document group box, type onlyforfriends.4. Click on Submit.

For More Information: http://www.packtpub.com/modx-web-development/book
Authentication and Authorization
[ 88 ]
Restricting access for a documentAll the documents so far have been created as All Document Groups (Public).This means that anybody can access the documents. When we assign a document to some other group, then only the users belonging to that particular group can access it. Now let us change the document group of Post a Blog to onlyforfriends as follows:
1. Click on the Post a Blog! document from the document tree.2. Click on the Edit button.3. Click on the Page Settings tab.4. Click on the onlyforfriends checkbox under the Access Permissions heading
at the bottom of the page.5. Click on the Save button.
User group: Document groupIf you have logged in as samira from the web site, log off and preview the Post a Blog! page. You will still see the blog page. This is because when we assign a document to a document group, it is still accessible to everyone. Only when a user group is linked to a document group do the permissions become exclusive to that group. Now let us link the Friends user group to the onlyforfriends document group.
1. Click on the Web Permissions menu item of the Security menu.2. Click on the User/Document group links.3. Select the onlyforfriends group from the drop-down box next to the Friends
user group and click Add.

For More Information: http://www.packtpub.com/modx-web-development/book
Chapter 5
[ 89 ]
User: User groupNow preview the Post a Blog! page again and you will see something like this:
Forget about the inappropriate message for now; we will deal with it at the end of the chapter. What you must understand now is that MODx has denied access to this page, and has redirected the user to the permission denied page that was initially set inthesiteconfiguration.
Try logging in as samira from the Home Page and visiting the Post a Blog! page again. You are still unauthorized to view the page. samira can only access the Post a Blog! page if samira is a member of the Friends user group. This is because we mapped the Friends user group to the onlyforfriends document group and Post a Blog! belongs to the onlyforfriends document group. So let us go ahead and add samira to the Friends user group.
1. Click on the Web Users menu item of the Security menu.2. Click on the username samira.3. Click on the General tab if it was not selected already.4. Select the Friends checkbox in the Web access permissions section.5. Click on Save.
Now having logged in as samira from the Home Page, visit the Post a Blog! page. You should be able to see the regular blog page.
For More Information: http://www.packtpub.com/modx-web-development/book
Authentication and Authorization
[ 90 ]
Post moderationIt will be helpful if we can delegate the role of moderating blogs to someone else. The user must only be able to manipulate the documents from the Manager interface and not perform any other activity. There are two points to note here:
Able to manipulate documents from the Manager interface—must be a Manager user typeNot able to perform any other activity—create a custom role only for manipulating documents
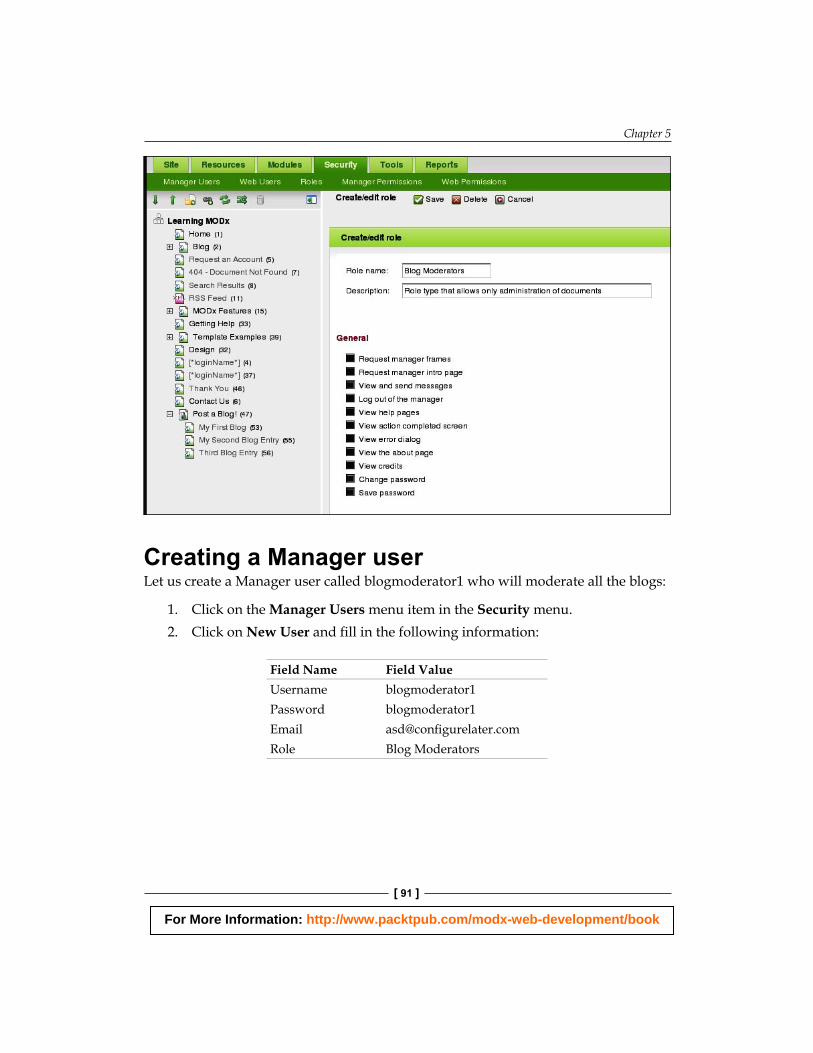
Creating a roleLet us create a role called Blog Moderators who can only edit documents.
1. Click on the Roles menu item of the Security menu.2. Click on Create/edit roleandfillinthefollowinginformation:
Field Name Field ValueRole name Blog ModeratorsDescription Role type that allows only
administration of documents
3. Have the following checkboxes clicked in Content management:Edit a documentDelete documents
4. Click on the Save button.
•
•
•
•
For More Information: http://www.packtpub.com/modx-web-development/book
Chapter 5
[ 91 ]
Creating a Manager userLet us create a Manager user called blogmoderator1 who will moderate all the blogs:
1. Click on the Manager Users menu item in the Security menu.2. Click on New Userandfillinthefollowinginformation:
Field Name Field ValueUsername blogmoderator1Password blogmoderator1Email [email protected] Blog Moderators

For More Information: http://www.packtpub.com/modx-web-development/book
Authentication and Authorization
[ 92 ]
3. Click on the Save button.
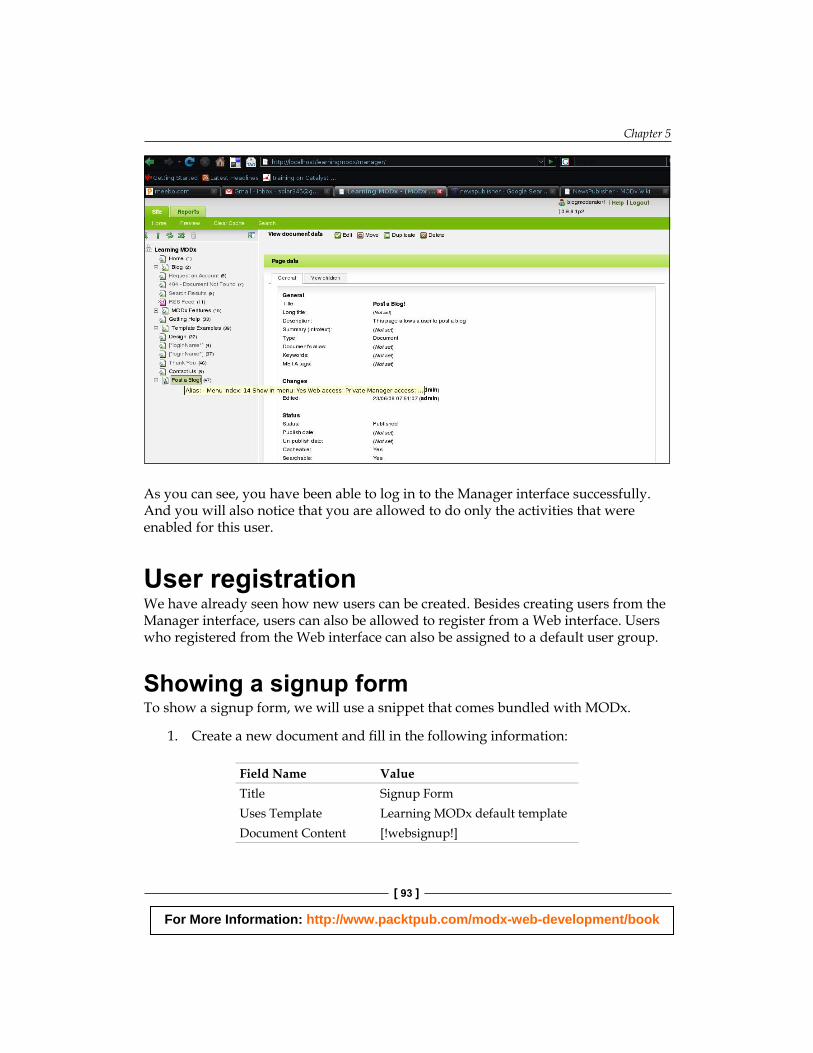
Checking the new roleNow that you have created a new role, and have assigned a user to that role, let us try to log in as that user. First, log out from the Manager interface and log in again with the username blogmoderator1 and password blogmoderator1. You will see a screen like the following:
For More Information: http://www.packtpub.com/modx-web-development/book
Chapter 5
[ 93 ]
As you can see, you have been able to log in to the Manager interface successfully. And you will also notice that you are allowed to do only the activities that were enabled for this user.
User registrationWe have already seen how new users can be created. Besides creating users from the Manager interface, users can also be allowed to register from a Web interface. Users who registered from the Web interface can also be assigned to a default user group.
Showing a signup formTo show a signup form, we will use a snippet that comes bundled with MODx.
1. Createanewdocumentandfillinthefollowinginformation:
Field Name ValueTitle Signup FormUses Template Learning MODx default templateDocument Content [!websignup!]

For More Information: http://www.packtpub.com/modx-web-development/book
Authentication and Authorization
[ 94 ]
2. Click on the Save button.
Notice that the content of the document is only [!websignup!], which is a call to the snippet websignup that displays a user registration form.
Now preview the page and it will look like the following:

For More Information: http://www.packtpub.com/modx-web-development/book
Chapter 5
[ 95 ]
Joining a default groupTo assign the registering users to the Friends user group, change the Document Contentfieldonthesignupformtothefollowing:
[!WebSignup? &groups=`Registered Users`!]
Notice that this functionality allows websignup to be called multiple times, with different parameters to have separate login forms for different kinds of users. You can even have different forms by setting a template parameter for the rendered forms.
Link the signup form in the log in snippetNow that we have created a User Registration page, we need to add a link to the signup page. Add the following code at the end of the document Home Page:
<br/><a href="[~57~]">Register</a>
We are just creating a link to the signup page in our Home Page.
Now the Home Page will appear like the following:

For More Information: http://www.packtpub.com/modx-web-development/book
Authentication and Authorization
[ 96 ]
Snippets and authorizationSo far, we have seen authentication and authorization with respect to:
Web users and documentsManagers and roles
Authorization on a document level restricts access or grants permission to a user for the entire document. Authorization within snippets can make this more granular by restricting only certain content within a document that is being rendered by the snippet. As explained in the previous chapter, snippets accept parameters, and certainsnippetsprovideparameterstobeconfiguredsothattheyareaccessibleonlyby a certain user type. In this section, we will modify the NewsPublisher snippet to allow posts from only the authenticated users.
NewsPublisher and authenticationEdit the contents of the Post a Blog! page and change the document's content to the following:
[!NewsPublisher? &folder=`47` &makefolder=`1` &canpost=`Friends`!]
Now, only the registered users will be able to submit the posts. You can check this out by logging out and visiting a blog page. It will look like the following:
•
•

For More Information: http://www.packtpub.com/modx-web-development/book
Chapter 5
[ 97 ]
SummaryThere are two categories of MODx users:
ManagerWeb
We learned that:
Users are grouped into User groupsDocuments can be assigned to Document groupsLinking Document groups to Web User groups will control viewing of the documentsLinking Document groups to Manager User groups will control Manager Access to the documentsRolesdefinewhatthemanagercandowiththeaccessibledocuments
Wehavemodifiedthesitetohaveasignupformandaloginform.Wehavealsoenabled blogs to be posted only by friends.
•
•
•
••
•
•
For More Information: http://www.packtpub.com/modx-web-development/book
Where to buy this book You can buy Authentication and Authorization from the Packt Publishing website: http://www.packtpub.com/modx-web-development/book.
Free shipping to the US, UK, Europe and selected Asian countries. For more information, please read our shipping policy.
Alternatively, you can buy the book from Amazon, BN.com, Computer Manuals and most internet book retailers.
www.PacktPub.com