Module 5 - Hoàng Đình Hạnh | Just another WordPress ... · PDF...
58
Configuring and Troubleshooting IPv6 TCP/IP 5-1 Module 5 Configuring and Troubleshooting IPv6 TCP/IP Contents: Lesson 1: Overview of IPv6 5-3 Lesson 2: Coexistence with IPv6 5-17 Lesson 3: IPv6 Tunneling Technologies 5-25 Lab A: Configuring an ISATAP Router 5-32 Lesson 3: IPv6 Tunneling Technologies (continued) 5-39 Lesson 4: Transitioning from IPv4 to IPv6 5-44 Lesson 5: Troubleshooting IPv6 5-47 Lab B: Converting the Network 5-52
Transcript of Module 5 - Hoàng Đình Hạnh | Just another WordPress ... · PDF...

Configuring and Troubleshooting IPv6 TCP/IP 5-1
Module 5 Configuring and Troubleshooting IPv6 TCP/IP
Contents: Lesson 1: Overview of IPv6 5-3
Lesson 2: Coexistence with IPv6 5-17
Lesson 3: IPv6 Tunneling Technologies 5-25
Lab A: Configuring an ISATAP Router 5-32
Lesson 3: IPv6 Tunneling Technologies (continued) 5-39
Lesson 4: Transitioning from IPv4 to IPv6 5-44
Lesson 5: Troubleshooting IPv6 5-47
Lab B: Converting the Network 5-52

5-2 Configuring and Troubleshooting IPv6 TCP/IP
Module Overview
Support for Internet Protocol version 6 (IPv6), a new suite of standard protocols for the Internet’s Network layer, is built into Windows Server 2008.
IPv6 is a critical technology that will help ensure that the Internet can support a growing user base and the increasingly large number of IP-enabled devices. The current Internet Protocol Version 4 (IPv4) has served as the underlying Internet protocol for almost 30 years. Its robustness, scalability, and limited feature set now is challenged by the growing need for new IP addresses, due in large part to the rapid growth of new network-aware devices.

Configuring and Troubleshooting IPv6 TCP/IP 5-3
Lesson 1 Overview of IPv6
IPv6 slowly is becoming more common. While adoption may be slow, it is important to understand how this technology will affect current networks and how to integrate IPv6 into those networks. The following lesson will cover the benefits of IPv6, how it compares to IPv4, and its basic types of IPv6 addresses. After completing this lesson, you should understand global, link-local, site-local, and unique-local addresses.
5-4 Configuring and Troubleshooting IPv6 TCP/IP
Benefits of IPv6
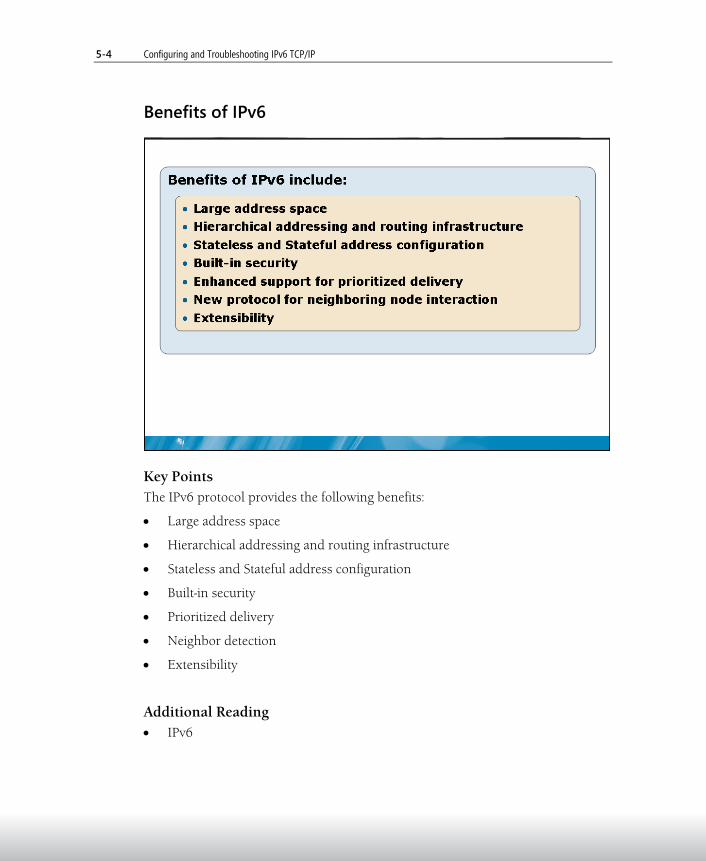
Key Points The IPv6 protocol provides the following benefits:
• Large address space
• Hierarchical addressing and routing infrastructure
• Stateless and Stateful address configuration
• Built-in security
• Prioritized delivery
• Neighbor detection
• Extensibility
Additional Reading • IPv6

Configuring and Troubleshooting IPv6 TCP/IP 5-5
Differences Between IPv4 and IPv6
Key Points The following table highlights the differences between IPv4 and IPv6:
IPv4 IPv6
Source and destination addresses are 32 bits (4 bytes) in length.
Source and destination addresses are 128 bits (16 bytes) in length.
IPsec support is optional. IPsec support is required.
No identification of packet flow for Quality of Service (QoS) handling by routers is present within the IPv4 header.
Packet-flow identification for QoS handling by routers is included in the IPv6 header using the Flow Label field.
Fragmentation is done by both routers and the sending host.
Fragmentation is not done by routers, only by the sending host.
Header includes a checksum. Header does not include a checksum.

5-6 Configuring and Troubleshooting IPv6 TCP/IP
IPv4 IPv6
Header includes options. All optional data is moved to IPv6 extension headers.
Address Resolution Protocol (ARP) uses broadcast ARP Request frames to resolve an IPv4 address to a link layer address.
ARP Request frames are replaced with multicast Neighbor Solicitation messages.
Internet Group Management Protocol (IGMP) is used to manage local subnet group membership.
IGMP is replaced with Multicast Listener Discovery (MLD) messages.
Internet Control Message Protocol (ICMP) Router Discovery, which is optional, is used to determine the IPv4 address of the best default gateway.
ICMP Router Discovery, which is required, is replaced with ICMPv6 Router Solicitation and Router Advertisement messages.
Broadcast addresses are used to send traffic to all nodes on a subnet.
There are no IPv6 broadcast addresses. Instead, a link-local scope all-nodes multicast address is used.
Must be configured either manually or through DHCP.
Does not require manual configuration or DHCP.
Uses host address (A) resource records in the Domain Name System (DNS) to map host names to IPv4 addresses.
Uses host address (AAAA) resource records in the Domain Name System (DNS) to map host names to IPv6 addresses.
Uses pointer (PTR) resource records in the IN-ADDR.ARPA DNS domain to map IPv4 addresses to host names.
Uses pointer (PTR) resource records in the IP6.ARPA DNS domain to map IPv6 addresses to host names.
Must support a 576-byte packet size (possibly fragmented).
Must support a 1280-byte packet size (without fragmentation).

Configuring and Troubleshooting IPv6 TCP/IP 5-7
IPv6 Implementations Using Microsoft Technologies
Key Points For all of the IPv6 implementations from Microsoft, you can use IPv6 without affecting IPv4 communications. Note that IPv6 is a dual stack implementation in Windows XP SP2 and Windows Server 2003, and a dual layer implementation for Windows Vista and Windows Server 2008.

5-8 Configuring and Troubleshooting IPv6 TCP/IP
The IPv6 Address Space
Key Points The most obvious distinguishing feature of IPv6 is its use of much larger addresses.
IPv4 IP addresses are expressed in four groups of decimal numbers, such as 192.168.1.1.
Each grouping of numbers represents a binary octet. In binary, the preceding number is:
11000000.10101000.00000001.00000001 (4 octets = 32 Bits)
The size of an address in IPv6 is 128 bits, which is four times the larger than an IPv4 address. IPv6 addresses also are expressed as hexadecimal addresses in their “readable” format. For example, 2001:DB8:0:2F3B:2AA:FF:FE28:9C5A.
This may seem counterintuitive for end users, however the assumption is that average users will rely on DNS names to resolve hosts and will rarely manually type IPv6 addresses. The IPv6 address in hex also is easier to convert to binary and vice versa. This simplifies working with subnets, and calculating hosts and networks.

Configuring and Troubleshooting IPv6 TCP/IP 5-9
Additional Reading • Introduction to IP Version 6

5-10 Configuring and Troubleshooting IPv6 TCP/IP
IPv6 Prefixes
Key Points Like the IPv4 address space, the IPv6 address space is divided by allocating portions of the available address space for various IP functions. The high-order bits (bits that are at the beginning of the 128-bit IPv6 address) are used to define areas statically in the IP space. The high-order bits and their fixed values are known as a format prefix.

Configuring and Troubleshooting IPv6 TCP/IP 5-11
Unicast IPv6 Address Types
Key Points A unicast address identifies a single interface within the scope of the unicast address type. With the appropriate unicast routing topology, packets addressed to a unicast address are delivered to a single interface.
Unicast IPv6 address types include:
• Global unicast addresses
• Local-use unicast addresses
• Unique local IPv6 unicast addresses

5-12 Configuring and Troubleshooting IPv6 TCP/IP
IPv6 Addresses Assigned to Hosts and Routers
Key Points An IPv6 host, including those with only one interface, typically has multiple IPv6 addresses. By default, link-local addresses are configured automatically for each interface on each IPv6 host or router. To communicate with non-neighboring nodes, a host also must be configured with unicast site-local or global addresses. A host obtains these additional addresses either from router advertisements or by manual assignment. Use commands in the netsh interface ipv6 context to configure IPv6 addresses manually.
In IPv6, hosts and routers are typically assigned the following addresses:
• Unicast addresses
• Multicast addresses (to listen for multicast traffic)
Additionally, IPv6 routers also have the following addresses:
• Multicast addresses
• Anycast addresses

Configuring and Troubleshooting IPv6 TCP/IP 5-13
Zone IDs
Key Points Unlike global addresses, you can reuse local-use addresses. Link-local addresses are reused on each link. Site-local addresses can be reused within each site of an organization. Link-local and site-local addresses are ambiguous because of this address-reuse capability.
You need an additional identifier to specify which link on which an address is assigned, located, or within which site an address is assigned or located. This additional identifier is a zone identifier (ID), also known as a scope ID, which identifies a connected portion of a network that has a specified scope. The syntax specified in RFC 4007 for identifying the zone associated with a local-use address is as follows:
Address%zone_ID

5-14 Configuring and Troubleshooting IPv6 TCP/IP
Address Autoconfiguration for IPv6
Key Points The host can proceed through several states as it goes through the autoconfiguration process, and there are several ways to assign an IP address and information. Based on how the router is set up, a client may use stateless configuration (no DHCP service), or stateful with a DHCP server involved, to either assign an IP address and other network information, or just assign other network information. (Other information includes DNS servers and gateways.)
Autoconfigured addresses are in one or more of the following states:
• Tentative. The address is in the process of being verified as unique.
• Valid. The address has been verified as unique, and can send and receive unicast traffic.
• Preferred. The address enables a node to send and receive unicast traffic to and from it.

Configuring and Troubleshooting IPv6 TCP/IP 5-15
• Deprecated. The address is valid but its use is discouraged for new communication.
• Invalid. The address no longer allows a node to send or receive unicast traffic.
Types of autoconfiguration include:
• Stateless. Address configuration is based on the receipt of Router Advertisement messages with the Managed Address Configuration and Other Stateful Configuration flags set to 0 and one or more Prefix Information options.
• Stateful. Configuration is based on the use of a stateful address configuration protocol such as DHCPv6 to obtain addresses and other configuration options.
• Both. Configuration is based on receipt of Router Advertisement messages with Prefix Information options and the Managed Address Configuration or Other Stateful Configuration flags set to 1.
Additional Reading • Introduction to IP Version 6

5-16 Configuring and Troubleshooting IPv6 TCP/IP
Demonstration: Configuring IPv6 Client Settings

Configuring and Troubleshooting IPv6 TCP/IP 5-17
Lesson 2 Coexistence with IPv6
From its inception, IPv6 was designed based on the idea that it needs to have the ability to coexist, long term, with IPv4. This lesson provides an overview of the technologies that support the two IP protocols’ coexistence. After completing this lesson, you should understand, and be able to describe, different node types and IP stack implementations of IPv6, how DNS defines IPv6 addresses, and the various types of IPv6 tunneling technologies.

5-18 Configuring and Troubleshooting IPv6 TCP/IP
What are Node Types?
Key Points When planning an IPv6 network, it is important to know what kind of nodes or hosts are on the network. By describing the nodes in the following ways, we can define their abilities on the network. This is important for tunneling because certain kinds of tunnels require specific node types, including:
• IPv4-only node. A node that implements only IPv4 (and has only IPv4 addresses) and does not support IPv6.
• IPv6-only node. A node that implements only IPv6 (and has only IPv6 addresses) and does not support IPv4.
• IPv6/IPv4 node. A node that implements both IPv4 and IPv6.
• IPv4 node. A node that implements IPv4. It can be an IPv4-only node or an IPv6/IPv4 node.
• IPv6 node. A node that implements IPv6. It can be an IPv6-only node or an IPv6/IPv4 node.

Configuring and Troubleshooting IPv6 TCP/IP 5-19
IPv4 and IPv6 Coexistence
Key Points To coexist with an IPv4 infrastructure and provide an eventual transition to an IPv6-only infrastructure, you can use the following mechanisms:
• Dual IP layer architecture (Windows Vista and Windows Server 2008).
• Dual stack architecture (Windows Server 2003 and Windows XP).
• DNS infrastructure requirements.
• IPv6 over IPv4 tunneling.
Additional Reading • IPv6 Transition Technologies
5-20 Configuring and Troubleshooting IPv6 TCP/IP
What is a Dual Layer Architecture?
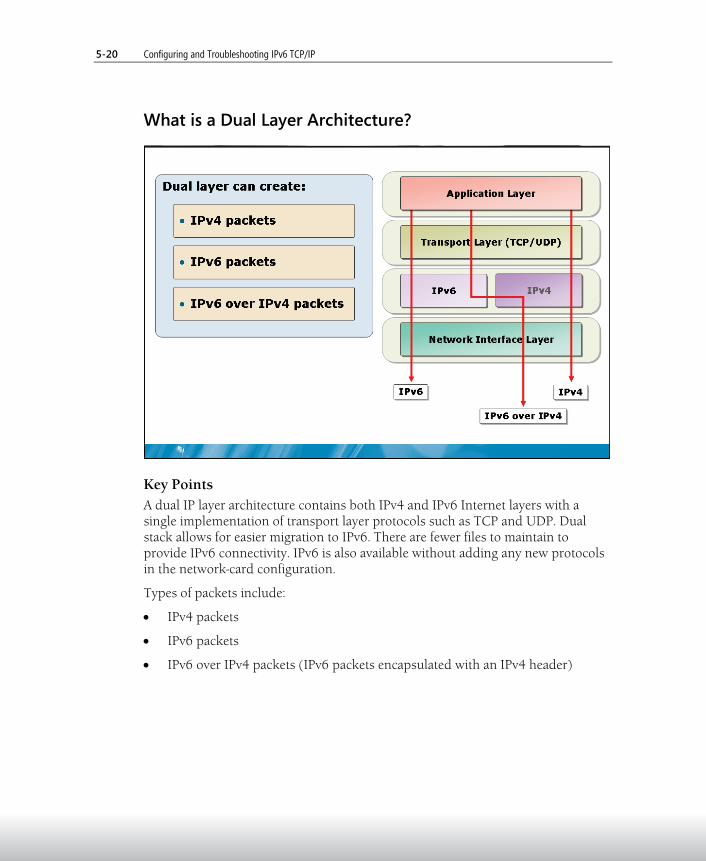
Key Points A dual IP layer architecture contains both IPv4 and IPv6 Internet layers with a single implementation of transport layer protocols such as TCP and UDP. Dual stack allows for easier migration to IPv6. There are fewer files to maintain to provide IPv6 connectivity. IPv6 is also available without adding any new protocols in the network-card configuration.
Types of packets include:
• IPv4 packets
• IPv6 packets
• IPv6 over IPv4 packets (IPv6 packets encapsulated with an IPv4 header)

Configuring and Troubleshooting IPv6 TCP/IP 5-21
What is a Dual Stack Architecture?
Key Points Dual stack architecture contains both IPv4 and IPv6 Internet layers with separate protocol stacks containing separate implementations of transport layer protocols, such as TCP and UDP.
The IPv6 protocol for Windows Server 2008, Windows Server 2003, and Windows XP uses the dual stack architecture. The IPv6 protocol driver in Windows Server 2008, Windows Server 2003 and Windows XP, Tcpip6.sys, contains a separate implementation of TCP and UDP.
Types of packets include:
• IPv4 packets
• IPv6 packets
• IPv6 over IPv4 packets

5-22 Configuring and Troubleshooting IPv6 TCP/IP
How Does DNS Support IPv6?
Key Points You need a DNS infrastructure for successful coexistence because of the prevalent use of names rather than addresses to refer to network resources. Upgrading the DNS infrastructure consists of populating the DNS servers with records to support IPv6 name-to-address and address-to-name resolutions. After you obtain the addresses using a DNS name query, the sending node must select which addresses to use for communication.
Configuring and Troubleshooting IPv6 TCP/IP 5-23
Demonstration: Configuring DNS to Support IPv6

5-24 Configuring and Troubleshooting IPv6 TCP/IP
What Is IPv6 Over IPv4 Tunneling?
Key Points IPv6 over IPv4 tunneling is the encapsulation of IPv6 packets with an IPv4 header so that IPv6 packets can be sent over an IPv4 infrastructure. Within the IPv4 header:
• The IPv4 Protocol field is set to 41 to indicate an encapsulated IPv6 packet.
• The Source and Destination fields are set to IPv4 addresses of the tunnel endpoints. You can configure tunnel endpoints manually as part of the tunnel interface or they are derived automatically from the next-hop address of the matching route for the destination and the tunneling interface.
Note: Unlike tunneling for the Point-to-Point Tunneling Protocol (PPTP) and Layer Two Tunneling Protocol (L2TP), there is no exchange of messages for tunnel setup, maintenance, or termination. Additionally, IPv6 over IPv4 tunneling does not provide security for tunneled IPv6 packets. This means that when you use IPv6 Tunneling, it does not need to establish a connection first. Also, the tunneling infers that it is only tunneling through IPv4 networks, and does not encrypt the tunnel.

Configuring and Troubleshooting IPv6 TCP/IP 5-25
Lesson 3 IPv6 Tunneling Technologies
An eventual successful transition to IPv6 requires interim coexistence of IPv6 nodes in today’s predominantly IPv4 environment. To support this, IPv6 packets are tunneled automatically over IPv4 routing infrastructures, enabling IPv6 clients to communicate with each other by using 6to4 or Intra-Site Automatic Tunnel Addressing Protocol (ISATAP) addresses and tunneling IPv6 packets across IPv4 networks. This lesson provides information about the different tunneling technologies available in IPv6.

5-26 Configuring and Troubleshooting IPv6 TCP/IP
Tunneling Configurations
Key Points RFC 2893 defines the following tunneling configurations with which to tunnel IPv6 traffic between IPv6/IPv4 nodes over an IPv4 infrastructure:
• Router-to-Router
• Host-to-Router or Router-to-Host
• Host-to-Host

Configuring and Troubleshooting IPv6 TCP/IP 5-27
Types of Tunnels
Key Points RFC 2893, “Transition Mechanisms for IPv6 Hosts and Routers," defines the following types of tunnels:
• Configured
• Automatic
Additional Reading • RFC 2893: Transition Mechanisms for IPv6 Hosts and Routers

5-28 Configuring and Troubleshooting IPv6 TCP/IP
Tunneling Technologies Usage
Key Points The tunneling technologies used for IPv6 over IPv4 tunneling include:
• ISATAP
• 6to4
• Teredo

Configuring and Troubleshooting IPv6 TCP/IP 5-29
PortProxy To facilitate the communication between nodes or applications that cannot connect using a common Internet layer protocol (IPv4 or IPv6), the IPv6 protocol for Windows Server 2008 provides PortProxy, a component that allows proxying of the following traffic:
• IPv4 to IPv4
• IPv4 to IPv6
• IPv6 to IPv6
• IPv6 to IPv4
Additional Reading • IPv6 Transition Technologies

5-30 Configuring and Troubleshooting IPv6 TCP/IP
What is ISATAP Tunneling?
Key Points ISATAP is an address-assignment and host-to-host, host-to-router, and router-to-host automatic tunneling technology that you can use to provide unicast IPv6 connectivity between IPv6/IPv4 hosts across an IPv4 intranet. ISATAP hosts do not require any manual configuration and can create ISATAP addresses using standard address autoconfiguration mechanisms.
What is an ISATAP Router? ISATAP allows IPv6 clients in an IPv4 subnet to communicate without additional manual configuration. An ISATAP router allows the clients to communicate with other IPv6 clients in pure IPv6 or mixed subnets.

Configuring and Troubleshooting IPv6 TCP/IP 5-31
How ISATAP Tunneling Works ISATAP tunneling can be initiated in several ways. The ISATAP router can be resolved by resolving the name “ISATAP” to an IPv4 Address or by using the Netsh Interface IPv6 ISATAP set Router command.
Additional Reading • RFC 4214: Intra-Site Automatic Tunnel Addressing Protocol (ISATAP)

5-32 Configuring and Troubleshooting IPv6 TCP/IP
Lab A: Configuring an ISATAP Router
Objectives • Configure a new IPv6 network and client
• Configure an ISATAP router to enable communications between the IPv4 network and the IPv6 network
Before you begin: To be able to simulate multiple networks, you must configure the following before starting the virtual machines:
1. On the host machine, open the Virtual Server Administration Web site.
2. In the left pane, under Virtual Networks, click Add, click 6421A-NYC-VN1_IPv4.vnc, and then click Add again.
3. In the left pane, under Virtual Networks, click Add, click 6421A-NYC-VN2_IPv6.vnc, and then click Add again.

Configuring and Troubleshooting IPv6 TCP/IP 5-33
4. In the left pane, under Virtual Machines, point to Configure, and then click 6421A-NYC-SVR1.
5. Under “6421A-NYC-SVR1” Configuration, click Network adapters.
6. Under Virtual network adapter 2, click the drop-down arrow, select 6421A-NYC-VN2_IPv6, and then click OK.
7. In the left pane, under Virtual Machines, point to Configure, and then click 6421A-NYC-CL1.
8. Under “6421A-NYC-CL1” Configuration, click Network adapters.
9. Under Virtual network adapter 1, click the drop-down arrow, select 6421A-NYC-VN2_IPv6, and then click OK.
Lab Setup For this lab, you will use the available virtual machine environment. Before you begin the lab, you must:
1. Start the 6421A-NYC-DC1, 6421A-NYC-SVR1, and 6421A-NYC-CL1 virtual machines.
2. Log on to the 6421A-NYC-DC1, 6421A-NYC-SVR1, and 6421A-NYC-CL1 virtual machines with the user name administrator and the password Pa$$w0rd.
5-34 Configuring and Troubleshooting IPv6 TCP/IP
Exercise 1: Configuring a New IPv6 Network and Client
Scenario You must design and implement an IPv6 network. For your initial proof of concept, you must deploy only one client.
Exercise Overview In this exercise, you will prepare the current environment to work with IPv6, and deploy an IPv6 client and IPv6 subnet.
The main tasks are as follows:
1. Start the 6421A-NYC-DC1, 6421A-NYC-SVR1, and 6421A-NYC-CL1 virtual machines.
2. Disable IPv4 on NYC-CL1.
3. Check the IP configuration on NYC-CL1. Make sure that it is not configured with an IPv4 IP address.
4. Disable IPv4 on NYC-SVR1 Interface 2.
5. Configure an IPv6 router advertisement for the global address 2001:db8:0:1::/64 network on NYC-SVR1.
6. Configure an IPv6 router advertisement for the site-local fec0:db8:0:1::/64 network on NYC-SVR1.
7. Check the IP configuration on NYC-CL1. Make sure it is configured with an IPv6 Global address and an IPv6 site-local address. Also, ensure that the IPv6 client can ping the IPv6 interface on NYC-SVR1.
8. Check the IP configuration on NYC-CL1. Make sure it is configured with an IPv6 site-local address, and make sure NYC-CL1 can communicate with NYC-SVR1.

Configuring and Troubleshooting IPv6 TCP/IP 5-35
Task 1: Start the 6421A-NYC-DC1, 6421A-NYC-SVR1, and 6421A-NYC-CL1 virtual machines 1. Start the 6421A-NYC-DC1, 6421A-NYC-SVR1, and 6421A-NYC-CL1 virtual
machines.
2. Log on to the virtual machines with the user name administrator and the password Pa$$w0rd.
Task 2: Disable IPv4 on NYC-CL1 • On NYC-CL1 in the Manage Network Connections control panel, disable
IPv4 connectivity.
Task 3: Check the IP configuration on NYC-CL1 and ensure that it is not configured with an IPv4 IP address • Validate that the IP address on NYC-CL1 is a valid link-local IP address.
Task 4: Disable IPv4 on NYC-SVR1 for the Local Area Connection 2 network • On NYC-SVR1, in the Manage Network Connections control panel, set Local
Area Connection 2 to work only with IPv6.
Task 5: Configure an IPv6 router advertisement for the global address 2001:db8:0:1::/64 network on NYC-SVR1 1. On NYC-SVR1, using the command line and the netsh command, configure
Local Area Connection 2 to forward packets and to advertise subnet prefixes.
2. Add a subnet prefix to Local Area connection 2 of: 2001:db8:0:1::/64. Make sure to publish this prefix.

5-36 Configuring and Troubleshooting IPv6 TCP/IP
Task 6: Check the IP configuration on NYC-CL1. Make sure that it is configured with an IPv6 global address in the 2001:db8:0:1::/64 network • Validate that NYC-CL1 has configured itself using the global prefix assigned to
the network.
Task 7: Configure an IPv6 router advertisement for the link-local fec0:db8:0:1::/64 network on NYC-SVR1 1. On NYC-SVR1, using the command line and the netsh command, configure
Local Area Connection 2 to forward packets and to advertise subnet prefixes.
2. Add a subnet prefix to Local Area connection 2 of: fec0:db8:0:1::/64. Make sure to publish this prefix.
Task 8: Check the IP configuration on NYC-CL1 and ensure that it is configured with an IPv6 link-local address in the 2001:db8:0:1::/64 network • Validate that NYC-CL1 has configured itself using the global prefix and the
site-local prefix assigned to the network.

Configuring and Troubleshooting IPv6 TCP/IP 5-37
Exercise 2: Configuring an ISATAP Router to Enable Communications Between an IPv4 Network and an IPv6 Network
Scenario Now that you have configured your IPv6 client, you must enable IPv4 client connectivity to the IPv6 network. Your evaluation of current IPv6 tunneling technologies has led you to choose to implement an ISATAP router.
Exercise Overview In this exercise, you will enable and configure an ISATAP router interface that will allow two-way communications between the IPv4 and IPv6 networks.
The main tasks are as follows:
1. Add the ISATAP entry in the DNS zone.
2. Configure the ISATAP router on NYC-SVR.
3. Test connectivity with the IPv6 client.
Task 1: Add the ISATAP entry into the woodgrovebank.com DNS zone on NYC-DC1 • On NYC-SVR1, in the Woodgrovebank.com zone, create a new host record
called ISATAP and configure it with the IPv4 address of NYC-SVR1 (10.10.0.24).
Task 2: Configure the ISATAP router on NYC-SVR1 1. On NYC-SVR1, identify the interface index (IDX) if the ISATAP local area
connection (use the IPconfig and Netsh interface IPv6 show interface commands).
2. Using the netsh command, enable forwarding and prefix advertise for the ISATAP interface.
3. Using the netsh command, publish a new subnet prefix for the ISATAP subnet using 2001:db8:0:2::/64.

5-38 Configuring and Troubleshooting IPv6 TCP/IP
Task 3: Test connectivity with the IPv6 client • Verify that you can ping NYC-DC1 from NYC-CL1, and that you can ping
NYC-SVR1. Finally, verify that you can ping NYC-CL1 from NYC-DC1.
Note: If the IP addresses do not resolve, reboot the servers, starting with NYC-DC1, NYC-SVR1, and then NYC-CL1.
Important: Do not turn off the virtual machines at this time because you need them to complete the next lab.

Configuring and Troubleshooting IPv6 TCP/IP 5-39
What is 6to4 Tunneling?
Key Points 6to4 is an address-assignment and router-to-router, host-to-router, and router-to-host automatic tunneling technology that you can use to provide unicast IPv6 connectivity between IPv6 sites and hosts across the IPv4 Internet. 6to4 treats the entire IPv4 Internet as a single link.
6to4 router functionality A 6to4 router:
• Enables IPv6 forwarding on both the 6to4 tunneling and private interfaces.
• Determines a 64-bit IPv6 subnet prefix to advertise on the private intranet.
• Sends router advertisement messages on the private interface.

5-40 Configuring and Troubleshooting IPv6 TCP/IP
How 6to4 tunneling works Within a site, local IPv6 routers advertise 2002:WWXX:YYZZ:Subnet_ID::/64 subnet prefixes so that hosts autoconfigure 6to4 addresses. IPv6 routers within the site deliver traffic between 6to4 hosts. Hosts on individual subnets are configured automatically with a 64-bit subnet route for direct delivery to neighbors and a default route with the next-hop address of the advertising router. IPv6 traffic that does not match any of the subnet prefixes that the site uses is forwarded to a 6to4 router on the site border. The 6to4 router on the site border has a 2002::/16 route that forwards traffic to other 6to4 sites and a default route (::/0) that forwards traffic to a 6to4 relay.
Additional Reading • RFC 3056: Connection of IPv6 Domains via IPv4 Clouds

Configuring and Troubleshooting IPv6 TCP/IP 5-41
What is Teredo Tunneling?
Key Points Teredo tunneling enables you to tunnel across the IPv4 network when the clients are behind an IPv4 NAT. Teredo was created because many IPv4 routers use NAT to define a private address space for corporate networks.
Teredo components The components of Teredo are:
• Teredo client
• Teredo server
• Teredo relay
• Teredo host-specific relay

5-42 Configuring and Troubleshooting IPv6 TCP/IP
How Teredo works For two Windows-based Teredo clients, the most crucial Teredo processes are those that you use for initial configuration and communication with a different site’s peer.
• Initial Configuration
• Teredo client:
• Resolves the name teredo.ipv6.microsoft.com for Teredo servers
• Sends multiple Teredo-encapsulated Router Solicitations to multiple Teredo servers
• Based on responses, Teredo client determines:
• Teredo server IPv4 address
• Type of NAT
• Externally mapped address and port for Teredo traffic
• Initial Communication Between Two Teredo Clients in Different Sites
The set of packets sent during the initial communication between Teredo clients located in different sites depends on whether the Teredo clients are located behind cone NATs or restricted NATs.
Teredo: restricted NAT The following process sends an initial communication packet from Teredo Client A to Teredo Client B:
1. Teredo Client A sends a bubble packet directly to Teredo Client B.
2. Teredo Client A sends a bubble packet to Teredo Client B through Teredo Server 2 (Teredo Client B’s Teredo server).
3. Teredo Server 2 forwards the bubble packet to Teredo Client B.
4. Teredo Client B responds to the bubble packet received from Teredo Client A with its own bubble packet, which is sent directly to Teredo Client A.
5. Upon the bubble packet’s receipt from Teredo Client B, Teredo Client A determines that source-specific NAT mappings exist for both NATs.

Configuring and Troubleshooting IPv6 TCP/IP 5-43
What is PortProxy?
Key Points You can use the PortProxy service as an application-layer gateway for nodes or applications that do not support IPv6. PortProxy facilitates the communication between nodes or applications that cannot connect using a common address type, Internet layer protocol (IPv4 or IPv6), and TCP port. This service’s primary purpose is to allow IPv6 nodes to communicate with IPv4 TCP applications.

5-44 Configuring and Troubleshooting IPv6 TCP/IP
Lesson 4 Transitioning from IPv4 to IPv6
The transition from IPv4 to IPv6 is expected to take many years. IPv4 remains the IP standard for the majority of applications and Internet services in use today. However, more and more networks and applications may function well in a purely IPv6 environment, as Windows Vista and Windows Server 2008 are adopted more widely. In this lesson, you will learn about the issues that you must consider when transitioning to IPv6 and review the necessary steps for transitioning to an IPv6-only installation.
Configuring and Troubleshooting IPv6 TCP/IP 5-45
Discussion: Considerations for Migrating from IPv4 to IPv6
Key Points Answer the questions in a classroom discussion.

5-46 Configuring and Troubleshooting IPv6 TCP/IP
Process for Transitioning to IPv6
Key Points The migration from IPv4 to IPv6 is expected to take considerable time. This was taken into consideration when designing IPv6 and as a result, the transition plan for IPv6 is a multistep process that allows for extended coexistence.
To achieve the goal of a pure IPv6 environment, use the following general guidelines.
• Upgrade your applications to be independent of IPv6 or IPv4.
• Update the DNS infrastructure to support IPv6 address and PTR records.
• Upgrade hosts to IPv6/IPv4 nodes.
• Upgrade routing infrastructure for native IPv6 routing.
• Convert IPv6/IPv4 nodes to IPv6-only nodes.

Configuring and Troubleshooting IPv6 TCP/IP 5-47
Lesson 5: Troubleshooting IPv6
This lesson describes the tools and techniques that you can use to identify a problem at successive layers of the TCP/IP protocol stack using an IPv6 Internet layer.

5-48 Configuring and Troubleshooting IPv6 TCP/IP
Methods Used to Troubleshoot IPv6
Key Points To troubleshoot IPv6, depending on the problem, you can:
• Start at the bottom of the stack and move up.
• Start at the top of the stack and move down.
When starting at the top of the stack, the methods you can use to troubleshoot IPv6 include:
• Verify IPv6 connectivity.
• Verify DNS name resolution for IPv6 addresses.
• Verify IPv6-based TCP sessions.
Additional Reading • TCP/IP Fundamentals for Microsoft Windows: Chapter 16 – Troubleshooting
TCP/IP

Configuring and Troubleshooting IPv6 TCP/IP 5-49
Verifying IPv6 Connectivity
Key Points You can use the following tasks to troubleshoot problems with IPv6 connectivity:
• Verify configuration
• Verify reachability
• Check packet filtering
• View and manage the IPv6 routing table
• Verify router reliability

5-50 Configuring and Troubleshooting IPv6 TCP/IP
Verifying DNS Name Resolution for IPv6 Addresses
Key Points When verifying network services connectivity, you use many of the same tools and software as with IPv4. When checking for DNS configuration and name resolution, you can verify the DNS configuration using the following tools:
• Ipconfig/all
• Ipconfig/displaydns and Ipconfig/flushdns
• Ping
• Nslookup

Configuring and Troubleshooting IPv6 TCP/IP 5-51
Verifying IPv6-based TCP Connections
Key Points To verify IPv6-based TCP connections:
• Check for packet filtering.
• Verify TCP connection establishment (Telnet).

5-52 Configuring and Troubleshooting IPv6 TCP/IP
Lab B: Converting the Network
Objective • Transition the network into an IPv6-only network.
Lab Setup For this lab, you will use the available virtual machine environment. Before you begin the lab, you must:
1. Start the 6421A-NYC-DC1, 6421A-NYC-SVR1, and 6421A-NYC-CL1 virtual machines.
2. Log on to the NYC-DC1, NYC-SVR1, and NYC-CL1 virtual machines with the user name administrator and the password Pa$$w0rd.

Configuring and Troubleshooting IPv6 TCP/IP 5-53
Scenario You are responsible for testing the IPv6 transition plan. To accomplish this, you will transition the computers from the previous network that uses both IPv4 and IPv6 and transition them to an IPv6-only network.

5-54 Configuring and Troubleshooting IPv6 TCP/IP
Exercise 1: Transitioning to an IPv6-Only Network
Exercise Overview In this exercise, you will migrate the IPv4 network to be a fully capable IPv6 network.
The main tasks are as follows:
1. Disable the ISATAP router on NYC-SVR1.
2. Configure the native IPv6 router on NYC-SVR1.
3. Disable IPv4 connectivity.
4. Test connectivity between each IPv6 subnet.
Task 1: Disable the ISATP router on NYC-SVR1 • On NYC-SVR1, disable the ISATAP router and delete the static route subnet
prefix that was defined previously for the ISATAP subnet.
Task 2: Configure the native IPv6 router on NYC-SVR1 • Configure an IPv6 router in the Local Area Connection interface on NYC-
SVR1. Make sure that forwarding and prefix advertising are enabled. Also add and publish the subnet prefix: 2001:db8:0:0::/64.
Task 3: Disable IPv4 connectivity • On NYC-SVR1 and NYC-DC1, disable all remaining IPv4 interfaces.
Task 4: Test connectivity between each IPv6 subnet • Make sure you can ping between NYC-DC1 and NYC-CL1. Also make sure that
NYC-SVR1 is able to ping both servers.
Note: If the IP addresses do not resolve, reboot the servers starting with NYC-DC1, NYC-SVR1, and then NYC-CL1.

Configuring and Troubleshooting IPv6 TCP/IP 5-55
Task 5: Reconfigure the Network Adapters To have the appropriate setup for future labs, you must configure the following before starting the virtual machines:
1. On the host machine, open the Virtual Server Administration Web site.
2. In the left pane, under Virtual Machines, point to Configure, and then click 6421A-NYC-SVR1.
3. Under “6421A-NYC-SVR1” Configuration, click Network adapters.
4. Under Virtual network adapter 2, click the drop-down arrow, select Internal Network, and then click OK.
5. In the left pane, under Virtual Machines, point to Configure, and then click 6421A-NYC-CL1.
6. Under “6421A-NYC-CL1” Configuration, click Network adapters.
7. Under Virtual network adapter 1, click the drop-down arrow, select Internal Network, and then click OK.
Task 6: Close all virtual machines and discard undo disks 1. On the host computer, click Start, point to All Programs, point to Microsoft
Virtual Server, and then click Virtual Server Administration Website.
2. Under Navigation, click Master Status. For each virtual machine that is running, click the virtual machine name, and in the context menu, click Turn off Virtual Machine and Discard Undo Disks. Click OK.

5-56 Configuring and Troubleshooting IPv6 TCP/IP
Module Review and Takeaways
Review Questions 1. What are the different types of unicast IPv6 addresses?
2. What are the main reasons why IPv6 is necessary?
3. What is the process called when a client configures itself with an IPv6 address?
4. What kind of IP address does every IPv6 client assign itself automatically?
5. How does the scope of an address affect its ability to communicate on the Internet?
6. What are the different tunneling technologies in IPv6?
7. What is the main purpose of a Teredo tunnel?

Configuring and Troubleshooting IPv6 TCP/IP 5-57
Command-Line Tools The following table describes the command-line tools that you can use to configure and troubleshoot IPv6 TCP/IP:
Command Description
IPconfig Provides overview data for IPv4 and IPv6.
Route Provides basic information about IPv4 and IPv6 routing tables.
Netsh Provides detailed information about the IPv6 configuration and is the primary tool used to configure IPv6 in Windows Server 2008 and Windows Vista. You also can use this command-line tool to configure an IPv6 router.