Module 3 of 6: Building Course and...
34
Module 3 of 6: Building Course and Assignments
Transcript of Module 3 of 6: Building Course and...

Module 3 of 6: Building Course and Assignments

1 | P a g e
Our Implementation Philosophy ......................................................................................................................... 2
Note: ................................................................................................................................................................ 2
Review course goals and learning outcomes ...................................................................................................... 4
Understand section share and copy functionality .............................................................................................. 4
Copy section .................................................................................................................................................... 6
Share section ................................................................................................................................................... 6
Review LearnSmart/SmartBook role and ............................................................................................................ 7
best practices ...................................................................................................................................................... 7
Select course content mapped to course goals .................................................................................................. 9
Create and assign content ................................................................................................................................. 11
Create a new assignment from the question bank ....................................................................................... 11
Create assignments using a question pool .................................................................................................... 14
Edit question point values and rename assignments ................................................................................... 16
Importance of policy-setting categories ........................................................................................................ 17
Assign content ............................................................................................................................................... 19
Edit, manage, and organize assigned content ............................................................................................... 19
Do you teach multiple sections of the same course? ................................................................................... 20
Duplicate your section ................................................................................................................................... 20
Provide assignment extensions ..................................................................................................................... 21
Extend due dates individually ........................................................................................................................ 22
Extend due dates in bulk ............................................................................................................................... 23
Manage due dates ......................................................................................................................................... 24
Manage due dates individually ...................................................................................................................... 25
Manage due dates in bulk ............................................................................................................................. 26
Allow additional time for all assignments for an individual student ............................................................ 27
Adjust assignment credit/grade .................................................................................................................... 28
Determine the value of Connect in the total course grade .............................................................................. 30
Add Connect course requirements to the syllabus ........................................................................................... 32

2 | P a g e
Introduction
The Connect Implementation Curriculum is comprised of SIX modules—organized into THREE parts. This guide represents Module 3 of 6. Modules 1-4 should be used for onboarding prior to the start of the semester. Modules 5-6 are most effective after the semester begins. EARLY ONBOARDING THROUGH PRIOR TO THE START OF THE SEMESTER:
Module 1: Course Consultation Module 2: Basics of Connect
Module 3: Building Course and Assignments Module 4: Class Start Readiness -------------------------------------------------------------------- AFTER THE SEMESTER STARTS:
Module 5: Reports Module 6: Ongoing Support and Training

3 | P a g e
Module 3: Building Course and Assignments
1) Review course goals and learning outcomes 2) Understand section Share and Copy functionality 3) Review LearnSmart/SmartBook role and best practices 4) Select course content mapped to course goals 5) Create and assign content
a) Create assignment using question bank b) Edit assignments c) Manage and organize assignments e) Duplicate section f) Importance of policy-setting
5) Determine the value of Connect in the total course grade 6) Add Connect course requirements to syllabus

4 | P a g e
In Module 1—Course Consultation, we outlined a series of questions about your specific course details and
goals. The answers to these questions will inform your course build. At this point in the implementation
process, it is critical to review your course goals and course details before beginning your course build.
Let’s review the questions:
Your instructor role will determine if you will need to share or copy your course.
(If you do NOT need to share or copy your section for other instructors, click here to advance.)
COPY
SHARE
SHARE
What is your instructor role? What is your course
modality and time frame?
What do you want your students
to accomplish from this course?
How will you measure
your course success?
Do you want to build a course
built on your current syllabus?

5 | P a g e
Most frequently
used?
COPY SECTION SHARE SECTION
Peer to Peer Assistance:
You teach independently from your colleague, and you do NOT need to monitor your colleague’s course data or reports.
Example: A colleague receives a late teaching assignment. You provide a copy of your course to assist with a quick start.
Course Coordinator or Lead:
Sharing allows the course coordinator or lead to control the content of the assignments and also to see the scores and reports for students in other sections, helping the coordinator monitor the effectiveness of the assignments included in the shared section.
Example: As a course coordinator, you may choose to share a section with a group of colleagues, adjunct professors, or graduate teaching assistants to ensure consistency across a department.
What does it
mean?
Copying a section provides your colleague with a duplicate of your section.
Your colleague will not receive any edits you make to assignments or new assignments you create after copying.
Sharing a section means sharing all assignments and course features set up in that section.
What section
content is
provided for my
colleague?
When you copy a section, you copy all course features and assignments in your section at that time, including assignment dates, policies, attached files, questions, and content and eBook annotations.
For LearnSmart modules, it copies the topics, dates, coverage amount, and points.
When you share a section, all course features and assignments in your section at that time are shared, including assignment dates, policies, attached files, questions, and content and eBook annotations.
For LearnSmart modules, it copies the topics, dates, coverage amount, and points.
In addition to assignments, shared course features include eBook annotations and gradebook categories.
What can my
colleague edit?
Your colleague can edit anything within the copied section— assignment dates and policies, content, learning outcomes, gradebook categories, and eBook annotations.
Your colleague is not able to edit these shared course features, but he or she may add to your eBook annotations.
Do I have any
control of the
content I
provided for my
colleague?
No.
Sharing a section with a colleague allows you to control the assignments your colleague will use. As sharing instructor, you control what your colleague can edit.
You can permit your colleague to edit all assignment policies, to edit only assignment start and due dates, or to edit nothing at all. Your colleague is never able to edit assignment categories (homework, practice, quiz, or exam), content (questions), or submission preferences (whether an assignment is set to automatically submit on the due date).
Is reporting
affected? No. Section data and reports are NOT shared.
Sharing a section allows you to see scores and reports from your colleague’s students. Your colleague, however, cannot see your section’s scores or reports. Your section roster is never shared.
The permissions you set will apply to every assignment in your section. Regardless of the permissions you set, your colleague will also receive all edits you make to assignment names, questions, content, policies, and start and due dates.

6 | P a g e
To copy an exact replica of your section into a colleague’s Connect account:
1) (A) Click on the section options menu.
2) (B) Choose Copy section.
3) (A) On the copy section screen: Enter in the email address(es) used by your colleague(s).
4) (B) Select find colleagues.
5) (C) Select copy when you’ve found the correct colleague.
To share an exact replica of your section with a colleague’s Connect account:
1) (A) Click on the section options menu.
2) (B) Select share section with colleague.
3) (A) On the share section screen: Enter the email address(es) used by your colleague(s).
4) (B) Select find colleagues.
5) (C) Select the number of sections that need to be created in your colleague’s account.
6) (D) Select the edits that your colleague will be able to make in his or her sections.
7) (E) Click share for the sections to be created in your colleague’s account.

7 | P a g e
SmartBook™, powered by LearnSmart, is the first and only adaptive reading experience designed to change the way students read and learn. It creates a personalized reading experience by highlighting the most impactful concepts a student needs to learn at that moment in time. As a student engages with LearnSmart/SmartBook, the reading experience continuously adapts by highlighting content based on what the student knows and doesn’t know. This ensures that the focus is on the content he or she needs to learn, while simultaneously promoting long-term retention of material. Use LearnSmart/SmartBook’s real-time reports to quickly identify the concepts that require more attention from individual students–or the entire class.
1 Bloom, B.S. (Ed.). Engelhart, M.D., Furst, E.J., Hill, W.H., Krathwohl, D.R. (1956). Taxonomy of Educational Objectives, Handbook I: The Cognitive
Domain. New York: David McKay Co Inc.
Tip: Although you may directly enter LearnSmart/SmartBook on your section home page, you will need to click on +Add Assignment in order to assign SmartBook to your students. Continue on to the topic Select course content based on course goals for more information.

8 | P a g e
To view assignment data, LearnSmart/SmartBook must be assigned. LearnSmart/SmartBook is included as a component of Connect via a link on the section home page. However, in order to view usage data (reports) and assign point values, it must be assigned through the add assignment process.
Since LearnSmart/SmartBook is an adaptive learning tool, the technology determines which questions to deliver based upon each student’s individual responses. Instructors do not pick specific questions, but you can control the topics to be delivered and the level of the depth of coverage. The topics chosen and the position of the coverage bar determine which portions of the LearnSmart/SmartBook will be highlighted.
Based on multiple case studies, it is highly recommended that LearnSmart/SmartBook assignments are due prior to lecture in face-to-face and hybrid courses. LearnSmart/SmartBook is designed to facilitate basic concept mastery. When assigned prior to lecture, both students and instructors benefit. Students are prepared with a base level of knowledge, while instructors can use LearnSmart/SmartBook data to identify common areas of weakness or struggle—and adjust lecture plans accordingly.
When considering slider bar placement, select coverage based on percentage of material to be covered rather than length of time. Since each book and chapter will vary with the estimated length time, it is suggested that you think about slider bar placement in terms of percentage of material to be covered rather than the length of time. Students do not have to complete LearnSmart/SmartBook in a single session—rather, they may enter as frequently as they wish. When they do return, the system will continue from last session.
Students can continue to use LearnSmart/SmartBook after the due date, but they will only accrue points for what they have mastered by the due date. Full points or a percentage of the total possible points will be determined based upon the progress of the completion bar. Questions to consider when assigning LearnSmart/SmartBook:
Which topics do you want to include?
Where do you want the position of the slider bar?
When do you want to set the due date?
If this is a large chapter, do you want to break it into multiple assignments?
Tip: You have the ability to break a chapter into more than one assignment. You can include only particular topics in each assignment. During the assignment creation process you can rename a LS assignment on the last screen before you hit the assign button.

9 | P a g e
Before we get started, it’s important to note that discipline and course-specific content can be found in the comprehensive Implementation Guides—located on the Connect Success Academy.
Additionally, our content revisions are based on heatmaps--empirical data collected anonymously from students via our LearnSmart/SmartBook programs. Our digital programs are created to provide support around the most difficult concepts identified.
To add content, begin by clicking on +Add Assignment. The two primary sources for course content are the Question Bank and LearnSmart/SmartBook.
Question Bank
LearnSmart/SmartBook

10 | P a g e
Let’s begin with the Question Bank.
Question Bank: Build and customize
assignments by adding pre-created questions, exercises, and activities. These can be questions from the book or additional exercises created specifically for Connect. Click on Question Bank.
Additional Assignment Options
Test Bank
For additional assignment and activity types, click on Full Chapter.
On this screen, you may explore the various assignment options by using filters to locate desired content. In addition to traditional test bank questions, you’ll find additional activity types under the Activity Type filter.

11 | P a g e
1) Click +Add assignment from your section home page.
2) Click on Question Bank.
Remember… you are not alone! As a part of our commitment to effective implementation, please remember that you have a dedicated Implementation team member who will partner with you to select course content aligned with your course goals and learning outcomes. If you’d like to utilize this service, please contact your local LTR to connect with your Implementation team member.

12 | P a g e
3) Select a question source from the list.
4) Next, select which questions/exercises you would like to view. This will typically divide the options by chapter.
5) Next you may be asked to select the bank of questions you would like to view to make your question/exercise selections. These options are typically divided by type of activity or source.
1) (A) Click rename and enter an assignment name.
2) (B) Enter any student instructions.

13 | P a g e
Before you select questions to assign, there are several things to know about this page:
(A) To change the question source, click select a different question source.
To narrow the question list, use the filters along the left side of the page.
(B) To create your own questions, click create a question.
(C) To add questions randomly to the assignment, select add random selection.
1) (A) Once you’ve found a question to add, select the checkboxes next to the question.
2) (B) Click add checked questions and choose to add as individual questions.
Tip: Use a consistent naming convention to ensure easy navigation for your students. For example, “Week 1–Quiz” and “Week 1–Homework.” This aids in identifying items in the reports that are displayed in alphabetical order. Abbreviate where possible (e.g., CH for chapter) to allow for cleaner reports and gradebook viewing.
Tip: If you want to create a question pool (see next page), do not use multi-part questions or survey questions.

14 | P a g e
WATCH: What is question pooling?
Create a question pool for quizzing, exams, or whenever randomization is needed—such as to prevent cheating or to provide a new question set for practice. 1) Select the questions (A) you would like to add to the pool.
2) Click add checked questions (B) and then select add to a pool (C).
3) When the pop up appears, name your pool (A).
4) Next, configure your pool by selecting the number of questions (B) from which the pool can draw.
5) You can also set the value of each question (C) in your pool.
6) To save your question pool, click add to pool (D).
Tip: Multi-part or survey questions may not be used in a question pool.
15 | P a g e
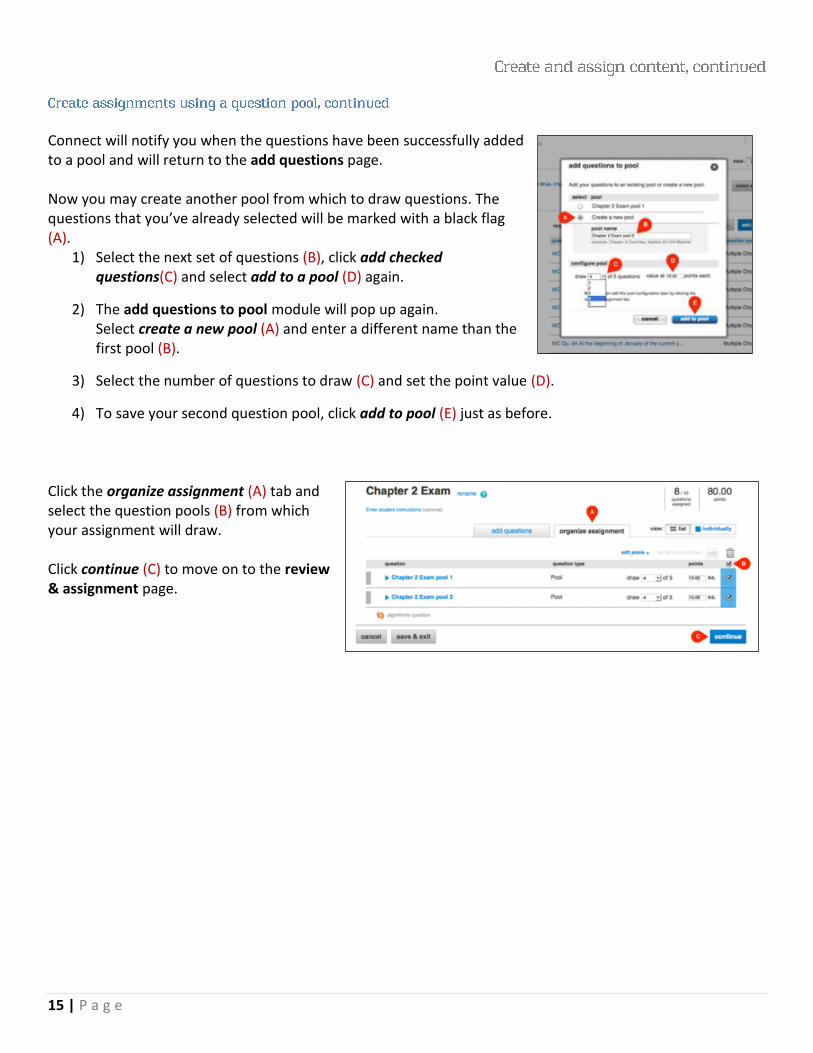
Connect will notify you when the questions have been successfully added to a pool and will return to the add questions page. Now you may create another pool from which to draw questions. The questions that you’ve already selected will be marked with a black flag (A).
1) Select the next set of questions (B), click add checked questions(C) and select add to a pool (D) again.
2) The add questions to pool module will pop up again. Select create a new pool (A) and enter a different name than the first pool (B).
3) Select the number of questions to draw (C) and set the point value (D).
4) To save your second question pool, click add to pool (E) just as before. Click the organize assignment (A) tab and select the question pools (B) from which your assignment will draw. Click continue (C) to move on to the review & assignment page.

16 | P a g e
Once you have finished adding questions, adjust the point value for each question or the assignment by
clicking on the organize assignment tab.
1) (A) Adjust all point values at once by clicking on set all point values.
2) (B) Adjust point values on an individual basis by selecting them one at a time.
3) After you have completed your adjustments, click continue.
IMPORTANT: With the exception of the due date, changes to the assignment cannot be made once students have
begun working on the assignment.
IMPORTANT: The default point value for most question bank items is 10 points each. Many instructors prefer a lower value. Use set all point values to adjust all point values at once.

17 | P a g e
Assignment policies have great impact on the student coursework experience. Therefore, it is critical to understand the implication of each policy type—then carefully set policies in accordance with your course policies and pedagogical strategies. Assignment start and due dates: Select whether to make the assignment available once it’s assigned or on a specific date.
1) (A) Select once it’s assigned to allow students to begin work on the assignment as soon as it is assigned. -OR- Select on this date to set a specific date in the future when students can begin work on the
assignment. Then select the assignment due date and time.
2) (B) Next select the assignment category.
3) (C) After selecting the assignment category, click expand advanced settings to see the expanded policy options for this assignment.
Tip: Use the “Auto-submit as is” feature, which collects unsubmitted student attempts of an assignment on the due date. This prevents students from forgetting to submit an assignment that they saved prior to the due date. However, using this feature overrides the ability to accept late assignments.
Tip: Policies are easily modified across assignments within a category. Also, be aware that students will view these assignments under these category labels.
Tip: You may save & exit at any time, but the assignment will not deploy until you review & assign.

18 | P a g e
Five basic policy-setting categories:
1) Basic policies: Indicate whether there is a time limit on the assignment, whether students can print the assignment, and other basic settings.
2) Attempts: Set how many times a student can complete and submit an assignment-- whether they continue from previous attempts or start fresh each time--and to enable student attempts after the due date.
3) Tolerances: Specify whether students must match accents, spacing, and punctuation, or whether they are allowed any numeric tolerance.
4) Resources: Turn various resources on/off for the students as they work on the assignment. For example, control whether students can see hints.
5) Feedback: Set the level of feedback that students receive when they complete an assignment with automatically graded questions. Options include varying levels of feedback, from no feedback to detailed feedback including solutions.
6) Click on review & assign to complete the assignment.
Tip: If you allow students multiple attempts where they will build on their previous attempt, it is recommended that you check the box allowing students to revise their previous attempts--even if manually graded questions are not yet graded.
Tip: It is recommended that you not require the correct spacing and punctuation in the tolerances area. An extra space before or after a word can cause a correct answer to be marked incorrect if you require correct spacing.
Tip: It is best to keep your policy settings consistent within assignment categories to prevent confusion among students. Once you have set your preferred policies, you will want to click on save as default settings to save these new policy settings as the defaults going forward.

19 | P a g e
1) On the review and assign page, you can select multiple sections within the same course.
2) Review your policies and questions.
3) Click Assign when you are ready to finalize the assignment.
4) If you’re not ready to assign, use the Save & Exit button on the bottom to come back later.
5) If you don’t want to keep the assignment, use the Delete Assignment button.
Some basic assignment edits/management can be done from the assignment list on the section home page. Begin by checking off the assignments you want to manage then select the desired action.
To change the start and due dates for the assignments, click Manage dates.
To copy or share an assignment to another section in your course or to a colleague’s course, select Share or Copy.
To show or hide the assignments on the student side, select Show/hide. You may also click on the eye icon next to the assignment to show/hide.
To move several assignments into a group you have created, click Move. You may also drag and drop assignments.
To delete selected assignments, click Delete.
New assignment groups (folders) can be created by clicking Add Groups after clicking on the folder icon.
20 | P a g e
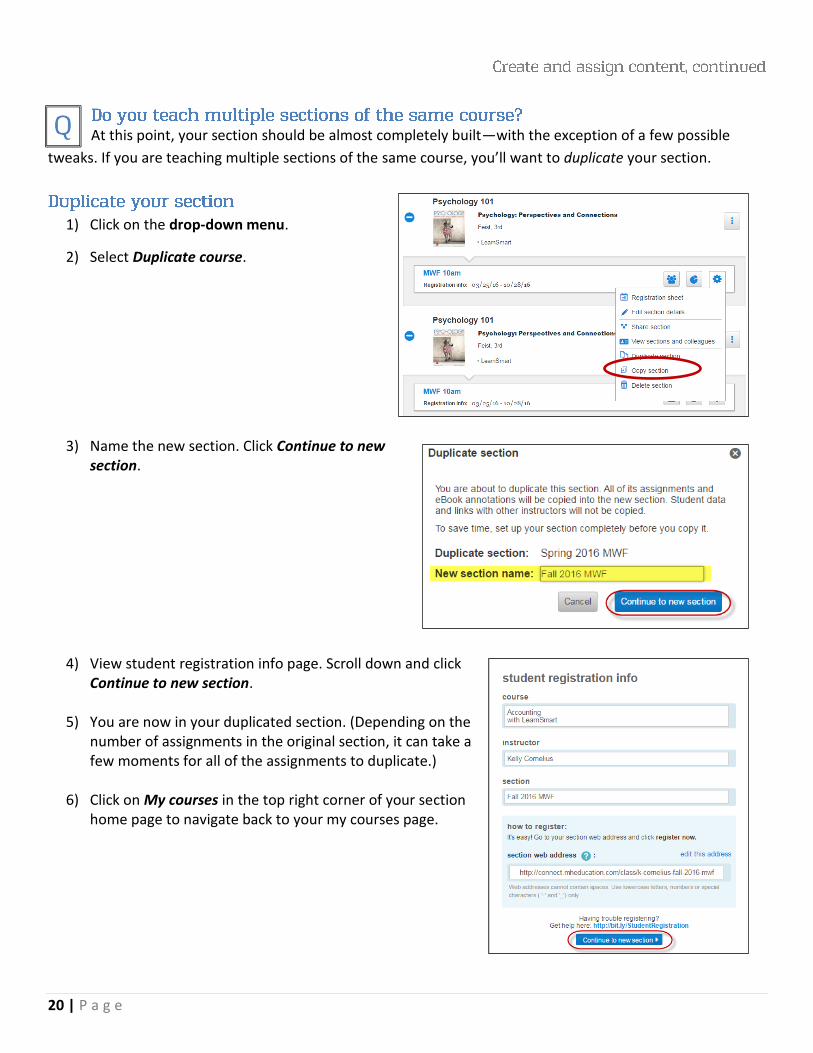
At this point, your section should be almost completely built—with the exception of a few possible
tweaks. If you are teaching multiple sections of the same course, you’ll want to duplicate your section.
1) Click on the drop-down menu.
2) Select Duplicate course.
3) Name the new section. Click Continue to new section.
4) View student registration info page. Scroll down and click Continue to new section.
5) You are now in your duplicated section. (Depending on the number of assignments in the original section, it can take a few moments for all of the assignments to duplicate.)
6) Click on My courses in the top right corner of your section home page to navigate back to your my courses page.

21 | P a g e
When extending assignment due dates, you’ll need to identify the desired outcome of the extension. To assist with this, please refer to the following scenario chart:
scenario action
go to
EXTENSION tab
I have a student who has an excused absence for a funeral.
I need to extend the due dates for more than one assignment for one student.
I need one common due date for all assignment extensions.
In Bulk
I need to extend the due dates for more than one assignment for one student.
I need different due dates for each assignment extension.
Individually
I have a few college athletes who will be missing a week for a tournament.
I need to extend the dates for a few assignments for a few students.
I need one common due date for all assignment extensions.
In Bulk
I need to extend the dates for a few assignments for a few students.
I need different due dates for each assignment extension.
Individually
I have one student who requires additional time for all assignments.
I need to allow additional time for all assignments for the entire semester for one student.
Neither!
Go to Allow Additional
Time for All Assignments
for an Individual Student

22 | P a g e
1) From your section home page, check the box next to the assignments for which you want to add extensions.
2) Click Manage dates.
3) Click the extensions tab.
Edit extensions for assignments separately by selecting the individually tab.
4) Click Add for the assignments that need
to be given an extension.
5) Select the students for the extensions,
as well as the new parameters, then
click Save.
IMPORTANT: Please note the important distinction between individually and in bulk:
Individually will result in different due dates for the selected assignments.
In bulk will result in one common due date for the selected assignments.
IMPORTANT: Students need to have at least one attempt remaining in order to complete their extension.
Tip: If you set the student extension due date beyond a previously set date of delayed feedback for the assignment, you will be prompted to confirm or change that feedback date. This will prevent the student with the extension from receiving answers from other students to whom feedback has already been revealed.

23 | P a g e
1) From your section home page, check the box next to the assignments for which you want to add extensions.
2) Click Manage dates.
3) Click the extensions tab.
4) For the extensions to have one common due date, click on in bulk.
5) Select the students that need the extensions
and adjust the due date, time limit, or attempts.
6) Click save.
IMPORTANT: Please note the important distinction between individually and in bulk:
Individually will result in different due dates for the selected assignments.
In bulk will result in one common due date for the selected assignments.
Tip: If you set the student extension due date beyond a previously set date of delayed feedback for the assignment, you will be prompted to confirm or change that feedback date. This will prevent the student with the extension from receiving answers from other students to whom feedback has already been revealed.

24 | P a g e
When changing due dates, you’ll need to identify the desired outcome of the extension. To assist with this, please refer to the following scenario chart:
scenario action
go to
DATES tab
Our campus was closed due to weather for two days.
I need to extend the dates of a few assignments for all of my students.
I need one common due date for all assignments.
In Bulk
I need to extend the dates of a few assignments for all of my students.
I need different due dates for each assignment.
Individually
My students are struggling with the content, and I need to spend additional class time on this topic. My assignment schedule has been disrupted for the rest of the semester.
I need to change the dates of all assignments for all students for the rest of the semester.
I need different due dates for each assignment.
Individually
I’d like to make a duplicate copy of my course for next semester.
I need to change the dates of all assignments to reflect the new dates.
Individually
I have one student who requires additional time for all assignments.
I need to allow additional time for all assignments for the entire semester for one student.
Neither!
Go to Allow
Additional Time for
All Assignments for
an Individual Student

25 | P a g e
1) From the section home page, check the box next to the assignments that need adjusted.
2) From the options dropdown, select Manage Dates.
3) For different due dates, click on
individually.
4) Adjust the due dates.
5) Click Save when finished.
IMPORTANT: Please note the important distinction between individually and in bulk:
Individually will result in different due dates for the selected assignments.
In bulk will result in one common due date for the selected assignments.

26 | P a g e
1) From the section home page, check the box next to the assignments that need adjusted.
2) From the options dropdown, select Manage Dates.
3) For the same common due date, click
on in bulk.
4) Next to due, click edit.
5) Enter the due date.
6) Click Save when finished.
IMPORTANT: Please note the important distinction between individually and in bulk:
Individually will result in different due dates for the selected assignments.
In bulk will result in one common due date for the selected assignments.

27 | P a g e
1) Access the student roster.
2) Locate the student who needs additional time for all assignments and click Manage.
3) You can add additional time by percentage or minutes.
4) Enter the additional time allowance for that individual student and click Save.

28 | P a g e
Adjust credit for all students: 1) From your section home page, click on the assignment for which you would like to adjust credit.
2) Click the preview tab of your active assignment.
3) Click Adjust credit in the question that you want to adjust.
In the adjust credit screen, you may award full credit, drop the question and its points, or flag the question for manual grading. 4) Click adjust to apply your changes.
These changes will apply to all students for all attempts, including those in shared or copied assignments and courses, and cannot be undone. Dropping the question will change the assignment’s total point value, even if you have locked the points.

29 | P a g e
Adjust points for individual students:
To edit a particular student's assignment grade, access the Student Performance report for a particular assignment. (See Module 5—Reports for step-by-step instructions on how to view a Student Performance report.) 1) (A) Enter the name of the student whose assignment grade you need to change.
2) (B) Click the score link under the assignment you want to edit and the student performance assignment detail page opens.
From the student performance assignment detail page, you can edit the score for each individual question.
3) (A) Click Award to apply the new score.

30 | P a g e
Before we can address how to determine the course value of the technology component, we must address why it’s critical that the Connect component has meaningful value in the overall course grade.
1) Motivation:
Motivation is the result of actively processing and interpreting information. Accordingly, students are generally motivated to complete coursework that they perceive to have meaningful value in the form of course credit. In this case, the instructor serves as the source of information and must communicate the requirement in order to trigger the motivation. Only the highly self-motivated will complete “recommended” coursework, but our mission is to improve results for all students.
2) Integral component of contemporary course ecology: As a company committed to the science of learning, we know from the great thought leaders in instructional design and educational technology that a course in higher education is comprised of three core components—content, technology, and pedagogy—as illustrated in the TPACK (Technological Pedagogical Content Knowledge) model.
The core of this framework requires that all three components are integrated--thoughtfully and harmoniously--in order to achieve the greatest potential for teaching and learning success. Additionally, the TPACK framework suggests that more knowledge can be gained at each intersection than in isolating the primary forms.
If the Connect coursework does not impact the overall course grade, then the technology component within the framework is devalued and loses the ability to drive outcomes.

31 | P a g e
3) Alignment with your course goals: By selecting Connect course content based on your course goals, you are integrating purposeful technology—specifically designed to improve student outcomes. By purposefully and strategically integrating Connect into your course, you have thoughtfully developed a course plan to enhance the student learning experience. In order to ensure that all students are equipped with the adaptive support they deserve, requiring Connect coursework as percentage of the overall grade fosters an environment of personalized learning.
At this point, you have analyzed your syllabus, identified your course goals, built a course, and selected content based on your course goals. As a simple best practice for determining Connect course value, let’s return to your syllabus, which now includes Connect coursework. We’ll use our syllabus example from Module 1—Course Consultation to illustrate.
Example:
Participation 10%
Reports 25%
Weekly Quizzes 25%
Midterm 20%
Final 20%
Course Total 100%
Participation SmartBook 10%
Reports 25%
Weekly Quizzes Connect question bank
25%
Midterm 20%
Final 20%
Course Total 100%
After exploring course content, our instructor decided to use:
1) SmartBook for the participation component
2) Connect question bank, selecting questions tied to her learning objectives, for weekly quiz component
Connect coursework = 35% of total course grade

32 | P a g e
At a minimum, be sure to include the following essential information:
1) Product information—including titles, authors, and ISBNs for all course components 2) Requirement status of all course components 3) Courtesy access (14 days of complimentary access) and purchase information 4) Mobile app information
Example of syllabus language for essential details:
For this course you will be required to purchase McGraw-Hill Education Connect® access for (name of text) by (authors). Connect will provide full access to the eBook, so you are not required to have a print text. Please be aware if you purchase a used textbook, you must still purchase Connect access.
(Insert appropriate purchase information.) Connect codes are available in the bookstore. If you would like a print version of the text to accompany Connect, the bookstore is carrying a discounted bundle, which includes a print text and a Connect access code. A print-upgrade option is also available via Connect throughout the semester. This will be a full color binder-ready version of the text.
Information on REQUIRED course material:
Title Edition Author Publisher ISBN
Information on bookstore offering course material:
Title Edition Author Publisher ISBN
Mobile apps are now available for both Connect and for SmartBook. They can be downloaded from the Apple App Store and Google Play. The Connect app is available on tablet only, while the SmartBook app is available on both tablet and smartphone devices. See the below grid for supported devices for the Connect app. If you are using both Connect and SmartBook, you will need to download both apps. {No SmartBook in your course? No problem! Access all your LearnSmart assignments on-the-go using the LearnSmart app, available for tablets and smartphones in the Apple App Store and Google Play.}
Operating System Supported Devices
iOS Version 7.0
and up
iPad 2+ iPad Air+ iPad mini
iPad mini 2+
Android Version 4.4
and up
Samsung Galaxy Tab Pro 10.1 Samsung Galaxy Tab 4
Google Nexus 10 Google Nexus 7
Tip: If you’re unsure about any of your course details, contact your local Learning Technology Representative.

33 | P a g e
Add an assignment schedule:
For the most effective results in setting and managing student expectations, create and add an assignment schedule—integrated with Connect coursework— to your syllabus.
Example of an assignment schedule from a sample syllabus:
READING & ASSIGNMENT SCHEDULE
Week Dates Topic Readings and Lecture
Videos Assignments Due
UNIT 1: Basics of Psychology and Mental Health
1 1/19-1/20
Class introduction, guide to
using your textbook & online
resources
Syllabus, Introduction
Video
Read syllabus, watch
video, register for
Connect, Facebook
2 1/23-1/27 History & Subfields of
Psychology Chapter 1
SmartBook (SB) & Quiz for
Chapter 1
3 1/30-2/3 Biology of Behavior Chapter 3 SB & Quiz for Ch. 3
4 2/6-2/10 Psychological Disorders & their
Treatment Chapters 15 & 16 SB & Quizzes for Ch. 15-16
2/11-2/12 EXAM # 1 Literature Review
Paper Tutorial Vid
Paper Topic, Interactivity
1
Remember… you are not alone! As a part of our commitment to effective implementation,
please remember that you have a dedicated Implementation team member who will partner
with you to integrate Connect requirements into your syllabus and/or provide additional
syllabus examples. If you’d like to utilize this service, please contact your local Learning
Technology Representative to connect with your Implementation team member.


![[PPT]PowerPoint Presentation - McGraw Hill Educationhighered.mheducation.com/olc2/dl/953407/Chap003.ppt · Web viewTitle PowerPoint Presentation Author Jagruti Gadekar Last modified](https://static.fdocuments.in/doc/165x107/5ae12dc87f8b9a6e5c8e64db/pptpowerpoint-presentation-mcgraw-hill-viewtitle-powerpoint-presentation-author.jpg)