Module 1 What is Majuro made of?
14
Water for Life Place-based science outdoor learning module for Majuro Atoll, Republic of the Marshall Islands Module 1 What is Majuro made of? Version date: September 15, 2017
Transcript of Module 1 What is Majuro made of?

Water for Life Place-based science outdoor learning module
for Majuro Atoll, Republic of the Marshall Islands
Module 1
What is Majuromade of?
Version date: September 15, 2017

Introduction
We have worked to create and implement engaging and locally relevant science outdoor learning units for Majuro Atoll, in the Republic of the Marshall Islands. Created for anyone with an interest in the environment and natural resources of Majuro, it can be used by community outreach and education specialists from local NGOs, as field trip guide during meetings and conferences, as professional development tool for persons employed in relevant fields at government and non-government agencies, as an outdoor learning guide for students engaged in school and extracurricular activities, and any other informal education efforts with youth and community members.
The content of these units is aligned with the science curriculum framework used in secondary schools in Majuro. The units were developed in collaboration with teachers. Because they incorporate science education curriculum objectives, modern scientific concepts, and indigenous environmental knowledge, they can be used to better educate students in Majuro about their local environment. Engaging students in field-based learning activities improves awareness of the required science content, encourages mental connections between classwork and observations, and promotes the application of scientific concepts to understanding and appreciating the complexity of the students’ island home.
Acknowledgments
This activity was carried out by iREi and PREL, under auspices of Water for Life project, with funding from the National Science Foundation, in collaboration with Majuro Atoll High School and the Marshall Islands Public School System.
This document was created by Dr. Danko Taborosi (iREi) and Charlin M. Donato of Marshall Islands High School (MIHS), with assistance from Dr. Ming Wei Koh (PREL). We would like to thank iREi, PREL, Water for Life network, Majuro Atoll High School, Marshall Islands Ministry of Education, the Pacific Islands Climate Education Partnership, and the people of Majuro Atoll.

Curriculum Considerations
KEY TOPICSThis outdoor learning activity can teach students the key aspects of island geology using local examples. The unit is developed to address the core question: What is Majuro made of? In the process of answering this question, students will be making use of knowledge and concepts they would have learned in 9th grade science classes. Specific references to 9th grade earth science scheme of work are provided below.
SUGGESTED PREPARATIONSPrior to the field trip teacher should review the sections of the 9th grade science text and vocabulary identified below. The science content and concepts covered will provide the basic information students will need to participate in the outdoor learning class.
Suggested Classroom Preparation Activity: divide students into 4 equal groups. Assign each group between 4-5 vocabulary words listed in the section below. Have students work in groups to complete and present the vocabulary activity:1) Provide book definition of word.2) Provide sentence from book where word is used.3) Provide a student friendly definition (their own definition) of the word.4) Create their own sentence using the word.
LAB AND CULMINATING ACTIVITYSchool lab work (including hands-on and written exercises) and a culminating activity for this outdoor science class are suggested at the end of this document.

Time and Materials
SUGGESTED TIMING OF THIS ACTIVITY Based on the Majuro High School “scheme of work” in Earth Science, it is suggested that this unit be implemented in the 9th grade during the Week 9 or Week 10 of school year, sometime in October.
SUGGESTED TIME USE 90 minutes
SUGGESTED CLASS SIZENo more than 25 persons
SUGGESTED ADULT TO STUDENT RATIO1 adult for every 4 students
MATERIALS AND RESOURCES NEEDED• 9th Grade Earth Science Textbook • Baskettocollectrocksamples(oneperstudent)• Smallcontainertocollectsand(oneperstudent)• Transportationforstudents• Drinkingwaterforstudents
LOCATION OF INSTRUCTIONAL SITE

Outdoor Lesson and Activities with Students
Step 1
The facilitators and participants* assemble at the beach in Rita, at the very end of Djarrit in Majuro. On arrival, the teacher asks: “What is this beach -- where we are now standing -- made of?”. If students answer “rocks, sand” the teacher can rephrase the question as “What are the rocks and sand on this beach made of?”.
The students may know that these are made of the remains of living things from the ocean. In any case, the teacher points to the ocean and asks students to name some of the living things found in the sea around Majuro.
Students will say things like fish, coral, crabs, etc. The teacher will then ask how these animals are classified in groups. Together, they will come up with the list of key phyla:
• Sponges• Cnidarians (corals, soft corals, jellyfish)• Worms • Molluscs (clams, snails, squid, octopus)• Arthropods (crabs, shrimp, lobsters)• Echinoderms (sea urchins, sea stars)• Vertebrates (fish, turtles, mammals)
Students and teachers can also discuss classification of living things in the Marshallese cultural context.
THE TIP OF DJARRIT, AT THE END OF RITA
* In further text, facilitators are referred to as teachers and participants are referred to as students. This is appropriate when the activity is done as part of school work or extracurricular activities. For other situations, e.g., community outreach by NGO, professional training, educational field trip for conference attendees, etc., please retain the use of the words facilitators and participants instead.

Outdoor Lesson and Activities with Students
Step 2
The teacher places index cards on the ground and labels them with names of phyla: sponges, cnidarians, worms, etc. The teacher then ask the students to explore around the beach and find and bring remains of each of the key phyla (try to find at least one from each phylum). The students bring whatever they can find and place them on or next to appropriate cards. The teacher reviews and corrects the students’ classifications, finding new specimens for cards that may have remained empty.
The teacher then adds an additional card labelled “algae” and finds material to place there (also making use of some specimens that the students are likely to have misclassified), as well as one more card labelled “man-made” (because this beach in Majuro happens to have a lot of debris made by people).
The teacher then suggest that -- other than man-made debris -- everything on the beach -- no matter how big or small -- originally comes from a living thing from the ocean. Make no mistake -- even the sand grains are remains of living things: they are either tiny shells of nearly microscopic organisms or broken-up pieces of previously larger remains.
Do the students believe this? Ask them to collect sand in bags or bottles to take back to the school so that it can be examined in lab under magnification.
EXAMPLES OF FINDS BROUGHT BY STUDENTS
SPONGES CNIDARIANS (CORALS)
WORMS
ECHINODERMS
ALGAEMAN-MADE
VERTEBRATESNote: fish and turtle bones may be hard to find, so this card can
stay empty.
ARTHROPODS
MOLLUSCS
Outdoor Lesson and Activities with Students
Step 3
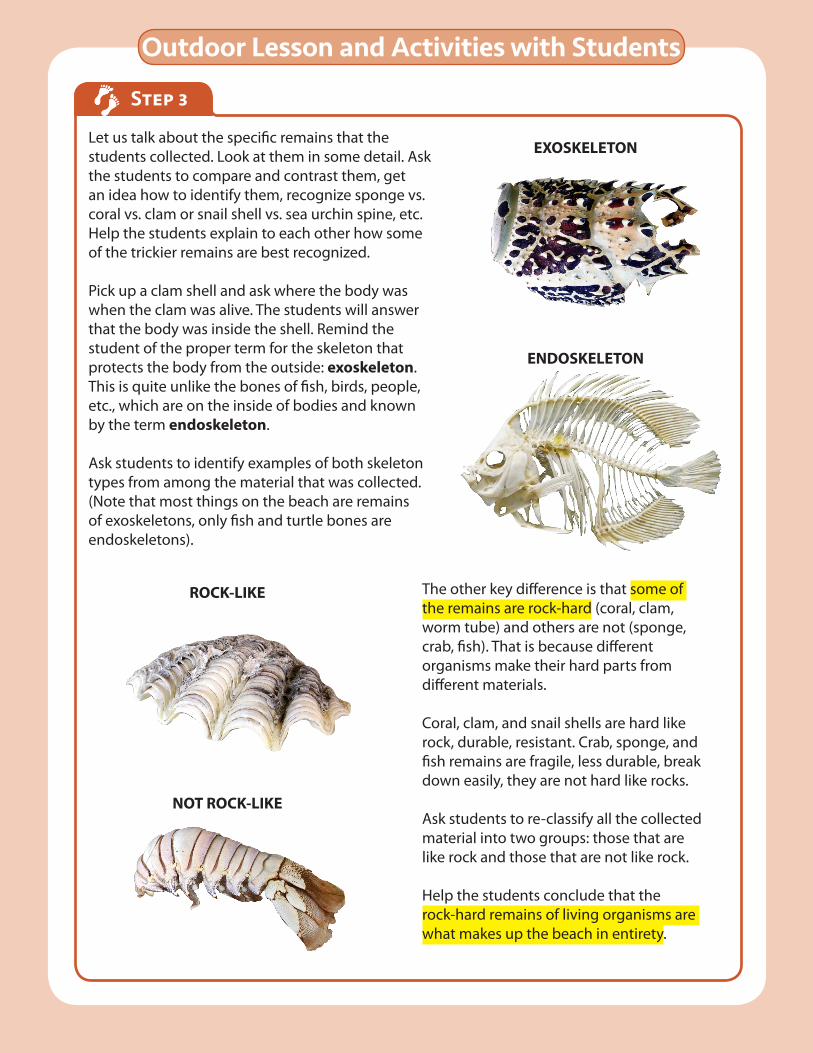
Let us talk about the specific remains that the students collected. Look at them in some detail. Ask the students to compare and contrast them, get an idea how to identify them, recognize sponge vs. coral vs. clam or snail shell vs. sea urchin spine, etc. Help the students explain to each other how some of the trickier remains are best recognized.
Pick up a clam shell and ask where the body was when the clam was alive. The students will answer that the body was inside the shell. Remind the student of the proper term for the skeleton that protects the body from the outside: exoskeleton. This is quite unlike the bones of fish, birds, people, etc., which are on the inside of bodies and known by the term endoskeleton.
Ask students to identify examples of both skeleton types from among the material that was collected. (Note that most things on the beach are remains of exoskeletons, only fish and turtle bones are endoskeletons).
EXOSKELETON
ENDOSKELETON
The other key difference is that some of the remains are rock-hard (coral, clam, worm tube) and others are not (sponge, crab, fish). That is because different organisms make their hard parts from different materials.
Coral, clam, and snail shells are hard like rock, durable, resistant. Crab, sponge, and fish remains are fragile, less durable, break down easily, they are not hard like rocks.
Ask students to re-classify all the collected material into two groups: those that are like rock and those that are not like rock.
Help the students conclude that the rock-hard remains of living organisms are what makes up the beach in entirety.
ROCK-LIKE
NOT ROCK-LIKE

Outdoor Lesson and Activities with Students
Step 4
Now we know what the beach is made of, but still have the main question: “What is Majuro made of?” Point to the nearby large boulders or, even better, to the exposed bedrock-like surface at the beach and ask the students what those parts are made of. The students will touch and examine the rock surfaces closely. Are these rocks the same throughout (homogeneneous) or are there different parts in them (for example, different textures, different color shades, fossils, etc.)?
If students did not notice fossils in the rocks, help them find some. Ask what organisms are the fossils from and where did they live? (Note: The majority of fossils here are from corals.) The students will reply that these organisms live in the ocean. Ask a follow-up question “How did the skeletons of ocean creatures get embedded in this rock, here on dry land?”.
Let the students explore possibilities. Depending on what they say, assist the students to come to the conclusion that the rock was originally formed underwater and became exposed as dry land. This can happen in two ways -- storm waves pile up rocks above sea level (as is the case of boulders in the back of the beach, shown in the photo above) or the sea level becomes lower and an ancient coral reef becomes dry land (as is the case with the exposed rock surface, shown on the photo below). The organisms died and their skeletons became the land we stand on. Over time, they changed so much that it is often difficult to recognize what they once were. We no longer call them corals, algae, molluscs, etc. -- we call them rocks. Specifically, they are the type of sedimentary rock called limestone. Limestone is created from old reefs and broken pieces of corals and other animals that live on reefs.
EXPOSED ROCK RICH IN CORAL FOSSILS
BOULDER IN THE BACK OF THE BEACH

Outdoor Lesson and Activities with Students
Step 6
The teacher will then ask the students how did the plants and soil get here? The students will answer that some seeds floated over the ocean or drifted in air or were carried by birds. Some of those plants are very hardy and can survive in tough places, including bare areas, near seawater, and with no or very little soil. They are the pioneer plants. They are the first to start growing on new land.
Ask the students to look at the plants around them and point out those that could have been pioneer plants that grew on an ancient Majuro when it was still mostly bare. As you stand on the beach and look inland, the pioneer plants will be those that are closest to the ocean (especially those that you often see growing on beaches or bare rock).
The students should come to the conclusion that over long periods of time, the pioneer plants grew, died, decayed, and contributed to the development of soil. With more plants available, land animals came too (by drifting, swimming, or flying...).
Remind the students that soil is a mixture of sand (from breakdown of rocks) and organic material (from breakdown of plants and animals). Students can compare recent soil from near the beach (as shown in the photo to the left) and older soil from interior of the island. Which has more organic material? Which supports a a greater diversity of plants?
Step 5
Now that we know that Majuro was made of remains of marine organisms from an ancient reef, let’s look again at the remains that make up the beach. Ask the students to describe the colors of skeletons that they collected. The skeletons are mostly white or pale grey. Then ask the students to look at the island and say what colors do they see? There will be greens, browns, etc.
Why do we see those colors on land if the skeletons that make up the rocks are white and pale grey? The students are going to say that there are trees and other plants and soil.
PIONEER PLANTS GROWING ON A BEACH
Why is our island not covered only with these pioneer plants? Why are there other plants? Ask students questions of this type: what came to Majuro first: a small coastal vine (as in the photo to the right)or a large tree? Use different examples and Marshallese plant names as needed. When students respond which came first, ask them what is it that made the survival of those latter plants possible? What enabled their growth?
A HANDFUL OF VERY SANDY SOIL

Algae
Seagrass
Sponges
Cnidarians
Worms
Molluscs
Arthropods
Echinoderms
PLAN
TSAN
IMAL
S
Lab Activity 1
Vertebrates
• Identify the sea organisms shown on the photos• Connect names and photos as in the example• Consider which groups have rock-like hard parts

Lab Activity 2
• Identify the illustrated material, found on a beach(Next to each item, write AL for algae, S for sponges, C for cnidarians (corals and relatives), W for worms, M for mollusks, A for arthropods, E for echinoderms, and V forvertebrates.Onechindarianandonemolluschavebeenidentified.Helpfulhint:There is only one item each for algae, sponges, and vertebrates).
MC

Lab Activity 3
• Collectsamplesofsandfromdifferentbeaches• Label each sample with beach name and date• Examinethesamplesundermagnification• Describe,compare,andcontrastdifferentsands
You know that all* rocks found on Majuro’s beaches are pieces of skeletons of corals, algae, molluscs, and other marine organisms.
But what about sand?Where do you think the sand comes from? What is it made of?
To answer these questions, let’s get down on our hands and feet and take a close look at the sand. Can you recognize any sand grains and tell where they come from? In general, it is difficult to recognize the origin of sand grains by looking at them with the naked eye. They are too small. Let’s grab some sand and take it to school, where we can examine it under magnification. Try to get sand from several different beaches.
Under magnification, we can take a very good look at individual grains of sand.
• Are the sand grains all the same or different? • What colors do you see? • What shapes do you see? • Can you identify the origin of some grains?• Are there differences in sand from different
beaches?
Just like rocks, sand in Majuro also comes from broken skeletons of coral, algae, molluscs, and other organisms. There are countless kinds! Imagine -- there are even sand grains made by single-celled organisms! Those grains are shaped as brownish balls of more or less the same size. They come from tiny organisms called foraminifera. They live on the bottom around coral reefs and when they die, their shells pile up as sand on the beaches. This is why it is essential that we keep our coral reefs healthy and full of life. Without living things, theer can be no sand and rocks that comprise our islands.
* The only exceptions are pieces of concrete and other man-made materials.
SAND FROM A BEACH IN LAURA
A CLOSER LOOK...
UNDER MAGNIFICATION

Lab Activity 4
• Look for evidence of sand turning into rock.• Try to naturally “cement” a pile of sand.
As you have learned during the outdoor science class, most of our island is an ancient coral reef that became limestone when the sea level changed. Parts of it may have originally been beaches, lagoon floors, and other sandy areas, but are now solid rock. How is that possible? Can sand turn into rock?
Take a walk around some of the beaches in Majuro to look for rocks that used to be loose sand. On the picture to the right is one such rock we found on a beach. Most of the beach is made of loose sand, but in some places, the sand became cemented into rocks. This is a natural process.
On Majuro, you can see some very large rocks that were made by the natural cementation. Look around the beach in your area to find long, dark-colored slabs of rock that stick out from the sand on the beach. If you break off a small piece, you will see that the inside of this rock is made of sand grains that were cemented together. An example of this from the instructional site in Rita is shown in the photo below. In it you can see numerous cemented grains that make up a big rock boulder.
LOOSE SAND
CEMENTED SAND
CRACKED ROCK REVEALS SAND WITHIN
You can even try an experiment. Work together to bring sand from a beach and make a large pile outdoors, somewhere where it won’t be in anyone’s way. To see how loose the sand is on day 1, use plastic spoons to scoop some of it up. Let days go by. The sand pile will be rained on, dried by the sun, and rained on again, many times over. After several weeks or even months, try to scoop the sand using the same plastic spoon. Is it still loose as it was originally, or is it harder than before? Did the grains begin to stick to each other? Imagine how hard the mass would be if we waited many years.

Culminating Activity
• Students will write a 1-page response to the unit corequestion:
> What are the islands of Majuro Atoll made of?• Students will develop a display or model that > demonstrates their answer, or > illustrates their interest
This document was developed by Danko Taboroši (Island Research & Education Initiative - iREi) and Charlin M. Donato (Marshall Islands High School - MIHS) in close collaboration with PREL staff in Majuro, students of the Marshall Islands High School, and RMI Ministry of Education (RMI MOE). The project was funded by National Science Foundation under Water for Life grant to PREL (award 1224185). For more information, or to suggest corrections/modifications to this document, please contact us at [email protected].