Module 1: Soil Water Retention - scitrek.chem.ucsb.edu Gro Potting Mix (Home Depot) the soil used...
45
Last updated 7/28/2014 1 Module 1: Soil Water Retention 2 nd Grade Activity Schedule: There are no scheduling restrictions for this activity. Day 1: Observation Assessment/Module Introduction/Technique/Observation Activity/Observations (60 minutes) Day 2: Question/Experimental Set-Up/Procedure (60 minutes) Day 3: Experiment/Graph (60 minutes) Day 4: Poster Making (40 minutes) Day 5: Poster Presentations (40 minutes) Day 6: Observation Assessment/Tie to Standards (60 minutes) *Student Groups: This module will be performed in four groups of approximately 5 students. NGSS Standard Addressed 2-ESS2-1 Compare multiple solutions designed to slow or prevent wind or water from changing the shape of the land. Common Core Mathematics Standards: 2.MD-10 Measurement and Data (Draw a picture graph and a bar graph (with single-unit scale) to represent a data set with up to four categories. Solve simple put-together, take-apart, and compare problems using information presented in a bar graph.) Learning Objectives: 1. Students will be able to list at least two factors that affect how much water soil absorbs. 2. Students will know that water can change the shape of the land and that humans have found ways to prevent or limit these changes. 3. Students will know how to read and use a graduated cylinder. 4. Students will be able to list at least three observations about a given system, and identify statements that are not observations. 5. Students will be able to list at least two ways that they behaved like scientists. Classroom Teacher Responsibilities: In order for SciTrek to be a sustainable program SciTrek needs to work with teachers to develop their abilities to run student-centered inquiry-based science lessons in their own classroom. As teachers take over the role as the SciTrek lead it will allow SciTrek to be able to expand to additional classrooms. Even when teachers lead the modules in their own classroom SciTrek will continue to provide volunteers and all of the materials needed to run the module. A sample time line for teachers to take over the role as the SciTrek lead is seen below. 1. Module 1 (year 1) a. Classroom Teacher Co-Runs a Group i. Classroom teacher will co-run a group with a SciTrek volunteer. Groups contain ~5 students. 2. Module 2 (year 1)
Transcript of Module 1: Soil Water Retention - scitrek.chem.ucsb.edu Gro Potting Mix (Home Depot) the soil used...

Last updated 7/28/2014
1
Module 1: Soil Water Retention 2nd Grade
Activity Schedule: There are no scheduling restrictions for this activity.
Day 1: Observation Assessment/Module Introduction/Technique/Observation Activity/Observations (60 minutes) Day 2: Question/Experimental Set-Up/Procedure (60 minutes) Day 3: Experiment/Graph (60 minutes) Day 4: Poster Making (40 minutes) Day 5: Poster Presentations (40 minutes) Day 6: Observation Assessment/Tie to Standards (60 minutes) *Student Groups: This module will be performed in four groups of approximately 5 students.
NGSS Standard Addressed
2-ESS2-1 Compare multiple solutions designed to slow or prevent wind or water from changing the shape of the land.
Common Core Mathematics Standards:
2.MD-10 Measurement and Data (Draw a picture graph and a bar graph (with single-unit scale) to represent a data set with up to four categories. Solve simple put-together, take-apart, and compare problems using information presented in a bar graph.)
Learning Objectives:
1. Students will be able to list at least two factors that affect how much water soil absorbs. 2. Students will know that water can change the shape of the land and that humans have found ways to
prevent or limit these changes. 3. Students will know how to read and use a graduated cylinder. 4. Students will be able to list at least three observations about a given system, and identify statements that
are not observations. 5. Students will be able to list at least two ways that they behaved like scientists.
Classroom Teacher Responsibilities:
In order for SciTrek to be a sustainable program SciTrek needs to work with teachers to develop their abilities to run student-centered inquiry-based science lessons in their own classroom. As teachers take over the role as the SciTrek lead it will allow SciTrek to be able to expand to additional classrooms. Even when teachers lead the modules in their own classroom SciTrek will continue to provide volunteers and all of the materials needed to run the module. A sample time line for teachers to take over the role as the SciTrek lead is seen below.
1. Module 1 (year 1) a. Classroom Teacher Co-Runs a Group
i. Classroom teacher will co-run a group with a SciTrek volunteer. Groups contain ~5 students.
2. Module 2 (year 1)

Last updated 7/28/2014
2
a. Classroom Teacher Runs a Group i. Classroom teacher will run a group. Groups ~5 students.
3. Module 3 (year 2) a. Classroom Teacher Runs a Group and Starts Leading Class Discussions
i. Classroom teacher will run a group. Group contains ~5 students. ii. Classroom teacher will start leading parts of group discussions (example:
observation activity, tie to standards, etc.). 4. Module 4 (year 2)
a. Classroom Teacher Leads the Class with Co-Lead Volunteer i. Classroom teacher will be responsible for leading whole class discussions
(example: observation activity, tie to standards, etc.). ii. Classroom teacher will be responsible for time management
iii. Classroom teacher will be responsible for overseeing volunteers and helping any groups that are struggling.
5. Any Additional Modules (year 3 and beyond) a. Classroom Teacher Leads the Class
i. Classroom teacher will be responsible for leading whole class discussions (example: observations activity, tie to standards, etc.).
ii. Classroom teacher will be responsible for time management. iii. Classroom teacher will be responsible for overseeing volunteers and helping
any groups that are struggling. iv. It is very important for the classroom teacher to contact
[email protected] if they will be unable to run the module on a specific day.
The SciTrek staff will be counting on teacher involvement after year one. Additional steps can be taken to become a SciTrek lead faster than the proposed schedule above. Please contact [email protected] to learn more. In addition, teachers are required to come to UCSB for the volunteer orientation, typically ran ~1 week prior to the start of the module (contact [email protected] for exact times and dates, or see our website at http://web.chem.ucsb.edu/~scitrek/Module_Times.html under your class’s modules times). At the orientation teachers will meet the volunteers that will be helping in their classroom, go over module content, and learn their responsibilities during the module.
Prior to the Module (at least 1 week):
1. Come to the SciTrek Orientation at UCSB 2. Divide the class into four groups (~5 students each). We find these groups work best when they
are mixed levels and mixed language abilities. Send your class list with the groups denoted to [email protected] one week before the start of the module so that we can have nametags/notebooks made for students.

Last updated 7/28/2014
3
During the Module:
Day 1-4: Have the students’ desks/tables moved into 4 groups and cleared off. This way each student can have a desk to sit at during SciTrek activities.
Day 5 and 6:
Have the students desks/tables cleared off. The desks/tables do not need to be moved into groups.
Day 1 and 6:
If possible have a document camera available to the SciTrek leader. Materials Used for this Module:
1. 9 oz Clear plastic cups (Smart and Final) with three 0.5 inch holes drilled in a triangle in the bottom 2. 20 oz Clear plastic cups (Smart and Final) 3. 1 oz cups any material (Smart and Final) 4. Filters for cups
Option 1 – 55 mm diameter pre-cut Filter Papers (Whatman Cat No. 1001-055, Fisher Part Number 09-924-109) Option 2 – Coffee Filters cut into 5.5 cm diameter circles (cost saving option)
5. Miracle Gro Potting Mix (Home Depot) the soil used for the original observation on day 1 and for experiments that are not changing soil type are 3 parts potting mix to one part sand
6. Vermiculite (Home Depot) 7. Play sand (Home Depot) 8. Bark (Home Depot) 9. Rocks of three different sizes (small, medium, large) 10. ThickenUp Clear (any drugstore)
To make levels of liquid, add the following amount of ThickenUp to 150 ml of water: Liquid Level 0 – No ThickenUp Liquid Level 1 – 1/3 Tablespoon Liquid Level 2 – 2/3 Tablespoon Liquid Level 3 – 1 Tablespoon Liquid Level 4 – 1 1/3 Tablespoon Liquid Level 5 – 1 2/3 Tablespoon Liquid Level 6 – 2 Tablespoon
11. Nalgene graduated cylinders 100 ml (Fisher part number:08-572D) 12. Disposable pipets (droppers) (Fisher Part Number: 13-711-7M)
*All printed materials used by SciTrek (nametags, material pages, poster parts, student notebooks, or instructions) can be made available for use and/or editing by emailing [email protected].

Last updated 7/28/2014
4
Day 1: Observation Assessment/Module Introduction/Technique/Observation Activity/Observations
Schedule:
Introduction (SciTrek Leader) – 2 minutes Observation Assessment (SciTrek Leader) – 5 minutes Module Introduction (SciTrek Leader) – 5 minutes Technique (SciTrek Leader) – 10 minutes Observation Activity (SciTrek Leader) – 13 minutes Observations (SciTrek Volunteers) – 20 minutes
Wrap-Up (SciTrek Leader) – 5 minutes Materials:
(4) Volunteer Boxes:
☐ Student nametags ☐ (7) Student notebooks ☐ Volunteer instructions
☐ Volunteer lab coat ☐ (2) Markers ☐ Dropper
☐ (2) 100 ml Graduated cylinders
☐ (2) 9 oz Cup with holes in bottom labeled A and B
☐ 9 oz Cup with no holes
☐ (4) 20 oz Cups (1) labeled A, (1) labeled B, and (2) unlabeled
☐ (4) 1 oz Cups ☐ (2) Filters
☐ 3:1 Potting soil/sand mixture ☐ Water (at least 100 ml) ☐ Paper towels
☐ Ziploc bag (for wet dirt) ☐ (7) Bendy straws
Other Supplies:
☐ (4) Large group notepads ☐ (4) Trays ☐ 500 ml Graduated cylinder
☐ Waste Bucket
Lead Box:
☐ (5) Blank nametags ☐ (3) Extra student notebooks ☐ Lead instructions
☐ Lead lab coat ☐ (4) Marker (red, green, blue, orange)
☐ Dropper
☐ (2) 100 ml Graduated cylinders
☐ (2) 9 oz Cup with holes in bottom labeled A and B
☐ 9 oz Cup with no holes
☐ (4) 20 oz Cups (1) labeled A, (1) labeled B, and (2) unlabeled
☐ (4) 1 oz. cups ☐ (4) Filters
☐ 3:1 Potting soil/sand mixture ☐ Water (at least 100 ml) ☐ Paper towels
☐ Ziploc bag (for wet dirt) ☐ (2) Pencils ☐ Landslide picture
☐ (25) Scented index card ☐ (25) Observation assessments ☐ Time card

Last updated 7/28/2014
5
SciTrek Notebook Pages Used with Students:

Last updated 7/28/2014
6
Group Notepad Pages Used With Students:
Set-Up:
SciTrek Leader: Put two filters in two 9 oz cups with holes. Pour 2 oz of dirt into each of the cups. Set the 9 oz cups in 20 oz cups. Pour 50 ml of water through one of the cups. Leave the other cup dry. This set up will be used in the wrap-up discussion If the classroom has a document camera, ask the teacher to use it for the technique discussion (pages 2 and 3) and the observation activity (page 4). If the classroom does not have a document camera, then tape the example poster size notebook pages to the front board.
SciTrek Volunteer: Put your name, the teachers’ name, and your group color on the top of your group notepad. As students are taking the observation assessment walk around the room and quietly place the students’ nametags and notebooks, which are in your group box, on each students’ desk. Fill four, 1 oz, measuring cups with topsoil/sand mixture (make sure that all cups are filled to the top). Place a filter inside each of the two labeled small (9 oz) cups with holes. Set the labeled small (9 oz) cup inside the larger labeled (20 oz) cup and place them on the tray. Set two unlabeled 20 oz cups and one unlabeled 9 oz cup (without holes) on the tray. Fill two graduated cylinders with 50 ml of water and set them on the tray. The observation set-up is seen below.

Last updated 7/28/2014
7
Introduction (2 minutes – Full Class – SciTrek Leader):
“Hi, we are scientists from UCSB and we want to show you what we do as scientists. We will show you an experiment and then you can make observations, and then design your own experiment to help answer the class question. We want to show you that you can do science and that it’s fun.”
If you are a teacher that is leading the class: tell your class that they are going to start a long-term science investigation and you have asked some scientists from UCSB to come and help. Allow the UCSB volunteers to introduce themselves and share their majors. Tell the class that for this module we are going to work together to try to answer the question: “What factors affect how much liquid a soil can absorb?” Ask the class if they know what the word “absorb” means. Make sure by the end of the conversation that they understand that it means the amount of liquid that the soil can hold.
Observation Assessment (5 minutes – Full Class – SciTrek Leader):
As the students are taking the assessment the volunteers should get the student nametags out of their group boxes and walk around the room looking for their students. Have the volunteers quietly lay each student’s nametag on their desk as well as a SciTrek notebook. If students do not have their name on their paper remind them to put their name on their paper. “Before we start with our module we want to see how your ideas on observations are developing.” Pass-out the observation assessment and a scented index card to each student. Tell students to fill out their name, teachers’ name, and date at the top of the assessment. Remind the students that it is important that they fill out this assessment on their own. Read the instructions to the students. Then read each of the observations aloud to the students and tell the students to circle “observation” for statements that are observations or “not an observation” for statements that are incorrect observations or statements that cannot be observations. When they are finished, collect the papers and verify that the student’s name is on the top of the paper. In addition, collect all of the scented index cards from the students.

Last updated 7/28/2014
8
Module Introduction (5 minutes – Full Class – SciTrek Leader):
Tell students to fill in their name and their teacher’s name on the front cover of their SciTrek notebook that the SciTrek volunteers passed out during the observation assessment. Note: they will not be able to fill in their SciTrek volunteer’s name or their group color until they get into their SciTrek groups. Show the students the picture of the landslide, as seen on the right. Ask the students, “what happened in this picture?” Students should reply that the hillside slipped down. Tell students that this is called a landslide. Ask the students if they have ever seen a landslide before and if so what were the weather conditions when they observed this landslide. By the end of the conversation make sure that students understand that many landslides happen during rain or right after it has rained. Tell students that because many landslides are observed after it has rained we can predict that the amount of water might affect if a landslide will happen. Now ask the students if they can think of any other factors, besides rain that might affect or cause a landslide. Students might come up with the following factors that could affect a landslide: soil type, soil compaction, rain amount, rain speed, hill steepness, etc.. Tell the students that “most of these factors that could affect or cause a landslide involve water and the soil. Therefore, to see how water and soil interact we are going to perform experiments with water and soil to test these factors and then we will relate our results back to landslides. Since we will be dealing with liquids during this experiment we will need to learn to measure the volume of liquids before we start the experiment.”
Technique (10 minutes – Full Class – SciTrek Leader):
Tell the class that today they are going to work with a scientific apparatus called a graduated cylinder. Show the class the 500 ml graduated cylinder. Tell the class that “graduated cylinders are used to measure the volumes of liquids. Scientists read gradated cylinders by placing them on a flat surface and putting their eyes at the same level as the level of the liquid. They then, read off the number on the graduated cylinder where the bottom of the liquid line is located. The liquid line will be curved; the curved liquid line is called the meniscus. The units on the gradated cylinder are in milliliters, which are abbreviated ml. You are going to practice reading graduated cylinders in your notebook which will prepare you to use them during your experiment.”
Tell students to turn to page 2 of their notebooks and place a blank notebook under the document camera and turn to page 2. Read the directions aloud to the class. Ask the students the following questions:
What do you think is the maximum amount of liquid that you could measure in the graduated cylinder on the sheet? (100 ml) What does each of the large labeled lines on the graduated cylinder represent? (10 ml) What do the medium lines on the graduated cylinder represent? (5 ml)

Last updated 7/28/2014
9
What do the smallest lines on the graduated cylinder represent? (1 ml) Tell students to determine the amount of liquid in the graduated cylinder, they need to find the bottom of the meniscus (the bottom of the curved line that the water forms in the graduated cylinder). Have students put their finger on the meniscus in the first gradated cylinder and you do the same on the document camera for students to copy. From there have students move their finger to the nearest labeled number that is below the meniscus. Then have the students count up by ones until they reach the level of the meniscus. Count aloud so students can follow along until you reach 88 ml of liquid. Ask students how much liquid is in the first graduated cylinder? Students should say that the graduated cylinder contains 88 ml of liquid.
Have the students read the other three graduated cylinders (B-D) and record their answers by themselves. As the students are working, volunteers should walk around and help students that are struggling.
Once students have completed reading the graduated cylinders have them share their results with the class. After a student has shared their answer have the rest of the class vote if they think that the answer is correct answer using thumbs up/thumbs down for agree/disagree. When a class consensus has been reached write the correct number on the notebook under the document camera.
Tell the students that in addition to reading graduated cylinder to determine the volume of a liquid they are also going to have to practice filling graduated cylinders to specific amounts. Tell students that when they fill graduated cylinders they should put the graduated cylinder on flat surface. They will then pour liquid into the cylinder until it is approximately 10 ml from the desired amount. At this point they should put the cylinder on a flat surface and add the remaining amount of liquid drop-wise with a dropper. In order to do this they need to know what level to fill the cylinder to, therefore, they will practice by
Last updated 7/28/2014
10
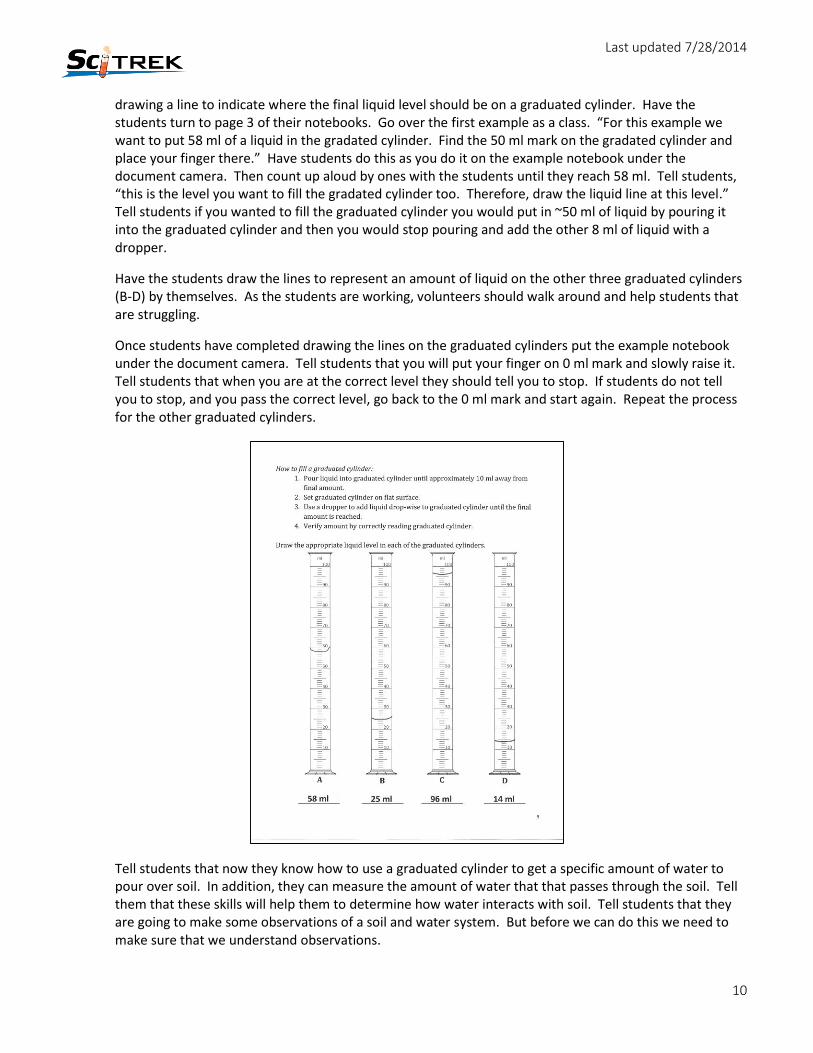
drawing a line to indicate where the final liquid level should be on a graduated cylinder. Have the students turn to page 3 of their notebooks. Go over the first example as a class. “For this example we want to put 58 ml of a liquid in the gradated cylinder. Find the 50 ml mark on the gradated cylinder and place your finger there.” Have students do this as you do it on the example notebook under the document camera. Then count up aloud by ones with the students until they reach 58 ml. Tell students, “this is the level you want to fill the gradated cylinder too. Therefore, draw the liquid line at this level.” Tell students if you wanted to fill the graduated cylinder you would put in ~50 ml of liquid by pouring it into the graduated cylinder and then you would stop pouring and add the other 8 ml of liquid with a dropper.
Have the students draw the lines to represent an amount of liquid on the other three graduated cylinders (B-D) by themselves. As the students are working, volunteers should walk around and help students that are struggling.
Once students have completed drawing the lines on the graduated cylinders put the example notebook under the document camera. Tell students that you will put your finger on 0 ml mark and slowly raise it. Tell students that when you are at the correct level they should tell you to stop. If students do not tell you to stop, and you pass the correct level, go back to the 0 ml mark and start again. Repeat the process for the other graduated cylinders.
Tell students that now they know how to use a graduated cylinder to get a specific amount of water to pour over soil. In addition, they can measure the amount of water that that passes through the soil. Tell them that these skills will help them to determine how water interacts with soil. Tell students that they are going to make some observations of a soil and water system. But before we can do this we need to make sure that we understand observations.

Last updated 7/28/2014
11
Observation Activity (13 minutes – Full Class – SciTrek Leader):
As the lead is going over types of observations with the students the volunteers should get the bendy straws out of their group boxes and walk around the room and quietly place one on each student’s desk.
Tell the students that scientists make lots of observations. Ask the class, “What is an observation? What are the types of things that you can record for an observation?” If they have trouble, show them an object and let them make observations about the object. Turn these observations into general features of observations. Examples of possible general observations are: color, texture, size, weight, temperature, material, etc.
Ask the class if there are statements that are not observations. Students should be able to come up with opinions and inferences. Have students give you examples of statements that are opinions (example: chocolate chip cookies taste better than ice cream) and inferences (example: the white lab coats are bought from K-Mart). If they are unable to come up with these categories (opinion and inference) or cannot give you an example, give them an example statement (colored pens are fun) and then have them identify the type of statement (opinion) as well as come up with another example.
Tell the class that they are now going to do an activity where they look at a list of possible observations about the object that was just put on their desk (bendy straw). They will then decide if each statement is an observation or not an observation that can be made about the object.
Tell students to turn to page 4 of their notebooks and place a blank notebook under the document camera and turn to page 4. Read the directions aloud to the class. For each of the questions read the statement aloud to the students, then let students try to determine the answer on their own. After have a student share their answer and why they think it is correct. Check for understanding with the class using thumbs up/thumbs down. If many students in the class disagree with the response of the original student have the other students tell why they do not agree. If needed let them have “mini conferences” with the students that are sitting in their area.

Last updated 7/28/2014
12
Letter a: The object is lighter than a bowling ball. Observation (Comparison)
This is an observation because the statement compares the weight of the object to the weight of a bowling ball. Note: if the statement had said, “the object is light” then this would not have been an observation because a scientist would not know what is meant by “light.” Example: the object is light compared to a brick but heavy compared to a strand of hair.
Letter b: The object is only one color. Not an Observation (False)
While the color of objects can be observations, in this case the object is two colors, instead of one. Therefore, this is a false observation made about the object. Students can tell this by looking at the object
Letter c: The object is hotter than boiling water. Not an Observation (False-Comparison)
The object is cooler than boiling water, not hotter. Therefore, this is a false comparison. Note: if the statement had said, “the object is cold” the statement would still not be a correct observation because a scientist would not know what is meant by “cold.” Example: the object is cold compared to boiling water but hot compared to ice.
Letter d: The object is silly. Not an Observation (Opinion)
Some people might think that bendy straws are silly but others might think they are sensible. Therefore, this is an opinion. Opinions cannot be observations.

Last updated 7/28/2014
13
Letter e: The object has a hole through the center. Observation
This is an observation because students can observe with their sense of sight, that the straw is hollow or has a hole through the center.
Letter f: The object can be bent so both ends touch. Observation (Test)
If students bend the object they will see that both of the ends can touch, making this statement an observation. Note: if students do not bend the object then the statement is an inference instead of an observation. Make sure that all students bend the object so that both ends touch making this statement an observation.
Letter g: The object came from McDonalds. Not an Observation (Inference)
This is not an observation because students do not know where the object came from. Since McDonalds does have straws the straw could have come from McDonalds, therefore, this is considered to be an inference or something that you think might be true based on past experiences. Inferences cannot be observations. Note: this statement is different from “the object is lighter than a bowling ball” because although students do not have a bowling ball in front of them, bowling balls are all similar in weight; therefore, students should know that the object is lighter than a bowling ball. However, the statement, the object came from McDonalds, is an inference because not all straws come from McDonalds, therefore, this may or may not be true.
Once students have completed the observation activity see if they can give you one or two more observations about the object. While students are giving other observations the volunteers should walk around and collect the straws from students and put them back in their group boxes.
Tell students we will now use the skills that we learned to make observations in our module. Tell students that for this module they will be investigating “What factors affect how much liquid a soil can absorb?” Remind students that we are interested in this because it will help us learn about landslides. Ask the students what were some of the factors that they came up with the might affect if a landslide would happen. Possible answers: water amount, soil type, soil amount, etc. Tell the class that they will first explore how compacting the soil affects the amount of water that a soil can absorb. Tell students that their SciTrek lead will show them the experimental set-up. After making observations about the experimental set-up, they will pour 50 ml of water through compact soil and 50 ml of water through the loose soil and make more observations. The group that generates the most observations will get a prize during the next session. Remind students that it is important to only come up with observations and not inferences/opinions because only observations will be counted. Tell students to look at their nametag color to determine their group and then tell them where each group will be sitting. Inform students that they should bring their notebook and a pencil when they go to their group. If a student does not have a nametag write the student’s name on one of the extra nametags that are in the lead box using the color of marker of the group that you are going to have them join.

Last updated 7/28/2014
14
Observations (20 minutes – Small Groups – SciTrek Volunteers):
Once students come over to your group have them sit in boy-girl fashion. Make sure the table is set-up as described in the set-up section. Have students fill in your name and the group color on the front of their SciTrek notebook. As a group, have the students come up with observations about the experimental set-up that is in front of them. As the students make observations record them in the group notepad. Students do not need to record any observations into their own notebooks. An example notepad is seen below. Feel free to deviate from the example.
Once students have exhausted these observations make sure there is a filter in the bottom of both of the little cups then pour two (1 oz) cups of dirt into both of the cups. Then use the small cup (without holes) to compact the dirt that is in cup B. Leave the dirt in cup A loose. Then pour the water (50 ml) from the graduated cylinders into the two cups at the same time. Try to pour the water down the side of the cup. Have the students make observations about the two cups and what is happening. As soon as the water has passed through the dirt students can move the small dirt cups into the two extra, large cups and then pour the water that passed through each of the cups into a graduated cylinder to determine the amount of water that passed through each. Ask students where did the water go? Allow students to feel the dirt. They should realize that some of the water stayed in the dirt. Ask them if they can determine how much water stayed in the dirt. They should say that if you take the initial amount of water and subtract off the water in the cup you will get the amount of water that is in the dirt. Do the math with the group to determine the amount of water in each of the soils. An example group notepad is seen below. Feel free to deviate from the example.

Last updated 7/28/2014
15
At the end of the observation section each group is going to be asked to share one of their observations. Pick one student that will share an observation with the rest of the class.
Wrap-Up (5 minutes – Full Class – SciTrek Leader):
Have each group share one of their observations with the class.
Review with the class what was in each cup and what happened to the water that was poured over the two cups.
Ask the students if soil compactness affects how much liquid a soil can absorb and what evidence they have to support this? The students should reply that although the two cups absorbed different amounts of water (the less compact the more water that was absorbed) they were fairly close to each other. The big difference between the two systems was that the compact soil absorbed the water much slower than the uncompact soil.
Tell students that we now want to relate what they found back to landslides. Tell students to image that there were two hills one with compact dirt and one with loose dirt. Ask the students what happens when it rains on both of these hills for one hour? The hill that has loose soil will absorb more water because it will be able to absorb the water before it runs off while the hill that has compacted dirt will absorb less water because some of this water will run off into other areas before it can be absorbed. Ask students which hill would be more likely to have a landslide and why they think this. Possible student answer: the hill with loose dirt will be more likely to have a landslide because it absorbs more water. Ask students why absorbing water might cause a landslide. How has the dirt changed? Students should realize that as the dirt absorbs water it will weigh more. To help students understand this have a student hold a cup with wet dirt and a cup with dry dirt and describe them for the class. The heavier the dirt is the more likely the hill will be to slide.

Last updated 7/28/2014
16
Tell the students that they have taught you a lot about how the compactness of the soil affects water absorption and landslides. You now know that the more compact the soil is the longer the soil takes to absorb water and the more water the soil absorbs the heavier the soil will be and the more likely it will be to have a landslide. Tell students that the next time SciTrek is there they will get to explore other factors that affect the amount of water that soil absorbs.
Clean-Up:
Before you leave have the students attach their nametag to their notebook and place them in the group box. Pour the wet dirt into the bag provided. Make sure to seal this bag so that water does not spill in your box. Pour the water and the cups and/or graduated cylinder into the bucket. Count the number of observations that your group generated (from pages 1 and 2 in the group notepad) and write it on the front page of your notepad underneath the group color. Bring all materials back to UCSB. In addition, put your lab coat back into your group box.
Day 2: Question/Experimental Set-Up/Procedure
Schedule:
Introduction (SciTrek Leader) – 7 minutes Question (SciTrek Volunteers) – 15 minutes Experimental Set- Up (SciTrek Volunteers) – 15 minutes
Procedure (SciTrek Volunteers) – 20 minutes Wrap-Up (SciTrek Leader) – 3 minutes Materials:
(4) Volunteer Boxes:
☐ Student nametags ☐ (7) Student notebooks ☐ Volunteer instructions
☐ Volunteer lab coat ☐ (2) Markers ☐ Materials Page for each of the four variables
Other Supplies:
☐ (4) Large group notepads
Lead Box:
☐ (5) Blank nametags ☐ (3) Extra student notebooks ☐ Lead instructions
☐ Lead lab coat ☐ (4) Marker (red, green, blue, orange)
☐ (2) Pencils
☐ Materials Page for each of the four variables
☐ (6) Erasers for prizes ☐ Time card
Last updated 7/28/2014
17
SciTrek Notebook Pages Used With Students:

Last updated 7/28/2014
18
SciTrek Notepad Pages Used With Students:
Set-Up:
SciTrek Leader: Make sure that you have identified the group with the most observations so that you can give the prize (erasers) to that group.

Last updated 7/28/2014
19
SciTrek Volunteer: Set out SciTrek notebooks/nametags around the table having students sit in boy/girl fashion.
Introduction (7 minutes – Full Class – SciTrek Leader):
Announce which group had the most observations from the previous session and distribute prizes (erasers) to that group.
Ask the students what they did the last SciTrek meeting. They should reply that they made observations about water going through compact soil and loose soil. The two soils held slightly different amounts of water with the compact soil holding less than the loose soil. In addition, it took much longer for the water to pass through the compact soil than the loose soil. Ask the class what did this help us learn about the world around us? Make sure by the end of the conversation that students have told you that what they are experimenting with can help them learn about landslides. For instance, if the ground is compact the water might run off the hillside before it has a chance to absorb into the ground. The more water that is absorbed the heavier the soil is and the more likely it will be for a landslide to occur. Tell the students that we will continue to explore what factors affect how much liquid a soil can absorb by designing an experiment to test another factor. The factors that they will get to pick from are some of the factors that they suggested before. They can either pick to explore if soil or liquid affect the amount of liquid that a soil can absorb. If they are interested in exploring how soil affects the amount of liquid that it can absorb they can manipulate either the soil type or the soil amount. If they are interested in exploring how liquid affects the amount of liquid that a soil can absorb they can manipulate either the liquid amount or the liquid thickness. If they choose liquid amount as their changing variable they can use the larger graduated cylinder that you had the first day. Ask the students, “What do they think the thickness of liquid physically represents?” Students may reply that the thickness of the liquid could represent snow instead of rain or mud that is coming in from another area. Tell students they will now vote in their groups about what they want to investigate. They will then generate a question around their selected changing variable. Tell students to get back into their SciTrek groups.
Question (15 minutes – Small Groups – SciTrek Volunteers):
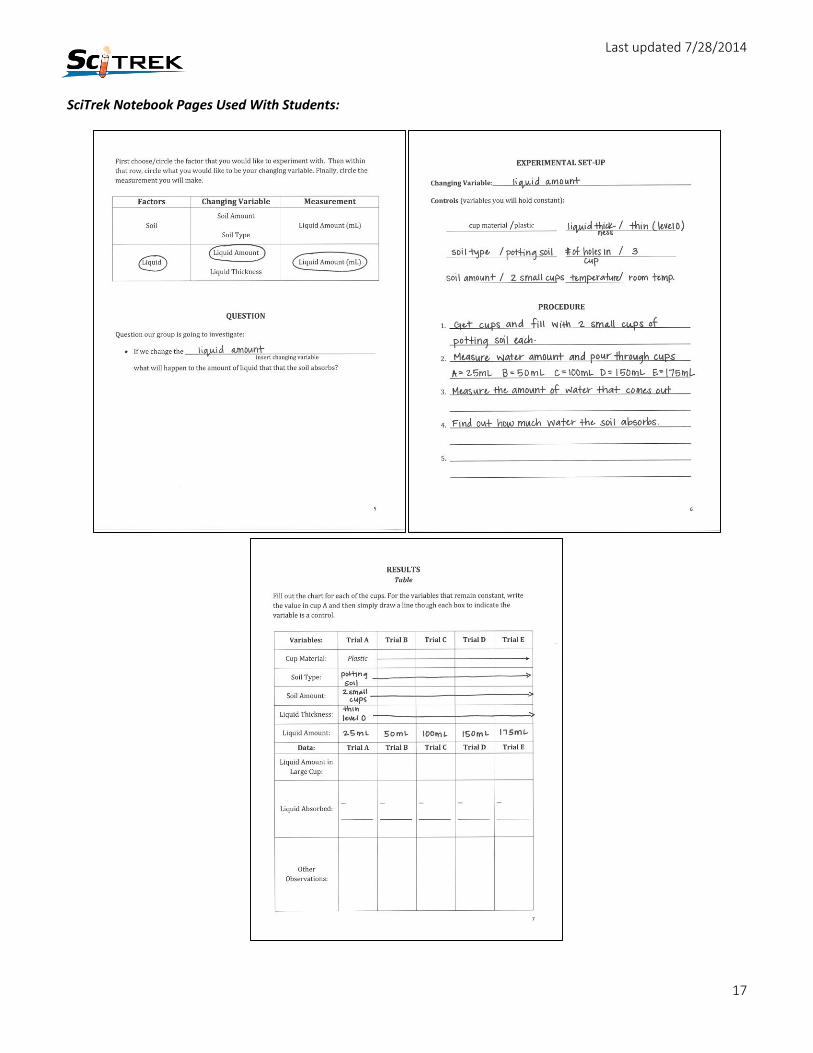
Have students get back into their small groups and turn to page 4 of their notebooks. As a group, have students vote if they are interested in investigating how the soil or the liquid affects the amount of liquid that soil can absorb. If there is a tie, then the volunteer will make the deciding vote. Volunteers should pick a factor that is not being investigated by other groups. Once they have decided on which factor they will investigate have them circle it in their notebooks. Then have them decide what their changing variable will be. If they decide to investigate a soil factor have them choose if their changing variable will be the soil amount or the soil type. If they decide to investigate a liquid factor have them choose if they will change the liquid amount or the liquid thickness. All experiments will measure the liquid amount that passes through the soil. They will then subtract the amount of liquid that passes through the soil from the initial liquid amount to determine the amount of liquid that the soil has absorbed. After they have decided on which changing variable they will explore, have the students come up with their question they will investigate. Ask the students again what they are changing in their experiment. Have the students tell you their changing variable and then insert this variable into the blank in the question sentence frame. Then have students copy this into their notebooks. An example of the group notepad/student notebook for the question is seen below.

Last updated 7/28/2014
20
Prepare one student to share the group question during the wrap-up.
Once students have determined their changing variable, find the matching materials page from your box (examples seen below) and tape it into the group notepad. The materials page will help your group determine their controls and their specific values. Have the students help you fill out the entire materials page.

Last updated 7/28/2014
21
Experimental Set-Up (15 minutes – Small Groups – SciTrek Volunteers):
Have the students turn to page 5 of their notebook and turn to the experimental set-up page of the group notepad. Ask what the group decided to have for their changing variable. Record the changing variable into the group notepad and have students copy this response into their notebooks. After students have filled out their changing variable have students reiterate the controls of their experiment and record these in the group notepad making sure to write the variable and the value that they will use, for example: soil type/sand. Try to come up with at least one control that is not on the materials page: example soil compactness/loose, number of holes/3, temperature/room temperature, etc. If your group is struggling to remember the controls turn the group notepad back to page 3. An example of the experimental set-up can be seen below.

Last updated 7/28/2014
22
Procedure (20 minutes – Small Groups – SciTrek Volunteers):
Once their experimental set-up is complete have the group generate a step-by-step procedure of how to answer their question and conduct their experiment. It is helpful to have the students dictate the procedure to you while you copy it on the group notepad. Once the procedure is complete have the students copy it from the group notepad into their notebooks. Try to keep the procedure as short as possible while still including the important information. Make sure to record all of the values for the changing variable in the procedure. Example procedure step for a group who has a changing variable of liquid amount: pour water through each cup A) 25 ml, B) 50 ml, C) 100 ml, D) 150 ml, and E) 175 ml. A sample of an appropriate procedure can be seen above. Have students fill out the variables in the result table on page 7. Have students record everything in the results table except the data (this will be recorded during the experiment). If a variable is constant then simply write the value in Trial A and draw a line through the remaining trials. For your changing variable record every value in each appropriate trial. An example of the results table can be seen below.
If you have extra time have the students predict what they think that will happen in the experiment and have them tell you why they think this. In addition, have students explain to you how their experiment will help them learn about landslides.
Last updated 7/28/2014
23
Wrap-Up (3 minutes – Full Class – SciTrek Leader):
Have each group share the question that they are going to investigate. Tell students that the next time SciTrek is here they will be running their experiments. Tell the students that all of the class experiments will help us be able to answer the question, what factors affect how much liquid a soil can absorb?
Clean-Up:
Before you leave have the students attach their nametag to their notebook and place them in the group box. Bring all materials back to UCSB. In addition, put your lab coat back into your group box.
Day 3: Experiment
Schedule:
Introduction (SciTrek Leader) – 5 minutes Experiment (SciTrek Volunteers) – 27 minutes Graph (SciTrek Volunteers) – 25 minutes Wrap-Up (SciTrek Leaders) – 3 minutes
Materials:
(4) Volunteer Boxes:
☐ Student nametags ☐ Student notebooks ☐ Volunteer instructions
☐ Volunteer lab coat ☐ (2) Markers ☐ (5) Dropper
☐ (5) 100 ml Graduated cylinders
☐ (5) 9 oz Cups with holes in bottom labeled A – E
☐ (10) 20 oz Cups (5) labeled A-E (5) unlabeled
☐ (5) 1 oz cups ☐ (6) Filters ☐ Water (at least 500 ml)
☐ Additional requested materials
☐ Scotch Tape ☐ (6) Graph parts
☐ Paper towels ☐ Ziploc bag (for wet soils)
Other Supplies:
☐ (4) Large group notepads ☐ Bucket
Lead Box:
☐ (3) Extra student notebooks ☐ Lead instructions ☐ Lead lab coat
☐ (2) Marker ☐ (5) Droppers ☐ (5) 100 ml Graduated cylinders
☐ (5) 9 oz Cups with holes in bottom labeled A-E
☐ (10) 20 oz Cups (5) labeled A-E (5) unlabeled
☐ (5) 1 oz. cups
☐ (6) Filters ☐ Water (at least 500 ml) ☐ Potting soil
☐ Vermiculite ☐ Sand ☐ Bark
☐ Small rocks ☐ Medium rocks ☐ Large rocks
☐ Scotch tape ☐ (6) Graph parts ☐ Paper towels
☐ Ziploc bag (for wet soil) ☐ Time card

Last updated 7/28/2014
24
SciTrek Notebook Pages Used with Students:
SciTrek Notepad Pages Used With Students:

Last updated 7/28/2014
25
Set-Up:
SciTrek Leader:
Have a dropper, cup of water, and graduated cylinder available for the dropper discussion in the introduction.
SciTrek Volunteer: Set out the SciTrek notebooks/nametags around the table having students sit in boy/girl fashion.
Introduction (5 minutes – Full Class – SciTrek Leader):
Ask the class, “What have we been working on the last two meetings?” They should be able to tell you that they have been exploring water and soil interactions and that they have found that the more compact the soil the slower the water absorbs into the soil. They should also state that they designed an experiment to look at how other variables or factors might affect the amount of liquid that the soil can absorb. Have each group tell you the variable that they are going to investigate. Ask the class, why do we care about the amount of water that soil can absorb? The students should be able to tell you that this will help us learn about landslides. Tell the students that today they will be working in their groups to complete their experiments using the procedures they developed last session. Tell them they will be recording the results from their experiments in their SciTrek notebooks and creating a bar graph from their data. Tell students that today they will be using a dropper or a pipet to fill graduated cylinders to the correct level. Tell students that in order to use a dropper they must squeeze the bulb, then put the tip of the dropper into the water. Once the tip of the dropper is underwater release the bulb. This will allow the water to come into the dropper. They can then remove the dropper from the water and put it over the graduated cylinder. Carefully squeeze the bulb again to release the water. Have students mime what they are going to do while you show them with the bulb. Have them repeat this process two or three times. Tell students it is now time for them to get into their groups.
Experiment (27 minutes – Small Groups – SciTrek Volunteers):
Before students start their experiment make sure that they have filled out the variable section of the results table on page 7.
Help the students’ set-up and complete their experiments. Have each student be in charge of at least one of the experiments. For that experiment have them fill the graduated cylinder, put the appropriate type and amount of soil in the cup, and measure the amount of liquid that goes through the system. Make sure the students pour the liquid over the soil slowly and carefully so the filter paper does not separate from the bottom of the cup, allowing soil to go through. Wait until the water is no longer dripping from the small cup into the large cup and then have students set the small cup in an extra, large cup and measure the amount of liquid that passed through the soil using a gradated cylinder. Have each student read their graduated cylinder and tell you their measurement and record this in the results table under liquid amount in large cup.
You can also encourage students to make observations other than the amount of water passing through, such as liquid color, speed with which the liquid came through, texture of the soil, etc.

Last updated 7/28/2014
26
Record the data that the students collect in the group notepad (see sample group notepad below).
Ask the students, how will they be able to figure out how much water the soil in each of the trials absorbed? They should say that if they take the initial amount of water they can subtract the amount of water that was in the large cup (the amount of water that passed through the soil) and the difference will be the amount of water that was absorbed by the soil. As a group do the math for each of the trials to figure out how much water was absorbed by each soil sample.

Last updated 7/28/2014
27
Graph (25 minutes – Small Groups – SciTrek Volunteers):
Once the results table has been completed, and each student has every trial filled out, pass out one partial graph piece to each student and have them fill out the piece for the cup that they were overseeing. On the bottom line have students write the value of their changing variable, not the trial letter of the cup. This way when the pieces are rearranged they will be able to see the values for each of the trials. Have students draw a line showing the appropriate absorbed liquid amount as well as write the absorbed liquid amount over the line. Once each student has completed the graph piece for their cup, arrange the partial graphs so that they go from most liquid absorbed to least liquid absorbed or from least liquid absorbed to most liquid absorbed. Tape the partial graphs to the group notepad so that they look like a complete graph (see sample group notepad below). When taping the graph pieces to the group notepad make sure that each graph piece overlaps with the one next to it so that you only see the y-axis for the first graph.
After the pieces of the graph are taped into the group notebook ask the students what was their changing variable. Record this answer for the x-axis title. Have students copy the graph into their notebooks. Once all the students have completed their graph, as a group fill in the sentence frame “My experiment shows _______,” see sample above. Do not simply record that the graph shows the x value vs. the y value. Instead, make sure that students make a claim about the trend or pattern in their data and provide

Last updated 7/28/2014
28
an explanation for their claim using the data. Since their graph pieces are in either ascending or descending order, they should be able to predict if a pattern or a trend exists and if so what it is. An appropriate claim could be: 3 small cups of potting soil can only absorb ~ 75 ml of water. This is an appropriate claim because it allows the students to make a prediction about what would happen if new values of their changing variable were introduced. After generating a claim or a prediction about what the experiment shows, write the word “because” and follow it with supporting data or values from the graph (when less than 75 ml of water was poured through the potting soil it all was absorbed and when more than 75 ml of water was poured through the soil only ~75 ml of water was absorbed). Help students copy this statement into their notebooks on page 8. Prepare one students to share this sentence frame with the rest of the class.
Once students have filled out “My experiment shows__________” have each student individually fill in the sentence frame (page 9): “I acted like a scientist when__________.” This sentence frame should be unique for each of the students. If students are having trouble with this sentence frame ask them what they did during each SciTrek visit.
If there is extra time talk to your students about how their results relate to landsides.
Wrap-Up (3 minutes – Full Class – SciTrek Leader):
Have each group present their sentence frame “My experiment shows___________” to the class. Tell the class that the next time we meet they will make a poster of their findings from their experiment to present to the class.
Clean-Up:
Before you leave have students attach their nametag to their notebook and place them in the group box. Pour the wet “soil” into the Ziploc bag provided. Make sure to seal this bag so that water does not spill in your box. Put the liquid and the cups into the bucket. Bring all supplies back to UCSB. In addition, put your lab coat back into your group box.
Day 4: Poster Making
Schedule:
Introduction (SciTrek Leader) – 3 minutes Poster Making (SciTrek Volunteers) – 35 minutes Wrap-Up (SciTrek Leader) – 2 minutes
Materials:
(4) Volunteer Boxes:
☐ Student nametags ☐ Student notebooks ☐ Volunteer instructions
☐Volunteer lab coat ☐ (2) Markers ☐ Highlighter
☐ (2) Glue ☐ Scissors ☐ Poster diagram (full page)
☐ Sticker for how to present graph
☐ (2) Paperclips

Last updated 7/28/2014
29
Poster Parts:
☐ Scientists’ names ☐ Question ☐ Experimental set-up
☐ Procedure ☐ Results ☐ Graph
☐ (6) “ I acted like a scientist when _______”
☐ (6) Picture spaces
Other Supplies:
☐ (4) Large group notepads ☐ Large poster paper
Lead Box:
☐ (3) Extra student notebooks ☐ Lead instructions ☐ Lead lab coat
☐ (2) Markers ☐ (2) Highlighters ☐ (2) Glues
☐ Scissors ☐ Poster diagram (full page) ☐ Sticker for how to present graph
☐ (5) Paperclips ☐ Scotch Tape ☐ Time card
Set-Up:
SciTrek Leader: Ask the classroom teacher for a place to leave the student posters in the classroom.
SciTrek Volunteer: Set out the student nametags/notebooks around the table having students sit in boy/girl fashion. Have poster parts ready for students.
Introduction (3 minutes – Full Class – SciTrek Leader):
Ask the class, “What is the class question that we have been investigating?” Students should tell you “what factors affect how much liquid a soil can absorb?” Ask the class why are we interested in this question. They should say that learning about water and soil interactions can help us learn about landslides. Tell students that today they are going to be putting together a poster to present to the class for the next session, which tells the class what they have found out about this question. Tell them that they should write a neatly as possible on the poster parts so that the other class members can read their poster. Tell the group if they have not filled in the “I acted like a scientist when________” sentence frame they should finish this before starting on their posters. In addition, tell students that before they start their poster they should explain the experiment they did to their volunteer along with what they found out. Tell students that they should try to do this without looking at their notebooks. Tell students that it is now time to get into their groups

Last updated 7/28/2014
30
Poster Making (35 minutes – Small Groups – SciTrek Volunteers):
If students have not finished “I acted like a scientist when _______” have them complete this before starting on their poster. Have your students explain their experiment to you without looking at their notebooks as well as their findings. Try to make every student in the group tell you something about the experiment. This should take between 5 and 10 minutes. Assign each student one of the poster sections to complete. If a student struggles with writing try to give them a shorter writing section to complete (example: question). If you have more students than there are poster pieces then cut the poster piece with the graph and “my experiment shows_______” into two parts so that one student can complete/present the bar graph and another students can complete/present “my experiment shows________.” Have the students write their name on the sections that they complete. In the students’ notebook highlight the section that they will complete/present. Note: if students are completing multiple sections use the paperclips in your group box to clip together the sections that they are completing so that during the poster presentation day they will have an easier time flipping back and forth between pages. Place the following sentence frame sticker on the top of page 8 in the notebook of the student that is completing the graph. Changing Soil Type/Liquid Thickness
When the ________________was ________________________ the soil absorbed _________ ml.
Changing Soil or Liquid Amount
The cup with ____________________ of ____________________ absorbed_____________ ml.
Then practice reading the five sentences with that student. For the poster below, the sentence frame would be: the cup with 10 ml of water absorbed 10 ml. An example of a sentence frame for a group that changed the thickness of liquid would be: When the liquid thickness was level 0 the soil absorbed 60 ml. Make sure that you fill in the second blank of the changing soil or liquid amount sentence frame but leave the changing variable value and measurement blanks empty. When students finish writing their sections, have them draw a picture of their experiment or how they acted like a scientist during the experiment. As soon as students have completed some of their pieces, start gluing them onto the large poster paper exactly as they are arranged in the example below. Do not wait until students have completed all the pieces to start gluing them onto the poster. Once the poster is complete have students start practicing for the poster presentation. Make sure that students know to read from their notebooks instead of from their poster. The poster should be presented in the following order: 1) scientists’ names, 2) question, 3) experimental set-up, 4) procedure, 5) graph, and 6) “my experiment shows ________.” They will NOT read the “I acted like a scientist when _______,”
measurement
measurement changing variable value soil/ water
changing variable value
(you should fill this blank out for the student)
soil type/liquid thickness
(you should fill this blank out for the student)

Last updated 7/28/2014
31
or results table from their poster. The “I acted like a scientist when _________” section will be discussed as a class after all posters are presented. In addition, it sometimes helps to write a small number (order seen above) on the sections in the students’ notebook in the order that they will be presented.
If there is extra time, ask the students questions that have them make predictions about the amount of liquid absorbed for situations that they did not test. They should be able to use their findings as a base for their predictions. For instance for the poster above an appropriate question would be if we poured 200 ml of water through the soil how much water would the soil absorb and why. One possible answer would be 75 ml of water because anytime more than 75 ml of water is poured over the soil it only absorbs 75 ml.
Wrap-Up (2 minutes – Full Class – SciTrek Leader):
Tell students that they will present their findings the next meeting and you are looking forward to hearing about all of their experiments.
Clean-Up:
Before you leave have students attach their nametag to their notebook and place them in the group box. Leave student posters in the classroom. Bring all supplies back to UCSB. In addition, put your lab coat back into your group box.

Last updated 7/28/2014
32
Day 5: Poster Presentations Schedule:
Introduction (SciTrek Leader) – 2 minutes Practice Posters (SciTrek Volunteers) – 10 minutes
Poster Presentations (SciTrek Volunteers/SciTrek Leader) – 23 minutes Wrap-Up (SciTrek Leader) – 5 minutes Materials:
(4) Volunteer Boxes:
☐ Student nametags ☐ Student notebooks ☐ Volunteer instructions
☐ Volunteer lab coat ☐ Highlighter ☐ Pencil
☐ (2) Paperclips ☐ Large binder clip ☐(6) Sharpened SciTrek pencils (all same color)
Lead Box:
☐ (3) Extra student notebooks ☐ Lead instructions ☐ Lead lab coat
☐ (2) Pencils ☐ (2) Highlighters ☐ Scotch tape
☐ (4) Paperclips ☐ Time card
*Student posters should already be in the classroom. Set-Up:
SciTrek Leader:
Write the class question on the board “What factors affect the amount of liquid a soil can
absorb?” Leave enough room so that you can record student findings under the question.
SciTrek Volunteer: Set out the SciTrek notebooks/nametags. Get your groups’ poster. Today students will be sitting in their regular classroom seats during poster presentations.
Introduction (2 minutes – Full Class – SciTrek Leader):
Tell students that today they are going to present their posters to the rest of the class. Tell the students that they are now going to be given 10 minutes to practice their poster before starting the presentations. Tell students before they practice their poster they need to explain to their volunteer what experiment they did and what they learned from their experiment. After that their SciTrek volunteer will ask them questions about their experiment. Tell students to pay attention to the type of questions their volunteer is asking because these are scientific questions and if they ask a scientific question during the poster presentations they will get a SciTrek pencil at the end of the day. After the 10 minutes students will return to their original class seats. They will sit in these seats during the presentations.

Last updated 7/28/2014
33
Practice Posters (10 minutes – Small Groups – SciTrek Volunteers):
Once students have gotten to your group have students explain to you what they did for their experiment and what they learned about the soil/liquid interactions. Ask students questions to make sure that they understand what they did during their experiment. Make sure that you also have them use their results to predict what would happen for other systems that they did not test. Remind them to think about the pattern or the trend that they saw for their own results and apply this trend to make other predications about how much liquid soil can absorb. For instance if the group’s changing variable was liquid thickness ask them to predict how much liquid would pass through the cup if they used a liquid that was even thicker than liquid level 6 (this would be a thickness that they did not test). Try to make sure that each student in your group answers one question. Once your group has an understanding of their experiment have them start practicing their poster. Make sure students are reading the poster parts in the correct order (scientists’ names, question, experimental set-up, procedure, graph, and “my experiment shows __________”) and out of their notebook, not off the poster. If the students’ section is not highlighted in their notebook, highlight the section for them. If they are reading multiple sections paperclip the sections together.
Poster Presentations (23 minutes – Full Class – SciTrek Volunteers/SciTrek Leader):
Have students return to their original class seats. Ask the class, “what is the question that we have been working on solving?” Students should tell you: what factors affect how much liquid a soil can absorb? Ask the class why we are interested in answering this question. Students should say that if they can determine the factors that affect the amount of liquid a soil can absorb they could use this to understand/predict landslides. Tell the students that after each presentation you will ask the class what changing variable the group was testing. They will then be given the opportunity to ask scientific questions to the presenting group to help them determine if the variable that the group was investigating affected the amount of liquid that a soil could absorb. Tell the students that anyone that asks a scientific question will get a SciTrek pencil after the presentations are over. Scientific questions are the type of questions that your group leader was asking you about your experiment to learn more about your trials. Ask the class “if the group experimented with soil type do you think that they would be able to answer questions about changing liquid amount? They should say no. “Therefore, we should try to ask the group questions that focus on their changing variable.” Tell the class once they have finished asking the group questions you will ask them if the group’s changing variable affected the amount of liquid absorbed and how. Summarize the students’ ideas on the board under the class question. Volunteers should make sure that students are quiet and respectful when other groups are presenting. When your group is presenting, go to the front of the room with the group and prompt students if they do not know who talks next and remind them to read out of their notebook and not off of the poster. During the student question time, the SciTrek lead and/or volunteers should ask at least one question. Examples of possible questions are: “How do you know…?” or “Is there anything else you can do to get more information about your question?” Each group should answer approximately 5 questions (1 question per student).

Last updated 7/28/2014
34
After all poster presentations, ask the class “what did we learn about how much liquid a soil can absorb? Have them summarize their results. Depending on the experiments that the class ran these are the highlights of the experiments.
The more “space” between the pieces of the soil, the less liquid that will be absorbed
The more soil, the more liquid that the be absorbed
The more liquid, the more liquid that will be absorbed until you reach the saturation point of that soil. At that point no matter how much more liquid you pour through the sample it will absorb approximately the same amount of liquid
The thicker the liquid, from the math it looks like the more the soil absorbs. However, students will notice not all of the liquid is absorbing into the soil. Instead the thick liquids sit on top of the soil. To bring this back to landslide talk about how the thick liquid could represent snow or mud and these would not absorb into the soil but they would add weight to the soil
When reflecting on the summary, use students’ collected data and not what they should have found, if the two are in disagreement. Ask students if you had a plant that needed a lot of water and you would only be able to water it once a week what type of soil should you use and how much should you use.
Soil Type: Small Pieces, Top Soil, Vermiculite, or Sand
Soil Amount: Lot of Soil, Large Pot Tell students they have taught you that you would want an absorbent soil and you would want to plant it in a large pot so that the soil could retain as much moisture as possible. Note: if no one in the class did experiments on the variable they will not know how that variable affects soil absorbency and do not expect them to tell you which value to use.
Wrap-Up (5 minutes – Full Class – SciTrek Leader):
Ask students the following wrap-up questions:
Did you act like a scientist during this project? What did you do that scientists do?
Tell the students that the volunteers that have been working with them are undergraduate and graduate students that volunteer their time so that they can do experiments. Have the students say thank you to the volunteers. Tell the students that this is the last day with their SciTrek volunteers, therefore, they should say goodbye to them. Tell students that you will be back one more time. Tell students to remove the paper part of the nametag from the plastic holder and that they can keep the paper nametag but to give the plastic sleeve back to their SciTrek volunteer. Have volunteers pass out pencils to the students that ask questions. If a student did not ask a question during the poster presentations have them answer a question form the volunteer and then they can have a pencil.
Clean- Up:
Before you leave collect plastic parts of nametags and put them in the group box. Students can keep the paper part of their nametag. Also collect and clip notebooks together with a large binder clip. Leave student posters in the classroom. Bring all materials back to UCSB. Remove tape from the lid of your box and place into group box. In addition, remove all materials from lab coat pockets, remove your nametag, unroll lab coat sleeves, and put your lab coat back into your group box.

Last updated 7/28/2014
35
Day 6: Observation Assessment/Tie to the Standards
Schedule:
Observation Assessment (SciTrek Leader) – 5 minutes Tie to Standards (SciTrek Leader) – 55 minutes
Materials:
Lead Box:
☐ (3) Extra Student notebooks ☐ Student notebooks ☐ Lead instructions
☐ Lead lab coat ☐ (2) Pencils ☐Pictures
☐ (25) Rubber bands
☐ Time card
☐ (25) Observation assessments ☐ If no group in the class tested soil type bring small rock, medium rock, large rock and sand to test with students
Other Materials:
☐ Poster with findings
SciTrek Notebook Pages Used with Students:

Last updated 7/28/2014
36
Findings Page Used With Students:
*All findings should be covered so that they can be revealed one by one as the SciTrek
lead goes through the tie to standards activity.

Last updated 7/28/2014
37
Set-Up:
SciTrek Leader: Pass out notebooks to students. If you do not have time to get set-up before the start of the module ask the teacher to pass out the notebooks during the observation assessment. If the classroom has a document camera, ask the teacher to use it to fill out the tie to standards activity with students on pages 9-12. If the classroom does not have a document camera, then tape the example poster size notebook pages to the front board. Tape up the findings poster with all the findings written out. Make sure that the findings are covered.
Observation Assessment (5 minutes – Full Class – SciTrek Leader)
“Before we start with our activity we want to see how your ideas on observations are developing.” Pass-out the observation assessment and a rubber band to each student. Tell students to fill out their name, teachers’ name, and date at the top of the assessment. Tell students one of the ways that we get money for the program is to show that the program is effective and that we need them to do their best on the assessment so we can know the effectiveness of the program. Remind the students that it is important that they fill out this assessment on their own. Read the instructions to the students. Then read each of the observations aloud to the students and tell the students to circle “observation” for statements that are observations or “not an observation” for statements that are incorrect observations or statements that cannot be observations. When they are finished, collect the papers and the rubber bands and verify that the student’s name is on the top of the paper.
Tie to the Standards (55 minutes – Full Class – SciTrek Leader):
Possible Factor 1: Liquid Amount (10 minute) Tell the class that you enjoyed their poster presentations the last time you were there. Tell them that today they are going to revisit all of the factors that they have been investigating and determine how they affect how much liquid a soil can absorb. In addition, tell students that we will discuss how these results apply to landslides. Have the students turn to page 9 of their notebooks. Place an example notebook on the document camera and turn to page 9.
Tell the students that first factor that we will discuss is how changing the water amount affects how much 1 small cup of top soil can absorb. Tell students to look at the graph on page 9. Tell them the amount of water that was poured over the top soil is shown on the x-axis. Point to where they can see these values. Ask the students how much water was poured over the potting soil for trial 1. (10 ml) Tell students that the amount of water that was absorbed by the soil is shown on the y-axis. Point to where they can see these values. Ask the students how much water was absorbed by the soil for the first trial. (10 ml) Ask the students if we poured 10 ml of water over the soil and 10 ml of water was absorbed, how much water would be in the large cup under the small cup? (0 ml) Tell the students that we will now look at trial 2. Ask the students for this trial how much water was poured over the soil (20 ml) as well as how much water was absorbed by the soil (20 ml). Ask the

Last updated 7/28/2014
38
students if we poured 20 ml of water over the soil and 20 ml of water was absorbed, how much water would be in the large cup under the small cup. (0 ml) Tell the students that we will now look at trial 3. Ask the students for this trial how much water was poured over the soil (30 ml) as well as how much water was absorbed by the soil (25 ml). Ask the students if we poured 30 ml of water over the soil and only 25 ml of water was absorbed, how much water would be in the large cup under the small cup. (5 ml) If needed do the math to determine the amount of water absorbed by the soil on the side of the notebook page. Example see below: 30 ml
-25 ml 5 ml
Ask the students why the first two cups absorbed all the water and this cup did not. (Possible answer: the soil was not fully wet in the first to cups but now it is fully wet.) Repeat the process that was used for the 30 ml of water for 40 ml and 50 ml of water poured over the soil. Ask the class question 1. Is there a limit to the amount of water that soil can absorb? By the end of the conversation make sure that students understand that the answer is yes. Have the class fill in the blank for question 2 (1 small cup of potting soil can hold 25 ml of water). Tell the students to look at the picture on page 9. Ask the students to explain what happened. By the end of the conversation make sure students understand that the soil absorbed all of the water that it could and could not hold any more water. Since the soil did not have a cup under it to collect the extra water, the extra water pooled on the top of the soil. Tell students that we are now going to apply what we know to landslides. Tell students, “pretend that you are standing on a hill and it starts raining. You take a soil sample and weigh the soil sample. Will that soil sample weigh more or less than the dry soil?” (It will weigh more now that it is wet). Tell students, “pretend that it continues to rain for the next 20 hours. During this time you keep taking soil samples. Do those soil samples keep weighing more and more, or is there a point when the soil samples weight stops getting heavier and heavier (or stops increasing)?” Students should realize that after the soil is saturated with water (completely full) the soil will not be able to hold any more water and will therefore, not increase in weight. In addition, any more water/rain in that area will run off/pool in another area because it will not be able to be absorbed by the soil.
Tell students that we have now learned that there is a maximum amount of water that soil can absorb and therefore there is a maximum weight of that soil. Remove the clips showing finding 1 on the class poster.
Finding 1: There is a maximum amount of liquid that soil can absorb (also a maximum weight) An example of this page in the student notebook can be seen below.
2 1

Last updated 7/28/2014
39
Possible Factor 2: Soil Amount (10 minutes)
Have students turn to page 10 in their notebooks. Ask students to make a prediction about what will happen to the maximum amount of water that soil can absorb as the soil sample size gets larger and why. Students should predict that the maximum amount of water that a soil can hold gets larger as the soil size increases. Ask students how much water 1 small cup of potting soil can hold? (25 ml) On the graph, shade in 25 ml of water for 1 cup of potting soil. Repeat the process for 2-4 small cups of potting soil. If necessary, do the math with the students on the side of the notebook or on the front board. Then have students plot these numbers on the graph on page 10. Ask the class question 3: is there a relationship between soil amount and the maximum amount of water the soil can absorb? (yes) Circle this answer in the group notebook and have students copy into their notebooks. Tell students that they have taught you that the more dirt there is, the more water the sample can absorb. Remove the clips showing finding 2 on the class poster.
Finding 2: The more soil there is, the more liquid it can absorb
An example of section in the student notebook can be seen below.

Last updated 7/28/2014
40
Possible Factor 3: Soil Type (10 minutes) Note: If a group did not test this bring in the materials to do this test with the class. Ask the students to put the following soil types in order of least to most absorbent with 1 being the least absorbent and 4 being the most absorbent. Students should be able to put the soil types in the following order large rock (least absorbent), medium rocks, small rocks, and sand (most absorbent). Ask students if different soil types absorb different amount of water. (yes) Ask the students, what pattern do you notice about the amount of water that the soil can absorb and a property of the soil. The larger the particle size the less the soil absorbs. Ask the students, if they add the maximum amount of water, that each soil type can absorb, which of the four soil types would have the largest weight change and why. (The sand because it absorbs the most water.) Have students fill in the answer for question 4. Different soil types absorb different amounts of water. Have the students look at the two pictures that are on page 10. Ask students, which situation do you think is more likely to have a landslide and why. Students should say the picture where the soil is loosely bound is more likely to have a landslide than the picture of the rock. This is because the rock is held together tightly. Tell students that they have just identified another factor that affects landslides, the ability of the soil to stick to itself (to stick together). Tell students that they most likely have experienced this before if they are at the beach and they are playing in the sand. If they try to build sand up as tall as possible they will only get their sand to a certain height before the sand starts slipping down the side of the hill. This because sand does not stick well to itself, or does not tend to stick together. Have students fill in the answer for question 5. Each soil type also has a different ability to stick to itself .

Last updated 7/28/2014
41
An example of this section in the student notebook can be seen above. Tell students that they have now taught you that soil types are very different from each other because they have different abilities to absorb water and different abilities to stick to itself. Remove the clips showing finding 3 on the class poster.
Finding 3: Different soil types absorb different amount of water as well as have different abilities to bind/stick to itself.
Tell students we will now look at how changing liquid thickness affects a soil’s ability to absorb liquid. Possible Factor 4: Liquid Thickness (10 minutes) Tell the class to turn to page 11. Turn the example notebook to page 11. Ask the class, what are two substances that act as “thick” sources of water that might be in areas that were landslides occur? If they are having trouble coming up with answers ask them if it is really cold and it starts to rain what would happen. The rain would turn to snow. Snow can be a “thick” source of water. Ask the students once the soil has absorbed as much water as it can what will happen if that area continues to get more and more water? That water will run off or pool depending on the slope of the area. If that water mixes with the dirt what can it form? (mud) Mud runoff can then move to other places. Mud can be a “thick” source of water. Have the students’ record snow and mud for question 6. Have the students look at the experiment and the picture of the experiment shown on page 11. Have a student describe the trial that was run. Possible answer: one small cup of potting soil was put into a cup then 50 ml of level 6 thickness liquid was poured over the soil. The student then recorded the amount of liquid that passed through the sample into the large cup, 10 ml. Tell the class that the student then did the math and made the statement that 40 ml of liquid was absorbed by the soil. Ask the class if they think this is a fair statement and why. By the end of the conversation make sure that students understand that this is not a fair statement because most of the liquid did not get absorbed by the soil and instead it remained on the top of the soil as can be seen in the picture on page 11. Have students mark no for question 7. Ask students how this is similar to snow or mud being deposited on a hill. Students should reply both of these substances would not absorb completely into the soil. However, as the snow melted water would be absorbed into the soil. Ask students question 8, if the soil does not absorb thicker materials can these materials still cause landslides? Make sure that students understand that although the thick liquids might not fully absorb they still add weight to the soil, which can lead to a landslide. In addition, if there is enough snow, the snow can also form a landslide with itself, which is called an avalanche. Tell students that they have taught you that snow and mud can also cause a landslide/avalanche to occur. Remove the clips showing finding 4 on the class poster.
Finding 4: Thick liquids such as snow and soil will not fully absorb into the soil. However they still add weight to the soil.
An example of this page in the student notebook can be seen below.

Last updated 7/28/2014
42
Other Possible Factors (5 minutes) Have the students turn to page 12 of their notebook. Turn the example notebook to page 12. Tell students that there is one other major factor that can lead to landslides that they did not test in their experiments. Ask the students if they know this factor? They should be able to come up with the slope of the hillside. Have students fill in slope for question 9. The steeper the slope the more likely it is for a landslide to occur. Have students draw a picture of a hill behind a house where it is likely for a landslide to happen and unlikely for a landslide to happen. Tell students we have now learned another important factor about landslides. That the steeper the slope the more likely it is to have a landslide. Remove the clips showing finding 5 on the class poster.
Finding 5: The steeper the slope the more likely a landslide. Ask the students question 11. What are possible factors that can affect landslides? Students should be able to come up with the following: slope, soil type (ability to stick to itself and absorb water), liquid thickness, water amount, soil amount. Make sure that two of the factors that you write in the example notebook are slope and soil type. An example of this section in the student notebook can be seen below.

Last updated 7/28/2014
43
Possible Ways to Prevent Landslides (5 minutes) Have students look at the first picture on the bottom of page 12. Tell the students that one way that people try to prevent landslides is by terracing the soil. This means that they grade the ground so that it is sloped and then flat, making stair like structures in the ground. Ask students which factor this method tries to solve and have them write the letter of this method on the line (slope). Ask them why they think this solution works to prevent landslides. By the end of the conversation make sure that students say that this works because the sloped section is only very small so even if there was a landslide it would only be in very small area (one section of the stairs). Have students look at the second picture on the bottom of page 12. Tell the students that another way that people try to prevent landslides is by planting plants in the soil on the hill. Ask students which factor this method tries to solve and have them write the letter of this method on the line (soil type). Ask them why they think this solution works. Students should say that plants have roots and the roots will help to hold the dirt together making the dirt stick more to itself. An example of this section in the student notebook can be seen below. Other Ways Water Changes the Earth (5 minutes) Do this section with the class only if there is remaining time.

Last updated 7/28/2014
44
Tell the students that we have been focusing on landslides. One of the factors that affect landslides is water. Therefore, landslides are one of the ways that water can change the shape of the land. Ask the students if they know of any other situations or ways that water can change the shape of the land. Talk to students about how rivers and the ocean shape the land and how humans try to prevent unwanted shaping of the land.
Rivers shape the land through three different methods: erosion, transportation, and
deposition. Erosion occurs when the land is worn down where a river flows over it.
Transportation occurs when the river moves rocks through the water from one place to
another. Deposition is the step where the rocks are deposited into another spot. Depending
upon what happens through each step and how much rock is moved to form different
landforms around the river. Rivers tend to form V shaped valleys. The mountains in areas that
rivers have shaped the land are pointed. Human prevention of rivers changing the land is to
build dykes or walls if we do not want the water to go in a certain area. Many times these
dykes are built so that they are only used when the river get to high and if they were not there
they would flood the area. Rivers also deposit sediments into areas which boats need to
travel. When this happens humans drudge, use a large shallow ship to, remove the sediment.

Last updated 7/28/2014
45
Tell students that they can keep their SciTrek notebook and that you have enjoyed working and learning with them and that SciTrek will be back later in the year to run another module.
Clean-Up: Bring all materials back to UCSB.
The ocean shapes the land through three different methods: erosion, transportation, and
deposition. Erosion occurs when the waves hit the side of a cliff taking away dirt and rocks.
Transportation occurs when the waves/tides move dirt/sand to other areas. Deposition
occurs when the dirt and sand are deposited either on the ocean floor or on another beach.
Human prevention of waves changing the land is to build sea walls so that the waves cannot
go over them. Or to line softer material, like sand, with rocks so the waves hit the harder
material instead of the softer material. In areas where humans do not think they can stop the
erosion they will build buildings on stilts so that if the hillside does erode the house is still
attached to the stilts. The waves also deposit material like sand into unwanted areas. For
instance sand is always being deposited in the Santa Barbara harbor, and just like for rivers
Santa Barbara drudges the harbor to remove the unwanted sand.