Module 1: Sheetmetal Fundamentals Unit 14: Exhaust Pipe...
22
Trade of Sheet Metalwork Module 1: Sheetmetal Fundamentals Unit 14: Exhaust Pipe Phase 2
Transcript of Module 1: Sheetmetal Fundamentals Unit 14: Exhaust Pipe...
Trade of Sheet Metalwork Module 1: Sheetmetal
Fundamentals
Unit 14: Exhaust Pipe
Phase 2

Trade of Sheet Metalwork – Phase 2 Module 1 Unit 14
Unit 14 3
Table of Contents
List of Figures .................................................................................................................... 4
List of Tables ..................................................................................................................... 4
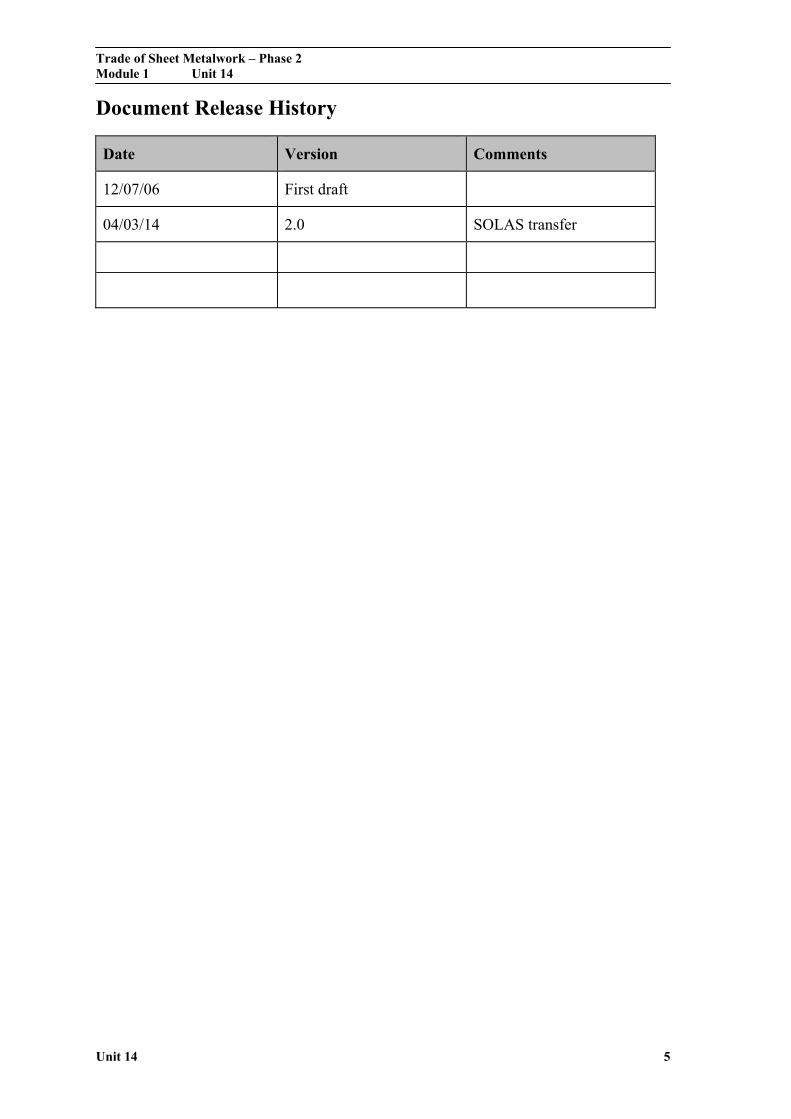
Document Release History ............................................................................................... 5
Module 1 – Sheetmetal Fundamentals ............................................................................ 6
Unit 14 – Exhaust Pipe ................................................................................................... 6 Learning Outcome: ..................................................................................................... 6 Key Learning Points: .................................................................................................. 6 Training Resources: .................................................................................................... 7 Exercise: ...................................................................................................................... 7 Key Learning Points Code: ......................................................................................... 7
Assembly of Exhaust Pipe ................................................................................................ 9
Tinman’s Jenny ............................................................................................................... 10
Setting up the Jenny ...................................................................................................... 10 Flanging a Disc ............................................................................................................. 11 Flanging a Cylinder ...................................................................................................... 13
Self Assessment................................................................................................................ 14
Answers to Questions 1-10. Module 1.Unit 14 .............................................................. 18
Index ................................................................................................................................. 21
Trade of Sheet Metalwork – Phase 2 Module 1 Unit 14
Unit 14 4
List of Figures
Figure 1 - Exhaust Pipe ....................................................................................................... 8
Figure 2 - Exhaust Pipe ....................................................................................................... 9
Figure 3 - Tinman's Jenny ................................................................................................. 10
Figure 4 - Setting up the Jenny ......................................................................................... 10
Figure 5 - Support Disc and Apply Pressure .................................................................... 11
Figure 6 - Position Disc and Place Metal between Rolls .................................................. 11
Figure 7 - Turn Handle and Tilt Disc ................................................................................ 12
Figure 8 - Flanging a Cylinder 1 ....................................................................................... 13
Figure 9 - Flanging a Cylinder 2 ....................................................................................... 13
Figure 10 - Flanging a Cylinder 3 ..................................................................................... 13
List of Tables
Trade of Sheet Metalwork – Phase 2 Module 1 Unit 14
Unit 14 5
Document Release History
Date Version Comments
12/07/06 First draft
04/03/14 2.0 SOLAS transfer
Trade of Sheet Metalwork – Phase 2 Module 1 Unit 14
Unit 14 6
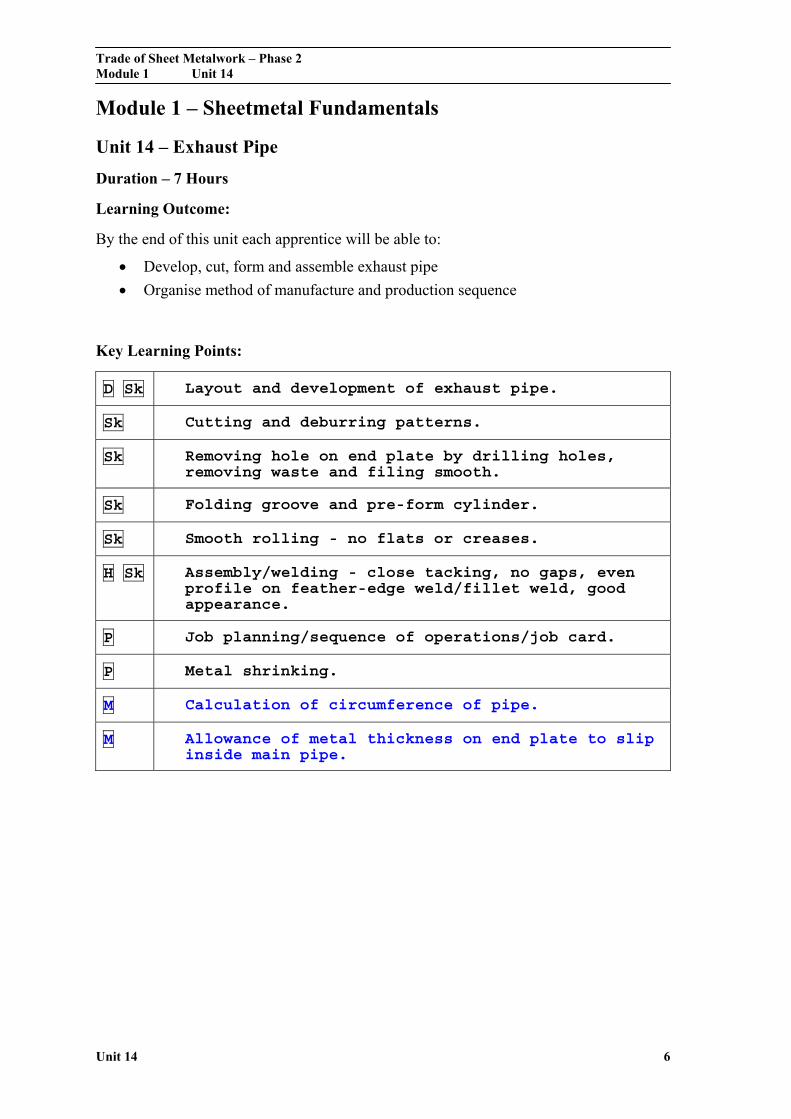
Module 1 – Sheetmetal Fundamentals
Unit 14 – Exhaust Pipe
Duration – 7 Hours
Learning Outcome:
By the end of this unit each apprentice will be able to:
Develop, cut, form and assemble exhaust pipe
Organise method of manufacture and production sequence
Key Learning Points:
D Sk Layout and development of exhaust pipe.
Sk Cutting and deburring patterns.
Sk Removing hole on end plate by drilling holes, removing waste and filing smooth.
Sk Folding groove and pre-form cylinder.
Sk Smooth rolling - no flats or creases.
H Sk Assembly/welding - close tacking, no gaps, even profile on feather-edge weld/fillet weld, good appearance.
P Job planning/sequence of operations/job card.
P Metal shrinking.
M Calculation of circumference of pipe.
M Allowance of metal thickness on end plate to slip inside main pipe.
Trade of Sheet Metalwork – Phase 2 Module 1 Unit 14
Unit 14 7
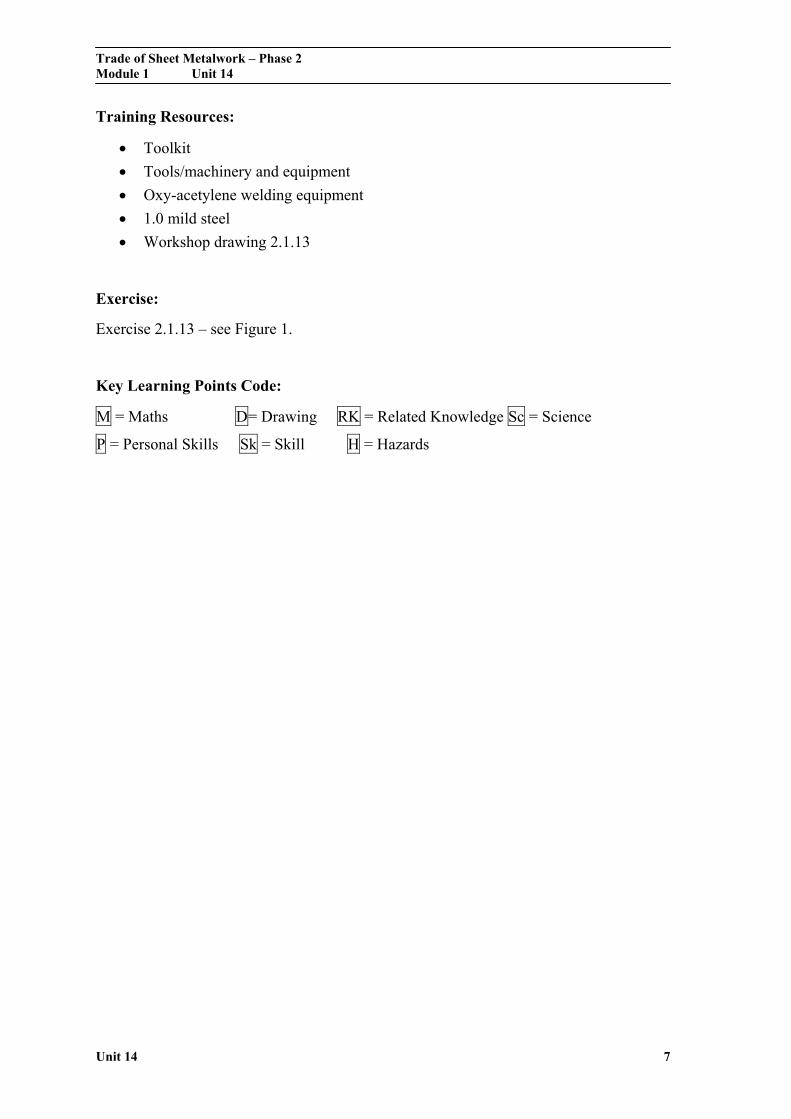
Training Resources:
Toolkit
Tools/machinery and equipment
Oxy-acetylene welding equipment
1.0 mild steel
Workshop drawing 2.1.13
Exercise:
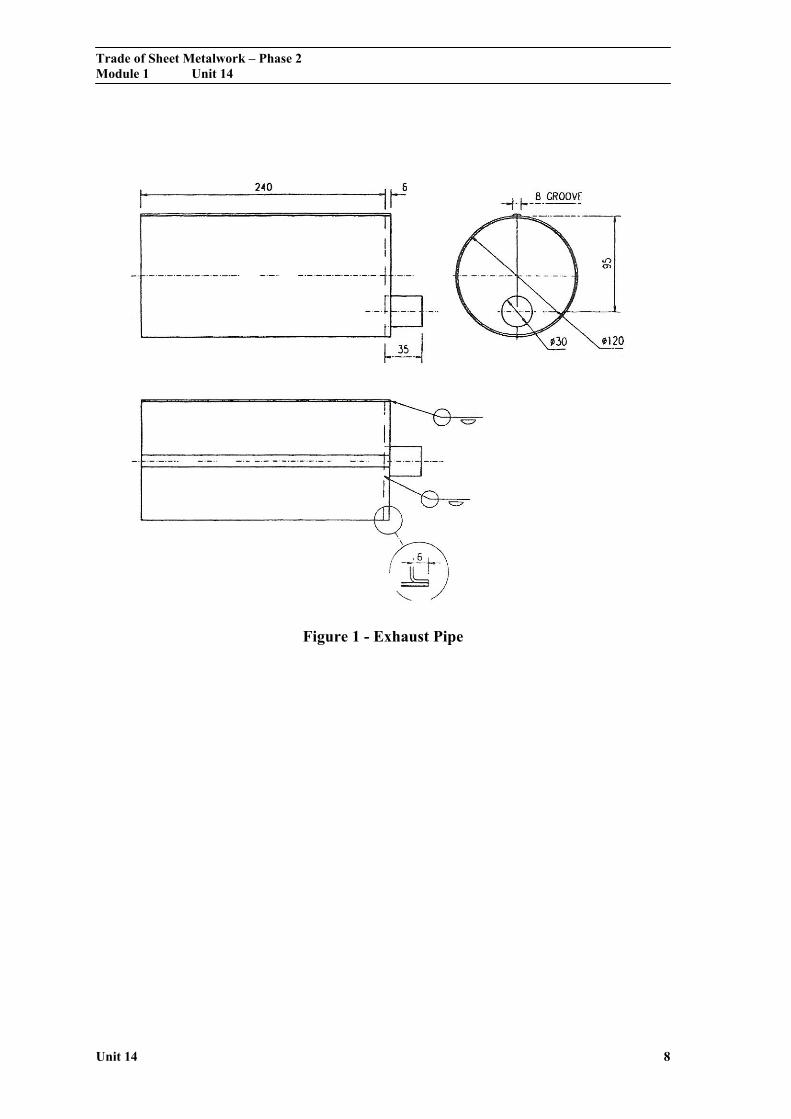
Exercise 2.1.13 – see Figure 1.
Key Learning Points Code:
M = Maths D= Drawing RK = Related Knowledge Sc = Science
P = Personal Skills Sk = Skill H = Hazards
Trade of Sheet Metalwork – Phase 2 Module 1 Unit 14
Unit 14 8
Figure 1 - Exhaust Pipe
Trade of Sheet Metalwork – Phase 2 Module 1 Unit 14
Unit 14 9
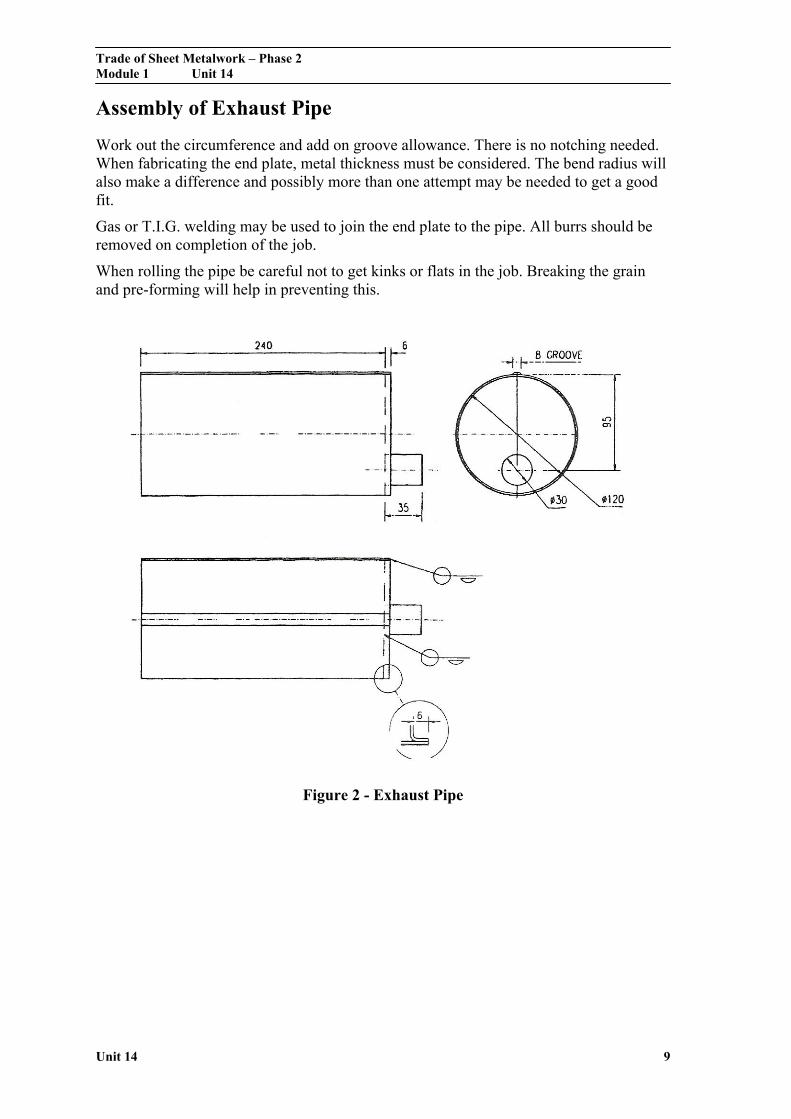
Assembly of Exhaust Pipe
Work out the circumference and add on groove allowance. There is no notching needed. When fabricating the end plate, metal thickness must be considered. The bend radius will also make a difference and possibly more than one attempt may be needed to get a good fit.
Gas or T.I.G. welding may be used to join the end plate to the pipe. All burrs should be removed on completion of the job.
When rolling the pipe be careful not to get kinks or flats in the job. Breaking the grain and pre-forming will help in preventing this.
Figure 2 - Exhaust Pipe
Trade of Sheet Metalwork – Phase 2 Module 1 Unit 14
Unit 14 10
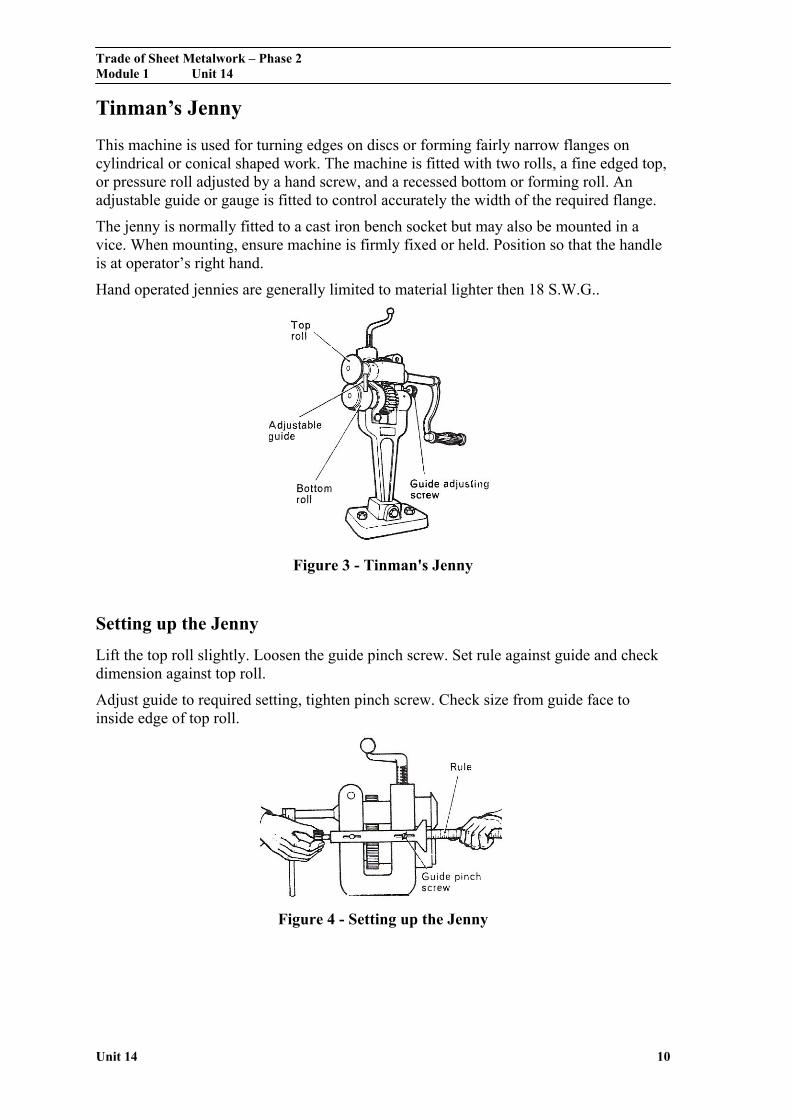
Tinman’s Jenny
This machine is used for turning edges on discs or forming fairly narrow flanges on cylindrical or conical shaped work. The machine is fitted with two rolls, a fine edged top, or pressure roll adjusted by a hand screw, and a recessed bottom or forming roll. An adjustable guide or gauge is fitted to control accurately the width of the required flange.
The jenny is normally fitted to a cast iron bench socket but may also be mounted in a vice. When mounting, ensure machine is firmly fixed or held. Position so that the handle is at operator’s right hand.
Hand operated jennies are generally limited to material lighter then 18 S.W.G..
Figure 3 - Tinman's Jenny
Setting up the Jenny
Lift the top roll slightly. Loosen the guide pinch screw. Set rule against guide and check dimension against top roll.
Adjust guide to required setting, tighten pinch screw. Check size from guide face to inside edge of top roll.
Figure 4 - Setting up the Jenny
Trade of Sheet Metalwork – Phase 2 Module 1 Unit 14
Unit 14 11
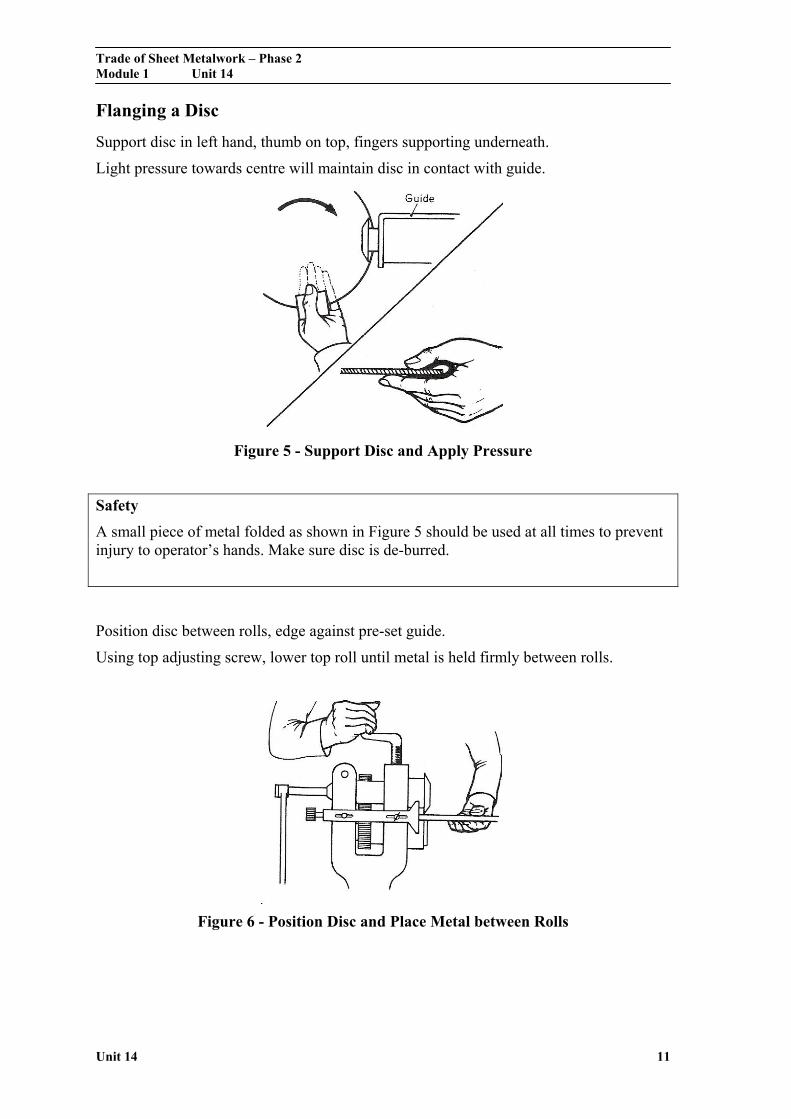
Flanging a Disc
Support disc in left hand, thumb on top, fingers supporting underneath.
Light pressure towards centre will maintain disc in contact with guide.
Figure 5 - Support Disc and Apply Pressure
Safety
A small piece of metal folded as shown in Figure 5 should be used at all times to prevent injury to operator’s hands. Make sure disc is de-burred.
Position disc between rolls, edge against pre-set guide.
Using top adjusting screw, lower top roll until metal is held firmly between rolls.
Figure 6 - Position Disc and Place Metal between Rolls

Trade of Sheet Metalwork – Phase 2 Module 1 Unit 14
Unit 14 12
Maintain disc in contact with guide, turn handle clockwise with smooth steady action. Steadily tilt disc slowly upwards until required angle is obtained. Loosen top adjusting screw and remove disc.
Figure 7 - Turn Handle and Tilt Disc
Trade of Sheet Metalwork – Phase 2 Module 1 Unit 14
Unit 14 13
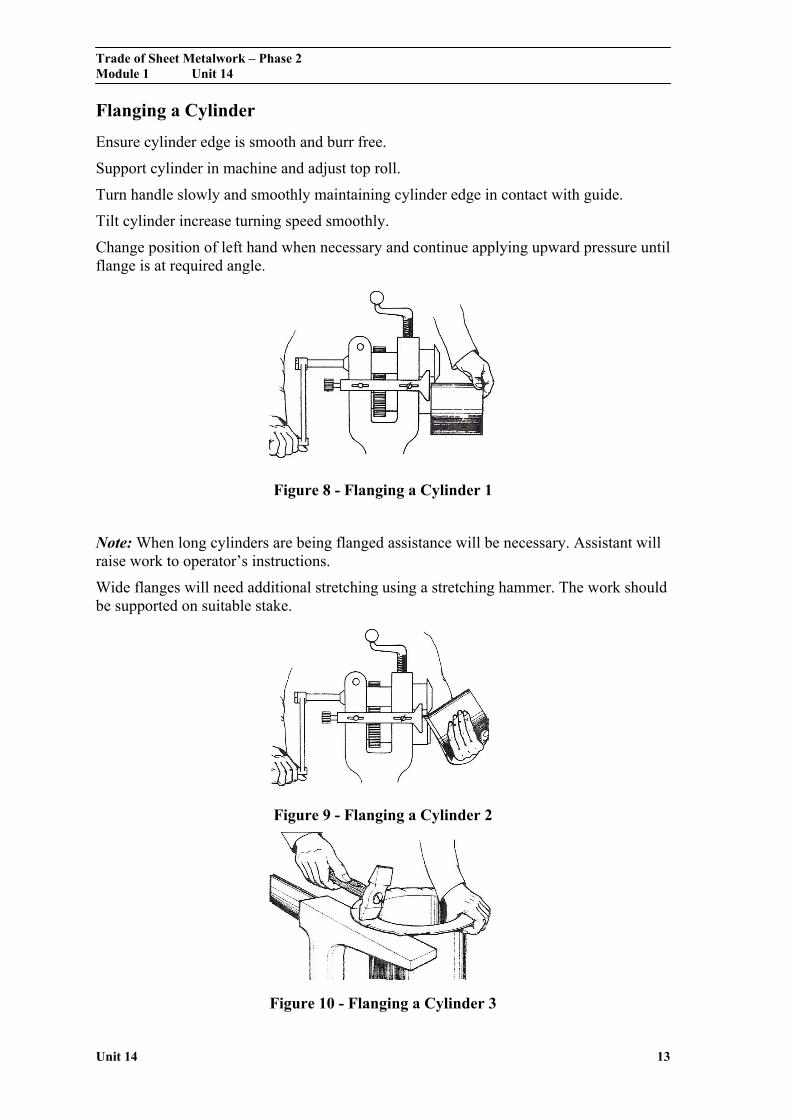
Flanging a Cylinder
Ensure cylinder edge is smooth and burr free.
Support cylinder in machine and adjust top roll.
Turn handle slowly and smoothly maintaining cylinder edge in contact with guide.
Tilt cylinder increase turning speed smoothly.
Change position of left hand when necessary and continue applying upward pressure until flange is at required angle.
Figure 8 - Flanging a Cylinder 1
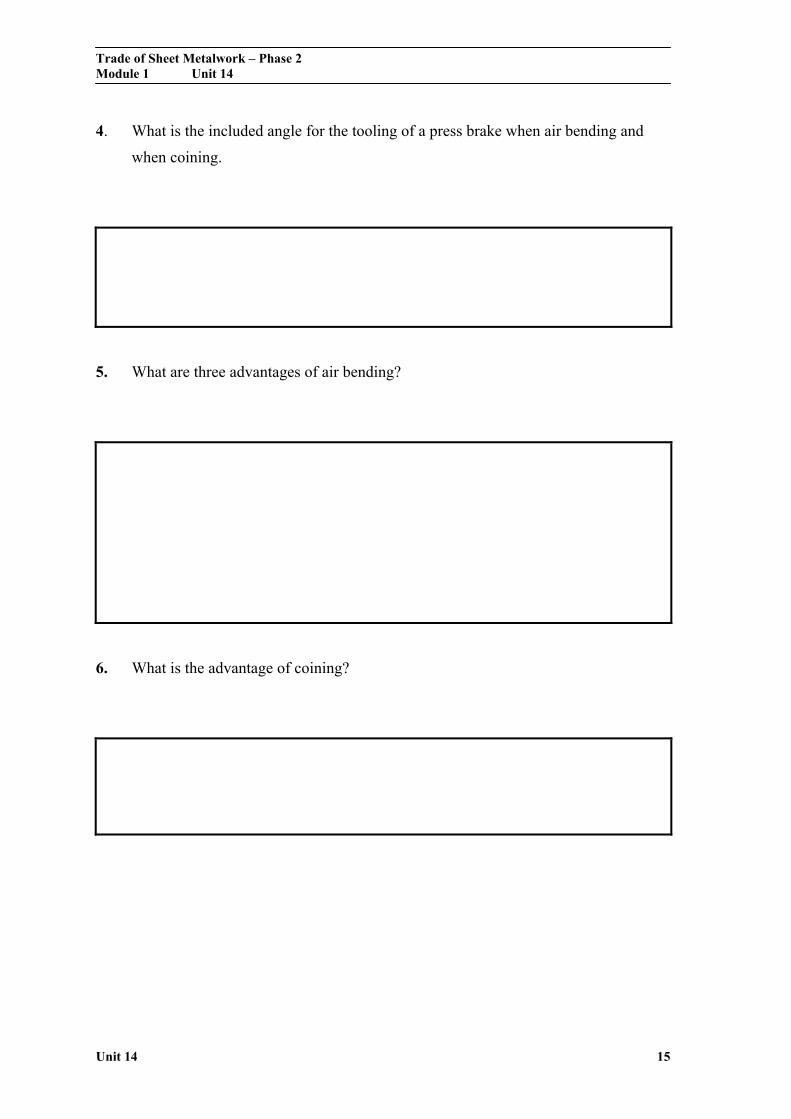
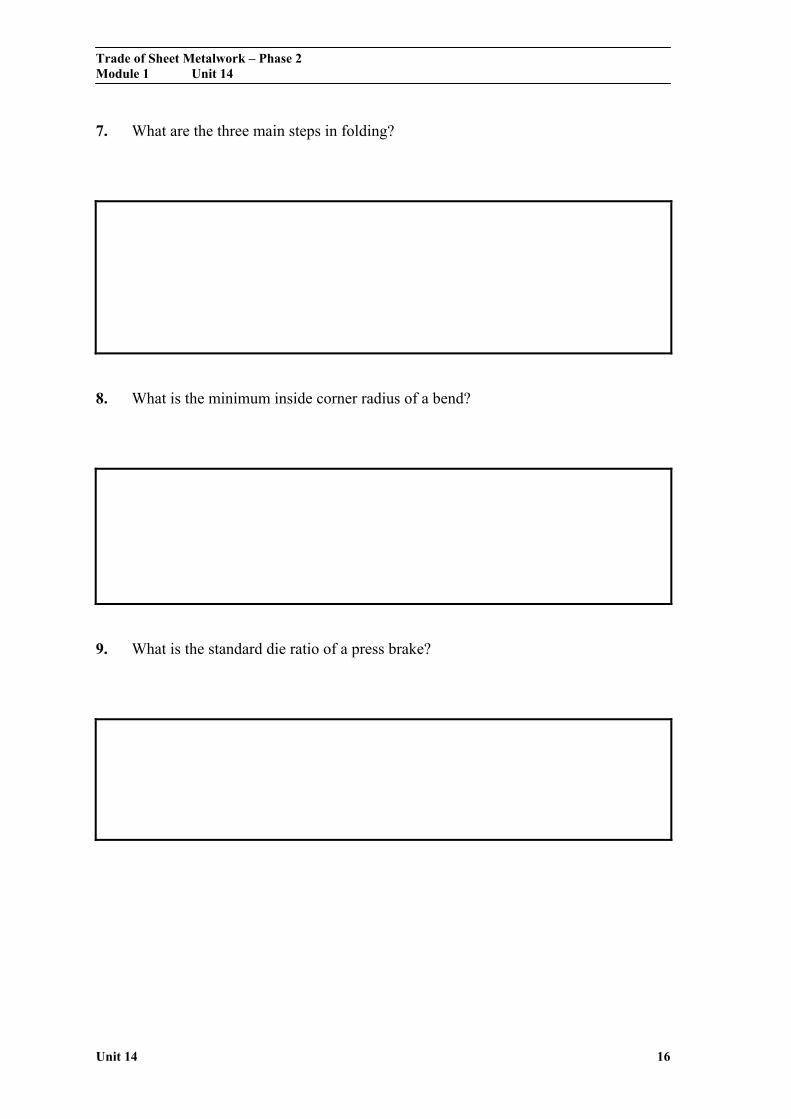
Note: When long cylinders are being flanged assistance will be necessary. Assistant will raise work to operator’s instructions.
Wide flanges will need additional stretching using a stretching hammer. The work should be supported on suitable stake.
Figure 9 - Flanging a Cylinder 2
Figure 10 - Flanging a Cylinder 3

Trade of Sheet Metalwork – Phase 2 Module 1 Unit 14
Unit 14 14
Self Assessment
Questions on Background Notes – Module 1.Unit 14
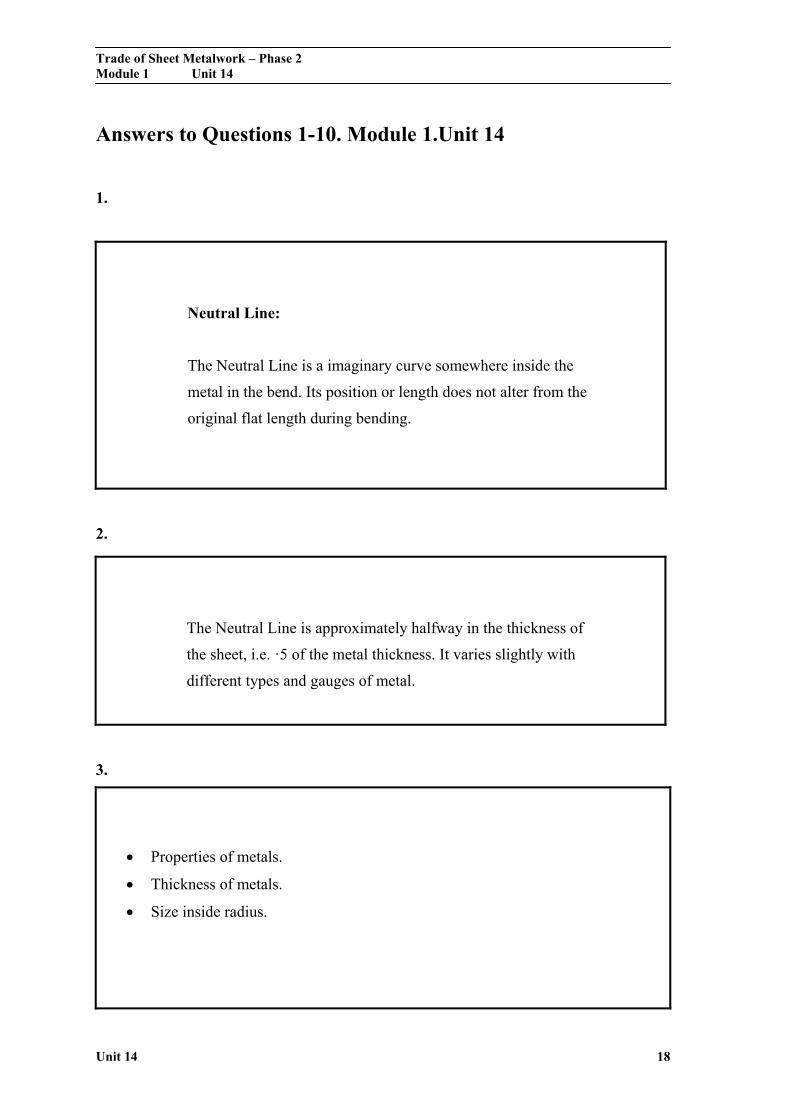
1. What is the Neutral Line?
2. In general where is the position of the Neutral Line?
3. Name the three factors which influence the precise position of the Neutral Line.
Trade of Sheet Metalwork – Phase 2 Module 1 Unit 14
Unit 14 15
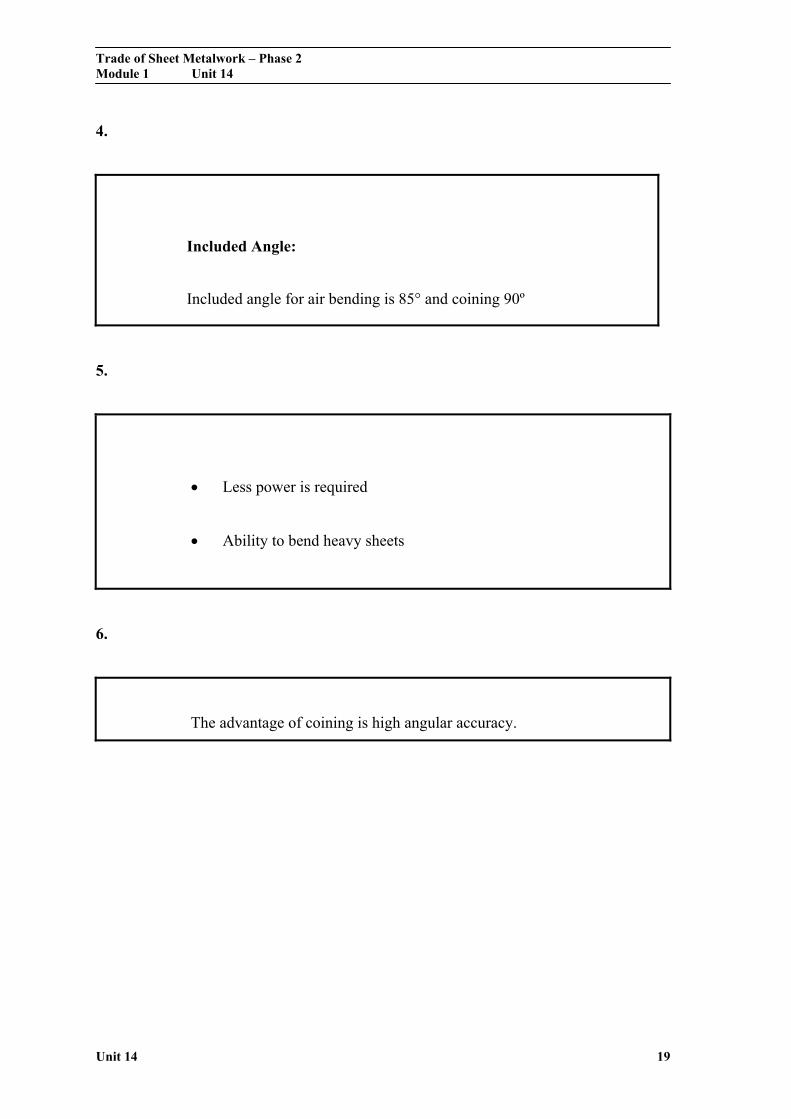
4. What is the included angle for the tooling of a press brake when air bending and
when coining.
5. What are three advantages of air bending?
6. What is the advantage of coining?
Trade of Sheet Metalwork – Phase 2 Module 1 Unit 14
Unit 14 16
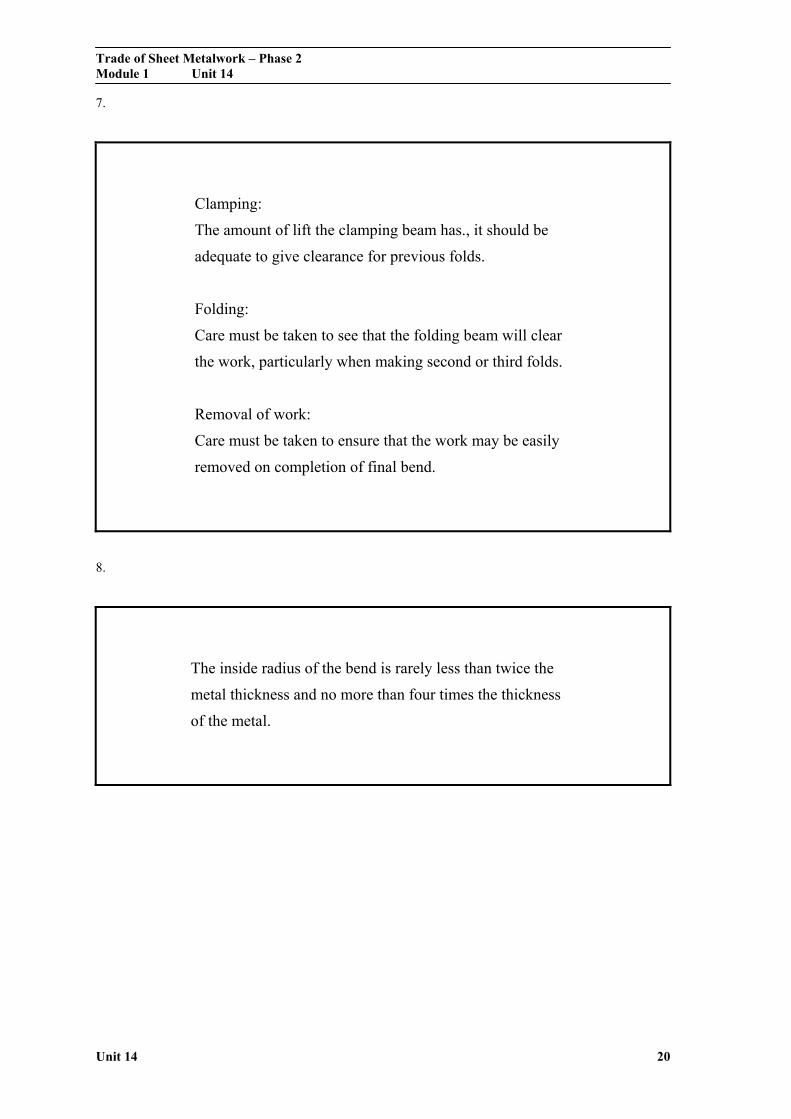
7. What are the three main steps in folding?
8. What is the minimum inside corner radius of a bend?
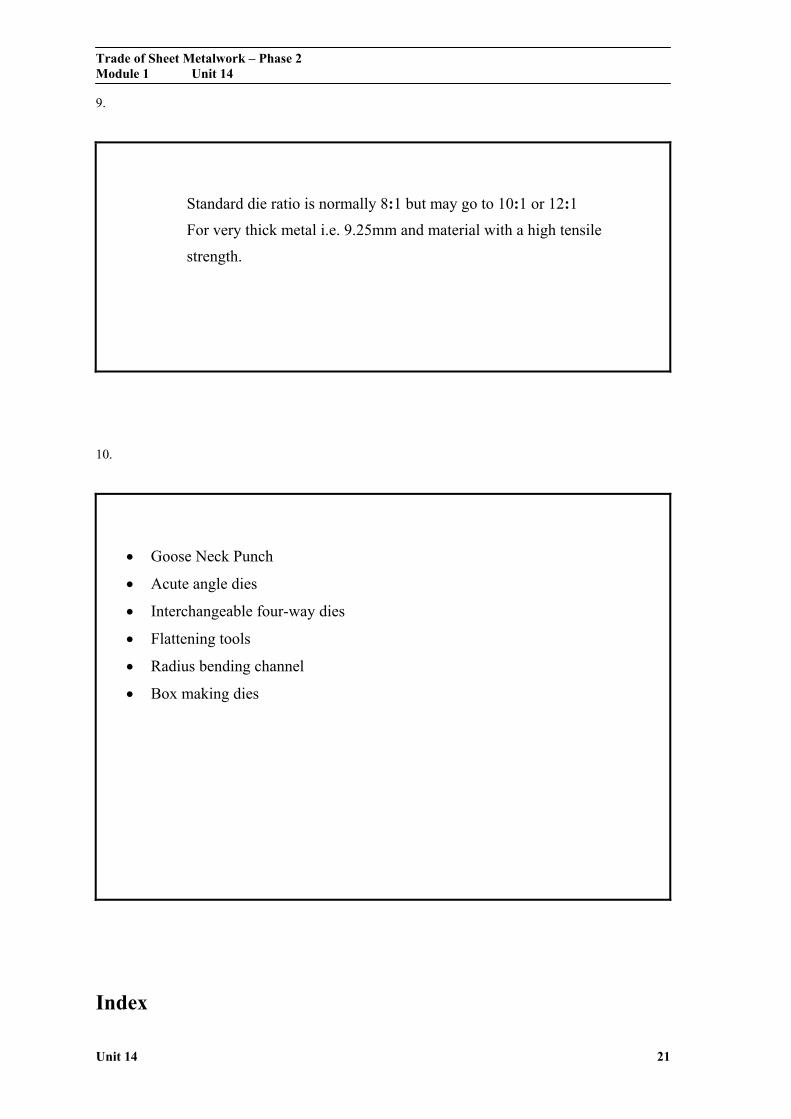
9. What is the standard die ratio of a press brake?
Trade of Sheet Metalwork – Phase 2 Module 1 Unit 14
Unit 14 17
10. Name three types of punches / dies that are used on a press brake.
Trade of Sheet Metalwork – Phase 2 Module 1 Unit 14
Unit 14 18
Answers to Questions 1-10. Module 1.Unit 14
1.
Neutral Line:
The Neutral Line is a imaginary curve somewhere inside the
metal in the bend. Its position or length does not alter from the
original flat length during bending.
2.
3.
Properties of metals.
Thickness of metals.
Size inside radius.
The Neutral Line is approximately halfway in the thickness of
the sheet, i.e. ·5 of the metal thickness. It varies slightly with
different types and gauges of metal.
Trade of Sheet Metalwork – Phase 2 Module 1 Unit 14
Unit 14 19
4.
Included Angle:
Included angle for air bending is 85° and coining 90º
5.
Less power is required
Ability to bend heavy sheets
6.
The advantage of coining is high angular accuracy.
Trade of Sheet Metalwork – Phase 2 Module 1 Unit 14
Unit 14 20
7.
Clamping:
The amount of lift the clamping beam has., it should be
adequate to give clearance for previous folds.
Folding:
Care must be taken to see that the folding beam will clear
the work, particularly when making second or third folds.
Removal of work:
Care must be taken to ensure that the work may be easily
removed on completion of final bend.
8.
The inside radius of the bend is rarely less than twice the
metal thickness and no more than four times the thickness
of the metal.
Trade of Sheet Metalwork – Phase 2 Module 1 Unit 14
Unit 14 21
9.
Standard die ratio is normally 8:1 but may go to 10:1 or 12:1
For very thick metal i.e. 9.25mm and material with a high tensile
strength.
10.
Goose Neck Punch
Acute angle dies
Interchangeable four-way dies
Flattening tools
Radius bending channel
Box making dies
Index

Trade of Sheet Metalwork – Phase 2 Module 1 Unit 14
Unit 14 22
A Assembly of Exhaust Pipe, 10
T Tinman’s Jenny, 11
Flanging a Cylinder, 14 Flanging a Disc, 12 Setting up the Jenny, 11