
Modelling Irish History - robdebie.home.xs4all.nl
20
1 The Plastic Paddy Maffia Modelling Irish History A plastic modeller’s guide Part 1 2
Transcript of Modelling Irish History - robdebie.home.xs4all.nl

1
The Plastic Paddy Maffia
Modelling Irish History A plastic modeller’s guide
Part 1
2

3
Welcome to the first volume
of Modelling Irish History . We decided to make this e-magazine as a means of pro-
moting and encouraging scale modelling with an explicit
Irish theme or ones with a direct relation to Ireland. We
love modelling be it planes, AFV’s ,figures or ships but
also the story behind every model; without it the hobby
is just about sticking bits of plastic together and painting
them. We are trying out a formula whereby a modelling
subject is covered within its historical context. It is the
latter which gives the modelling an uniquely Irish char-
acter and in extending the coverage of the subject mat-
ter to include the historical background and some refer-
ences and resources we hope to inform and inspire the
modeler to build something a little different. The arti-
cles are ordered loosely in historical chronological order
but we will in later issues be revisiting various periods
time and again.
So who are we?
A loose collection of modellers who share a passion for
the subject matter. Collectively we fall under the moni-
ker Plastic Paddy Mafia. We represent no club or society
however we have as individuals affiliations with various
IPMS organizations. Some of the materials here have
appeared in IPMS club newsletters or on web forums
but the work is ours and it has been re-worked or added
to for this volume.
Enjoy the read and happy modelling,
THE PLASTIC PADDY MAFFIA
Index
• The Footballer of Loos 1915 Tommy’s War 56mm figure
• Rise 16! Clanwilliam House 1:35 scale Vignette of Mount Street Ambush • Guinness armoured truck(1916) 1:35 scale Scratch-built Guinness truck
• Sowing Sedition 1919 1:72 Austin MK IV in Ennis
• Death lurks below (1917)
1:350 scale SM UC-75 in Arklow • Through the looking glass (1950) 1:48 Scale Seafire III Aerial Archeologist
• Paddy Panzer! (1964) 1:35 AML 60 CS in Cyprus
• Aris Anthony Aris ! (1970) 1:35 AML 60 HB
• IAC EC-135 P2 (2005) 1:72 EC-135 P2
If you have any comments
or want to contribute drop
us a line at
visit my blog at
PaddyPanzer.com
4
The footballer of Loos legend was born out of an ac-
tion by members of 1st Battalion London Irish Rifles
(47th Division). They were chosen to lead the attack
on the 25th September. In order to encourage them-
selves Rifleman Frank Edwards and companions
brought along a football which they dribbled across
no-man's land. Edwards survived with injuries but
many of his comrades did not. The ball was recov-
ered later and returned to the regiment where it still
bears a special place in their museum. If you are
interested in more background information check out
Ed Harris “The footballer of Loos” or just Goggle
the term Footballer of Loos.
Tommy’s
War 54mm
figure
The grey resin
figure comes
in a small soft
box rather like
the box for a
deck of cards
featuring a
nice photo of
the finished
figure. The
parts are
sealed in a zip
lock bag.
These include 8 resin parts and a small PE part for
the rifle strap. There are no assembly instructions
but it's self-explanatory. Casting detail is very nice
and I found no imperfections in the parts.
Some figures in Tommy's War range feature sepa-
rate painting instructions which you can download
but not so for this figure.
Assembly and painting
Pretty self-explanatory; arm goes on shoulder, head
goes on neck etc. I decided to do a lot of the paint-
ing before assembly as the fit of parts is good.
The only issue I had was trying to figure out how the
gasmask pouch was to fit into the location hole. I
ended up filling in the latter and don’t seem to be
able to find the strap for this anywhere. In the end I
didn’t use it.
As I don't do British Army stuff often I spent an
evening on the Web looking for photos and videos of
British Army kit which is as follows;
The Footballer of Loos 1915
The release of Tommy's War figure
“Corporal 1st Batt. London Irish
Rifles number TW54023” was an
opportunity to make something to
mark the Great War and Ireland's
part in it.
TOMMY ‘S WAR

5
1902 Pat-
tern Ser-
vice dress
tunic and
pants The
uniform is
standard
khaki col-
our.
1908 Pat-
tern Web-
bing
which
seems to be an innovative approach to the question of
kit and copied by
plenty afterwards.
Then there were the
puttees and ammuni-
tion boots with hob-
nailed soles. The
Short Magazine Lee
Enfield rifle of course
and lastly the Hypo
helmet gas mask.
Uniform
I made up a mix using
Vallejo dark sand yel-
low with a few drops
of Luftwaffe green to
give me a slightly
khaki greenish hue.
This mix was light-
ened with white for
highlights and darkened for shadows.
Webbing
I used Model Master’s white mixed with Russian Earth
(7:1 ), this gives a colour which is too light. I used it to
give me more contrast on the figure and to mediate
against the fading effects of dry brushing, washes and
pastels/pigments.
Putees
I sourced a Humbrol light green for these the colour
differences with the uniform colour allowing for the nat-
ural variations of different materials.
Boots Black or brown. I used black for the contrast with the grass mud base.
Rifle The wooden stock of the Lee Enfield is quiet dark and I didn’t realise that the barrel is covered in wood. My usual approach to wood colours is to apply a sand base coat followed by oil paints smeared and toned up using various shades of burnt sienna, raw umber etc.. Gasmask Is a canvas sack so lighter than all the rest and dark gloss for the eye pieces. I have to admit I was sorely tempted to convert the figure to a member of Slipknot.
Craig Jones or Sid Wilson. A few spikes sticking out of his head and there you have it. Football White with Adidas logo. Actually no. Leather brown with laces to keep the tube in. General approach to painting and finishing I start with a base of black, this tones all the colours down. Then add the primary base colour of the specific object, the details of which are above. Then shadow and highlight by darkening or lighten-
ing the base colour and lastly I use oils for extra drybrushing of edges. Seal with varnish and add dark washes. I usually make this heavy so the details jumps out. This also tones down the colour contrasts. Seal with a matt coat and then dust using pigment powders and good old fashion pastels. The wash I used was black while the powders and pastels were various shades of earth brown.
6
Final assembly I did the final assembly tidying up various bits and pieces. I had a small base using polyfiller for the surface and static grass. I decided to feature the football in flight so using stretched clear sprue I drilled a hole out for the ball and popped the ball on top of it. I at-tached the figure to the base us-ing a steel pin and superglue.
Having found a recruitment post-er for the London Irish Rifles I printed it off and affixed it to a black card background. I cut a second piece of card for the base which set the whole scene off. A simple but effective finish to the character.
So there you have it a member of London Irish Rifles dribbling the ball across no man’s lands to near certain destruction.
These 54mm figures are nice and I am not unhappy about the end result but the limitations of my figure painting skills are more obvious to me when com-pared to some of the 75mm stuff I have done. I will definite-ly do some more Tommy's War stuff though as the subjects are beautifully sculpted and cast well.
I picked up third place at the IPMS IRL nationals in 2016 with this fella.
The actual football used by
Frank Edwards

7
British Army kit 1914-1916
1902 Pattern Service dress tunic
and pants 1914 British Army infantry kit . Note
that the famous Brodie Tommy
helmet was only introduced in 1916
1908 Pattern Webbing a revolution
in infantry kit emulated by many
The Short Magazine Lee Enfield rifle
A poor bugger wearing a Hypo helmet
gas mask. Give him a football and he’ll
be alright!
Use the images as a guide when choosing your paint colours and allow
for scale, wear and the effect of weather. Remember uniforms were pro-
duced by many suppliers and while they would approximate the standard
khaki there were many variations in tone and hue.
With the centenary of WWI past
we have a far greater choice of kits
and equipment for the period than
ever before. As well as the Tom-
my’s War line of 1:32 figures ICM
do nice 1914 set(35684) which
includes an officer and three sol-
diers and the right kit for this pre-
Somme period.
8
LOOS- A FORGOTTEN BATTLE
The Battle of Loos was a World War I battle that took place from 25 September – 13 October 1915 in France on the Western Front. It was the biggest British attack of 1915, the first time that the British used poison gas and the first mass engagement of New Army units. Oft overshadowed by the even greater dis-asters of the Somme and Ypes offensives in the following years. The battle cost BEF commander French his job and the lives or injuries of 50.000 of his men. The battle lasted from 25th Sep-tember till 13th of October and would prove that victory on the western front would be elusive and costly.
25 September 1915
“7.05am – noon : a report of the action of each Division IV Corps: The right-hand 47th (2nd London) Division: In this sector the gas cloud moved well and with thick smoke from mortar shells, the leading units captured the first German positions before the enemy were aware of what was happening. British machine-gunners located in North Maroc caught enemy troops fleeing.
German machine-guns firing from Cite St Pierre caused losses, and some counter-attacks with bombs threatened the newly-taken positions. However, 1/20 Londons eventually captured the Chalk Pit, and the 140th Brigade secured the Double Crassier. The left-most battalion, the 1/19th Londons, suffered heavy cas-ualties early on from a machine-gun firing from the area of the 15th Division, and most of its officers were hit. The companies of the battalion were badly broken up as they advanced into the Southern buildings of Loos, and the flank defence on the Loos Crassier was not extended as planned. In many places British
artillery had failed to cut the German wire in advance of the attack. Advancing over open fields, within range of German ma-chine guns and artillery, British losses were devastating. The British were able to break through the weaker German defences and capture the town of Loos-en-Gohelle, mainly due to numer-ical superiority. Supply and communications problems, com-bined with the late arrival of reserves, meant that the break-through could not be exploited. Haig did not hear until 10:00 a.m. that the divisions were moving up to the front. French visit-ed Haig from 11:00 to 11:30 a.m. and agreed that Haig could have the reserve but rather than using the telephone he drove to Haking's headquarters and gave the order at 12:10 p.m. Haig then heard from Haking at 1:20 p.m. that the reserves were moving forward.
THE LONDON IRISH RIFLES
The London Irish Rifles was originally formed in 1859 during the Victorian Volunteer Movement and named 28th Middlesex (London Irish) Rifle Volunteer Corps.
In 1908, the London Irish was transferred to the Territorial Force and renamed the 18th (County of London) Battalion, the London Regiment (London Irish Rifles).
First World War
During the First World War, the LIR raised three Battalions, one of which stayed in reserve in Eng-land. The 1st Battalion was sent to France in 1915 and saw its first ac-tion at Festubert in May, before taking part in many of the major battles on the western front dur-ing the next three years. The 2nd Battalion served in France, Greece and Palestine.
At the Battle of Loos, the 1st Battalion LIR particularly distin-guished itself. While storming across No-Man's Land to capture the enemy trenches, Rifleman Frank Edwards, the Captain of the football team, kicked a football along in front of the troops. This earned the LIR probably their most famous Battle Honour - "Loos, 1915". The Loos football is still preserved in the Regimen-tal Museum, and to this day, the memory of Rifleman Edwards and his comrades is commemorated every year at Connaught House on Loos Sunday. Over 1000 London Irishmen were killed during the conflict.
British infantry of the 47th (2nd London) Division advance through the
gas cloud on 25 September 1915. A photograph believed to have been
taken by a soldier of the 1/5th London Regiment. IWM HU63277B

9
RISE 16 !
Clanwilliam House
All models for me start typically with a story and this story first came to me a number of years ago when I read Paul O' Brein's "Blood on the street". The book focuses almost entirely on the events of the Mount Street ambush during the 1916 Rising and this was the first book for me at least which gave a detailed account of the military actions during the Rising. It focused on the actions by 17 volunteers in ambushing the Sherwood Foresters advance from what was then Kingstown into the center of Dublin. The idea was to make a vignette of the snipers of Clanwilliam House. This would be limited to a window scene featuring 1 or 2 figures. There are quiet a few high resolution photos of the ruins of the house which gave me a solid source material to work from.
10
Scratch building a window scene
I sketched various ideas out in the end settling for a corner window on
the 3rd story (2nd floor). I intended to use a small square base . The
dimensions of which essentially set the physical scope of the vignette.
In retrospect I should have covered the window on the first floor as this
is where much of the action was . The move to the upper floor only
taking place much later in the day of the 24th April.
I made the house segment out of a piece of balsa foam [1]. I drew out
the section on paper and transferred them across to the foam board
and only cut them into separate sections after marking out the details
[2]. In this way I could keep everything square and symmetrical. Next it
was a matter of cutting out the window openings and marking out the
various masonry work. These would act as a guide for the placement
the Evergreen plastic card . The two halves were then joined together
and checked against the base. Everything was square and I could move
into the fabrication of the cornerstones[3]. These were cut on my
trusty chopper and added making sure that there was little or no gap
between the right hand side and the left hand sided ones.[4]
Using high definition photo close-up of the frame I sketched out the
details and using my desk cutter and various Evergreen pieces I made
the frame.[5] The last thing to be made was the plinth above the win-
dow on the 1st floor. This I made up by simply laminating smaller and
smaller pieces of plastic card. A undercoat of black was the next to step
and the brick work on the side wall was engraved into the balsa foam.
[6]
The interior
A simple floor-ceiling unit was made using balsa wood and Evergreen
strip. The floor was simply wood paneled and painted while the ceiling
was finished with a plain border[7]. I was tempted to do an ornate one
which would be typical but in the interest of limiting the scope I passed.
Next up was the walls which I wanted wallpapered to add to the colour
and as far as I can tell was also typical for the time. Goggle is always
your friend in these things and I printed off two different styles and
colours of the Georgian period. And while I was at it I decide to add
paneling to the walls as well as this seems to be a period piece.
These interior design sites are a great source of information![8].
Base was one
of my late
fathers wood-
work crea-
tions so I used
it and added a
close up of the
window and
affixed the
vignette with
clear sprue
rods [see page
12].
1
2
3
4
5
6
7
8
9

11
For the two figures I used a combination of Hobby
Dens Volunteers torso and hats( thanks Brian!!) ,
ICM British troops 1914 (35684)and the Tamiya set
35339. The Volunteers uniform and kit is a mix of
comparable British Army kit with a few differences.
Figure 1 is the sniper and for this I used the Tamiya crouching figure setting him off with the characteristic resin Cronkie hat from
Hobby Den. The Tamiya kit features the 1908 webbing which isn't accurate for a Volunteer but I decided to leave well enough
alone as the chopping involved was tricky and fitting a bandolier on this crouching figure was not a realistic option. With regard
to the use of Putees, I chose to cover them over with Milliput as the reenactment groups never have them on. However I noticed
afterwards that in some of the period photos and museum exhibits they do have them. You make your choice and you stick with
them. I opted to use the Lee Enfield over the modified Mauser (1871) as the fit of the latter wasn't as convincing .
Figure 2 was made by joining using a ICM legs and head combined with the Hobby Den torso and Cronkie hat. A few adjustments to
the lower part of the tunic and the neck area were made with Milliput. Interestingly there is a significant difference in the sizes of
the Tamiya and ICM figures the latter being larger.
I used the ICM Mauser G98 ( kit 35678) as a base for the so-called Howth Mauser 1871 rifles, the latter were 10 cm longer which is
a noticeable difference in this scale. The difference being in the length of the barrel and I cut the barrel just behind the muzzle and
added in the 3mm plug. Sounds more hairy than it was as I was able to get a clean splice.
For the small arms of both I used the Mauser C96 pistol with the famous Peter the Painter handle holster which no self-respecting
revolutionary would be without. These were worn very low on the thigh and a very typical of the period.
Do you have what it takes to make a Volunteer?
12

13
Irish Volunteer Tunic 1916 Easter RisingTunic (green wool with
arrow green cuff facings and shoulder boards and hook and eye
fastened neck)Irish Volunteers IV shoulder ciphers Harp and IV
embossed buttons (wide harp version) .
Mauser C96 pistol with the famous Peter
the Painter handle holster
Short Magazine Lee-Enfield
The “Howth” Mauser Gewehr 1871
Martini-Henry
Lieutenant Michael Malone, commanding officer for the Irish Volunteers at Mount Street Bridge, was armed with a 7.63mm C96. The use of a shoulder-stock which doubles as a holster for the pistol was first employed on the M1898 pistol carbine
The Irish Volunteers imported 900 M/71 rifles in 1914 during what became known as the Howth gun-running episode. A smaller number came ashore at Kilcoole in County Wicklow (1,500 rifles were ‘imported’ in total). These firearms were financed by Irish Nationalist and Easter Rising combatant Michael O’Rahilly and were subsequently referred to as ‘Howth Mausers’ or ‘Howth Guns’.
Irish Volunteer kit Easter 1916
14
The ambush at Mount Street Bridge accounted for the single largest casualties suffered by the British Army during the week Ris-
ing. Some 28 men lost their lives most of them little more than teenagers and another 200+ were made casualties. These were all
members of the Sherwood
Foresters Regiment which
were in turn a part of the
59th North Midlands Divi-
sion. The 17 men of the C
Company 3rd Battalion Vol-
unteers armed with rifles
and pistols held up the ad-
vance of a whole battalion
of British reinforcements.
Monday 24th April 1916 and
members of the Volunteers
garrison at Bolands Mills[5]
were sent to cover and
block access to the city cen-
ter by way of the bridge at
Mount Street. A total of 17
men sent under the com-
mand of Mick Malone initial-
ly took up positions at [2,3
4 ]. There was initially also a
position occupied at School House on Northumberland Rd. but this had been abandoned by Wednesday. There had been a shoot-
out on Monday when 4 British soldiers had been killed from various positions including the schoolhouse. Another position [1]
seems to have been occupied but the details of who manned this is missing from all accounts I have read to date. It did provide
supporting enfilading fire to the other positions particularly Mount Street during the final assault. It also seems that the garrison
at Boland's Mill [5]further up the canal did the same which would go a long way to clarifying how so few managed to injure so
many.
On the morning of Wednesday the 26th the 59th Division landed at what was then Kingstown. The Sherwood Foresters marched
into the city arriving mid-morning in Ballsbridge where they rested before moving out towards Northumberland Road. Some ac-
counts say that at this stage there were altered to the danger ahead but mistakenly thought that the Volunteers were only in the
schoolhouse. Their strength was 1000 men but these were mostly stretched back along a line extending some distance. There is
some discrepancy in the accounts as to the course of actions but I have made a summary of the main points
The Sherwood’ers proceeded straight towards the schoolhouse coming under heavy fire from the position at Nr.25 [4] getting no
further than the corner of Northumberland Rd and Haddington Road [I]. Attempts to proceed up the latter in order to go around
the positions on Northumberland Rd were thwarted by fire form Nr.25. The position[4] was eventually stormed both from the
front and from the rear through Percy Lane and Lt. Malone was killed but Vol. James Grace survived and escaped under cover of
darkness. There was a sweep up Haddington Rd [II] with troops swinging back around Percy Place. These troops would be caught
by enfilading fire from position [1] and [5]. General Lowe gave orders to take the positions at all cost so a charge was lead again
straight down Northumberland Rd towards Mount Street bridge [III] but took intense fire from both Parochial Hall [3] and Clan
William House[ 2]
The position at Parochial Hall was abandoned after this assault as the volunteers were out of ammunition. They were captured by
the troops who had stormed Northumberland Rd through Percy Lane avoiding summary execution due to the intervention of an
officer. There are in some reports indications pincer movements being carried out on the right flank of Clan William House[2]in
the vicinity of Estate cottages[V] but they were beaten back because of enfilading fire coming from Boland Mills[5] and Clan Wil-
liam Place [1]. Eventually frontal attacks on Clan William House[2] lead it to being fire-bombed resulting in the deaths of 3 of the
seven Volunteers[IV]. The rest being able to escape.
15
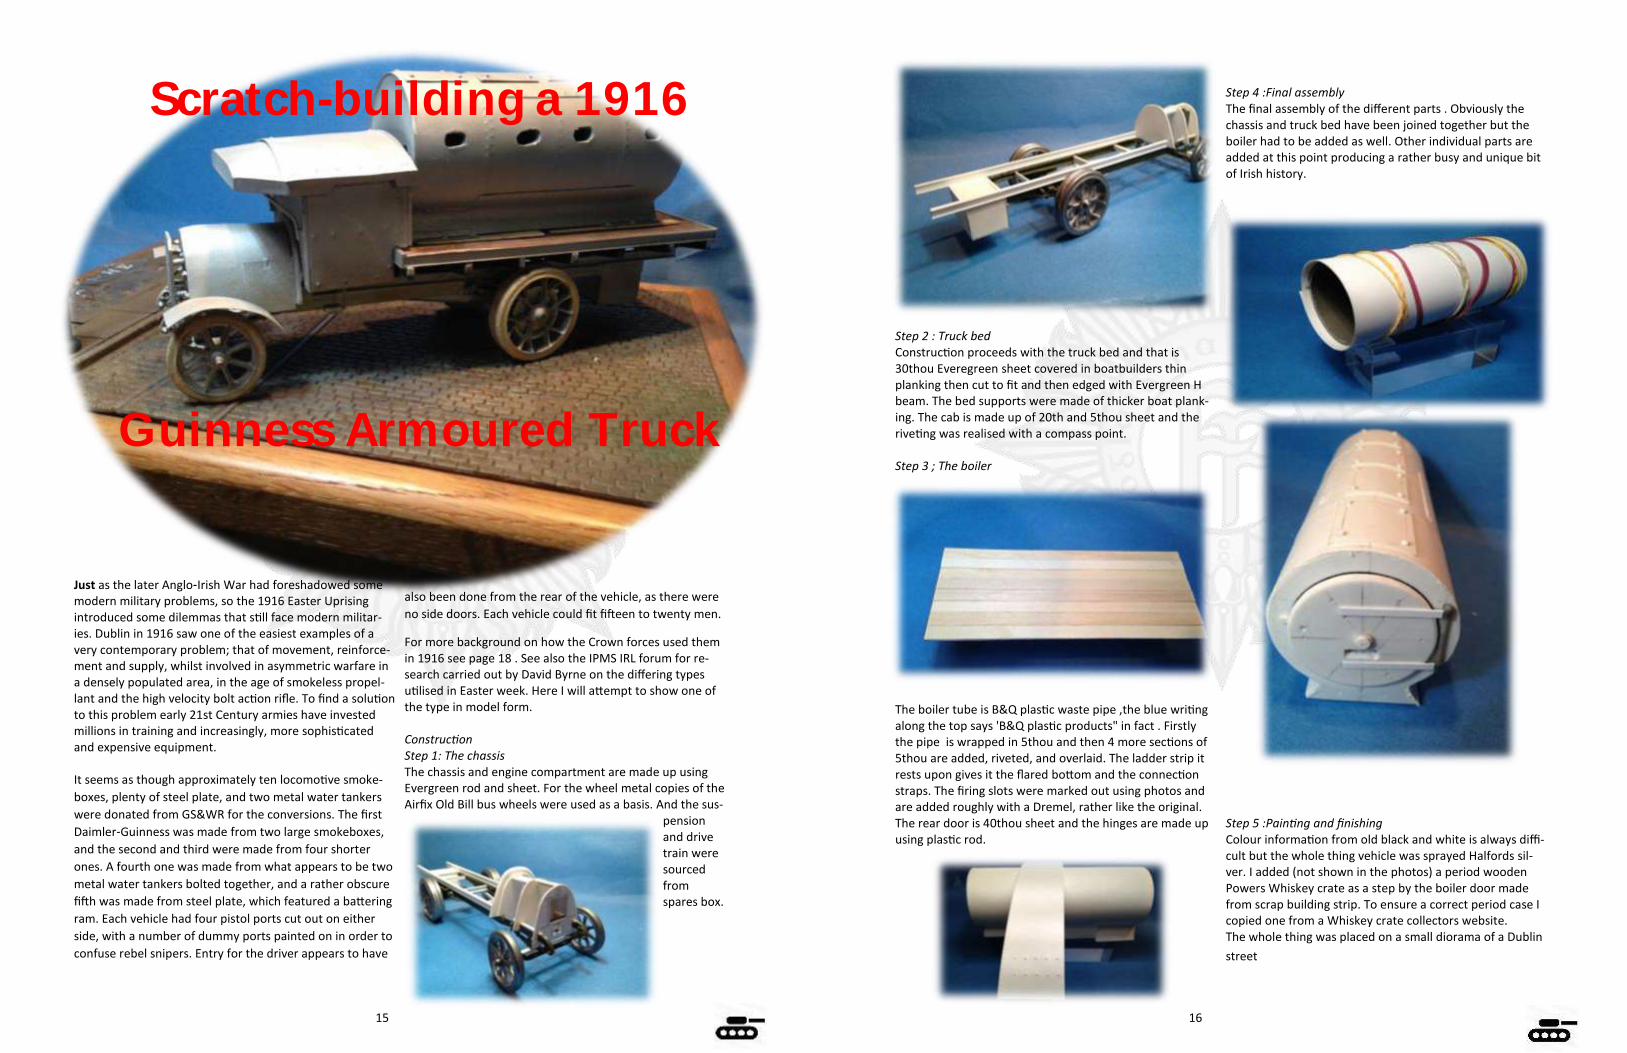
Scratch-building a 1916
Guinness Armoured Truck
Just as the later Anglo-Irish War had foreshadowed some modern military problems, so the 1916 Easter Uprising introduced some dilemmas that still face modern militar-ies. Dublin in 1916 saw one of the easiest examples of a very contemporary problem; that of movement, reinforce-ment and supply, whilst involved in asymmetric warfare in a densely populated area, in the age of smokeless propel-lant and the high velocity bolt action rifle. To find a solution to this problem early 21st Century armies have invested millions in training and increasingly, more sophisticated and expensive equipment. It seems as though approximately ten locomotive smoke-
boxes, plenty of steel plate, and two metal water tankers
were donated from GS&WR for the conversions. The first
Daimler-Guinness was made from two large smokeboxes,
and the second and third were made from four shorter
ones. A fourth one was made from what appears to be two
metal water tankers bolted together, and a rather obscure
fifth was made from steel plate, which featured a battering
ram. Each vehicle had four pistol ports cut out on either
side, with a number of dummy ports painted on in order to
confuse rebel snipers. Entry for the driver appears to have
also been done from the rear of the vehicle, as there were
no side doors. Each vehicle could fit fifteen to twenty men.
For more background on how the Crown forces used them in 1916 see page 18 . See also the IPMS IRL forum for re-search carried out by David Byrne on the differing types utilised in Easter week. Here I will attempt to show one of the type in model form. Construction Step 1: The chassis The chassis and engine compartment are made up using Evergreen rod and sheet. For the wheel metal copies of the Airfix Old Bill bus wheels were used as a basis. And the sus-
pension and drive train were sourced from spares box.
16
Step 2 : Truck bed Construction proceeds with the truck bed and that is 30thou Everegreen sheet covered in boatbuilders thin planking then cut to fit and then edged with Evergreen H beam. The bed supports were made of thicker boat plank-ing. The cab is made up of 20th and 5thou sheet and the riveting was realised with a compass point. Step 3 ; The boiler
The boiler tube is B&Q plastic waste pipe ,the blue writing along the top says 'B&Q plastic products" in fact . Firstly the pipe is wrapped in 5thou and then 4 more sections of 5thou are added, riveted, and overlaid. The ladder strip it rests upon gives it the flared bottom and the connection straps. The firing slots were marked out using photos and are added roughly with a Dremel, rather like the original. The rear door is 40thou sheet and the hinges are made up using plastic rod.
Step 4 :Final assembly The final assembly of the different parts . Obviously the chassis and truck bed have been joined together but the boiler had to be added as well. Other individual parts are added at this point producing a rather busy and unique bit of Irish history.
Step 5 :Painting and finishing Colour information from old black and white is always diffi-cult but the whole thing vehicle was sprayed Halfords sil-ver. I added (not shown in the photos) a period wooden Powers Whiskey crate as a step by the boiler door made from scrap building strip. To ensure a correct period case I copied one from a Whiskey crate collectors website. The whole thing was placed on a small diorama of a Dublin
street

17
18
Urban warfare and improvised armoured trucks: As the action
at Mount Street proved infantry units moving against a forti-
fied position would be cut to pieces. They would need to have
the ability to move close to their targets before being exposed
to fire. It was on Friday evening and Saturday morning that the
Daimler-Guinness saw its most infamous combat. General
Maxwell ordered an attack with its axis down North King
Street. The area was held by some 70 rebels commanded by
Tom Daly distributed in strongholds spread out amongst the
area from the Four Courts[4] on the Quay up to Brunswick
Street over to the east at Bolton Street and to the west
Queens Street. The Volunteers had had a week to dig in and
had chosen flanking positions to each other and barricaded
streets. In addition high vantage points such as the roof of the
Bridewell Police station[5] and James Malt House [3]would
allow snipers commanding fields of fire.
The action began on Friday morning from the east by units of
the 2/6th South Staffs. They were given orders to press west-
wards from Capel Street to join up with the 2/5th South Staffs,
who were advancing eastwards from Queen Street. Numerous
infantry attacks were launched and met with withering fire
from Langan’s pub[2] and what would later be called Riley’s
Fort[1].
The fighting continued all day and in the evening support in
the form of the Daimler-Guinness trucks arrived as support.
The vehicle dropping troops under fire up the road [I]. Lagans
and Riley’s were overran but by which time the surviving vol-
unteers had escaped. In their book “When the clock struck in
1916” Molyneux and Kelly detail (p.205) the use of a second
truck in and around Red Cow Lane [II]. This is situated close to
the junction of Queen Street and North King Street. The truck
approached a barricade in Red Cow Lane and dropped a num-
ber of troops off presumably 2/5th South Staffs.
By 2am on Saturday morning, the British had made little pro-
gress in clearing the remaining positions, but events had al-
ready overtaken the volunteers when the order from Pearse to
surrender came through. At the end of
the fighting 14 British soldiers had been
killed, 30+ wounded and 15 civilians were
found murdered. An inquiry into the lat-
ter pointed the finger at the British how-
ever there were never any charges
brought. The number of Volunteers killed
is unclear .
Volunteers

19
Improvised Guinness Armoured Trucks
Used during the 1916 Easter Rising
N.T.S.
20
1916 GUINESS GUN TRUCKS PHOTOGRAPHIC ALBUM
Un-airbrushed photo of the third Daimler-Guinness that
was built. The original photo released to the public had all
the workers airbrushed out. Below an Daimler-Guinness
surrounded by a crowd of civilians on Sackville Street.
British soldiers with a Daimler-Guinness, believed to be on
Sackville Street.
The fourth Daimler-Guinness, which is boxier in its con-
struction. It was probably made from two water tankers
bolted together.

21
Sedition in Ennis 1919 !
22
MB kit releases in 2015 of the Austin MK III– IV gave modellers a chance to build this
idiosyncratic vehicle in polystyrene .What a great little kit ! The details is beautiful
and the fit excellent. With only modest numbers of parts there is not actually alot to
the car. The kit of the MkIV comes with 10 colour options and three main types alt-
hough two of which are nearly identical only differing in weapons and blast shields.
Construction begins with the bottom chassis and as the fit of the upper hull onto this
is a snap tight fit I decided to paint the two half separately. The running gear and axel
are nicely detailed and fit without any problem. I assembled everything first and
painted afterwards. Construction of the upper hull continued though I opted not to
fit the rear tool box, trenching gear and PET just yet.
I added extra rim detail to the twin turrets in the form of silver foil as it is quiet prom-
inent on the original and covered the seam line with some Evergreen.
The lower hull was sprayed black and I left the sides in black though the instructions
call for them to be painted green. I am not sure what it should be but I like to break
up the monotone colour. The exhaust were painted alight colour and then with oils I
smeared them down to rusty brown. I also applied a thin layer of oils over the entire
underside and used pastels to give the whole undeside some gritty texture The fit
was so good I never bothered to glue the upper hull to the lower one.
I painted the toolbox in naturel wood finish just because I wanted to. The POW
(petrol, oil and water) cans were also painted
separately and each their individual colour add-
ed during final construction. Final construction
was easy though the wheels were a little deli-
cate and needed encouraging to get all 4 onto
the ground. Added all the gear and the extras
included a spot light on the front bonnet, a can-
vas cover for the squaddies to sit on and supports for the front mudguards.

23
Ennis a 100 years on ! Amongst the options in the kit are three 17th Armoured car Battalion based in Ireland in the period
1919-1920. These include the colorful B Company machine 2200 as well as the plain green car featuring the graffiti "Up
Sinn Fein" on the back toolbox. The latter is based on a well know photo of a Mk IV outside Mountjoy on the 12th April
1920 during IRA hunger strikes. Anyways I choose to build the colourful 2200 as I was familiar with photo below and was
able to identify it as British Army's B Company 17th (Armoured Car) Battalion and their Austin Armoured Car crossing The
Club Bridge close to the RIC Barracks (now Garda Station) at Ennis, County Clare, in November 1919. Anyway being a first
class nerd I checked the location and found it and many of the features are there still 100 years on !!!
Using an upturned wooden jewelry box which cost something like €1 I set about using the upturned box as a base and a
section of the curved lid as a base for the bridge hump. I used balsa foam for the walls referring to the photo for refer-
ence. I used a silicon mould of paving stones for the resin bridge deck and used bits of wooden wine box for other details.
Finished up the scene with some squaddies sitting on their arses while the local Sinn Fein’er is sowing sedition under
the bridge.
24
Death lurks below
—SM UC-75
Barry Spencer used U-boot-laboratorium’s tiny 1:350 UC56 kit of a
UCII type U-boot to build Johannes Lohs SM UC-75 mine layer. The
young Oberleutnant zur See tenure at
the helm coincided with the most inten-
sive period of the no-holes barred 1917
U-boot campaign in and around the Irish
coast. The weapon of choice wasn't the
torpedo but the sea mine and its toll was
deadly; 54 trawlers, fishing vessels and
steamers would be sunk by UC-75 mines
in the period of March 1917 till January
1918. Barry built a beautiful model of
Lohs boot and won first place at IPMS
Ireland Nationals in 2016 .

25
A recreation of a sketch by Lohs of a mine laying operation on the coast of Wexford and Wicklow in Au-
gust 1917. Through clever use of navigational aids in deciding where to place his mines Lohs makes the
journey in and out of Arklow harbor very hazardous.
Arklow was home to Kynoch munitions factory which produced gun cotton for artillery shells and would
have been known to and of interest to the Imperial German Navy. Just a few weeks later on 21st Septem-
ber there would be an explosion at the factory. 28 people were killed in the incident .It has long been
speculated that a u-boot might have actually shelled the site.
Lohs original sketch
Readers tip Roy Stokes books describes a number of incidents which took
place during the submarine offensive in 1917-1918 in Irish Sea. His
first book “Death in the Irish Sea: dealt with the sinking of the
steam packet RMS Leinster by UB-123 with the loss of 500+ lives
and his later work “U-boot Alley “ deals with amongst others Lohs
cruises. It’s a fascinating read on a rather under- reported area of
WWI maritime history and is packed with prime sources and pho-
tos. UC-75 type mines layer with through
hull mine chutes visible in deck forward
26
In the 1950’s the National Monuments Advisory Council commissioned the Air Corps to undertake some aerial archaeo-logical surveys. The Air Corps would con-tinue this sort of contribution to the ar-cheological record right up until the 1970’s and has a large archive of aerial phots. The IAC Seafire III was used exten-sively for this and other surveys and I wanted to represent these roles in my model. Page 89 of Donald Macarron ‘s “Wings over Ireland ” features a photo of a IAC ground crew loading a camera through a starboard hatch of 149. These aircraft formed the nucleus of the
1st Fighter Squadron.
The original Seafire III were essentially Mk. V’s Spitfires fitted
with a Merlin 66 enigne , folding wing mechanism in combina-
tion with Type C(full) wing, various airframe reinforcing , arres-
tor hook ,spools and two camera hatches port and starboard
and a reinforced radio hatch on the port side. The aircraft were
sourced from Royal Navy stocks and were modified by Vickers
prior to delivery to IAC. Designated as a de-navalised Seafire the
actual configuration of these aircraft is a bit of a riddle.
What does de-navalised mean? Tony Kearns published a photo
in December 2017 on Aviation Forum of the S147 (ex PR315)
logbook and in it the following can be made out;
• the arrestor hook and spools were removed and the bay
sealed. IAC Nr. 153 seems to have retained the spools.
• All wing folds were pinned during service. Photos do exists
clearly show the wings folded but this seems to have hap-
pened when the aircraft were taken out of service and uti-
lized for storage purposes.
• These aircraft were in fact modified to Spitfire MkVc stand-
ard but had the 4 blade propeller and 6 exhaust stubs. The
single 20mm cannon had the thin upper wing bulges.
• The aircraft were fitted to carry oblique cameras on both
sides. Vertical cameras were not part of this fit.
• As far as I can make out these were F24 camera
Build a 1;48 Air Corps Seafire aerial archeologist
THROUGH THE LOOKING GLASS
The F24 camera was the main air reconnaissance camera at the start of World War 2. However, by the end of 1941 it was clear that the F24 camera with its small 5" x 5" format and short focal length lens (only 20") that this was too small for detailed photo interpretation, especially as the camera-carrying aircraft were then having to fly much higher.

27
SEAFIRE III LF C 1:48
COOKBOOK
In building this Supermarine Seafire III LFc I used the following
• Hasegawa Mk Vb (Kit:2409308),
• MDC Seafire III conversion (CV48026),
• Eduard Spitfire Mk.V (48293)
• Cutting Edge Control surfaces(CEC 48227)
• Aeroclub canopy,
• Evergreen rod and strip,
• Max Decals 4801+ 02, or 4821
• Scratch built M24 camera
• Lots of patience and persistence…..or just buy the Special Hobby kit !!!
Ingredients for building a 1:48
Seafire III
28
PADDY PANZER !
Irish Army Panhard AML 60-7CS
in Cyprus (UNFICYP)1964
Takom’s 1:35 release in 2017 of first the AML 90 and then
the 60 was an opportunity to build one of these armoured
cars in polystyrene. The kit (No.2084)comes in a relatively
small box and contains styerne parts, decals, rubber tires and
a very nice instruction booklet. There are four sprues and the
hull and turret packed as separate items. Not stated on the
box is the fact that this is a AML 60-7CS. This refers to the
main armament which is the Cloche Special (CS) mortar weap-
on. This means that you can’t build the AML 60 HS version
without a conversion. As mentioned earlier the Panhard AML 60
CS were acquired for the Irish UN contingent and delivered di-
rectly form France to Cyprus.
Building: These kits are a joy to build and have very few vices.
The only real issue are the rubber tires which are simply too big.
When fitted they rub against the side of the wheel arc. You will
need to replace them with aftermarket sources like Blast.
Construction starts assembly of the hull which is a single piece
needing only the sides and rear decking added. I would add
H13,H14 and H15 first and then slide H16 into place as the fit of
the latter is unambiguous. To the best of my knowledge H10
wasn’t fitted to the Irish machines at least its absent on any pho-
tos I have seen.
I chose not to fit the exhaust(G34,E4 and E5) at this point of the
build but add it after the main painting has been done. The
same goes for many of the small parts adorning the hull
sides like the tow rings G3, E1 parts (G3, E1, E35, E36)
and the clear styrene headlights. The build is quiet swift
and the general order of the instructions can be followed.
The fit is most part excellent with much use being made
of bevelled edges. You do need to be sure to press every-
thing together while bonding to avoid hairline gaps.

29
The placement of rear spring suspension E28 (step 3)
and E27 is somewhat ambivalent but they should be
placed alongside E17 and G35(step6). If you are feeling
adventurous you could also had the cable visible in photo
above. Step 8 in the kit instructions details the construc-
tion of the fore and aft wheel mounts and while they ap-
pear complex they snap fit together. I used Tamiya thin cement to secure
the joint afterwards. I found that for proper alignment of
the mounts at the rear it better to fit G25 and G27 to the
hull on each side and then add the rest of the sub-
assembly. The parts are handed so the fit is spot on.
Next up are the mudguards and despite their complex
breakdown they fit together nicely. The only remark to
be made would be that the rubber mudguards
(E42,43,44,45) are a tad thick in plastic. Azimuth pro-
vide the same parts as PE and this is a better approach. Assembly continues with the addition of upper hull and
the car begins to take shape. I would advise to fit the air
filters screens (E39 and E40) after G14 and G15. The
tires were made up but not added before painting.
The same going for all the tools and various attachments. he hull assembly is up next and there are no great issues here. It is a pity given the gaping hole that is the upper hatch that Takom included no interior detail a la their FV432 MK2/3 kit. This kit is screaming out for interior detail and the engineering lends itself to it as well. Before you know it there is a pretty little Noddy car as the South Africans called them waiting to be painted.
Painting The AML 60's ere delivered from the factory in olive drab scheme no.298/ BS 381C. . I used Humbrol 150 Forest Green over a undercoat of black and then gently over
sprayed that with semi-transparent Grass Green. I dry-brushed the car with Van Gogh Yellowish Green oil paints and allowed them to dry out before handling the model any further. I also used Flory’s Dark Dirt weathering wash and Vallejo Pigments Sienna Claro. And then it was onto making up the decals. I sourced various photos from various Internet sources and did the artwork and printed them off. I decided on 420, which is shows up in a few photos. The Irish Military Vehicle Group have a AML 60-7CS with the registration 420.
Black under- Forest Green
Humbrol 150
Grass Green
Humbrol 80
30
1.Undercoat of black which will darken the upper coat.
2.Overall coat of Forest Green H150.
3.I added a few drops of H66 to H150 to vary the tone of
the overall colour.
4.I started dry-brushing various areas of the car typically
edges.
I added the homemade decals using various photos
as placement guides. I eventually chose 420 as it
turned up in quiet a few of the photos I had of Irish
Army in Cyprus. It is also part of
the Irish Military Vehicles collec-
tion.
D.I.Y. Decals ?
The decals were made up using
a graphic vectored-based
software Serif Draw Plus X .
They were generated by
digitalizing sourced jpg and then
printed onto transparent decals
paper fixed with decal spray.

31
PADDY PANZER AML60-CS
32
AML 60 IN CYPRUS PHOTOGRAPHIC ALBUM
33
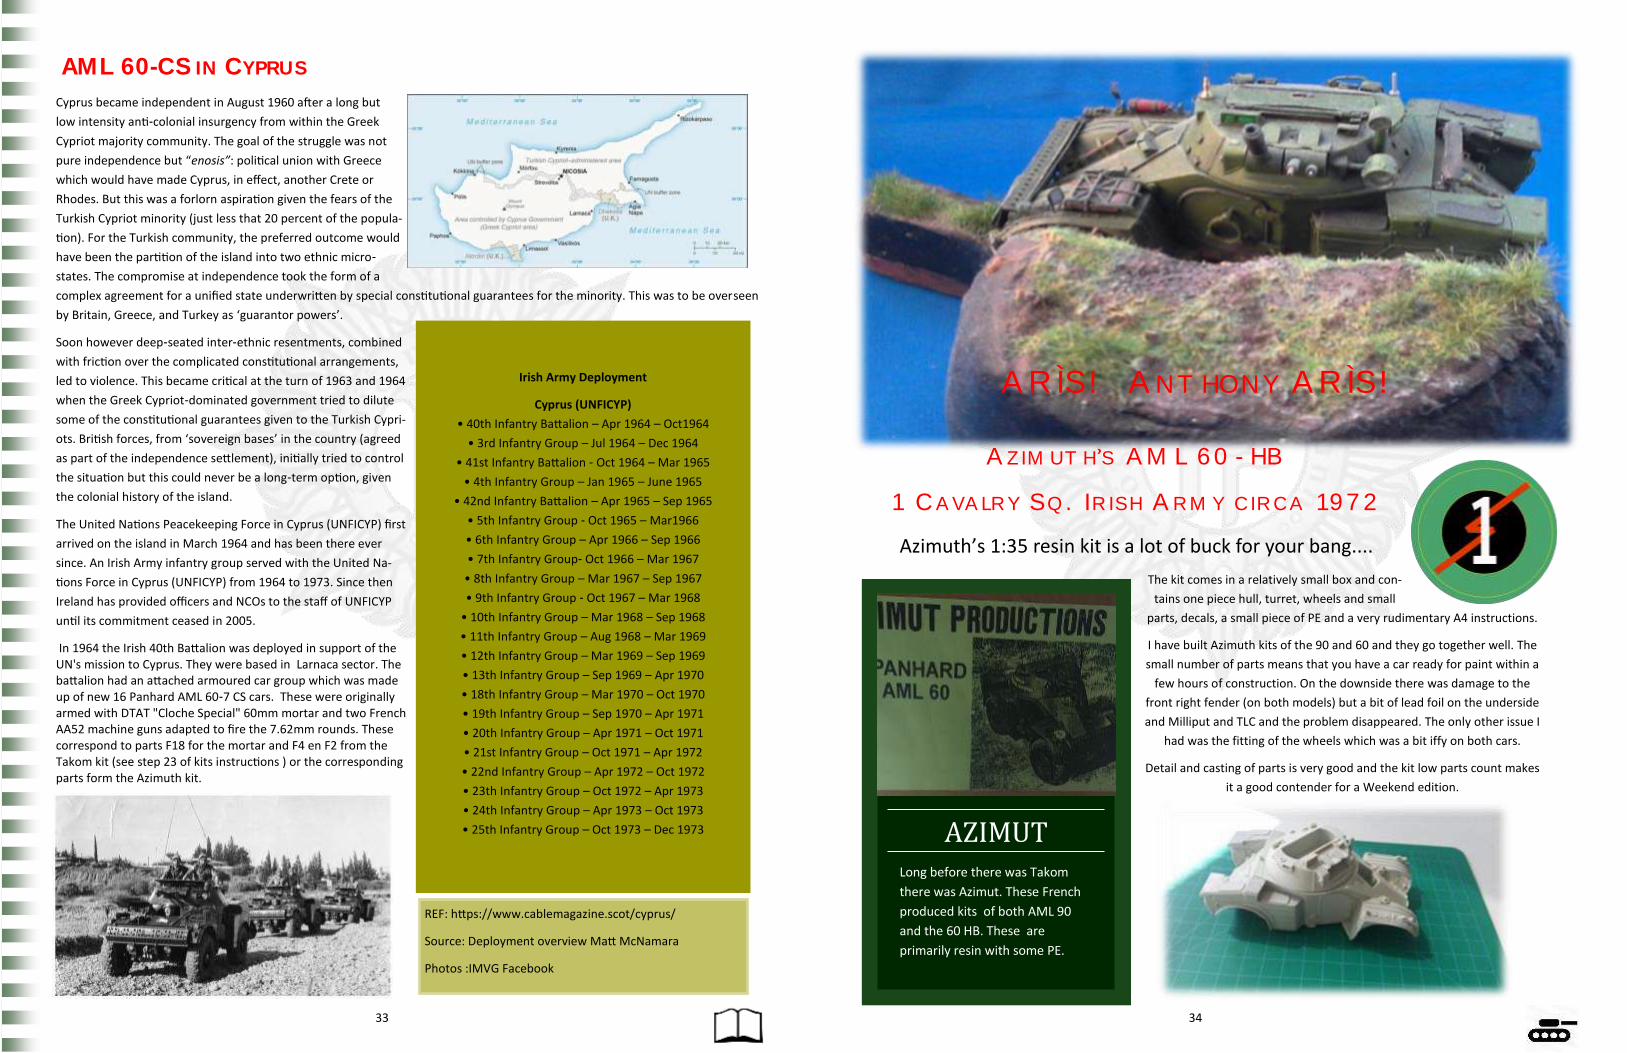
AML 60-CS IN CYPRUS
Cyprus became independent in August 1960 after a long but
low intensity anti-colonial insurgency from within the Greek
Cypriot majority community. The goal of the struggle was not
pure independence but “enosis”: political union with Greece
which would have made Cyprus, in effect, another Crete or
Rhodes. But this was a forlorn aspiration given the fears of the
Turkish Cypriot minority (just less that 20 percent of the popula-
tion). For the Turkish community, the preferred outcome would
have been the partition of the island into two ethnic micro-
states. The compromise at independence took the form of a
complex agreement for a unified state underwritten by special constitutional guarantees for the minority. This was to be overseen
by Britain, Greece, and Turkey as ‘guarantor powers’.
Soon however deep-seated inter-ethnic resentments, combined
with friction over the complicated constitutional arrangements,
led to violence. This became critical at the turn of 1963 and 1964
when the Greek Cypriot-dominated government tried to dilute
some of the constitutional guarantees given to the Turkish Cypri-
ots. British forces, from ‘sovereign bases’ in the country (agreed
as part of the independence settlement), initially tried to control
the situation but this could never be a long-term option, given
the colonial history of the island.
The United Nations Peacekeeping Force in Cyprus (UNFICYP) first
arrived on the island in March 1964 and has been there ever
since. An Irish Army infantry group served with the United Na-
tions Force in Cyprus (UNFICYP) from 1964 to 1973. Since then
Ireland has provided officers and NCOs to the staff of UNFICYP
until its commitment ceased in 2005.
In 1964 the Irish 40th Battalion was deployed in support of the UN's mission to Cyprus. They were based in Larnaca sector. The battalion had an attached armoured car group which was made up of new 16 Panhard AML 60-7 CS cars. These were originally armed with DTAT "Cloche Special" 60mm mortar and two French AA52 machine guns adapted to fire the 7.62mm rounds. These correspond to parts F18 for the mortar and F4 en F2 from the Takom kit (see step 23 of kits instructions ) or the corresponding parts form the Azimuth kit.
Irish Army Deployment
Cyprus (UNFICYP)
• 40th Infantry Battalion – Apr 1964 – Oct1964
• 3rd Infantry Group – Jul 1964 – Dec 1964
• 41st Infantry Battalion - Oct 1964 – Mar 1965
• 4th Infantry Group – Jan 1965 – June 1965
• 42nd Infantry Battalion – Apr 1965 – Sep 1965
• 5th Infantry Group - Oct 1965 – Mar1966
• 6th Infantry Group – Apr 1966 – Sep 1966
• 7th Infantry Group- Oct 1966 – Mar 1967
• 8th Infantry Group – Mar 1967 – Sep 1967
• 9th Infantry Group - Oct 1967 – Mar 1968
• 10th Infantry Group – Mar 1968 – Sep 1968
• 11th Infantry Group – Aug 1968 – Mar 1969
• 12th Infantry Group – Mar 1969 – Sep 1969
• 13th Infantry Group – Sep 1969 – Apr 1970
• 18th Infantry Group – Mar 1970 – Oct 1970
• 19th Infantry Group – Sep 1970 – Apr 1971
• 20th Infantry Group – Apr 1971 – Oct 1971
• 21st Infantry Group – Oct 1971 – Apr 1972
• 22nd Infantry Group – Apr 1972 – Oct 1972
• 23th Infantry Group – Oct 1972 – Apr 1973
• 24th Infantry Group – Apr 1973 – Oct 1973
• 25th Infantry Group – Oct 1973 – Dec 1973
REF: https://www.cablemagazine.scot/cyprus/
Source: Deployment overview Matt McNamara
Photos :IMVG Facebook
34
ARÌS! ANTHONY ARÌS!
AZIMUTH’S AML 60-HB
1 CAVALRY SQ. IRISH ARMY CIRCA 1972
Azimuth’s 1:35 resin kit is a lot of buck for your bang....
The kit comes in a relatively small box and con-
tains one piece hull, turret, wheels and small
parts, decals, a small piece of PE and a very rudimentary A4 instructions.
I have built Azimuth kits of the 90 and 60 and they go together well. The
small number of parts means that you have a car ready for paint within a
few hours of construction. On the downside there was damage to the
front right fender (on both models) but a bit of lead foil on the underside
and Milliput and TLC and the problem disappeared. The only other issue I
had was the fitting of the wheels which was a bit iffy on both cars.
Detail and casting of parts is very good and the kit low parts count makes
it a good contender for a Weekend edition.
Long before there was Takom
there was Azimut. These French
produced kits of both AML 90
and the 60 HB. These are
primarily resin with some PE.
AZIMUT

35
Comparison with the Takom kit are inevitable; The Azimuth features either the AHE 60-7 or the AHE60-12 arrangement
both of which have the Hotchkiss Brandt 60mm(HB) mortar whereas the Takom offers the Cloche Special (CS) mortar ver-
sion. The Irish Army used both the HB and the CS versions in combination with the 7.62mm FN MAG80’s . You can’t miss
these difference in these barrel; the springs rings on the outside of the barrel of HB and its muzzle counterweight are very
distinctive. Other than that the other issue with Takom’s wheels means when the two kits are placed alongside each other
there is a noticeable height difference. Also the girth of the wheels on the Azimuth kit is noticeable smaller.
36
The Irish Air Corps operate a total of four EC-135, two
T2’s for the Garda GASU (police support team) and
two P2’s for the Air Corps . The latter are meant as
lead-in trainers for the AW139’s and various other
Army (ISTAR) roles.
The two (No.270 and 271) were delivered in 2005 and
replaced the two Gazelle helicopter the last remain-
ing one which was phased out in December of 2005
having flown over 5000 hours. In contrast to their
predecessors these are twin engine aircraft with full
digital flat screen cockpits. The aircraft were deliv-
ered with an optional air ambulance suite, a pylon for
under-slung loads, a detachable winch and floatation
gear fitted to a skid extension kit. The fitting of a
SINCGARS VHF radio system means it can communi-
cate directly with vehicles on the ground.
Sporting a over all matt bronze green (RAL 6031)
colour scheme their role as Army support
aircraft is more obvious than the old Gazelles.
Gone are the days of trying to do a little bit of
everything ; the Defence Forces using the
widescale procurement process of the late
1990’s and early 2000’s went through a major
realignment of scope and role. The aim is to
try to do less but doing it better with dedicat-
ed equipment; for the Air Corps the con-
tracting out of the SAR role and some of the mainte-
nance has lead to a leaner organization more focused
on the core business of Army support.
Its an attractive helicopter and the simple scheme
shows off its lines to good effect and I wanted one.

37
Kit manufacturer Kit Code Kit Description Remarks
Heller 80375 50375 EC 145 Securie Civile
An EC 145 and not a 135 but contains extended skids, radar nose and much of the right fittings for an EC-135. See photo essay for details.
Revell 04647 EC 635 Swiss Military
An EC-635 and not a 135 with no radar nose, extended skids but sprue C contains most of the extra fitting neces-sary for a IAC EC135.
Revell 04649 EC 135 Austrian and Bundes Police
No radar nose or extends skids but sprue H and I contain some of the extra fittings for an IAC EC 135 including the winch and many of the aerials and wire cutters.
Revell 04475 EC 135 VIP Basic kit with no extras except the medevac unit which is on sprue A.
Revell 04486 EC 145 ADAC
An EC 145 and not a 135 but contains the radar nose, part of the extended skids and shares common sprue H and I of the EC 135 which contain some of the extra fittings for an IAC EC 135 including the winch and many of the aerials and wire cutters. No medevac unit.
Revell 04457 EC 135 ADAC / OMATC Basic kit with no extras except the medevac unit which is on sprue A.
Revell 04939 EC 135 ANWB Basic kit with no extras except the medevac unit which is on sprue A.
Revell 04986 EC 135 Air Glaciers Contains an extra sprue (J) with some of the fittings for an IAC EC 135 including the ventral pylon fitted to the skids.
My model of Irish Air Corps EC 135 uses a standard Revell 1:72 kit with many of the missing parts scratch built. In
the course of my reading and research on the type however I have gathered information on how to build one
without all the bother of scratch-building and have set that out here. I built a 1:72 kit as they are cheap and easily
available. Someone wanting to build the 1:32 scale version will do well to get the new Revell kit (04659 and
04982) rather than the older mid 1990’s versions the first of which was 04426. In addition to the Revell 1:72 kit
Heller do a 145 kit which can provide most of the parts needed for an IAC 135 in conjunction with the Revell kit.
Before you can build an IAC EC 135 you have a few choices to make; the question is simply what configuration you want
to build your helicopter. There are also two EC 135 T2 operated by the Air Corps for the Garda Air Support Unit which
because of the differences in kit I have opted not to deal with here. Here are a number of choices for IAC
• Build it as two-seated piloted or as a single seat piloted configuration in the latter you just omit the floor pedals and
column on the (RH) side. These parts are common to all Revell 1:72 kits.
• Build the interior as medevac version yes or not. These parts are common to all Revell 1:72 kits.
• Fitted with an exterior winch fitted these are parts not common to all the Revell 1:72 kits
• Fitted with extended skids with floatation gear these are parts not common to all the Revell 1:72 kits
As well as the options there are a number of external details common to all; the radar nose, wire cutters, aerials, spot-
lights and the various lumps and bumps including the ventral pylon for hoisting loads. As already mentioned the EC 135 shares much commonality with the EC 145 so kit bashing a 145(Heller or Revell) is actually a very viable option and alter-
native to scratch building missing parts. The Heller kit has also been released under the Mister Craft label and Hasegawa
have also released the Revell kit of 135 and 145 under their own brand. To the best of my knowledge these are identical
to the Revell kits with the exception of decals. Adjust the sit of the aircraft on the skids as it appears to be slightly off and good luck with the glass work it’s a nightmare. Also the Revell instructions show the main rotor blades reversed.
You think its easy just to buy one of the many Eurocopter EC 135 1:72 model kit?
So which kits to use ?
38
1. Add strip for wire cutters.
2. a. Fit antennae base and antennae.
2.b. Reprofile engine intakes.
3. Check panel lines, hand grips and make opening in the rear
of the rotor housing.
4. Drill out and thin exhausts outlets and add internal trunk-
ing.
5. Add mounting for the VHF aerial and opening for the extra
aerial.
6. Add thick strip to this side of the Fentstrom(port side only).
7. Add mounts to the rear boom and the aerial on the upper
part of the boom.
8 Fit of various bumps and lumps on the left hand side
9.a. Reprofiled skid rail. Check also the sit of the model
9.b. Scratch-build a floodlight
9.c. Add a cable cutters to the front of the skid. Option is to
extend skid to include the extra long leg + flotation bags
10. Wire cutters and hockey stick aerial.
11. Retractable landing light housing.
12. Radar housing
39
Bronze Green
Vallejo Model Air 71. 250
EC 135 colours and markings
• Overall bronze green RAL 6031
• The main rotor blades are 'gunship grey' with yellow tips.
• The fenestron blades are silver though look white .
• The winch if fitted is black,
• The skid undercarriage in very dark grey.
• A small roundel is painted on the sliding cabin doors, with
the aircraft's serial number and a tricolour on the tail-fin.
Maxdecals 4814 features the decals in 1:72 for 270 and
271. Please note that 271 seems to have carried her
marking in black and later on in off-white with the a/c
number repeated on the nose above the radar. As far as I
can tell the Maxdecals only has the black codes.
• 'Eurocopter' and 'EC135' titling feature on the engine housing and main rotor pylon respectively.
40
The Plastic Paddy Maffia


