Model Users Guide v3 - Georgia Department of Transportation€¦ · Citilabs software Cube Base and...
16
GEORG Statewid GIA STATEWIDE MO DEL DRAFT de Model Users Guid Model Version 4.1 Released December 31, 2013 Prepared for: Georgia Department of Transportation Prepared by: Atkins Atlanta, GA December 31, 2013 de
Transcript of Model Users Guide v3 - Georgia Department of Transportation€¦ · Citilabs software Cube Base and...

G E O R G I A S T A T EW I D E M O
Statewide
G E O R G I A S T A T EW I D E M O D E L
DRAFT
Statewide Model Users GuideModel Version 4.1
Released December 31, 2013
Prepared for:
Georgia Department of Transportation
Prepared by: Atkins
Atlanta, GA
December 31, 2013
Users Guide

Introduction
This document is provided as a basic guide to installing, opening, running, and interacting with model data for the Georgia Statewide model. This document does not document the individual model steps or processes. For information on the content of the model refer to the full model documDocumentation folder provided with the model
The Georgia Statewide Model has been implemented in Cube Voyager and uses the Scenario Manager interface in Cube Base to define and run model scenarios. The model has been developed using the Citilabs software Cube Base and Cube Voyager version 5.1.2 released 11/2/2010. To use this mensure that you have a licensed and installed copy of both Cube Base and Cube Voyager available and that the software versions for both are v5.1.2 or later.
This document discusses the following
• Installing the Statewide
• Opening the model
• Running the model
• Viewing model results
• Creating and running alternative scenarios
Model Users Guide
- 2 -
This document is provided as a basic guide to installing, opening, running, and interacting with model model. This document does not document the individual model steps or
For information on the content of the model refer to the full model documentation Documentation folder provided with the model.
s been implemented in Cube Voyager and uses the Scenario Manager interface in Cube Base to define and run model scenarios. The model has been developed using the Citilabs software Cube Base and Cube Voyager version 5.1.2 released 11/2/2010. To use this mensure that you have a licensed and installed copy of both Cube Base and Cube Voyager available and that the software versions for both are v5.1.2 or later.
the following:
Statewide model
alternative scenarios
This document is provided as a basic guide to installing, opening, running, and interacting with model model. This document does not document the individual model steps or
entation found in the
s been implemented in Cube Voyager and uses the Scenario Manager interface in Cube Base to define and run model scenarios. The model has been developed using the Citilabs software Cube Base and Cube Voyager version 5.1.2 released 11/2/2010. To use this model ensure that you have a licensed and installed copy of both Cube Base and Cube Voyager available and
Installing the Statewide Model
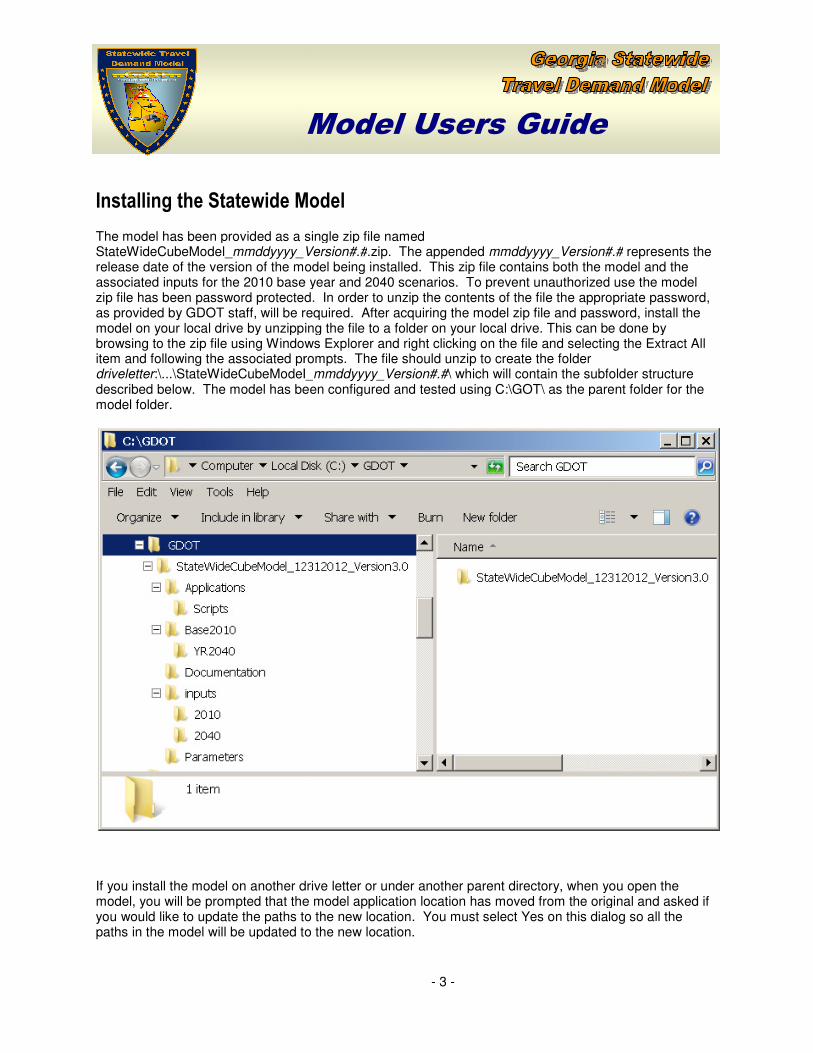
The model has been provided as a single zip file named StateWideCubeModel_mmddyyyy_Version#.#release date of the version of the model being installed. associated inputs for the 2010 base yearzip file has been password protected. In order to unzip the contents of the file the appropriate password, as provided by GDOT staff, will be required. model on your local drive by unzipping the file to browsing to the zip file using Windows Explorer and right clicking on the file and selecting the Extract All item and following the associated prompts. driveletter:\...\StateWideCubeModel_described below. The model has been configured and tested using model folder.
If you install the model on another drive letter or under another model, you will be prompted that the you would like to update the paths to the new location. paths in the model will be updated to the new location.
Model Users Guide
- 3 -
Model
model has been provided as a single zip file named mmddyyyy_Version#.#.zip. The appended mmddyyyy_Version#.#
release date of the version of the model being installed. This zip file contains both the model and thbase year and 2040 scenarios. To prevent unauthorized use the model
otected. In order to unzip the contents of the file the appropriate password, as provided by GDOT staff, will be required. After acquiring the model zip file and password
drive by unzipping the file to a folder on your local drive. This can be done by browsing to the zip file using Windows Explorer and right clicking on the file and selecting the Extract All item and following the associated prompts. The file should unzip to create the folder
eModel_mmddyyyy_Version#.#\ which will contain the subfolder structure described below. The model has been configured and tested using C:\GOT\ as the parent folder for the
the model on another drive letter or under another parent directory, when you open the that the model application location has moved from the original and asked
you would like to update the paths to the new location. You must select Yes on this dialog so model will be updated to the new location.
mmddyyyy_Version#.# represents the This zip file contains both the model and the
To prevent unauthorized use the model otected. In order to unzip the contents of the file the appropriate password,
and password, install the This can be done by
browsing to the zip file using Windows Explorer and right clicking on the file and selecting the Extract All
subfolder structure as the parent folder for the
directory, when you open the moved from the original and asked if
You must select Yes on this dialog so all the

The Georgia Statewide model uses the following directories:
• …\StateWideCubeModel_mmddyyyy_Version#.#files and folders. This directory is what Cube Scenarioas it contains the model catalog file, Manager considers to be the model directory as it contains the main model application, StateWideModelApplication.app.
• …\StateWideCubeModel_mmddyyyy_Version#.#application files *.app that make up the main model application StateWideModelApplicationThese files are used by Application Manager in Cube Base to view and navigate the flow chart structure of the model when opened in Cube. This directory also contains a Scripts subfolder that holds all of the Cube Voyager script files that are linked tofolder should not be modified.
• …\StateWideCubeModel_mmddyyyy_Version#.#that correspond to scenarios defined in Scenario Manager. Each defined scenario in scenamanager will have an automatically created folder in this directory to hold all scenario specific data files. The root scenario is the Base20specific folders defined under this folder. and ‘Passenger’ will be created during the model run to hold outputs produced by these two components of the model. These folders contain all the model output files produced for a given scenario.
• …\StateWideCubeModel_mmddyyyy_Version#.#documentation and other model reference materials. This this directory.
• …\StateWideCubeModel_mmddyyyy_Version#.#for defined scenarios. The model as provided The model requires 13 user defined input files for a given scenario as shown below. descriptions of these required input data files see the full model documentation.
Model Users Guide
- 4 -
model uses the following directories:
mmddyyyy_Version#.#\ — Primary directory for storing all model. This directory is what Cube Scenario Manager considers to be the catalog directory
as it contains the model catalog file, GDOT_State_Wide.cat. This is also what Cube Application Manager considers to be the model directory as it contains the main model application,
app.
mmddyyyy_Version#.#\Applications\ — Directory that holds the model application files *.app that make up the main model application StateWideModelApplicationThese files are used by Application Manager in Cube Base to view and navigate the flow chart structure of the model when opened in Cube. This directory also contains a Scripts subfolder that holds all of the Cube Voyager script files that are linked to the model application files.
mmddyyyy_Version#.#\Base2010\ — Directory for storing subdirectories that correspond to scenarios defined in Scenario Manager. Each defined scenario in scenamanager will have an automatically created folder in this directory to hold all scenario specific data
The root scenario is the Base2010 scenario and all defined scenarios will have scenario specific folders defined under this folder. Under each scenario specific folder the subfolders ‘Freight’ and ‘Passenger’ will be created during the model run to hold outputs produced by these two
These folders contain all the model output files produced for a given
mmddyyyy_Version#.#\Documentation\ — Directory for storing ocumentation and other model reference materials. This Users Guide document is maintained in
mmddyyyy_Version#.#\Inputs — Directory that holds the user’s input data for defined scenarios. The model as provided includes input data for the 2010 Base year scenario.
user defined input files for a given scenario as shown below. required input data files see the full model documentation.
Primary directory for storing all model–related Manager considers to be the catalog directory .cat. This is also what Cube Application
Manager considers to be the model directory as it contains the main model application,
Directory that holds the model application files *.app that make up the main model application StateWideModelApplication.app. These files are used by Application Manager in Cube Base to view and navigate the flow chart structure of the model when opened in Cube. This directory also contains a Scripts subfolder that
the model application files. Files in this
Directory for storing subdirectories that correspond to scenarios defined in Scenario Manager. Each defined scenario in scenario manager will have an automatically created folder in this directory to hold all scenario specific data
scenario and all defined scenarios will have scenario ch scenario specific folder the subfolders ‘Freight’
and ‘Passenger’ will be created during the model run to hold outputs produced by these two These folders contain all the model output files produced for a given
Directory for storing the model document is maintained in
ry that holds the user’s input data Base year scenario.
user defined input files for a given scenario as shown below. For detailed

• …\StateWideCubeModel_mmddyyyy_Version#.#files considered to be model parameters. These input parameters are generally considered to be fixed across all model scenarios and therefore should not be modify by the user. For a detailed description of these parameters refer to the full model documentation.
Model Users Guide
- 5 -
mmddyyyy_Version#.#\Parameters — Directory that holds various input files considered to be model parameters. These input parameters are generally considered to be
cross all model scenarios and therefore should not be modify by the user. For a detailed description of these parameters refer to the full model documentation.
Directory that holds various input files considered to be model parameters. These input parameters are generally considered to be
cross all model scenarios and therefore should not be modify by the user. For a detailed
Opening the Statewide Model
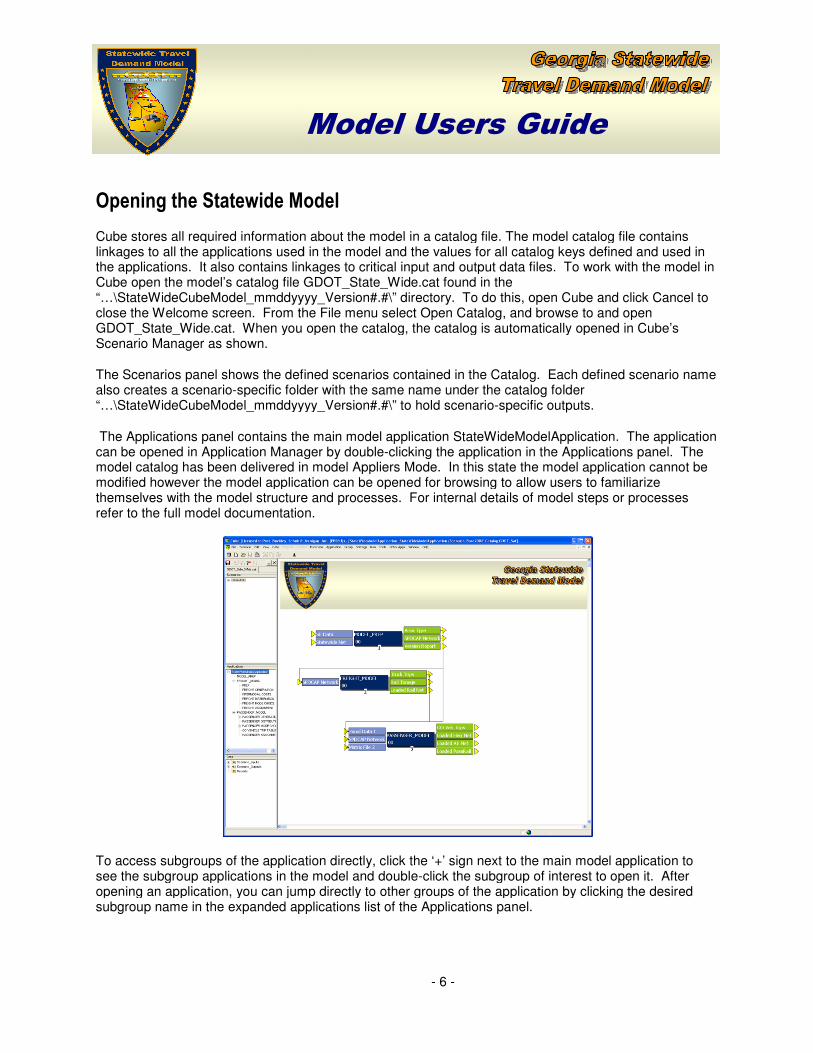
Cube stores all required information about the model in a cataloglinkages to all the applications used in the model and the values for all catalog keys defined and used in the applications. It also contains linkages to critical input and output data files. To work with the model Cube open the model’s catalog file GDOT_State_Wide“…\StateWideCubeModel_mmddyyyy_Version#.#close the Welcome screen. From the File menu select Open Catalog, and browse to and opGDOT_State_Wide.cat. When you open the catalog, the catalog is automatically opened in Cube’sScenario Manager as shown.
The Scenarios panel shows the defined scenarios also creates a scenario-specific folder with the sam“…\StateWideCubeModel_mmddyyyy_Version#.#
The Applications panel contains the main model applicationcan be opened in Application Manager by doublemodel catalog has been delivered in model Appliers Mode. In this state the model application cannot be modified however the model application can be opened for bthemselves with the model structurerefer to the full model documentation.
To access subgroups of the application directly, click the ‘+’ sign next to see the subgroup applications in the model and doubleopening an application, you can jump directly to other groups of the application by clicking the desired subgroup name in the expanded applications list of the Applications panel.
Model Users Guide
- 6 -
Model
Cube stores all required information about the model in a catalog file. The model catalog file contains linkages to all the applications used in the model and the values for all catalog keys defined and used in
. It also contains linkages to critical input and output data files. To work with the model GDOT_State_Wide.cat found in the
mmddyyyy_Version#.#\” directory. To do this, open Cube and click Cancel to close the Welcome screen. From the File menu select Open Catalog, and browse to and op
. When you open the catalog, the catalog is automatically opened in Cube’s
The Scenarios panel shows the defined scenarios contained in the Catalog. Each defined scenario name specific folder with the same name under the catalog folder
mmddyyyy_Version#.#\” to hold scenario-specific outputs.
ains the main model application StateWideModelApplicationned in Application Manager by double-clicking the application in the Applications panel. The
model catalog has been delivered in model Appliers Mode. In this state the model application cannot be modified however the model application can be opened for browsing to allow users to familiarize themselves with the model structure and processes. For internal details of model steps or processesrefer to the full model documentation.
To access subgroups of the application directly, click the ‘+’ sign next to the main model application to see the subgroup applications in the model and double-click the subgroup of interest to open it. After opening an application, you can jump directly to other groups of the application by clicking the desired
the expanded applications list of the Applications panel.
file. The model catalog file contains linkages to all the applications used in the model and the values for all catalog keys defined and used in
. It also contains linkages to critical input and output data files. To work with the model in
” directory. To do this, open Cube and click Cancel to close the Welcome screen. From the File menu select Open Catalog, and browse to and open
. When you open the catalog, the catalog is automatically opened in Cube’s
in the Catalog. Each defined scenario name
StateWideModelApplication. The application ion in the Applications panel. The
model catalog has been delivered in model Appliers Mode. In this state the model application cannot be rowsing to allow users to familiarize
. For internal details of model steps or processes
the main model application to click the subgroup of interest to open it. After
opening an application, you can jump directly to other groups of the application by clicking the desired
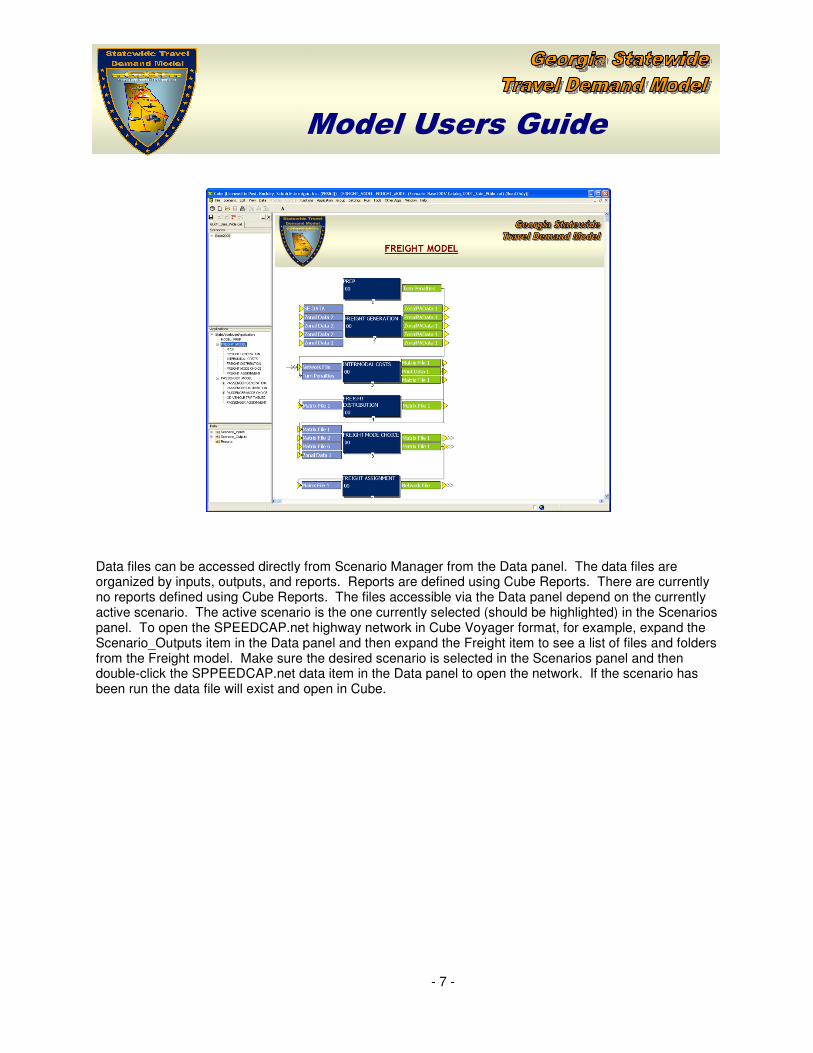
Data files can be accessed directly from Scenario Manager from the Data panel. The data files are organized by inputs, outputs, and reports. Reports are defined using Cube Reports. no reports defined using Cube Reportsactive scenario. The active scenario is the one currently selected (should be highlighted) in the Scenarios panel. To open the SPEEDCAP.netScenario_Outputs item in the Data panel and then expand the from the Freight model. Make sure the double-click the SPPEEDCAP.net data item in the Data panel to open the network.been run the data file will exist and open in Cube.
Model Users Guide
- 7 -
Data files can be accessed directly from Scenario Manager from the Data panel. The data files are organized by inputs, outputs, and reports. Reports are defined using Cube Reports. There are cno reports defined using Cube Reports. The files accessible via the Data panel depend on the currently active scenario. The active scenario is the one currently selected (should be highlighted) in the Scenarios
SPEEDCAP.net highway network in Cube Voyager format, for example, expand the item in the Data panel and then expand the Freight item to see a list of
. Make sure the desired scenario is selected in the Scenarios panel and then data item in the Data panel to open the network. If the scenario has
been run the data file will exist and open in Cube.
Data files can be accessed directly from Scenario Manager from the Data panel. The data files are There are currently
. The files accessible via the Data panel depend on the currently active scenario. The active scenario is the one currently selected (should be highlighted) in the Scenarios
mple, expand the item to see a list of files and folders
panel and then If the scenario has

Running the Statewide Model
You can use Scenario Manager and/or Application
You can run the entire model, a single subgroup or a single program step of the model for a defined scenario. This section describes how:
To run the entire model for the
To run a specific Sub Group of the model from Application Manager
To run a specific program step of the model from Application Manager
To run the entire model for a selected scenario, follow these steps:
1. Open the model catalog GDOT_State_Wide
2. In the Scenarios panel, doubleThe run window prompts you for all inputs, outputs, and options that can or need to be definedthe scenario.
NOTE: Your computer’s screen resolution affects how much information appears on the scenario run window. A Next button appears to enable you to viewadditional screens.
Model Users Guide
- 8 -
Model
You can use Scenario Manager and/or Application Manager to run the model.
You can run the entire model, a single subgroup or a single program step of the model for a defined scenario. This section describes how:
To run the entire model for the Base2010 base year scenario from Scenario Manager
specific Sub Group of the model from Application Manager
To run a specific program step of the model from Application Manager
To run the entire model for a selected scenario, follow these steps:
GDOT_State_Wide.cat as described in the previous section.
In the Scenarios panel, double-click the scenario Base2010 to open the scenario The run window prompts you for all inputs, outputs, and options that can or need to be defined
r computer’s screen resolution affects how much information appears on the scenario window. A Next button appears to enable you to view additional options that wrap
You can run the entire model, a single subgroup or a single program step of the model for a defined
base year scenario from Scenario Manager
as described in the previous section.
to open the scenario run window. The run window prompts you for all inputs, outputs, and options that can or need to be defined for
r computer’s screen resolution affects how much information appears on the scenario additional options that wrap onto
3. The first section of the scenario window for the running the model. First is a selection item of whether the scenario you are running is the base year scenario Base2010 or not. scenario select no.
4. The next set of options allows you to check whether you want to run the Freight model and/or the Passenger model. These options should default to checked on. The Freight model can be run without running the Passenger model however the Passenger model requires filthe Freight model. If just running the Passenger model the user must ensure that the input files produced by the Freight model are available.
5. The last option allows you to indicate if you would like to delete temporary or intermediate datfiles produced during the model run at the end of the run. The model produces intermediate data files that are generally not needed once the model run is complete. This option allows you to automatically delete these files once the model run is complete
6. The next section of the scenario window provides required input file used by the model. pointing to the correct data files. To change what input file a particular data item is set to use, click the Browse button to opealternate input file. No changes should be required in this section to run the base
7. Depending on your screen resolution you may need to click the Next button to see the next section of the scenario window. for the Freight model and for the
8. Review the path and file names for all changes should be required
9. The last section of the scenario window provides an input data box to allow the user to specify an alternate file name for the final loaded output network produced by the model. The default file name will be loaded.lod unless the user provides an alternate file name.
10. When finished reviewing the scenario run window capplication for the base scenario, progress of the model run. window.
Model Users Guide
- 9 -
The first section of the scenario window for the model application provides a set of running the model. First is a selection item of whether the scenario you are running is the base
or not. If running the Base2010 scenario select yes. For any other
set of options allows you to check whether you want to run the Freight model and/or the Passenger model. These options should default to checked on. The Freight model can be run without running the Passenger model however the Passenger model requires filthe Freight model. If just running the Passenger model the user must ensure that the input files produced by the Freight model are available.
The last option allows you to indicate if you would like to delete temporary or intermediate datfiles produced during the model run at the end of the run. The model produces intermediate data files that are generally not needed once the model run is complete. This option allows you to automatically delete these files once the model run is complete
The next section of the scenario window provides file boxes for defining the locations of the required input file used by the model. The menu should already be pre-populated with values pointing to the correct data files. To change what input file a particular data item is set to use,
open a file browse box which will let you browse to and select an alternate input file. No changes should be required in this section to run the base
Depending on your screen resolution you may need to click the Next button to see the next tion of the scenario window. Input file boxes are provided for the SE data and
for the Freight model and for the Public Transport data for the Passenger model.
Review the path and file names for all input file menu items. Again, for the basechanges should be required.
The last section of the scenario window provides an input data box to allow the user to specify an alternate file name for the final loaded output network produced by the model. The default file
oaded.lod unless the user provides an alternate file name.
When finished reviewing the scenario run window click the Run button to run the modelapplication for the base scenario, Base2010. The Task Monitor window should open showing the
odel run. When the run is complete click the Close button to close the scenario
ation provides a set of options for running the model. First is a selection item of whether the scenario you are running is the base
scenario select yes. For any other
set of options allows you to check whether you want to run the Freight model and/or the Passenger model. These options should default to checked on. The Freight model can be run without running the Passenger model however the Passenger model requires files produced by the Freight model. If just running the Passenger model the user must ensure that the input files
The last option allows you to indicate if you would like to delete temporary or intermediate data files produced during the model run at the end of the run. The model produces a large number of intermediate data files that are generally not needed once the model run is complete. This option
r defining the locations of the populated with values
pointing to the correct data files. To change what input file a particular data item is set to use, which will let you browse to and select an
alternate input file. No changes should be required in this section to run the base-year scenario.
Depending on your screen resolution you may need to click the Next button to see the next s are provided for the SE data and Network data
data for the Passenger model.
menu items. Again, for the base year scenario no
The last section of the scenario window provides an input data box to allow the user to specify an alternate file name for the final loaded output network produced by the model. The default file
the model The Task Monitor window should open showing the
When the run is complete click the Close button to close the scenario

To run a specific subgroup of the model from Application Manager, follow these steps:
1. Under Scenarios, click the base scenario,
2. Under Applications, double-
3. Under Applications, click the ‘+’ signs to expand Expand the Freight model and then double click on FREIGHT GENERATION to open this subgroup.
4. Press the F2 key on the keyboard. This is a short cut key equivalent to opening the Application menu and then choosing Run Application. You will get the follo
Model Users Guide
- 10 -
To run a specific subgroup of the model from Application Manager, follow these steps:
Under Scenarios, click the base scenario, Base2010, to make this the active scenario.
-click StateWideModelApplication to open the model
Under Applications, click the ‘+’ signs to expand the application and find the subgroup to be runExpand the Freight model and then double click on FREIGHT GENERATION to open this
Press the F2 key on the keyboard. This is a short cut key equivalent to opening the Application menu and then choosing Run Application. You will get the following Run Application dialog.
scenario.
to open the model application.
the application and find the subgroup to be run. Expand the Freight model and then double click on FREIGHT GENERATION to open this
Press the F2 key on the keyboard. This is a short cut key equivalent to opening the Application wing Run Application dialog.

5. Select the Run Current Group Only check box and then click OK.
6. This will run just those steps in the current subgroup as well as any steps in subgroups of this subgroup.
7. Note that running just a subgroup assumes that the subgroup have already been successfully run so that all of the inputs required by the steps in the subgroup are available.
To run a specific program step of the model from Application Manager, follow these steps:
1. With the model application open as described in the step above, navigate to the subgroup where the step you wish to run resides.
2. Double-click the program step box inputs for a step must exist f
Model Users Guide
- 11 -
Select the Run Current Group Only check box and then click OK.
his will run just those steps in the current subgroup as well as any steps in subgroups of this
Note that running just a subgroup assumes that the model steps prior to those in the selected subgroup have already been successfully run so that all of the inputs required by the steps in the
To run a specific program step of the model from Application Manager, follow these steps:
With the model application open as described in the step above, navigate to the subgroup where the step you wish to run resides.
click the program step box in the application of the step you wish to run. Note that the inputs for a step must exist for it to run properly.
his will run just those steps in the current subgroup as well as any steps in subgroups of this
model steps prior to those in the selected subgroup have already been successfully run so that all of the inputs required by the steps in the
To run a specific program step of the model from Application Manager, follow these steps:
With the model application open as described in the step above, navigate to the subgroup where
of the step you wish to run. Note that the

Viewing results from the Statewide
Outputs produced by the model can be accessed directly from the Data panel in Scenario Manager double clicking on the data item or you can access outputs from Application Manageron the file box you wish to open. Outputs available in the Data panel subgroup of the model application where they are produced.
To access outputs from the Data panel of Scenario Manager, follow these stehighway network file as an example:
1. After successfully running the base scenario as described in the section scenario under Scenarios panel to make this the active scenario.
2. Under Data in Scenario Manager, click the ‘+’ sAssignment to view the list of
Model Users Guide
- 12 -
Statewide Model
Outputs produced by the model can be accessed directly from the Data panel in Scenario Manager or you can access outputs from Application Manager by double clicking
. Outputs available in the Data panel have been organized by the subgroup of the model application where they are produced.
To access outputs from the Data panel of Scenario Manager, follow these steps to open the final loaded highway network file as an example:
After successfully running the base scenario as described in the section above, click the base under Scenarios panel to make this the active scenario.
o Manager, click the ‘+’ sign to expand Scenario_Outputs>Passenger>to view the list of outputs from the Passenger model assignment group
Outputs produced by the model can be accessed directly from the Data panel in Scenario Manager by by double clicking
have been organized by the
ps to open the final loaded
above, click the base
ign to expand Scenario_Outputs>Passenger>Hwy outputs from the Passenger model assignment group.

3. Double click the data item, loaded.lod
4. All other data items (both inputs and outputs) can be opened directly from the data panel in this way. If you receive a “File does not exist” message when attempting to open a file from the data panel check to make sure you have selected the correct scenario Scenarios panel. If the correct scenario is selected, doubledata file has been run successfully.
5. Outputs produced by the model and available in the data panel for opening and viewing include reports, data, matrices and networks. Report files are in ascii text format and will have .rpt or .prn file extensions. The main run report produced by Voyager root Scenario_Outputs folder of the data panel and has a .prn file extension. Data files will be in either DBF or CSV format with these file extensions. Matrix data will be in Cube Voyager binary matrix format and include matrix tables of costs/utilities or trips. Networks will also be in Cube Voyager binary format and can be opened in Cube for display and/or editing.
Model Users Guide
- 13 -
loaded.lod, to open the final loaded highway network from the model.
other data items (both inputs and outputs) can be opened directly from the data panel in this way. If you receive a “File does not exist” message when attempting to open a file from the data panel check to make sure you have selected the correct scenario to make it active in the Scenarios panel. If the correct scenario is selected, double-check that the step that produces the data file has been run successfully.
Outputs produced by the model and available in the data panel for opening and viewing include reports, data, matrices and networks. Report files are in ascii text format and will have .rpt or .prn
. The main run report produced by Voyager for the scenario run is located in the root Scenario_Outputs folder of the data panel and has a .prn file extension. Data files will be in either DBF or CSV format with these file extensions. Matrix data will be in Cube Voyager binary
matrix tables of costs/utilities or trips. Networks will also be in Cube Voyager binary format and can be opened in Cube for display and/or editing.
, to open the final loaded highway network from the model.
other data items (both inputs and outputs) can be opened directly from the data panel in this way. If you receive a “File does not exist” message when attempting to open a file from the data
to make it active in the check that the step that produces the
Outputs produced by the model and available in the data panel for opening and viewing include reports, data, matrices and networks. Report files are in ascii text format and will have .rpt or .prn
for the scenario run is located in the root Scenario_Outputs folder of the data panel and has a .prn file extension. Data files will be in either DBF or CSV format with these file extensions. Matrix data will be in Cube Voyager binary
matrix tables of costs/utilities or trips. Networks will also be in Cube
Creating and running alternative scenarios
Creating a new scenario requires four basic steps.
• Create a new scenario in Scenario Manager in the Scenarios panel
• Create a scenario-specific input directory to hold the inputs specific to this new scenario
• Prepare the inputs unique to this scenario and store them in the
• Modify the scenario window items for the new scenario to point to the scenariomake any changes to other run parameters desired for the new scenario.
To create and run a new scenario, follow these steps
1. Close any files that are open in Cube and reopen the model catalog.
2. Under Scenarios, right-click alternative scenario for the 2020 forecast yearscenario. In this example the new scenario will be named Alt1_scenario. You will supply a modified input highway network with the proposed projects coded for this scenario.
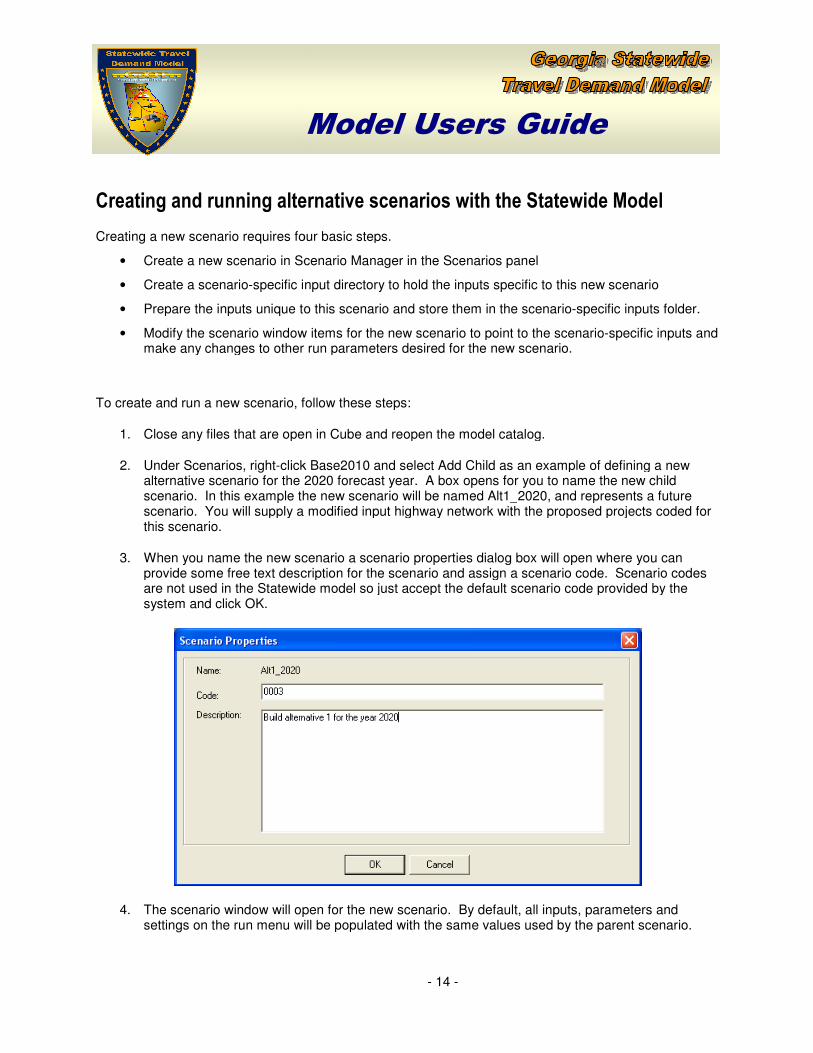
3. When you name the new scenario a scenario propertiesprovide some free text description for the scenario and assign a scenario code. Scenario codes are not used in the Statewidesystem and click OK.
4. The scenario window will open for the new scenario. By default, all settings on the run menu will be populated with the same values used by the parent scenario.
Model Users Guide
- 14 -
alternative scenarios with the Statewide
ires four basic steps.
Create a new scenario in Scenario Manager in the Scenarios panel
specific input directory to hold the inputs specific to this new scenario
Prepare the inputs unique to this scenario and store them in the scenario-specific inputs folder.
Modify the scenario window items for the new scenario to point to the scenario-make any changes to other run parameters desired for the new scenario.
follow these steps:
Close any files that are open in Cube and reopen the model catalog.
click Base2010 and select Add Child as an example of defining a new alternative scenario for the 2020 forecast year. A box opens for you to name the new child
enario. In this example the new scenario will be named Alt1_2020, and represents a future scenario. You will supply a modified input highway network with the proposed projects coded for
When you name the new scenario a scenario properties dialog box will open where you can provide some free text description for the scenario and assign a scenario code. Scenario codes
Statewide model so just accept the default scenario code provided by the
enario window will open for the new scenario. By default, all inputs, parameterswill be populated with the same values used by the parent scenario.
Statewide Model
specific input directory to hold the inputs specific to this new scenario
specific inputs folder.
-specific inputs and
as an example of defining a new . A box opens for you to name the new child
, and represents a future scenario. You will supply a modified input highway network with the proposed projects coded for
dialog box will open where you can provide some free text description for the scenario and assign a scenario code. Scenario codes
model so just accept the default scenario code provided by the
parameters and will be populated with the same values used by the parent scenario.
Click the Save button on the scenario window to save the new scenario. At tcreated a duplicate of the Base20
5. By creating and saving the new scenario, a new scenariocreated under the scenario …\StateWideCubeModel_mmddyyyy_Version#.#new directly has been created. This directory will hold all scenarioscenario by default.
6. Using Windows Explorer, create the new directory …\StateWideCubeModel_mmddyyyy_Version#.#inputs for this scenario. This is not required as inputs can be stored anywhere but is recommended as good practice to keep all inputs used in the scenario runs within the model folder sub directory structure.
7. At this point the scenario specific inputs that define this scenario and make it unique from the parent scenario need to be defined. These inputs may have been prepared before hand and already be available or inputs from the parent sceninputs folder and then modified as required for the scenario definitionscenario-specific inputs do not exist yet so you must create them by coping and modifying existing forecast-year inputs using Cube.
8. From the scenario window in Cube, find the Networkthe run menu. This item defines the input scenario. It is currently linked to the input networinput highway network for this scenario has already been prepared then you can select the Browse button next to the NetworkOtherwise you may select Edit to edit and save a copy of the network from the parent scenario for use in your scenario.
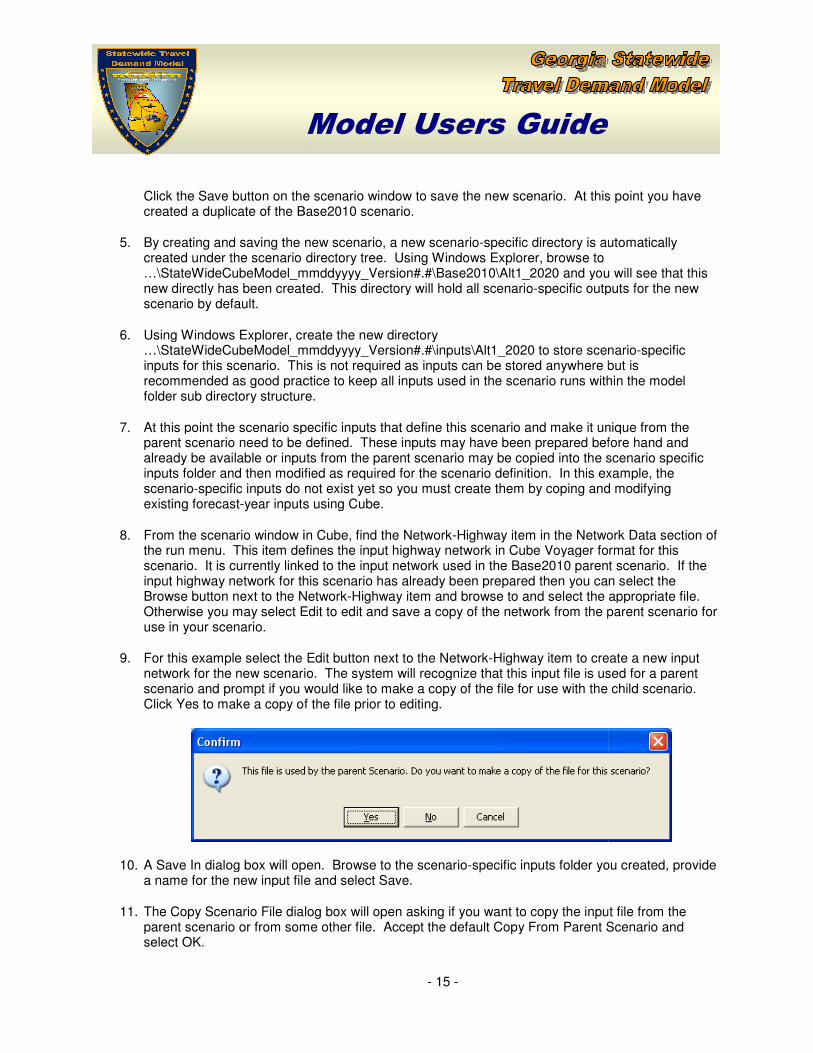
9. For this example select the Edit button next to the Networknetwork for the new scenario. The system will recognize that this input file is used for a parent scenario and prompt if you would like to make a copy of the file for use with the child scenario. Click Yes to make a copy of the fil
10. A Save In dialog box will open. Browse to the scenarioa name for the new input file and select Save.
11. The Copy Scenario File dialog box will open asking if you want to copy the input fileparent scenario or from some other file. Accept the default Copy From Parent Scenario and select OK.
Model Users Guide
- 15 -
Click the Save button on the scenario window to save the new scenario. At this point you have Base2010 scenario.
By creating and saving the new scenario, a new scenario-specific directory is automatically scenario directory tree. Using Windows Explorer, browse to
mmddyyyy_Version#.#\Base2010\Alt1_2020 and you will see that this new directly has been created. This directory will hold all scenario-specific outputs for the new
Using Windows Explorer, create the new directory mmddyyyy_Version#.#\inputs\Alt1_2020 to store scenario
This is not required as inputs can be stored anywhere but is recommended as good practice to keep all inputs used in the scenario runs within the model
rectory structure.
At this point the scenario specific inputs that define this scenario and make it unique from the parent scenario need to be defined. These inputs may have been prepared before hand and already be available or inputs from the parent scenario may be copied into the scenario specific inputs folder and then modified as required for the scenario definition. In this example
specific inputs do not exist yet so you must create them by coping and modifying puts using Cube.
From the scenario window in Cube, find the Network-Highway item in the Network Datadefines the input highway network in Cube Voyager format
It is currently linked to the input network used in the Base2010 parent scenario. If the input highway network for this scenario has already been prepared then you can select the Browse button next to the Network-Highway item and browse to and select the appropriate file.
t Edit to edit and save a copy of the network from the parent scenario for
elect the Edit button next to the Network-Highway item to create a new input network for the new scenario. The system will recognize that this input file is used for a parent scenario and prompt if you would like to make a copy of the file for use with the child scenario. Click Yes to make a copy of the file prior to editing.
dialog box will open. Browse to the scenario-specific inputs folder you created, provide a name for the new input file and select Save.
The Copy Scenario File dialog box will open asking if you want to copy the input fileparent scenario or from some other file. Accept the default Copy From Parent Scenario and
his point you have
specific directory is automatically
and you will see that this specific outputs for the new
to store scenario-specific This is not required as inputs can be stored anywhere but is
recommended as good practice to keep all inputs used in the scenario runs within the model
At this point the scenario specific inputs that define this scenario and make it unique from the parent scenario need to be defined. These inputs may have been prepared before hand and
ario may be copied into the scenario specific example, the
specific inputs do not exist yet so you must create them by coping and modifying
Network Data section of network in Cube Voyager format for this
parent scenario. If the input highway network for this scenario has already been prepared then you can select the
and browse to and select the appropriate file. t Edit to edit and save a copy of the network from the parent scenario for
to create a new input network for the new scenario. The system will recognize that this input file is used for a parent scenario and prompt if you would like to make a copy of the file for use with the child scenario.
ific inputs folder you created, provide
The Copy Scenario File dialog box will open asking if you want to copy the input file from the parent scenario or from some other file. Accept the default Copy From Parent Scenario and
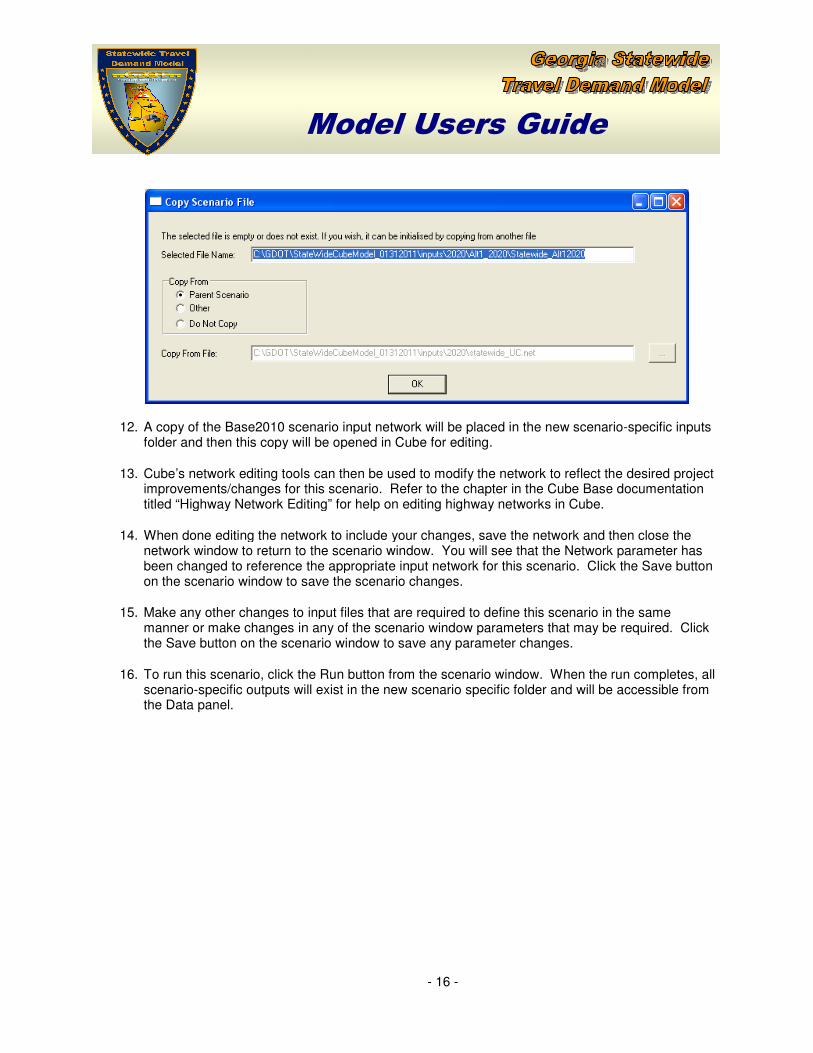
12. A copy of the Base2010 scenario input networkfolder and then this copy will be opened in C
13. Cube’s network editing toolsimprovements/changes for this scenariotitled “Highway Network Editing” for help on ed
14. When done editing the network to include your changes, save the network and then close the network window to return to the scenario window. You will see that the Network parameter has been changed to reference the appropriaon the scenario window to save the scenario changes.
15. Make any other changes to input files that are required to define this scenario in the same manner or make changes in any of the scenario windowthe Save button on the scenario window to save any parameter changes.
16. To run this scenario, click the Run button from the scenario windowscenario-specific outputs will exist in the newthe Data panel.
Model Users Guide
- 16 -
scenario input network will be placed in the new scenariofolder and then this copy will be opened in Cube for editing.
Cube’s network editing tools can then be used to modify the network to reflect the/changes for this scenario. Refer to the chapter in the Cube Base documentation
titled “Highway Network Editing” for help on editing highway networks in Cube.
When done editing the network to include your changes, save the network and then close the network window to return to the scenario window. You will see that the Network parameter has been changed to reference the appropriate input network for this scenario. Click the Save button on the scenario window to save the scenario changes.
Make any other changes to input files that are required to define this scenario in the same manner or make changes in any of the scenario window parameters that may be required. Click the Save button on the scenario window to save any parameter changes.
To run this scenario, click the Run button from the scenario window. When the run completes, all specific outputs will exist in the new scenario specific folder and will be accessible from
will be placed in the new scenario-specific inputs
the desired project . Refer to the chapter in the Cube Base documentation
When done editing the network to include your changes, save the network and then close the network window to return to the scenario window. You will see that the Network parameter has
te input network for this scenario. Click the Save button
Make any other changes to input files that are required to define this scenario in the same parameters that may be required. Click
When the run completes, all scenario specific folder and will be accessible from