Model: TB-PMP - ILSCO · 5 TB-PMP • Keep cutting tools sharp and clean. Properly maintained...
24
Instruction manual Model: TB-PMP Read and understand all of the instructions and safety information in this manual before operating or servicing this tool. TASKMASTER TOOLS 4730 Madison Road Cincinnati OH 45227 www.ilsco.com Phone: 800-776-9775 513-533-6200
Transcript of Model: TB-PMP - ILSCO · 5 TB-PMP • Keep cutting tools sharp and clean. Properly maintained...

Instruction manual
Model: TB-PMP
Read and understand all of the instructions andsafety information in this manual before operatingor servicing this tool.
TASKMASTER TOOLS4730 Madison RoadCincinnati OH 45227www.ilsco.com
Phone:800-776-9775513-533-6200
2
TB-PMP
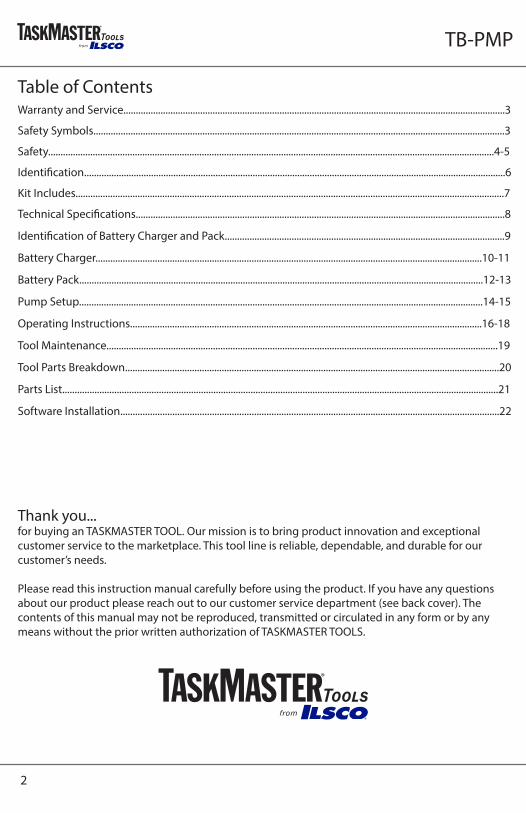
Table of ContentsWarranty and Service..........................................................................................................................................................3
Safety Symbols......................................................................................................................................................................3
Safety....................................................................................................................................................................................4-5
Identification..........................................................................................................................................................................6
Kit Includes.............................................................................................................................................................................7
Technical Specifications.....................................................................................................................................................8
Identification of Battery Charger and Pack.................................................................................................................9
Battery Charger............................................................................................................................................................10-11
Battery Pack...................................................................................................................................................................12-13
Pump Setup...................................................................................................................................................................14-15
Operating Instructions..............................................................................................................................................16-18
Tool Maintenance..............................................................................................................................................................19
Tool Parts Breakdown.......................................................................................................................................................20
Parts List................................................................................................................................................................................21
Software Installation.........................................................................................................................................................22
Thank you...for buying an TASKMASTER TOOL. Our mission is to bring product innovation and exceptional customer service to the marketplace. This tool line is reliable, dependable, and durable for our customer’s needs.
Please read this instruction manual carefully before using the product. If you have any questions about our product please reach out to our customer service department (see back cover). The contents of this manual may not be reproduced, transmitted or circulated in any form or by any means without the prior written authorization of TASKMASTER TOOLS.

3
TB-PMP
WARRANTY AND SERVICETASKMASTER PRO 5-Year Tool Service Protection Program
Introducing the industry’s best service & support program for all your ILSCO hydraulic crimping and cutting tools. All ILSCO tool buyers are automatically registered in the UtilPro Service Protection Program and will receive free tool repairs for defects in material or workmanship on their tool(s) for five years after their original purchase date. (Excludes abuse, non-intended use, tampered with or normal wear and tear.)
TASKMASTER PRO 5-Day Repair Pledge If your tool needs repaired at any time within five years of your original purchase date, our service network will repair your registered tool within five business days of receipt.
TASKMASTER PRO Tool Loaner Program If you need a replacement tool during any repair, our network will provide a comparable loaner tool while your tool is being repaired.
FREE Tool Reconditioning Your first reconditioning is on us! Call us after about 20,000 cycles.
To Find a TASKMASTER PRO Service Partner Call ILSCO for assistance in solving tool performance issues or for any of your service needs. ILSCO tool owners will be offered options to solve any tool replacement, parts or repair issues.
Call 513-533-6200 or 800-776-9775 Monday to Friday 8:00AM to 5:00PM Eastern Time (ET)
MILWAUKEE BATTERIES- LIMITED 3-YEAR WARRANTY Every MILWAUKEE Battery Pack (sold with ILSCO Battery-Powered product and/or as a replacement battery pack) is warranted to the original purchaser only to be free from defects in material and workmanship. Subject to certain exceptions, MILWAUKEE will repair or replace a battery pack which, after examination, is determined by MILWAUKEE to be defective in material or workmanship for the stated warranty period from date of purchase. Return of the battery pack to a MILWAUKEE factory Service Center location or MILWAUKEE Authorized Service Station, freight prepaid and insured, is required. For the proper shipping procedure of battery packs, contact 1.800.SAWDUST (1.800.729.3878), or go to www.milwaukeetool.com. A copy of the proof of purchase should be included with the return product. This warranty does not apply to damage that MILWAUKEE determines to be from repairs made or attempted by anyone other than MILWAUKEE authorized personnel, misuse, alterations, abuse, normal wear and tear, lack of maintenance, or accidents.
SAFETY SYMBOLS
Do not dispose of product.
Please recycle
Electric Shock Hazard- use
proper protective equipment
Attention!Risk of
cutting injury
Never use with unlocked
workhead
Read the operating instructions before use
Wear protective goggles
4
TB-PMP
SAFETYRead all safety warnings, instructions provided with this battery operated tool. Failure to follow all instructions listed below may result in electric shock, fire and/or serious injury. Save all warnings and instructions for future reference.
WORK AREA SAFETY• Keep work area clean and well lit. Cluttered or dark areas invite accidents.• Do not operate battery powered tools in explosive atmospheres, such as in the
presence of flammable liquids, gases or dust. Power tools create sparks which may ignite the dust or fumes.
• Keep children and bystanders away while using a battery operated tool. Distractions can cause injuries.
PERSONAL SAFETY• Stay alert, watch what you are doing and use common sense when operating a
battery powered tool. Do not use a battery powered tool while you are tired or under the influence of drugs, alcohol, or medication.
• Use personal protective equipment. Always wear eye protection. Protective equipment such as a dust mask, non-skid safety shoes, hard hat or hearing protection for appropriate conditions will reduce personal injuries.
• Do not overreach. Keep proper footing and balance at all times. This enables better control of the tool in unexpected situations.
• Do not let familiarity gained from frequent use of tools allow you to become complacent and ignore tool safety principles. A careless action can cause severe injury.
TOOL USE AND CARE• Do not force the battery operated tool. Use the correct tool for your application. The
correct tool will do the job better and safer at the speed for which it was designed. • Remove the battery pack from the tool before making any adjustments changing
accessories, or storing tools. Such preventive safety measures reduce the risk of starting the battery operated tool accidentally.
• Store idle tool out of the reach of children and do not allow persons unfamiliar with the tool, or these instructions, to operate the tool. Battery operated tools are dangerous in the hands of untrained users.
• Maintain battery operated tools and accessories. Check for misalignment or binding of moving parts, breakage of parts and any other condition that may affect the tool‘s operation. If damaged, have the tool repaired before use. Many accidents are caused by poorly maintained tools.
5
TB-PMP
• Keep cutting tools sharp and clean. Properly maintained cutting tools with sharp cutting edges are less likely to bind and are easier to control.
• Use the battery operated accessories in accordance with these instructions, taking into account the working conditions and the work to be performed. Use of the tool for operations different from those intended could result in a hazardous situation.
BATTERY USE AND CARE• Recharge only with the charger specified by the manufacturer. A charger that
is suitable for one type of battery pack may create a risk of fire when used with another battery pack.
• When battery pack is not in use, keep it away from other metal objects like paper clips, coins, keys, nails, screws or other small metal objects, that can short circuit from one terminal to another. Shorting the battery terminals together may cause burns or a fire.
• Under abusive conditions, liquid may be ejected from the battery; avoid contact. If accidental contact occurs, flush with water. If liquid contacts eyes, seek medical help. Liquid ejected from the battery may cause irritation or burns.
• Do not use a battery pack or tool that is damaged or modified. Damaged or modified batteries may exhibit unpredictable behavior resulting in fire, explosion or risk of injury.
• Do not expose a battery pack or tool to fire or excessive temperature. Exposure to fire or temperature above 265°F (130°C) may cause an explosion.
• Follow all charging instructions and do not charge the battery pack or tool outside the temperature range specified in the instructions. Charging improperly or at temperatures outside the specified range may damage the battery and increase the risk of fire.
SERVICE• Have your tool serviced by a qualified repair technician using only certified
replacement parts. This will ensure that the safety of the power tool is maintained.• Never service damaged battery packs. Service of battery packs should only be
performed by the manufacturer or authorized service providers.
6
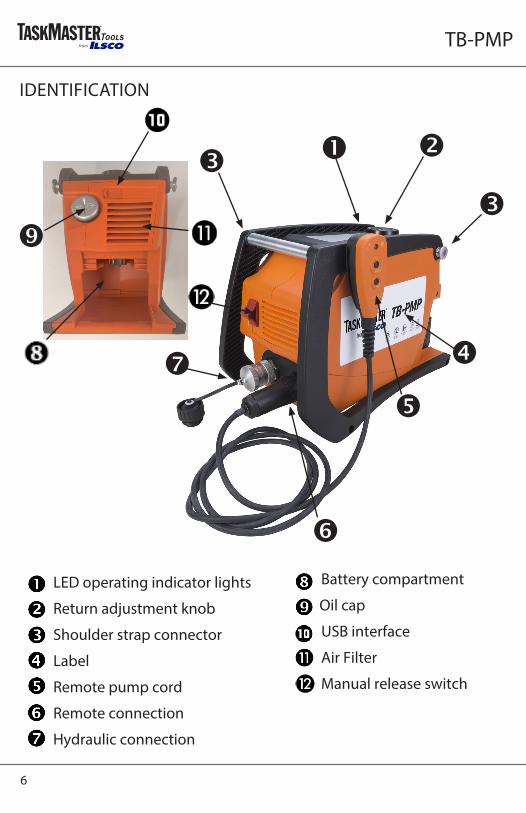
TB-PMP
LED operating indicator lights
Return adjustment knob
Shoulder strap connector
Label
Remote pump cord
Remote connection
Hydraulic connection
� �
�
��
�
IDENTIFICATION
�
� Battery compartment
Oil cap
USB interface
Air Filter
Manual release switch
13
}
7
TB-PMP
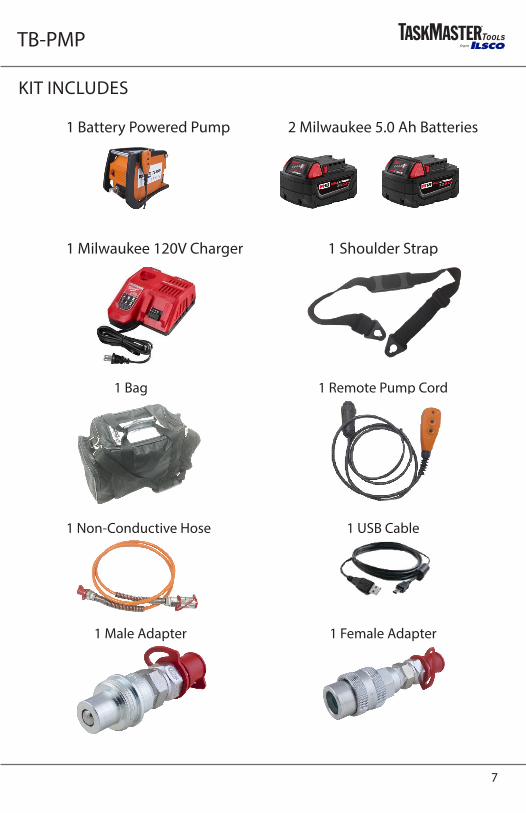
KIT INCLUDES
1 Battery Powered Pump 2 Milwaukee 5.0 Ah Batteries
1 Milwaukee 120V Charger 1 Shoulder Strap
1 Bag 1 Remote Pump Cord
1 Non-Conductive Hose 1 USB Cable
1 Male Adapter 1 Female Adapter
8
TB-PMP
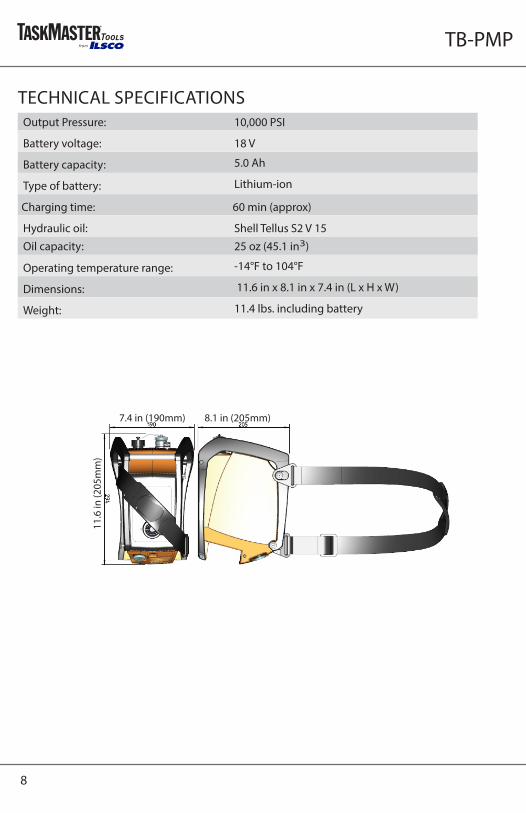
TECHNICAL SPECIFICATIONS Output Pressure: 10,000 PSI
Battery voltage: 18 V
Battery capacity: 5.0 Ah
Type of battery: Lithium-ion
Charging time: 60 min (approx)
Hydraulic oil: Shell Tellus S2 V 15
Oil capacity: 25 oz (45.1 in3)
Operating temperature range: -14°F to 104°F
Dimensions: 11.6 in x 8.1 in x 7.4 in (L x H x W)
Weight: 11.4 lbs. including battery
8.1 in (205mm)7.4 in (190mm)
11.6
in (2
05m
m)
9
TB-PMP
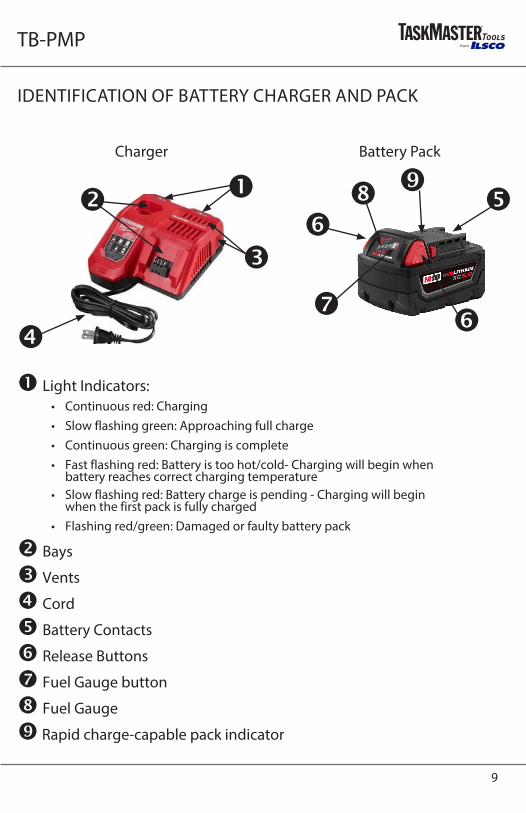
IDENTIFICATION OF BATTERY CHARGER AND PACK
Charger Battery Pack
��
�
�
�
�
�
�
� }
� Light Indicators: • Continuous red: Charging • Slow flashing green: Approaching full charge • Continuous green: Charging is complete • Fast flashing red: Battery is too hot/cold- Charging will begin when
battery reaches correct charging temperature • Slow flashing red: Battery charge is pending - Charging will begin
when the first pack is fully charged • Flashing red/green: Damaged or faulty battery pack
� Bays
� Vents
� Cord
� Battery Contacts
� Release Buttons
� Fuel Gauge button
� Fuel Gauge
} Rapid charge-capable pack indicator
10
TB-PMP
BATTERY CHARGER
Charge only MILWAUKEE M18™ Li-Ion batteries in this MILWAUKEE Li-Ion charger. Other types of batteries may cause personal injury and damage.
WHEN TO CHARGE THE BATTERY PACK WITH THIS MILWAUKEE CHARGERRemove the battery pack from the tool for charging when convenient for you and your job. MILWAUKEE batteries do not develop a memory when charged after only a partial discharge. It is not necessary to run down the battery pack before placing it on the charger.• Use the Fuel Gauge to determine when to charge your MILWAUKEE Li-Ion battery pack. • You can Top-Off your battery pack‘s charge before starting a big job or long day of use.• The only time it is necessary to charge the MILWAUKEE Li-Ion battery pack is when the battery
pack has reached the end of its charge. To signal the end of charge, power to the tool will drop quickly, allowing just enough power to finish a pump cycle. Charge the battery pack as needed.
HOW TO CHARGE THE BATTERY PACKAlign the battery pack with the bay and slide the battery pack into the charger as far as possible. The red light will come on, either flashing quickly (battery pack is too hot or cold), flashing slowly (battery pack is waiting for another pack to finish charging) or continuous (pack is charging). • A fully discharged battery pack with an internal temperature in the normal range will charge
in about 30 to 185 minutes, depending on the battery pack. • Heavily cycled batteries may take longer to charge completely.• The Fuel Gauge lights on 18V battery packs are displayed as the pack is being charged,
indicating the charge level. The fuel gauge will turn off when charging is complete. • After charging is complete, the green light will stay on continually. • The charger will keep the battery pack fully charged if it is left on the charger. The light
indicator will flash green during this maintenance charging. • The second battery pack inserted in the charger will begin charging when the first battery
pack is fully charged.• If the light indicator flashes red and green, verify that the battery pack is fully seated into the
bay. Remove the battery pack and reinsert. If the light continues to flash red and green, remove pack(s) and unplug charger for at least 2 minutes. After 2 minutes, plug charger back in and insert pack. If the problem persists, contact a MILWAUKEE service facility.
• If the light indicator does not come on, verify that the battery pack is fully seated into the bay. Remove the battery pack and reinsert. If the light indicator still does not come on, remove pack(s) and unplug charger for at least 2 minutes. After 2 minutes, plug charger back in and insert pack. If after these attempts the light indicator still does not come on, contact a MILWAUKEE service facility.
11
TB-PMP
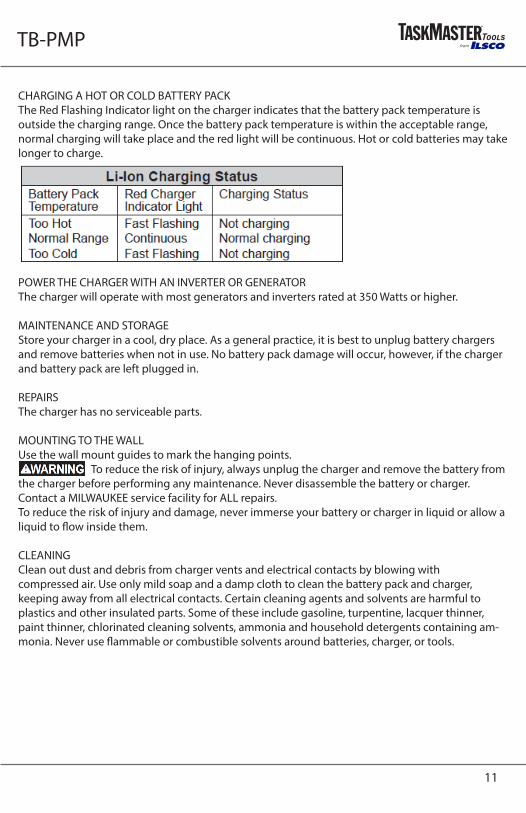
CHARGING A HOT OR COLD BATTERY PACKThe Red Flashing Indicator light on the charger indicates that the battery pack temperature is outside the charging range. Once the battery pack temperature is within the acceptable range, normal charging will take place and the red light will be continuous. Hot or cold batteries may take longer to charge.
POWER THE CHARGER WITH AN INVERTER OR GENERATORThe charger will operate with most generators and inverters rated at 350 Watts or higher.
MAINTENANCE AND STORAGEStore your charger in a cool, dry place. As a general practice, it is best to unplug battery chargers and remove batteries when not in use. No battery pack damage will occur, however, if the charger and battery pack are left plugged in.
REPAIRSThe charger has no serviceable parts.
MOUNTING TO THE WALLUse the wall mount guides to mark the hanging points. To reduce the risk of injury, always unplug the charger and remove the battery from the charger before performing any maintenance. Never disassemble the battery or charger. Contact a MILWAUKEE service facility for ALL repairs. To reduce the risk of injury and damage, never immerse your battery or charger in liquid or allow a liquid to flow inside them.
CLEANINGClean out dust and debris from charger vents and electrical contacts by blowing with compressed air. Use only mild soap and a damp cloth to clean the battery pack and charger, keeping away from all electrical contacts. Certain cleaning agents and solvents are harmful to plastics and other insulated parts. Some of these include gasoline, turpentine, lacquer thinner, paint thinner, chlorinated cleaning solvents, ammonia and household detergents containing am-monia. Never use flammable or combustible solvents around batteries, charger, or tools.
12
TB-PMP
BATTERY PACK
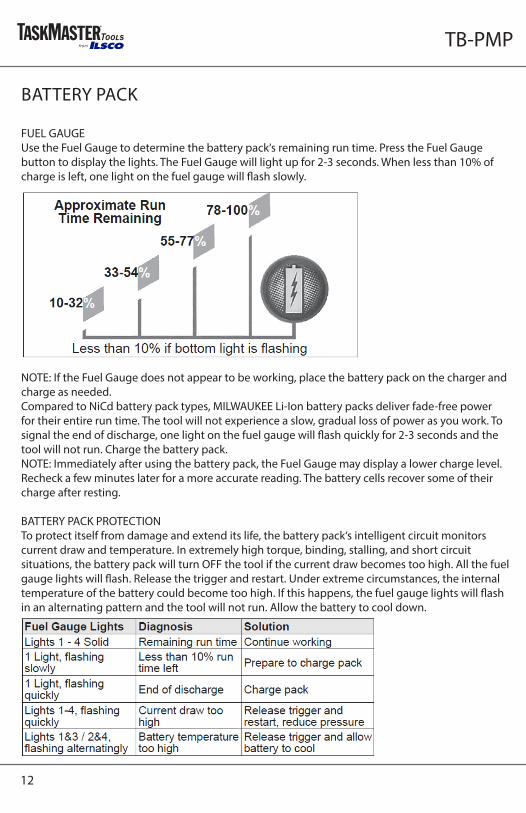
FUEL GAUGEUse the Fuel Gauge to determine the battery pack‘s remaining run time. Press the Fuel Gauge button to display the lights. The Fuel Gauge will light up for 2-3 seconds. When less than 10% of charge is left, one light on the fuel gauge will flash slowly.
NOTE: If the Fuel Gauge does not appear to be working, place the battery pack on the charger and charge as needed.Compared to NiCd battery pack types, MILWAUKEE Li-Ion battery packs deliver fade-free power for their entire run time. The tool will not experience a slow, gradual loss of power as you work. To signal the end of discharge, one light on the fuel gauge will flash quickly for 2-3 seconds and the tool will not run. Charge the battery pack.NOTE: Immediately after using the battery pack, the Fuel Gauge may display a lower charge level.Recheck a few minutes later for a more accurate reading. The battery cells recover some of their charge after resting.
BATTERY PACK PROTECTIONTo protect itself from damage and extend its life, the battery pack‘s intelligent circuit monitors current draw and temperature. In extremely high torque, binding, stalling, and short circuit situations, the battery pack will turn OFF the tool if the current draw becomes too high. All the fuel gauge lights will flash. Release the trigger and restart. Under extreme circumstances, the internal temperature of the battery could become too high. If this happens, the fuel gauge lights will flash in an alternating pattern and the tool will not run. Allow the battery to cool down.
13
TB-PMP
COLD WEATHER OPERATIONMILWAUKEE Li-Ion battery packs are designed to operate in temperatures below freezing. When the battery pack is too cold, it may need to warm up before normal use. Put the battery on a tool and use the tool in a light application. It may buzz for a short time until it warms up. When the buzzing stops, use the tool normally. To reduce the risk of fire, personal injury, and product damage due to a short circuit, never immerse your tool, battery pack or charger in fluid or allow a fluid to flow inside them. Corrosive or conductive fluids, such as seawater, certain industrial chemicals, and bleach or bleach containing products, etc., can cause a short circuit.
MAINTENANCE AND STORAGEDo not expose your battery pack or cordless tools to water or rain, or allow them to get wet. This could damage the tool and battery pack. Do not use oil or solvents to clean or lubricate your battery pack. The plastic casing will become brittle and crack, causing a risk of injury. Store battery packs at room temperature away from moisture. Do not store in damp locations where corrosion of terminals may occur. As with other battery pack types, permanent capacity loss can result if the pack is stored for long periods of time at high temperatures (over 120° F). MILWAUKEE Li-Ion battery packs maintain their charge during storage longer than other battery pack types. After about a year of storage, charge the pack as normal.
TRANSPORTPersonal transport of Li-Ion battery packs is allowed when done in accordance with these warnings and instructions. The proper classification, packaging, labeling, marking, and documentation requirements for shipping Li-Ion batteries is dependent upon whether the particular batteries is dependent upon whether the particular batteries are rated greater than or less than 100 Wh. Li-Ion batteries rated 100 Wh or less are typically exempt from certain Class 9 DG requirements. Always check compliance of Li-Ion battery consignments against the regulations governing the mode of transport. When in doubt, contact the carrier or other trained Dangerous Goods professional to confirm acceptability. Li-Ion packs are shipped under classification UN 3480 (battery only) or UN 3481 (batteries contained in or packed with equipment).
To reduce the risk of injury or explosion, never burn or incinerate a battery pack even if it is damaged, dead, or completely discharged. When burned, toxic fumes and materials are created.
DISPOSING OF MILWAUKEE LI-ION BATTERY PACKSMILWAUKEE Li-Ion battery packs are more environmentally friendly than other types of power tool battery packs (e.g., nickel-cadmium). Always dispose of battery pack according to federal, state, and local regulations. Contact a recycling agency in your area for recycling locations. Even dischar-ged battery packs contain some energy. Before disposing, use electrical tape to cover the terminals to prevent the battery pack from shorting, which could cause a fire or explosion.
RBRC BATTERY RECYCLING SEALSThe RBRC™ Battery Recycling Seals (see Symbology) on your tool battery pack indicates that MILWAUKEE has arranged for the recycling of that battery pack with the Rechargeable Battery Recycling Corporation (RBRC). At the end of the battery pack‘s useful life, return it to a MILWAUKEE Branch Office/Service Center or the participating retailer nearest you. For more information, visit the RBRC web site at www.rbrc.org.
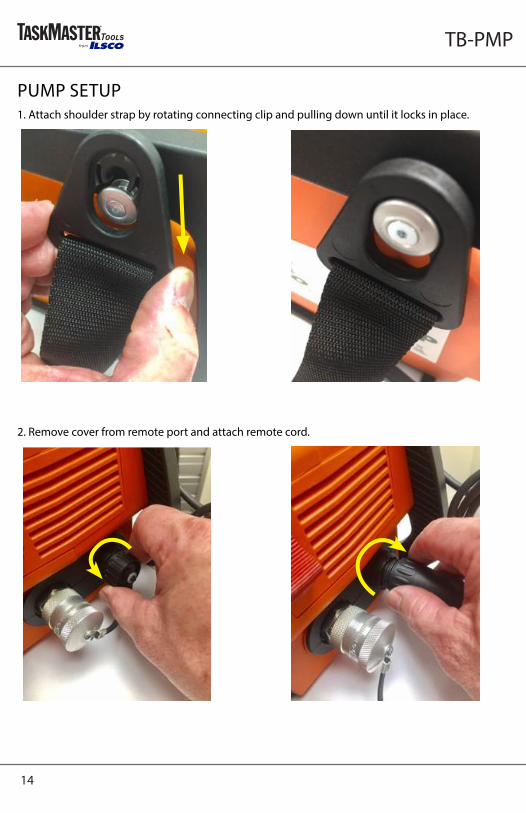
14
TB-PMP
PUMP SETUP1. Attach shoulder strap by rotating connecting clip and pulling down until it locks in place.
2. Remove cover from remote port and attach remote cord.
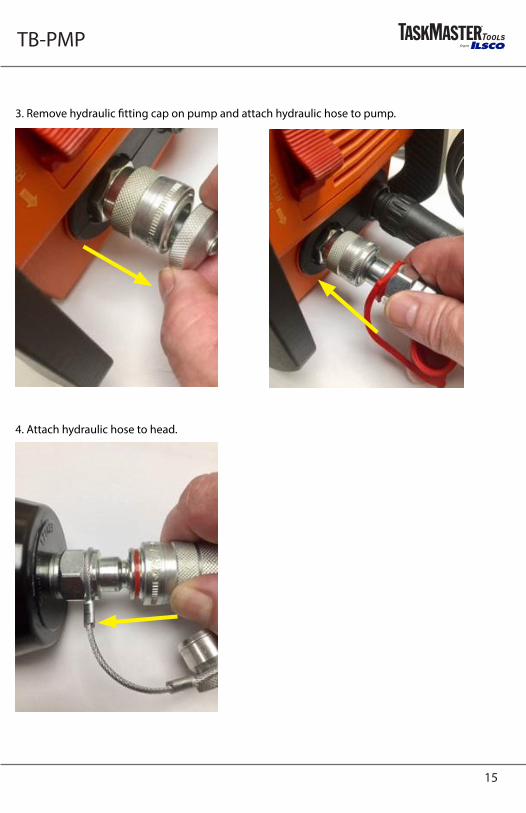
15
TB-PMP
3. Remove hydraulic fitting cap on pump and attach hydraulic hose to pump.
4. Attach hydraulic hose to head.
16
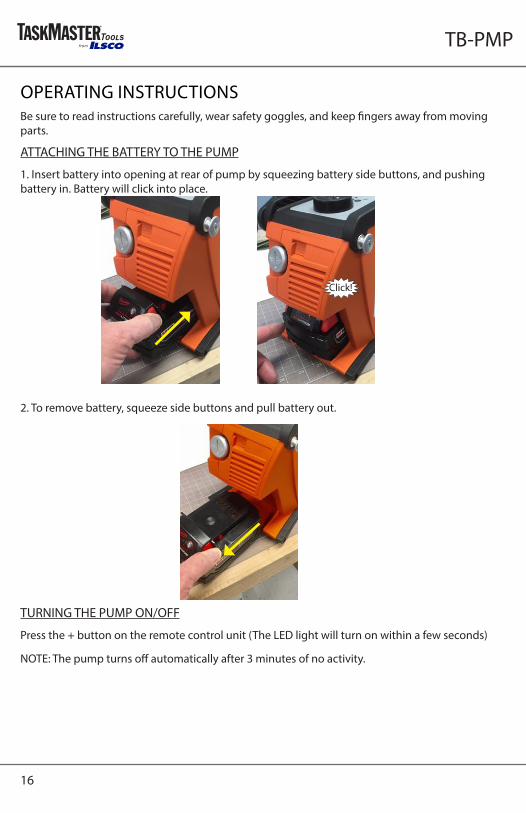
TB-PMP
OPERATING INSTRUCTIONSBe sure to read instructions carefully, wear safety goggles, and keep fingers away from moving parts.
ATTACHING THE BATTERY TO THE PUMP
1. Insert battery into opening at rear of pump by squeezing battery side buttons, and pushing battery in. Battery will click into place.
2. To remove battery, squeeze side buttons and pull battery out.
TURNING THE PUMP ON/OFF
Press the + button on the remote control unit (The LED light will turn on within a few seconds)
NOTE: The pump turns off automatically after 3 minutes of no activity.
Click!
17
TB-PMP
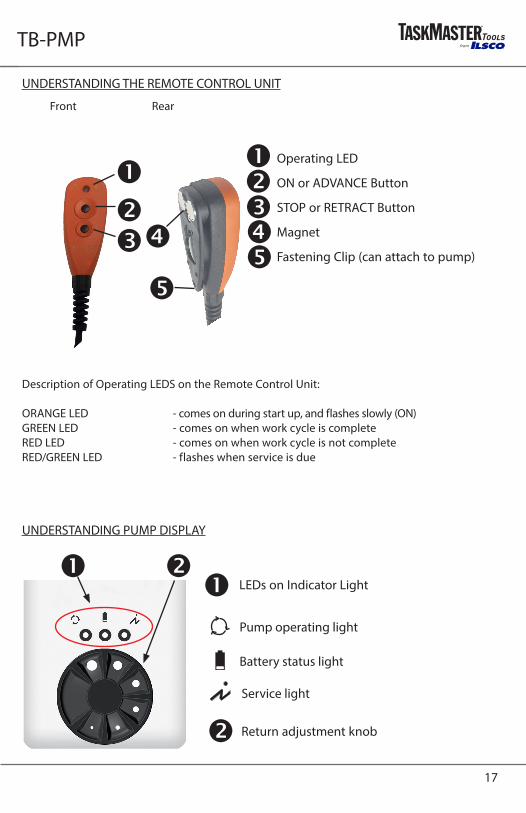
LEDs on Indicator Light
UNDERSTANDING THE REMOTE CONTROL UNIT
Front Rear
Description of Operating LEDS on the Remote Control Unit:
ORANGE LED - comes on during start up, and flashes slowly (ON)GREEN LED - comes on when work cycle is completeRED LED - comes on when work cycle is not completeRED/GREEN LED - flashes when service is due
UNDERSTANDING PUMP DISPLAY
Operating LED ON or ADVANCE Button STOP or RETRACT Button Magnet Fastening Clip (can attach to pump)
Pump operating light
Battery status light
Service light
Return adjustment knob
��
�� �
��
�
�� ��
��
18
TB-PMP
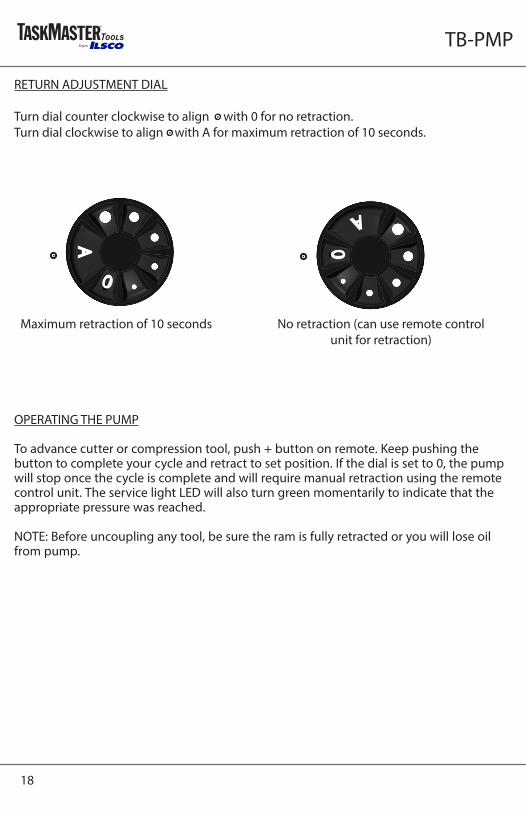
RETURN ADJUSTMENT DIAL
Turn dial counter clockwise to align with 0 for no retraction.Turn dial clockwise to align with A for maximum retraction of 10 seconds.
OPERATING THE PUMP
To advance cutter or compression tool, push + button on remote. Keep pushing the button to complete your cycle and retract to set position. If the dial is set to 0, the pump will stop once the cycle is complete and will require manual retraction using the remote control unit. The service light LED will also turn green momentarily to indicate that the appropriate pressure was reached.
NOTE: Before uncoupling any tool, be sure the ram is fully retracted or you will lose oil from pump.
. .
A
0
A
0. .
Maximum retraction of 10 seconds No retraction (can use remote control unit for retraction)
19
TB-PMP
TOOL MAINTENANCE
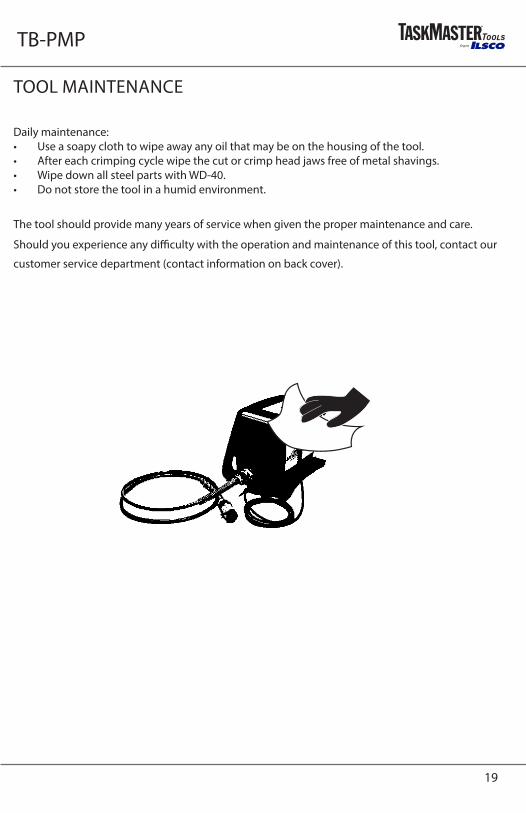
Daily maintenance:• Use a soapy cloth to wipe away any oil that may be on the housing of the tool.• After each crimping cycle wipe the cut or crimp head jaws free of metal shavings.• Wipe down all steel parts with WD-40.• Do not store the tool in a humid environment.
The tool should provide many years of service when given the proper maintenance and care.
Should you experience any difficulty with the operation and maintenance of this tool, contact our
customer service department (contact information on back cover).
20
TB-PMP
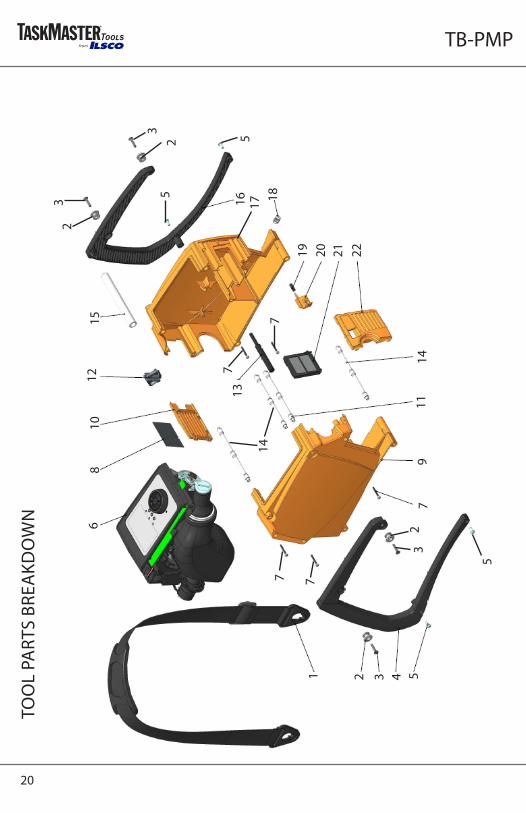
1 2 3 4 5
6
7
8
9
10
11
12
13
14
15
16 17 18
19 20 21 22
3
3
3
5
5
5
2
2
2
147 7
7
7
TOO
L PA
RTS
BREA
KDO
WN
21
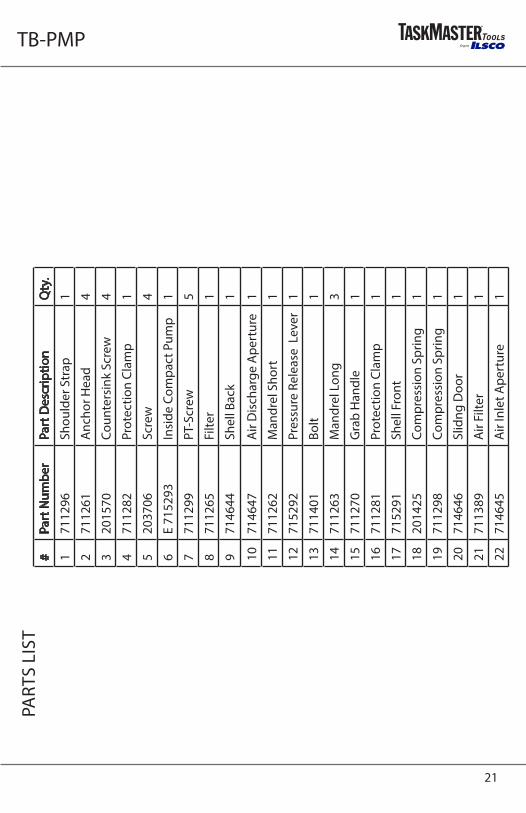
TB-PMP#
Part
Num
ber
Part
Des
crip
tion
Qty
.
171
1296
Shou
lder
Str
ap1
271
1261
Anc
hor H
ead
4
320
1570
Coun
ters
ink
Scre
w4
471
1282
Prot
ectio
n Cl
amp
1
520
3706
Scre
w4
6E
7152
93In
side
Com
pact
Pum
p1
771
1299
PT-S
crew
5
871
1265
Filte
r1
971
4644
Shel
l Bac
k1
1071
4647
Air
Dis
char
ge A
pert
ure
1
1171
1262
Man
drel
Sho
rt1
1271
5292
Pres
sure
Rel
ease
Lev
er1
1371
1401
Bolt
1
1471
1263
Man
drel
Lon
g3
1571
1270
Gra
b H
andl
e1
1671
1281
Prot
ectio
n Cl
amp
1
1771
5291
Shel
l Fro
nt1
1820
1425
Com
pres
sion
Spr
ing
1
1971
1298
Com
pres
sion
Spr
ing
1
2071
4646
Slid
ng D
oor
1
2171
1389
Air
Filte
r1
2271
4645
Air
Inle
t Ape
rtur
e1
PART
S LI
ST

22
TB-PMP
SOFTWARE INSTALLATION
System requirementsBefore proceeding with the installation of the software, assure that your PC satisfies the following requirements:
Operating system: Windows 2000, Windows XP, Windows Vista, Windows 7CPU: Pentium 4, at least 1,7 GHzMemory: 512MB or more (1 GB or more recommended)Hard Drive: 200 MB (1 GB recommended)Screen resolution: 1024 x 768 or higher, at least 65,535 colorsOther: CD-ROM, USB 2.0
Plug & PlayOnce you have completed the installation of the software, the computer will automatically recognize the battery operated tool, allowing you to update the data and programs.

23
TB-PMP
Notes:

Service:
Date: 03/18 Version 2
TaskMaster from ILSCO 4730 Madison Rd.Cincinnati, OH 45227
Phone: 800-776-9775 513-533-6200
www.ilsco.com